SMS Center 2.X For WHMCS
Contents |
About SMS Center For WHMCS
| SMS Center For WHMCS is a module created to send text messages to your clients and administrators. You will be able to choose from ten different SMS gateways, define SMS templates in various languages and manage bulk text messaging. |
- Admin Area Features:
| ✔ Notify Both Your Clients And Administrators via SMS Message |
| ✔ Define SMS Gateway To Be Used Per Country |
| ✔ Use SMS Queue To Send SMS Within Defined Time Period |
| ✔ Manage List Of Queued SMS |
| ✔ Send Mass SMS Using Recipient Filtering |
| ✔ Define SMS Template Counterpart For Each Email Template |
| ✔ Define Mass SMS Template |
| ✔ Define Default SMS Template Version For Each Language |
| ✔ Define Notifications To Receive Per Administrator |
| ✔ Choose Products To Notify Administrator When They Are Ordered |
| ✔ Notify Chosen Administrator When: |
| ✔ Selected Product is Ordered |
| ✔ Specified Product Addon is Ordered |
| ✔ Specified Domain is Ordered |
| ✔ Ticket With Specified Priority is Opened |
| ✔ Enable/Disable Administrator Notifications Per Admin |
| ✔ Enable/Disable SMS Gateways |
| ✔ Check Connection With SMS Gateways |
| ✔ Enable/Disable SMS Templates |
| ✔ View Clients And Orders Verification Status |
| ✔ Manually Verify Client Status On Client Summary Page |
| ✔ Send SMS From Client Summary Page |
| ✔ SMS Templates - Merge Fields Support |
| ✔ Characters Counter - Trace Length Of Your Messages |
| ✔ Choose Client Custom Field To Be Used As Client Phone Number |
| ✔ Set Custom Token Length And Characters Set |
| ✔ Adjust Format Number To International Automatically |
| ✔ View Logs |
- Client Area Features:
| ✔ Define SMS Notifications To Receive |
| ✔ Request SMS Token To Resend |
- Security And Verification:
| ✔ Two-Factor Authentication Submodule - Use Second Layer Of Security: |
| ✔ Client Area Login |
| ✔ Admin Area Login |
| ✔ Verify New Client Accounts With SMS Token |
| ✔ Verify New Orders With SMS Token |
- Mass SMS Recipient Filtering:
| ✔ Client Account Filter: |
| ✔ Account Statuses |
| ✔ Account Custom Fields |
| ✔ Account Languages |
| ✔ Addon Filter: |
| ✔ Purchased Addons |
| ✔ Purchased Addon Statuses |
| ✔ Domain Filter: |
| ✔ Domain Statuses |
| ✔ Product Filter: |
| ✔ Purchased Products |
| ✔ Purchased Product Statuses |
| ✔ Purchased Product Servers |
- Supported Gateways:
| ✔ BearSMS |
| ✔ BoxisSMS |
| ✔ BulkSMS |
| ✔ Clickatell |
| ✔ Fastsms |
| ✔ InfoBip |
| ✔ MessageBird |
| ✔ Nexmo |
| ✔ SMSEagle |
| ✔ SMSGlobal |
| ✔ Twilio |
- General Info:
| ✔ Module API - Integrate Other SMS Gateways |
| ✔ Integrated With Client Profile Viewer For WHMCS - Send SMS From Any WHMCS Place (read more) |
| ✔ Multi-Language Support |
| ✔ Supports PHP 5.6 Up To PHP 7.2 |
| ✔ Supports WHMCS Template Six |
| ✔ Supports WHMCS V7 |
Installation
| This tutorial will show you how to successfully install and configure SMS Center For WHMCS. We will guide you step by step through the whole installation and configuration process. |
Installation
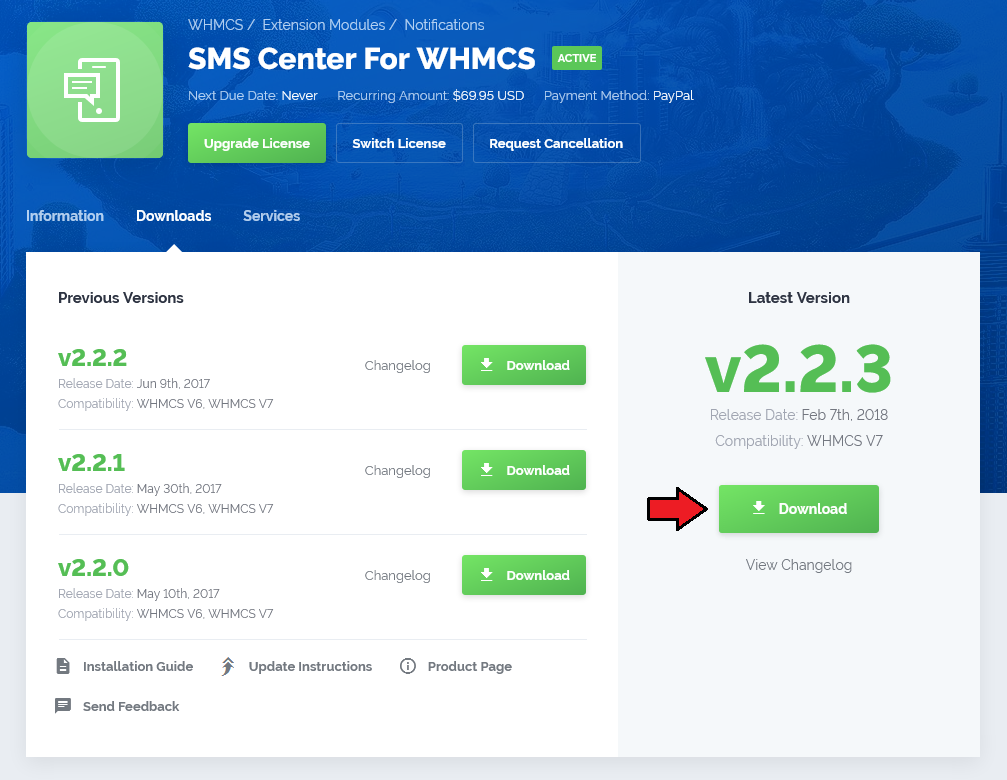
| 1. Log in to our client area and download the module. |
|
| 2. In the downloaded file you will find two packages that support different PHP versions. As presented on the screen below, the first one is dedicated to PHP 5.6 up to PHP 7.0, while the second one is aimed at PHP 7.1 up to PHP 7.2. It does not apply to open source versions. Note: You can check the current PHP version in your WHMCS. To do so, proceed to 'Utilities' › 'System' › 'PHP Info'. |

|
| 3. Extract the downloaded file and choose the one with the right PHP version. Upload and extract the PHP file into the main WHMCS directory. The content of PHP version files should look like this. |
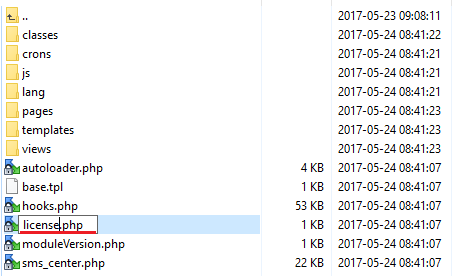
| 4. When you install SMS Center For WHMCS for the first time you have to rename 'license_RENAME.php' file. File is located in 'modules/addons/sms_center/license_RENAME.php'. Rename it from 'license_RENAME.php' to 'license.php'. |
|
| 5. In order to configure your license key, you have to edit the previously renamed 'license.php' file. Enter your license key between quotation marks as presented on the following screen. You can find your license key in our client area → 'My Products'. |

|
Activate The Addon
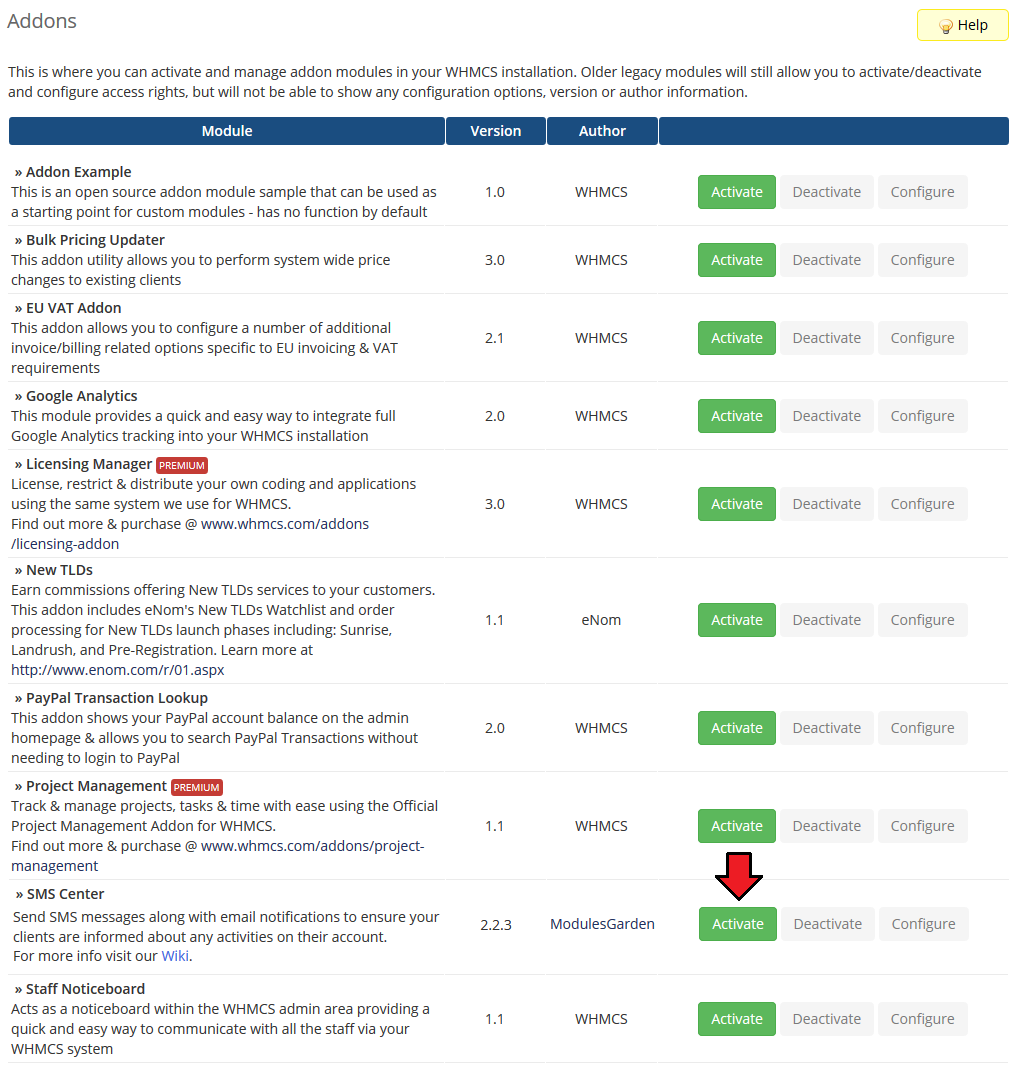
| 5. Now, you have to activate the module in your WHMCS system. Log in to your WHMCS admin area and proceed to 'Setup' → 'Addon Modules'. |
|
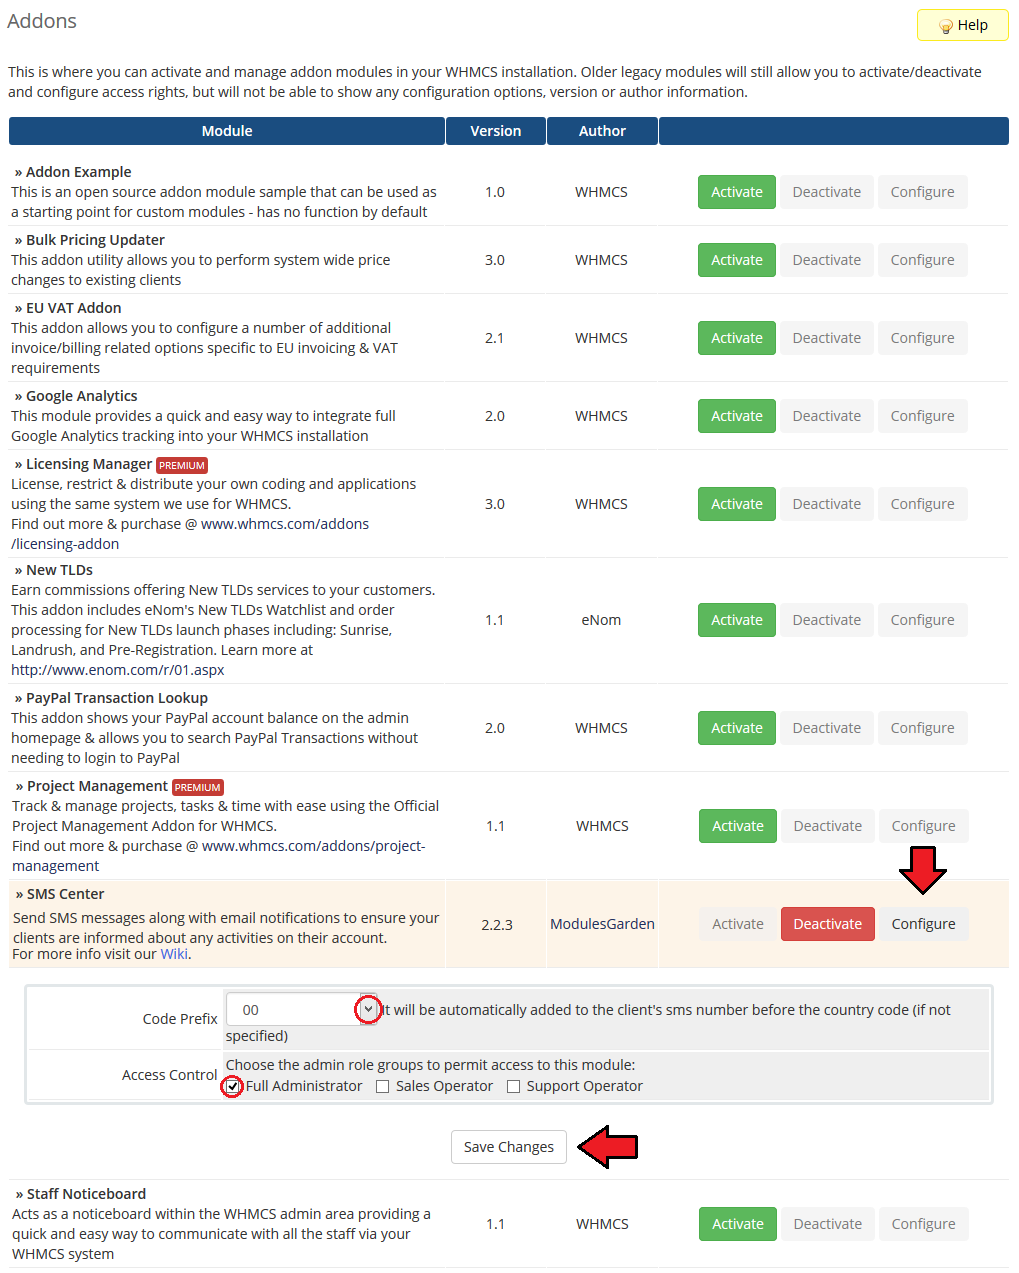
| 6. In the next step you need to permit access to this module. To do so, click on 'Configure' button, tick checkboxes to assign desired admin roles. |
|
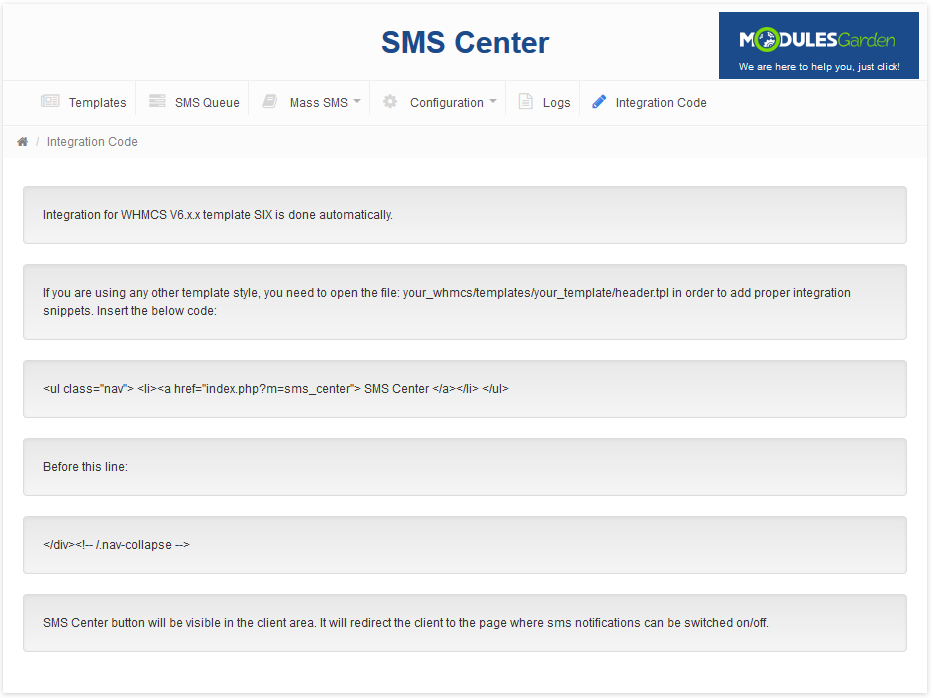
| 7. Now, proceed to the addon → 'Integration Code' and follow integration instructions. Remember that integration depends on the WHMCS version and template that you are using. |
|
8. The last thing you need to still do is setting up a cron job. It is advised to set the cron job with a 1 or 2 minutes interval./your_whmcs_dir/modules/addons/sms_center/crons/cron.php Remember to replace your_whmcs_dir with a correct directory of your system. |
| 9. You have just successfully installed SMS Center For WHMCS! |
Configuration and Management
| SMS Center For WHMCS is a module which allows you to send predefined text messages to your clients the same way emails are sent. |
Configuration
| Under 'Configuration' tab you will find 'Submodules', 'Administrators' and 'General' sections. Configure each of them to allow full usage of SMS Center For WHMCS module. Press the first one 'Submodules' to configure and check connection with SMS gateways. |
Submodules Configuration
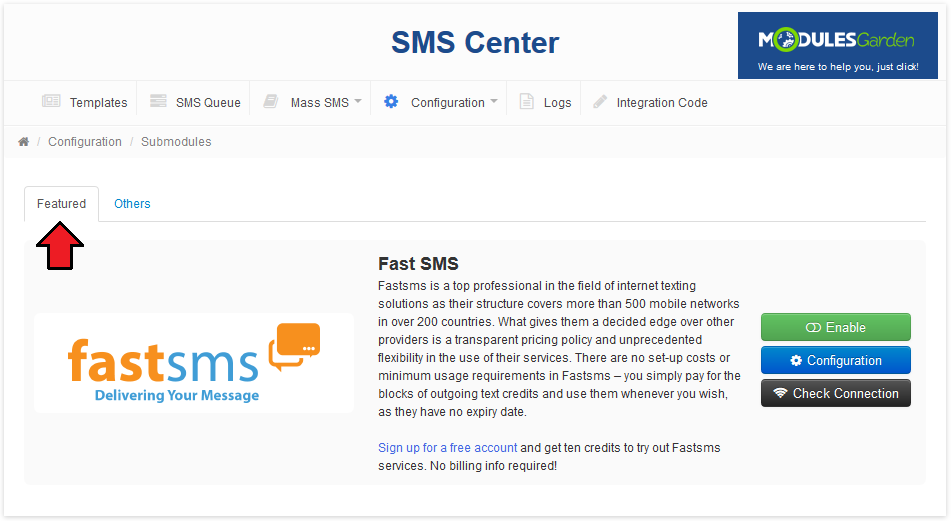
| Find here all possible gateways that can be used in our module. You can use a recommended 'FastSMS' gateway: |
|
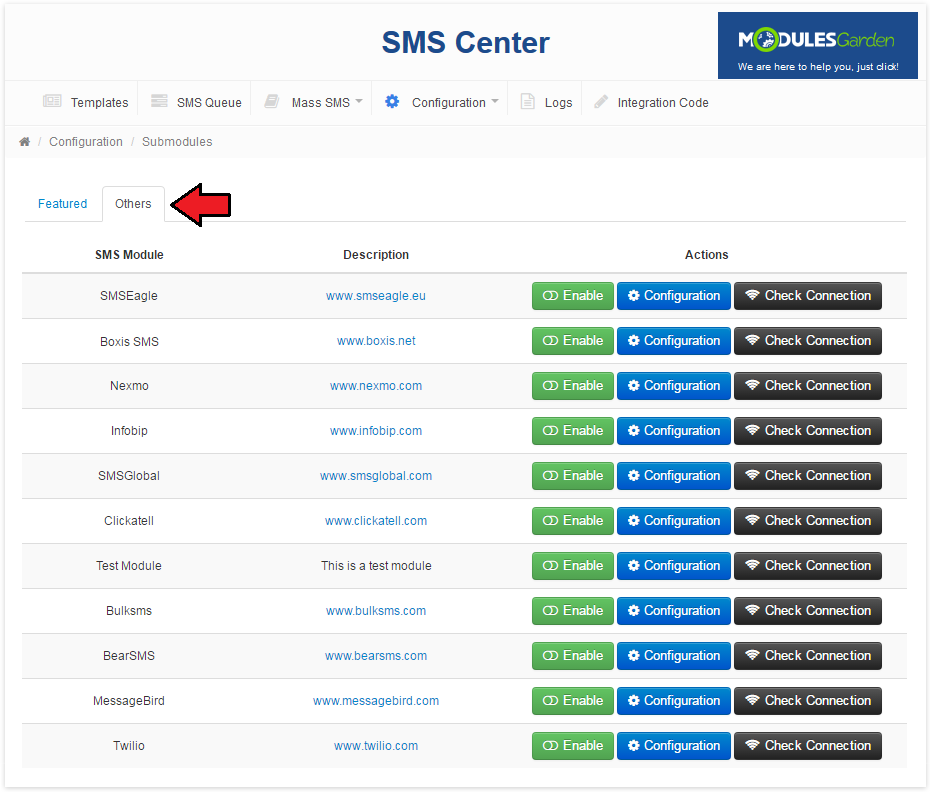
| Or choose form other acceptable gateways: |
|
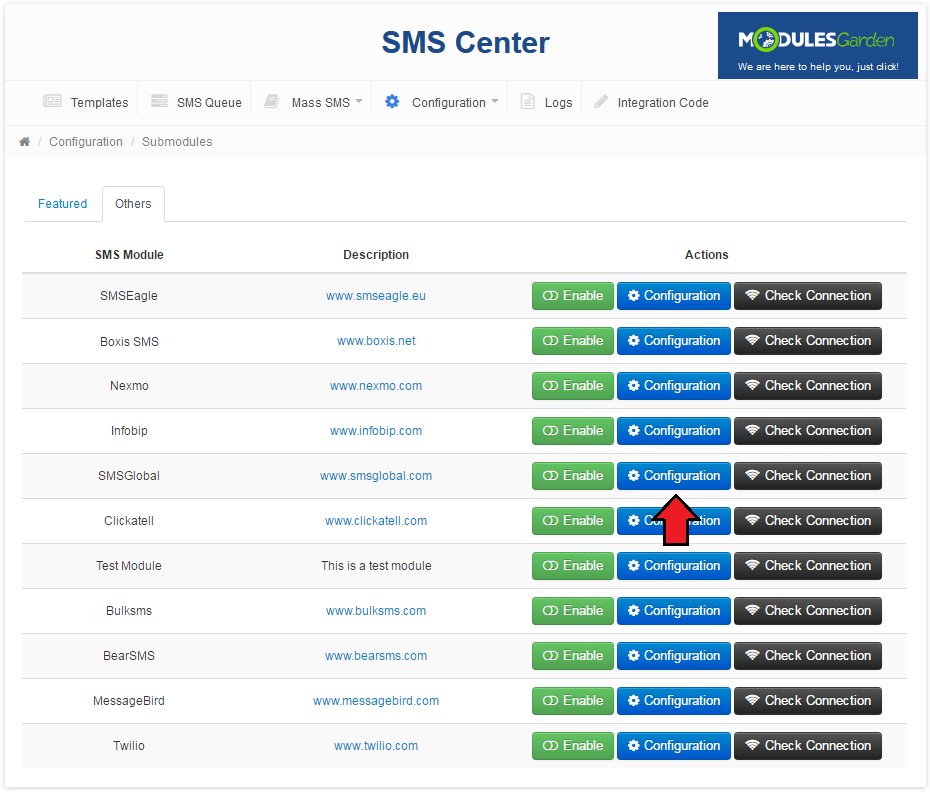
| Press 'Configuration' next to a gateway you wish to use. |
|
| Configuration of each gateway may vary depending on its requirements. As an example we will configure SMSEagle gateway. |
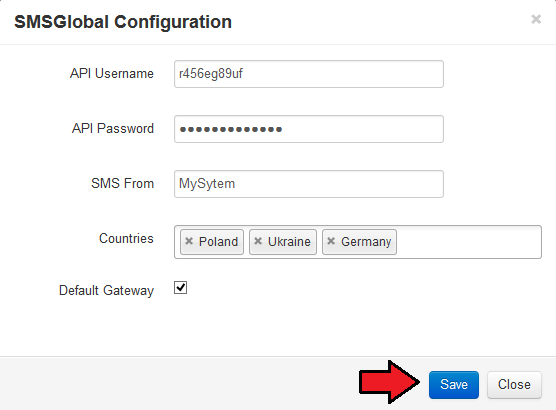
|
| You can check whether configuration is correct through pressing 'Check Connection'. |
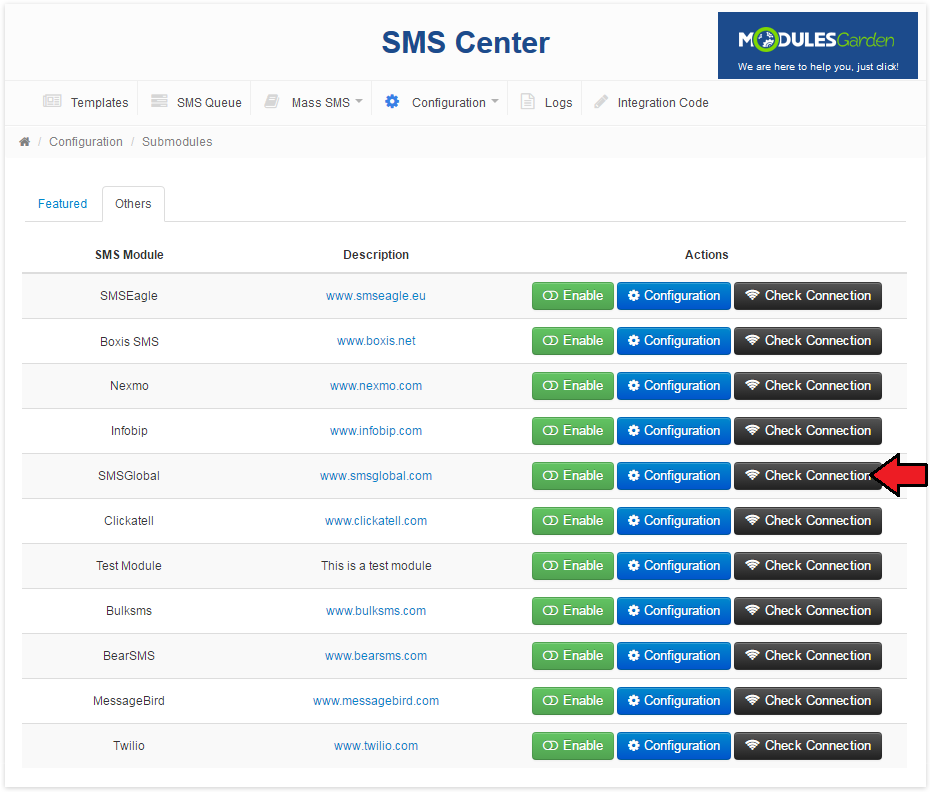
|
| If connection is successful, we can proceed. Activate the gateway, press 'Enable' next to it. |
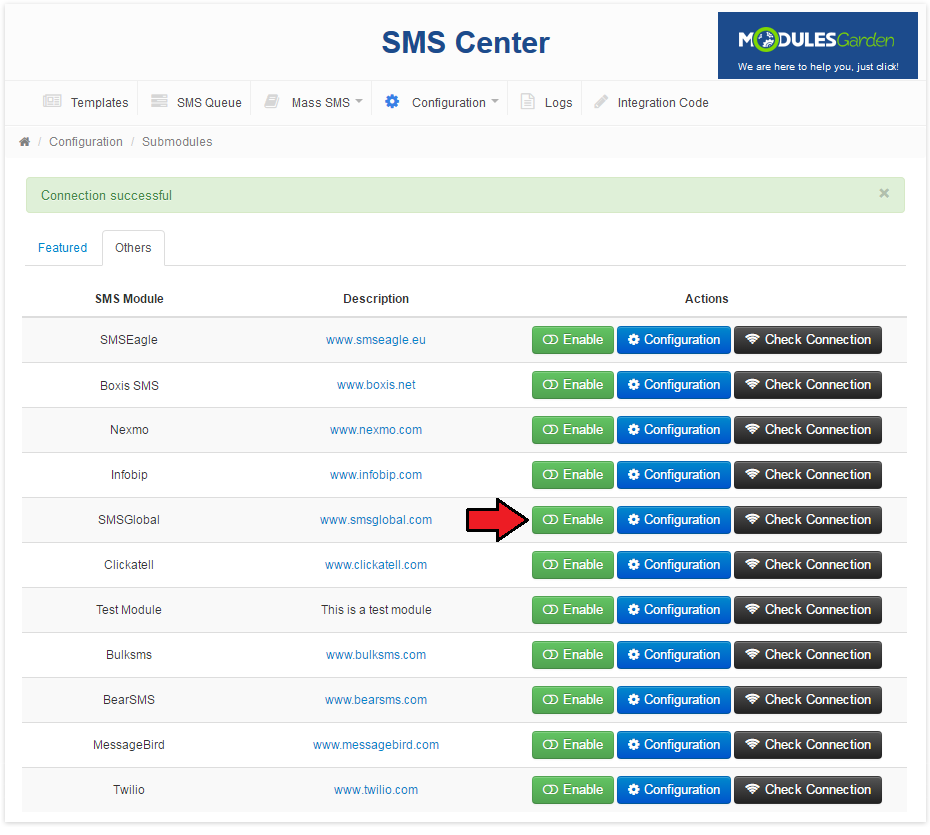
|
| As mentioned before, you may activate more than one gateway. All you need to remember is to set one gateway as default, assignment of countries to a gateway is not obligatory. |
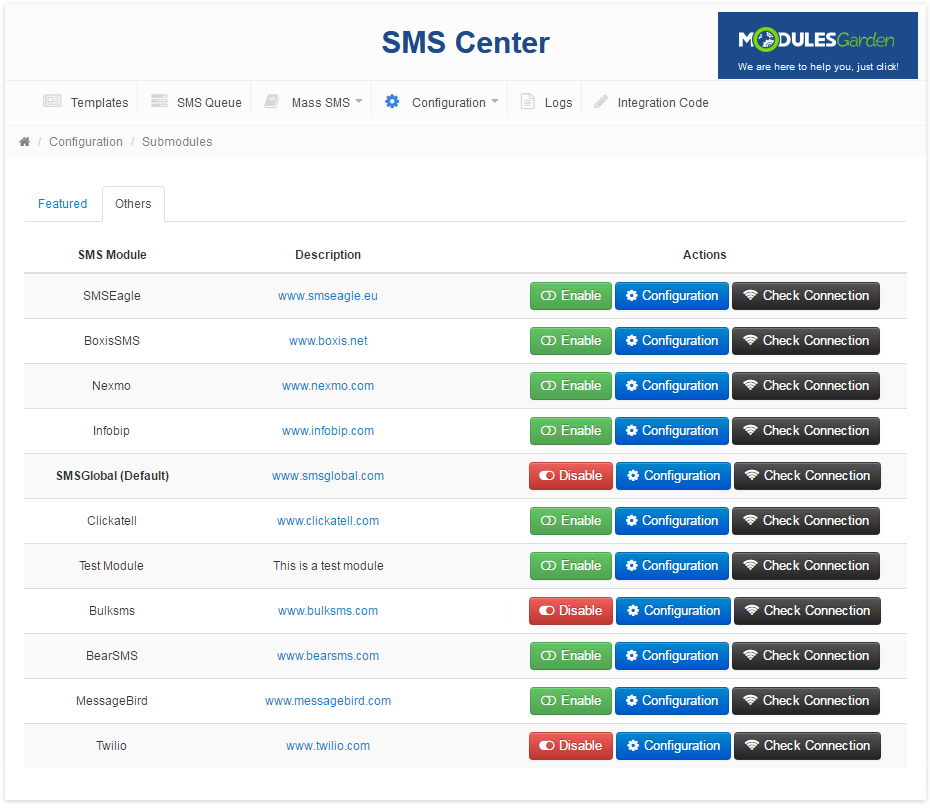
|
Administrators Configuration
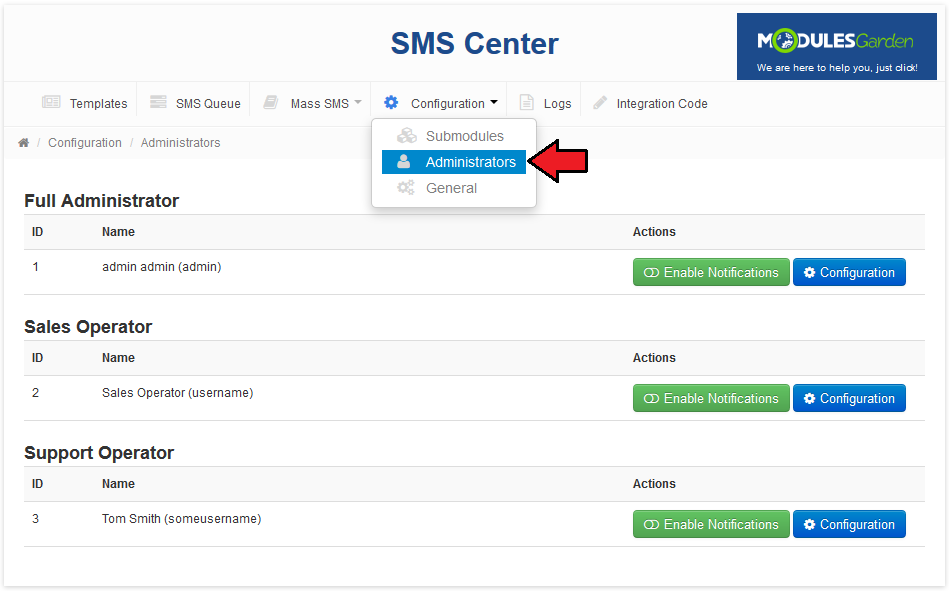
| This section contains a list of all staff administrators. You have the possibility here to decide who of them will receive SMS notifications and which notifications exactly. Press 'Administrators' under 'Configuration' tab. |
|
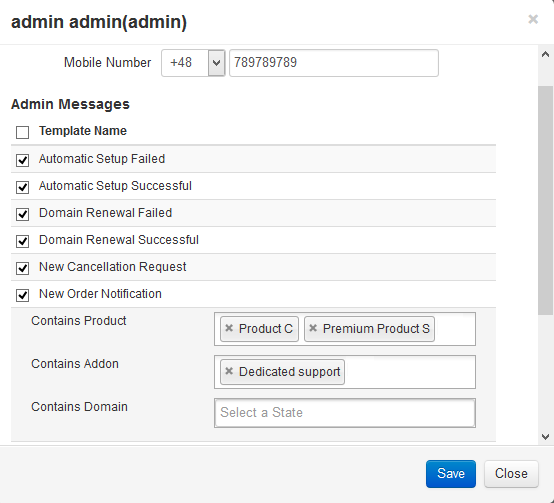
| In order to enable SMS notifications for administrators individually, firstly set configuration for them. 1. Fill in the administrator's phone number, where text messages with notifications will be sent. |
|
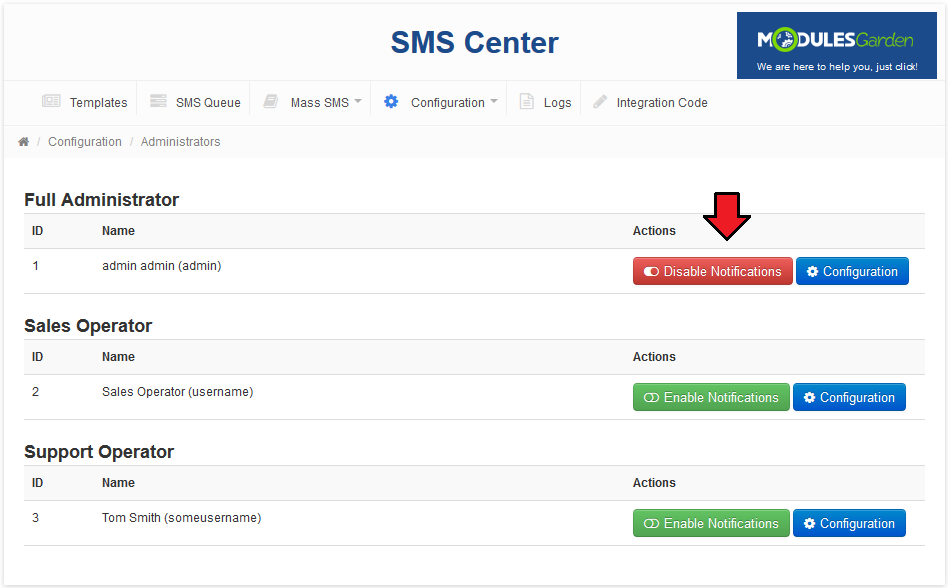
| Press 'Enable Notifications.' Repeat these steps for every administrator you wish to receive admin notifications. |
|
General Settings
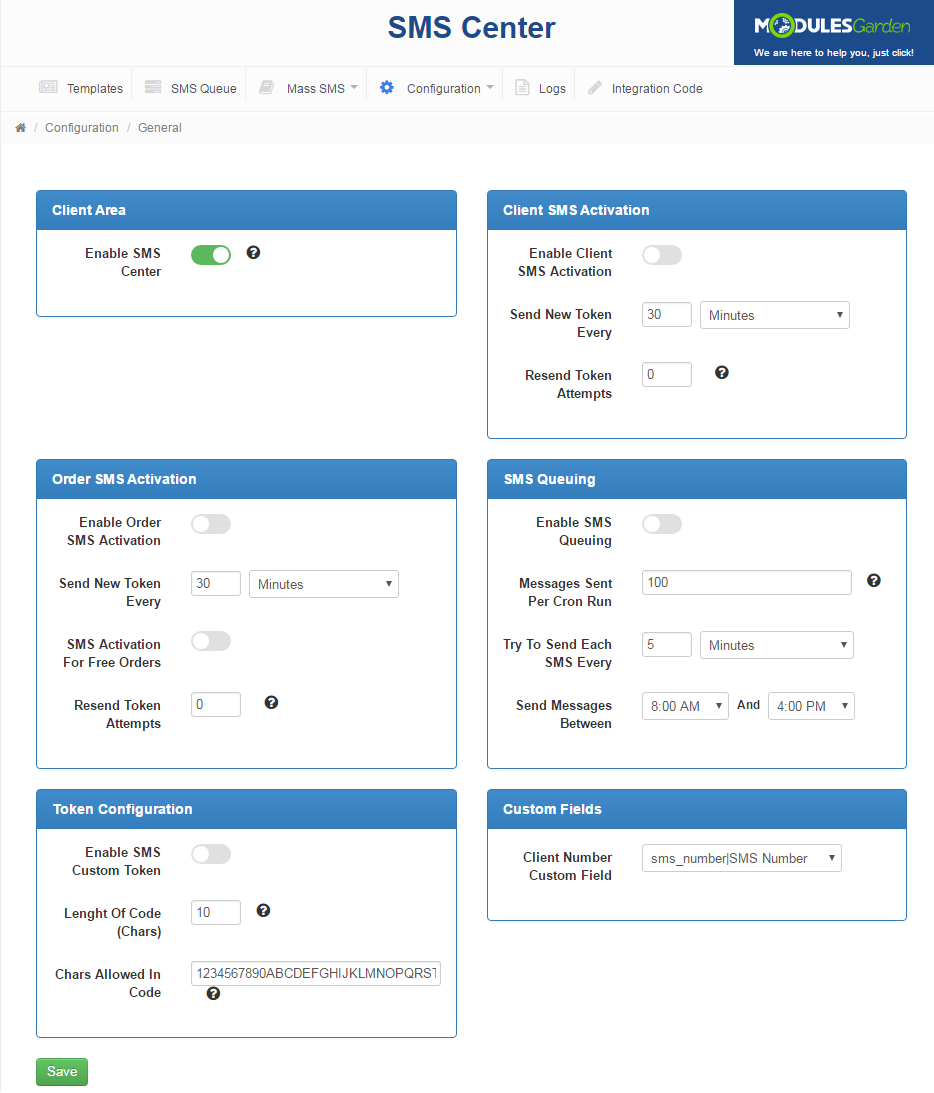
| In 'General' section there are specific SMS configuration possibilities. Configure those you wish to activate and 'Save' the changes once ready! By default, 'SMS Center' for client area is enabled, you may disable it here. |
|
Order SMS Activation
| Enable 'Order SMS Activation' to allow activating orders once placed. Once an order is placed a client will receive a text message with a token, which must be then used to finish the order. |

|
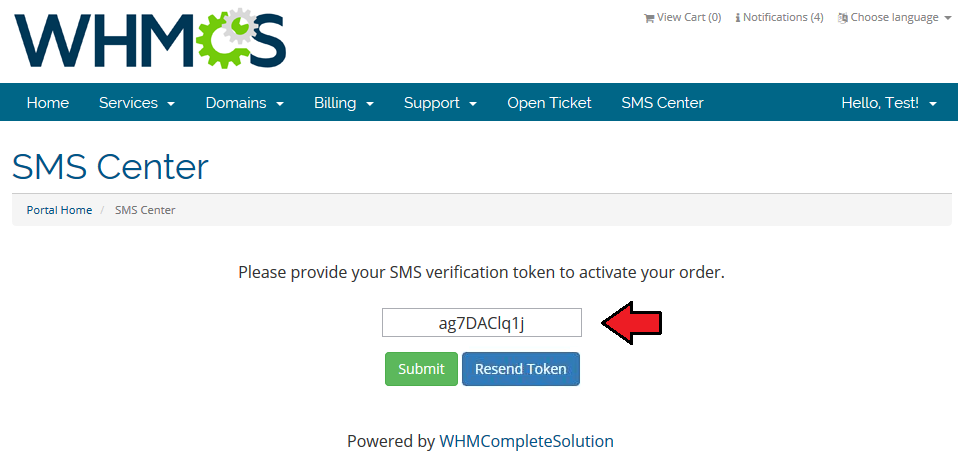
| If the above option is enabled, a client when placing an order before being able to complete it must enter a valid token that was sent via SMS. Only then the order can be completed. Depending on the settings, you may allow clients to ask for resending the token. |
|
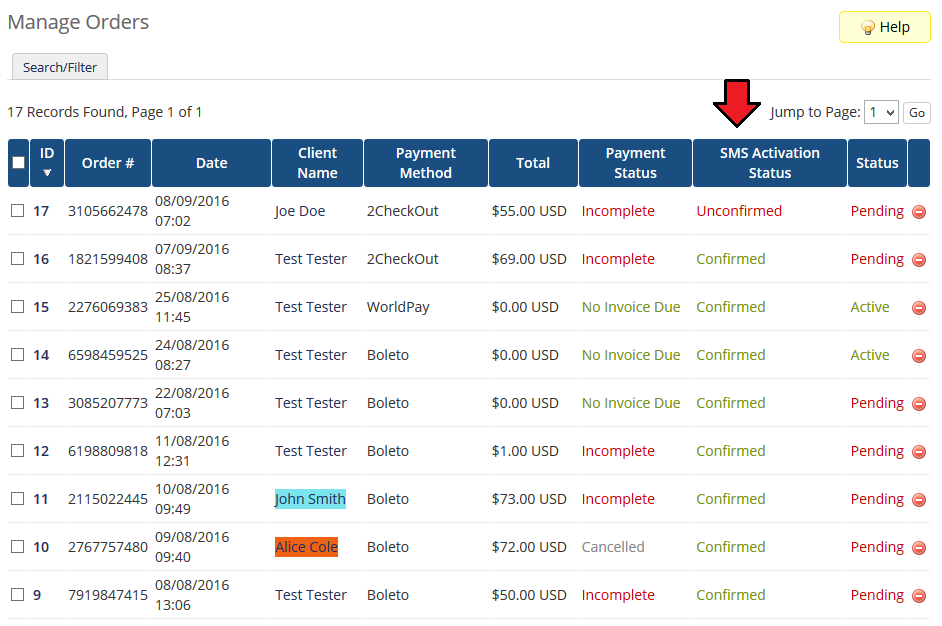
| If provided token is correct, the order's verification status is changed to 'Confirmed'. |
|
Client SMS Activation
| Enable 'Client SMS Activation' and every newly activated client will receive a token, which must be used to end up the activation process. Declare time intervals for sending tokens here and allowed number of attempts to resend the token. |

|
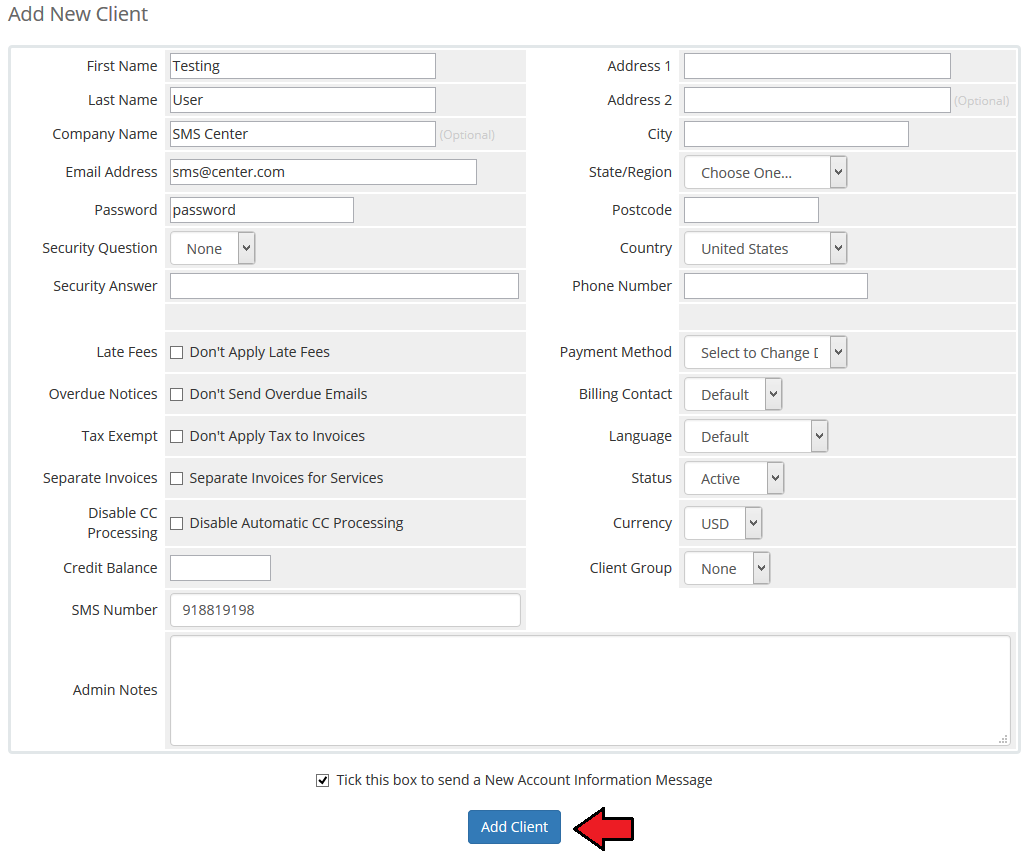
| With the above option enabled, the process of a new client's activation is a little bit different. Start with filling out the client's details. |
|
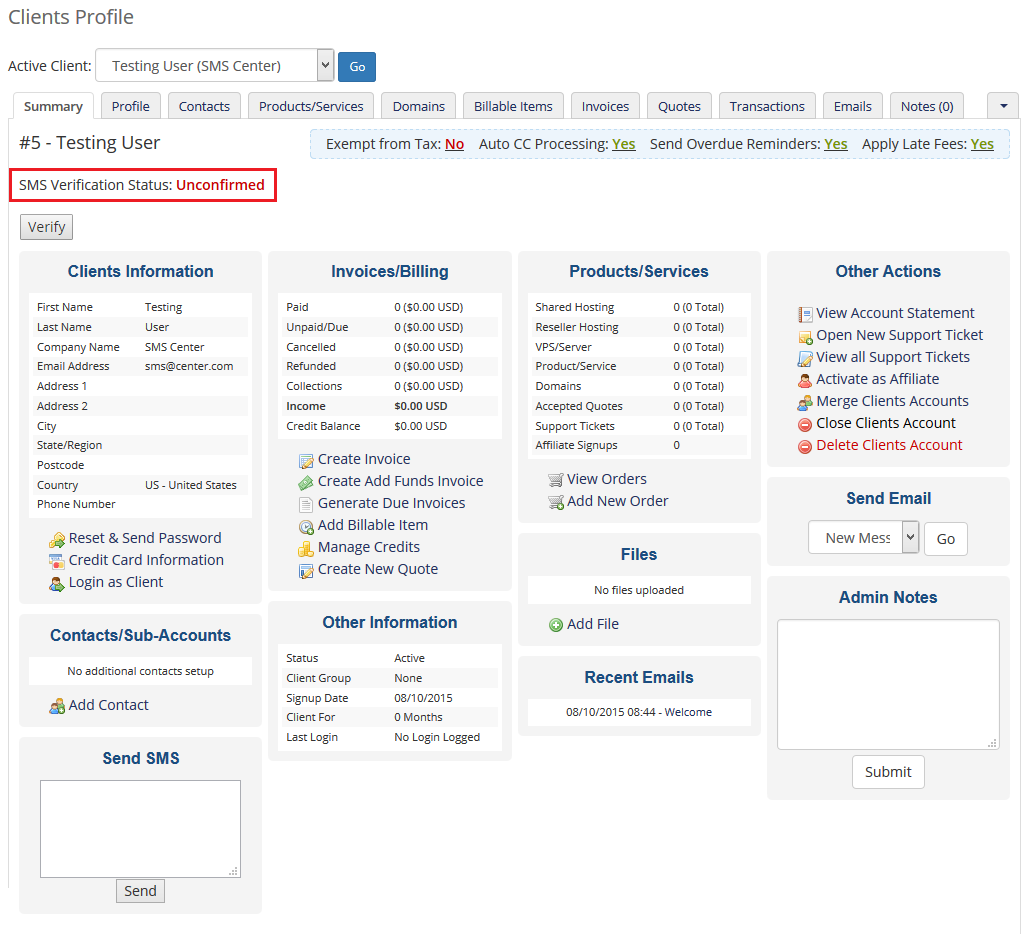
| When added, the client's verification status will be 'Unconfirmed'. |
|
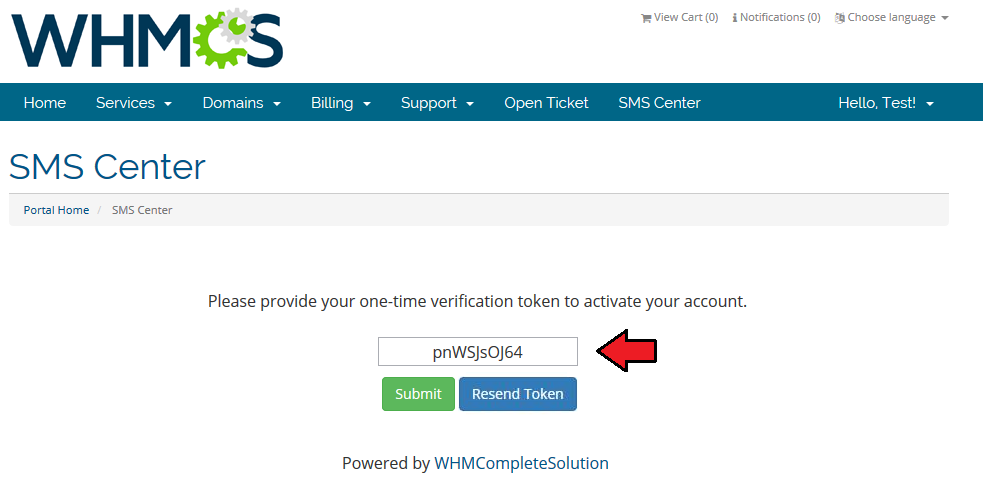
| To verify activation the new client needs to log in to their client area page and type in a token received via SMS. If allowed by the administrator, client may request sending the token again by pressing 'Resend Token' button. |
|
|
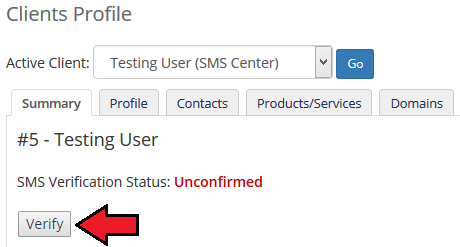
As an administrator you can also verify client's account manually.
|
|
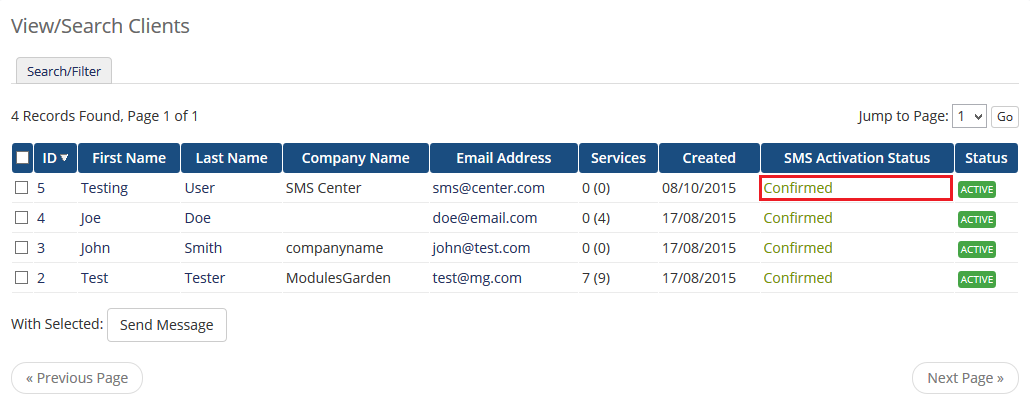
| Client's status has now changed to 'Confirmed'. |
|
| Please be advised that whenever the client changes their phone number - the status will revert to 'Unconfirmed' and the verification process will have to be repeated. |
SMS Queuing
| Enable this option to allow text messages queues. Declare time intervals between attempts to send text messages and the number of messages that can be sent in one attempt. |

|
Token Configuration
| In this section you can also change default token settings by defining own token length and available characters set. Please note that allowed set of characters used for generating a token may contain chars from the following range only: 1234567890ABCDEFGHIJKLMNOPQRSTUVWXYZabcdefghijklmnopqrstuvwxyz |

|
Custom Fields
| Finally, select which of the existing client custom fields should be used to provide the client phone number to send messages. |

|
Management
Templates
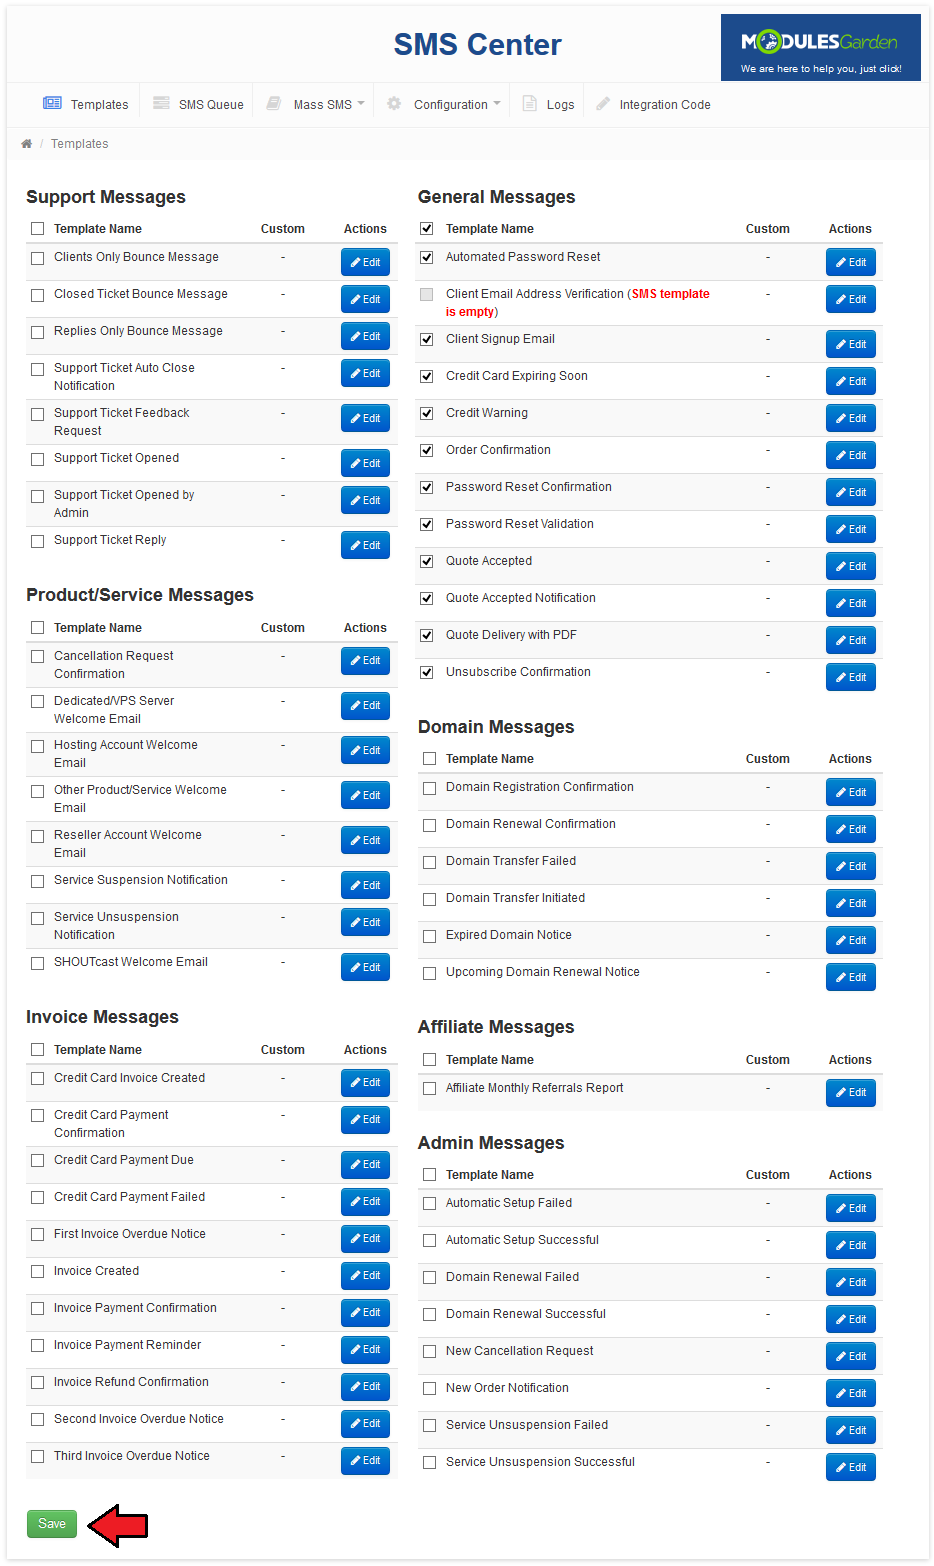
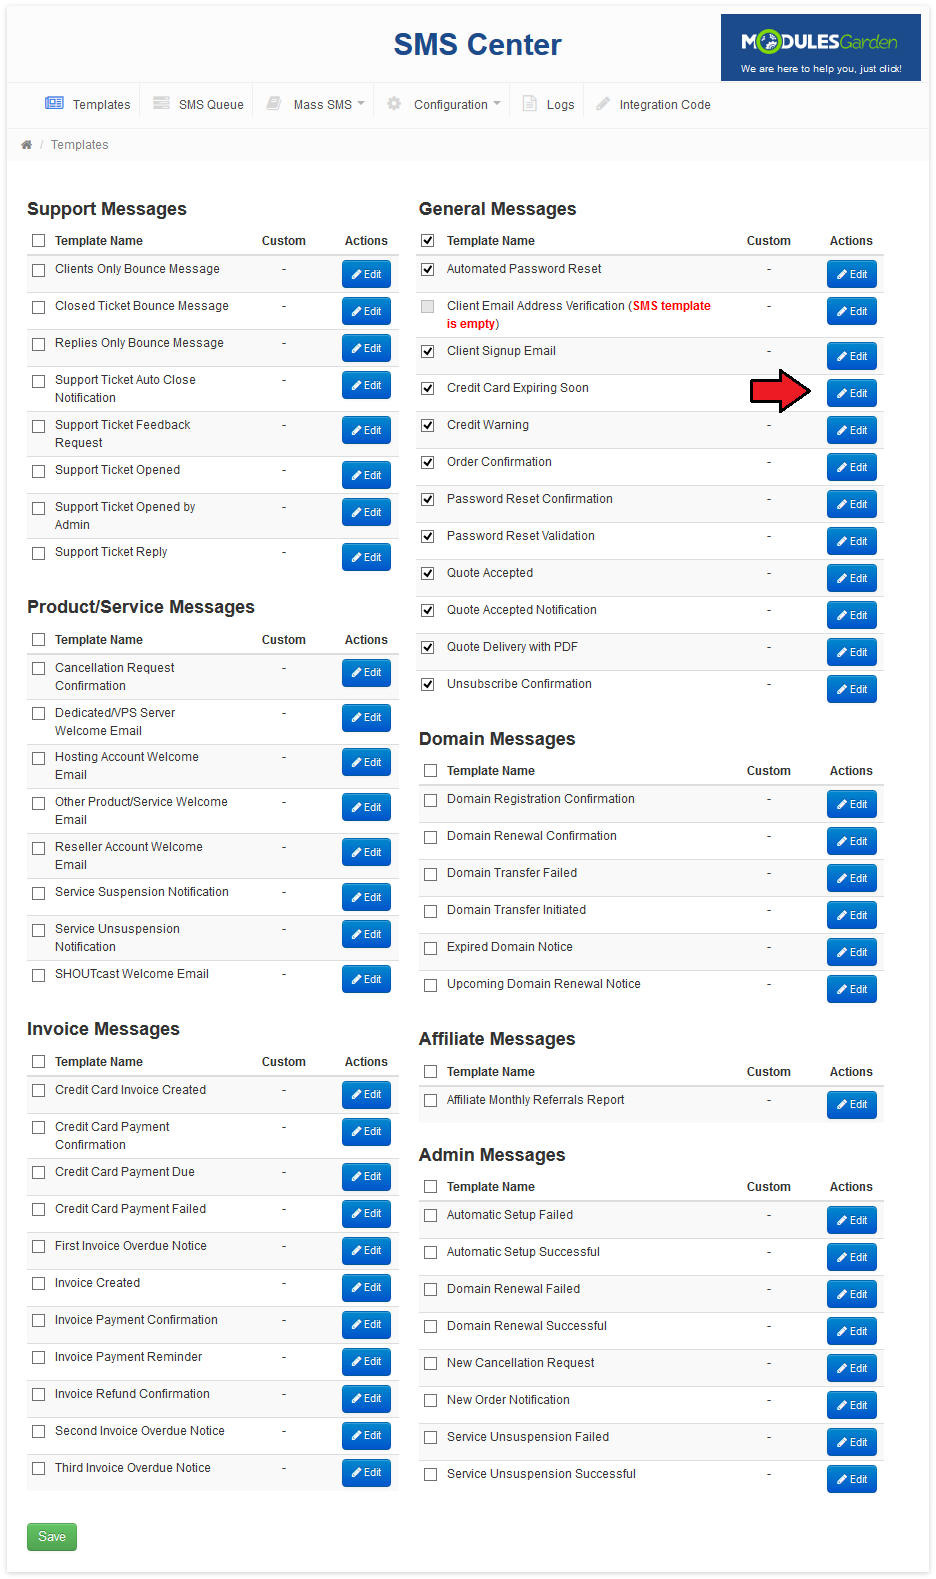
| 'Templates' tab contains the list of message templates. Each email template in your system has its text message counterpart. Any of these messages can be enabled/disabled through marking/unmarking checkbox next to them and pressing 'Save'. |
|
| Module comes with default message templates, but you can edit each of them. Press 'Edit' to do so. |
|
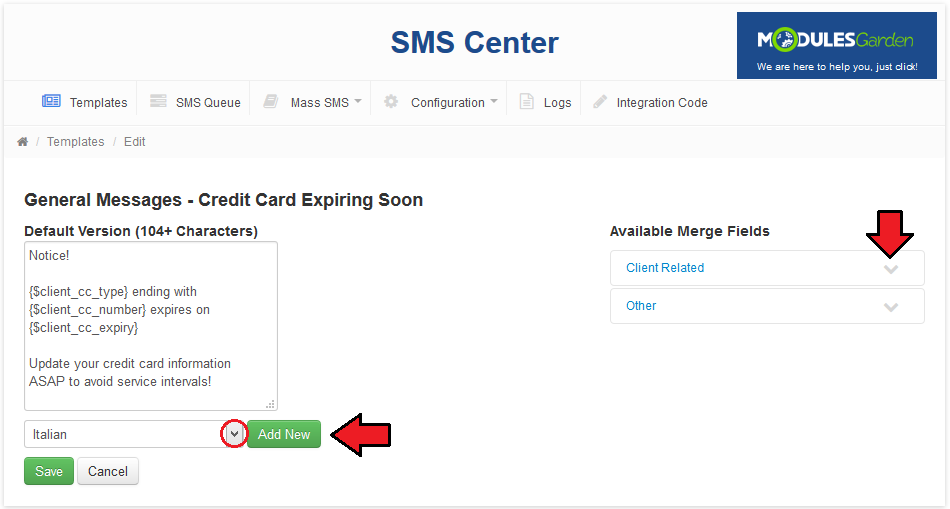
| The first field is a default message of the template. Our module allows you to define messages for selected languages. In order to prepare a message in an additional language, select desired language from a dropdown menu and press 'Add' as shown on the following screen. |
|
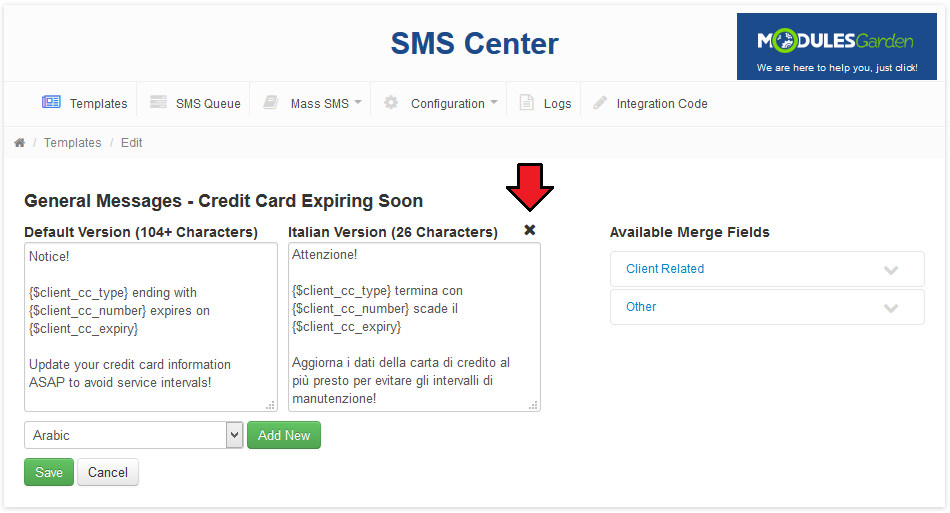
| As you can see on the screen below, a new field for chosen language appeared. You can remove any additional language through pressing 'x' icon next to it. |
|
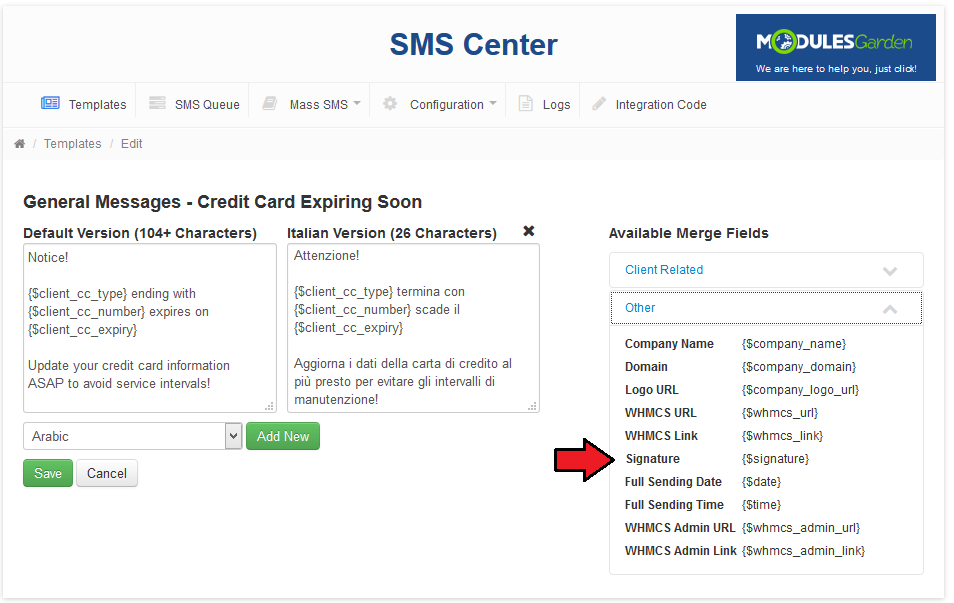
| Module template supports merge fields which can be easily injected into messages. Simply, click on the wanted merge field, it will be injected into currently edited version of the message. |
|
SMS Queue
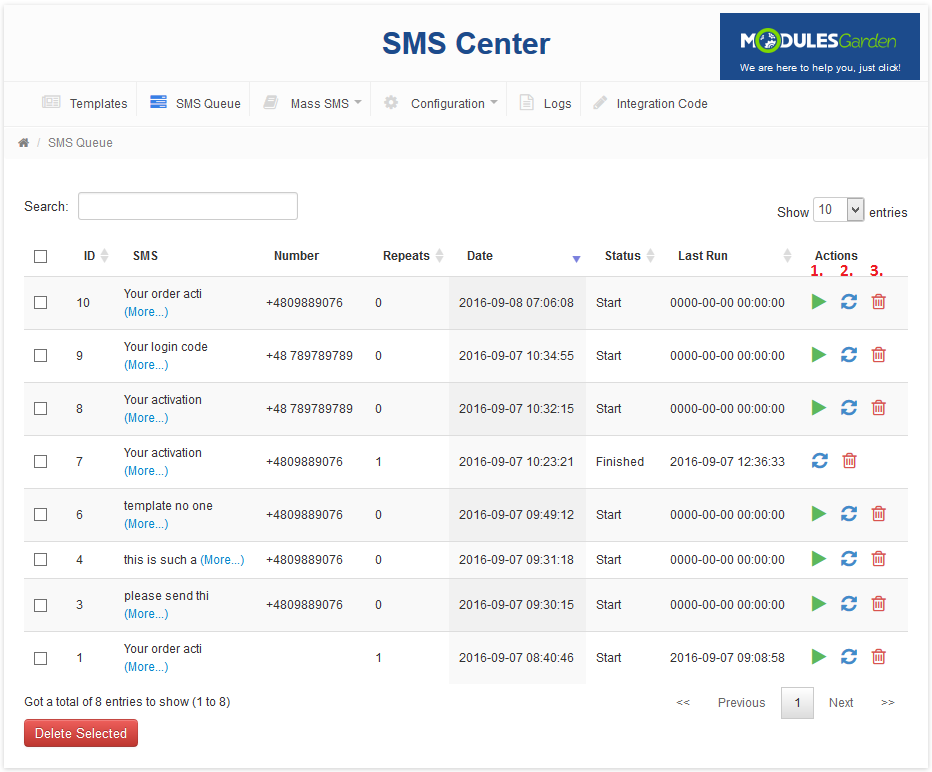
| In this section you will find a list of all text messages waiting for a cron run to be sent. Specific details on messages that can be sent in one attempt are specified in 'General' section. |
| Actions: 1. Send - send message manually. |
|
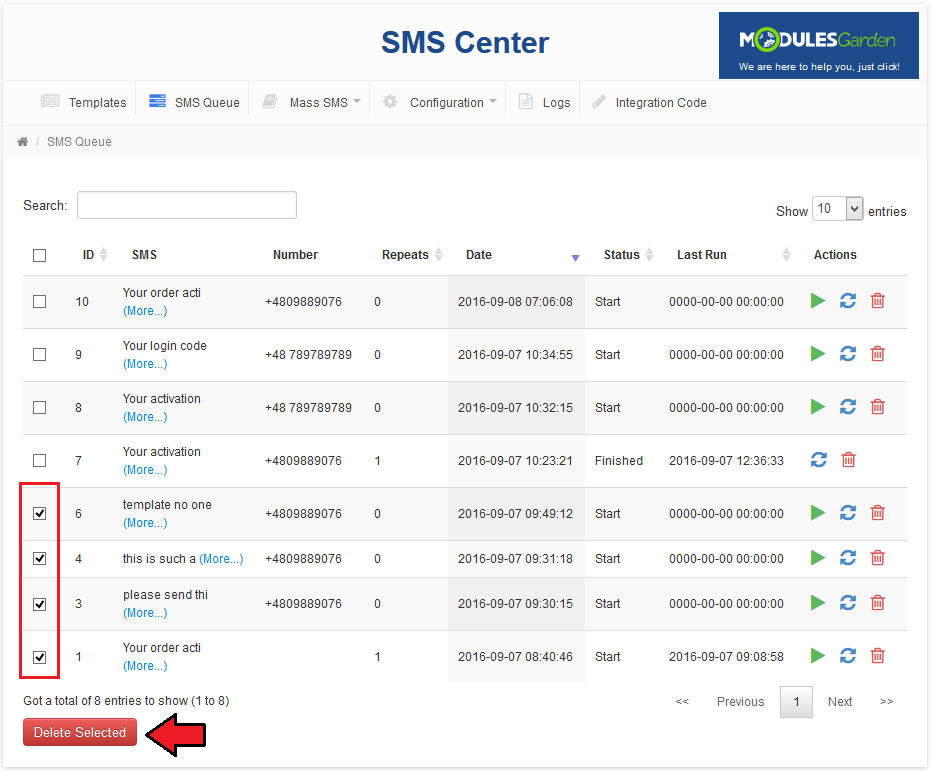
| Select multiple entries and remove them in bulk to save the time. |
|
Mass SMS
| Sending mass text messaged to your clients is a convenient tool that allows preparing ready made messages that will be delivered to group of clients according to specified configuration. |
Mass SMS Templates
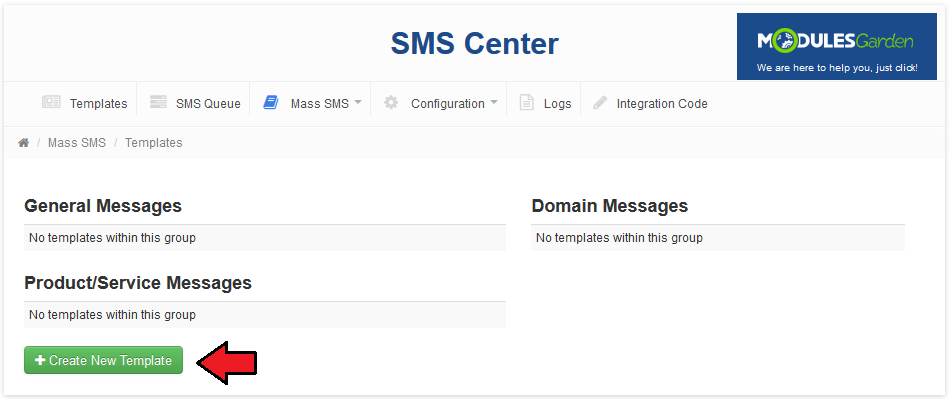
| Firstly, move to 'Mass SMS' → 'Templates', there create templates for mass texting. Press 'Create New Template' to begin. |
|
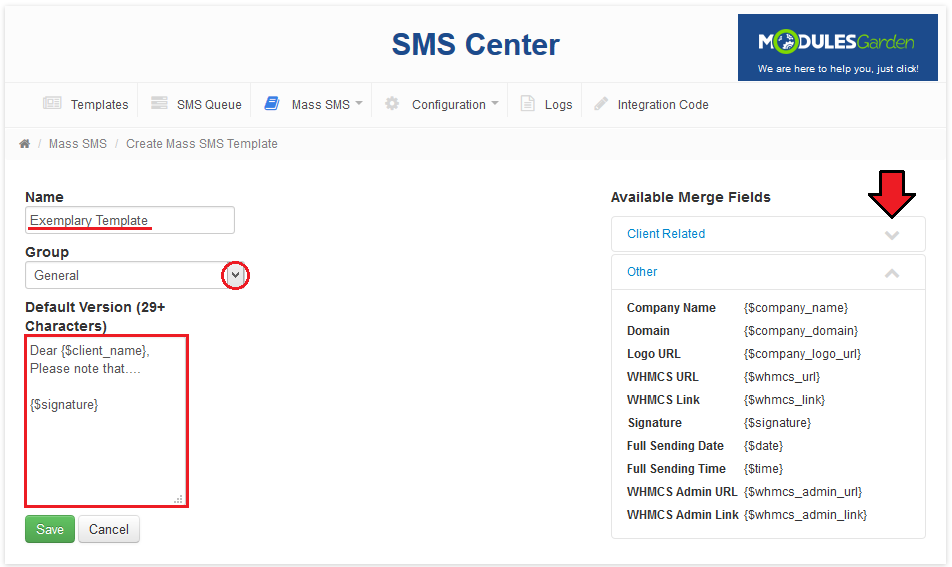
| You are moved to template creation site. Enter your template name, choose a group it will belong to and type in the message text. Use available for the group merge fields. |
|
| All created templates are available to edit or remove when no longer used. |
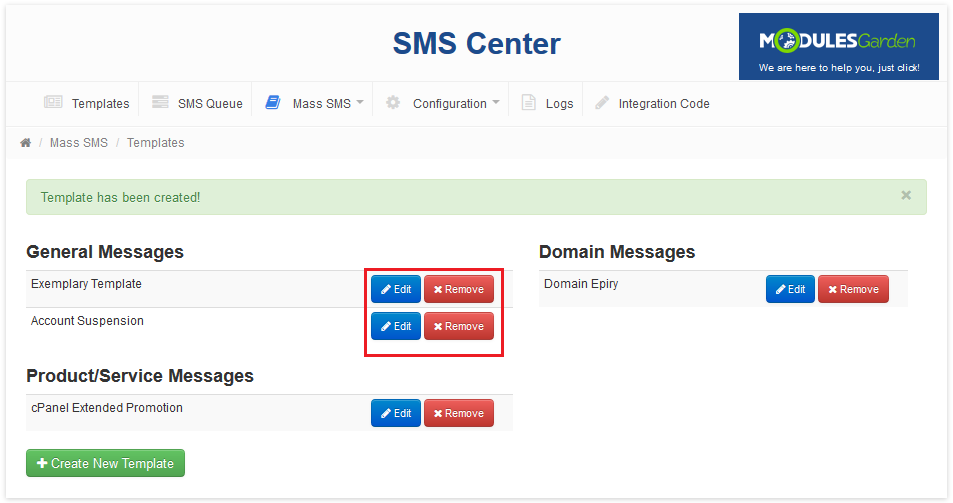
|
Mass SMS Configuration
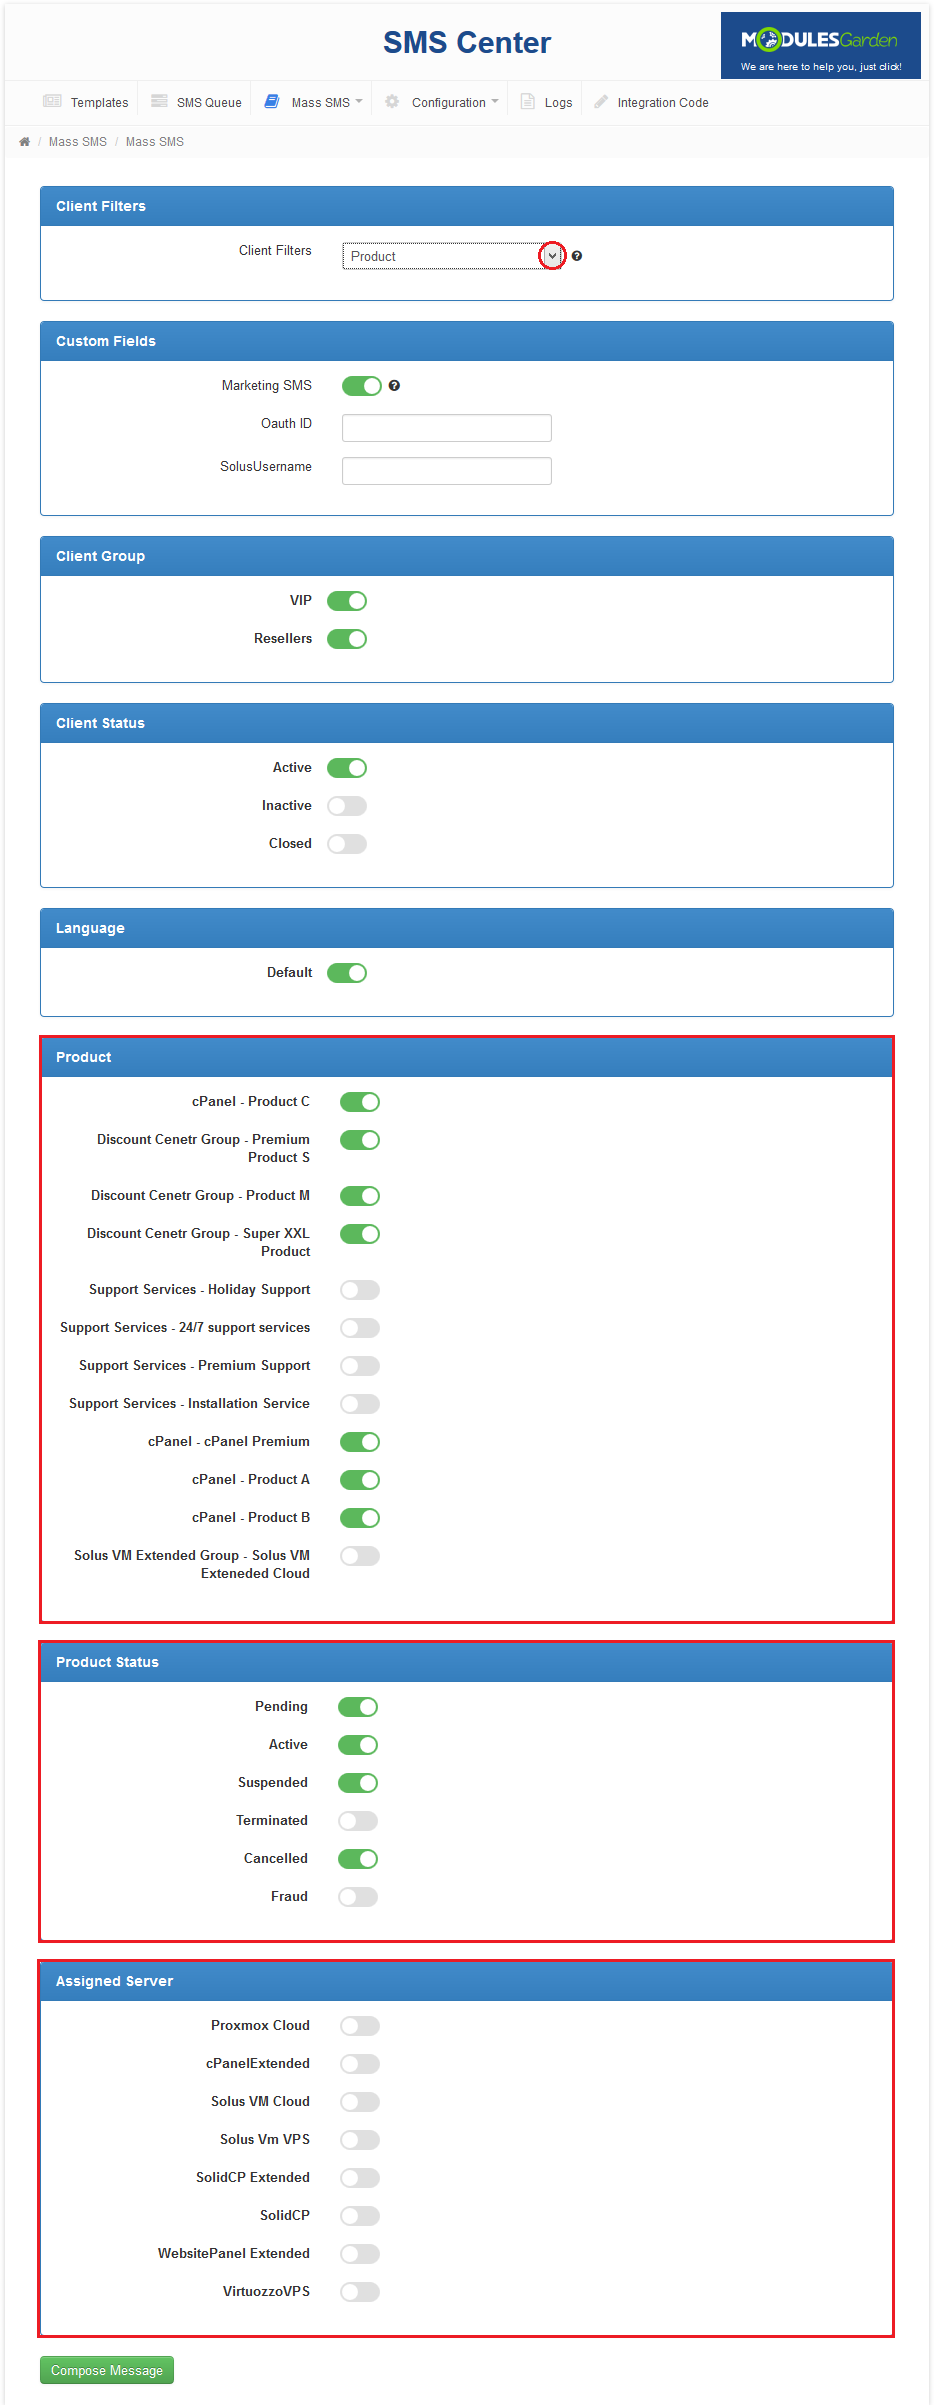
| Now, that you have created the templates move to 'Mass SMS', there configure the recipient group. Use filtering fields to set it up as you need. Select the type of filtering, you can choose from:
Each filter type configuration differs slightly, but there are some general settings available for each type. These are:
All the above sections are available for 'General' client filter. |
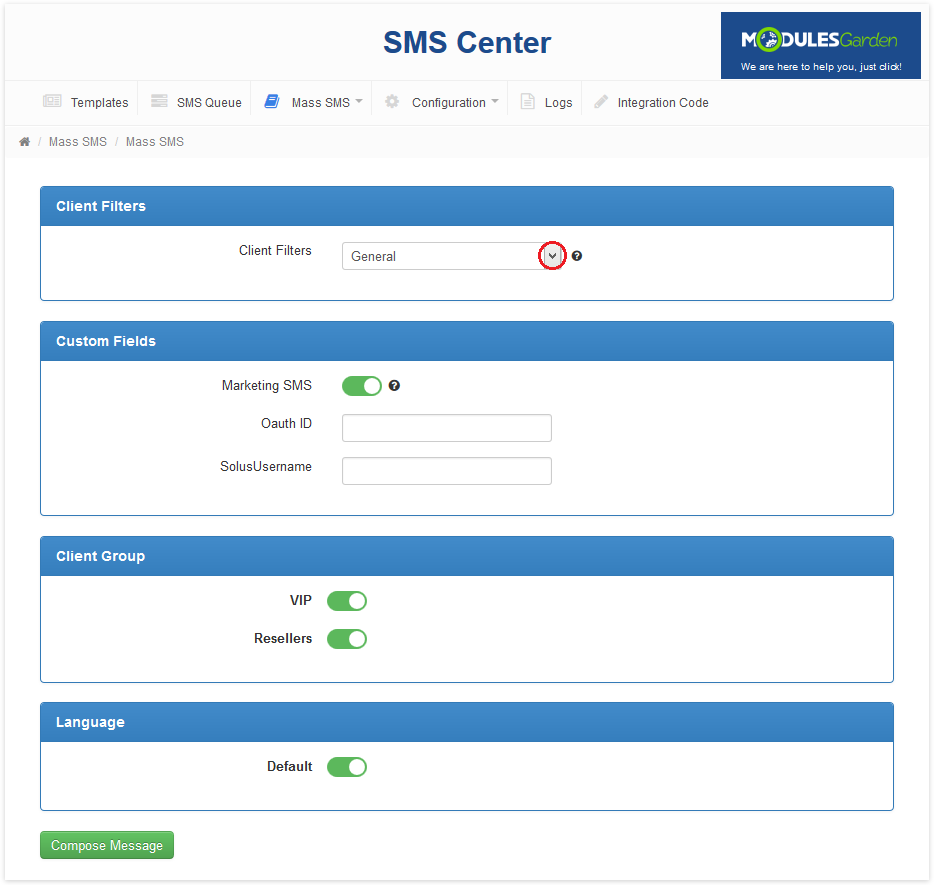
|
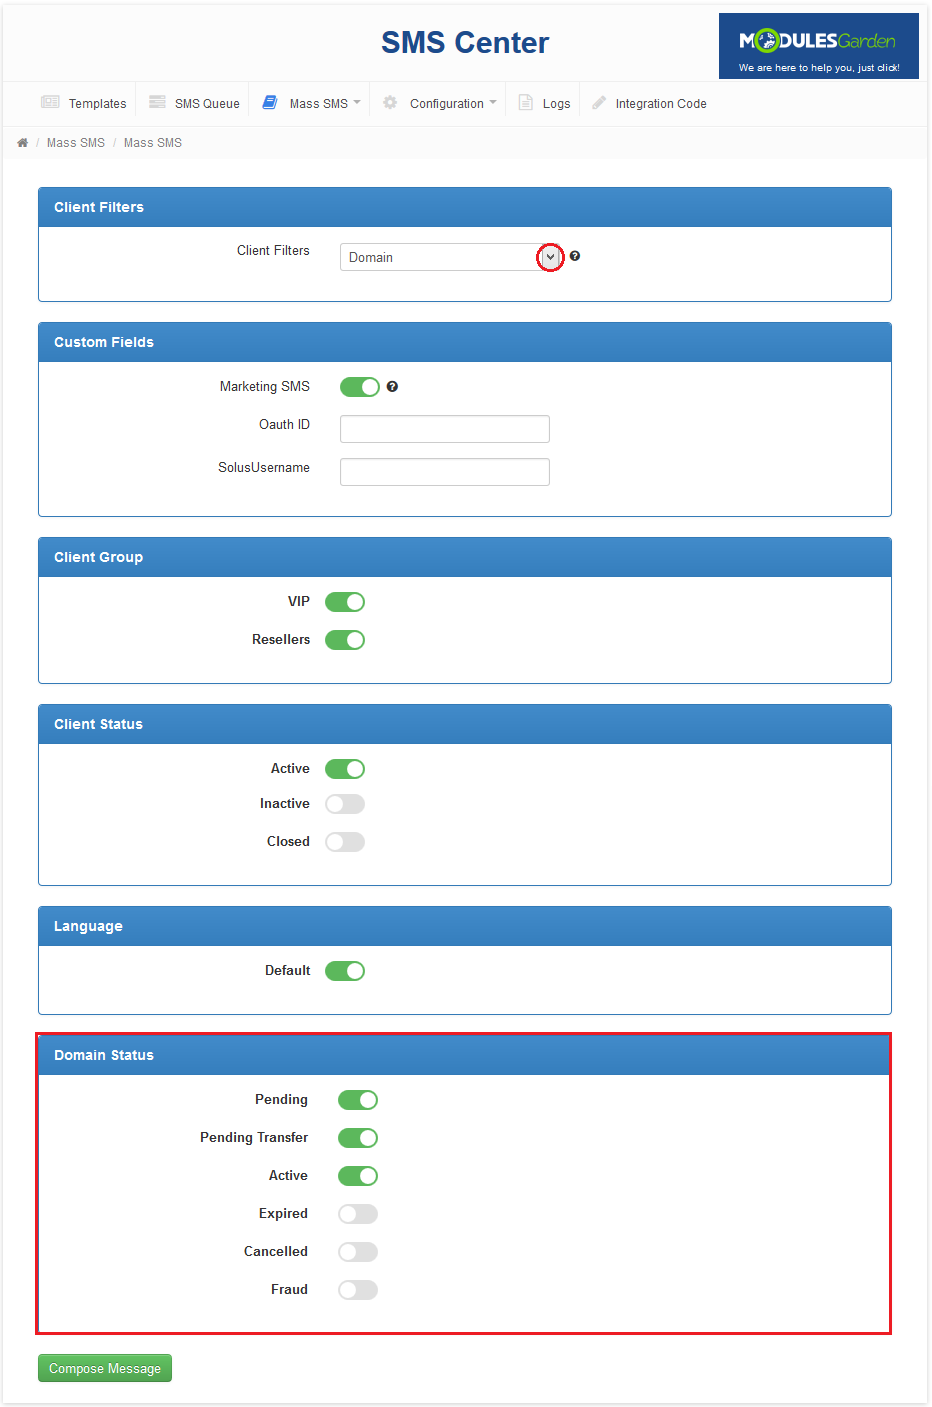
| Every other filter includes these options as well, but there are also some additional filters to choose form for each of the types: Client Filter - Addon
|
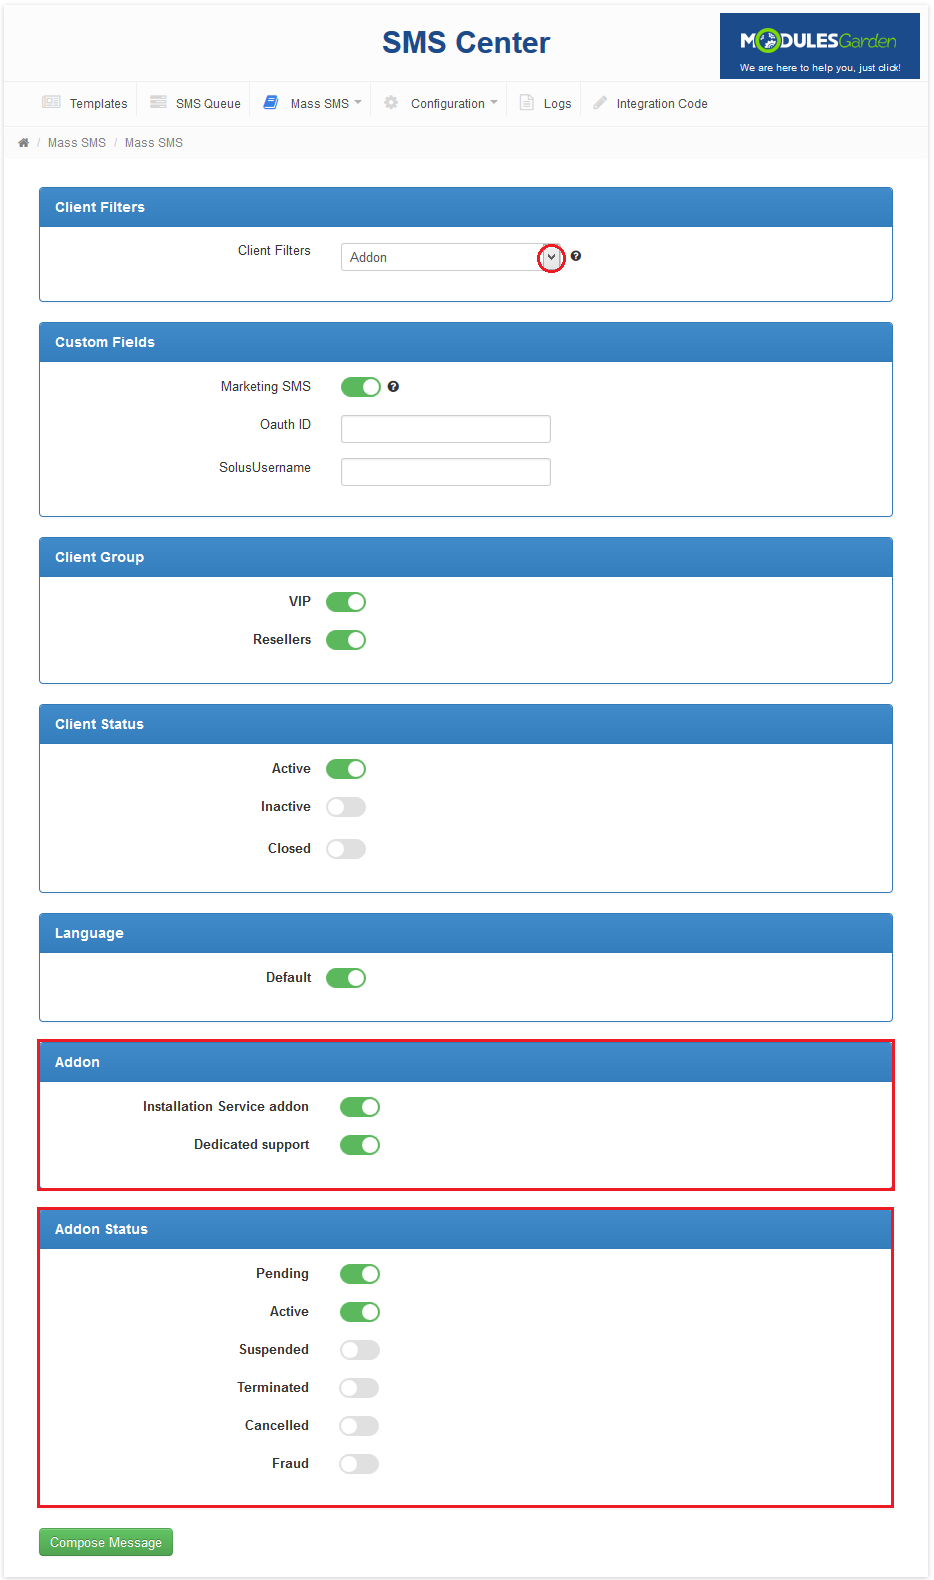
|
Client Filter - Domain
|
|
Client Filter - Product
Press 'Compose Message' to continue sending mass messages. |
|
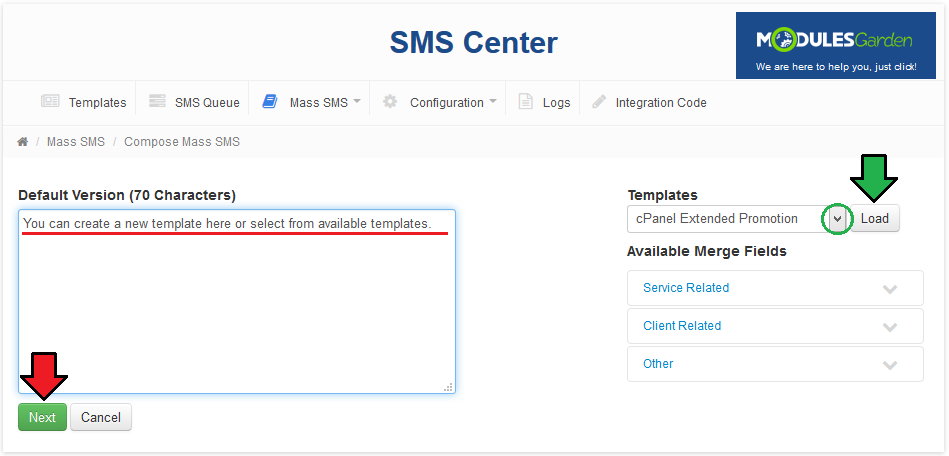
| When you have your filter ready, you will be moved to the next step where you may create a new text message or upload one of your previously prepared templates. Choose it from dropdown menu and press 'Load'. When message is ready, press 'Next'. |
|
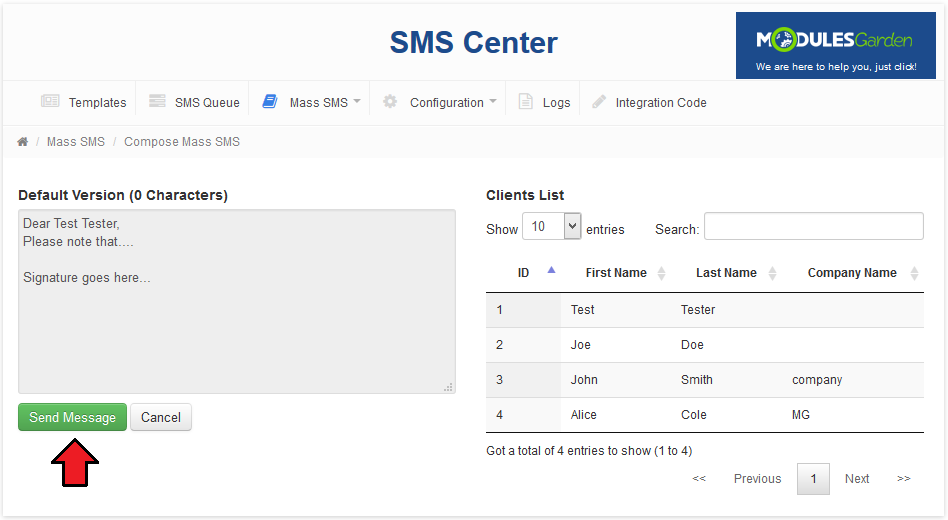
| You can see now how the final SMS looks like and see the list of clients that will receive the message. If everything is correct, press 'Send Message'. |
|
Logs
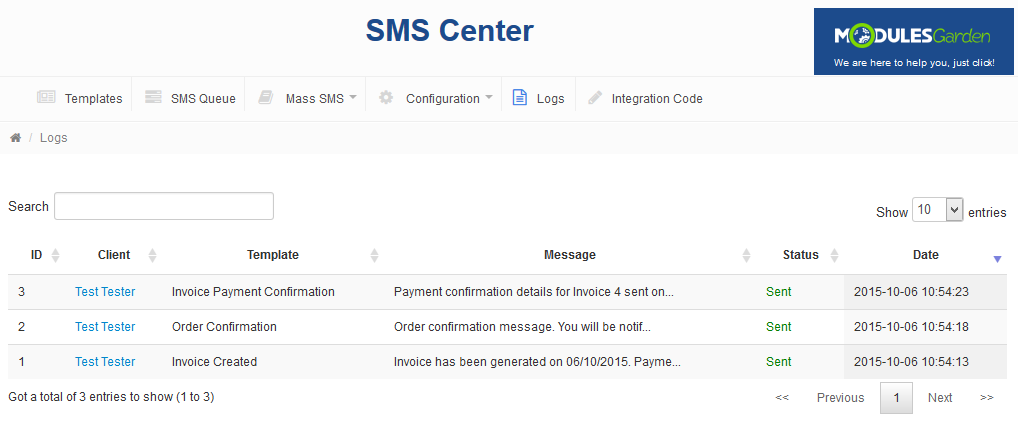
| Messages sent to your clients are logged under 'Logs' tab. As you can see on the following screen, here you can find detailed information about each message sent automatically to a client after certain actions. |
|
Client's Summary Page
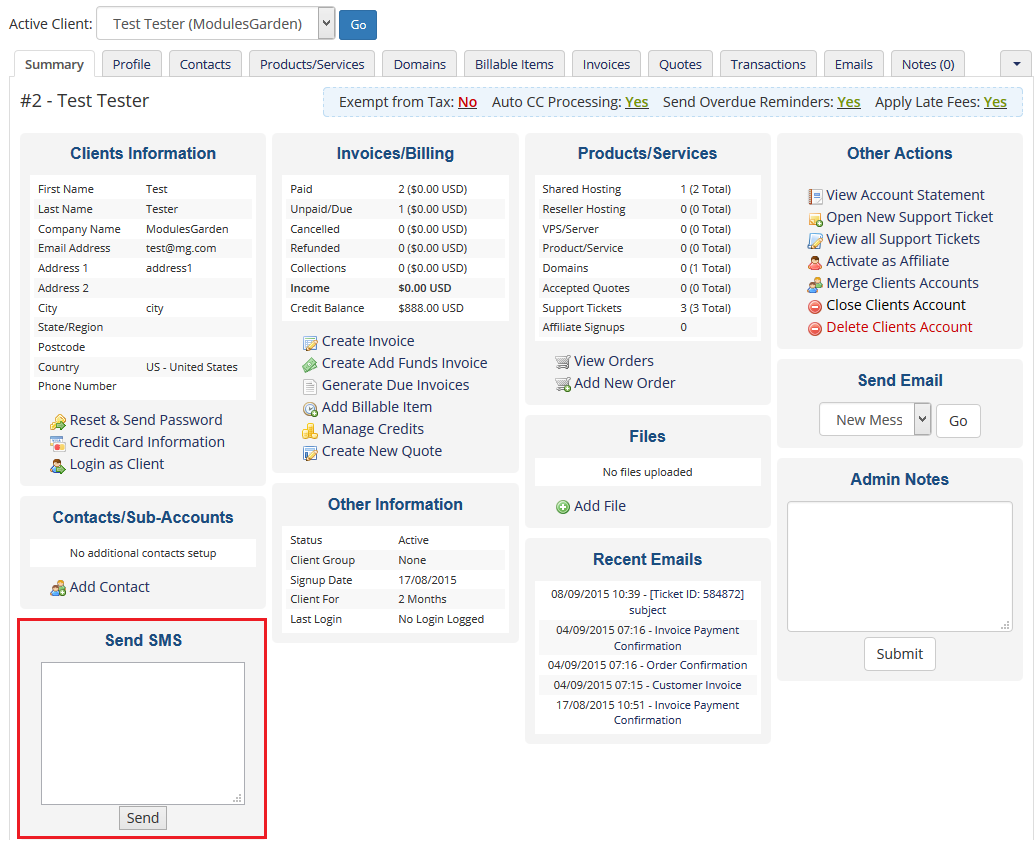
| From the clients' summary page you can send text messages to clients using only a simple box. Type in the message text into the text field like on the screen below and press 'Send'. |
|
Client Area
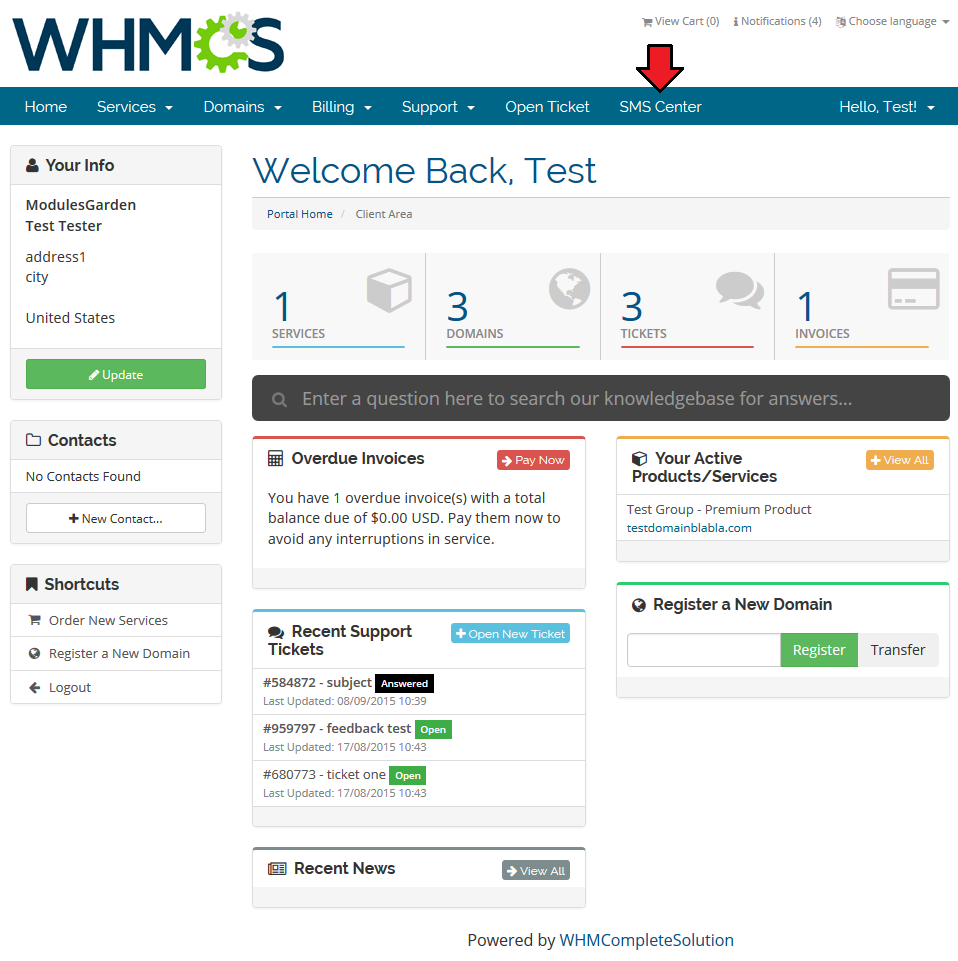
| After placing integration code, a new position appears in the client area navigation menu. Through pressing it your client will be moved to configuration of SMS notification. |
|
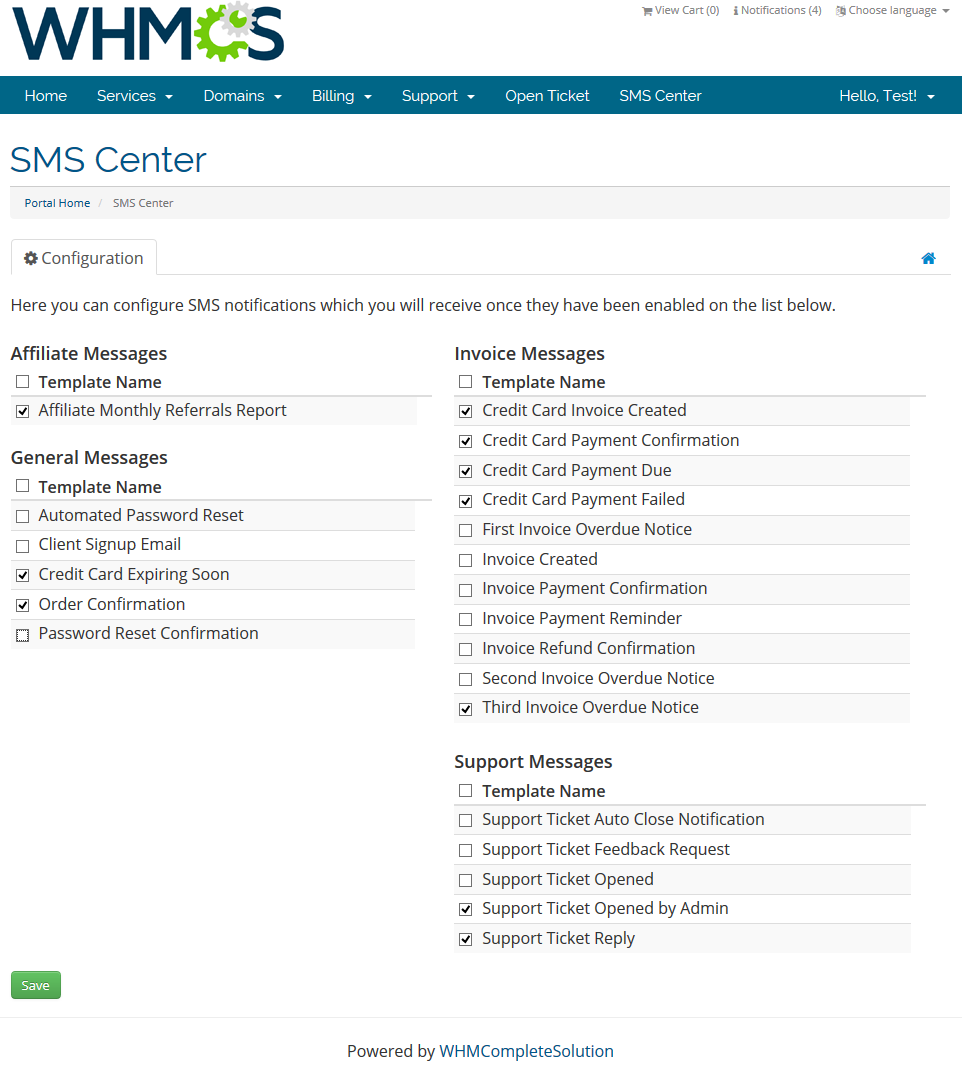
| In this place your client can choose which notifications to receive. Note! Provide SMS Number in the client's profile. Otherwise SMS Notifications will be unavailable for that client. |
|
SMS Center Two-Factor Authentication
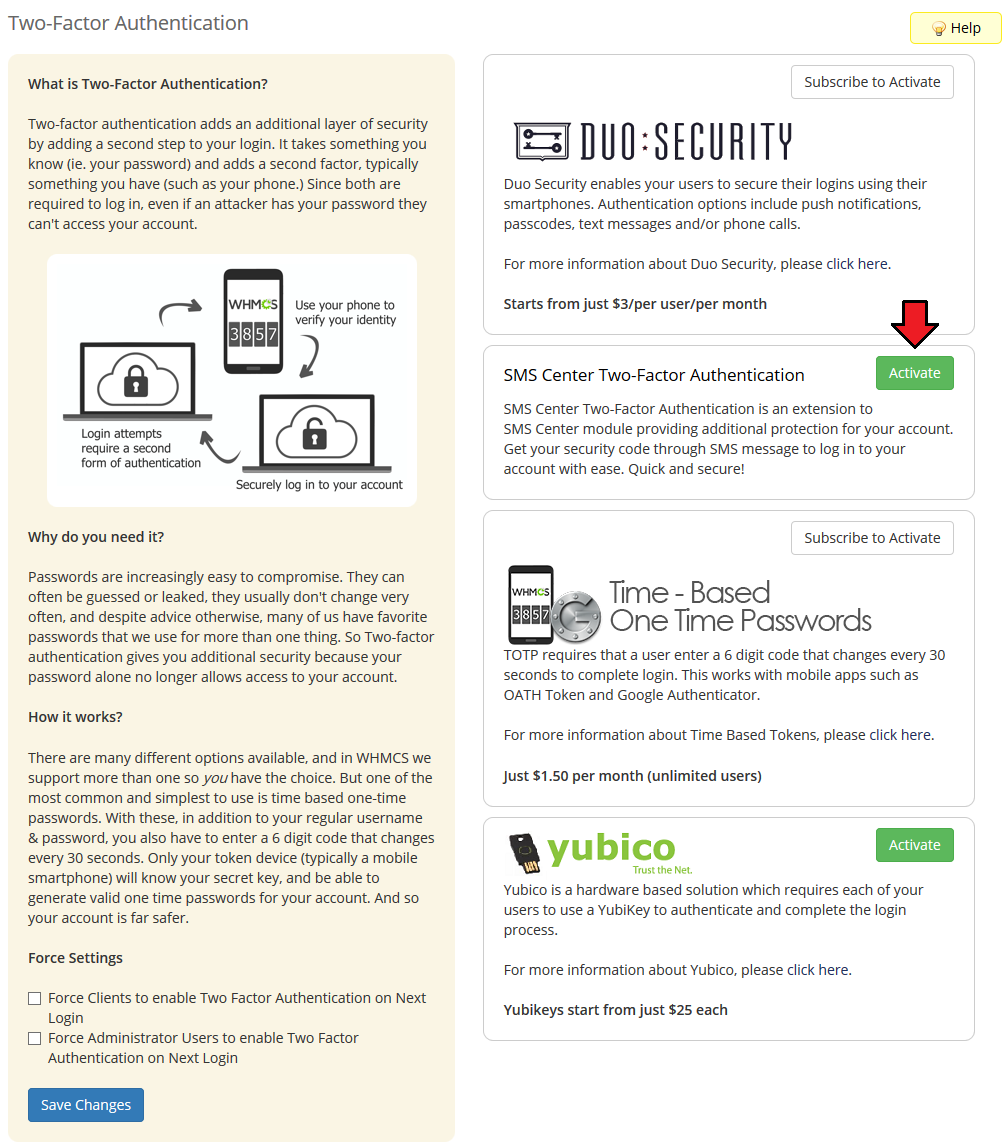
| SMS center For WHMCS consists of two parts, the actual SMS Center addon and the authentication addon. Two-Factor Authentication adds an extra layer of protection while logging in. |
|
| In the next step you need to configure the addon settings. To do so, fill out the data:
|
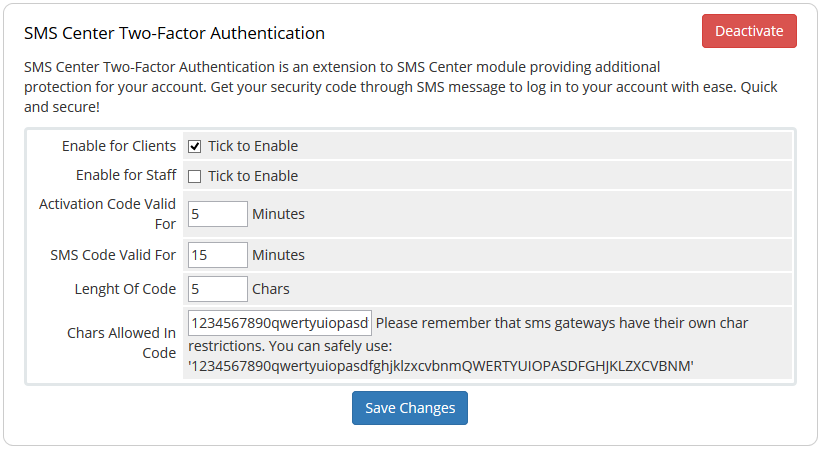
|
Security Settings
Clients
| If you have activated 'SMS Two-Factor Authentication' addon, your clients will be allowed now to decide if they wish to use such security opportunity. Here is how to enable such functionality: |
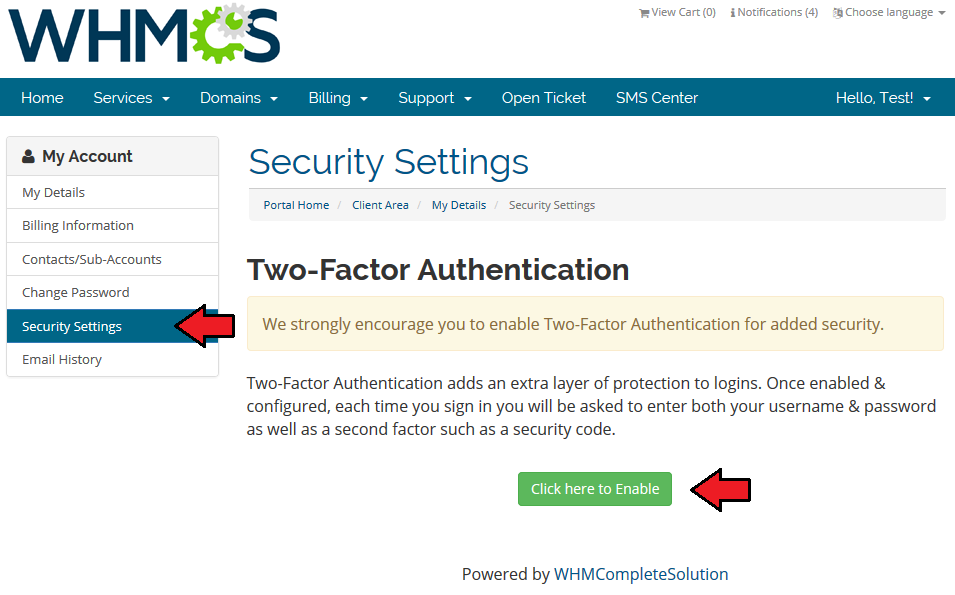
|
| 2. Press 'Get Started' button to proceed with the process. |
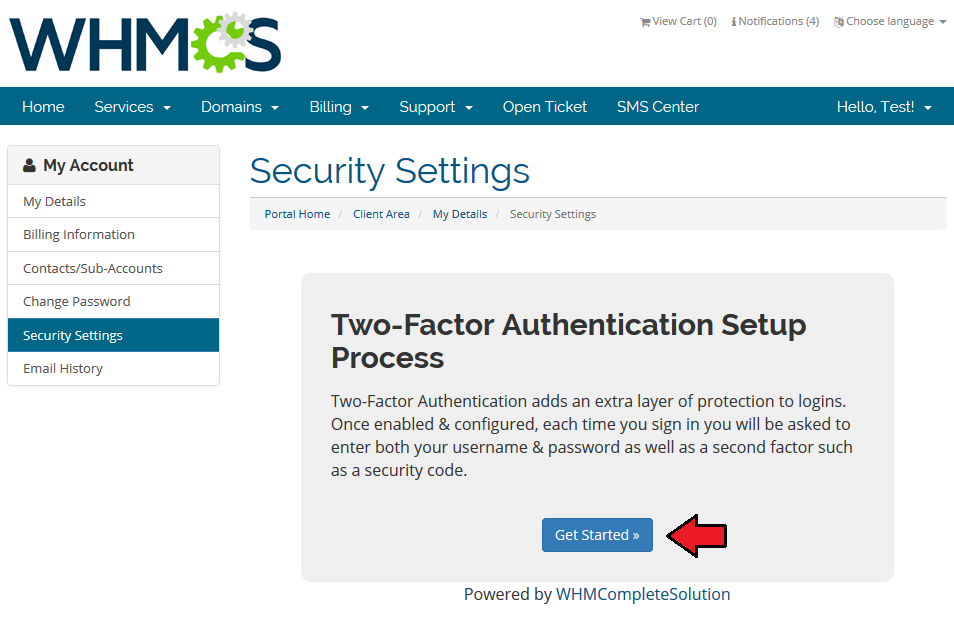
|
| 3. Provide phone number to proceed with SMS Two-Factors Authentication. Press 'Activate.' This step will be skipped if the client entered a valid SMS number in the profile before! |
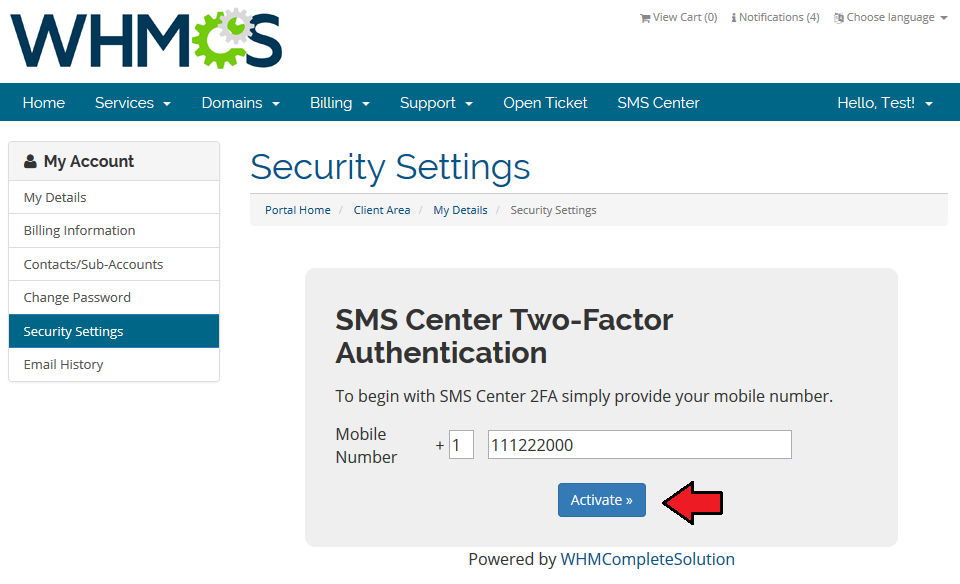
|
| 4. A client should receive now an authentication code via SMS. Type in the code in the field and press 'Activate'. Remember that the code is valid only temporarily, according to the addon settings! |
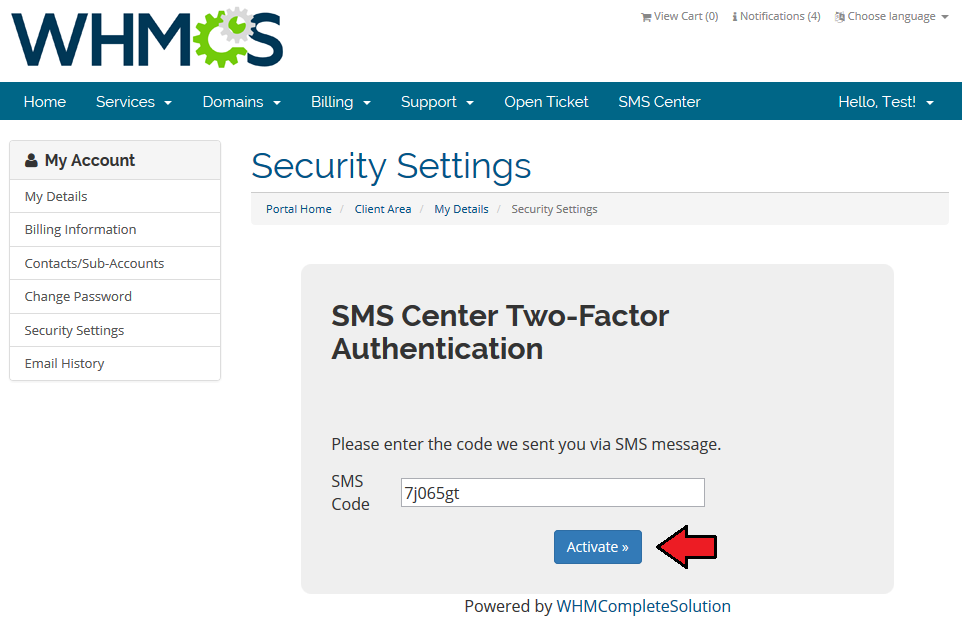
|
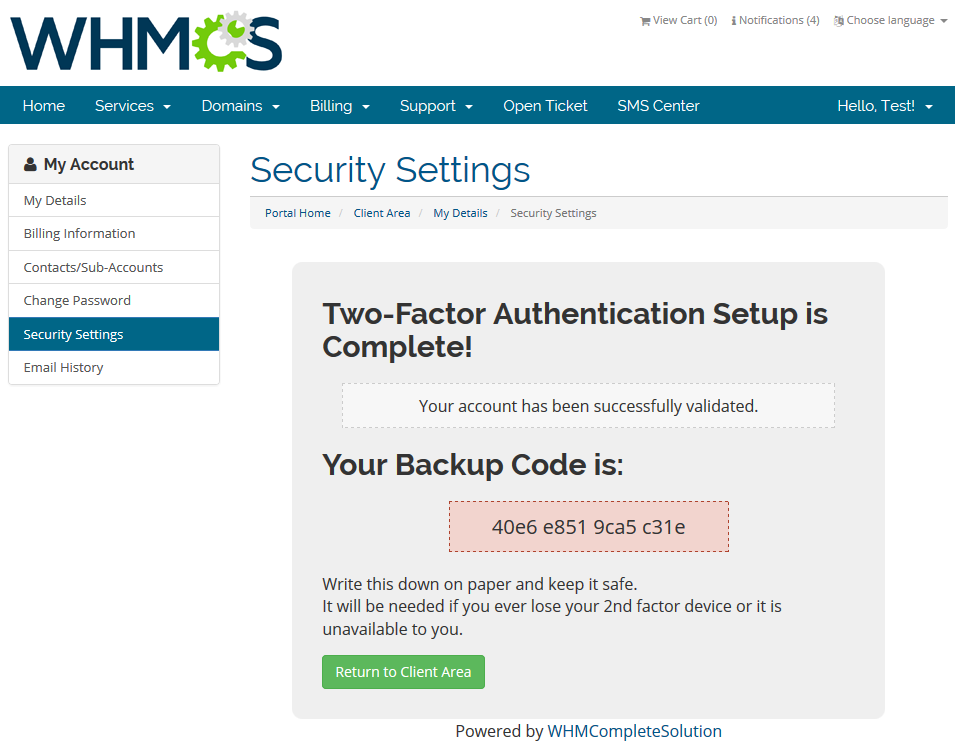
| 5. Two-Factor Authentication is now complete. |
|
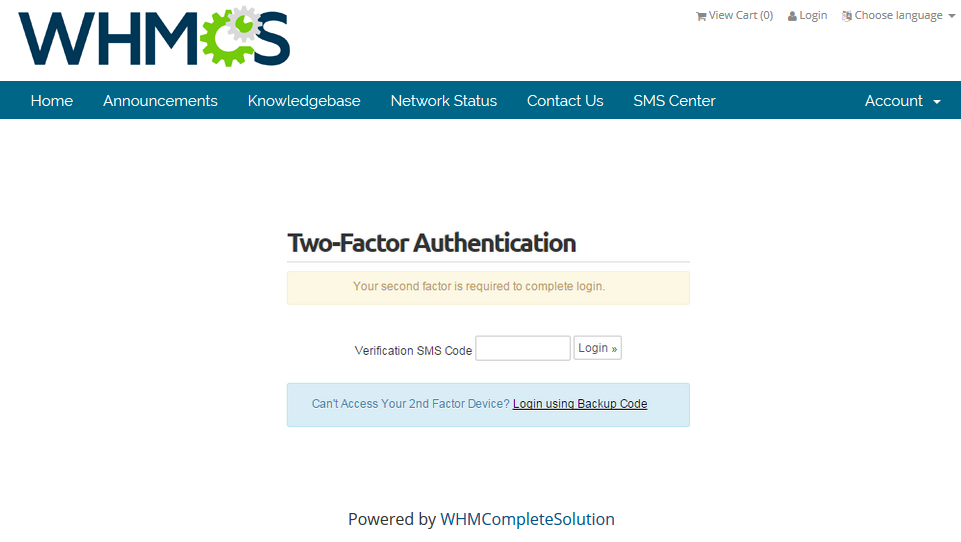
| 6. The second factor is now required to log in. Wait for the SMS with verification code and enter it in the field. Press 'Login'. If you have any problems with receiving/entering the verification code, you can use your backup code. Remember to note and keep your new backup code in a secure place! |
|
Administrators
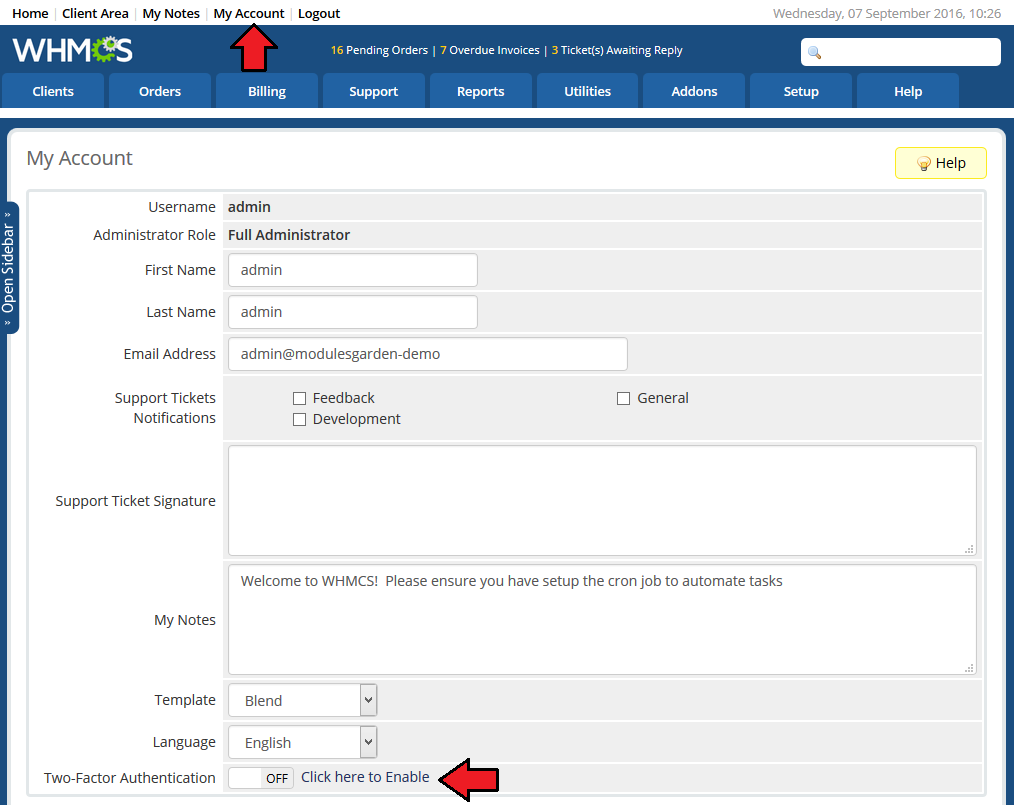
| If 'SMS Two-Factor Authentication' addon has been activated and enabled for staff, as an administrator you can decide if you wish to use such security opportunity. Here is how to enable such functionality: |
|
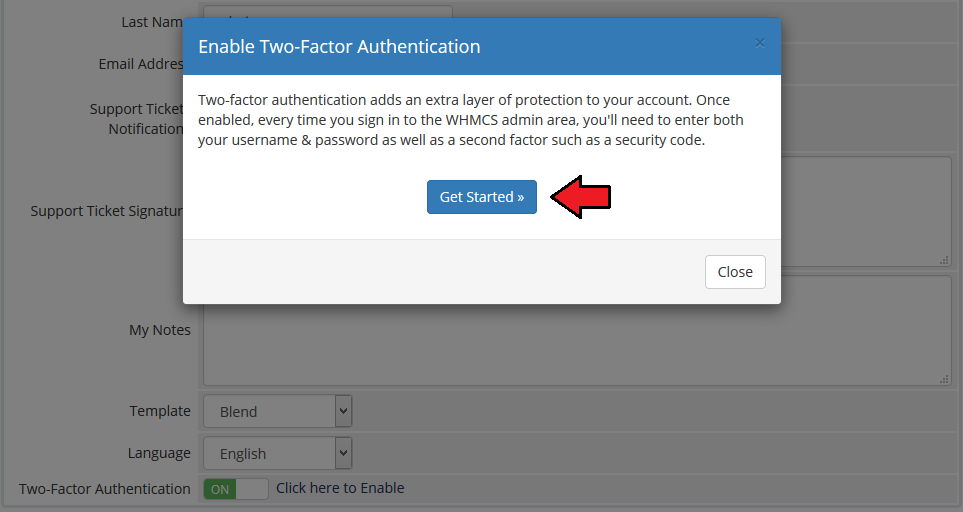
| 2. Press 'Get Started' button to proceed with the process. |
|
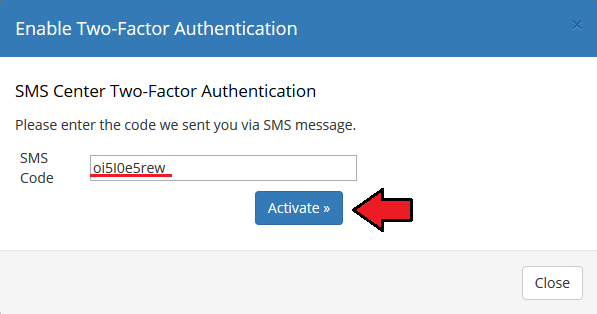
| 3. You will receive now an authentication code via SMS. Type in the code in the field and press 'Activate.' Remember that the code is valid only temporarily, according to the addon settings! |
|
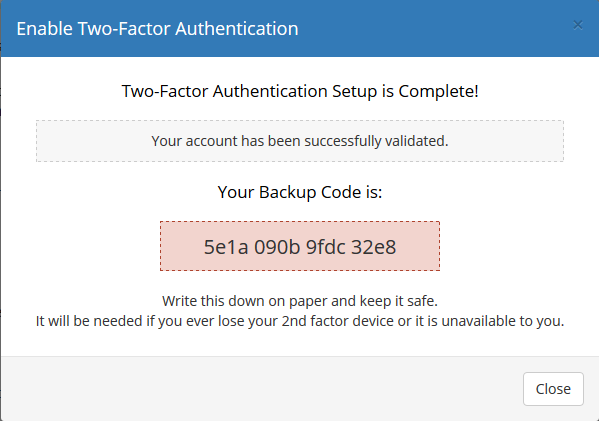
| 4. If entered code is correct, you will see a proper information. There will also be a backup code which must be copied and saved securely to log in with in case of some issues. |
|
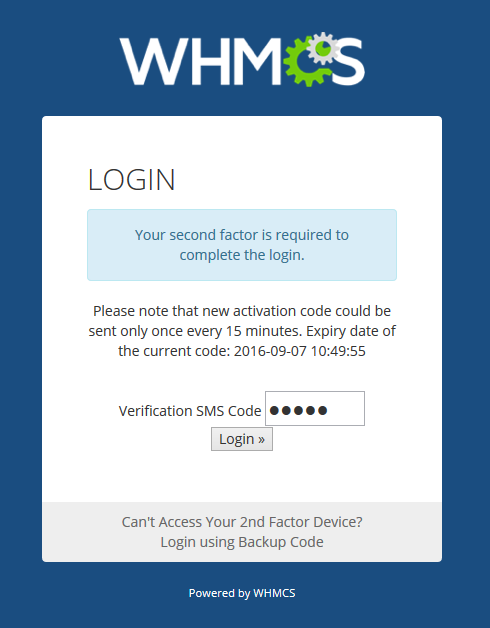
| 5. The second factor is now required to log in. Wait for the SMS with verification code and enter it in the field. Press 'Login.' If you have any problems with receiving/entering the verification code, you can use your backup code. Remember to note and keep your new backup code in a secure place! |
|
SMS Center and WHMCS API Integration
| Underneath you can find a short instruction on how to integrate your SMS Center For WHMCS with the WHMCS API. |
| 1. Function name: 'sendsms' 2. Required parameters:
localAPI('sendsms', array('userid' => $_POST['userid'], 'message' => $_POST['message']), 'admin');
5. An example of usage for admin 'array' with parameters: array('admin' => 1,'phonenumber' => $number, 'messagename' => 'Service Unsuspension Successful',
'relid' => array('client' => $params['params']['userid'], 'service' => $params['params']['serviceid']))
In case you add phonenumber in the message, you have to specify whether it is an admin's number by entering: 'admin' => 1, just like in the example above. localAPI('sendsms', array('userid' => $_POST['userid'], 'message' => $_POST['message'], 'force'=> true), 'admin');
|
Additional Information
| 1. SMS Center For WHMCS has been integrated with our Client Profile Viewer For WHMCS module - enabling you to send messages to your clients in a faster and even more convenient way. |
2. The messages sent by our module are divided into four categories:
|
Tips
| 1. You may customize the text of 'Two-Factor Authentication' verification message delivered to a user. Default message: 'Your account activation token is: erkhq34j329' |
Update Instructions
| Essential guidance through the process of updating the module is offered here. Keep in mind there is a quick and easy option in our client area that will let you upgrade the license of your module to an open source version at any time - and at a lower price! |
Common Problems
| 1. When you have problems with connection, check whether your SELinux or firewall does not block ports. |
| 2. The module is not compatible with Multibrand For WHMCS: there are no contradictions to use the two products together, however, they are not integrated which means that a client may for example choose from (SMS) templates for every brand (text messages are not branded). |
| 3. The module is not compatible with Resellers Center For WHMCS functionality. |