Proxmox Mail Gateway For WHMCS has reached End of Support (EOS) and is no longer actively maintained. The module remains available for purchase, including the Open Source version and License Upgrade at a discounted price. Current license subscriptions continue and stay valid for future renewals.
Proxmox Mail Gateway For WHMCS is a modern security tool that assures protection to mail servers from any kind of threats.
The module allows to perform the core management actions on the Proxmox Mail Gateway services directly from your WHMCS, from both the admin and the client side.
ModulesGarden is official Proxmox Solution Partner. Our products and services are recommended by Proxmox Server Solutions GmbH.
|
| ✔ Create/Suspend/Unsuspend/Terminate Service
|
| ✔ View/Edit Service Configuration:
|
| ✔ Transport Host/Port/Protocol
|
| ✔ Configure Product Details
|
| ✔ Allow User To Change Domain Name
|
| ✔ Order Service For Mail Server Domain
|
| ✔ View/Edit Service Configuration:
|
| ✔ Transport Host/Port/Protocol
|
| ✔ Deliver Proxmox Mail Gateway Security Solution To Protect Clients Mail Servers Against Threats
|
| ✔ Supports Proxmox Mail Gateway 7.X And Later
|
| ✔ Supports PHP 8.2 Back To PHP 8.1
|
| ✔ Supports WHMCS Themes "Six" And "Twenty-One"
|
| ✔ Supports WHMCS V8.12 Back To WHMCS V8.9
|
| ✔ Requires ionCube Loader V13 Or Later
|
Installation and Configuration
Proxmox Mail Gateway For WHMCS has reached End of Support (EOS) and is no longer actively maintained. The module remains available for purchase, including the Open Source version and License Upgrade at a discounted price. Current license subscriptions continue and stay valid for future renewals.
This tutorial will show you how to successfully install and configure Proxmox Mail Gateway For WHMCS.
We will guide you step by step through the whole installation and configuration process.
|
Installation
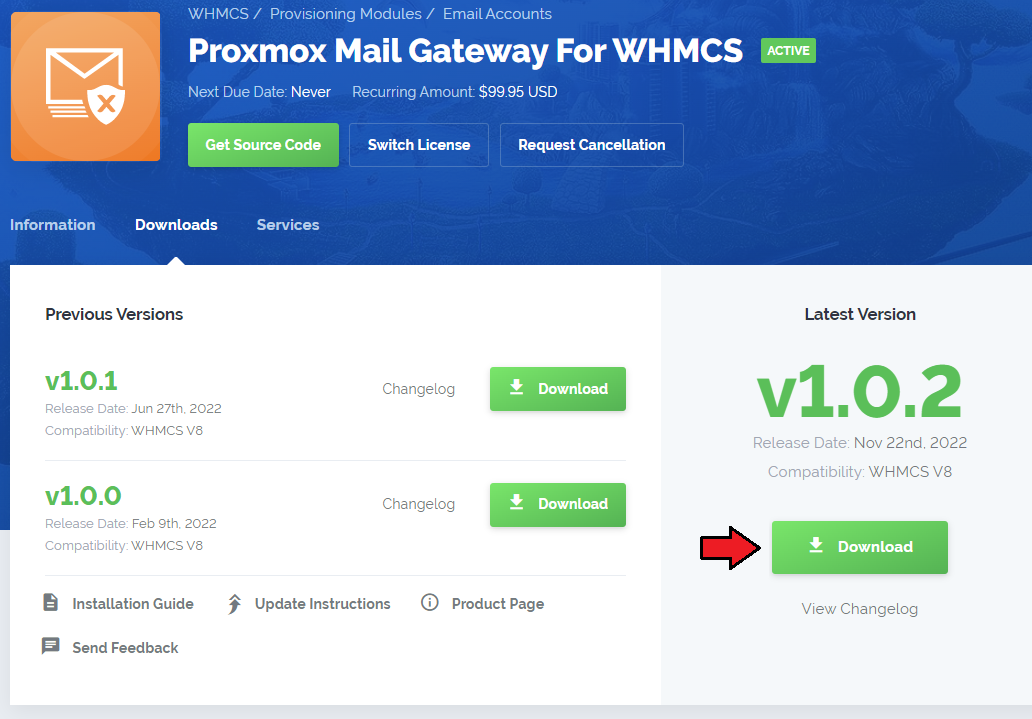
| 1. Log in to our client area and download the module.
|
2. Upload and extract the extension into the main WHMCS directory.
Extracted files in your WHMCS directory should look like this:
|
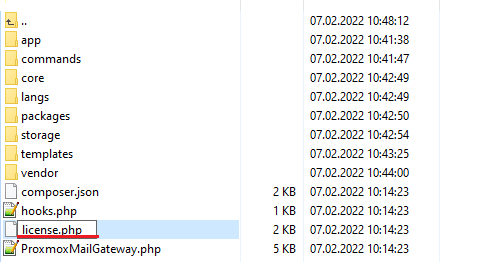
3. When you install Proxmox Mail Gateway For WHMCS for the first time, you have to rename the 'license_RENAME.php' file.
The file is located in '/yourWHMCS/modules/servers/ProxmoxMailGateway/license_RENAME.php'. Rename it from 'license_RENAME.php' to 'license.php'.
|
4. In order to configure your license key, you have to edit the previously renamed 'license.php' file.
Enter your license key between the quotation marks as presented on the following screen.
You can find your license key in our client area → 'My Products'.
|
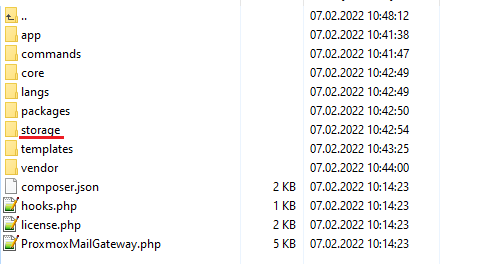
5. Now, set up the 'storage' folder as recursively writable.
This folder is available at '/yourWHMCS/modules/servers/ProxmoxMailGateway/'.
|
Server Configuration
6. Now, we will show you how to configure a new server.
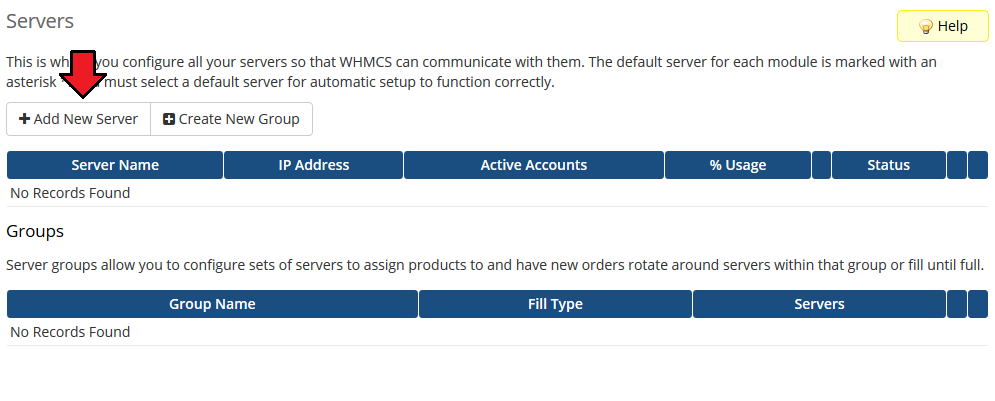
To do so, log into your WHMCS and go to 'System Settings' → 'Servers'.
Once you are there, press 'Add New Server'.
|
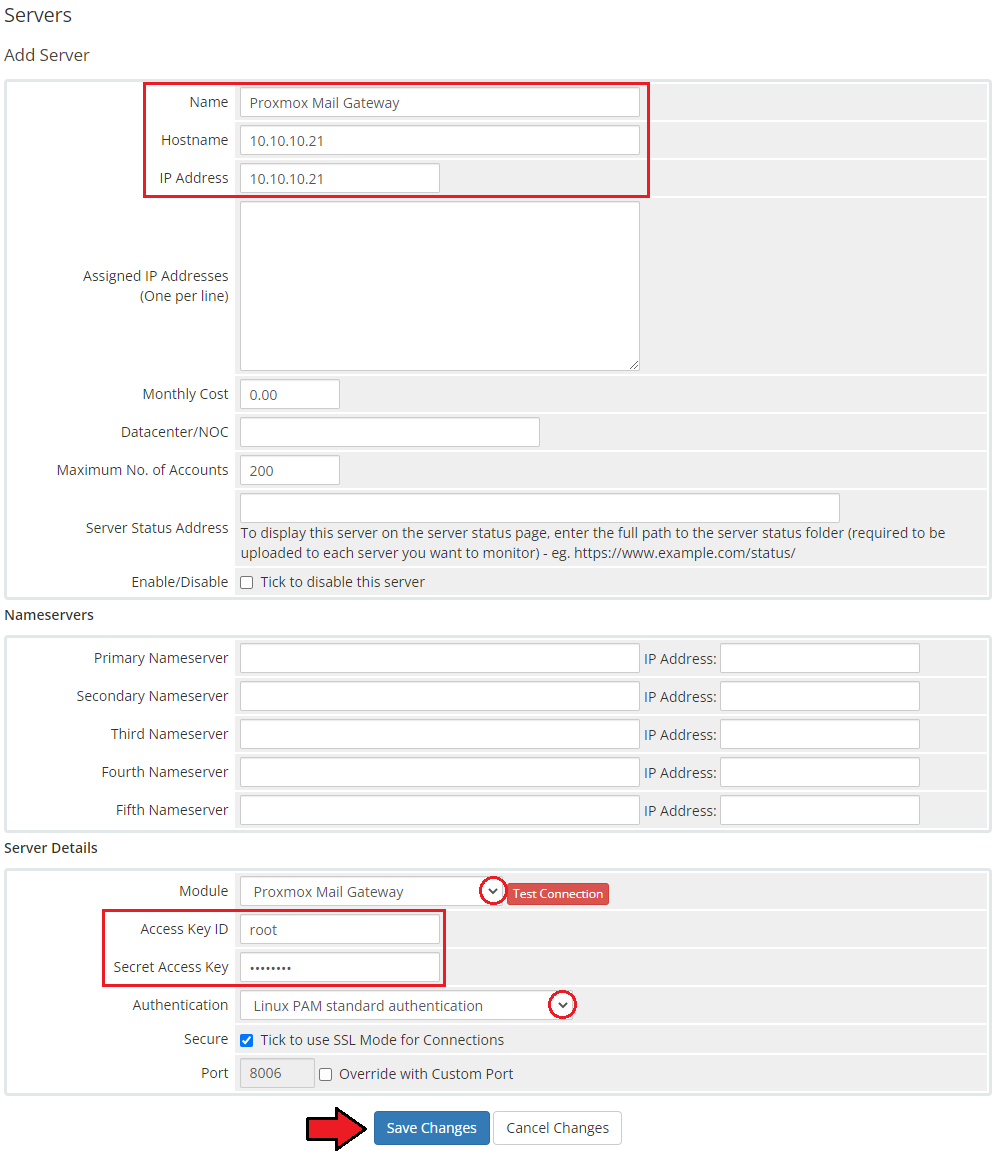
7. Next, enter your server name, hostname and IP address, username and password. Choose 'ProxmoxMailGateway' from a dropdown menu.
If you want to provide data for a Linux user account in 'Authentication' select 'Linux PAM standard authentication' , and for ProxmoxMailGateway user select 'Proxmox Mail Gateway authentication server'.
Remember to save the changes when ready.
|
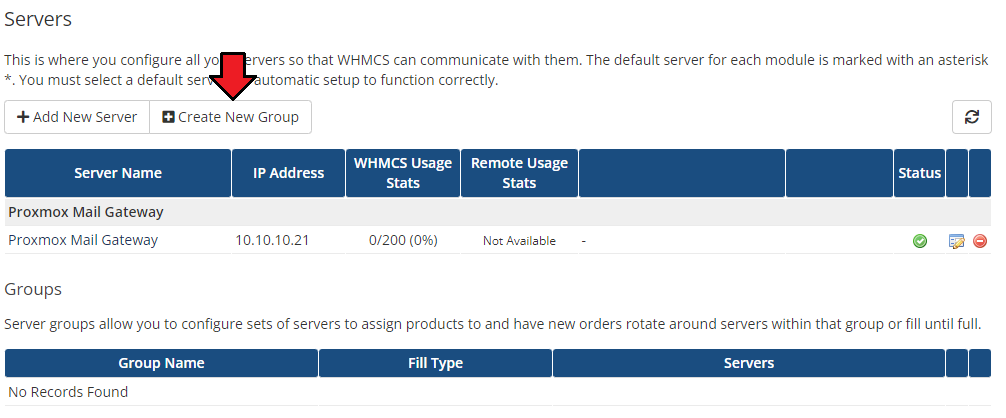
8. After you configure your server correctly, you will see the following screen.
At this point, you need to create a new group for your server. For that purpose, press 'Create New Group'.
|
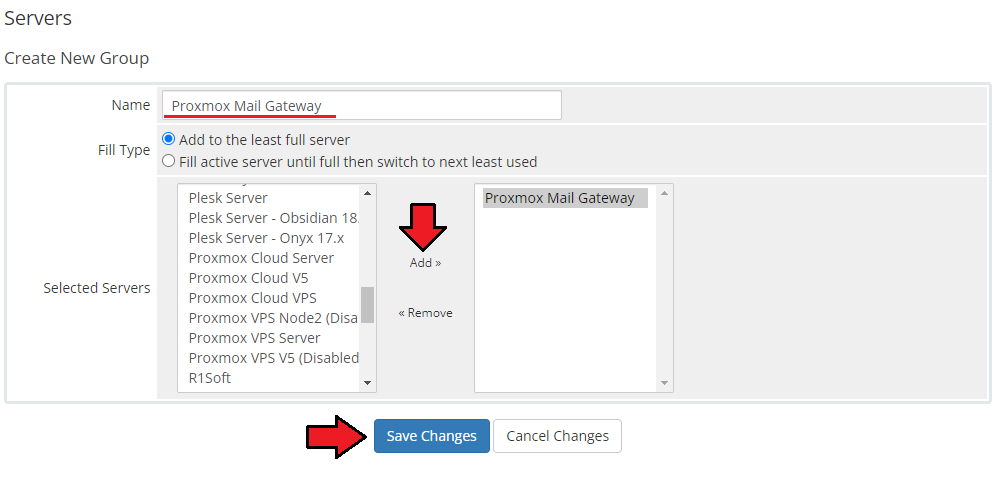
| 9. Enter the name, click on your previously created server, press 'Add' and then 'Save Changes'.
|
Configuration of Product
10. In order to create and configure a product, go to 'System Settings' → 'Products/Services' → 'Products/Services'.
Click on 'Create a New Group'.
|
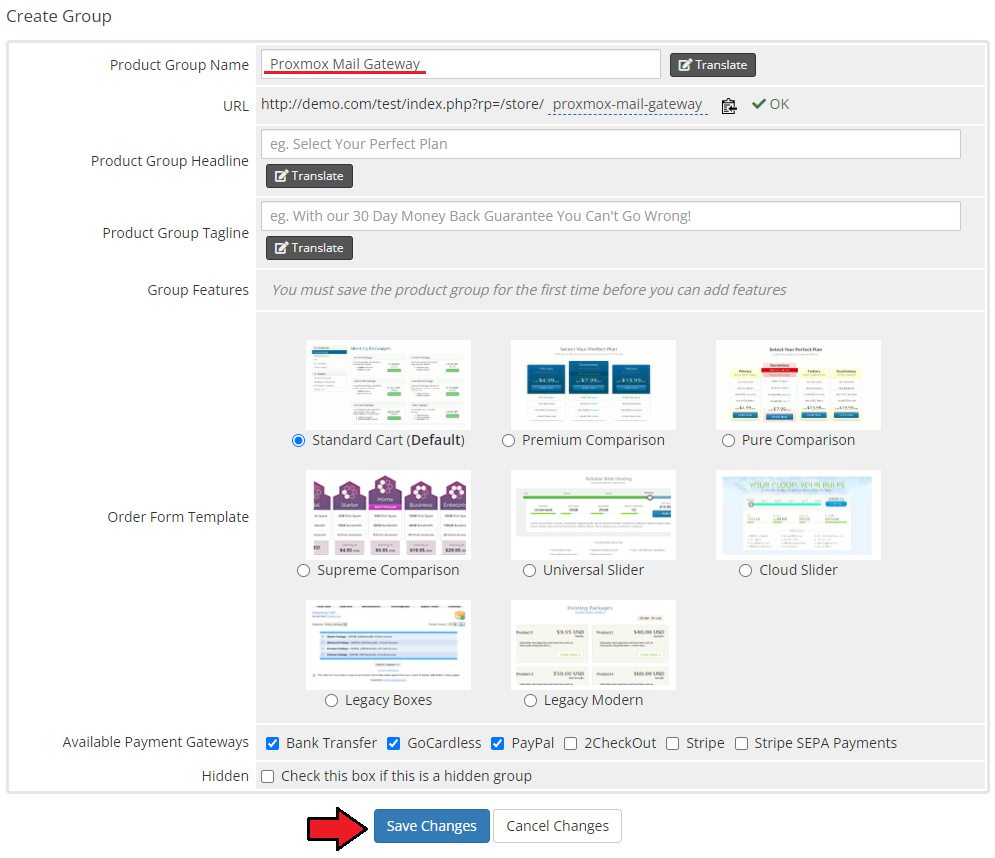
| 11. Enter your product group name and press 'Save Changes'.
|
12. Once you have a product group, you can create a new product.
To do so, first click on 'Create a New Product'.
|
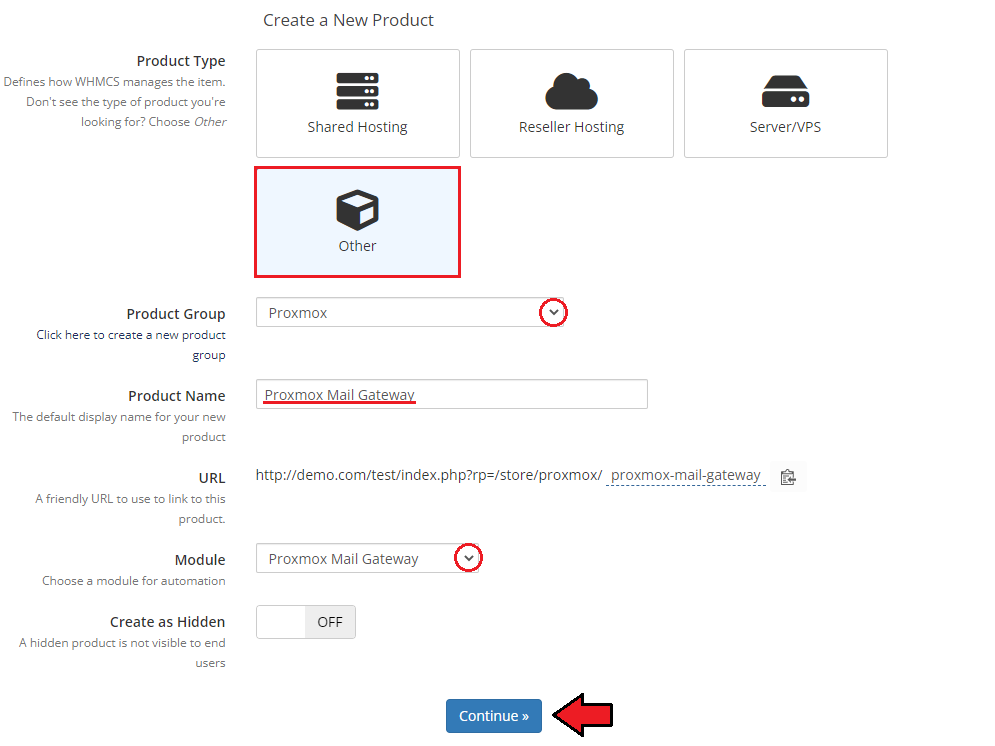
| 13. Afterward, choose your product type, enter your product name, choose module and the product group from the dropdown menus. Press 'Continue'.
|
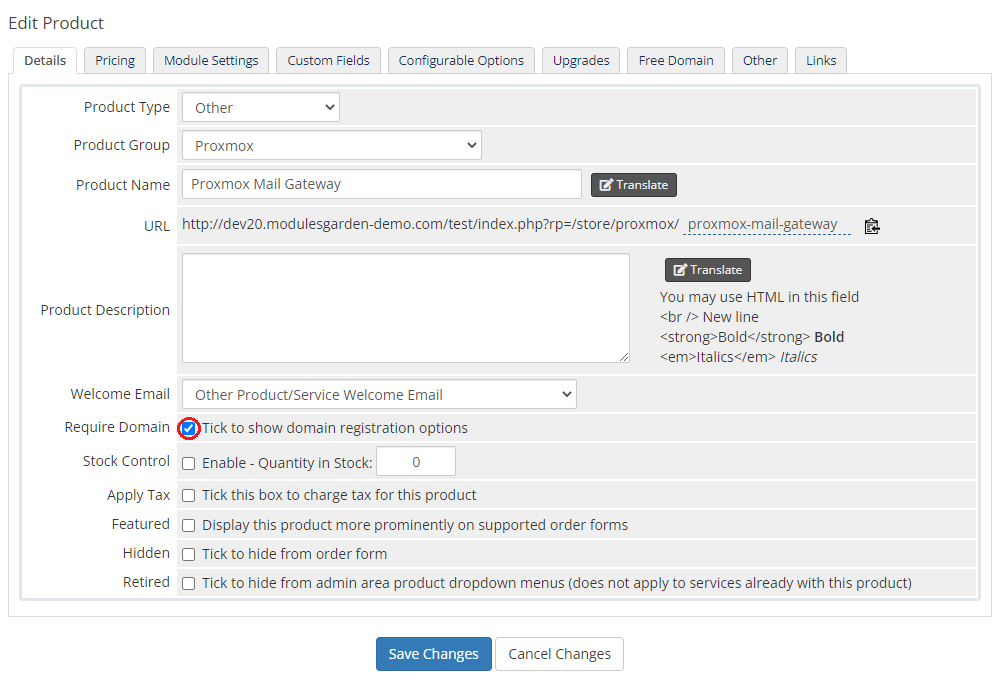
14. At this moment, in the product 'Details', you may also check the 'Require Domain' option as providing a domain must be a required step in the service ordering process.
Alternatively, you may add an adequate custom field to let the clients enter the domain name there (see step 17).
|
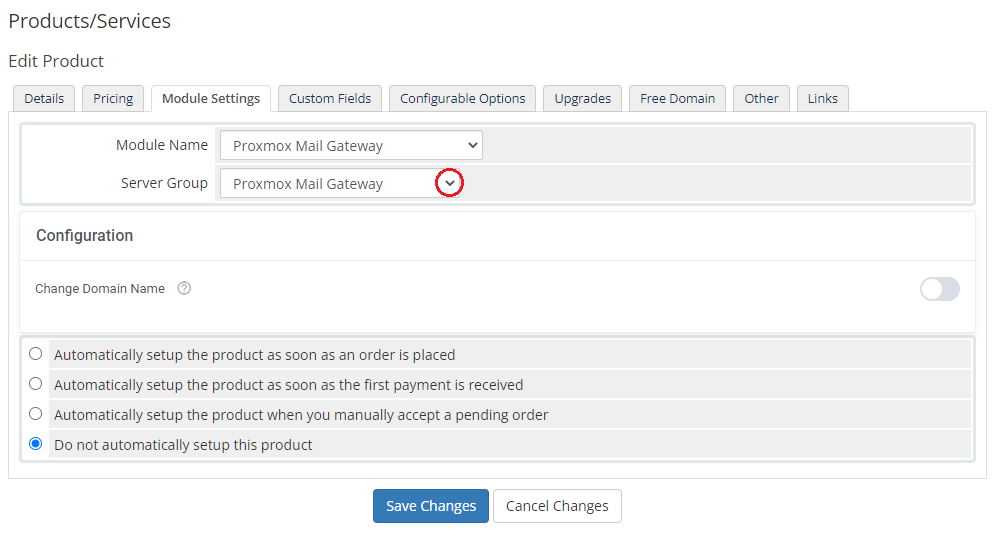
15. Now, go to the 'Module Settings' section, choose your previously created server group from the dropdown menu.
If you did not set the proper permissions, you will be asked to do it now.
|
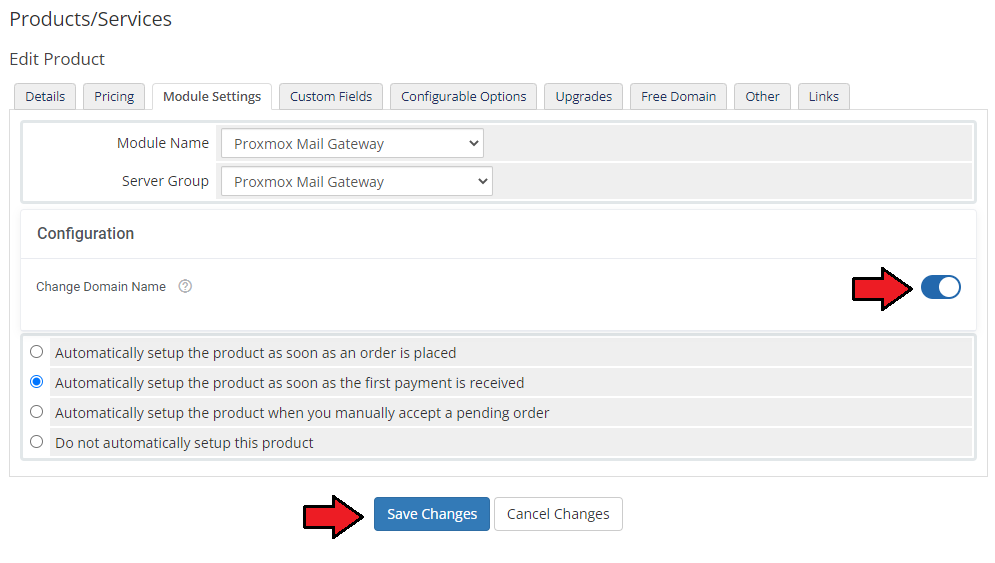
16. Let's start configuring the product settings finally. Choose whether you wish to allow your clients to change the domain name or not.
Toggle the 'Change Domain Name' option and save the changes.
|
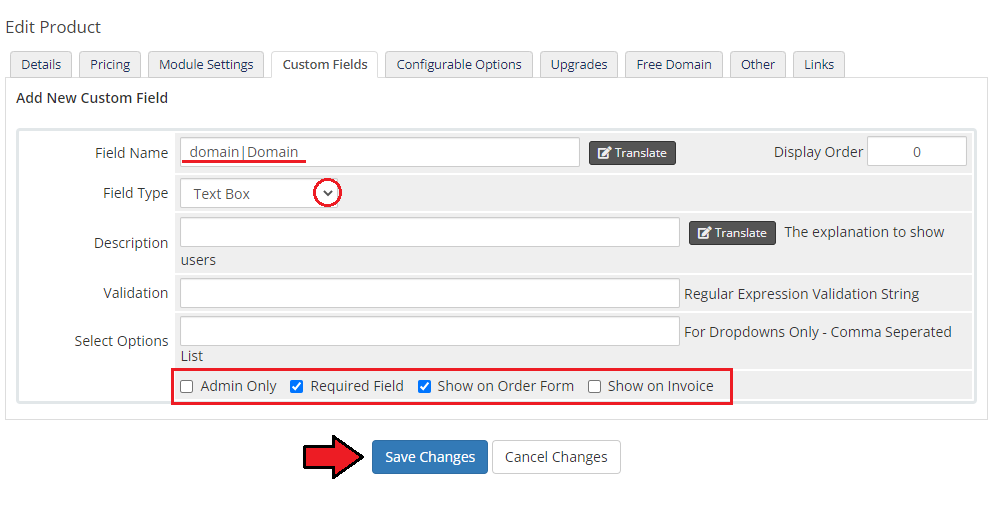
17. In case you did not mark the 'Require Domain' option in the product 'Details' (step '14th'), move to the 'Custom Fields' tab and create a 'domain|Domain' custom field.
Do not forget to mark it as a 'Required Field' and 'Show On Order Form'. Only then your clients will be able to successfully order and use this security tool for their relay domains.
|
| That is all. Your product is now ready to use so move to the following sections to learn about all the possibilities it may give you and your clients.
|
Management
In this section we will show and discuss every benefit that using the Proxmox Mail Gateway solution may bring.
Go through the below descriptions to become familiarized with all the options of this security tool may offer you.
|
Admin Area
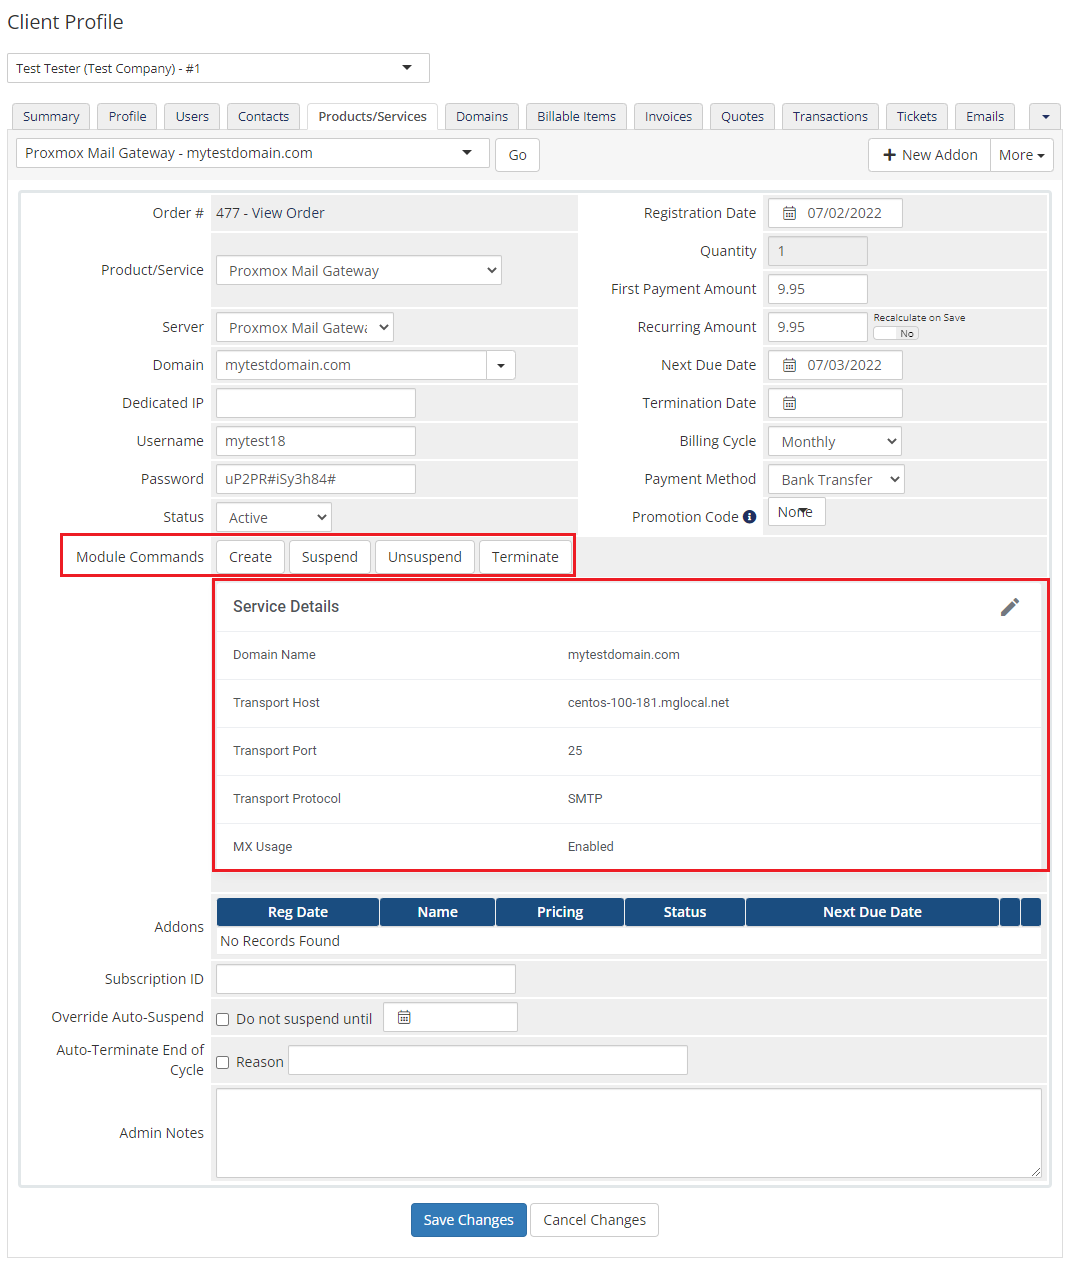
Proxmox Mail Gateway For WHMCS allows you to monitor and edit your service configuration details from the admin area of your WHMCS system.
This includes supervision of such features like:
- Domain Name
- Transport Host
- Transport Port
- Transport Protocol
- MX Usage Status
Basic module commands that can be executed on the service:
- Create
- Suspend
- Unsuspend
- Terminate
|
Ordering
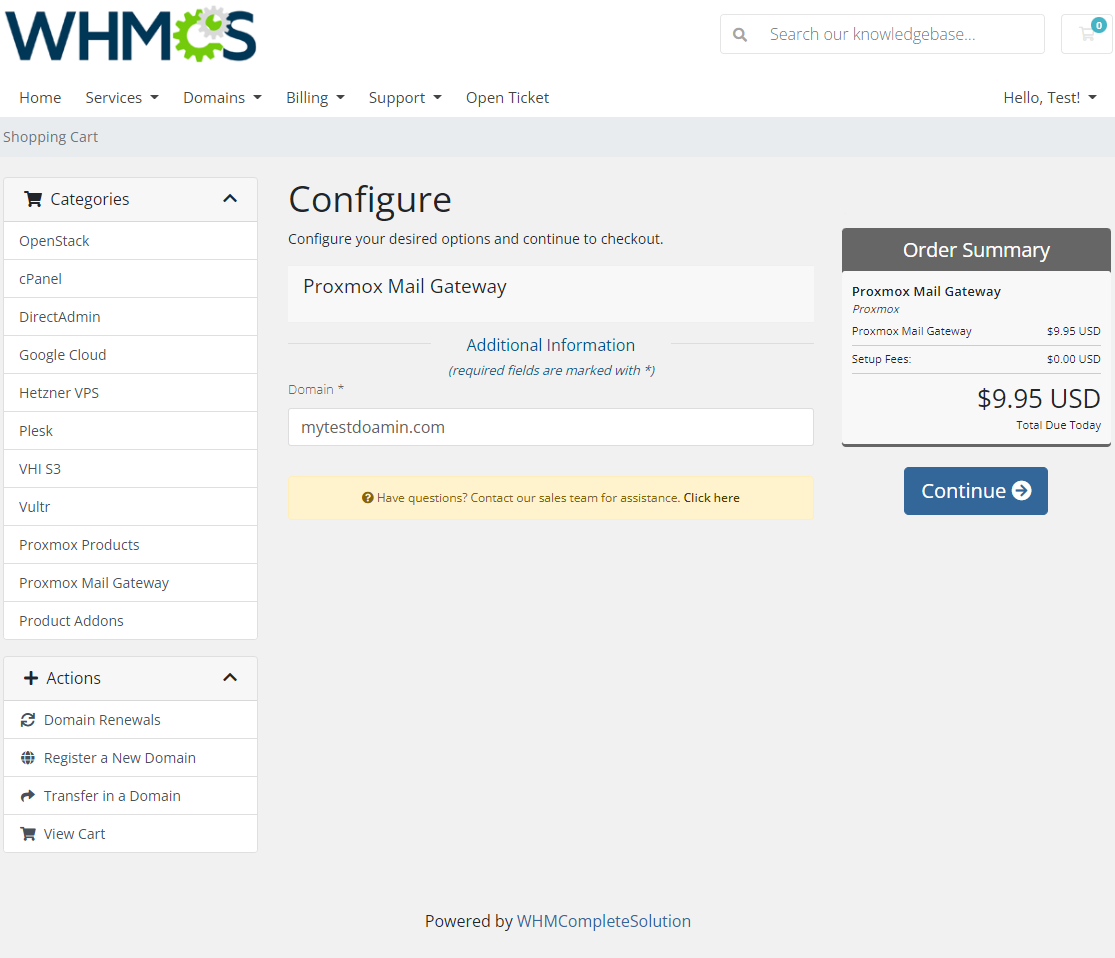
That is how an exemplary page with the order may look like. Please be aware that a domain is obligatory when placing the order.
The relay domain may also be provided in the form of a custom field to be filled in depending on the product configuration, just like on the screen below.
|
Client Area
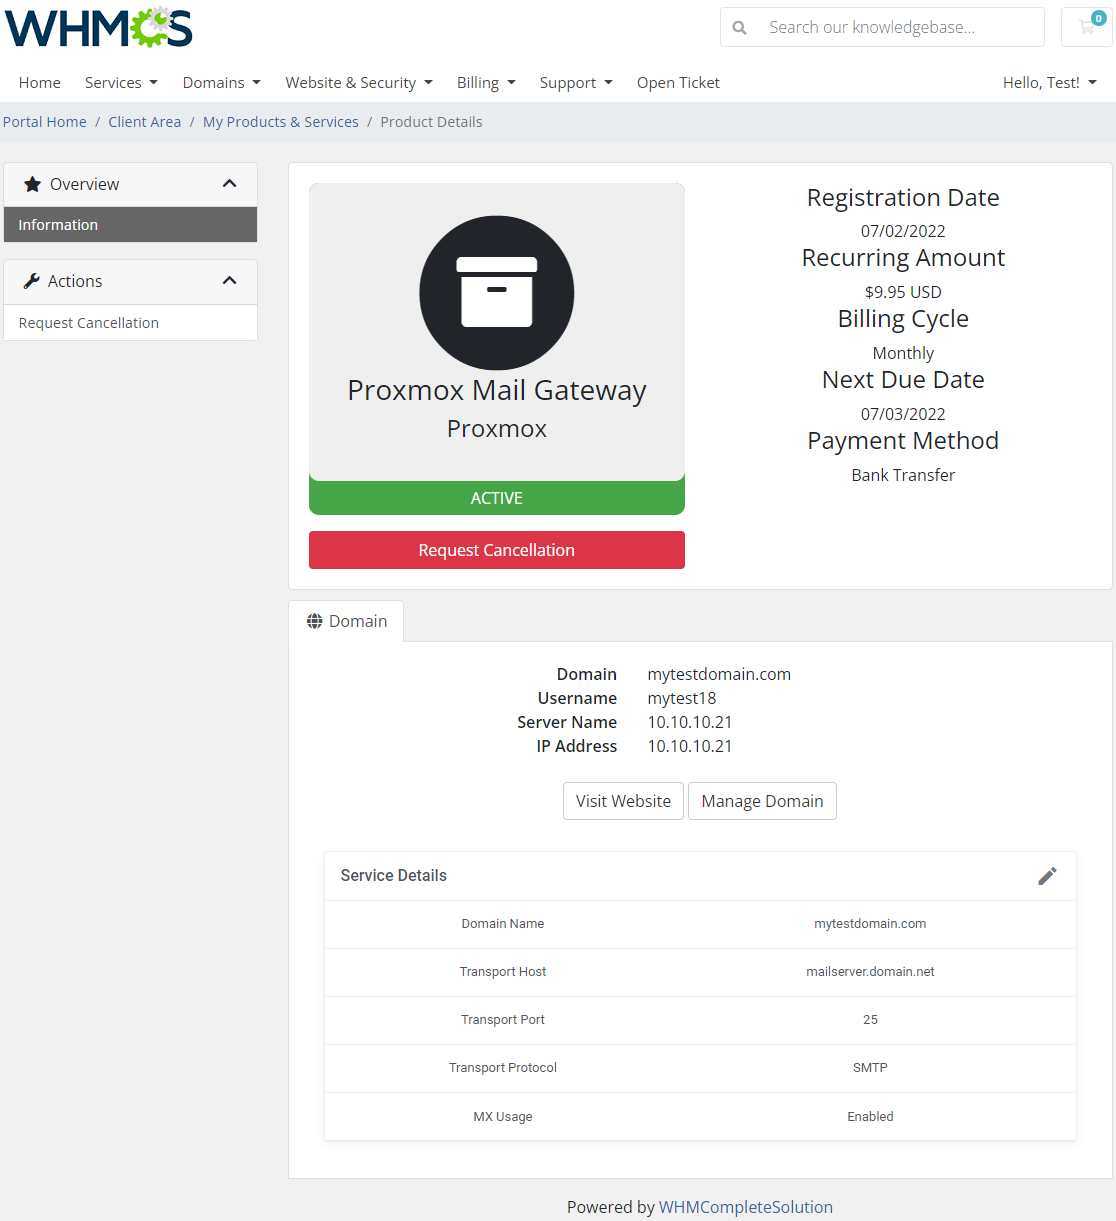
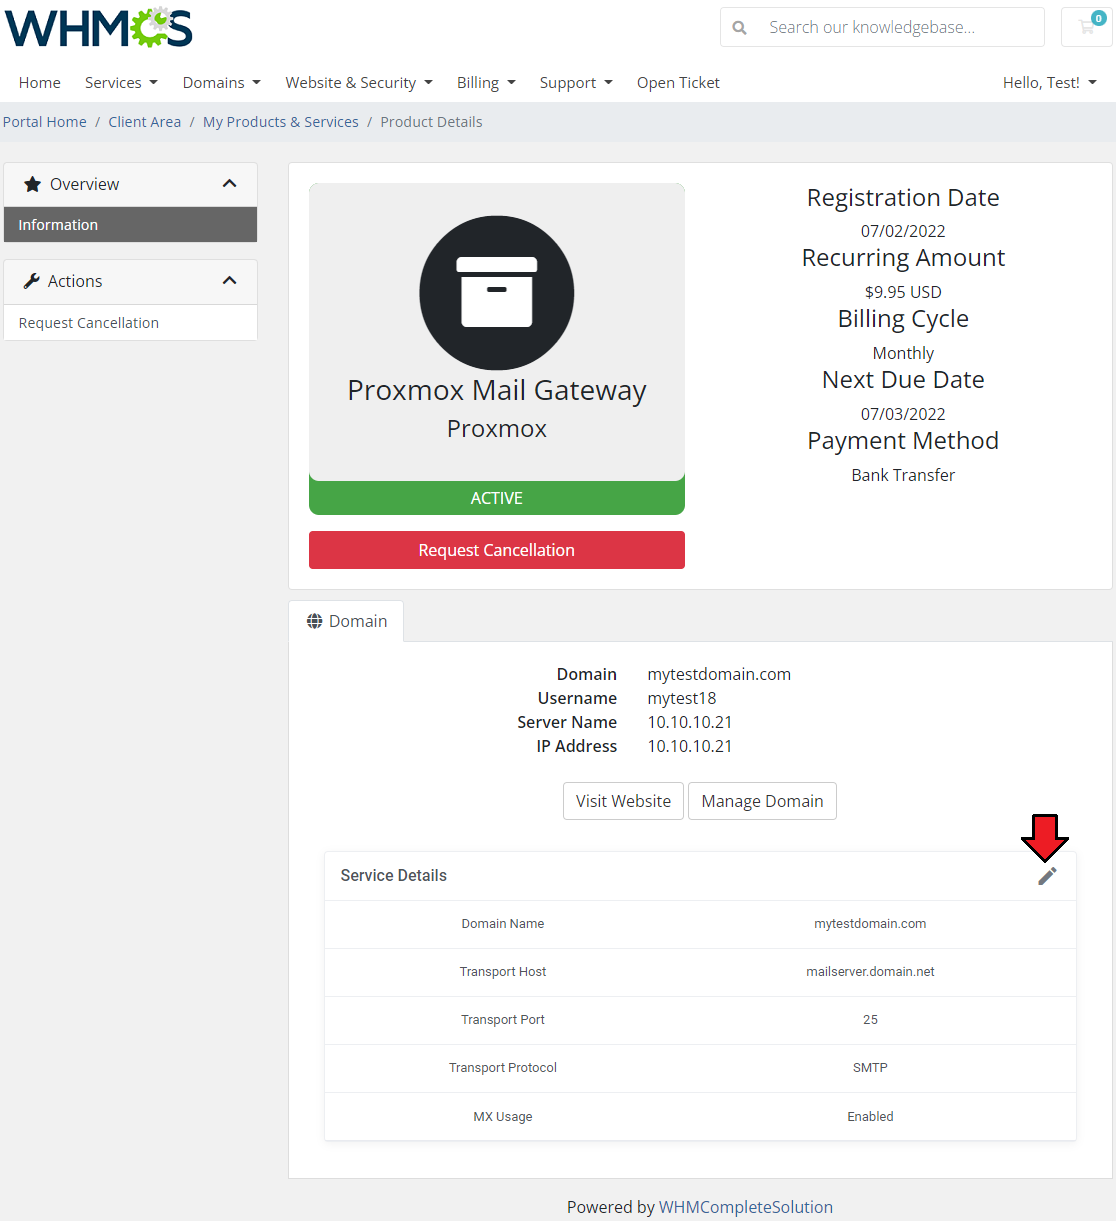
Proxmox Mail Gateway For WHMCS assures protection to your clients' mail servers against threats. Your clients are allowed to view and edit the service details, including:
- Domain name
- Transport of Host, Port and Protocol
- MX Usage Status
|
| Edit the service details, press the edit icon marked on the below screen. A new widow will appear.
|
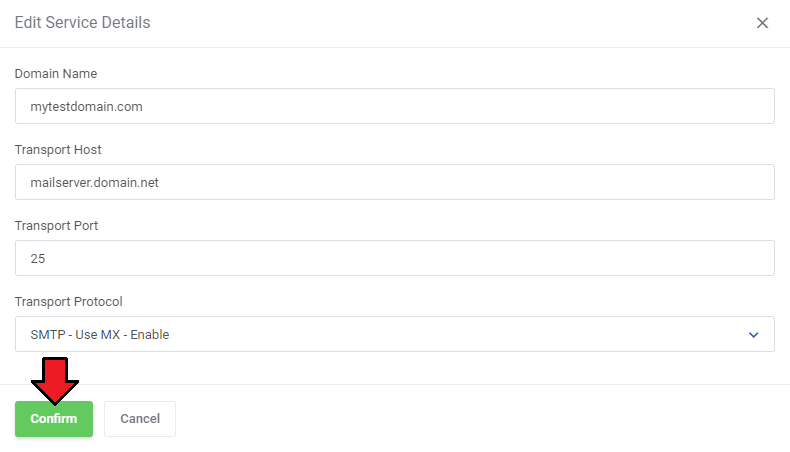
You may now change your service for mail server details. Select options, change the configuration.
Remember to confirm your changes in the end.
|
Tips
How To Use Language Overrides
Incorporating language customizations - the module readily accommodates language overrides, allowing you to tailor the language files to your preferences.
The language file english.php remains unencoded and can be modified to suit your needs. However, it's recommended to avoid altering the core file itself, and instead, leverage the capability of using overrides.
|
Here's how to apply language overrides:
- Navigate to the ~/langs/ directory located within the following yourWHMCS/modules/servers/moduleName/langs/ path.
- Within this directory, create a new file or duplicate the language file you intend to modify. For instance, if you wish to create an override for the English language, establish the following directory structure:
~/langs/overrides/english.php.
- Open the newly created override file to edit its contents.
- At the beginning of the file, indicate the used code, for instance, you can use: <?php for PHP code.
- Adapt the file content according to your requirements. You can either selectively modify specific variables or opt to revise the entire content of the language file.
For example:
Original yourWHMCS/modules/servers/moduleName/langs/english.php:
$_LANG['Search'] = 'Search';
Override yourWHMCS/modules/servers/moduleName/langs/overrides/english.php:
$_LANG['Search'] = 'Look for';
|
By following these steps, you can seamlessly implement language customizations without altering the core language file, ensuring your changes will not be lost after every module update.
Remember that some of the modules have more than one language file, located under /addons and /servers paths. You may create the override files for both of them.
Note that you do not need to paste all the original content of the lang file into the override file. Enter there only the lines that you wish to change, every other line will be fetched from the original module lang file.
Consequently, the override lang file might include only one or just a few lines.
|
Update Instructions
An essential guidance through the process of updating the module is offered here.
Ensure successful completion of the module update by carefully following each step, thereby preventing data loss or any unforeseen issues.
Additionally, you will find a current list of supplementary actions necessary for a smooth update process there.
|
Upgrade Guide
Seeking a solution that offers greater flexibility, customization tailored to your precise needs, and unrestricted availability?
There is an option that not only proves to be cost-effective in the long run but also includes prioritized support services, making it a truly valuable investment.
Opt for the Open Source version of your Proxmox Mail Gateway For WHMCS module to unlock these benefits.
Simply click on either the Get Source Code or Upgrade To Lifetime button found on the product's page in our client area to complete the one-step upgrade process, with a dedicated discount already applied.
Follow a comprehensive guide covering the transition process, the advantages it brings, and step-by-step instructions on what to do next after the order has been successfully finalized.
|
Common Problems
| 1. When you have problems with connection, check whether your SELinux or firewall does not block ports.
|
