QuickBooks Desktop For WHMCS
About QuickBooks Desktop For WHMCS
| QuickBooks Desktop For WHMCS module enables the two-way integration between WHMCS and QuickBooks Desktop and thereby helps you improve your accounting management. This module synchronizes the clients, invoices and transaction details gathered in your WHMCS with QuickBooks database. |
- Module Features:
| ✔ Export Manually: |
| ✔ Clients |
| ✔ Invoices |
| ✔ Transactions |
| ✔ Products |
| ✔ Credit Payments |
| ✔ Product Addons |
| ✔ Export Automatically: |
| ✔ Clients |
| ✔ Invoices |
| ✔ Merged Invoices |
| ✔ Transactions |
| ✔ Products |
| ✔ Refunds |
| ✔ Credit Payments |
| ✔ Import And Synchronize: |
| ✔ Clients |
| ✔ Invoices |
| ✔ Transactions |
| ✔ Products |
| ✔ Manage Relations: |
| ✔ Clients With Automatching |
| ✔ Custom Client Fields |
| ✔ Products With Automatching |
| ✔ Product Addons With Automatching |
| ✔ Domains With Automatching |
| ✔ Invoices With Automatching |
| ✔ Tax Rules |
| ✔ Currencies |
| ✔ Payment Gateways - Including Payment Methods, Deposits And Currencies |
| ✔ Transactions With Automatching |
| ✔ Create Own Custom Rules |
| ✔ Choose Default Product Item |
| ✔ Choose Default Domain Item |
| ✔ Choose Account For Products |
| ✔ Choose Tax Zero-Rated |
| ✔ Choose US Default Tax |
| ✔ Choose Home Currency |
| ✔ Set Exported Client Name Format |
| ✔ Set Client Business Number Custom Field |
| ✔ Define Automatic Export Settings |
| ✔ Set Printed Invoices Custom Field |
| ✔ Choose Accounts Receivable |
| ✔ Choose Invoice Default Class |
| ✔ Choose Gateway Fee Account |
| ✔ Send Email Notifications About Task Failures |
| ✔ View Export And Cron Run Summary |
| ✔ View Web Connector Task |
| ✔ View Logs |
| ✔ Set Web Connector Account |
- General Info:
| ✔ Multi-Currency Support |
| ✔ Refunds Support |
| ✔ Multi-Language Support |
| ✔ Supports PHP 8.2 Back To PHP 8.1 |
| ✔ Supports WHMCS V8.12 Back To WHMCS V8.9 |
| ✔ ✔ Easy Module Upgrade To Open Source Version |
- Requirements:
| ✔ QuickBooks Desktop Product: |
| ✔ Pro Plus 2024 |
| ✔ Premier Plus 2024 |
| ✔ Enterprise 24.X |
| ✔ QuickBooks Web Connector 34.X or Above |
| ✔ WHMCS With HTTPS And SSL Certificate |
| ✔ ionCube Loader V13 Or Later |
Installation
| This tutorial will show you how to successfully install and configure QuickBooks Desktop For WHMCS. We will guide you step by step through the whole installation and configuration process. |
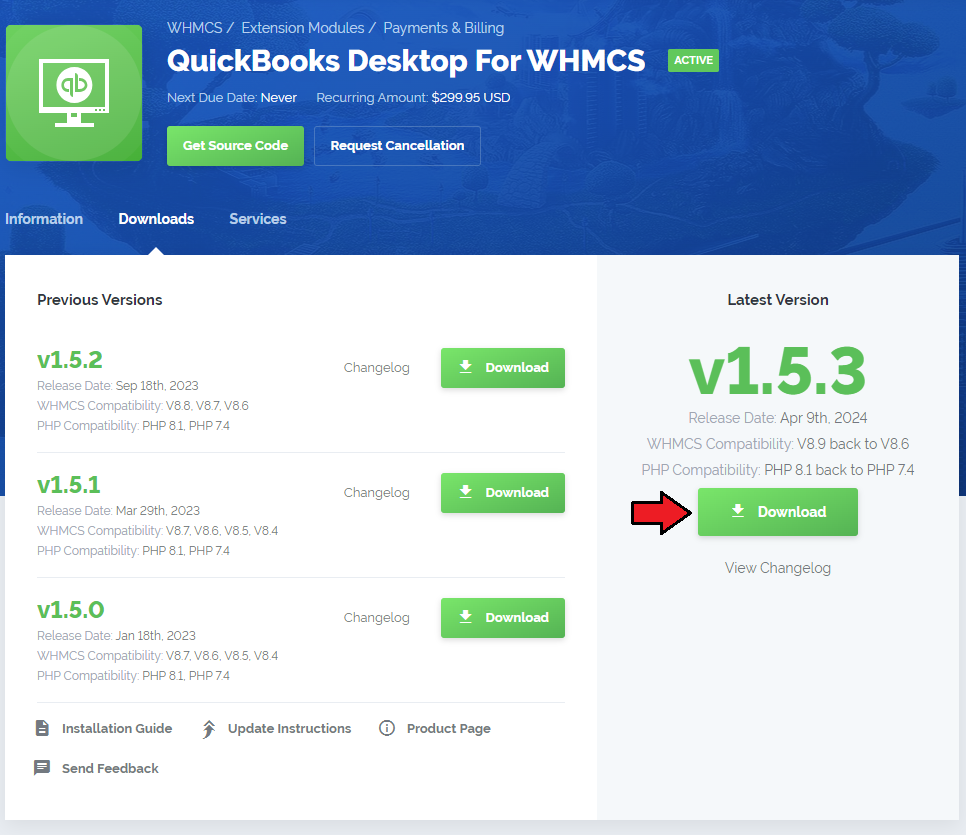
| 1. Log in to our client area and download the module. |
|
| 2. In the downloaded file you might find one or two packages that support different PHP versions. In the most recent versions of the module, you will find only one package that supports PHP 7.2 and later. |
| Previous updates of the module may contain two packages dedicated to various PHP versions. The first one that supports PHP 5.6 up to PHP 7.1, and the second one addressed to PHP 7.2 up to PHP 7.4. |

|
| Note: You can check the current PHP version in your WHMCS. To do so, proceed to 'Utilities' → 'System' → 'PHP Info'. |
| 3. Extract the package and upload its content into the main WHMCS directory.
The content of the package to upload should look like this. |
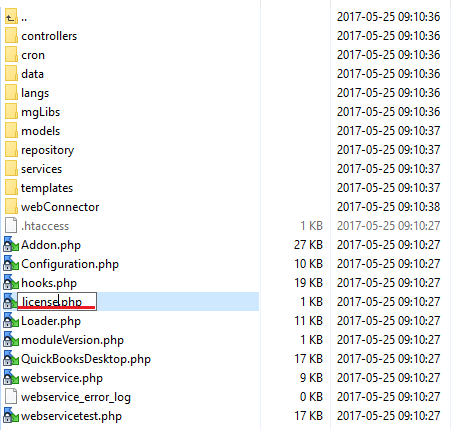
| 4. When you install QuickBooks Desktop For WHMCS for the first time you have to rename 'license_RENAME.php' file. File is located in 'modules/addons/QuickBooks_Desktop/license_RENAME.php'. Rename it from 'license_RENAME.php' to 'license.php'. |
|
| 5. In order to configure your license key, you have to edit the previously renamed 'license.php' file. Enter your license key between quotation marks as presented on the following screen. You can find your license key in our client area → 'My Products'. |

|
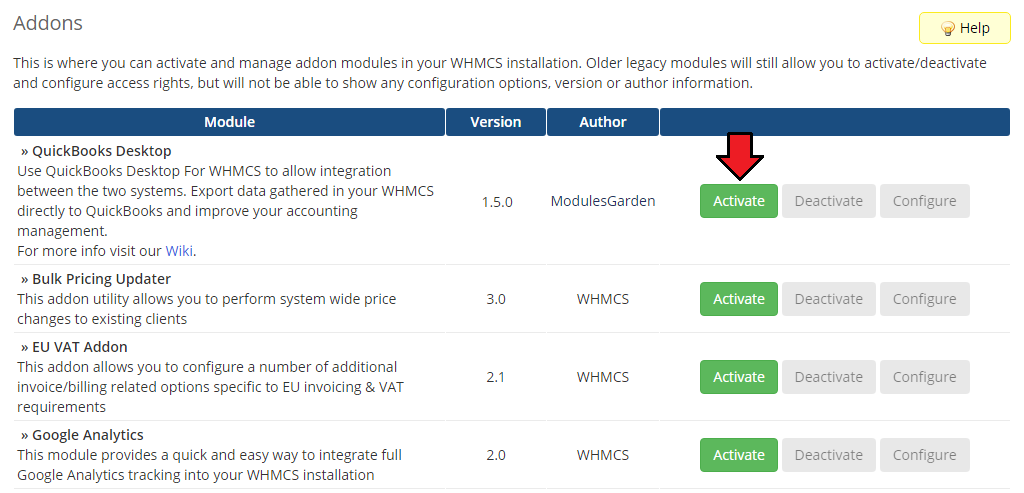
| 6. Now you have to activate the module in your WHMCS system. Log in to your WHMCS admin area. Go to 'Setup' → 'Addon Modules' . Afterwards, find 'QuickBooks Desktop' and press 'Activate' button. |
|
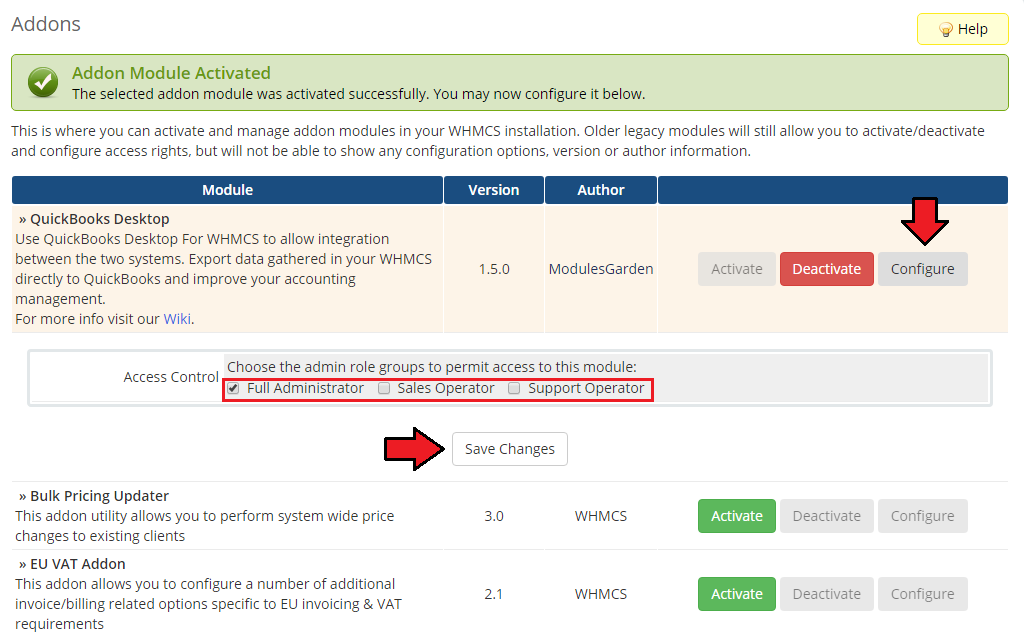
| 7. In the next step, you need to enable the access to this module. To do so, click on 'Configure' button, check the required group of administrators and press 'Save Changes'. |
|
| 8. You have just successfully installed QuickBooks Desktop For WHMCS! You can access your module under 'Addons' → 'QuickBooks Desktop'. |
Configuration and Management
| QuickBooks Desktop For WHMCS is a module which allows you to synchronize any data on clients, invoices and transactions with QuickBooks Desktop. |
Configuration
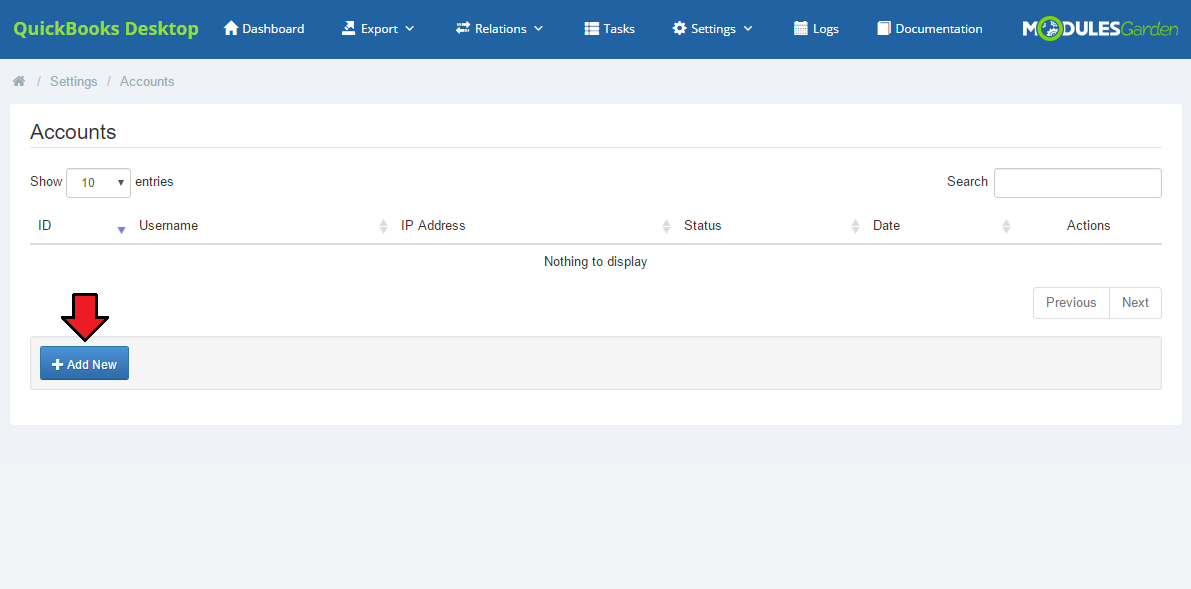
| 1. To configure your module properly, you first have to add a new account. To do so, proceed to 'Addons' → 'QuickBooks Desktop' → 'Settings' → 'Accounts'. |
|
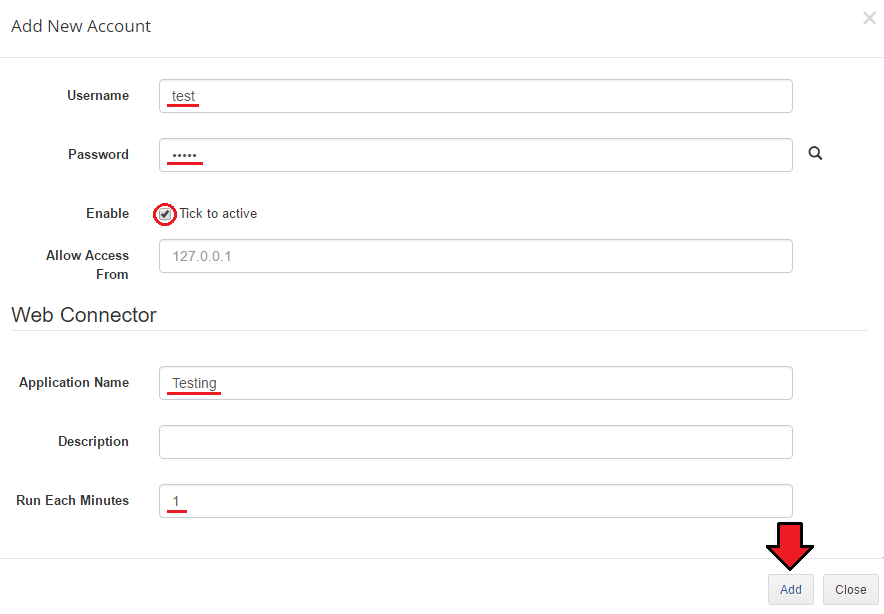
| In order to use the module fully, your account will be linked to Web Connector, the tool that enables the integration between your WHMCS system and QuickBooks Desktop. Provide the necessary information. You can also specify when the data shall be synchronized automatically. |
|
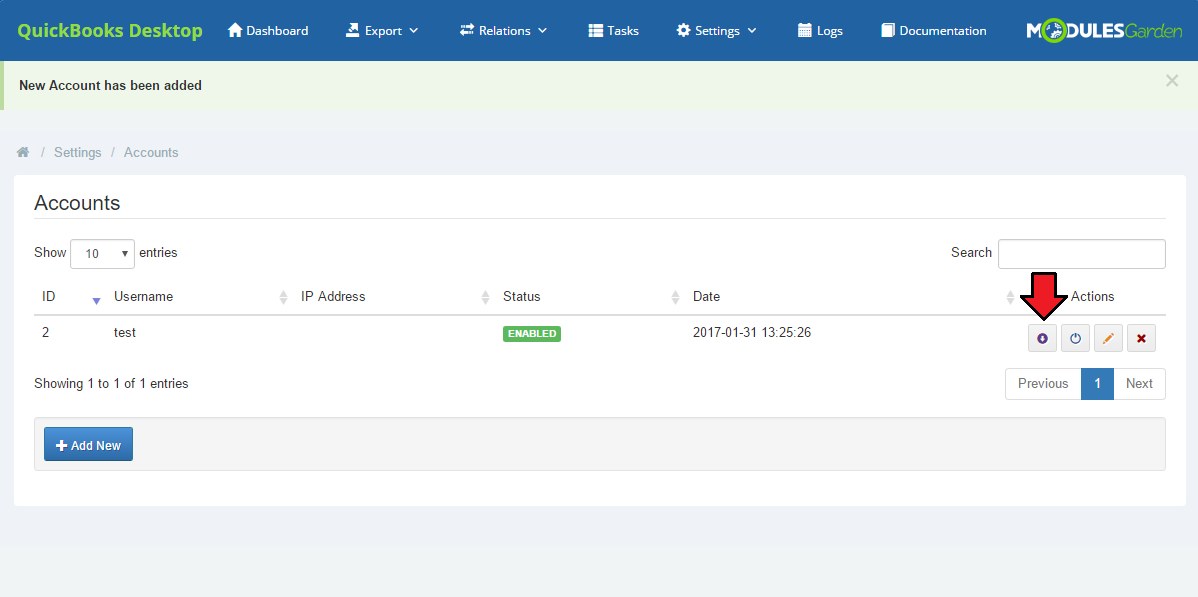
| Your account should appear on the list. It can be switched on/off, edited or deleted. For the proper configuration, you need to download the file of Web Connector now, as shown below. |
|
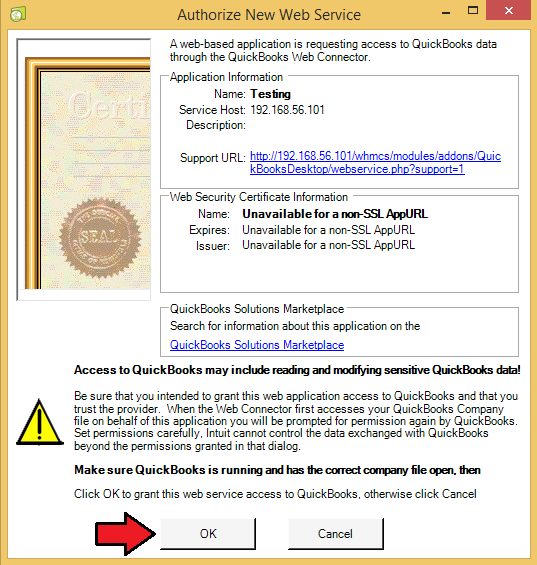
| Be sure that your QuickBooks Desktop software is now running and there is your company file opened within in. |
| Then, open the generated account file in the QuickBooks Web Connector. Click 'OK'. It will allow the module to authenticate your identity in QuickBooks system and let your WHMCS connect with it. |
|
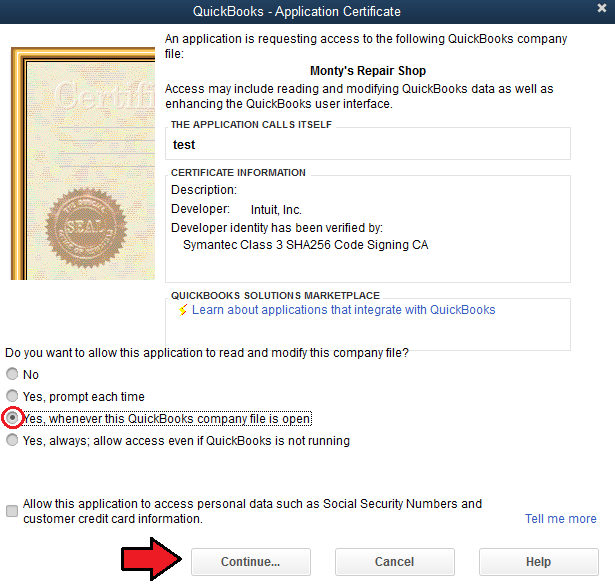
| Next, the certification window will appear to ask for permission to read and modify your company file. Choose the appropriate option and continue. |
|
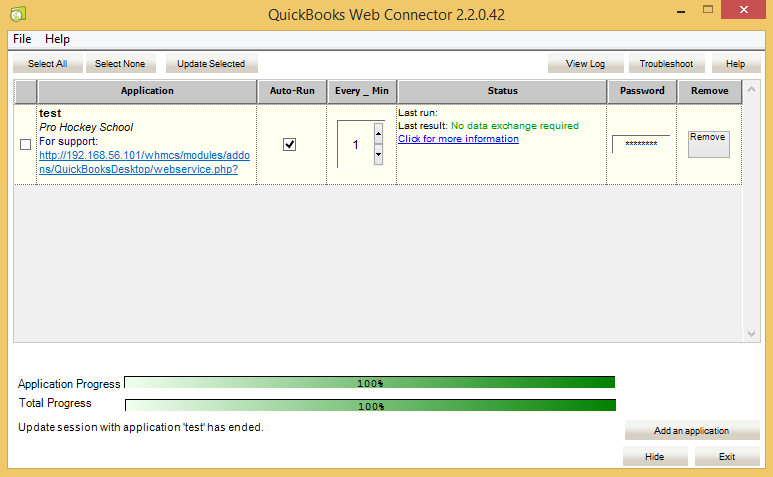
| You should see the successfully added account in Web Connector window: |
|
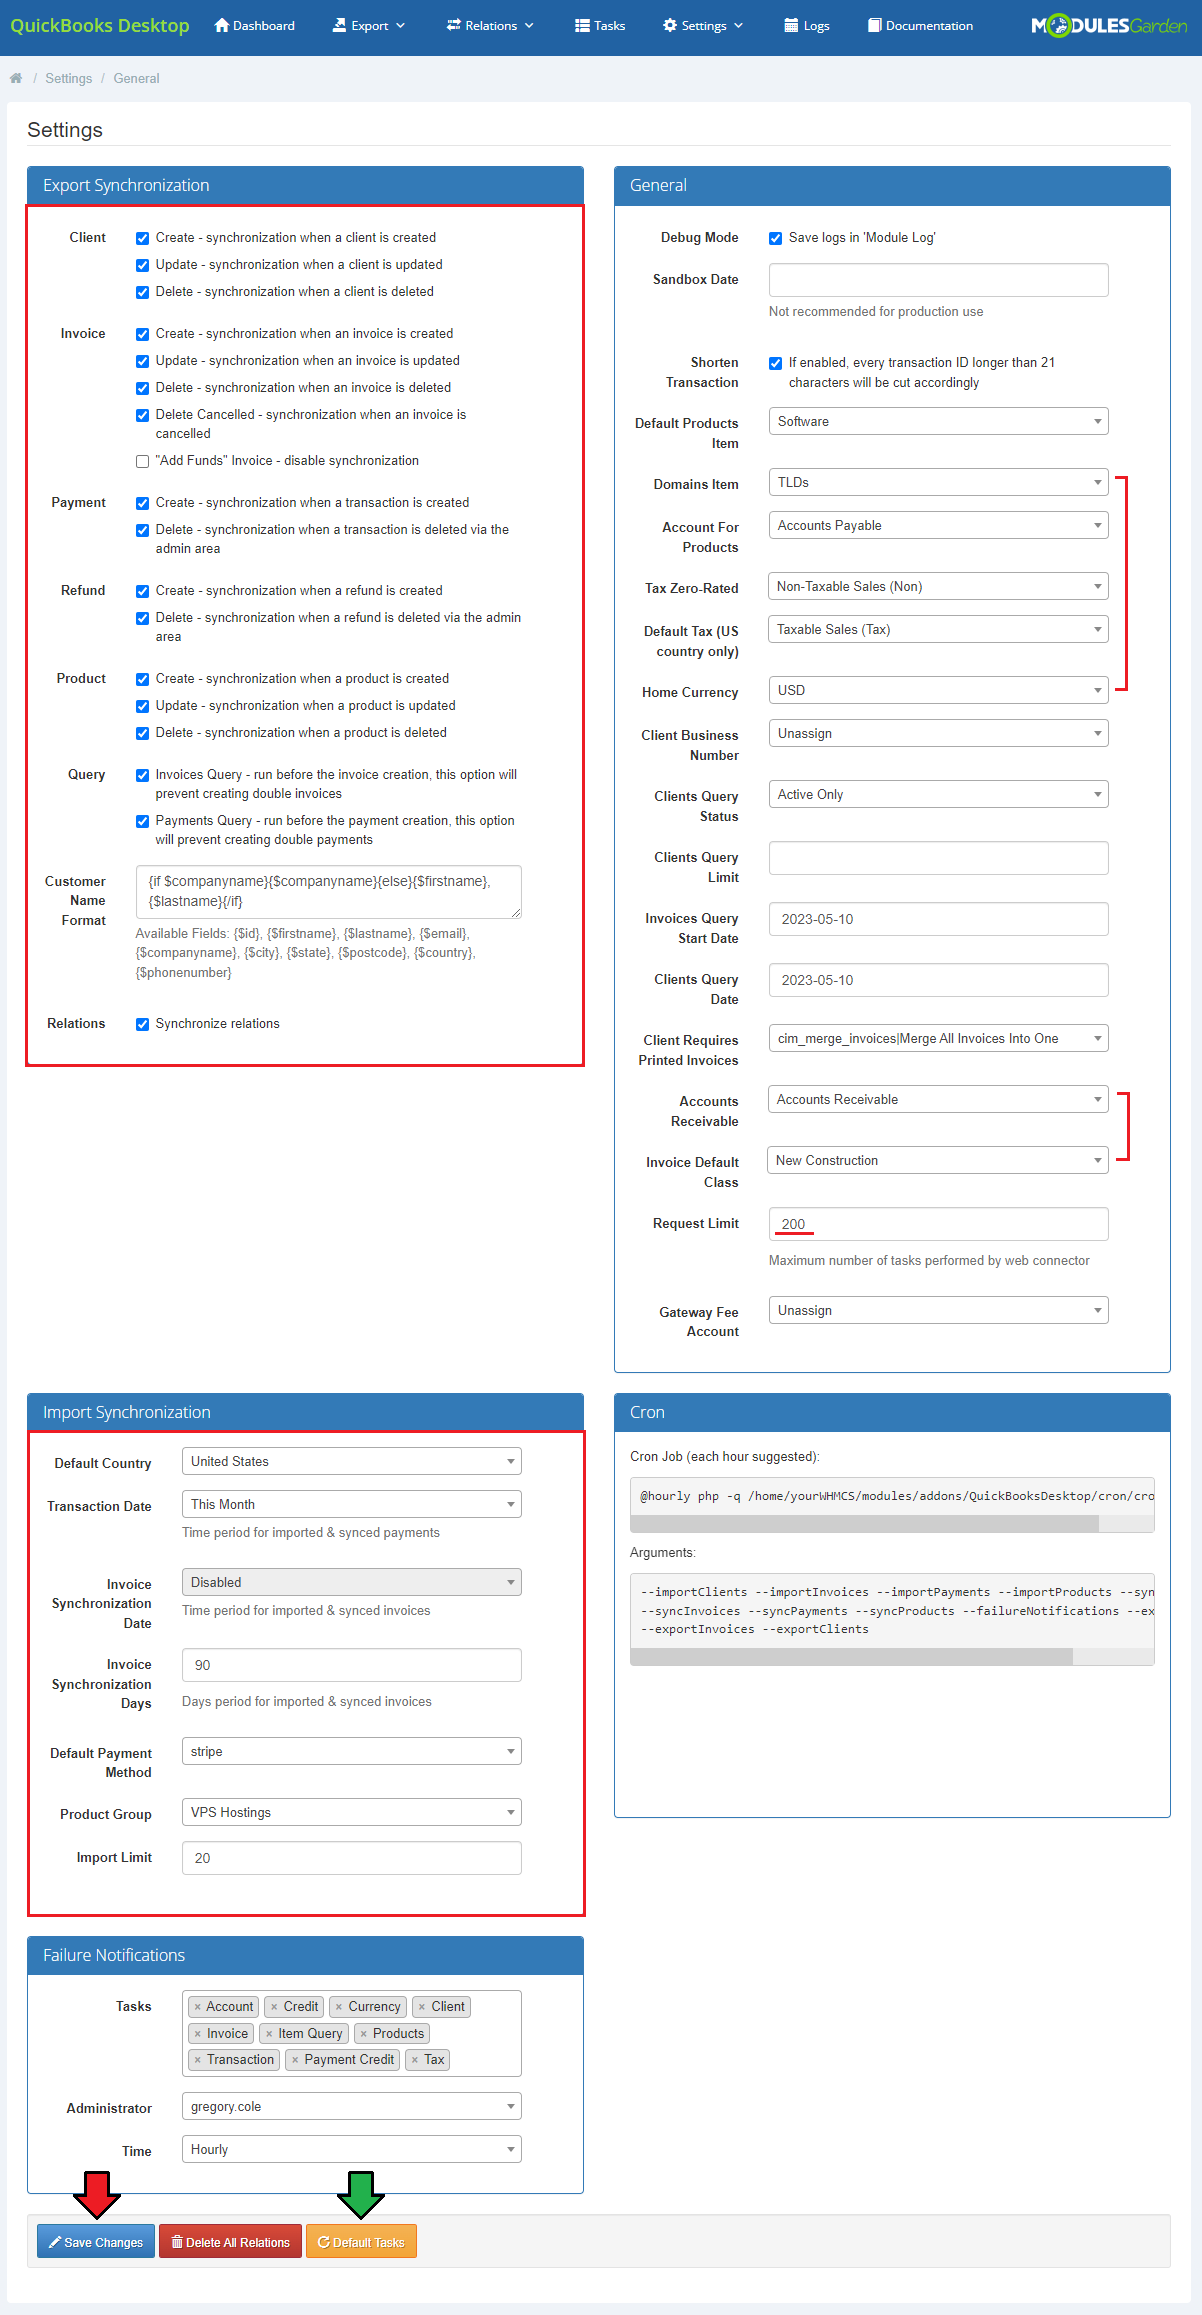
| 2. Synchronization Settings - decide which of the possible synchronization options you want to enable. Proceed to 'Addons' → 'QuickBooks Desktop' → 'Settings' → 'General' and tick the ones you are interested in. |
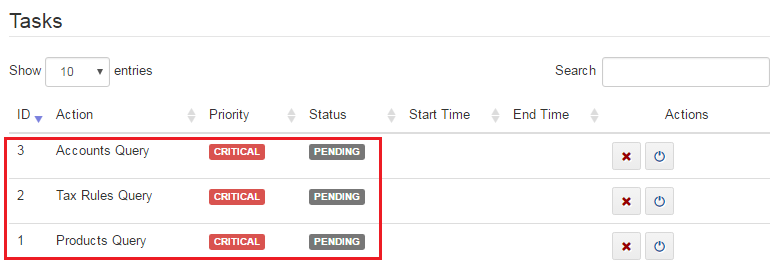
| In the 'Task' tab, you can check whether all the tasks are completed. Only then the values will be visible. |
|
| The following synchronization options are available: Clients synchronization:
Invoices synchronization:
Payments synchronization:
Refunds synchronization:
Products synchronization:
Query synchronization:
Customer Name Format synchronization:
|
| For more information about Import Synchronization configuration, go to the Cron Jobs section. Apart from choosing the required synchronization options, you have to decide which items from QuickBooks Desktop will be associated with 'Products ' and 'Domains' .
Press Save Changes button. |
|
| All the tasks and their statuses will be displayed in the Task tab. Note: Some tasks are automatically blocked when created. However, they will be automatically unlocked at a later stage of execution. |
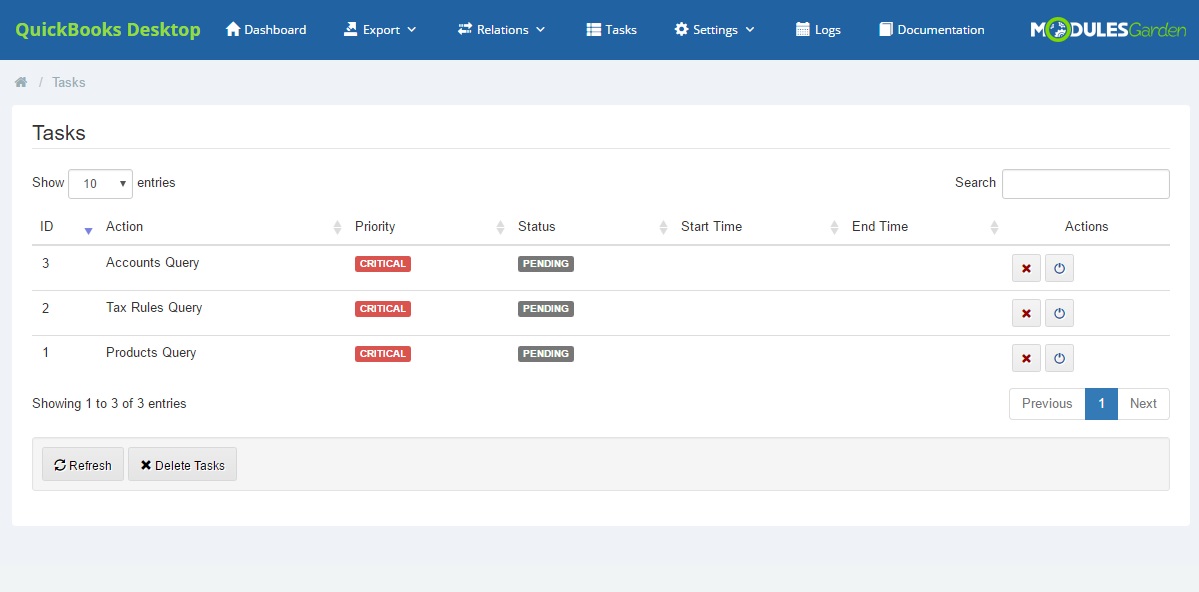
|
Relations
| 3. To use the module properly, remember to set the relations correctly. It is possible to manually declare relations between WHMCS clients, products as well as invoices and corresponding QuickBooks Desktop elements. |
Relation: Clients
| One of possible relations to be declared are relations between WHMCS clients and QuickBooks customers. Proceed to 'Relation' → 'Clients,' you will find there a list of all clients, with their email addresses, that exist in WHMCS, |
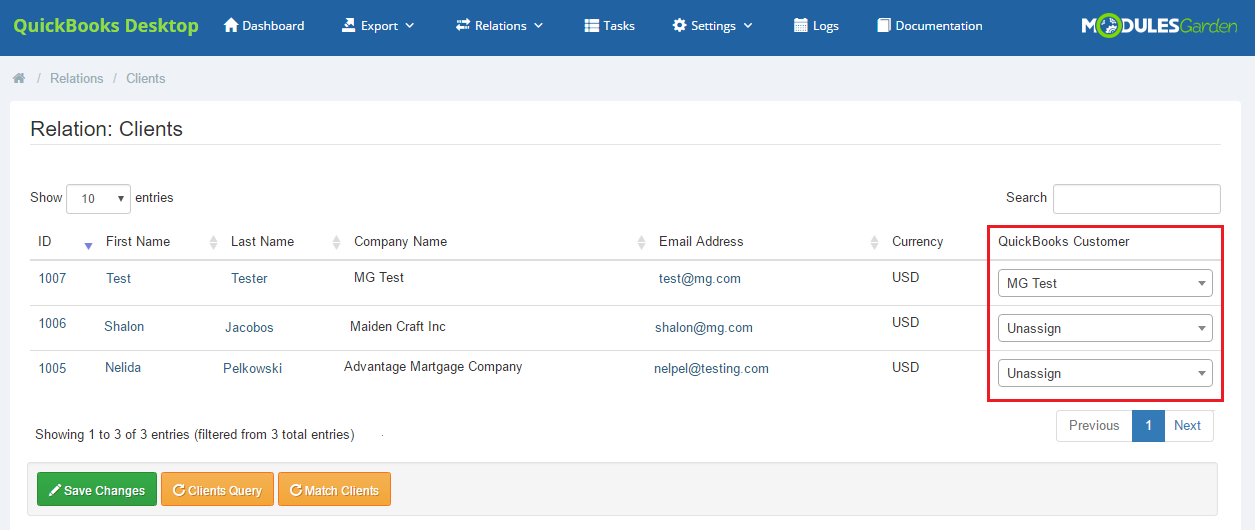
|
Relation: Custom Client Fields
| When you go to 'Relation' → Custom Client Fields' , you will find a list of fields which appear in the client profile. Firstly, select 'Clients Query' option and wait until all tasks are done. Note that if all clients in QuickBooks Desktop have the same custom field with no value provided, that field will not be synchronized and displayed on the list. At least one of the clients has to have it filled in. |
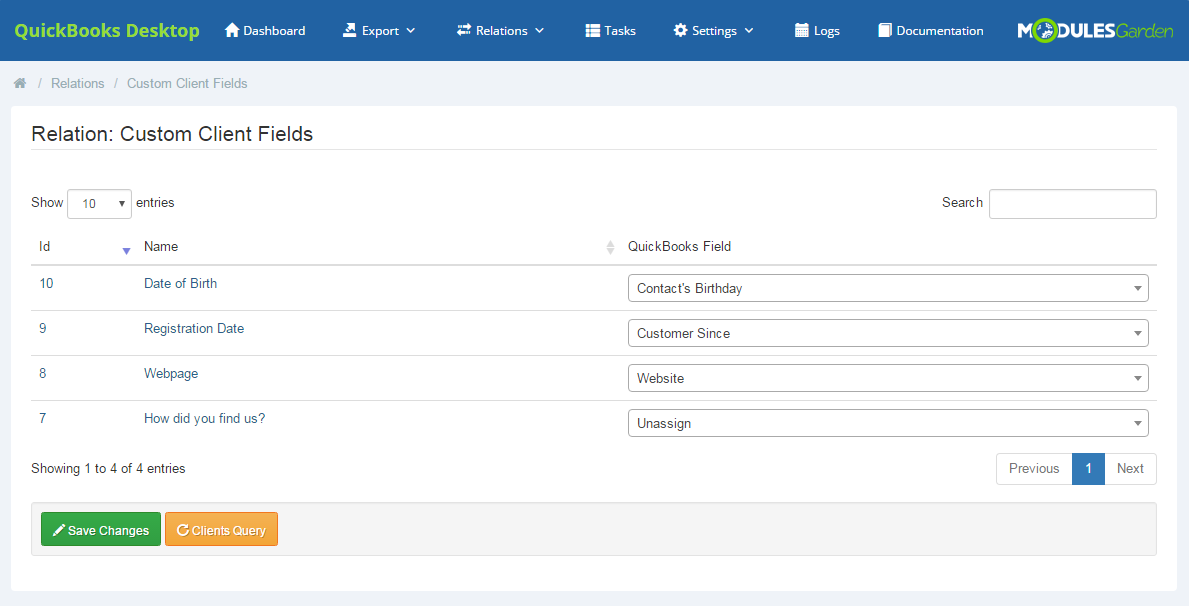
|
Relation: Products
| Product relations can be declared manually and for each product separately along with those declared in 'Configuration' → 'Synchronization Settings.' ' Proceed to 'Relation' → 'Products,' you will find there a list of all products with their type and payment standard. |
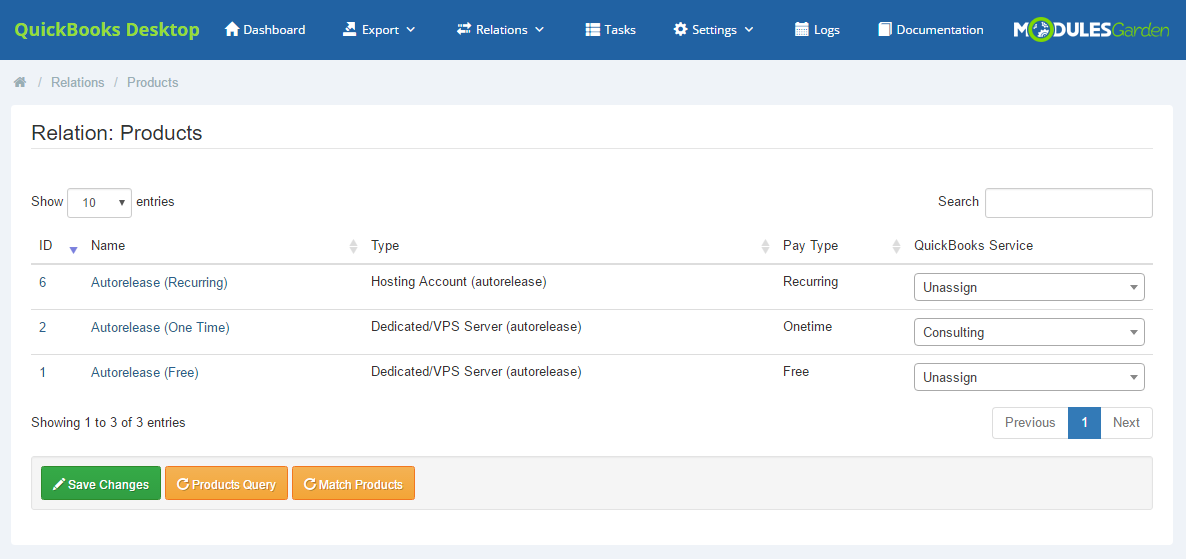
|
Relation: Domains
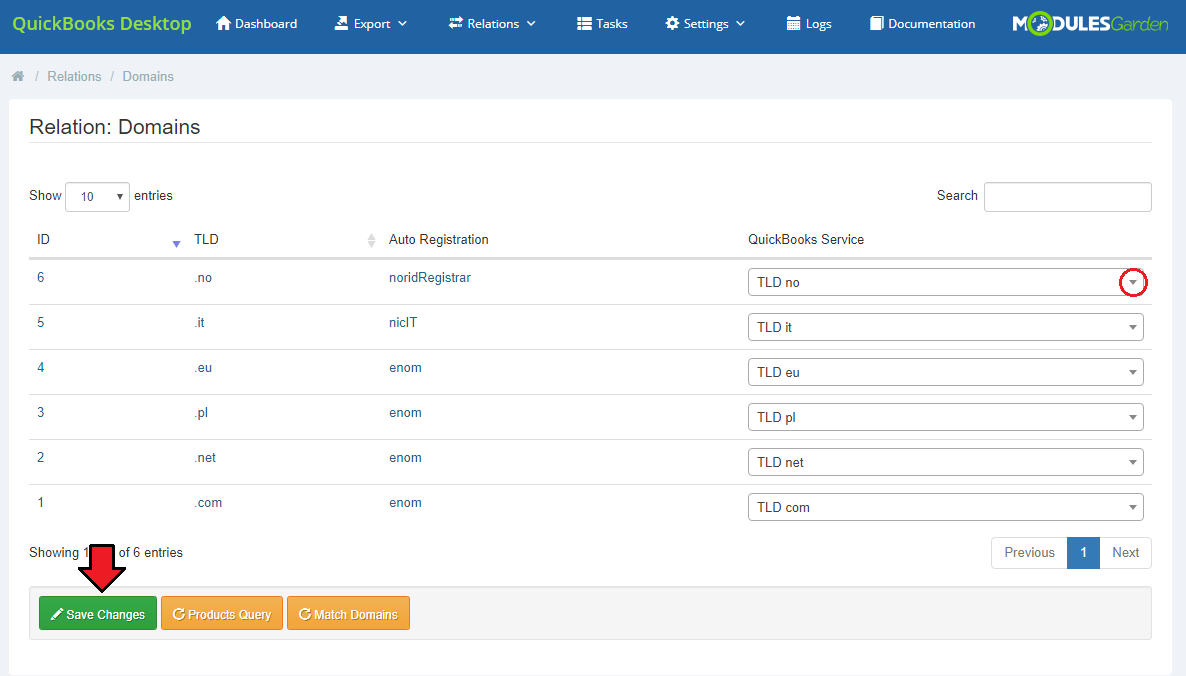
| In 'Relation' → 'Domains' tab, you will find a list of all WHMCS domains with their TLD. You may assign a WHMCS domain to a QuickBooks service here. Just select such a service from a dropdown menu and save the changes. |
|
Relation: Addons
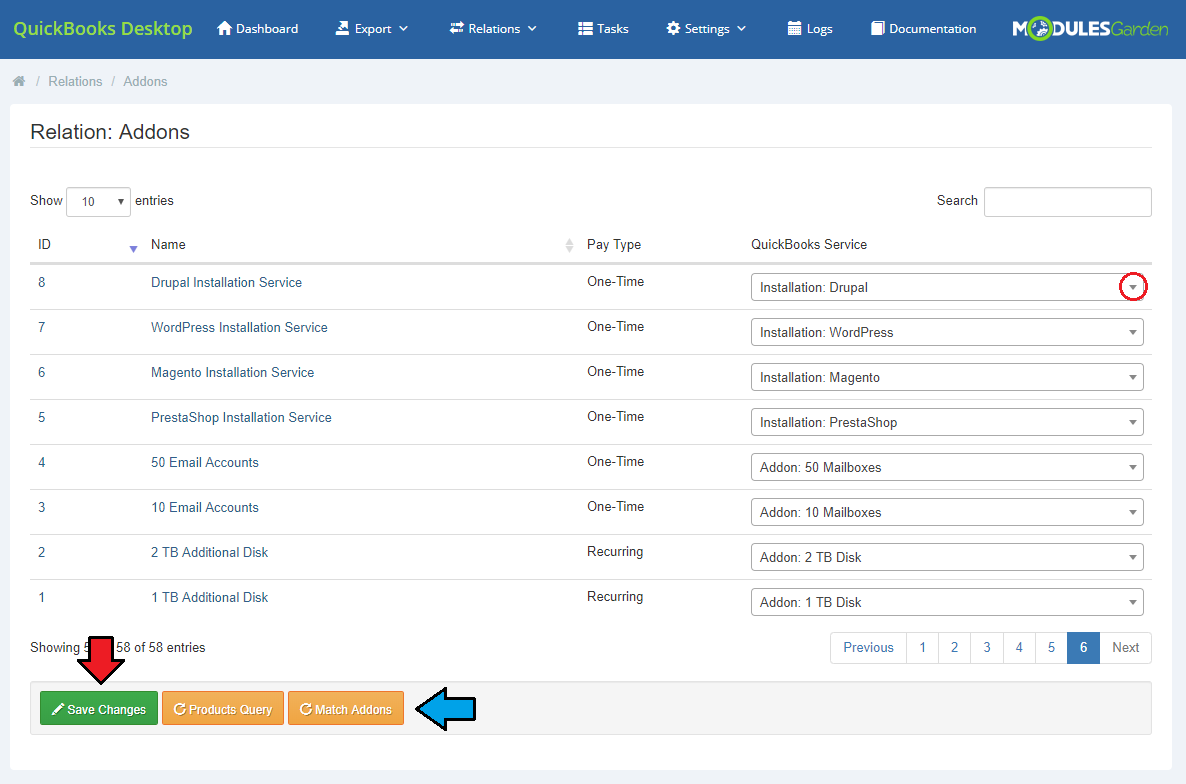
| You can assign addons to the services already existing in QuickBooks. Just go to 'Relation' → 'Addons' directory and choose the QuickBooks service from a dropdown menu. Remember to save the changes. You can also use the 'Match Addons' button to find any matches automatically. |
|
Relation: Invoices
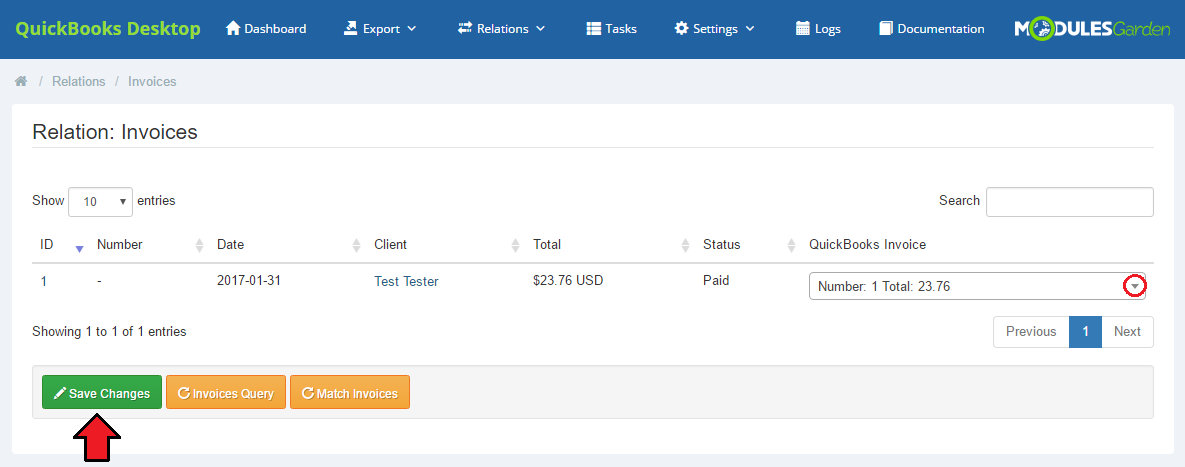
| In 'Relation' → 'Invoices' directory, you will find a list of all WHMCS invoices with their ID, date of creation, assigned client, total sum and status. It is possible to assign such a WHMCS invoice to another invoice already exported to QuickBooks Desktop. Just choose such from a dropdown menu and save changes. |
|
Relation: Tax Rules
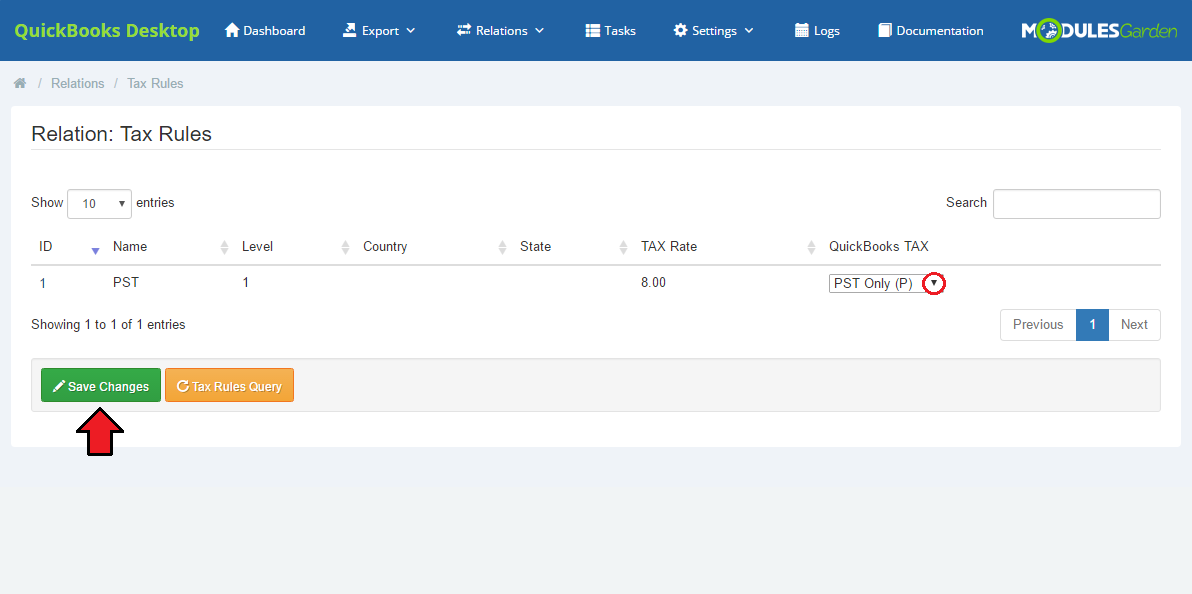
| In 'Relation' → 'Tax Rules' directory, you will find a list of defined tax rules. Firstly, select 'Tax Rules Query' option and wait until all tasks are completed. Then, assign each rule to a specific QuickBooks tax. Select one from a dropdown menu and save changes. Note: QuickBooks Desktop does not support WHMCS's level 2 taxes. Only level 1 taxes are supported. |
|
Relation: Currencies
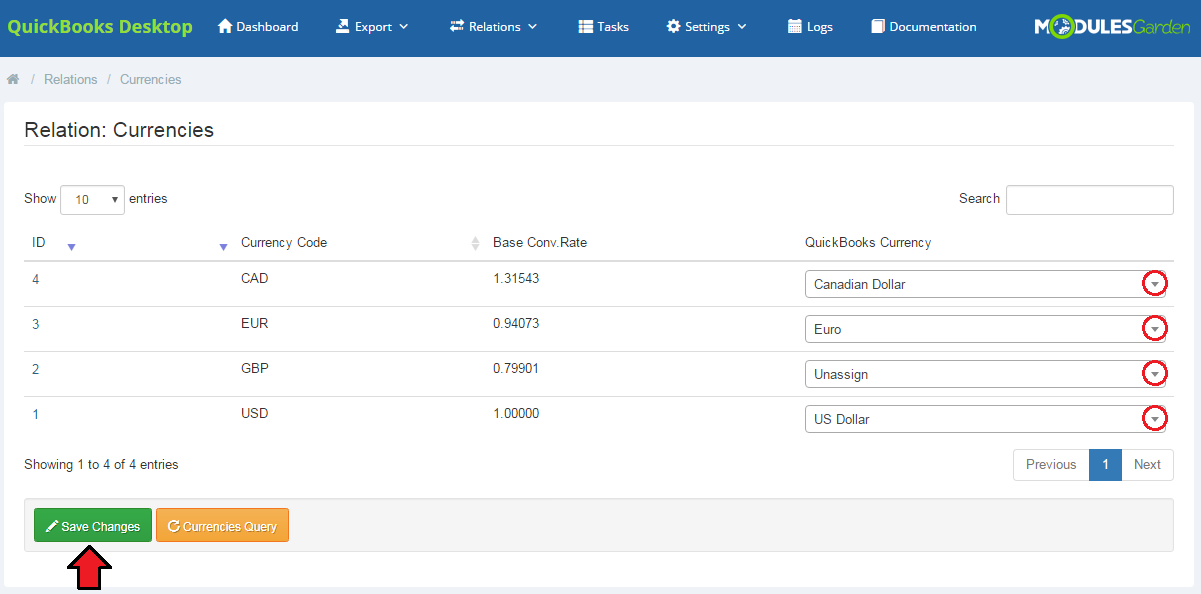
| In 'Relation' → 'Currencies' directory, you will find a list of defined currencies. Firstly, select 'Currencies Query' option and wait until all tasks are completed. Then, assign each currency to a specific one from QuickBooks Desktop. Select one from a dropdown menu and save changes. Note that if you would like to use several currencies, 'Multicurrency' option has to be enabled in QuickBooks Desktop settings. Otherwise, the process will not be successful. |
|
Relation: Payment Gateways
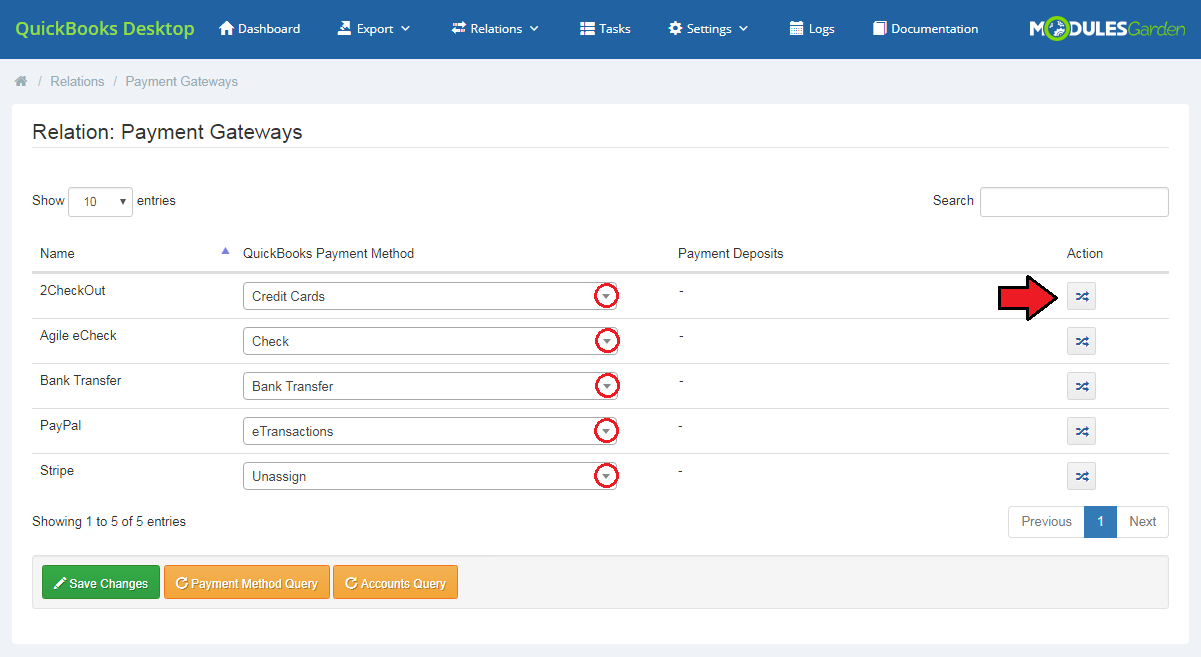
| In 'Relations' → 'Payment Gateways', there is a list of available payment methods. Select the one you wish to use from a dropdown menu. Save changes. |
|
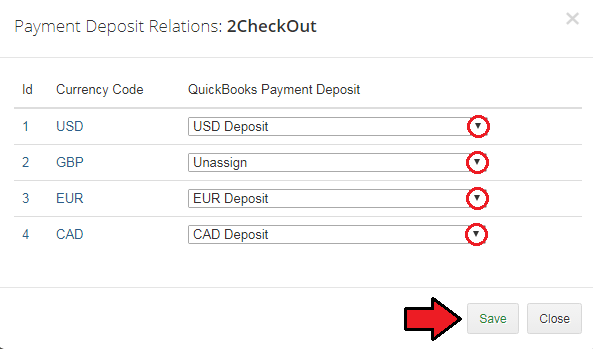
| When you click the button in the 'Action' section, you can set relations for previously chosen payment method. Assign QuickBooks Payment Deposits to a single currency. |
|
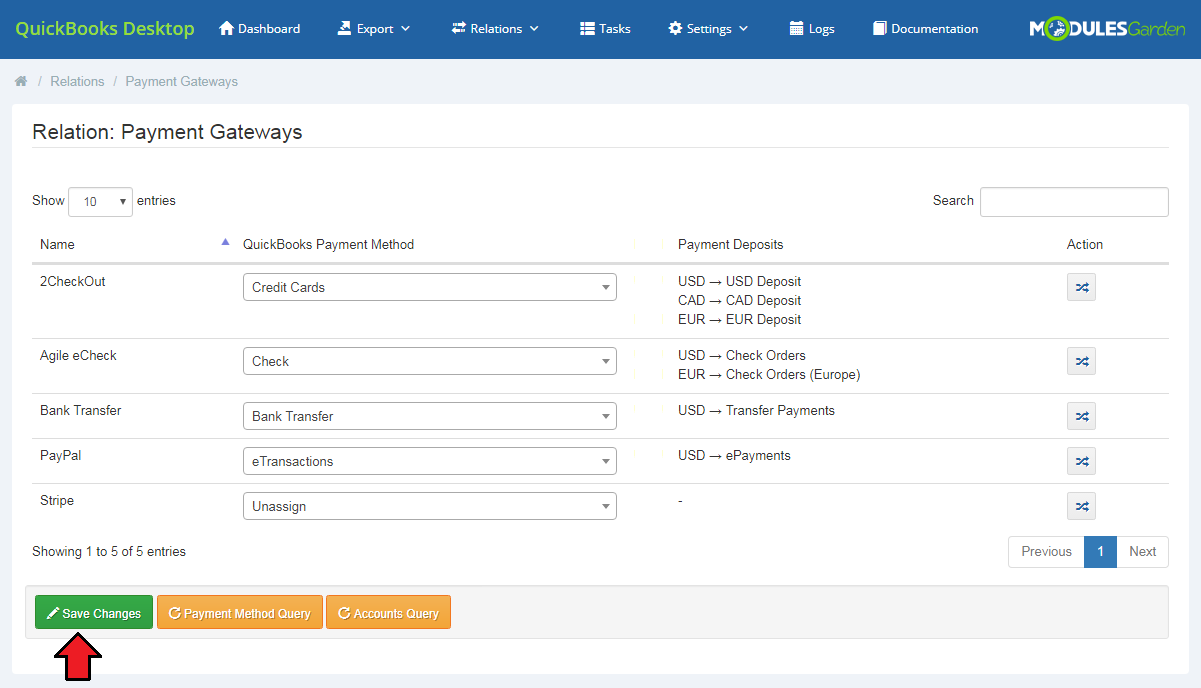
| In this way, the relation between payment methods, upon which choosing the deposit a transaction in selected currency will go to depends, has been set. Finally, do not forget to save changes. |
|
Relation: Transactions
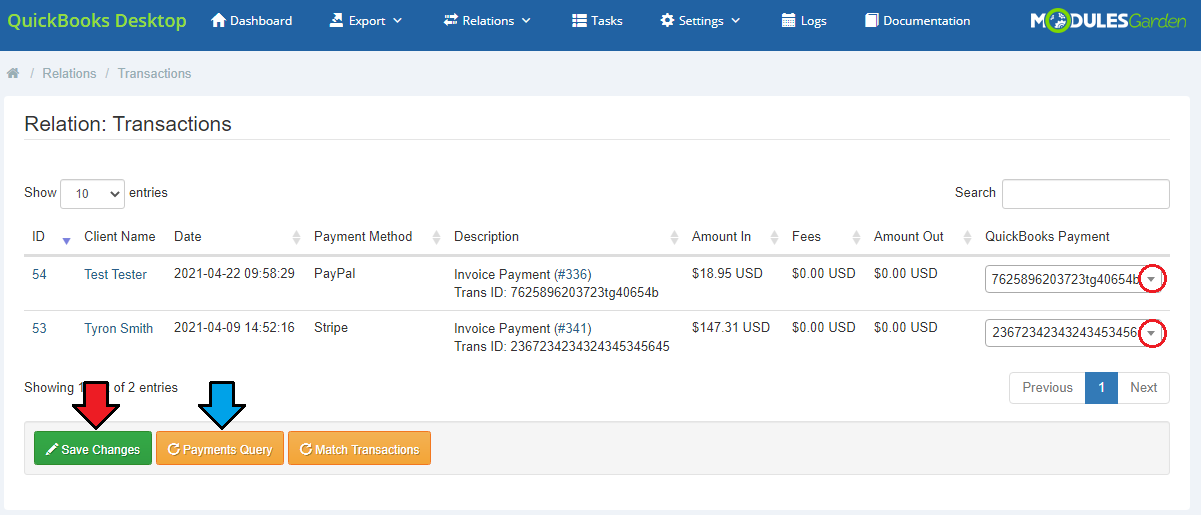
| In 'Relation' → 'Transactions', there is a list of transactions. Press 'Payments Query' to fetch all the WHMCS transactions, then assign the QuickBooks Payment to every one you wish, use the dropdown menu. Save changes. |
|
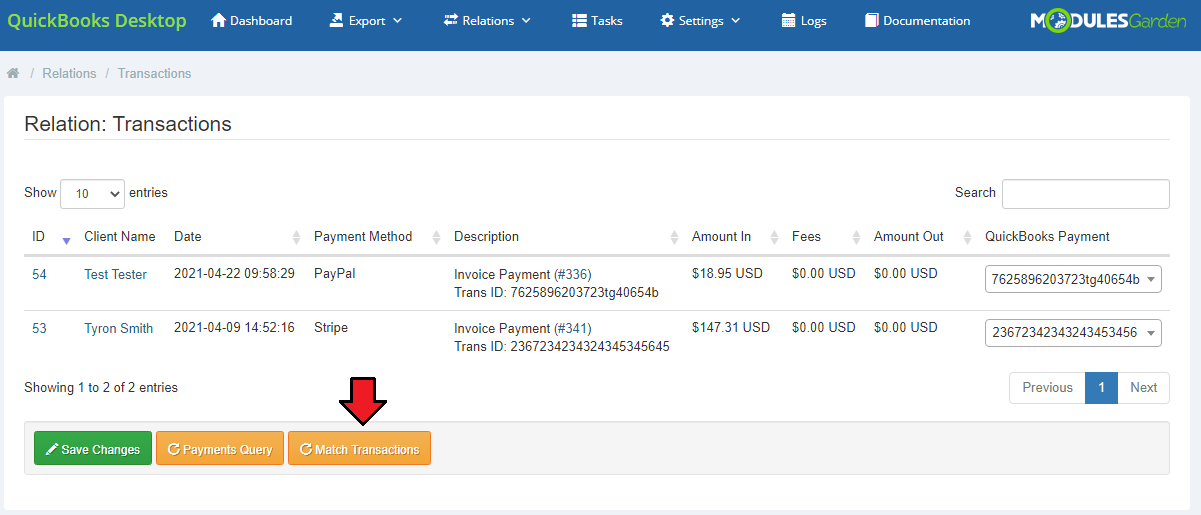
| Use the 'Match Transactions' button to automatically find an existing relation in QuickBooks without manual search for every single transaction. You will get an extended list with information on which of the transactions a match has been found, and for which it has not. |
|
Relation: Custom Rules
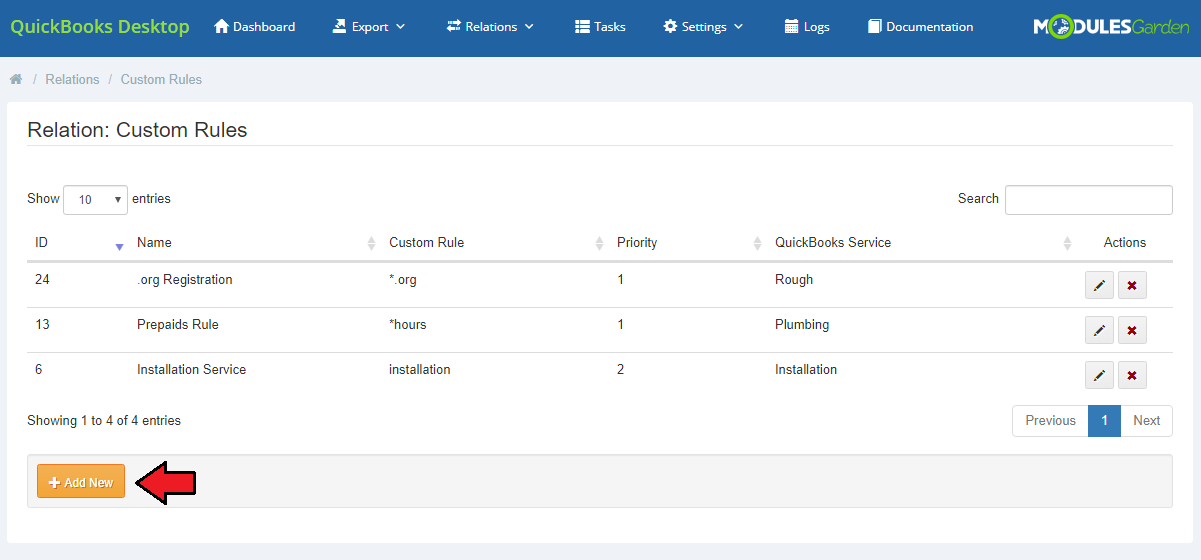
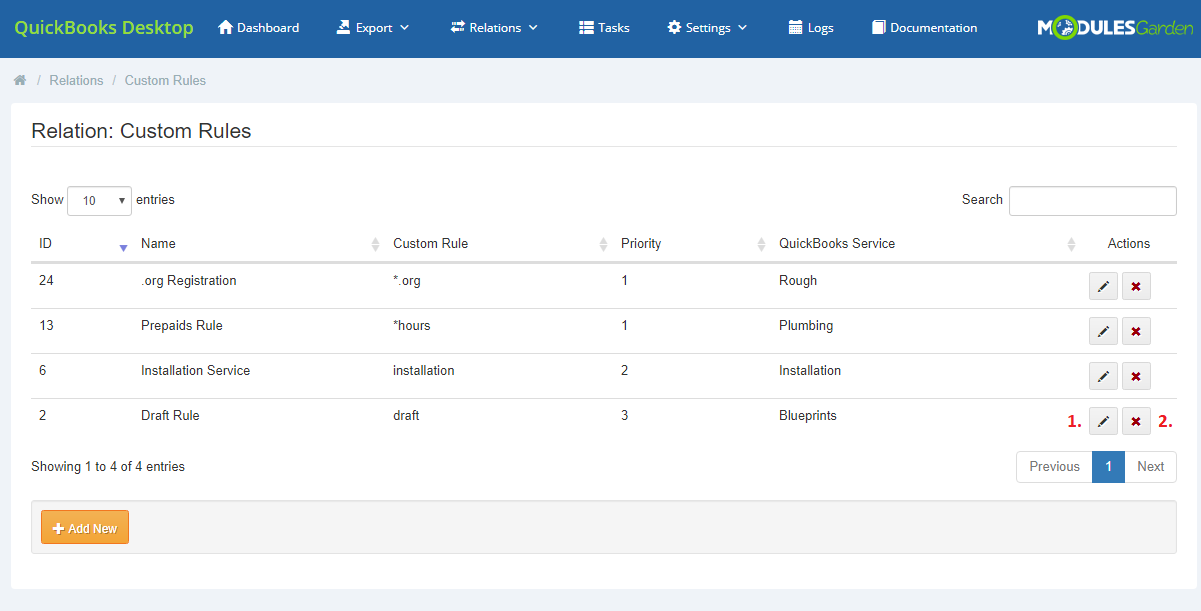
| In 'Relations' → 'Custom Rules', there you can create and manage existing custom rules, which aim is to manage items that exist on the invoice but have no relation. The rule task checks if these items have any matching type in QuickBooks. |
|
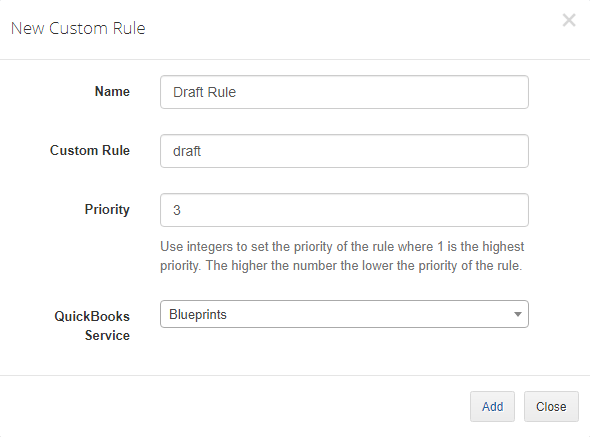
Provide necessary details of the created rule to make it work properly. These are:
Press 'Add' when ready. |
|
| A new rule appears on the list immediately. You may edit its specification at any moment, just press the marked on the screen icon (1). |
|
Management
| In this section, we will show you the possibilities of QuickBooks Desktop For WHMCS. Once it has been properly connected with QuickBooks Desktop and all the configuration is complete, we can move to the 'Export' section. |
Export
| Our module offers several ways to export any data gathered in your WHMCS. Read the below points to learn what data can be synchronized with QuickBooks Desktop and what are the possible means of such synchronization. |
Clients
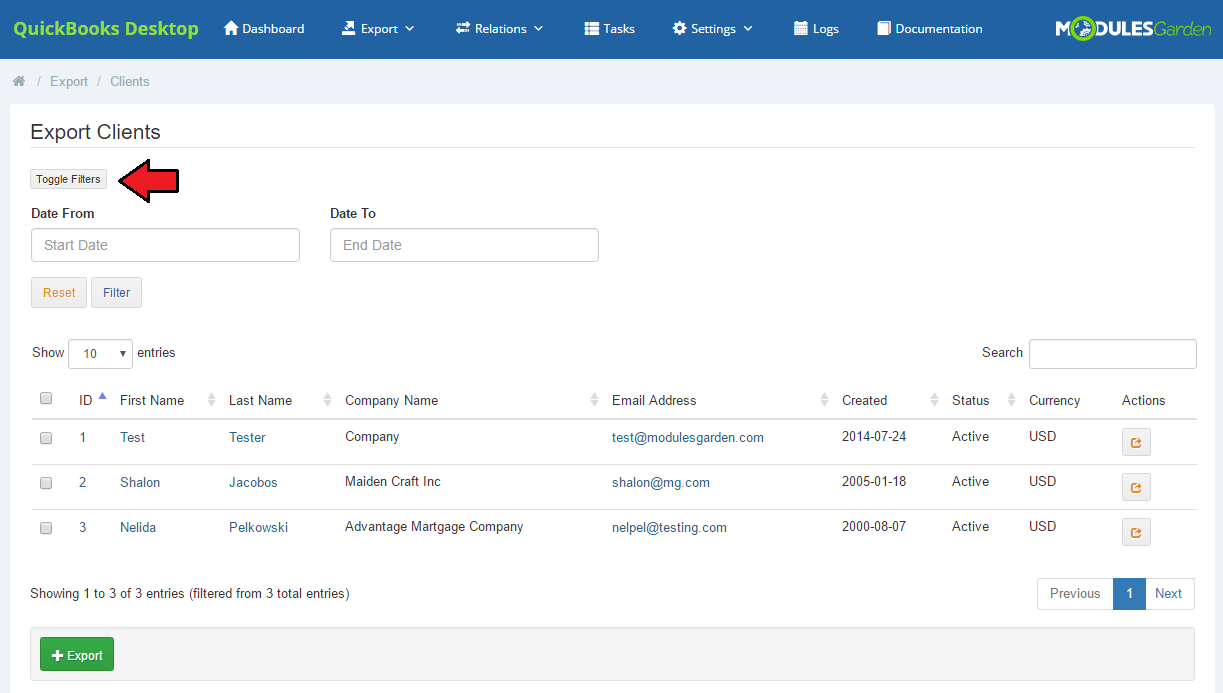
| The first option offered by our module is the export of clients from WHMCS to QuickBooks Desktop, proceed to 'Export' → 'Clients.' You will see a list of all clients who exist in your WHMCS and have not been synchronized with QuickBooks yet. Use the filter to find clients with their account created during the specified period of time. |
|
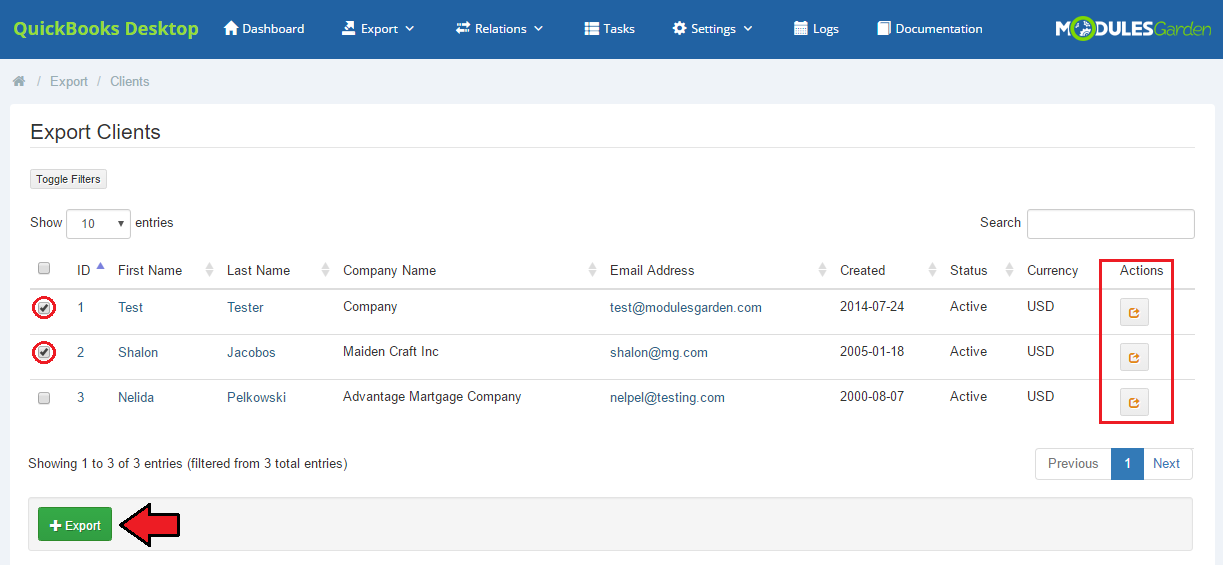
| Now, you can manually export all of the clients available on the list or choose only some of them. Check boxes next to the clients you are going to export and press 'Export' button as marked on the screen. If you want to export only one client you can do it by pressing 'Export' button located in 'Action' column next to the name of the client. |
|
| If a client has already been exported from WHMCS to QuickBooks, they will no longer be visible on the list. All clients newly added to WHMCS will be automatically synchronized with QuickBooks, unless otherwise stated in 'Synchronization Settings.' |
Invoices
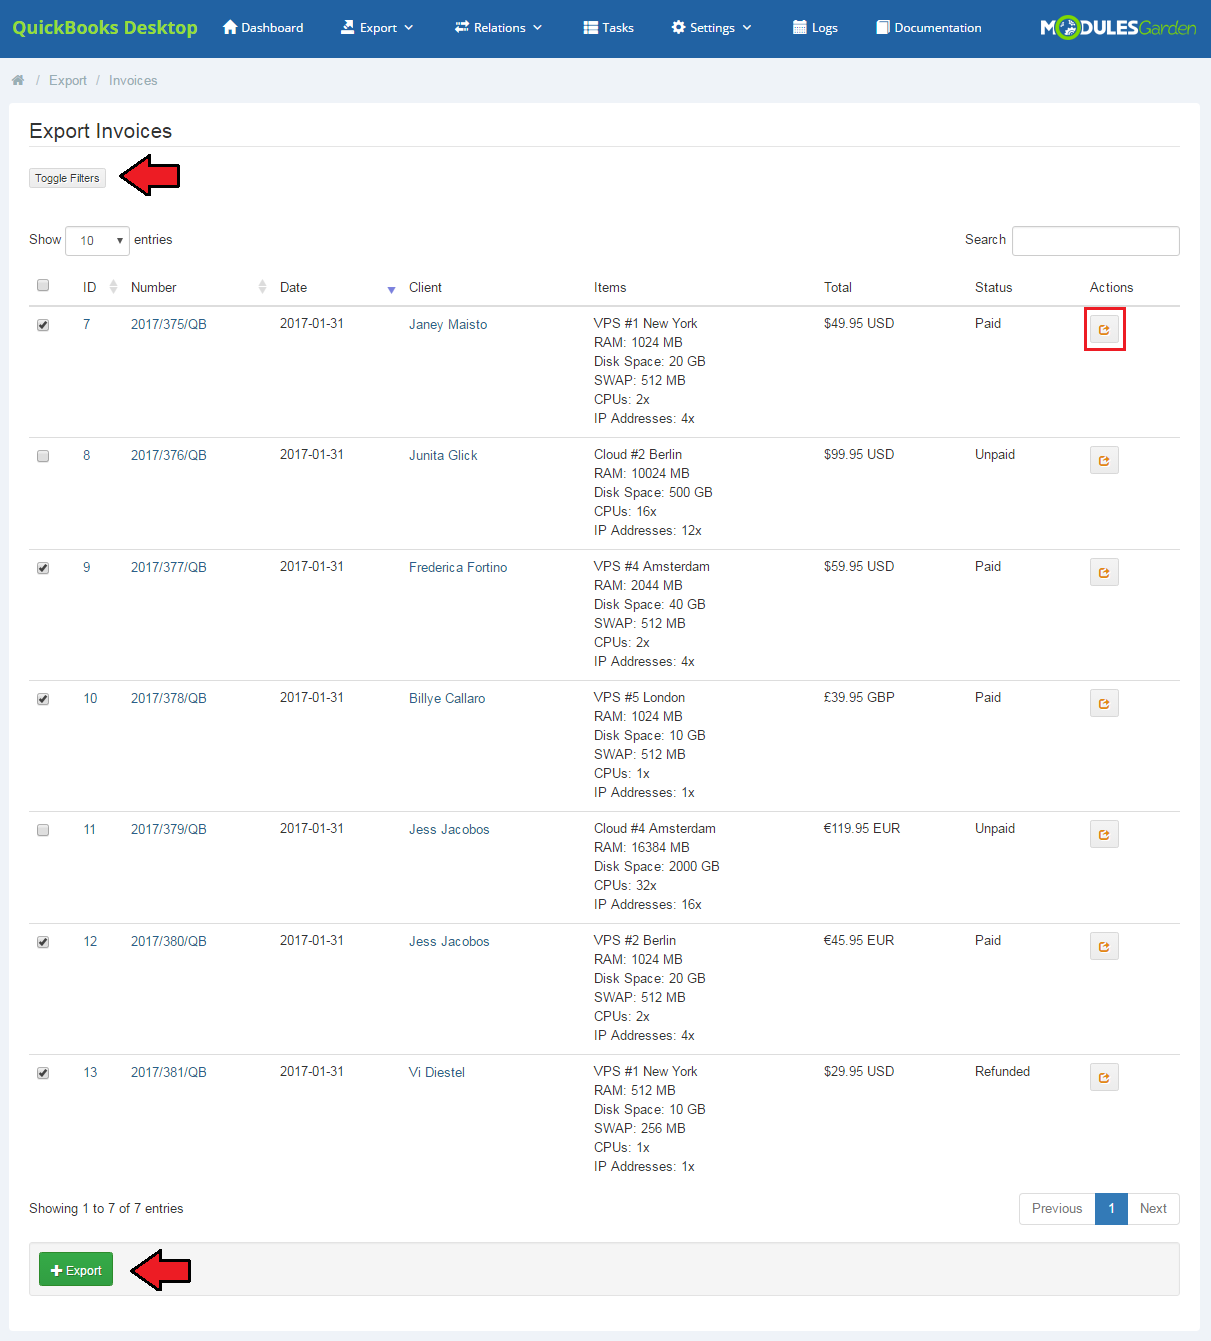
| The other choice is the export of invoices. Proceed to 'Export' → 'Invoices' and you will find a list of all invoices existing in our WHMCS that have not been synchronized with QuickBooks yet. In the details you will find information on the invoice:
|
Just like in case of clients:
|
|
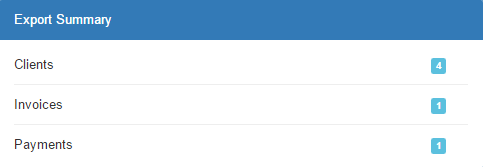
| Once you have exported some of the invoices, you will see their number along with the number of any transactions connected with them in the 'Summary' table on the dashboard. |
|
| Keep in mind that all newly added (after the first usage of QuickBooks For WHMCS) invoices and transactions are automatically synchronized and exported to QuickBooks Desktop, unless otherwise stated in 'Synchronization Settings.' |
Transactions
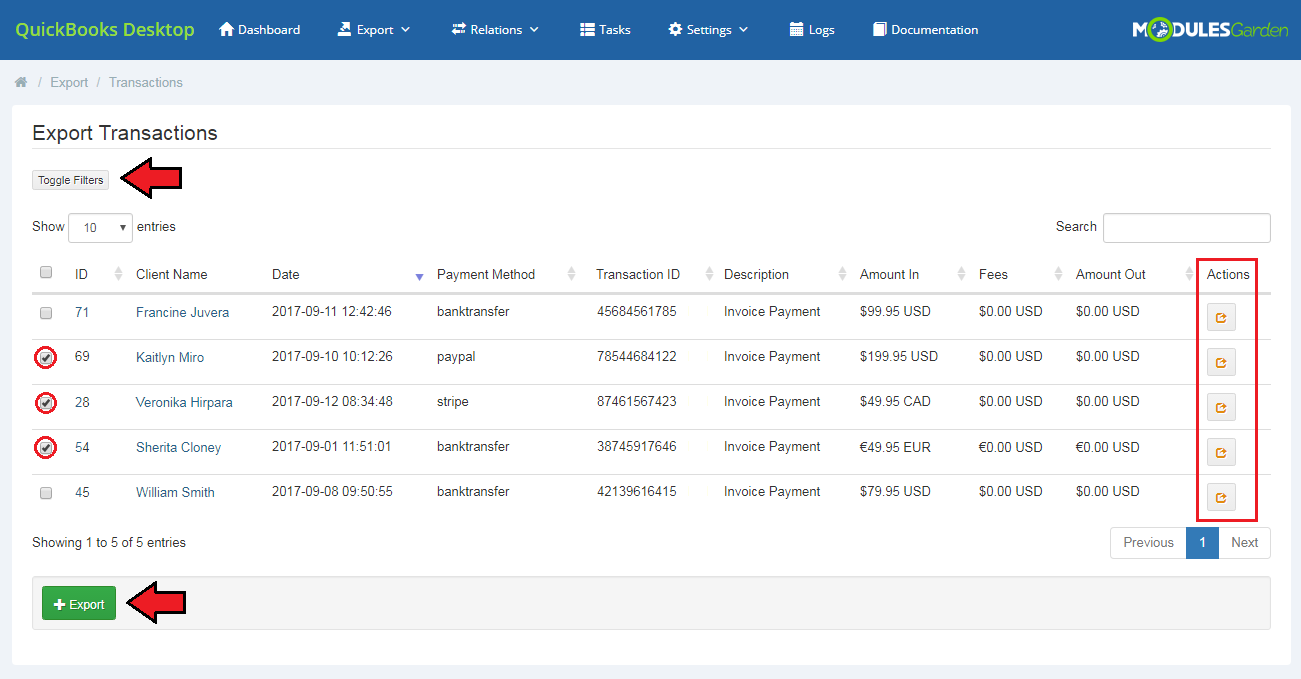
| In 'Export' → 'Transactions' section you will find a list of payments for exported invoices. Note that only these transactions that could not be exported automatically during the invoice export will be visible or if the 'Payment Create' option in 'Export Synchronization' in general settings is disabled. |
|
Products
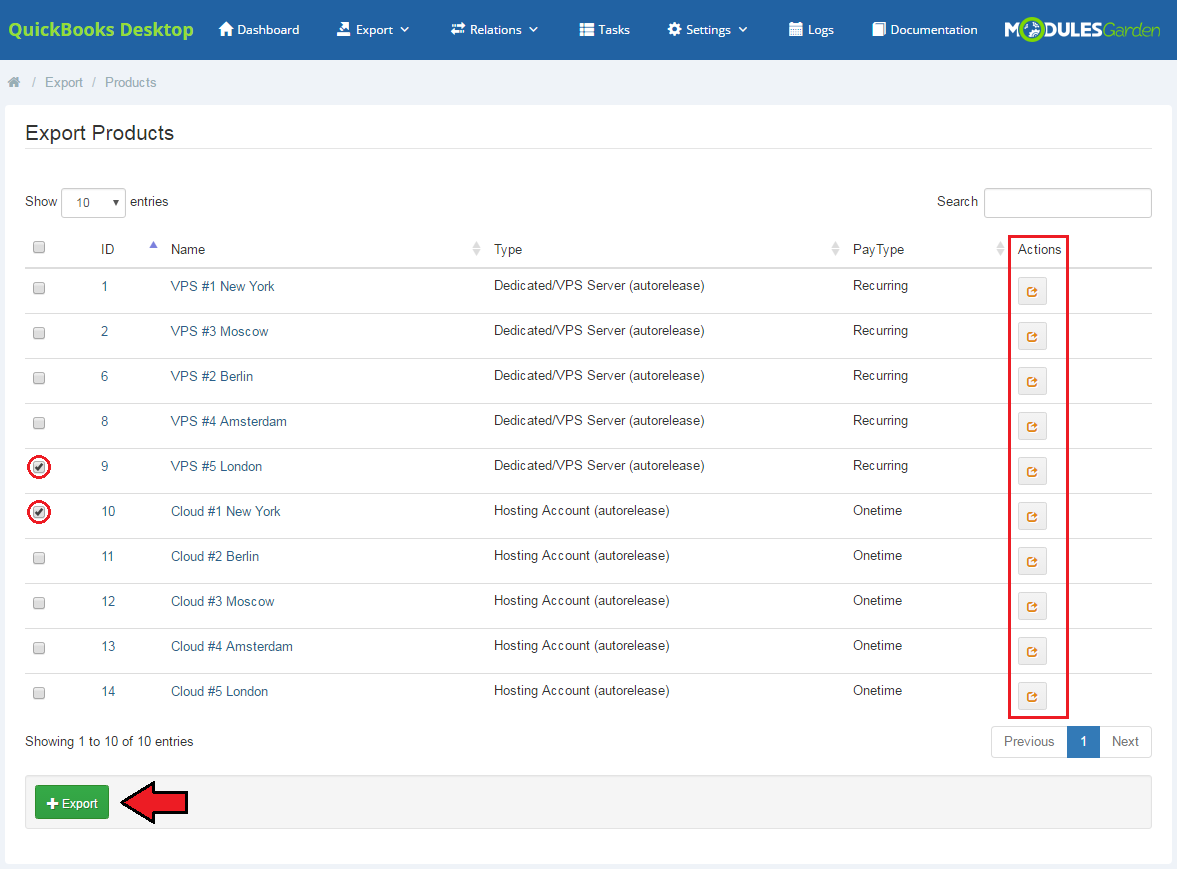
| If you would like to manually export products from WHMCS to your QuickBooks Desktop, please go to the 'Export' → 'Products' section. Then, select the products you want to be exported and press on the 'Export' button. |
|
Credit Payments
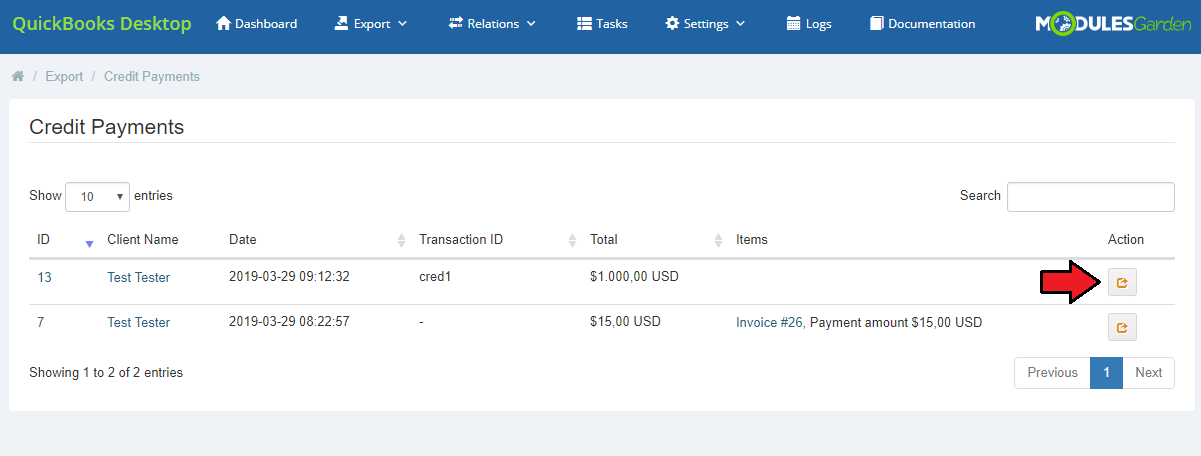
| 'Export' → 'Credit Payment' section allows insight into the list of transactions with option to synchronize them manually. |
|
Product Addons
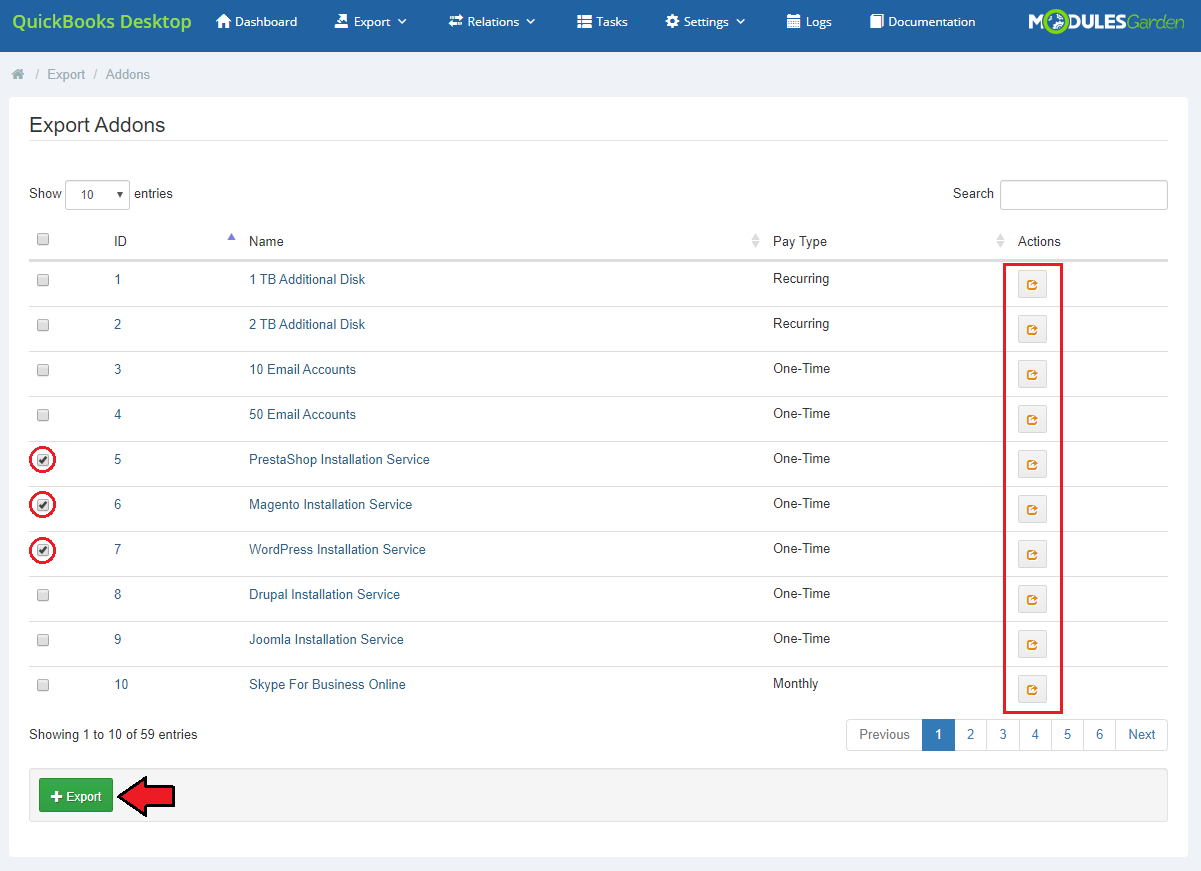
| In the 'Export' → 'Addons' section you can see all product addons from your WHMCS system with the option to manually export them to QuickBooks. |
|
Cron Jobs
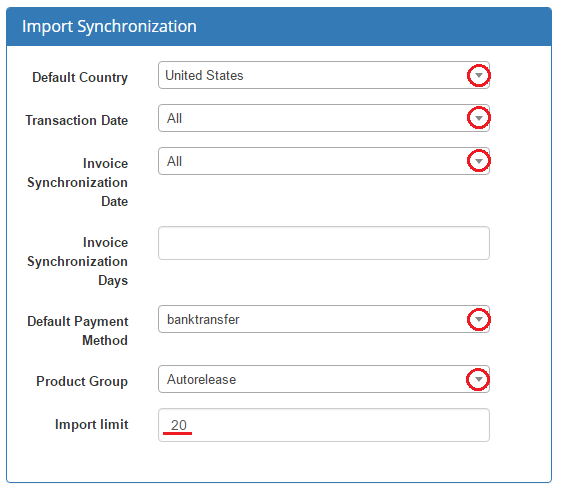
| Properly set up cron job with a recommended interval is responsible for importing and synchronization of data from QuickBooks into WHMCS e.g. any updates carried out on invoices or clients' accounts from WHMCS. Once the cron is running, it executes settings included in 'Import Synchronization' table and will also send the notifications specified in the 'Failure Notifications' section. |
|
It is recommended to run a cron job every six hours in order to synchronize the data between QuickBooks Desktop and WHMCS. |
Logs
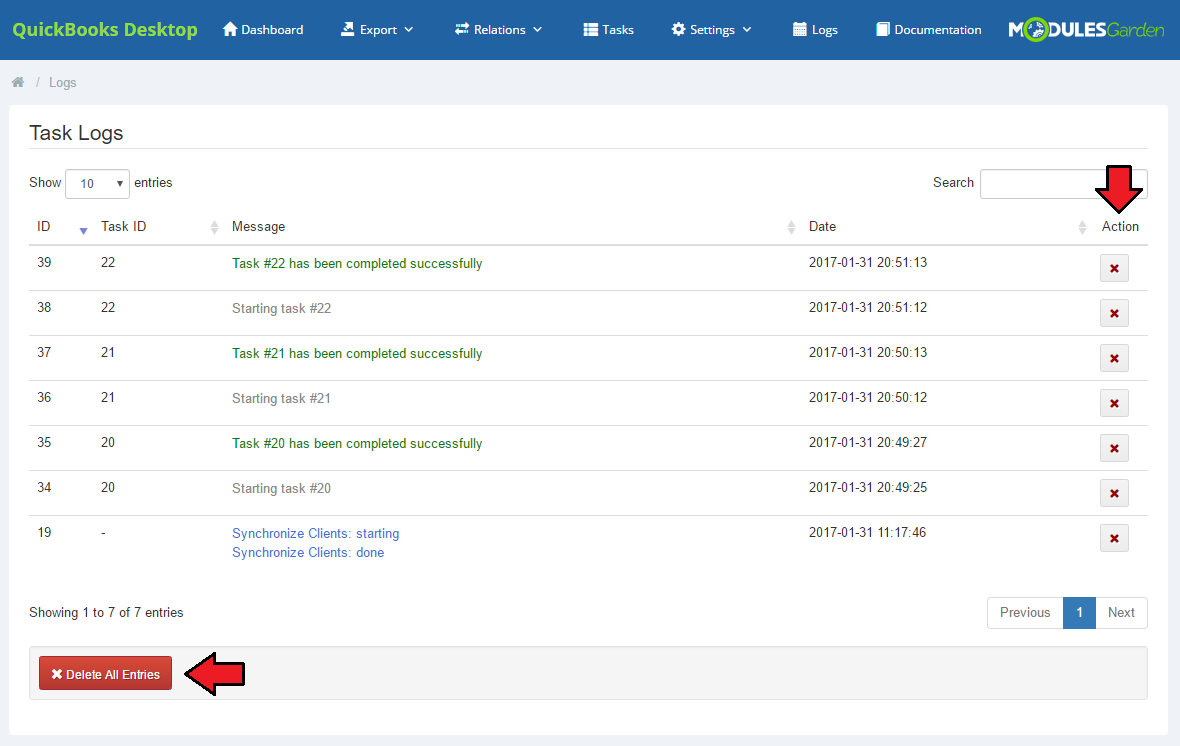
| The 'Logs' tab contains ALL actions on clients, invoices and transactions. Regardless of whether they were performed manually in the module, automatically or by a cron job. You will find there a list of all entries with precisely described details and the exact date of the action. |
|
| Clear all the entries or delete only some of them. Use the buttons marked on the screen above. |
Dashboard
| 'Dashboard' includes two useful and user-friendly tables. The first one, 'Export Summary' contains data on the number of exported clients, invoices and payments. |

|
Documentation
| The very last tab - 'Documentation' , once clicked, will redirect you to the article you are currently reading! |
Tips
| 1. Please note that QuickBooks Desktop supports the services of One Time type only. Other billing cycles cannot be added. |
| 2. If you add a single transaction in WHMCS using the 'Add to Client's Credit Balance' option, a transaction corresponding to this one will be also created in QuickBooks. Afterwards, when the customer pays the invoice using WHMCS credits, this invoice will also be added to the previously created transaction in QuickBooks (provided that there are sufficient funds in this transaction). |
Update Instructions
| An essential guidance through the process of updating the module is offered here. Ensure successful completion of the module update by carefully following each step, thereby preventing data loss or any unforeseen issues. |
Upgrade Guide
| Seeking a solution that offers greater flexibility, customization tailored to your precise needs, and unrestricted availability? There is an option that not only proves to be cost-effective in the long run but also includes prioritized support services, making it a truly valuable investment. Opt for the Open Source version of your QuickBooks Desktop For WHMCS module to unlock these benefits. Follow a comprehensive guide covering the transition process, the advantages it brings, and step-by-step instructions on what to do next after the order has been successfully finalized. |
Common Problems
| 1. When you have problems with connection, check whether your SELinux or firewall does not block ports. |
| 2. In rare cases, taxes might be counted incorrectly for invoices with multiple items, whereby a part of the items is taxed and some are not. Please, be careful! |
| 3. In case you encounter any issues with installation and configuration please make sure you have php7.0-soap installed. Without that the module will not work properly. |
| 4. When .htaccess is enabled, the module may not work due to the lack of connection between QuickBooks Web Connector and WHMCS system. |
| 5. In order for Web Connector to be linked with your WHMCS, your site has to be SSL certified. |
|
6. If you get the following error: 'Got a packet bigger than 'max_allowed_packet' bytes' you need to increase the SET GLOBAL max_allowed_packet=16777216; This command can be also performed in your phpMyAdmin if you are logged in as the root user. |
| 7. In case you see 'The given object ID "0" in the field "list id" is invalid.' error, please check that 'Default Products Item' or 'Domains Item' fields are properly configured. |
| 8. If you get an error 'Object specified in the request cannot be found' during the invoice export, make sure that you have 'Accounts Receivable' field selected in general settings. |
| 9. Long product names are automatically cut to a maximum of 31 characters to meet QuickBooks requirements. |
| 10. If you get the following error: 'There was an error when converting the price "x.xyz" in the field "item cost". QuickBooks error message: This field contains an invalid character.' You need to make sure your system locale settings (Time & Language → Region → Additional date, time, & regional settings) are the same as the ones set up in your WHMCS. |
| 11. Error: "An application with a revoked certificate is requesting access to the following QuickBooks company file" Solution: please contact the QuickBooks team support or follow the instructions in the following article. |