Virtuozzo Hybrid Server For WHMCS
Contents
|
About Virtuozzo Hybrid Server For WHMCS
| Virtuozzo Hybrid Server For WHMCS is a useful module created for the automatic provisioning and management of VPS servers in your WHMCS. Your clients will gain the flexibility to remotely manage backups, snapshots, and firewalls, as well as access the noVNC console. |
- Admin Area Features:
| ✔ Create/Suspend/Unsuspend/Terminate Server |
| ✔ Stop/Restart/Suspend/Reinstall Virtual Machine |
| ✔ Migrate Server Between Nodes |
| ✔ Change Package - Supports Configurable Options |
| ✔ Change Password |
| ✔ Update IP Addresses List |
| ✔ Assign/Delete Virtual Machine By Name |
| ✔ View Server Details And Status |
| ✔ View And Update Assigned IP Addresses |
| ✔ View Scheduled Tasks |
| ✔ Configure Product As Virtuozzo Container Or Virtual Machine Type |
| ✔ Configure Product Networking |
| ✔ Configure Product Features And Limits |
| ✔ Configure Client Area Features Per Product |
| ✔ Select Available OS Templates To Rebuild Server |
| ✔ Enable "Guest Tools" Installation (Virtual Machine Type Only) |
| ✔ Automatically Enable Console After Server Creation |
| ✔ Disable Including Unnamed Backups For Clients |
| ✔ Enable Sending Welcome Email Template After Server Creation |
- Client Area Features:
| ✔ View Server Details And Status |
| ✔ Start/Stop/Restart/Suspend/Resume/Reinstall Server |
| ✔ Add And Download Public SSH Keys (Virtual Machine Type Only) |
| ✔ Change Hostname |
| ✔ Change Boot Device (Virtual Machine Type Only) |
| ✔ Schedule/Restore/Manage Backups |
| ✔ Create And Revert Snapshots (Virtual Machine Type Only) |
| ✔ Enable/Disable/Access noVNC Console |
| ✔ View Usage Statistics |
| ✔ View And Order IP Addresses |
| ✔ Manage Firewall Rules (Container Type Only) |
| ✔ Rebuild Server With Selected OS Template |
| ✔ Mount Selected ISO Images To Chosen CD/DVD-ROM (Virtual Machine Type Only) |
| ✔ Change Password |
| ✔ Upgrade/Downgrade Product |
- Virtuozzo Hybrid Server Addon Features:
| ✔ Add/Edit Node |
| ✔ Check Nodes Status |
| ✔ View Nodes IP Address, Usage, And Statistics |
| ✔ View Virtual Machines List On Node |
| ✔ Assign And Manage IP Network Configurations - Requires IP Manager For WHMCS |
| ✔ Configure OS Template |
| ✔ Configure Network Classes Names, Rates, Total Rates, And Status |
| ✔ Configure Virtuozzo Automator For Backups Restoration |
| ✔ Configure Console Proxy |
| ✔ View Installation Steps |
- Configurable Options:
| ✔ Available Nodes |
| ✔ Available Base Templates |
| ✔ Available OS Templates |
| ✔ Number Of CPU Cores |
| ✔ CPU Limit |
| ✔ Memory Size |
| ✔ Bandwidth |
| ✔ Number Of Public IP Addresses |
| ✔ Number Of Private IP Addresses |
| ✔ Disk Size |
| ✔ Backup Quota |
| ✔ Disk I/O Limit, Bps |
| ✔ Disk I/O Limit, Nps |
| ✔ Snapshots Limit |
- General Info:
| ✔ Requires Virtual Automation (PVA) |
| ✔ Supports High Availability Function |
| ✔ Supports Proxy For Console Connections |
| ✔ Server Resources Chosen During Order |
| ✔ Integrated With IP Manager For WHMCS - Complete Control And Easy Assignment Of IP Subnets |
| ✔ Integrated With Advanced Billing For WHMCS - Actual Server Resource Usage Billing |
| ✔ Integrated With Server Allocator For WHMCS - Automatic Assignment Of Most Suitable Servers To Products |
| ✔ Multi-Language Support |
| ✔ Supports Virtuozzo And Virtuozzo Containers Up To Version 7 |
| ✔ Supports PHP 8.2 Back To PHP 7.4 |
| ✔ Supports WHMCS Theme "Twenty-One" |
| ✔ Supports WHMCS V8.12 Back To WHMCS V8.8 |
| ✔ Requires ionCube Loader V13 Or Later |
| ✔ Easy Module Upgrade To Open Source Version |
Installation and Configuration
| This tutorial will show you how to successfully install and configure Virtuozzo Hybrid Server For WHMCS. We will guide you step by step through the whole installation and configuration process. |
Installation
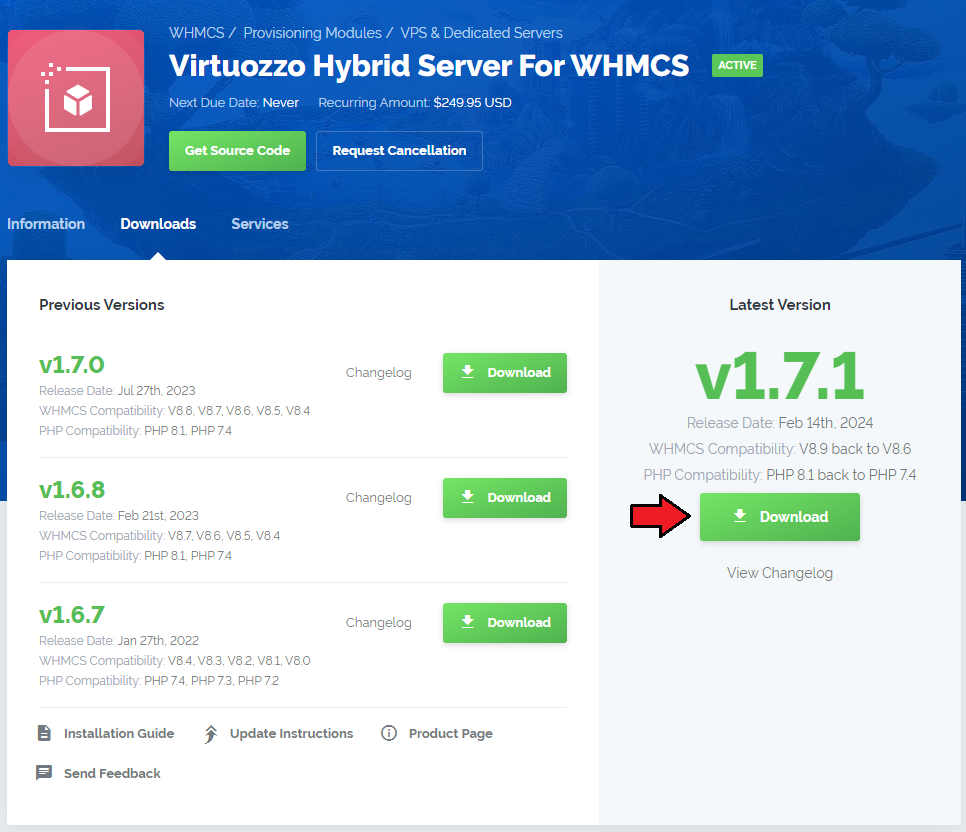
| 1. Log in to our client area and download the module. |
|
| 2. In the downloaded file you might find one or two packages that support different PHP versions. In the most recent versions of the module, you will find only one package that supports PHP 7.4 and later. |
| Previous updates of the module may contain two packages dedicated to various PHP versions. The first one that supports PHP 5.6 up to PHP 7.3, and the second one addressed to PHP 7.4 up to PHP 8.1. |

|
| Note: You can check the current PHP version in your WHMCS. To do so, proceed to 'Utilities' → 'System' → 'PHP Info'. |
| 3. Extract the package and upload its content into the main WHMCS directory.
The content of the package to upload should look like this. |

|
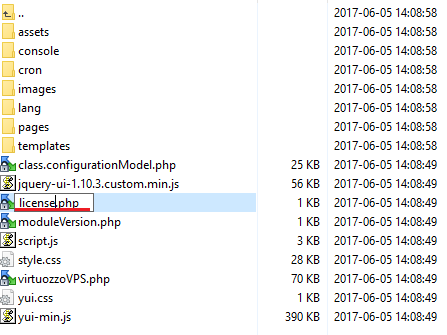
| 4. When you install Virtuozzo Hybrid Server For WHMCS for the first time, you have to rename 'license_RENAME.php' file. File is located in 'modules/servers/virtuozzo/license_RENAME.php'. Rename it from 'license_RENAME.php' to 'license.php'. |
|
| 5. In order to configure your license key, you have to edit a previously renamed 'license.php' file. Enter your license key between quotation marks as presented on the following screen. |

|
Activation of Virtuozzo Hybrid Server Monitor
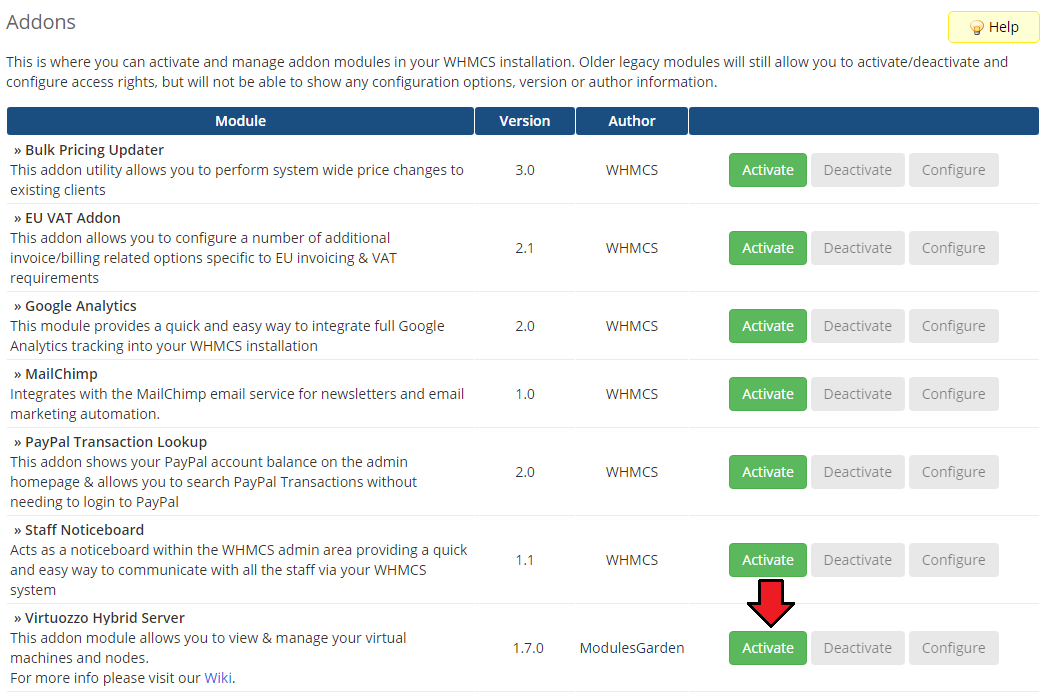
| 6. Firstly, you need to activate Virtuozzo Hybrid Server addon. To do so, log in to your WHMCS and move to 'Setup' → 'Addon Modules'. Find 'Virtuozzo' and press 'Activate'. |
|
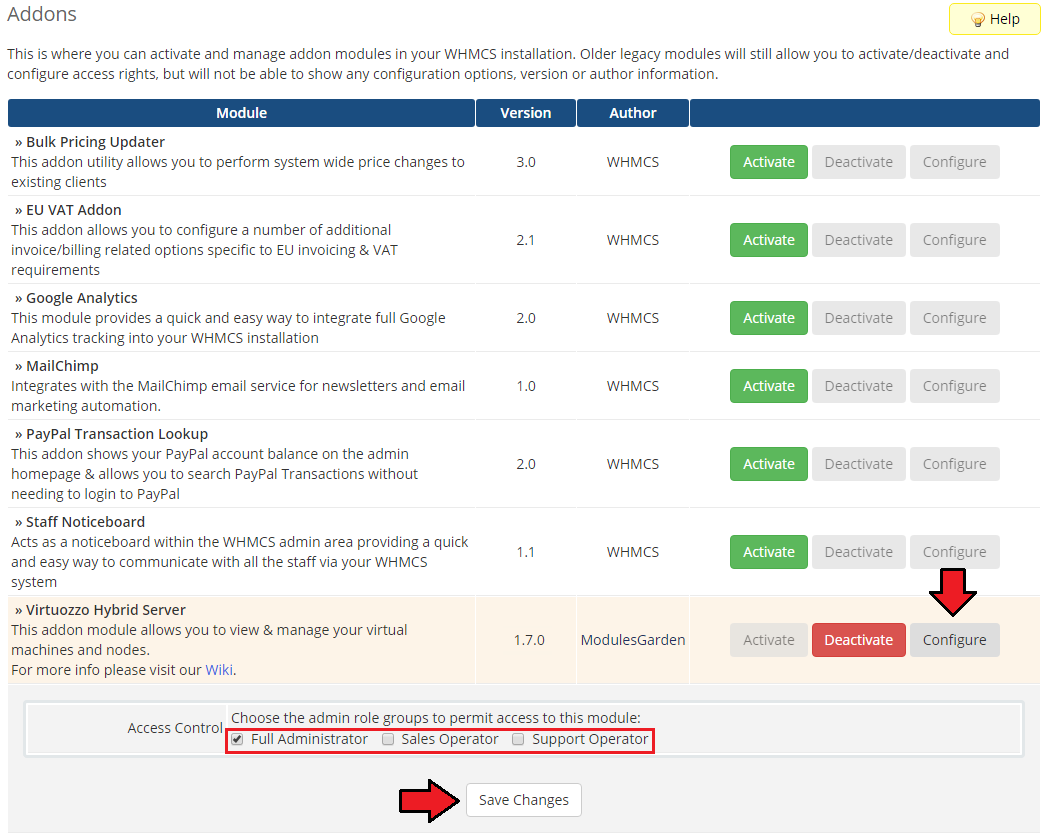
| 7. In the next step you need to permit access to this module. To do so, click on 'Configure' button, tick 'Full Administrator' and press 'Save Changes' . |
|
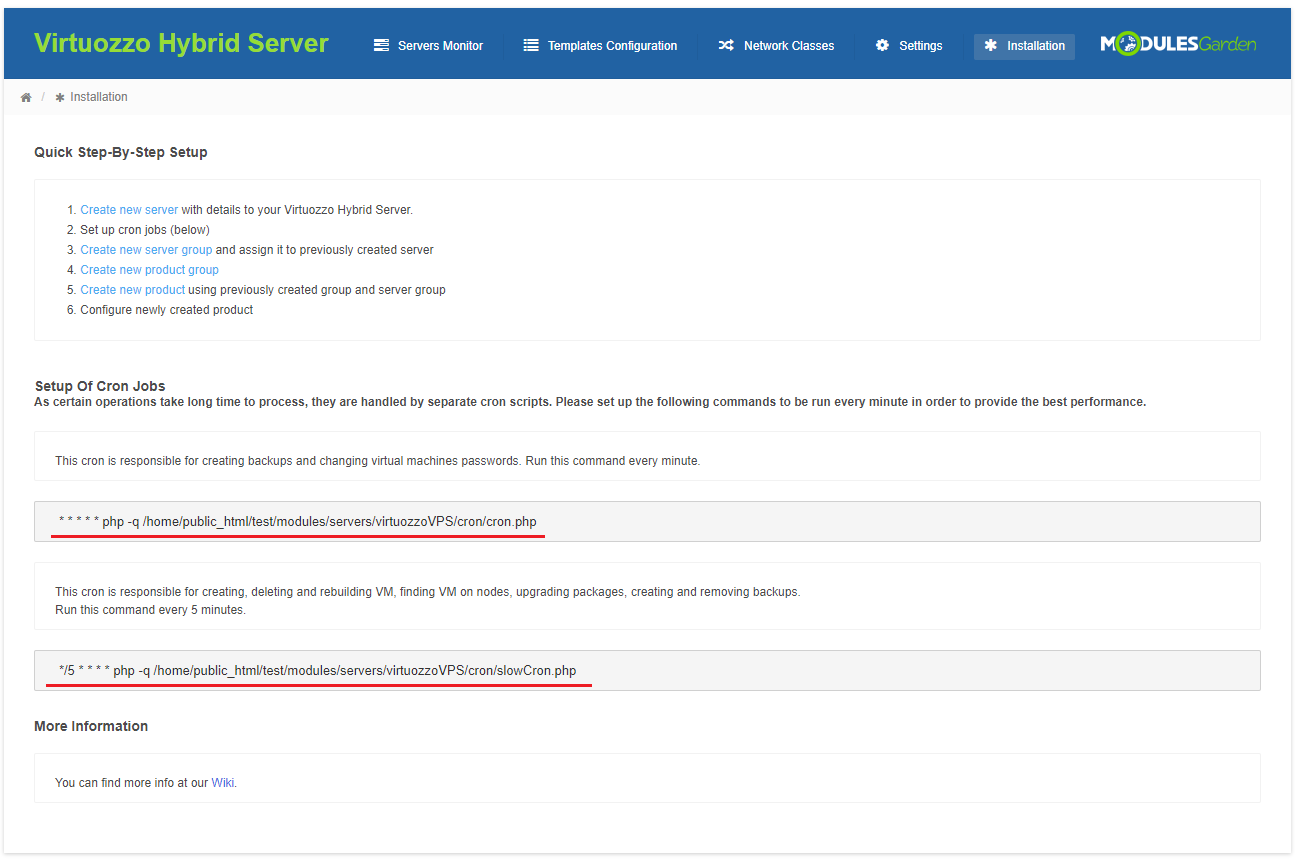
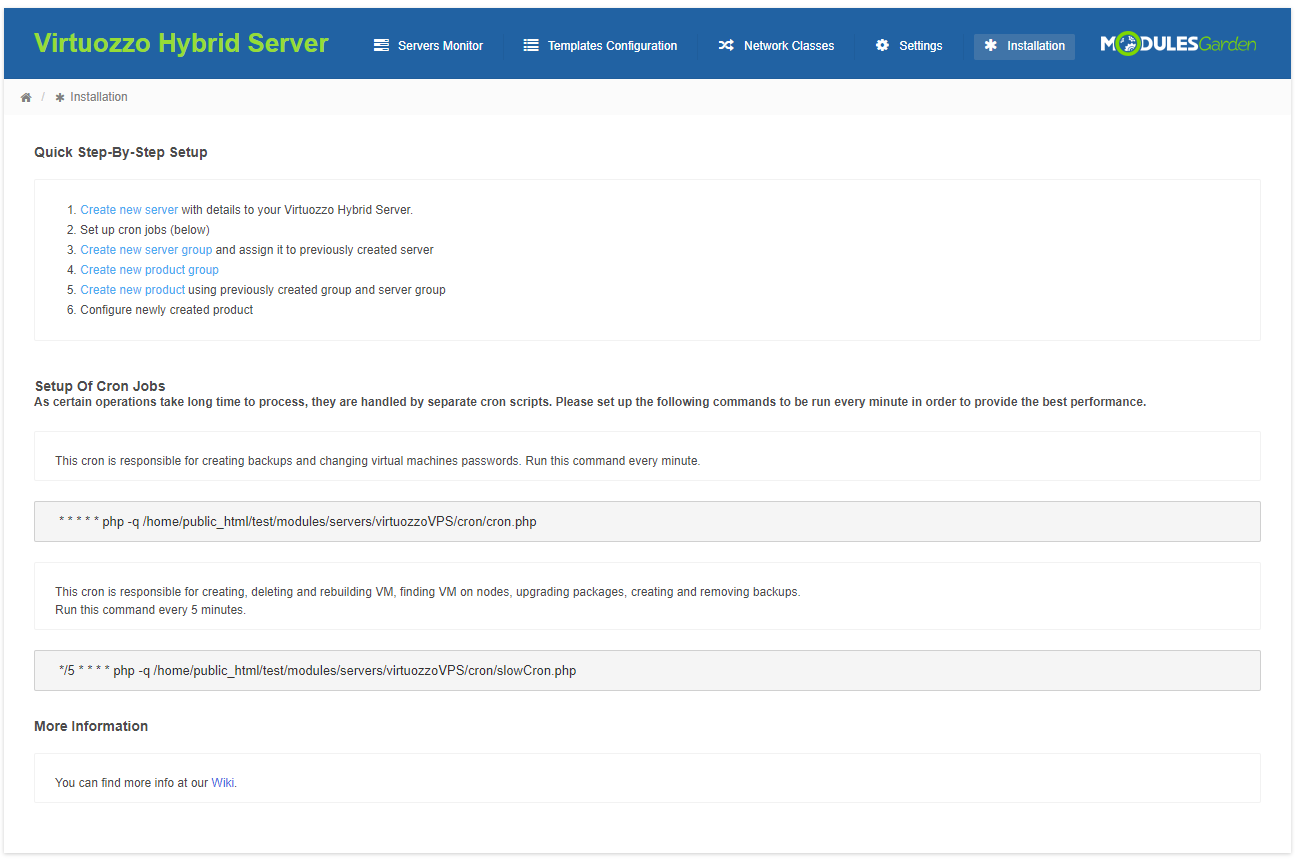
| 8. In order to allow module to run smoothly, go to your addon → 'Installation' tab and add two cron jobs marked on the following screen. Suggested execution time for 'slowCron' - each 5 minutes. |
|
Configuration of Server
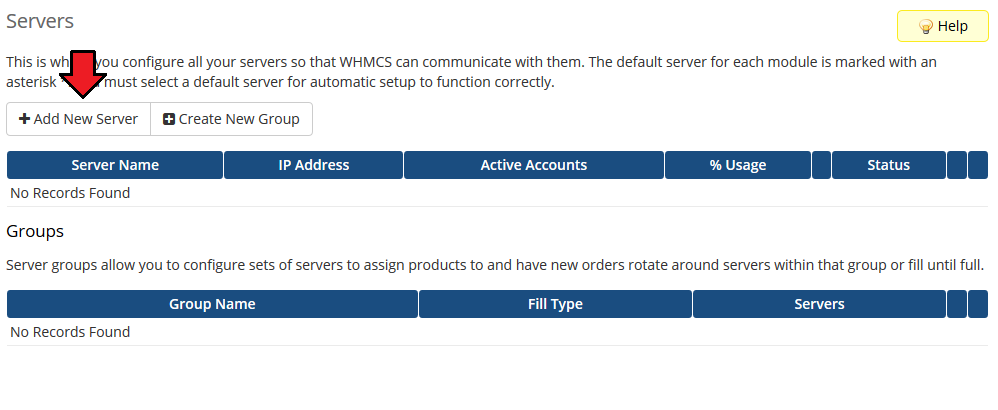
| 9. Now we will show you how to configure a new product. Go to 'Setup' → 'Products/Services' → 'Servers' and press 'Add New Server' . |
|
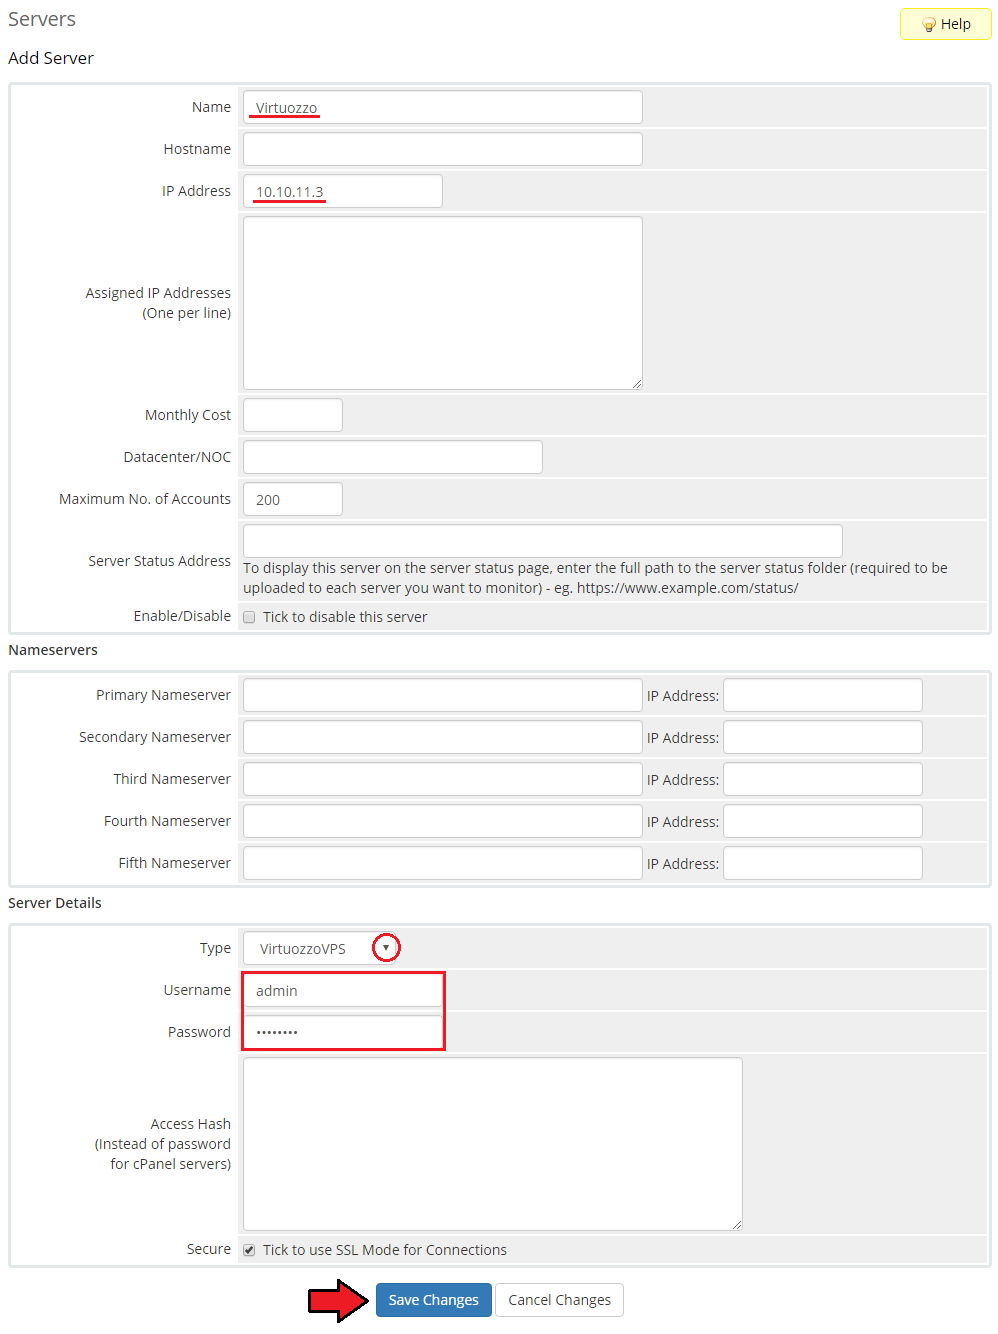
| 10. Next, enter your server name, IP address, username and password. Choose 'Virtuozzo' from a dropdown menu and press 'Save Changes'. Note: Server you are using on WHMCS is in fact a node on your PVA server, not a whole PVA server. |
|
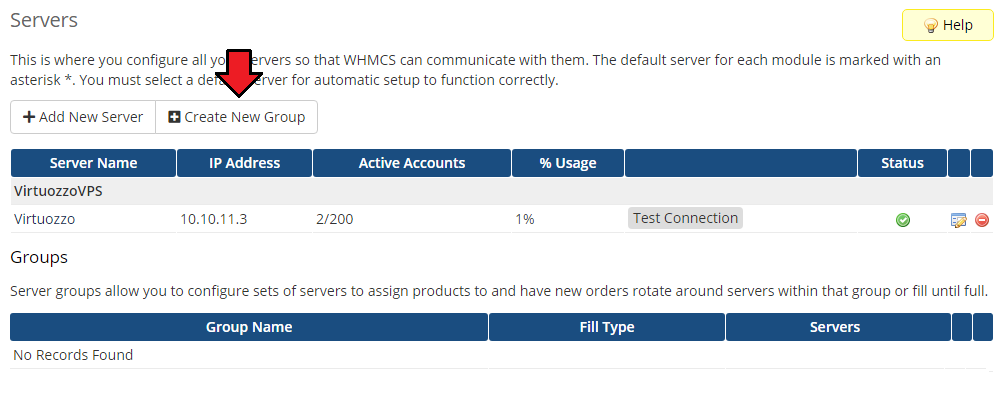
| 11. It is time to create a server group, to do so click on 'Create New Group'. |
|
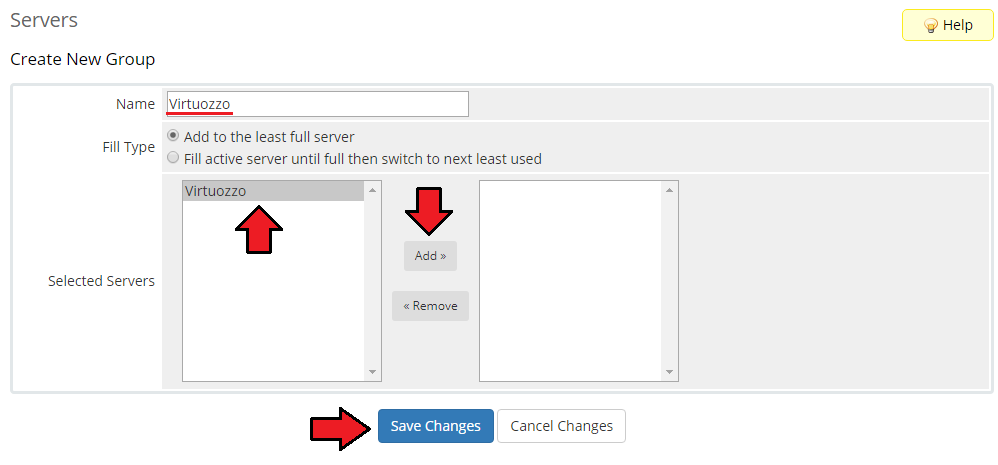
| 12. Enter name, click on your previously created server, press 'Add' and afterwards 'Save Changes'. |
|
Configuration of Product
| 13. In order to create and configure a product click on 'Setup' → 'Products/Services' → 'Products/Services'. Click on 'Create a New Group' . |

|
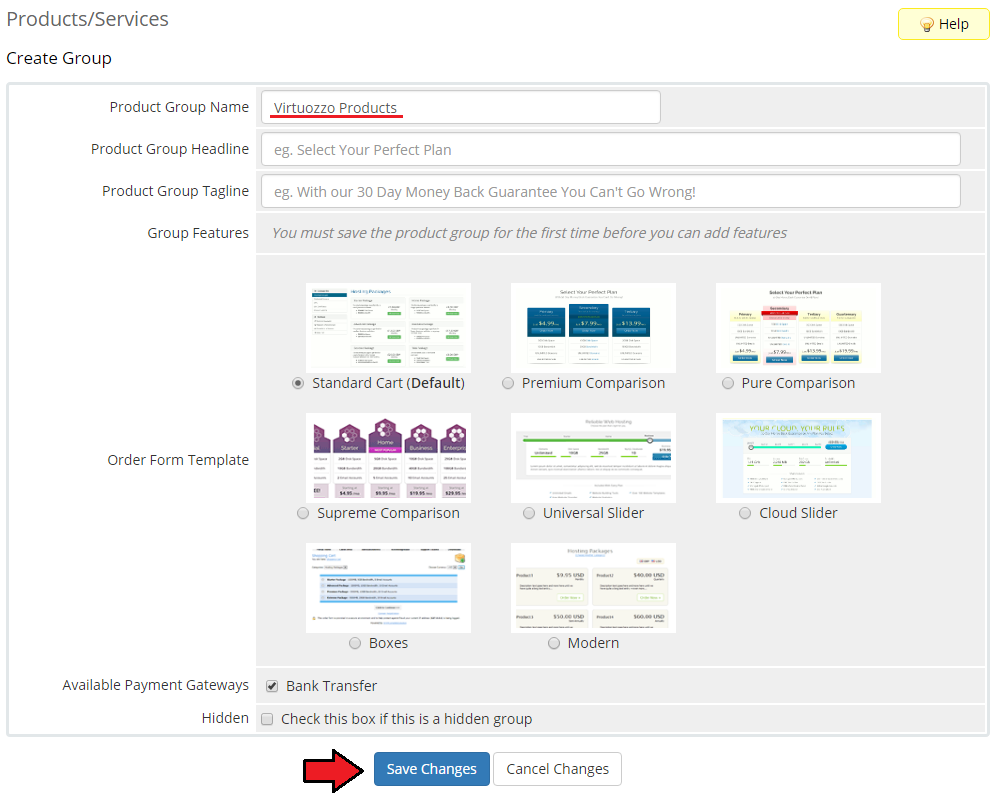
| 14. Enter product group name and press 'Save Changes'. |
|
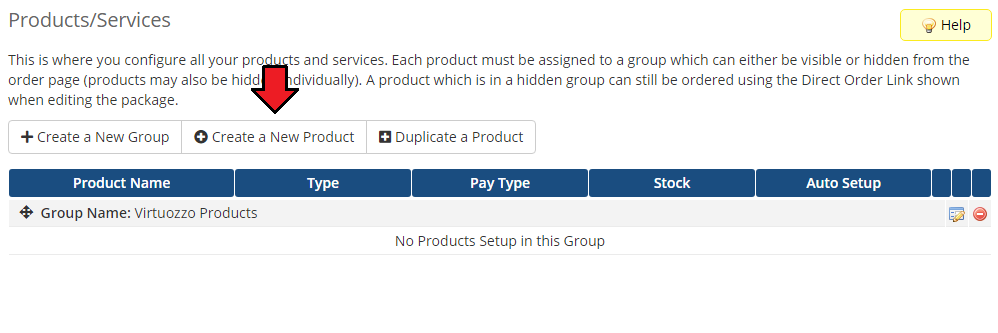
| 15. When you have a product group, you can create your product. To create a product click on 'Create a New Product'. |
|
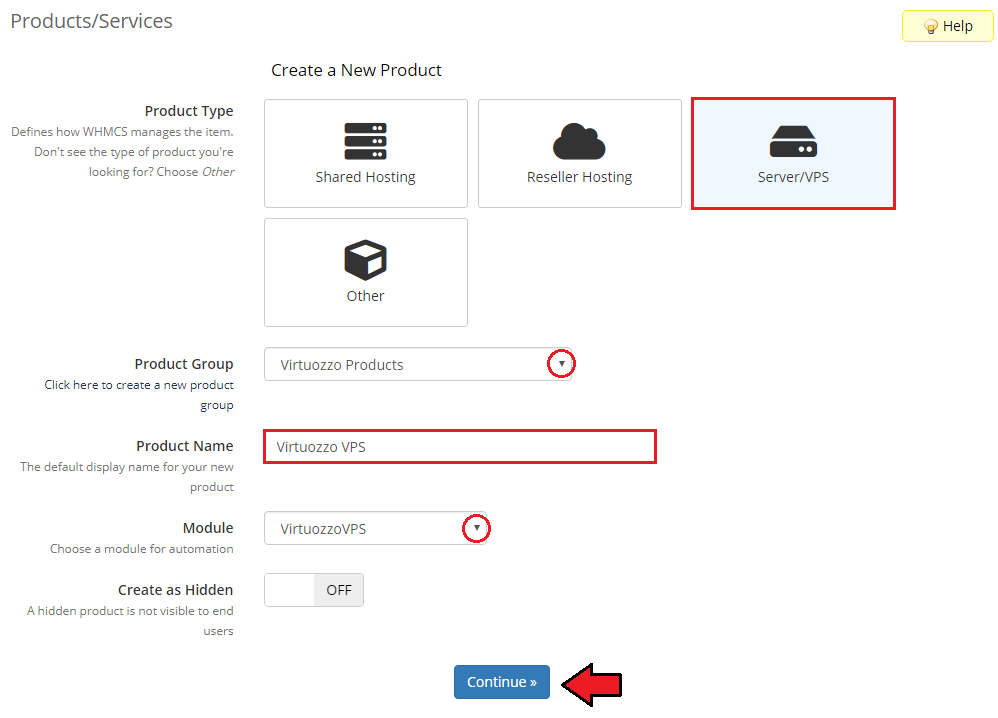
16. Afterwards, fill in the below fields and press 'Continue' when ready:
|
|
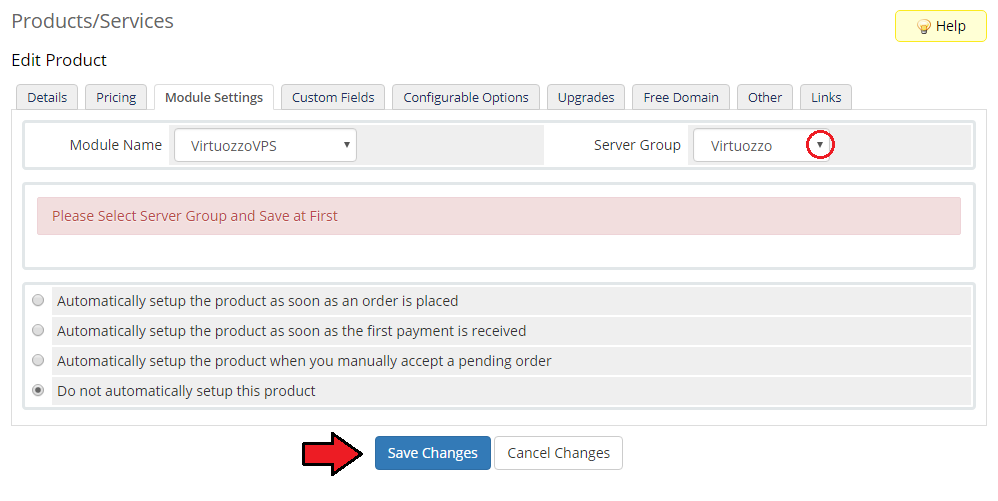
| 17. Now, go to 'Module Settings' section. As the module name has been already selected, find the server group in the dropdown menu. Next, click on 'Save Changes'. |
|
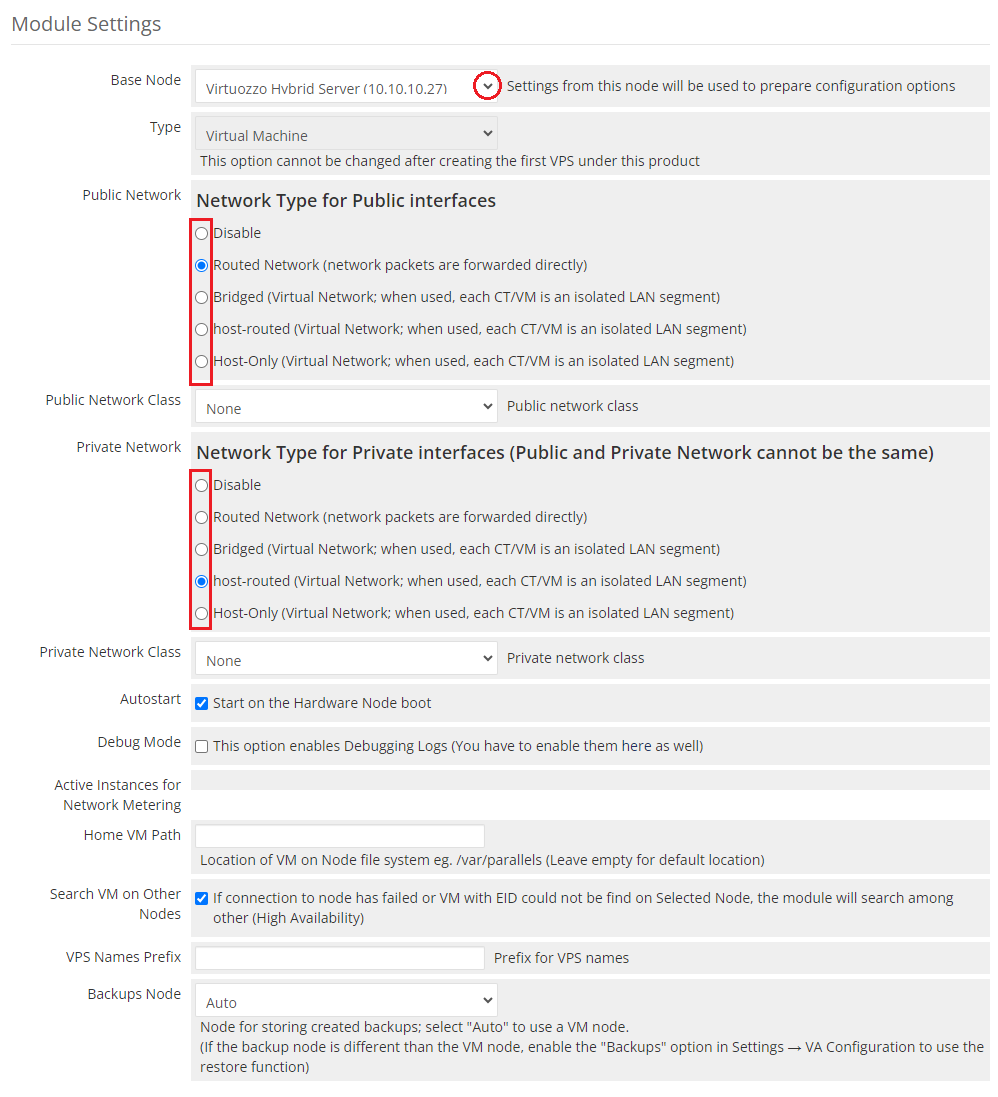
| 18. From dropdown menus choose 'Base Node', 'Type', 'Public Network' and 'Private Network'. Note: 'Virtuozzo Container' server type can have only one routed network. |
|
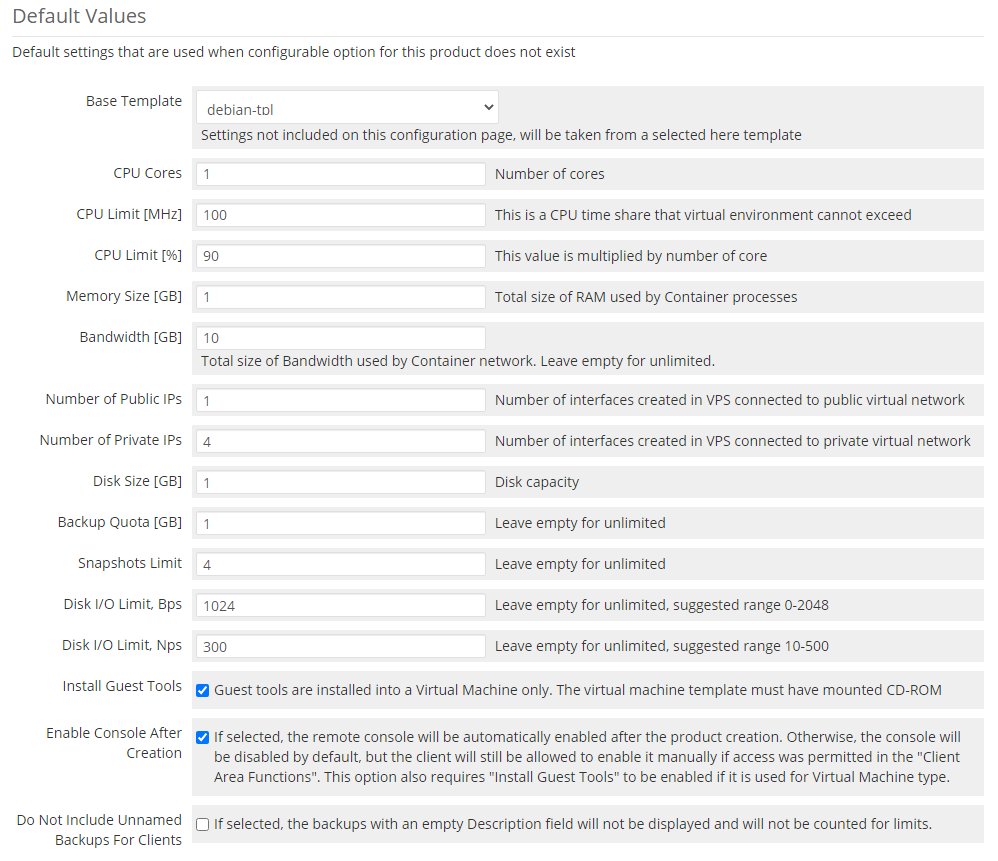
| 19. Depending on the server type that you have chosen, you may see different field names in 'Default Values' and 'Configurable Options' subsection. On the following screen we will show you the configuration of 'Virtual Machine' server type. Note2: Virtual machine template must have mounted CD-ROM to use guest tools. |
|
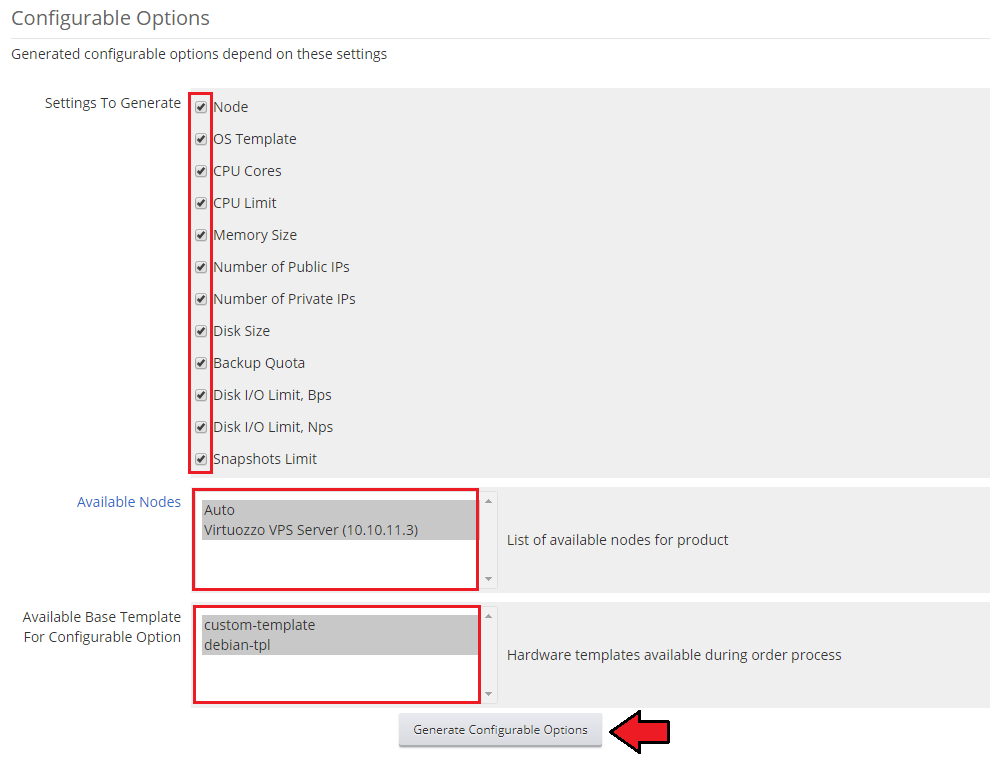
| 20. At 'Configurable Options' you can generate/update specific configurable options for product. Firstly, mark/unmark checkboxes at 'Settings To Generate' to specify which option you want to generate in your configurable options. |
|
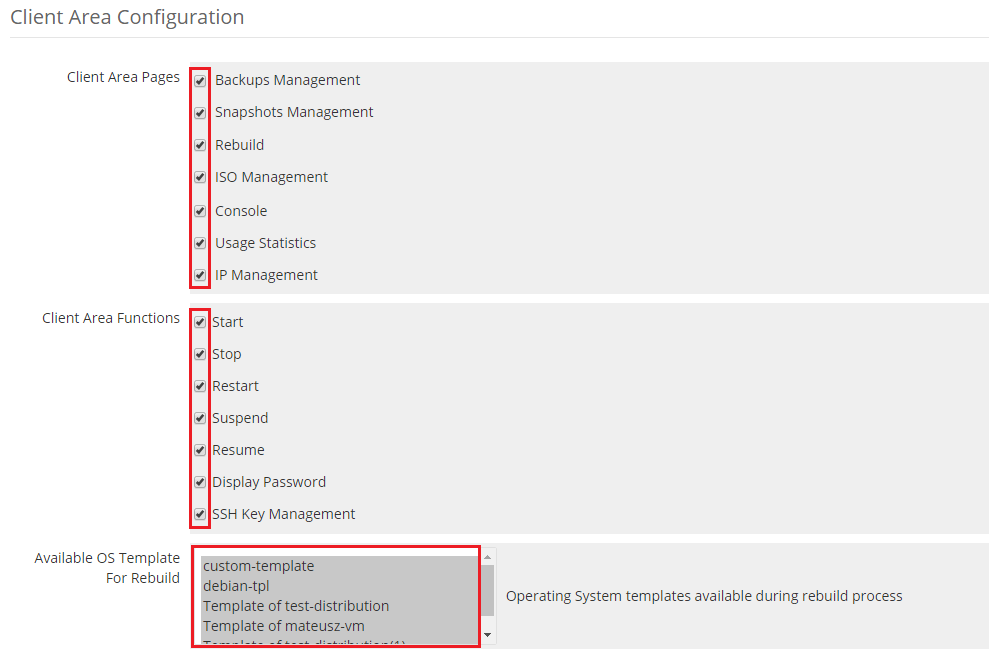
| 21. Now, it is time to define pages and functionalities visible for client in 'Client Area Configuration' subsection. You can do it by simply selecting/unselecting checkboxes next to a page/functionality you want to enable/disable. Important: There are different sets of possible options to choose depending on the selected type: |
|
| 22. For Virtual Machines you can also specify the OS images paths that clients will be able to mount and install using the 'ISO Management' section. To make OS images available to customers, you must manually upload them to your local Virtuozzo server and then enter the direct paths to them. For example, you can create '/root/images/' directory and upload to it downloaded OS images that you want to make available to your customers. Please note that Virtuozzo should support OS images in the following formats: .iso, .cue, .ccd, and .dmg and these images cannot be compressed and/or encrypted. |

|
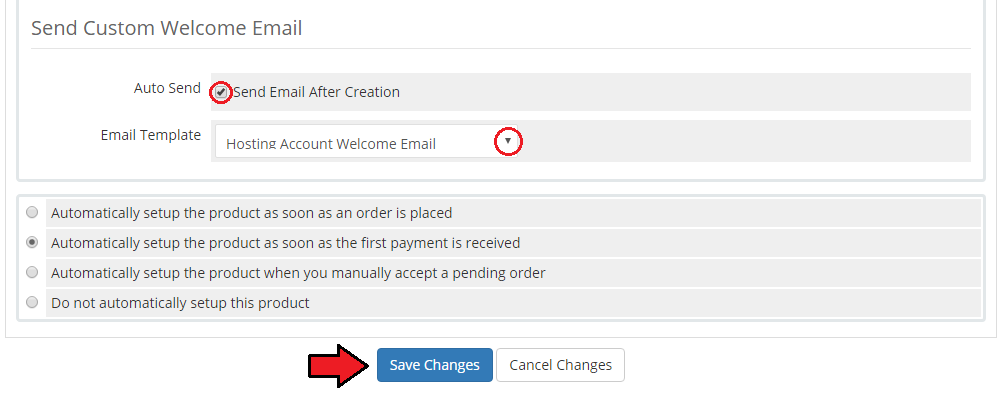
| 23. Send Custom Welcome Email - select this option to send a welcome email to a client only after the virtual machine is successfully created. Please do not set up a standard welcome template email in 'Details' section not to double the messages. If you decide to use the option to send the email after the machine has been created, not just the product, you may add to the template extra merger fields that will indicate a list of assigned IP addresses.
Select the template from dropdown. Email notification will be sent on the virtual machine creation. |
|
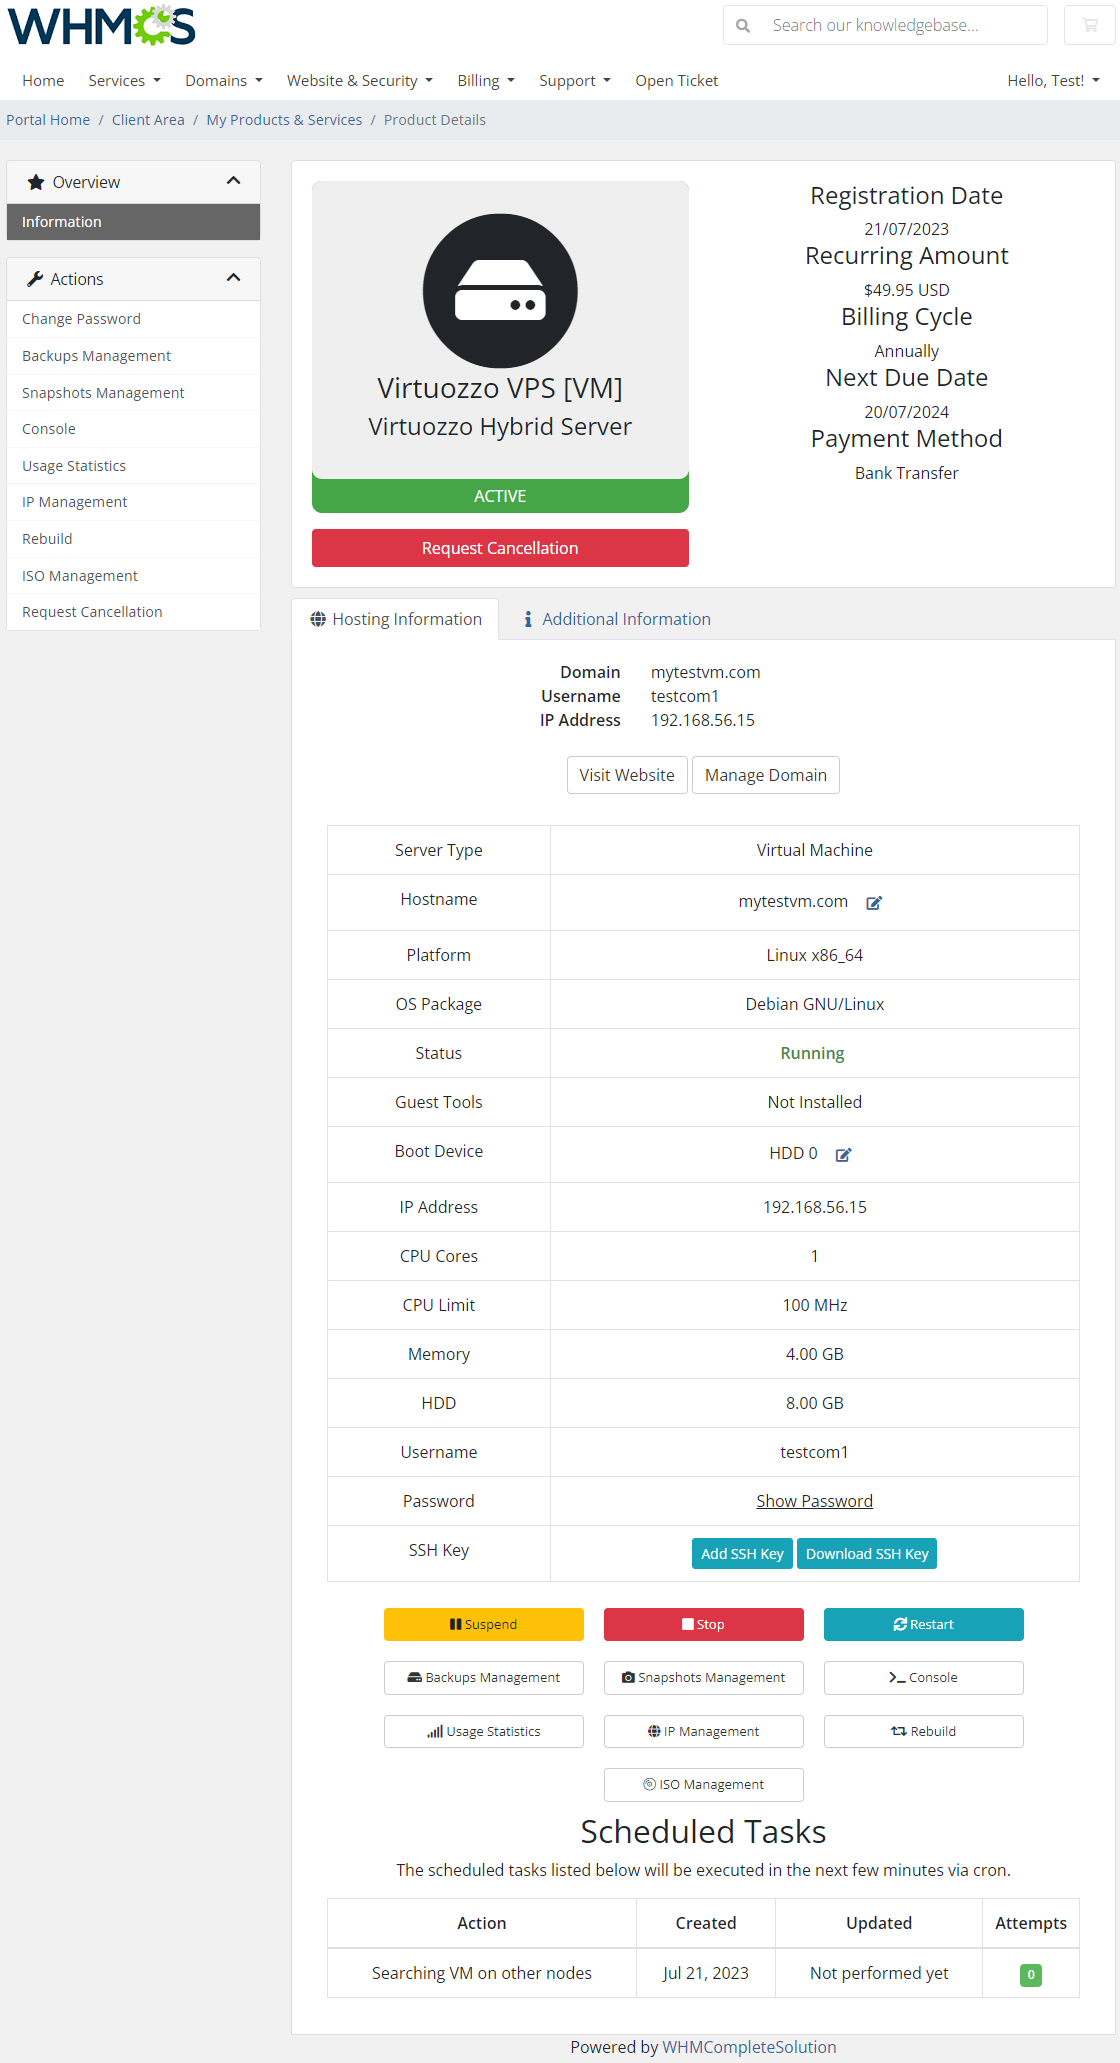
| Congratulations! You have just finished the installation and configuration of the module. Your clients should see something similar to the screen below. |
|
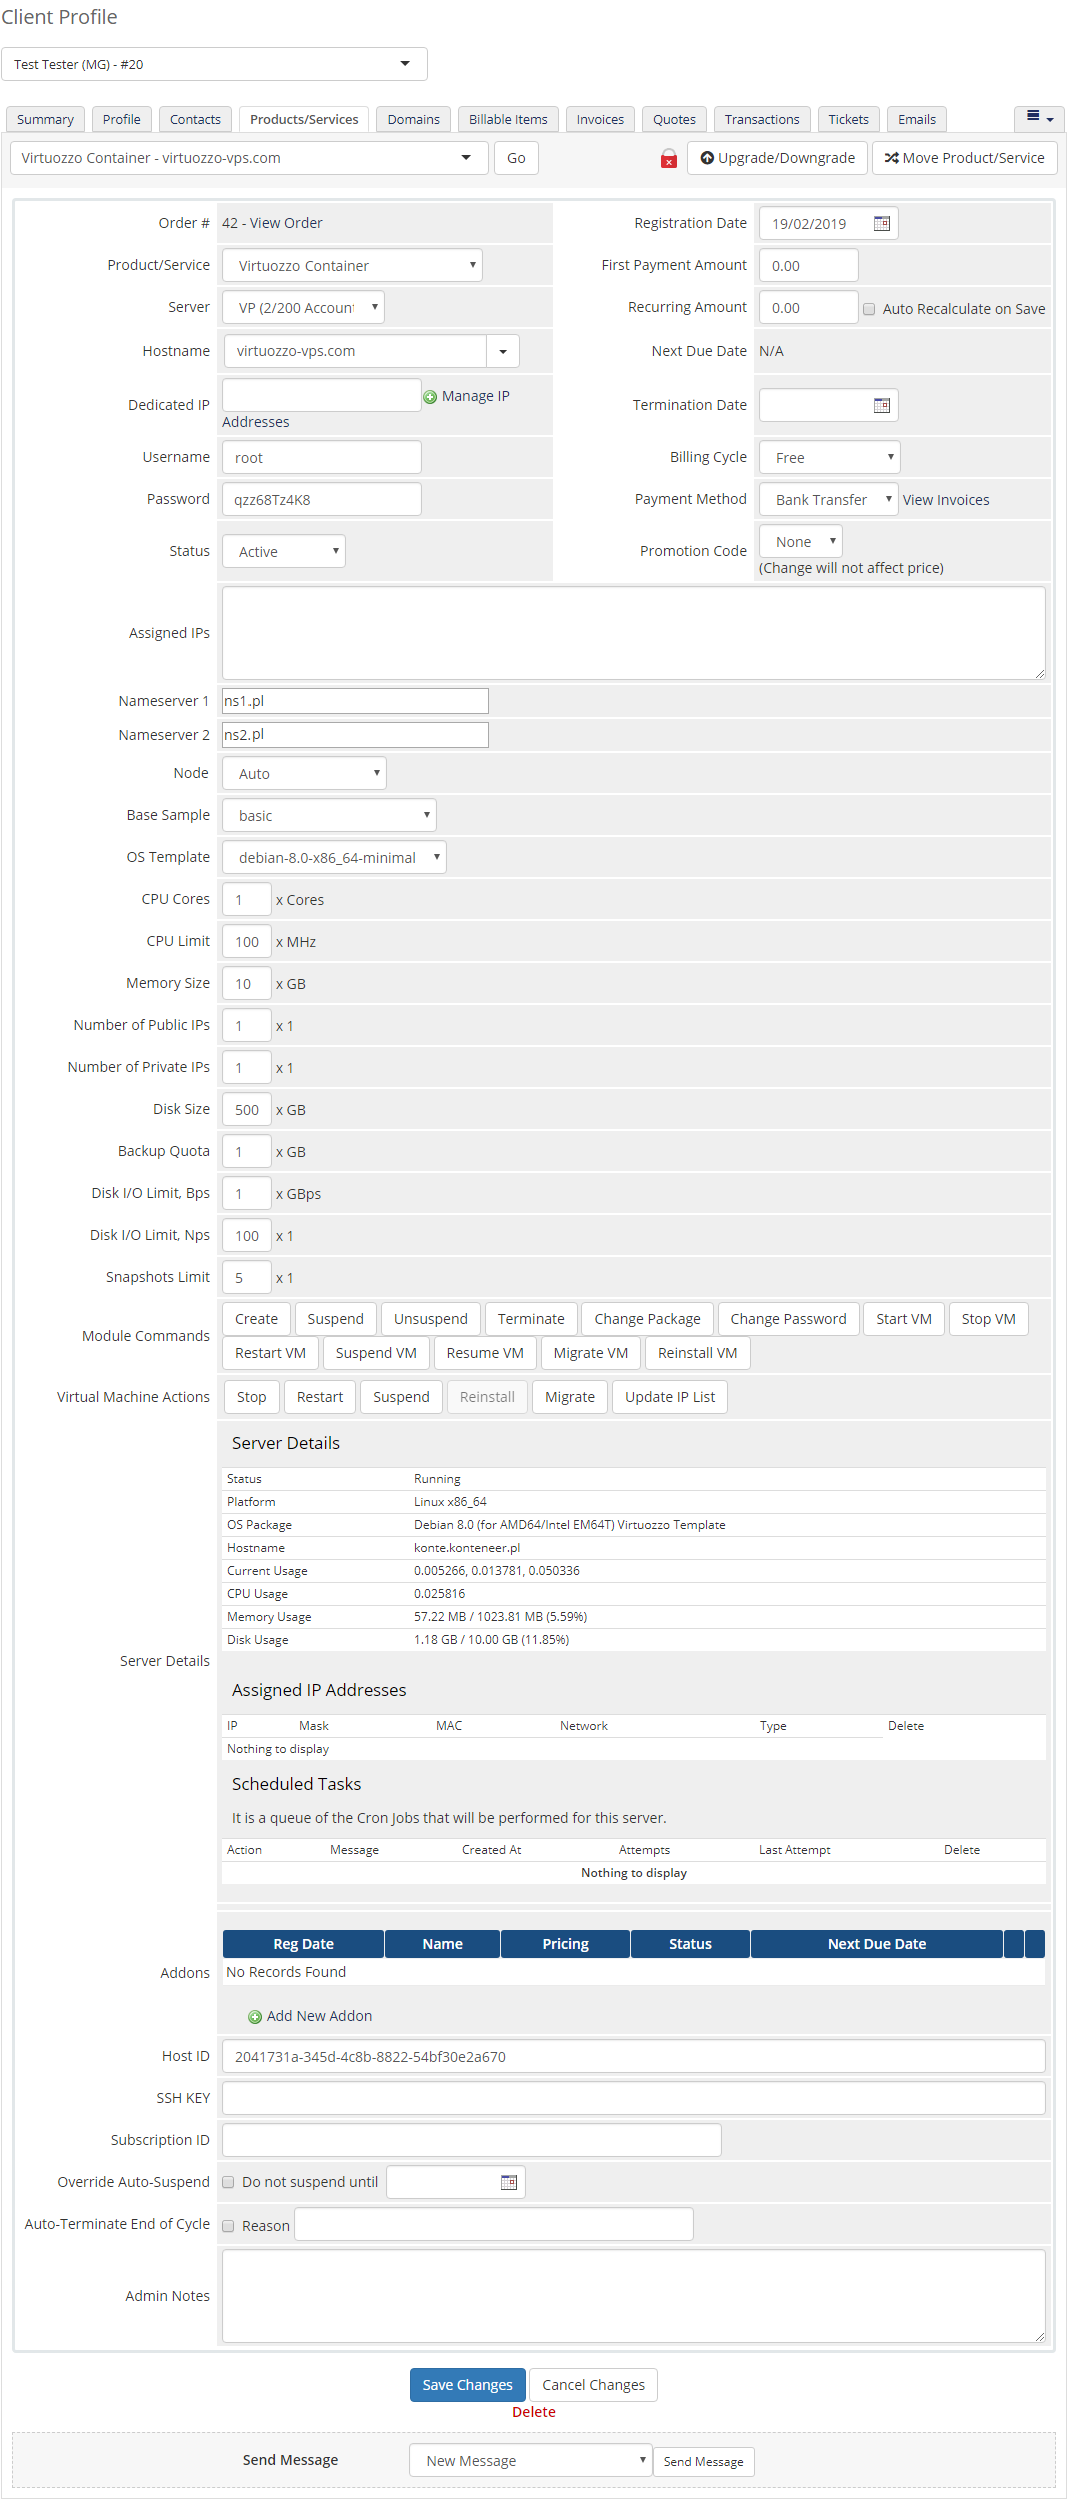
| In the admin area you can monitor and manage each of your products: |
|
Management
| In the following articles we will include all crucial information on how to use the addon and how to manage your products with ease. Finally, you will find here described all the possibilities that your clients are offered to manage their virtual machines in the client area. Take a look below to learn all of that. |
Addon
| In 'Addons' → 'Virtuozzo Hybrid Server' you can find all used virtual machines and nodes as well as instructions on how to install the module. |
Installation
| At this tab you can find instructions on how to install Virtuozzo Hybrid Server For WHMCS and configure the product. You can also find here a link to Virtuozzo Hybrid Server For WHMCS wiki article which you are currently reading. |
|
Servers Monitor
| To add new node, press '+ Add Node' button. Afterwards, follow steps 9 to 21 of 'Installation and Configuration' instructions. |

|
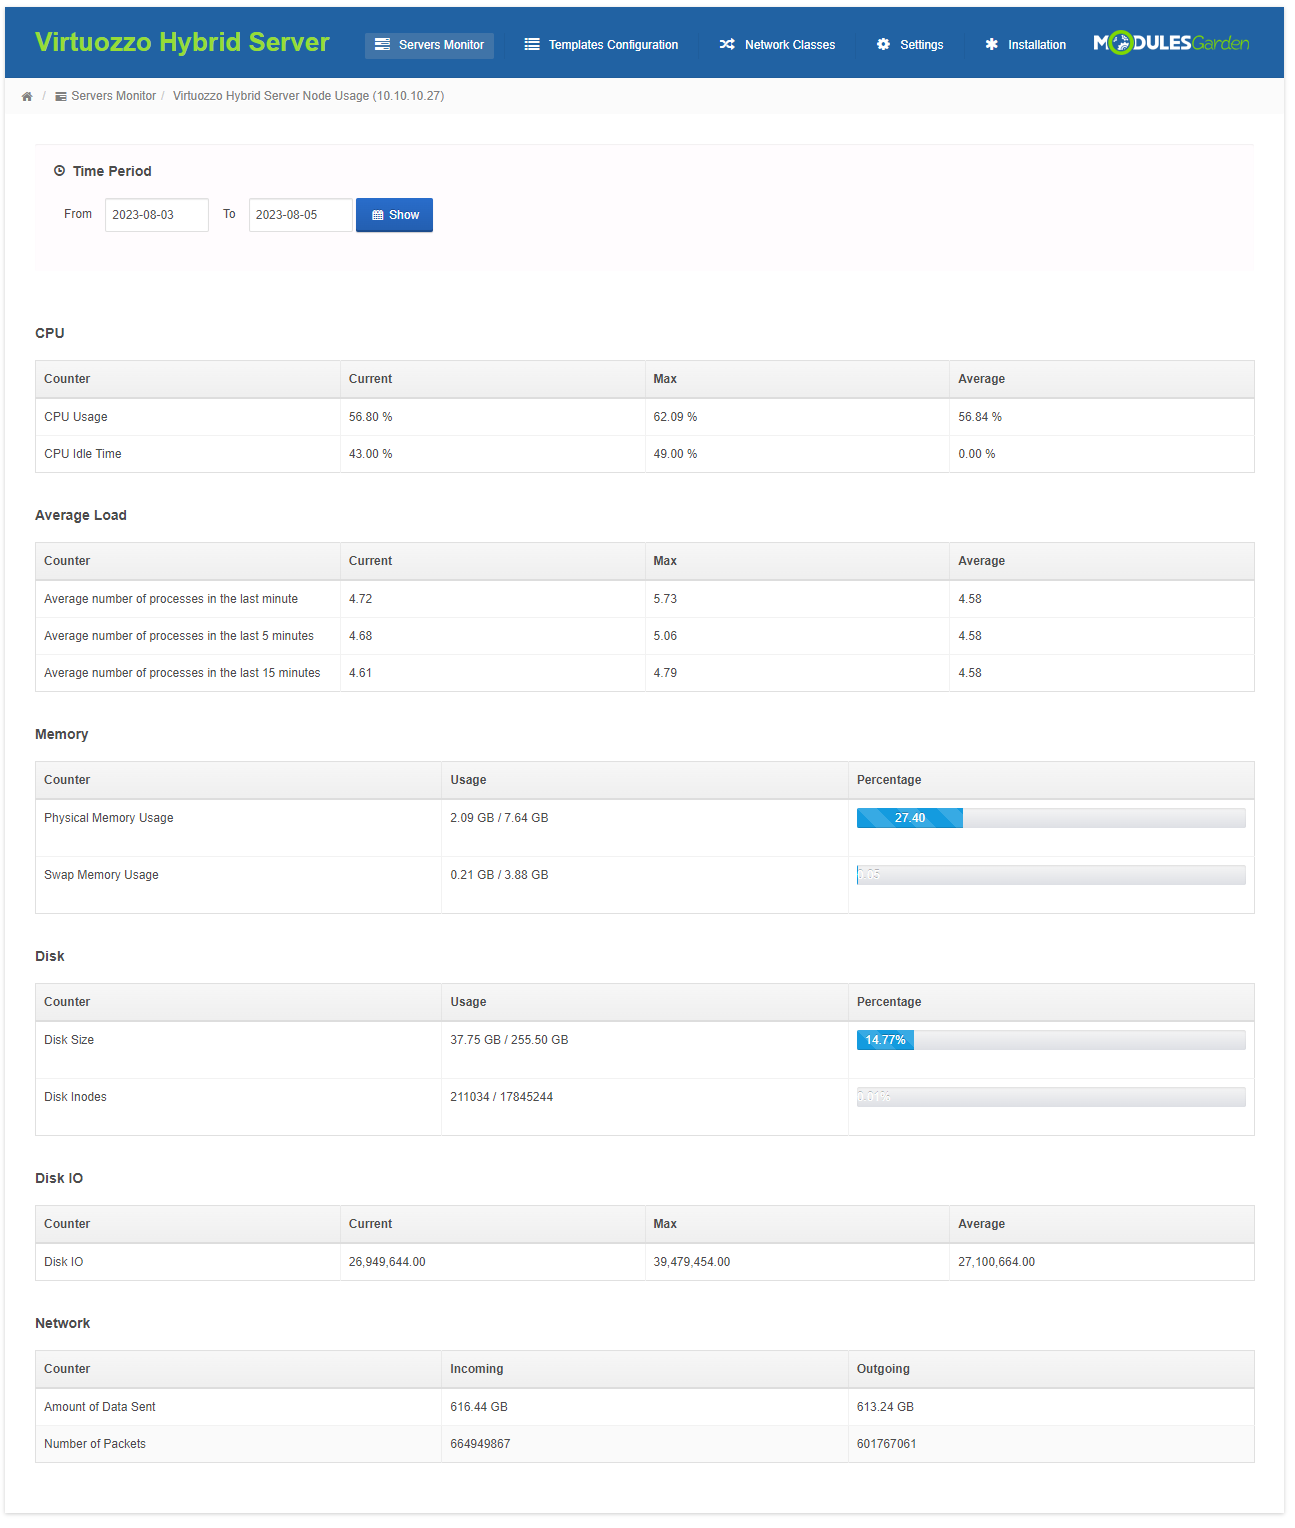
| You can also view current node usage through pressing 'Usage' button, as presented on the following screen. |

|
| In 'Usage' tab you can view resource usage in specific time period for node that you chose. |
|
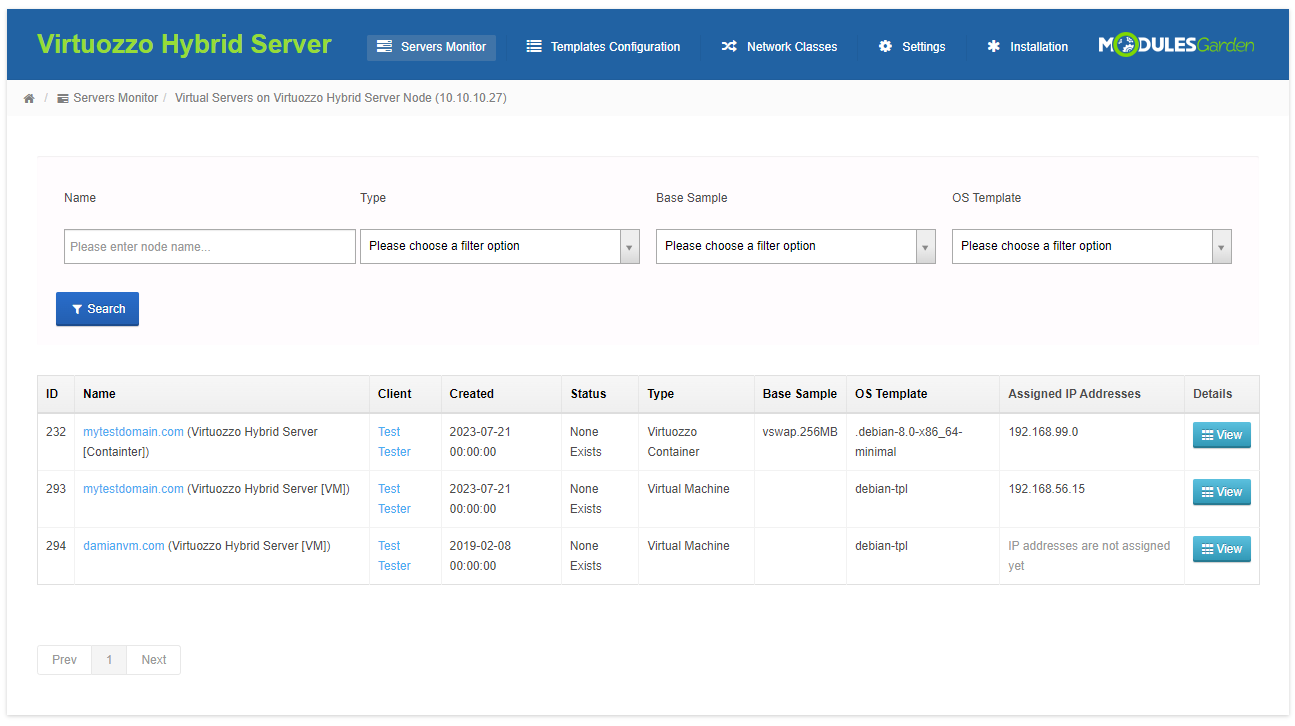
| To access virtual machines list on a particular node, press on 'Virtual Machines'. |

|
| 'Virtual Machines' tab contains virtual machines list created on this WHMCS and node that you selected. You can view here basic information about virtual servers. |
|
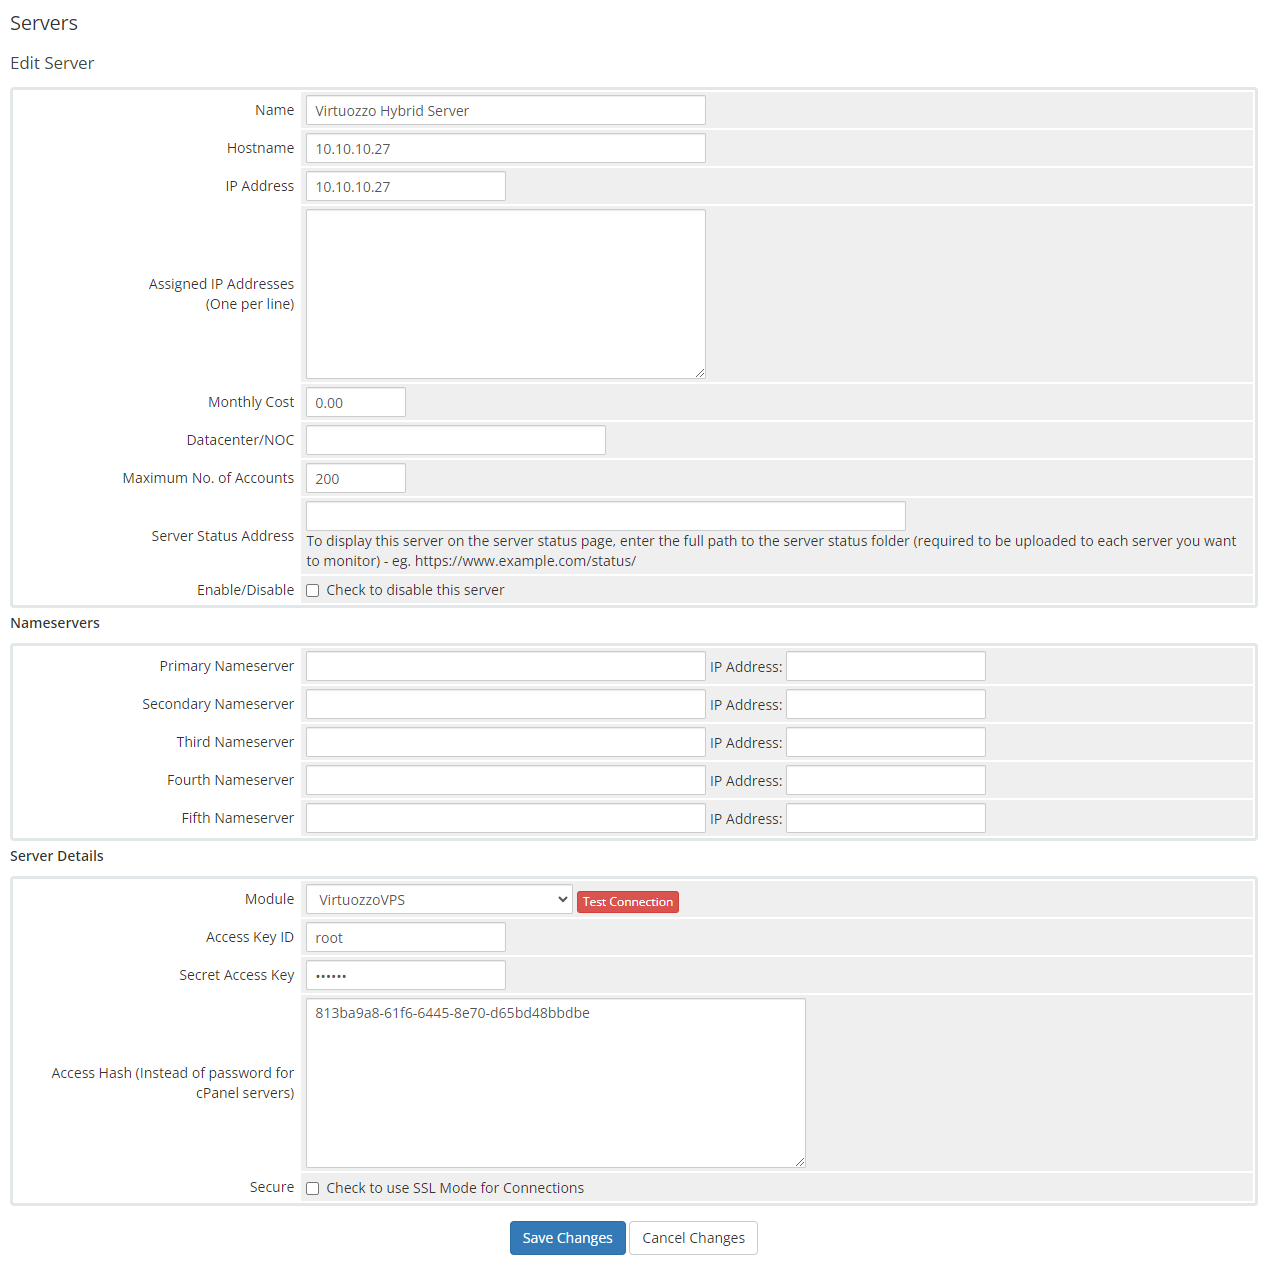
| If you change your Virtuozzo server connection details, you can update connection credentials on your WHMCS through pressing 'Edit' next to altered node. |

|
| Afterwards, upgrade your connection details and confirm through pressing 'Save Changes'. |
|
Templates Configuration
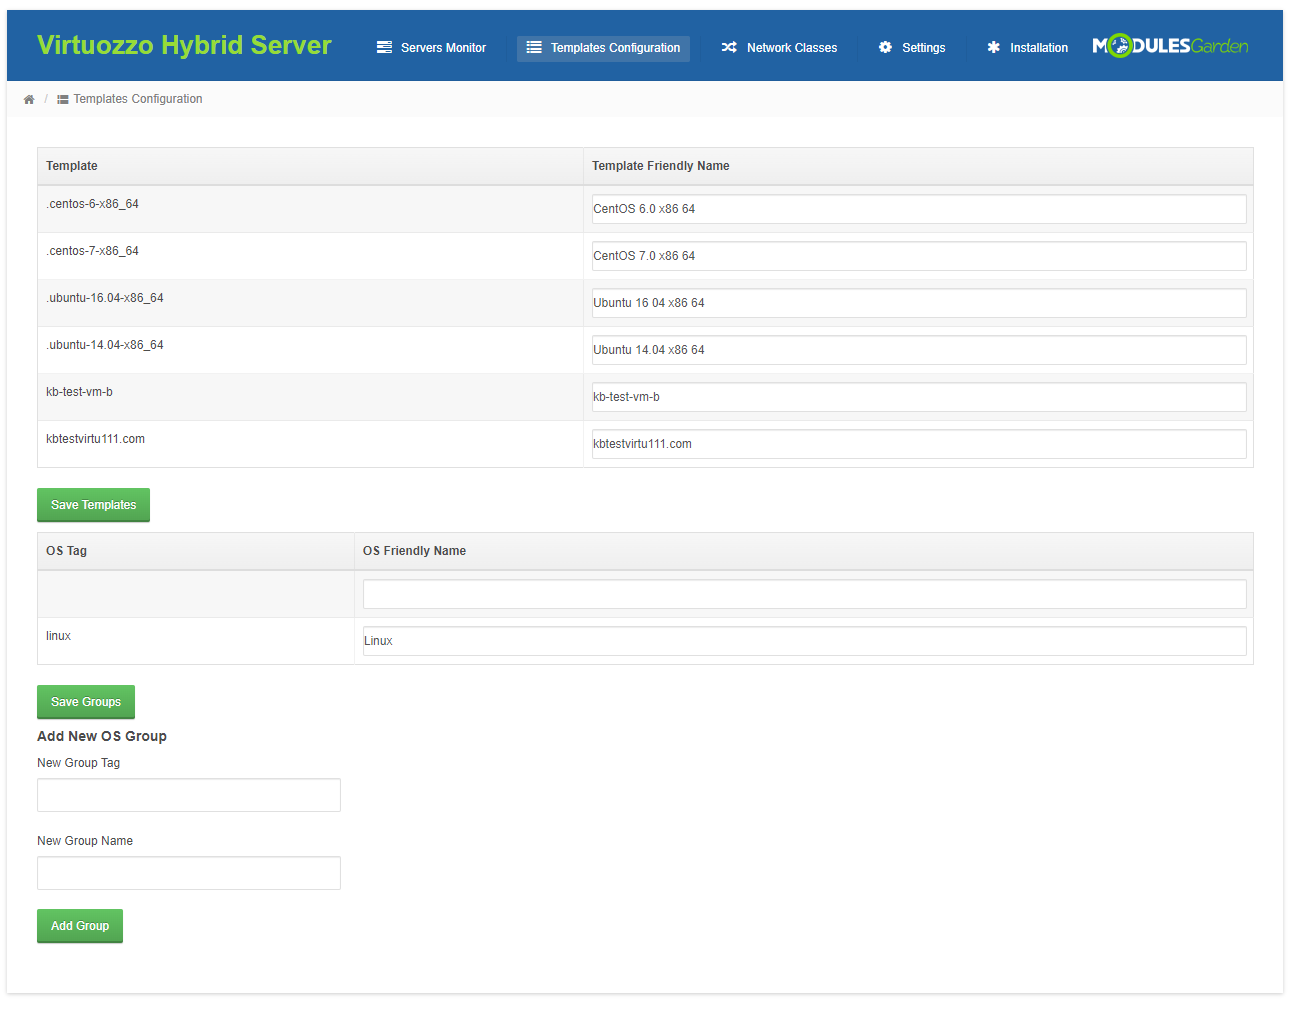
| In this section, you may configure the OS templates. Assign friendly names to templates and existing tags and create new OS groups for easier management. |
|
Network Classes
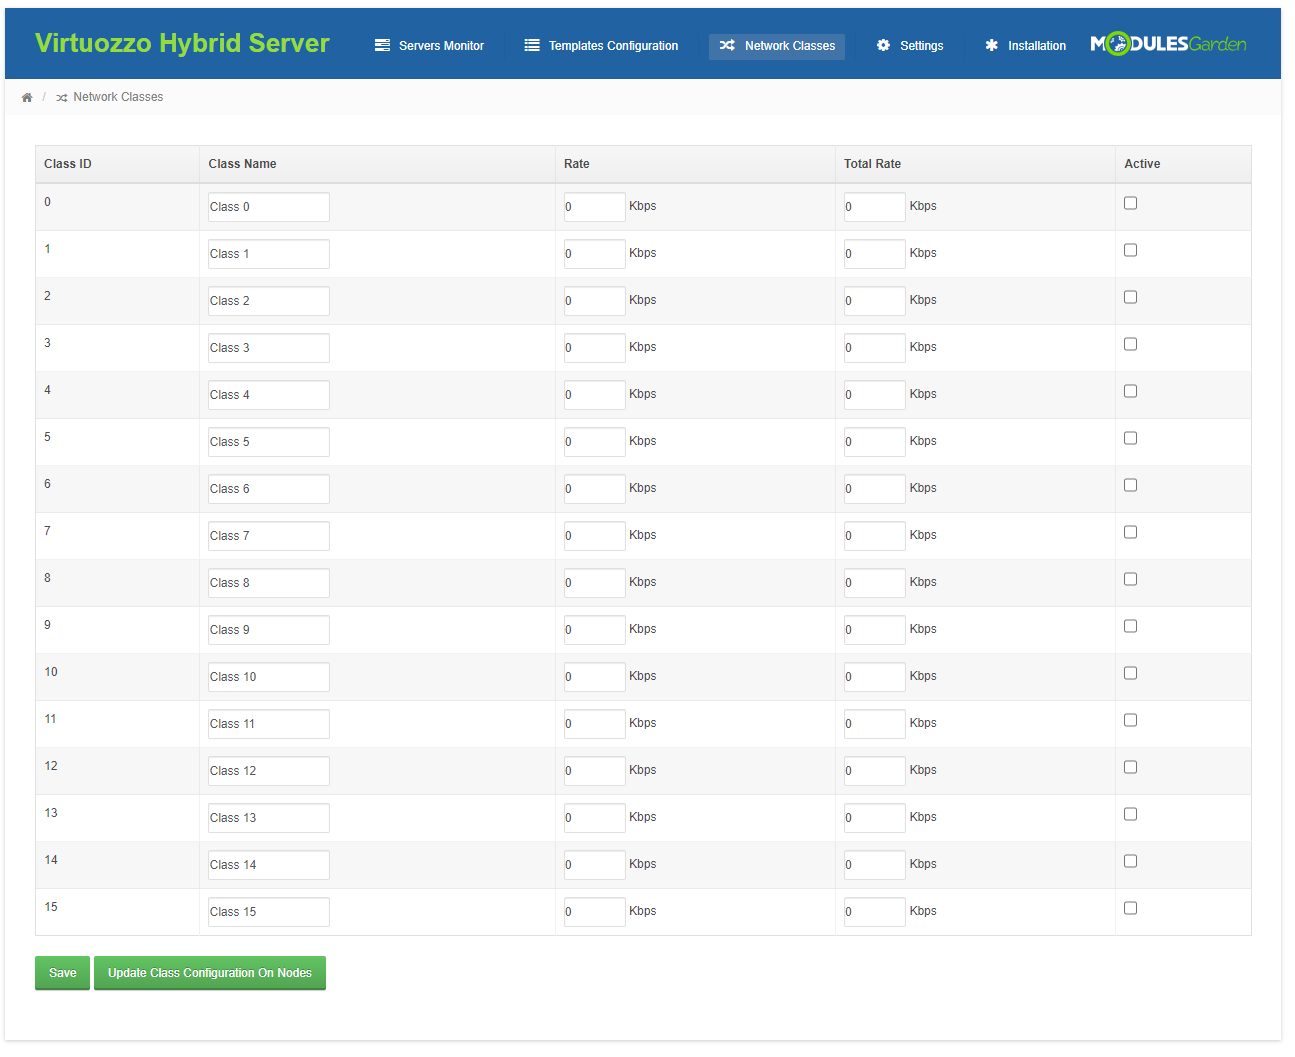
| The Network Classes section allows quick and easy configuration of the network classes' names, rates, total rates, and statuses. Remember to update the class configuration on nodes after making any changes. |
|
Settings
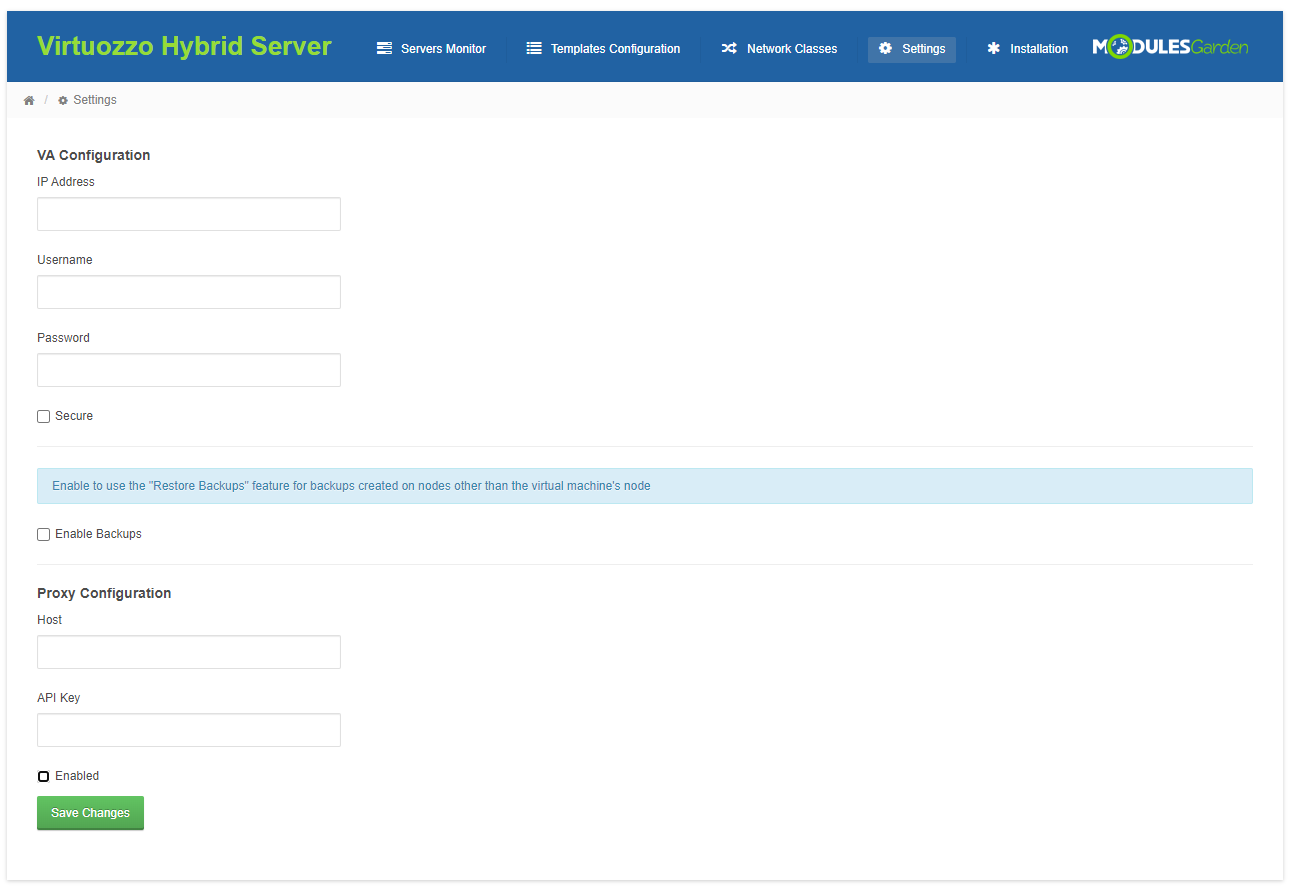
| In 'Settings' you can find the fields required for the configuration of Virtuozzo Automator and proxy. |
|
Virtuozzo Automator
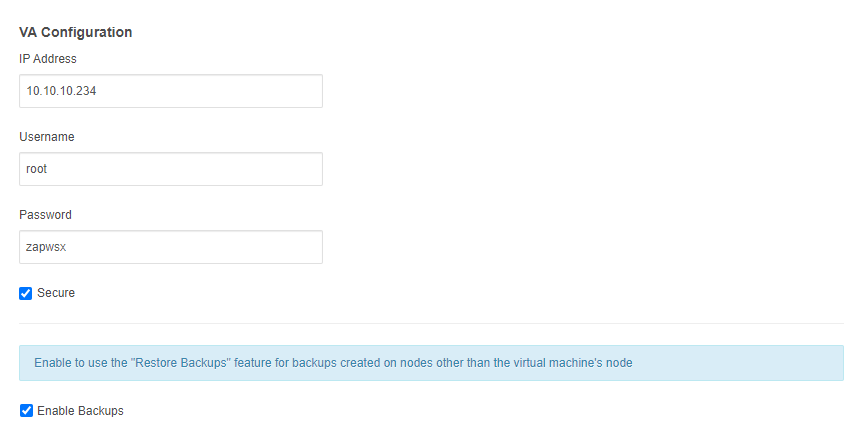
Set up Virtuozzo Automator to allow the restoration of backups created on nodes other than the node of the virtual machine.
|
|
| Important: In the product's module settings you may define if backups are stored on the virtual machine's node (Auto) or choose another available node from the drop down list. If a backup node is different than the VM node, enable the backups option to use the restore function. |

|
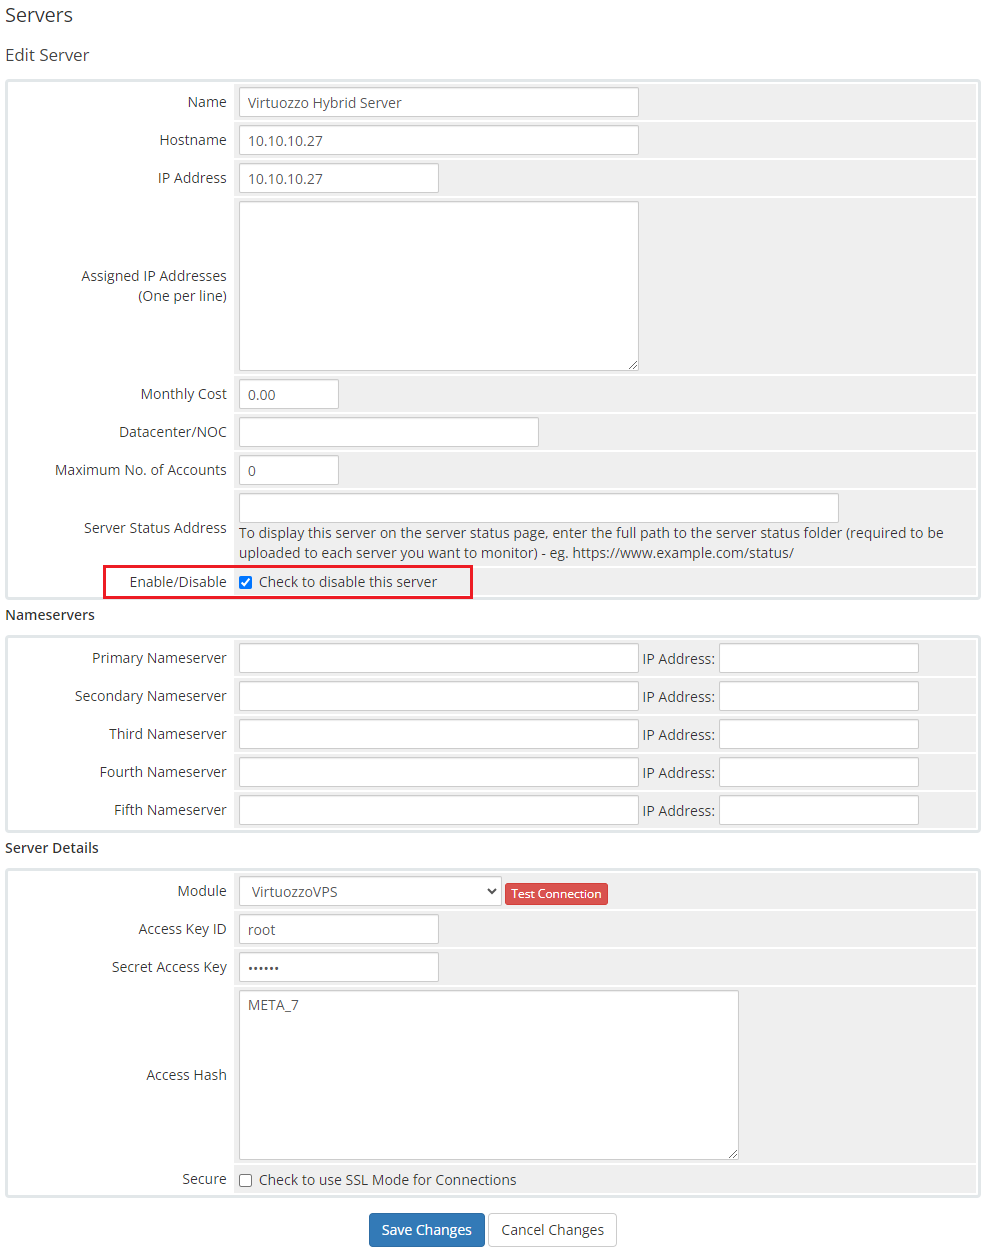
| Additionally, it is possible to create a server that will be used only for backup purposes. To do so, create a new server, and establish the successful connection as always, but remember to disable the server by selecting the 'Enable/Disable' option in the server details. |
|
Proxy Installation For Console Connection
| A comprehensive guide detailing the installation, update instructions, and operational flow for the Proxmox Proxy application can be found in a dedicated article accessible through the following link. We encourage you to refer to it for further insight into the Proxmox Proxy application. |
| The proxy feature can be looked on as an added security boost for your infrastructure. It hides your Virtuozzo server so that your clients will not get to know its actual address when connecting to the server via the console in your system. |
| Before you begin the process of connecting the console to the server through a proxy, you need to download the proxy application file. The file can be found under the following link after you have logged in to your ModulesGarden account. |
| 1. Create a new VPS server, which you may run on a Virtuozzo server. It is advised to use the KVM virtualization type. Warning! The used VPS may NOT have any services running, such as: PHP, WebServer (e.g. apache, nginx) or MySQL server. |
2. Configure the network on the virtual machine, make sure the network works correctly, to do so you may use the below command:
ping modulesgarden.com If everything is fine, assure that basic server security settings have been established. |
| 3. Log into the machine on which you are going to set up proxy. |
| 4. Install the docker engine and the docker compose:
https://docs.docker.com/engine/install/ |
| 5. Upload the application files into a proper directory, eg: /root/virtuozzo-proxy (create if needed). Then unzip the files. |
6. Move to the following catalog:
cd /root/virtuozzo-proxy Note that the exact directory depends on the previous step where you uploaded the files. |
| 7. Purchase or generate your own SSL certificate, and then use the certificate to overwrite the following files: 'nginx/localhost.crt' and 'nginx/localhost.key' . |
| 8. Find the 'example.env' file and rename it to '.env'. Then open the just renamed '.env' file and provide a random set of signs to create the database and root passwords: DB_PASSWORD and MYSQL_ROOT_PASSWORD |
9. Run the below command:docker-compose up --build -d |
10. Move to docker container:
docker exec -it proxyphp bash and run the installation script: php -q /var/www/html/installer.php install When ready, find the API Key and keep it safe, you will need it later on when pasting the data into the Virtuozzo Hybrid Server Addon, see point 12 for details. |
11. Next, copy your machine IP address to WHMCS. You may check the IP address using the below command:
ip a Note: Remember to check the IP address in your virtual machine, not in the proxyphp conatiner. |
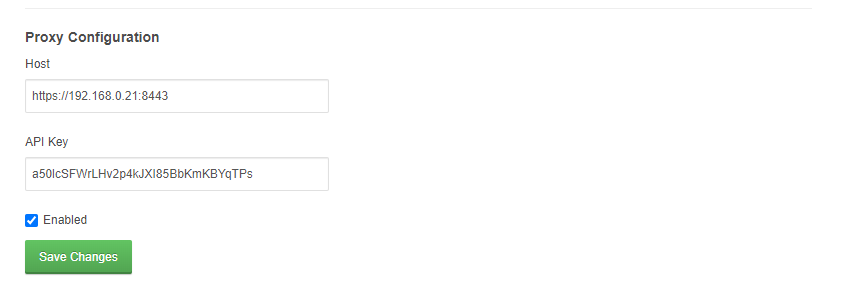
| 12. Configure all the required data in the Virtuozzo Hybrid Server addon in your WHMCS. Move to 'Addons' → 'Virtuozzo Hybrid Server Addon' → 'Settings'. At the bottom you will find section 'Proxy Configuration' with 'Host' and 'API Key' fields. Provide the necessary data, tick 'Enabled' and save changes. |
|
| 13. Make sure the server works. In order to do so, please open the address: https://{vmip}:8443. Remember to replace {vmip} with a valid virtual machine IP address, for example: https://192.168.8.113:8443/ |
| 14. Finally, try to open the noVNC console on your WHMCS Virtuozzo product to check if the proxy configuration is working properly. |
Important: If your certificate expires in the meantime, you will need to buy/generate a new one and follow the below steps:
docker-compose up --build -d |
Note: If you ever encounter an iconcube error while rerunning the 'docker-compose up' command, delete all local docker images related to your docker file using the following command and try again.
$ docker rmi -f $(docker images -a -q) |
| For instruction on how to react in case an update is required, please refer to the dedicated article including all details on the Proxmox Proxy application. |
IP Management
| Our Virtuozzo Hybrid Server For WHMCS module supports management of IP addresses, but it needs IP Manager For WHMCS module to work correctly. To access it, go to 'Addons' → 'Virtuozzo Hybrid Server Addon' → 'Servers Monitor' and press 'IP Management' button. |

|
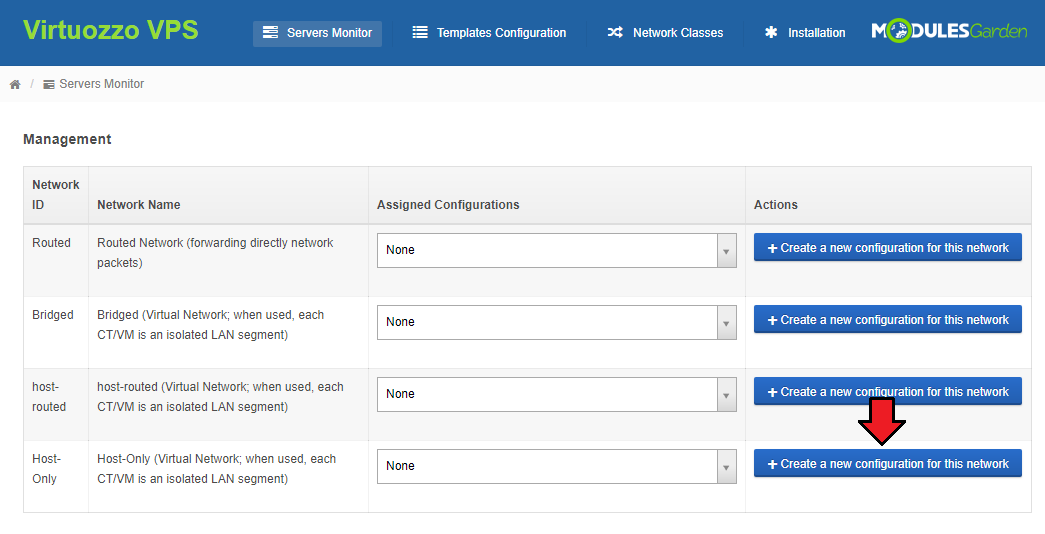
| As you can see, you can assign different IP Manager configurations to each network type. Let's add a new configuration to 'Host Only' network. To do so, press ' Create a new configuration for this network' button. |
|
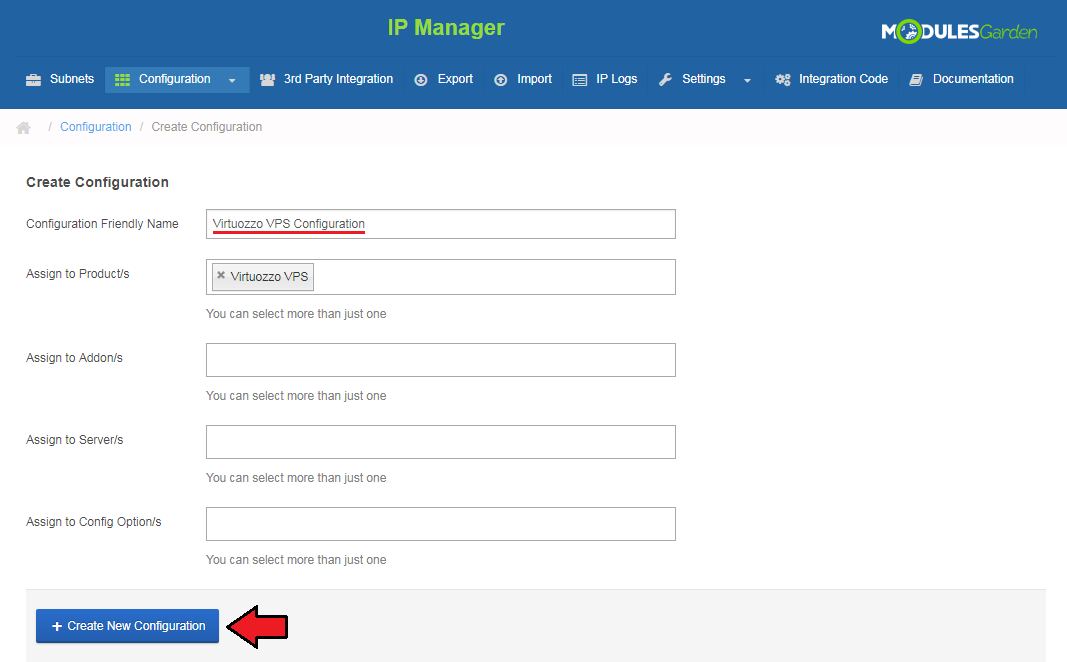
| You will be moved to the IP Manager module where you can create a new configuration for Virtuozzo product. Provide your configuration name, assign it to Virtuozzo products, addons or server and press 'Create New Configuration' . |
|
| Now you can add IP pool through creating a new subnet. To do so, click 'Create New Subnet' button and follow the steps described here. |
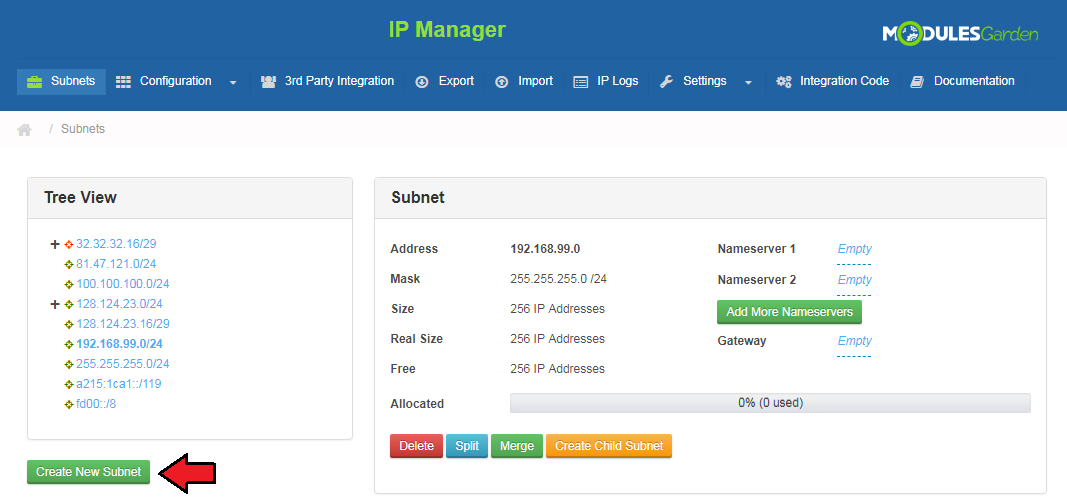
|
| Successfully created IP pool can now be assign to your previously set Virtuozzo configuration. Go back to the IP Manager configuration list and press the 'Assigned Subnets' button. |

|
| Select created IP pool from the dropdown menu and press 'Assign Subnet' . |
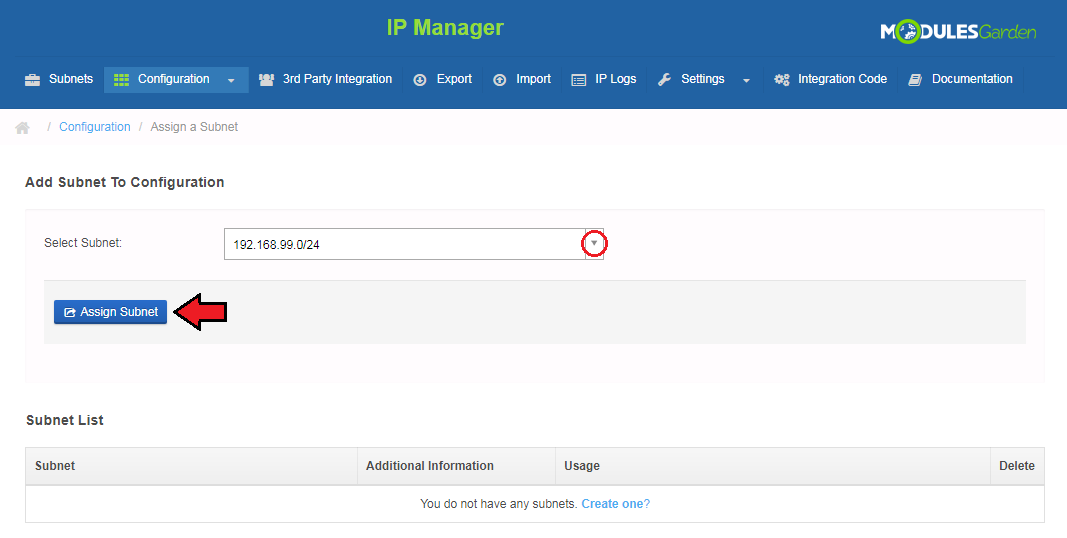
|
| Once again move to the configuration list. You will now have to assign Virtuozzo configurable options that will be used to determine the number of IP addresses from the pool assigned to the Virtuozzo product. ip_number|Number of Public IP ip_number_secondary|Number of Private IP Click here for more information. If you already have configurable options set, press the 'Configurable Options' button to add a new relation. |

|
| Now you can add the defined Virtuozzo configurable option relations to your IP Manager. Specify what type of address to assign to the chosen 'Network ID' : public IP, private IP or both as a shared address. Important: If you decide to assign both public and private configurable options, as shown below, then you will also have to assign that configuration to the second network interface (if used). |
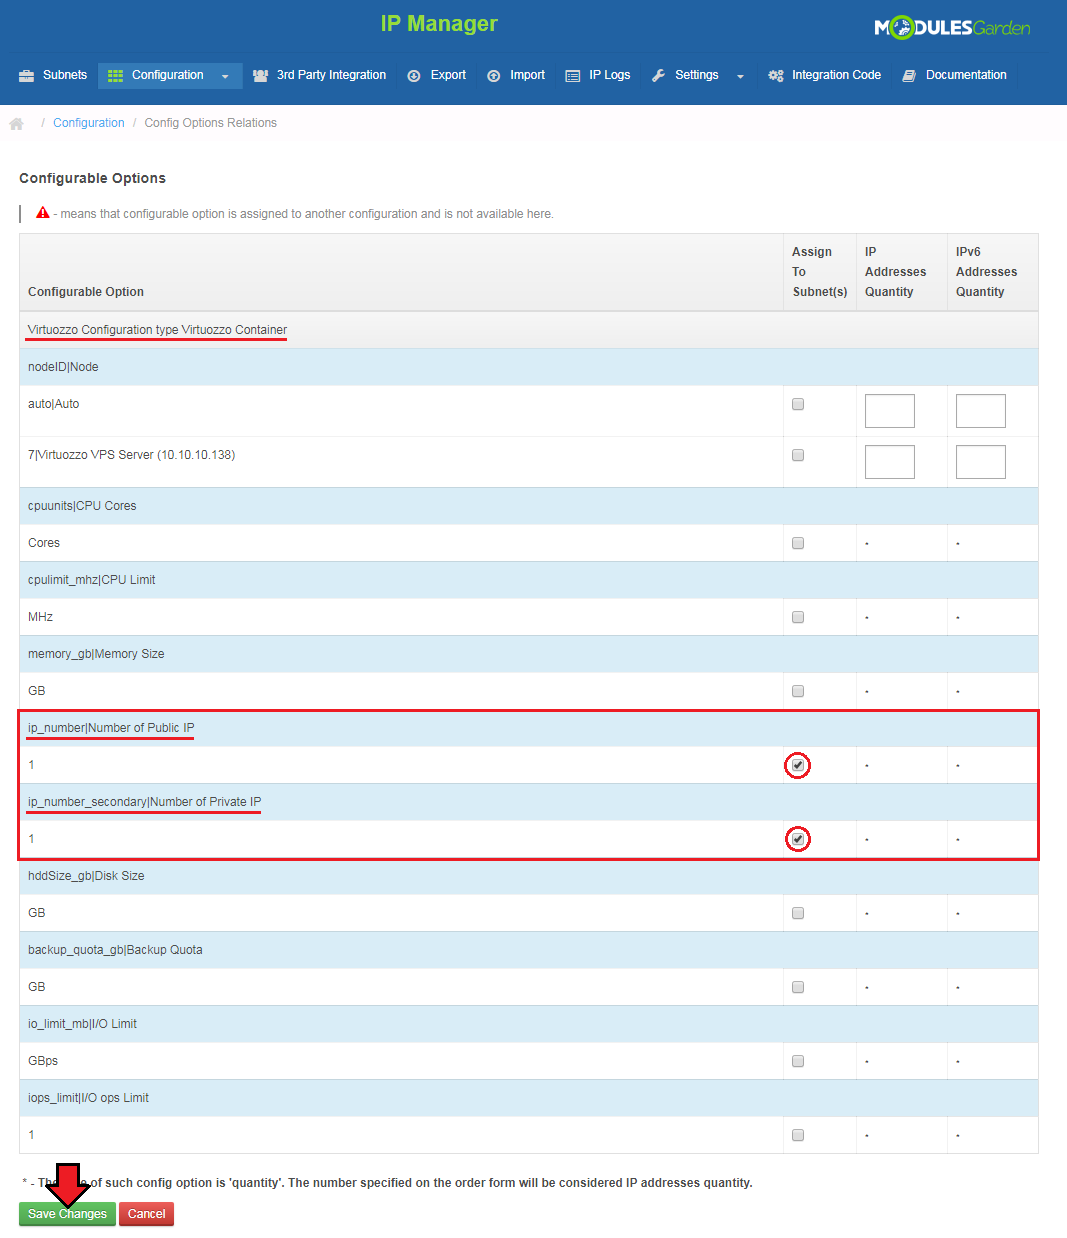
|
| Finally, go back to the Virtuozzo addon and assign the created configuration to the chosen network interface. |

|
| Congratulations, you have successfully completed the IP Manager configuration! Repeat the above steps for the second configuration in the same manner, or use the already created configuration to use shared IP pool. |
Management of Admin Area
| In the admin area you can execute basic commands(2) as 'Create' , 'Suspend' , 'Unsuspend' , 'Terminate' and 'Change Package'. You can also order 'Server Actions' (3) such as 'Stop' , 'Restart' , 'Suspend' , 'Start' , 'Reinstall' , 'Resume' and 'Migrate'. |
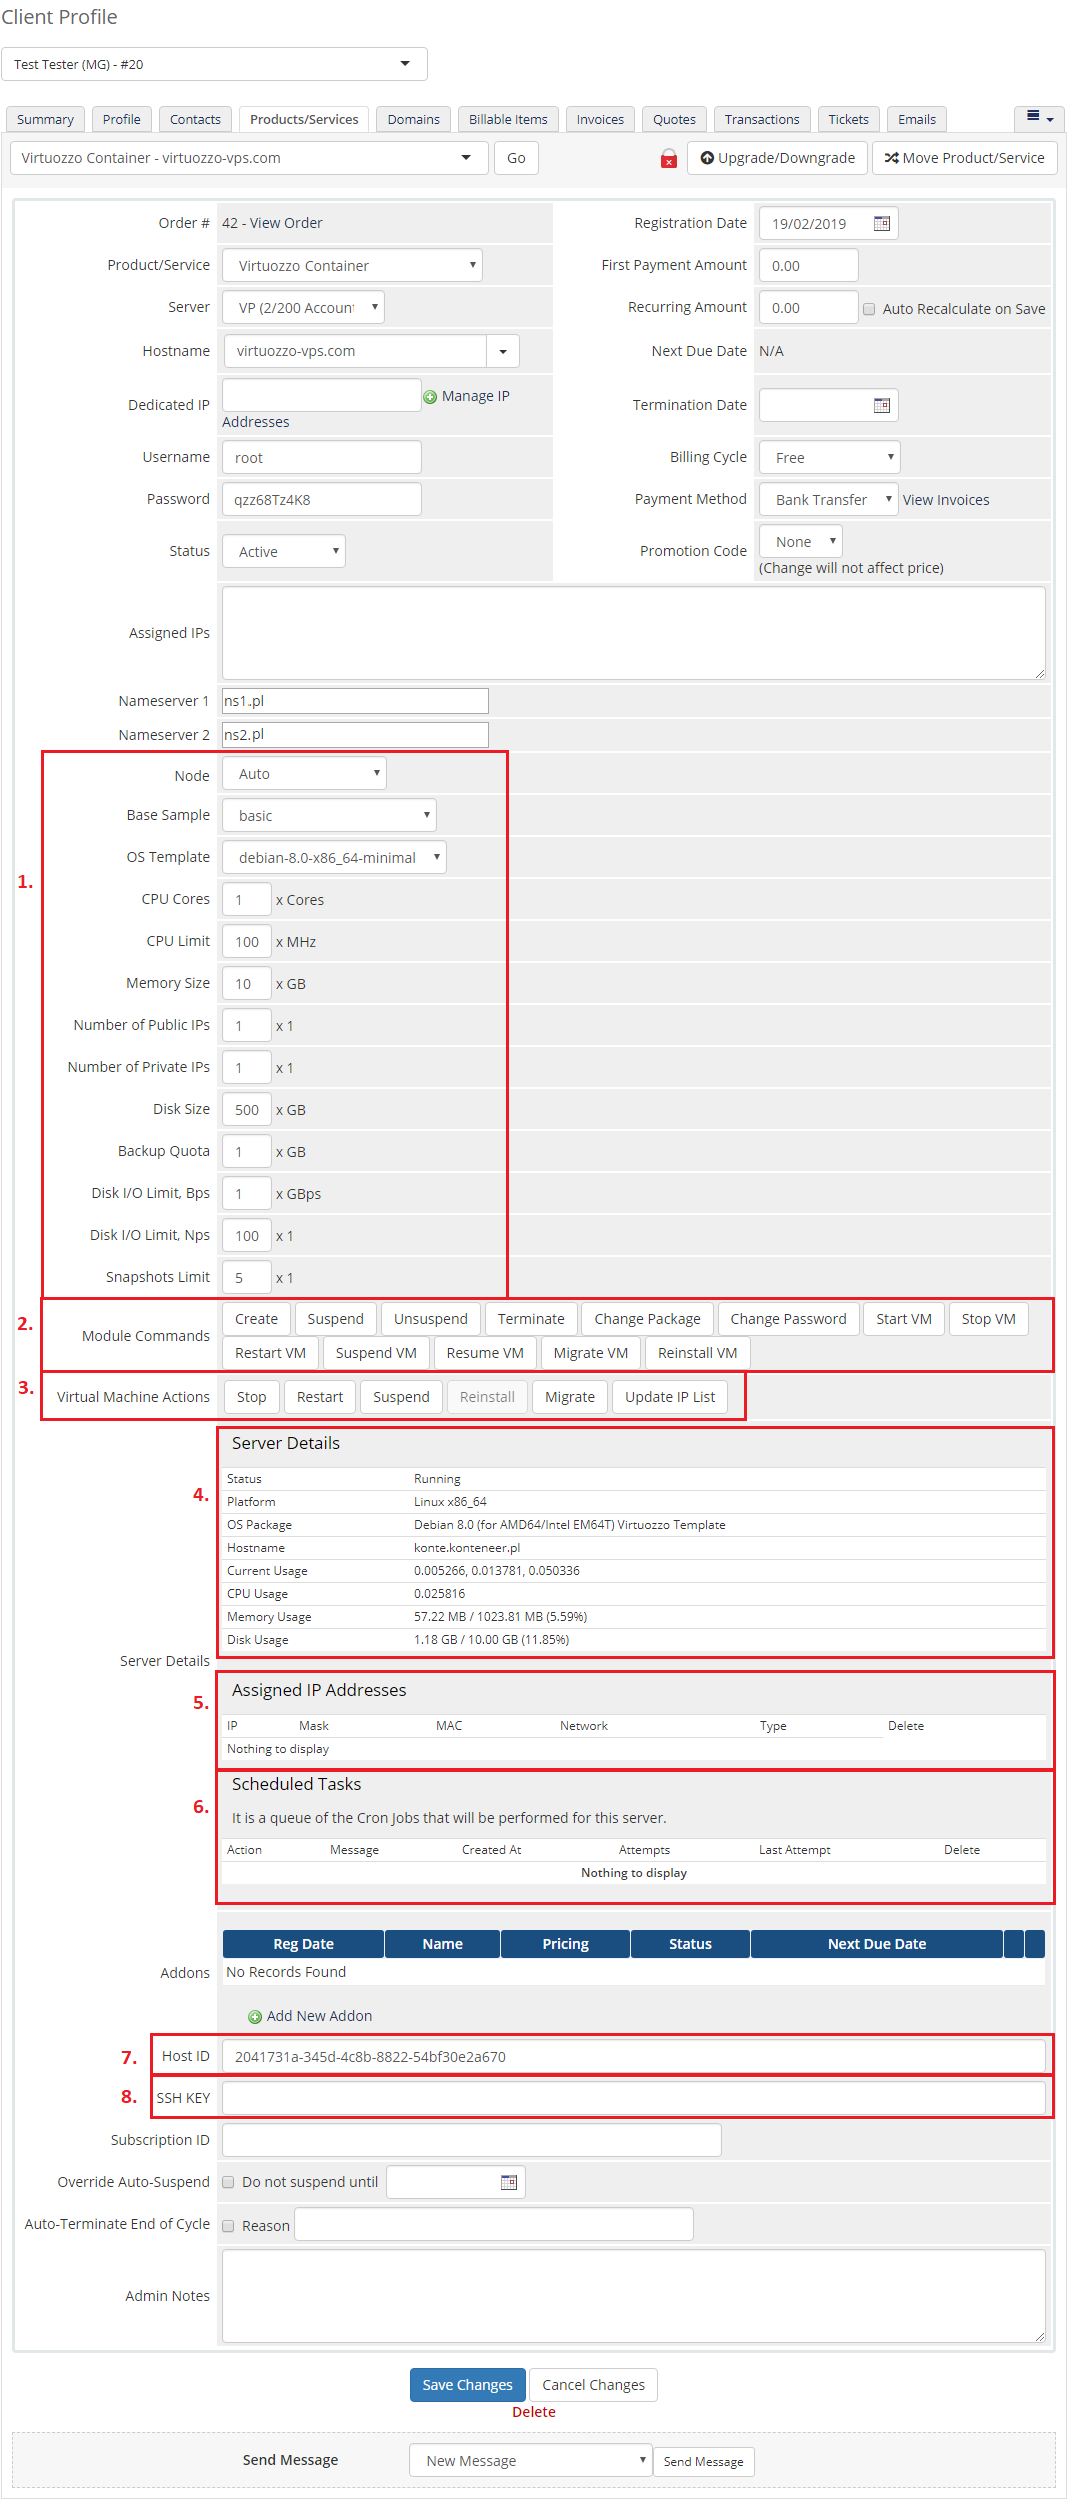
|
Reinstall
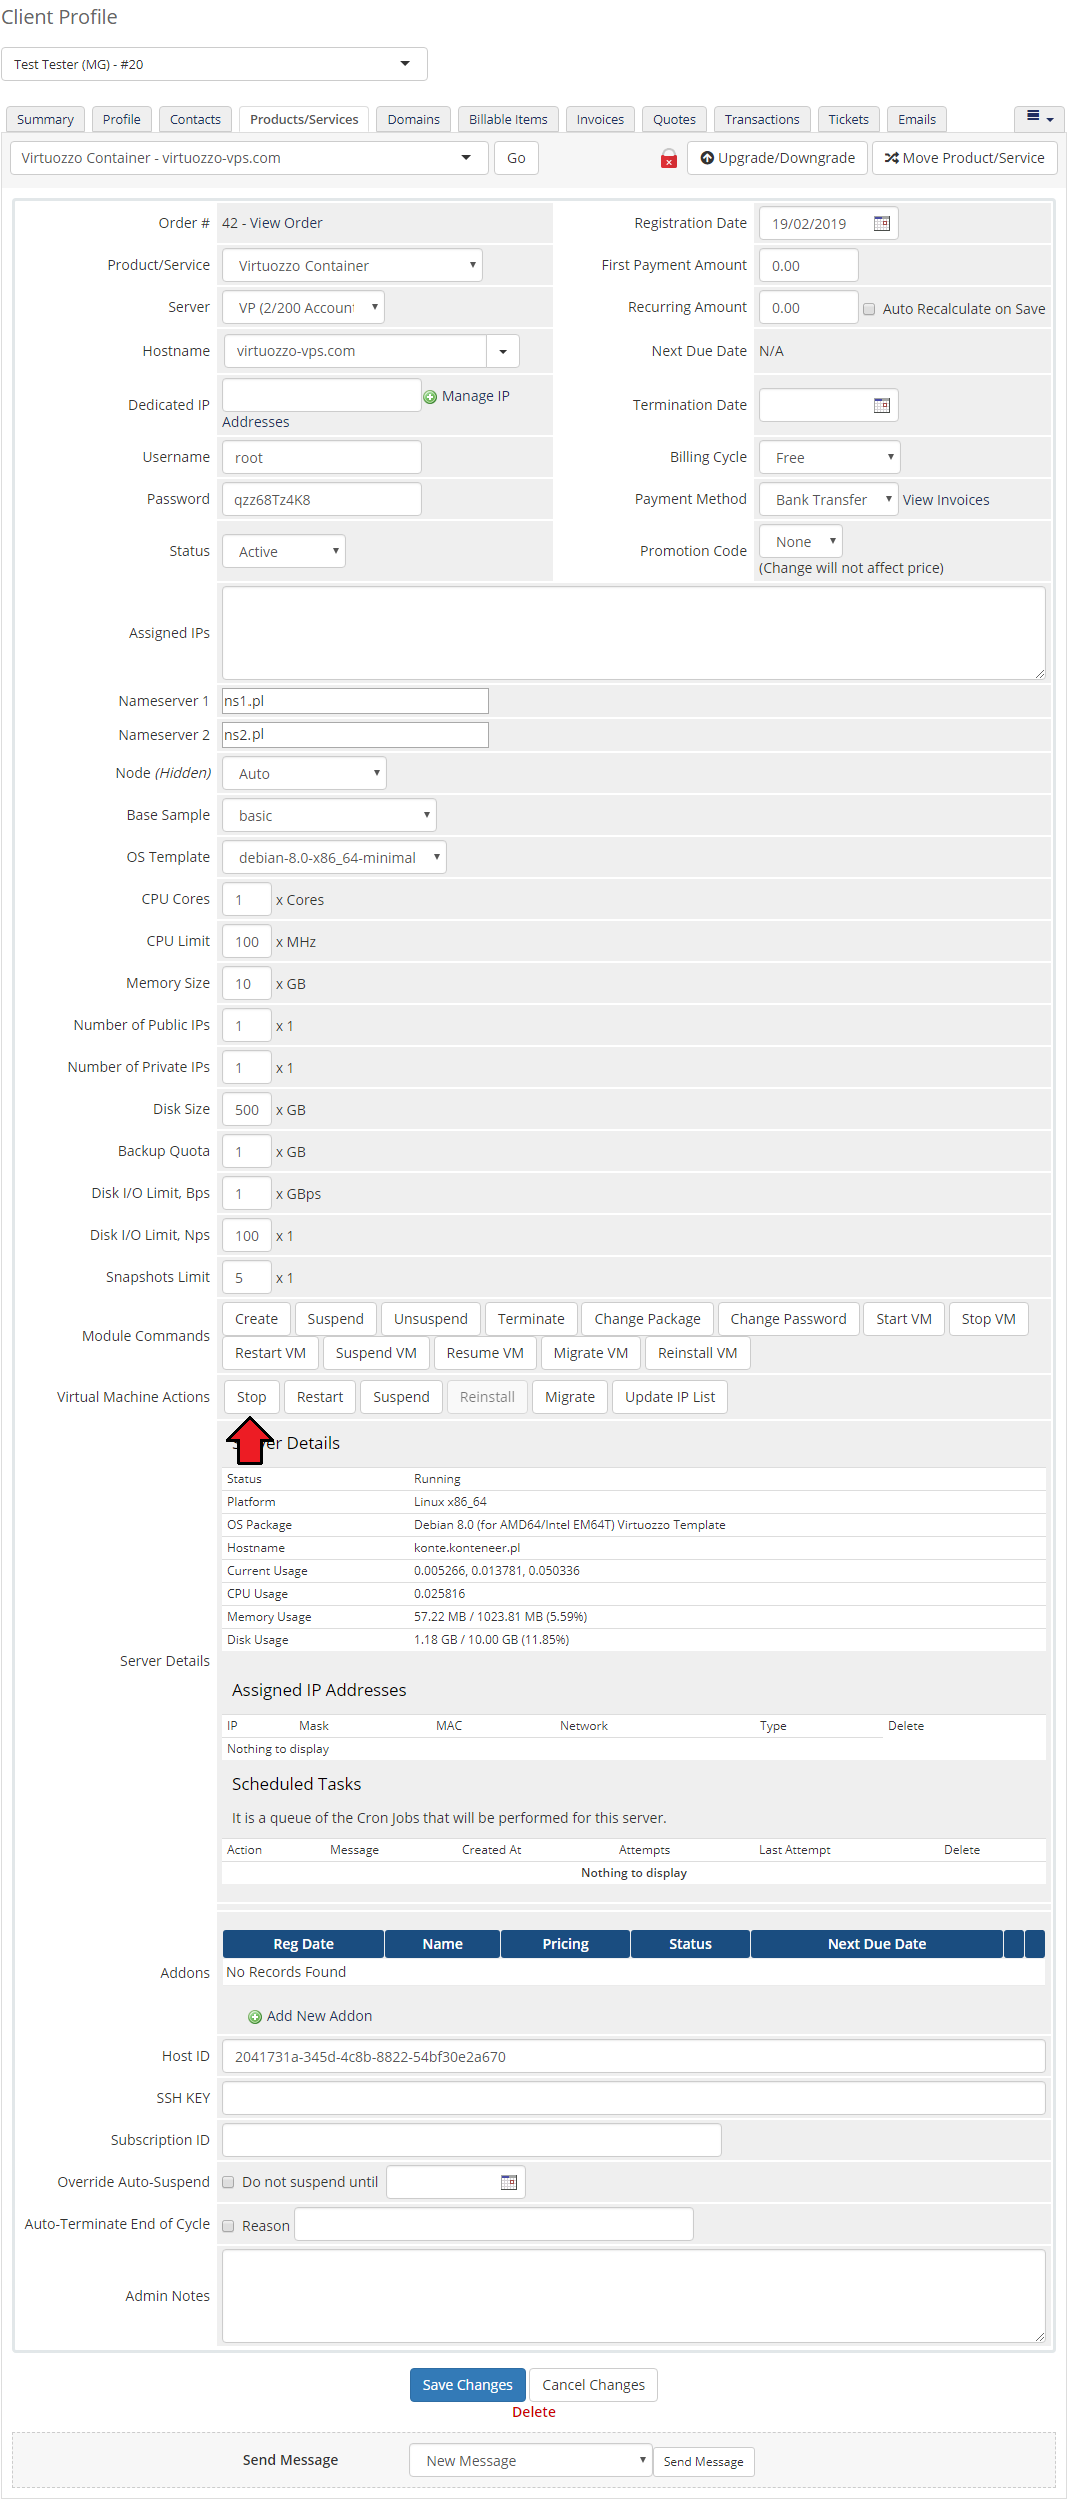
| To reinstall your virtual server you have to stop it through pressing 'Stop' button.
Note: You are not able to reinstall 'Virtual Machine' server type. |
|
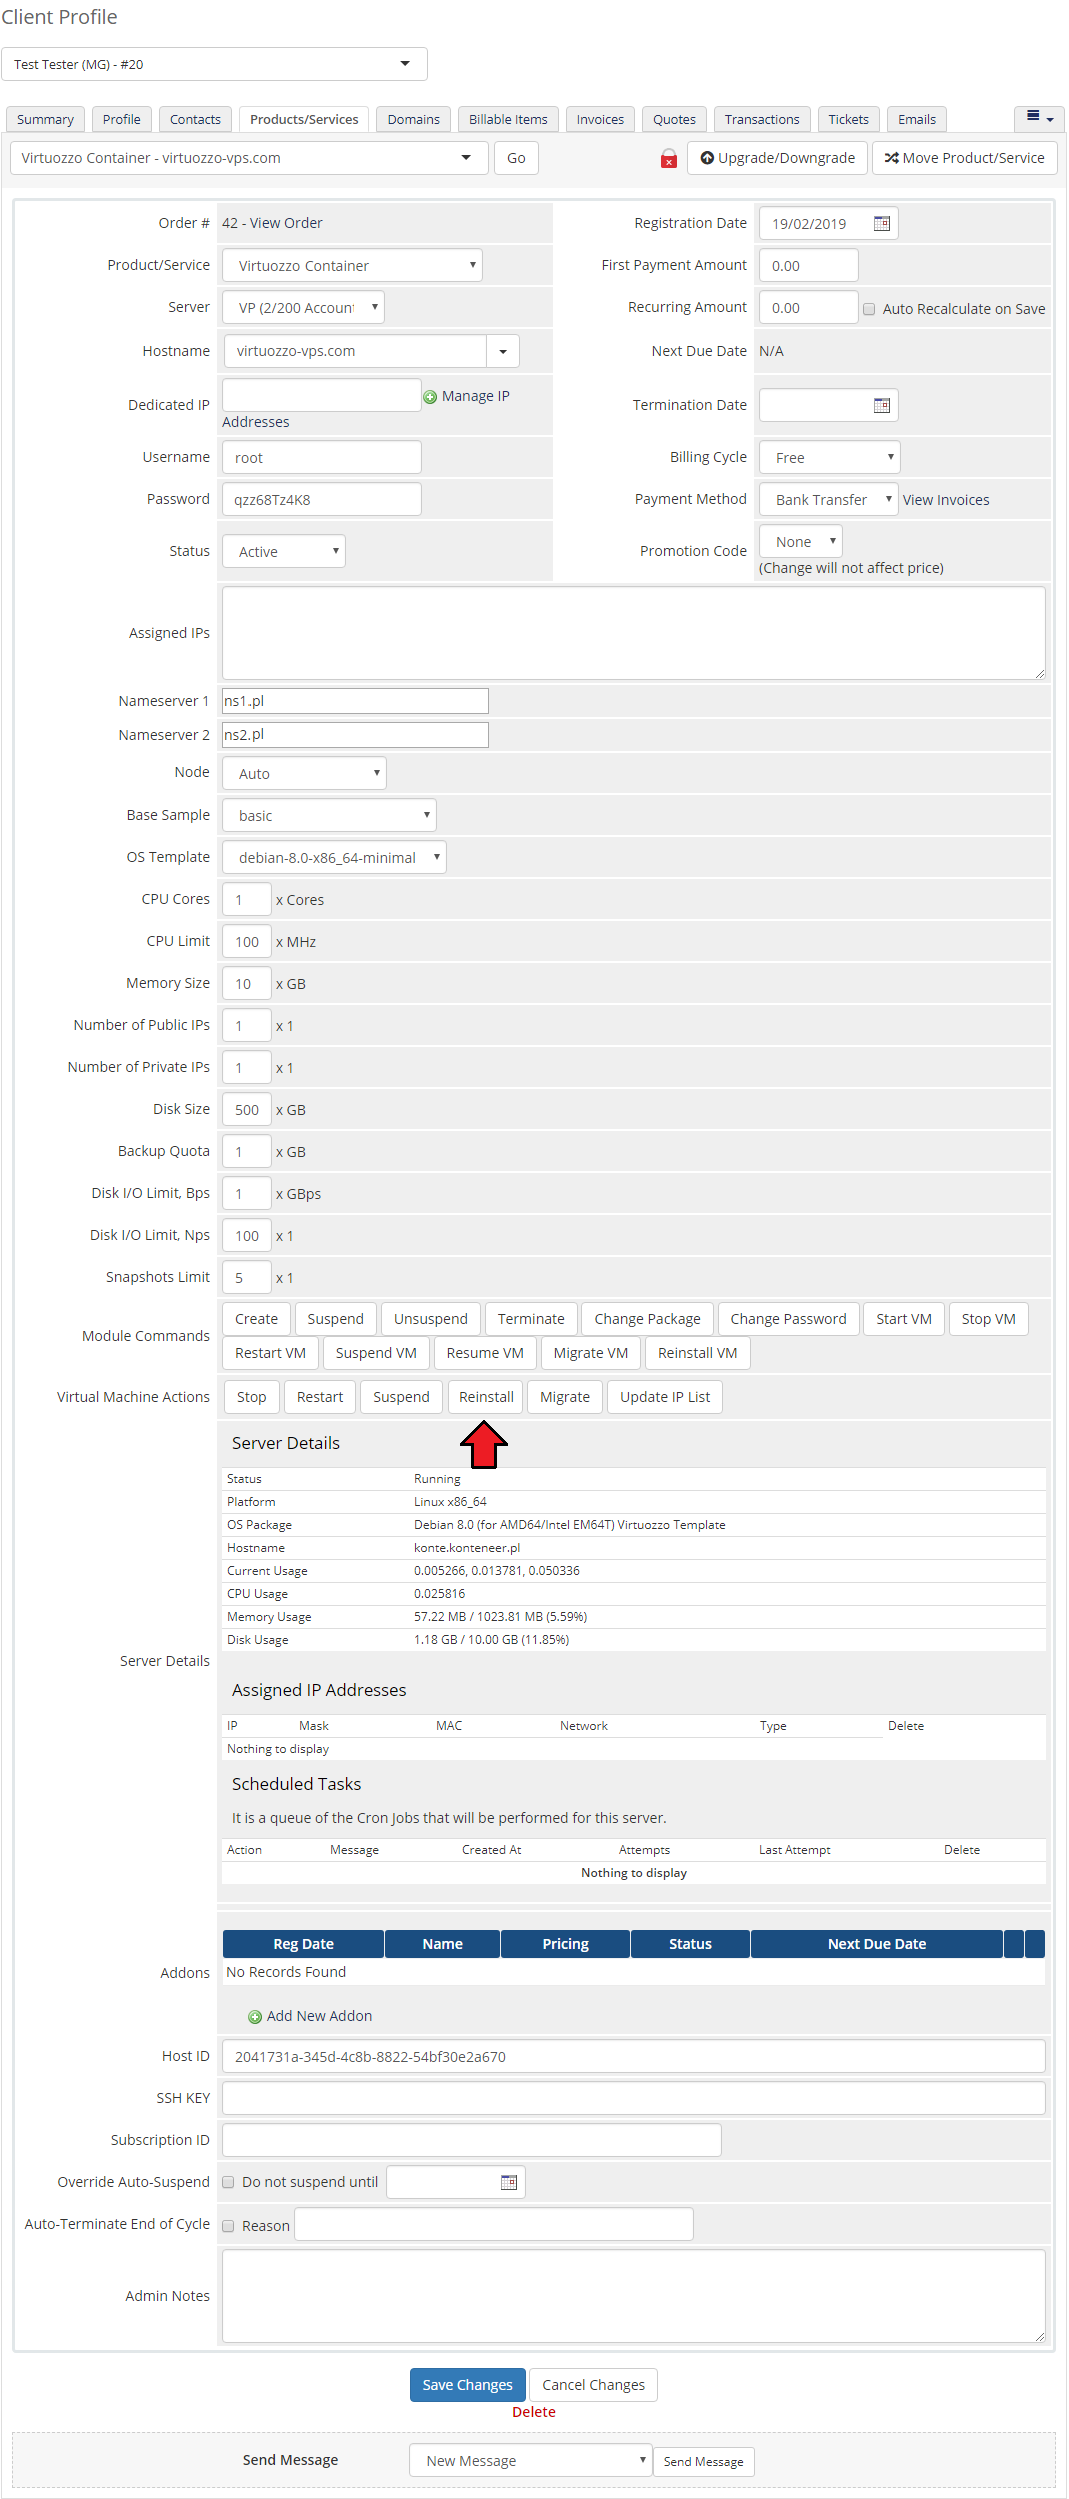
| Afterwards, press 'Reinstall' button. |
|
Migrate
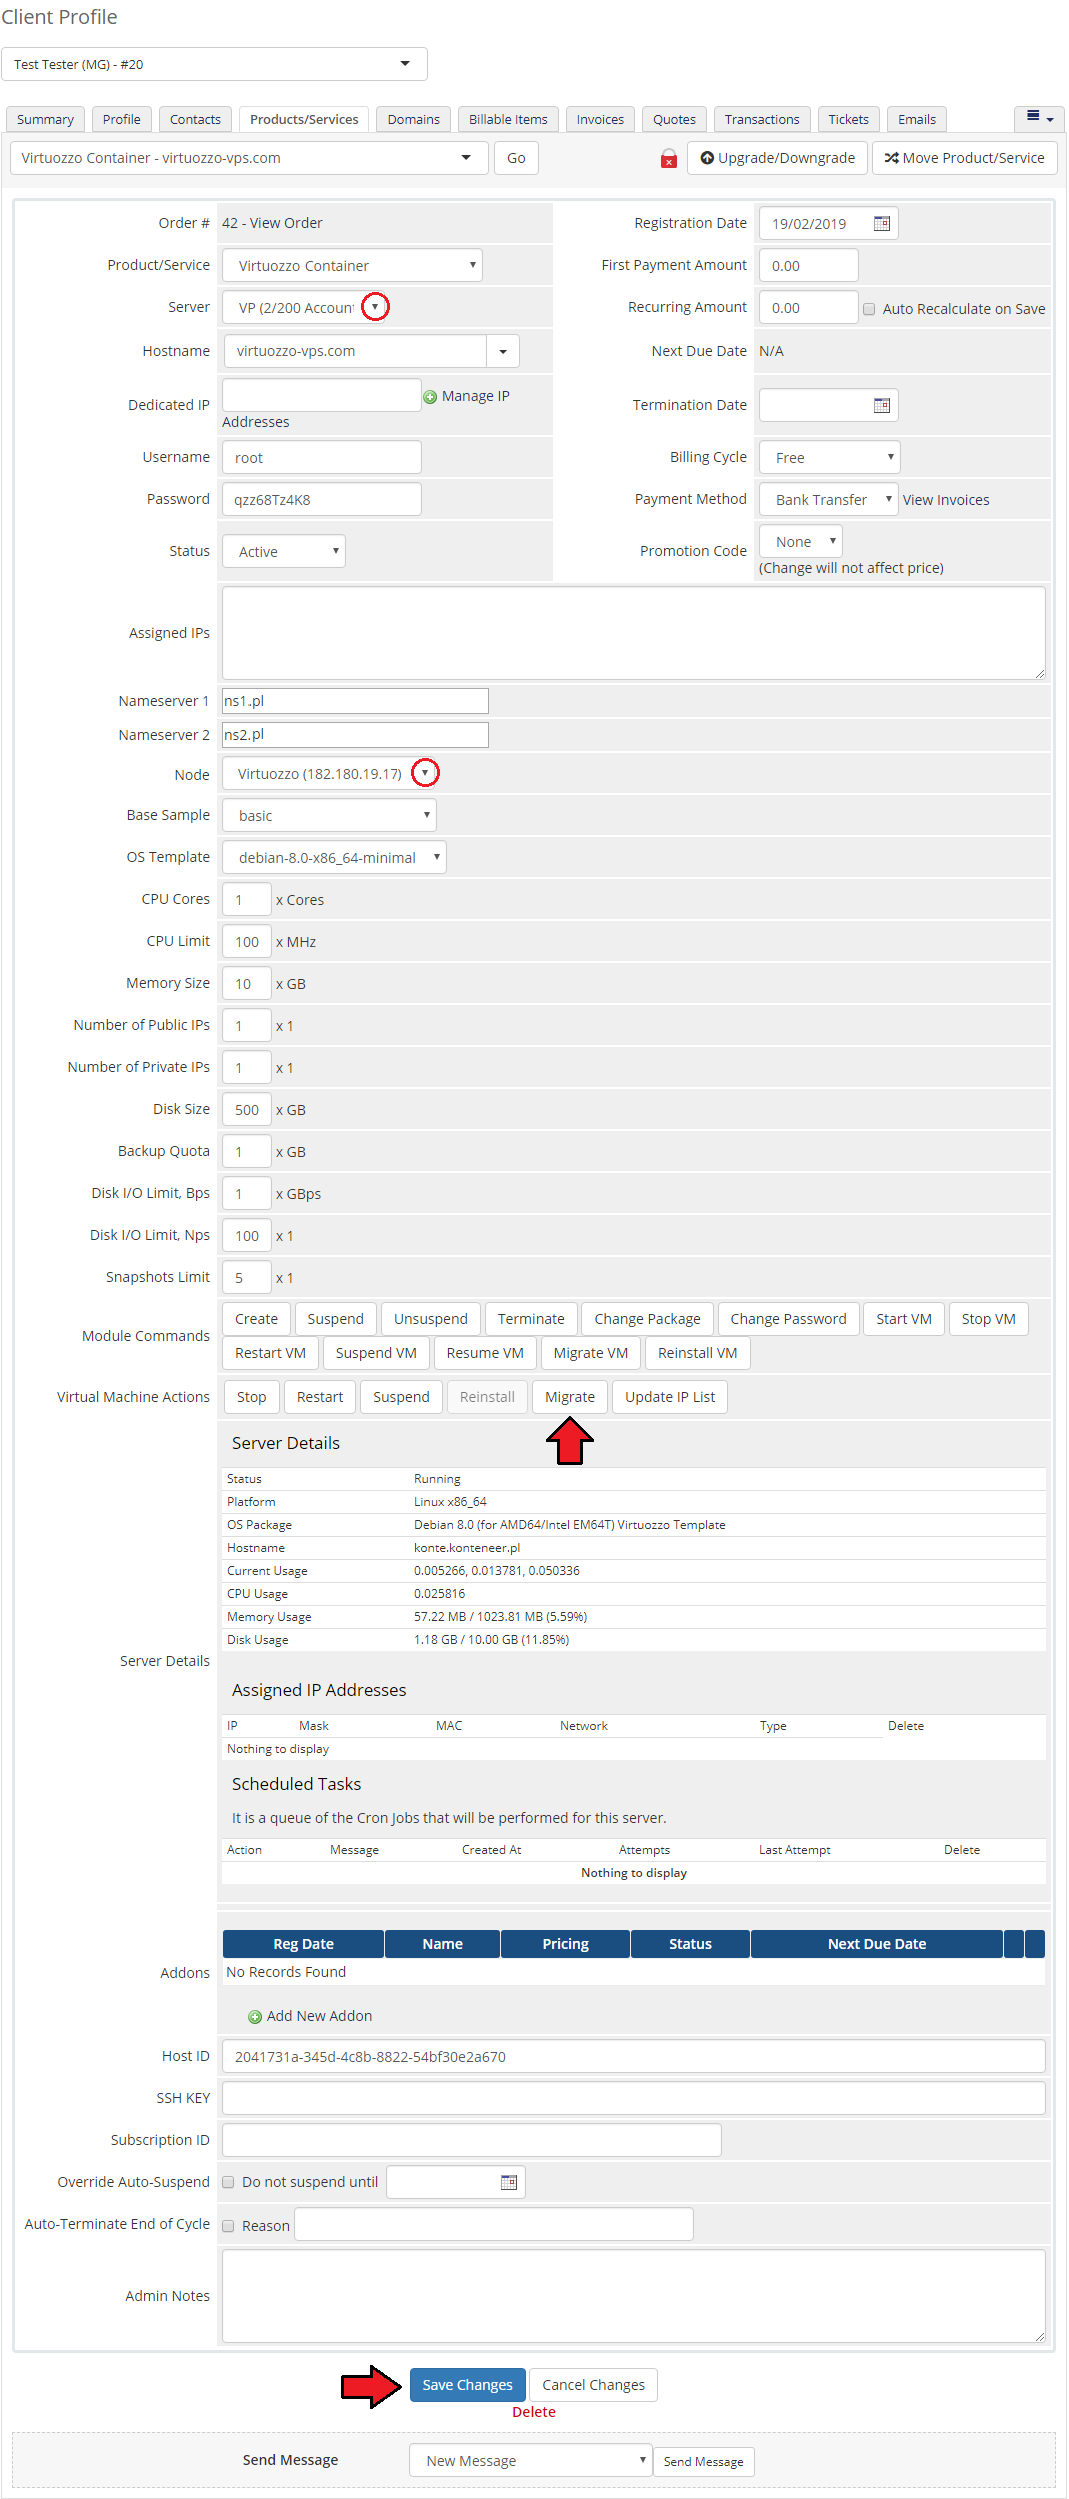
| To migrate your virtual machine, choose server you want to migrate your virtual machine to. Afterwards, select node on this server from a 'Node' configurable option and press 'Save Changes' button. |
|
| Afterwards, popup should appear. Confirm migration through clicking 'Migrate' button. |

|
Management of Client Area
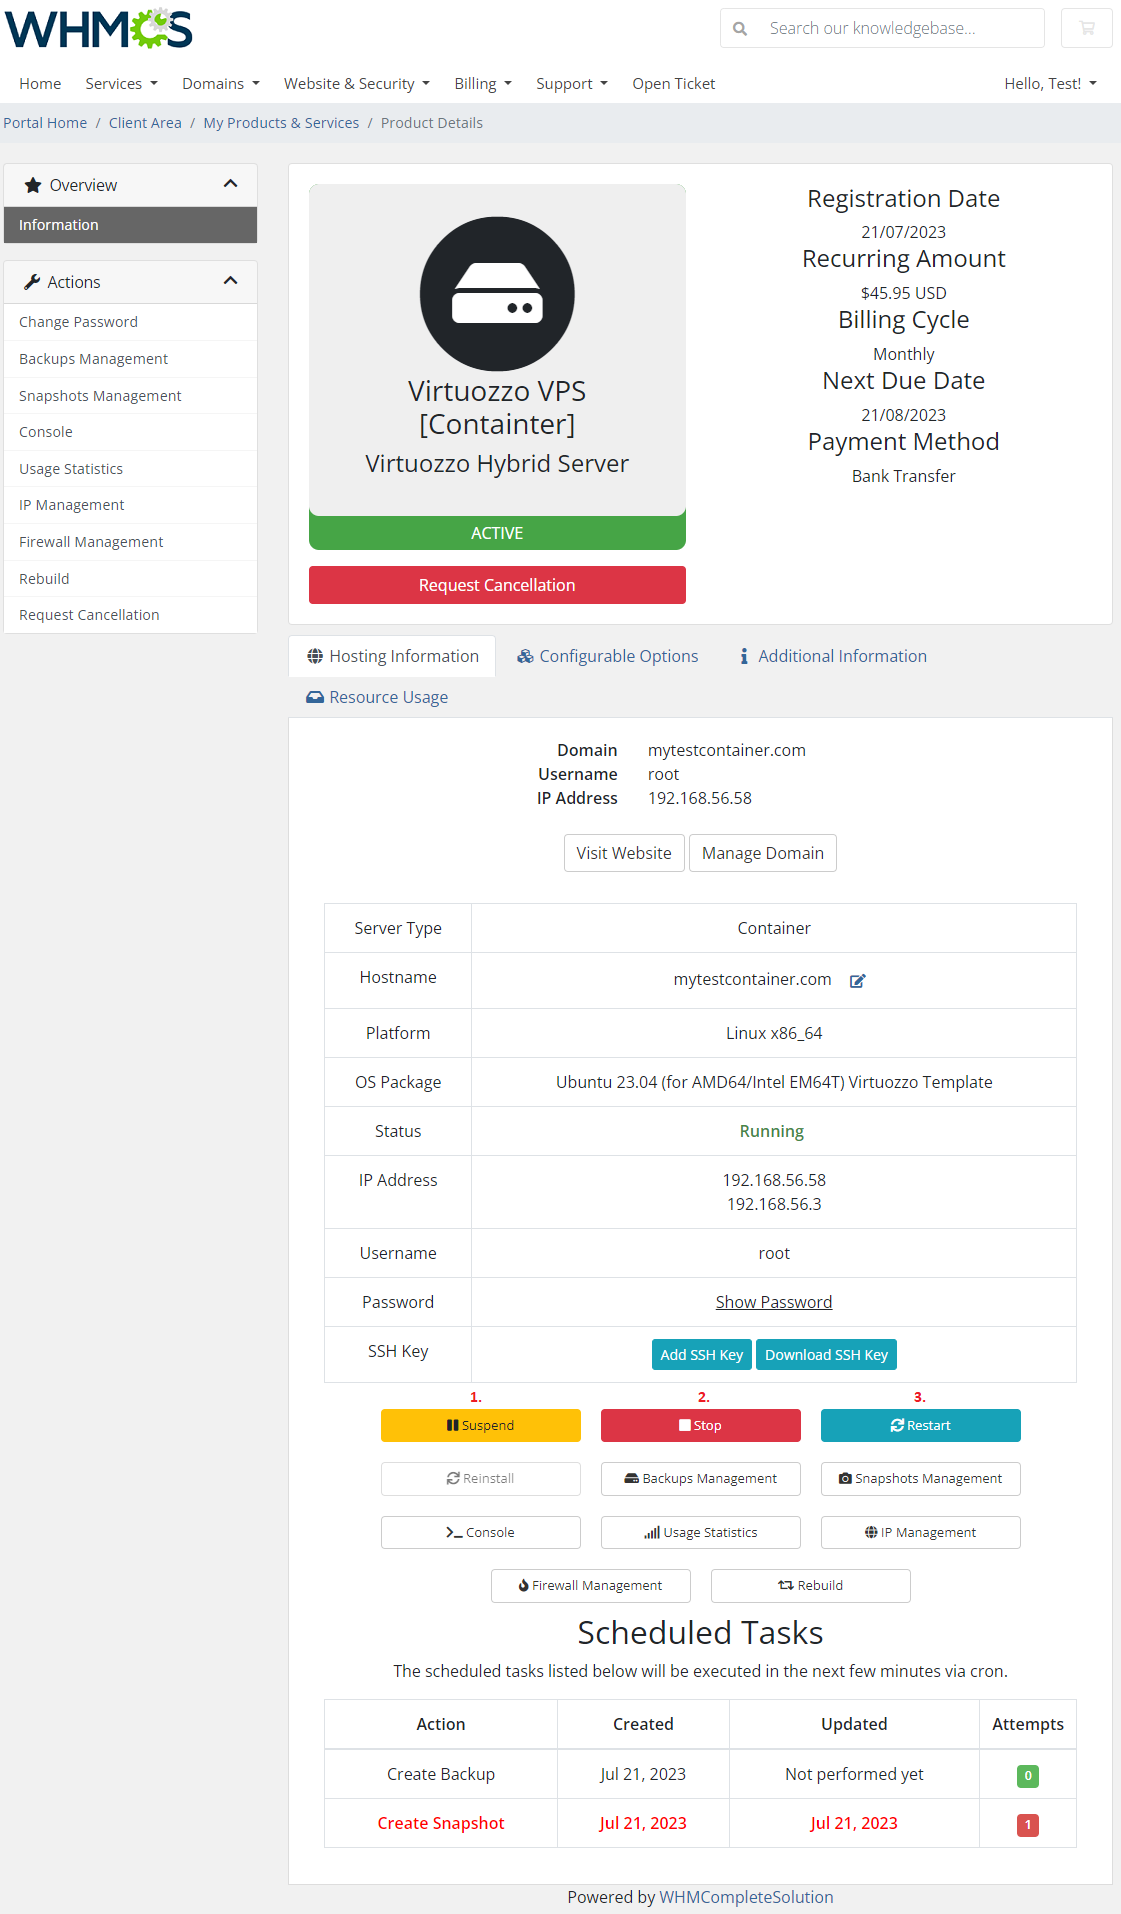
| Client area interface of Virtuozzo Hybrid Server should look like the one on the screen below. As you can see, control panel contains useful options needed to manage a VPS. |
|
SSH Management
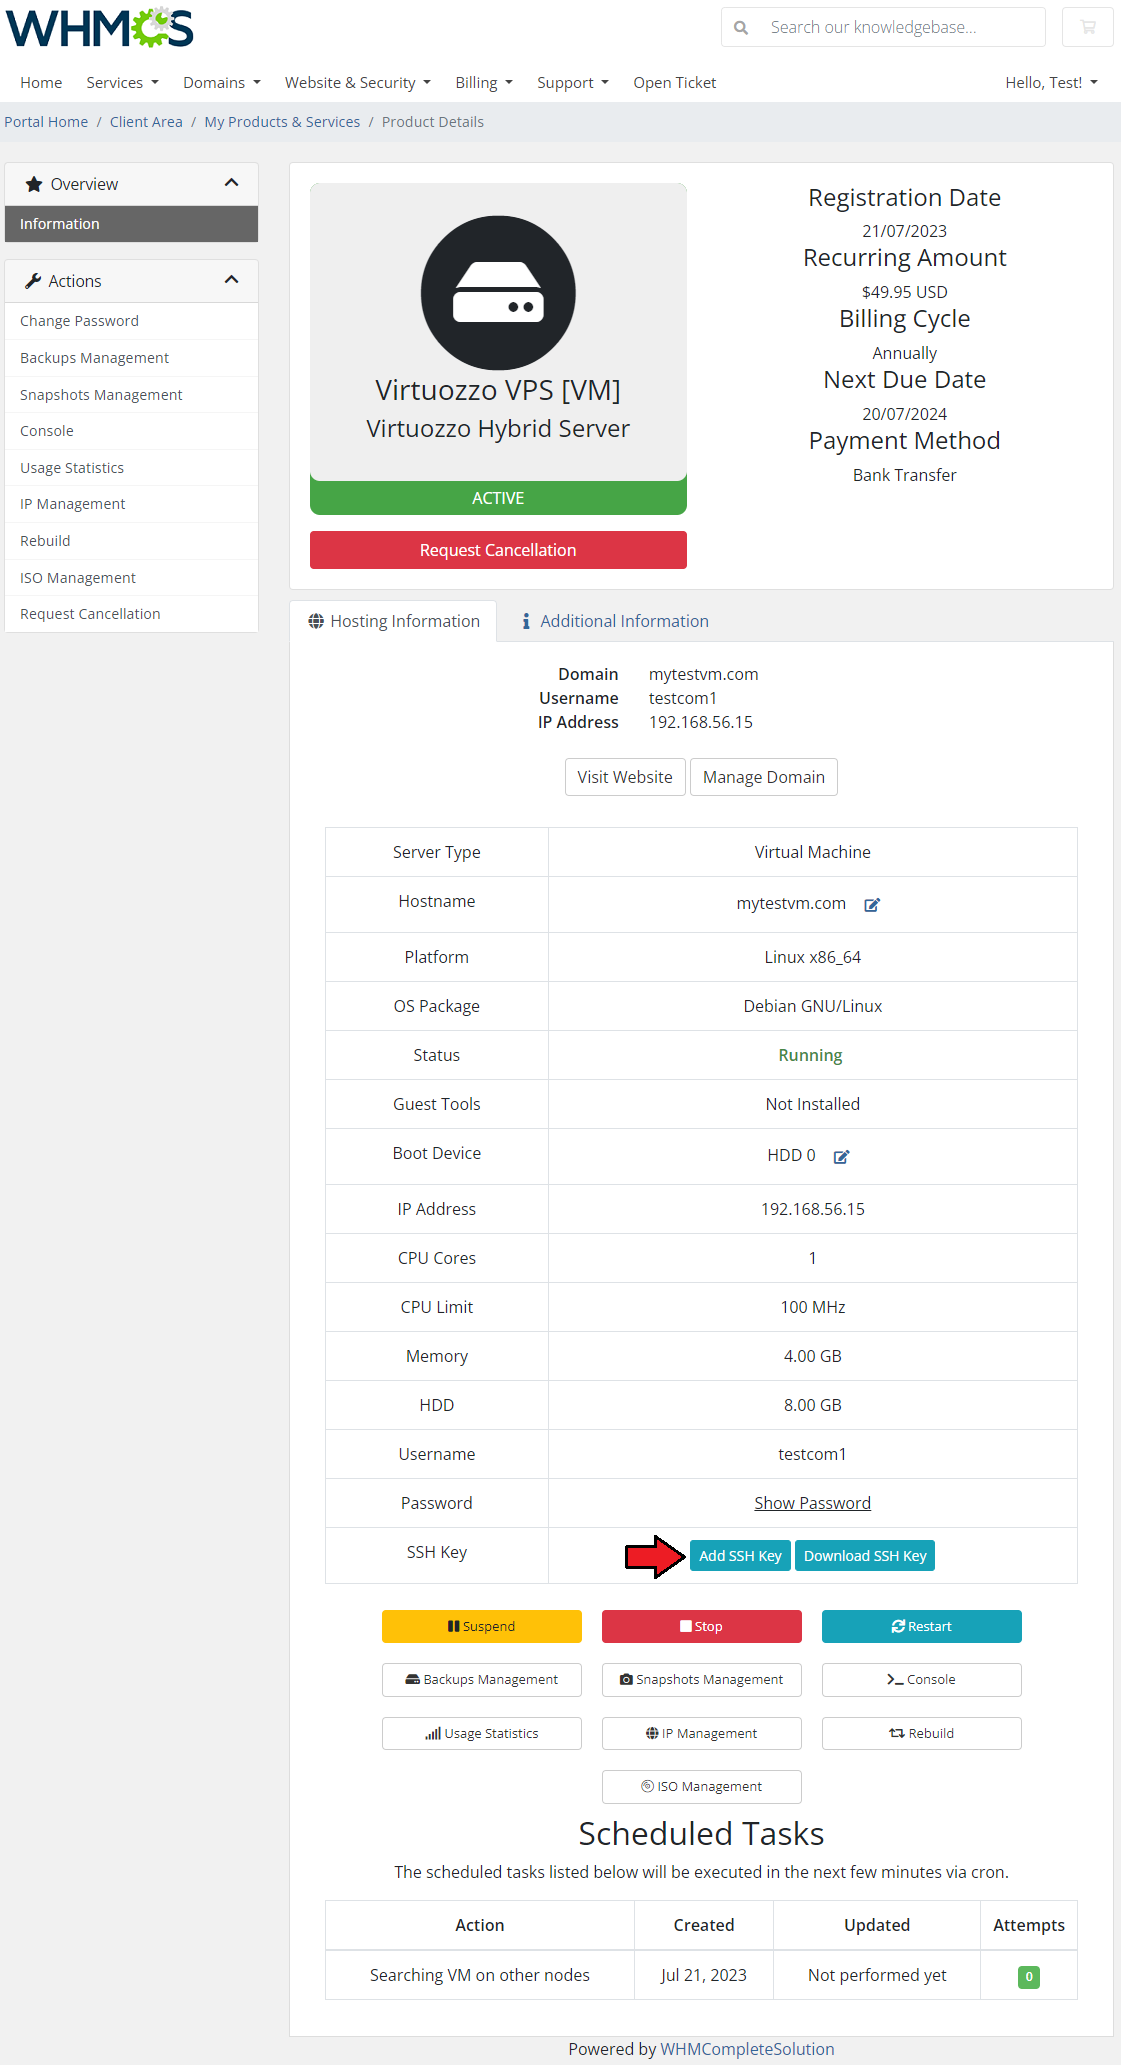
| SSH Key management is available for 'Virtual Machine' type and only if 'Guest Tools' are installed. Add SSH Key to use it as authentication step when connecting to the server.< You may do that on the product page by pressing 'Add SSH' button marked on the screen below. |
|
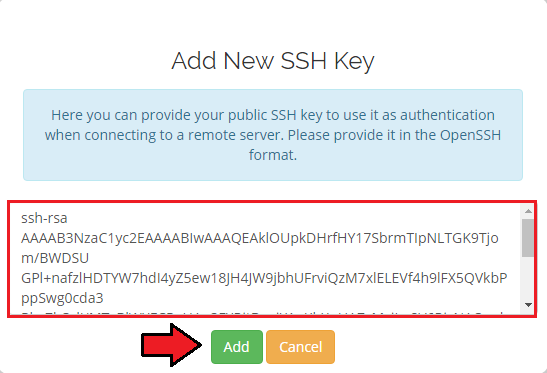
| A new window will appear, paste your public SSH key, use the OpenSSH format. |
|
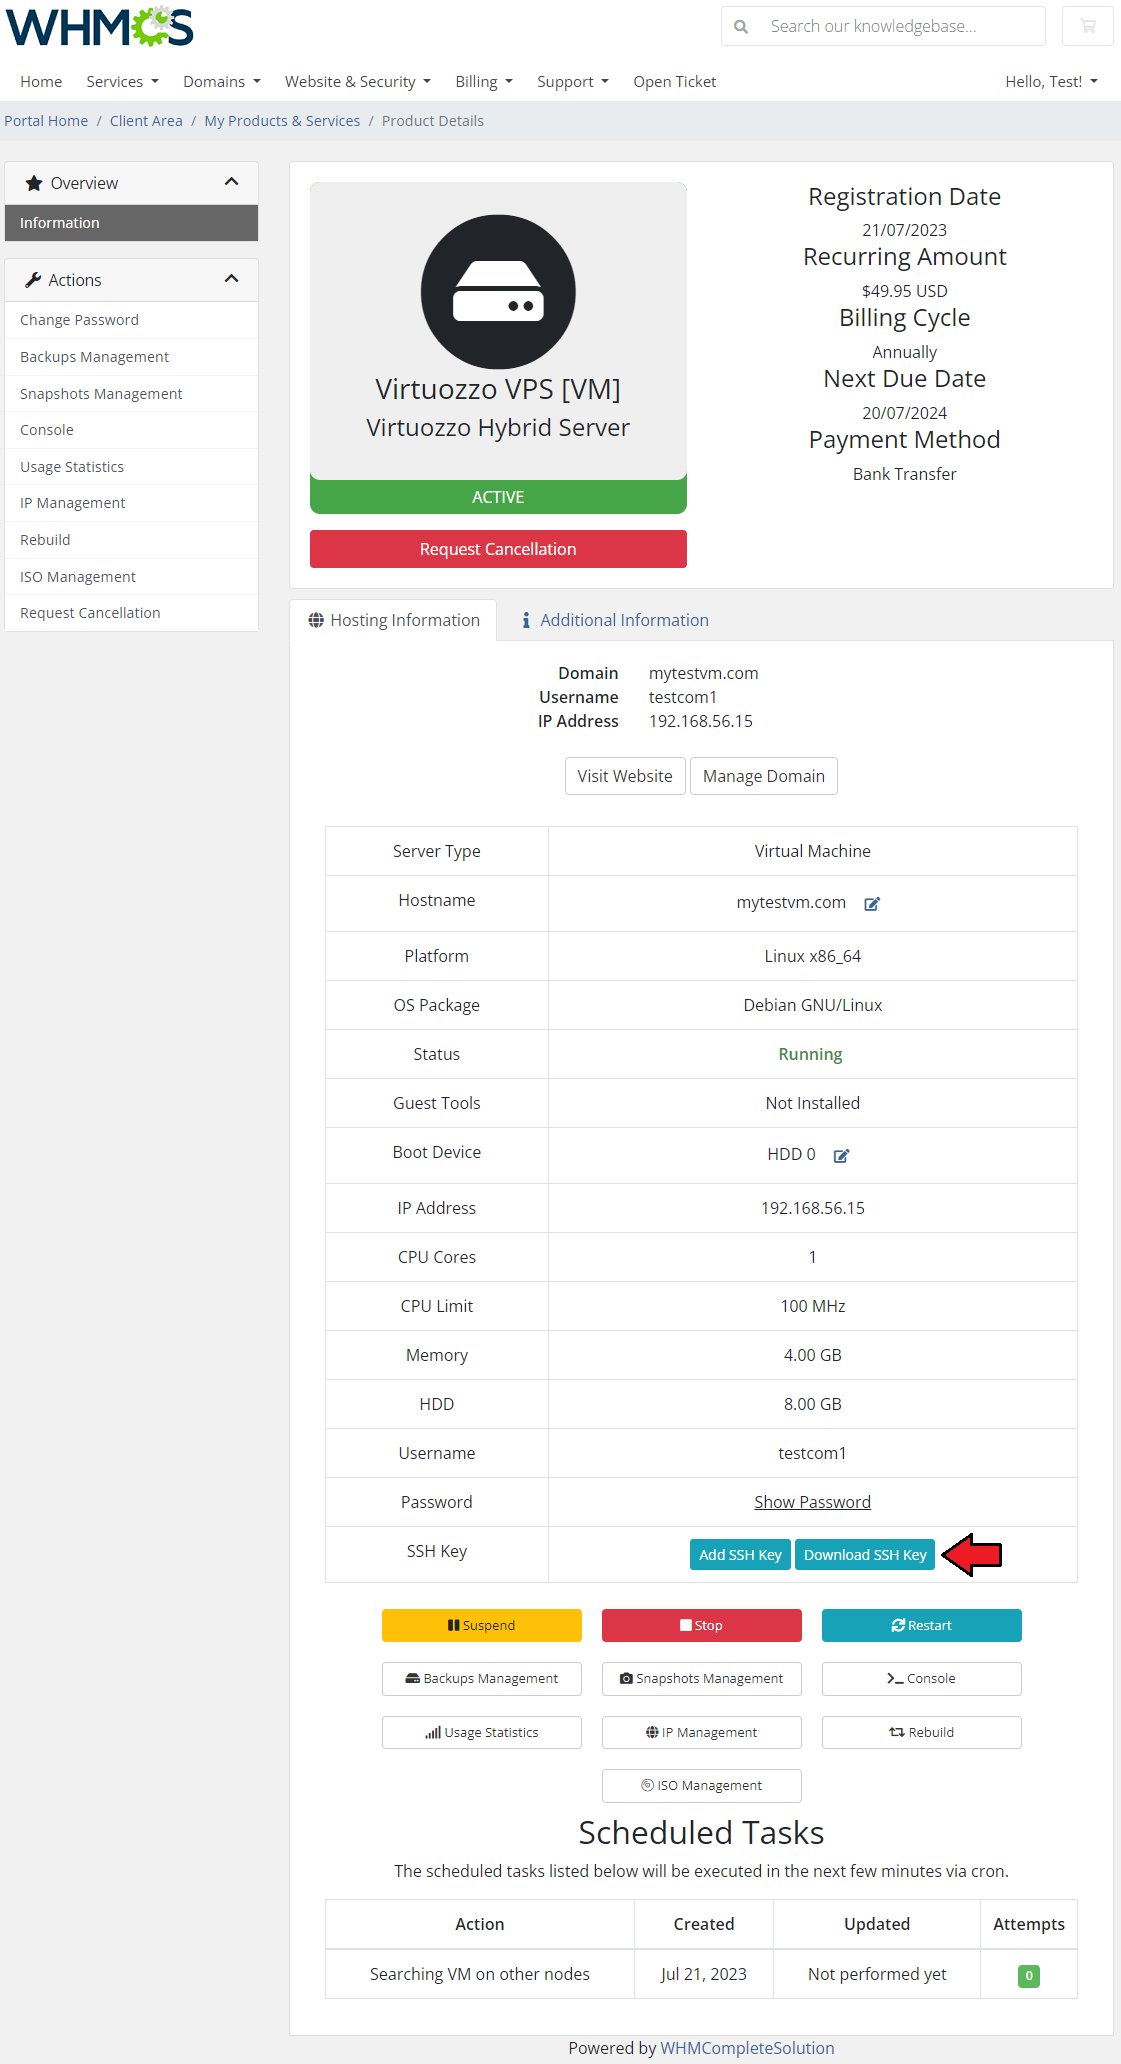
| You may also download and check your SSH Key, just press the adequate button and the file will be downloaded. Important: Adding and downloading SSH keys is supported only if guest tools are installed on the virtual machine. |
|
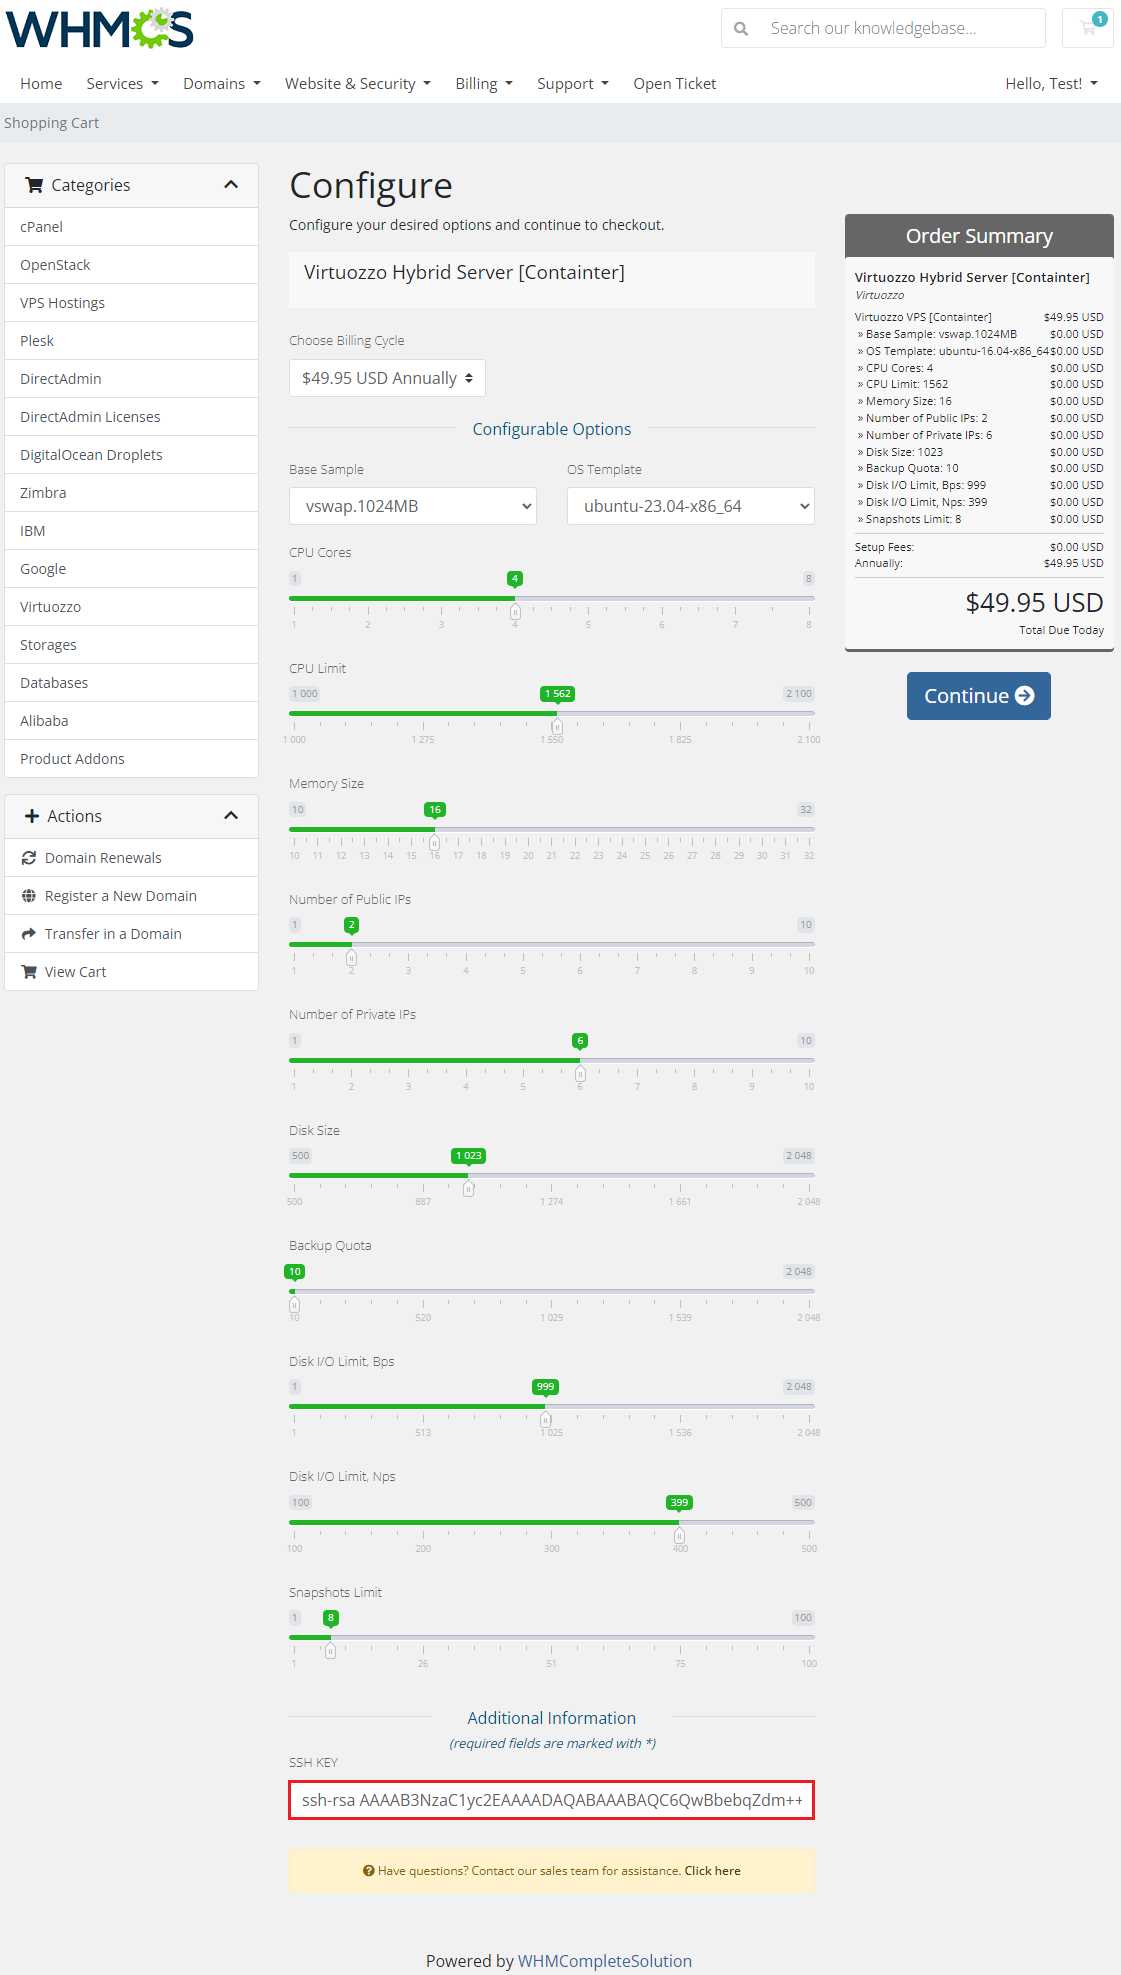
| There are two ways to add an SSH key. You may do that already when placing an order, by filling in an adequate configurable option field. Take a look at the screen below: |
|
Backups Management
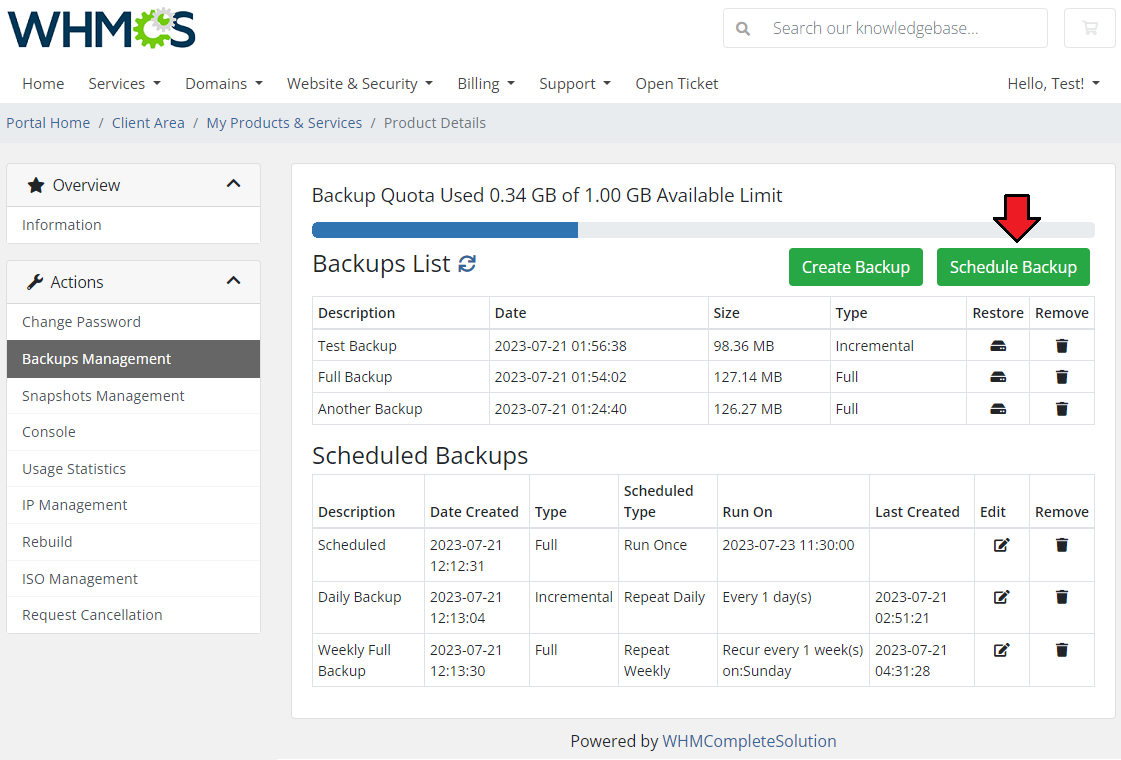
| In 'Backups Management' you can order backup jobs or create backups. To create backup job press 'Create Backup Schedule' as shown on the screen below. Note: If two backup tasks are ordered in a small time interval, only one backup is created. |
|
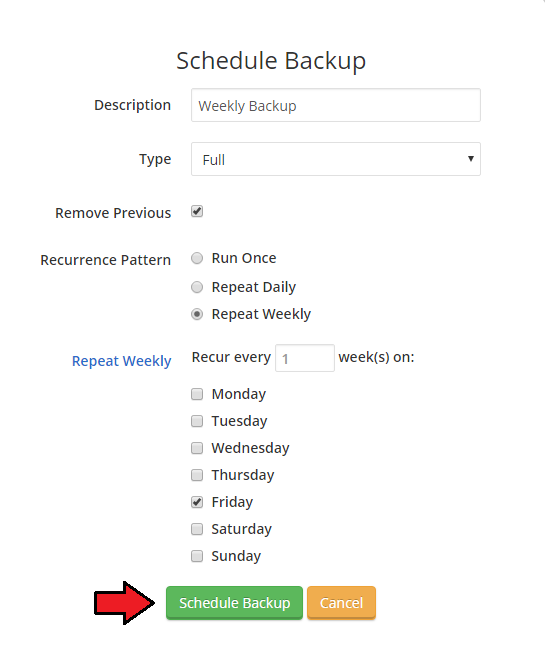
| Now define backup description by typing its name into a textbox and choose backup type from a dropdown menu. You can choose whether to delete previous backup or not, through marking checkbox next to 'Remove Previous'. |
|
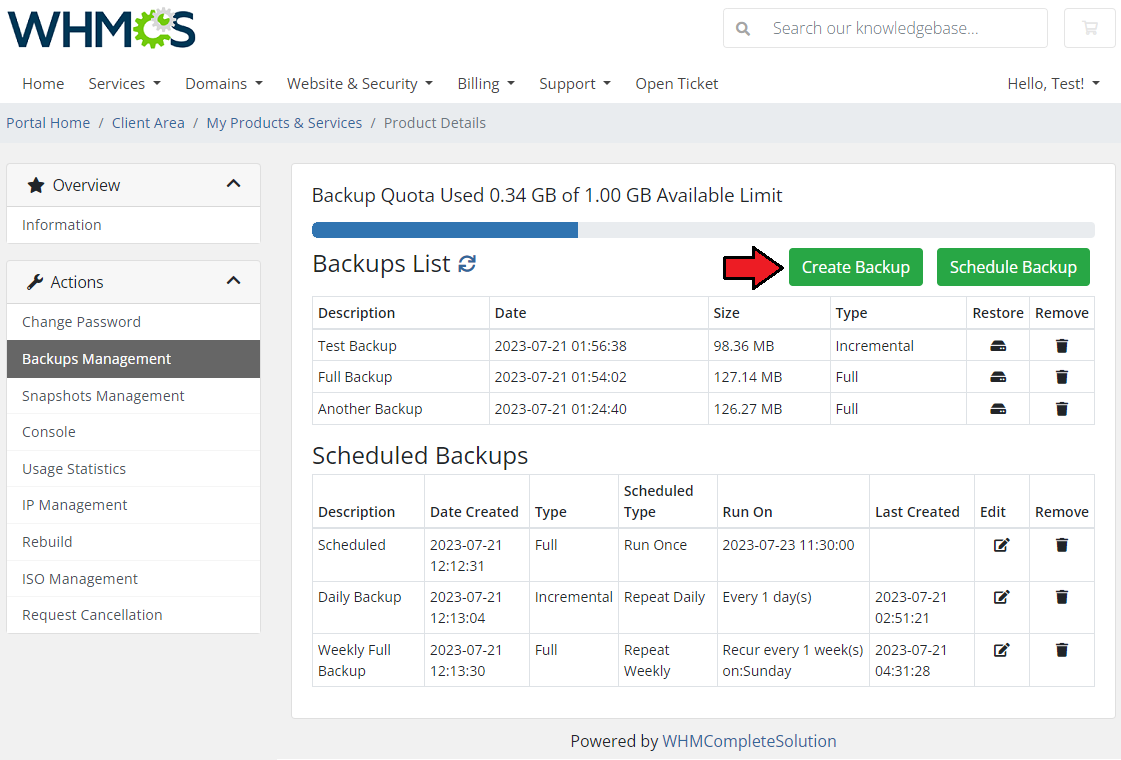
| You can also create a single backup. To do so, click on 'Create Backup' button as shown on the following screen. |
|
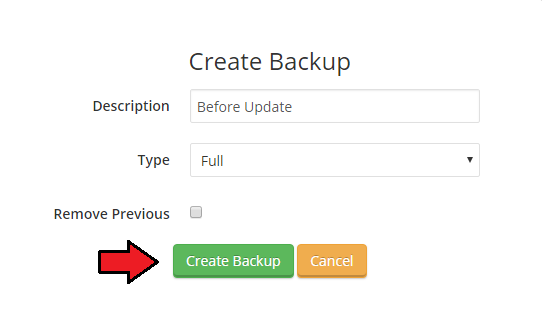
| Now enter backup description and select backup type from a dropdown menu. Afterwards, choose whether to delete previous backup or not, through marking checkbox next to 'Remove Previous'. |
|
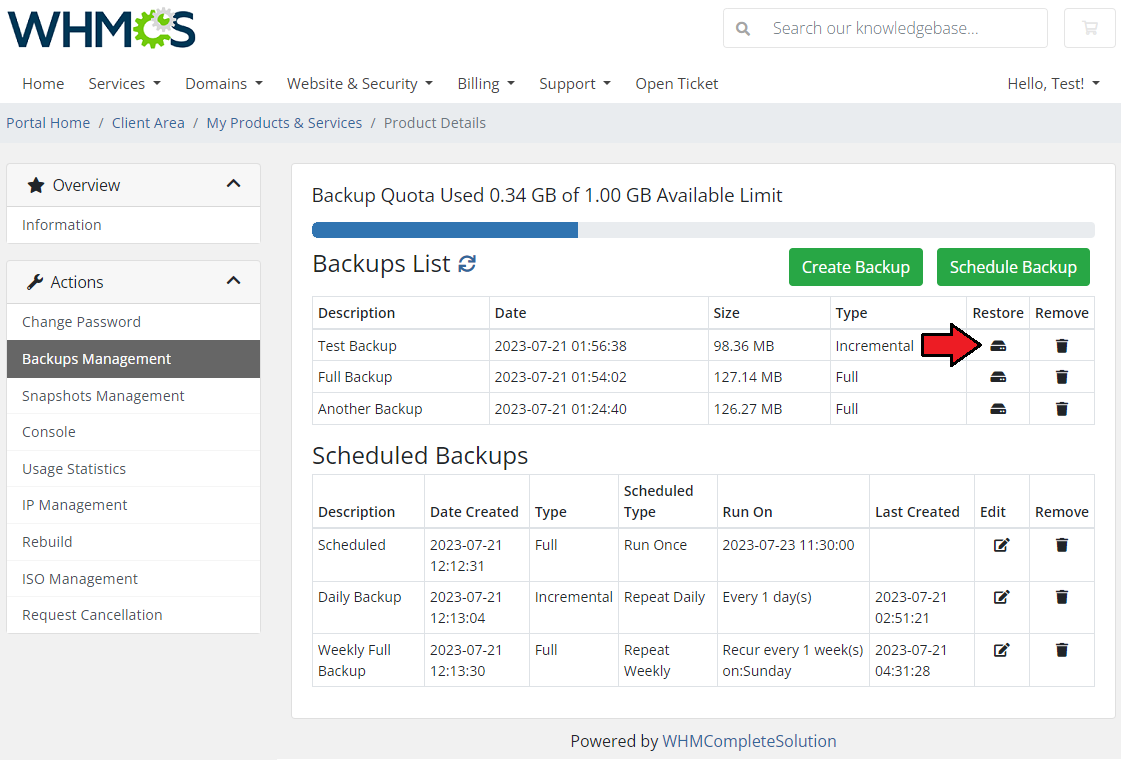
| To restore a backup, simply press restore icon and then confirm the action. Important: Along with the decision to restore a backup of your virtual machine, you accept to delete all the created snapshots of your virtual machine. |
|
Snapshots Management
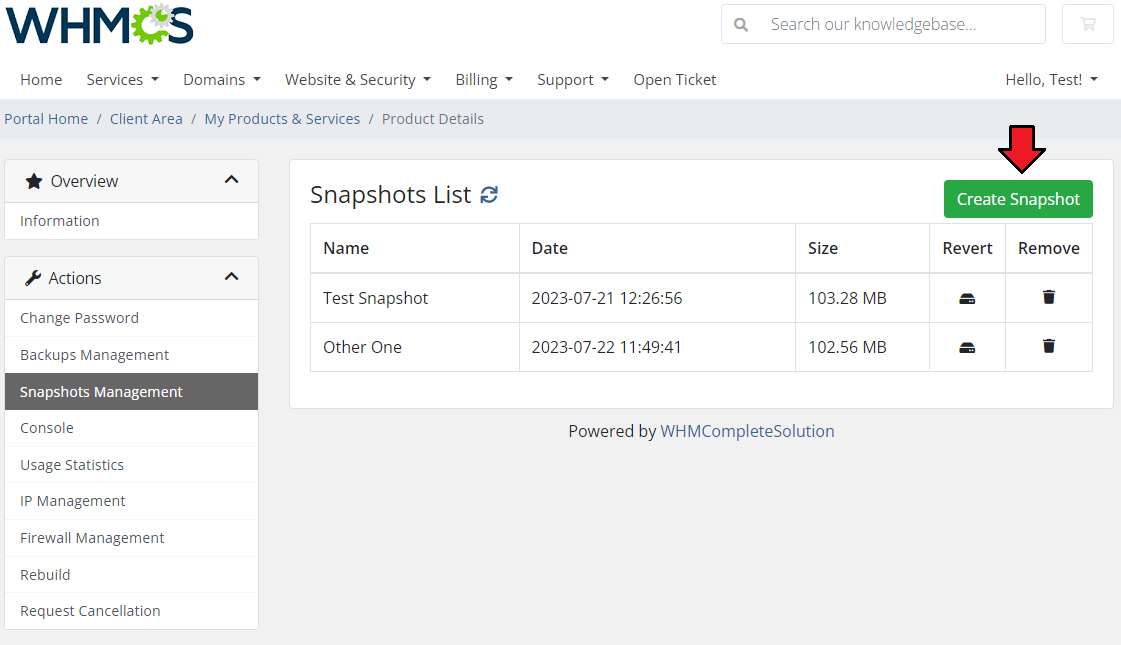
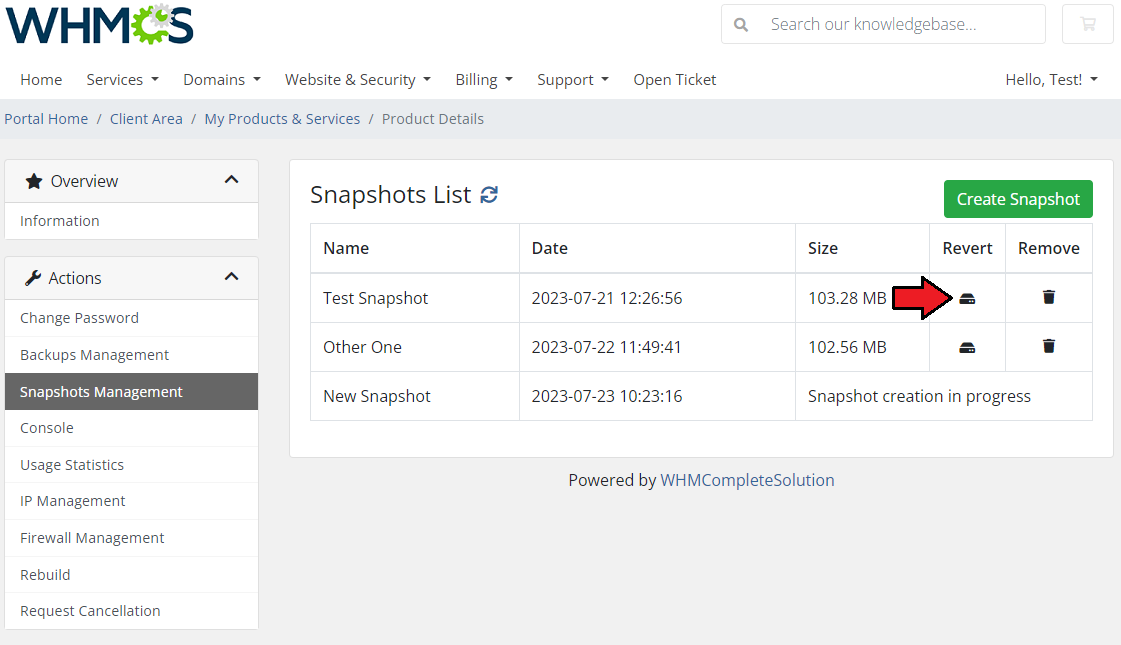
| 'Snapshots Management' section allows you to create single snapshots of the current virtual machine look and condition. To create a snapshot simply press 'Create Snapshot' button. |
|
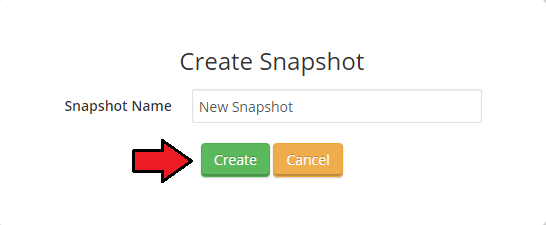
| Name the snapshot and confirm the action. |
|
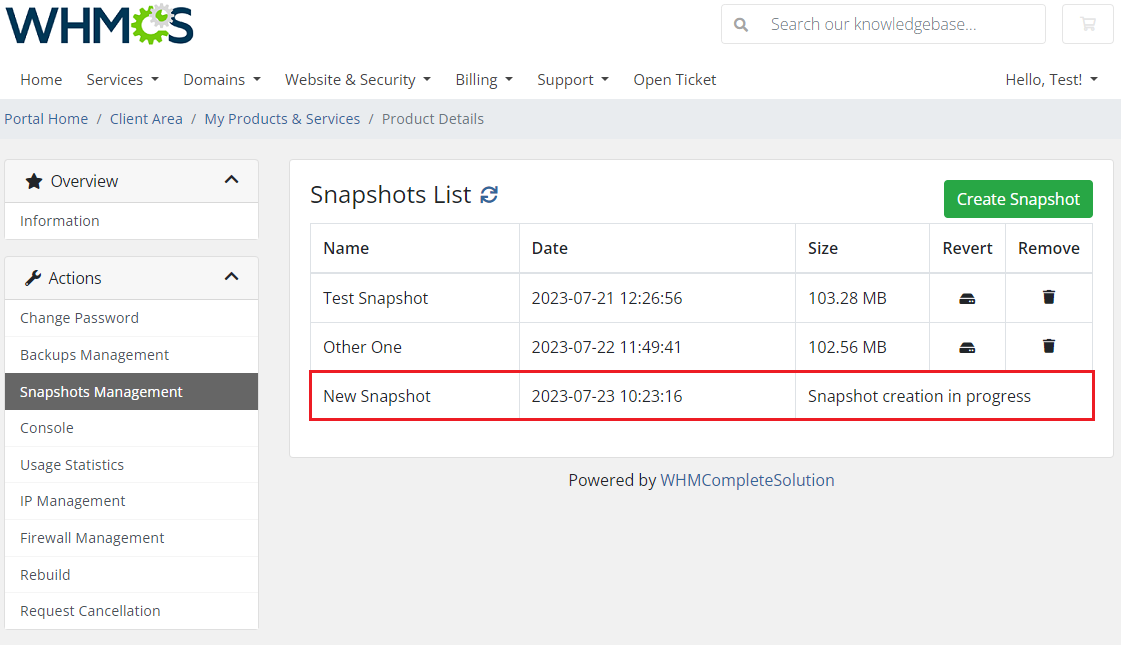
| Creating a snapshot might last a few minutes. Please wait until the next cron run to see it on the list of current snapshots. When the snapshot is ready, you will see it on the list with information on its creation date, size and options to revert the snapshot or delete it. |
|
| To revert a snapshot simply press adequate button. The virtual machine snapshot will be reverted to real environment. |
|
Console
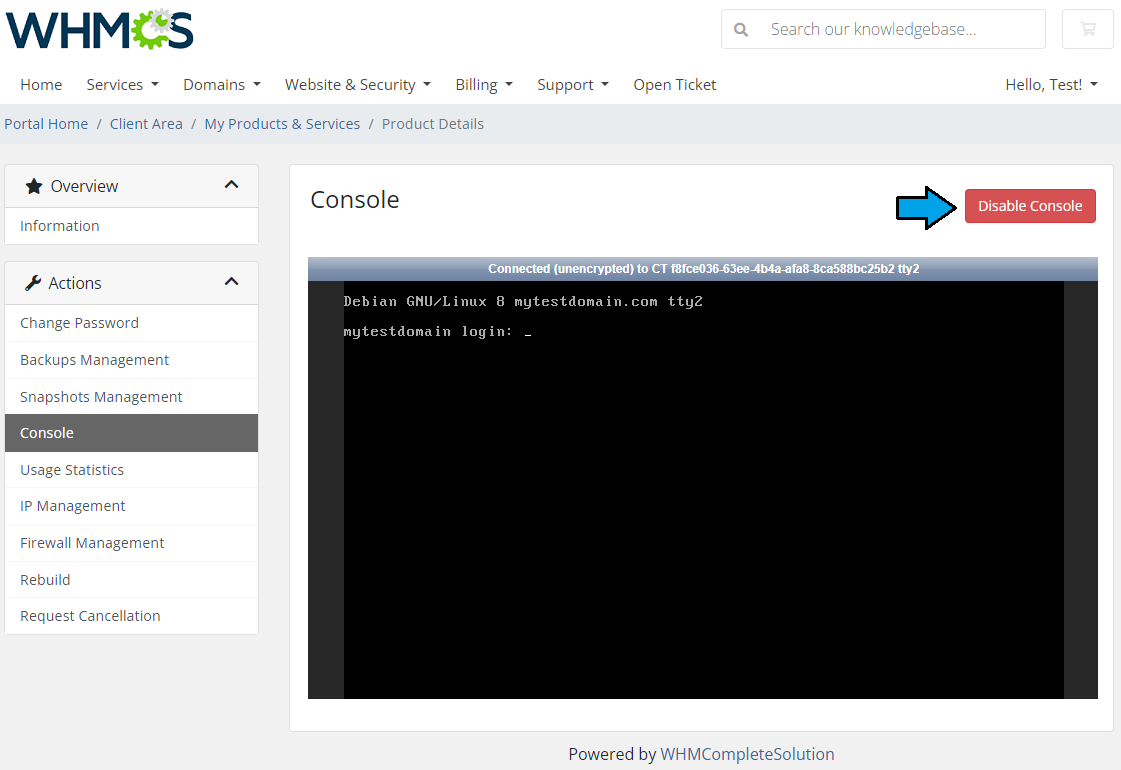
| One of the most interesting functionalities is noVNC console (which uses HTML5) where your clients can remotely manage server. To access it, simply press on the 'Console' button. A new window will be opened, so make sure your browser does not block it. Note: If the noVNC console does not work, make sure that it has been enabled in your Virtuozzo panel. There you can also test if it works properly. |
|
| Important: If your WHMCS instance uses 'HTTPS' protocol, then your Virtuozzo host must use 'HTTPS' as well. In order to establish connection between Virtuozzo and your WHMCS, run the below command on Virtuozzo server: prlsrvctl set --vnc-ssl-certificate /PathToCert/certificate.crt --vnc-ssl-key /PathToKey/private.key Remember that the used here certificate must be generated for the used by Virtuozzo host. |
Firewall Management
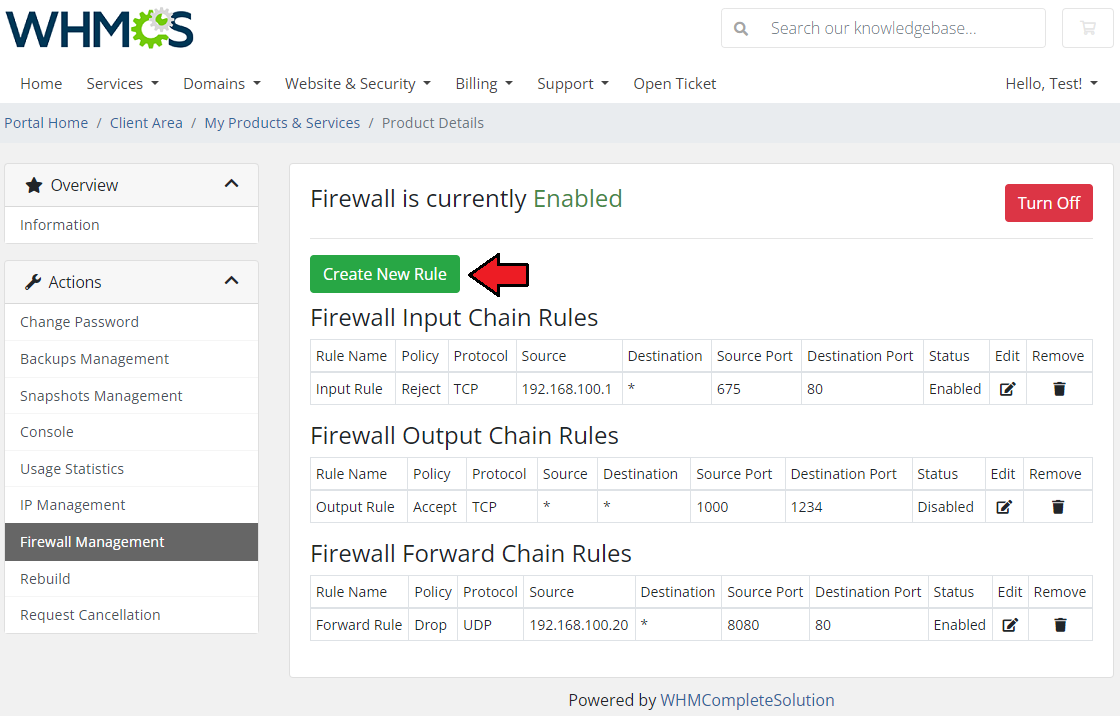
| Under 'Firewall Management' section the client can set up firewall for their virtual server. They can 'Enable' / 'Disable' firewall, add new firewall rules, view existing rules list and manage existing rules. |
|
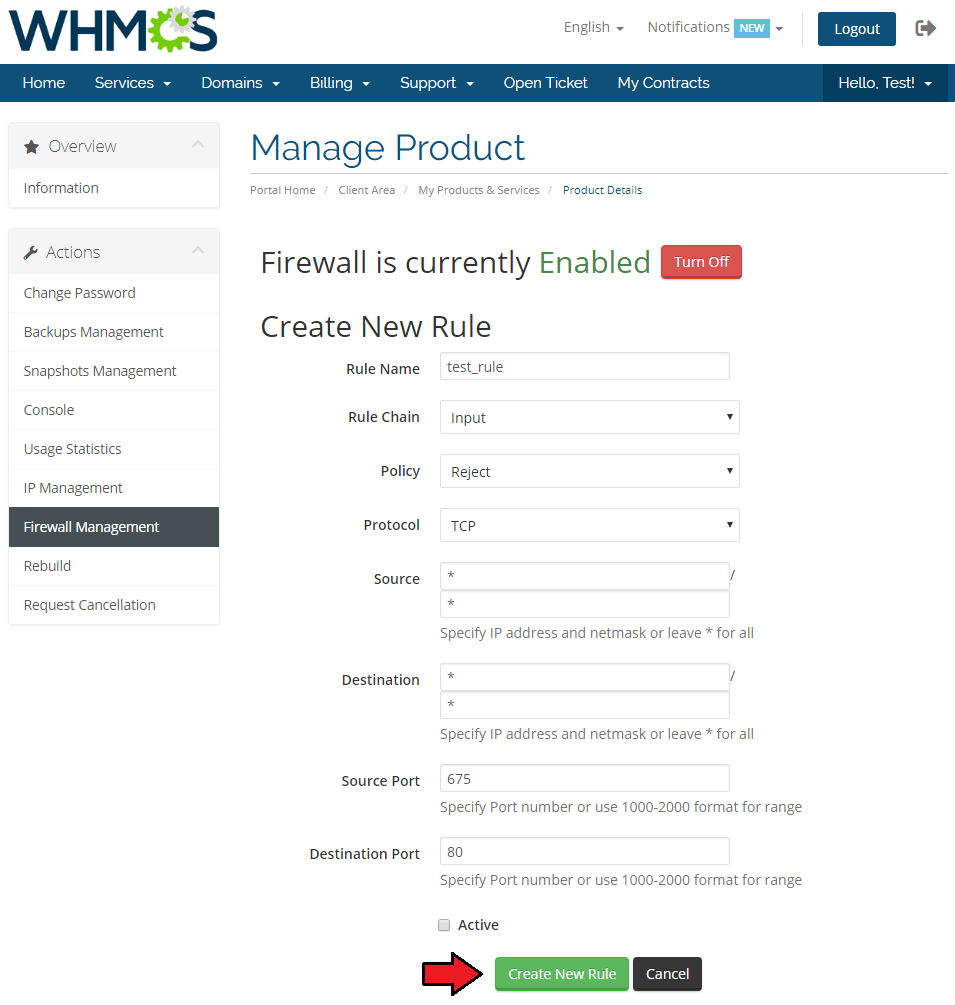
Now, enter all the required data to set up a valid firewall rule.
|
|
Usage Statistics
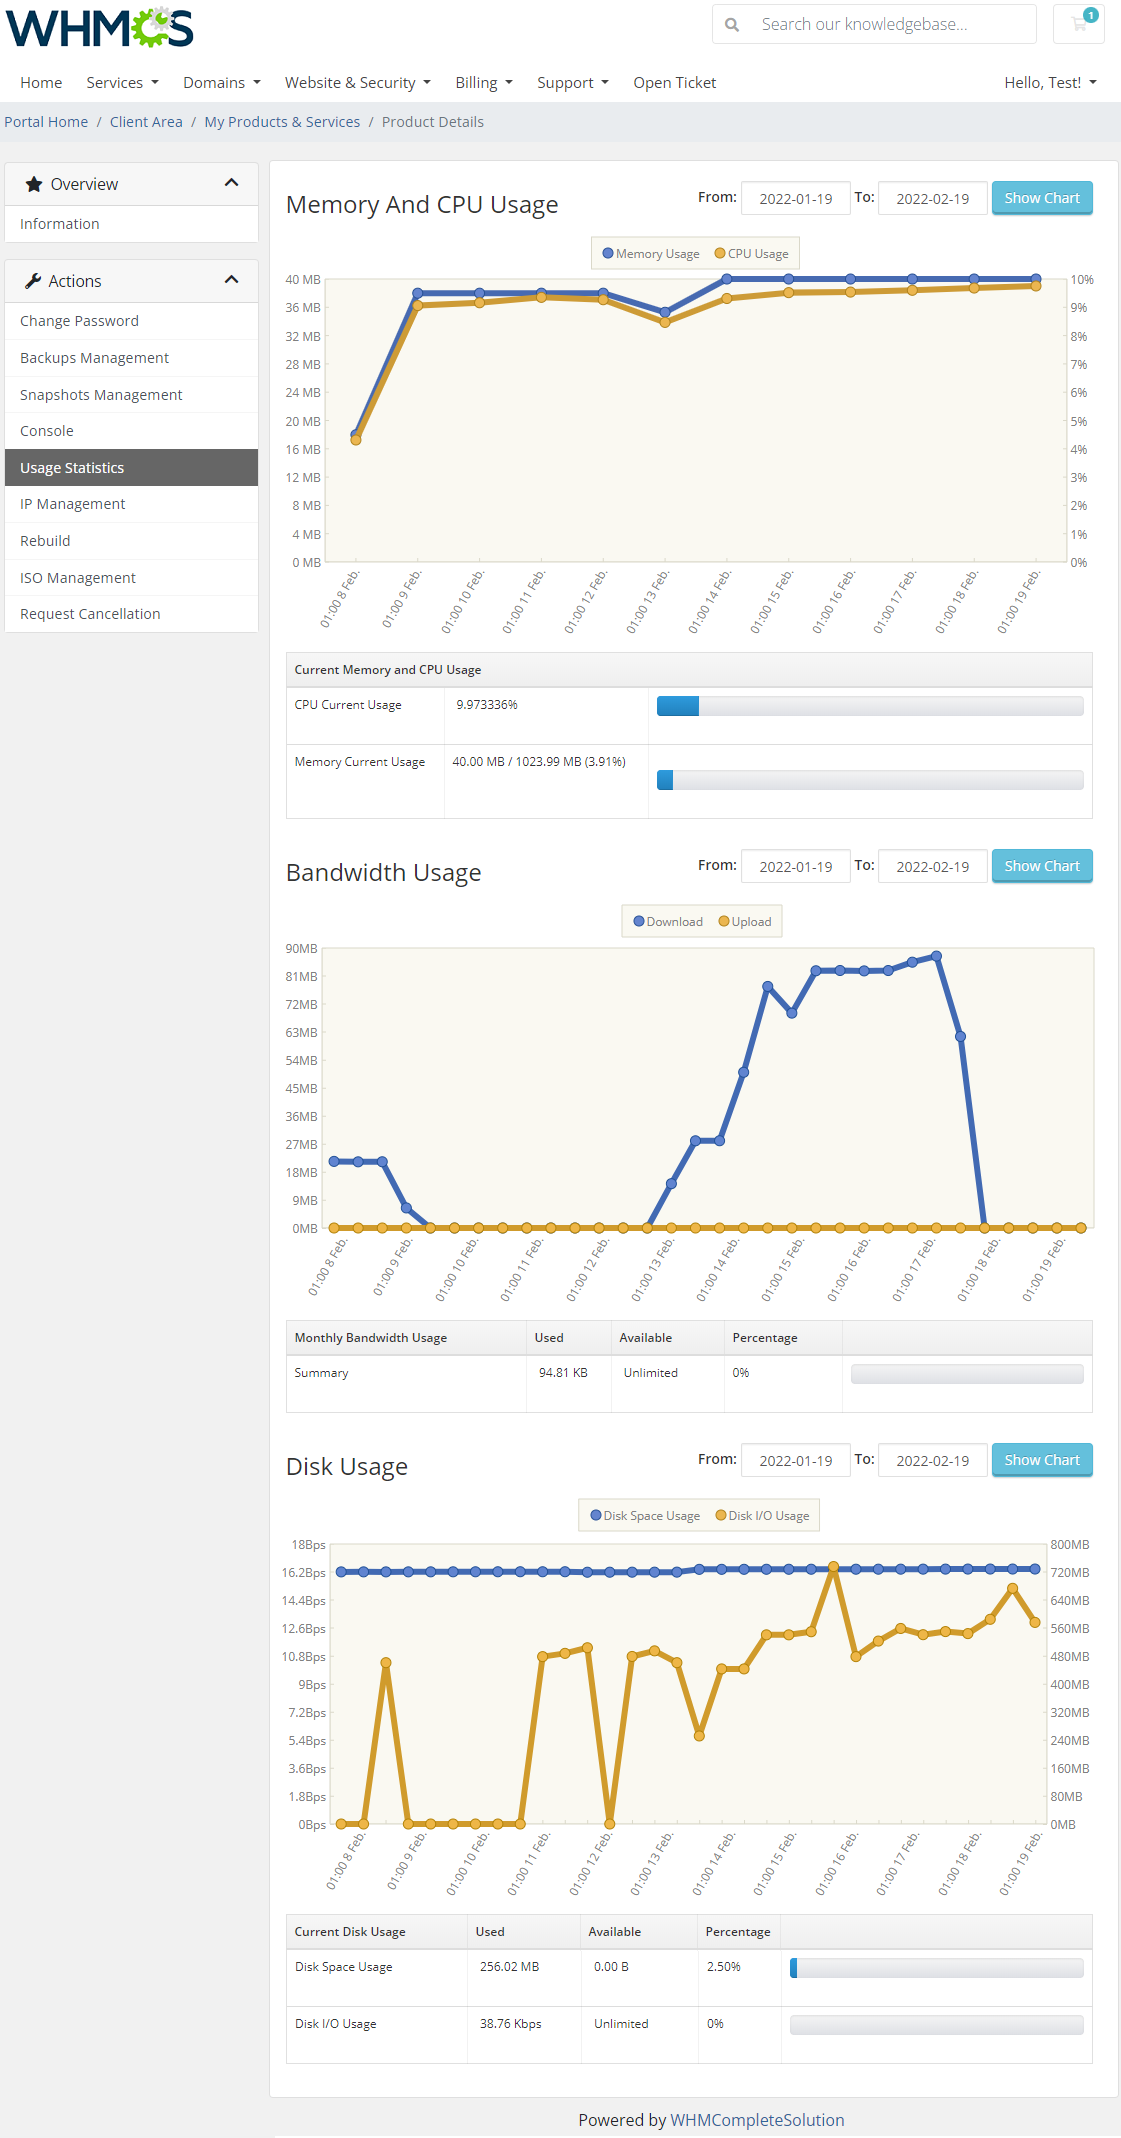
| At 'Usage Statistics' your clients can view information about resource used by the virtual server. There can be found resource usage and graphs of CPU, memory, bandwidth and disk. |
|
IP Management
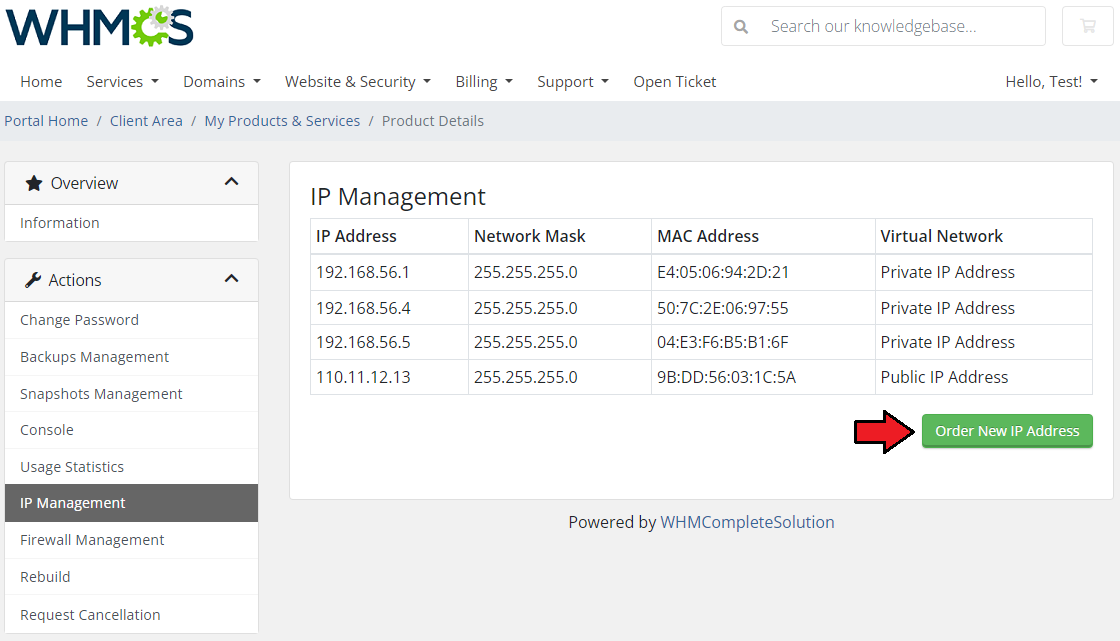
| Here your clients can find all IP addresses assigned to their virtual server. To order new IP addresses, press 'Order New IP'. Note 2: You can hide these configurable options from the order form. You can find instruction here. |
|
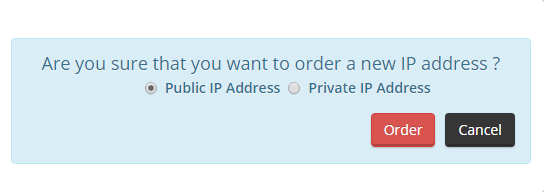
| Popup will appear, select IP address type and press 'Order'. |
|
Rebuild Server
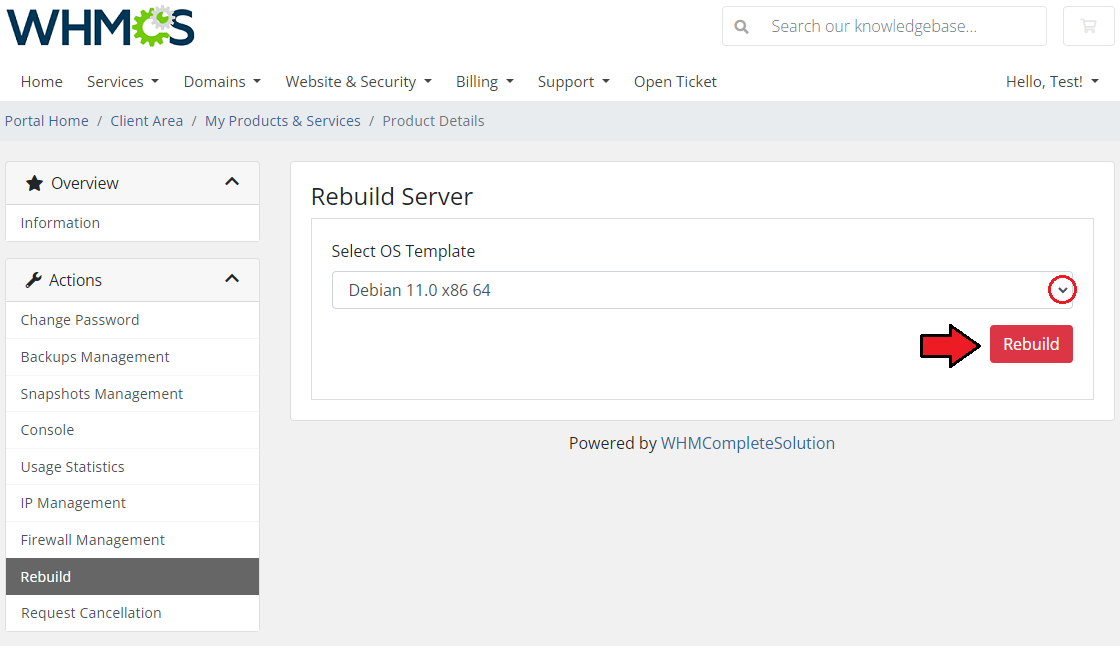
| Here you can rebuild your server. Select one of the available OS templates and press the 'Rebuild' button. |
|
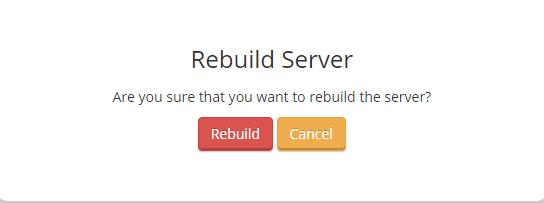
| A popup will appear, confirm if you are sure to rebuild the server. |
|
ISO Management
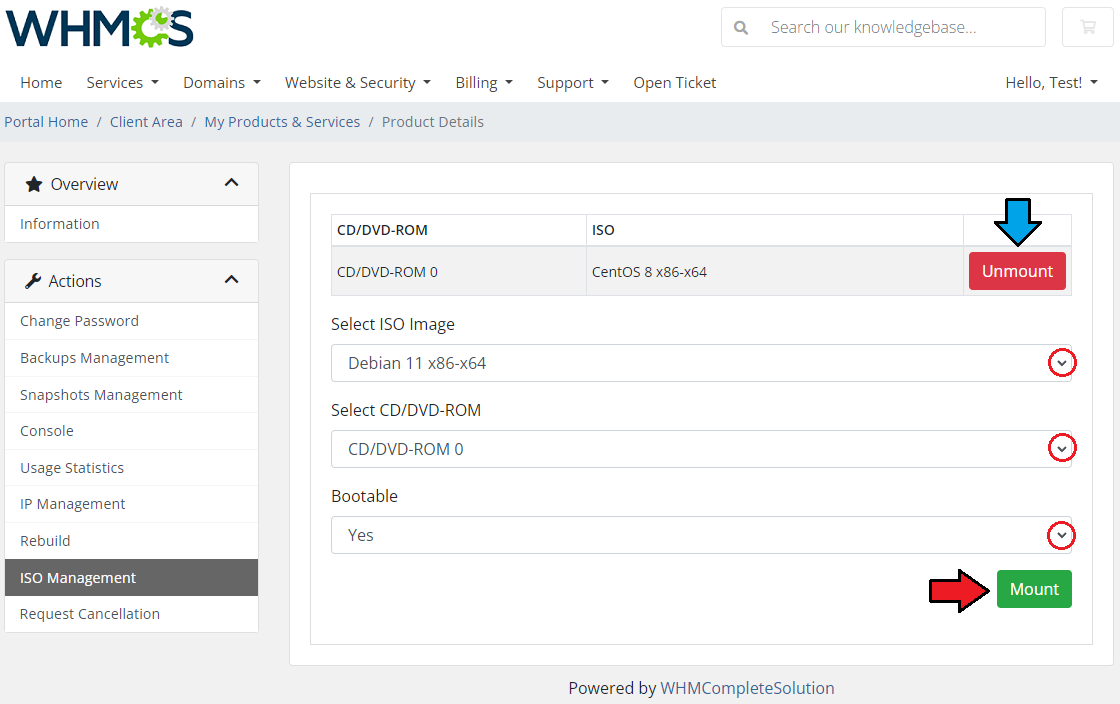
| If you have given your customers access to the ISO Management section, they will be able to see which image is currently mounted on their Virtual Machine. Note: This section is available only for the Virtual Machine type. Clients can unmount the currently used image from here as well as mount other images which paths you provided in the configuration of product. Please note that images can only be mounted if the virtual machine is stopped. |
|
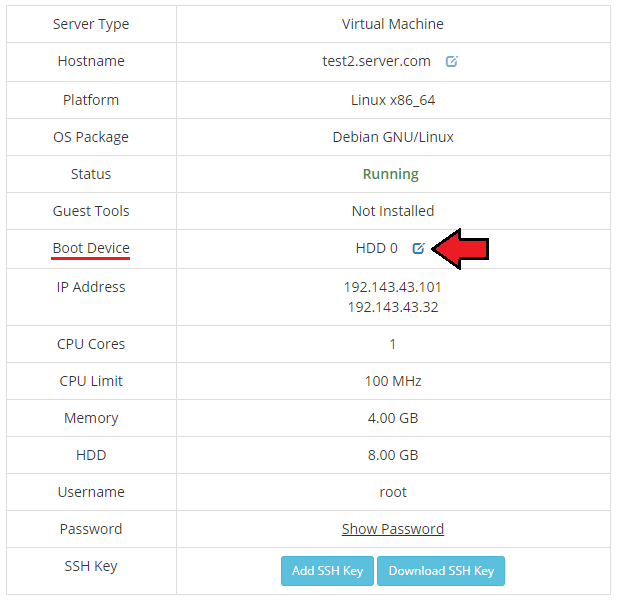
| After mounting the image, please remember that in order to use it during the boot of virtual machine, you also need to change the 'Boot Device' in the server details to the CD/DVD-ROM in which the image is mounted. |
|
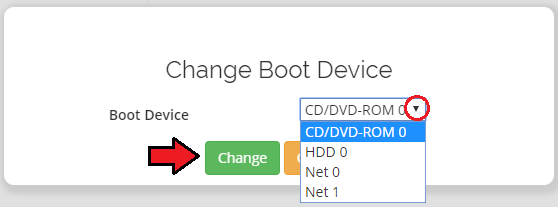
| The boot device, in addition to available CD/DVD-ROM devices, can also be selected as HDD disks or network interfaces. |
|
Management of Configurable Options
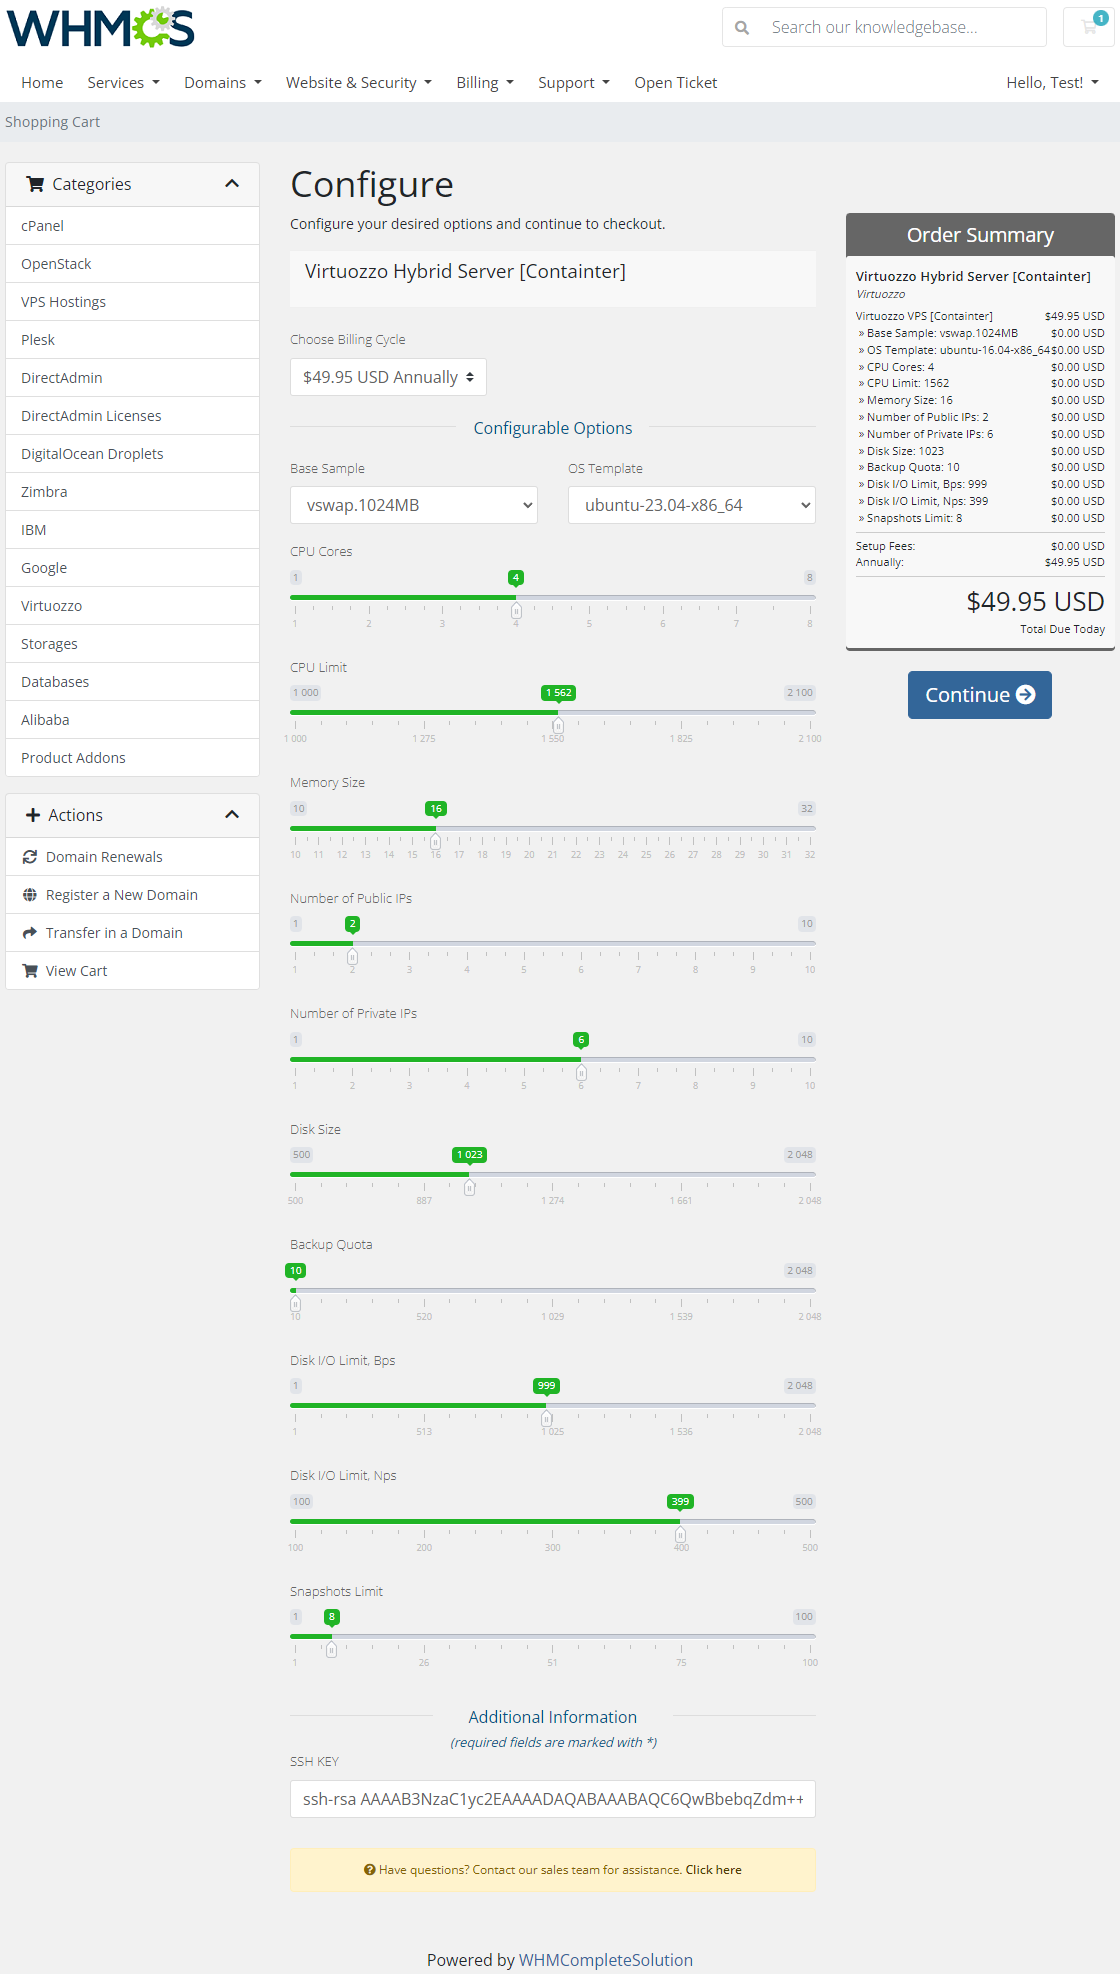
| When you successfully set up a product, your client can order it by choosing amount of resources from default configurable options. |
|
Editing Configurable Options
| In case these options don't suit your needs, you can edit them. To do so, go to 'Setup' → 'Products/Services' → 'Configurable Option' . |

|
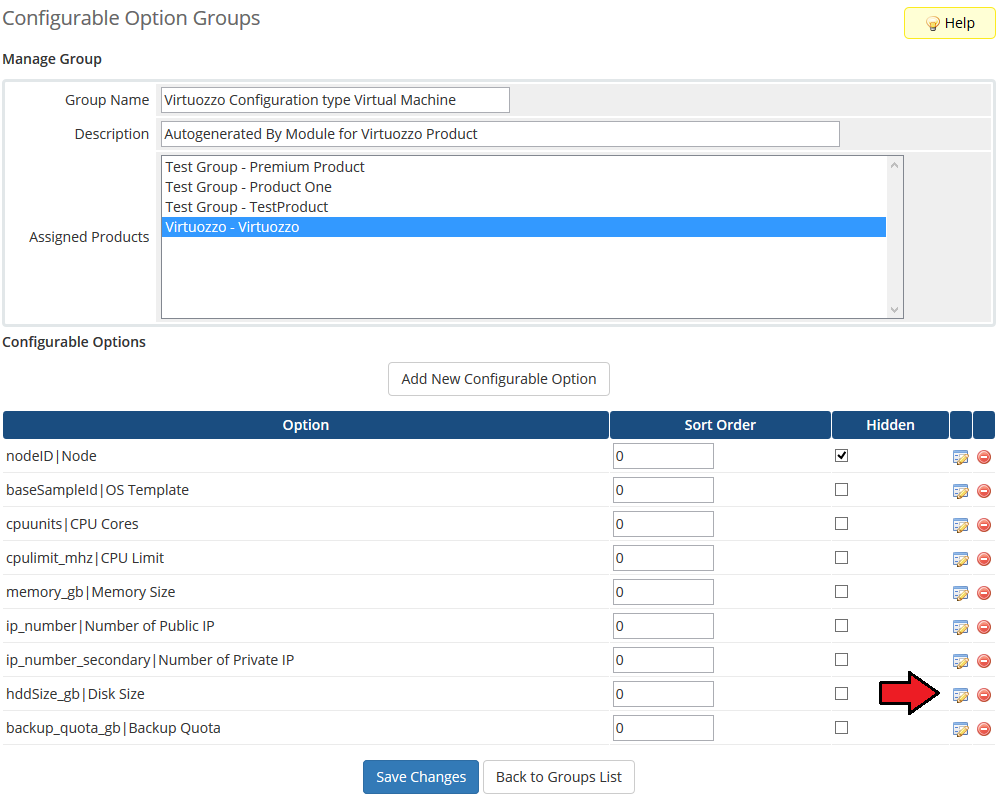
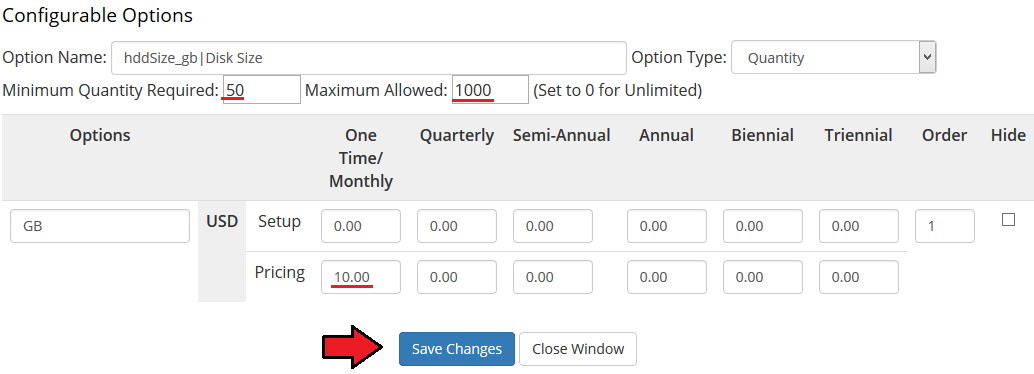
| Here you can view all products this configurable option group is assigned to. Now, let us show you how to edit options. Let’s say you want to add an option to order VPS with 1000 GB disk. |
|
| You will see a popup window, so make sure your browser will not block it. Edit 'Maximum Allowed' textbox as shown on the following screen. |
|
Here is a list of all available configurable options for Virtuozzo Hybrid Server products:
|
Hiding Configurable Options
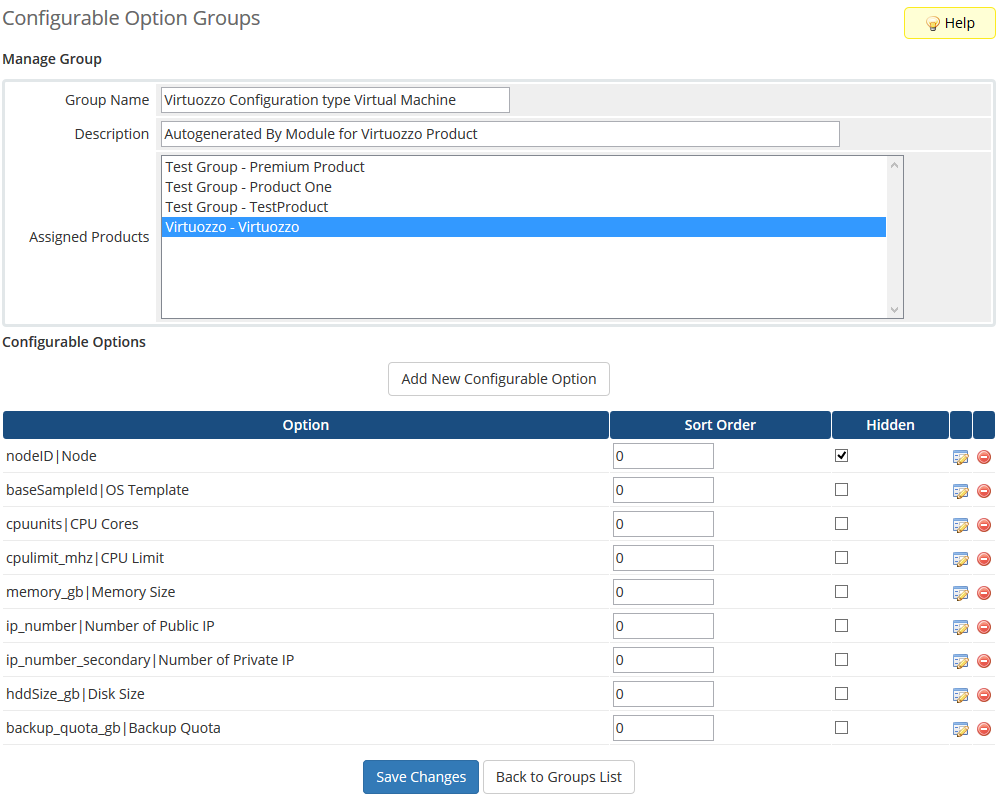
| If you decide to hide configurable options from a client order form, follow steps below. Firstly, go to 'Setup' → 'Products/Services' → 'Configurable Option'. |
|
| Afterwards, tick 'Hidden' checkboxes next to configurable options you want to hide. On the screen below you can see hiding of 'Number of Public IP' and 'Number of Private IP'. |
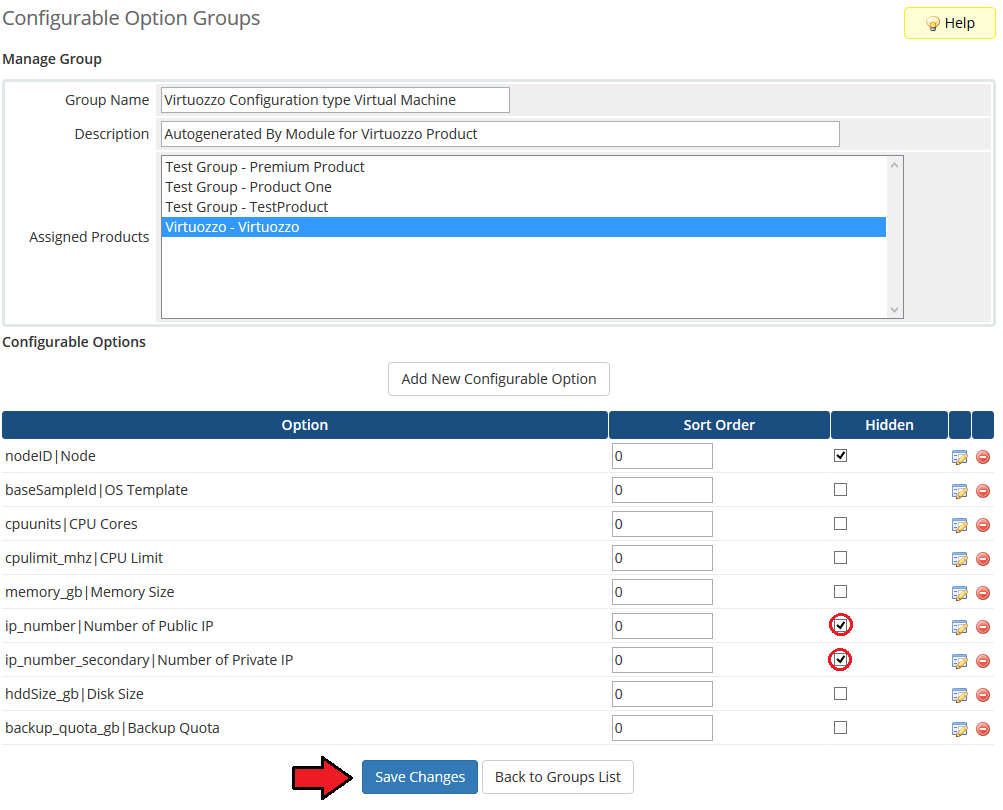
|
Management of Billing
| When you combine Virtuozzo Hybrid Server For WHMCS with Advanced Billing For WHMCS, you will be able to set up additional billing options. Module allows you to charge your customers based on the server resources used by them. |
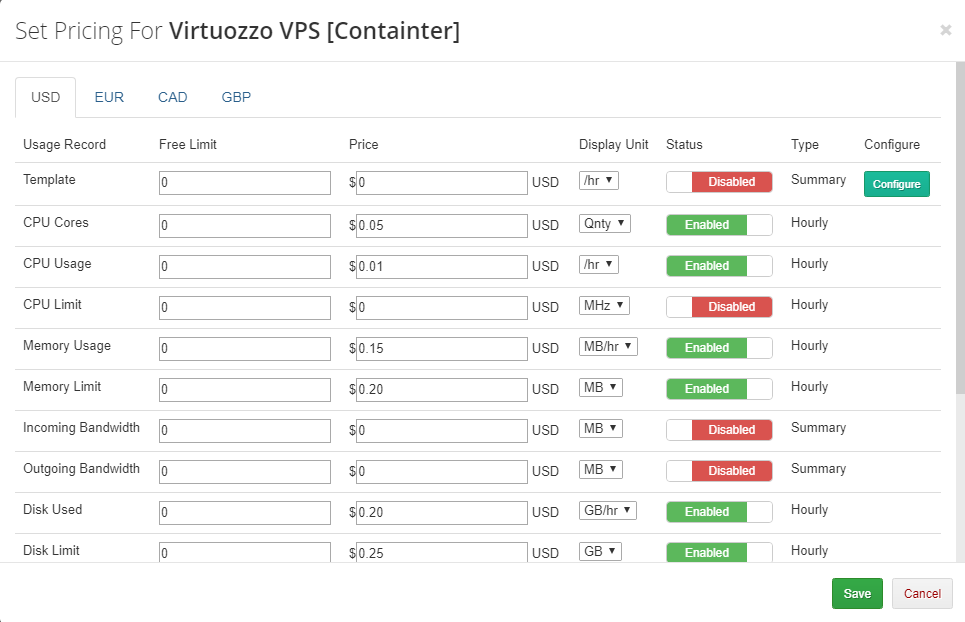
|
| With Advanced Billing module, you can also display your customers the current server resource usage and their cost. |
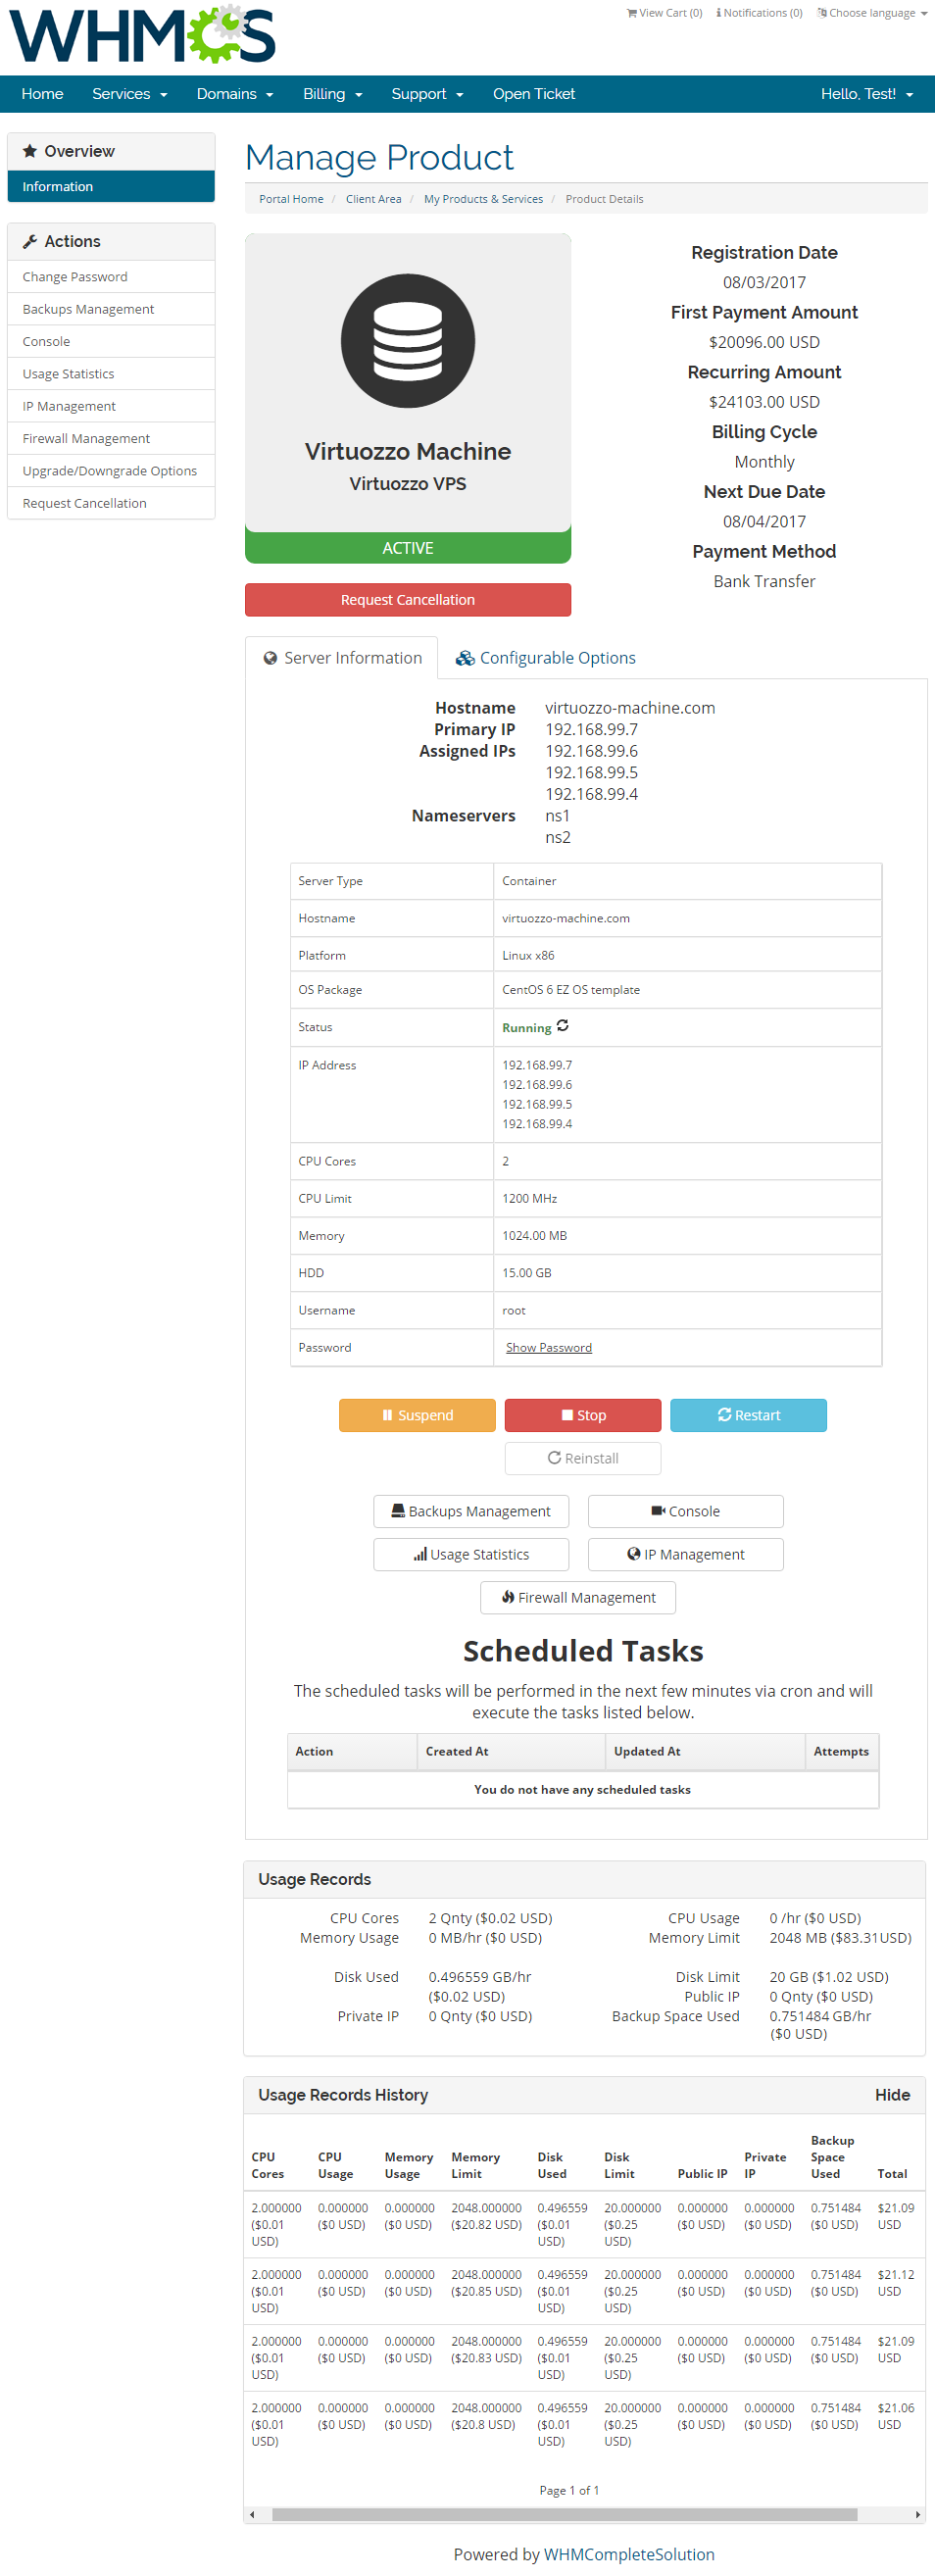
|
Management of Existing Accounts
| You can easily use Virtuozzo Hybrid Server For WHMCS module with your existing Virtuozzo accounts. To do so, follow the instructions below: 1. Create and configure a Virtuozzo server and a server group. |
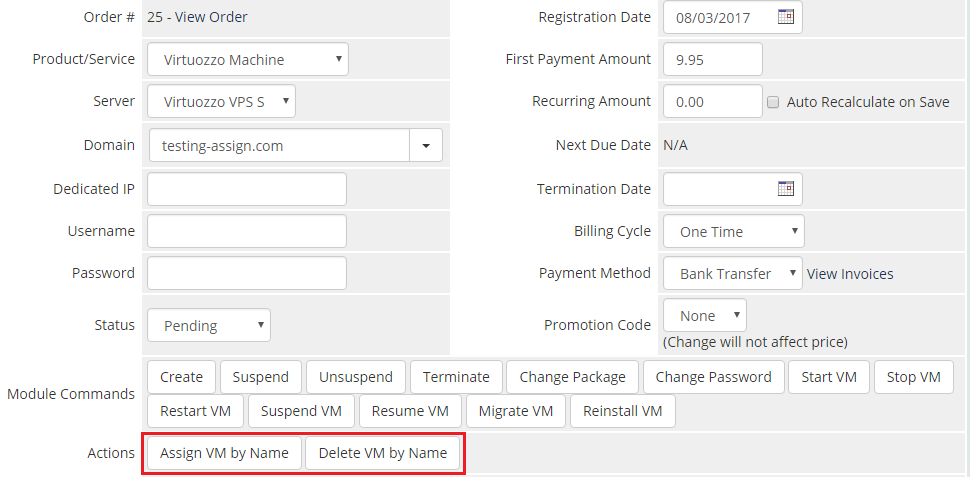
|
Tips
| 1. Operations performed on the virtual servers are not executed immediately. Give your Virtuozzo servers some time for processing the request and execution of the operation. |
| 2. To change the password, OS on VM has to finish a boot sequence. Password is changed when the ready status is detected by cron. |
Update Instructions
| An essential guidance through the process of updating the module is offered here. Ensure successful completion of the module update by carefully following each step, thereby preventing data loss or any unforeseen issues. |
How To Update From Parallels Cloud Server
| 1. If you switch from Parallels Cloud Server to newer version of Virtuozzo Hybrid Server, follow the below steps. Firstly, download the latest version from our client area. |

|
| 2. In the downloaded file you might find one or two packages that support different PHP versions. In the most recent versions of the module, you will find only one package that supports PHP 7.4 and later. |
| 3. Once you have chosen the package with the right PHP version, extract it and upload its content into the main WHMCS directory. The content of the chosen PHP version files to upload should look like this. |

|
| 4. Then you need to update server settings in 'Products/Services' → 'Servers'. Find more here |
| 5. Finally, update your product details. To do so, move to 'Products/Services' → 'Products/Services'. Find details here. |
| 6. If you are updating from Parallels Cloud Server 1.0.5 or older, you have to make additional changes. Update configurable options of product using Virtuozzo Hybrid Server module. |
| Your module and products have been just successfully updated, good job! |
Upgrade Guide
| Seeking a solution that offers greater flexibility, customization tailored to your precise needs, and unrestricted availability? There is an option that not only proves to be cost-effective in the long run but also includes prioritized support services, making it a truly valuable investment. Opt for the Open Source version of your Virtuozzo Hybrid Server For WHMCS module to unlock these benefits. Follow a comprehensive guide covering the transition process, the advantages it brings, and step-by-step instructions on what to do next after the order has been successfully finalized. |
Common Problems
| 1. When you have problems with connection, check whether your SELinux or firewall does not block ports. |
| 2. It can happen that at your 'Module Settings' tab you can get loading gray screen. Do not worry, it can take a while to download available settings from your Virtuozzo server. |
| 3. When you see the message shown on the screen below, it means that you have not installed IP Manager For WHMCS. This module is needed to manage your IP addresses from the Virtuozzo Hybrid Server addon, and can be downloaded from here. |

|
| 4. It is not advised to use Parallels Cloud Server For WHMCS module with Virtuozzo Hybrid Server For WHMCS at the same time. |
5. If you are getting an error like this one:
SQLSTATE[42S02]: Base table or view not found: 1146 Table 'username.pcsNetworkClassConf' doesn't exist. when configuring the product's module settings, make sure that the Virtuozzo Hybrid Server addon has been enabled. |
| 6. You may encounter a problem with the scheduled backup task that may have been initiated successfully but got stuck on the "Current in progress" status with 0 attempts. In that case, we recommend that you increase the 'wait_timeout' parameter in your MySQL configuration from the default 300 to at least 3600. |