Amazon Lightsail For WHMCS
Contents |
About Amazon Lightsail For WHMCS
| Amazon Lightsail For WHMCS will enhance your AWS provisioning business by letting you provide and manage Amazon Lightsail instances straight from your WHMCS system. Your clients will receive the chance to handle their machines remotely through start, stop, and reboot options as well as access flexible graphs on their server usage. |
- Admin Area Features:
| ✔ Create/Suspend/Unsuspend/Terminate Server |
| ✔ Start/Stop/Reboot Server |
| ✔ Toggle Static IP Address |
| ✔ View Server Status And Details |
| ✔ View Remote Connection Details |
| ✔ View Assigned Public And Private IP Addresses |
| ✔ View Attached Disk Details |
| ✔ View Scheduled Tasks |
| ✔ Configure Product Details: |
| ✔ Choose Region |
| ✔ Choose Availability Zone |
| ✔ Choose Platform: |
| ✔ Linux/Unix |
| ✔ Microsoft Windows |
| ✔ Choose Blueprint |
| ✔ Choose Snapshot |
| ✔ Choose Instance Plan |
| ✔ Define Snapshots Limit |
| ✔ Choose Email Template |
| ✔ Define Tag Name |
| ✔ Define Random Domain Prefix |
| ✔ Provide User Data Script |
| ✔ Provide Displayed Client Area Merge Fields Variables |
| ✔ Toggle Static IP Address |
| ✔ Toggle API Request Logging |
| ✔ Choose Client Area Features |
| ✔ Generate Configurable Options |
| ✔ Run API Connection Test |
- Client Area Features:
| ✔ Start/Stop/Reboot Server |
| ✔ View Server Status And Details |
| ✔ View Provided Merge Field Variables |
| ✔ View Remote Connection Details |
| ✔ View Assigned Public And Private IP Addresses |
| ✔ View Attached Disk Details |
| ✔ View Scheduled Tasks |
| ✔ View Tasks History |
| ✔ View Usage Graphs For Given Time Period |
| ✔ View/Create/Edit/Delete Firewall Rules |
| ✔ View/Create/Restore/Delete Snapshots |
| ✔ Provide SSH Key During Order |
- Configurable Options:
| ✔ Region |
| ✔ Blueprint |
| ✔ Snapshot |
| ✔ Instance Plan |
| ✔ Static IP Address |
| ✔ Snapshots Limit |
- Available Blueprints:
| ✔ Linux/Unix Applications: |
| ✔ Drupal |
| ✔ GitLab CE |
| ✔ Joomla |
| ✔ LAMP (PHP 7) |
| ✔ MEAN |
| ✔ Magento |
| ✔ Nginx |
| ✔ Node.js |
| ✔ Plesk Hosting Stack |
| ✔ Redmine |
| ✔ WordPress |
| ✔ WordPress MultiSite |
| ✔ Linux/Unix OS: |
| ✔ Amazon Linux |
| ✔ CentOS |
| ✔ Debian |
| ✔ FreeBSD |
| ✔ openSUSE |
| ✔ Ubuntu |
| ✔ Microsoft Windows: |
| ✔ SQL Server 2016 Express |
| ✔ Windows Server 2012 R2 |
| ✔ Windows Server 2016 |
| ✔ Any Other Applications And OS When Available |
- General Info:
| ✔ Multi-Language Support |
| ✔ Supports PHP 8.2 Back To PHP 8.1 |
| ✔ Supports WHMCS Themes "Six" And "Twenty-One" |
| ✔ Supports WHMCS V8.12 Back To WHMCS V8.9 |
| ✔ Requires ionCube Loader V13 Or Later |
| ✔ Easy Module Upgrade To Open Source Version |
Installation and Configuration
| This tutorial will show you how to successfully install and configure Amazon Lightsail For WHMCS smoothly. We will guide you step by step through the whole process. |
Installation
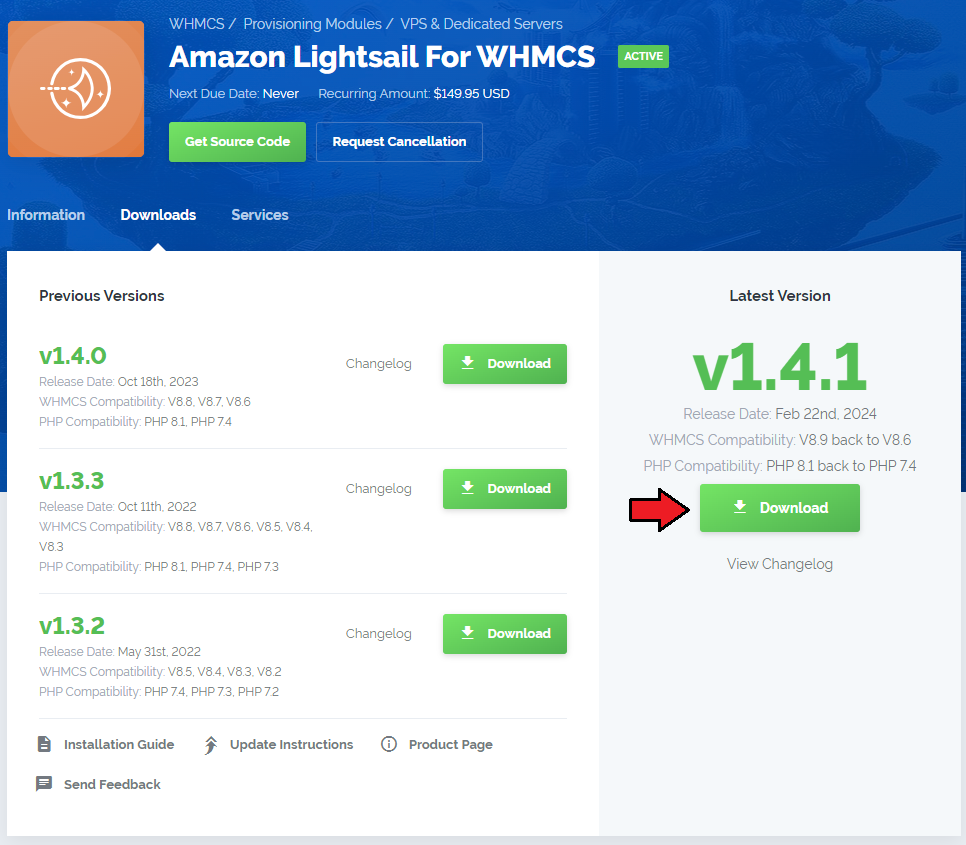
| 1. Log in to our client area and download the module. |
|
| 2. Upload and extract the extension into the main WHMCS directory. Extracted files in your WHMCS directory should look like this: Note: The module uses modified AWS files provided by WHMCS in the 'vendor' folder. In order for the module to work properly, it is necessary to overwrite these files with the files from the module. |

|
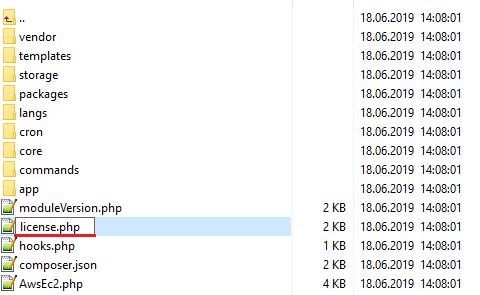
| 3. When you install Amazon Lightsail For WHMCS for the first time, you have to rename the 'license_RENAME.php' file. The file is located in '/yourWHMCS/modules/servers/AmazonLightsail/license_RENAME.php'. Rename it from 'license_RENAME.php' to 'license.php'. |
|
| 4. In order to configure your license key, you have to edit the previously renamed 'license.php' file. Enter your license key between the quotation marks as presented on the following screen. |

|
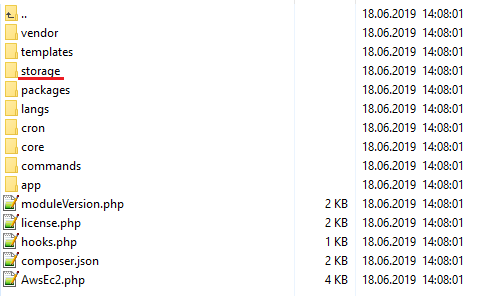
| 5. Now, set up the 'storage' folder as recursively writable. This folder is available at '/yourWHMCS/modules/servers/AmazonLightsail/'. |
|
| 6. The last step is setting up the queue cron job. It will be used to assign IP addresses to created machines as well as to obtain passwords for Windows OS. php -q /yourWHMCS/modules/servers/AmazonLightsail/cron/cron.php queue It is suggested to run the cron every 5 minutes. |
Configuration of Server
| Before you can continue, you must generate your Amazon Lightsail access details. You will need them to connect with the server successfully. Underneath, you will find detailed instructions on where to find this information. |
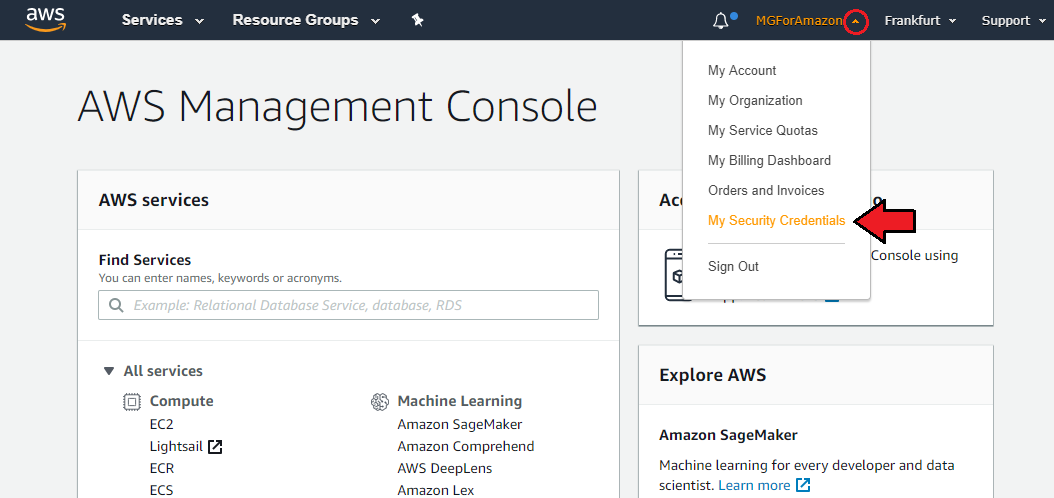
| 7. Firstly, log in to your Amazon AWS Management Console and find 'My Security Credentials' section under your account name dropdown. |
|
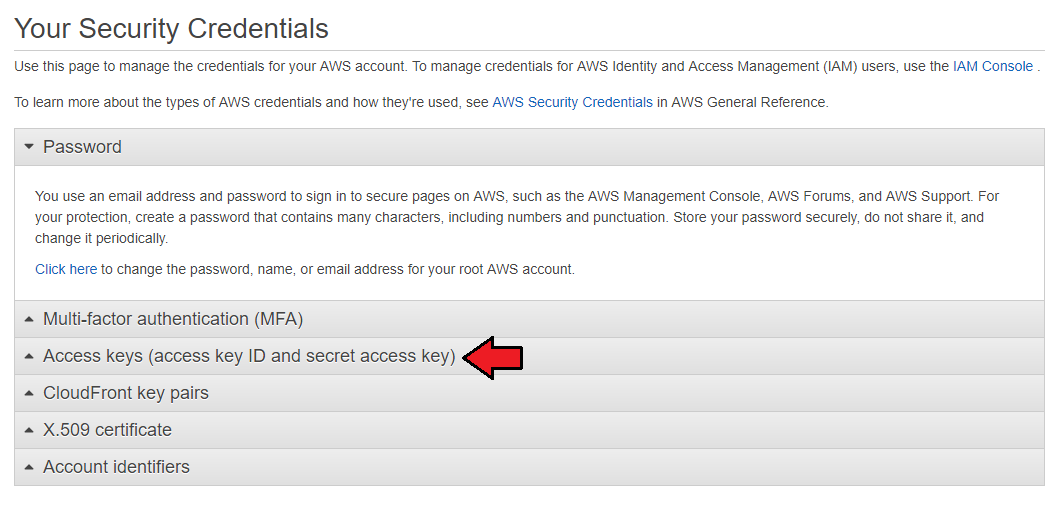
| 8. There, move to the 'Access Keys (access key ID and secret access key) section. |
|
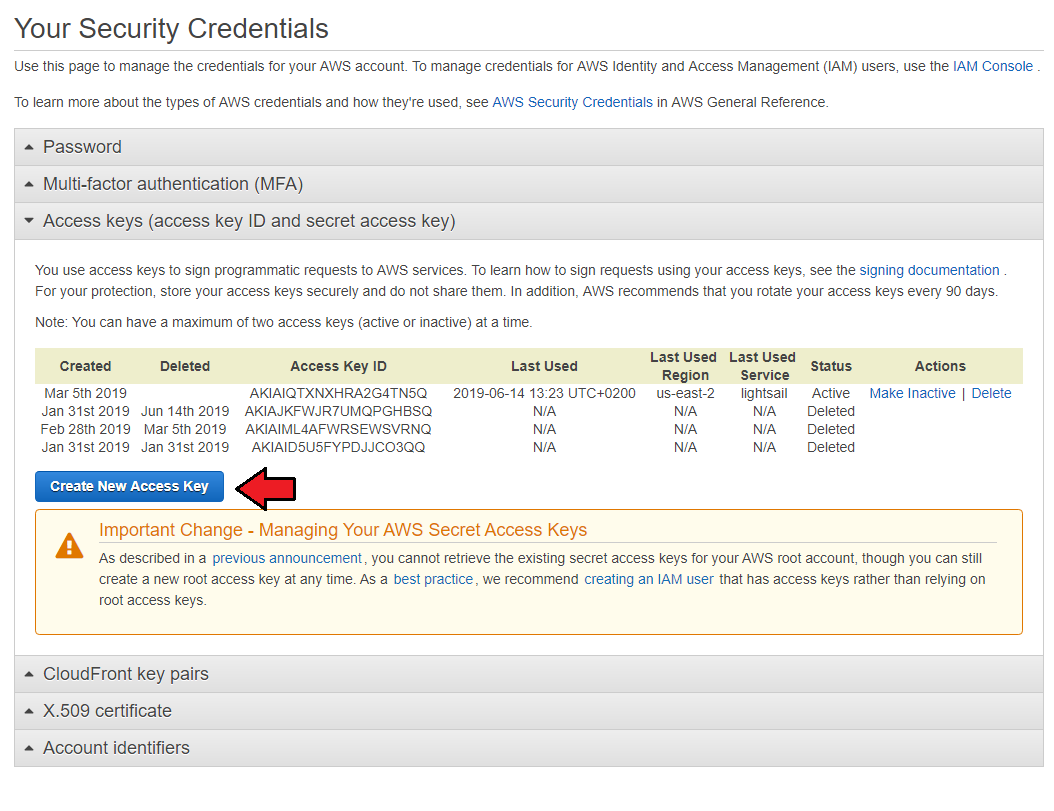
| 9. If you do not have any active keys yet, then press the 'Create New Access Key' button to generate a new set of details. |
|
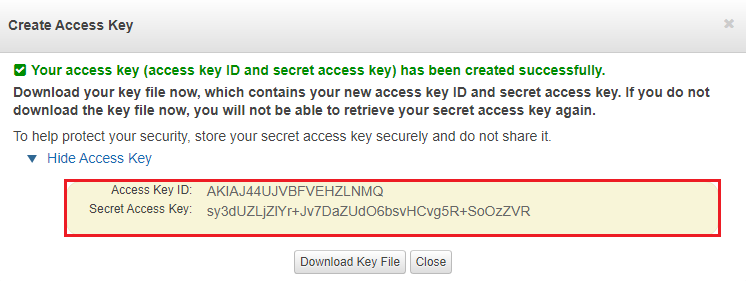
| 10. A modal with Access Key ID and Secret Access Key will appear, so copy this information and keep it safe. You may also download a suitable file with these details. Note: This is the only place where you can find the corresponding secret key later. It will not be visible next to the Key ID in the panel. |
|
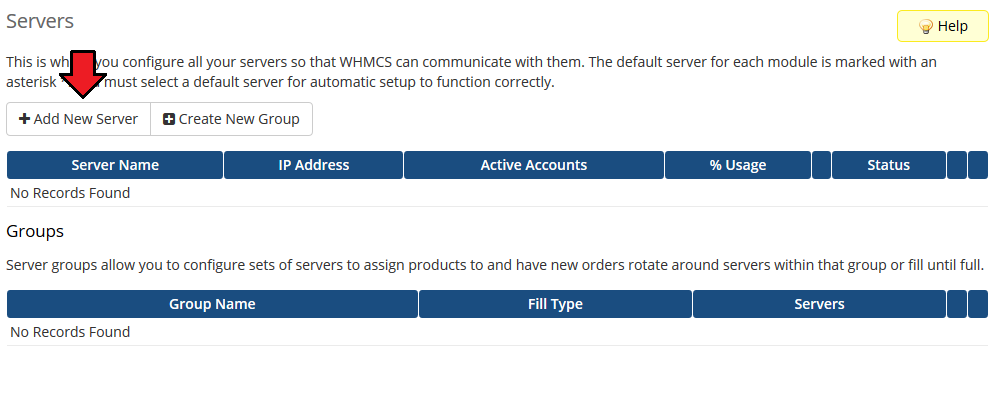
| 11. Now, log in to your WHMCS and proceed to 'Setup' → 'Products/Services' → 'Servers' and press 'Add New Server'. |
|
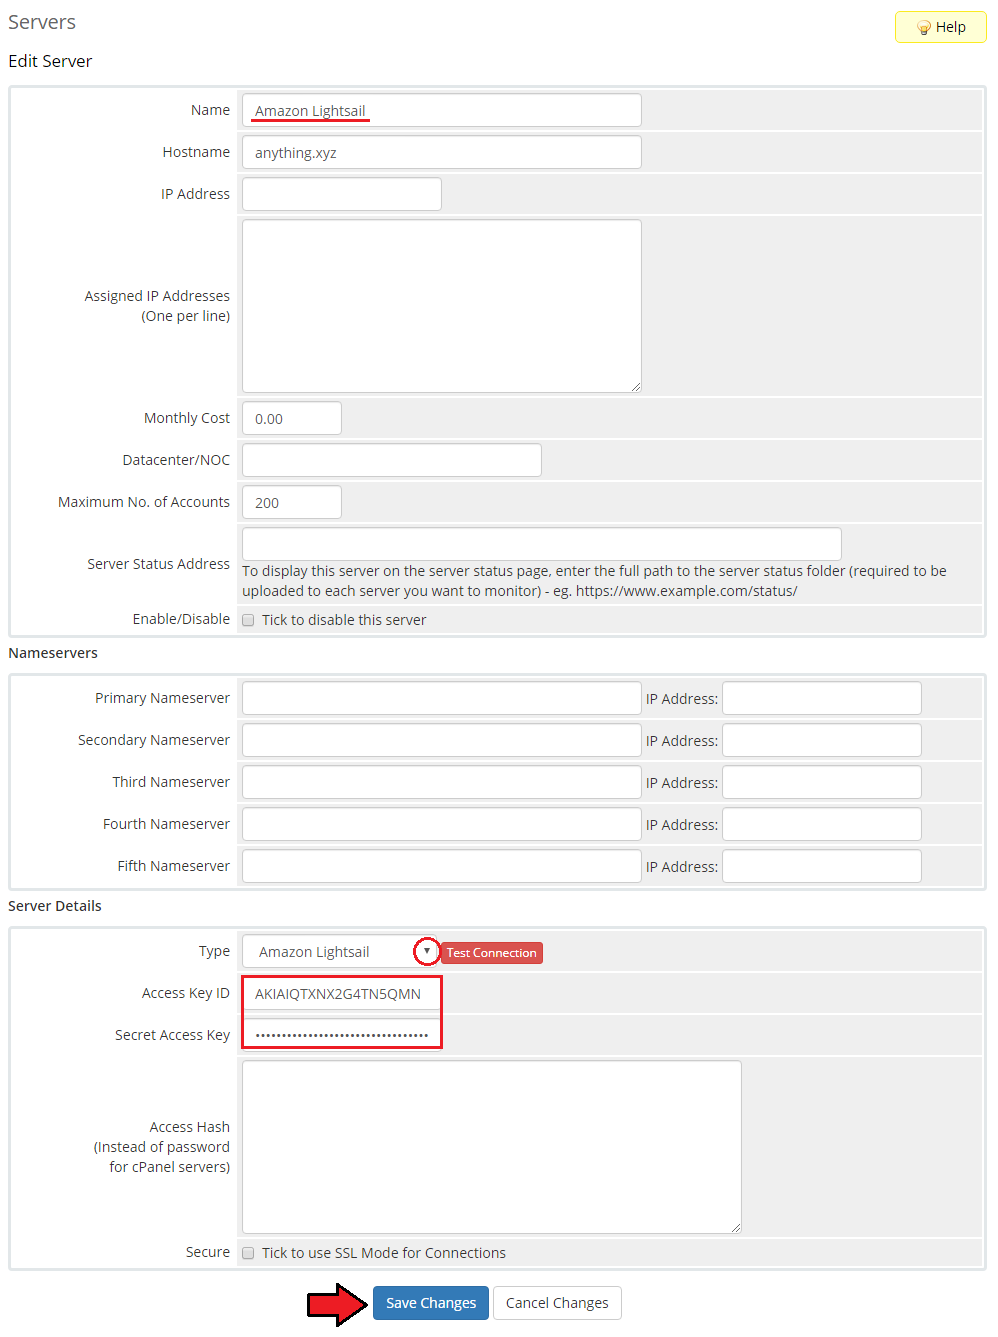
| 12. Next, enter your server name and select 'Amazon Lightsail' from the 'Type' field. Now, provide the previously generated 'Access Key ID' and 'Secret Access Key'. Then, check the connection and if successful, save the changes. Important: If you are using WHMCS V7.8.X, then a fatal error may occur when trying to save server settings without providing any hostname or IP address details, even if the module configuration does not require them. |
|
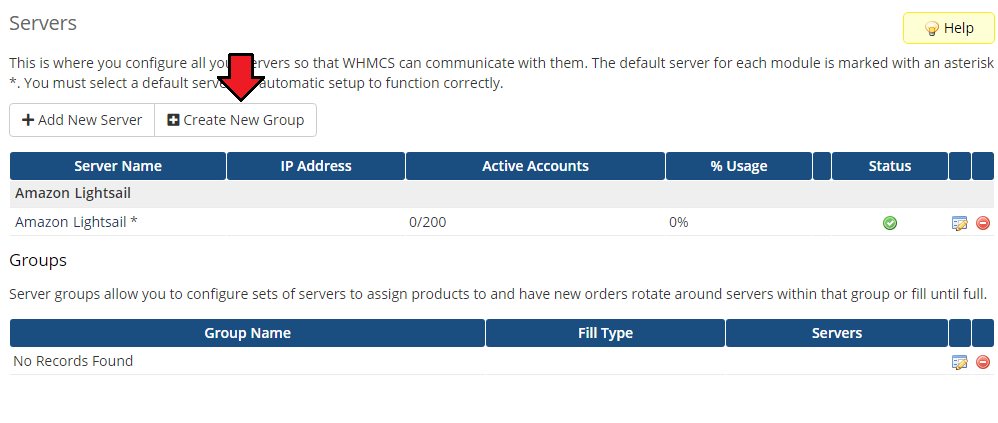
| 13. Now, it is time to create a server group. To do so, click on 'Create Server Group' . |
|
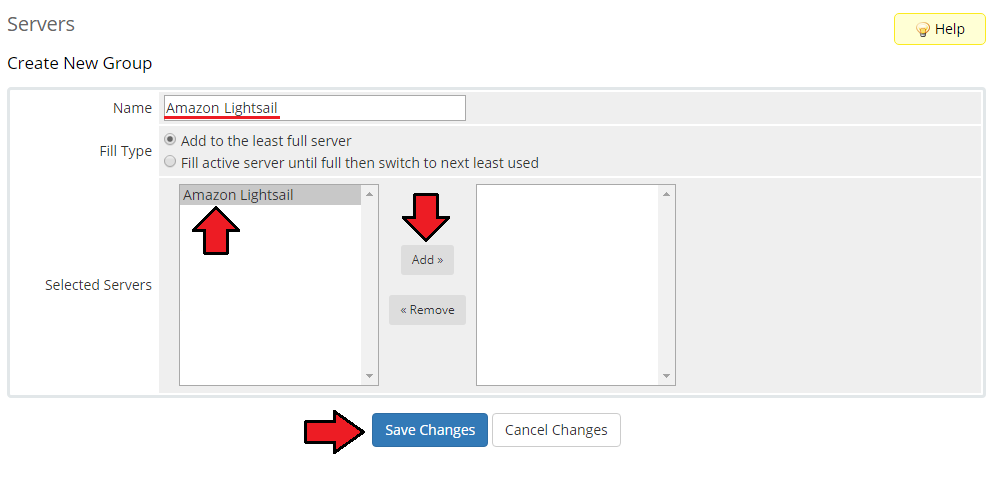
| 14. Enter a name, click on your previously created server, press 'Add' and afterward 'Save Changes' . |
|
Configuration of Product
| 15. In order to create and configure a product, go to 'Setup' → 'Products/Services' → 'Products/Services'. Click on 'Create a New Group'. |

|
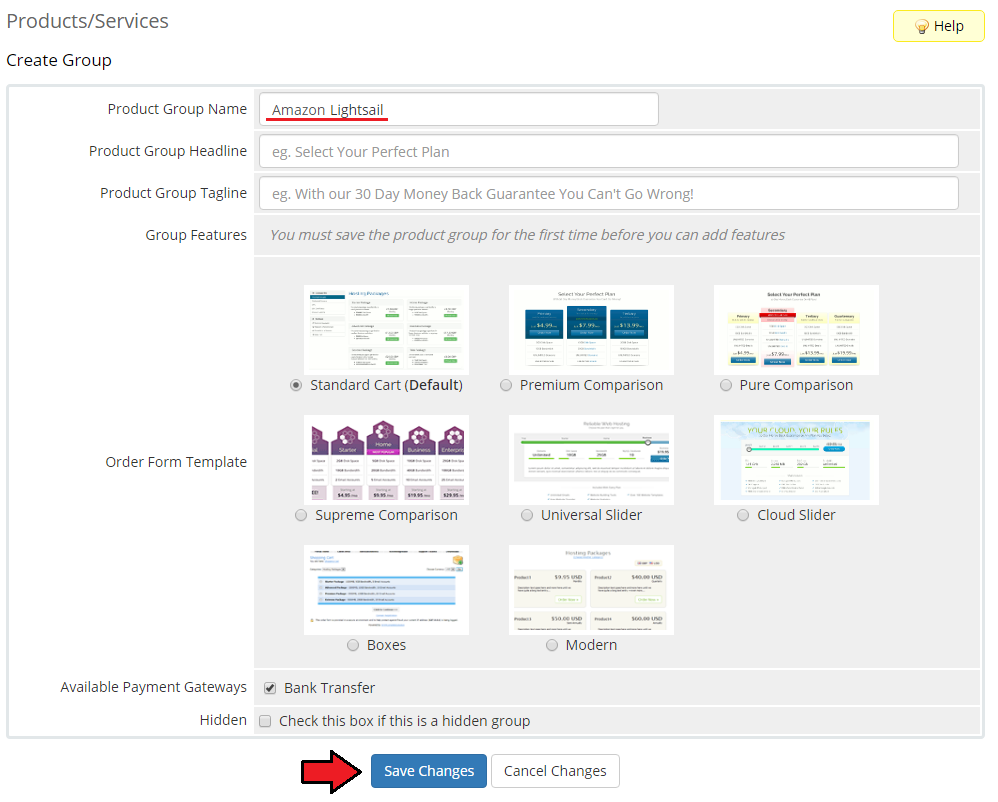
| 16. Enter your product group name and press 'Save Changes'. |
|
| 17. Once you have added a product group, you can create a new product. To do so, first click on 'Create a New Product'. |

|
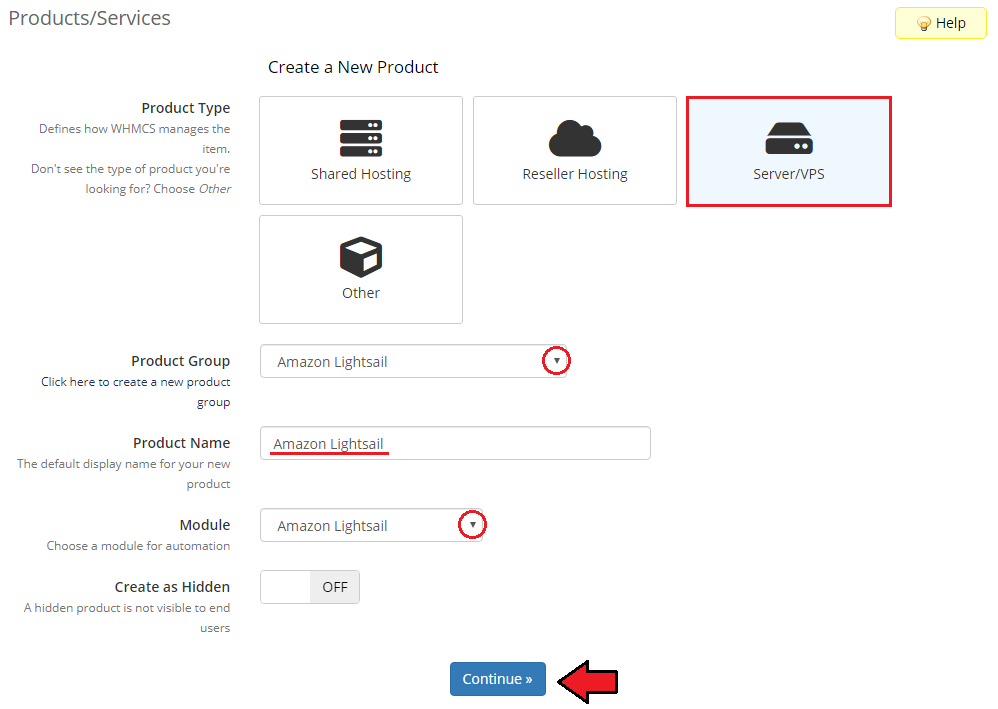
| 18. Afterward, choose your product type, enter your product name, choose module and the product group from the dropdown menus. Press 'Continue'. |
|
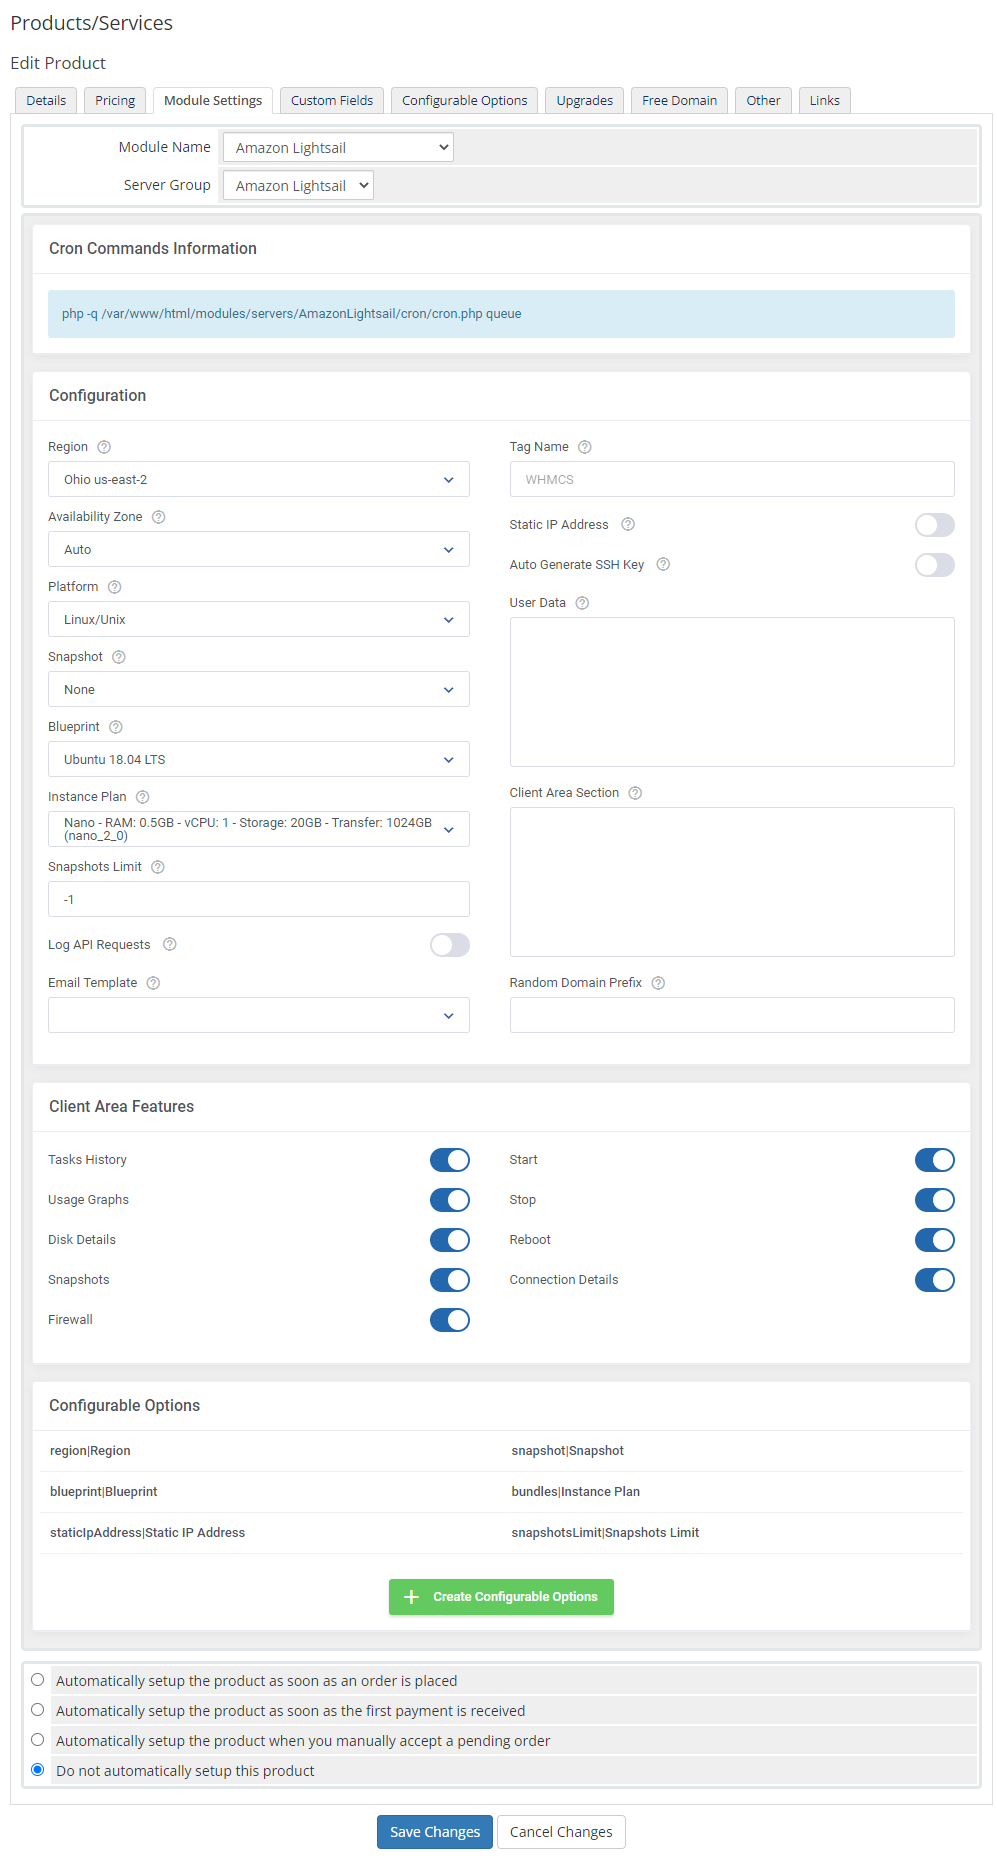
| 19. Now, go to the 'Module Settings' section and choose your previously created server group from the dropdown menu. The module should automatically save and reload the settings. If not, click on the 'Save Changes' option manually. |
|
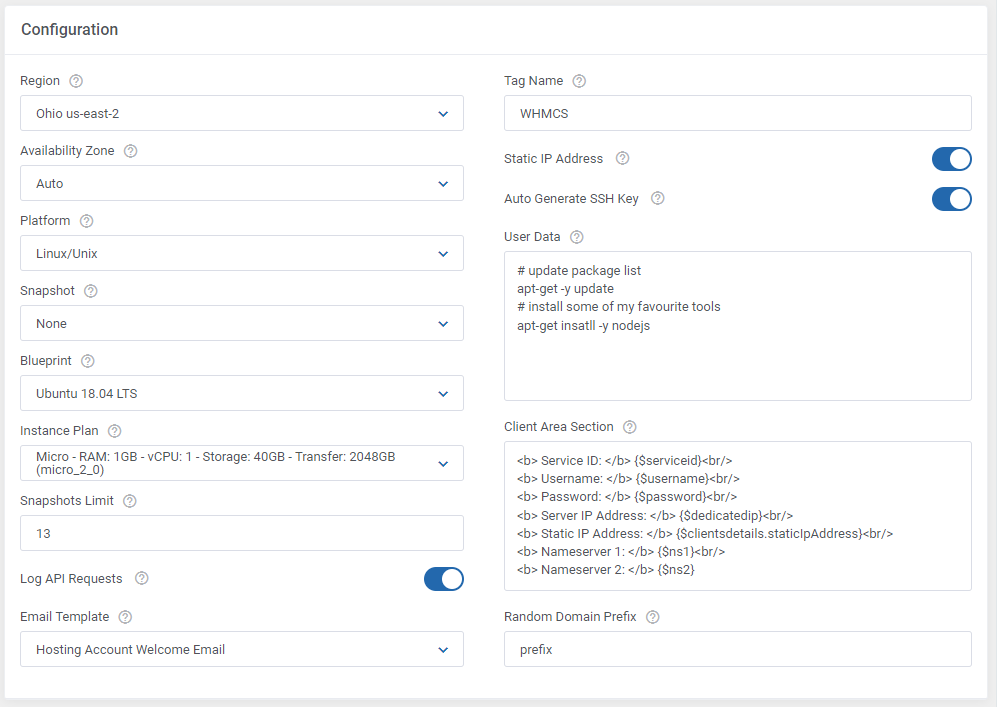
| 20. Now, you can start configuring the settings of the offered server. Just like when creating a new virtual machine in your Lightsail panel, here also you can configure such options as:
|
|
| 21. Next, choose which client area features will be available for your clients. |

|
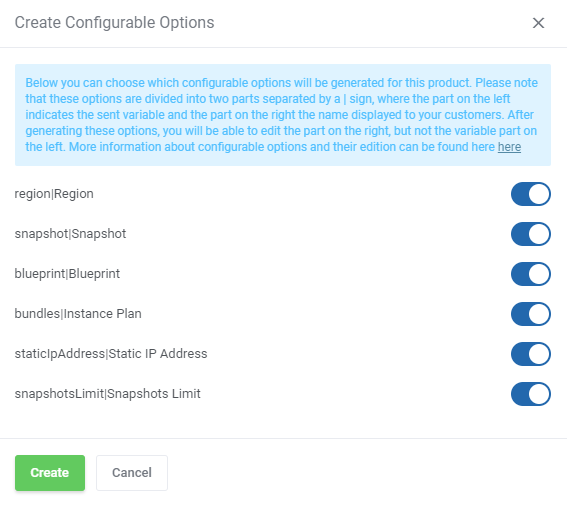
| 22. At the end of the configuration process, you can decide whether you want to generate configurable options for the product. Configurable options can be used by your clients to select each virtual machine parameters individually while placing an order. |

|
| If you decide to use configurable options, press on the 'Create' button and select which options you want to generate. Note that the configuration for disabled options will still be taken from the configuration of the main product. More information about how to use configurable options can be found here or in the official WHMCS documentation. |
|
| Finally, when everything is set, do not forget to 'Save Changes' . |
| The 'Client Area Section' option gives you the possibility to provide the HTML code and display the content in the client area. Before using this option, please make sure that you are familiar with the following instruction. Important! If you come across some errors with displaying values in the client area, please check if you closed brackets {}. {$serviceid}, {$pid}, {$serverid}, {$domain}, {$username}, {$password}, {$producttype}, {$moduletype}, {$configoptionX}, {$server}, {$serverip}, {$serverhostname},
{$serverusername},{$serverpassword}, {$serveraccesshash}, {$serversecure}, {$serverport}, {$bundles}, {$region}, {$zone}, {$platform}, {$snapshot}, {$blueprint}, {$snapshotsLimit},
{$tagName}, {$userData}, {$emailTemplate}, {$userid}, {$orderid}, {$packageid}, {$server}, {$regdate}, {$domain}, {$paymentmethod},{$firstpaymentamount}, {$amount},
{$billingcycle}, {$nextduedate}, {$nextinvoicedate}, {$termination_date}, {$completed_date}, {$domainstatus}, {$username}, {$password}, {$notes}, {$subscriptionid},
{$promoid}, {$suspendreason}, {$overideautosuspend}, {$overidesuspenduntil}, {$dedicatedip}, {$assignedips}, {$ns1}, {$ns2}, {$diskusage}, {$disklimit}, {$bwusage},
{$bwlimit}, {$lastupdate}
2. On/Off values that you can choose from: {$clientAreaHistory}, {$clientAreaMetric}, {$clientAreaShowDisk}, {$logApiRequests}, {$staticIpAddress}, {$clientAreafirewall}, {$clientAreasnapshots},
{$autoGenerateSSHKey}, {$clientAreaServiceActions}
3. Access values provided in Arrays:
{.userid}, {.id}, {.uuid}, {.firstname}, {.lastname}, {.fullname}, {.companyname}, {.email}, {.address1}, {.address2}, {.city}, {.fullstate}, {.state},
{.postcode}, {.countrycode}, {.country}, {.phonenumber}, {.tax_id}, {.password}, {.statecode}, {.countryname}, {.phonecc}, {.phonenumberformatted}, {.telephoneNumber},
{.billingcid}, {.notes}, {.twofaenabled}, {.currency}, {.defaultgateway}, {.cctype}, {.cclastfour}, {.gatewayid}, {.securityqid}, {.securityqans}, {.groupid}, {.status},
{.credit}, {.taxexempt}, {.latefeeoveride}, {.overideduenotices}, {.separateinvoices}, {.disableautocc}, {.emailoptout}, {.marketing_emails_opt_in}, {.overrideautoclose},
{.allowSingleSignOn}, {.email_verified}, {.language}, {.isOptedInToMarketingEmails}, {.lastlogin}
{.general}, {.invoice}, {.support}, {.product}, {.domain}, {.affiliate}
{.InstanceId}, {.InstanceTags}, {.sshKey} As an example, we provide: |
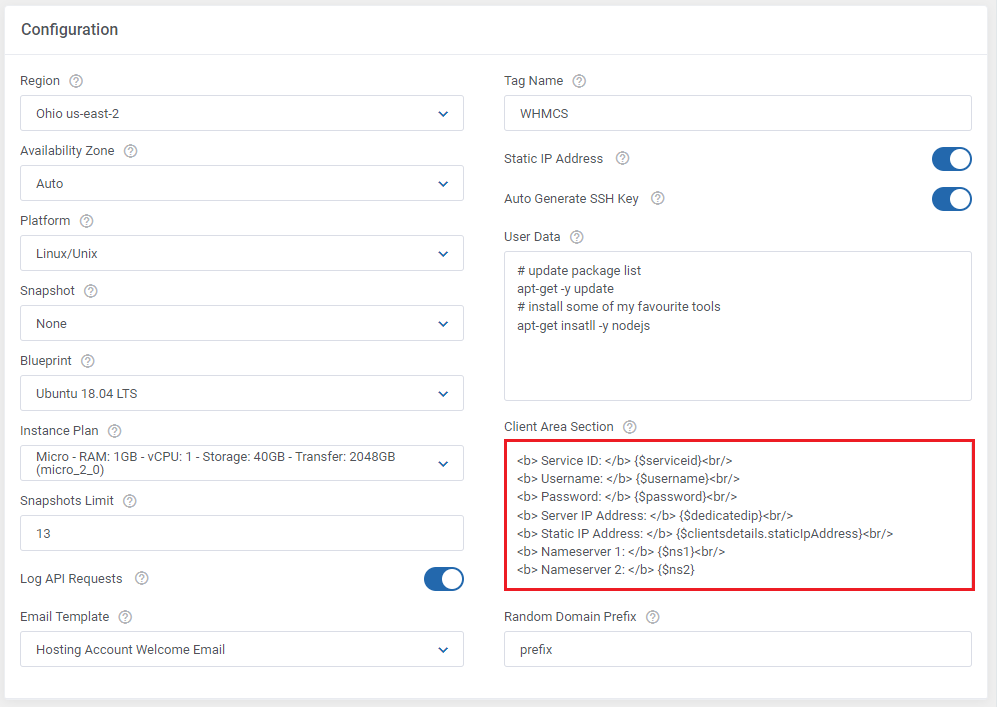
|
| As you can see, all data is available here: |
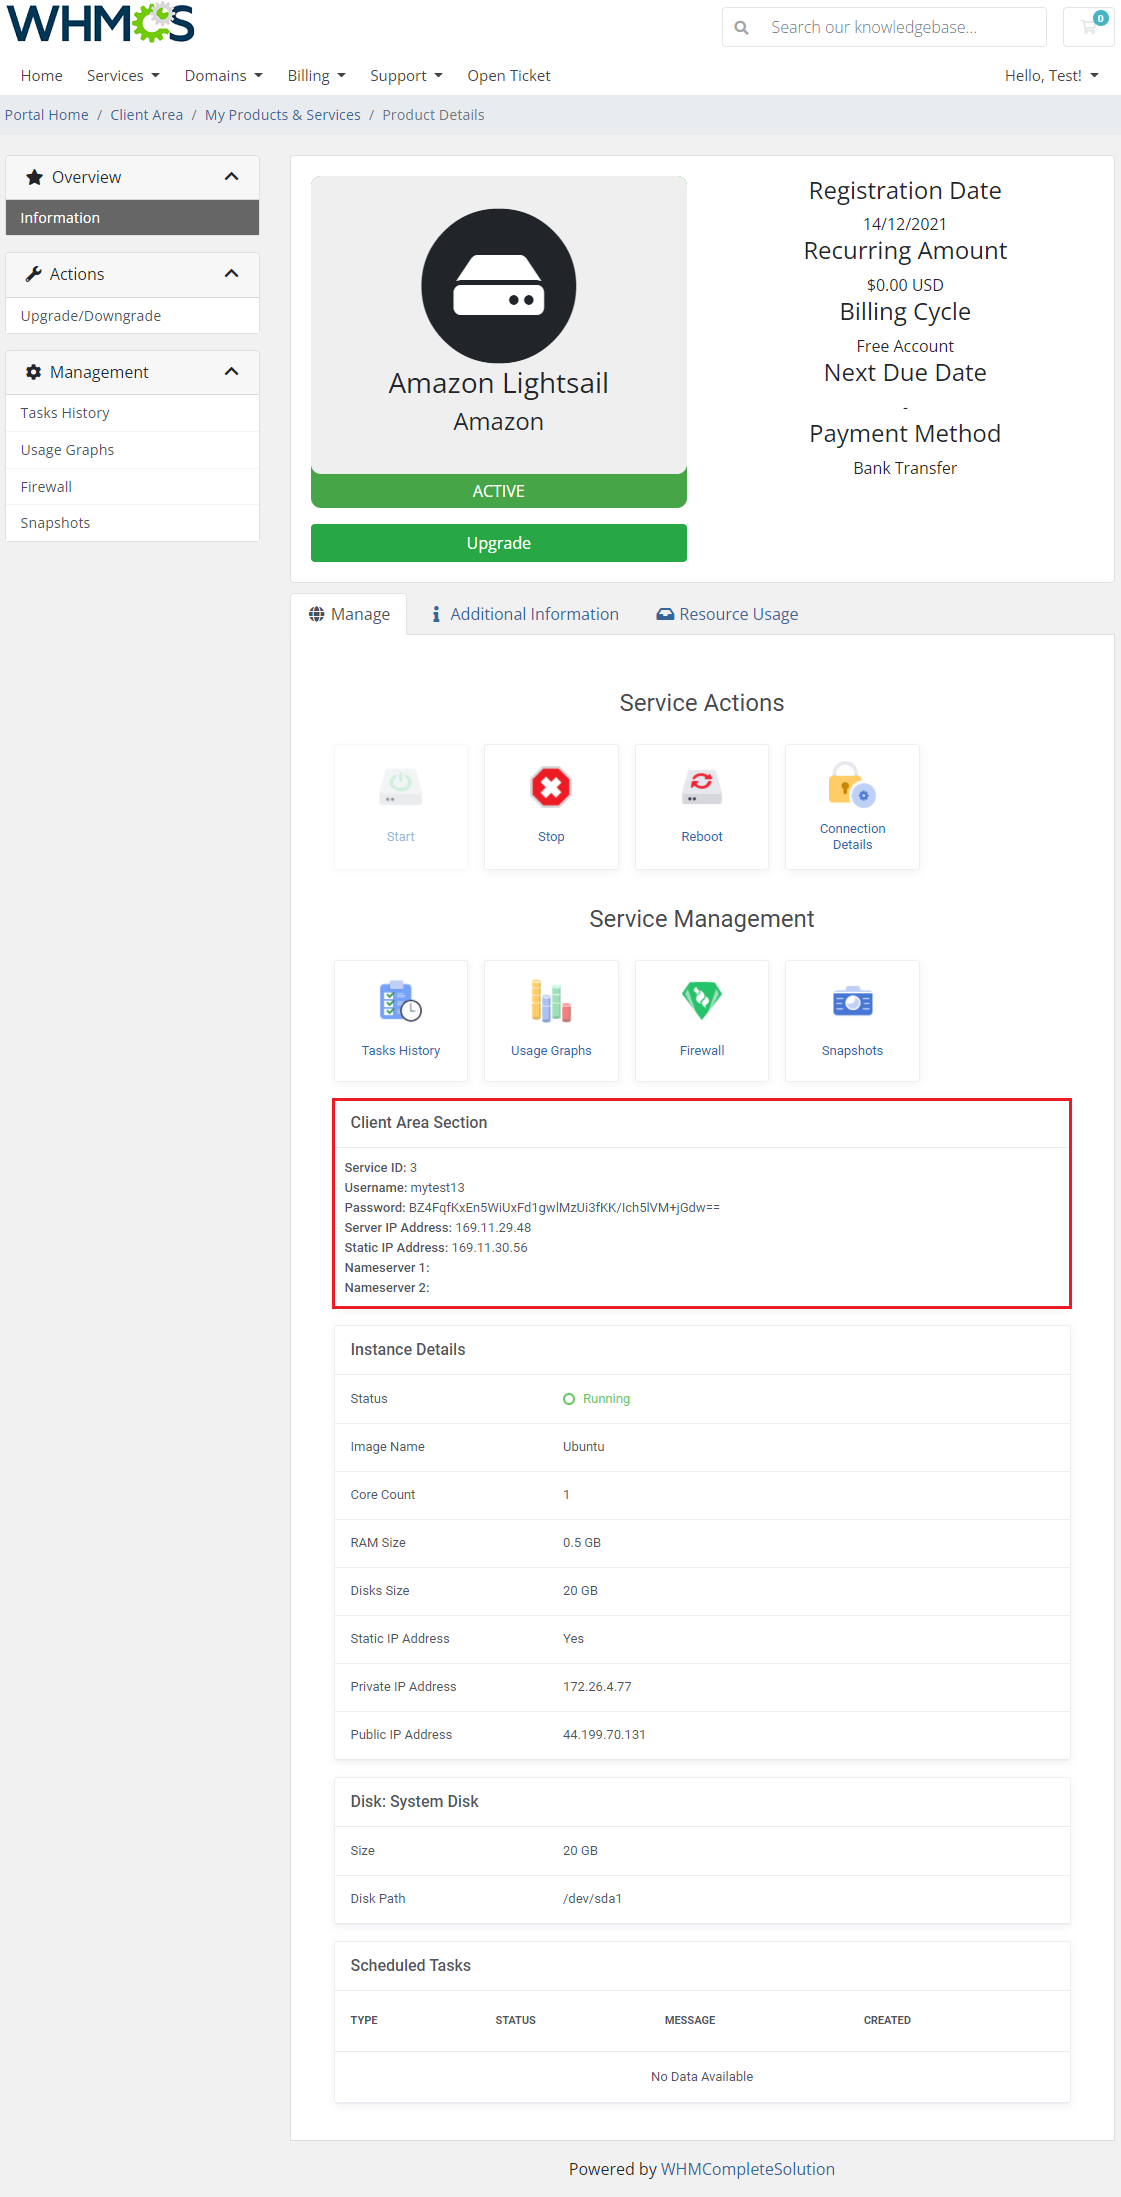
|
SSH Keys
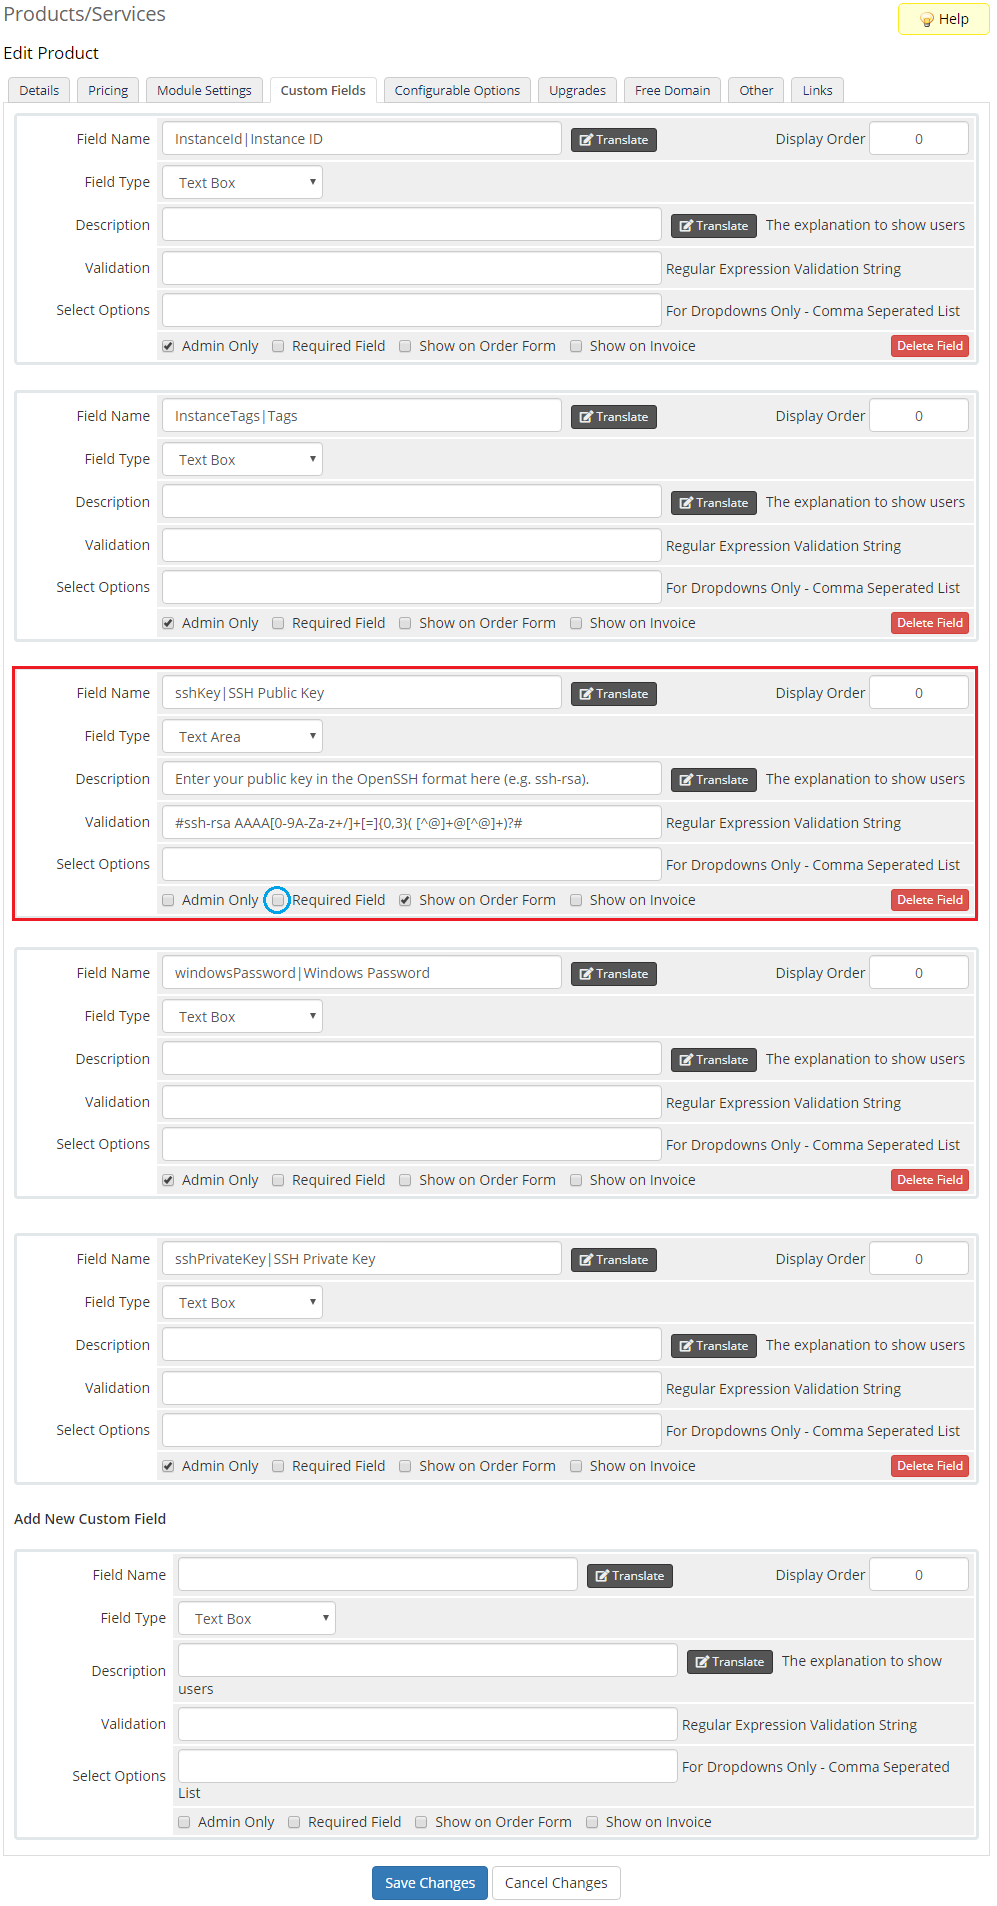
| In the 'Custom Fields' tab you will find an 'SSH Public Key' field which is displayed to clients on the order form by default. Please be aware that this field can be left as optional for Linux/Unix as well as Windows platforms. The following formats are supported:
Create an RSA key. Amazon Lightsail does not accept DSA keys. The supported lengths are 1024, 2048, and 4096. If you would like to limit the possibility of entering the key e.g. only to the 'ssh-rsa' format, you can use the regular expression in the validation field, such as: #ssh-rsa AAAA[0-9A-Za-z+/]+[=]{0,3}( [^@]+@[^@]+)?#
Remember that API allows such action only once, during the initial VM creation. |
|
Management
Admin Area
| Amazon Lightsail For WHMCS allows you to monitor and manage your customer server instance from the admin area of your WHMCS system. This includes the supervision of such features as:
|

|
Ordering
| Due to configurable options, you are able to offer a product which your clients can tailor to their needs. Additionally, you are able to set up pricing for each configurable option, which makes your offer even more competitive. At this moment clients can also optionally provide their public SSH key. |
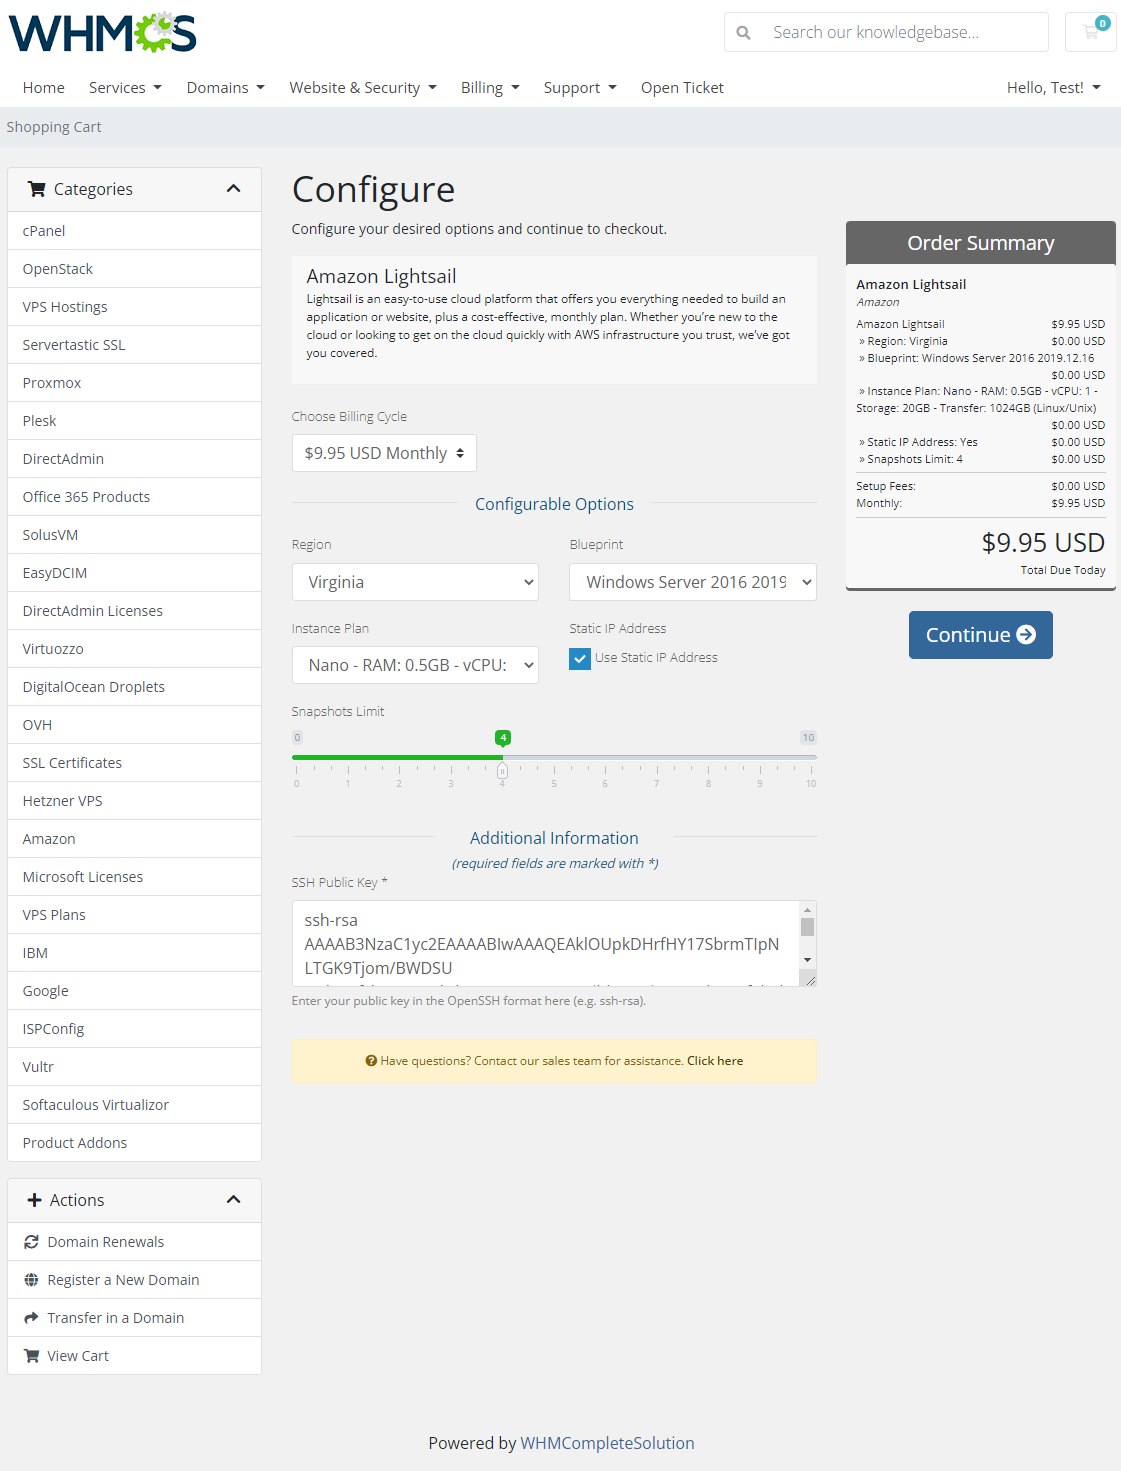
|
Client Area
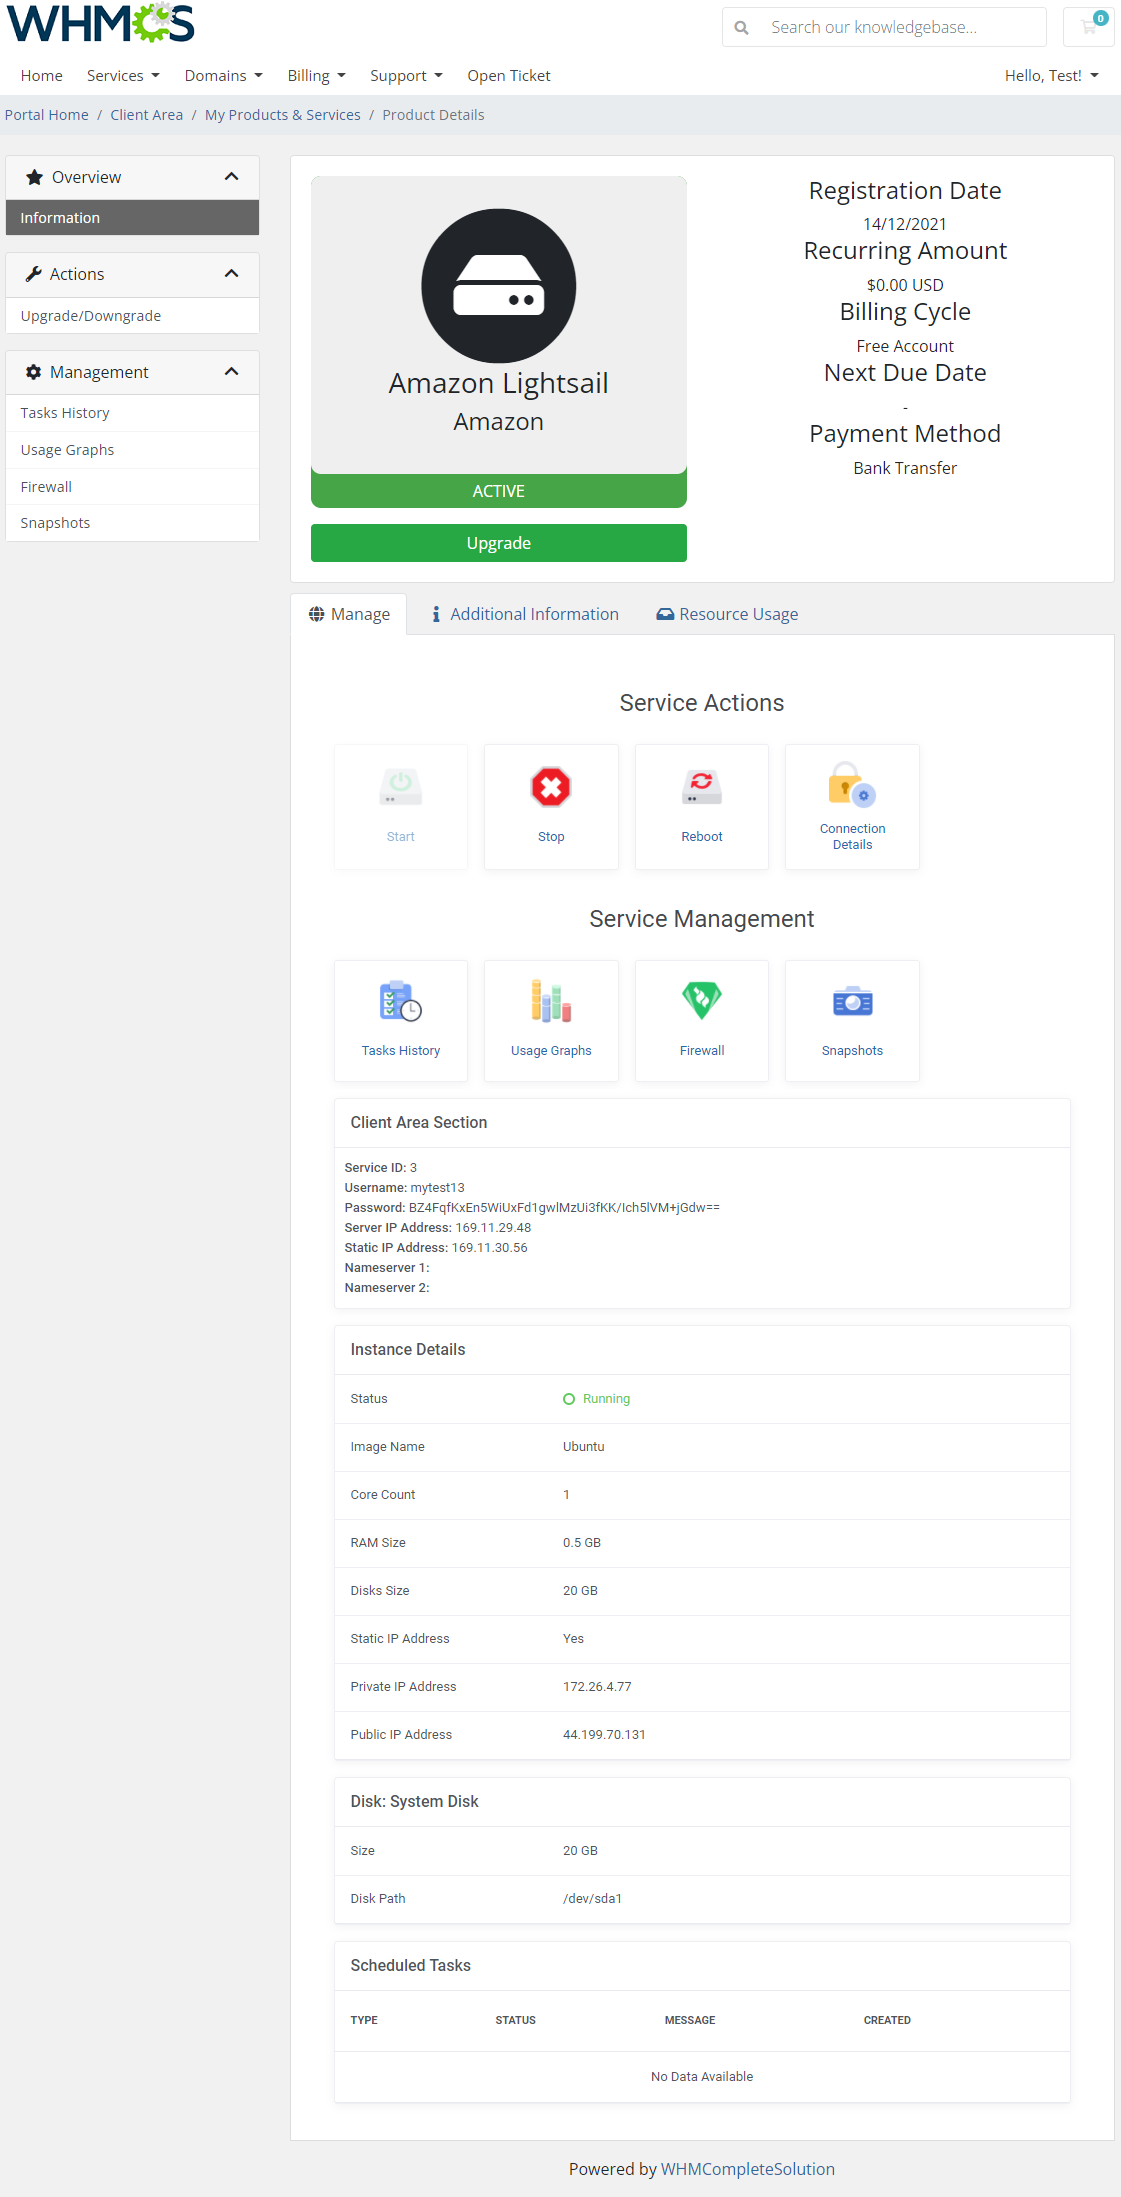
| Client area interface of Amazon Lightsail should look like the one on the screen below. As you can see, the control panel contains useful details of a managed server. The module allows your customers to easily start, stop and reboot their server instance through pressing the corresponding buttons. |
|
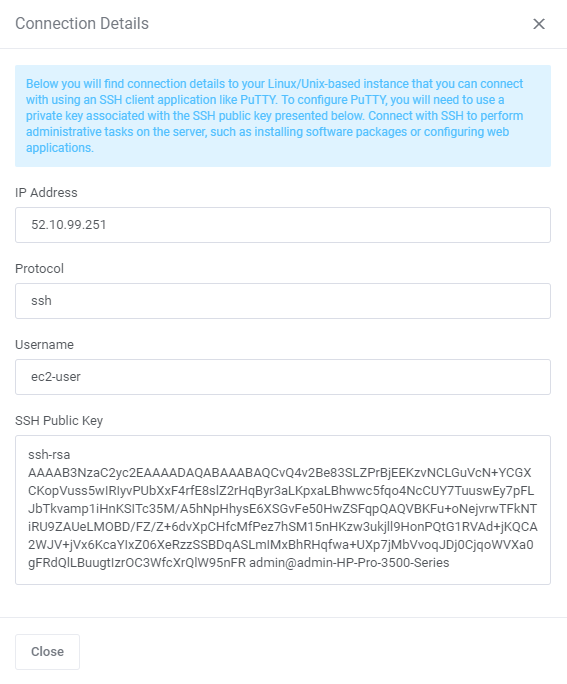
| If the clients want to connect to the instance, by clicking on the 'Connection Details' button, the data will be displayed, which will allow them to make a remote connection. This data will vary depending on whether the instance is based on Linux/Unix or Windows as well as on whether the public SSH key was provided during the order. To connect to an instance on the Linux/Unix platform, clients can use an SSH client application.
ssh username@ip -i ida_rsa Depending on the configuration of the instance, the popup window will display the instance IP address, connection protocol, username, and private or associated public SSH key. |
|
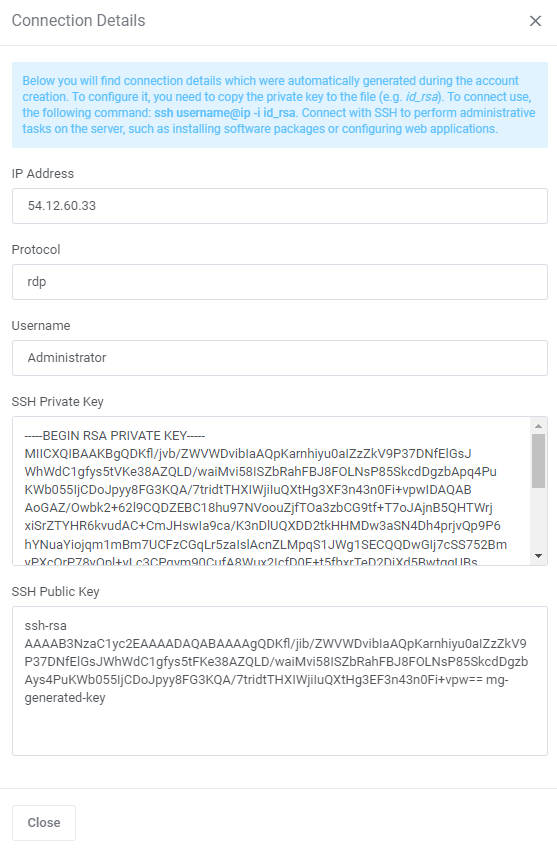
| For Windows-based instances, clients can also connect to their instance using an RDP client such as Remote Desktop Connection (learn more). Depending on the configuration of the instance, the popup window will display the instance IP address, connection protocol, Windows username and generated password in its decoded or encoded form. If Windows password is encoded it can still be somehow decrypted using this Amazon method. |
|
Task History
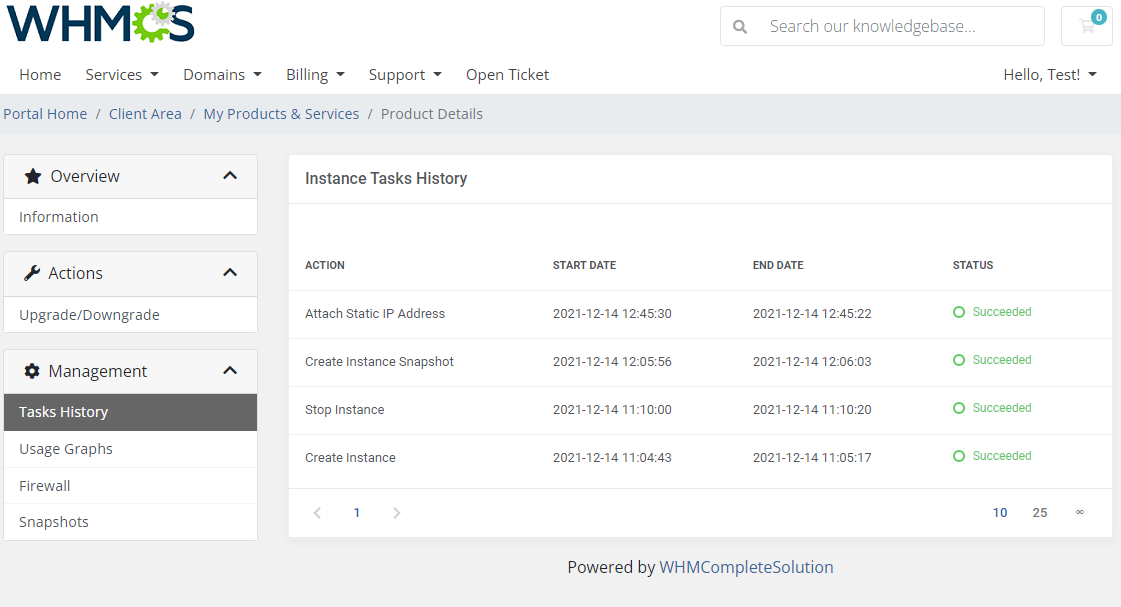
| To access the history of a machine, simply press the 'Tasks History' button. Afterward, the customer can see all the actions performed on the instance, as well as their status. |
|
Usage Graphs
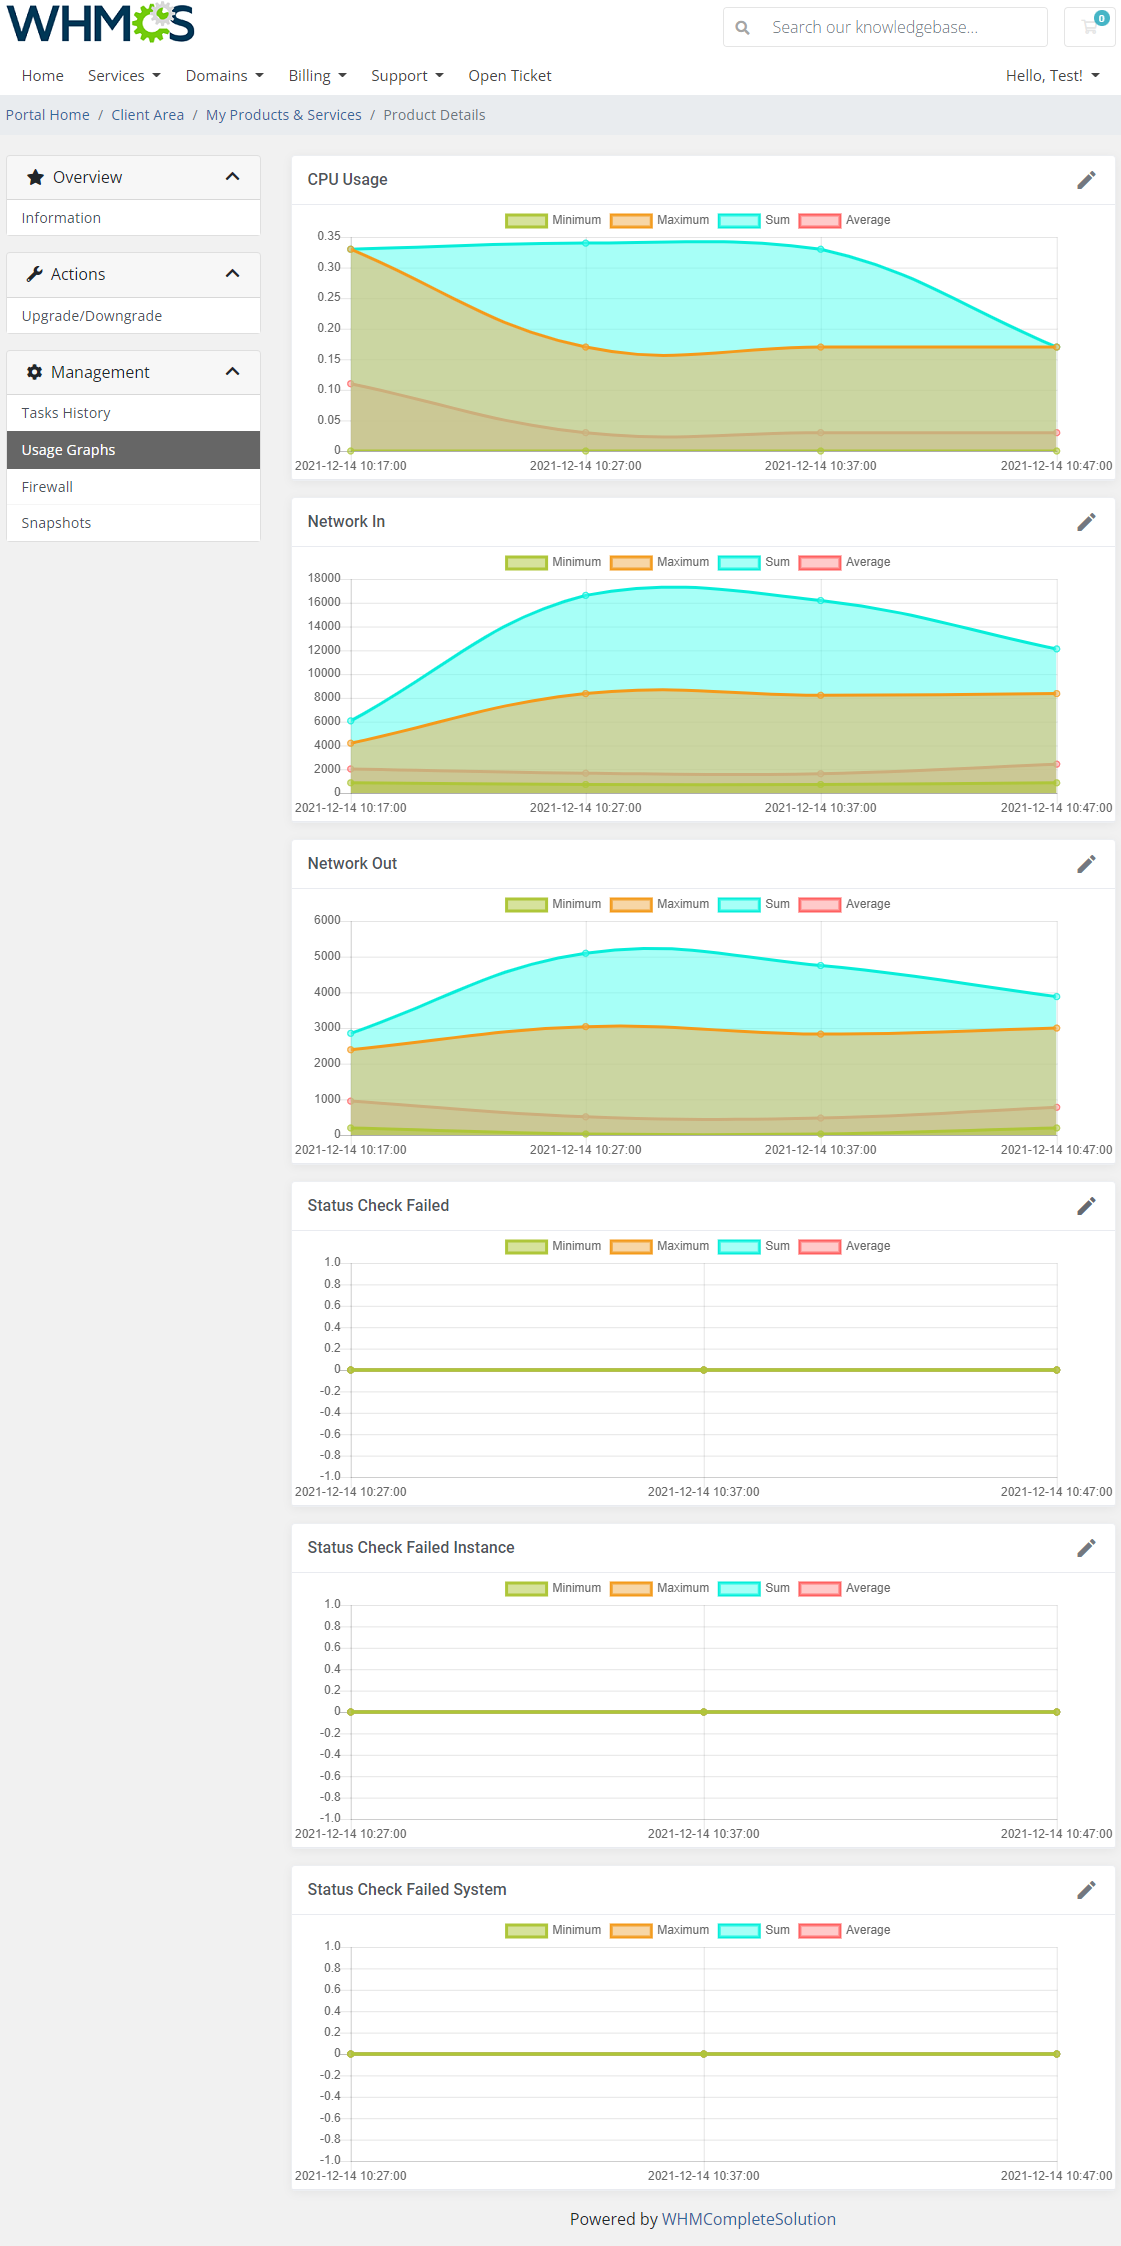
| Through pressing the 'Usage Graphs' button, clients will be moved to the page where they can view generated graphs on CPU usage and network traffic as well as check vital statuses. They can also switch the timeline of graphs by choosing a new one from the 'Edit' dropdown menu. Clients can pick between '1 hour', '6 hours' '1 day', '1 week' and '2 weeks'. |
|
Firewall
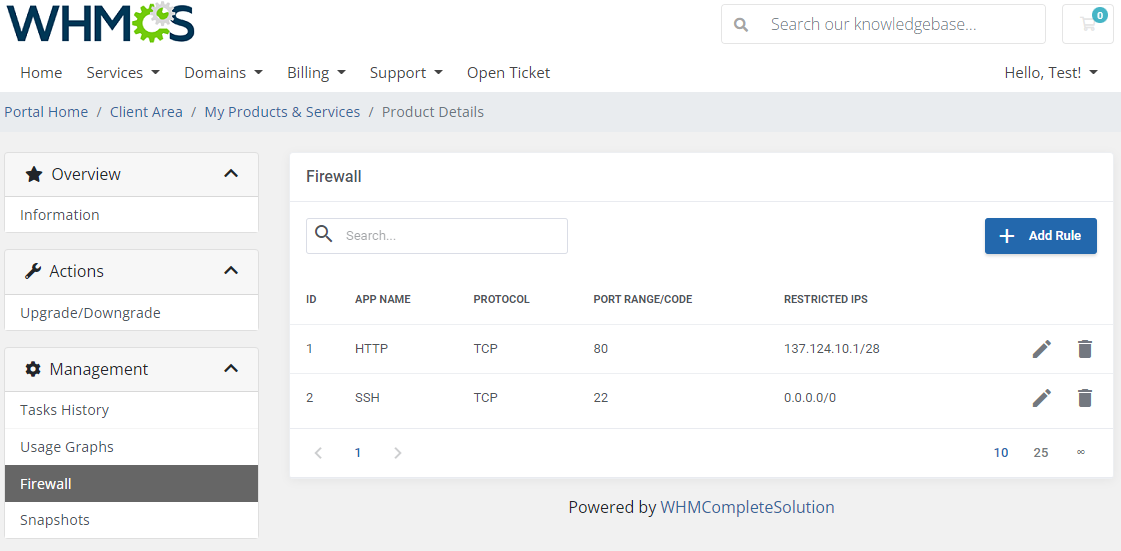
| In the 'Firewall' section clients can manage their firewall settings to control which ports are open to the public. Note that when a Lightsail instance is created, some network ports are open by default so the instance can accept public network connections. Clients can add here new rules, edit existing ones or delete them. |
|
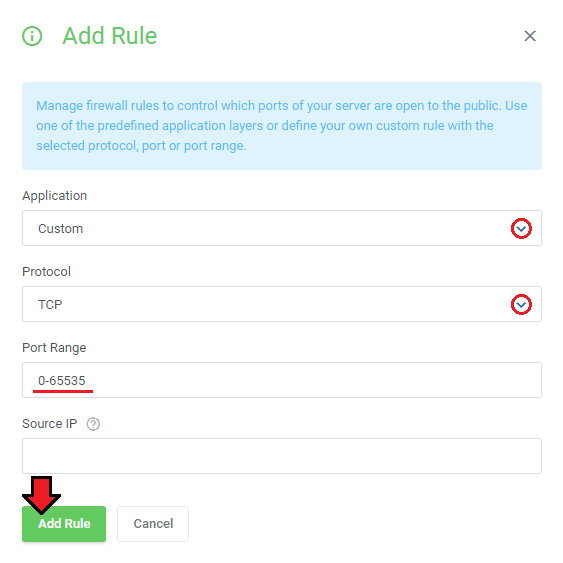
| When adding or editing an existing rule, clients manually control which ports and protocols (TCP or UDP) on their instances will accept connections. The selection of predefined application rules are also available so that protocol and port range fields will be automatically fulfilled. You can also find a complete list of port settings, application layer protocol types, and transport layer protocol types in this Amazon documentation. |
|
Snapshots
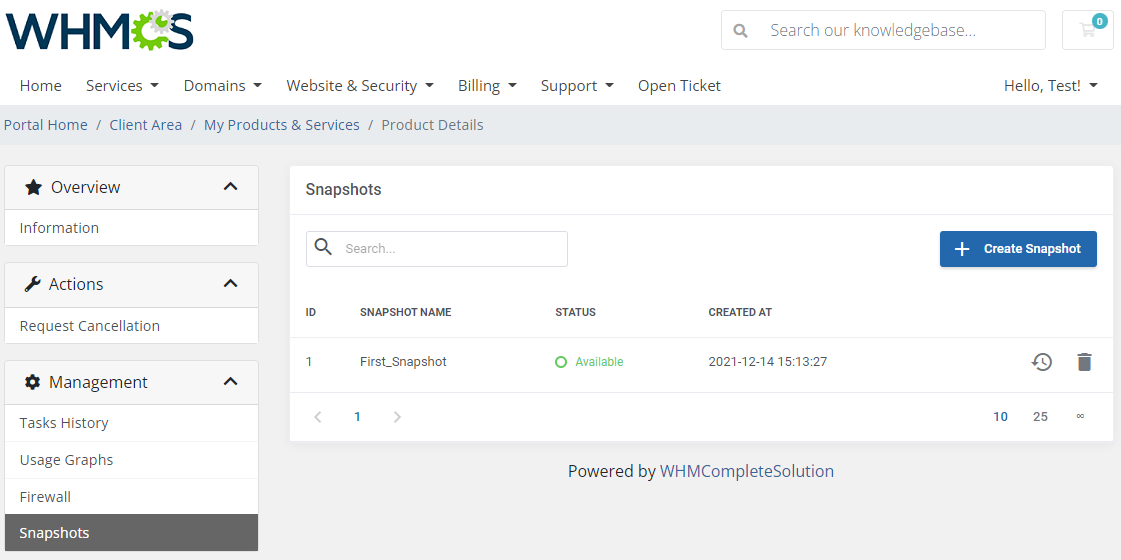
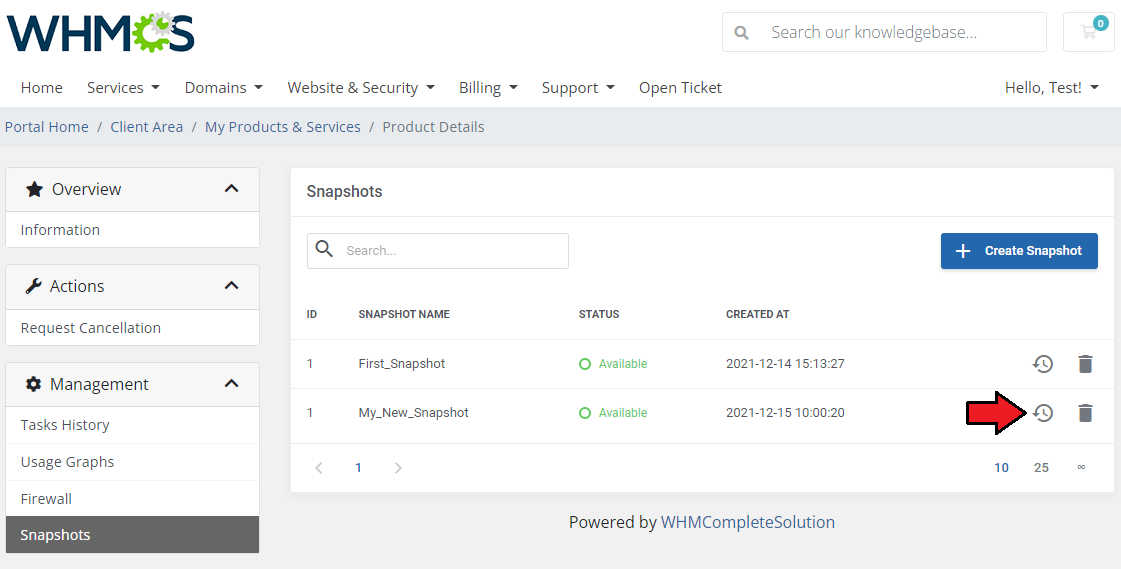
| A snapshot is a point in time backup of the client's instance. In the snapshots section clients can create new snapshots of their instances, view previous snapshots or restore instance from a snapshot. Please note that Amazon also takes additional fees for each created snapshot. |
|
| To create a new snapshot simply provide its name and press the 'Create' button. Note that the name can contain from 2 to 200 characters which can be only alphanumeric, numbers, periods, dashes or underscores. |
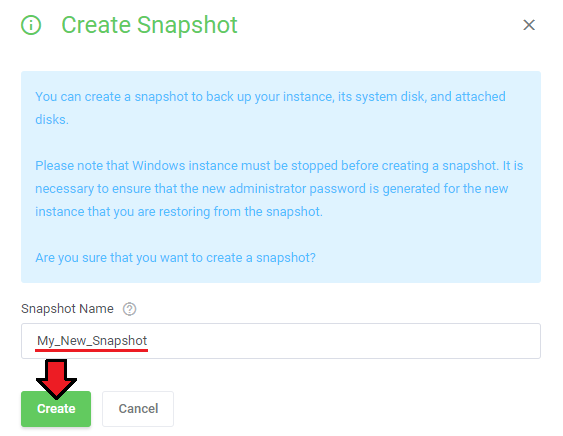
|
| Once the snapshot is created, it can be restored using the following button. |
|
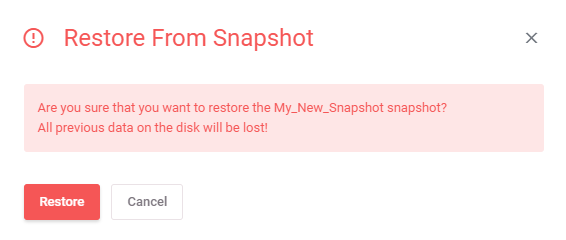
| Before restoring a snapshot remember that all previous data on the disk will be lost. |
|
Importing Existing VM
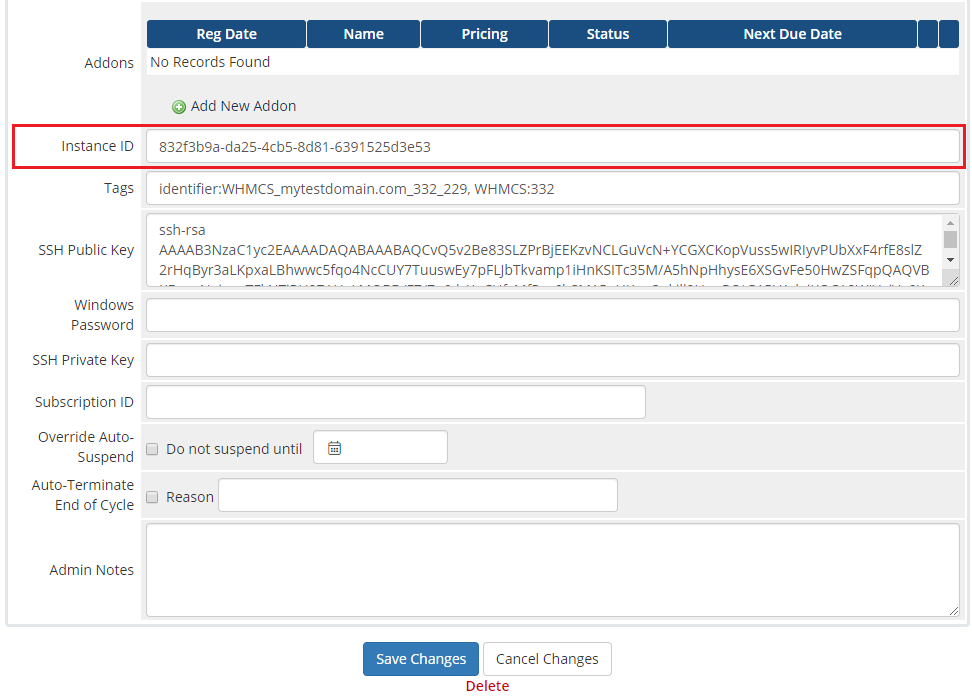
| In this section, you can find short instruction on how to connect one of your clients to your already existing virtual machine. Take the following steps to make sure that the process will be carried out properly. 1. Firstly, manually create an order for your customer in WHMCS. Choose a client and in the summary, view click on the ' Add New Order' button. Next, select a 'Product/Service' and press 'Submit Order' .
Now, fill out the field with the ID of the machine that you wish to assign to this client. |
|
| 3. If the completed data is correct, after refreshing the page, you will see the attached virtual machine. Important! Remember to manually add other missing parameters of the VM such as domains, credentials, IP Addresses, configurable options, SSH Key, billing cycle, etc. so they match the parameters of the attached VM. |
Tips
| 1. If you need to generate any of the configurable options once again, you must delete the previously created ones. Only then will it be possible to generate a new configurable option. Read more about configurable options here. |
| 2. When you upgrade WHMCS, please be aware that the module uses custom modified AWS files located in the main WHMCS 'vendor' directory, and their unmodified versions are also delivered by WHMCS itself. In this case, the WHMCS upgrade may overwrite these files to their default form so you may need to overwrite these files again with the files delivered with the module. |
| 3. Names of snapshots created by clients will have added prefixes with instance domains visible only in your Amazon Lightsail panel. This is because Amazon requires snapshot names to be unique to each AWS Region in your Lightsail account, not just within a single instance. |
How To Use Language Overrides
| Incorporating language customizations - the module readily accommodates language overrides, allowing you to tailor the language files to your preferences. The language file english.php remains unencoded and can be modified to suit your needs. However, it's recommended to avoid altering the core file itself, and instead, leverage the capability of using overrides. |
Here's how to apply language overrides:
~/langs/overrides/english.php.
For example: Original yourWHMCS/modules/servers/moduleName/langs/english.php: $_LANG['Search'] = 'Search'; Override yourWHMCS/modules/servers/moduleName/langs/overrides/english.php: $_LANG['Search'] = 'Look for'; |
| By following these steps, you can seamlessly implement language customizations without altering the core language file, ensuring your changes will not be lost after every module update. Remember that some of the modules have more than one language file, located under /addons and /servers paths. You may create the override files for both of them. |
Update Instructions
| An essential guidance through the process of updating the module is offered here. Ensure successful completion of the module update by carefully following each step, thereby preventing data loss or any unforeseen issues. |
Upgrade Guide
| Seeking a solution that offers greater flexibility, customization tailored to your precise needs, and unrestricted availability? There is an option that not only proves to be cost-effective in the long run but also includes prioritized support services, making it a truly valuable investment. Opt for the Open Source version of your Amazon Lightsail For WHMCS module to unlock these benefits. Follow a comprehensive guide covering the transition process, the advantages it brings, and step-by-step instructions on what to do next after the order has been successfully finalized. |
Common Problems
| 1. When you have problems with connection, check whether your SELinux or firewall does not block ports. |
| 2. If there is a problem with obtaining details in WHMCS for an already existing instance, make sure that the correct region is selected in the product configuration. Otherwise, if the regions do not match, there can be a problem with fetching details of the instance. |
| 3. If you are using WHMCS V7.8.X, a fatal error may occur when trying to save server settings without providing any hostname or IP address details. Our module does not require this field to be filled out, but in that case, try to provide anything in the hostname field. Please note that this is a bug that occurs in WHMCS, not in the module itself. |
| 4. Currently, issues have been observed when using the PuTTY client application to connect to an instance on the Linux/Unix platform. We recommend using OpenSSH for connection instead. |