OVHcloud VPS & Dedicated Servers For WHMCS
Contents |
About OVHcloud VPS & Dedicated Servers For WHMCS
| OVHcloud VPS & Dedicated Servers For WHMCS will let you automatically supply VPS and dedicated servers powered by OVH, as well as So you Start and Kimsufi. The module will allow your clients not only to remotely control the status of a machine, but also access the KVM and IMPI console, and update reverse DNS paths. |
- Admin Area Features:
| ✔ Create/Suspend/Unsuspend/Terminate/Renew Server |
| ✔ Power On/Power Off/Reboot Server |
| ✔ Reboot Server In Rescue Mode |
| ✔ Reinstall Server |
| ✔ Access KVM/IPMI Console (Dedicated Servers) |
| ✔ View Server Status And Details |
| ✔ Monitor Server Protocols Status (VPS) |
| ✔ View/Create/Restore/Delete Snapshots (VPS) |
| ✔ View Assigned IP Addresses And Update Reverse DNS Paths |
| ✔ View Assigned Disks With Bandwidth And Space Limit |
| ✔ View Traffic Statistics Graph (Dedicated Servers) |
| ✔ Configure Product Details For: |
| ✔ VPS |
| ✔ Dedicated Server |
| ✔ Choose Features Available In Client Area |
| ✔ Generate Configurable Options |
| ✔ Choose Welcome Email, Reinstallation And Rescue Reboot Email Templates |
| ✔ Configure Email Piping |
| ✔ Choose Usable OVH Server Location, Country And Type |
| ✔ Choose Existing Servers To Be Reused By Another Client |
| ✔ View Servers Logs |
- Client Area Features:
| ✔ Power On/Power Off/Reboot Server |
| ✔ Reboot Server In Rescue Mode |
| ✔ Reinstall Server |
| ✔ Access KVM/IPMI Console (OVH) |
| ✔ View Server Status And Details |
| ✔ View/Create/Restore/Delete Snapshots (VPS) |
| ✔ View Assigned Disks With Bandwidth And Space Limit (VPS) |
| ✔ View Assigned IP Addresses: |
| ✔ Enable/Disable Firewall (VPS) |
| ✔ Manage Firewall Rules (VPS) |
| ✔ Update Reverse DNS Paths |
| ✔ View Traffic Statistics Graph (Dedicated Servers) |
| ✔ Choose Server Parameters During Order |
| ✔ Receive Email Notifications After Server Creation, Reinstallation And Rescue Reboot |
- Configurable Options:
| ✔ VPS: |
| ✔ Solution Type |
| ✔ Operating System Template |
| ✔ Data Center Location |
| ✔ Snapshot |
| ✔ License |
| ✔ Solution Type, Operating System And Application (As Single Option) |
| ✔ Dedicated Servers: |
| ✔ Operating System Template |
| ✔ Operating System Language |
- General Info:
| ✔ Integrated With Server Allocator For WHMCS - Automatic Assignment Of Most Suitable Servers To Products |
| ✔ Supports VPS And Dedicated Servers |
| ✔ Supports Plan Upgrades (VPS) |
| ✔ Multi-Language Support |
| ✔ Supports PHP 8.2 Back To PHP 8.1 |
| ✔ Supports WHMCS Themes "Six", "Twenty-One" And "Lagom WHMCS Client Theme" |
| ✔ Supports WHMCS V8.12 Back To WHMCS V8.9 |
| ✔ Requires ionCube Loader V13 Or Later |
| ✔ Easy Module Upgrade To Open Source Version |
Installation and Configuration
| This tutorial will show you how to successfully install and configure OVHcloud VPS & Dedicated Servers For WHMCS. We will guide you step by step through the whole installation and configuration process. |
Installation
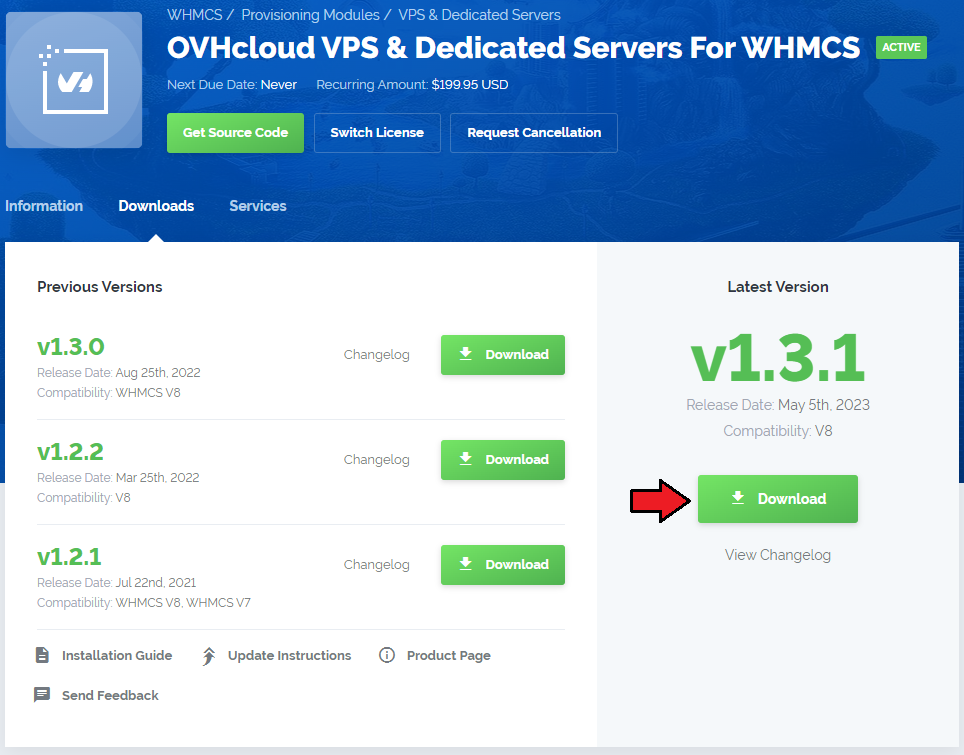
| 1. Log in to our client area and download the module. |
|
| 2. Upload and extract the extension into the main WHMCS directory. Extracted files in your WHMCS directory should look like this: |

|
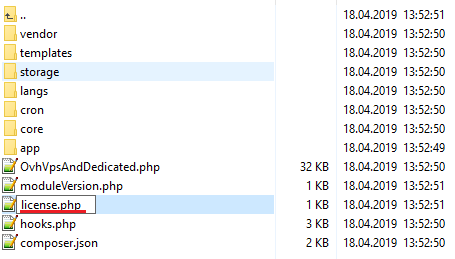
| 3. When you install OVHcloud VPS & Dedicated Servers For WHMCS for the first time, you have to rename the 'license_RENAME.php' file. The file is located in 'modules/servers/OvhVpsAndDedicated/license_RENAME.php'. Rename it from 'license_RENAME.php' to 'license.php'. |
|
| 4. In order to configure your license key, you have to edit the previously renamed 'license.php' file. Enter your license key between the quotation marks as presented on the following screen. |

|
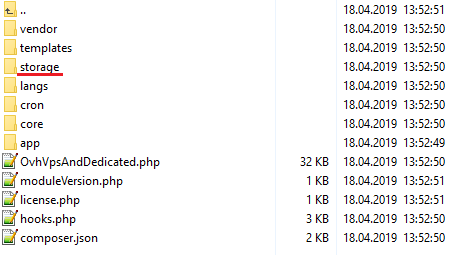
| 5. Now, set up the 'storage' folders as recursively writable. These folders are available at:
|
|
6. The last step is setting up the cron job.
php -q /your_whmcs/modules/servers/OvhVpsAndDedicated/cron/cron.php mail:run Remember to replace 'your_whmcs' with your WHMCS root path. |
Activation of Addon
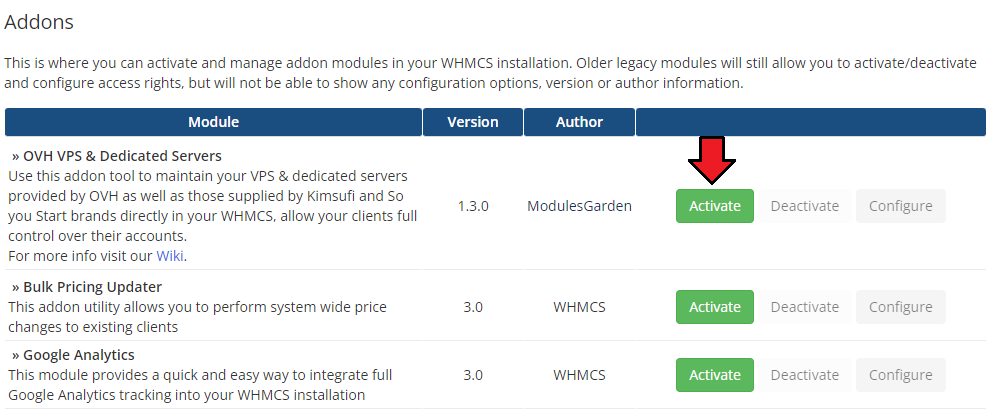
| 7. Now you have to activate the module in your WHMCS system. Log in to your WHMCS admin area. Click 'System Settings' and find 'Addon Modules'. |
|
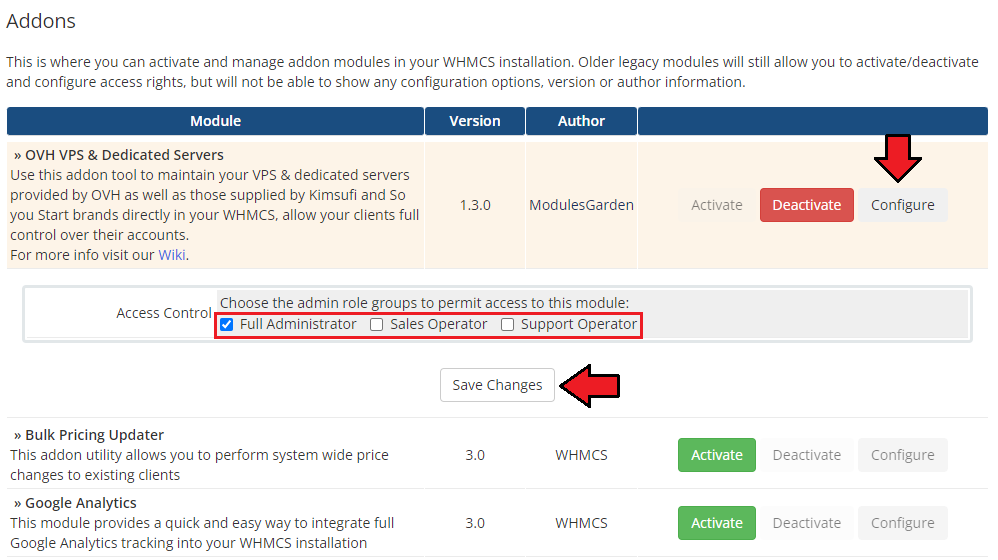
| 8. In the next step you need to permit access to this module. To do so, click on the 'Configure' button, tick the desired admin roles and press 'Save Changes'. |
|
| 9. OVHcloud VPS And Dedicated Servers For WHMCS has been successfully installed! Access the addon under 'Addons' → 'OVHcloud VPS And Dedicated'. |
Configuration of Server
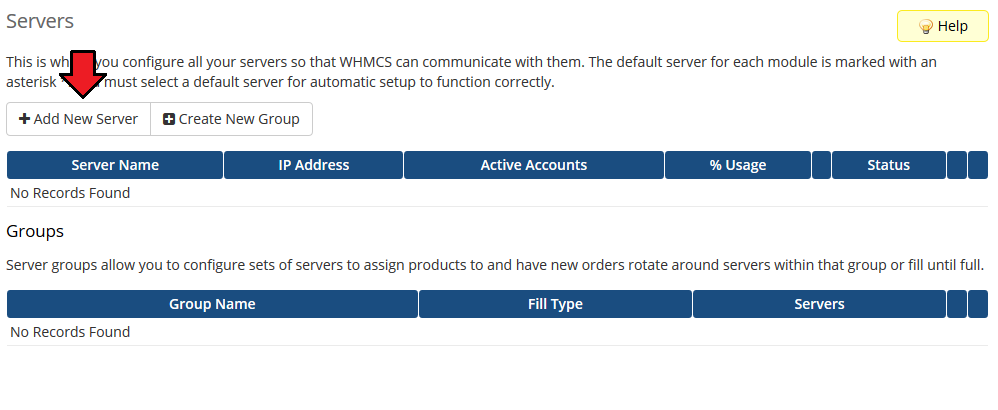
| 10. Now, we will show you how to configure a new product. Go to 'System Settings' → 'Servers' and press 'Add New Server' . |
|
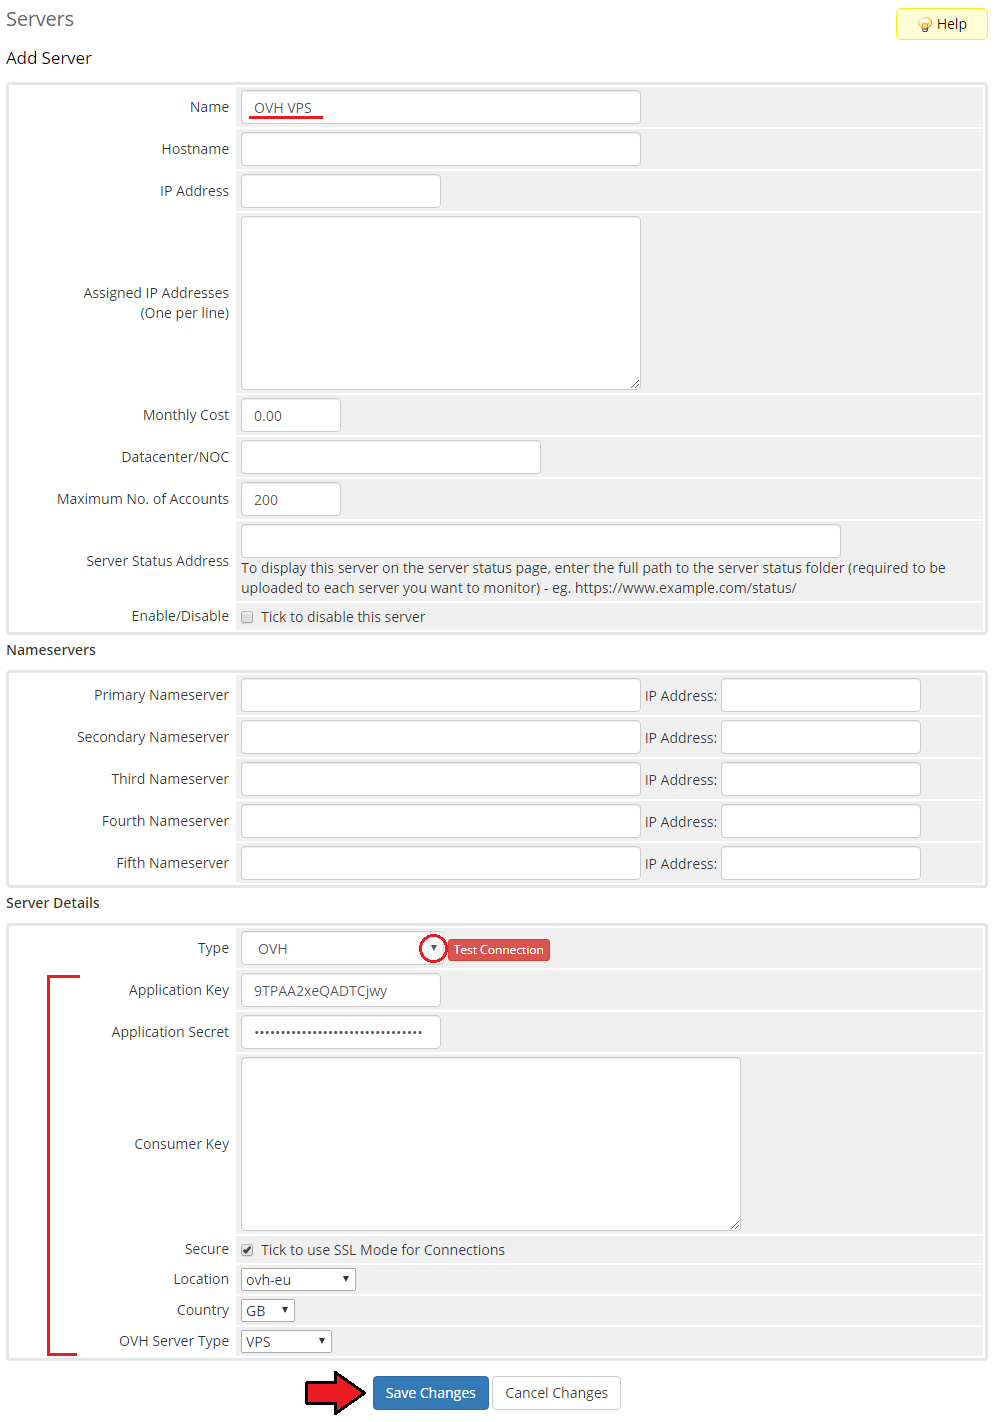
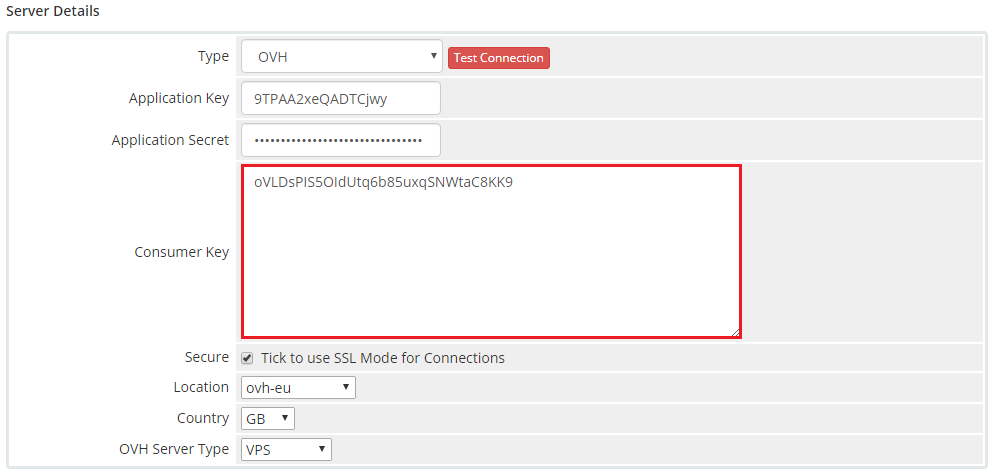
| 11. Next, enter your server name, a hostname or an IP address, then select 'OVH' from the 'Type' field. Now, provide your:
Then select Location and Country corresponding with the server offered by the administrator and finally, select the OVH Server Type (VPS/Dedicated).
|
|
API details are generated depending on the location where you own the OVH account. These might be:
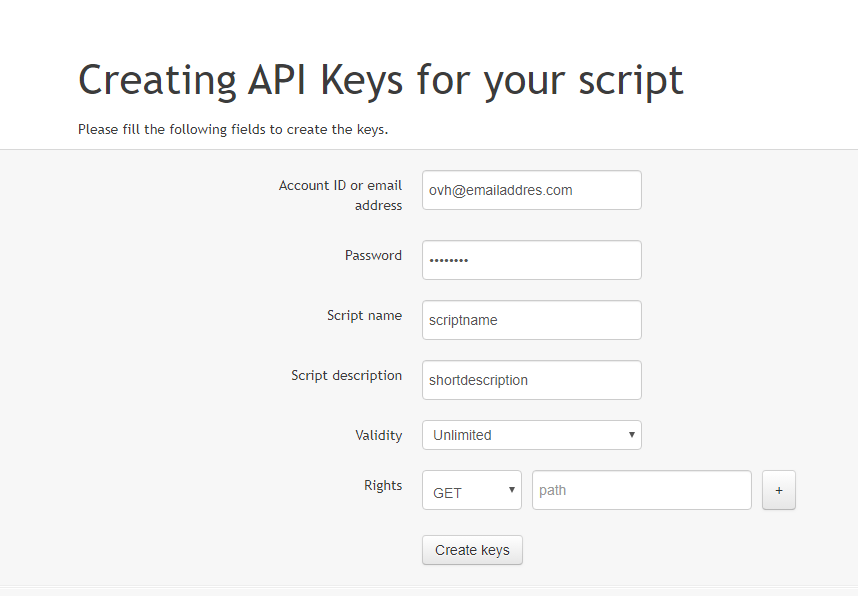
To create an application, please move directly here and create the necessary keys. |
|
| After saving the changes, the module will redirect you to your provider's page where the consumer key is generated at once. Please log in and select 'Unlimited' in the key validity field. The 'Consumer Key ' will be automatically generated and entered in the appropriate field in the server's configuration page in the module. |
|
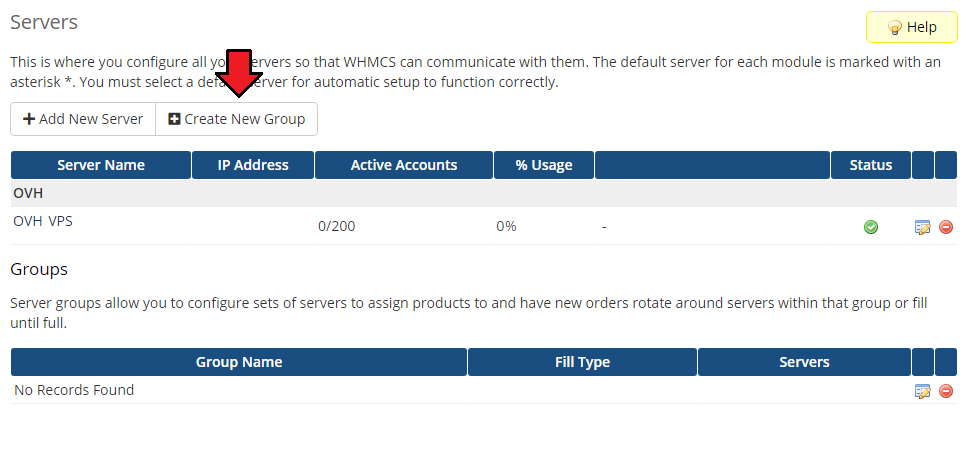
| 12. It is time to create a server group. To do so, click on 'Create New Group'. |
|
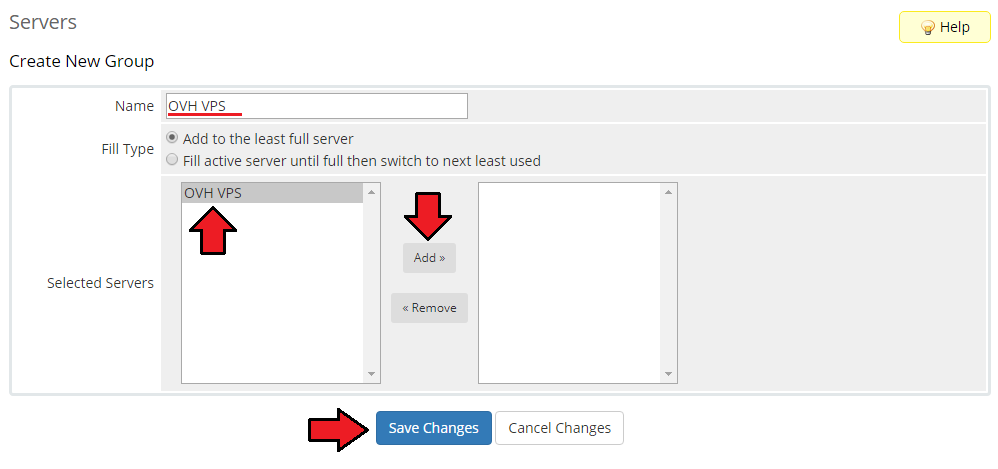
| 13. Enter a name, click on your previously created server, press 'Add' and afterward 'Save Changes'. |
|
Configuration of Product
| 15. In order to create and configure a product, go to 'System Settings' → 'Products/Services'. Click on 'Create a New Group'. |

|
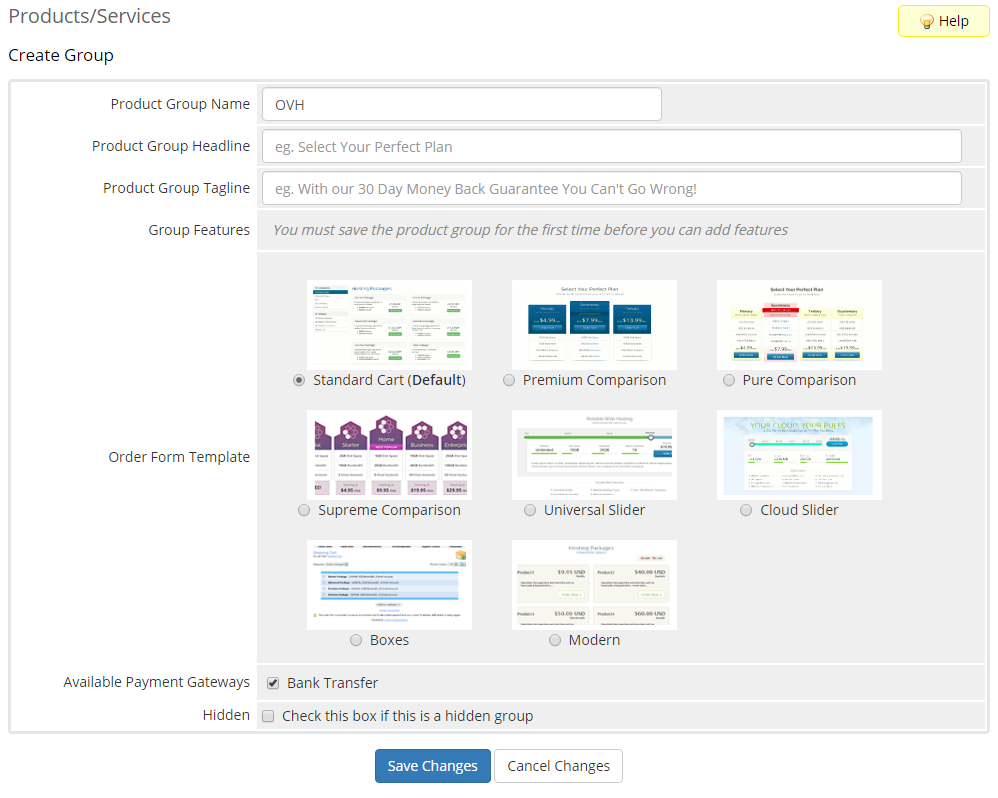
| 16. Enter your product group name and press 'Save Changes'. |
|
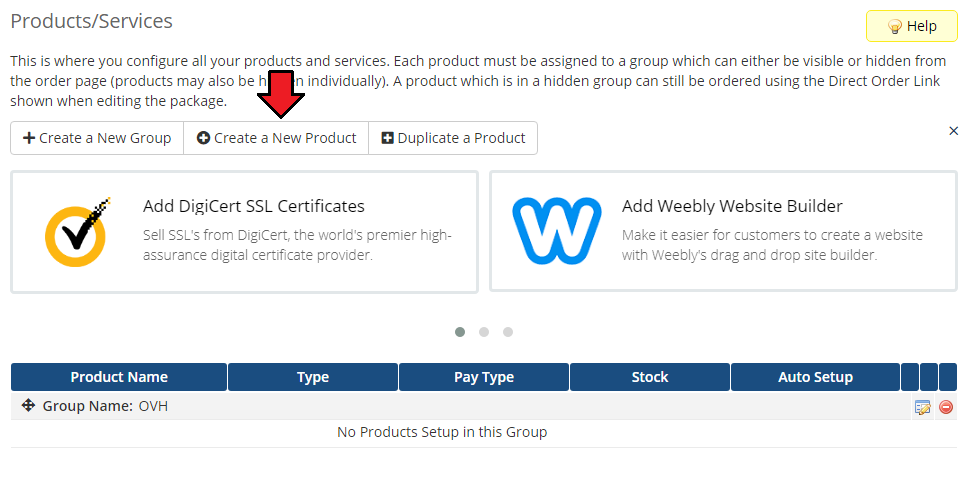
| 17. Once you have a product group, you can create a new product. To do so, first click on 'Create a New Product'. |
|
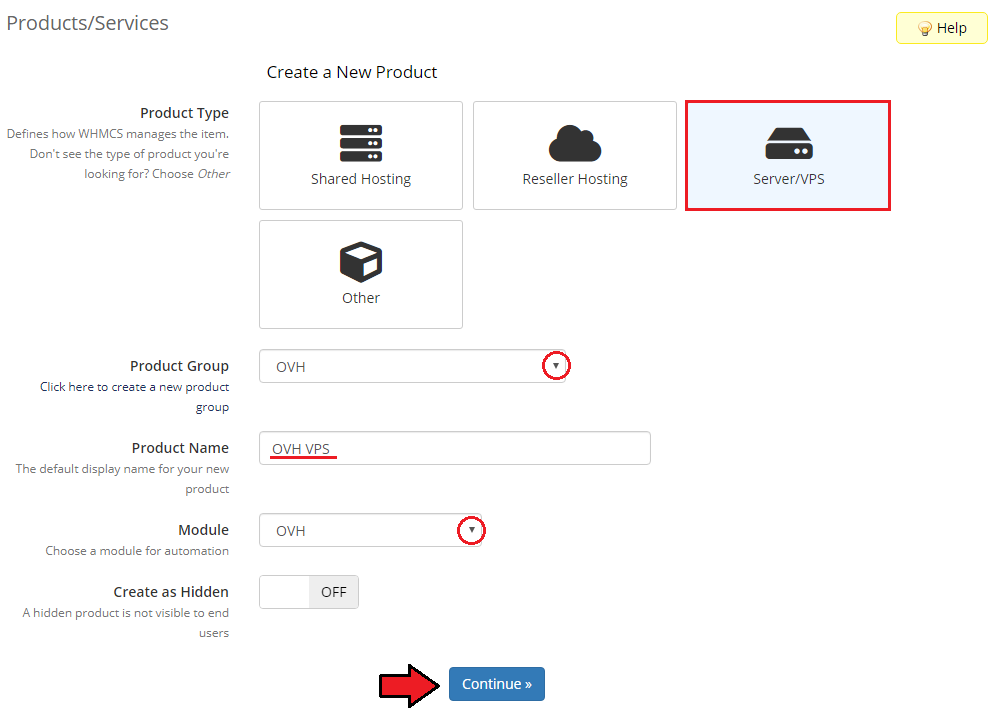
| 18. Afterward, choose your product type, enter your product name and choose the product group from the dropdown menu. Press 'Continue'. |
|
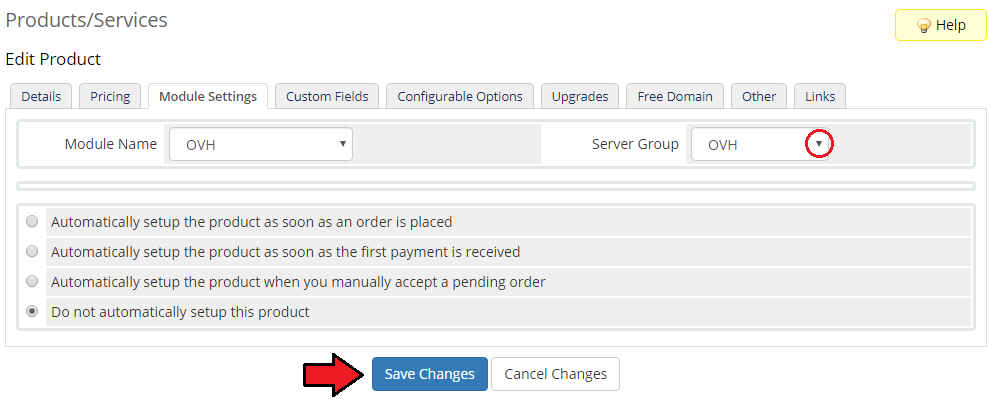
| 19. Now, go to the 'Module Settings' section, choose your previously created server group from the dropdown menu. The module should automatically save and reload the settings. If not, click on the 'Save Changes' option manually. |
|
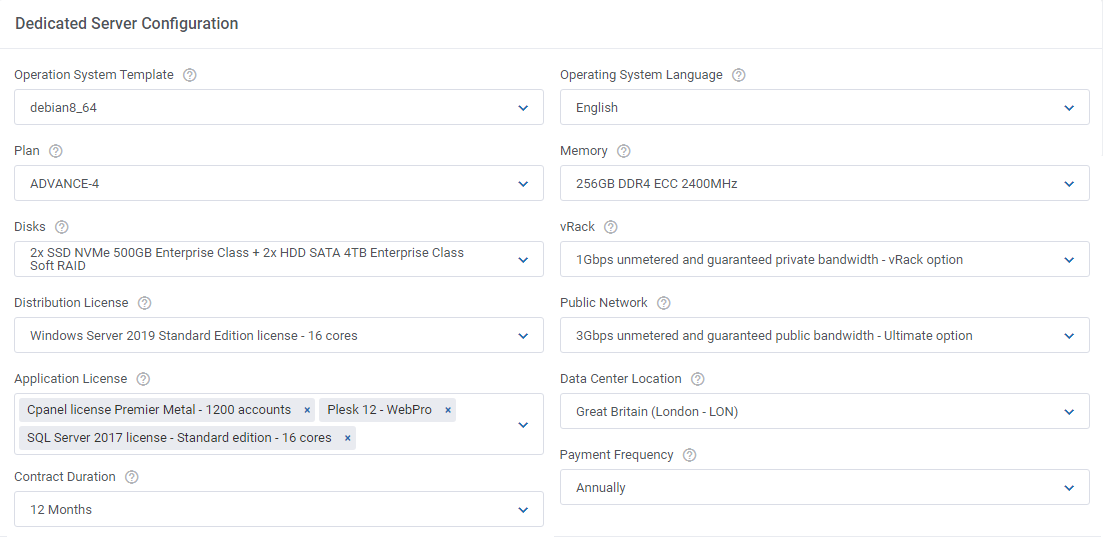
| 20. Now, you can start configuring the settings of the Server you sell. Bear in mind that the settings vary, depending on the server type selected. Underneath we will describe the settings configuration for 'OVH VPS' and 'OVH Dedicated Servers' in details. OVH VPS configuration settings:
|

|
OVH Dedicated Server configuration settings:
|
|
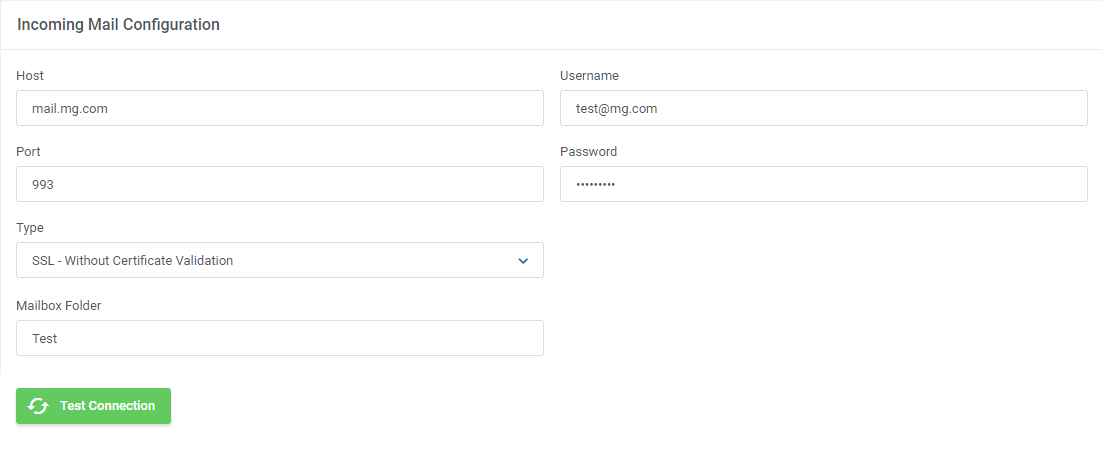
| 21. Afterward, set up incoming mail configuration. Due to API limitations, all emails with server credentials can only be sent to your OVH / Kimsufi / So You Start email address set in the panel. Note: Even though the module filters the received messages in your mailbox, we recommend that you use a separate mailbox for your main OVH VPS and Dedicated Servers profile account to avoid any issues with non-OVH content. After setting up the dedicated mailbox, provide its valid credentials below and test whether the connection has been established correctly. Note: There is available an option to 'Disable Certificate Validation'. Please toggle this option ONLY if you are having trouble with the connection. The certificate validation will be omitted when connecting to an email box. |
|
| The cron set during the last stage of the module's installation should periodically check that mailbox for OVH messages. If any new emails are received, they will be then converted to your email template and sent to the corresponding client. The default email templates for product creation, reinstallation and reboot in rescue mode can be specified below. Take a look at the Tips section - tip no 1, and check the templates' types. |

|
22. Automation Settings section includes detailed actions that will be automatically performed by the module in several situations:
|

|
| 23. The following section is dedicated to the Client Area Features. You will find here numerous options that can be enabled and then will be available to your clients in their client area. Please note that some options are available for VPS only, Dedicated Server only and some for both of them:
|

|
| 24. At the end of the configuration process, you can decide whether you want to generate configurable options for the product. Configurable options can be used by your clients to select each Server parameters individually during order placement. Configurable options for OVH Dedicated Servers:
Configurable options for OVH VPS server type:
|

|
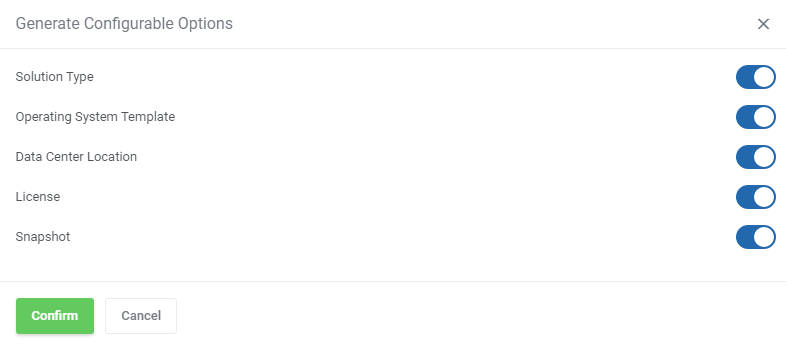
| If you decide to use configurable options, press on the 'Create' button and select which options you want to generate. Note that the configuration for disabled options will still be taken from the configuration of the main product. More information about how to use configurable options can be found here or in the official WHMCS documentation. |
|
Generating Additional Configurable Option
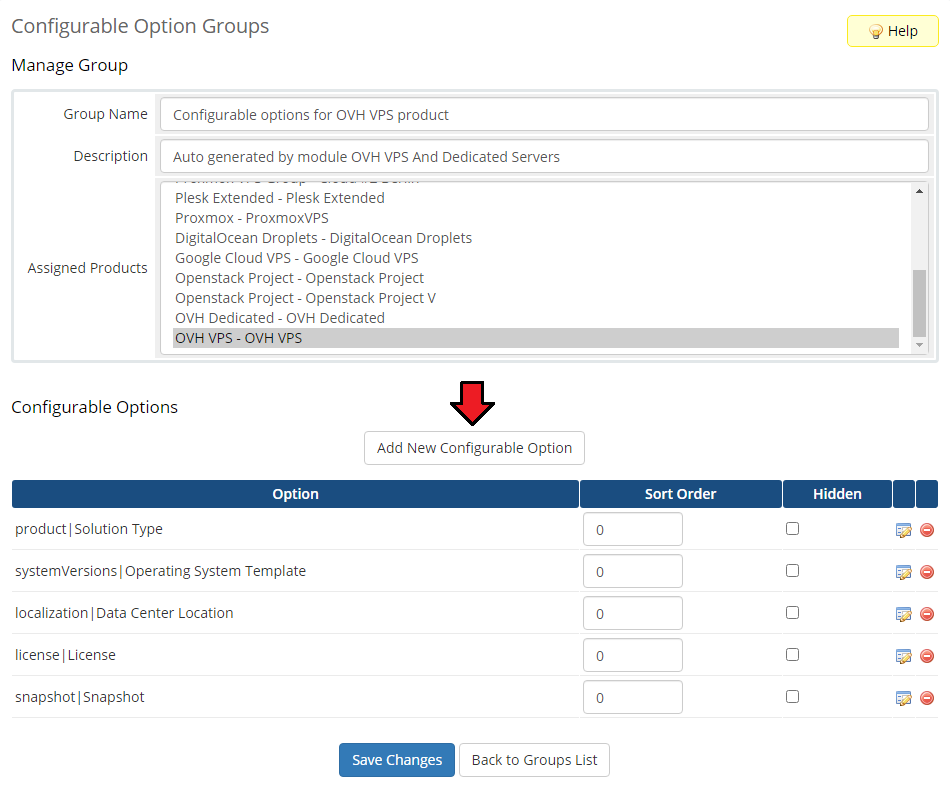
| This section presents how you can manually add 'Solution Type & Operating System & Application' as additional configurable option in order to provide the diversity of your products. Proceed to 'System Settings' → 'Configurable Options' . Click on the 'Configurable Options' that were generated previously. |

|
| Click 'Add New Configurable Option' as presented below. |
|
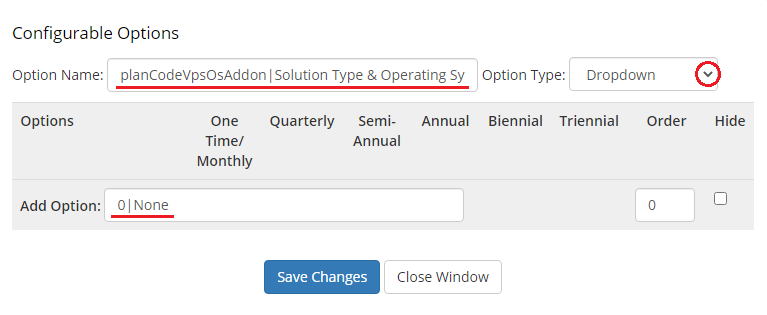
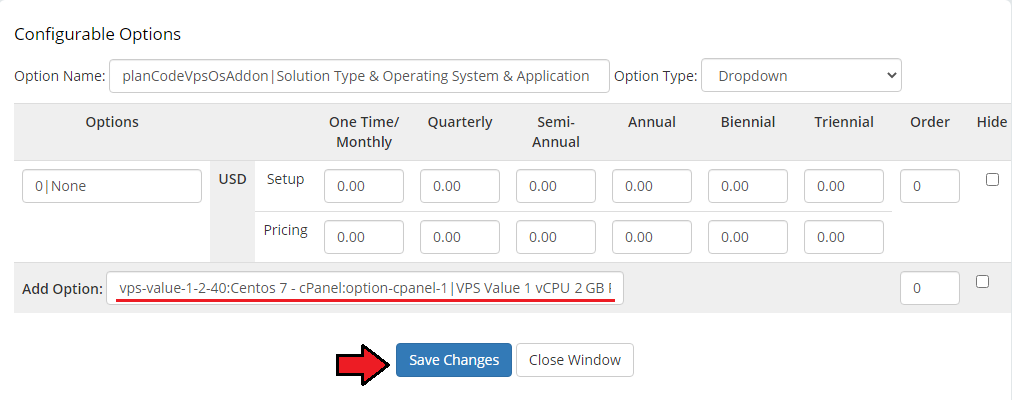
| Now, you need to provide 'planCodeVpsOsAddon|Solution Type & Operating System & Application' as 'Option Name' and choose 'Dropdown' as 'Option Type' . The first option has to be '0|None' . |
|
You can add another 'Options' following this scheme: product:OS:license|your name that is displayed to customers As an example, we will provide 'vps-value-1-2-40:Centos 7 - cPanel:option-cpanel-1|VPS Value 1 vCPU 2 GB RAM 40 GB disk - Centos 7 - cPanel (Option cPanel 1 account)' . |
|
| If you wish to diversify your products, set different prices to make your products more competitive on the market. You can create another options using the following values. |
| Product | OS | License |
|---|---|---|
| vps-comfort-4-16-160 | Archlinux | option-cpanel-100 |
| vps-comfort-4-16-320 | Centos 7 | option-cpanel-200 |
| vps-comfort-4-16-80 | Centos 7 - cPanel | option-cpanel-30 |
| vps-comfort-4-4-80 | Centos 8 | option-cpanel-5 |
| vps-comfort-4-8-160 | Centos 8 - Plesk | option-cpanel-1 |
| vps-comfort-4-8-320 | CoreOS Stable | option-plesk-webadmin |
| vps-comfort-4-8-80 | Debian 10 | option-plesk-webhost |
| vps-elite-8-16-160 | Debian 10 - Plesk | option-plesk-webpro |
| vps-elite-8-16-320 | Debian 8 - Docker | option-windows |
| vps-elite-8-16-640 | Debian 8 - OpenVPN | |
| vps-elite-8-32-160 | Debian 8 - Plesk | |
| vps-elite-8-32-320 | Debian 8 - Vestacp | |
| vps-elite-8-32-640 | Debian 8 - Virtualmin | |
| vps-elite-8-8-160 | Debian 8 - WordPress | |
| vps-elite-8-8-320 | Debian 9 | |
| vps-elite-8-8-640 | Fedora 31 | |
| vps-essential-2-4-160 | Ubuntu 16.04 | |
| vps-essential-2-4-40 | Ubuntu 18.04 | |
| vps-essential-2-4-80 | Ubuntu 19.10 | |
| vps-essential-2-8-160 | Ubuntu 20.04 | |
| vps-essential-2-8-80 | Windows Server 2016 Standard (Desktop) | |
| vps-value-1-2-40 | Windows Server 2019 Standard (Desktop) | |
| vps-value-1-2-80 | ||
| vps-value-1-4-40 | ||
| vps-value-1-4-80 |
| Note: Please remember that the above options can be changed as plans are updated. You can easily check the currently available options by generating the default configurable options in the 'Module Settings' section. |
Configuration of Addon
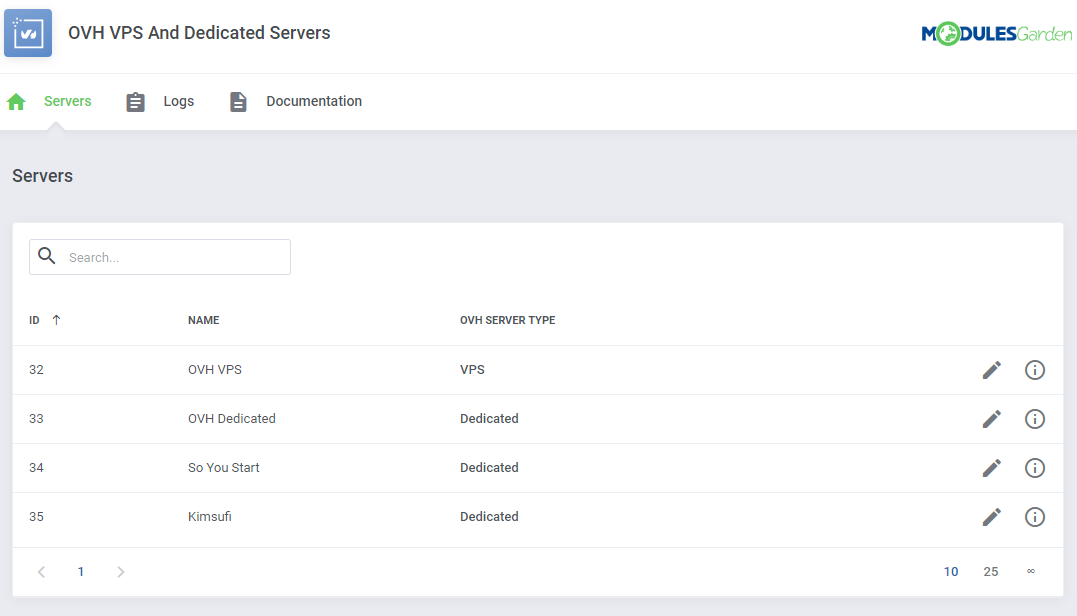
| You have just correctly created and customized a new product. Go to 'Addons' → 'OVHcloud VPS And Dedicated' in your WHMCS. |
|
Servers
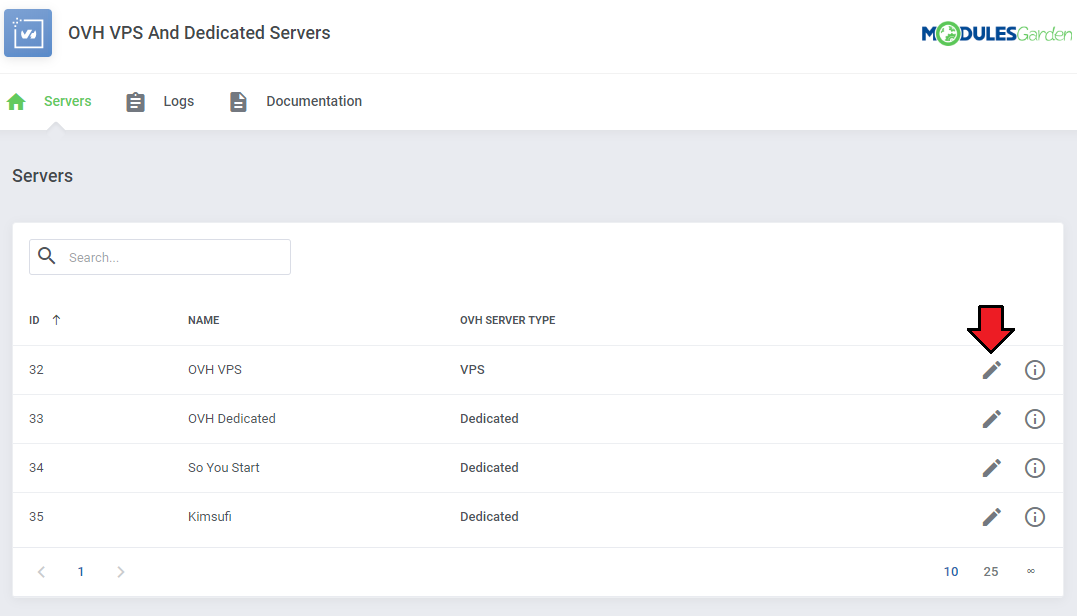
| 'Servers' section contains a list of your configured servers, you may quickly edit them directly from this site, simply press the edit icon. |
|
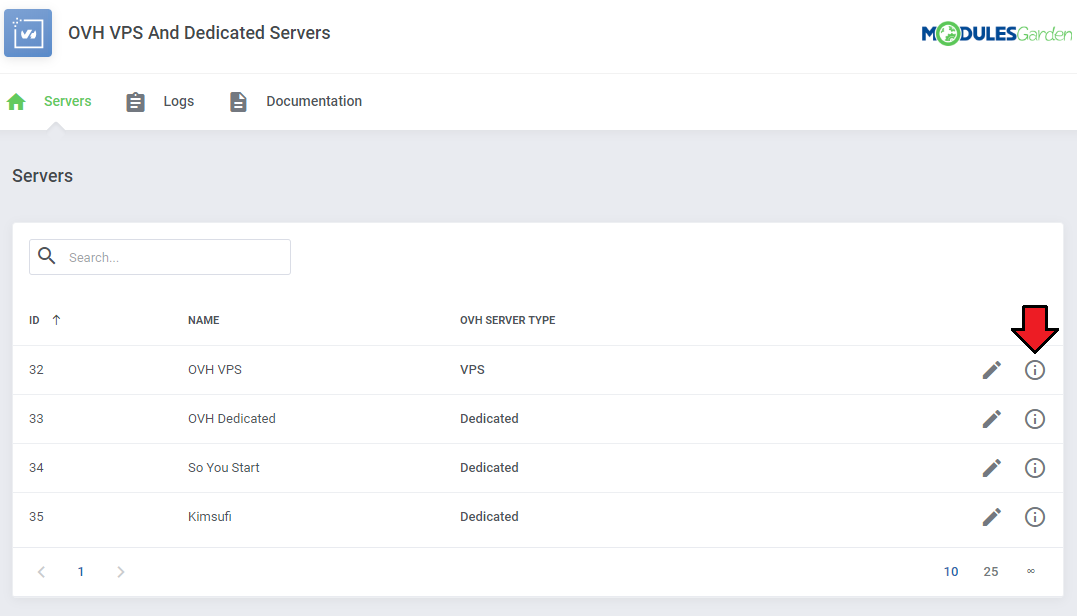
| In the next step, press the marked icon to see a list of deployed machines. |
|
| There you will see all existing machines on this very server. Whether they are used by any client already or not. Next to the machine name, there are details such as:
In order to manually assign the machine to a client, simply press the marked on the screen button. |
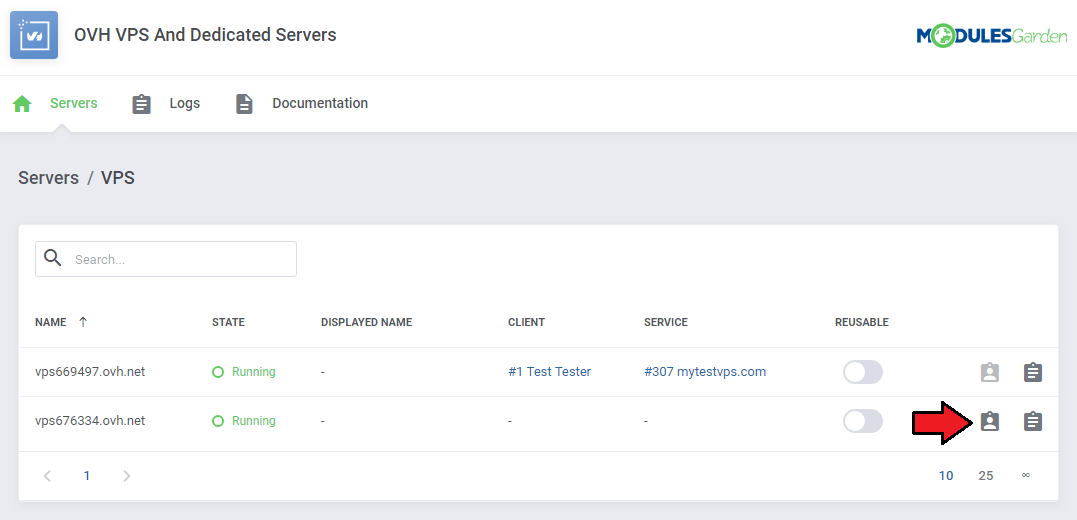
|
| Start typing to see a list of clients, then select existing service to assign. |
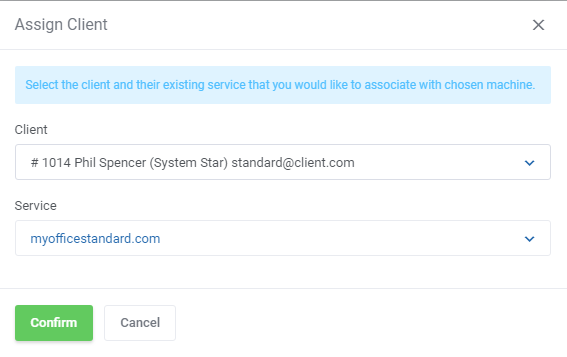
|
| There is also a possibility to assign reusable products to the machine. These products will be permitted to use this machine. |
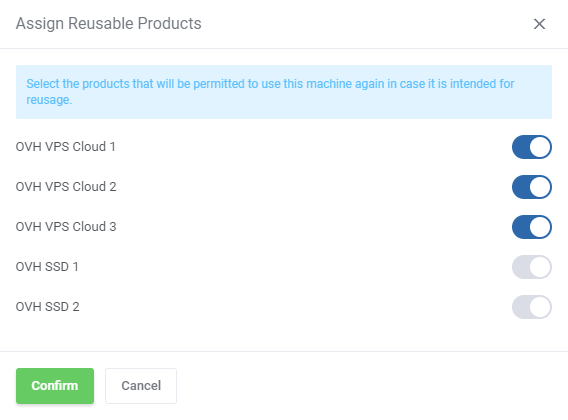
|
Logs
| Go back to 'Logs' section, there you will see a list of all module actions, including errors, notifications etc. |
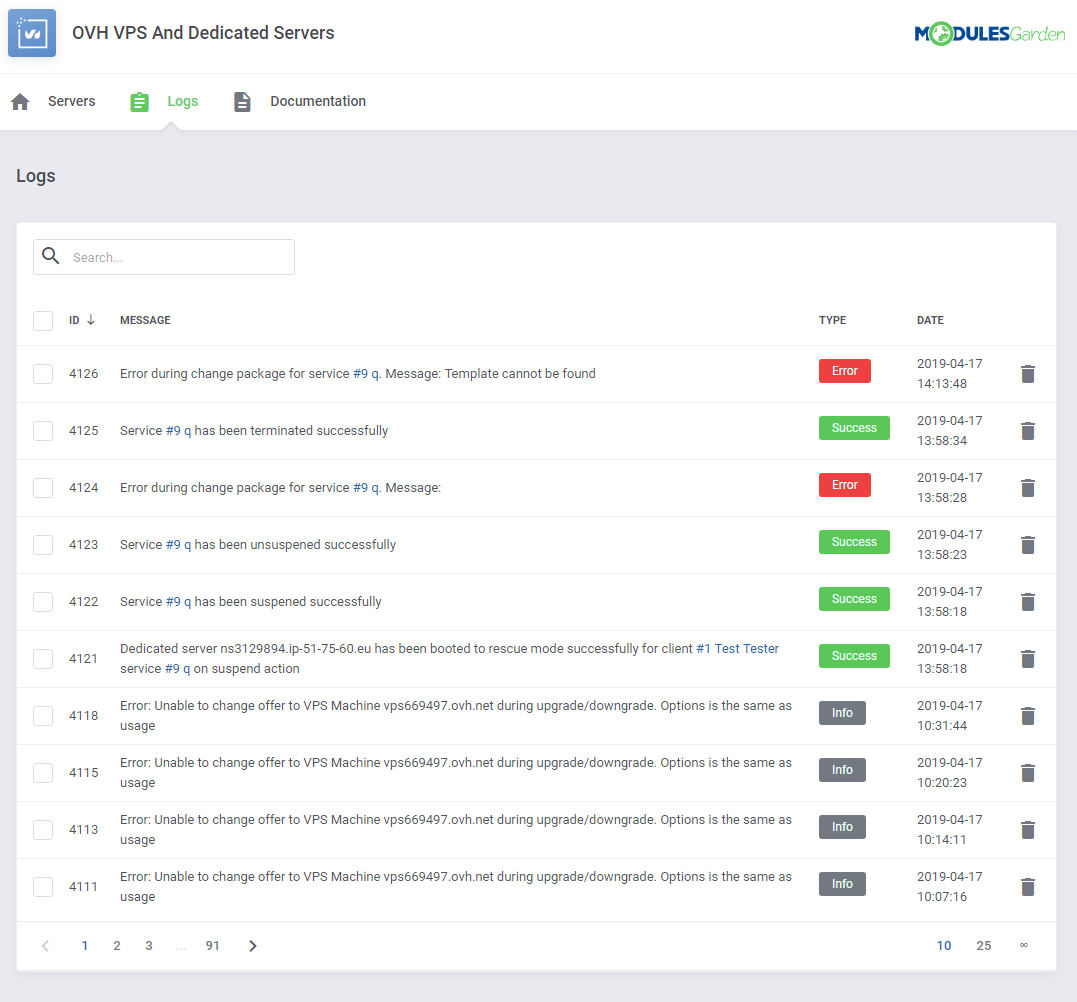
|
Management
Admin Area
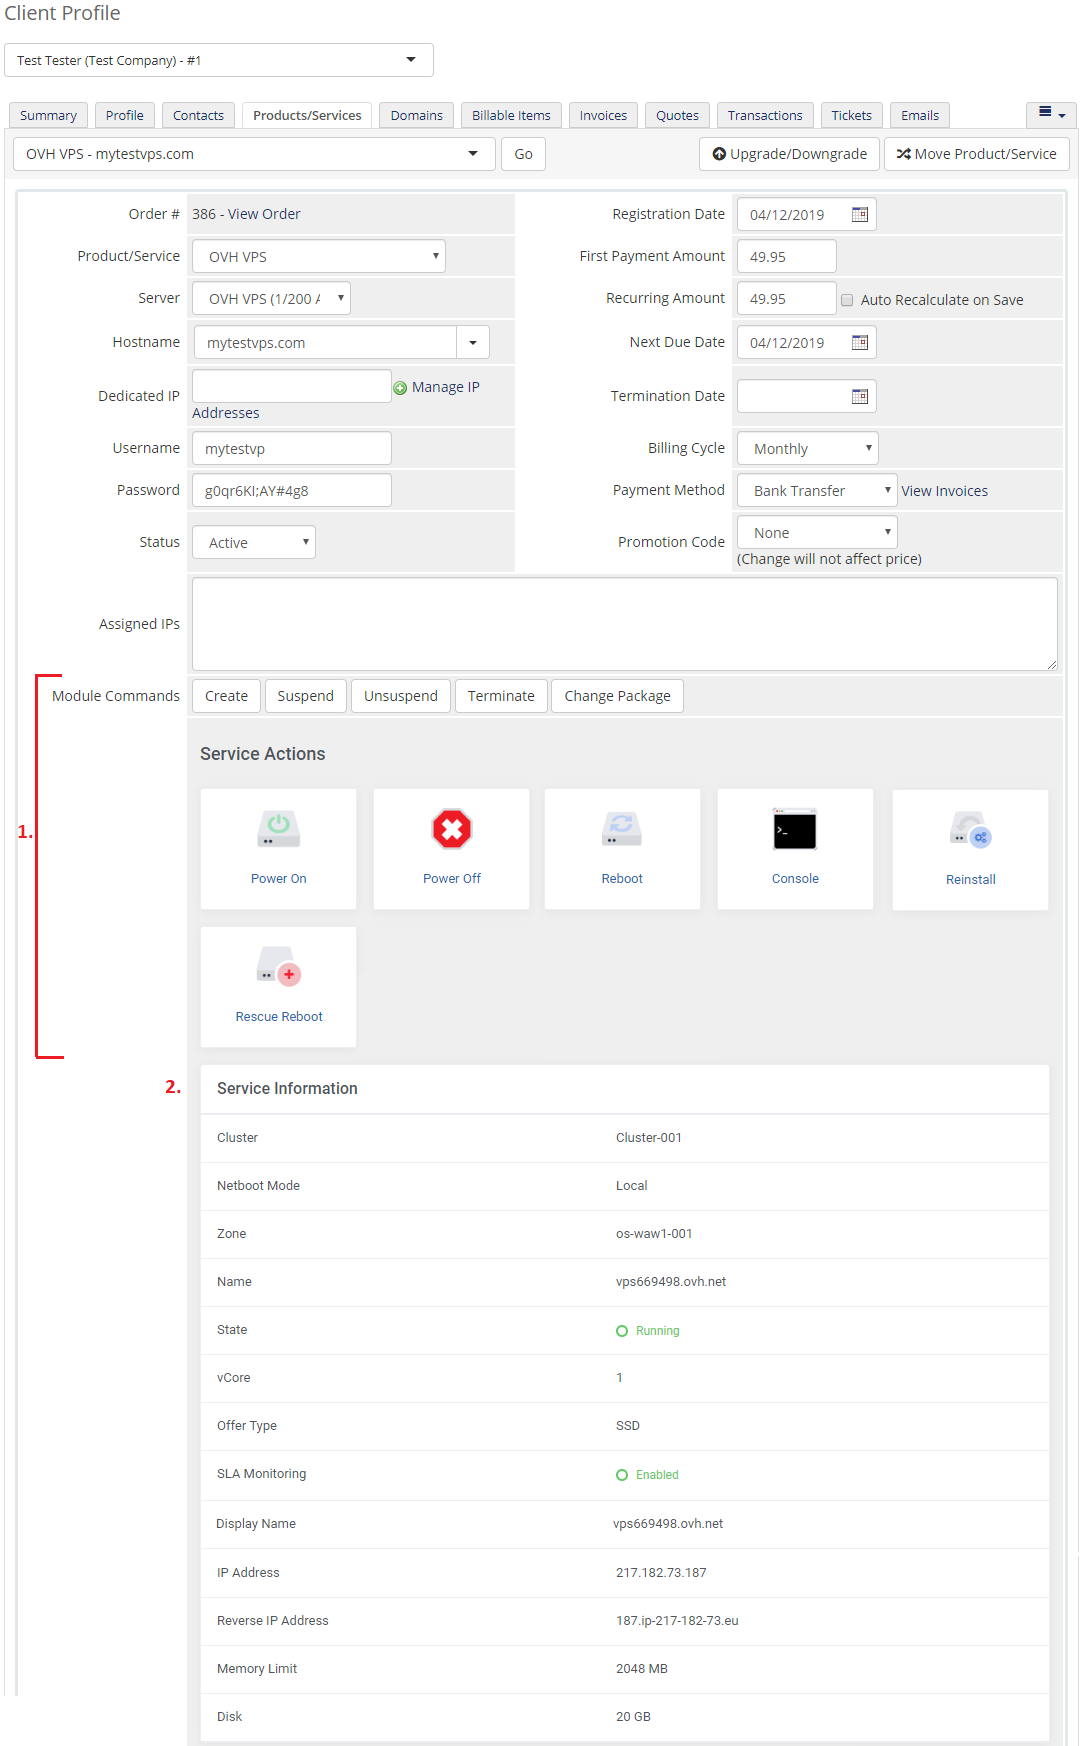
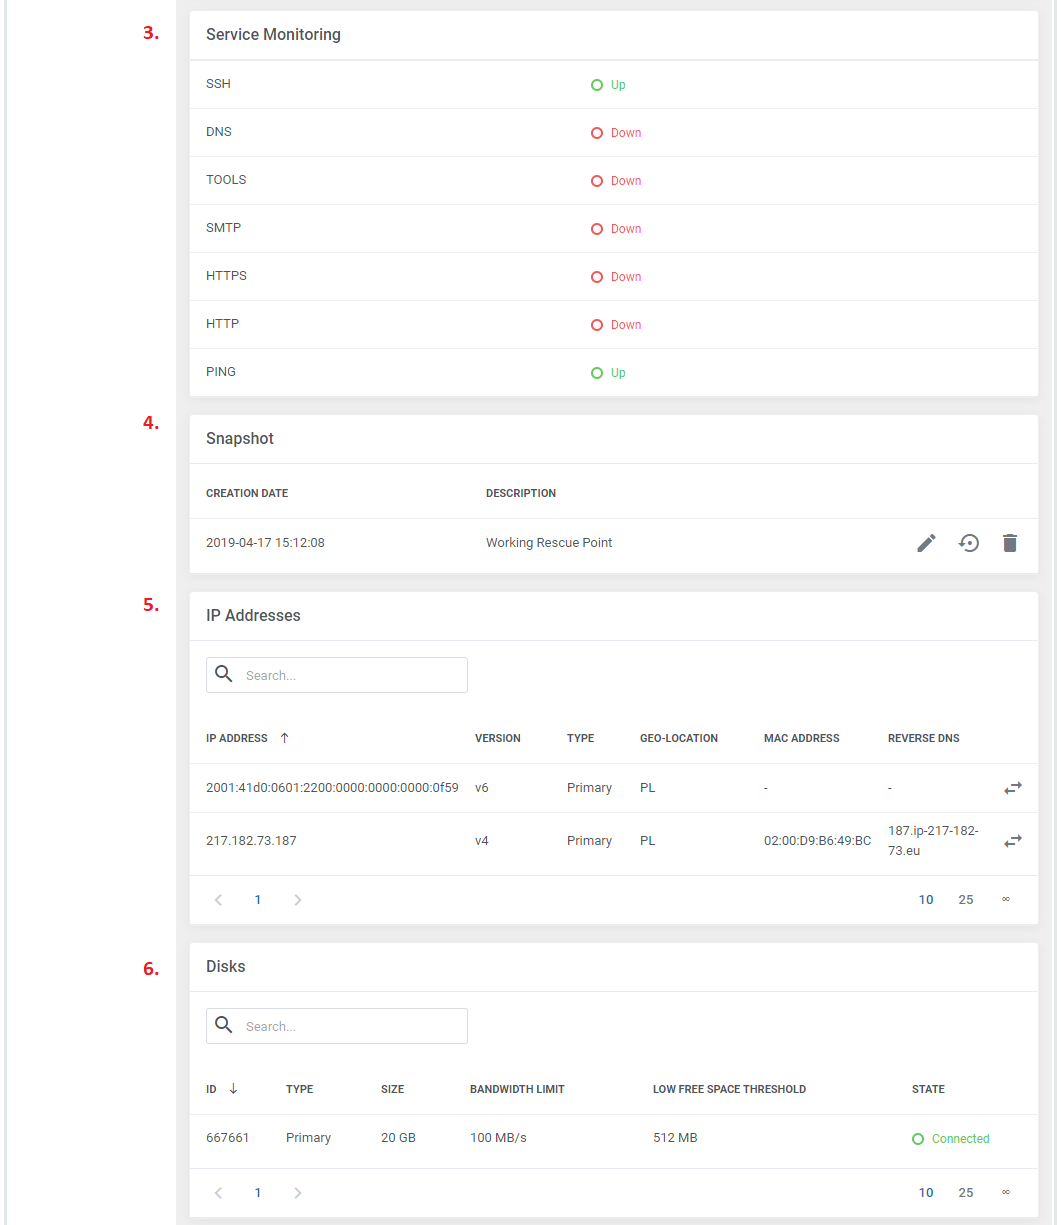
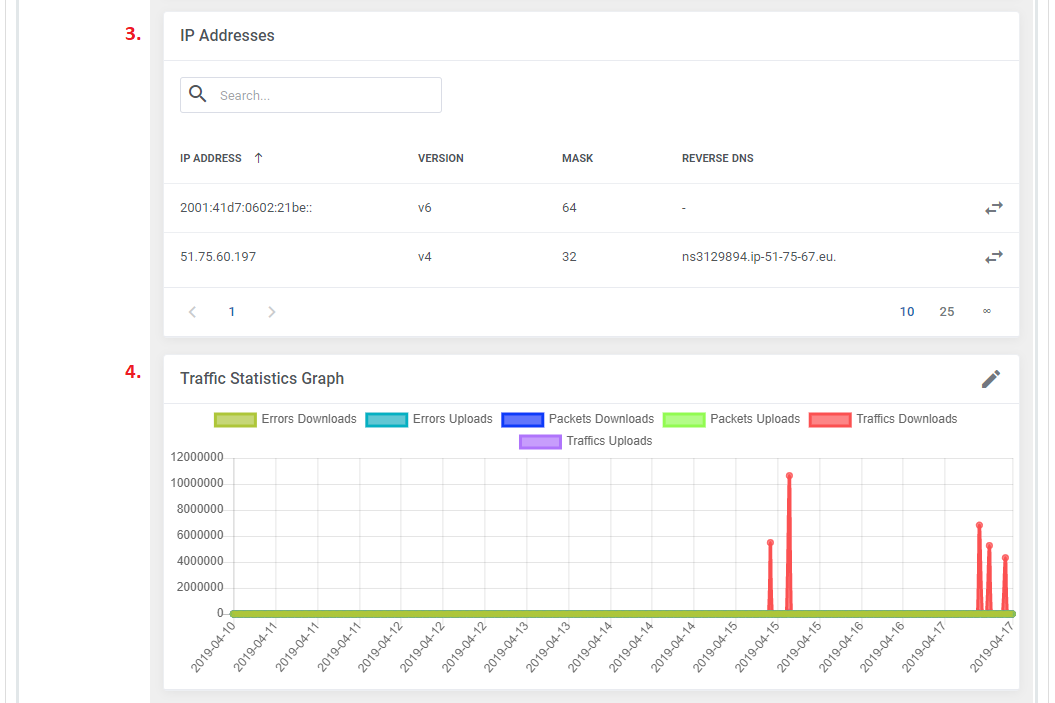
| OVHcloud VPS & Dedicated Servers For WHMCS allows you to monitor and manage your customer servers from the admin area of your WHMCS system. This includes supervision of such features like:
|
|
OVH VPS type
|
|
OVH Dedicated Servers type:
|
|
Ordering
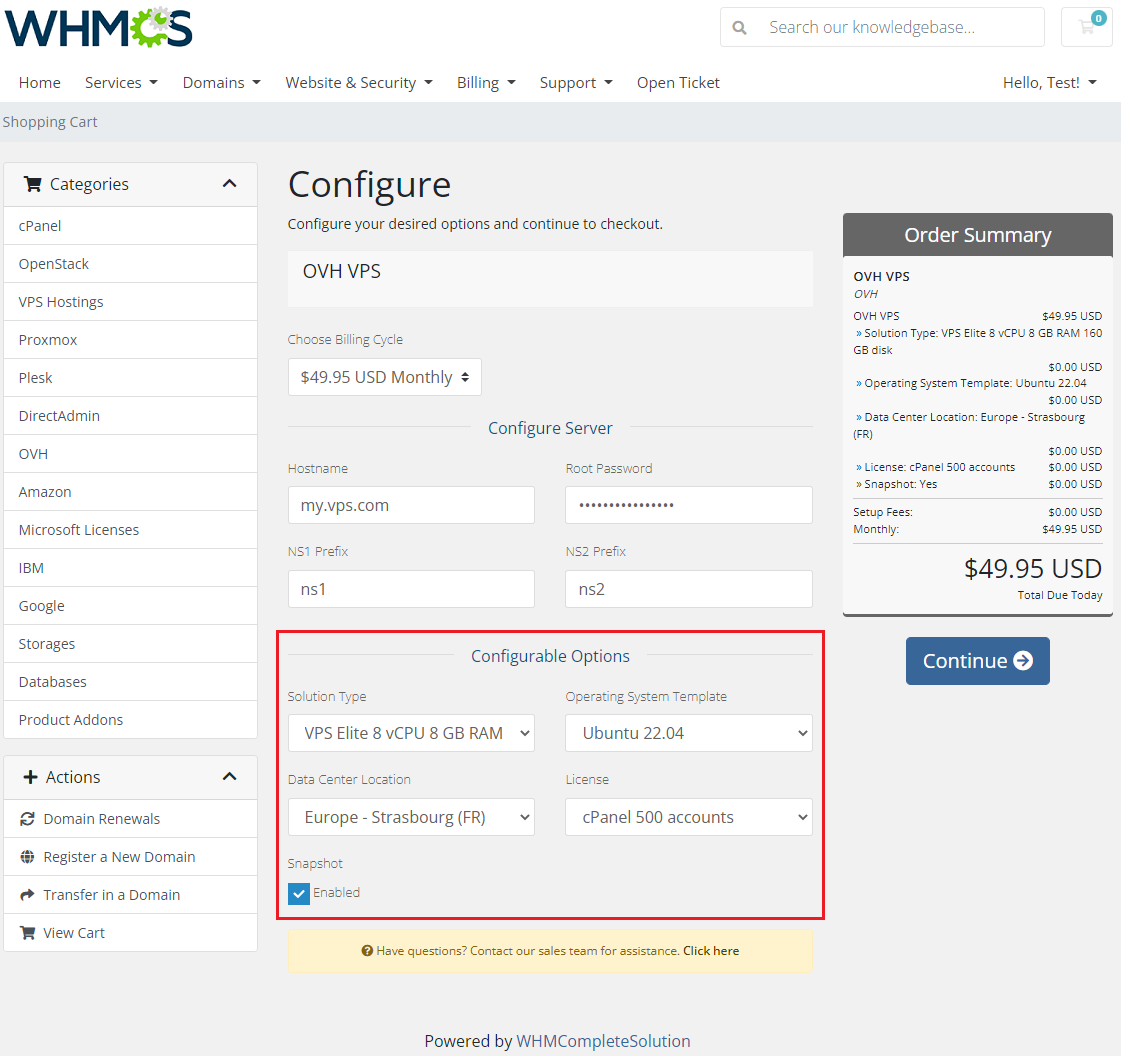
| Owing to configurable options, you are able to offer a product which your clients can tailor according to their needs. Additionally, you are able to set up pricing for each configurable option, which makes your offer even more competitive. After the order placement and successful VM creation, the server credentials will be sent to the client's email address according to the set cron execution intervals. |
|
Importing Existing VPS
| In this section, you can find short instruction on how to connect one of your clients to your already existing VPS in the OVH panel. Take the following steps to make sure that the process will be carried out properly. 1. Firstly, manually create an order for your customer in WHMCS. Choose a client and in the summary, view click on the ' Add New Order' button. Next, select a 'Product/Service' and press 'Submit Order' .
The above-mentioned information has to be consistent with the data from your OVH panel. Now, complete this field as presented below. |
| 3. If the completed data is correct, after refreshing the page, you will see the attached VPS from OVH. Important! Remember to manually add other missing parameters of the VPS such as domains, IP Addresses, configurable options, etc. so they match the parameters of the attached VPS from the OVH panel. |
Client Area
| Client area interface of 'OVHcloud VPS & Dedicated Servers' should look like the one on the screen below. As you can see, the control panel contains useful options required for managing a server. The module allows your customers to easily power on/off, reboot and reboot in rescue mode, reinstall and access console through pressing the corresponding buttons. OVH VPS client area view: |
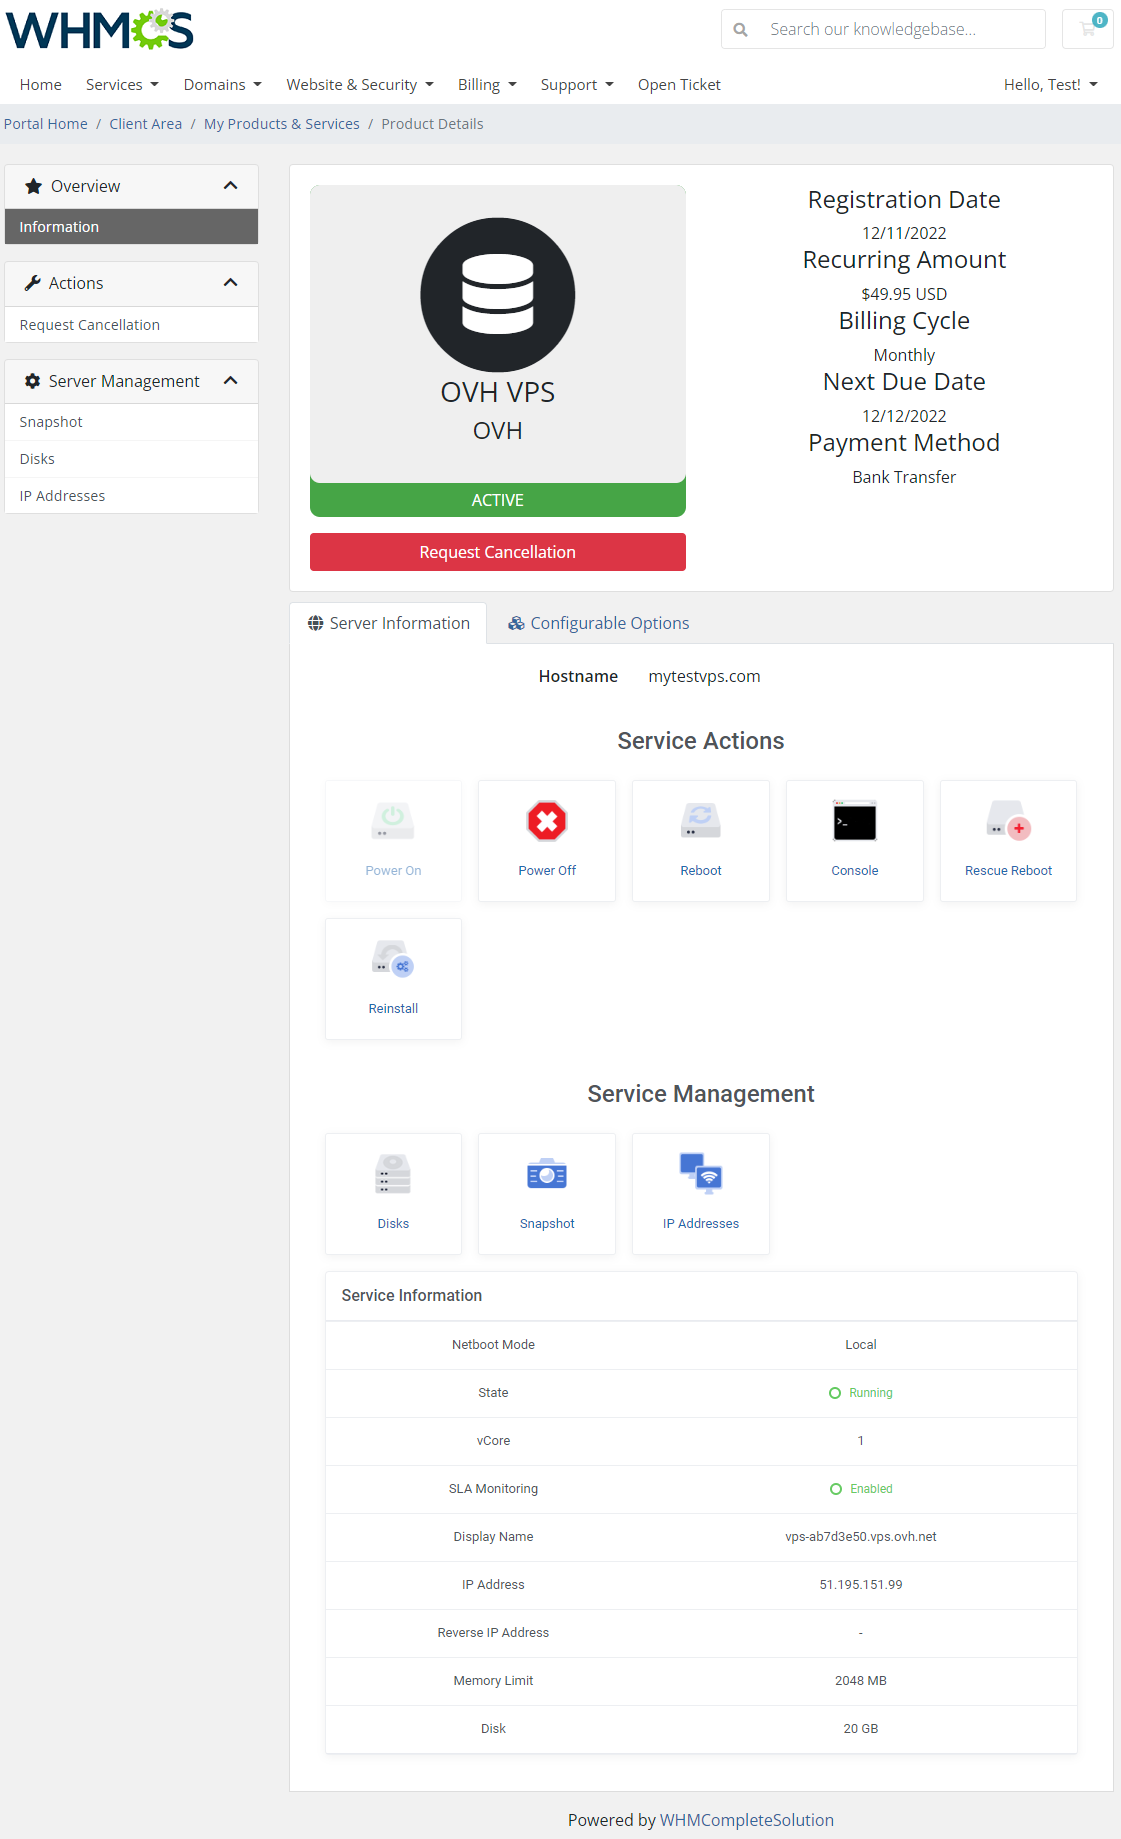
|
| OVH Dedicated Server client area view: |
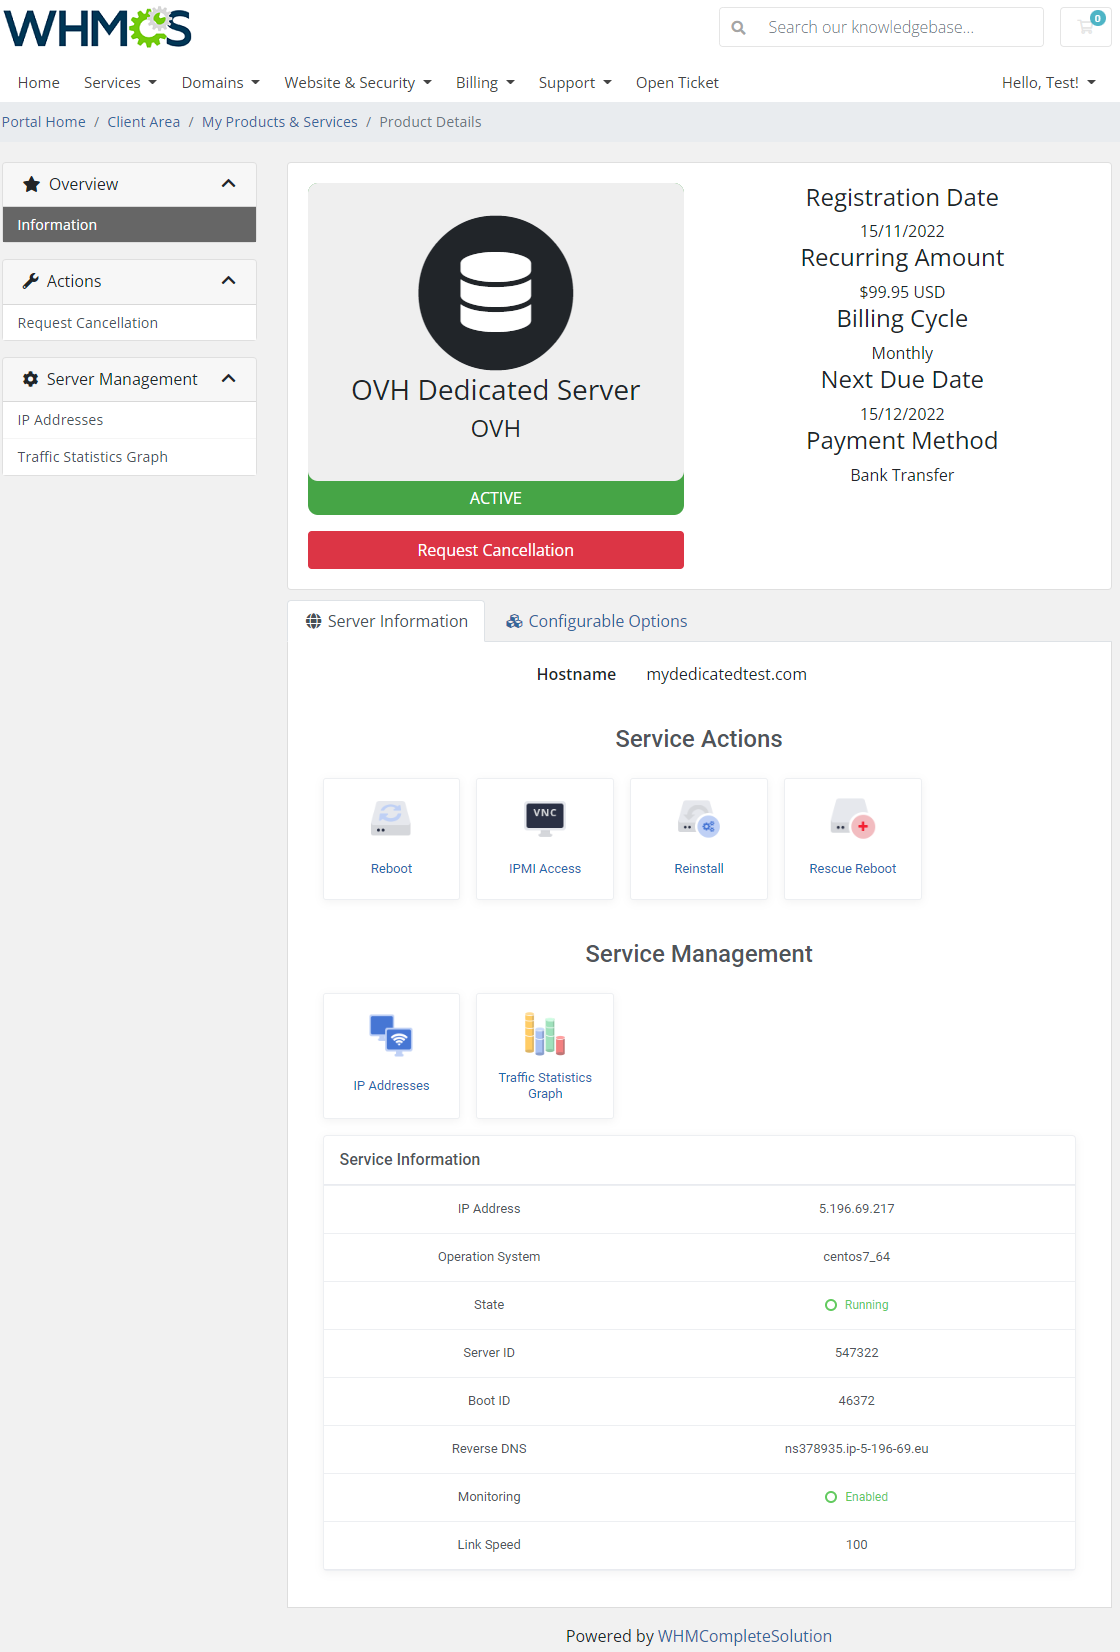
|
Service Actions
Access Console
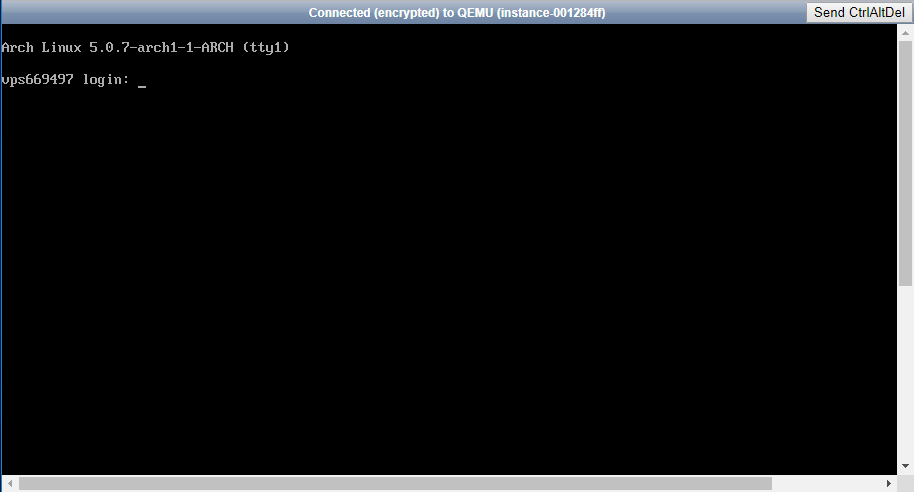
| In case of OVH VPS, clients might be granted access to KVM console. Simply press its icon to open the console window. |
|
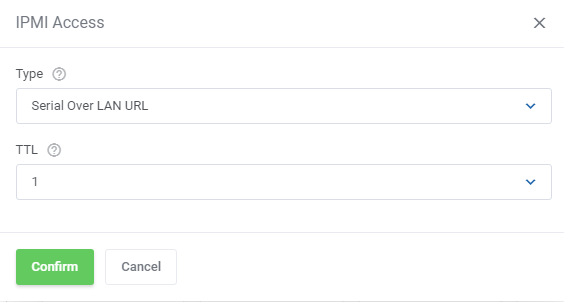
| For OVH Dedicate Servers, there is supported IPMI console. Press the IPMI Access icon and then select type and TTL of the IPMI access to continue to the console. |
|
Rescue Reboot
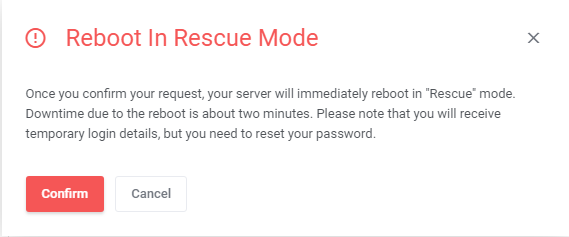
| This action reboots the server in the rescue mode. The moment you press the confirm button, new login details are sent in an email template selected in the product configuration (see point 21), with accordance to the cron settings. |
|
Reinstall
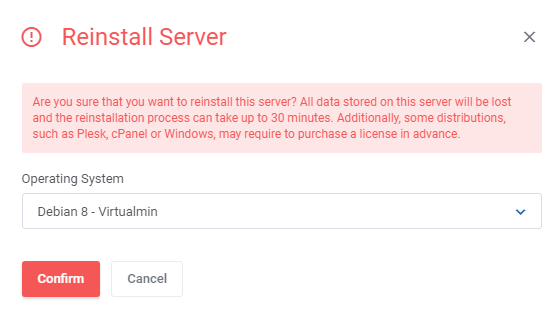
| The action when triggered, causes the new login details to be sent in an email template selected in the product configuration (see point 21) and with accordance to the cron settings. Note: Please be patient as reinstallation process is quite time consuming. |
|
Service Management
Snapshot (VPS)
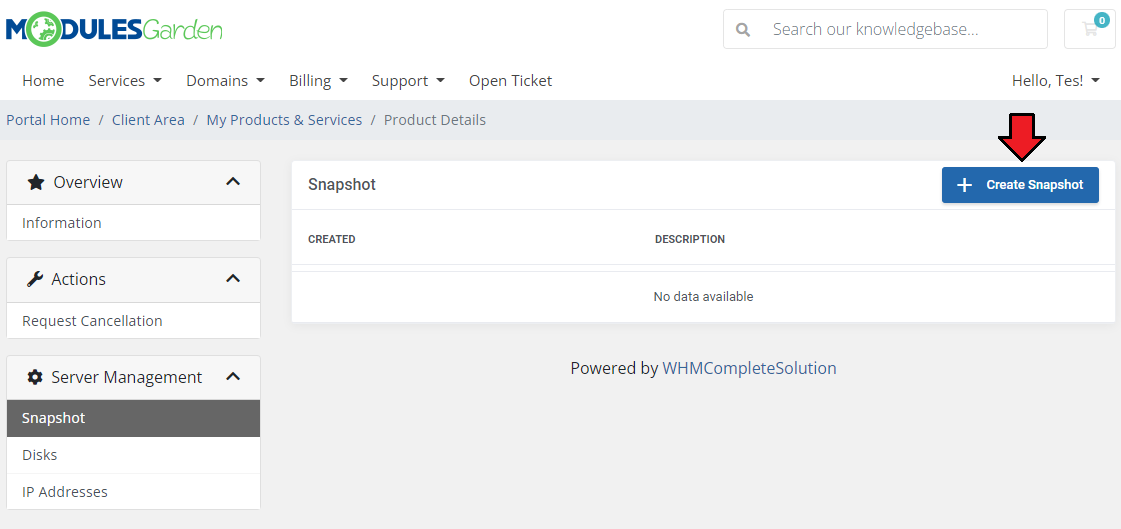
| Use snapshots to save the current contents of the virtual machine memory. You may use them later to restore the VM's settings. Note: Creating a snapshot may take a while, so it will not appear on the list right away. |
|
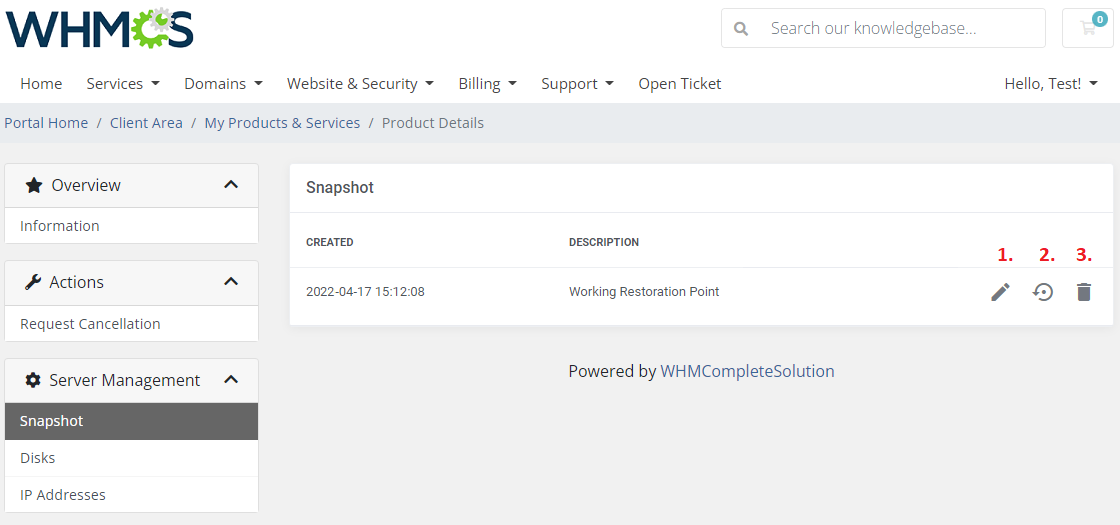
Allowed actions on the created snapshot:
|
|
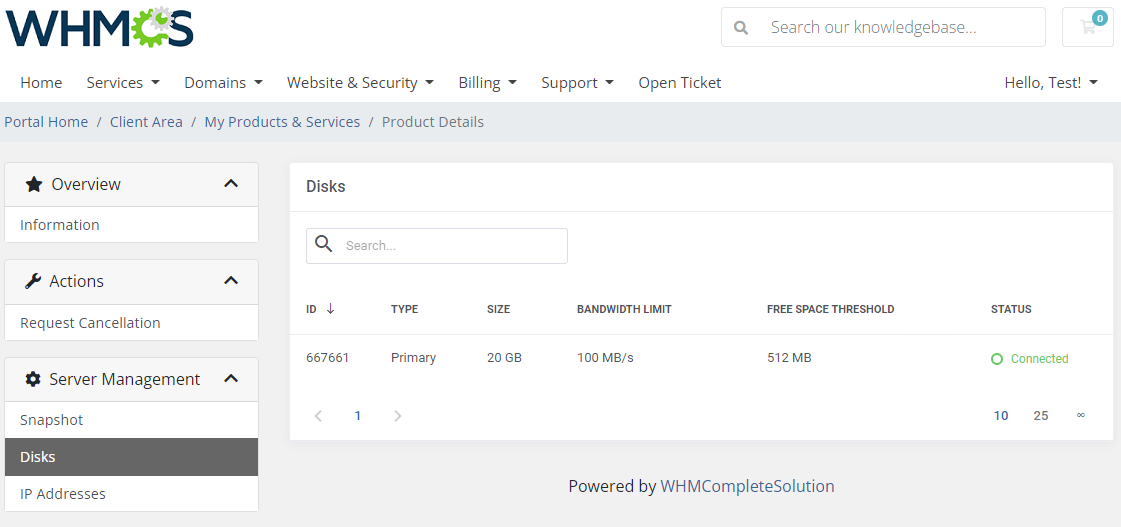
Disks (VPS)
When you enter this section, you will see a list of assigned disks with any details on them, such as:
|
|
IP Addresses
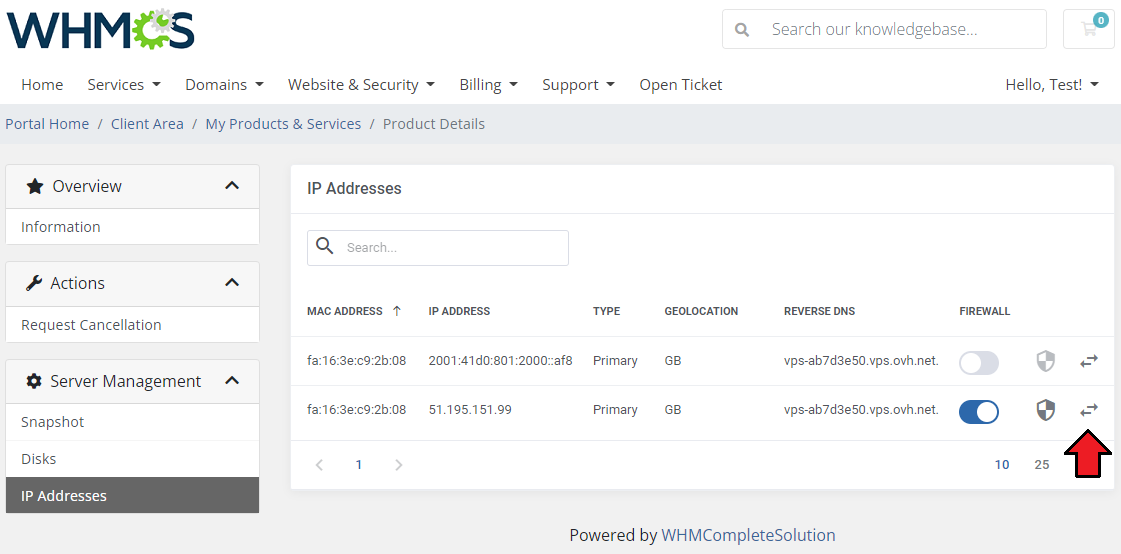
| Under 'IP Addresses' you may see any assigned IP addresses, their version, type, location, MAC address and reverse DNS if specified. (1) Update the reverse DNS path of an IP address by pressing the marked button. |
|
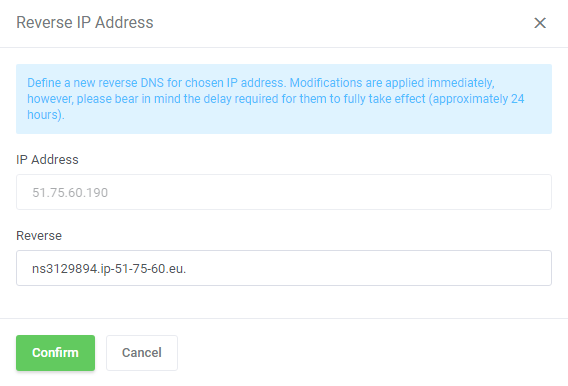
| (1) - Provide a new reverse DNS for the selected IP address. Press 'Confirm' when ready. |
|
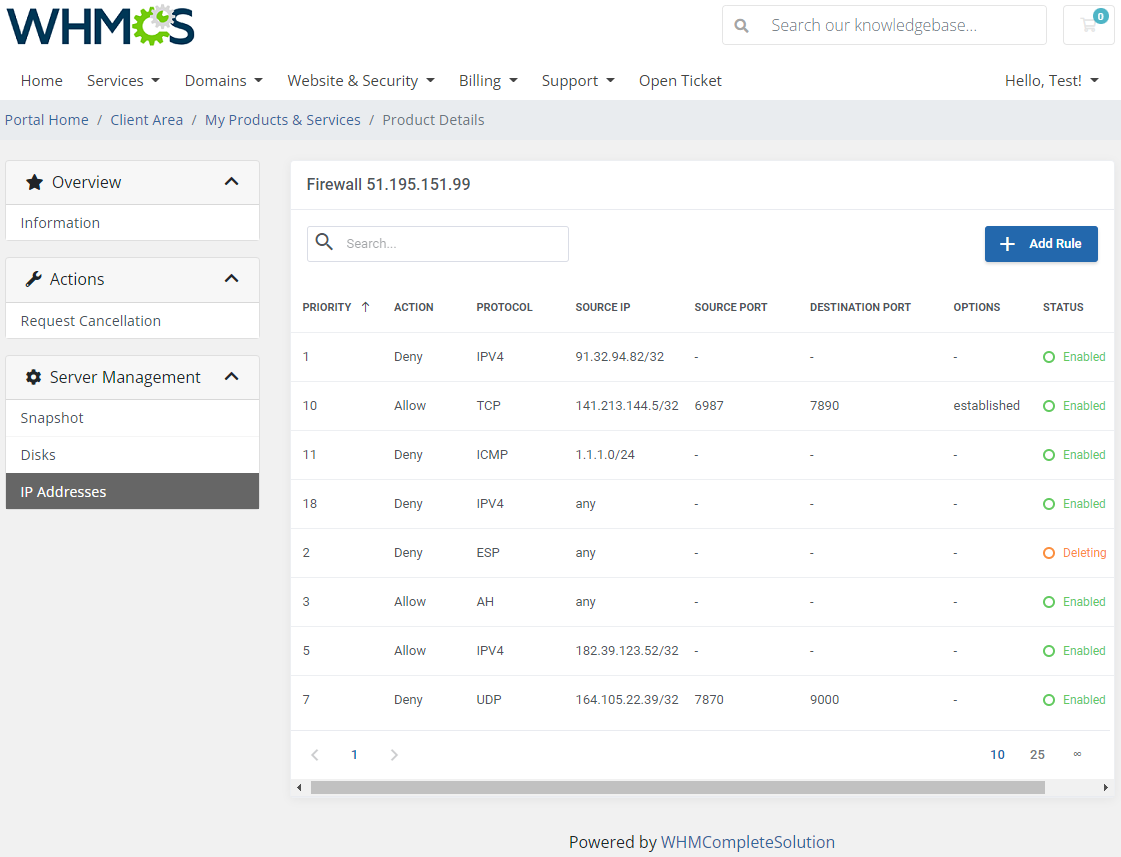
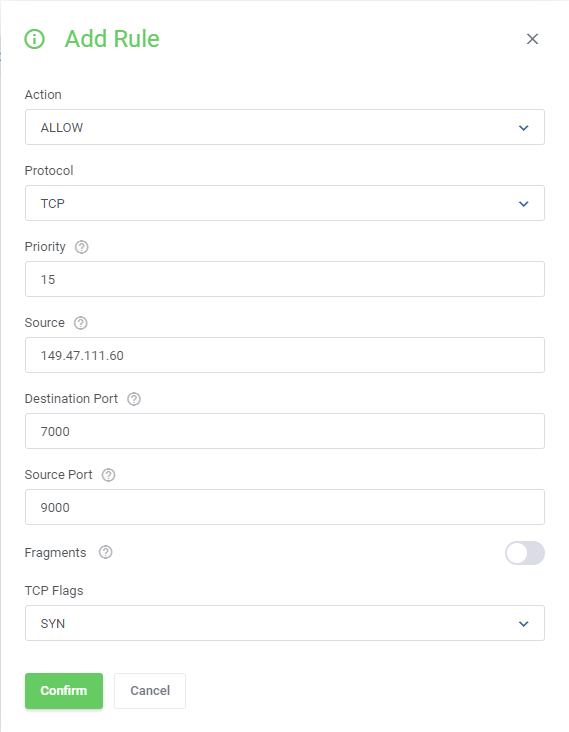
| (2) - Manage existing firewall rules, preview their priority and other details, delete if necessary. |
|
| Add a new firewall rule by pressing appropriate button. A new window with rule details to be filled out will appear. |
|
Traffic Statistics Graph (Dedicated Servers)
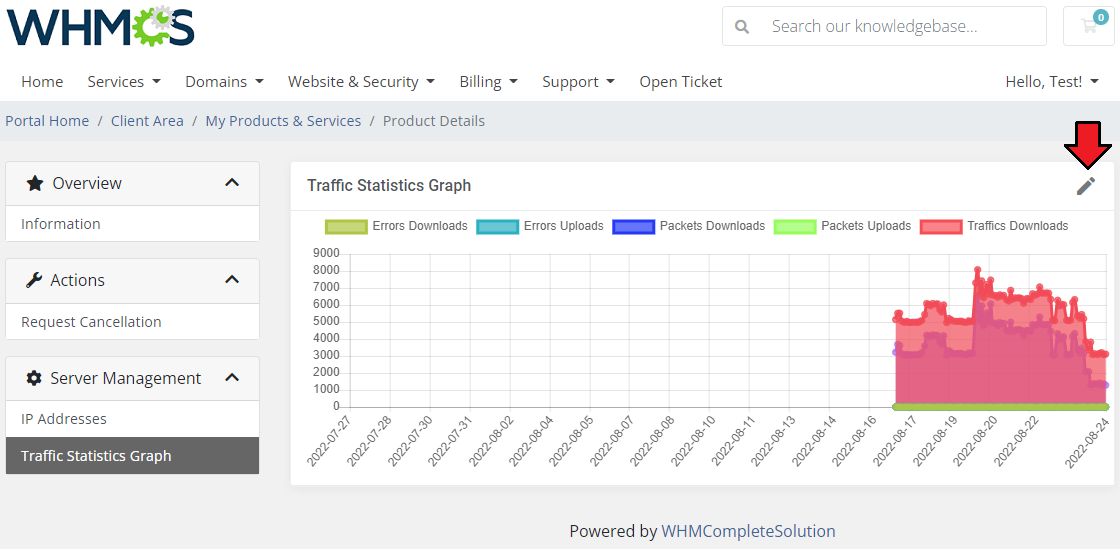
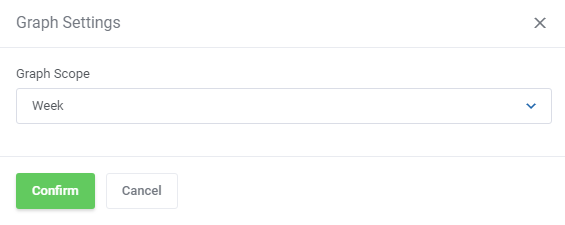
| Open this section to see the graph with traffic statistics. You will find there outlined data on errors, packets and traffic downloads as well as uploads. You may easily adjust the graph's view by changing the time scope of the displayed stats. Note 1: Some of the mentioned option may not be visible on the graph until soma data are generated. This is applicable to the graph itself as well. |
|
| Select the time scope: |
|
Tips
1. List of 'OVH VPs & Dedicated Servers' email templates included in the module:
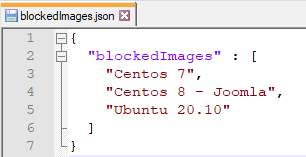
In order to view the templates' content and edit it, please move to WHMCS → System Settings → Email Templates. 2. If you want to block specific OS images which are available for the server reinstallation process, you need to add these OS images to the following file: |
|
Update Instructions
| An essential guidance through the process of updating the module is offered here. Ensure successful completion of the module update by carefully following each step, thereby preventing data loss or any unforeseen issues. |
Upgrade Guide
| Seeking a solution that offers greater flexibility, customization tailored to your precise needs, and unrestricted availability? There is an option that not only proves to be cost-effective in the long run but also includes prioritized support services, making it a truly valuable investment. Opt for the Open Source version of your OVHcloud VPS & Dedicated Servers For WHMCS module to unlock these benefits. Follow a comprehensive guide covering the transition process, the advantages it brings, and step-by-step instructions on what to do next after the order has been successfully finalized. |
Common Problems
| 1. When you have problems with connection, check whether your SELinux or firewall does not block ports. |
| 2. If you encounter an error in logs: Error during create for service #name_of_your_service. Message: Your preferred payment method is not valid Solution: Please log in to your OVH panel and set up a default payment method. |
| 3. The OVHcloud VPS And Dedicated Servers For WHMCS module previously supported the "Kimsufi" and "So You Start" brands. However, due to an API update implemented by OVHcloud, the module is no longer compatible with these brands. |