Freshdesk For WHMCS
Contents |
About Freshdesk For WHMCS
| Freshdesk For WHMCS gives your customers the access to a complex Freshdesk support solution in your own WHMCS. Not only will your clients manage Freshdesk tickets straight on your website, but also your support teams will control every WHMCS ticket in Freshdesk. |
- Client Area Features:
| ✔ View Freshdesk Departments |
| ✔ Manage Existing Tickets |
| ✔ Open New Ticket |
| ✔ Fill Out Freshdesk Ticket Forms |
| ✔ Assign Owned Service To Ticket |
| ✔ Attach Files To Ticket |
| ✔ List Recent Tickets |
- Admin Area Features:
| ✔ Manually Export To Freshdesk: |
| ✔ WHMCS Clients |
| ✔ WHMCS Tickets |
| ✔ Define Module Behavior |
| ✔ Show Solved Tickets |
| ✔ Update Client Credentials |
| ✔ Define Replies Order |
| ✔ Define Available Support Departments |
| ✔ Define Client Service Field |
| ✔ Define Client ID Field |
| ✔ Define Ticket Status Colors |
| ✔ Set Default Field Values For Agent Required Fields |
| ✔ Configure And Test Server Connection |
| ✔ Toggle SSL Verification |
| ✔ Enable Single Sign-On To Freshdesk |
| ✔ Define Client Fields Relations |
| ✔ View Logs |
- Integration:
| ✔ Automatically Export To Freshdesk: |
| ✔ New Tickets |
| ✔ Clients On Tickets Creation |
| ✔ Synchronize Ticket Responses Between WHMCS And Freshdesk |
| ✔ Transfer Ticket Forms Settings |
| ✔ Transfer Client Custom Fields Details |
| ✔ Transfer Custom Ticket Statuses |
| ✔ View WHMCS Client Details In Freshdesk Using Widget |
| ✔ Contact Details |
| ✔ Services |
| ✔ Domains |
| ✔ Product Addons |
| ✔ Due Invoices |
| ✔ Use Single Sign-On To Log Into Freshdesk |
- General Info:
| ✔ Requires Freshdesk "Pro" Pricing Plan Or Higher |
| ✔ Custom Templates Support |
| ✔ Multi-Language Support |
| ✔ Supports PHP 8.2 Back To PHP 8.1 |
| ✔ Supports WHMCS Themes "Six" And "Twenty-One" |
| ✔ Supports WHMCS V8.12 Back To WHMCS V8.9 |
| ✔ Requires ionCube Loader V13 Or Later |
| ✔ Easy Module Upgrade To Open Source Version |
Installation and Configuration
| This tutorial will show you how to successfully install and configure Freshdesk For WHMCS. We will guide you step by step through the whole installation and configuration process. |
Installation
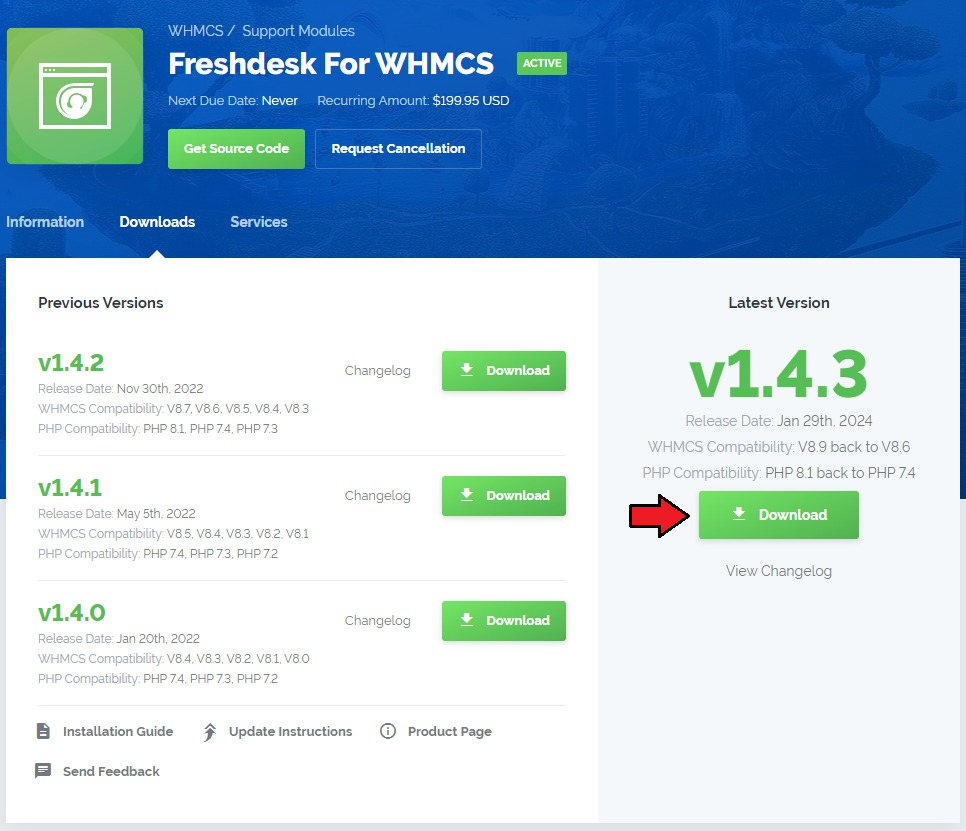
| 1. Log in to our client area and download the module. |
|
| 2. Extract it and upload its content into the main WHMCS directory. The content of the chosen PHP version files to upload should look like this. |

|
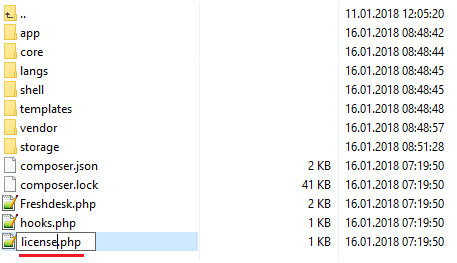
| 3. When you install Freshdesk For WHMCS for the first time you have to rename 'license_RENAME.php' file. File is located in 'modules/addons/Freshdesk/license_RENAME.php'. Rename it from 'license_RENAME.php' to 'license.php'. |
|
| 4. In order to configure your license key, you have to edit the previously renamed 'license.php' file. Enter your license key between quotation marks as presented on the following screen. You can find your license key in our client area → 'My Products'. |

|
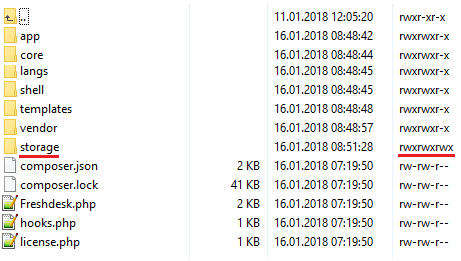
| 5. Now, set up the 'storage' folder as recursively writable. This folder is available at 'your_whmcs/modules/addons/Freshdesk/'. |
|
Activation
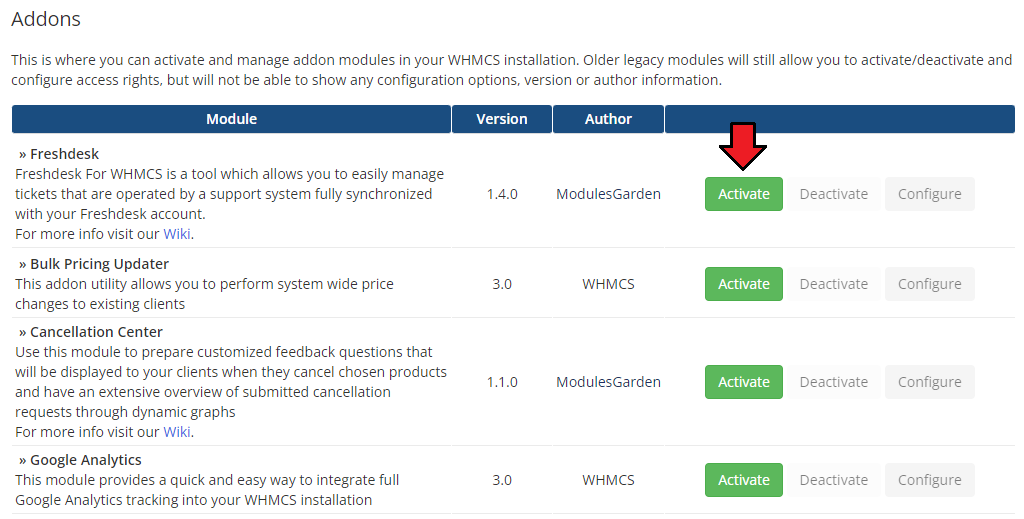
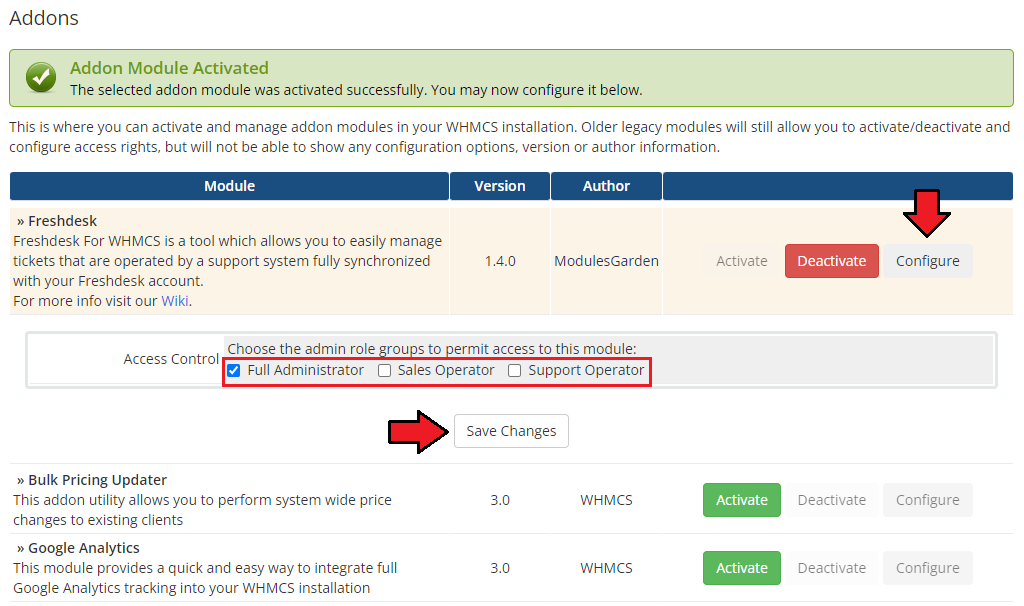
| 6. Now, you have to activate the module in your WHMCS system. Log in to your WHMCS admin area and proceed to 'System Settings' → 'Addon Modules'. |
|
| 7. In the next step you need to permit access to this module. To do so, click on the 'Configure' button, tick checkboxes to assign desired admin roles. |
|
| 8. You have just successfully installed Freshdesk For WHMCS! |
Configuration
| Now you have to configure your newly installed module. Before we proceed to the configuration itself, you have to find API details to your Freshdesk account. |
API Connection
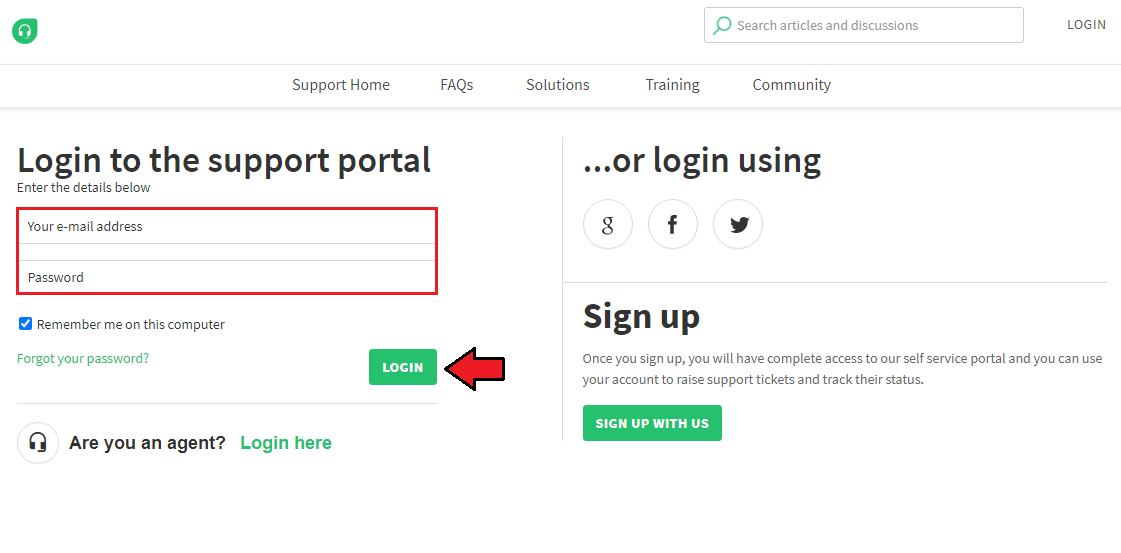
| Firstly, log in to your Freshdesk portal at https://support.freshdesk.com/support/login. |
|
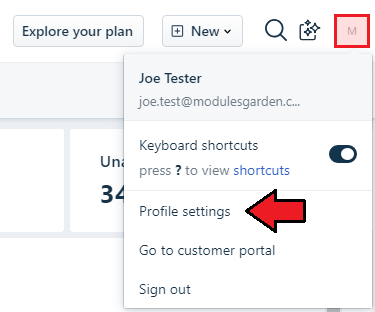
| Click on your profile picture that is in the top right corner of the page and go to the 'Profile Settings' section. |
|
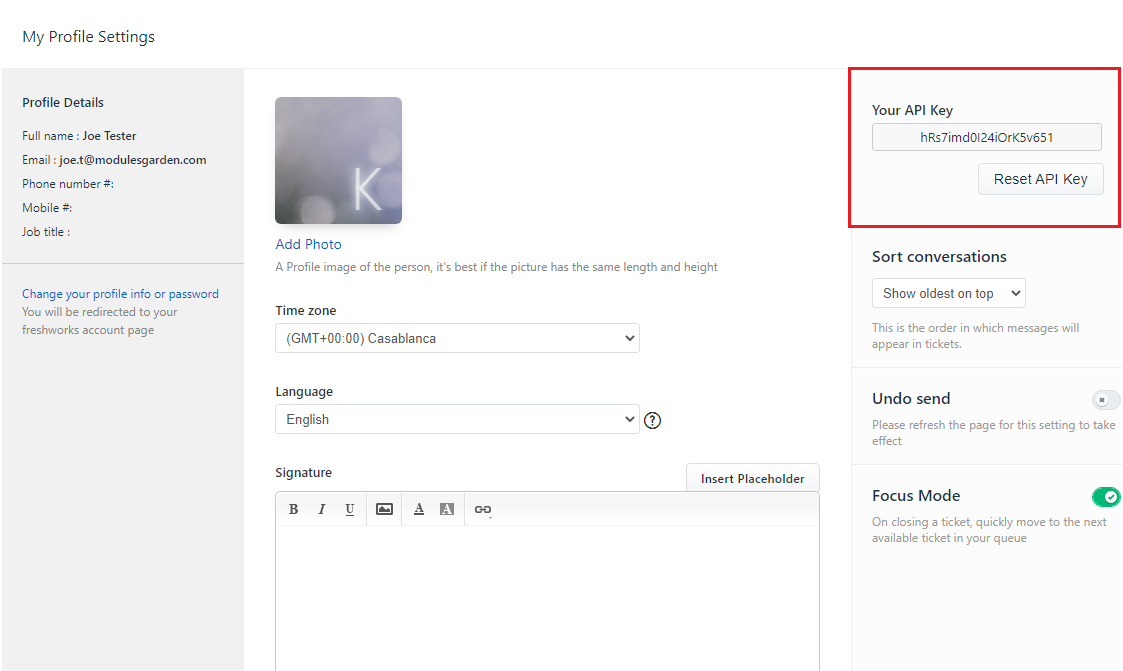
| You can find your API key on the right side of the settings page.
Use an existing key or reset it to generate a new one. Copy the active API key. |
|
Server Configuration
| Now, that you have safely stored your API, you may move to the second part of configuration. Proceed to 'Addons' → 'Freshdesk' → 'Settings' → 'Server Settings', here you have to enter any data required to connect your WHMCS with the Freshdesk server. |
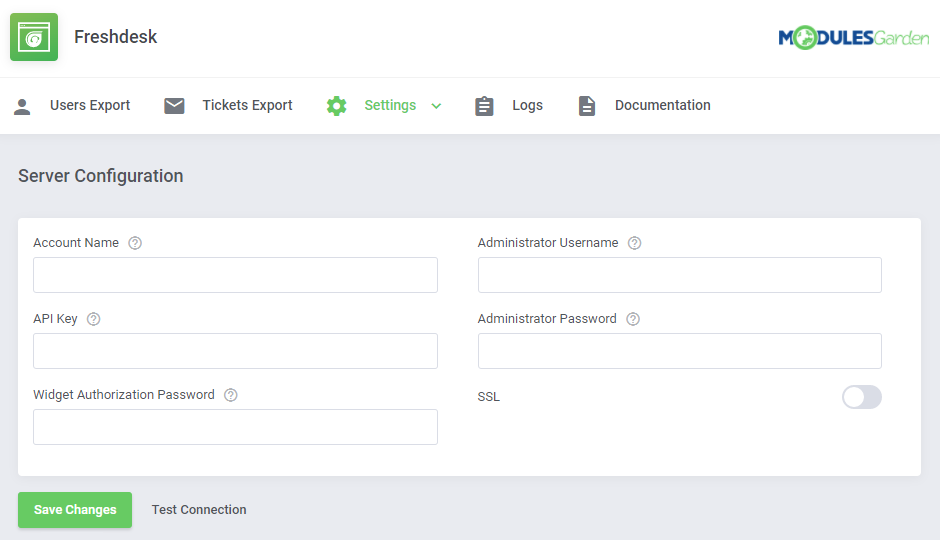
|
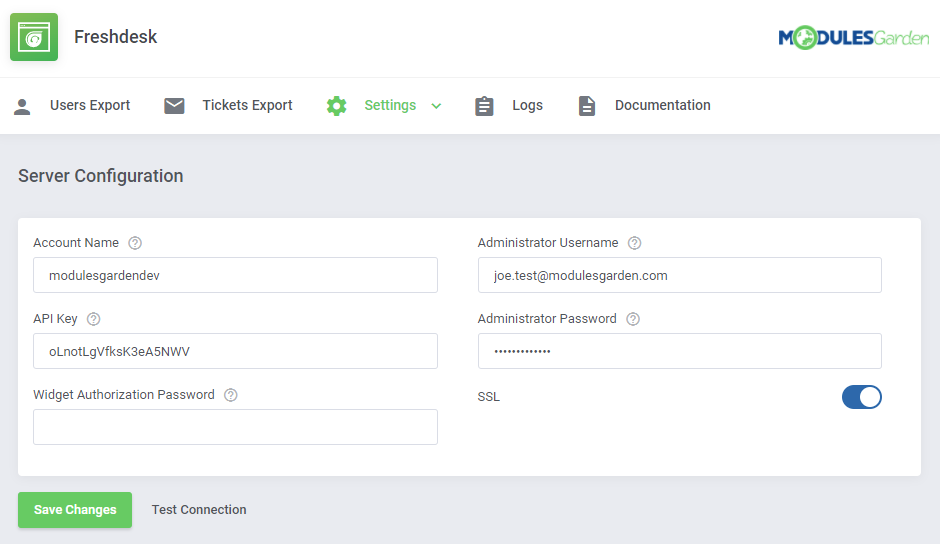
| Enter your Freshdesk details: Note: Please remember that in order to connect your WHMCS with the Freshdesk server you need to complete 'Administrator Username' and 'Administrator Password' or your 'API Key'.
Finally, test the connection and, if successful, save the changes. |
|
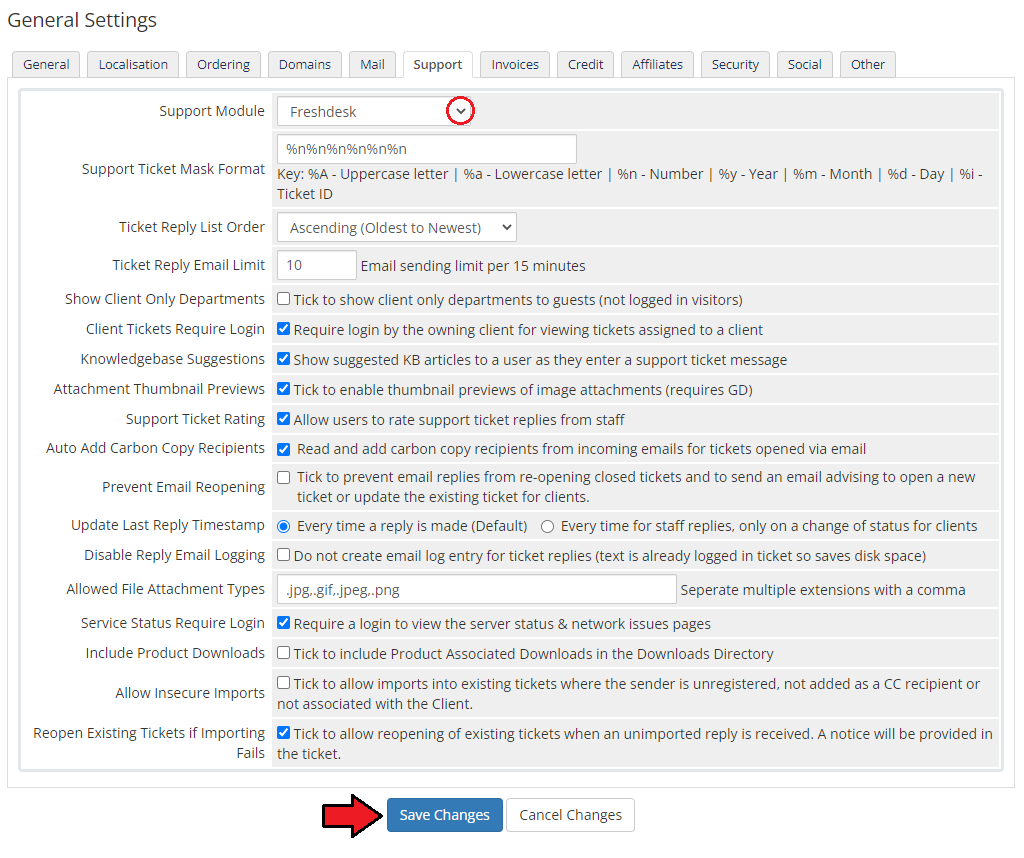
| Finally, move to 'System Settings' → 'General Settings' → 'Support' in your WHMCS. There choose the 'Freshdesk' support module from a dropdown menu and save the changes. |
|
| Good job! Now your WHMCS is connected with the Freshdesk support system. |
Freshdesk Customer Widget
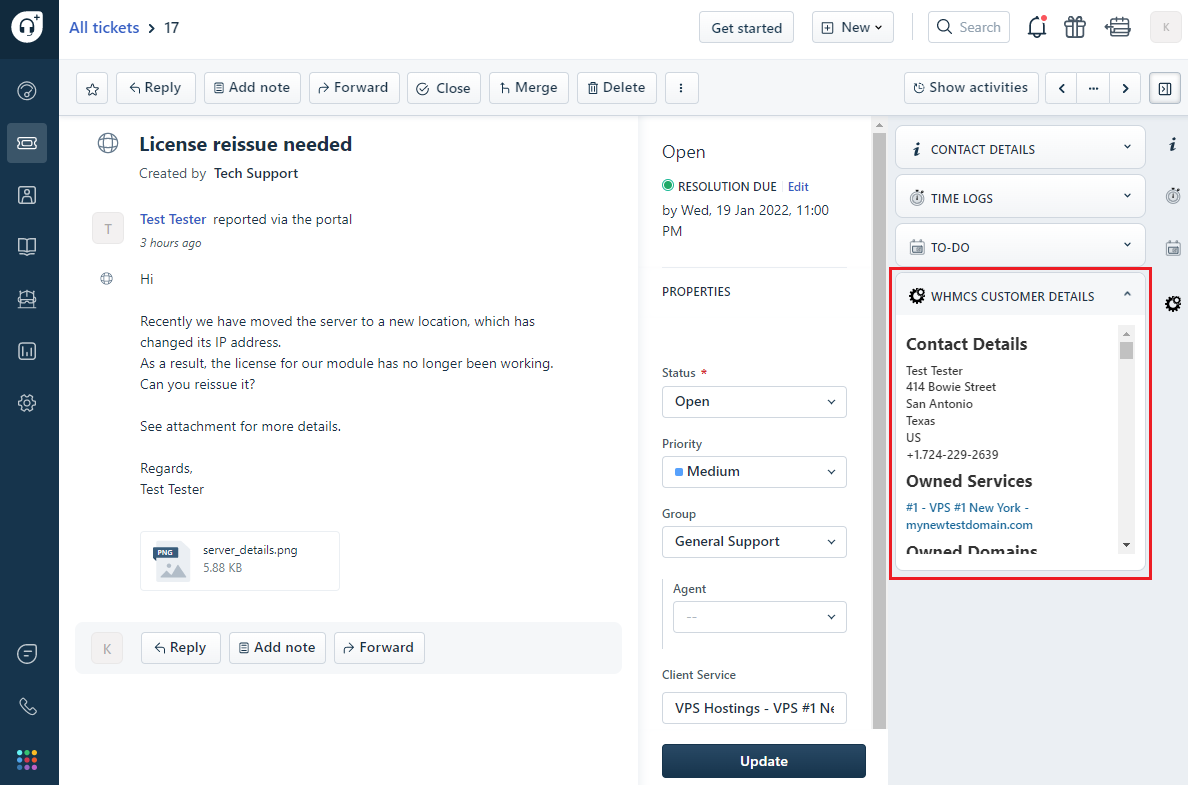
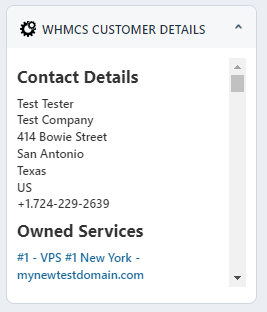
| Configuration of the Freshdesk Customer Widget is completely optional. If you do not aim to use this tool, simply skip it and move directly to the Management section. Freshdesk App Widget, once configured, allows to see customer's WHMCS data. The widget includes client contact details along with their owned products, domains, product addons and due invoices next to the created ticket in the Freshdesk panel, as shown in the picture below: |
|
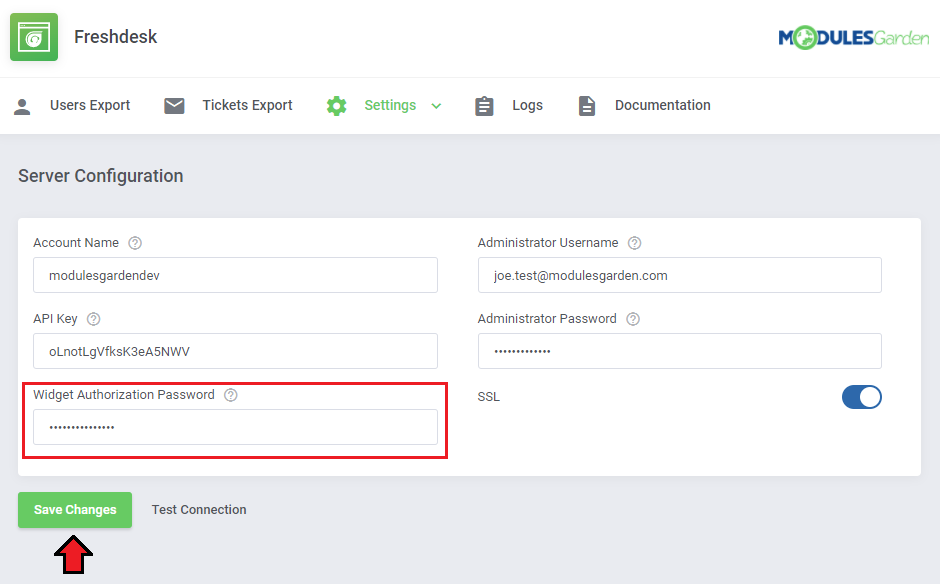
| In order to enable the widget, compete the following steps: Navigate to 'Addons' → 'Freshdesk' → 'Settings' → 'Server Settings' in your WHMCS. Find the 'Widget Authorization Password' field and enter your own password. |
|
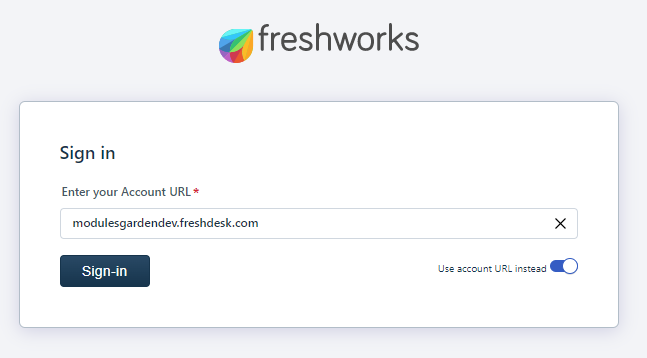
| Next, go to https://developers.freshdesk.com, click 'Log in as Developer' and sign on using your Freshdesk 'Organization URL' or 'Account URL' data. |
|
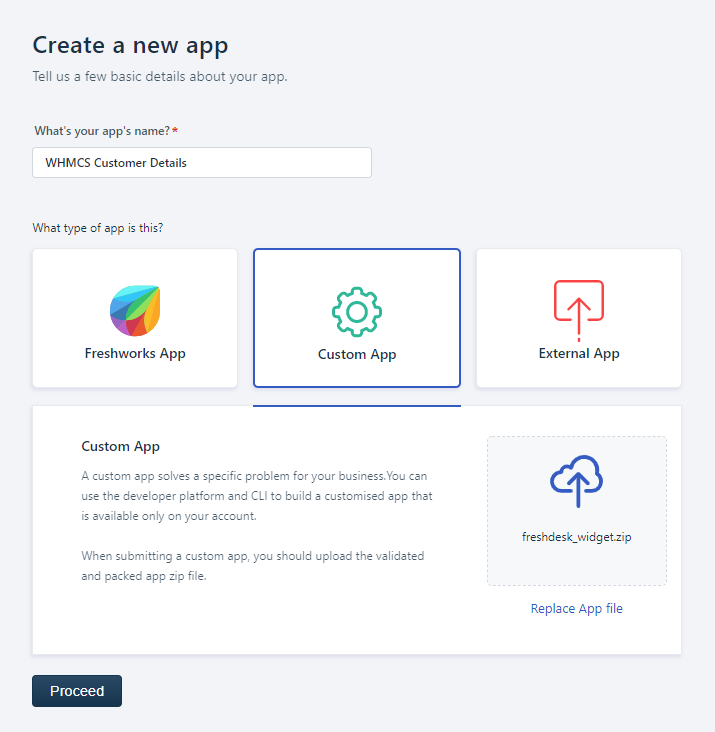
| After a successful sign-in, press the 'Create App'. Provide any app name, next choose 'Custom Apps' type and 'Upload App file' with the archive that you will find below. Download: Freshdesk Customer Widget 1.0.3 Proceed when you are ready. |
|
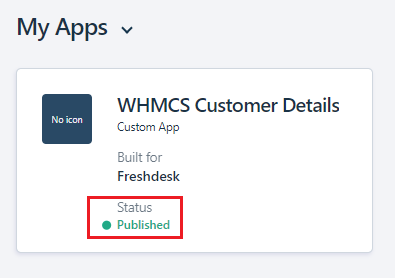
| Now, fill out the rest of the required fields and click 'Save and Publish'. After a few minutes (max 30), the app will be ready to run in your Freshdesk instance (the status must be 'Published' ). |
|
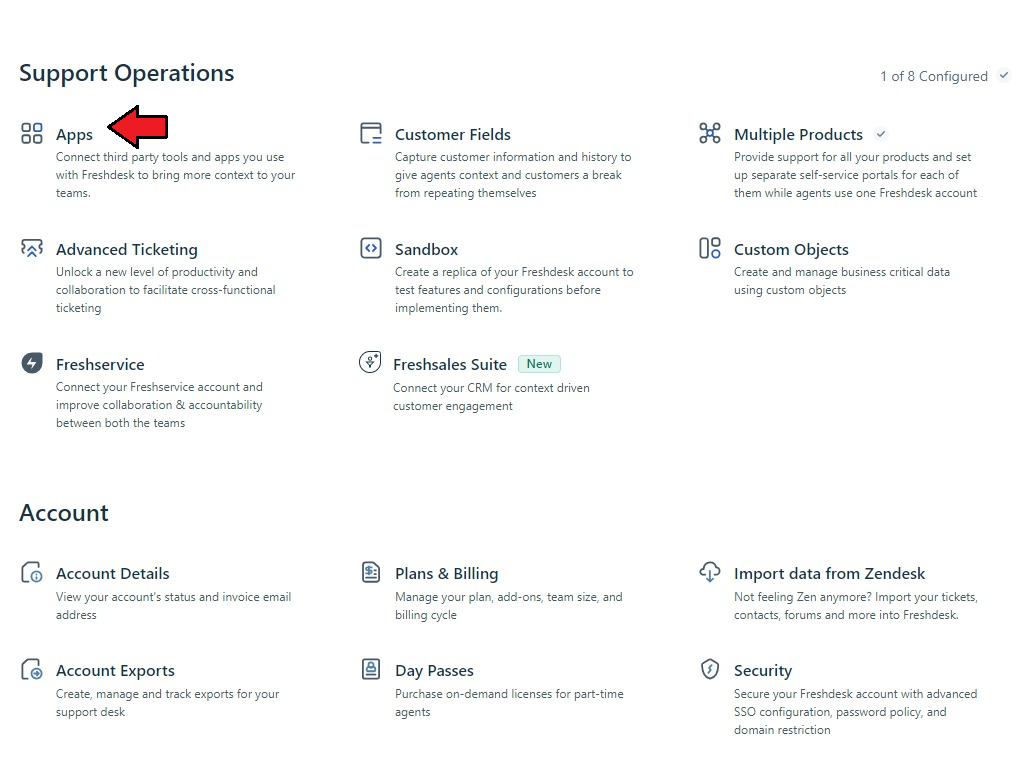
| Go to Freshdesk admin panel and click 'Admin' → 'Support Operations' → 'Apps' settings. |
|
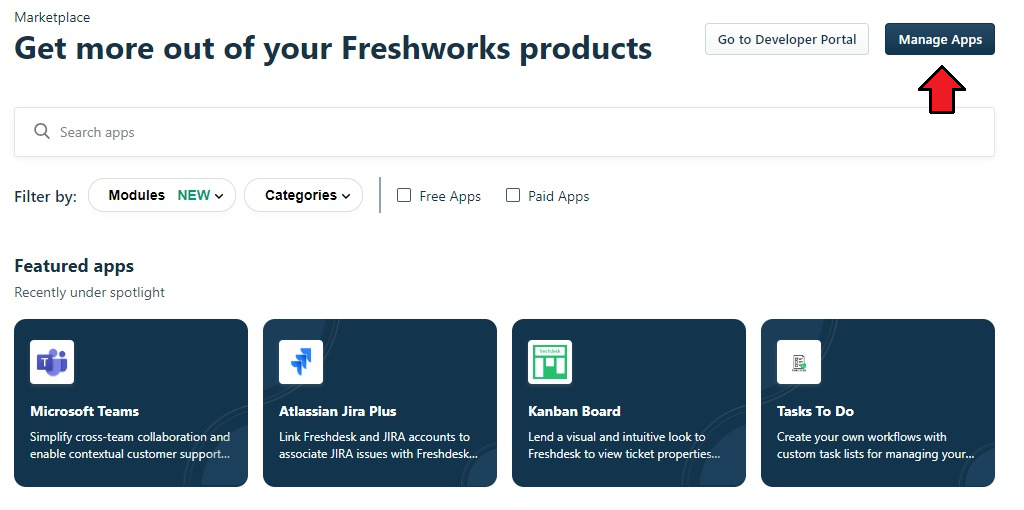
| Find the 'Manage Apps ' button located in the top right corner and click on it. |
|
| Choose 'Custom App' and press 'Install' next to the previously created app. |

|
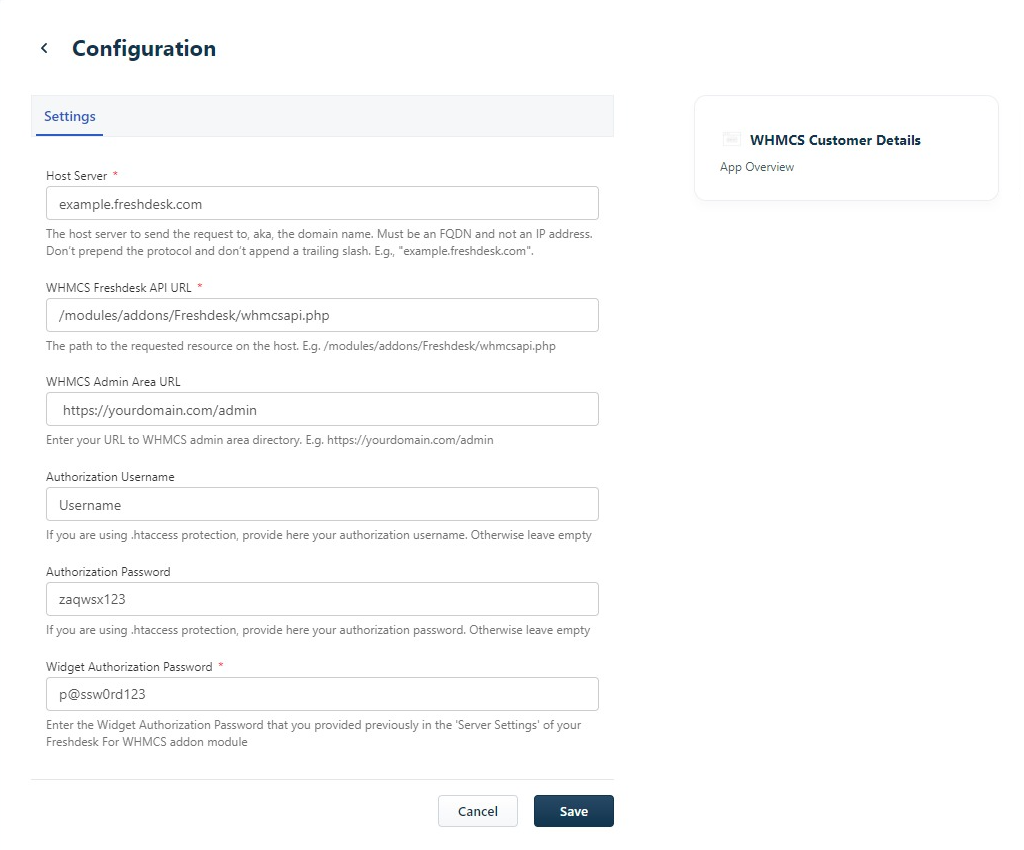
| Finally, fill out the fields according to the prompts so the application can connect to your WHMCS. |
|
| That's all. If all the provided data are correct, then, next time, when you open a WHMCS ticket from your Freshdesk account, you should see the customer details in the panel on the right. |
|
Management
| Once Freshdesk For WHMCS is installed and the connection is configured, you can create/update your ticket departments and begin using them. Each ticket department you create in Freshdesk will be available for your customers in WHMCS client area. |
Settings
WHMCS
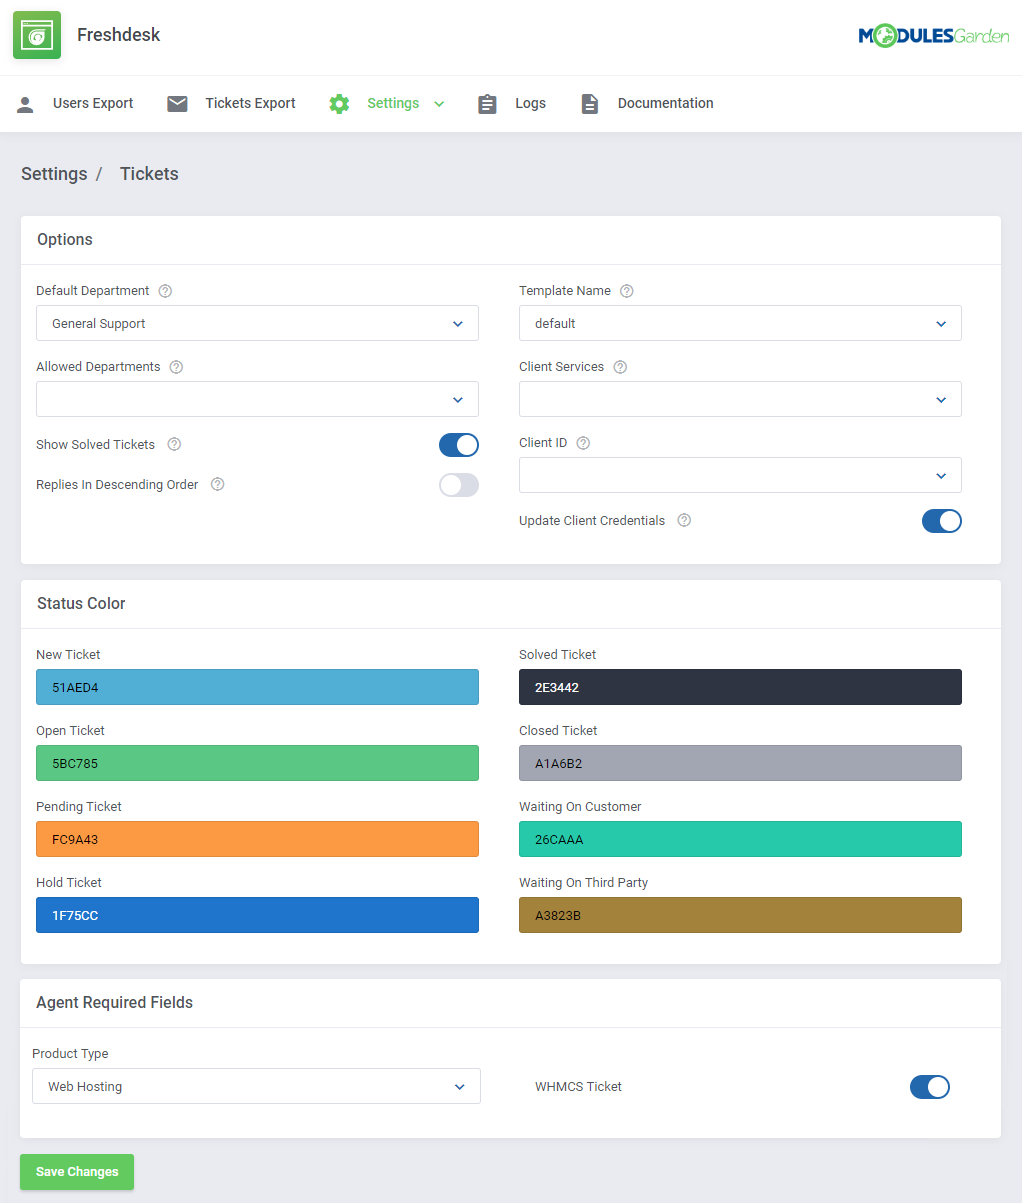
| Before you start your actual work on support tickets with Freshdesk For WHMCS, move again to 'Addons' → 'Freshdesk' → 'Settings' → 'Ticket Settings'. This section of the addon allows an easy and comfortable management of the way tickets are displayed in your client area, their visibility, sorting etc. |
|
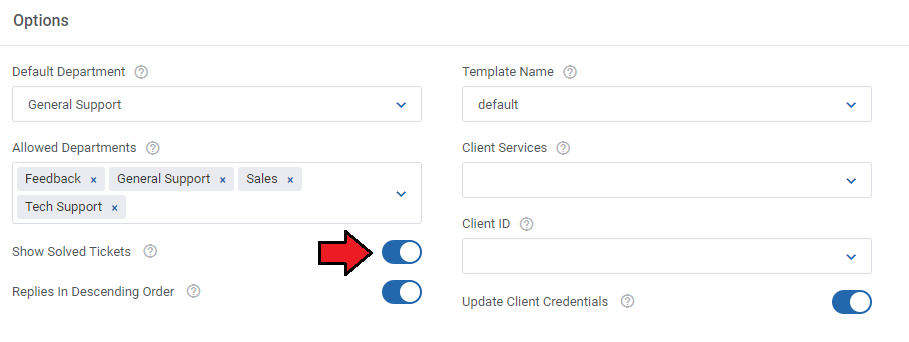
| In the first box 'Options', you may enable some basic settings that will be applied to tickets view in the client area. Let's now discuss their functionality in details:
|
|
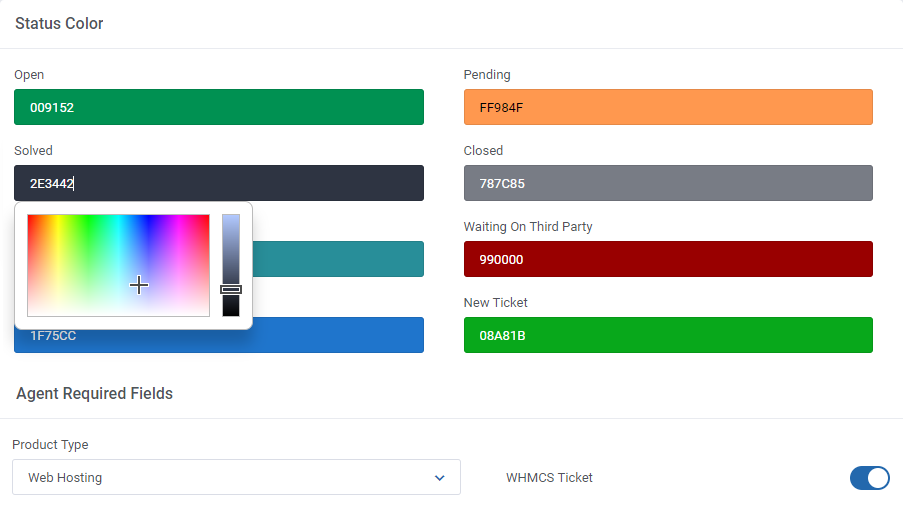
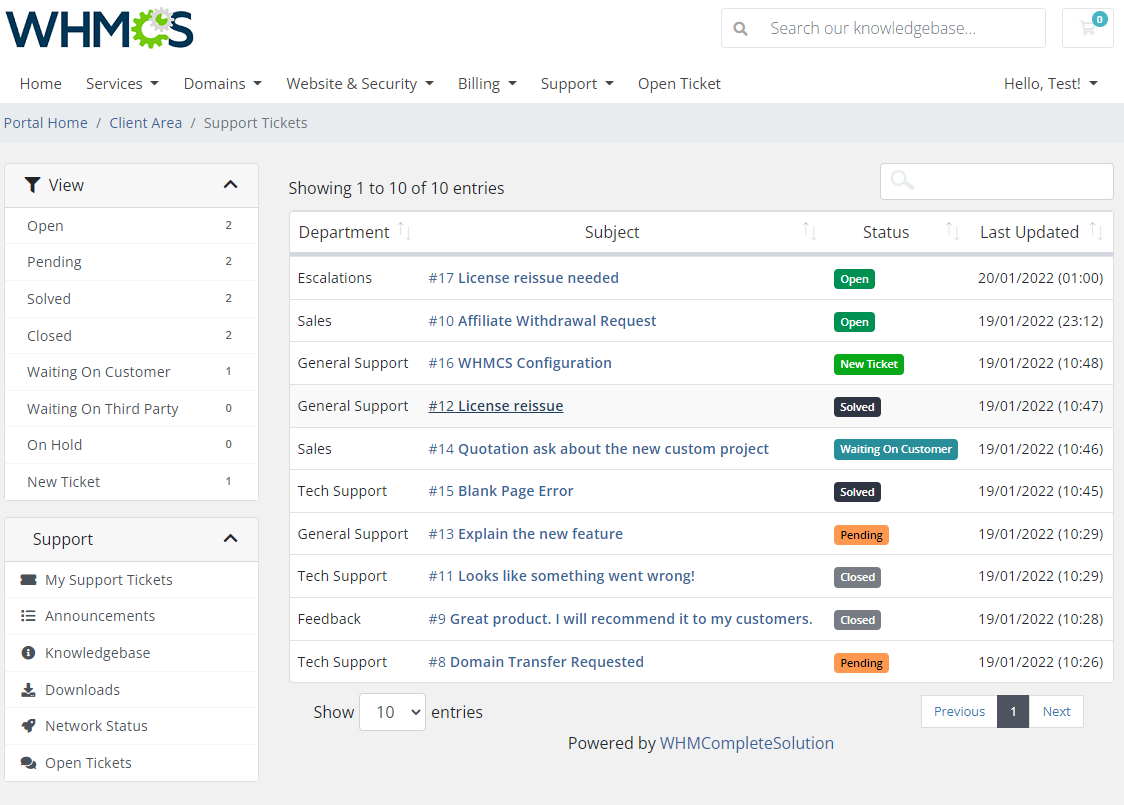
| Under the 'Options' box you will find a section where you can assign some colors to a specific ticket status. Click on the field to choose a color from the palette of colors or type in the number of the color you like. |
|
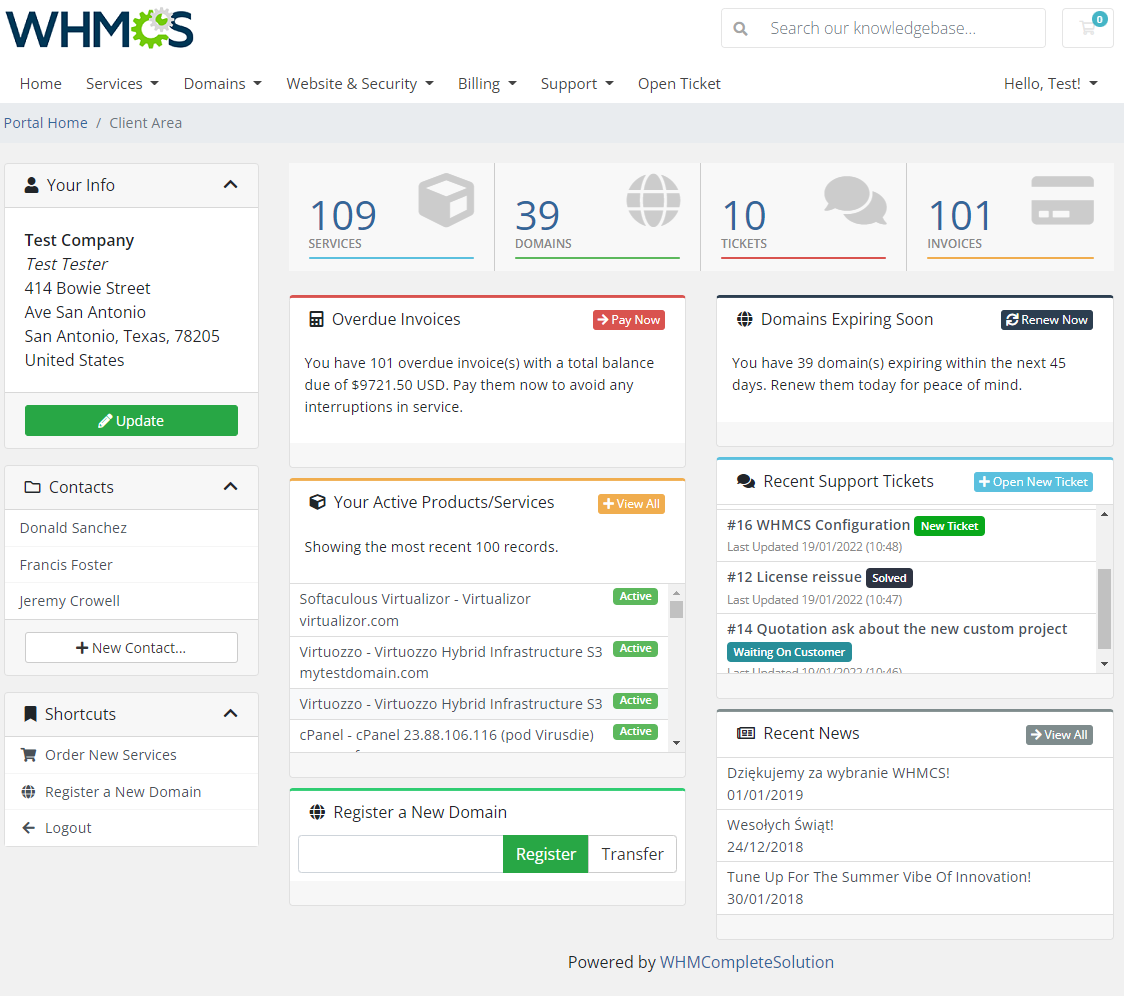
| Tickets of each status are now marked with the selected colors on homepage: |
|
| Tickets history in the client area: |
|
Freshdesk Client Fields
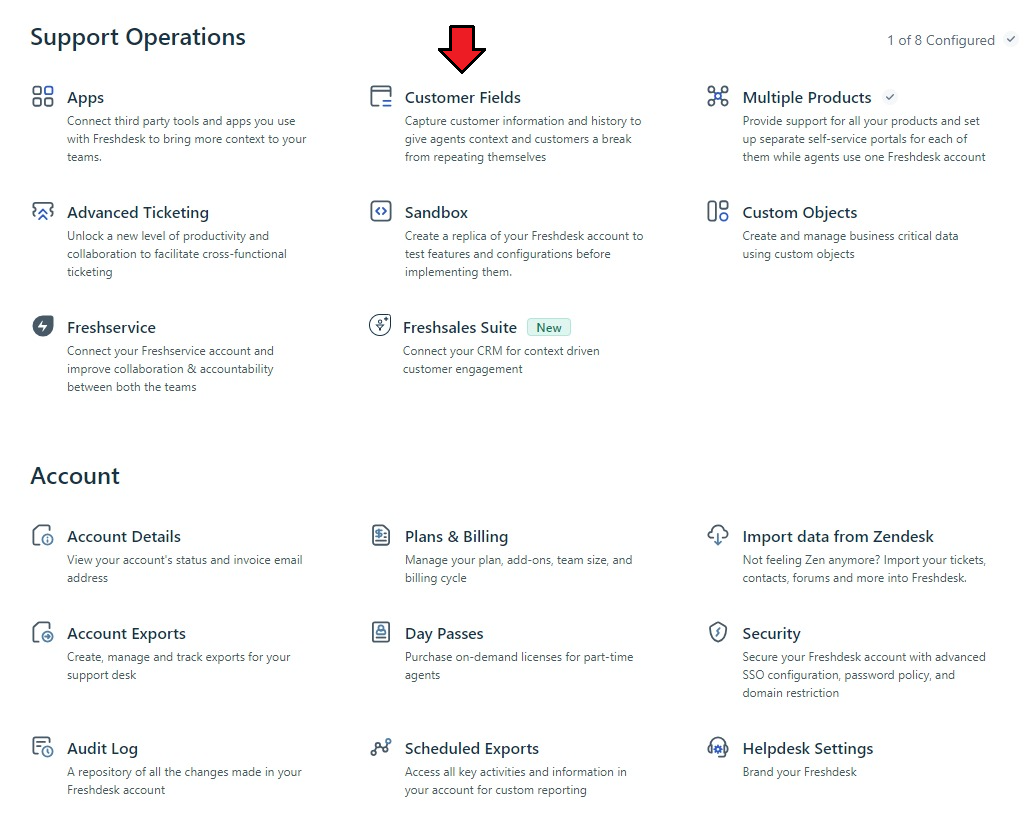
| Freshdesk For WHMCS module allows the management of 'Customer Fields' created in the panel.
Move to 'Freshdesk' → 'Admin' → 'Support Operations' → 'Customer Fields'. On this site you can edit existing or add new custom fields to add any data on the client in their profile. |
|
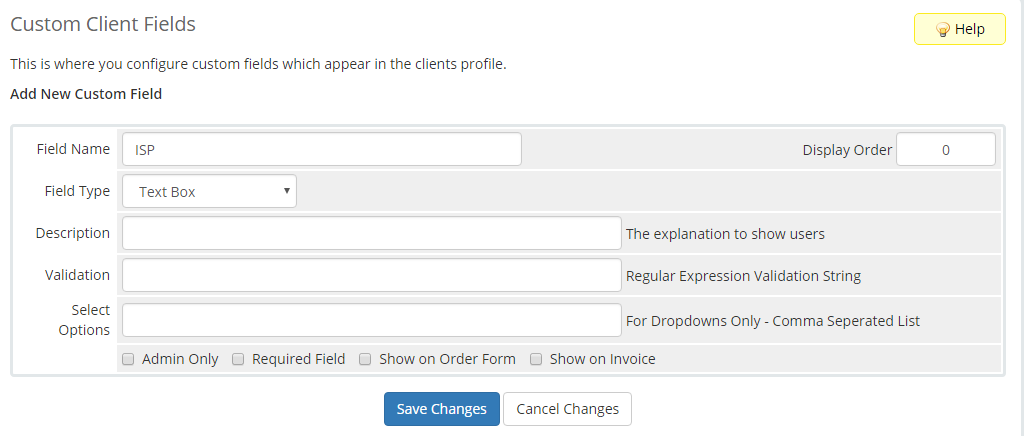
| Once ready, you will need to move to your 'WHMCS' → 'System Settings' → 'Custom Client Fields' where a corresponding field shall be created. |
|
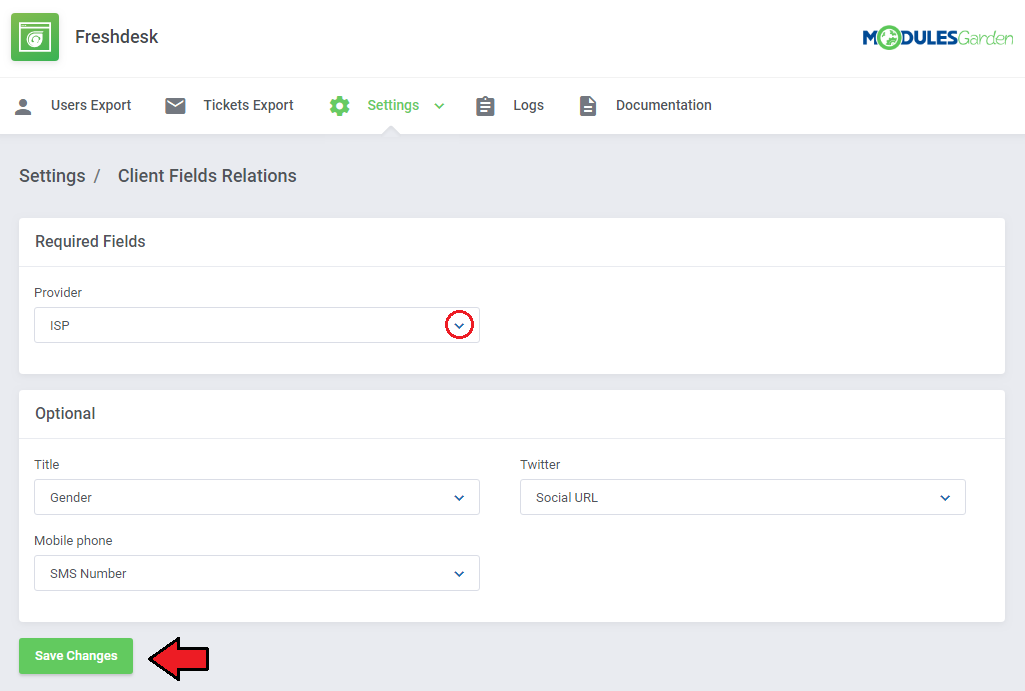
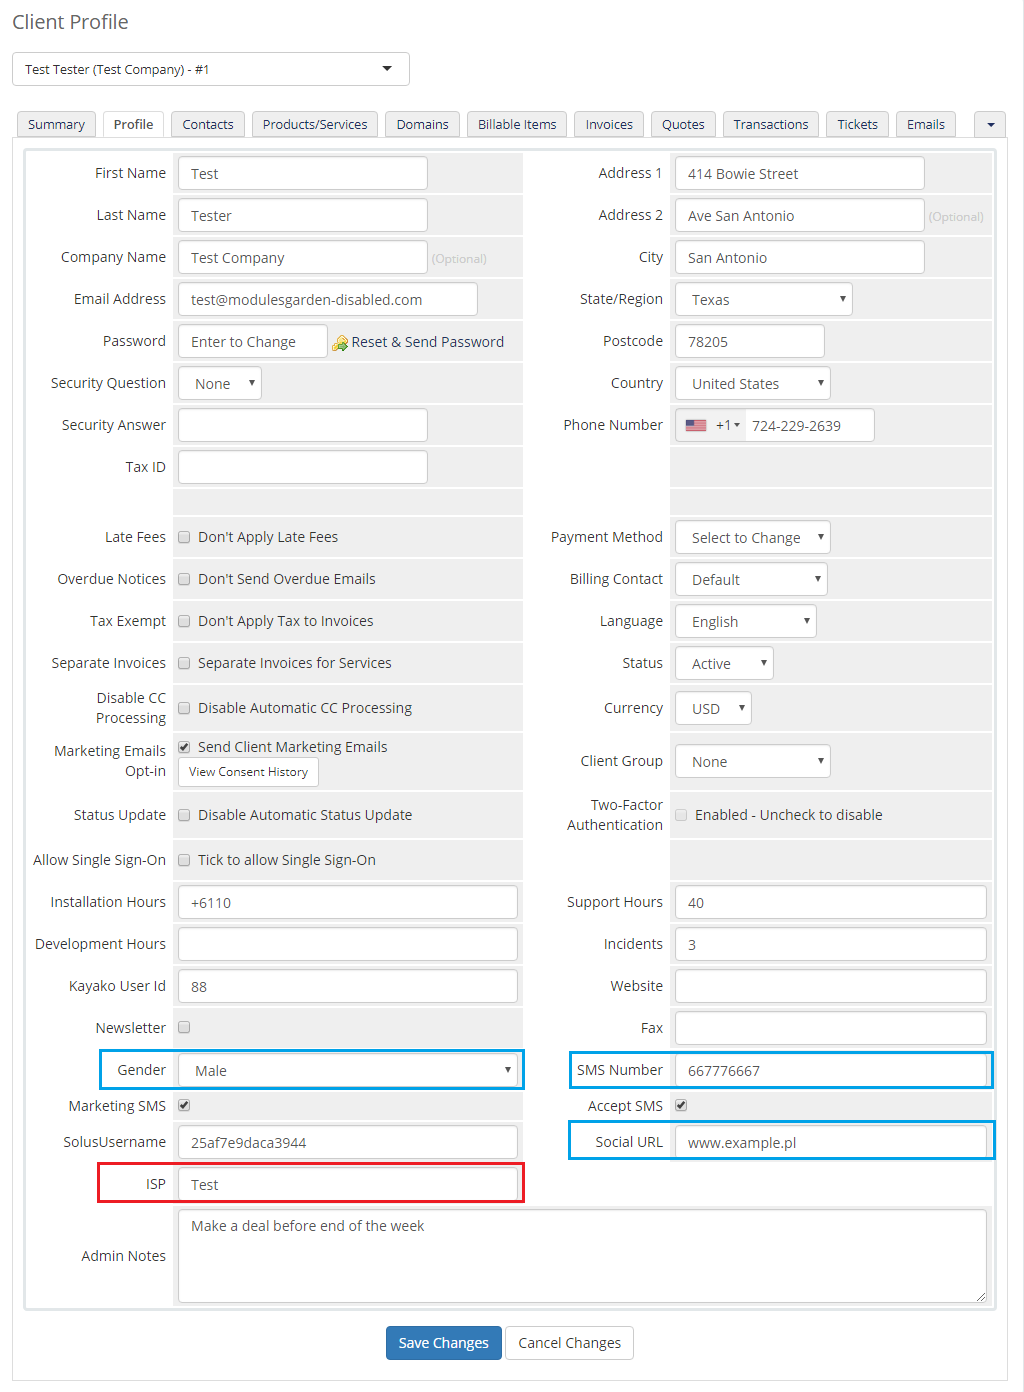
| Then, move again to the addon 'Settings' → 'Client Fields Relations' to define the relations between the Freshdesk fields and the ones you have in your WHMCS. Select from the list of corresponding fields, that will be visible in the client's profile. |
|
| Fields from the 'Required' section (marked in red) must be filled in to export the user to Freshdesk successfully. If left empty, error will occur and export fail. Adequately, optional fields (marked in blue) may be left empty to proceed with the export. |
|
Freshdesk Ticket Forms
Custom Ticket Forms
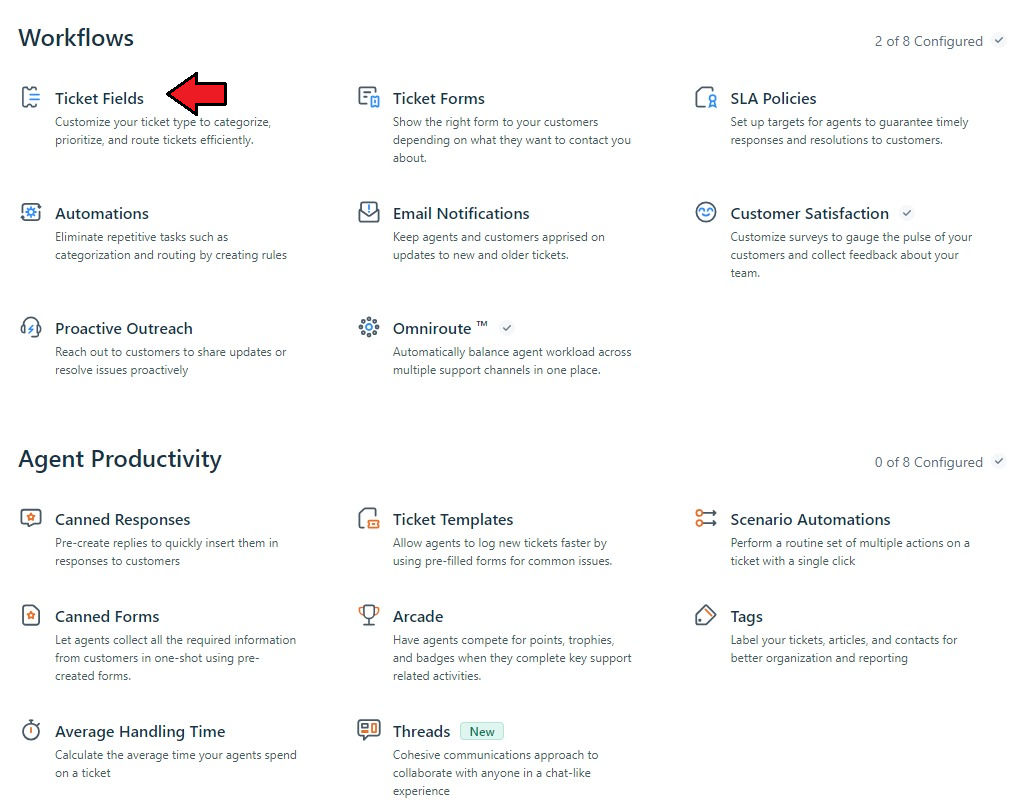
| You can also manage ticket forms, by adding fully editable Custom Fields that are available in WHMCS on a new ticket form, directly in Freshdesk. Move to 'Freshdesk' → 'Admin' → 'Workflows' → 'Ticket Forms'. There follow the Freshdesk instructions to edit or add new custom fields to collect the data when a client submits a ticket. |
|
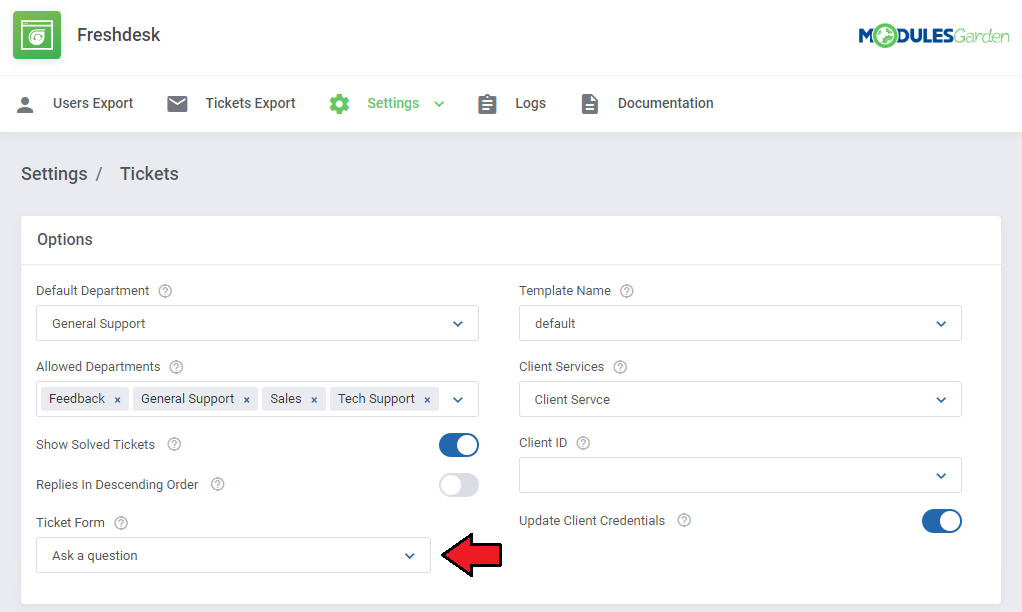
| You can select the ticket forms in the 'Ticket Settings'. |
|
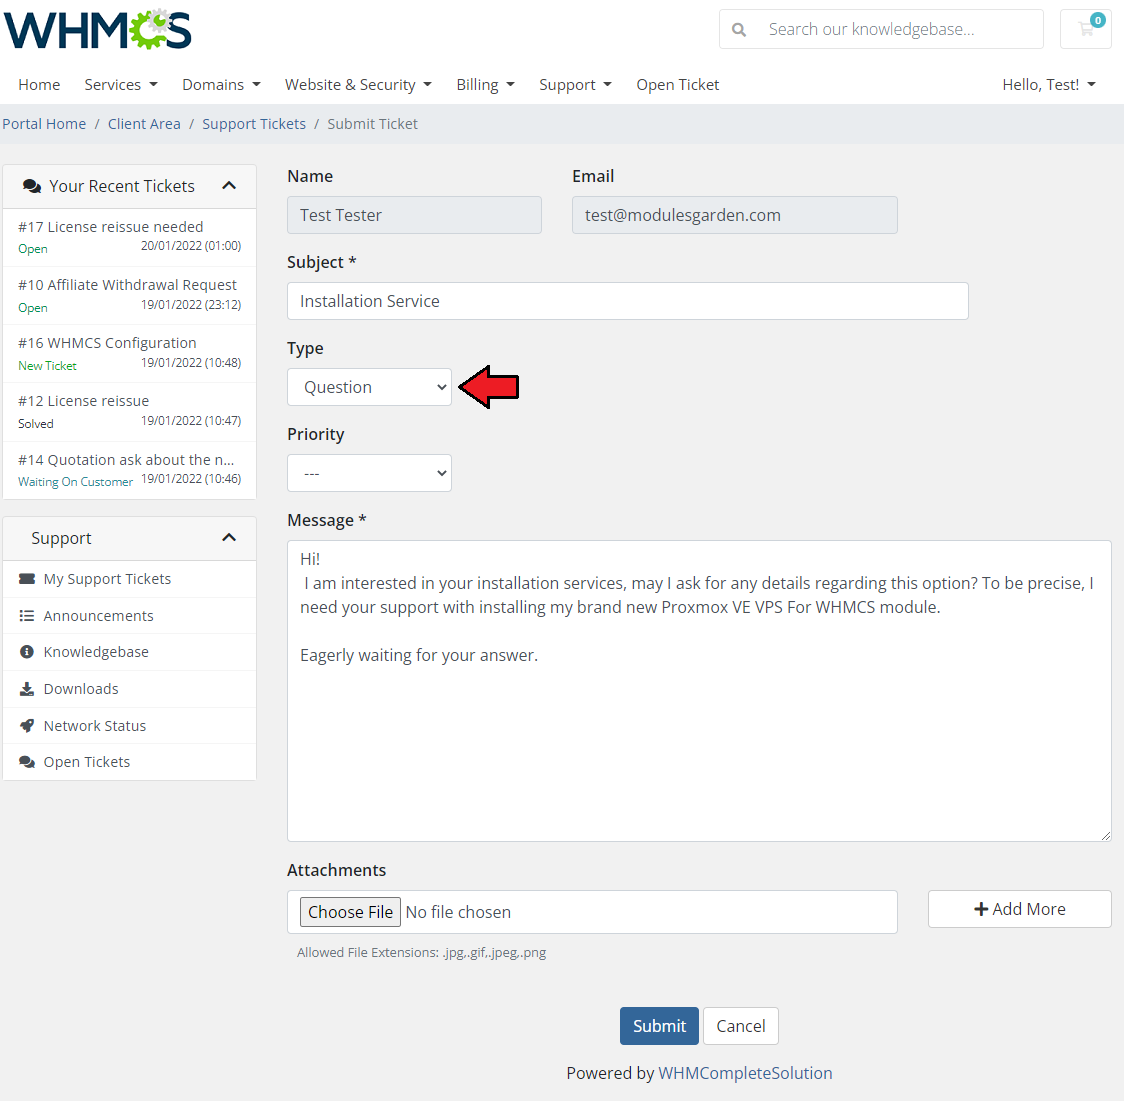
| Once you have configured your ticket forms, they will automatically be added and visible in the ticket view in WHMCS client area. Note: Custom fields with the 'Default' label will not be visible, you will have to create additional custom fields if you want to include them. 'Dependent Fields' will not be visible either. |
|
Client Services
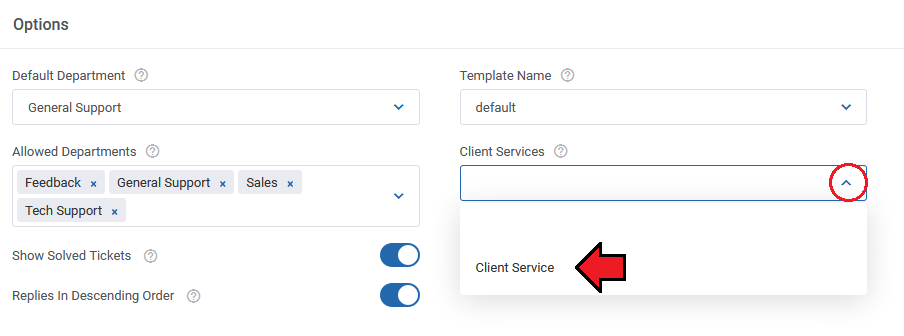
| It is possible to use one of the created in Freshdesk panel custom fields as a dropdown to select an owned product that a client may assign to a just created ticket. Go back to WHMCS addon → 'Ticket Settings', where you can instantly select it under the 'Client Services' dropdown. |
|
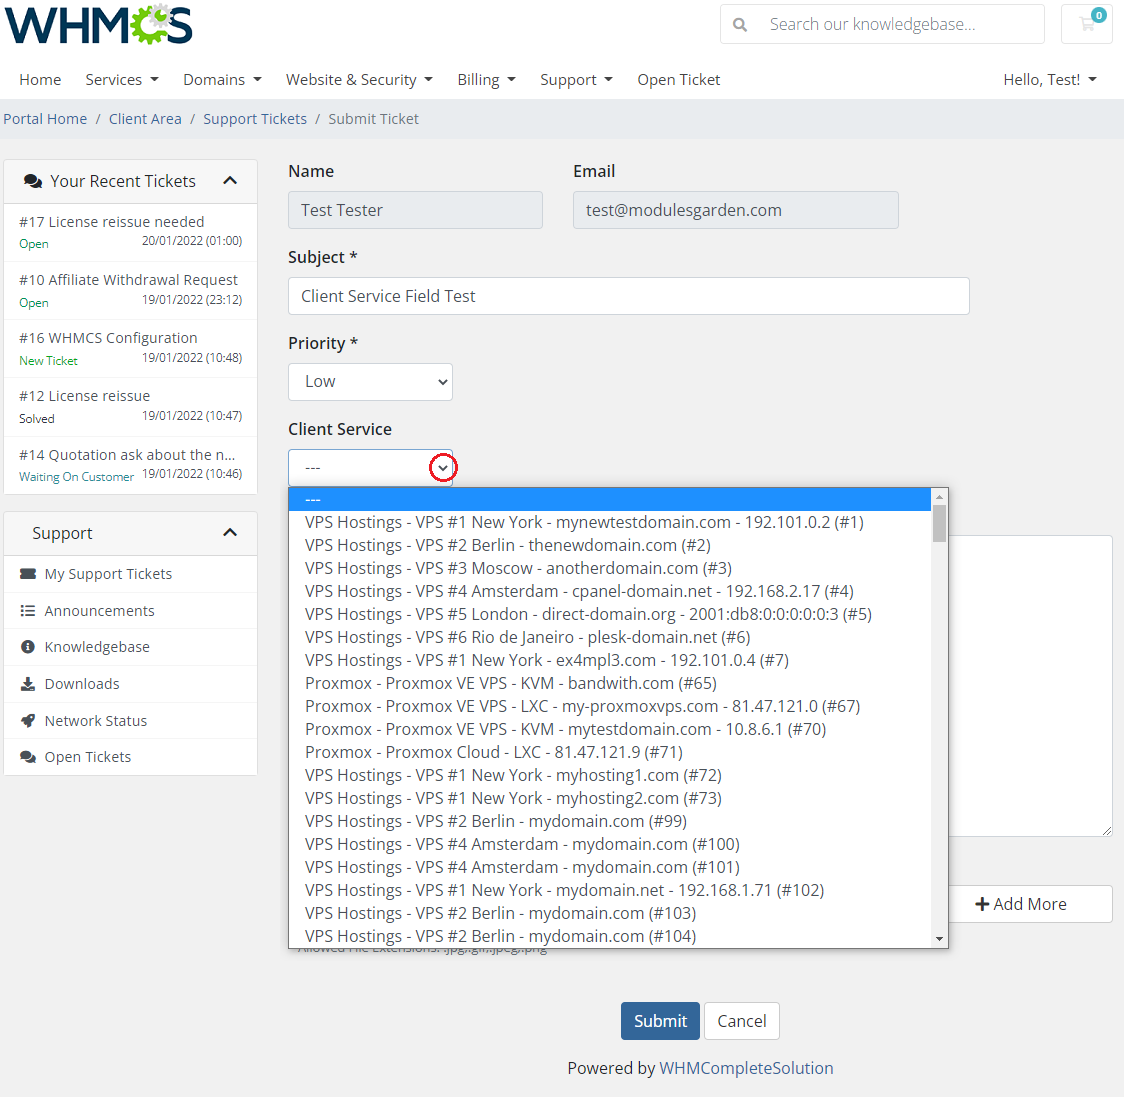
| As you can see on the screen below, a new field, which may help to draw the Administrator's attention to a specific client's service appeared in WHMCS client area. Edit/add ticket fields to adjust the ticket form perfectly to your needs. |
|
Custom Ticket Statuses
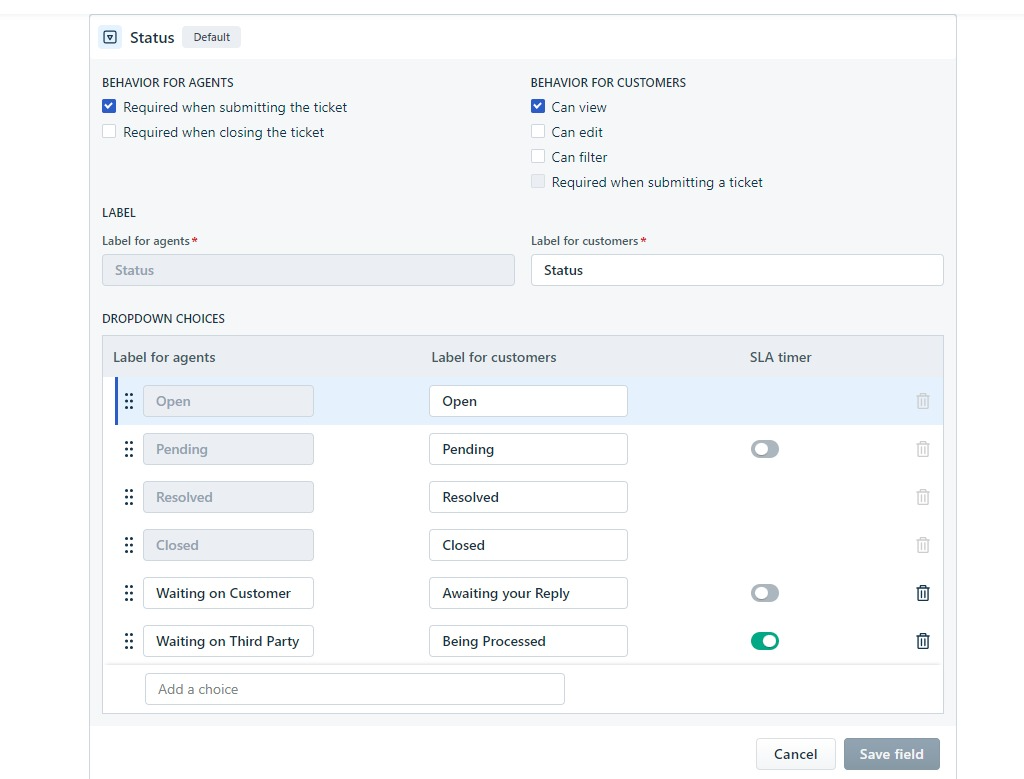
| You can also manage custom ticket statuses used in Freshdesk panel. Move again to 'Freshdesk' → 'Admin' → 'Workflows' → 'Ticket Fields' → 'Status' to add new or modify existing ticket statuses. |
|
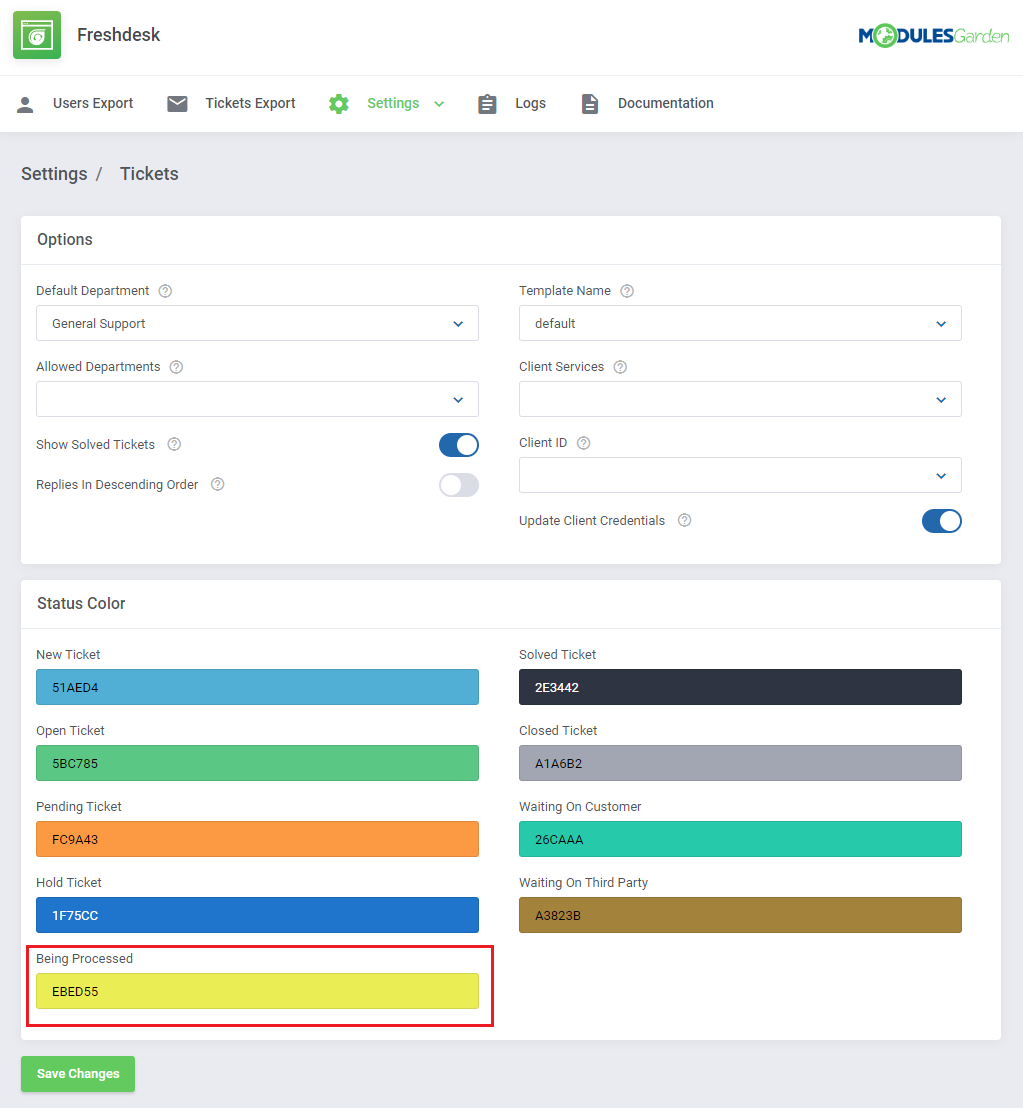
| Once you have configured your ticket statuses on the Freshdesk panel side, go back to WHMCS addon → 'Ticket Settings', where you can see them among other default statuses. Select colors for them. |
|
| The custom statuses are visible in the client area with names typed in the panel in the 'For Customers' field. However, it is possible to alter or translate the Fresdesk custom statuses names. Open the used language file located in /your_WHMCS/moduels/addons/Freshdesk/langs/ directory and add new lines at the very bottom. Exemplary lines to add: $_LANG['addonCA']['FreshdeskCustomStatusName'] = "Your translation visible in WHMCS Client Area"; $_LANG['addonCA']['Being Processed'] = "In lavorazione"; |
Export
| Our module allows to export data gathered in your WHMCS, more specifically, all the users and tickets generated before the installation of the product. Read the below points to learn what data can be synchronized with Freshdesk and what are the possible means of such synchronizations. |
Users
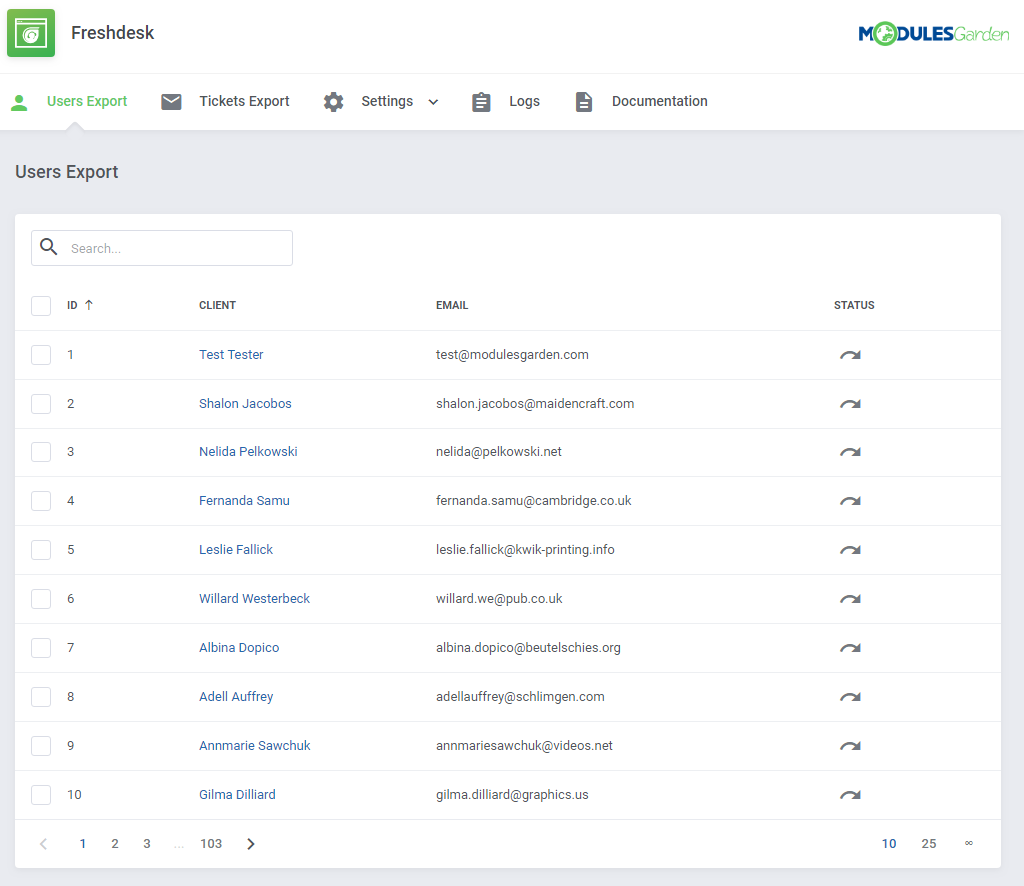
| The first option offered by our module is the export of users from WHMCS to Freshdesk, proceed to 'Users Export'. You will see here a list of all users who exist in your WHMCS and have not been synchronized with Freshdesk yet. |
|
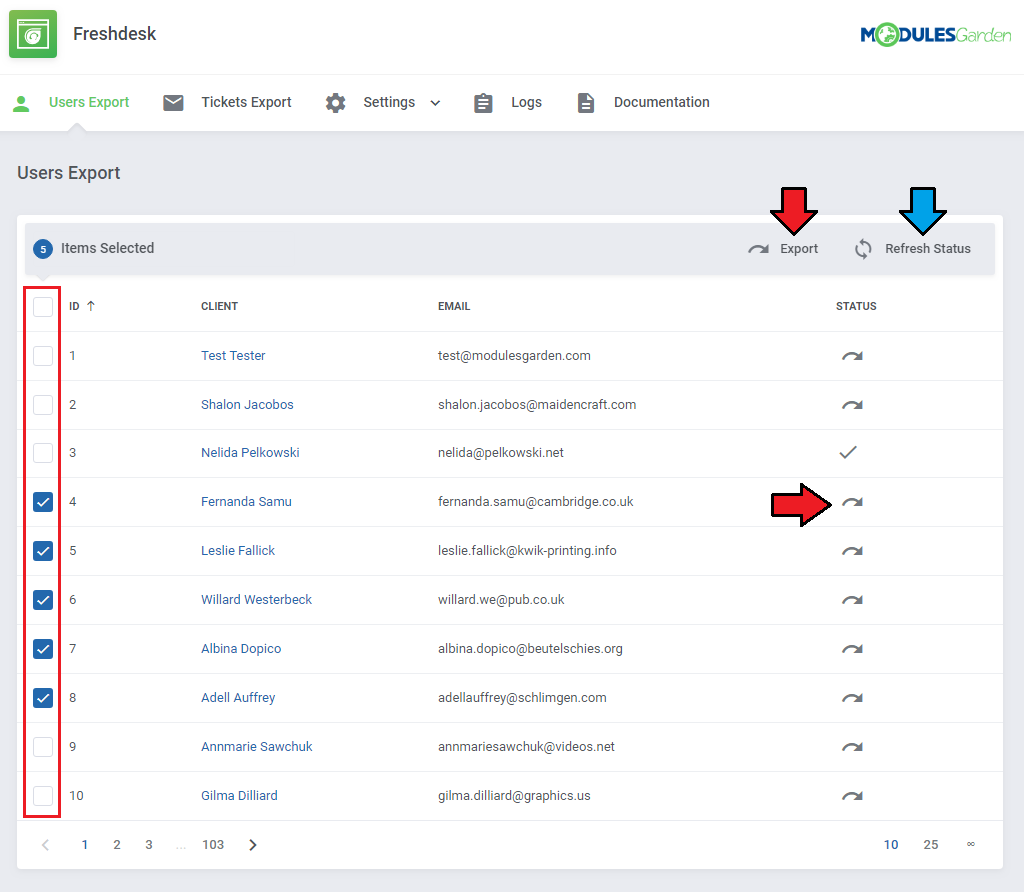
| Now, you can manually export all of the users available on the list or choose only some of them. Check the boxes next to the users you are going to export and press the 'Export' button, marked with the red arrow on the screen. |
|
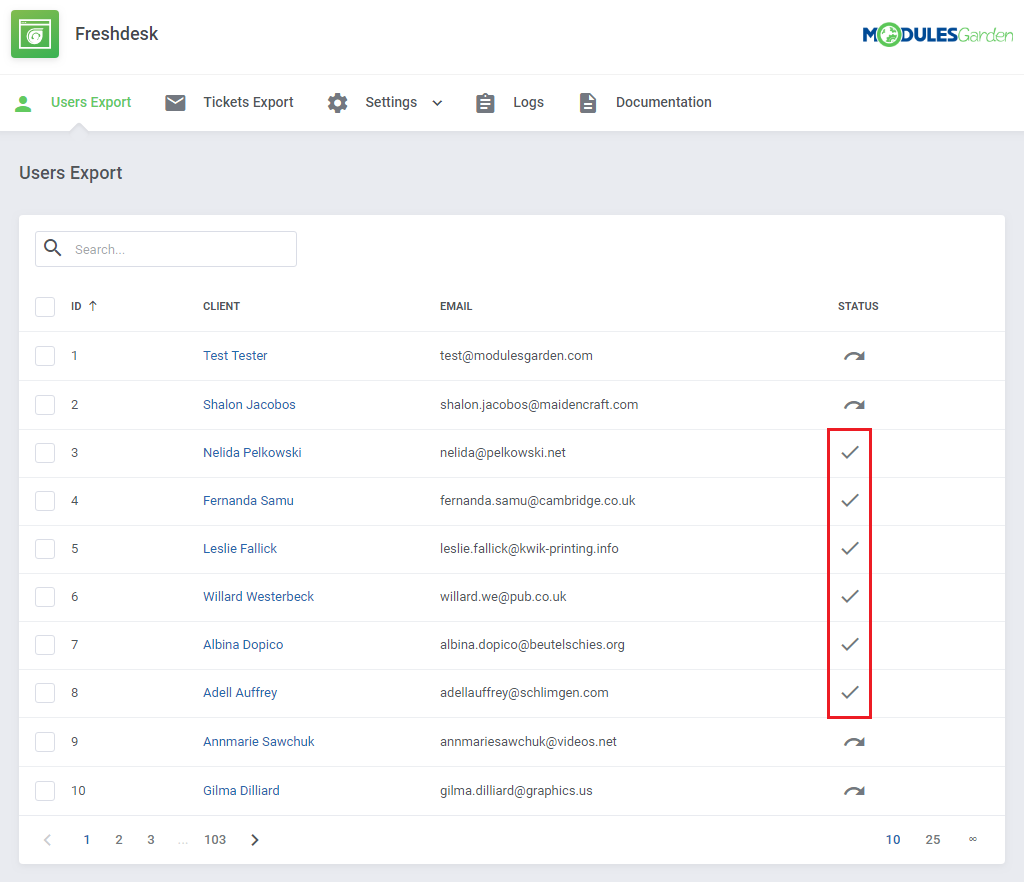
| After confirming your choice, the selected user should be exported from WHMCS to Freshdesk, and their 'Status' field will become modified as well. All users newly added to WHMCS will be automatically synchronized with Freshdesk. Note: The email of the WHMCS user cannot be already used for an account in Freshdesk, or the export process will fail. |
|
Tickets
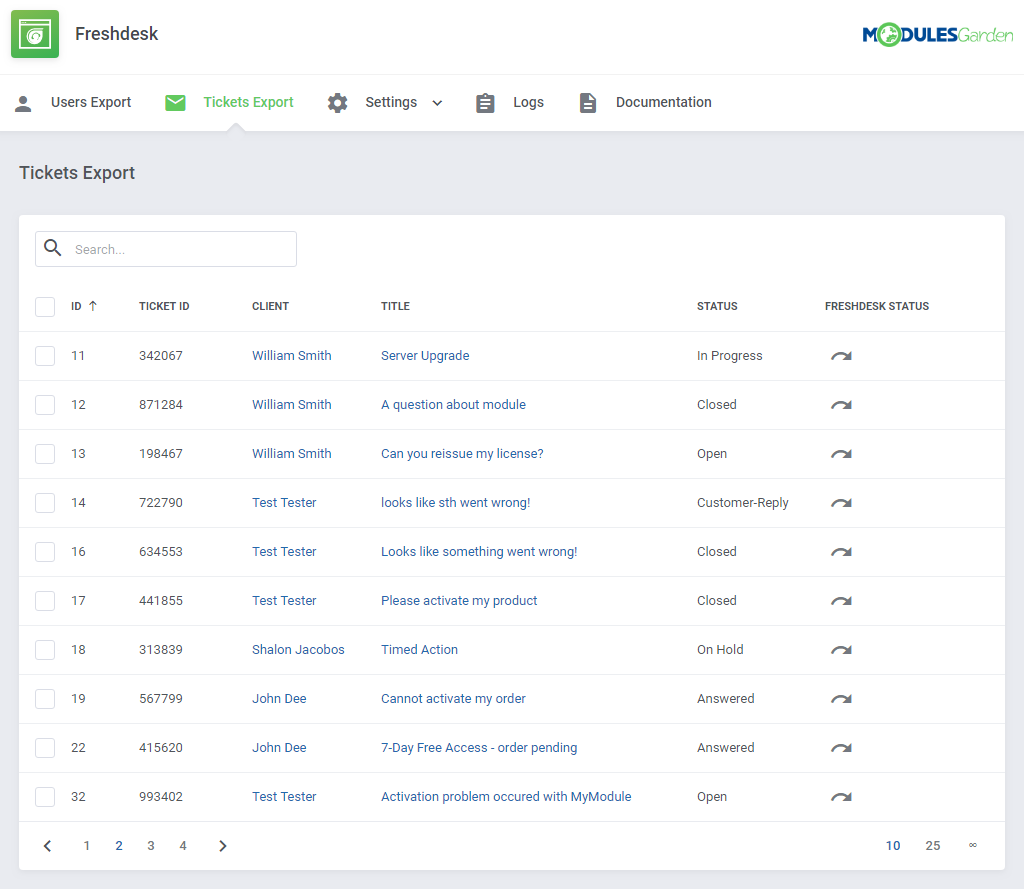
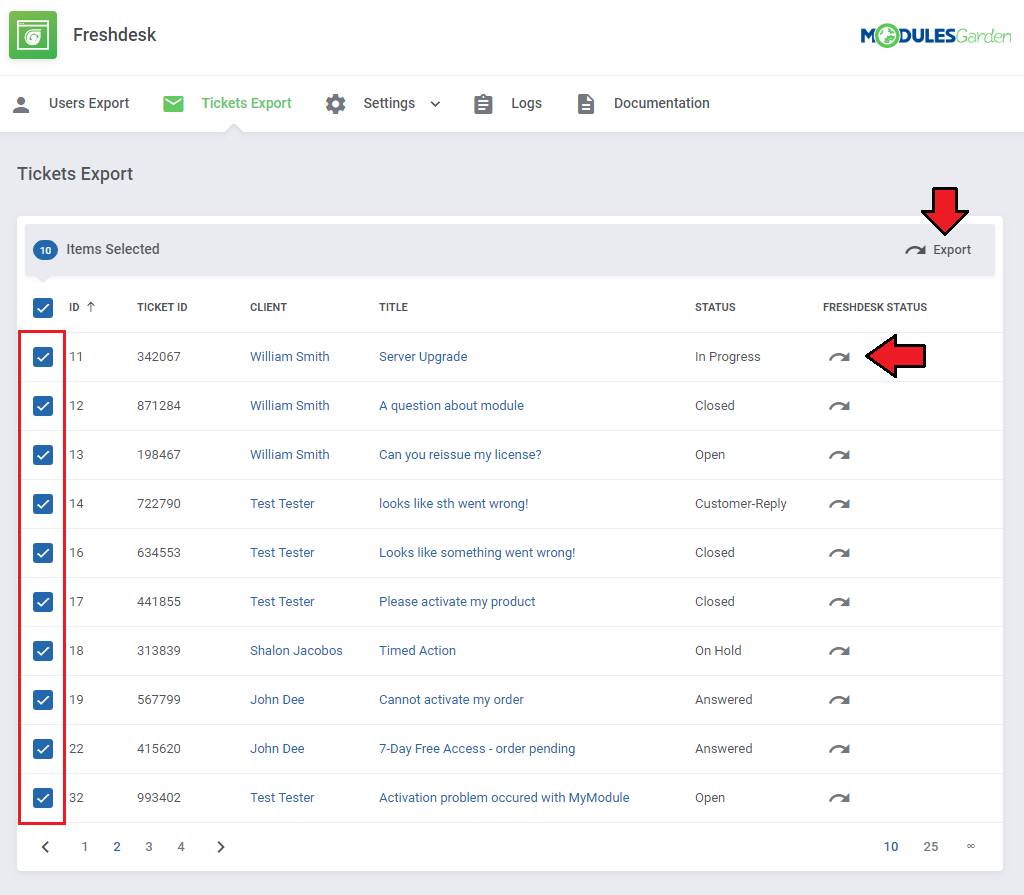
| The next option offered by our module is the export of tickets from WHMCS to Freshdesk, proceed to 'Tickets Export'. You will see here a list of all tickets which exist in your WHMCS and have not been synchronized with Freshdesk yet. |
|
| Now, you can manually export all of the tickets available on the list or choose only some of them. Check boxes next to the tickets you are going to export and press the 'Export' button as marked on the screen. |
|
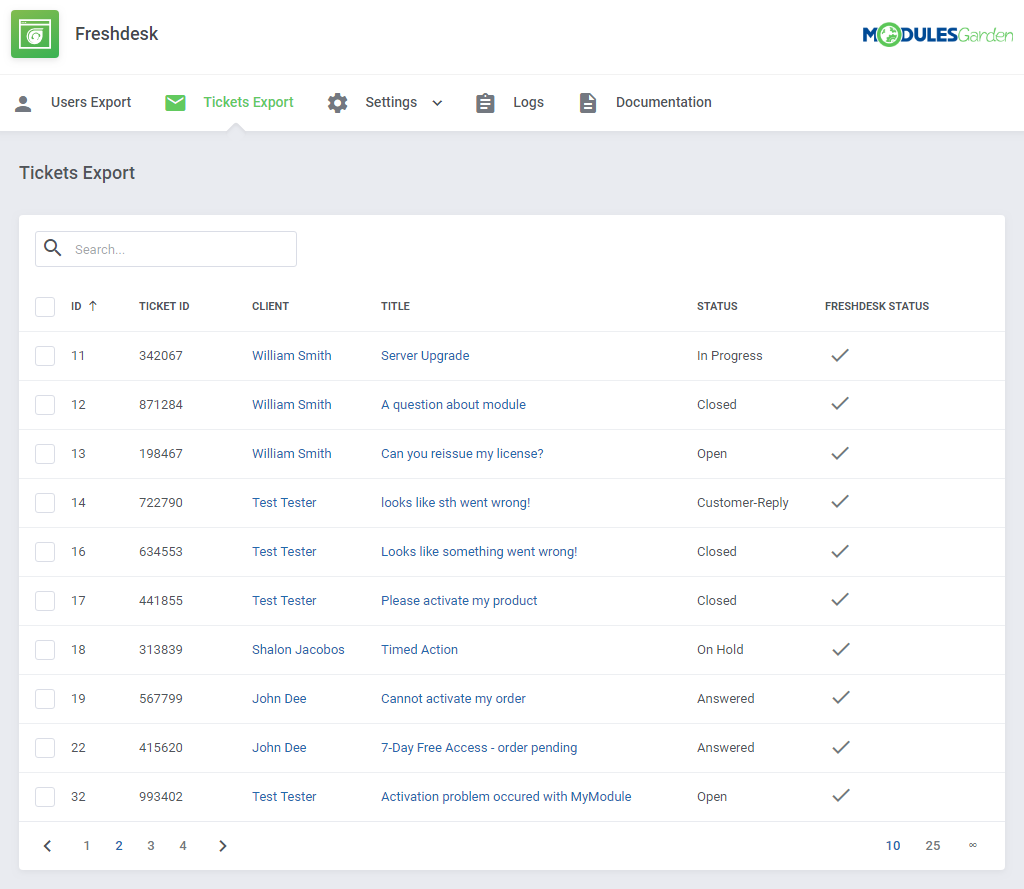
| If a ticket has already been exported from WHMCS to Freshdesk, they will have a different Freshdesk Status visible on the list. All tickets newly created to WHMCS will be automatically synchronized with Freshdesk. |
|
| Is is also possible to export tickets using a CLI cron command, which can be useful when you need to export a greater number of tickets created within the selected date range. Underneath you can see a command that must be executed from you CLI to start such export. Please remember to adjust the date rage located at the end of the command to your personal needs first! php /yourWHMCS/modules/addons/Freshdesk/cron/cron.php ExportTicket 2022-01-01 2022-12-31 Important: Keep in mind that the provided dates at the end of the command (in the above example these are: 2022-01-01 2022-12-31) are exemplary. Note: Keep in mind that exporting too many tickets at once can cause issues with running out of API calls per minute, that you have available in your Freshdesk plan. |

|
Support Tickets
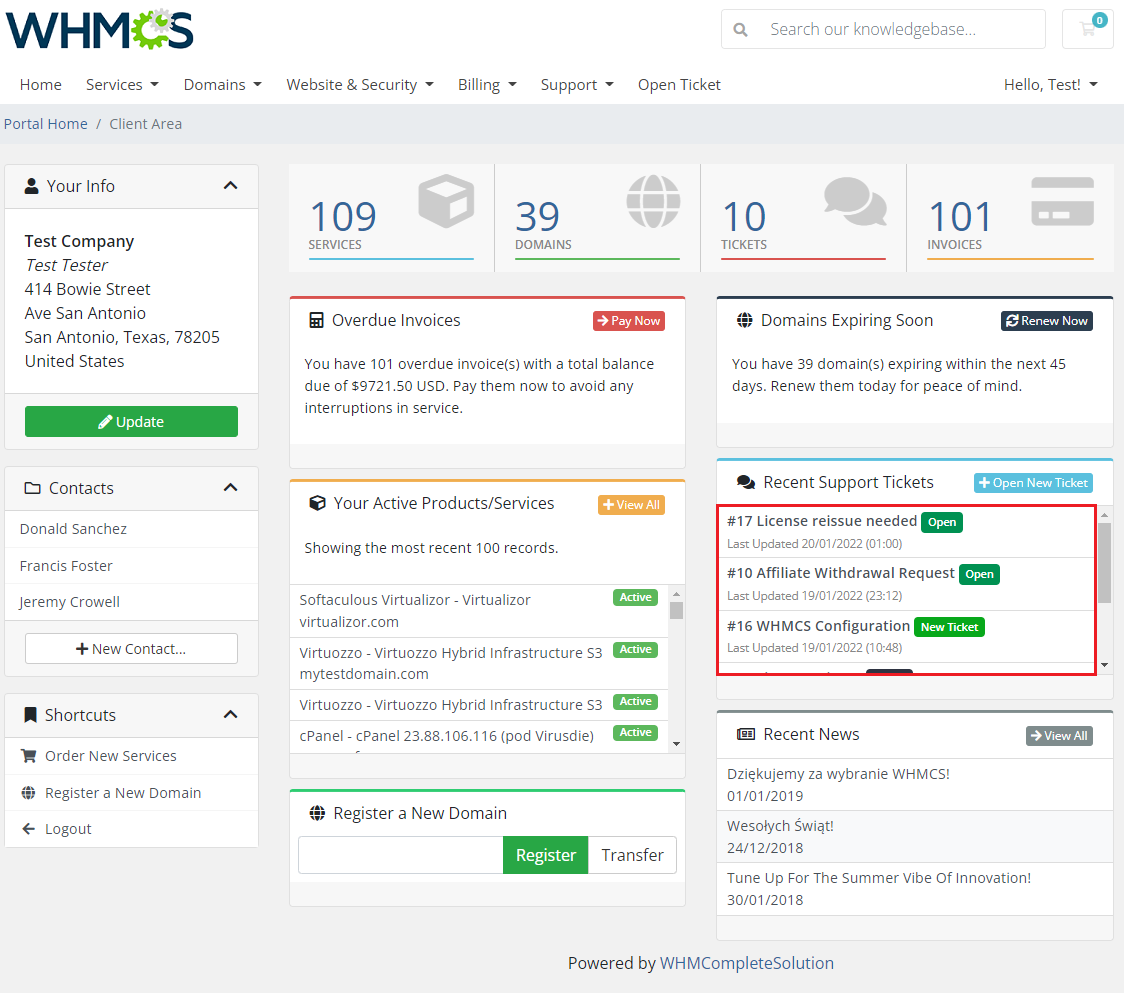
| Move to your client area. There, on your homepage, is the 'Recent Support Tickets' box. You will find the latest tickets available in your system. The visible tickets are marked with colors related to their current status. |
|
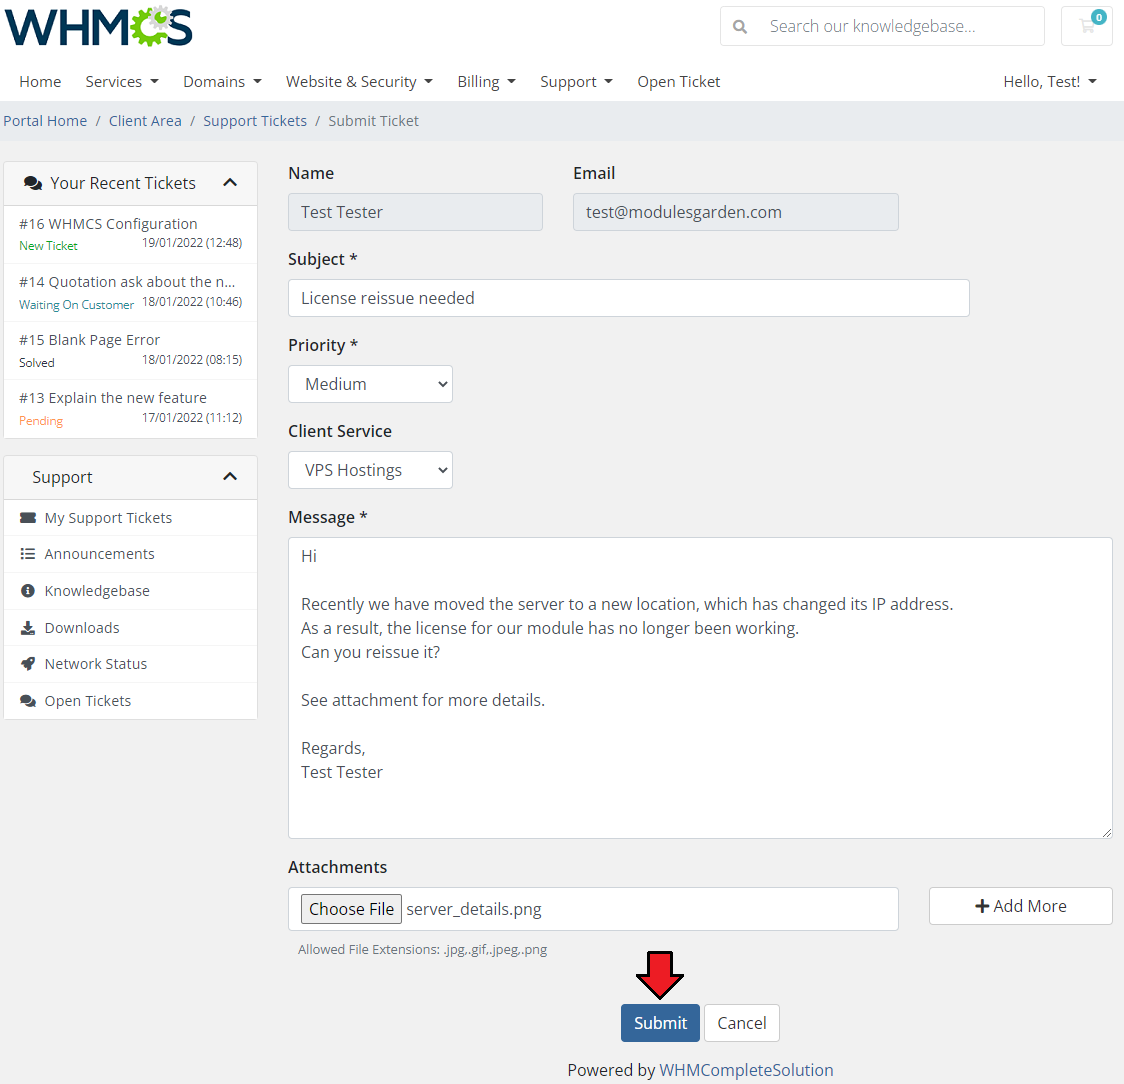
| Now, we will create a ticket message to show the flow. Just like in case of a standard WHMCS support ticket, choose a department, fill out the form and submit the ticket. |
|
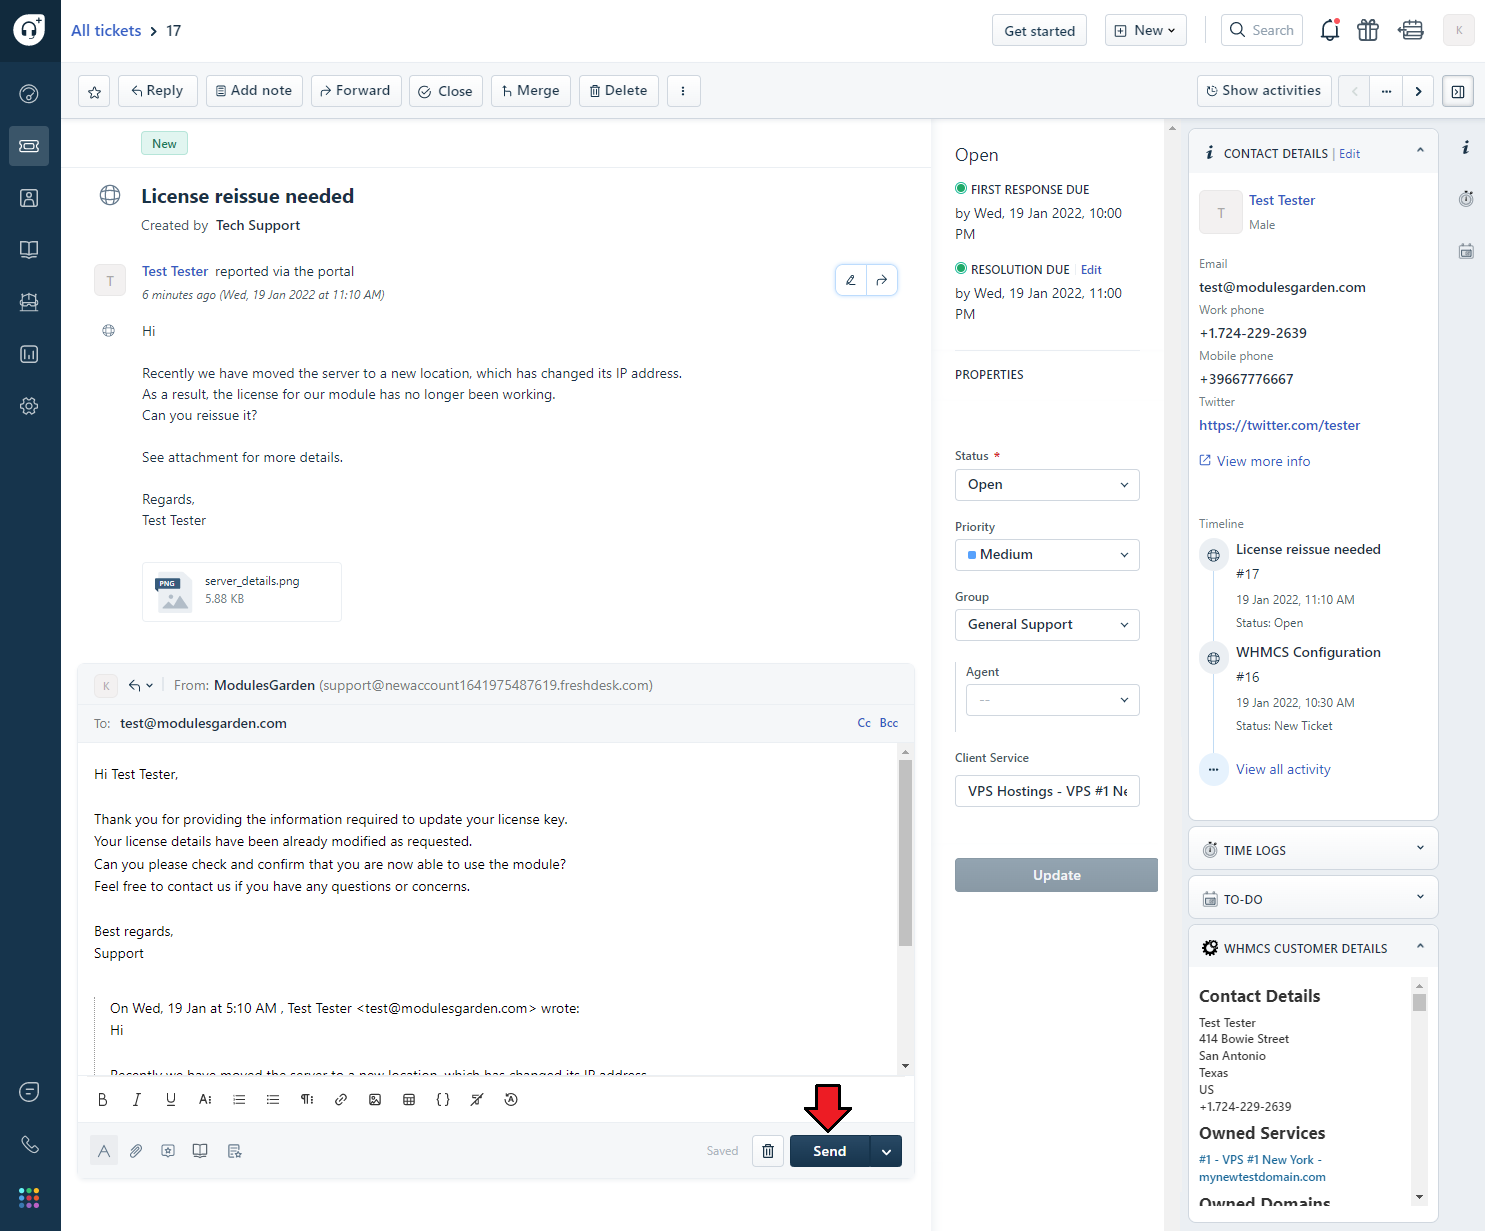
| A new ticket, sent with Freshdesk For WHMCS module, is immediately visible in Freshdesk admin area. Do not hesitate and send a reply to this ticket. |
|
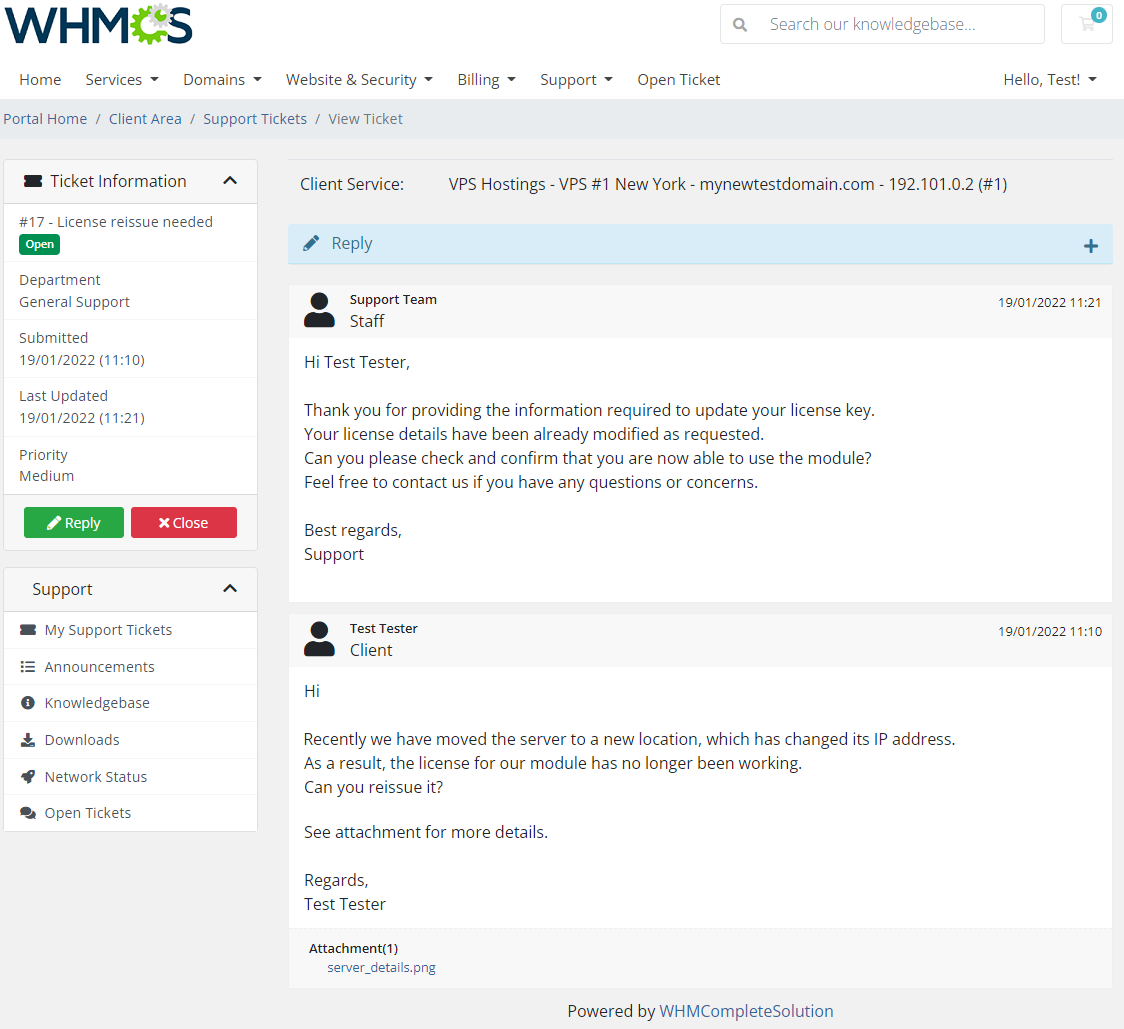
| A client has received an answer. Note that the ticket status has been updated as well. |
|
Logs
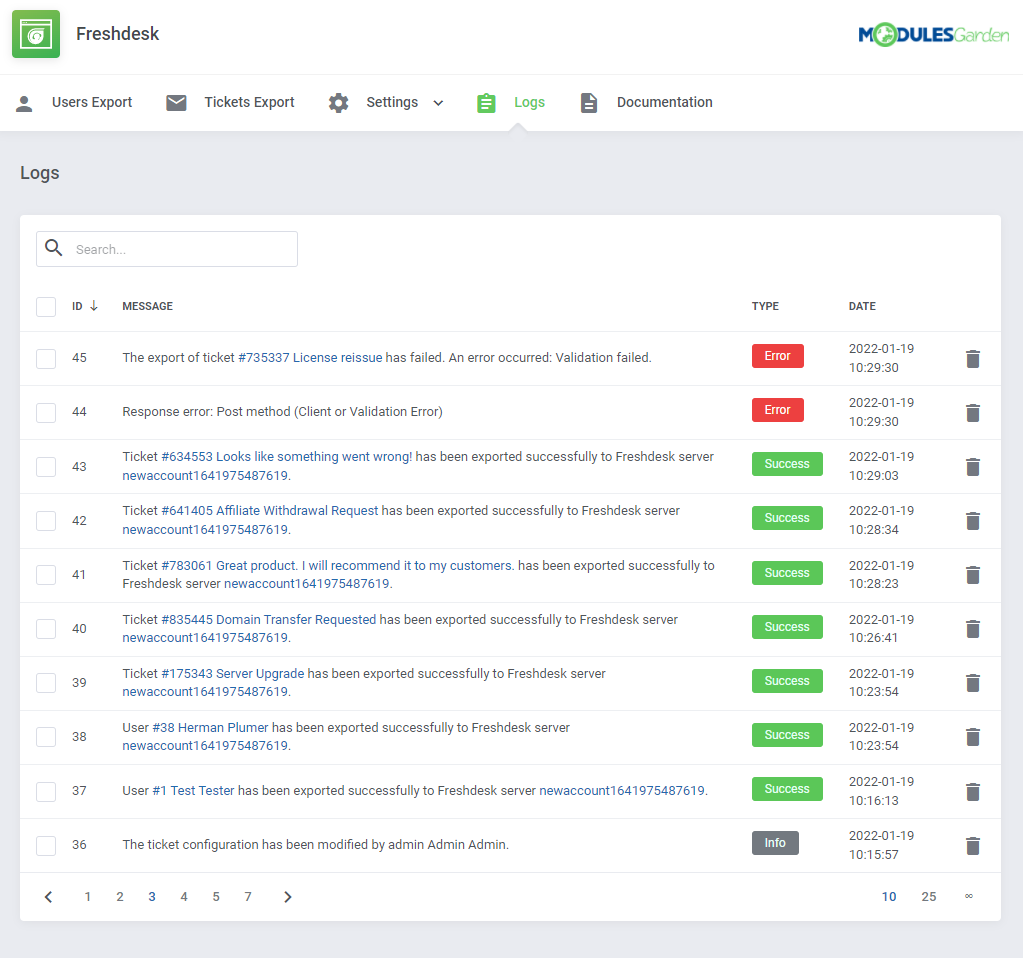
| All module activities are recorded in the 'Logs' section. Note: You might have no visible logs here if there are no logged actions yet. |
|
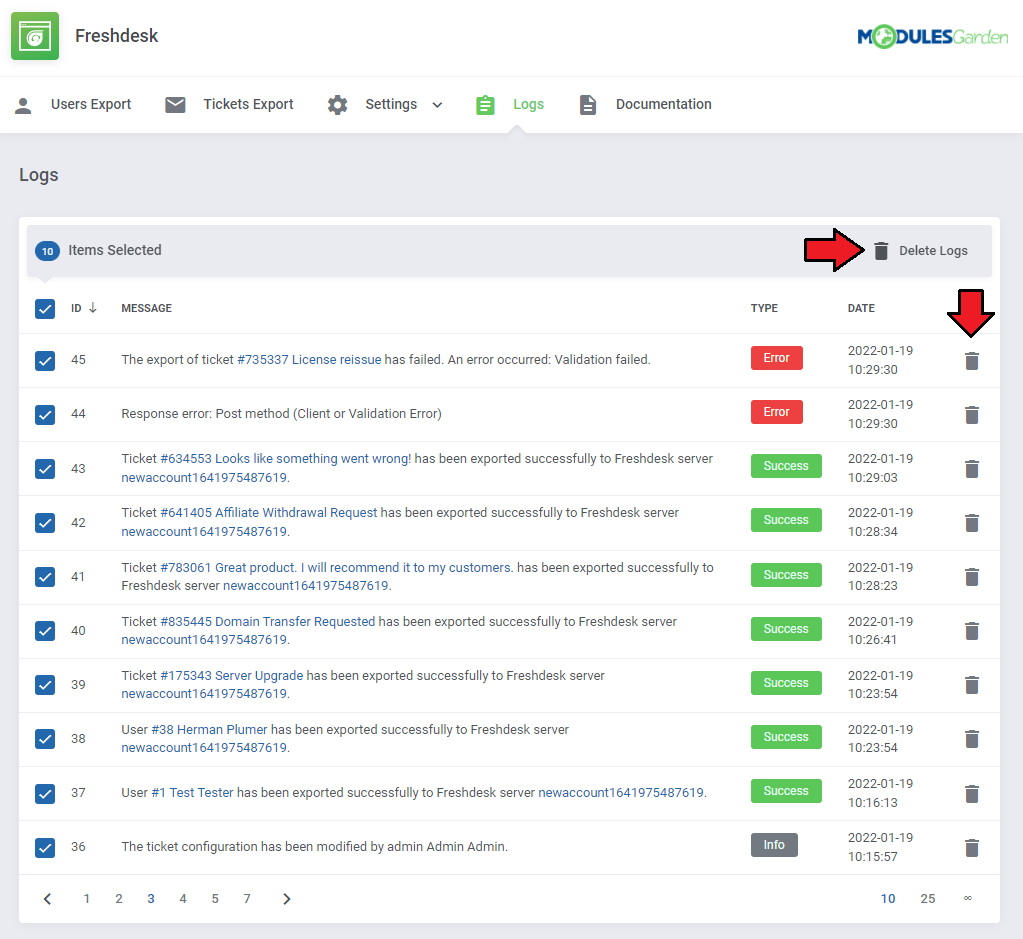
| In case you no longer wish to see a particular log you can easily remove it. Click on the bin icon next to a selected entry as presented on the screen below. In order to delete multiple logs at the same time you can simply take advantage of the 'Mass Remove Action'. |
|
Single Sign On
| Freshdesk For WHMCS allows you to use WHMCS to authenticate Freshdesk users with Single Sign-on. To activate the function, generate the RSA key (https://support.freshworks.com/support/solutions/articles/50000000670) #generate RSA key ssh-keygen -t rsa -b 1024 -m PEM -f jwtRS256.key # use empty passphrase openssl rsa -in jwtRS256.key -pubout -outform PEM -out jwtRS256.key.pub Paste it inside the 'SSO RSA Private Key' field, toggle the 'Single Sign-on (SSO)' on, and save the changes. |
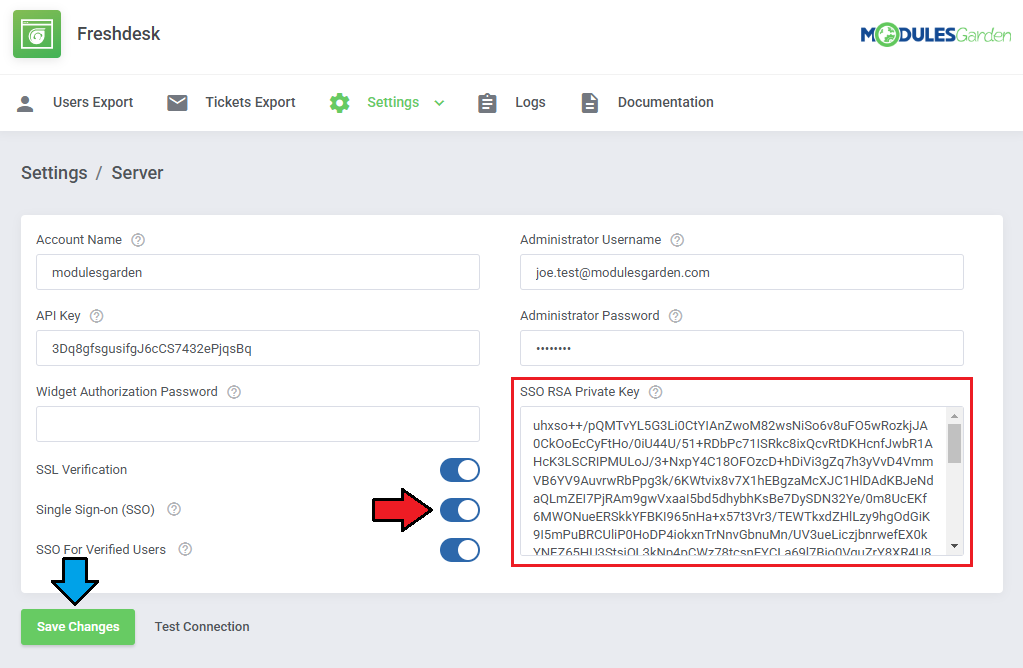
|
| In your Freshdesk panel, navigate to 'Admin' → 'Account' → 'Security' and find the 'Freshworks SSO' option. Click on 'Edit Confiuration'. |
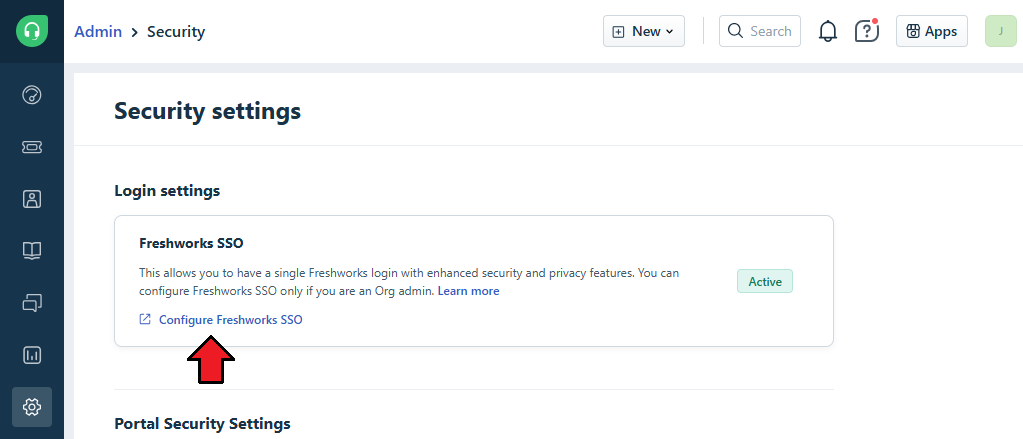
|
| Select 'Default Login Methods'. |
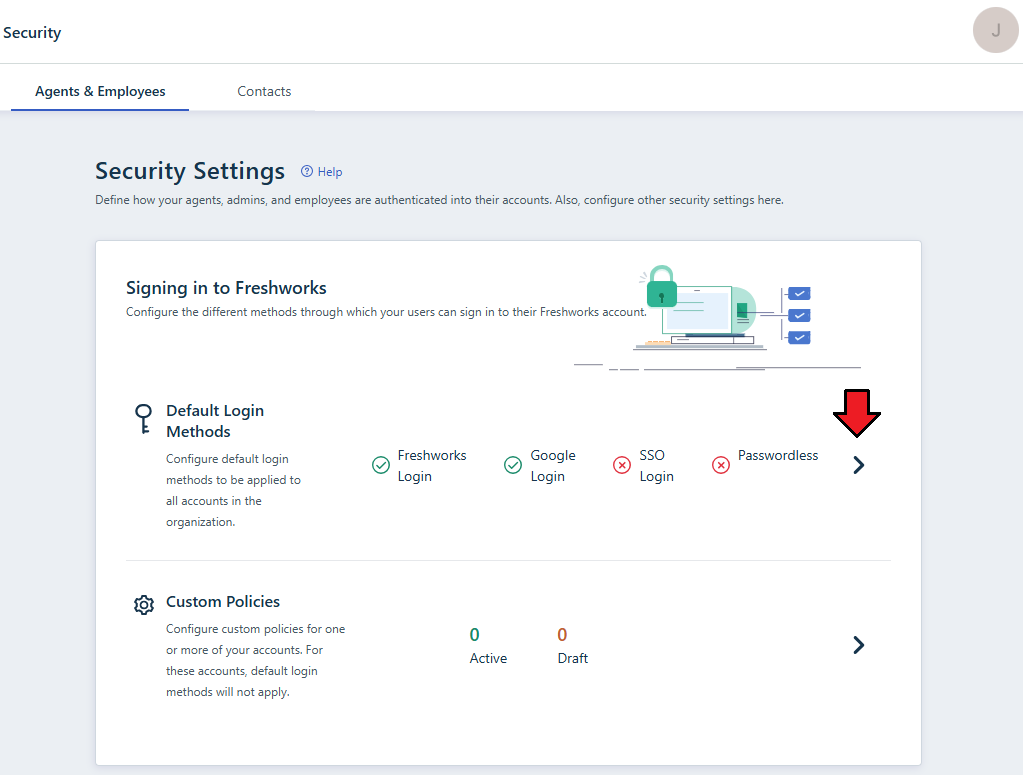
|
| Find 'SSO Login' and enable it. |
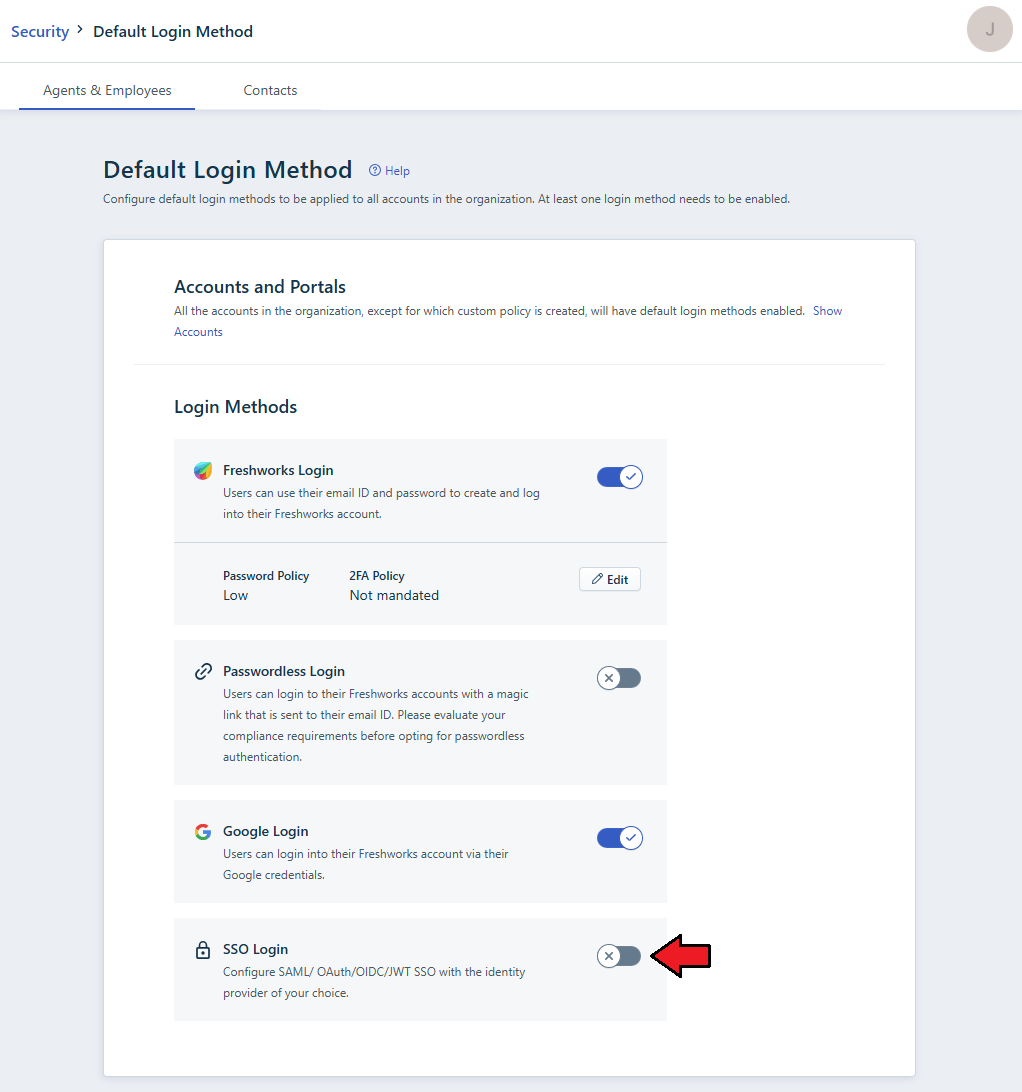
|
| Pick the 'JWT' type and continue. |
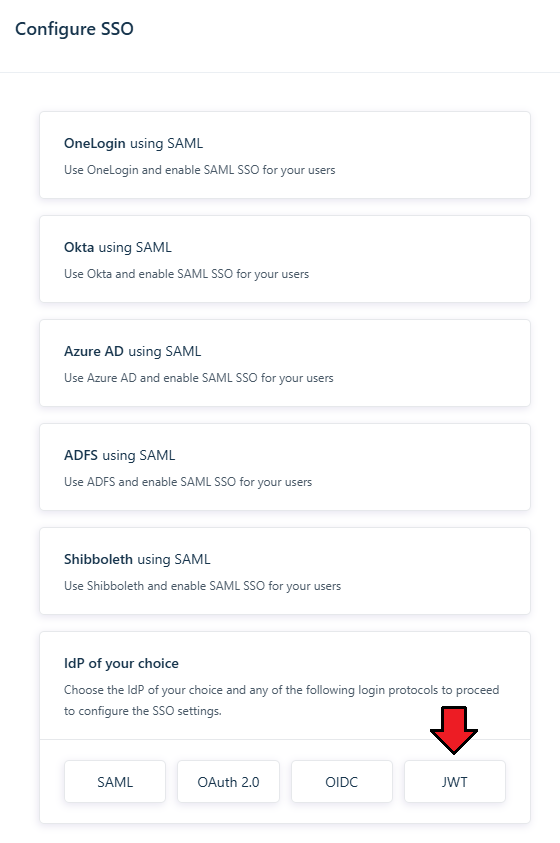
|
Complete the following fields:
https://{your_whmcs}/modules/support/Freshdesk/loginshare_jsonwt.php
https://{your_whmcs}/modules/support/Freshdesk/loginshare_jsonwt.php
|
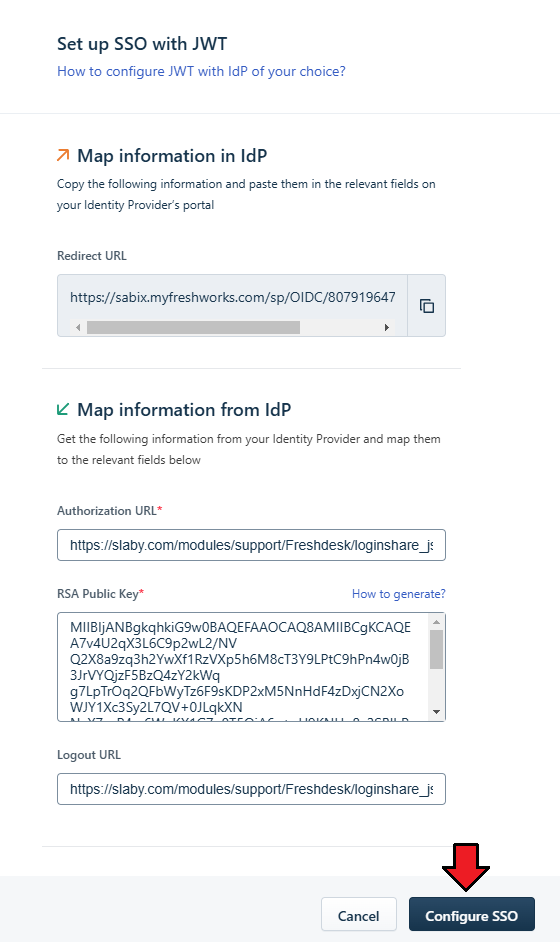
|
| If you want to allow customers to use SSO, switch tabs to 'Contacts' and configure a 'Custom Policy' the same way. |
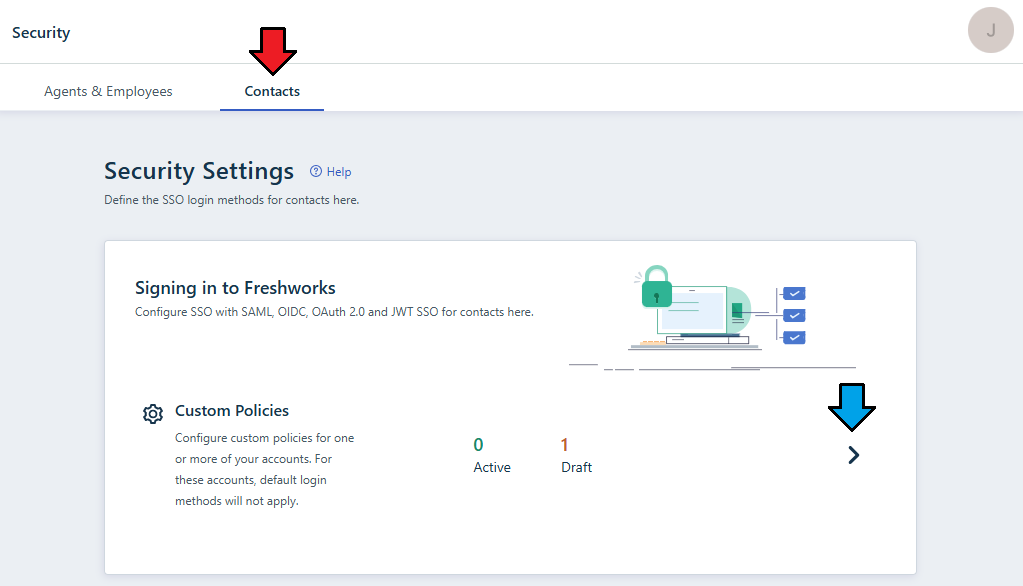
|
| From now on, clicking on the 'Are you an agent? Login here' and 'Are you a customer? Login here' buttons respectively will redirect to WHMCS login page for authorization. |
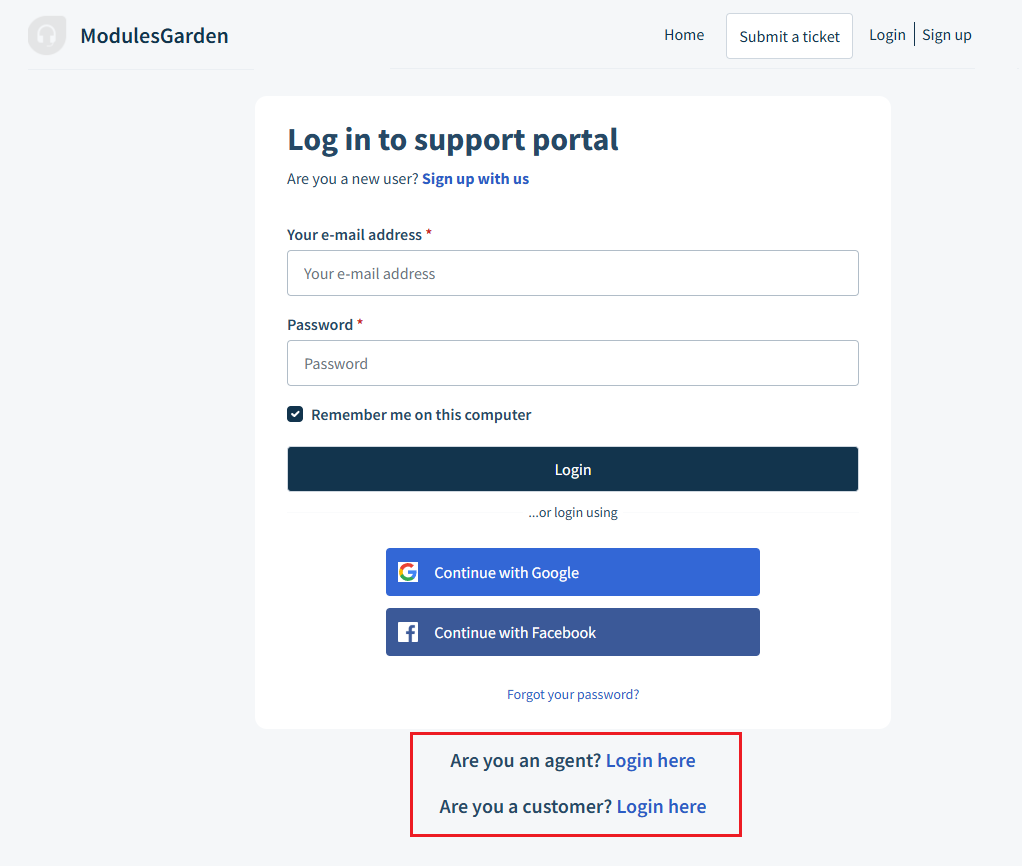
|
Tips
| 1. If you create a custom field in Freshdesk, it will be also visible in WHMCS. Custom fields need to be enabled/visible/editable by the client. |
2. In case you wish to use a custom template, do not forget to place its files in the following directory:
/modules/addons/Freshdesk/templates/client/default/pages/submodule/yourCustomTemplateName/ |
| 3. You can configure the support sidebars that are displayed in the client area by switching them on/off. Simply, change the flag from true into false in the following file if you wish to hide the support sidebars. /modules/addons/freshdesk/app/Config/freshdesk.yml |
| 4. Freshdesk limits API calls based on the user's plan. Additional limit increases are also available for purchase. Exact numbers and more information can be found in the official Freshdesk documentation. |
Update Instructions
| An essential guidance through the process of updating the module is offered here. While moving from the 1.0.0 version of Freshdesk, note that no data can be migrated, so the module needs to be configured from scratch. |
Upgrade Guide
| Seeking a solution that offers greater flexibility, customization tailored to your precise needs, and unrestricted availability? There is an option that not only proves to be cost-effective in the long run but also includes prioritized support services, making it a truly valuable investment. Opt for the Open Source version of your Freshdesk For WHMCS module to unlock these benefits. Follow a comprehensive guide covering the transition process, the advantages it brings, and step-by-step instructions on what to do next after the order has been successfully finalized. |
Common Problems
| 1. When you have problems with connection, check whether your SELinux or firewall does not block ports. |
| 2. In case it is taking too much time for new tickets to appear, keep in mind that the module's cache is set for 5 minutes. Some of other module elements may also not reflect immediate changes made in the Freshdesk panel. If you need the immediate cache refreshment, go to the 'Ticket Settings' or save 'Server Settings' again. |
| 3. We do not recommend using Freshdesk For WHMCS module either with Multibrand For WHMCS or with Resellers Center For WHMCS. Integration between these modules is hampered due to specific features of each one of them and their individual work flow. |