Alibaba Cloud Virtual Machines For WHMCS has reached End of Support (EOS) and is no longer actively maintained. The module remains available for purchase in the Open Source version, along with License Upgrade option at a discounted price. Current license subscriptions continue and stay valid for future renewals.
Alibaba Cloud Virtual Machines For WHMCS is a perfect tool designed to push your provisioning business a few steps further by automating the Alibaba Cloud instances management.
Your clients will get the opportunity to remotely start, stop, restart the server, as well as preview the assignment of IP addresses and scheduled tasks.
The module will also let you keep control over the product features, and supervise the status of each sold machine.
|
| ✔ Create/Suspend/Unsuspend/Terminate Server
|
| ✔ Start/Stop/Restart/Shut Down Server
|
| ✔ Reset Instance Password
|
| ✔ View Instance Status And Details
|
| ✔ View Network Interfaces Details
|
| ✔ View Assigned IP Addresses
|
| ✔ Configure Product Details:
|
| ✔ Default Server Configuration:
|
| ✔ Enable Burstable Instance
|
| ✔ Switch Current Billing To Subscription On Renewal
|
| ✔ Select Instance Region/Image/Type
|
| ✔ Enable Public IPv4 Address
|
| ✔ Select Usage Billing Method:
|
| ✔ Provide Cloud-Init User-Data Initiation Script
|
| ✔ Select Cloud-Init User-Data File
|
| ✔ Assign Server To Selected vSwitch:
|
| ✔ Toggle I/O Optimized Instance
|
| ✔ Select Welcome Email Template
|
| ✔ Provide Random Domain Prefix
|
| ✔ Override WHMCS Generated Username
|
| ✔ Choose Features Available In Client Area:
|
| ✔ Reset Instance Password
|
| ✔ Network Interfaces Details
|
| ✔ Manage Instance Images:
|
| ✔ Search Through Available Public Images Base
|
| ✔ Add Custom Images Manually By Their Names Or IDs
|
| ✔ Generate Configurable Options
|
| ✔ Run Server API Connection Test
|
| ✔ Start/Stop/Restart/Shut Down Server
|
| ✔ Reset Instance Password
|
| ✔ View Instance Status And Details
|
| ✔ View Assigned IP Addresses
|
| ✔ View Network Interfaces Details
|
| ✔ Windows Server 2022 DataCenter Edition
|
| ✔ Windows Server 2022 with Container DataCenter Edition
|
| ✔ Windows Server 2019 Data Center Edition
|
| ✔ Windows Server 2019 with Container DataCenter Edition
|
| ✔ Windows Server 2016 Data Center Edition
|
| ✔ Windows Server 2012 R2 Data Center Edition
|
| ✔ Windows Server 2008 R2 Enterprise
|
| ✔ Windows Server Version 2004 Data Center Edition
|
| ✔ Windows Server Version 2004 with Container Data Center Edition
|
| ✔ Custom Images Added By Their Name IDs
|
| ✔ Any Other Public OS Platforms When Made Available By API
|
| ✔ Requires Access To Alibaba Elastic Compute Service (ECS)
|
| ✔ Supports PHP 8.2 Back To PHP 8.1
|
| ✔ Supports WHMCS Themes "Six", "Twenty-One" And "Lagom WHMCS Client Theme"
|
| ✔ Supports WHMCS V8.12 Back To WHMCS V8.9
|
| ✔ Requires ionCube Loader V13 Or Later
|
Installation and Configuration
Alibaba Cloud Virtual Machines For WHMCS has reached End of Support (EOS) and is no longer actively maintained. The module remains available for purchase, including the Open Source version and License Upgrade at a discounted price. Current license subscriptions continue and stay valid for future renewals.
Installation
| 1. Log in to our client area and download the module.
|
2. Upload and extract the extension into the main WHMCS directory.
Extracted files in your WHMCS directory should look like this:
|
3. When you install Alibaba Cloud Virtual Machines For WHMCS for the first time, you have to rename the 'license_RENAME.php' file.
The file is located in '/yourWHMCS/modules/servers/AlibabaCloudVirtualMachines/license_RENAME.php'. Rename it from 'license_RENAME.php' to 'license.php'.
|
4. In order to configure your license key, you have to edit the previously renamed 'license.php' file.
Enter your license key between the quotation marks as presented on the following screen.
You can find your license key in our client area → 'My Products'.
|
5. Now, set up the 'storage' folder as recursively writable.
This folder is available at '/yourWHMCS/modules/servers/AlibabaCloudVirtualMachines/'.
|
6. The last step is setting up the queue cron job.
It will be used to execute module commands such as: create, terminate or change package.
php -q /yourWHMCS/modules/servers/AlibabaCloudVirtualMachines/cron/cron.php queue
It is suggested to run the cron every 5 minutes.
|
Configuration of Server
Before you can go on, you must generate your Alibaba Cloud Virtual Machines access details. You will need them to connect with the server successfully.
Underneath, you will find instructions where to find them.
|
| 8. Now, you need to move to the 'Console', press the adequate button and you will be redirected there immediately.
|
| 9. Hover over your 'Main Account' icon in the top right corner of the screen, a dropdown menu will appear. Press the 'AccessKey Management' selection.
|
10. You will be moved to 'AccessKey Pair section. There, you will be asked to confirm that you wish to 'Use Current AccessKey Pair'.
Press the button to get access.
|
| 11. If you do not have yet any active keys, press 'Create AccessKey' button to generate a new set of details.
|
12. A modal with "AccessKey ID" and "AccessKey Secret" will appear, so copy them and keep safe. You may also download a file with the details.
|
| Note that you can find the corresponding secret key later on, it will be accessible next to the "AccessKey ID" in the panel.
|
| 13. Now, that you have you access keys, you may move back to your WHMCS. Proceed to 'System Settings' → 'Servers' and press 'Add New Server'.
|
14. Next, enter your server name, fill in the 'Hostname' field, you may provide any data here, the provided content is not used in any way by the module.
Move to the "Server Details", select 'Alibaba Cloud Virtual Machines' from the 'Module' field.
Provide the previously generated access keys into 'Access Key ID' and 'Secret Access Key' fields.
Then check the connection. If successful, save the changes.
|
| 15. It is time to create a server group. To do so, click on 'Create New Group'.
|
| 16. Enter a name, click on your previously created server, press 'Add' and afterward 'Save Changes' .
|
Configuration of Product
17. In order to create and configure a product, go to 'System Settings' → 'Products/Services'.
Click on 'Create a New Group'.
|
| 18. Enter your product group name and press 'Save Changes'.
|
19. Once you have a product group, you can create a new product.
To do so, first click on 'Create a New Product'.
|
| 20. Afterward, choose your product type, enter your product name, choose module and the product group from the dropdown menus. Press 'Continue'.
|
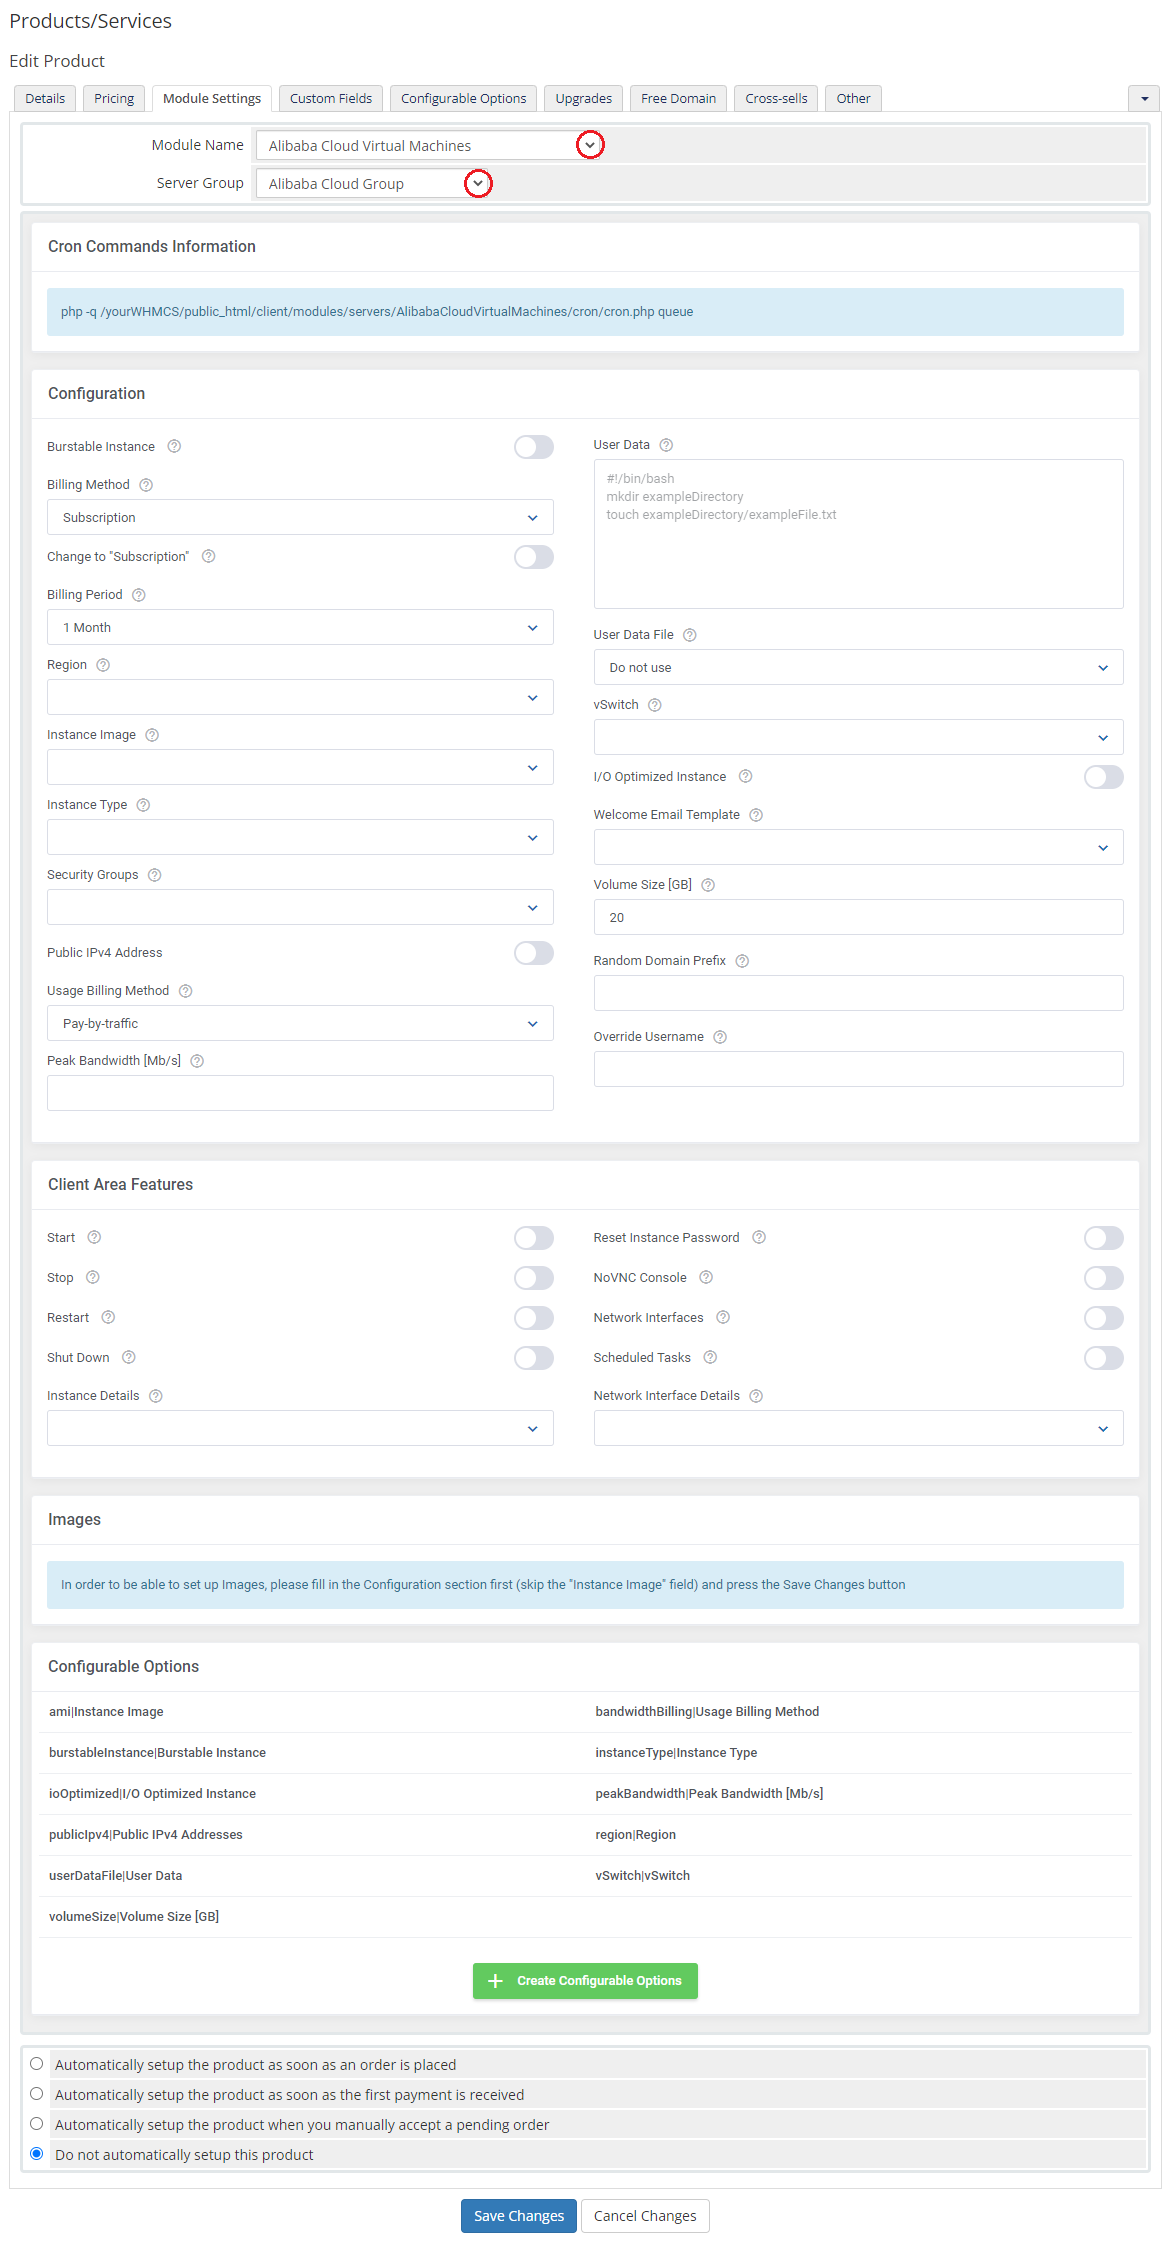
21. Now, go to the 'Module Settings' section, choose your previously created server group from the dropdown menu.
The module should automatically save and reload the settings. If not, click on the 'Save Changes' option manually.
|
|
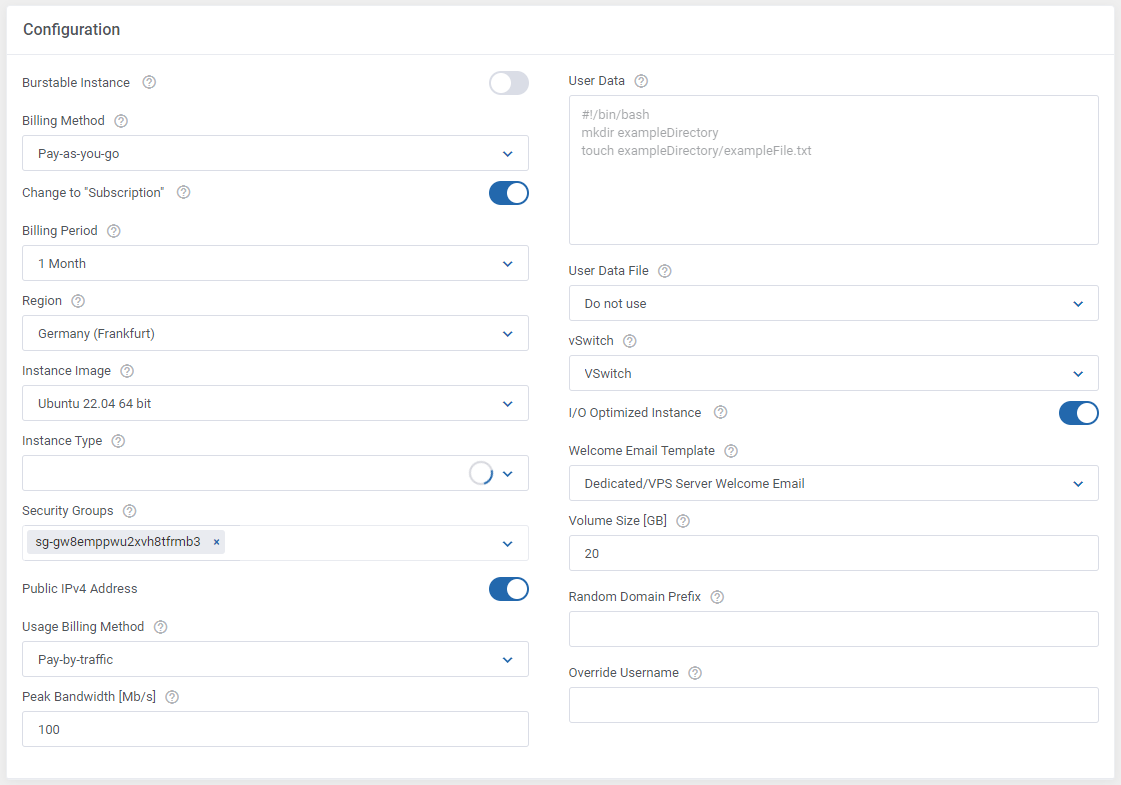
22. Now, you can start configuring the settings of the server you sell.
The first section is dedicated to general configuration. Define the settings of following options:
- Burstable Instance - enable to allow to create burstable instances (addons)
- Billing Method - select between:
- "Subscription" - pay upfront and then use the service over a period of time
- "Pay-as-you-go" - pay for resources after you use the resources
- Change to "Subscription" - if enabled, the billing method will be automatically changed to "Subscription" on renewal
- Billing Period - billing period to charge for the instances billed as subscription ("Subscription" method)
- Region - select a region to deploy the resource
- Instance Image - choose image that will be installed on the instance
- Instance Type - select instance type based on the requirements of the application or software that you plan to run on your instance
- Security Groups - a named set of allowed inbound network connections for an instance. Each security group consists of a list of protocols, ports, and IP address ranges.
- Public IPv4 Address - enable public IPv4 addresses
- Usage Billing Method - select between two available methods:
- Pay-by-bandwidth
- Pay-by-traffic
- Peak Bandwidth [Mb/s] - set the Peak Bandwidth value in Mb/s. A peak bandwidth is the upper limit placed on the outbound bandwidth of an instance.
- User Data - you can specify user data to configure an instance or run a configuration script during launch (this field is optional)
Tutorial on how to use this option can be found here.
- User Data File - choose the execution script which will be used to configure the virtual machine on the first boot. Go here to find more information about how to use these scripts.
Note: User Data scripts are optional for product configuration if you do not want to use them, simply set this field to the 'Do not use' option.
- vSwitch - assign server to a vSwitch
- I/O Optimized Instance - enable if you aim to create an I/O optimized instance
- Welcome Email Template - choose an email template among WHMCS inbuilt templates, the one that will be sent to a client when the VM is created
- Volume Size [GB] - provide the data disks size between 20GB and 32TB
- Random Domain Prefix - enter the domain prefix that will be used when the domain is not provided
- Override Username - if specified, WHMCS generated username will be overwritten with this value
|
|
22. Enable features that will be available for your clients :
- Instance Details: Status, Password, Instance ID, Image ID, Instance Type, Operating System, Memory, Core Count, Threads per Core, Tags, Public IPv4 Address
- Network Interface Details: Type, Primary IP Address, IPv6 Addresses, MAC Address, Network Interface ID
|
23. The following section is dedicated to "Images".
Here, you may look for and then select single images to be added to the list. They will be available to choose from in the 'Instance Image' field in the main configuration of the product.
First of all, enter as many details as possible to find the images you are interested in. Press search button when ready.
When the list of available images appears, press 'Add' next to the one you wish to add to the list of selected.
|
| Enter a custom name in the 'Configurable Option Name' if you wish to change it and confirm the action.
|
On the list of selected, there are all images that you have added, and which will be available to select from when setting up the 'Instance Image' configuration field.
It is also possible to add images manually here.
|
| Simply enter the image ID or name ("Custom Image" is enabled) and enter a unique configurable option name.
|
23. At the end of the configuration process, you can decide whether you want to generate configurable options for the product.
Configurable options can be used by your clients to select each virtual machine parameters individually during order placement.
Otherwise, if configurable options are not defined, then the fixed parameters specified in the earlier configuration will be used instead.
|
If you decide to use configurable options, press on the 'Create' button and select which options you want to generate.
Note that the configuration for disabled options will still be taken from the configuration of the main product.
More information about how to use configurable options can be found here or in the official WHMCS documentation.
|
User Data Scripts
User data is arbitrary data that can be executed during Alibaba Cloud virtual machine creation, typically during the first boot of the server.
This allows you to perform tasks or run scripts as the root user which can be extremely useful when provisioning a server.
You can provide your own scripts using 'cloud-config' or 'Bash', keep in mind that module parameters are supported and may be used in the script files.
By default, we provide two exemplary scripts for changing the OS password or inserting SSH key, which you can use as a reference.
The script you want to include has to be located in the '/your_whmcs/modules/servers/AlibabaCloudVirtualMachines/storage/userDataFiles/' directory and may not exceed 64 KiB in size.
|

|
Once you create your own script, it can be chosen for product execution.
You can provide multiple scripts for configurable options, but only one can be chosen for Alibaba Cloud server creation.
If you would like to execute several different scripts at once, you should try combining them within a single file.
|
Management
Admin Area
Alibaba Cloud Virtual Machines For WHMCS allows you to monitor and manage your customer server instance from the admin area of your WHMCS system.
This includes supervision of such features as:
- Configurable options which enable you to view the chosen server details
- Module commands to allow easy and quick management of the server
- Service actions, including: Start, Stop, Restart the server, Reset Instance Password, access noVNC Console
- Instance details that provide the current status, resources and options set.
- Network interfaces details
- List of scheduled tasks with their specified type, status and date.
|
Ordering
Thanks to configurable options, you are able to offer a product which your clients can tailor according to their needs.
Additionally, you are able to set up pricing for each configurable option, which makes your offer even more competitive.
|
Importing Existing Instance
In this section, you can find short instruction on how to connect one of your clients to your already existing instance in the Alibaba Cloud panel.
Take the following steps to make sure that the process will be carried out properly.
1. Firstly, manually create an order for your customer in WHMCS. Choose a client and in the summary, view click on the ' Add New Order' button. Next, select a 'Product/Service' and press 'Submit Order' .
What is important, do not perform the 'Create' action. The status has to remain as 'Pending' .
More info about placing orders can be found here
2. Proceed to the newly created product's page in your admin area. Find the following empty field:
The above-mentioned information has to be consistent with the data from your Alibaba Cloud panel. Now, complete this field as presented below.
Important! Remember to make sure that the format of the provided data is compatible with the format supported by the module. You can preview it for another product of the module you have already created and enter it in a similar way.
If you completed the required data, now change the status from 'Pending' to 'Active' and 'Save Changes' .
|

|
3. If the completed data is correct, after refreshing the page, you will see the attached instance from Alibaba Cloud.
Important! Remember to manually add other missing parameters of the instance such as domains, credentials, IP Addresses, configurable options, billing cycle, etc. so they match the parameters of the attached instance from Alibaba Cloud panel.
|
Client Area
The client area interface of Alibaba Cloud service should look like the one on the screen below.
As you can see, the control panel contains useful details of the managed server.
The module allows your customers to easily start, stop, restart and reset the instance password through pressing the corresponding buttons.
Clients can also check the server status with its details, view assigned network interfaces and assigned IP addresses details as well as control the list of currently scheduled tasks.
|
Reset Instance Password
| Among other actions, clients are allowed to change their instance password. Please keep in mind that after changing the password, it is required to restart the machine.
|
noVNC Console
| Press adequate icon to establish connection via the noVNC Console.
|
Tips
1. In case you need to generate any of the configurable options once again, you must delete the previously created one.
Only then it will be possible to generate a new configurable option. Read more about configurable options here.
|
Update Instructions
An essential guidance through the process of updating the module is offered here.
Ensure successful completion of the module update by carefully following each step, thereby preventing data loss or any unforeseen issues.
Additionally, you will find a current list of supplementary actions necessary for a smooth update process there.
|
Upgrade Guide
Seeking a solution that offers greater flexibility, customization tailored to your precise needs, and unrestricted availability?
There is an option that not only proves to be cost-effective in the long run but also includes prioritized support services, making it a truly valuable investment.
Opt for the Open Source version of your Alibaba Cloud Virtual Machines For WHMCS module to unlock these benefits.
Simply click on either the Get Source Code or Upgrade To Lifetime button found on the product's page in our client area to complete the one-step upgrade process, with a dedicated discount already applied.
Follow a comprehensive guide covering the transition process, the advantages it brings, and step-by-step instructions on what to do next after the order has been successfully finalized.
|
Common Problems
| 1. When you have problems with connection, check whether your SELinux or firewall does not block ports.
|


