SMS Center For WHMCS
Contents
|
About SMS Center For WHMCS
| SMS Center For WHMCS is a module created to send text messages to your clients and administrators. You will be given the possibility to choose from over 80 different SMS gateways, define SMS templates in various languages, and manage bulk text messaging. |
- Admin Area Features:
| ✔ Notify Your Clients And Administrators Via SMS Messages |
| ✔ Use Single Or Multiple Configurations Per SMS Gateway |
| ✔ Define SMS Gateway Rules Per Country |
| ✔ Send SMS Using Client's Phone Number Field Or Custom Field |
| ✔ Use SMS Queue To Send SMS Within Defined Time Period |
| ✔ Manage List Of Queued SMS |
| ✔ Send Single SMS To Chosen Client Or Type In Any Number Manually |
| ✔ Send Mass SMS Using Recipient Filtering |
| ✔ Define SMS Template Counterpart Of Each Email Template |
| ✔ Define Mass SMS Templates |
| ✔ Estimate Message Length Using Character Counter |
| ✔ Create Different Language Versions Of Each SMS Template |
| ✔ Choose SMS Notifications To Be Received By Each Administrator |
| ✔ Notify Chosen Administrators Via SMS When: |
| ✔ Specified Product Is Ordered |
| ✔ Specified Product Addon Is Ordered |
| ✔ Specified Domain Is Ordered |
| ✔ Ticket With Specified Priority Is Opened Or Flagged |
| ✔ Support Ticket Has Response |
| ✔ Support Ticket Department Reassigned |
| ✔ Specified Administrator Or Client Logs In |
| ✔ Product Automatic Setup Failed Or Succeeded |
| ✔ Service Is Suspended |
| ✔ Service Unsuspension Failed Or Succeeded |
| ✔ Domain Renewal Failed Or Succeeded |
| ✔ New Order Is Submitted |
| ✔ New Cancellation Request Is Submitted |
| ✔ Enable/Disable SMS Notifications Per Administrator |
| ✔ Enable/Disable SMS Gateways |
| ✔ Check Connection With SMS Gateways |
| ✔ Enable/Disable SMS Templates |
| ✔ View Verification Status Of Clients And Orders On WHMCS Lists |
| ✔ Manage Client Verification Status, Accepting SMS And Marketing SMS Agreements From Addon |
| ✔ Manually Verify Client Status On Client Summary Page |
| ✔ Send SMS From Client Summary Page |
| ✔ SMS Templates - Merge Fields Support |
| ✔ Choose Client Custom Field To Be Used As Client Phone Number |
| ✔ Set Custom Token Length And Characters Set |
| ✔ Adjust Format Number To International Automatically |
| ✔ View SMS History |
| ✔ View Logs |
- Client Area Features:
| ✔ Choose To Opt-In/Out From Receiving SMS Messages |
| ✔ Choose SMS Notifications To Receive |
| ✔ View SMS History |
| ✔ Request SMS Token To Be Resent |
- Security And Verification:
| ✔ Two-Factor Authentication Submodule - Use Second Layer Of Security: |
| ✔ Client Area Login |
| ✔ Admin Area Login |
| ✔ Verify New Client Accounts With SMS Token |
| ✔ Verify New Orders With SMS Token: |
| ✔ Before And/Or After Checkout |
- Mass SMS Recipient Filtering:
| ✔ Client Account Filter: |
| ✔ Account Statuses |
| ✔ Account Custom Fields |
| ✔ Account Languages |
| ✔ Account Brand |
| ✔ Addon Filter: |
| ✔ Purchased Addons |
| ✔ Purchased Addon Statuses |
| ✔ Domain Filter: |
| ✔ Domain Statuses |
| ✔ Product Filter: |
| ✔ Purchased Products |
| ✔ Purchased Product Statuses |
| ✔ Purchased Product Servers |
- Supported SMS Gateways:
| ✔ 4jawaly |
| ✔ Africa's Talking |
| ✔ Amazon SNS |
| ✔ Aruba Network |
| ✔ Atomic SMS |
| ✔ Bandwidth.com |
| ✔ BearSMS |
| ✔ Beem Africa |
| ✔ BoxisSMS |
| ✔ BudgetSMS |
| ✔ BulkSMS |
| ✔ Burst SMS |
| ✔ BYTEHAND |
| ✔ Cheap Global SMS |
| ✔ Clickatell |
| ✔ ClickSend |
| ✔ CommzGate |
| ✔ ConnectSaudi |
| ✔ Dialpad |
| ✔ EBulkSMS |
| ✔ eSMS.vn |
| ✔ FastSMS |
| ✔ FireText |
| ✔ Geez SMS |
| ✔ Grameenphone |
| ✔ Gretor SMS |
| ✔ Hajana One |
| ✔ HostPinnacle |
| ✔ ICOMBD |
| ✔ InfoBip |
| ✔ IT Core |
| ✔ Kavenega |
| ✔ MEDIA SAT |
| ✔ MessageBird |
| ✔ MiM SMS-eSMS |
| ✔ Mobishastra |
| ✔ Mocean SMS |
| ✔ Msegat |
| ✔ Nexmo |
| ✔ OnnoRokom SMS |
| ✔ OVH SMS |
| ✔ Releans |
| ✔ SemySMS |
| ✔ SerwerSMS.pl |
| ✔ Sinch |
| ✔ sms77.io |
| ✔ SMSAPI.com |
| ✔ SMSAPI.pl |
| ✔ SMS Bao |
| ✔ SMS Broadcast |
| ✔ SMSEagle |
| ✔ SMS Gateway Me |
| ✔ SMSGlobal |
| ✔ SMS Maldives (SMSMV) |
| ✔ SMSO.ro |
| ✔ SMSPortal |
| ✔ SMSpubli |
| ✔ smss.co.il |
| ✔ Sozuri |
| ✔ Telenor |
| ✔ Telnyx |
| ✔ TextAnywhere |
| ✔ Textlocal |
| ✔ Textplode |
| ✔ TNZ |
| ✔ TraiTel |
| ✔ Trio Mobile |
| ✔ TurboSMS |
| ✔ Twilio |
| ✔ Unifonic |
| ✔ Unitel |
| ✔ VasPro |
| ✔ VoIP.ms |
| ✔ Voodoo SMS |
| ✔ WABuzz |
| ✔ WebSMS.lk |
| ✔ WinSMS |
| ✔ Yamamah |
| ✔ Yunpian |
| ✔ Zenziva |
| ✔ Zettatel |
| ✔ Missing your favorite SMS gateway? We will integrate it for free! |
- General Info:
| ✔ Meets GDPR Requirements |
| ✔ Module API - Integrate Other SMS Gateways |
| ✔ Integrated With Client Profile Viewer For WHMCS - Send SMS From Any WHMCS Place |
| ✔ Integrated With Marketing Triggers Automation For WHMCS - Send Customizable SMS Messages Triggered By Various WHMCS Events |
| ✔ Integrated With Multibrand For WHMCS - Send Personalized SMS Messages Based On Clients Brands |
| ✔ Fully Integrated With Lagom WHMCS Client Theme |
| ✔ Multi-Language Support |
| ✔ Supports PHP 8.3 Back To PHP 8.1 |
| ✔ Supports WHMCS Themes "Six" And "Twenty-One" |
| ✔ Supports WHMCS V8.13 Back To WHMCS V8.10 |
| ✔ Requires ionCube Loader V14 Or Later |
| ✔ Easy Module Upgrade To Open Source Version |
Installation
| This tutorial will show you how to successfully install and configure SMS Center For WHMCS. We will guide you step by step through the whole installation and configuration process. |
Installation
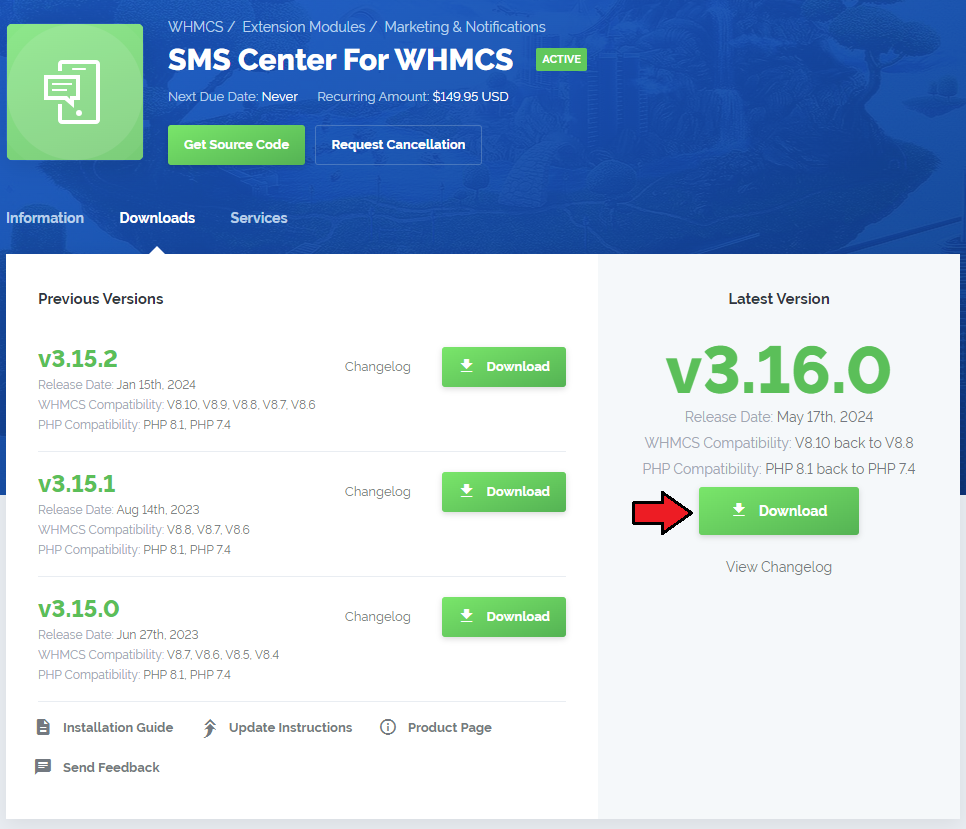
| 1. Log in to our client area and download the module. |
|
| 2. In the downloaded file you will find a package that supports PHP 7.4 up to 8.1. |
| 3. Extract the package and upload its content into the main WHMCS directory.
The content of the package to upload should look like this. |

|
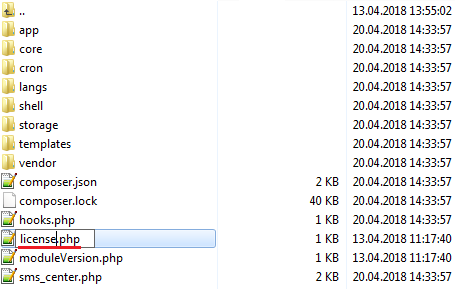
| 4. When you install SMS Center For WHMCS for the first time, you have to rename the 'license_RENAME.php' file. The file is located in 'modules/addons/sms_center/license_RENAME.php'. Rename it from 'license_RENAME.php' to 'license.php'. |
|
| 5. In order to configure your license key, you have to edit the previously renamed 'license.php' file. Enter your license key between the quotation marks as presented on the following screen. You can find your license key in our client area → 'My Products'. |

|
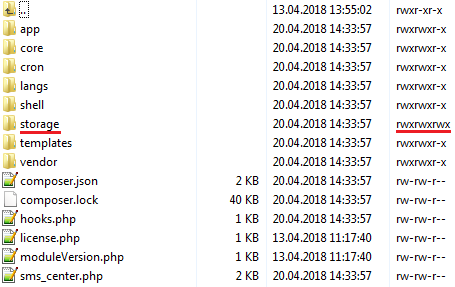
| 6. In the next step, set up the 'storage' folder as recursively writable. This folder is available at 'yourWHMCS/modules/addons/sms_center/' . |
|
Activate The Addon
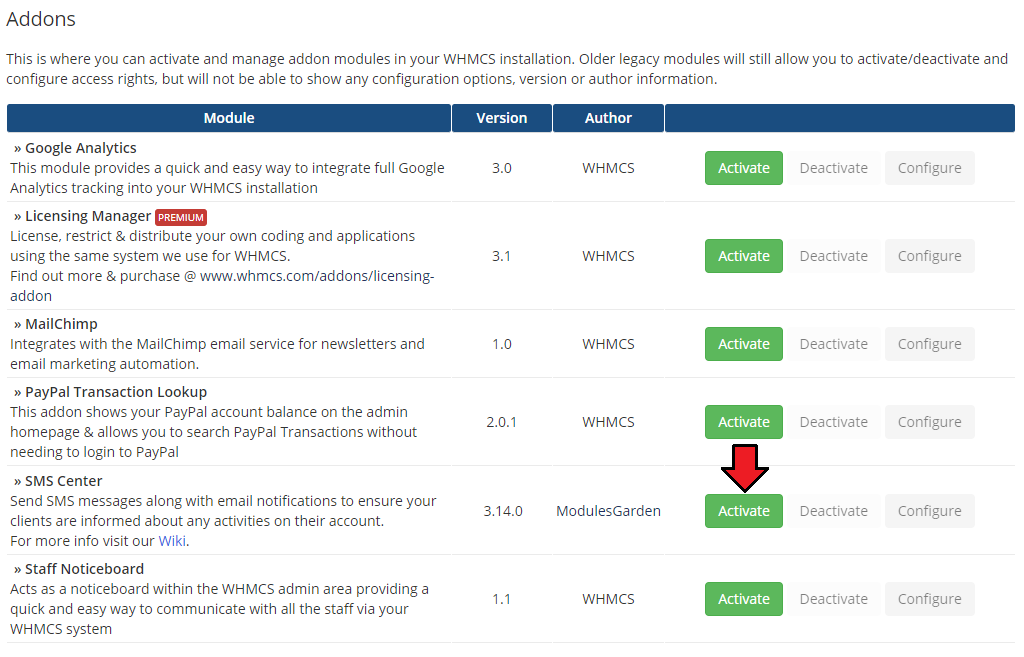
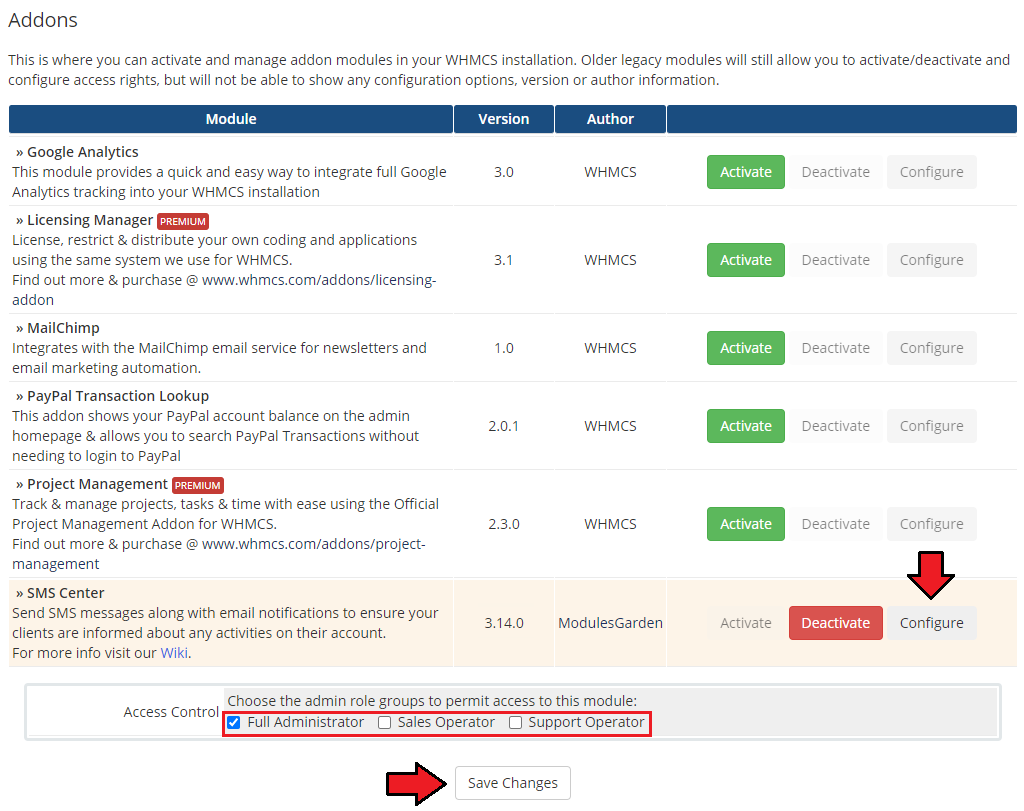
| 5. Now, you have to activate the module in your WHMCS system. Log in to your WHMCS admin area and proceed to 'Setup' → 'Addon Modules'. |
|
| 6. In the next step, you need to permit access to this module. To do so, click on the 'Configure' button and select the admin roles that should have access to the module. |
|
7. Finally, set up the cron command line provided below and define its frequency (10 minute interval is suggested).
php -q /yourWHMCS/modules/addons/sms_center/cron/cron.php SmsTask This will allow the module to send text messages. rm -r /yourWHMCS/modules/addons/sms_center/storage/crons/* This will allow you to run the cron process again next time. Do not forget to replace 'yourWHMCS' with your WHMCS root location. |
| 8. Congratulations, you have just successfully installed SMS Center For WHMCS! |
Configuration and Management
| SMS Center For WHMCS is a module which allows you to send predefined text messages to your clients the same way emails are sent. |
Configuration
| Under 'Configuration' tab you will find 'General', 'SMS Gateways', 'Administrators' and 'Rules' sections. Configure each of them to allow full usage of SMS Center For WHMCS module. Press the first one 'SMS Gateways' to configure and check connection with SMS gateways. |
SMS Gateways Configuration
Simple Gateway Configuration
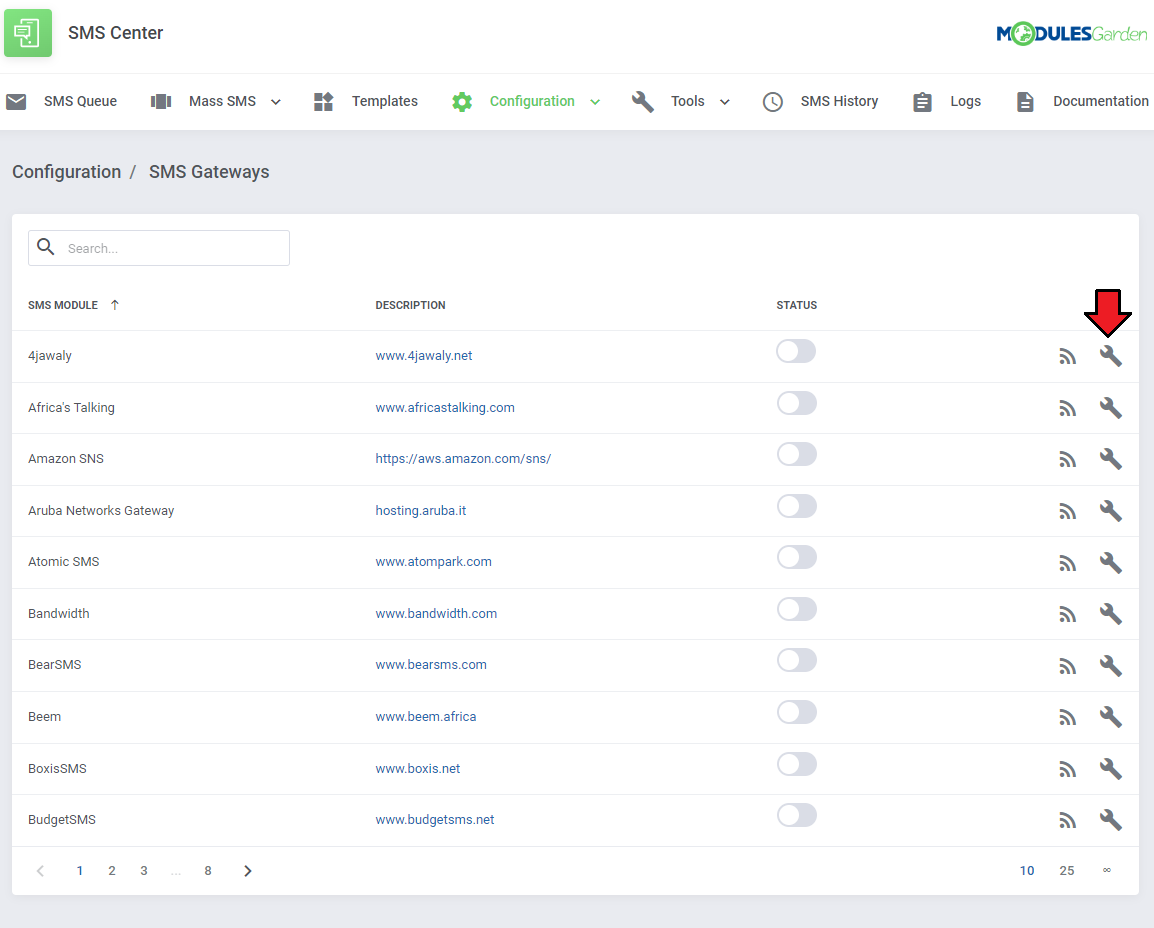
| Here you will find all possible gateways that can be used in our module. Press 'Simple Configuration' next to a gateway you wish to use. |
|
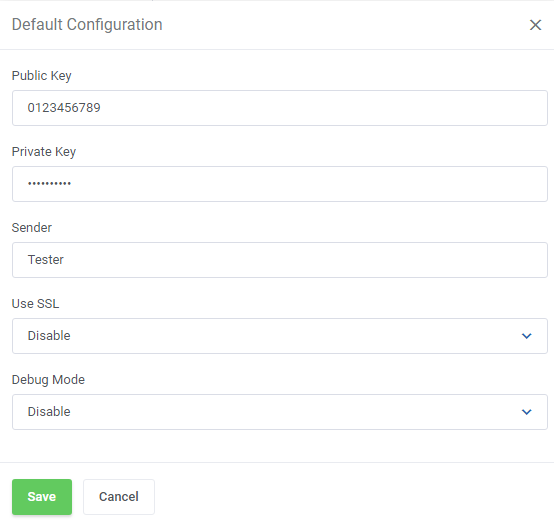
| Configuration of each gateway may vary depending on its requirements. Apart from connection details, you may here also enable debug mode to log API requests and responses. |
|
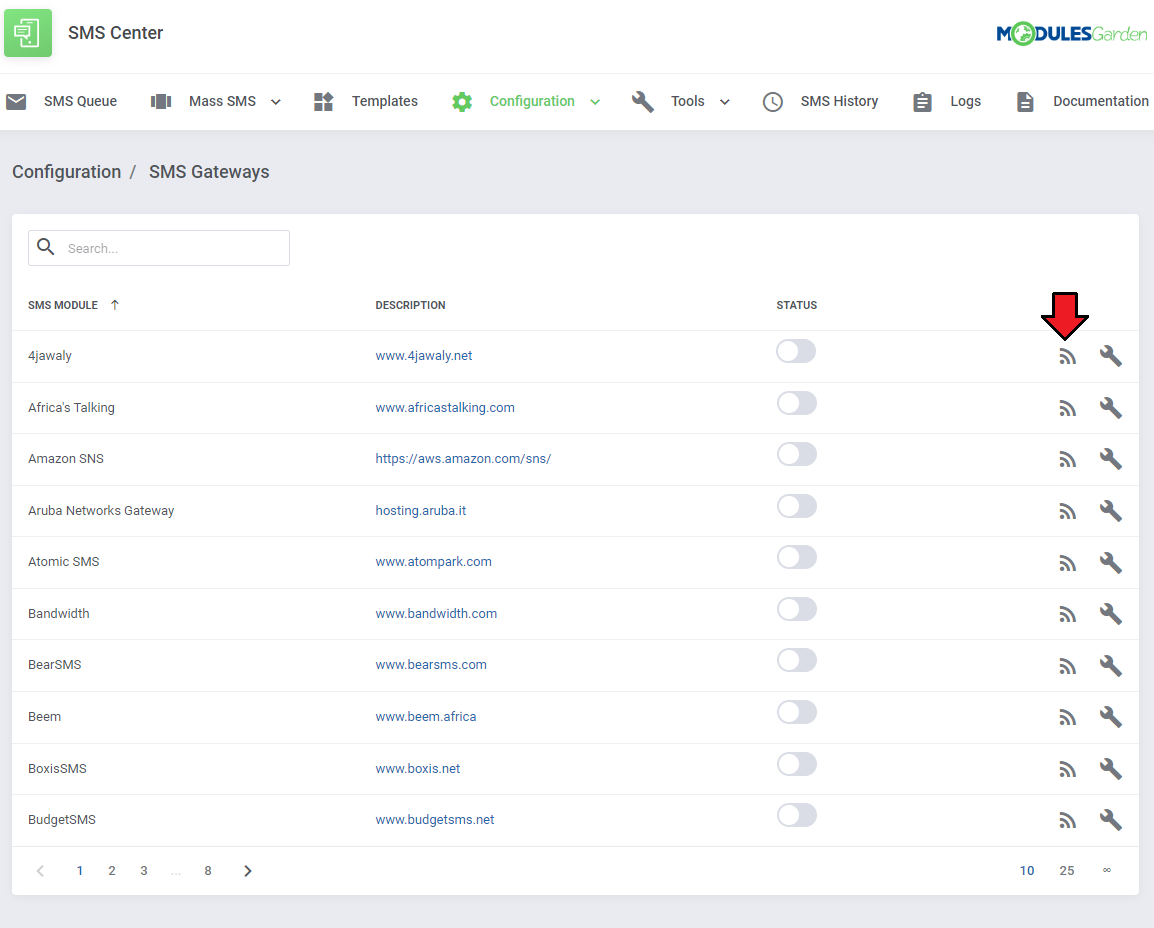
| You can check whether configuration is correct through pressing 'Check Connection'. |
|
| If connection is successful, you can proceed further. Press 'Enable' next to the gateway to activate it. |
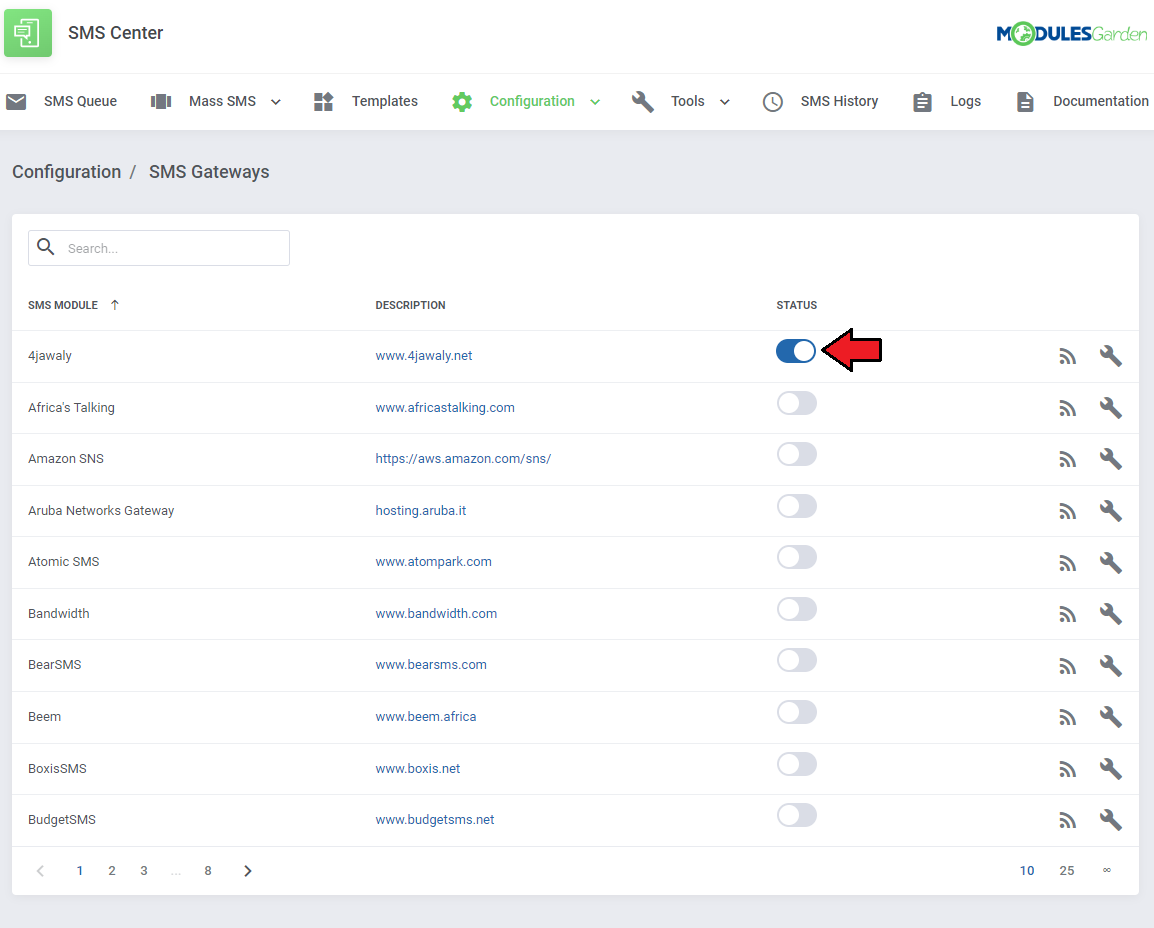
|
Advanced Gateway Configuration
| Advanced gateway configuration allows you to use multiple credentials for the chosen gateway type. This feature can prove useful when you want to use a single gateway submodule with configurations from accounts dedicated to various countries.
|
|
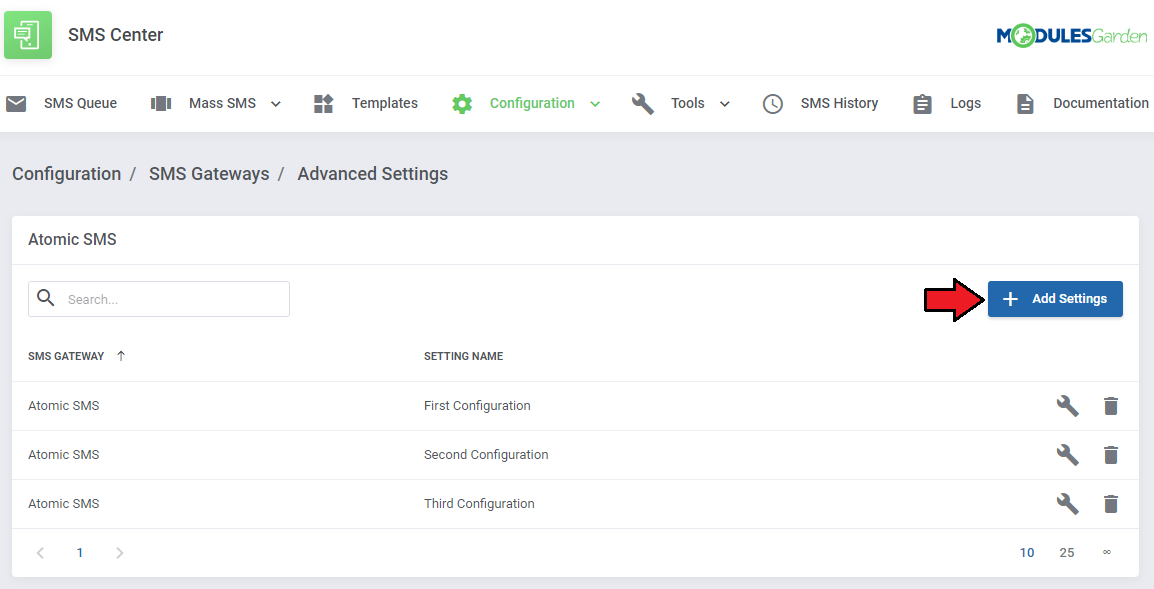
| When you go back to the 'SMS Gateways' section, press the 'Advanced Configuration' button next to the chosen gateway and you will notice it has replaced the 'Simple Configuration'. Now you will be redirected to a new section, where you can add multiple configurations for a chosen gateway. |
|
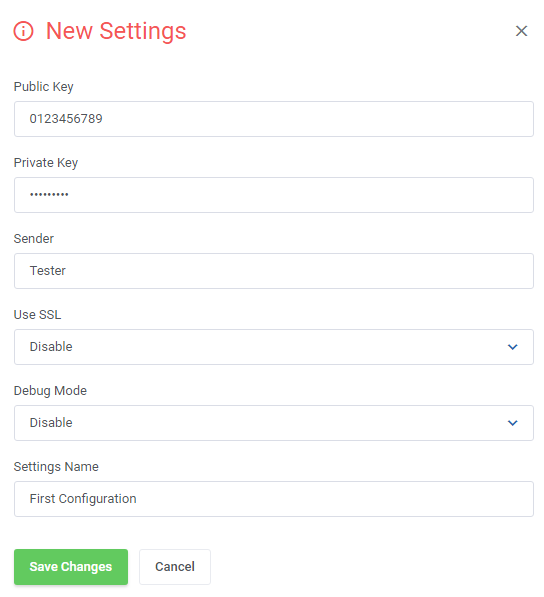
| Next, add your gateway configuration in the same way as you would do during a simple configuration. Additionally, enter your 'Settings Name' to be able to distinguish this configuration from others afterward. Note: You can have as many configurations as you want. You will determine which configuration will be used in which case later on, in the rules section. |
|
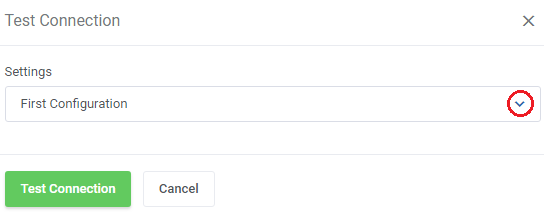
| To check if your configurations have been saved properly, go back to the gateway list and press the 'Check Connection' button next to the gateway you had configured. Then, in the newly opened window, you will be able to select one of your saved configurations and perform a connection test. |
|
Administrator Notifications
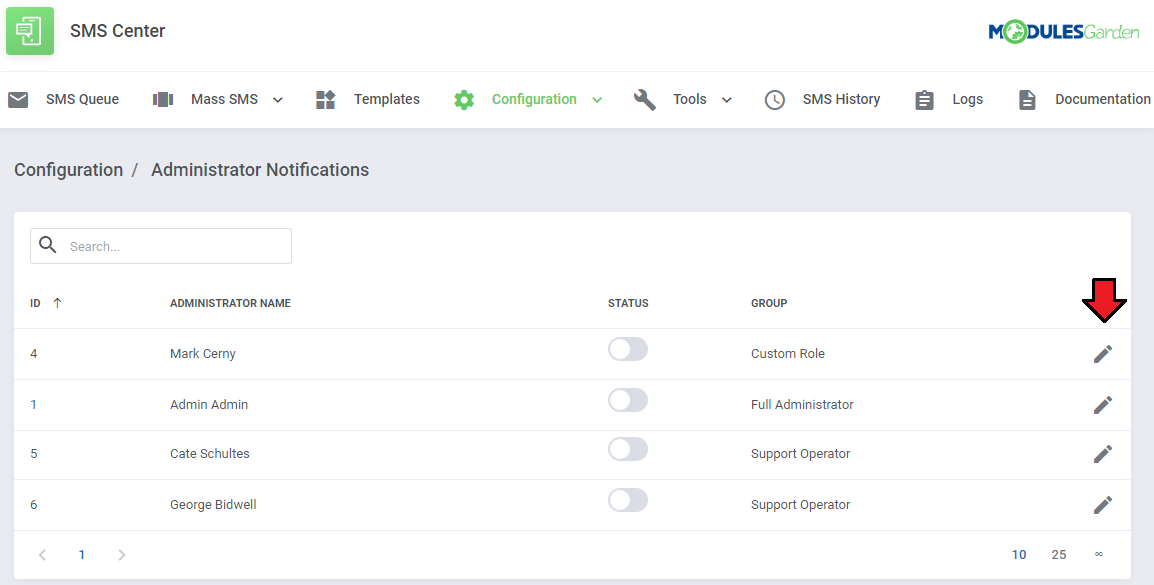
| This section contains a list of all administrators. Here you can choose who exactly will receive particular SMS notifications. Find the 'Administrator Notifications' section under the 'Configuration' menu. Next, press 'Edit' next to the chosen administrator. |
|
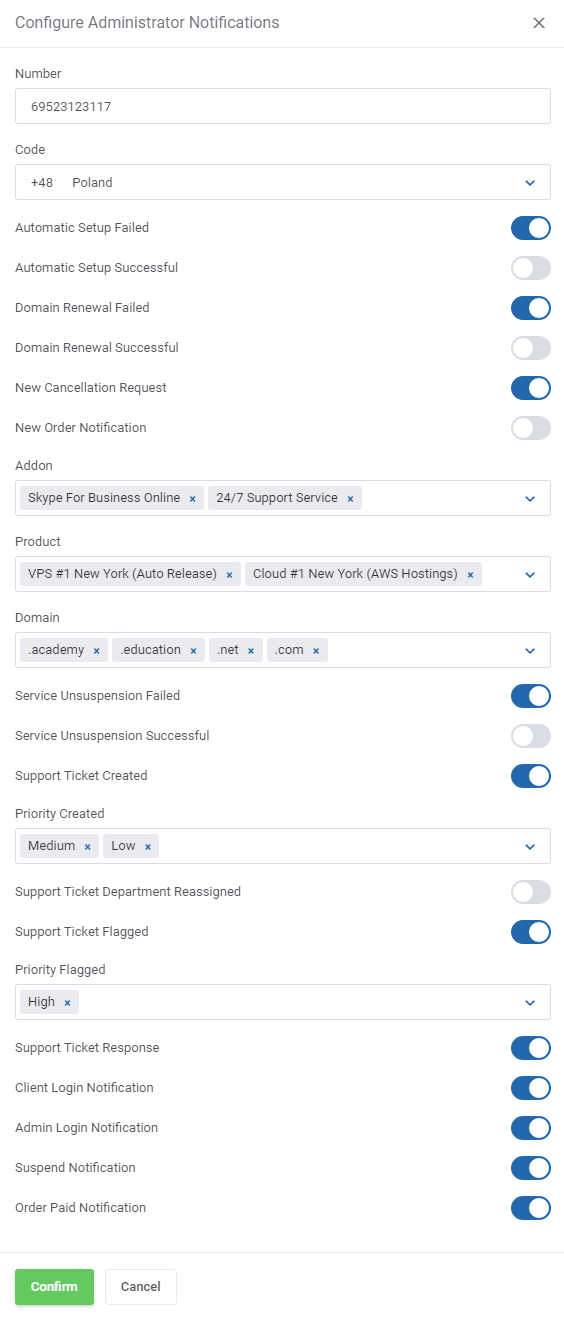
| In order to enable SMS notifications for each administrator individually, firstly set configuration for every one of them. 1. Fill in the administrator's country code and phone number to which text messages with notifications will be sent. |
|
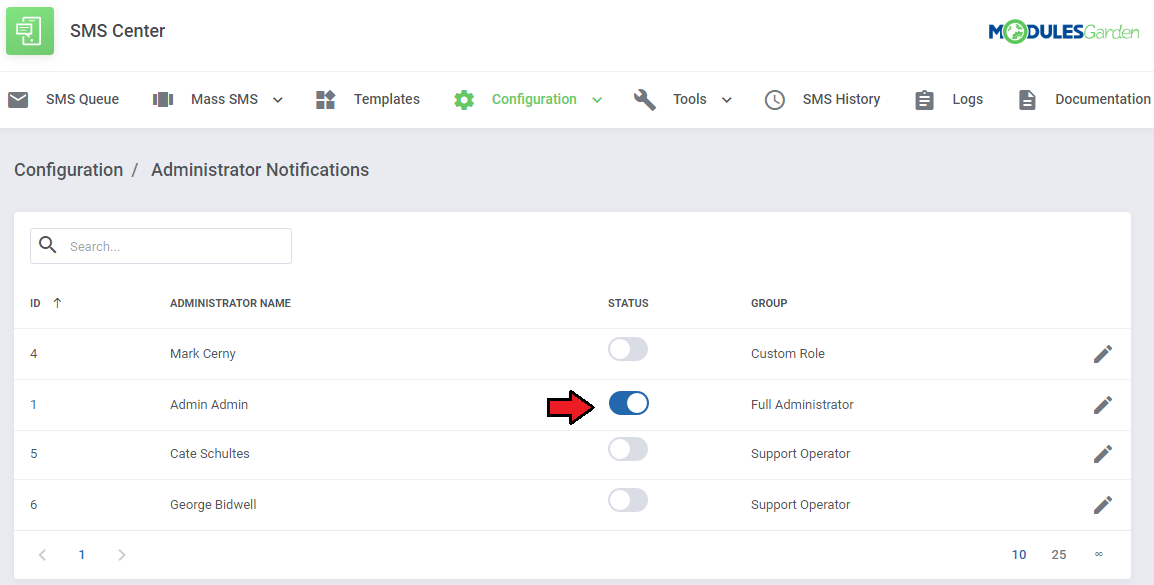
| Finally, enable all remaining notifications you wish to receive. Repeat these steps for every administrator if you wish to receive individual admin notifications. |
|
Rules
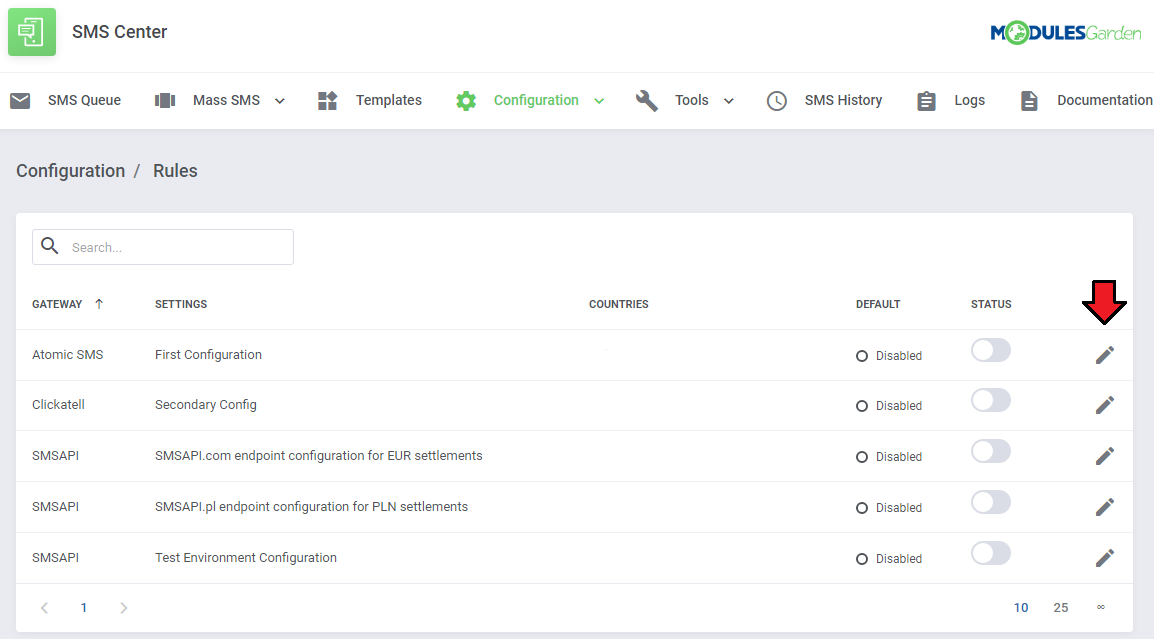
| The rules allow you to use different gateways (or their configurations) depending on the customer's country. You can find them under the 'Configuration' → 'Rules' menu. To add a rule, press 'Edit' next to the chosen gateway configuration. Note: Make sure that you have already your SMS gateways configured and enabled. Otherwise, the rules will not show up. |
|
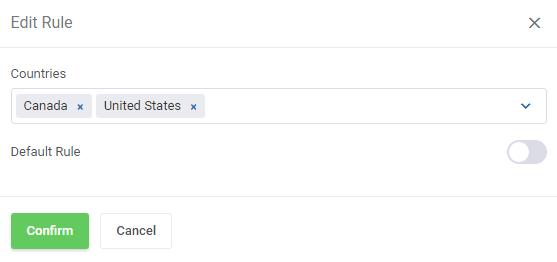
| Now, select countries for which a particular gateway configuration will be applied. The selected country may only be assigned to one rule. You can also mark the gateway as default, which means that it will also be used if no other rule concerning the customer's country is met. Note: Only one rule can be set as default. If you want the gateway to be used only when other rules are not met, set it as 'Default' and leave the 'Countries' field empty. |
|
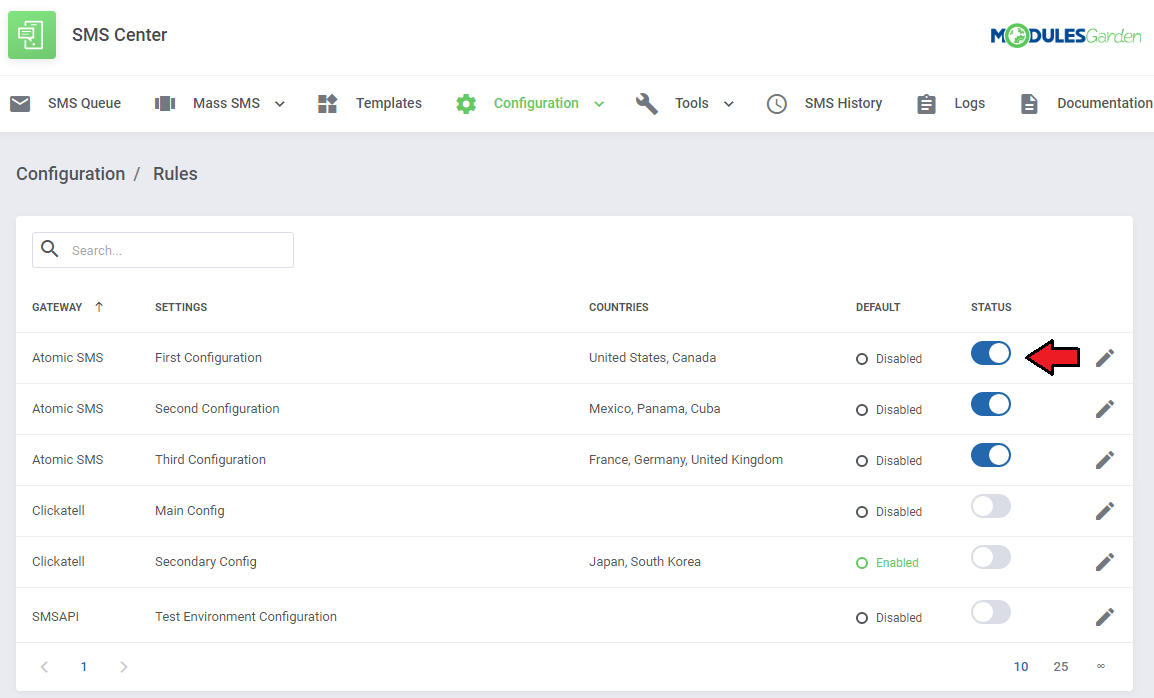
| Finally, toggle the status to enable your newly created rules. |
|
General Configuration
| In the 'General' section you can find specific SMS configuration possibilities. Configure those you wish to activate and save changes when ready. |
General Settings
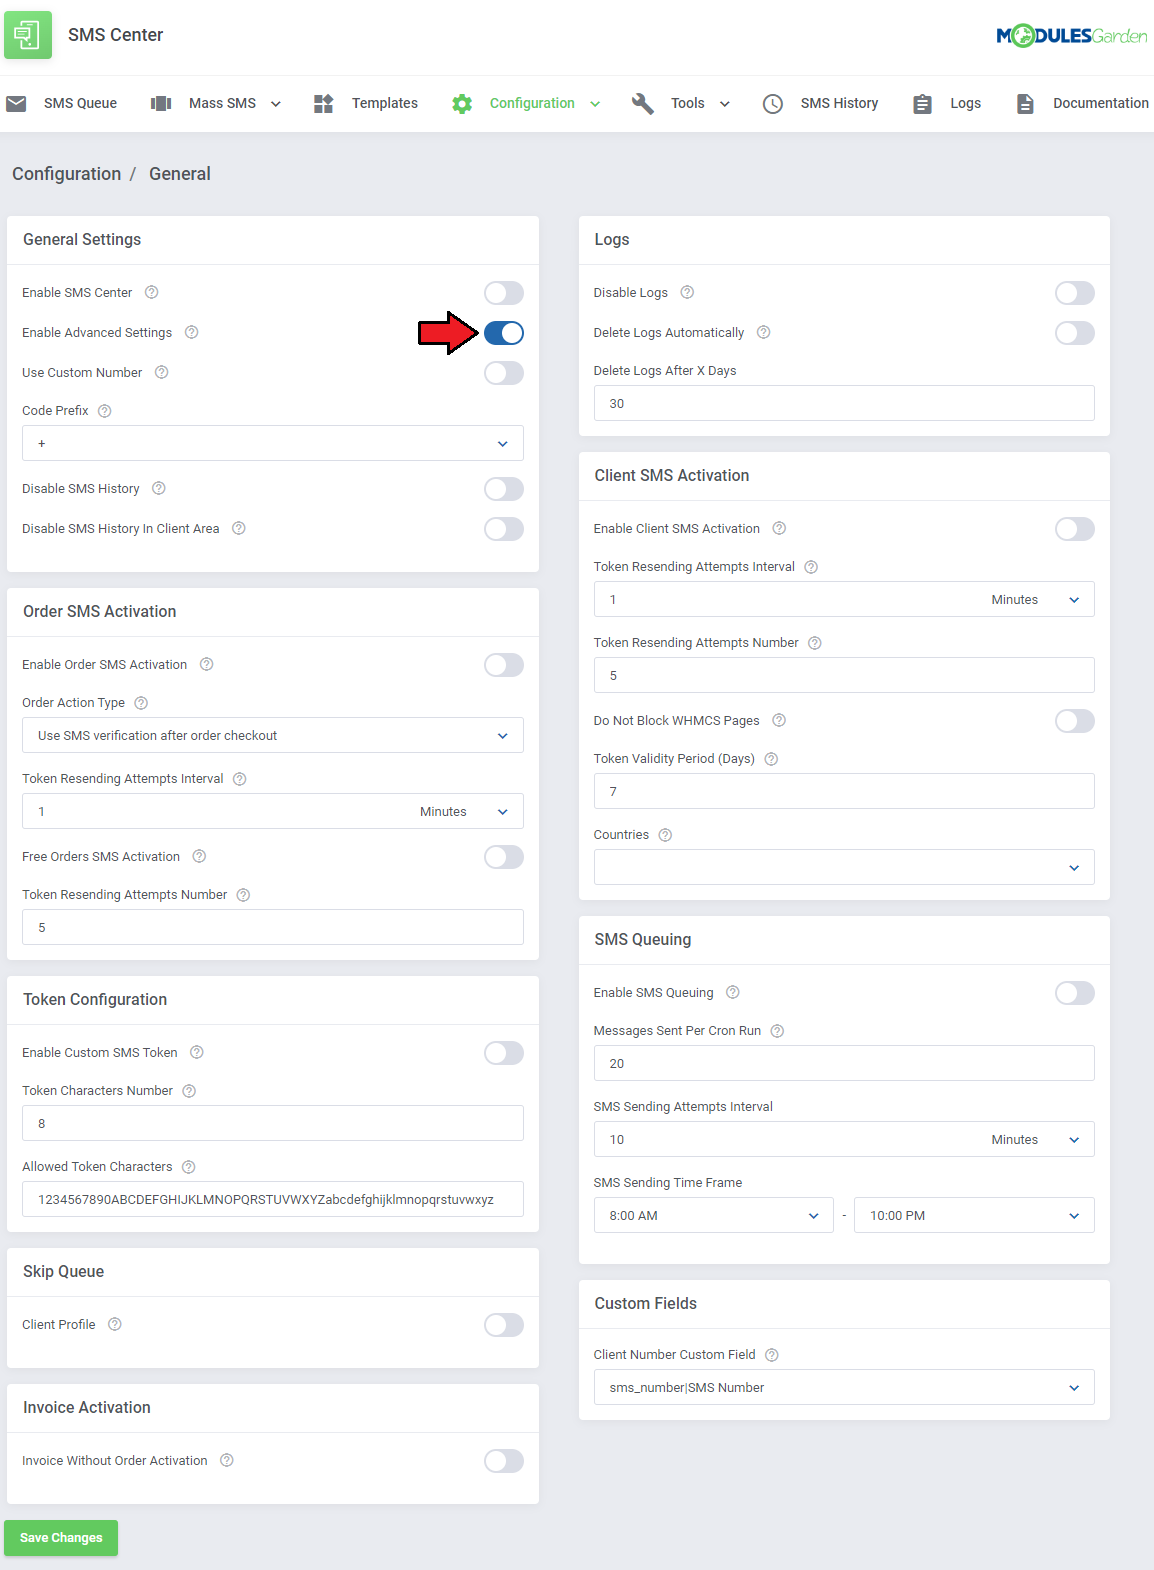
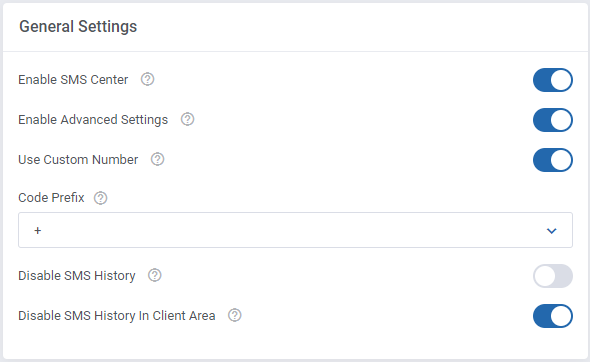
| By default, the 'SMS Center' section in the client area is disabled. You may enable it here. You can also toggle the advanced settings used for advanced gateway configuration. |
|
Client SMS Activation
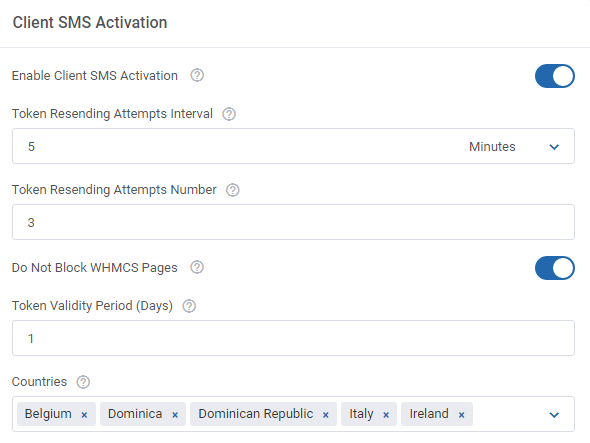
| Enable 'Client SMS Activation' to grant each newly activated client a token which they will use to complete the activation process. Determine time intervals for sending tokens and the maximum number of attempts to resend a token. |
|
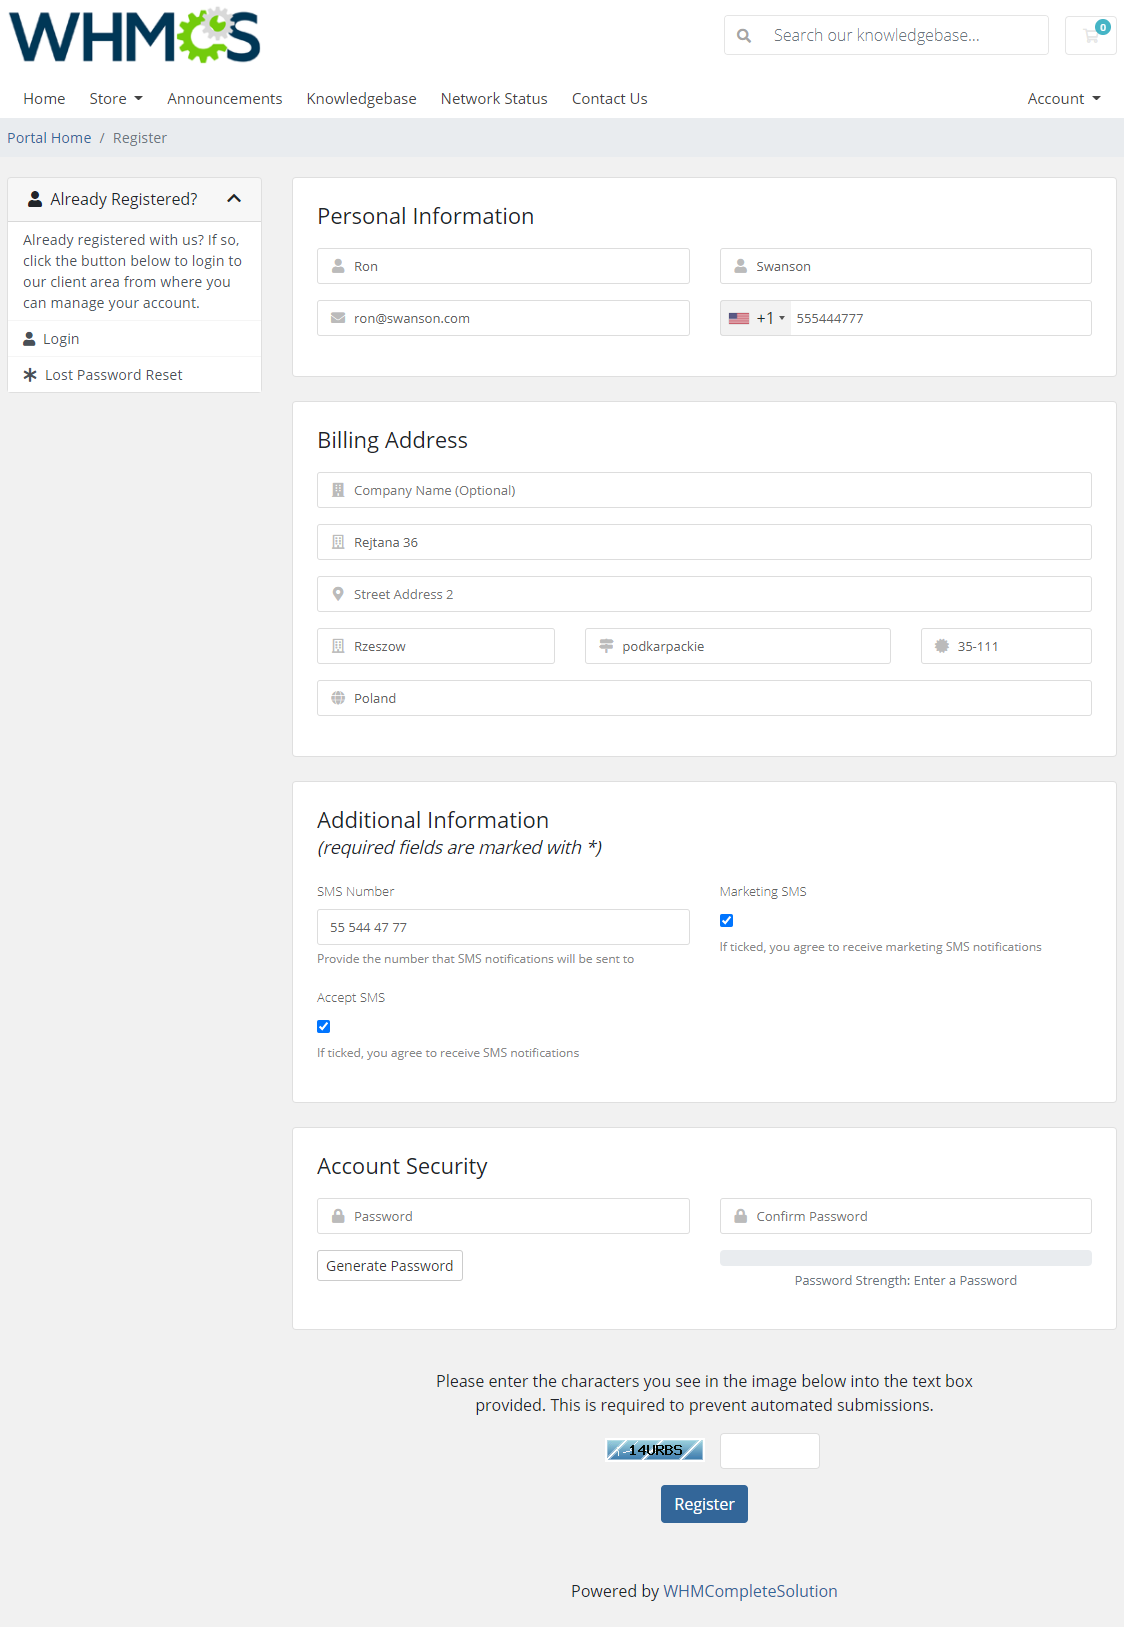
| When you enable the above option, the activation process of a new client proceeds in a slightly different way. Start with filling out your client's details. You can also accept the SMS agreements, but it is not required to receive the account activation token through SMS. |
|
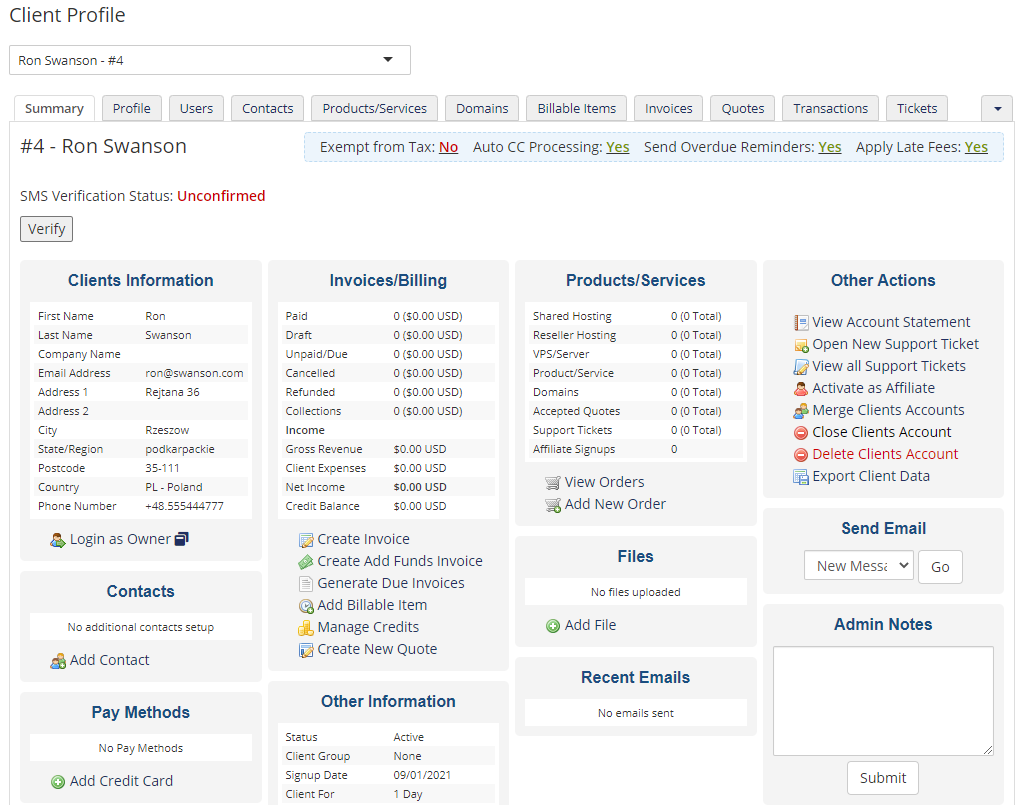
| When registered, the client's verification status will be 'Unconfirmed'. |
|
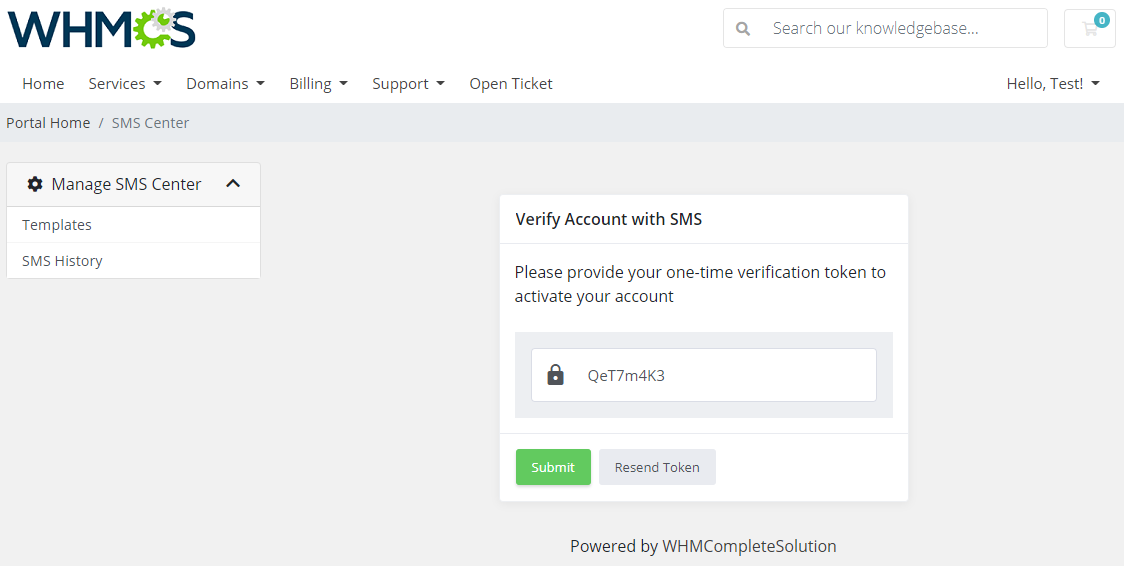
| To verify activation after registration, the new client will have to type in a token received via SMS. If the administrator enables such a possibility, the client may request to send the token again by pressing the 'Resend Token' button. |
|
|
As an administrator, you can also verify the client's account manually.
|
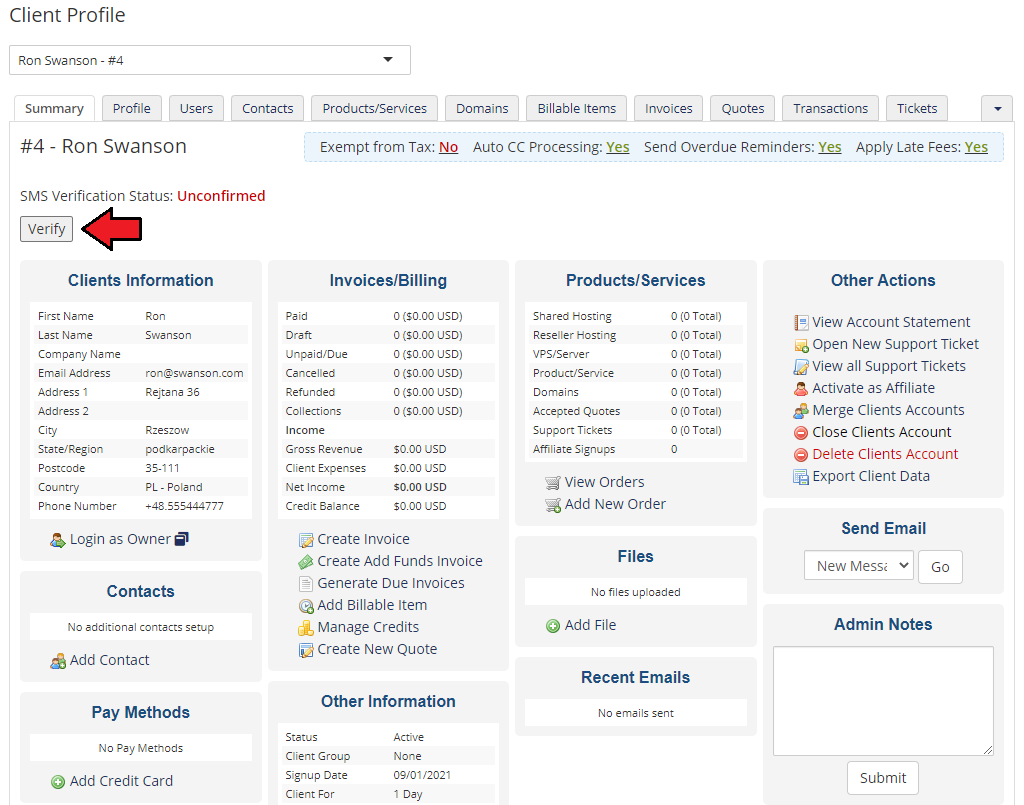
|
| After successful verification, the client's status will change to 'Confirmed'. |
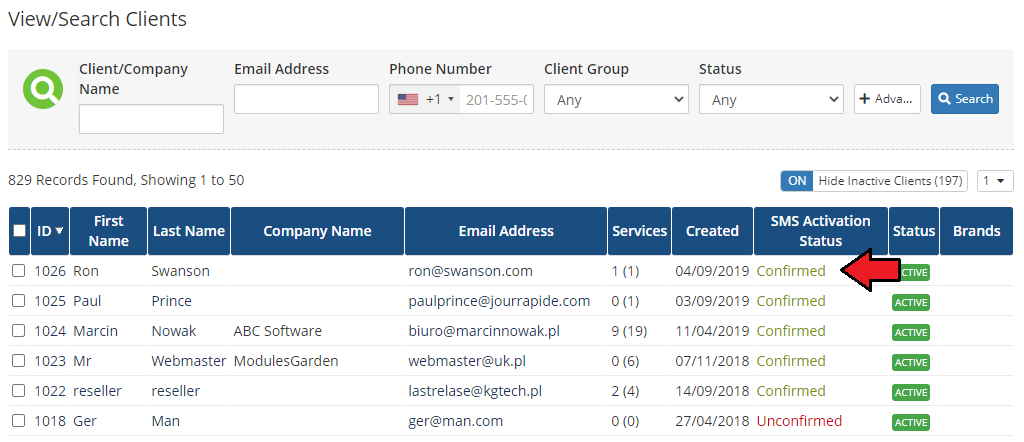
|
| Please be advised that whenever the client changes their phone number, their status will change back to 'Unconfirmed' and the verification process will have to be repeated. |
Order SMS Activation
| Enable 'Order SMS Activation' to allow activating orders. Decide when the order verification shall be forced:
A client will receive a text message with a token, which must be then used to move to the next step. |
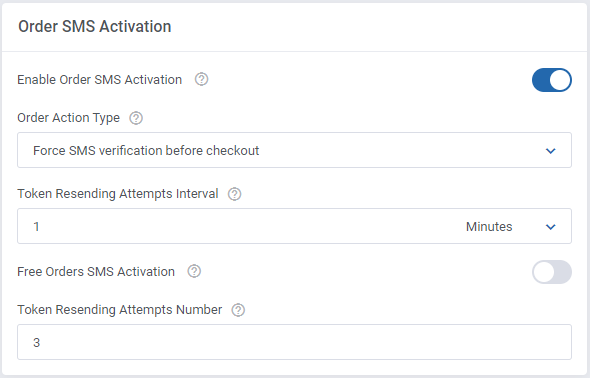
|
| If the above option is enabled, a client will have to enter a valid token received via SMS in order to complete the placed order. Depending on the settings, you may allow clients to ask for resending the token. |
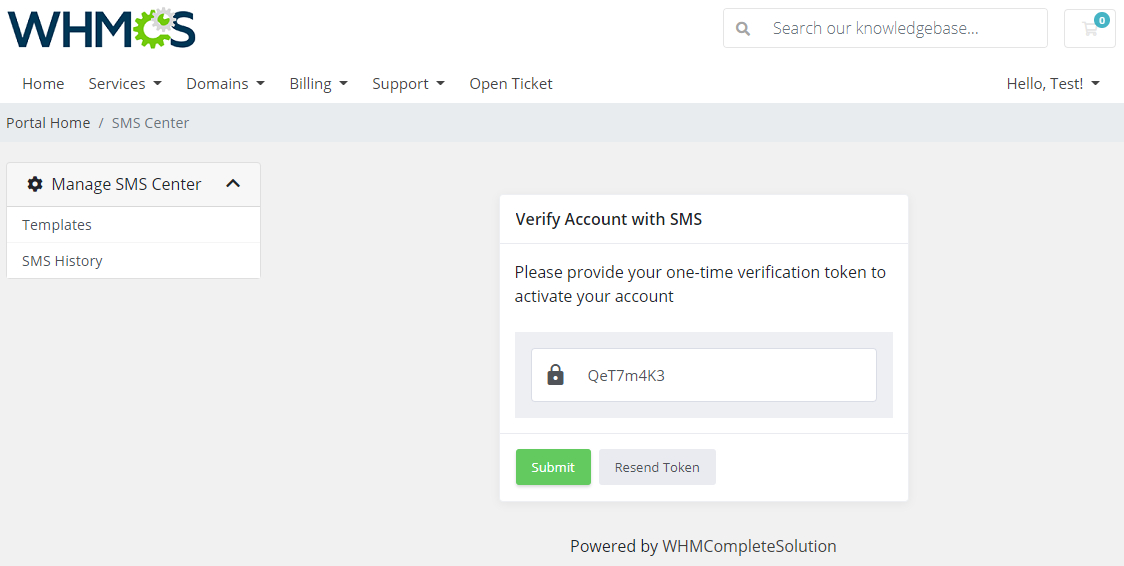
|
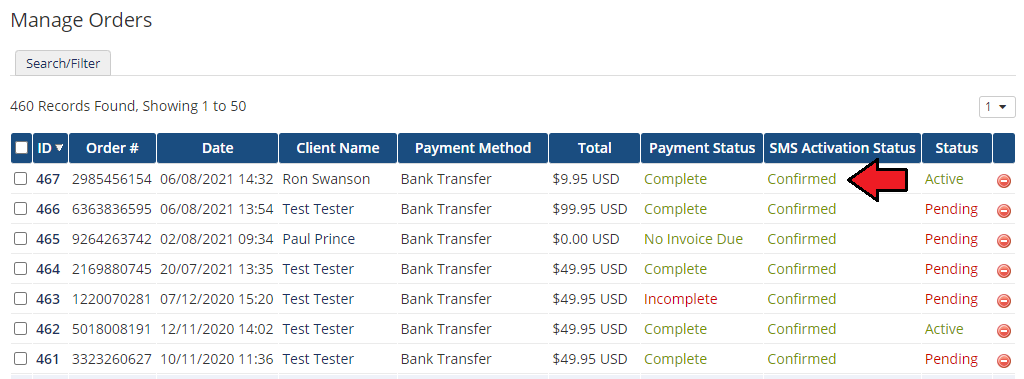
| If the provided token is correct, the order's verification status will change to 'Confirmed'. |
|
SMS Queuing
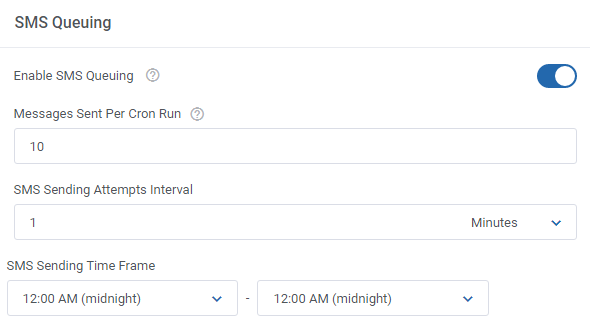
| Enable this option to allow queuing of text messages. Note that this will not cover tokens sent for activations. Determine time intervals between the next resending attempts and the total number of messages that can be sent in one attempt. Detailed information on this function is provided here. |
|
Token Configuration
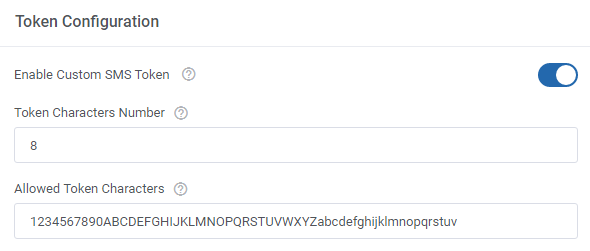
| In this section you can also change default token settings by providing your own token length as well as allowed character sets. Please note that the allowed set of characters used for generating a token may contain chars from the following range only: 1234567890ABCDEFGHIJKLMNOPQRSTUVWXYZabcdefghijklmnopqrstuvwxyz Any other special characters like: ", &, >, < or similar may cause unpredictable errors. |
|
Custom Fields
| Finally, select which of the existing client custom fields should be used to provide the client phone number to send messages. Note: Choose only if you have enabled the 'Use Custom Number' from the 'General Settings', because otherwise the default WHMCS number will be used and any additional custom fields will not be required. |

|
Skip Queue
| If you want the messages that are sent from the client's profile to skip the queue then enable the 'Skip Queue' option. |

|
Invoice Activation
| If you want clients to check invoices that are not assigned to any order using a token delivered via SMS, then enable the 'Invoice Without Order Activation' option. |

|
Logs
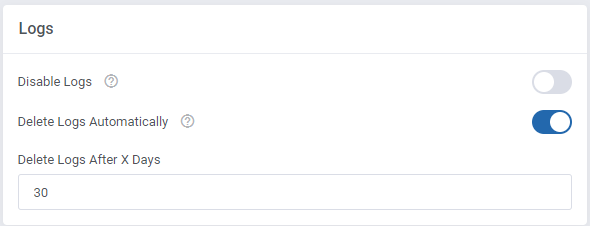
| Logs are by default turned on, if you want to hide the "Logs" section from the top menu, you may do it here. It is also possible to set up the logs to be automatically cleared after the specified here number of days. |
|
Management
Templates
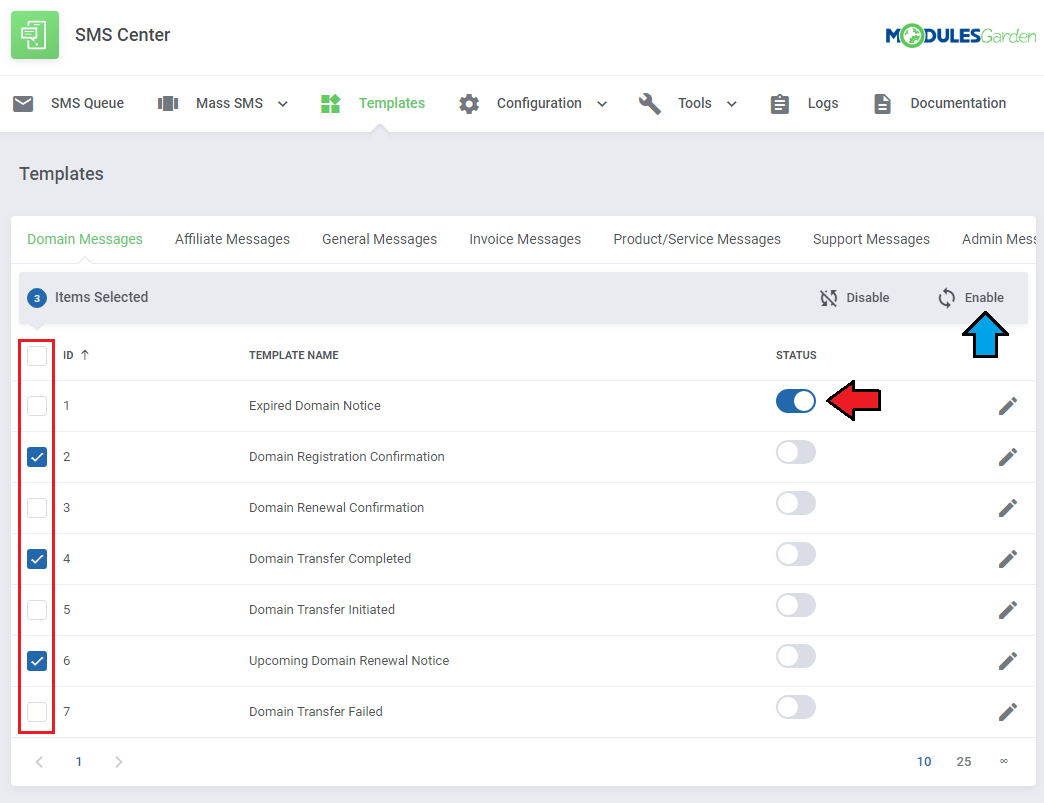
| The 'Templates' tab contains the list of message templates. Each email template in your system has its text message counterpart. Any of these messages can be enabled/disabled by the 'Status' toggle or using the mass actions feature. Note: Titles of the message templates can be translated into the module language file. |
|
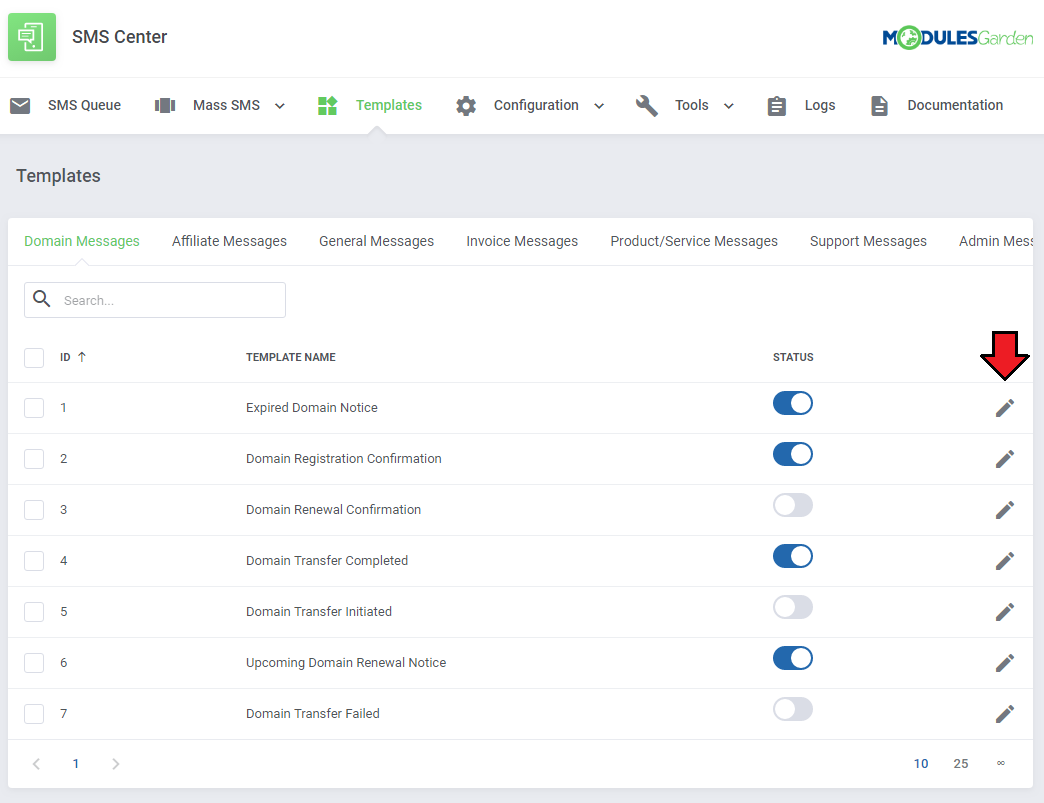
| By default, the module comes with simplified message templates, but you can edit each of them. First, choose the message category from the tabs above, and then press 'Edit' next to the chosen template. |
|
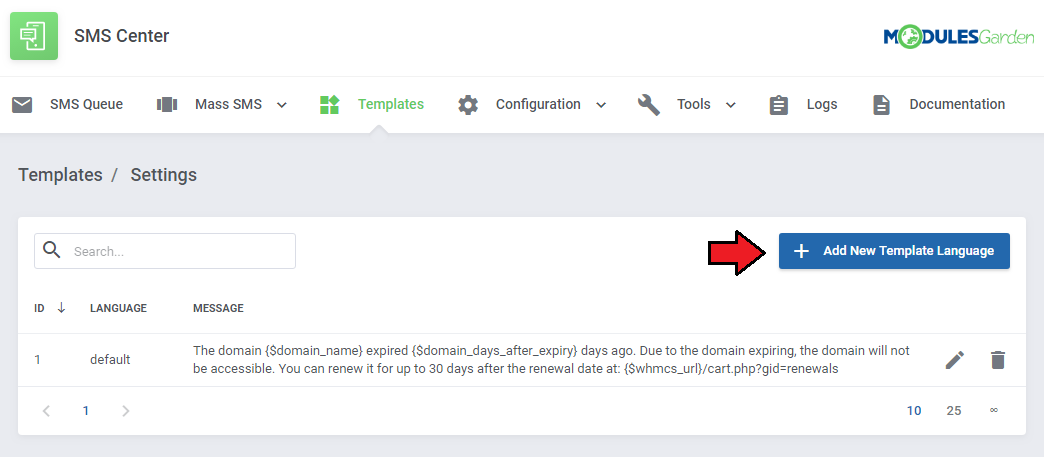
| The first record on the list is a default message of the template. Our module allows you to define messages in selected languages. In order to prepare a message in an additional language, press 'Add New Template Language' as shown on the following screen. |
|
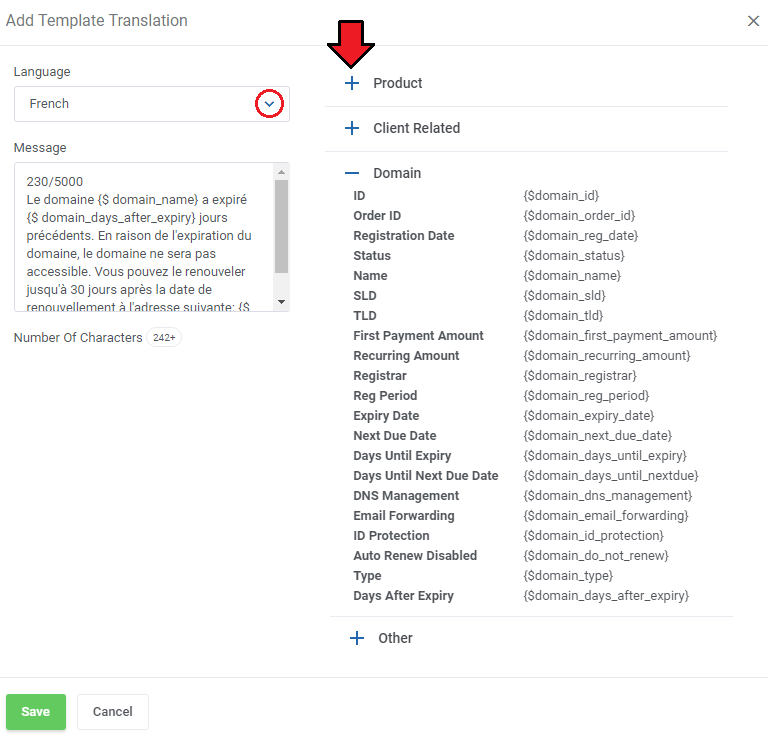
| As you can see on the screen below, a new window appeared. Select the desired language from the dropdown menu and add your translated message. Module template supports merge fields which can be easily inserted into messages. Below the message field, there is a characters counter which helps to estimate the message length. Note: The Language of sent messages is the client's language. If you do not define a message in your client's language, the default message will be sent instead. |
|
SMS Queue
| In this section, you will find a list of all text messages waiting for a cron run to be sent. Specific details on messages that can be sent in one attempt are specified in the 'General' section. |
| Available actions: 1. Start - send message manually. |
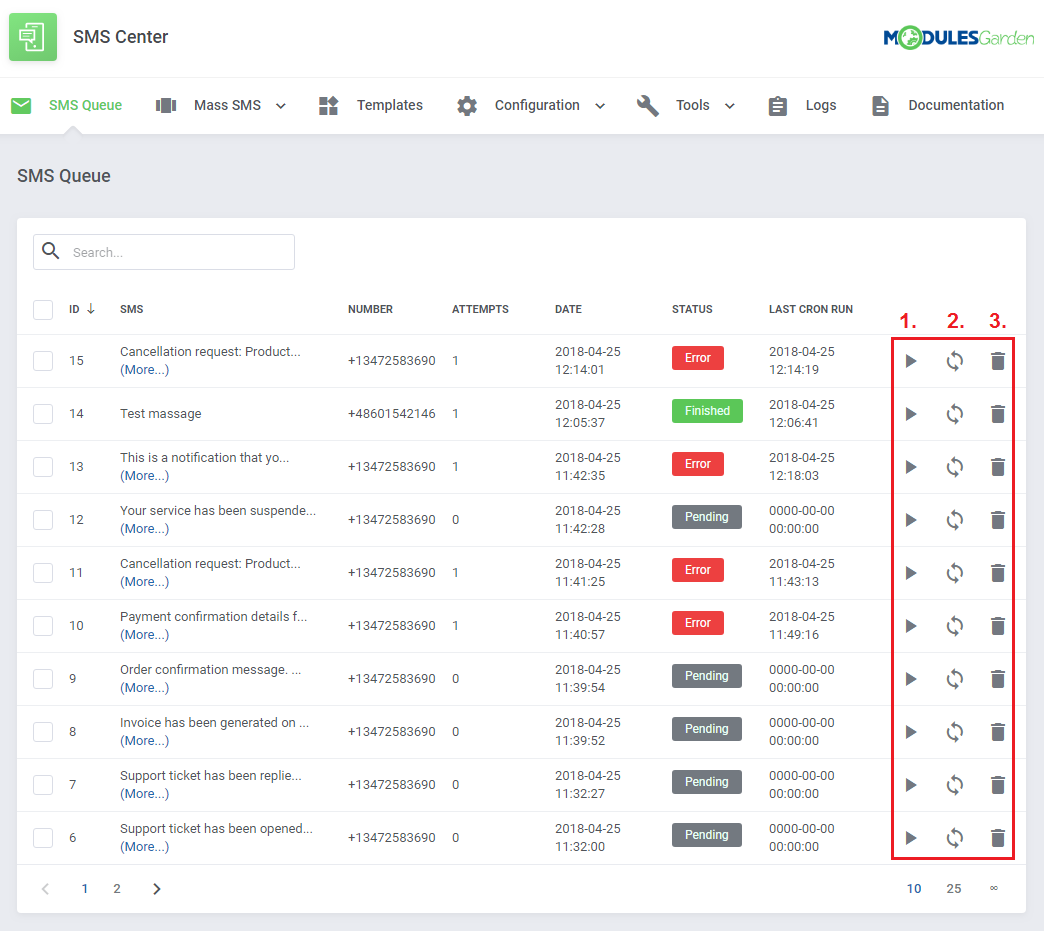
|
| To save time, you can also use mass actions. |
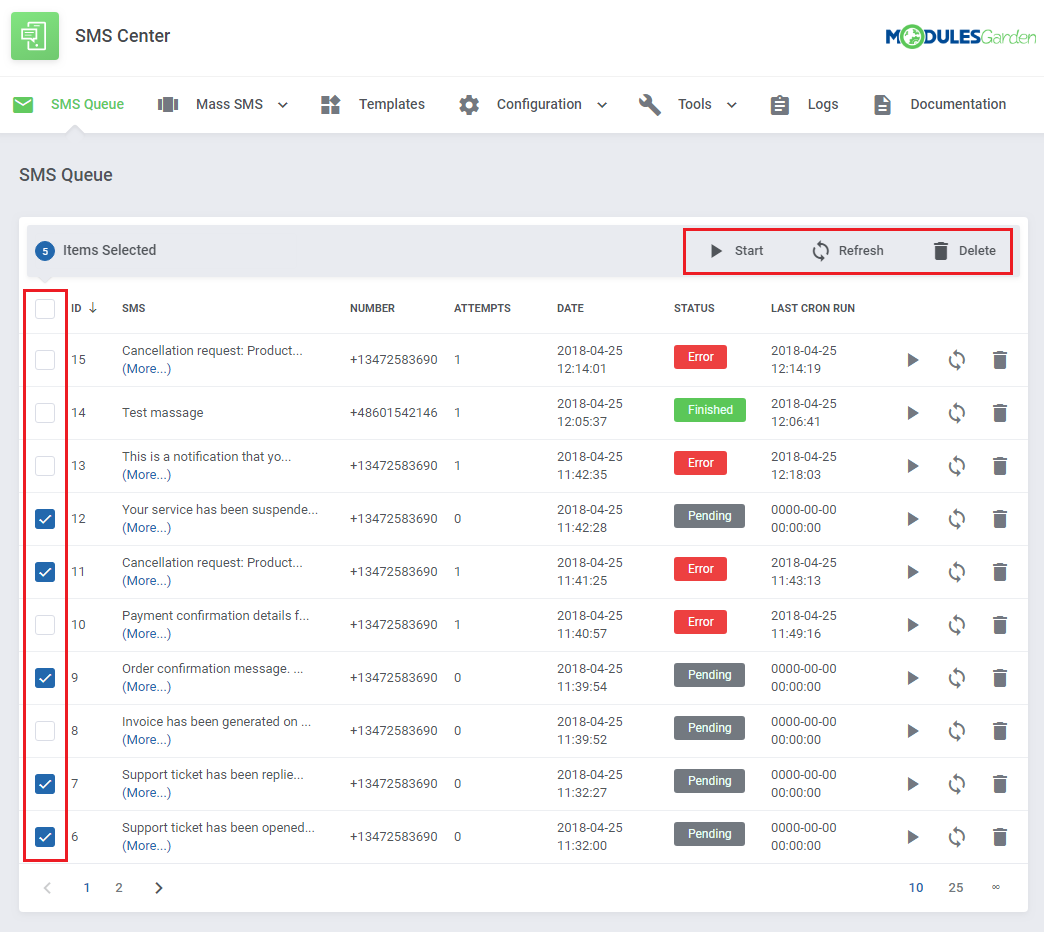
|
Mass SMS
| Sending mass text messages to your clients is a convenient tool that allows preparing messages that will be delivered to a group of clients according to a specified configuration. |
Mass SMS Templates
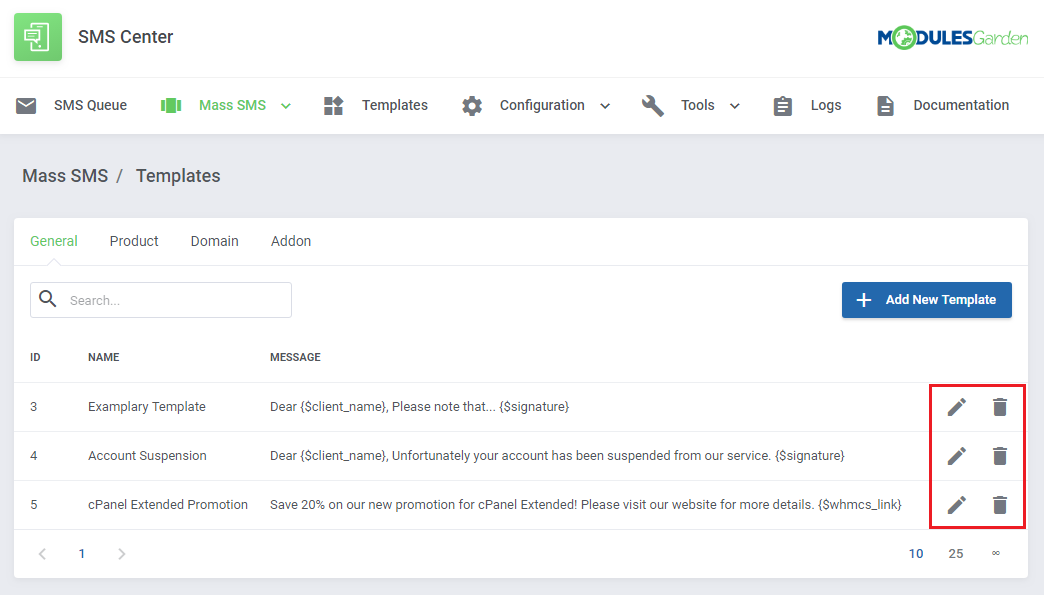
| Firstly, move to 'Mass SMS' → 'Templates', and create templates for mass messages there. To start with, choose a group to which the template will be connected and then press 'Add New Template' . |
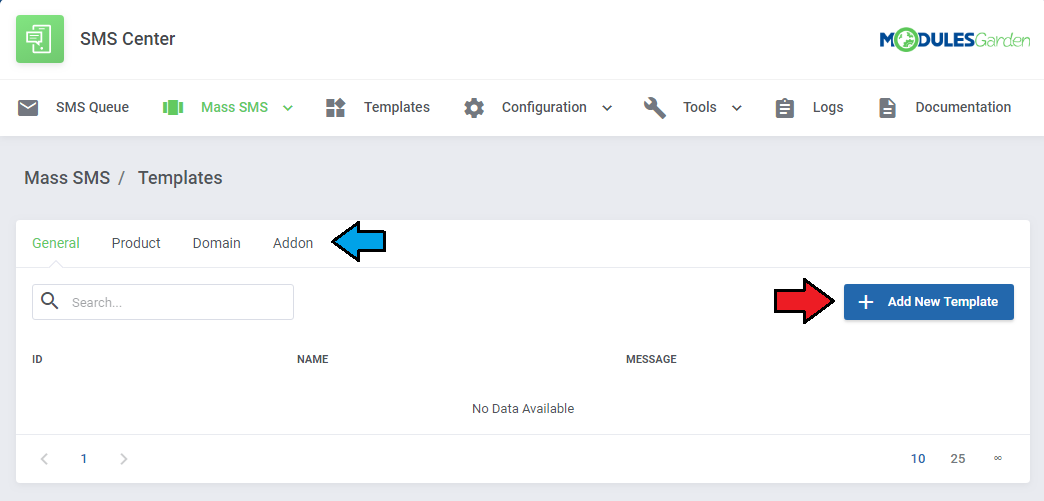
|
| Enter your template name and type in the message content. Use merge fields available for the group. Follow the characters counter current rate to estimate the message length. Do not forget to confirm the changes. |
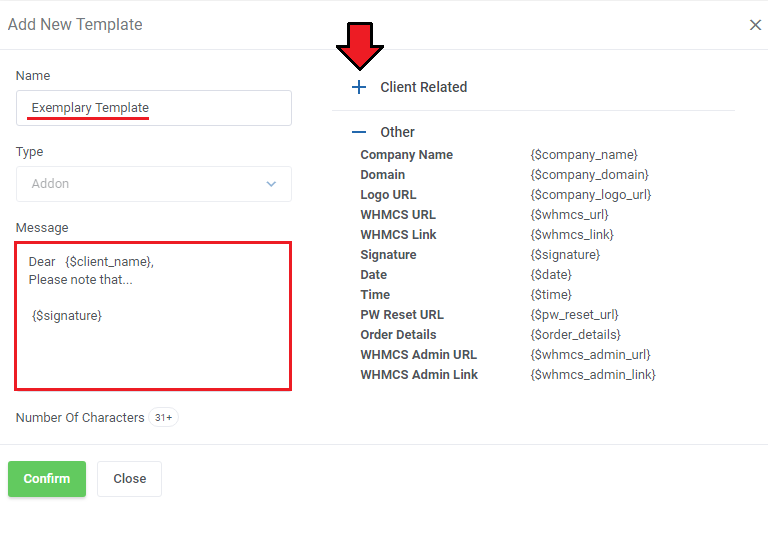
|
| All created templates are free to edit or remove when no longer used. |
|
Mass SMS Configuration
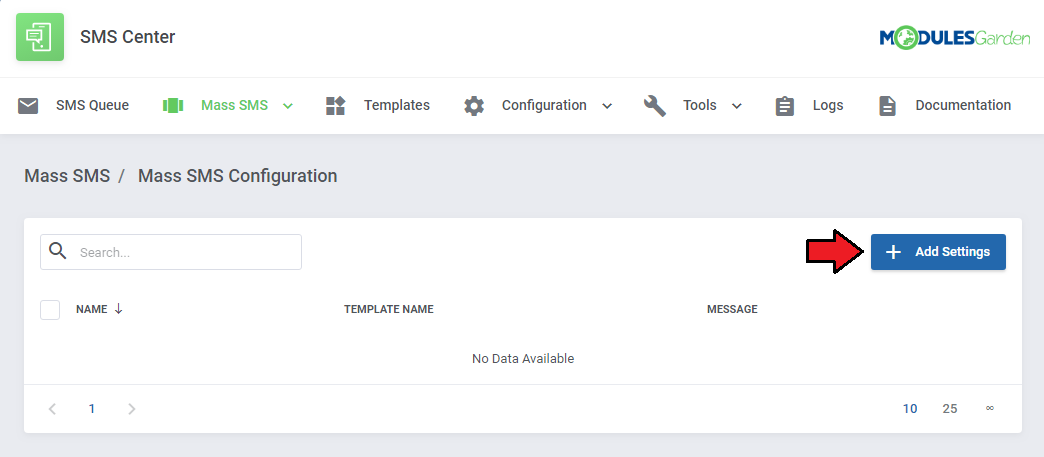
| Now that you have created the templates, move to 'Mass SMS Configuration' to configure the recipient group. Start by adding new settings. |
|
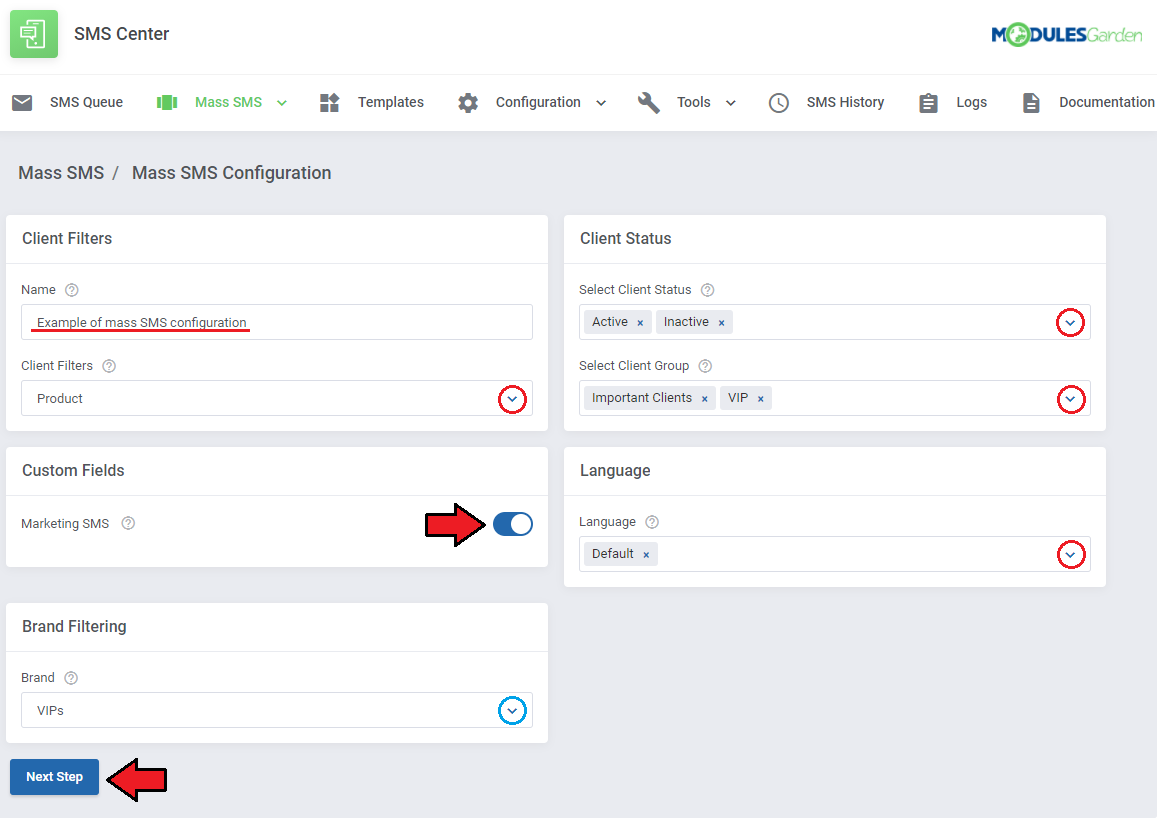
Use filtering fields to set it up as you need. Enter the configuration name and select the type of filtering. You can choose from:
Each filter type configuration differs slightly, but there are some general settings available for each type. These are:
All the above sections are available for 'General' client filter. |
|
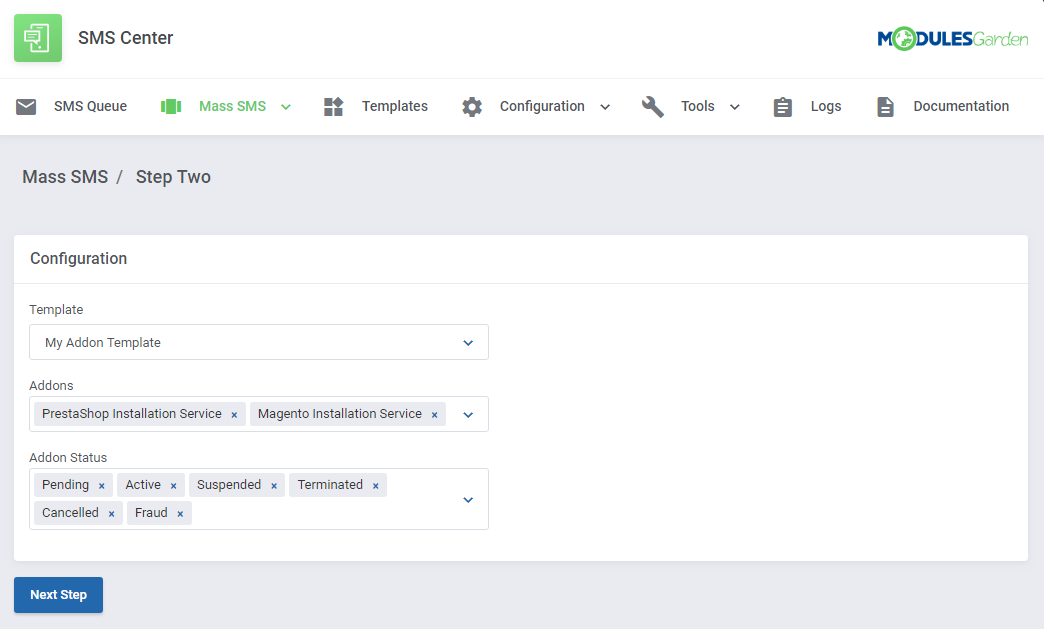
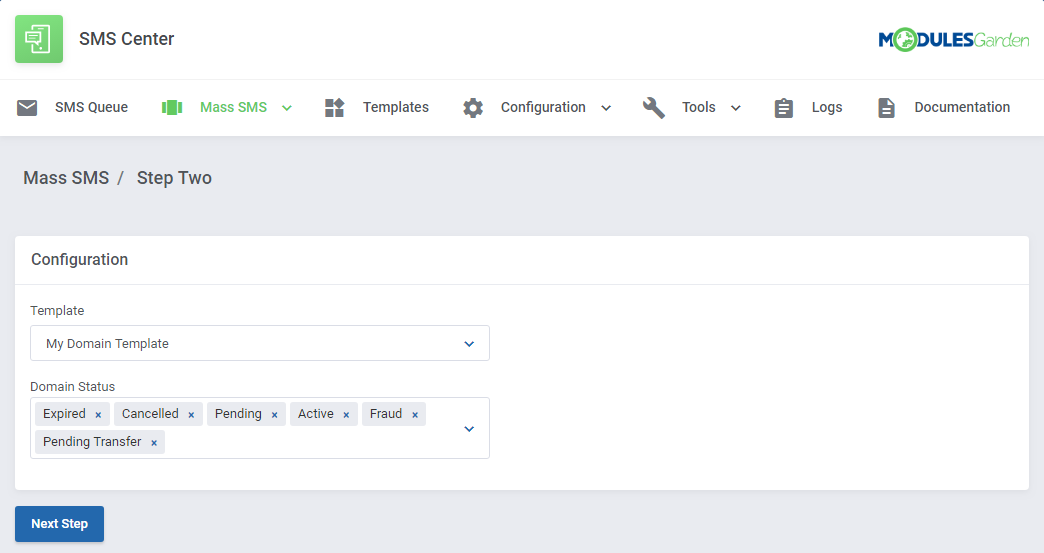
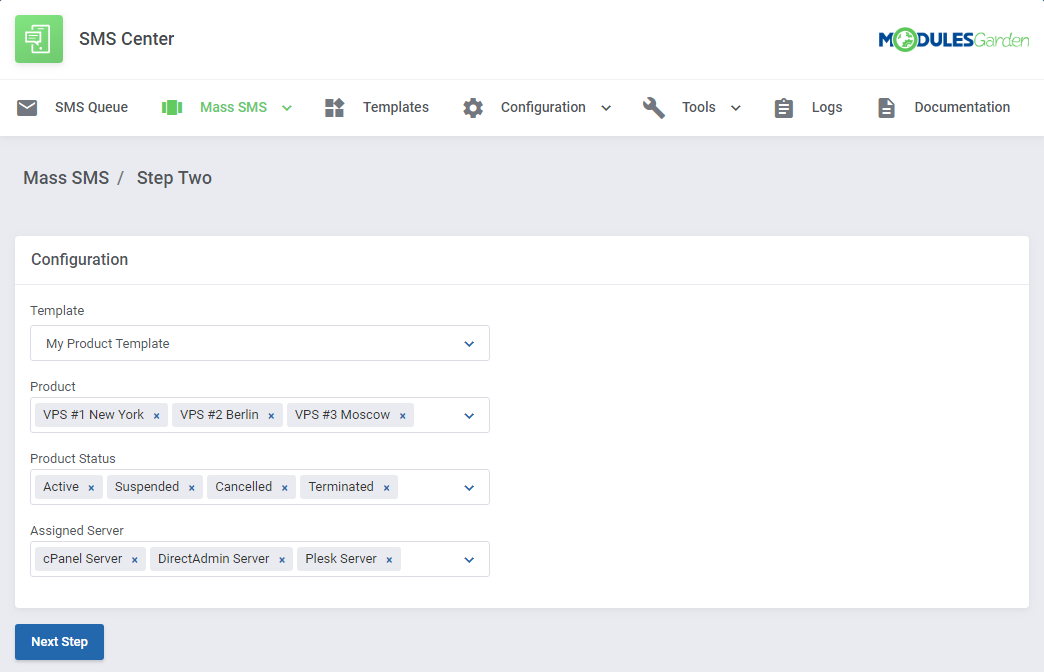
| In the next step you can select an SMS mass template created earlier and add some additional filters depending on which of the 'Client Filters' you had selected in the previous step: Client Filter - Addon
|
|
Client Filter - Domain
|
|
Client Filter - Product
|
|
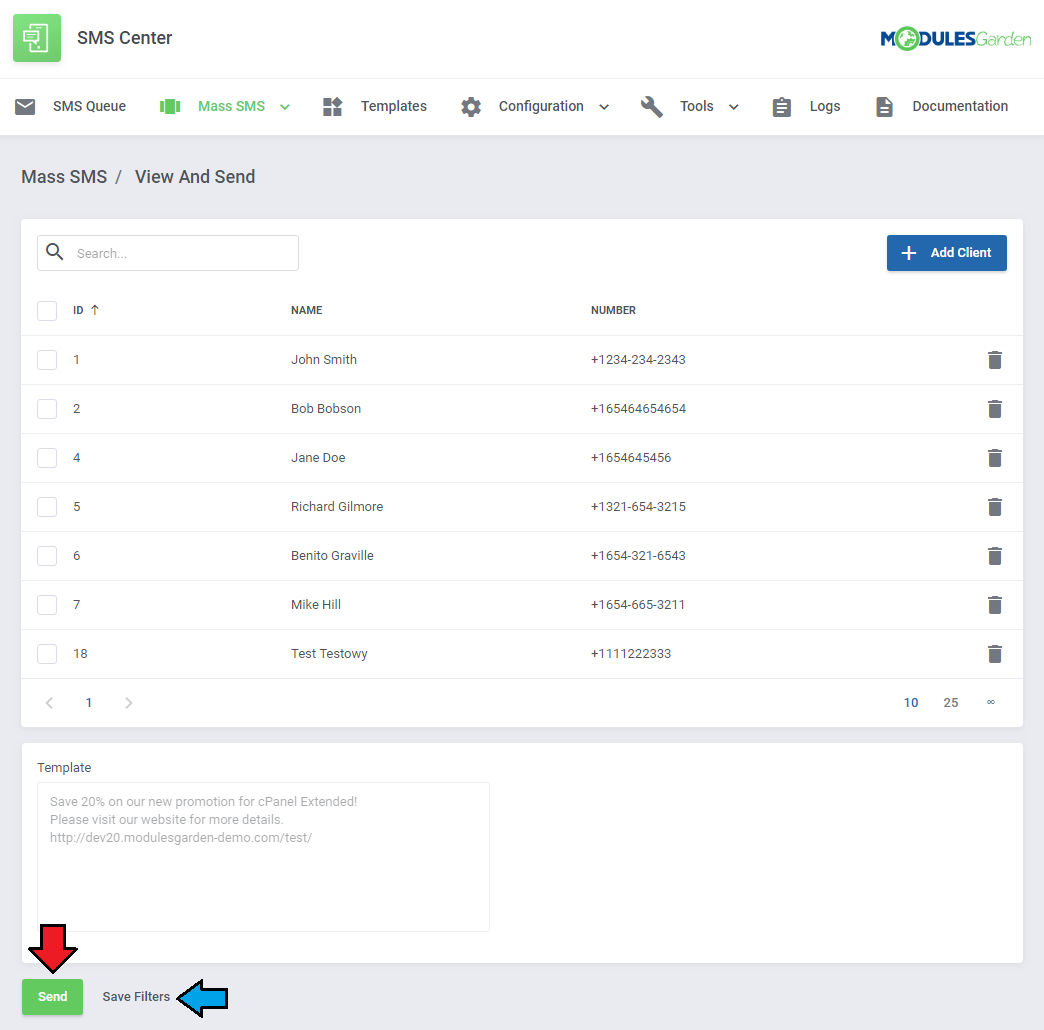
| In the next step you will see what the final SMS will look like and preview the list of clients who will receive the message (based on the previously selected filters). If you want to save this filter for later use, click 'Save Filters' . If everything is correct, press 'Send' to start sending messages to the clients. |
|
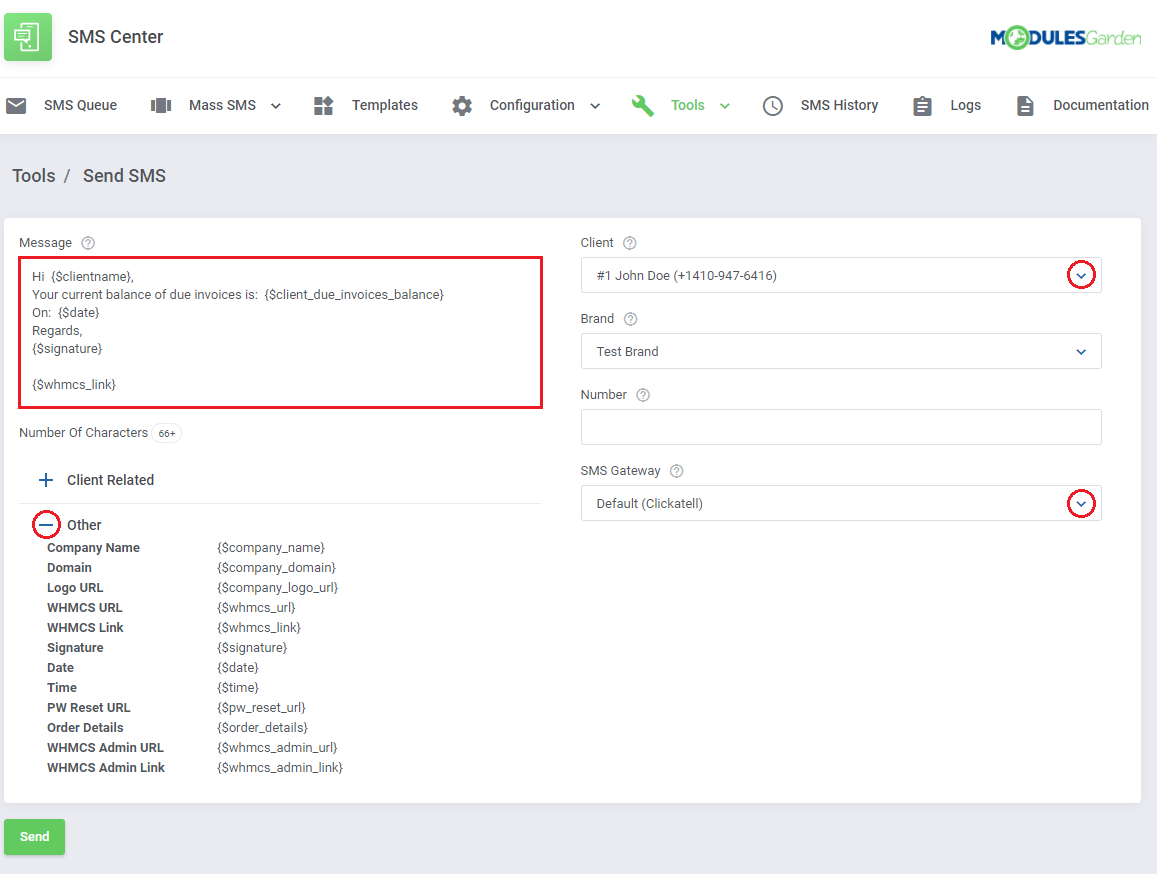
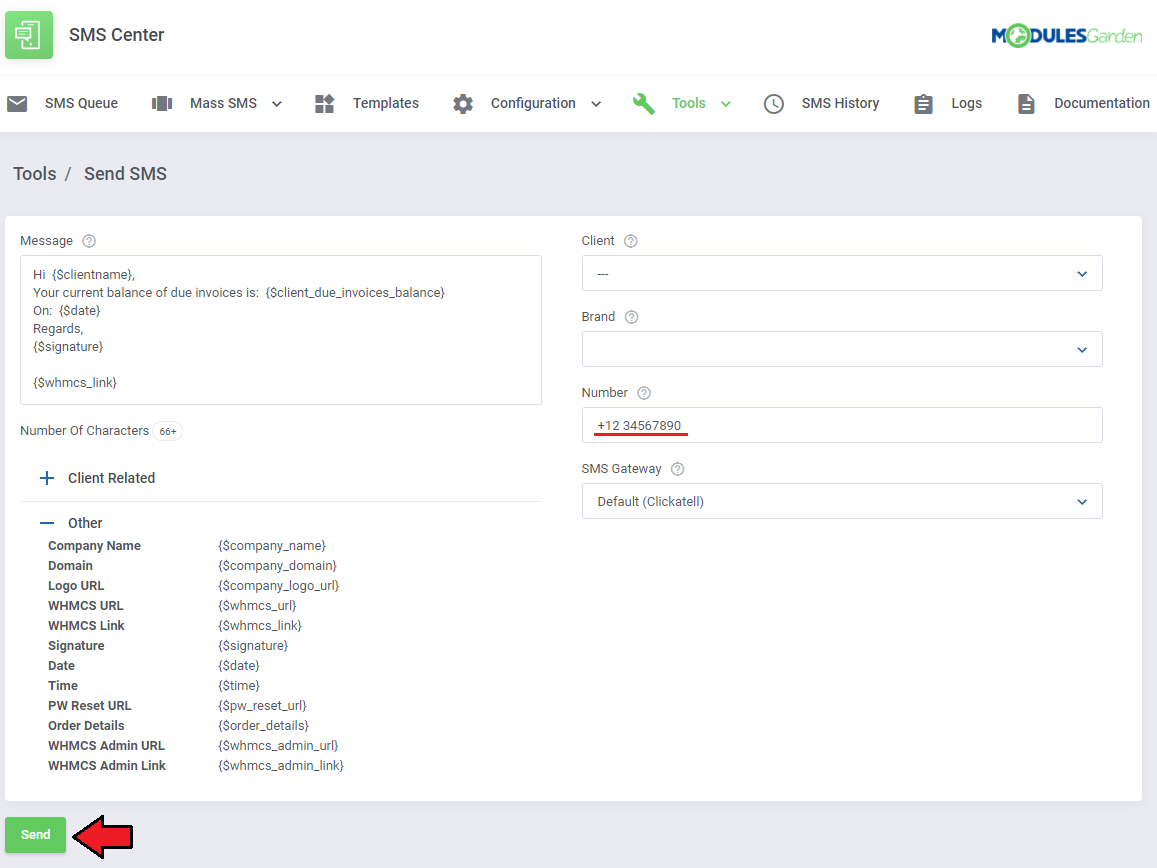
| In the 'Tools' → 'Send SMS' you can send your custom SMS directly to any client or phone number using any of your gateways. Simply type in your message, you may use the available 'Client Related' and 'Other' variables to compose a dedicated message. |
|
| Instead of selecting a client's number, you can also enter any number you want. In such case remember to leave the 'Client' field empty and provide a custom number in the field below. The 'Brand' field is available only if you have the Multibrand For WHMCS module active. Once you select a client, you may choose the brand within which the SMS message will be sent. When the message is ready, press the 'Send' button which will add it to the 'SMS Queue' . |
|
Clients
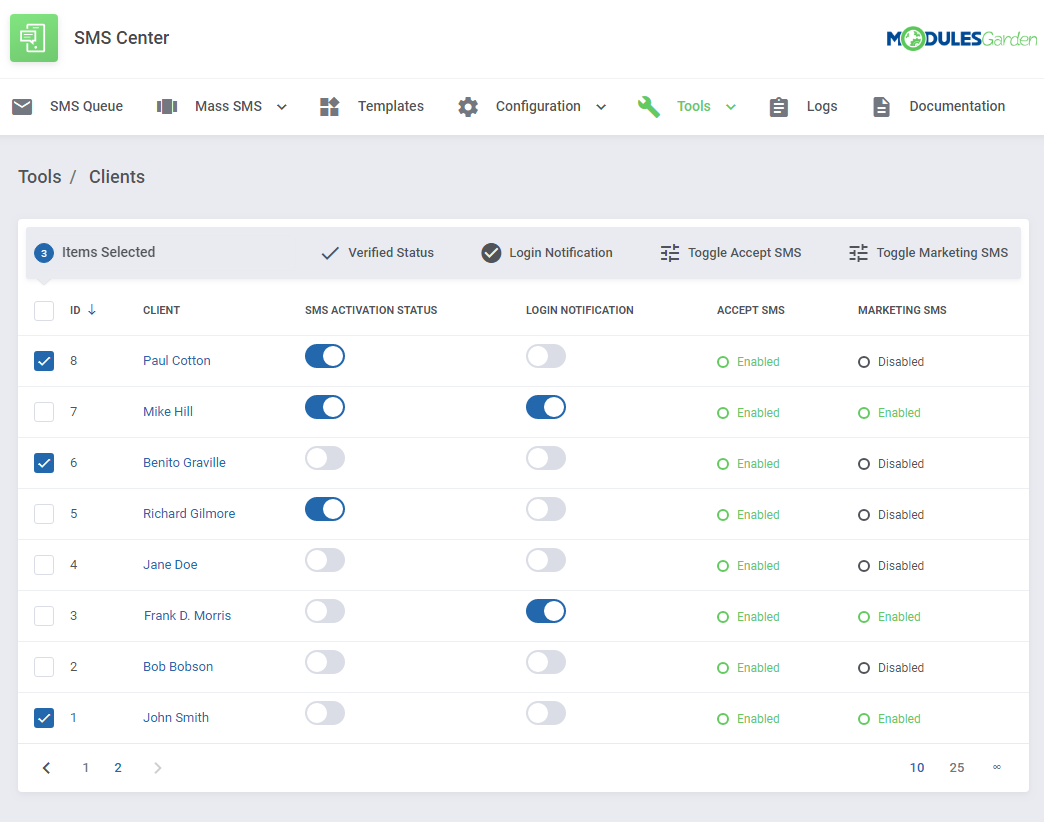
| In the 'Tools' → 'Clients' you can find list of all your WHMCS clients with their current SMS verification status. From here you can easily manage the verification status as well as toggle SMS notifications for administrators to receive when a specified customer logs in to the client area. |
|
Logs
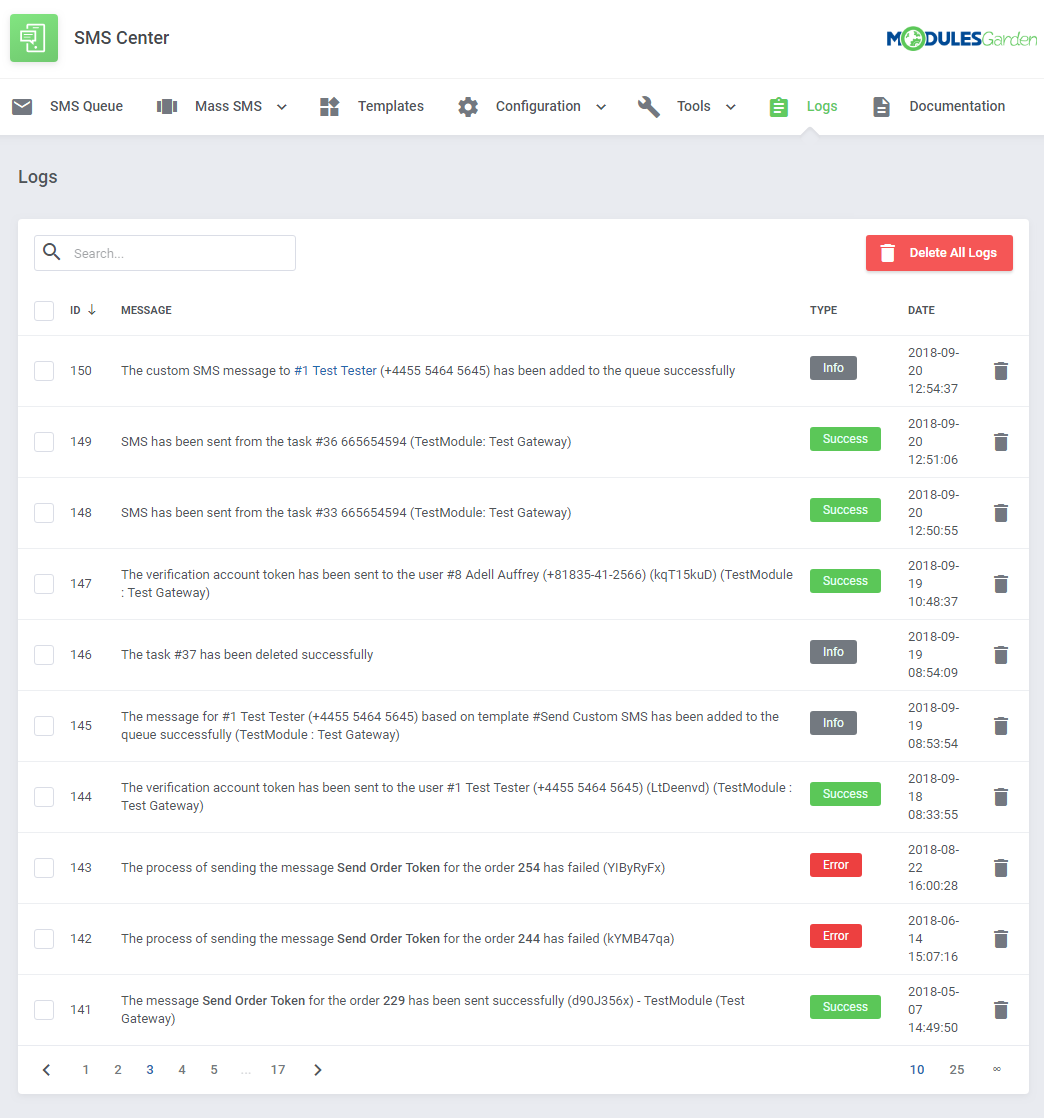
| Messages sent to your clients are logged under the 'Logs' tab. As you can see on the following screen, here you can find detailed information on each message sent automatically to a client notifying them about certain actions. |
|
SMS History
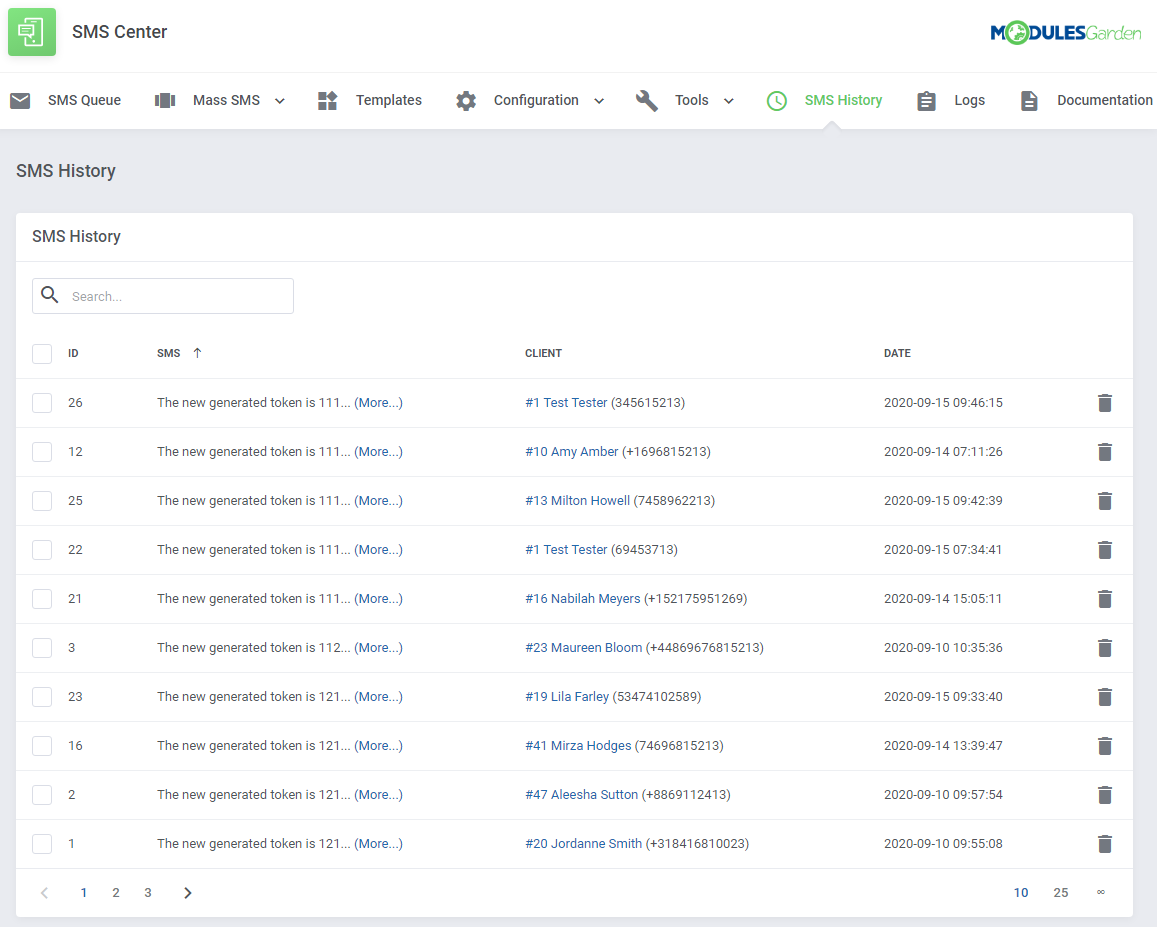
| In this section you will find a precise list of all SMS messages sent recently. If you want to find a particular client or mobile phone number, simply use the search box. |
|
Client's Summary Page
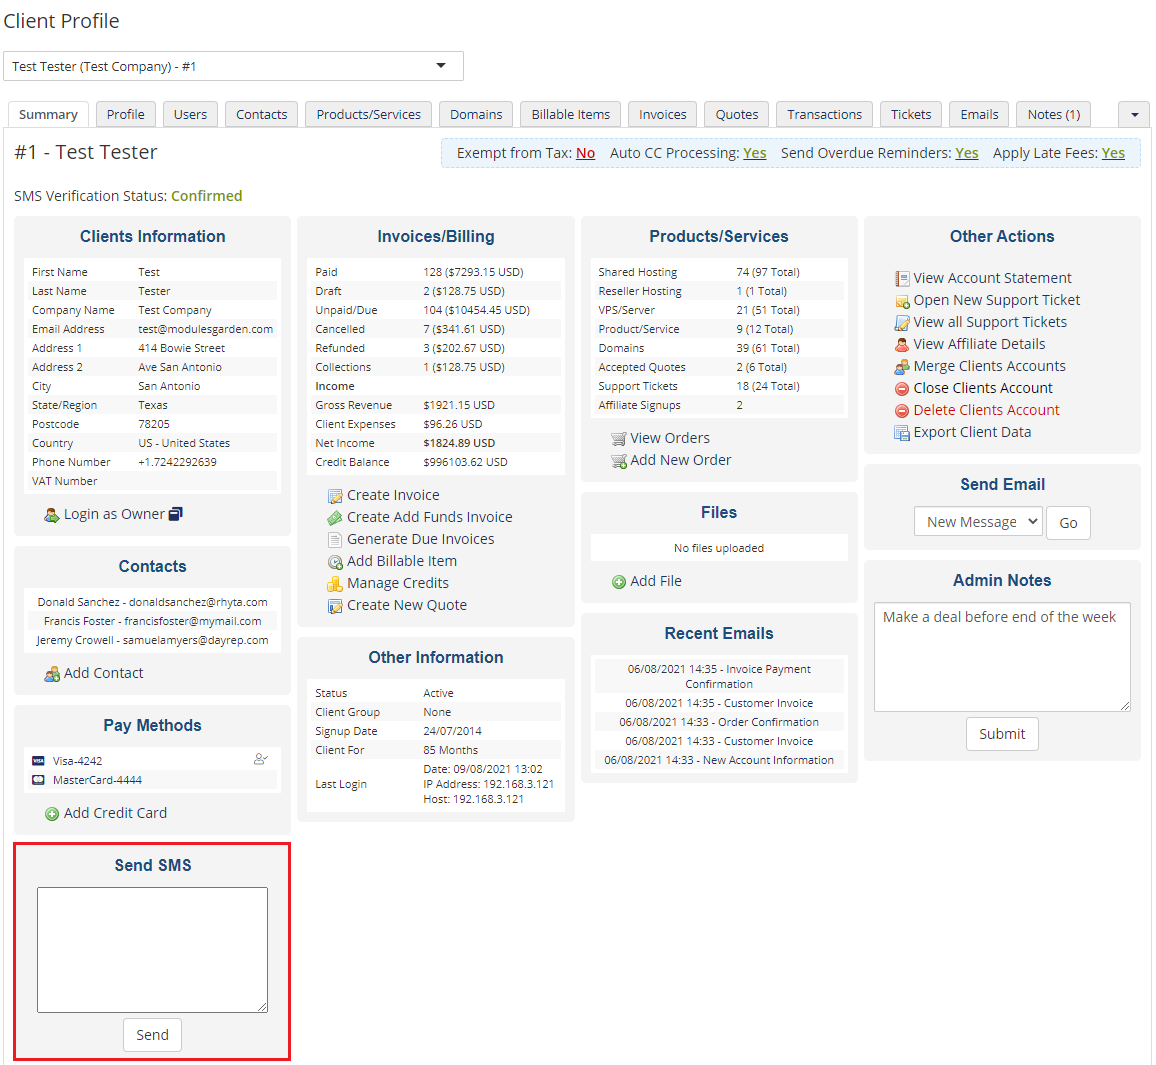
| From the clients' summary page you can send text messages to clients using only a simple box. Type in the message content into the text field like on the screen below and press 'Send'. |
|
Client Area
Opt-In/Out Agreements
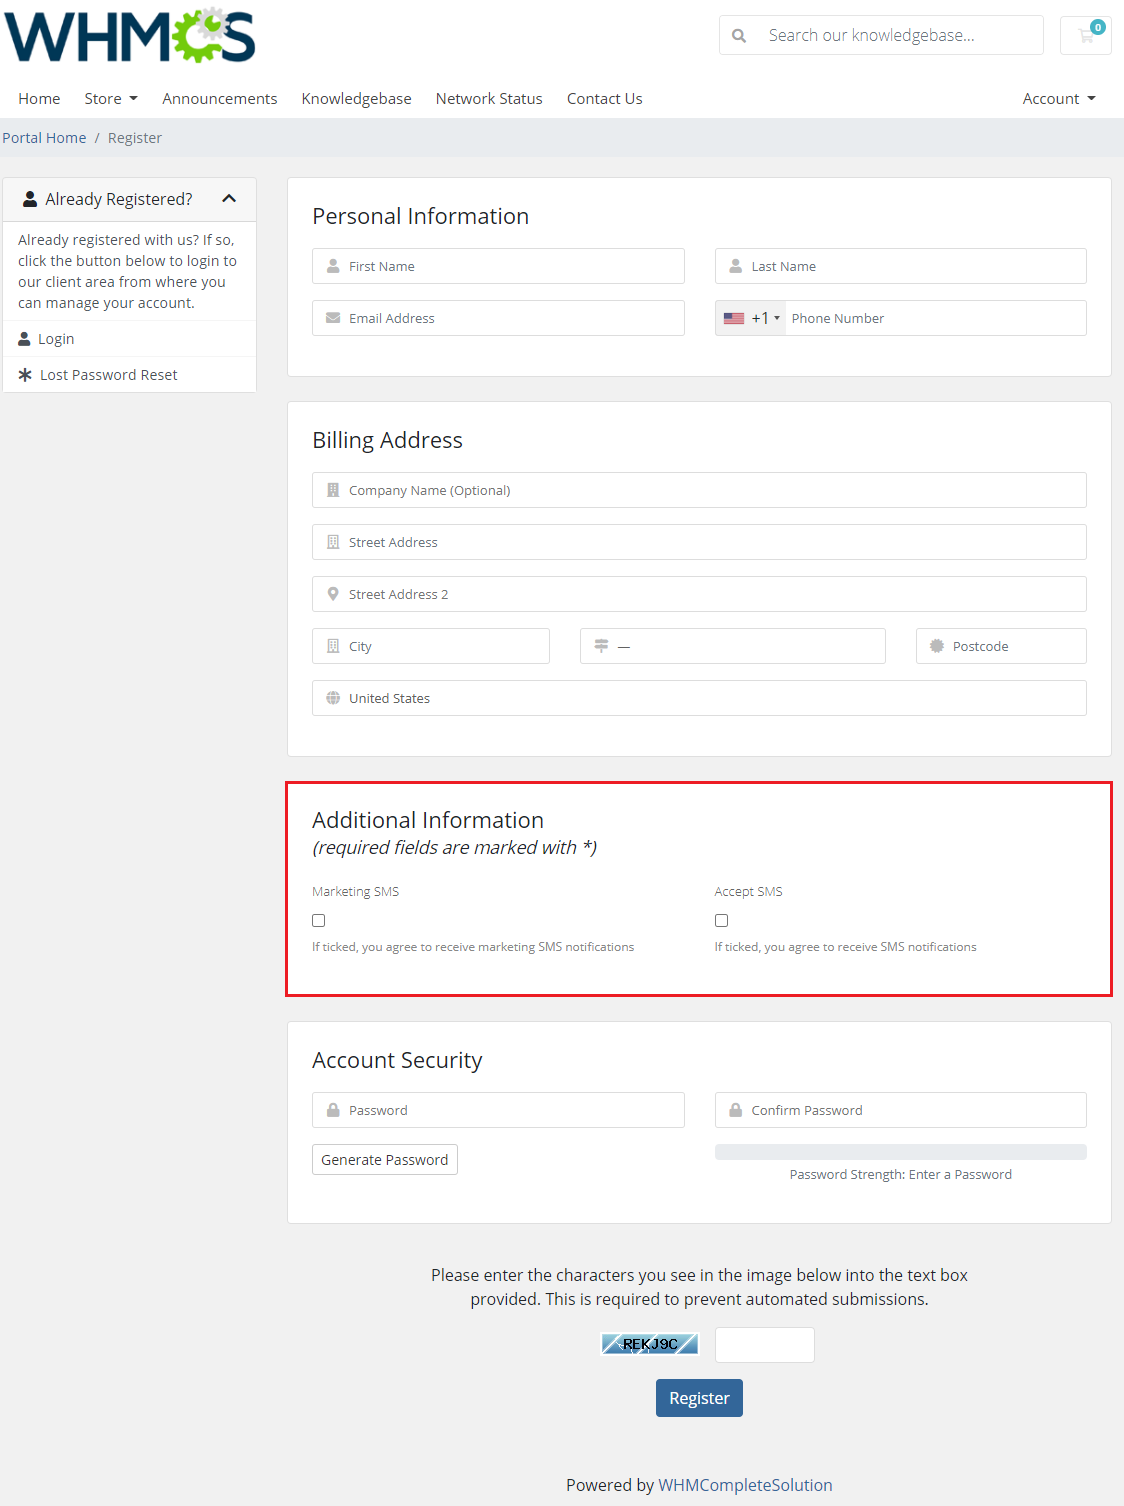
| To meet the GDPR requirements, the client can decide to opt-in/out from receiving SMS message notifications and marketing messages during the registration process. Note: You can edit the description of these rules in your 'WHMCS' → 'Setup' → 'Custom Client Fields' section. |
|
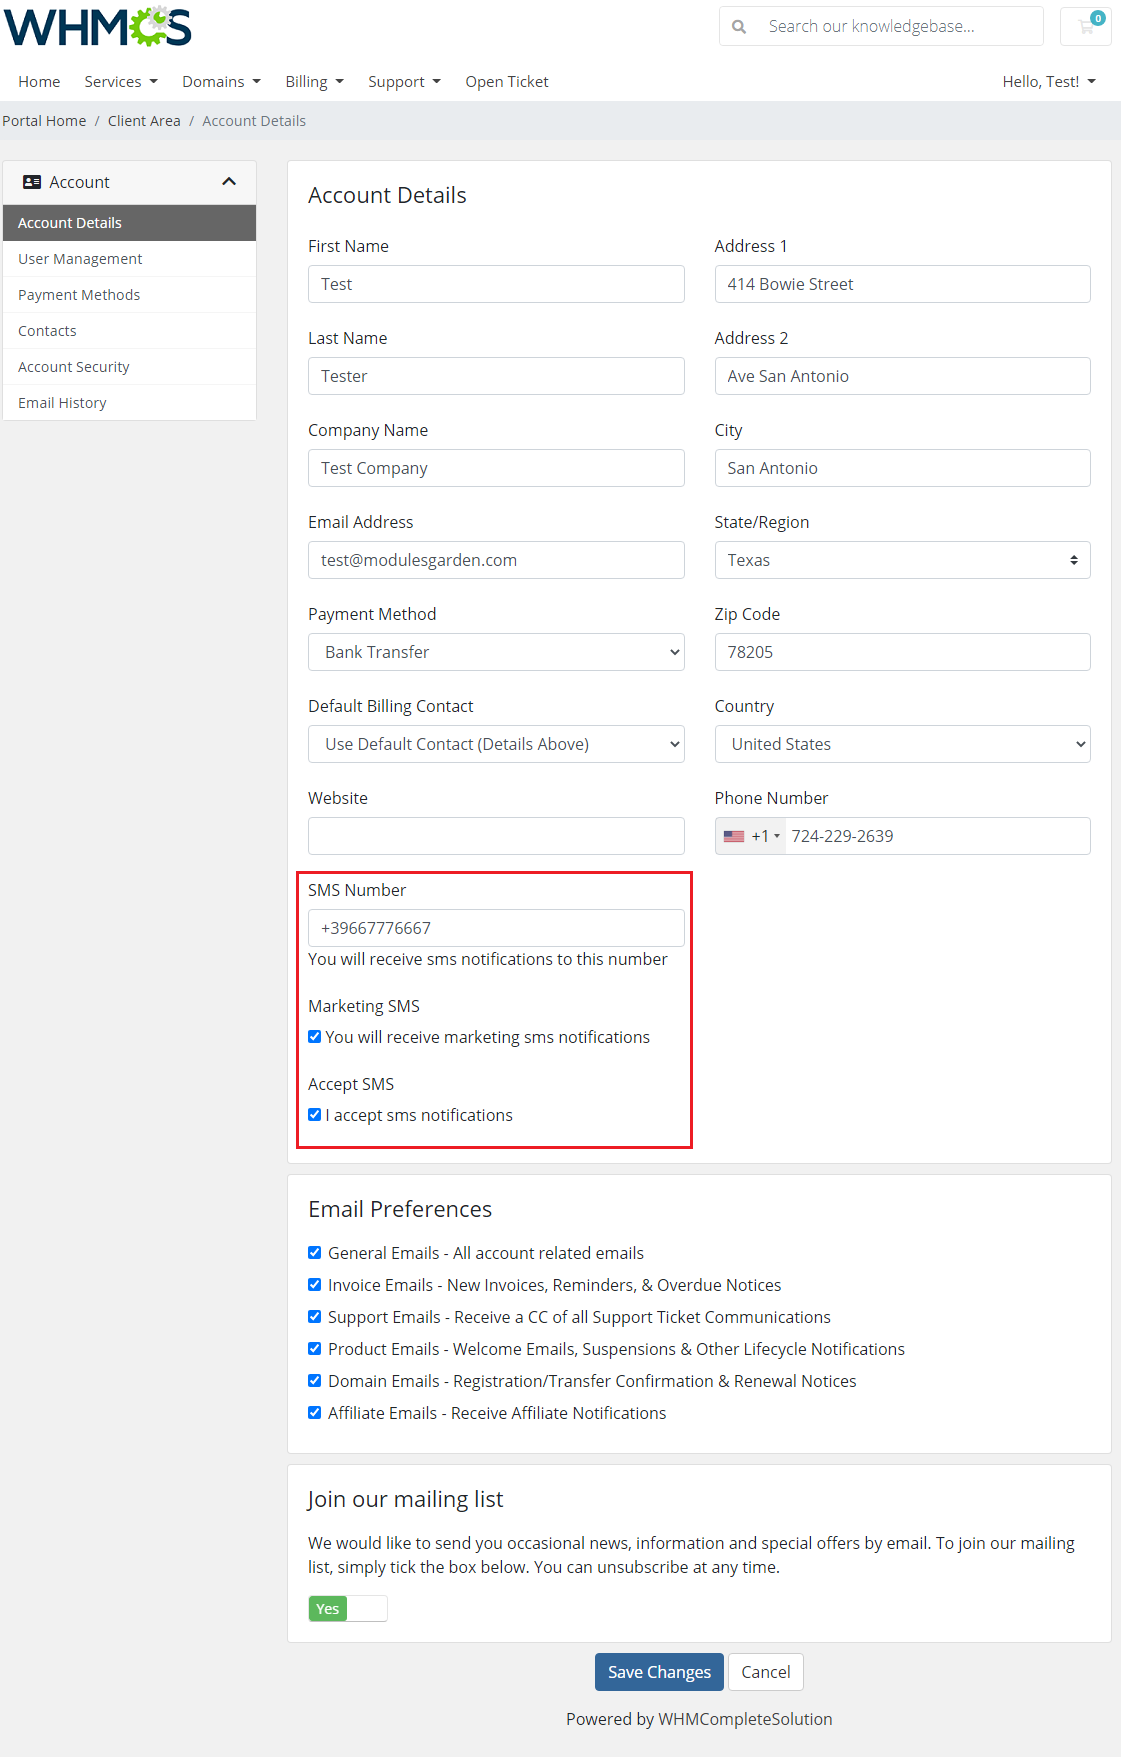
| After registration, the options can later be changed in the client's profile. Important: The 'Accept SMS' field will be enabled by default for the already existing clients when you install the module for the first time. |
|
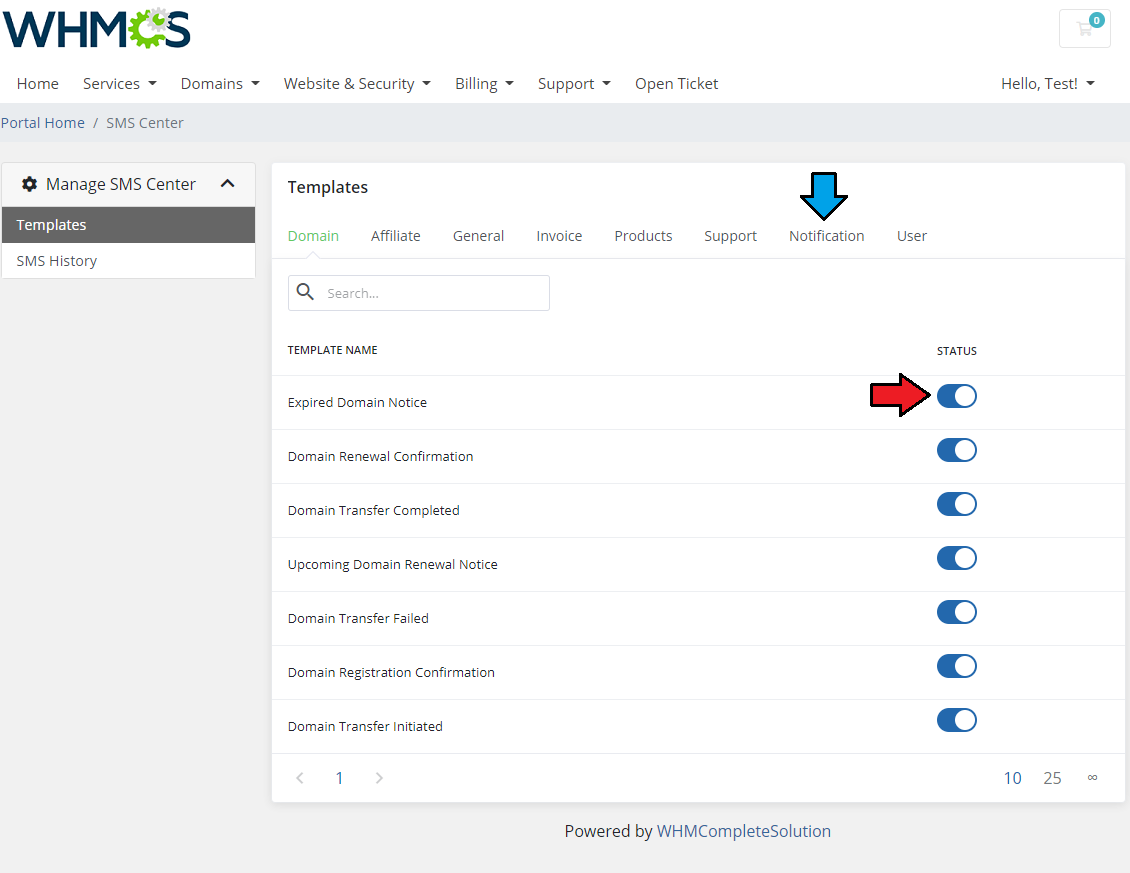
Notifications Templates
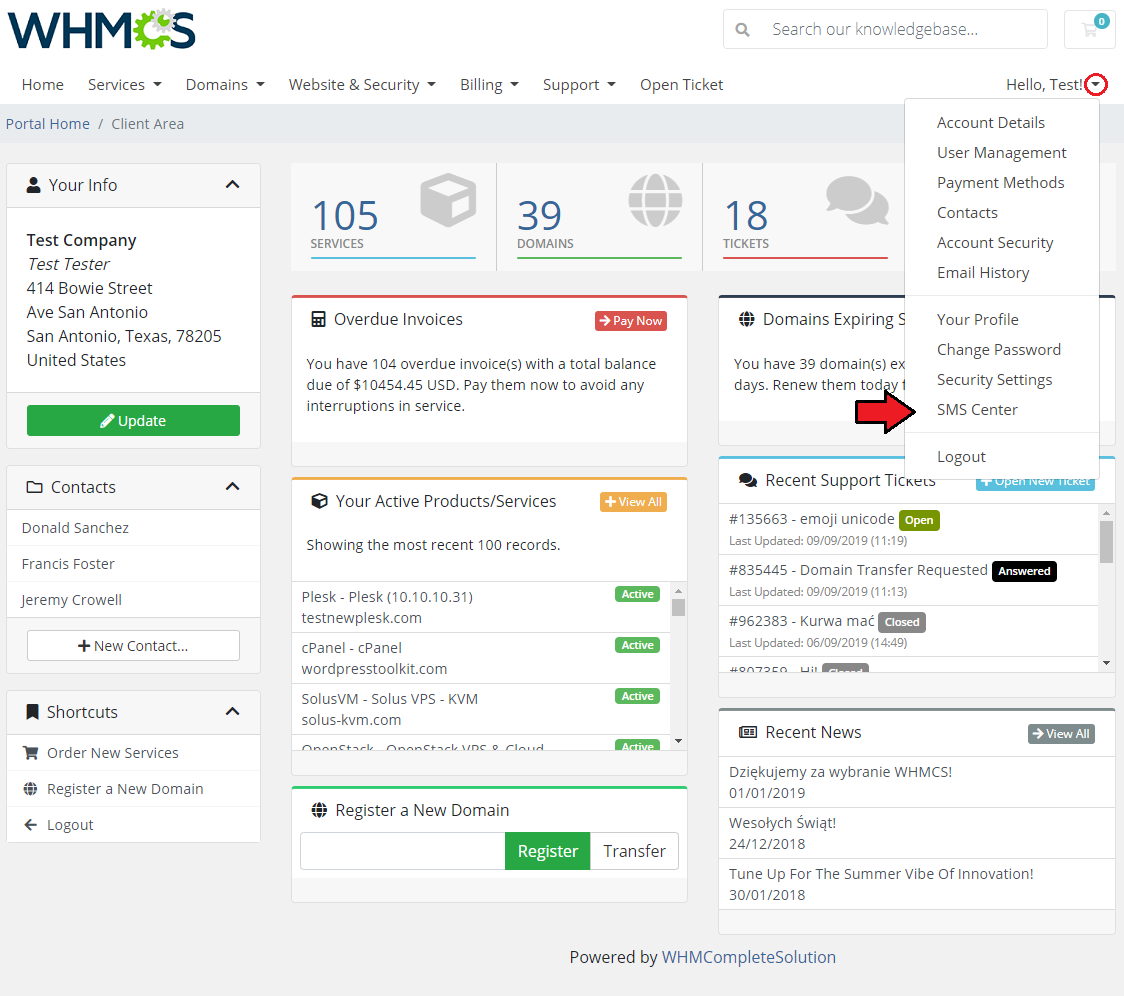
| If enabled in general settings, a new position will appear in the client area navigation menu. By pressing it, your client will be moved to the configuration of SMS notification. |
|
| Here, your client can choose which notifications to receive. Remember that only templates with the status enabled set in templates configuration will be visible to the clients. Note: If you are using a custom number field to store clients SMS numbers, make sure they are provided in their profiles. Otherwise, SMS notifications will be unavailable for that clients. |
|
SMS Center Two-Factor Authentication
| SMS center For WHMCS consists of two parts: the actual SMS Center addon and the authentication addon. Two-Factor Authentication adds an extra layer of protection while logging in. |
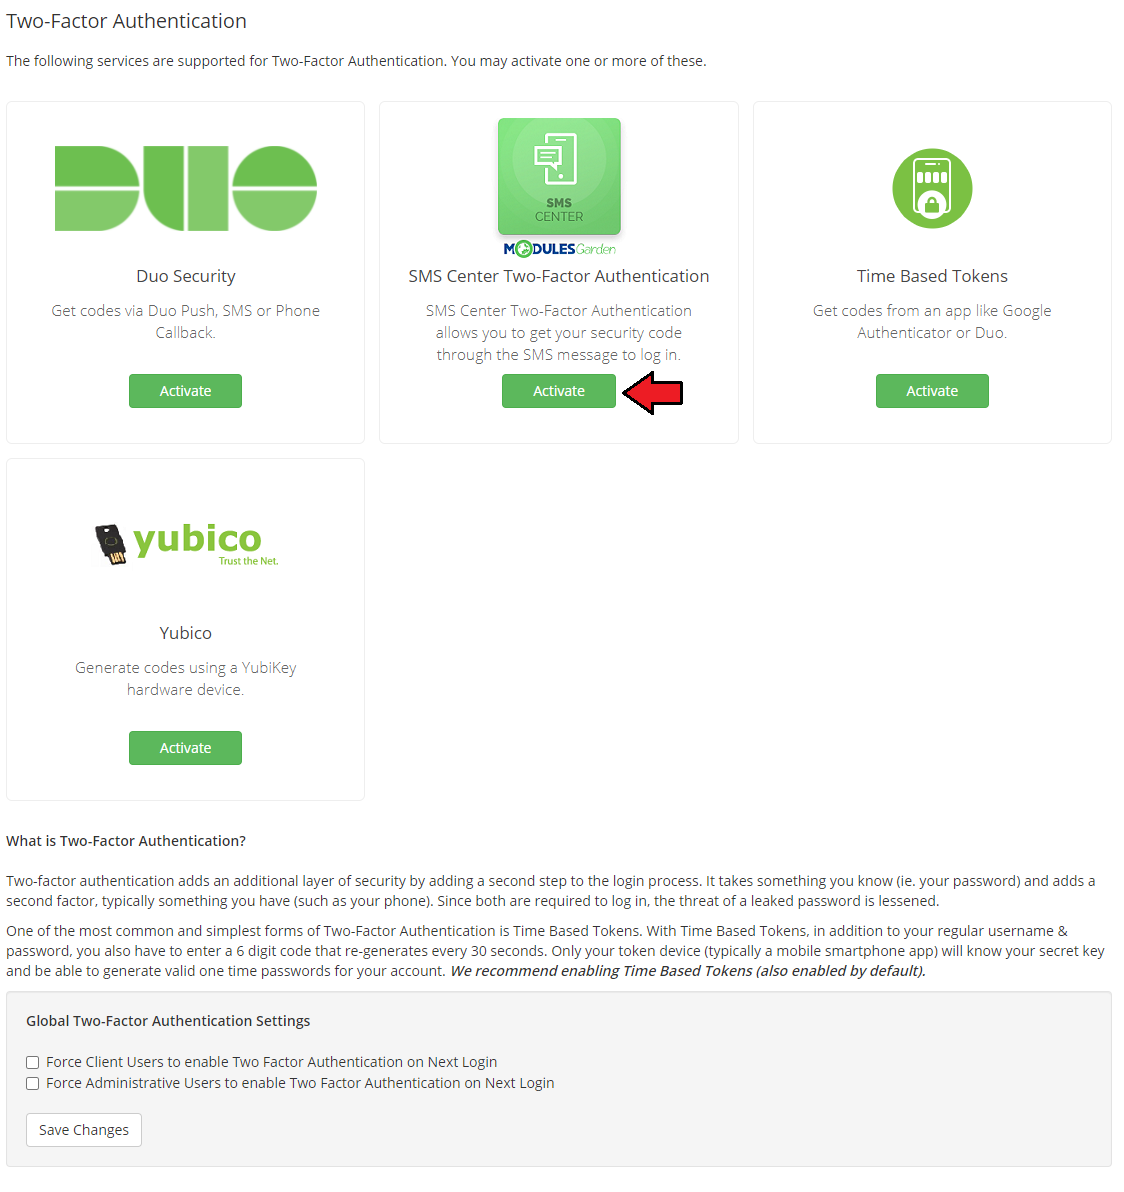
|
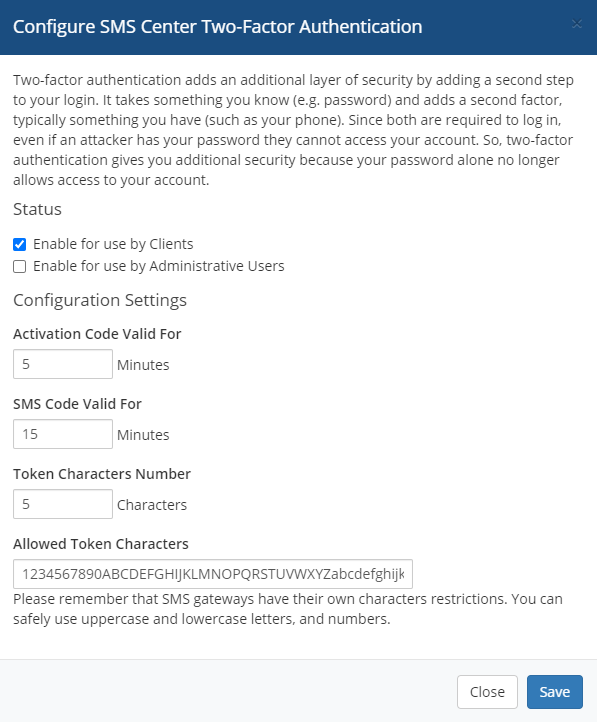
| In the next step you need to configure the addon settings. To do so, fill out the data:
|
|
Security Settings
Clients
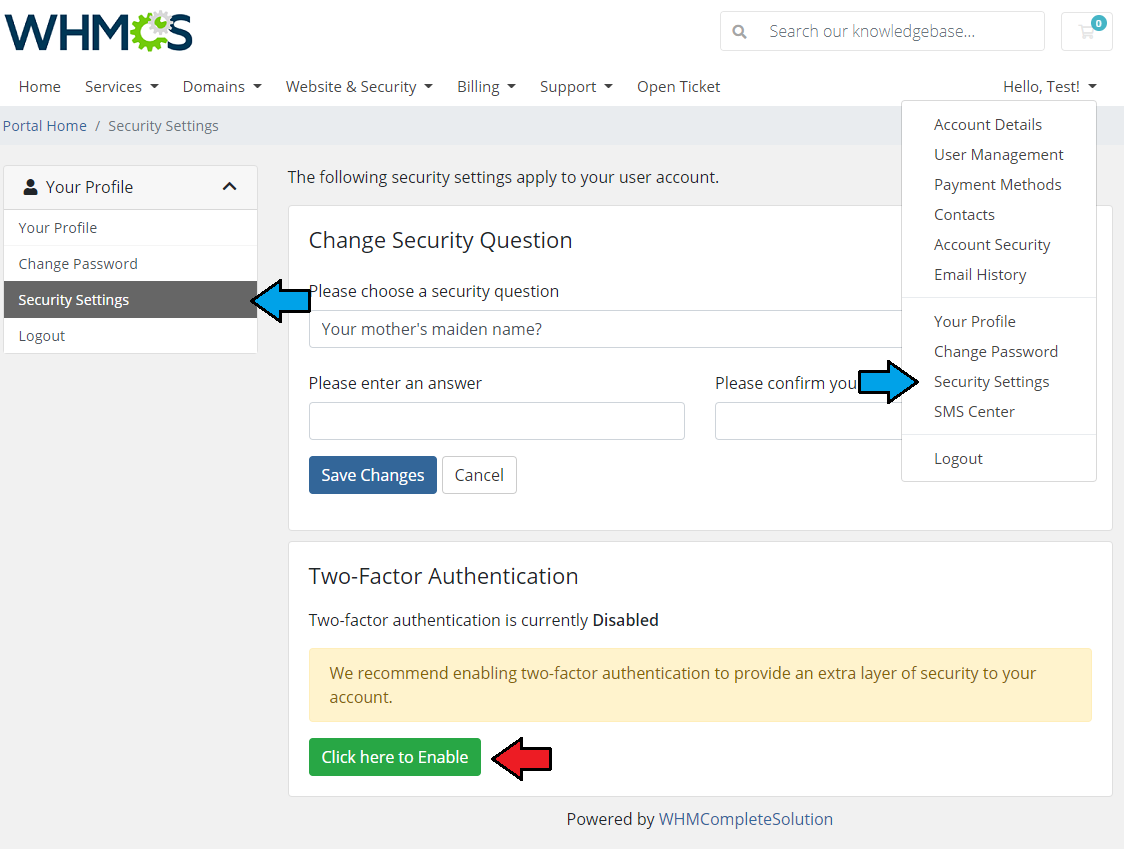
| If you have activated the 'SMS Two-Factor Authentication' addon, your clients will be allowed to decide if they wish to use such a security option. Here is how to enable this functionality: |
|
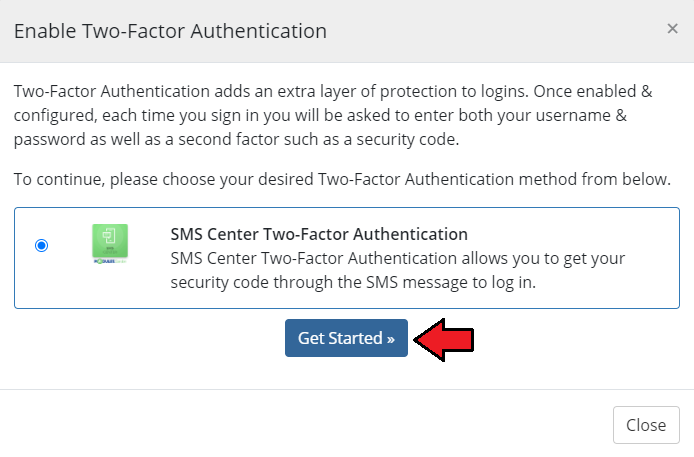
| 2. Press the 'Get Started' button to proceed with the process. |
|
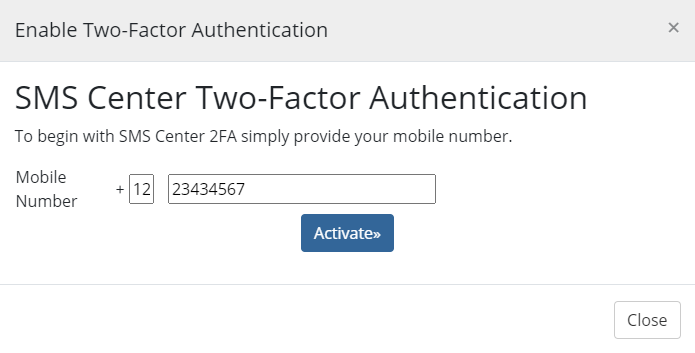
| 3. Provide a phone number to proceed with SMS Two-Factors Authentication. Press 'Activate.' Note: This step is obligatory, no matter if the client has already provided a valid SMS number in the profile. |
|
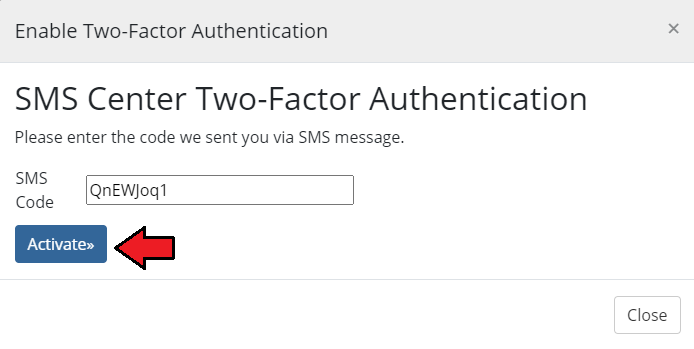
| 4. A client should receive now an authentication code via SMS. Provide the code in the field and press 'Activate'. Note: Remember that the code is valid only temporarily, according to the addon settings! |
|
| Two-Factor Authentication is now complete. Important: Remember to note and keep your backup code in a secure place! |
| The second factor will now be required in the next login attempt. Wait for the SMS with the verification code and enter it in the appropriate field. If you have any problems with receiving/entering the verification code, you can use your backup code. |
| In case there are clients who, for some reason, do not have the required phone number provided, you may turn off 2FA for such clients only. Use the below script to turn off the 2FA for such clients: php -q /yourWHMCS/modules/addons/sms_center/cron/cron.php Reset2FA Please make sure you have used a full and correct path to the module cron file. Once you run this script, you will find information in the 'Logs' section about the 2FA being turned off for a particular client account. If the client wants to use 2FA security, he must turn it on again for his account (Security Settings). |
Administrators
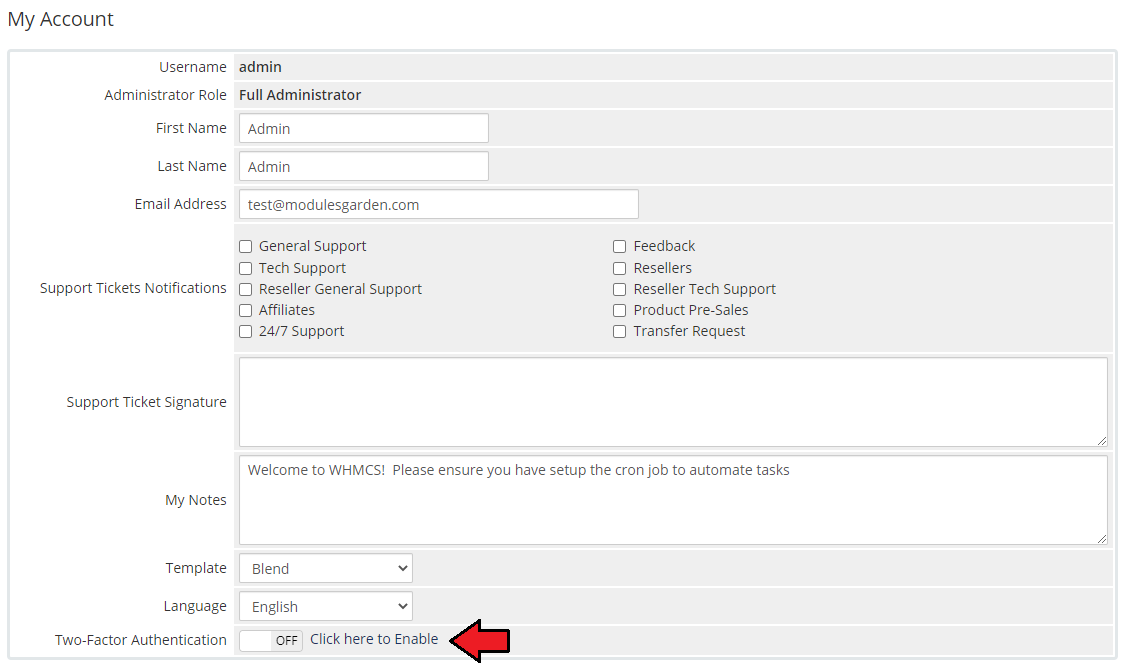
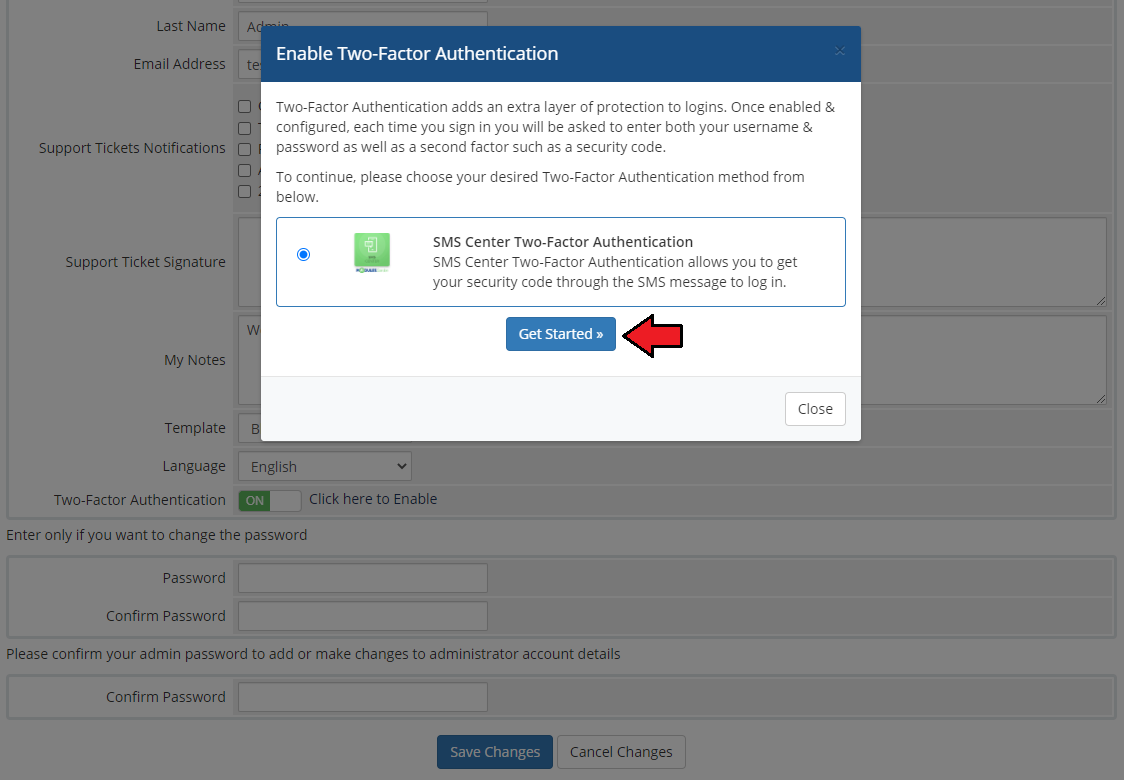
| If the 'SMS Two-Factor Authentication' addon has been activated and enabled for staff, you will be able to decide as administrator if you wish to use such a security option. Here is how to enable this functionality: |
|
| 2. Press the 'Get Started' button to proceed with the process. |
|
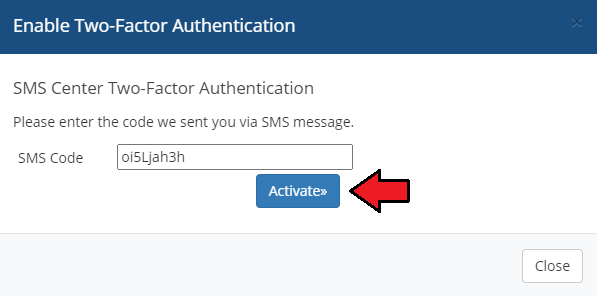
| 3. You will receive now an authentication code via SMS. Type in the code in the field and press 'Activate.' Remember that the code is valid only temporarily, according to the addon settings! |
|
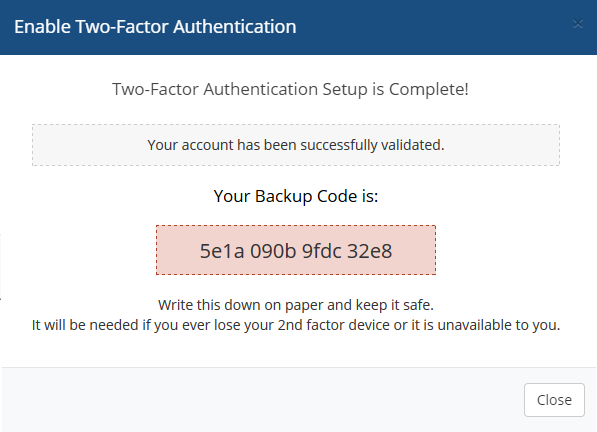
| 4. If the entered code is correct, you will see the proper information. There will also be a backup code which must be copied and saved securely to log in with in case of some issues. |
|
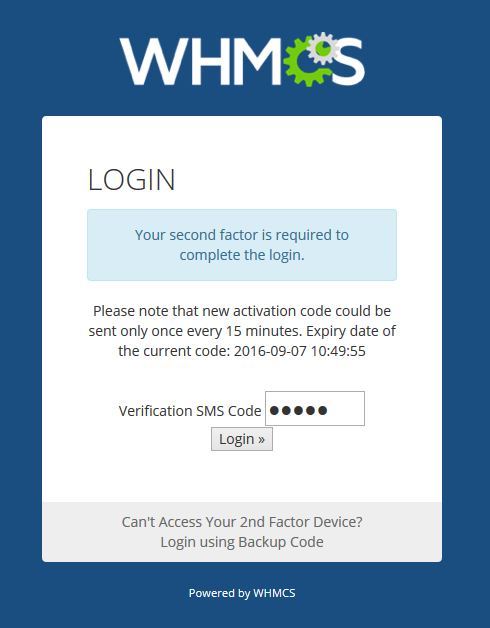
| 5. The second factor is now required to log in. Wait for the SMS with the verification code and enter it in the field. Press 'Login.' If you have any problems with receiving/entering the verification code, you can use your backup code. Remember to note and keep your new backup code in a secure place! |
|
SMS Center and WHMCS API Integration
| Below you can find a short instruction on how to integrate your SMS Center For WHMCS with the WHMCS API. |
| 1. Function name: 'sendsms' 2. Required parameters:
localAPI('sendsms', array('userid' => $_POST['userid'], 'message' => $_POST['message']), 'admin');
5. An example of usage for admin 'array' with parameters: array('admin' => 1,'phonenumber' => $number, 'messagename' => 'Service Unsuspension Successful',
'relid' => array('client' => $params['params']['userid'], 'service' => $params['params']['serviceid']))
In case you add phonenumber in the message, you have to specify whether it is an admin's number by entering: 'admin' => 1, just like in the example above. localAPI('sendsms', array('userid' => $_POST['userid'], 'message' => $_POST['message'], 'force'=> true), 'admin');
|
Custom Gateway In SMS Center
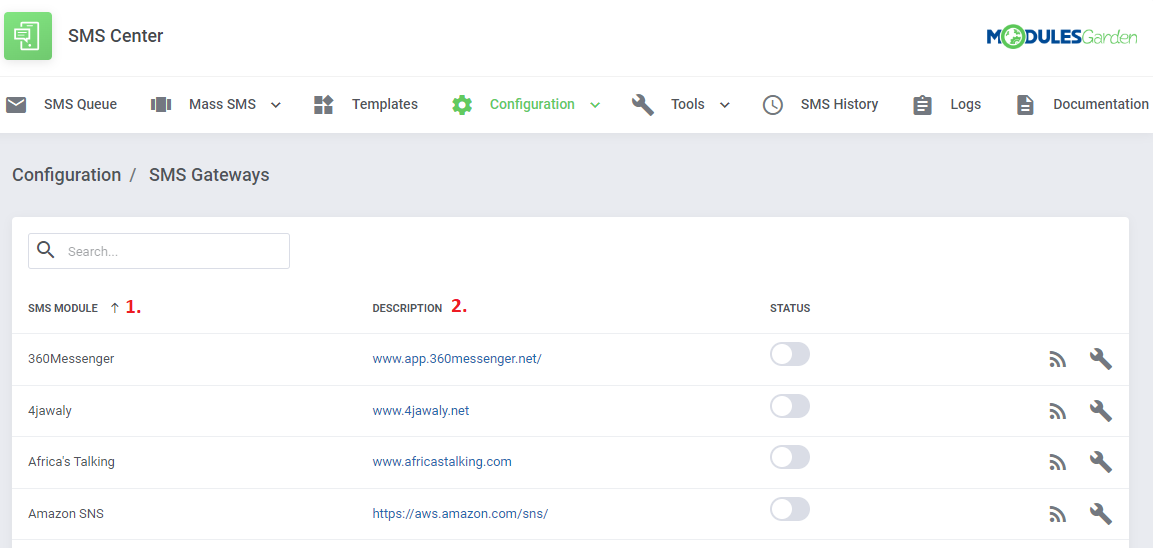
| Below you can find a short instruction on how to implement a new SMS gateway into the SMS Center For WHMCS module by yourself. Follow the below steps: 1. Firstly, create a new PHP class in the directory:/modules/addons/sms_center/app/Libs/Smswhich inherits the class: ''ModulesGarden\SmsCenter\App\Libs\AbstractSms\AbstractSubmodule 2. Inside that class, create the following two fields:
public static $name = "Gateway Name"; public static $description = '<a href="https://gatewayName.com/" target="_blank">www.gatewayName.com</a>'; |
|
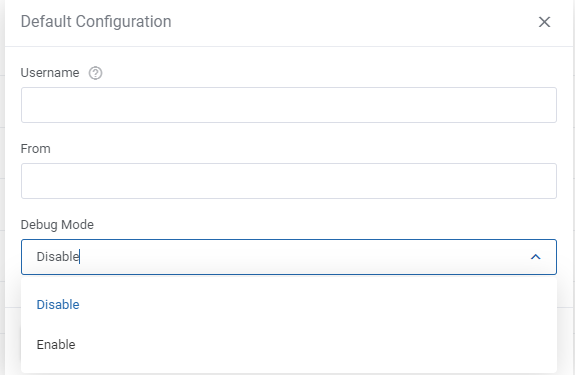
| 3. The next steps to follow here will be to define various functions inside the class. The first one to define is getConfiguration(), which is used to build the gateway configuration form. The field types available to build this form can be found in the following class: ModulesGarden\SmsCenter\App\Helper\SubmodulesHelper\MG_SMS_SubmoduleConfiguration Here is an example of a function that can be defined here - adding this block to your file will create a form comparable to one you can view in the screenshot below:
public static function getConfiguration()
{
     return array(
         'username'    => array(
             'validators' => array('required'),
             'description' => true;
         ),
         'public_key'  => array(
             'validators' => array('required'),
         ),
         'from'        => array(

         ),
         'debug_mode'  => array(
             'type'    => MG_SMS_SubmoduleConfiguration::TYPE_SELECT,
             'options' => array('disable', 'enable'),
         ),
     );
}
|
|
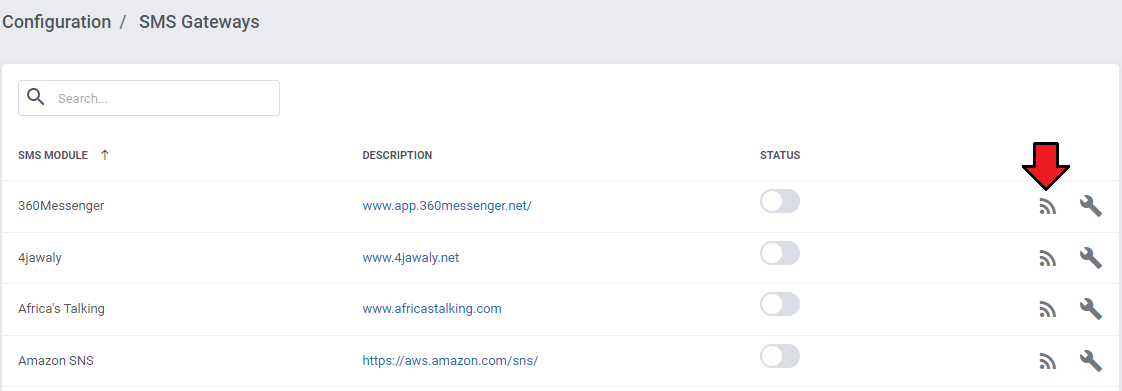
| 4. Another function to define is checkConnection() - this button is usually used to send a request that returns the information concerning the available balance on the SMS Gateway account. The button in question can be seen here: |
|
| 5. The function sendMessage($message, $number) should contain the logic used to send SMS messages - i.e. this function is used to handle the API of the gateway. The parameters:
6. Some additional tips:
$this>configuration['{name_of_configuration_field}'];
You can replace "name_of_configuration_field" with any field, for example $this->configuration['username'];
|
7. Below, you can find an example of a full class that contains all the above described functions. You can use that example as reference when adding your own gateway to the module.
<?php

namespace ModulesGarden\SmsCenter\App\Libs\Sms;

use ModulesGarden\SmsCenter\App\Libs\AbstractSms\AbstractSubmodule;
use \ModulesGarden\SmsCenter\App\Helper\SubmodulesHelper\MG_SMS_SubmoduleConfiguration;

class Exmaple extends AbstractSubmodule{

    public static $name                = "Exmaple";
    public static $description         = '<a href="https://example.com/" target="_blank">www.example.com</a>';


    public function checkConnection()
    {
        $username = $this->configuration['username'];
        $url = 'https://payments.example.com/query/wallet/balance?username='.$username;
        $this->sendRequest($url);
    }

    public static function getConfiguration()
    {
        return array(
            'username'    => array(
                'validators' => array('required'),
            ),
            'public_key'  => array(
                'validators' => array('required'),
            ),
            'from'        => array(

            ),
            'debug_mode'  => array(
                'type'    => MG_SMS_SubmoduleConfiguration::TYPE_SELECT,
                'options' => array('disable', 'enable'),
            ),
        );
    }

     public function sendMessage($message, $numbers)
    {

        $username = $this->configuration['username'];
         $url = 'https://api.example.com/version1/messaging';
         $params = [
             'username' => $username,
             'to' => $numbers,
             'message' => $message,
         ];

         if($this->configuration['from'])
         {
             $params['from'] = $this->configuration['from'];
         }

        $this->sendRequest($url, $params);
    }

    private function sendRequest($url, $postFields = null)
    {
        $apikey = $this->configuration['public_key'];
        $ch = curl_init();
        curl_setopt($ch, CURLOPT_URL, $url);
        if($postFields){
            curl_setopt($ch, CURLOPT_POST, 1);
            curl_setopt($ch, CURLOPT_POSTFIELDS, http_build_query($postFields));
        }
        curl_setopt($ch, CURLOPT_RETURNTRANSFER, true);
        curl_setopt($ch, CURLOPT_TIMEOUT, 60);
        $header[] = "apiKey: $apikey";
        $header[] = 'Accept: application/json';
        curl_setopt($ch, CURLOPT_HTTPHEADER, $header);


        $response = curl_exec($ch);

        if ($response == false)
        {
            $curlError = curl_error($ch);
            if ($this->configuration['debug_mode'] == "enable")
            {
                $this->saveLog($url, $postFields, 'Curl error: ' . $curlError);
            }
            throw new \Exception('Curl error: ' . $curlError);
        }
        $jsonResponse = json_decode($response, true);

        if ($this->configuration['debug_mode'] == "enable")
        {
            $this->saveLog($url, $postFields, $response);
        }

        if(empty($jsonResponse)){
            throw new \Exception($response);
        }

        if(!empty($response['SMSMessageData'])){
            if($response['SMSMessageData']['Recipients'][0]['status'] != 'Success'){
                throw new \Exception($response['SMSMessageData']['Recipients'][0]['status']);
            }
        }

        return $response;
    }


    private function saveLog($endpoint, $request ,$response)
    {
        logModuleCall(
                'MG_SMS_Example', $endpoint, $request, $response, ""
        );
    }
}
|
Additional Information
| 1. SMS Center For WHMCS has been integrated with our Client Profile Viewer For WHMCS module enabling you to send messages to your clients in a faster and even more convenient way. |
2. The messages sent by our module are divided into four categories:
|
Tips
| 1. You may customize the 'Two-Factor Authentication' verification message text delivered to a user. E.g. the default messages are: 'Your activation code is: erkhq34j329' and 'Your login code is erkhq34j329' $_LANG['clientArea']['2FA']['loginCode'] = 'Your login code is :token:'; $_LANG['clientArea']['2FA']['activateCode'] = 'Your activation code is :token:'; |
2. Invoice special merge fields clarification:
Example of usage:
{foreach from=$invoice_items item=i}
{$i.description}
{/foreach}
Example of usage:
{foreach from=$invoice_domains_registered item=i}
<p>DOMAIN REGISTERED: {$i}</p>
{/foreach}
|
| 3. Information on any errors that a cron task might encounter while being executed are stored in the following file: 'storage/logs/cron_log' Check the file content for cron error details. |
4. There is the possibility to switch on all templates for all your clients. To do so, please follow these steps:
php -q runTask.php --taskName templates --taskAction setDefault
php -q runTask.php --taskName templates --taskAction setDefaultAll |
5. If you want to delete logs, you may need the following command. Firstly, proceed to <whmcs>/modules/addons/sms_center/shell and run the task:
php runTask.php --taskName clear --taskAction logs |
Update Instructions
| An essential guidance through the process of updating the module is offered here. When updating the module, remember to remove the old module files before uploading the new ones (step three).
This step is required to ensure that only the current files remain. Important: When updating the module from version 2.x to 3.x, you need to start the migration process to move settings from the previous version to the new one. php -q /yourWHMCS/modules/addons/sms_center/shell/migrationTo3_0_0.php Do not forget to replace 'yourWHMCS' with your WHMCS root location. If you are using Client Profile Viewer For WHMCS integration, you will also need to update it to the version 1.5.8 or later. |
Upgrade Guide
| Seeking a solution that offers greater flexibility, customization tailored to your precise needs, and unrestricted availability? There is an option that not only proves to be cost-effective in the long run but also includes prioritized support services, making it a truly valuable investment. Opt for the Open Source version of your SMS Center For WHMCS module to unlock these benefits. Follow a comprehensive guide covering the transition process, the advantages it brings, and step-by-step instructions on what to do next after the order has been successfully finalized. |
Common Problems
| 1. When you have problems with connection, check whether your SELinux or firewall does not block ports. |
| 2. The module is currently not compatible with:
It is advised not to use the modules mentioned above at once. |