OpenStack Projects For WHMCS
Contents
|
About OpenStack Projects For WHMCS
| OpenStack Projects For WHMCS is a module that will allow you to provision virtual projects to your customers in a fully automatic manner. The module has been designed in such a way that your customers can place orders and overview them in the client area. As an administrator, you are equipped with all key features to keep track of your customers’ projects. |
- Admin Area Features:
| ✔ Create/Suspend/Unsuspend/Terminate OpenStack Projects |
| ✔ Change Package/Password |
| ✔ Log In To Panel: |
| ✔ With Single Sign-On Support To Virtuozzo Hybrid Infrastructure |
| ✔ View Created Project/User/Domain IDs |
| ✔ View Scheduled Tasks |
| ✔ View Block Storage Limits Usage Statistics |
| ✔ Set Up Project Configuration: |
| ✔ Toggle Domain-Only Mode |
| ✔ Define Default Domain |
| ✔ Define Client Projects Mode: |
| ✔ Default |
| ✔ Only One Domain Per Client |
| ✔ With Domain Permissions |
| ✔ Without Domain Permissions |
| ✔ Only One Domain And User Per Client |
| ✔ Define Project User Roles |
| ✔ Inherit Domain Roles |
| ✔ Provide OpenStack Panel Web Address |
| ✔ Provide Default Domain/Project/User Name |
| ✔ Select WHMCS Domain Field Content: |
| ✔ Project Name |
| ✔ Domain Name |
| ✔ Disabled |
| ✔ Toggle Logging API Requests |
| ✔ Enable User Creation Without Password |
| ✔ Toggle Password Removal After Project Creation |
| ✔ Configure Quota For: |
| ✔ Compute |
| ✔ Block Storage |
| ✔ Network |
| ✔ Load Balancer |
| ✔ Container Infrastructure |
| ✔ Kubernetes |
| ✔ Traits (OpenStack) / Placement Groups (Virtuozzo) |
| ✔ QoS Policy - Minimum Bandwidth Rate Rules |
| ✔ QoS Policy - Maximum Bandwidth Limit Rules |
| ✔ Toggle Client Area Features: |
| ✔ Select Client Area Login Information |
| ✔ Select Block Storage Limits For Usage Statistics Widget |
| ✔ Toggle Opening Management Panel In New Window |
| ✔ Enable Login Restrictions |
| ✔ Enable Access To Project Servers Section |
| ✔ Set Up Module Custom Web And Shell Hooks |
| ✔ Set Up Usage Billing Settings |
| ✔ Set Up Configurable Options Settings |
| ✔ Generate Configurable Options |
| ✔ Set Up OpenID Connect For Single Sign-On To Virtuozzo Hybrid Infrastructure |
| ✔ Run Server Connection Test |
- Client Area Features:
| ✔ View Project Details: |
| ✔ Web Address |
| ✔ Domain |
| ✔ Username |
| ✔ Password |
| ✔ View Project Servers |
| ✔ View Block Storage Limits Usage Statistics |
| ✔ Manage Login Restrictions: |
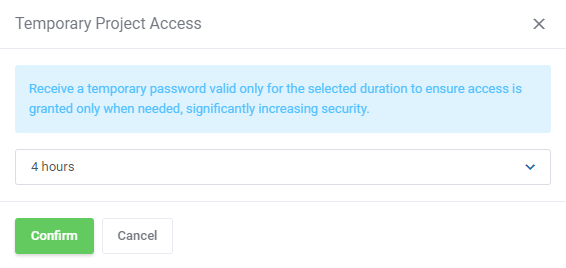
| ✔ Enable Temporary Passwords Valid Only For Predefined Time |
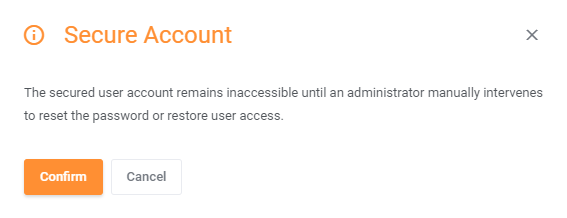
| ✔ Secure User Accounts To Prevent Access |
| ✔ Log In To Panel |
| ✔ With Single Sign-On Support To Virtuozzo Hybrid Infrastructure |
- Configurable Options:
| ✔ Backups |
| ✔ Bandwidth Limit |
| ✔ Bandwidth Limit Rules - Max Egress (kbps) |
| ✔ Bandwidth Limit Rules - Max Egress Burst (kbps) |
| ✔ Bandwidth Limit Rules - Max Ingress (kbps) |
| ✔ Backundwidth Limit Rules - Max Ingress Burst (kbps) |
| ✔ Cores |
| ✔ Endpoint Group |
| ✔ Fixed IP Addresses |
| ✔ Floating IP Address |
| ✔ Floating IP Addresses |
| ✔ Gigabytes |
| ✔ Groups |
| ✔ Hard Limit |
| ✔ Health Monitor |
| ✔ Ike Policy |
| ✔ Injected File Content [Bytes] |
| ✔ Injected File Path [Bytes] |
| ✔ Injected Files |
| ✔ Instances |
| ✔ IPsec Policy |
| ✔ IPsec Site Connection |
| ✔ Key Pairs |
| ✔ Listener |
| ✔ Load Balancer |
| ✔ Member |
| ✔ Metadata Items |
| ✔ Minimum Bandwidth |
| ✔ Minimum Bandwidth Rates Rules - Min Egress (kbps) |
| ✔ Minimum Bandwidth LimitRate Rules - Min Ingress (kbps)< |
| ✔ Network |
| ✔ Per Volume Gigabytes |
| ✔ Pool |
| ✔ Port |
| ✔ RAM [MB] |
| ✔ Role-based Access Control Policy (RBAC Policy) |
| ✔ Router |
| ✔ Security Group |
| ✔ Security Group Device |
| ✔ Security Group Rule |
| ✔ Security Group Rules |
| ✔ Security Groups |
| ✔ Server Group Members |
| ✔ Server Groups |
| ✔ Snapshots |
| ✔ Subnet |
| ✔ Subnet Pool |
| ✔ Traits (OpenStack) / Placement Groups (Virtuozzo) |
| ✔ Volumes |
| ✔ VPN Service |
- Required Components:
| ✔ Gnocchi (Required For Billing) |
- General Info:
| ✔ Integrated With Advanced Billing For WHMCS - Actual Project Resource Usage Billing |
| ✔ Integrated With Products Reseller For WHMCS - End-To-End Solution For Products And Servers Reselling |
| ✔ Fully Integrated With Lagom WHMCS Client Theme |
| ✔ Multi-Language Support |
| ✔ Supports All Providers That Grant Access To OpenStack API On System Admin Level |
| ✔ Supports Latest Stable OpenStack and Previous |
| ✔ Supports OpenStack Gnocchi |
| ✔ Supports Virtuozzo Hybrid Infrastructure |
| ✔ PHP 8.3 Back To PHP 8.1 |
| ✔ Supports WHMCS Metric Billing - Integration: CPU, Compute Instance Booting Time, Custom Floating IP Addresses, Custom IP Addresses, Custom Network Incoming Bytes, Custom Network Incoming Packets, Custom Network Outgoing Bytes, Custom Network Outgoing Packets, Default Storage, Disk Device Read Bytes, Disk Device Read Requests, Disk Device Write Bytes, Disk Device Write Requests, Disk Ephemeral Size, Disk Root Size, Floating IP Addresses, IP Addresses, Image Size, Load Balancers, Memory, Memory Usage, Network Incoming Bytes, Network Incoming Packets, Network Outgoing Bytes, Network Outgoing Packets, OS ImagesSnapshot Size, VCPUs, Volume Size, VolumResources OS VCPU Usage, Resources SSD |
| ✔ Supports WHMCS Themes "Six" And "Twenty-One" |
| ✔ Supports WHMCS V8.13 Back To WHMCS V8.10 |
| ✔ Requires ionCube Loader V14 Or Later |
| ✔ Easy Module Upgrade To Open Source Version |
Installation and Configuration
| This tutorial will show you how to successfully install and configure OpenStack Projects For WHMCS smoothly. We will guide you step by step through the whole installation and configuration process. |
Installation
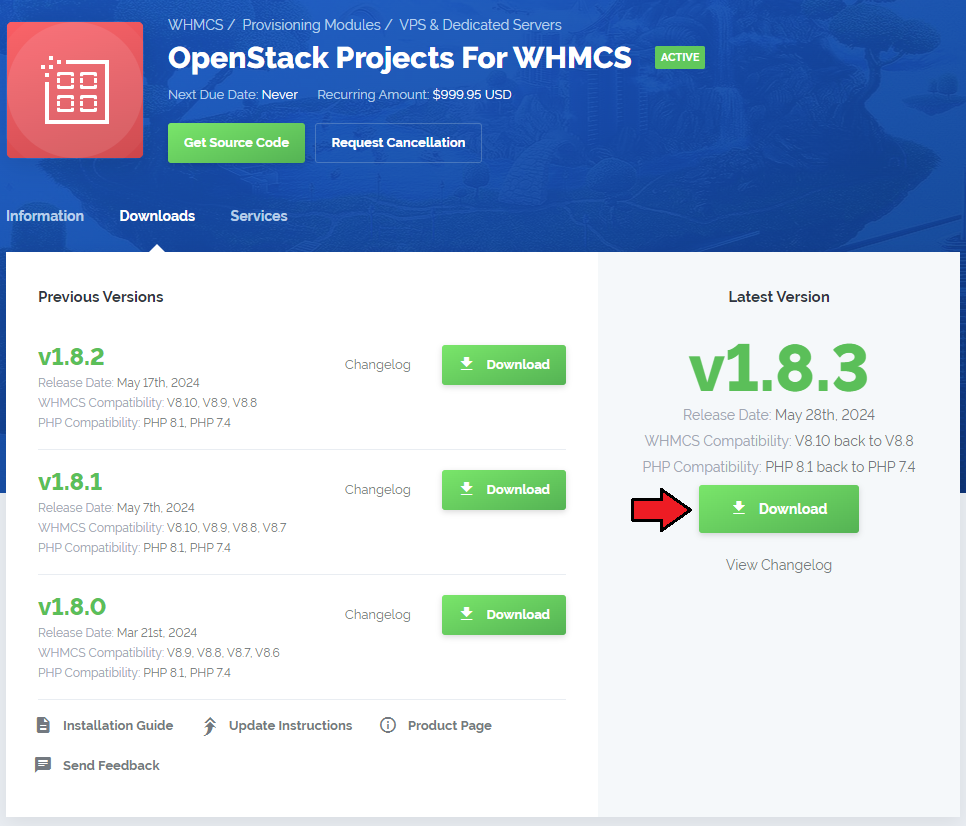
| 1. Log in to our client area and download the module. |
|
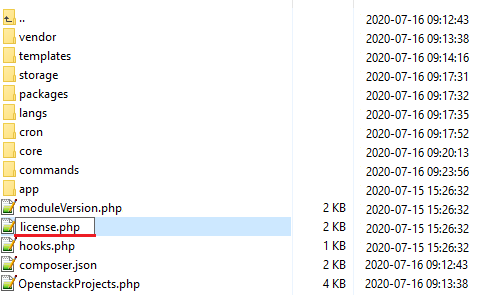
| 2. Upload and extract the extension into the main WHMCS directory. Extracted files in your WHMCS directory should look like this: |
| 3. When you install OpenStack Projects For WHMCS for the first time, you have to rename the 'license_RENAME.php' file. The file is located in '/yourWHMCS/modules/servers/OpenStackProjects/license_RENAME.php'. Rename it from 'license_RENAME.php' to 'license.php'. |
|
| 4. In order to configure your license key, you have to edit the previously renamed 'license.php' file. Enter your license key between the quotation marks as presented on the following screen. |

|
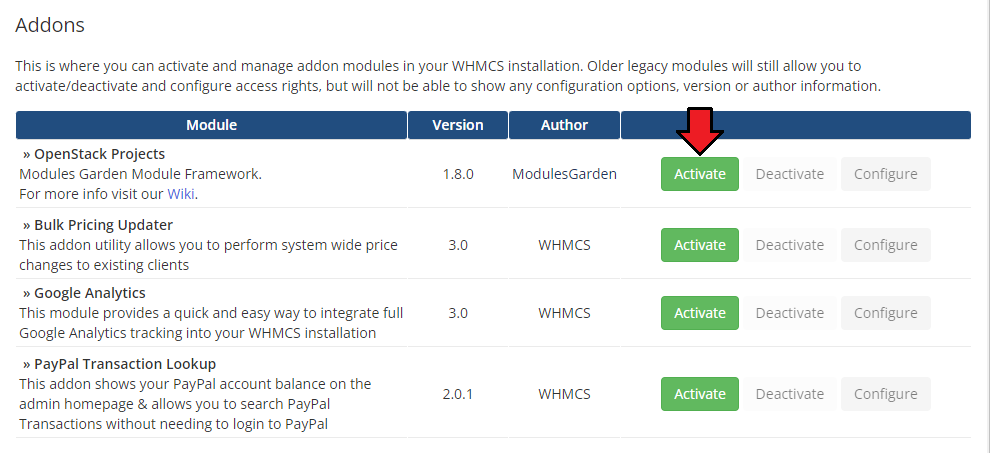
| 5. Now you have to activate the module in your WHMCS system. Log in to your WHMCS administrator area. Go to 'System Settings' → 'Addon Modules'. |
|
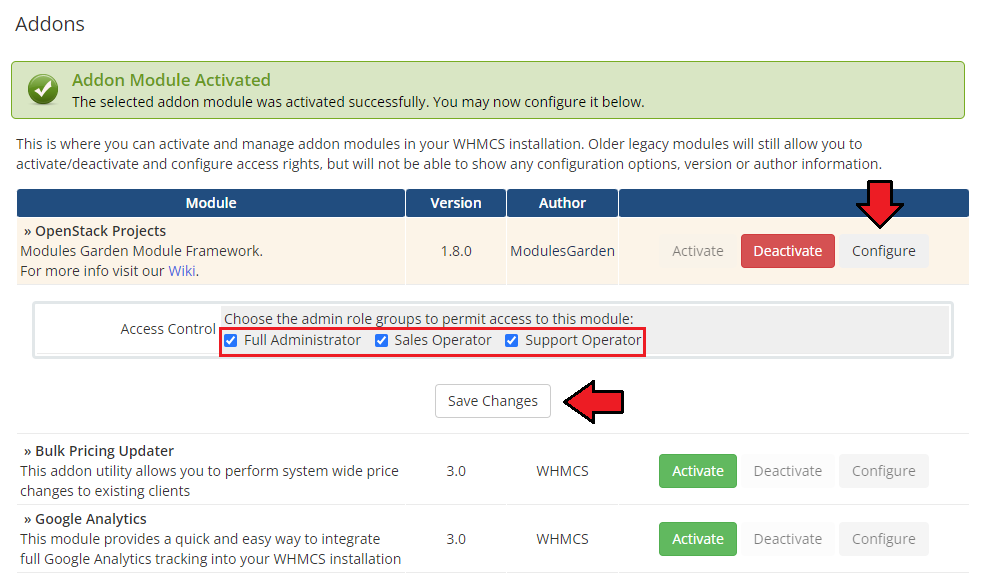
| 6. In the next step, you need to permit access to the module. To do so, click on the 'Configure' button, select administrator groups that should have access to this addon and press 'Save Changes'. |
|
7. Finally, set up the cron command line provided below and define its frequency (1 minute interval is suggested).
php -q /yourWHMCS/modules/servers/OpenstackProjects/cron/cron.php queue This enables tasks such as 'suspend resources,' 'unsuspend resources,' 'terminate resources,' and 'lock account' to queue and run. |
| 8. You have just successfully installed OpenStack Projects For WHMCS! You can access your module under 'Addons' → 'OpenStack Projects'. |
Configuration of Server
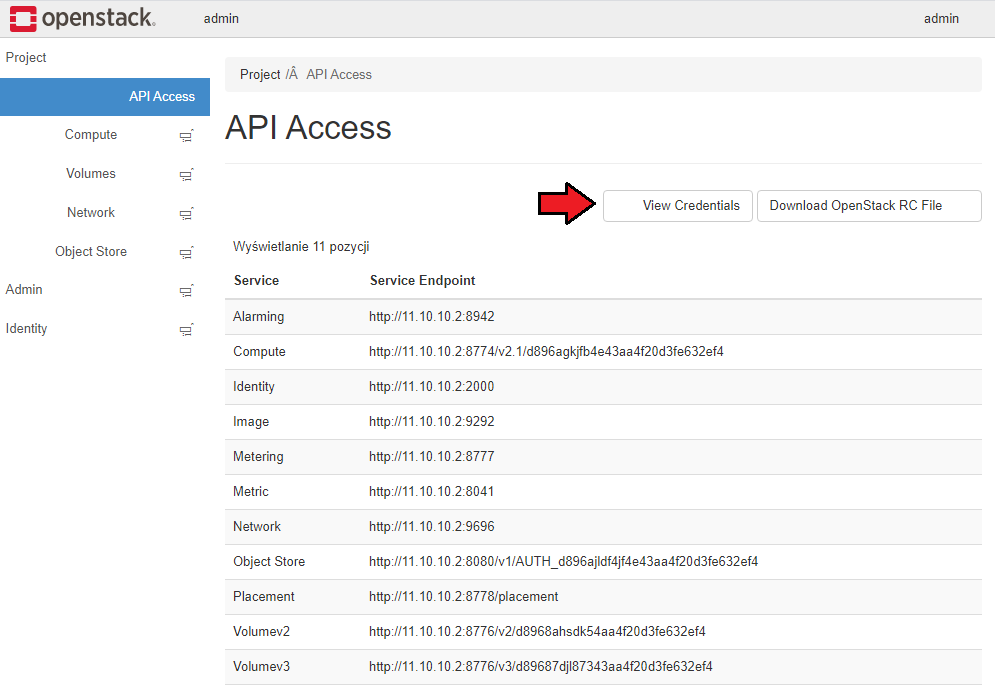
| Before you can go on, you need to copy your 'API Details' . You will need them to connect with the server successfully. Proceed to your 'OpenStack' panel. All necessary information will be found in the 'View Credentials' section under 'API Access' . |
|
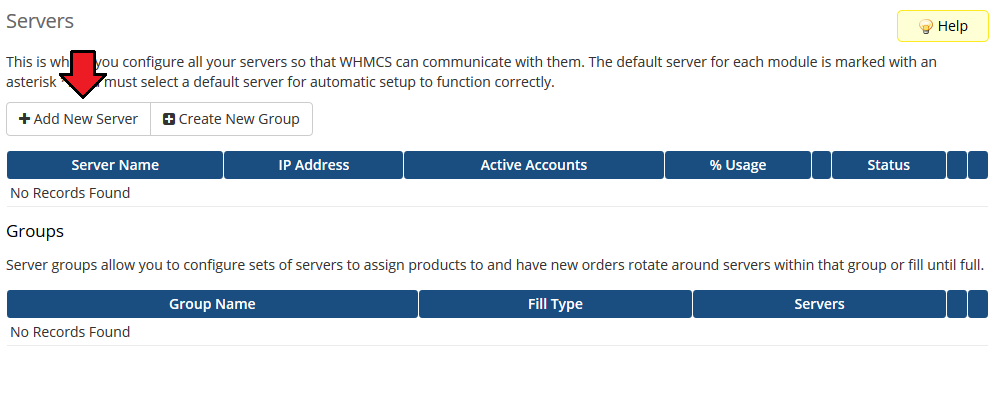
| 9. Now, log in to your WHMCS and proceed to 'System Settings' → 'Products/Services' → 'Servers' and press 'Add New Server'. |
|
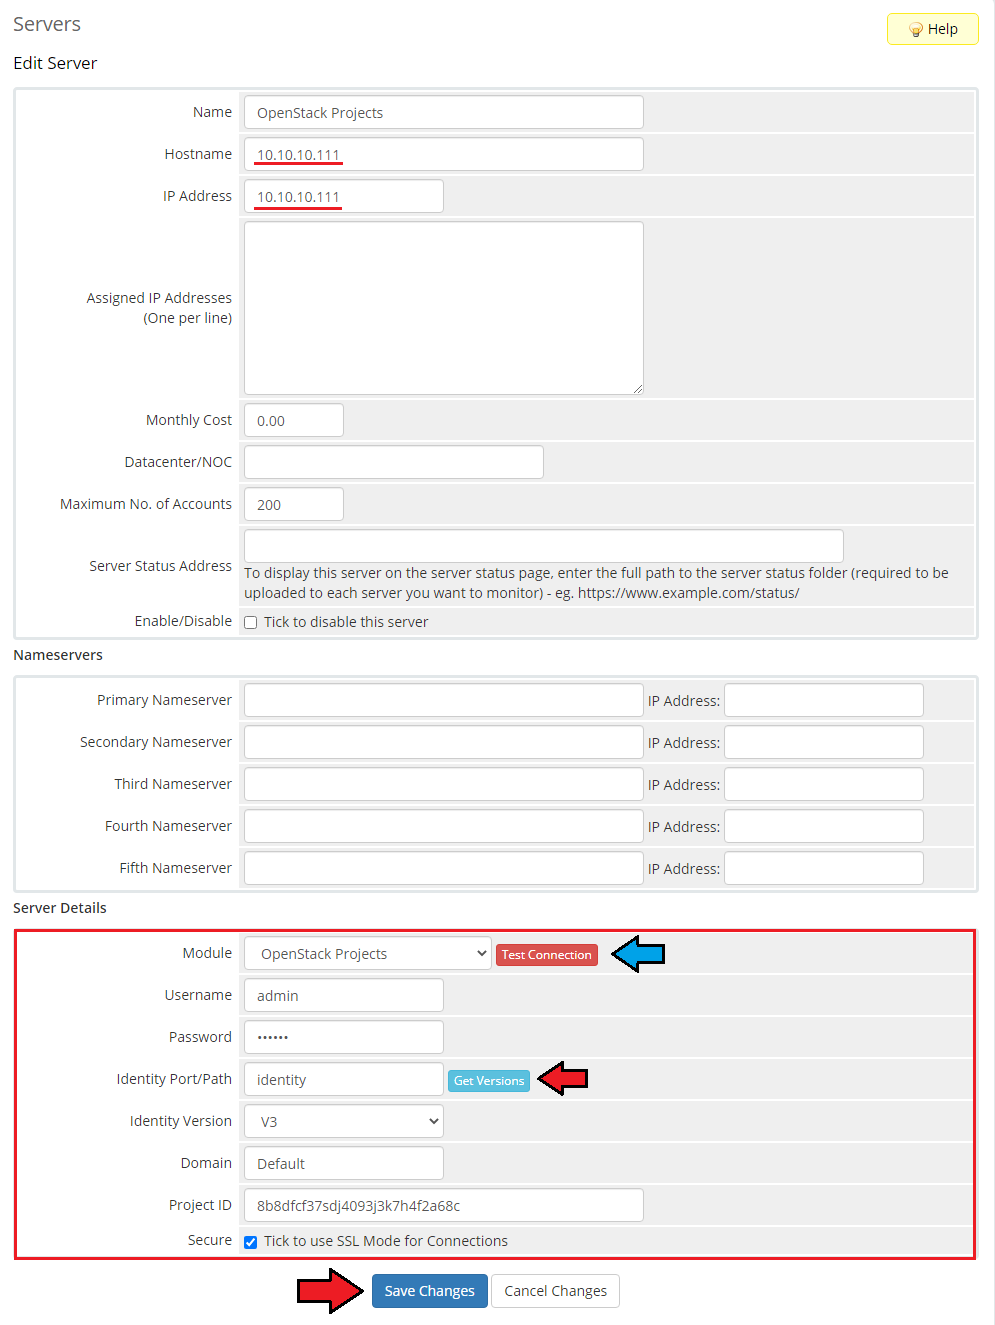
| 10. Next, enter your server 'Name' , 'Hostname' and 'IP Address' . In the Server Details section:
Make sure that your server connection is correct and save the changes. Important: The module supports OpenStack providers that allow access to the OpenStack API with system admin-level permissions. |
|
|
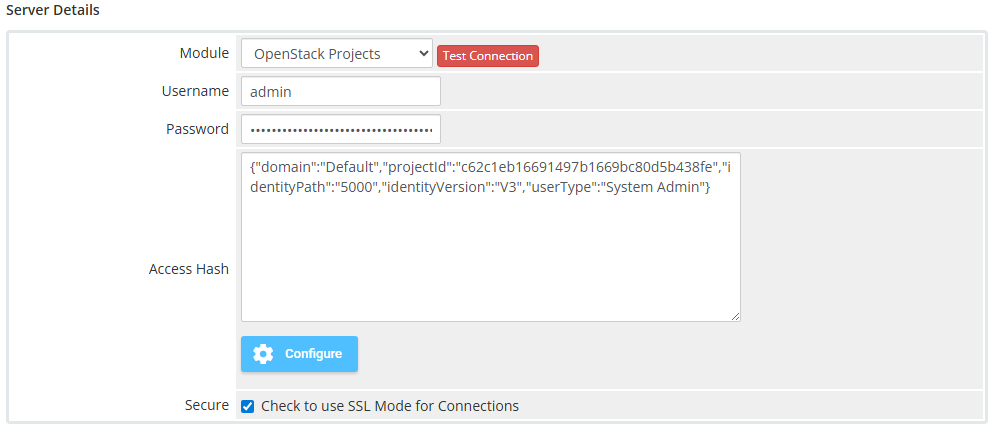
|
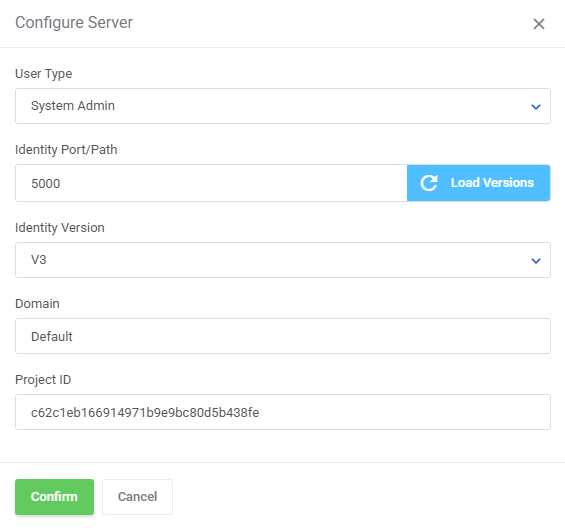
| Integration with Virtuozzo Hybrid Infrastructure If you you use Virtuozzo Hybrid Infrastructure (VHI) – OpenStack from Virtuozzo, please use the following guide: 1. WHMCS server must have access to VHI OpenStack API, please open the required ports according to the guide 2. Configure OpenStack endpoint OpenStack endpoint 3. Use system admin or domain admin credentials to access the cluster from WHMCS side:
Use the above data to fill out the server creation form in the WHMCS admin area. |
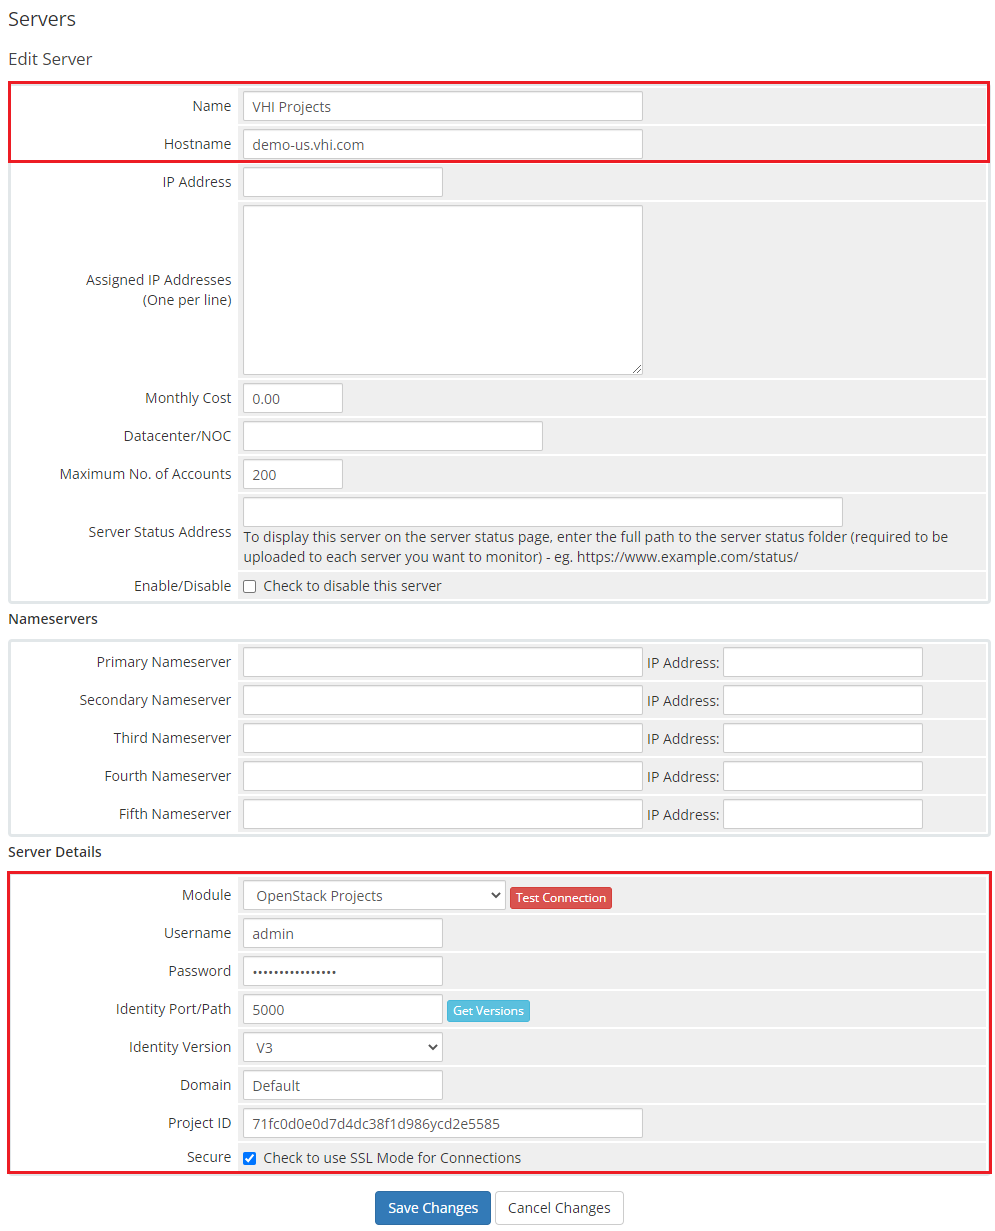
|

|
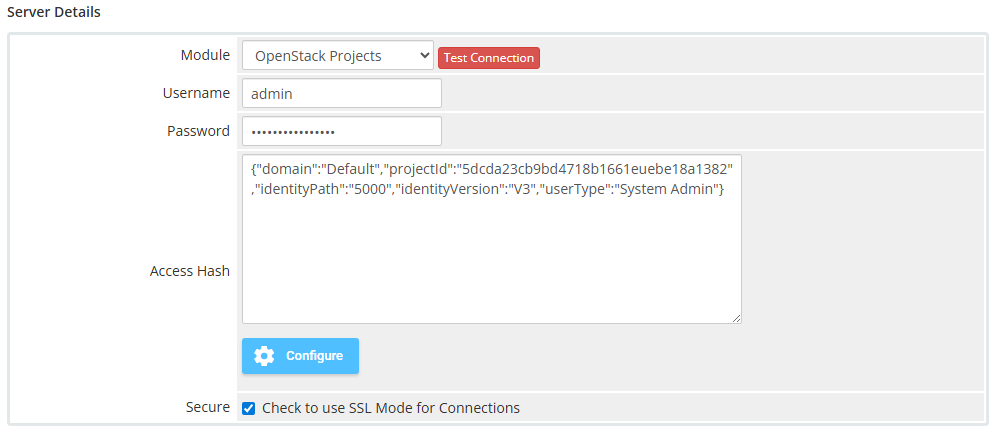
|
| 11. It is time to create a server group. To do so, click on 'Create New Group' . |
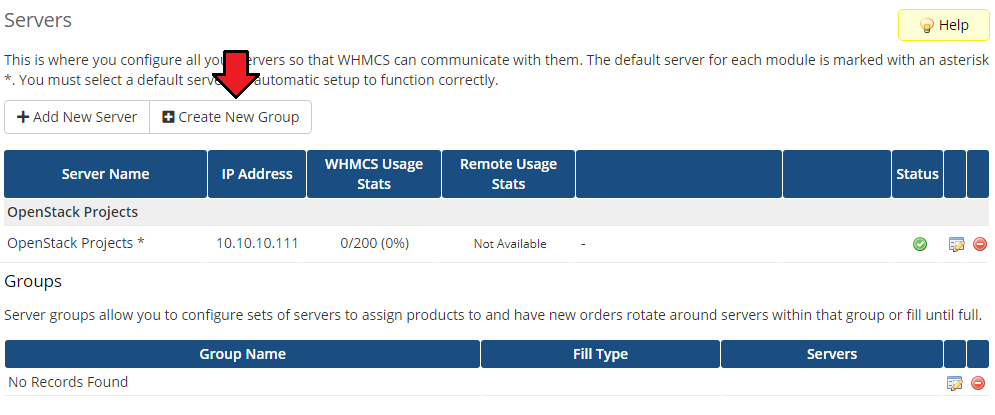
|
| 12. Enter a name, click on your previously created server, press 'Add' and afterward 'Save Changes' . Important: Please do not add more than one server into a single server group, as the module always fetches data from the first server listed in the group. |
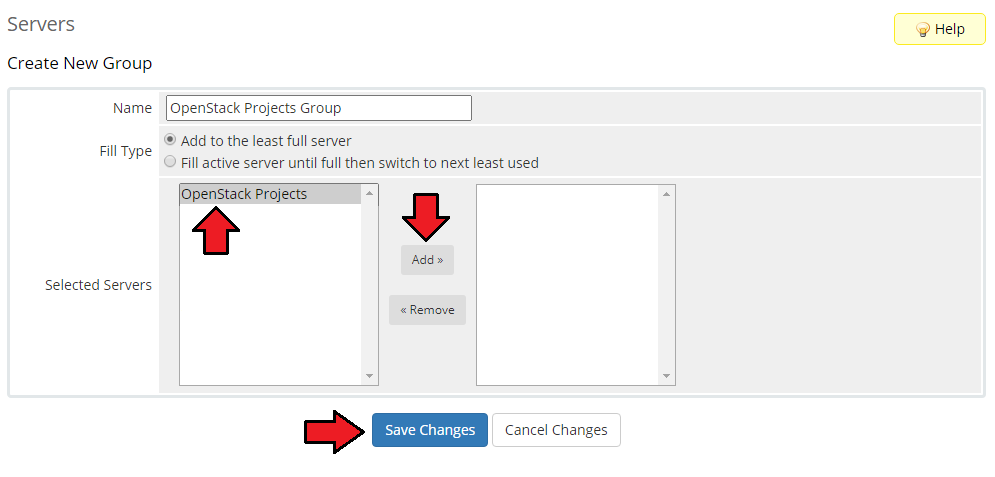
|
Configuration of Product
| 13. In order to create and configure a product, go to 'System Settings' → 'Products/Services' → 'Products/Services'. Click on 'Create a New Group'. |

|
| 14. Enter your product group name and press 'Save Changes'. |
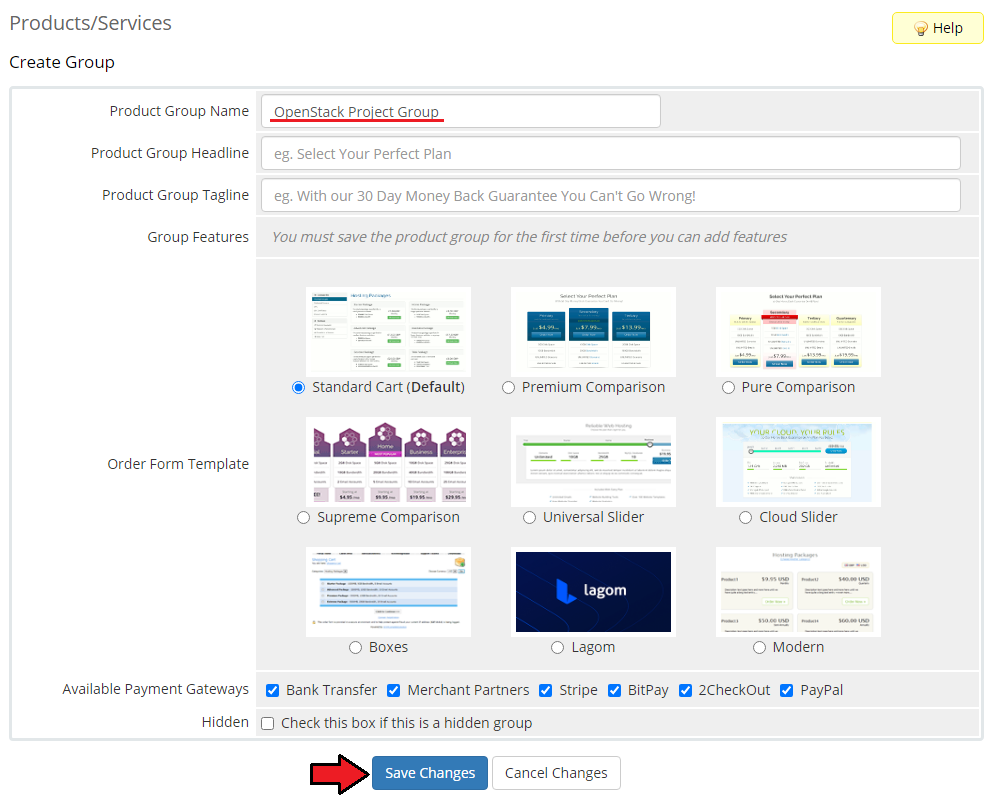
|
| 15. Once you have a product group, you can create a new product. To do so, click 'Create a New Product'. |

|
| 16. Afterward, choose your product type, enter your product name, choose module and the product group from the dropdown menus. Press 'Continue'. |
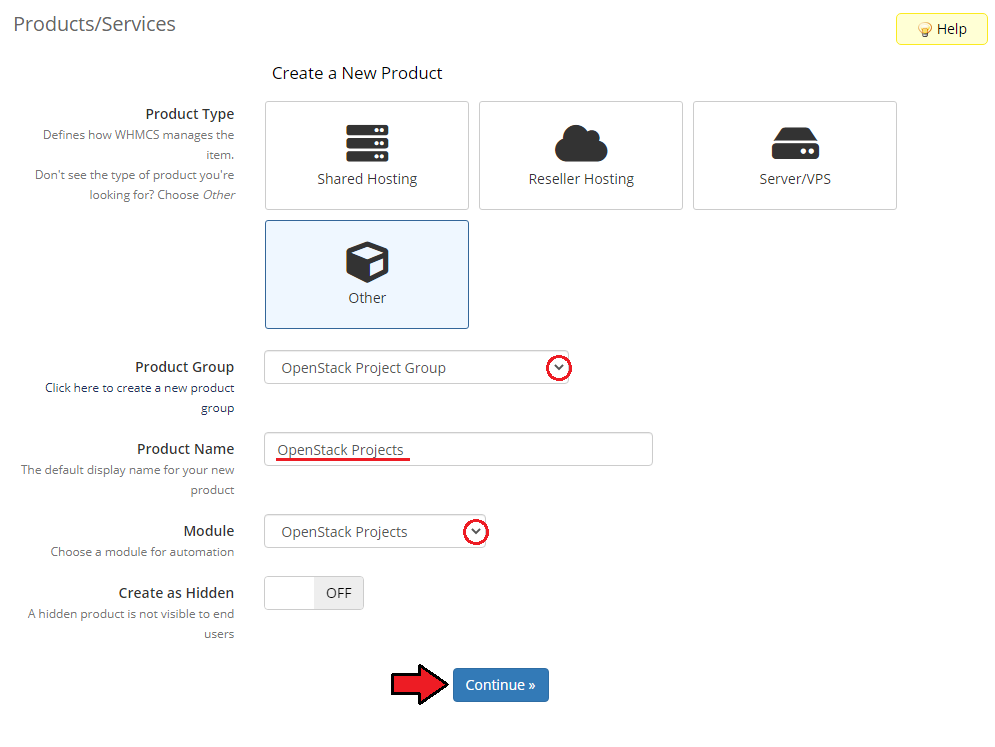
|
| 17. Now, go to the 'Module Settings' section, choose your previously created server group from the dropdown menu. |
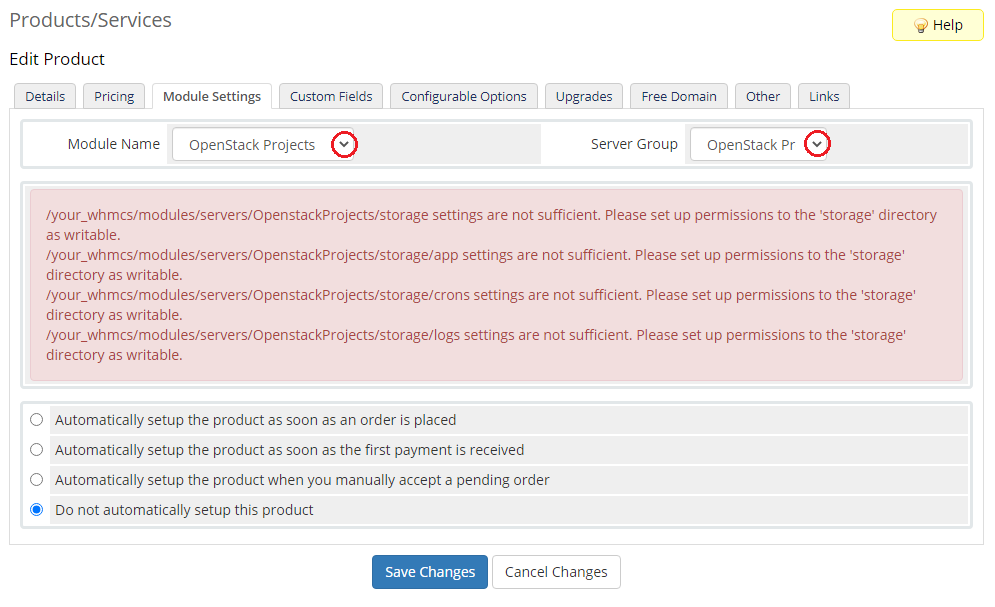
|
General Configuration
| 18. Now, let's start configuring the settings. Note: The below description refers to the "VHI" product configuration. Configuration:
|
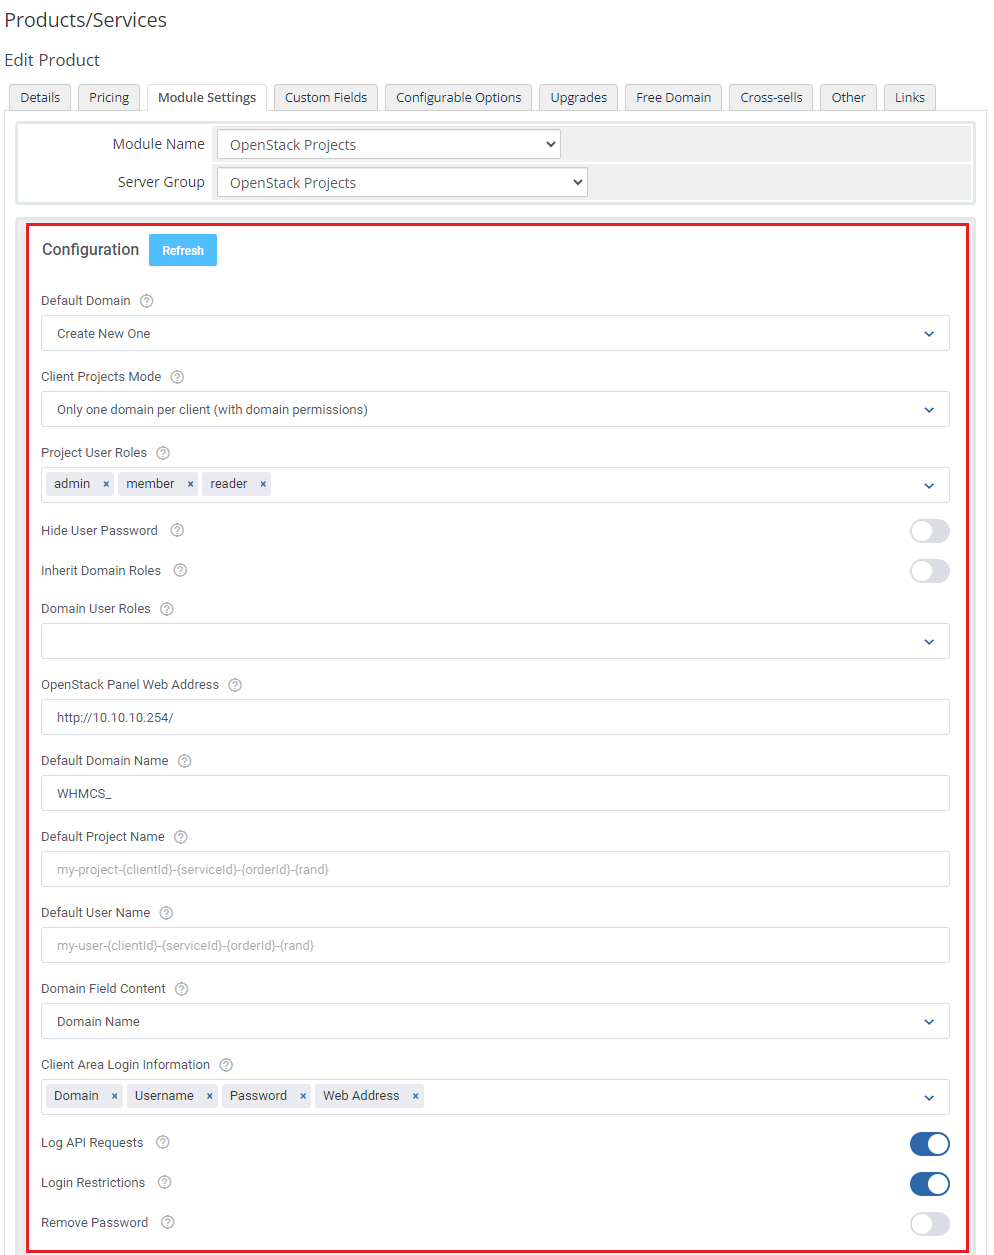
|
Quotas Configuration
|
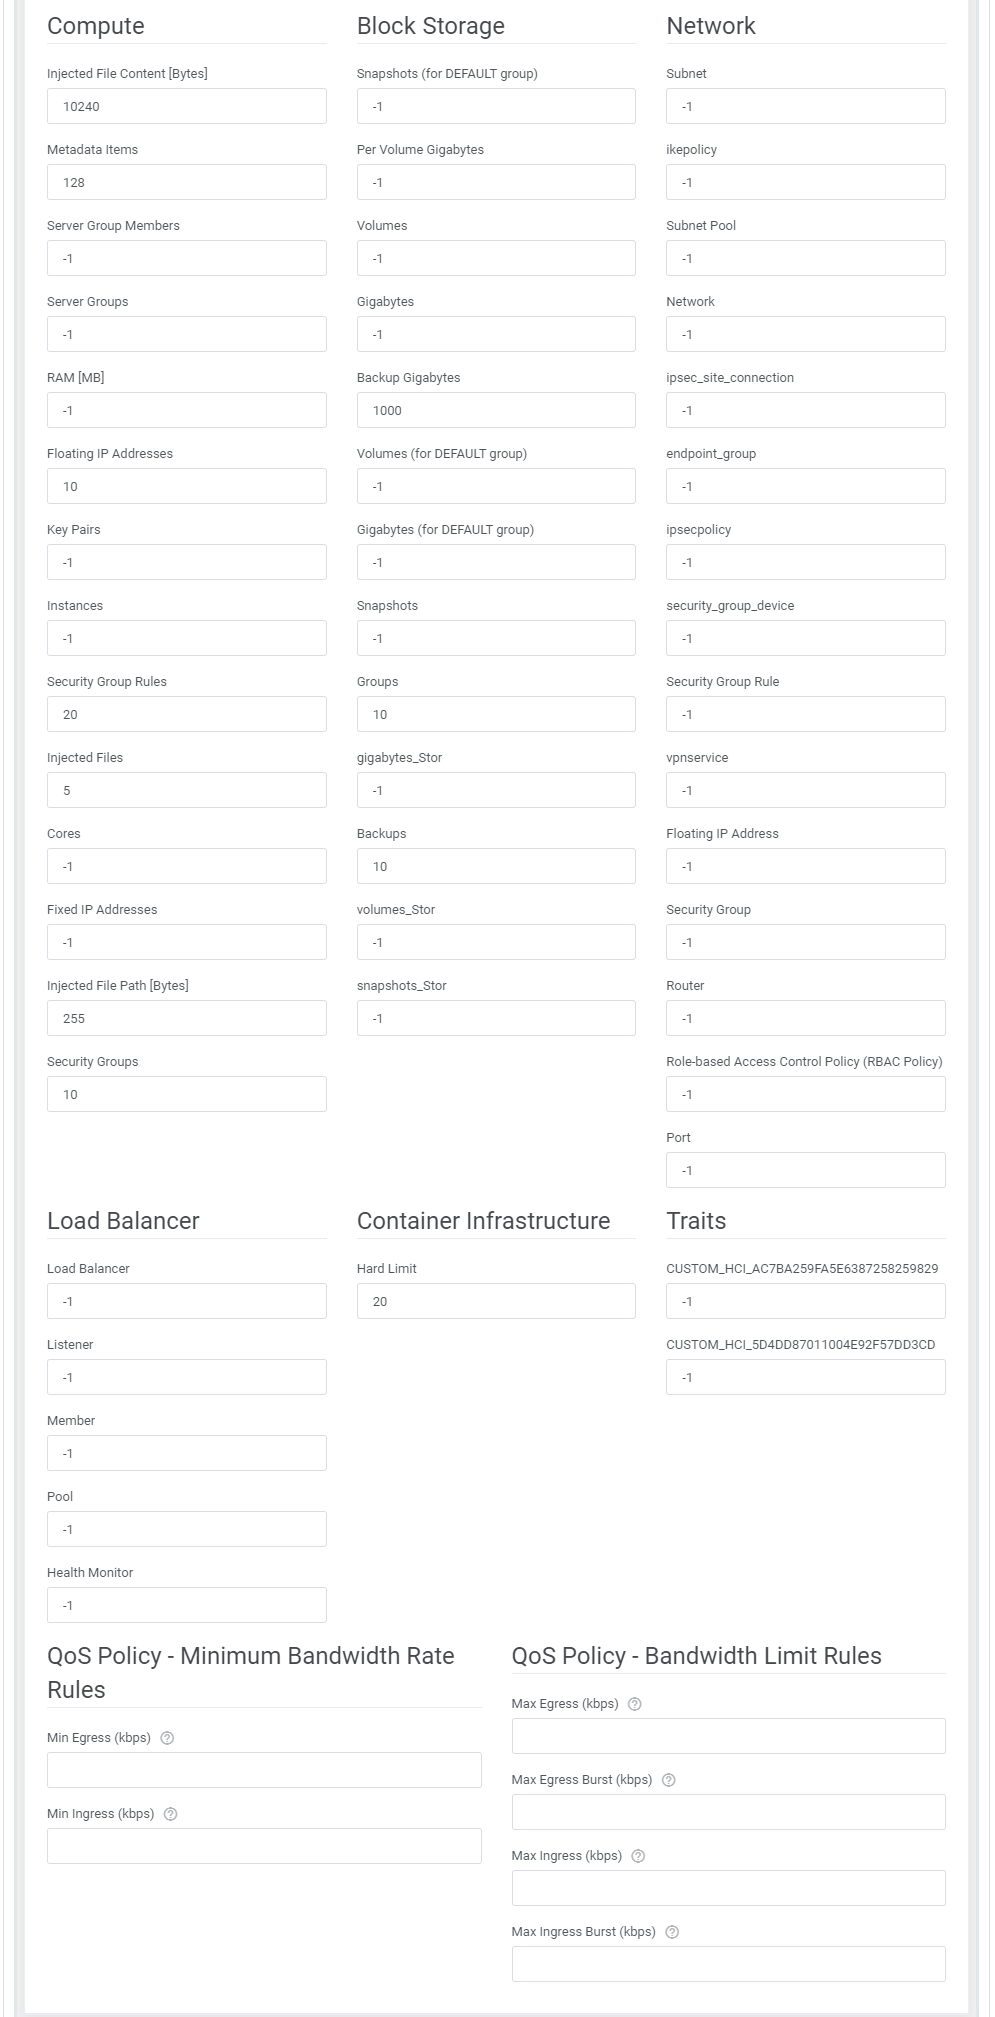
Compute, Block Storage, Network, Load Balancer, Container Infrastructure, Traits - |
|
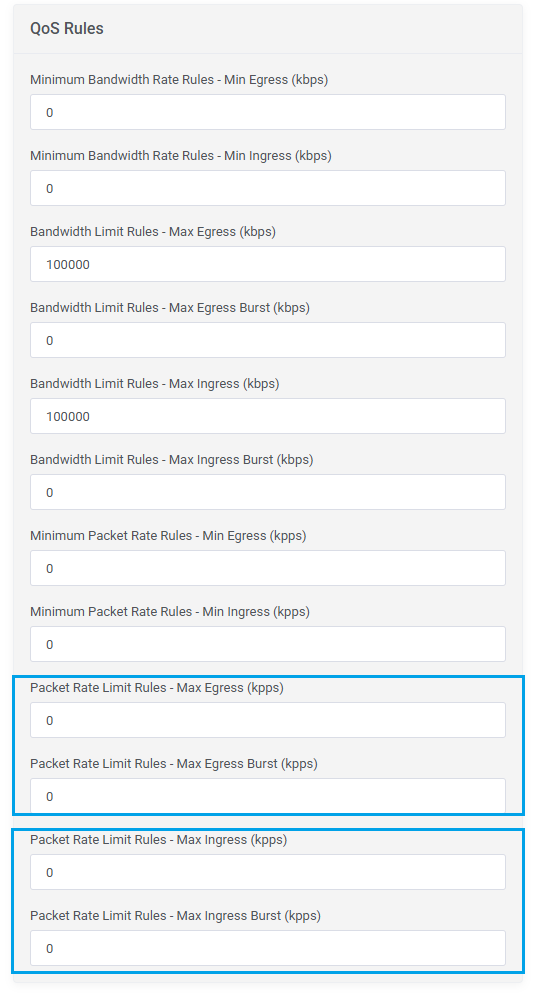
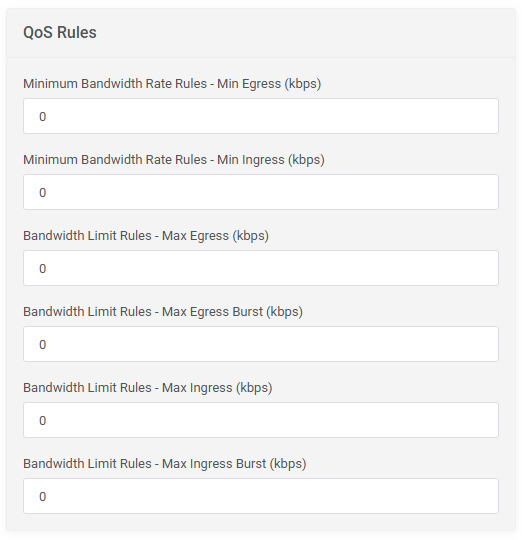
| In the QoS Rules configuration, certain QoS rules are consolidated into a single rule and respectively into a single configurable option. |
|
Client Area Features
|

|
Module Hooks
|
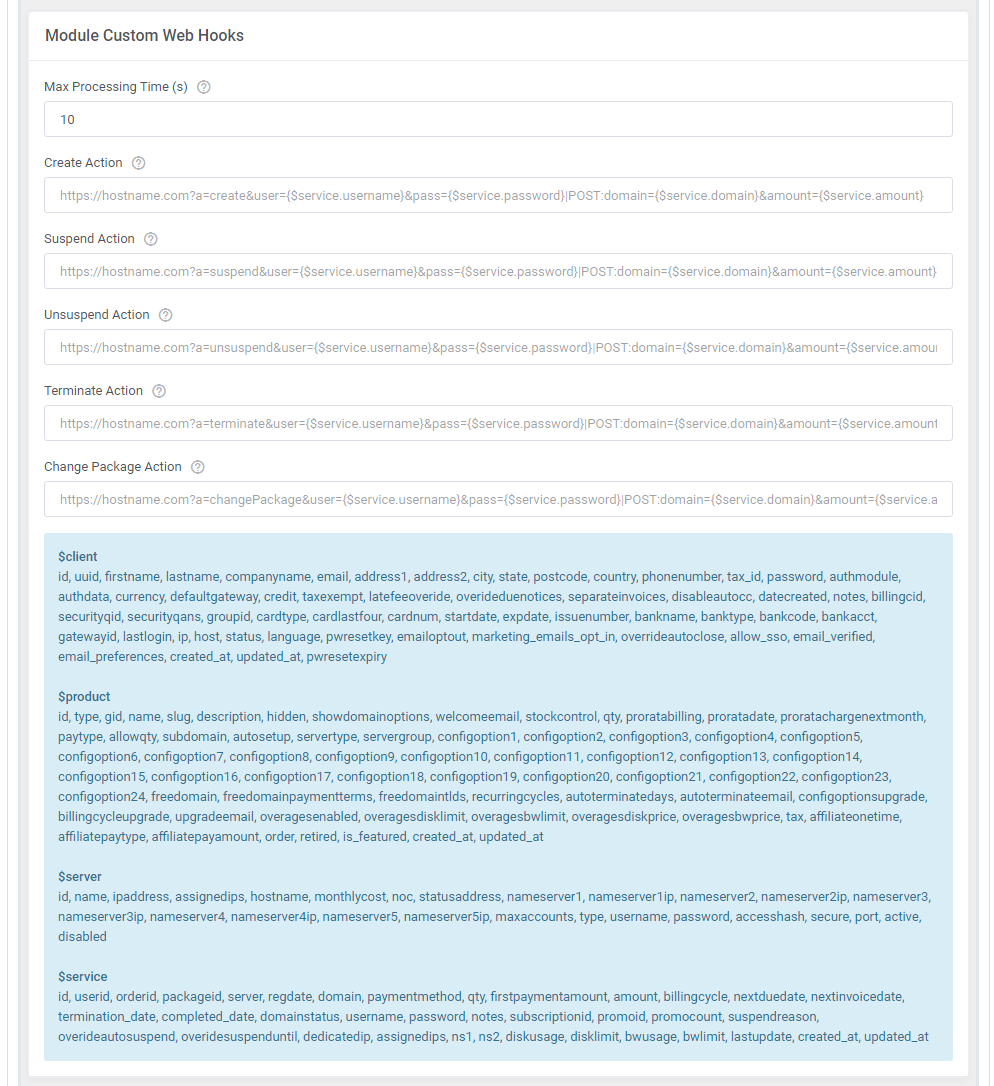
Module Custom Web Hooks - here you may add the URL with WHMCS parameters to perform additional actions after the create/suspend/unsuspend/terminate/change package actions. |
|
|
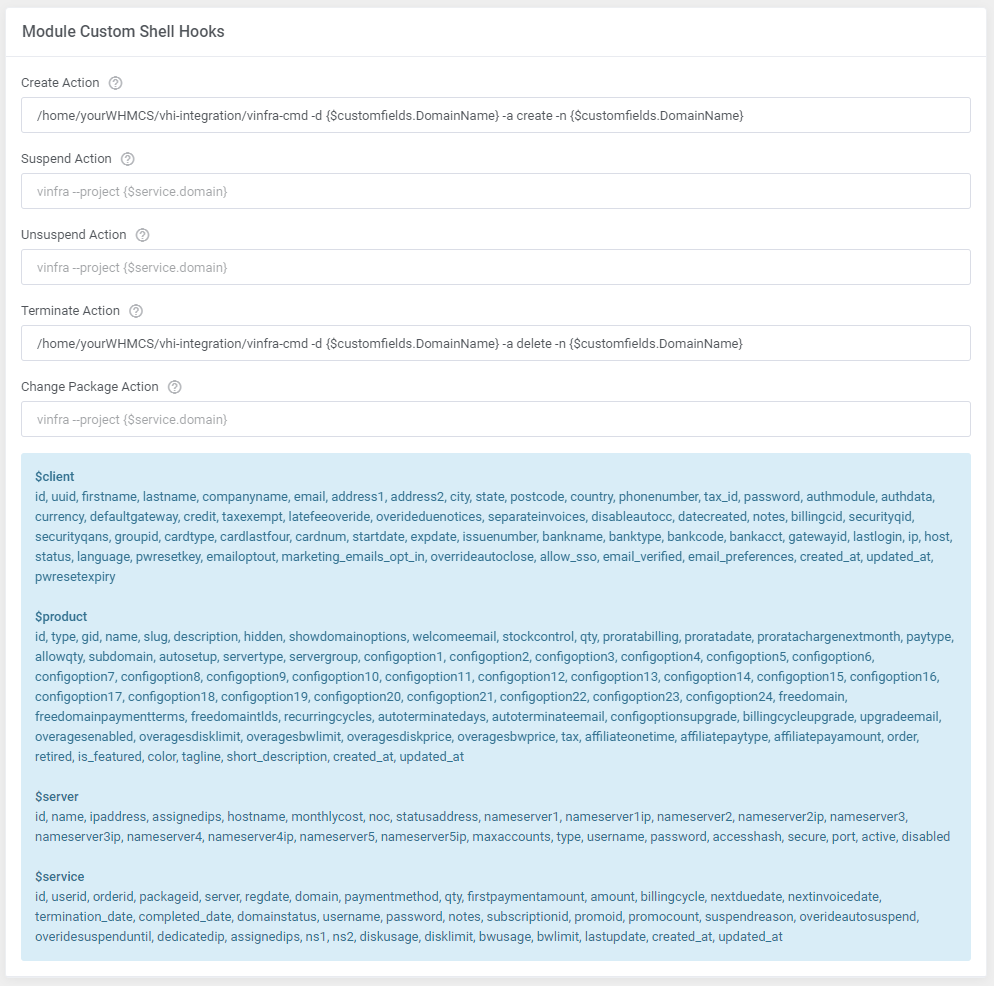
Module Custom Shell Hooks - enter the commands with WHMCS parameters to perform additional actions after the create/suspend/unsuspend/terminate/change package actions. |
|
Configurable Options
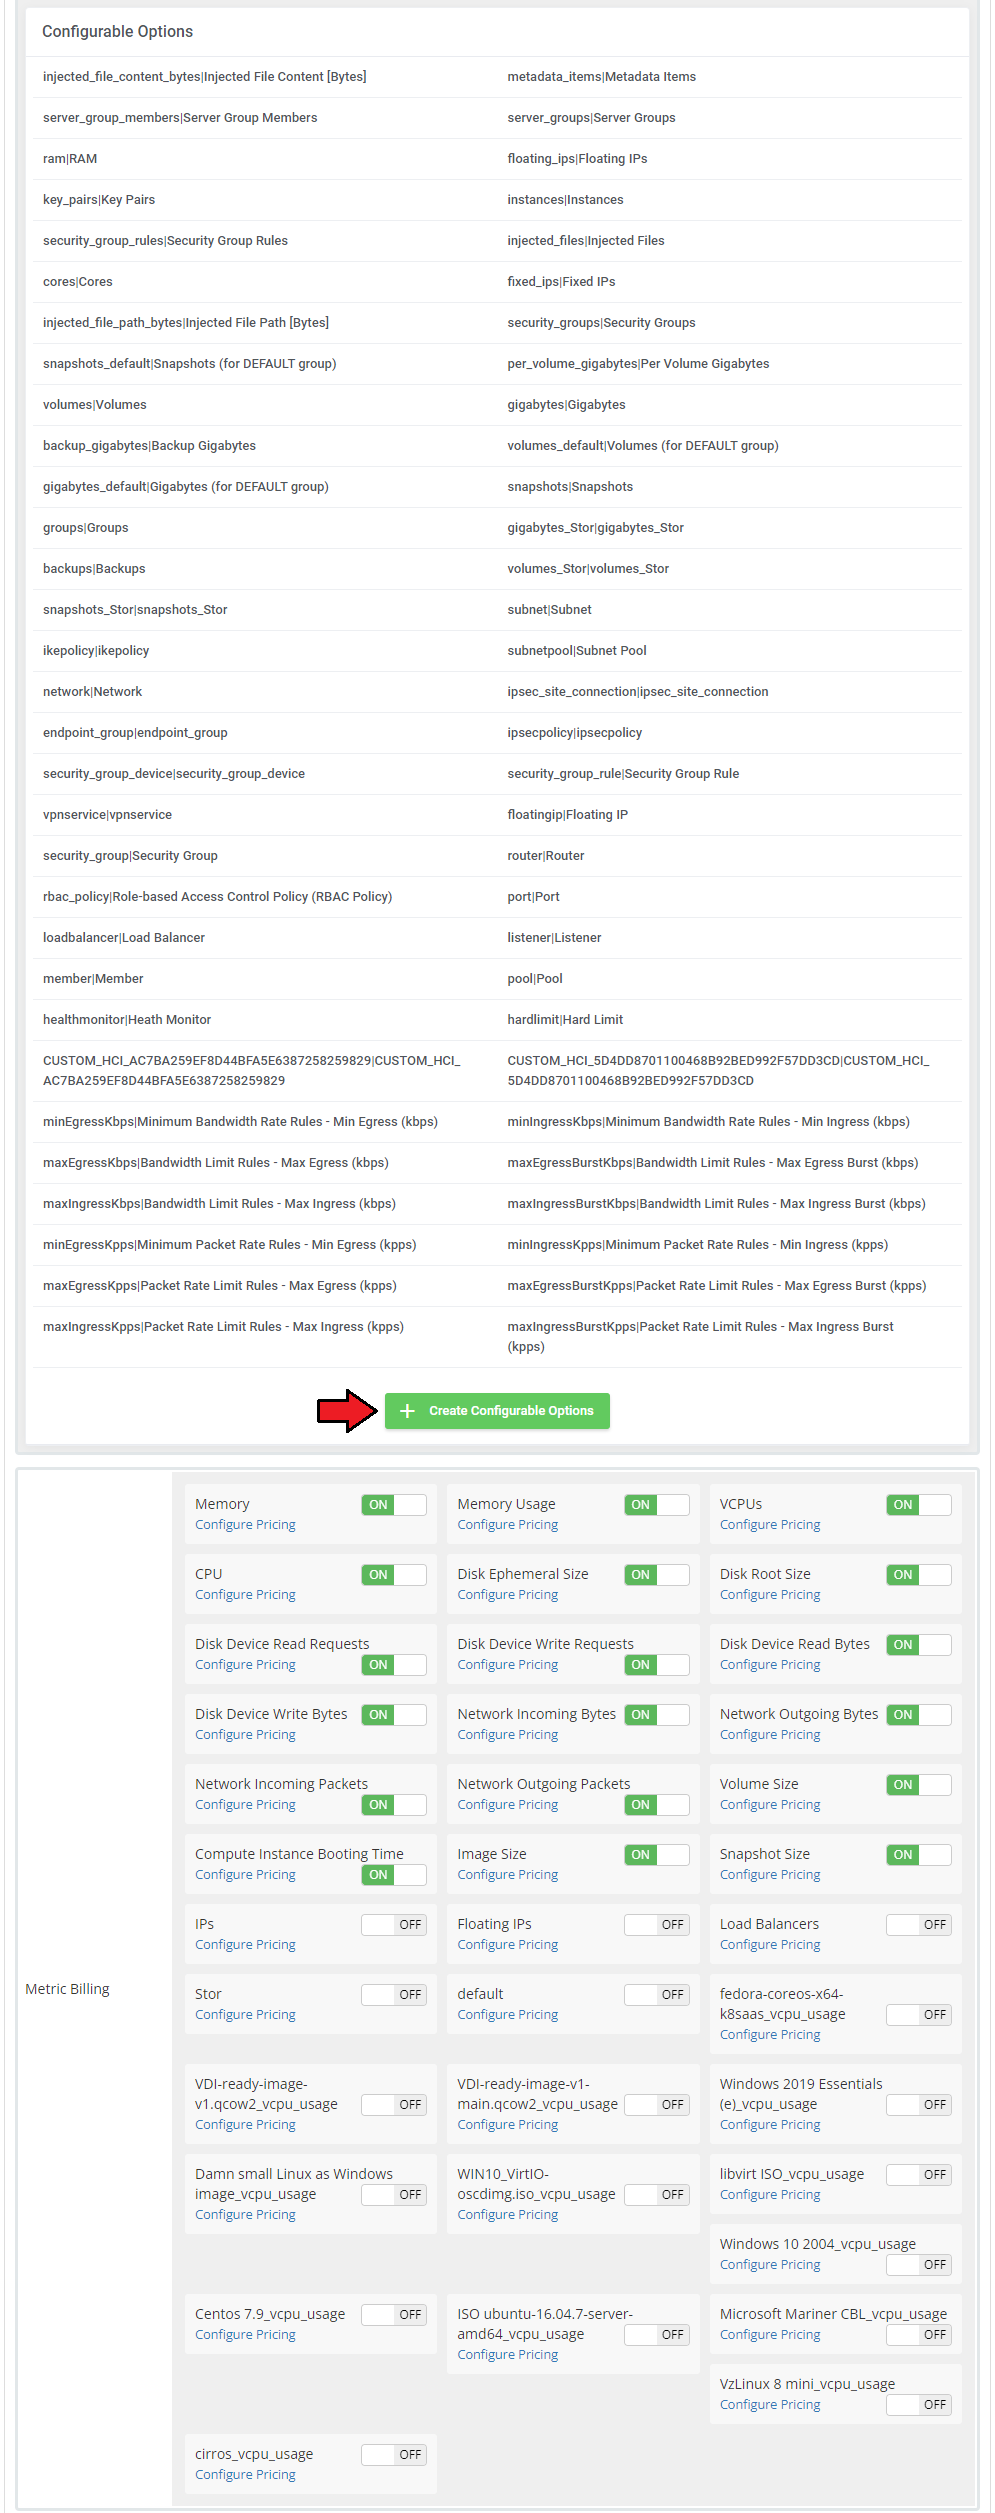
| 20. At the end of the configuration process, you can enable 'Metric Billing' and decide whether you want to generate configurable options for the product. Configurable options can be used by your clients to select each virtual machine parameter individually during order placement. There is also an 'Alternative Mode' available, which changes the way the configurable options values are verified and calculated. |

|
|
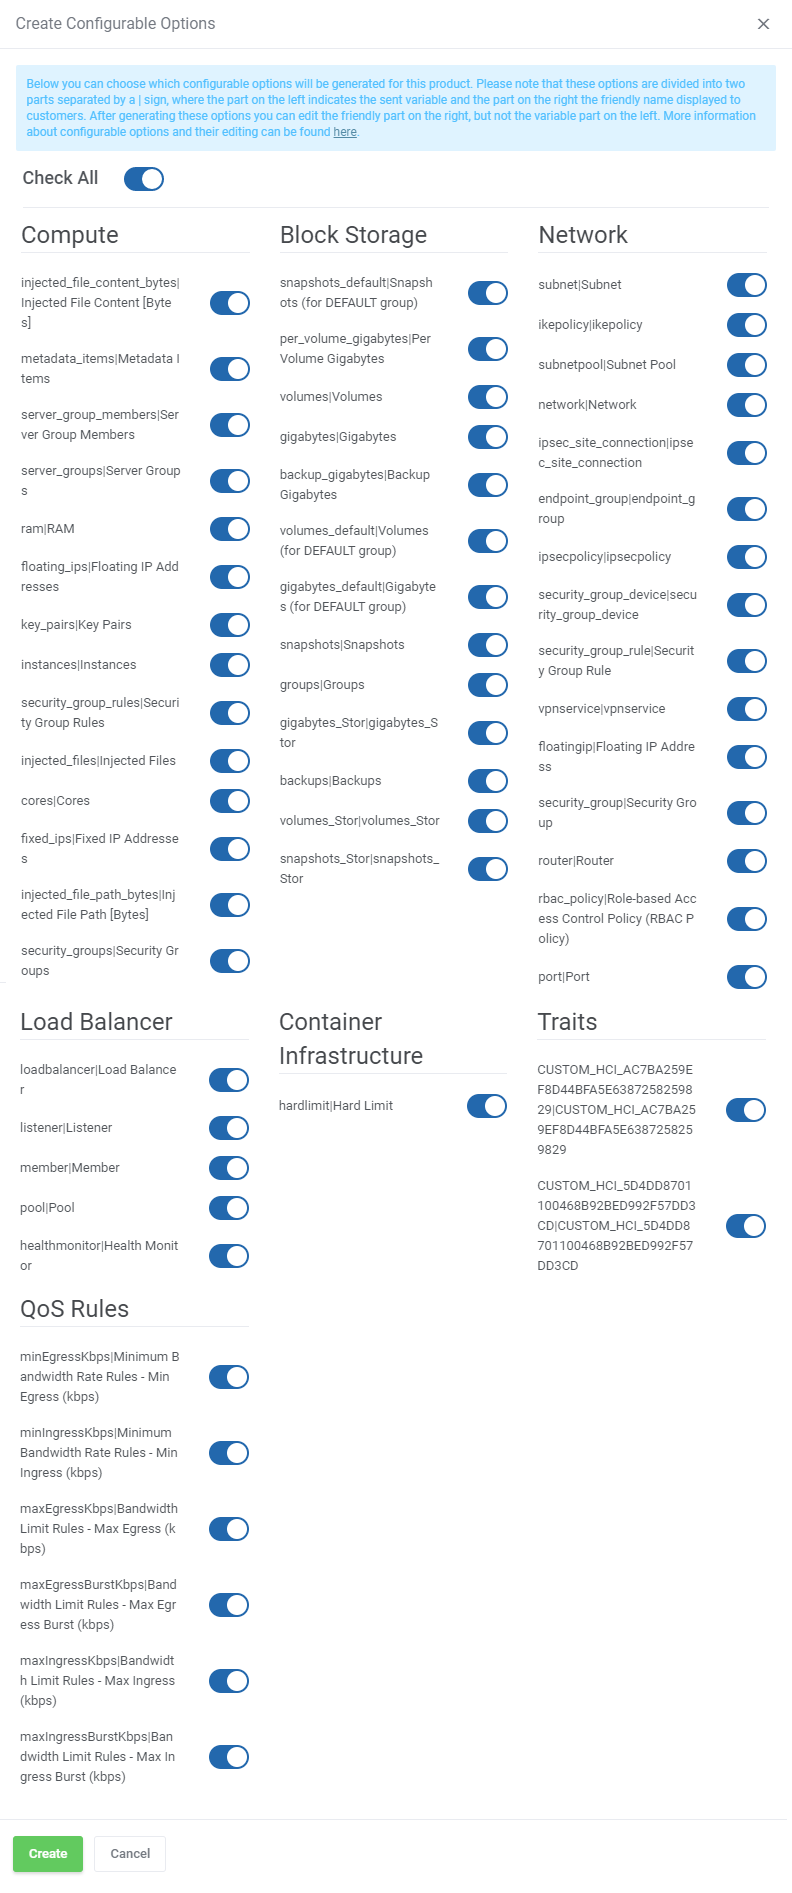
| Now, select which options you want to generate and confirm by clicking 'Create' . Note that the configuration for disabled options will still be taken from the configuration of the main product. More information about how to use configurable options can be found here or in the official WHMCS documentation. |
|
| There are specific exceptions where options must be configured together to create a functional rule. The following rules must be set together, as the API requires several parameters to be specified, therefore they are now combined into one configurable option for your comfort of use. These are:
Configured as:
Configured as:
Configured as:
Configured as: |
|
| For example:
In the QoS Policy generate the following configurable options:
This will result in the following configuration (overwriting the product configuration QoS Rules): |

|
User Roles Configuration
Roles, or in other words permissions, in OpenStack can be assigned to users, they can be associated with either a domain or a project.
|
| Move to 'Products/Services' → 'Module Settings' → 'Configuration'. There you will find all the options associated with the roles configuration: |
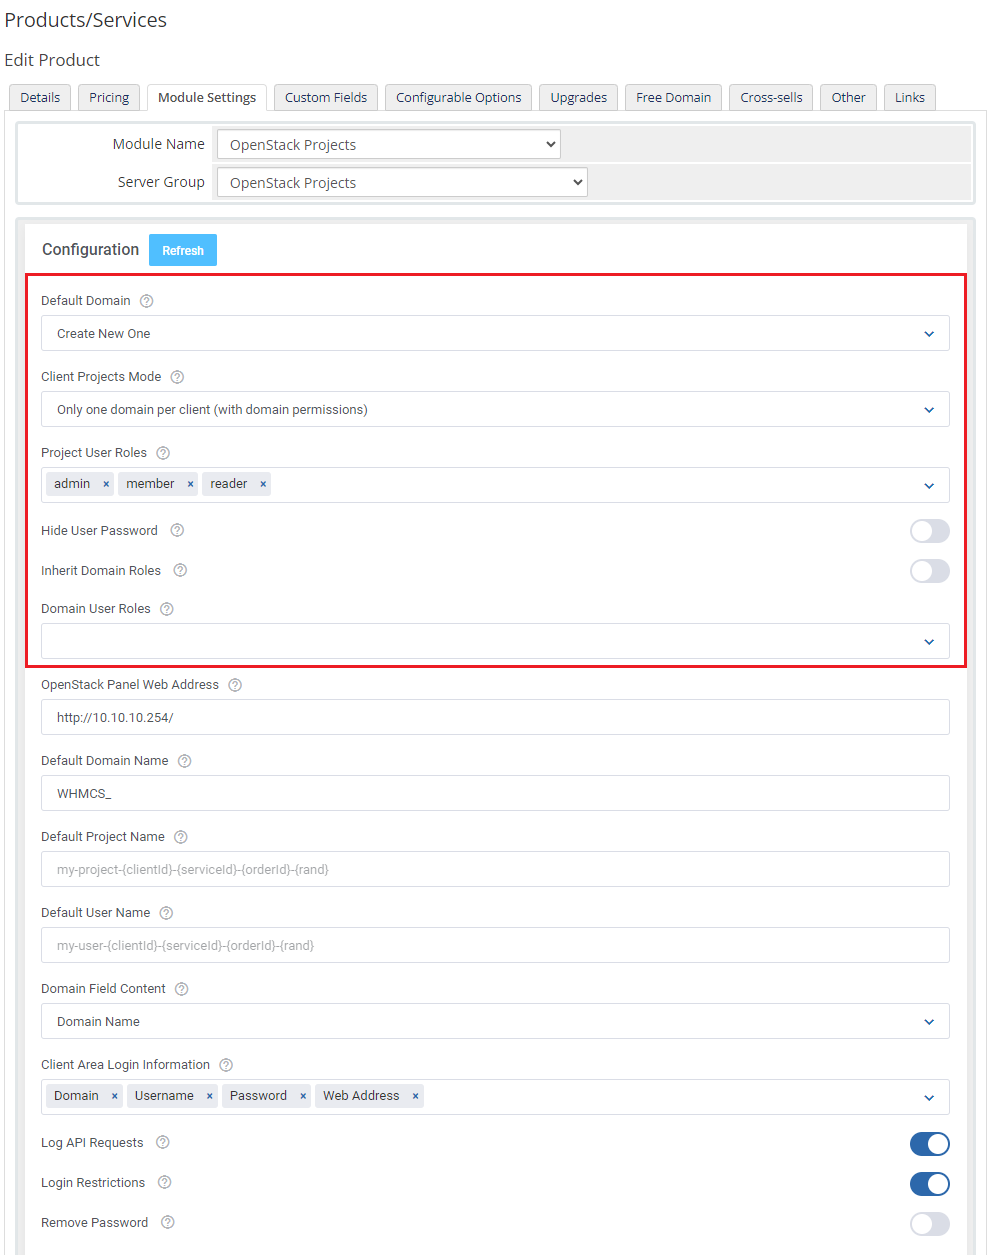
|
|
| Important: When upgrading from 1.3.0 to 1.4.0 module version and you do not save changes in the module settings the roles will work as in the previous version. |
Quota Configuraton Guide
Adding Quotas Using CLI
| Before configuring quotas, it's essential to identify which quotas your OpenStack environment supports. To set quotas via the module, they must be added to the Use the following CLI commands to list available quotas from your OpenStack environment: openstack quota show --compute -f json openstack quota show --network -f json openstack quota show --volume -f json openstack loadbalancer quota show default -f json openstack coe quota list openstack trait list |
| Next, edit the 'quotas.json', ensure that the quotas specified align with the capabilities and limitations of your OpenStack setup. Important: |
Example Configuration For Compute, Network, and Volume Quotas
 [
 {
   "Resource": "cores",
   "Limit": -1
 },
 {
   "Resource": "instances",
   "Limit": -1
 },
 {
   "Resource": "ram",
   "Limit": -1
 },
 {
   "Resource": "fixed_ips",
   "Limit": null
 },
 {
   "Resource": "floating_ips",
   "Limit": null
 },
 {
   "Resource": "networks",
   "Limit": null
 },
 {
   "Resource": "security_group_rules",
   "Limit": null
 },
 {
   "Resource": "security_groups",
   "Limit": null
 },
 {
   "Resource": "injected-file-size",
   "Limit": 10240
 },
 {
   "Resource": "injected-path-size",
   "Limit": 255
 },
 {
   "Resource": "injected-files",
   "Limit": 5
 },
 {
   "Resource": "key-pairs",
   "Limit": -1
 },
 {
   "Resource": "properties",
   "Limit": 128
 },
 {
   "Resource": "server-group-members",
   "Limit": -1
 },
 {
   "Resource": "server-groups",
   "Limit": -1
 }
 ]
 "compute": {
  "quota_resource_name": "default_limit_value"
 }
 "compute": {
  "cores": -1,
  "instances": -1,
  "ram": -1,
  "fixed_ips": null,
  "floating_ips": null,
  "networks": null,
  "security_group_rules": null,
  "security_groups": null,
  "injected-file-size": 10240,
  "injected-path-size": 255,
  "injected-files": 5,
  "key-pairs": -1,
  "properties": 128,
  "server-group-members": -1,
  "server-groups": -1
 }
|
Example Configuration For Load Balancer Quota
 {
  "load_balancer": 0,
  "listener": -1,
  "pool": -1,
  "health_monitor": -1,
  "member": -1,
  "l7policy": -1,
  "l7rule": -1
 }
 "loadBalancer": {
  "load_balancer": 0,
  "listener": -1,
  "pool": -1,
  "health_monitor": -1,
  "member": -1,
  "l7policy": -1,
  "l7rule": -1
 }
|
Example Configuration For Container Infrastructure Quota
|
| project_id | resource | hard_limit |
|---|---|---|
| 5dcda23cb9bd4718b32610bbe18a1382 | Cluster | 20 |
"containerInfra": {
 "hard_limit": 20
}
|
Example Configuration For Placement / Traits
|
| name |
|---|
| COMPUTE_NET_VIF_MODEL_SRIOV |
| HW_CPU_AARCH64_FCMA |
| HW_CPU_X86_AMD_SSBD |
| HW_NIC_OFFLOAD_GSO |
| CUSTOM_MG |
| CUSTOM_HCI_5EDCF1C91EEC41839078D7C9FF3F6A46 |
| CUSTOM_HCI_9F5665A0B47C40438E20F0B866B79703 |
| CUSTOM_HCI_D3E179EFBF1F42FF854C791410C82B66 |
"traits": {
 "CUSTOM_MG": 1
}
|
Block Storage Quota Configuration
To configure available quotas, update the following file:
modules/servers/OpenstackProjects/app/Config/quotas.json Manually add additional storage types to block storage as needed. To set a volume size limit for block storage, modify the Example Configuration for SSD Volume Type To specify an unlimited quota for SSD volumes, use the following setting: "gigabytes_ssd": -1
 "blockStorage": {
   ....
   "gigabytes_default": -1,
   "gigabytes_ssd": -1
 }
Once the file is updated and the page is refreshed, the new quota will be reflected in the Block Storage section. |
Default Quota Configuration
Below is an example of the default quotas.json configuration. By ensuring these settings are correctly configured, your OpenStack Projects For WHMCS module will properly enforce quotas across your environment. {
"compute": {
"cores": -1,
"fixed_ips": -1,
"floating_ips": -1,
"injected_file_content_bytes": 10240,
"injected_file_path_bytes": 255,
"injected_files": 5,
"instances": -1,
"key_pairs": -1,
"metadata_items": 128,
"ram": -1,
"security_group_rules": -1,
"security_groups": -1,
"server_group_members": -1,
"server_groups": 30
},
"blockStorage": {
"volumes": 100,
"per_volume_gigabytes": 50,
"snapshots": 100,
"gigabytes": 300,
"backups": 10,
"backup_gigabytes": 200,
"volumes_default": -1,
"gigabytes_default": -1,
"snapshots_default": -1,
"groups": 10
},
"network": {
"network": -1,
"subnet": -1,
"subnetpool": -1,
"port": -1,
"router": -1,
"floatingip": -1,
"rbac_policy": -1,
"security_group": -1,
"security_group_rule": -1,
"security_group_device": -1,
"endpoint_group": -1,
"vpnservice": -1,
"ipsec_site_connection": -1,
"ipsecpolicy": -1,
"ikepolicy": -1
},
"loadBalancer": {
"load_balancer": -1,
"listener": -1,
"member": -1,
"pool": -1,
"health_monitor": -1
},
"containerInfra": {
"hard_limit": 20
},
"traits": {}
}
|
QoS Policy Assignment
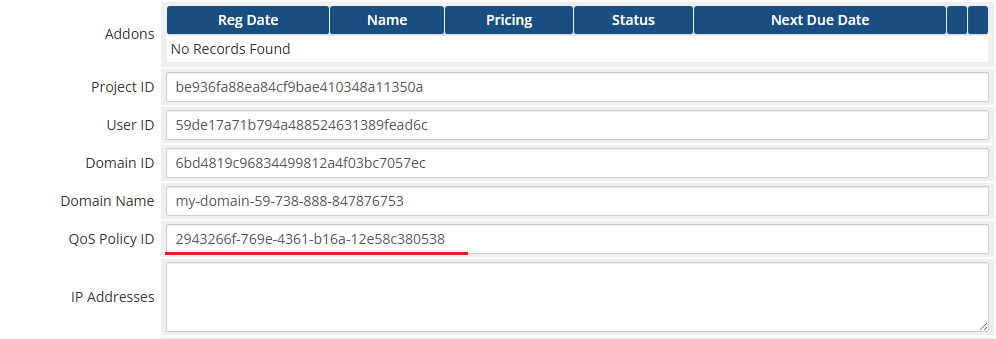
| This command helps manage projects that do not yet have a QoS Policy assigned. Command: php -q /yourWHMCS/modules/servers/OpenstackProjects/cron/cron.php create:missing-qos The command scans all OpenStack products and attempts to assign a QoS Policy where it is missing. If the QoS configuration for a product is empty (all values set to 0), a warning will be displayed. |
|
Management
| OpenStack Projects For WHMCS is a module that will allow you to provision virtual projects to your customers in a fully automatic manner. Check the manual below to learn how to configure the module to take all the advantages it has to offer. |
Addon Module
| While management of specific projects mostly takes place in the admin area, functions that affect the whole module can be found in the addon. See the section below for an in depth explanation of each of them. |
Queue
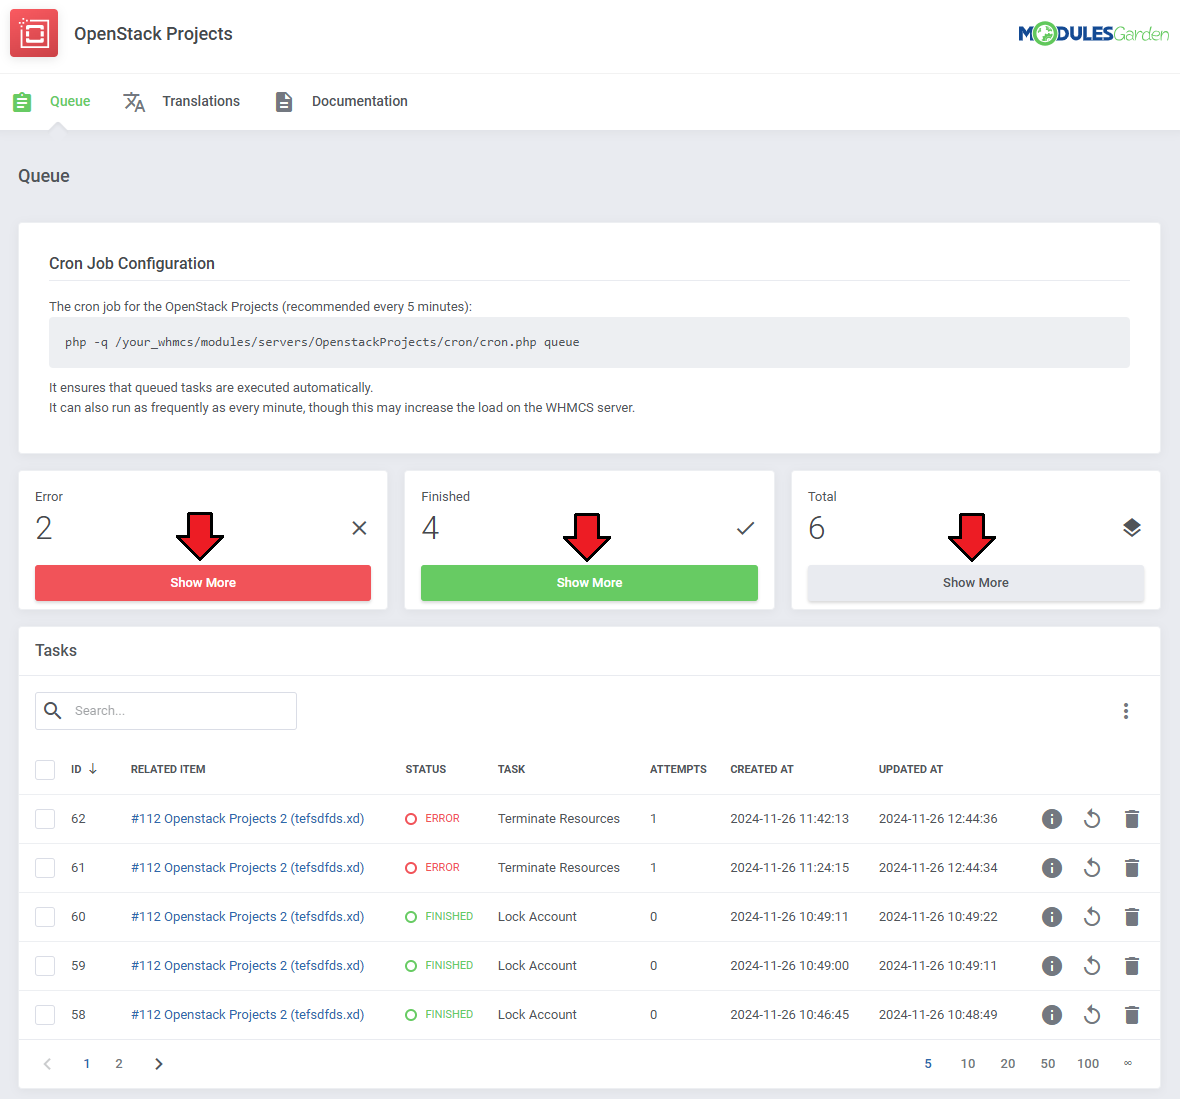
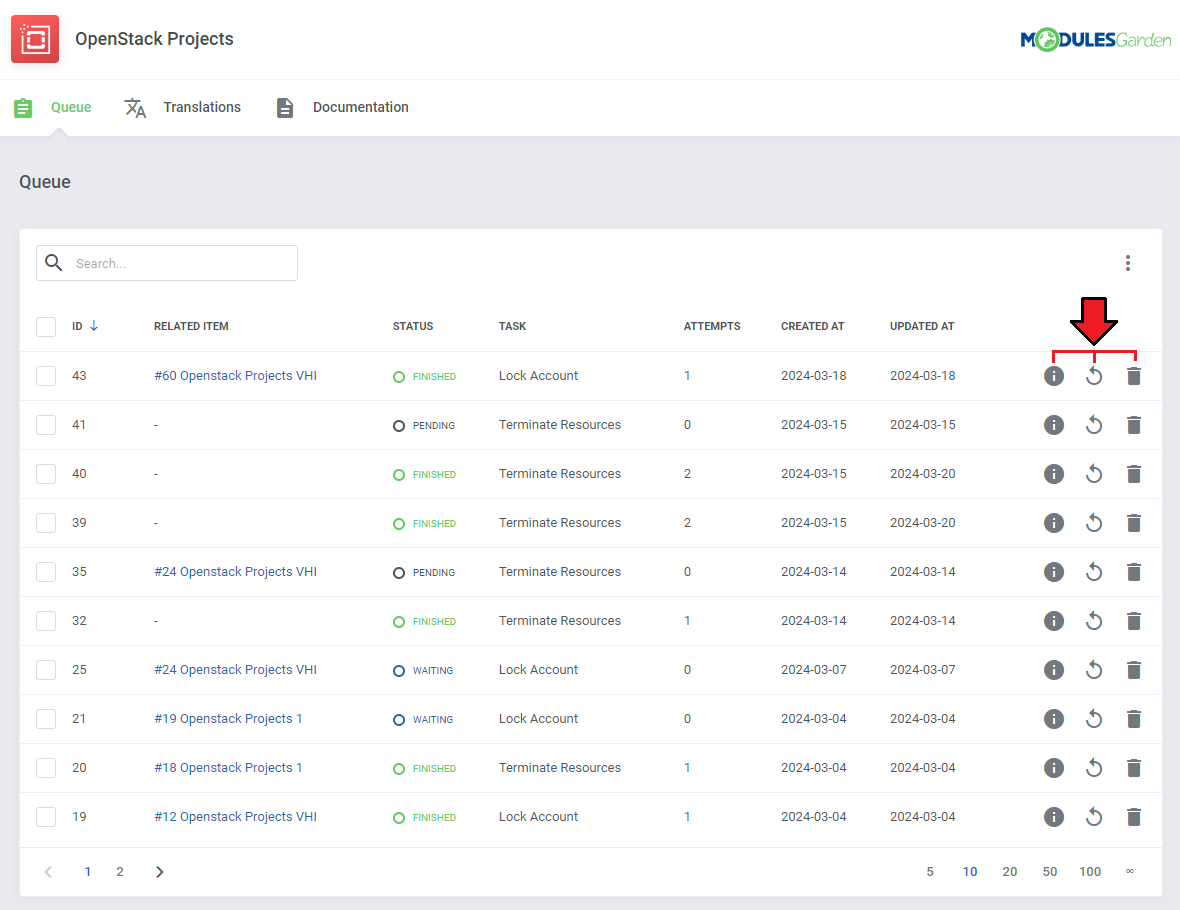
| At the top of this section you will find information regarding the cron job. The task cards can be used to filter the task table underneath. |
|
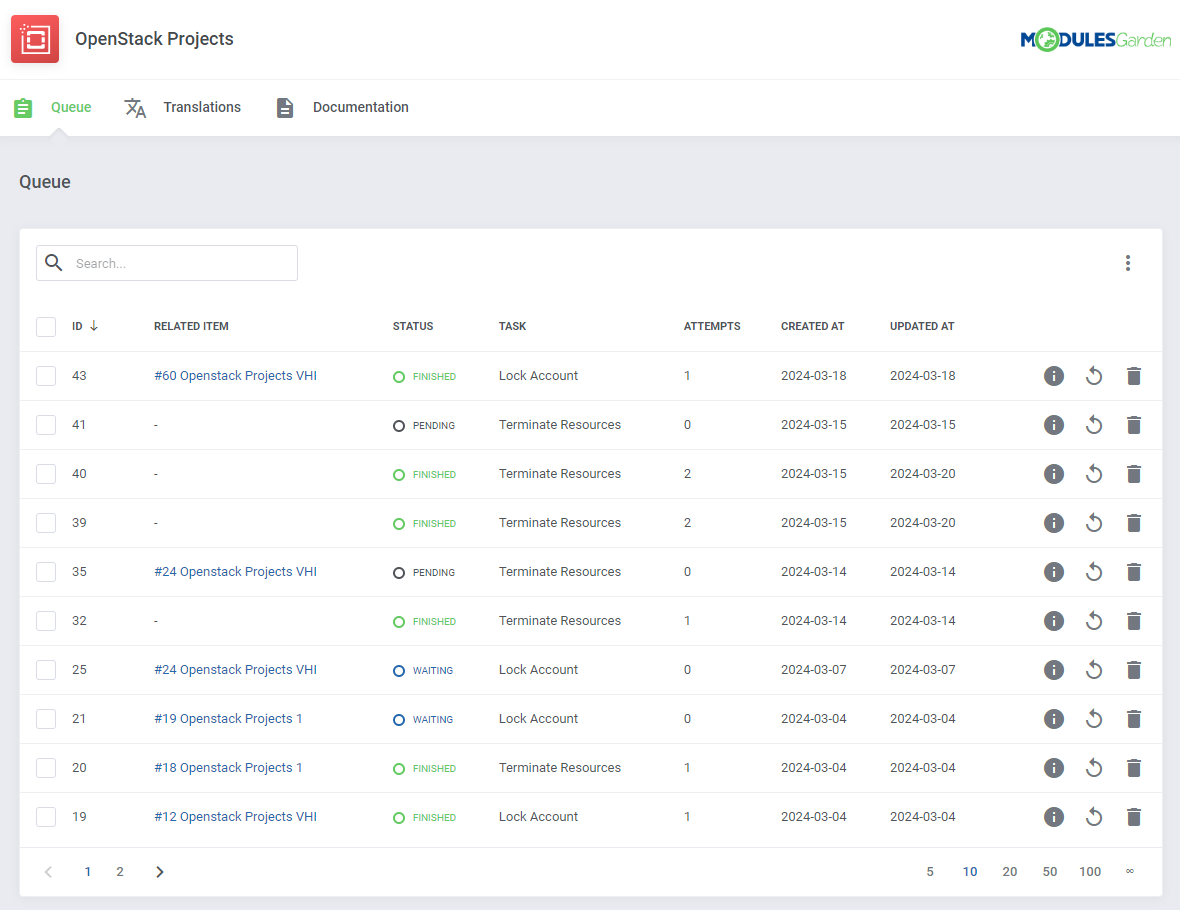
| Cron job tasks sent to the server through the module can be viewed and managed here. The basic information includes:
|
|
On the right side of the tasks list you will find the action buttons. These are in order:
|
|
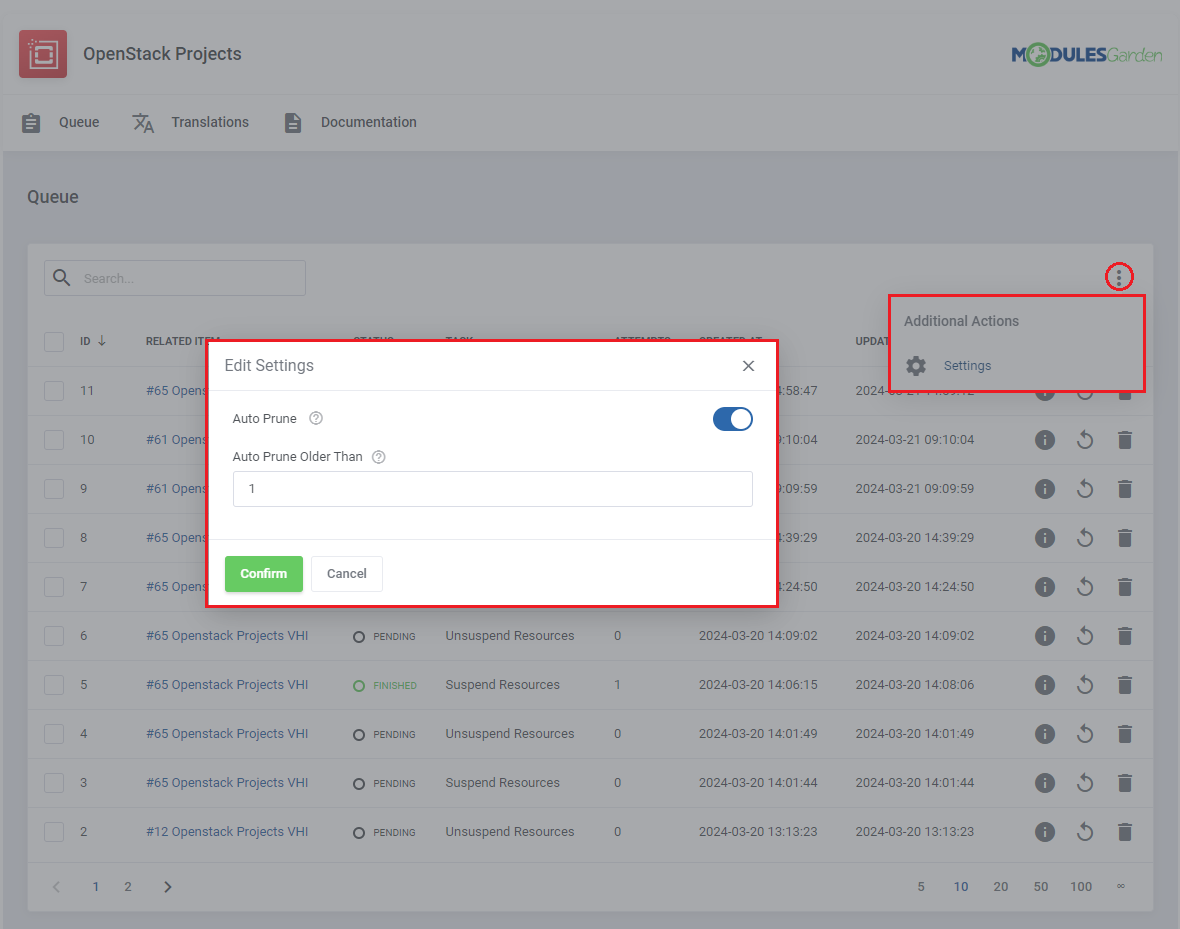
Moreover, you can change additional settings by clicking on the three dots above the basic actions.
|
|
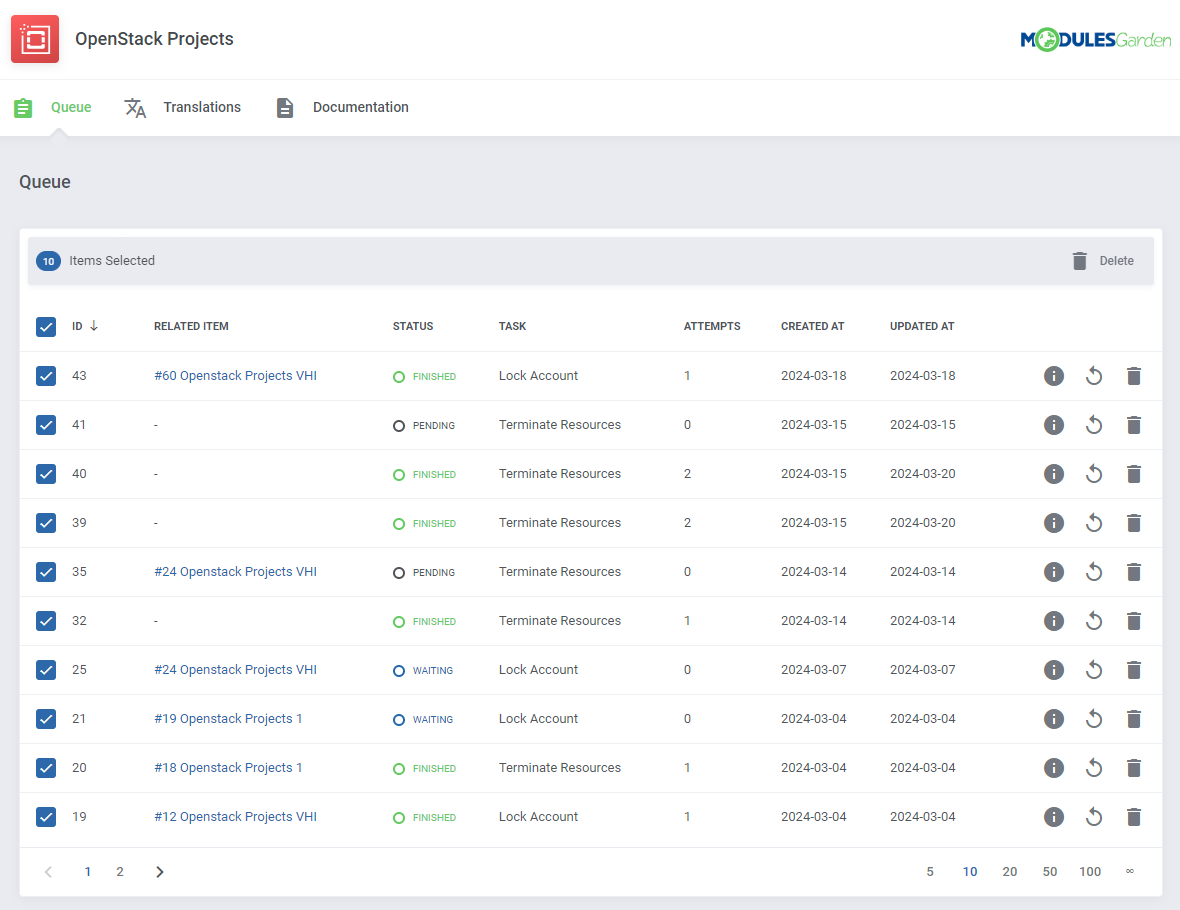
| Remember to make use of the search bar when you need to find a specific task, and the mass action feature, when you need to delete multiple tasks at once. |
|
Translations
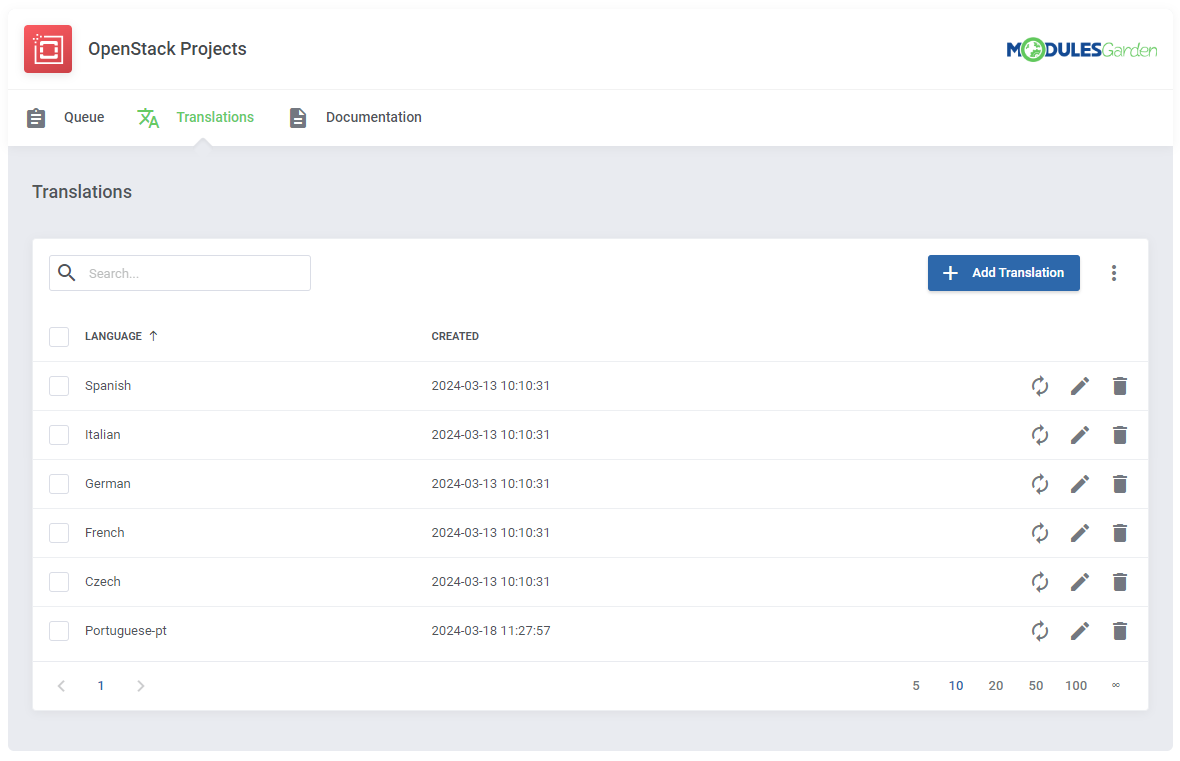
| Customizing language files is now extremely easy with the "Translations" tool that is now available directly in the addon. Its user-friendly design makes managing various language file tweaks a smooth and efficient process. Prepare translations for the original English files with this handy built-in tool. For specific instructions on how to use this tool please refer to its dedicated article, you will find it here. |
|
Admin Area
| OpenStack Projects For WHMCS allows you to supervise and manage your customer products from the admin area of your WHMCS system. This includes supervision of such features as:
|
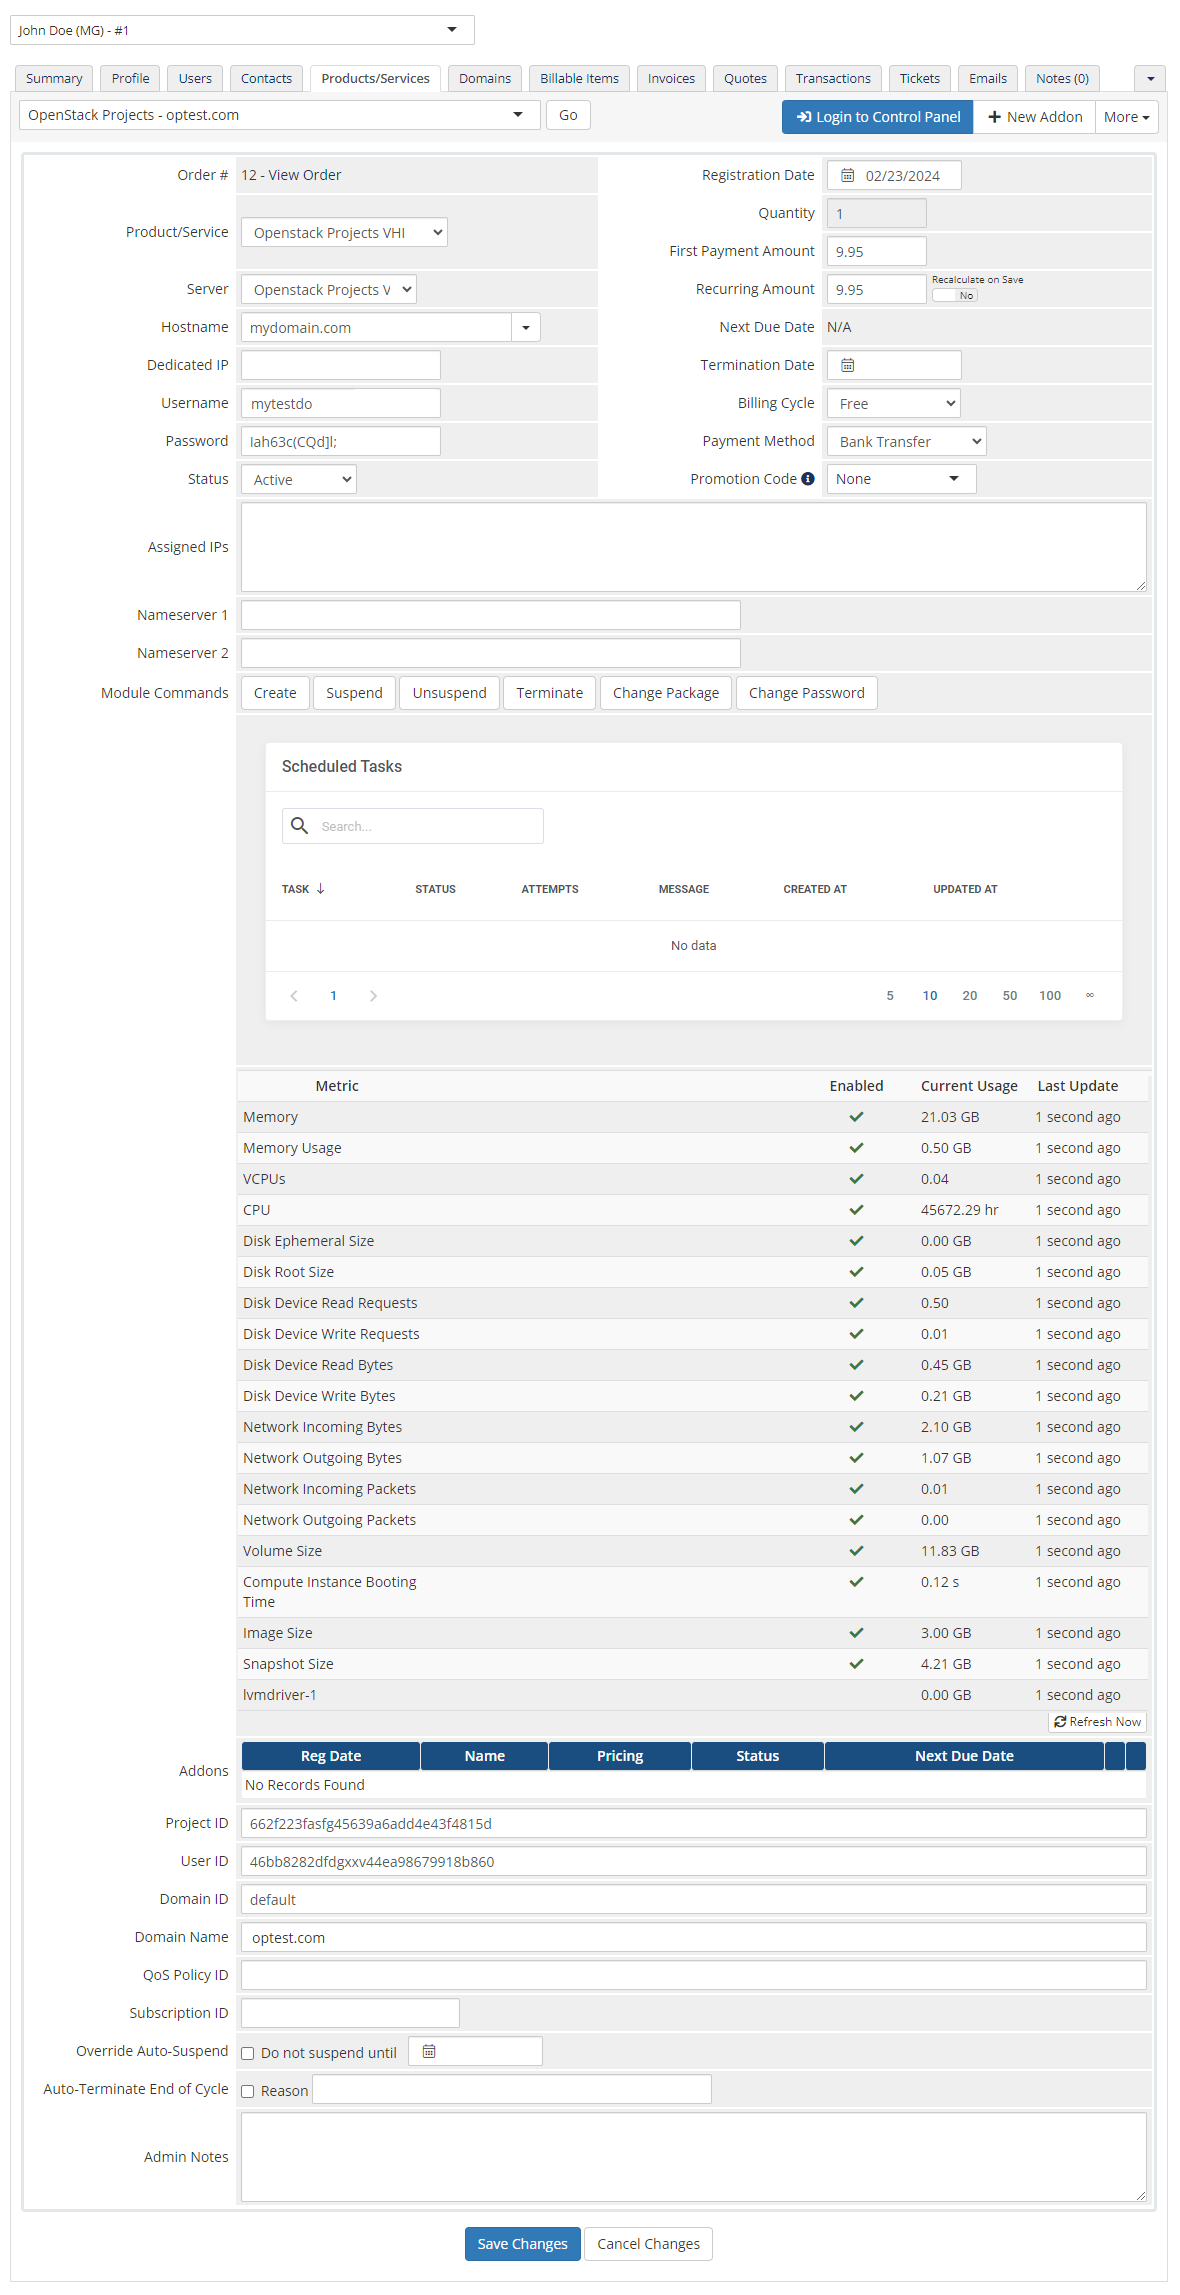
|
Ordering New Projects
| Thanks to configurable options, you are able to offer a product that your clients can match to their needs. Additionally, you are able to set up pricing for each configurable option, which makes your offer even more competitive. |
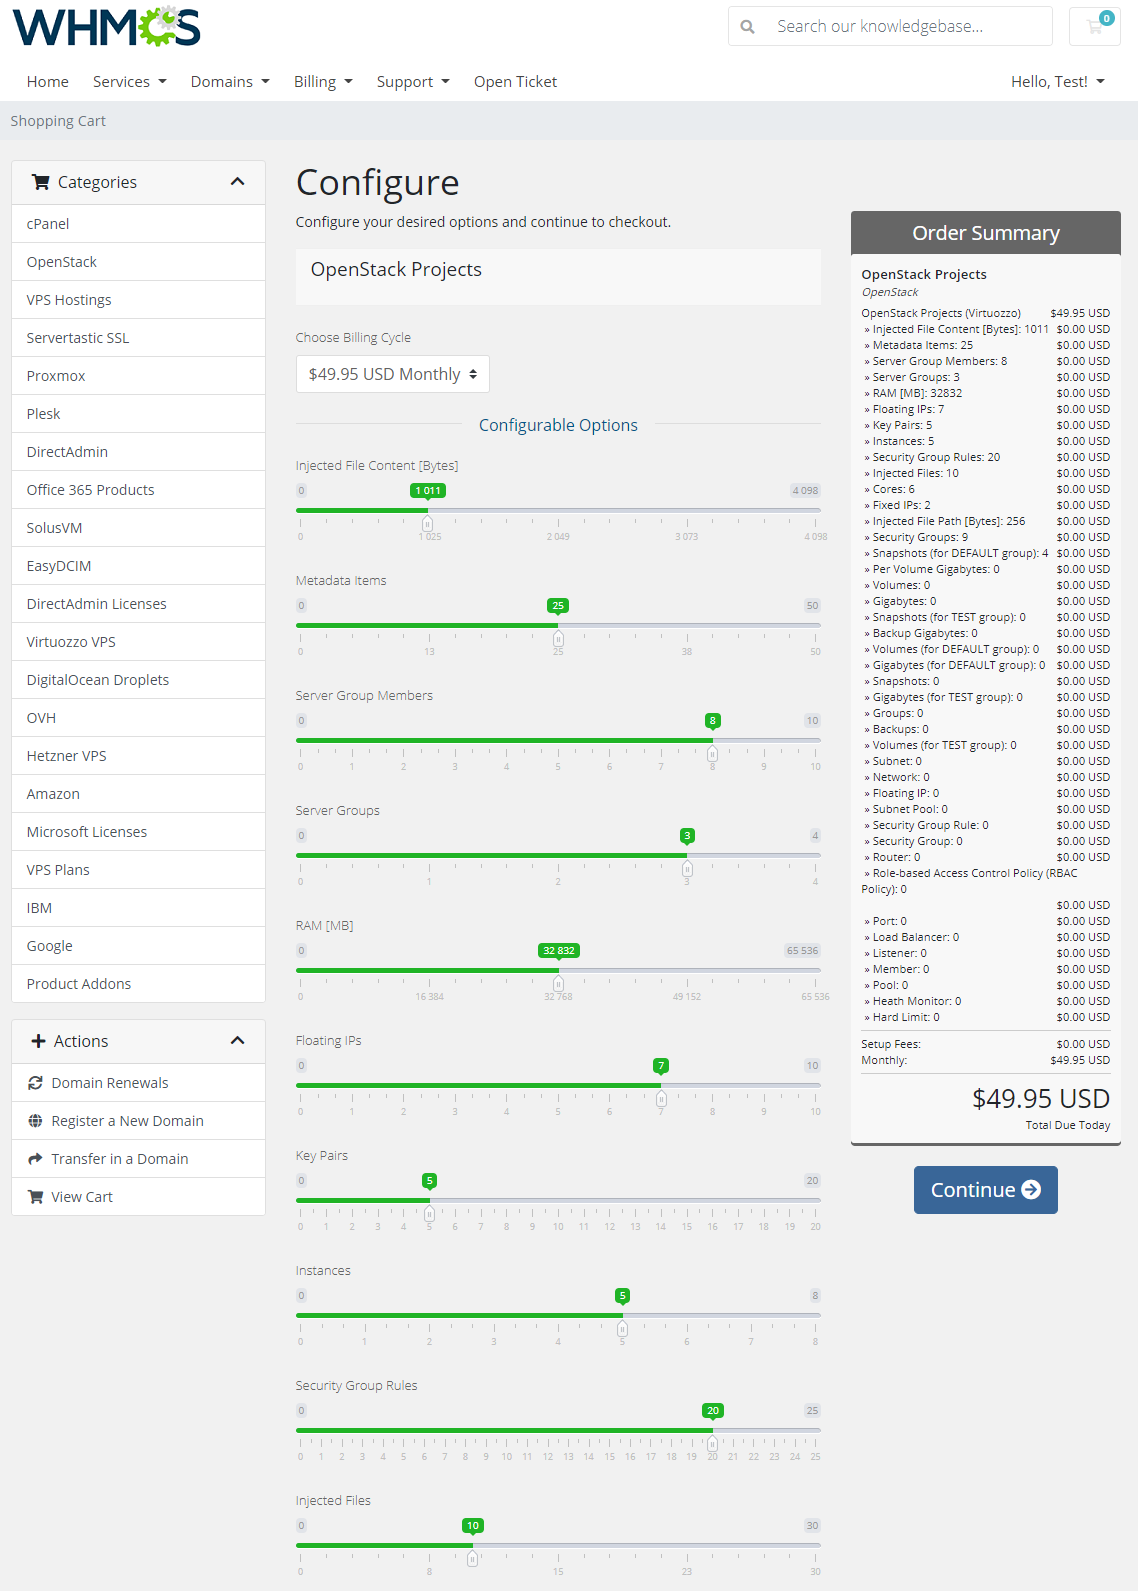
|
Importing Existing Project
| You can easily import existing projects into the module by following the instructions provided below: 1. Find a client to whom you want to assign a project. |
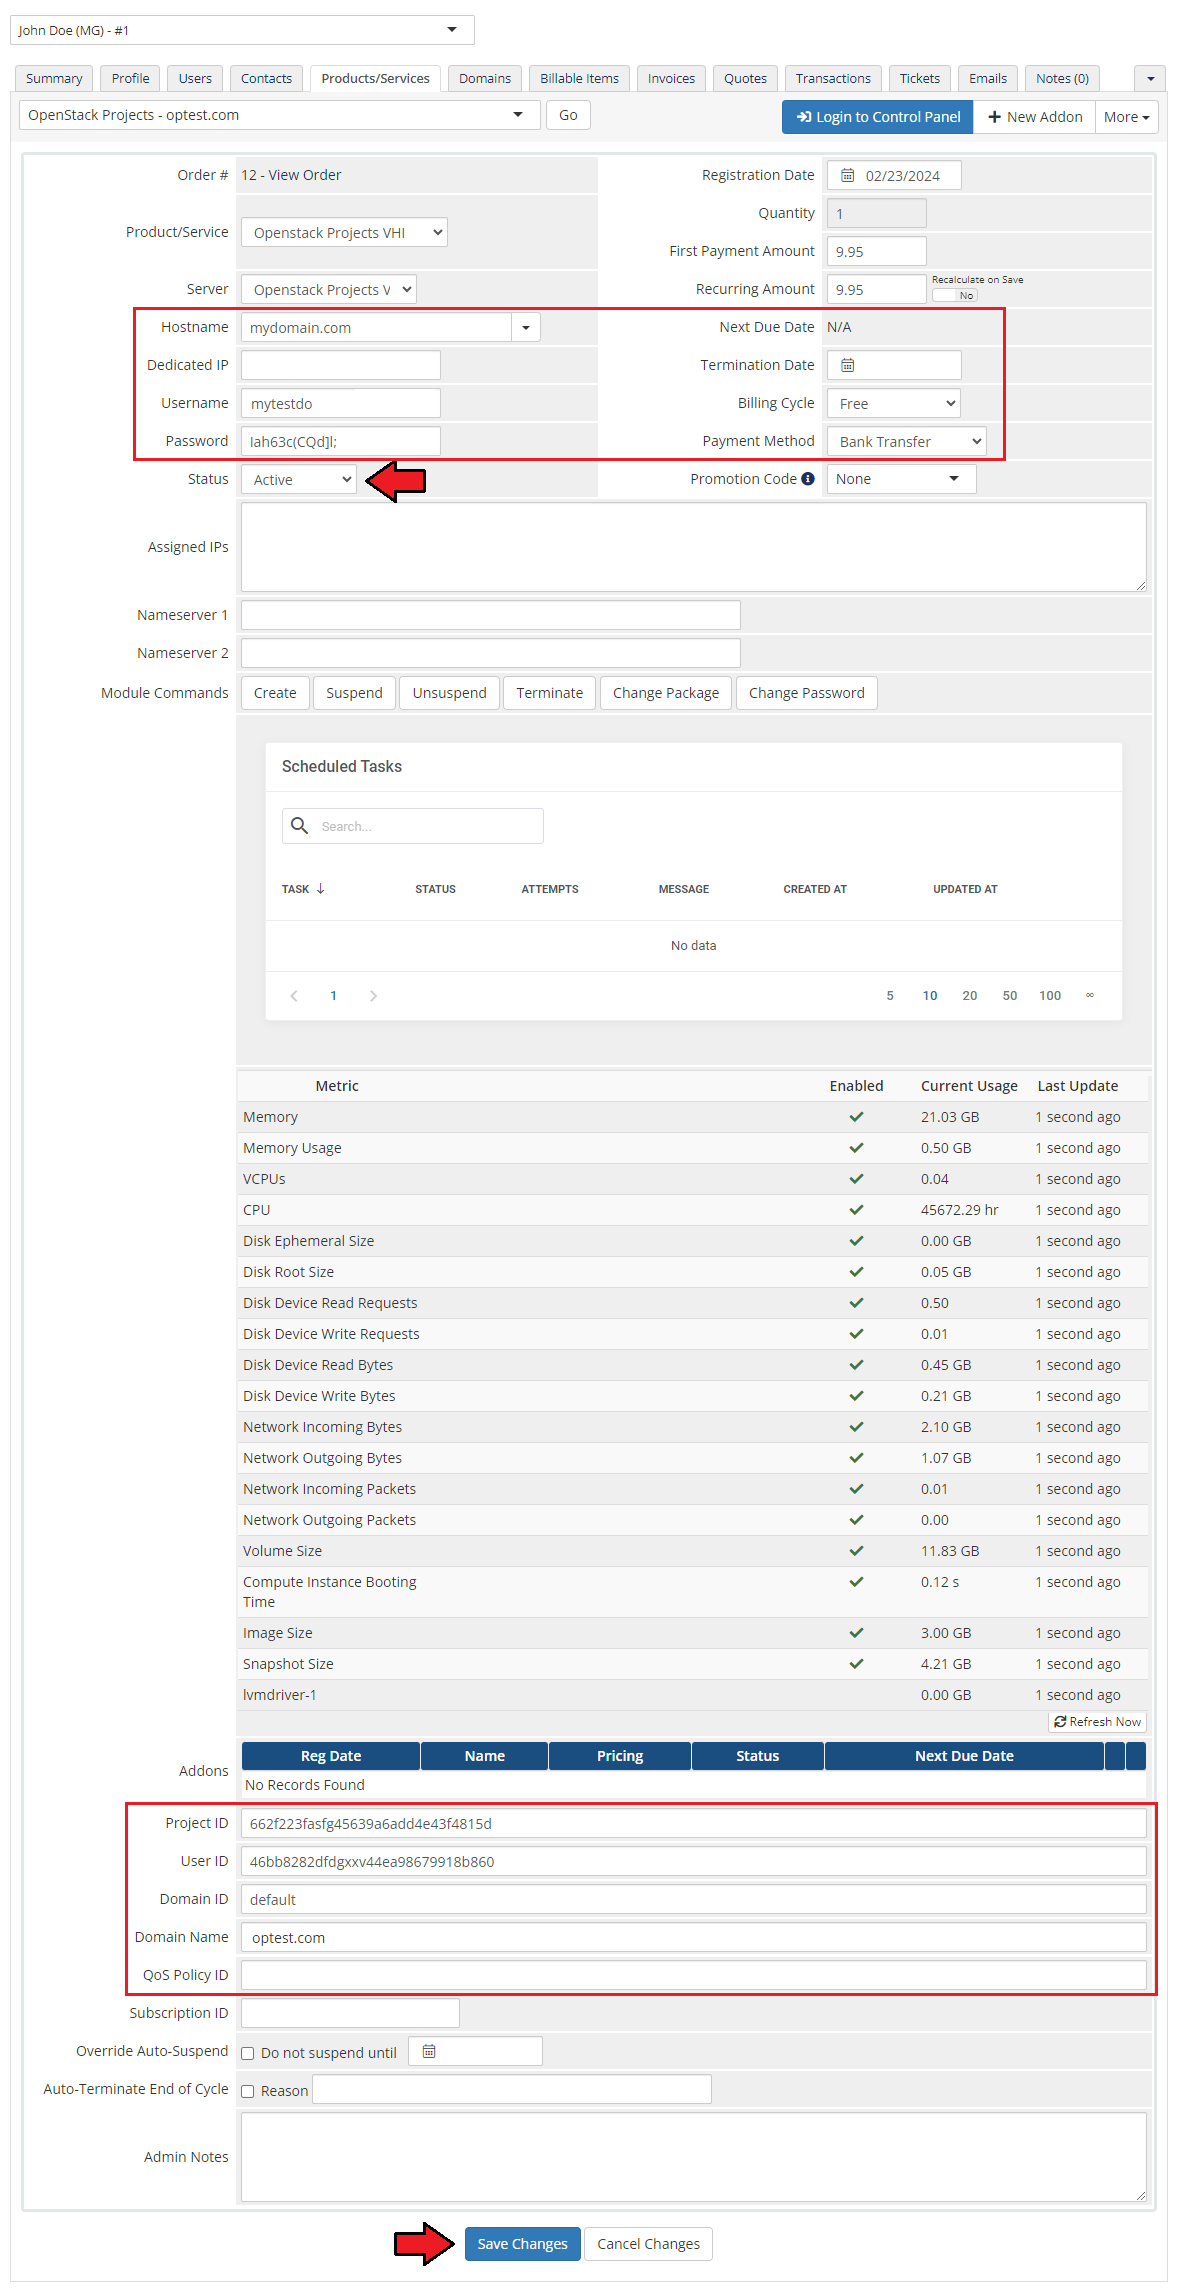
|
Client Area
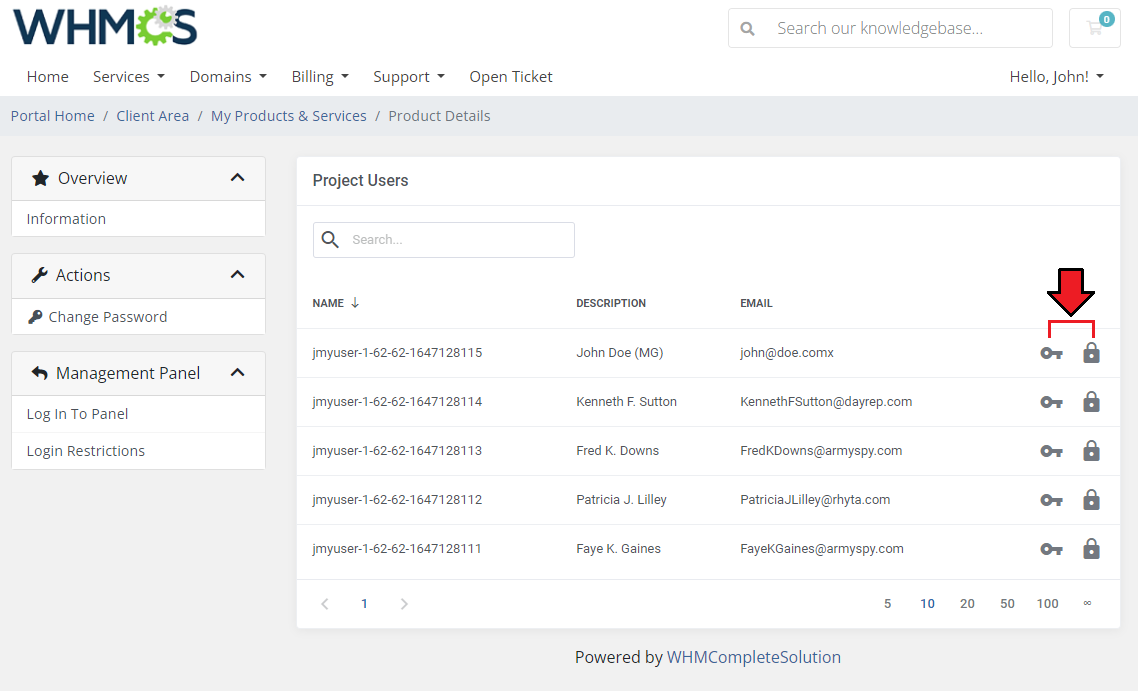
| The client area interface of OpenStack Projects For WHMCS looks like this. As you can see, you may easily be redirected to the 'OpenStack' login page. Moreover, you can check the 'Configurable Options ' and 'Metrics Billing'. |
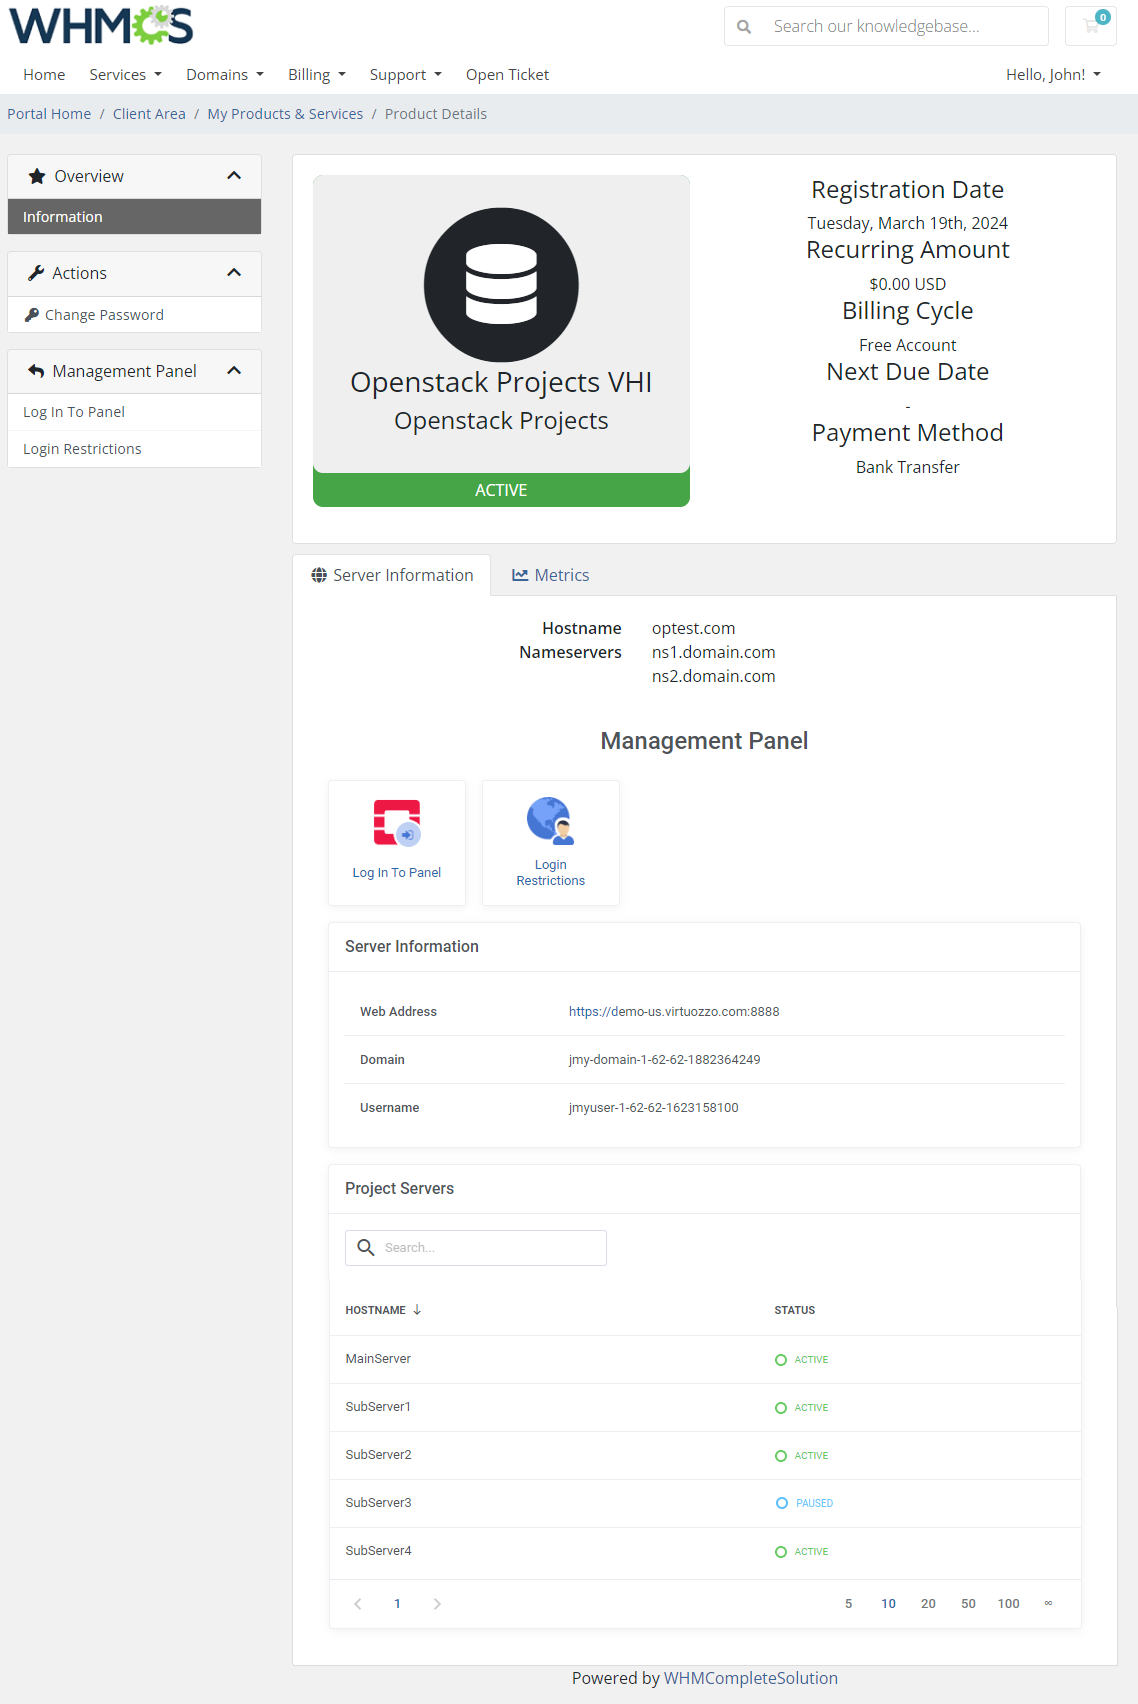
|
If the 'Login Restrictions feature is enabled for your product, you will also find an additional quick access shortcut.
|
|
|
|
OpenID Configuration (VHI)
Customer Domain
| Important: Before you begin the OpenID configuration, make sure the vinfra program is installed in the /usr/bin catalog. You can obtain and install it directly from the official Virtuozzo repository. Please contact the Virtuozzo team if you need further assistance.
 ### VHI ACCESS DETAILS
 export VINFRA_PORTAL=
 export VINFRA_USERNAME=
 export VINFRA_PASSWORD=""
 export VINFRA_PROJECT=""

 ### WHMCS OPENID CONFIGURATION
 ISSUER=""
 CLIENT_ID=""
 CLIENT_SECRET=""
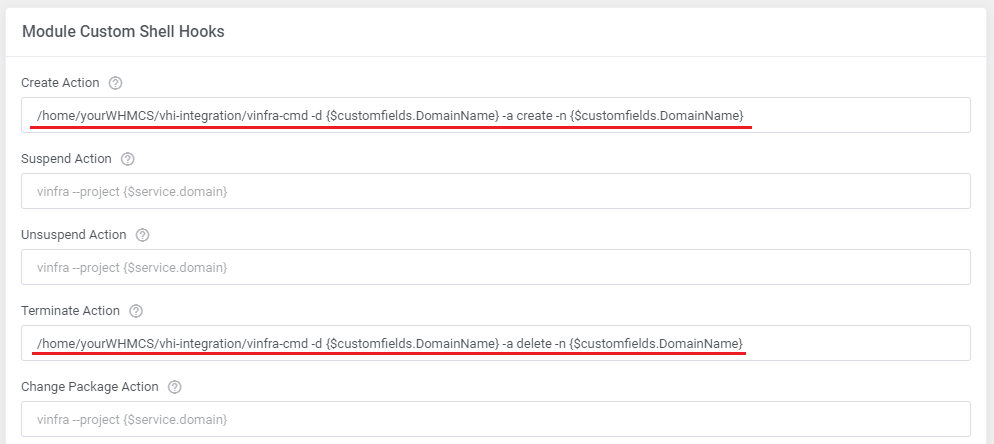
3. Move to the product 'Module settings' → 'Module Custom Shell Hooks' section. There add content to the 'Create' and ' Terminate' actions, for example: /home/yourWHMCS/vhi-integration/vinfra-cmd -d {$customfields.DomainName} -a create -n {$customfields.DomainName}
Terminate: /home/yourWHMCS/vhi-integration/vinfra-cmd -d {$customfields.DomainName} -a delete -n {$customfields.DomainName}
|
|
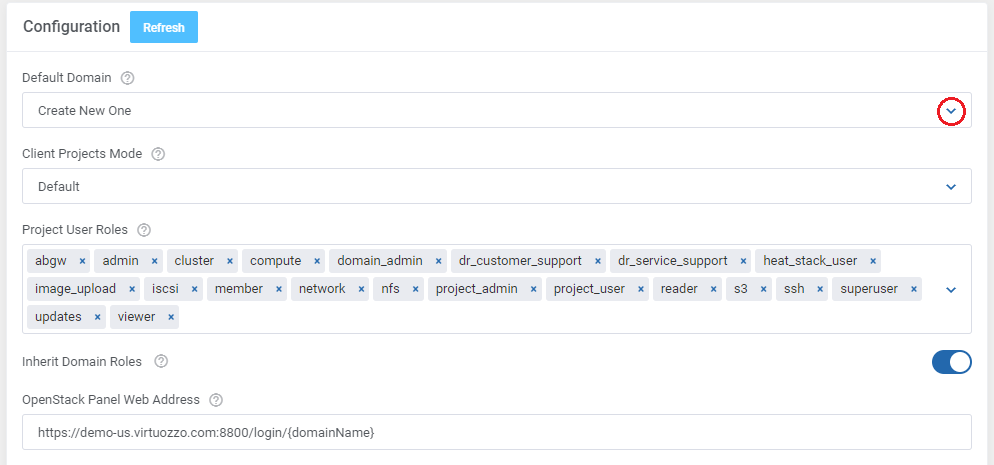
| 4. Again, in the 'Module Settings → 'Configuration' → 'Default Domain' select the Create New One option. |
|
|
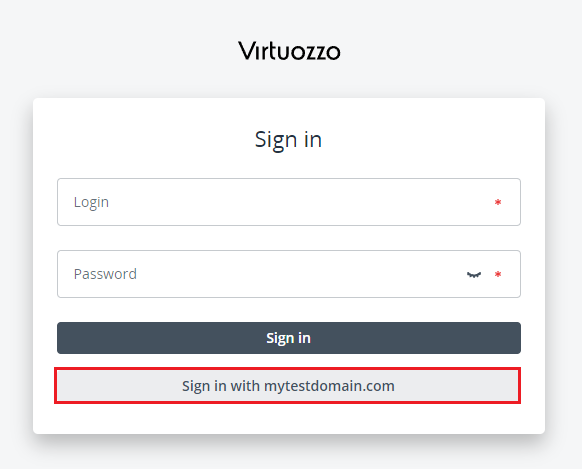
5. Run 'Create' module command. |
|
| Additional steps required:
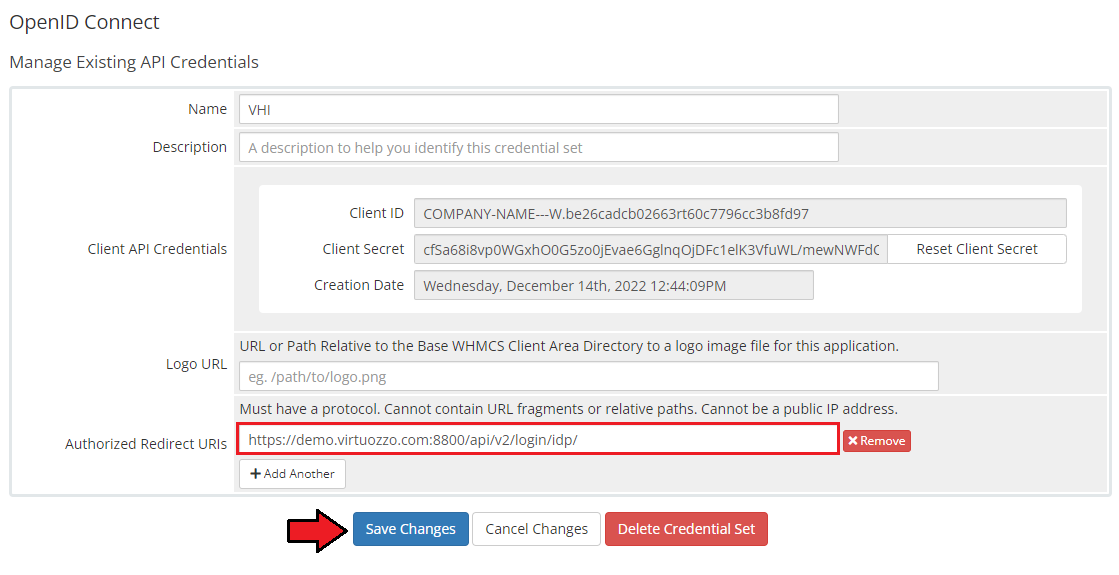
1. OpenID Connect → Authorized Redirect URIs. Type in the VHI address that connects to your WHMCS, use the formula: https://VHI_DOMAIN:8800 and/or https://VHI_DOMAIN:8800/api/v2/login/idp/ |
|
2. Add the below lines to the .htaccess file:
Order allow,deny
Allow from 138.128.150.246
Allow from 192.168.5.91
satisfy any
RewriteEngine On RewriteRule ^.well-known/openid-configuration ./oauth/openid-configuration.php [L,NC] |
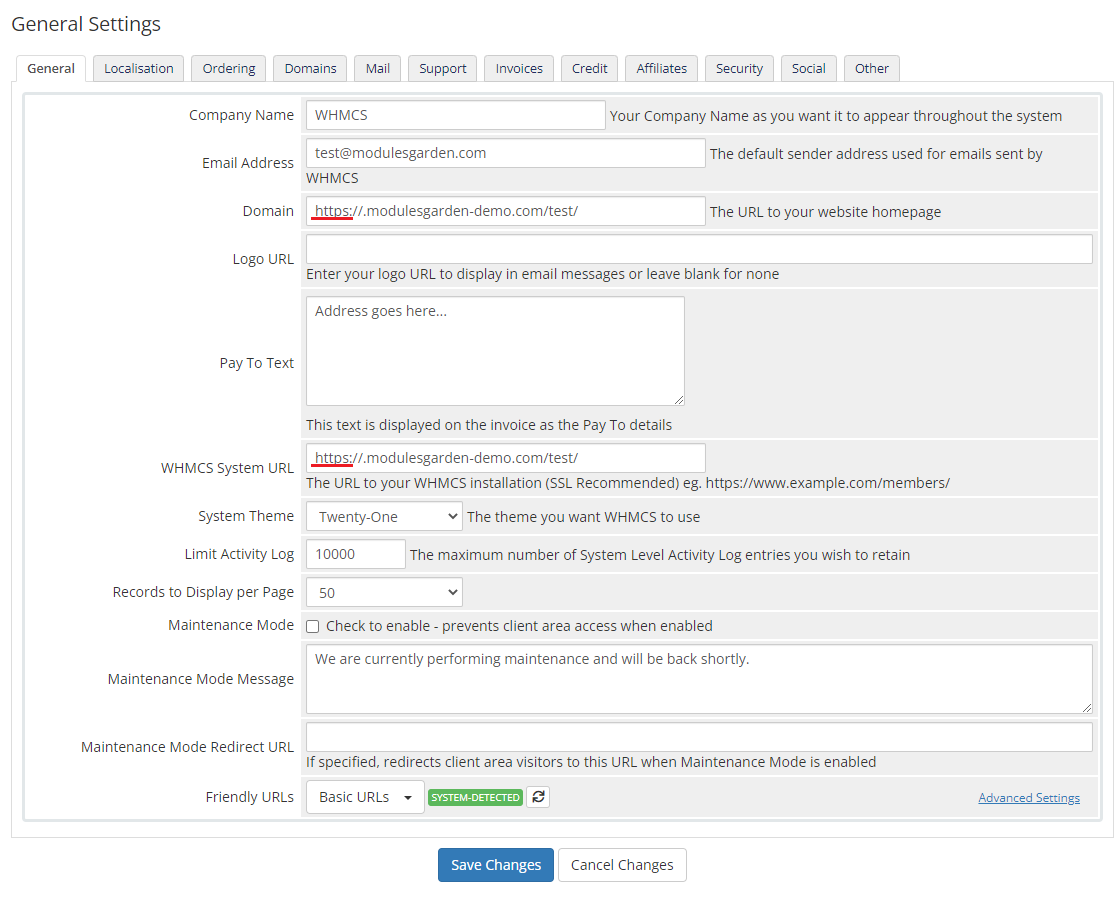
| 3. Domain and WHMCS system URLs must have https protocol: |
|
| 4. Enter the login link into the OpenStack Panel web address |
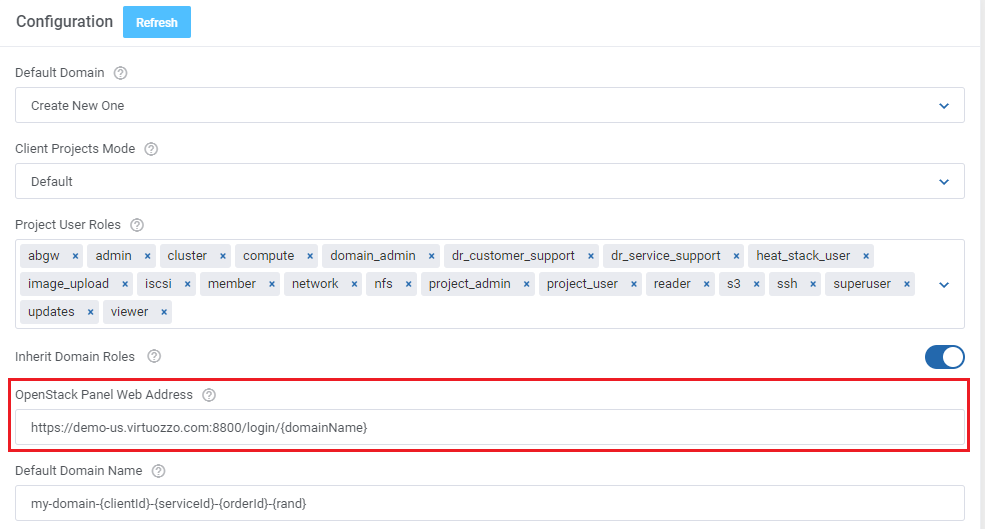
|
Predefined Domain
| Follow the below instruction step by step to use a predefined domain for OpenID configuration: 1. Configure OpenID in WHMCS, read the following article to learn how to proceed. |
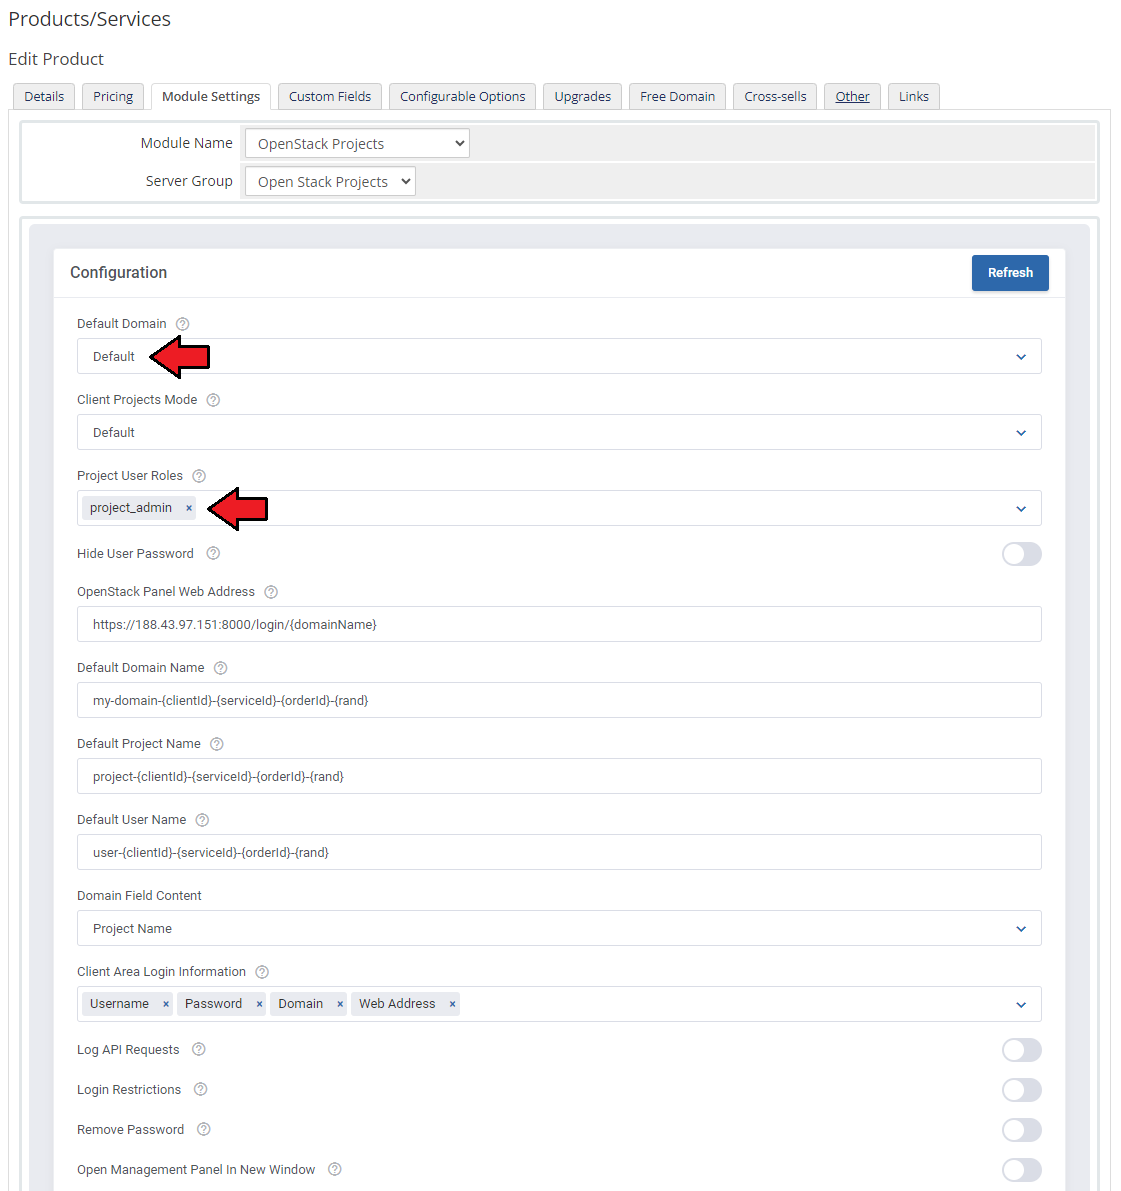
|
| 3. Configure OpenID in VHI. Remember to include the same domain that has been used during product configuration in WHMCS after the '=' symbol in 'Metadata URL'. |
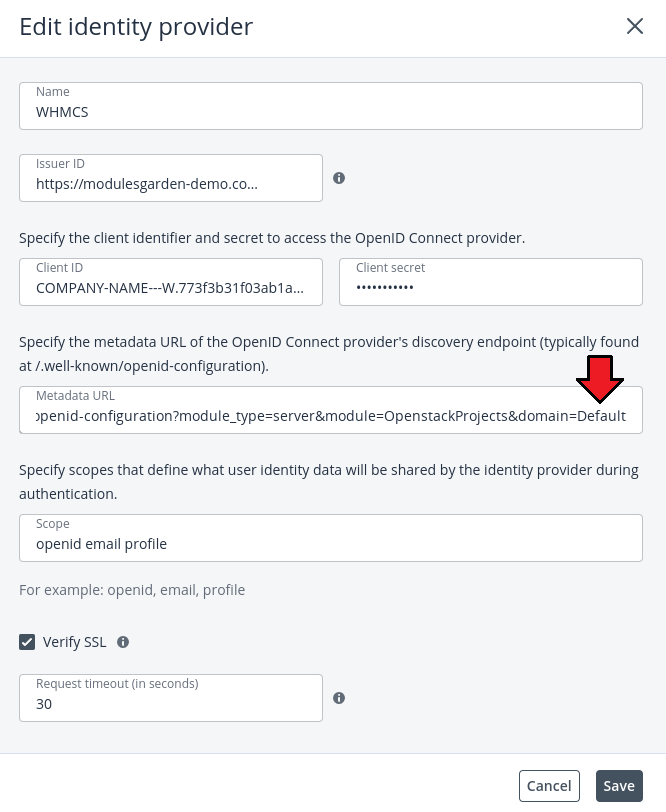
|
| 4. Select 'Authorization Code Flow'. |
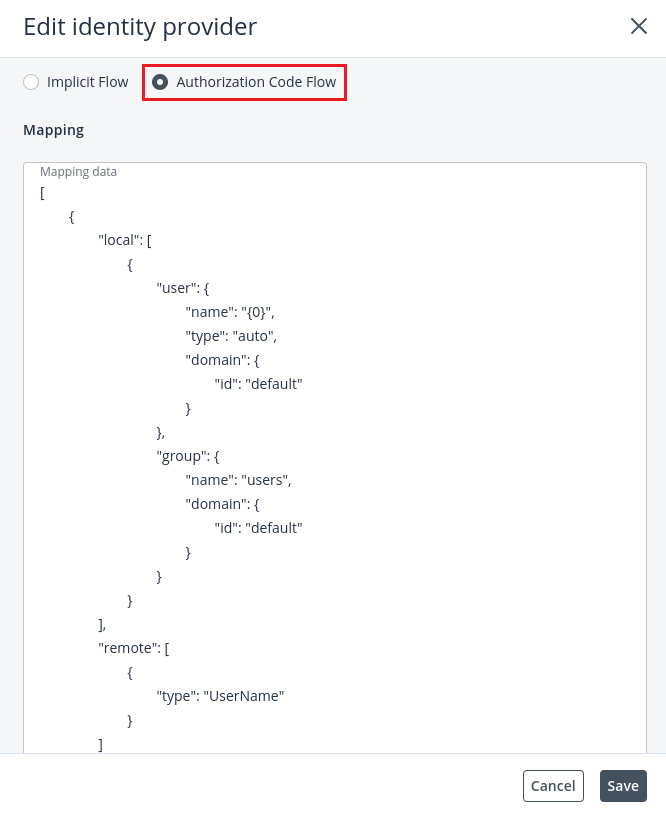
|
Custom Scope Configuration
| Due to differences in policy configurations across various OpenStack environments, each API request now has a configurable authentication method. This configuration is managed through the auth.yml file located in app/Config/auth.yml. The file contains settings for two user types: System Admin and Domain Admin.The appropriate configuration is loaded based on the server settings. |
Configuration Structure
The auth.yml file is structured into two sections:
Each section contains:
|
Exemplary Configuration
System Admin Configuration
 systemAdmin:
 default:
   authUrl: "{$server.authUrl}"
   auth:
     identity:
       methods:
         - "password"
       password:
         user:
           name: "{$server.username}"
           domain:
             name: "{$server.domain}"
           password: "{$server.password}"
     scope:
       project:
         id: "{$server.projectId}"
 "network.v2.actions.floating_ips.get.get":
   auth:
     identity:
       methods:
         - "password"
       password:
         user:
           name: "{$server.username}"
           domain:
             name: "{$server.domain}"
           password: "{$server.password}"
     scope:
       project:
         id: "{$service.projectId}"
         domain:
           name: "{$service.domainName}"
Domain Admin Configuration domainAdmin:
default:
authUrl: "{$server.authUrl}"
auth:
identity:
methods:
- "password"
password:
user:
name: "{$server.username}"
domain:
name: "{$server.domain}"
password: "{$server.password}"
scope:
project:
id: "{$server.projectId}"
domain:
name: "{$server.domain}"
"identity.v3.actions.users.delete.delete":
auth:
identity:
methods:
- "password"
password:
user:
name: "{$server.username}"
domain:
name: "{$server.domain}"
password: "{$server.password}"
scope:
domain:
name: "{$server.domain}"
|
Explanation:
|
Adding Custom Authentication Scope
| If a specific API request is not functioning as expected due to scope limitations, a custom authentication method can be defined. To do this:
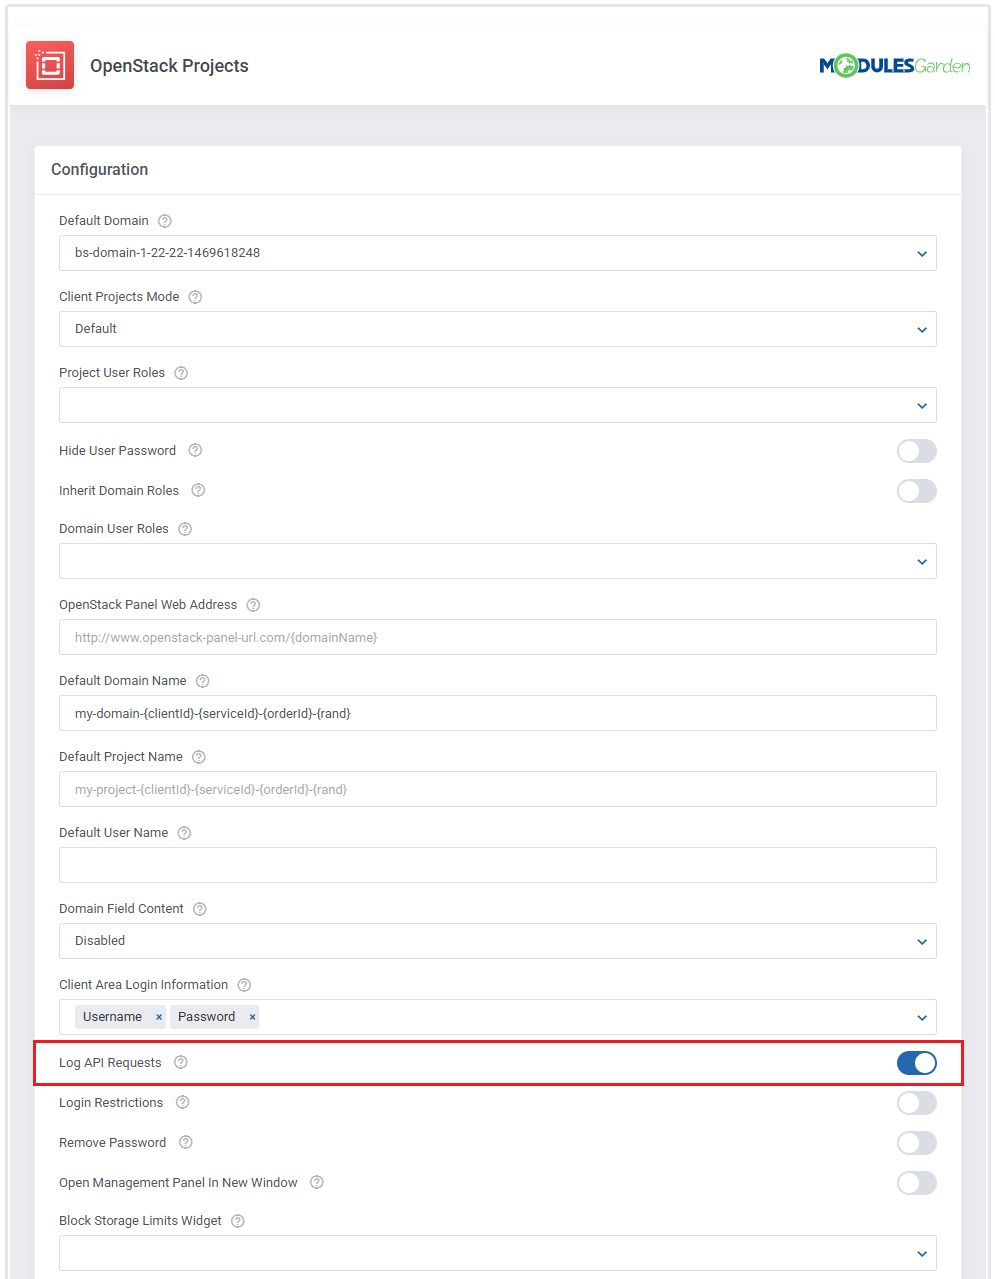
1. Enable API logging in the module settings: Log API Requests. |
|
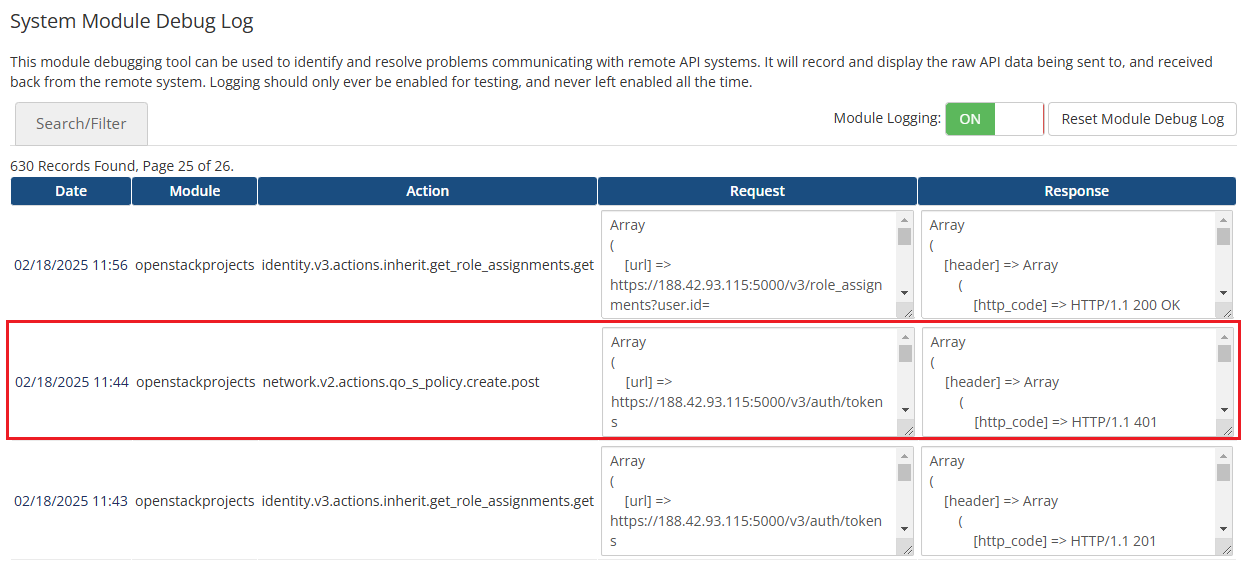
| 2. Identify the problematic API request from the logs. |
|
| 3. Add a new authentication scope to auth.yml for the relevant user type. To add custom authentication for the domainAdmin:
"network.v2.actions.qo_s_policy.create.post":
auth:
identity:
methods:
- "password"
password:
user:
name: "{$server.username}"
domain:
name: "{$server.domain}"
password: "{$server.password}"
scope:
project:
id: "{$service.projectId}"
domain:
name: "{$service.domainName}"
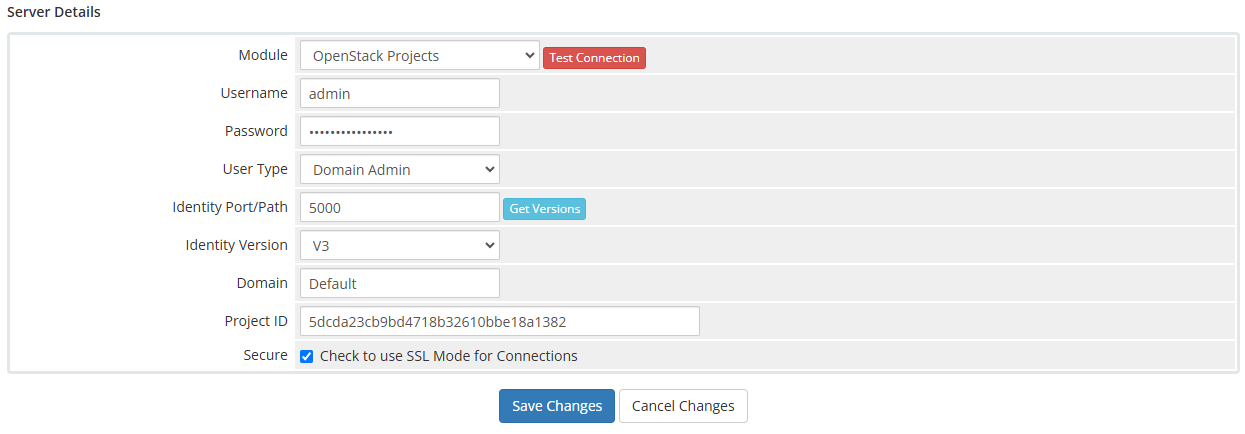
After this modification, the request |
|
Replacement Fields
| In the auth.yml configuration, several replacement fields dynamically pull values from the OpenStack environment and server configuration: |
| Replacement Fields | Description | |
|---|---|---|
| 1. | $service.password
|
Password from the service. |
| 2. | $service.username
|
Username from the service. |
| 3. | $service.domainName
|
Domain name from the DomainName field.
|
| 4. | $service.domainId
|
Domain ID from the DomainId field.
|
| 5. | $service.projectId
|
Project ID from the ProjectId field.
|
| 6. | $server.host
|
Server IP address. |
| 7. | $server.protocol
|
HTTP/HTTPS based on server settings. |
| 8. | $server.username
|
Username from the server configuration. |
| 9. | $server.password
|
Password from the server configuration. |
| 10. | $server.domain
|
Domain from the server configuration. |
| 11. | $server.projectId
|
Project ID from the server configuration. |
| 12. | $server.userType
|
User type (Domain Admin / System Admin).
|
| 13. | $server.identityVersion
|
Identity version from server configuration. |
| 14. | $server.identityPath
|
Identity path from the server configuration. |
Manual Configuration in File
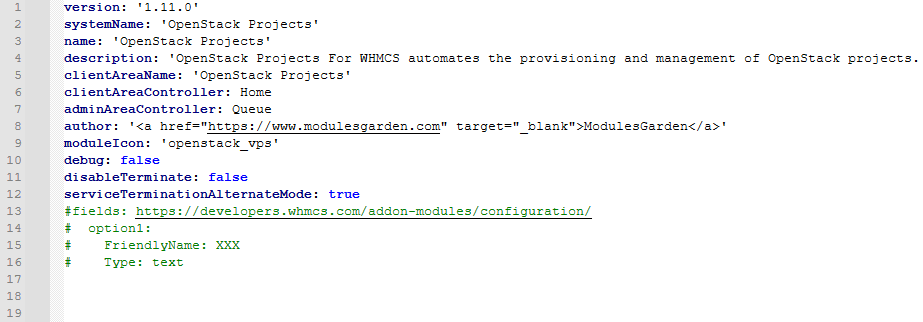
The configuration.yml file located at /yourWHMCS/modules/servers/OpenstackProjects/app/Config/configuration.yml allows you to configure advanced options:
|
| 1. Disabling module termination option To completely disable the termination function in the module, set the disableTerminate: true |

|
| 2. Alternative Mode for Service Termination (default: false) When set to serviceTerminationAlternateMode: true |
|
| When Alternative Mode for Service Termination is enabled and the dedicated task is completed, a notification email is sent to administrators with the subject: OpenStack Projects Status Change Notification. This email provides details about the affected product and account. In addition to the standard Product/Service Related and Client Related merge fields, the template also supports the following extra module merge fields:
|
Tips
| 1. The module supports OpenStack providers that grant access to the OpenStack API on system admin level. Make sure the account you use has sufficient permissions to manage projects and perform required actions through the API. For more details, see the OpenStack API documentation. |
| 2. Please remember that if you integrate OpenStack Projects For WHMCS with Advanced Billing For WHMCS, the cron task should be set no more than once for an hour. |
| 3. When using multiple OpenStack servers or products, keep in mind that the quotas configuration (quotas.json) is shared globally. To avoid issues during provisioning, make sure all linked servers support the same quota options or leave unsupported ones empty to skip them. |
Update Instructions
| An essential guidance through the process of updating the module is offered here. Before updating your OpenStack Projects For WHMCS module to version 1.8.0, it is strongly recommended to delete all files (excluding license.php) located in: /yourWHMCS/modules/servers/OpenStackProjects/. After a successful upgrade, please proceed to the product's module settings section to ensure a smooth transition. |
Upgrade Guide
| Seeking a solution that offers greater flexibility, customization tailored to your precise needs, and unrestricted availability? There is an option that not only proves to be cost-effective in the long run but also includes prioritized support services, making it a truly valuable investment. Opt for the Open Source version of your OpenStack Projects For WHMCS module to unlock these benefits. Follow a comprehensive guide covering the transition process, the advantages it brings, and step-by-step instructions on what to do next after the order has been successfully finalized. |
Common Problems
| 1. When you have problems with connection, check whether your SELinux or firewall does not block ports. |
| 2. If you encounter a connection error in the module settings: 'Error:Connection Error: No route to host (Action: GET https://compute-api.svc.vstoragedomain.:8784/v2.1/5dcda23cb9bd4718b32610bbe18a1382/os-availability-zone). Check WHMCS module log for more information' |