CRM For WHMCS
About CRM For WHMCS
| CRM For WHMCS is a module created to expedite the management process of potential clients. You will be able to not only add new contacts and easily alter their status or labels on a Kanban board but also create accounts for them directly in the addon. |
- Addon Module Features:
| ✔ Create Contacts: |
| ✔ Leads |
| ✔ Potentials |
| ✔ Custom Types |
| ✔ Convert Contact Type |
| ✔ Send Mass Email & SMS To: |
| ✔ All Clients |
| ✔ Chosen Client Groups |
| ✔ Contacts From Chosen Campaigns |
| ✔ Restrict Access To Contact Types |
| ✔ Assign Client Account To Contact |
| ✔ Assign Administrator To Contact |
| ✔ Assign Ticket To Contact |
| ✔ Quickly Edit Contact Details |
| ✔ Add And Manage Contact's Follow-ups |
| ✔ Add And Manage Contact's Notes: |
| ✔ Tag Staff Members To Receive Notifications |
| ✔ View, Create And Synchronize Quotes For Contact |
| ✔ View Contact Tickets |
| ✔ View Contact Orders |
| ✔ Send Email From Template Or Custom Message - Include Files And Quote |
| ✔ Send And Receive Emails Using Custom Mailboxes |
| ✔ Send Ticket Response |
| ✔ View Email And SMS Messages In Conversation Log |
| ✔ Upload And Manage Files From Contact Profile |
| ✔ Add And Assign Labels To Contacts |
| ✔ Manage Customer Relationship Stages On Kanban Board |
| ✔ View Announcements For Administrators |
| ✔ View Logs Concerning Contact |
| ✔ View Dashboard Containing: |
| ✔ Incoming Follow-ups |
| ✔ Contact Lists |
| ✔ Last Email Messages |
| ✔ Last Activity |
| ✔ View Calendar With All Reminders Sorted By Type |
| ✔ View CRM Statistics And Graphs Concerning Contacts |
| ✔ Import Contacts In Chosen File Formats: CSV, XSL, XSLX, ODS |
| ✔ Export Contacts In Chosen File Formats: CSV, XSL, XSLX, ODS, PDF |
| ✔ Perform Bulk Actions On Multiple Contacts |
| ✔ Remove Contact: |
| ✔ Move Contact To Archive Where It Can Be Restored From |
| ✔ Delete Contact From CRM Database Completely |
- Follow-up Features:
| ✔ 3 Types Of Notifications: Now, On Follow-up Date, Before Follow-up Date - Both For Administrators And Clients |
| ✔ Administrator To Notify - Defines Included Administrators Per Notification Type |
| ✔ Notify Administrator And Clients Via Email And SMS |
| ✔ Notify Administrator Via Pop-up Alarm |
| ✔ Follow-up Type - Easier Determination Of Follow-up Purpose |
| ✔ Follow-up Status - View Follow-up Current Stage |
| ✔ Use Email Template Or Place Custom Message |
| ✔ Synchronize Follow-ups With: |
| ✔ Google Calendar |
| ✔ WHMCS Calendar |
- Campaign Features:
| ✔ Create Campaign |
| ✔ Define Campaign Duration Time |
| ✔ Assign Contacts To Campaign Using Filters |
| ✔ Manually Assign Campaign To Contact |
| ✔ Display Dashboard Per Campaign |
| ✔ Display Campaign Description In Assigned Contact Profile |
- Web Form Features:
| ✔ Create Web Form |
| ✔ Allow Your Site Guests To Create New Contacts And Follow-ups Via Web Form |
| ✔ Define Details Of Web Form Created Contact: |
| ✔ Contact Type |
| ✔ Contact Status |
| ✔ Assigned Admin |
| ✔ Assign Fields To Web Form |
| ✔ Get Generated Web Form To Be Placed On Your Site |
| ✔ View Number Of Contacts Created From Each Web Form |
| ✔ Notify Administrators About New Contact Creations |
- Addon Settings Features:
| ✔ View Module Status - Contains Status Of CRM Key Elements |
| ✔ Define Whether To Use Quotes And Administrator Assignment |
| ✔ Define Whether To Disable Contacts Creation With Already Existing Email Addresses |
| ✔ Define Follow-up Types And Default Notifications On Follow-up Reschedule |
| ✔ Define Temporary And Permanent Notifications For Administrators |
| ✔ Define If Notification Needs To Be Acknowledged By Administrators |
| ✔ Automatically Add Follow-Ups And Reminders Based On The Set Conditions |
| ✔ Configure Incoming And Outgoing Mailbox Settings |
| ✔ Manage Custom Fields: |
| ✔ Create Fields Groups |
| ✔ Create Custom Fields - Text, Textarea, Checkbox, Radio, Select, Phone And Date Time |
| ✔ Add Description To Custom Field |
| ✔ Add Validators To Custom Fields |
| ✔ Define WHMCS - CRM Fields Mapping - Automatically Fill Out Form With Appropriate Values |
| ✔ Define Custom Contact Types: |
| ✔ Define Contact Type Color And Icon |
| ✔ Define Contact Type Visibility On Navigation |
| ✔ Configure Default View Of Contact Lists - Visibility And Order In Columns |
| ✔ Define First Day Of Week In Calendar |
| ✔ Define Permissions Per Administrator Role Group |
| ✔ Define Personal Settings: |
| ✔ Define Avatar |
| ✔ Define Default Email Address |
| ✔ Define Visible Fields And Their Order For Contacts And Dashboard |
| ✔ Create CRM Email Templates |
| ✔ View Information About CRM Cron |
- Admin Area Features:
| ✔ WHMCS Support Tickets System - Create Contact, Quickly View Their Details And Move To CRM Contact Profile |
| ✔ WHMCS Quotes - Quotes Created From CRM Profile Are Assigned To Contact Automatically |
| ✔ WHMCS Client Profile - Create Contact |
- General Info:
| ✔ Meets GDPR Requirements |
| ✔ Integrated With Quotes Automation For WHMCS - Extend Your Quotes Possibilities |
| ✔ Integrated With Report Generator For WHMCS - Access Advanced Reports On Customer Relationships |
| ✔ Integrated With SMS Center For WHMCS - Send Reminders And Mass Messages Via SMS |
| ✔ Integrated With WhatsApp - Move To Service On Pressing Contact Phone Number |
| ✔ Integrated With WHMCS Notifications - Receive Notifications About New Emails From CRM Mailboxes In Your Slack Channels |
| ✔ Support For Internal WHMCS API |
| ✔ Toggle Standalone Mode - Display CRM Outside WHMCS |
| ✔ Display Any Page Or Panel In Full Screen Mode |
| ✔ Multi-Language Support |
| ✔ Supports PHP 8.3 Back To PHP 8.1 |
| ✔ Supports WHMCS V8.13 Back To WHMCS V8.10 |
| ✔ Requires ionCube Loader V14 Or Later |
| ✔ Easy Module Upgrade To Open Source Version |
Installation
| This tutorial will show you how to successfully install and configure CRM For WHMCS. We will guide you step by step through the whole installation and configuration process. |
Installation
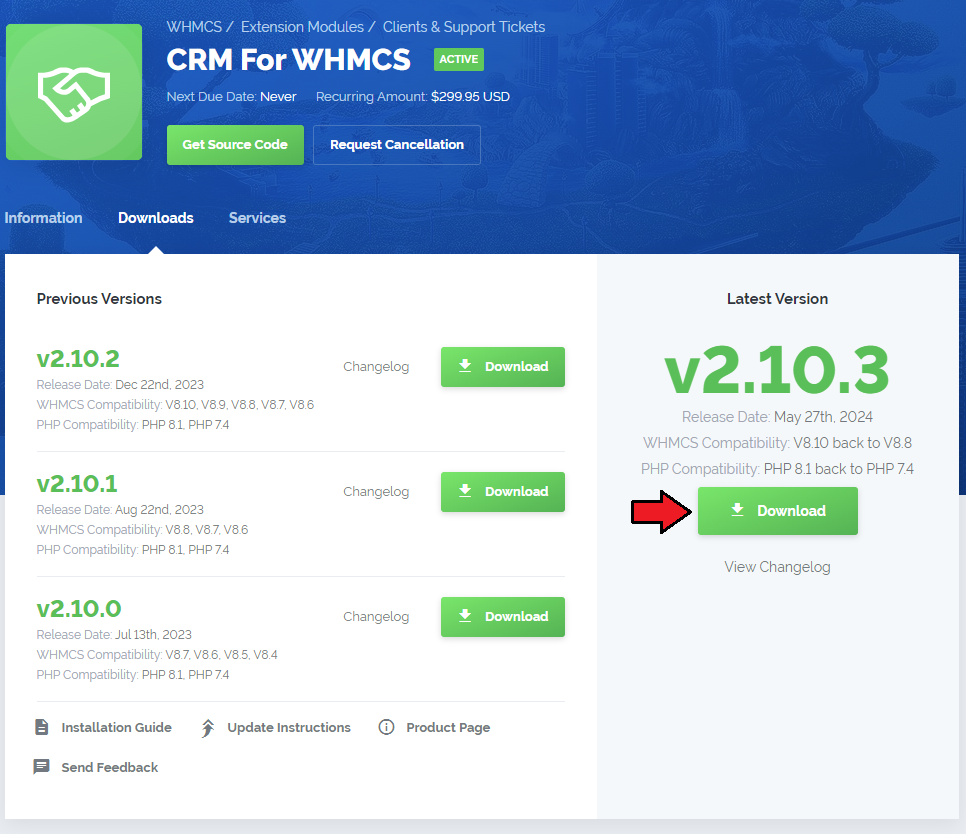
| 1. Log in to our client area and download the module. |
|
| 2. Extract the package and upload its content into the main WHMCS directory.
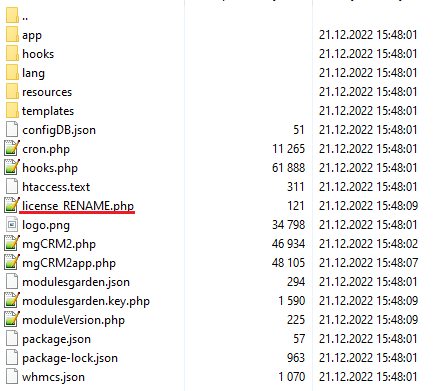
The content of the package to upload should look like this. |

|
| 3. When you install CRM For WHMCS for the first time, you have to rename the 'license_RENAME.php' file. The file is located in 'modules/addons/mgCRM/license_RENAME.php'. Rename it from 'license_RENAME.php' to 'license.php'. |
|
| 4. In order to configure your license key, you have to edit the previously renamed 'license.php' file. Enter your license key between the quotation marks as presented on the following screen. You can find your license key in our client area → 'My Products'. |

|
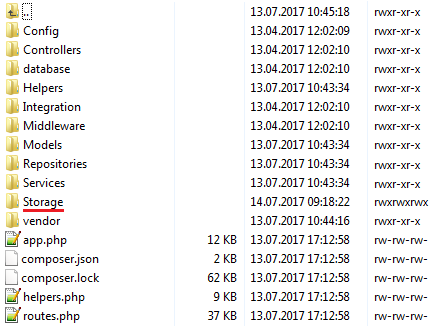
| 5. The next step is to set up the 'Storage' folder as recursively writable. It is located in 'your_whmcs/modules/addons/mgCRM2/app/'. |
|
Activate the Addon
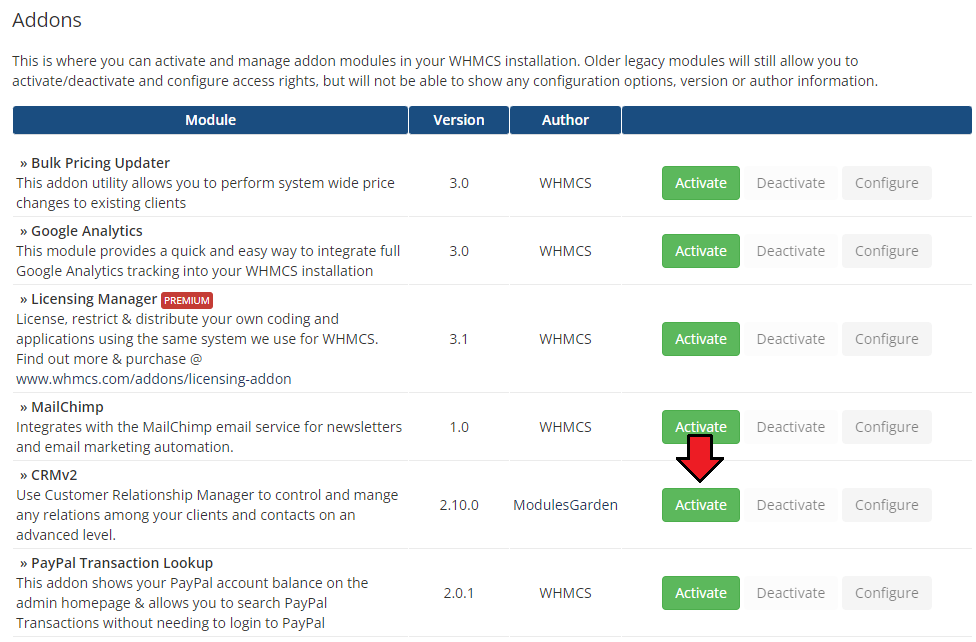
| 6. Now, you have to activate the module in your WHMCS system. Log in to your WHMCS admin area. Go to 'System Settings' → 'Addon Modules'. Afterward, find 'CRM' and press the 'Activate' button. |
|
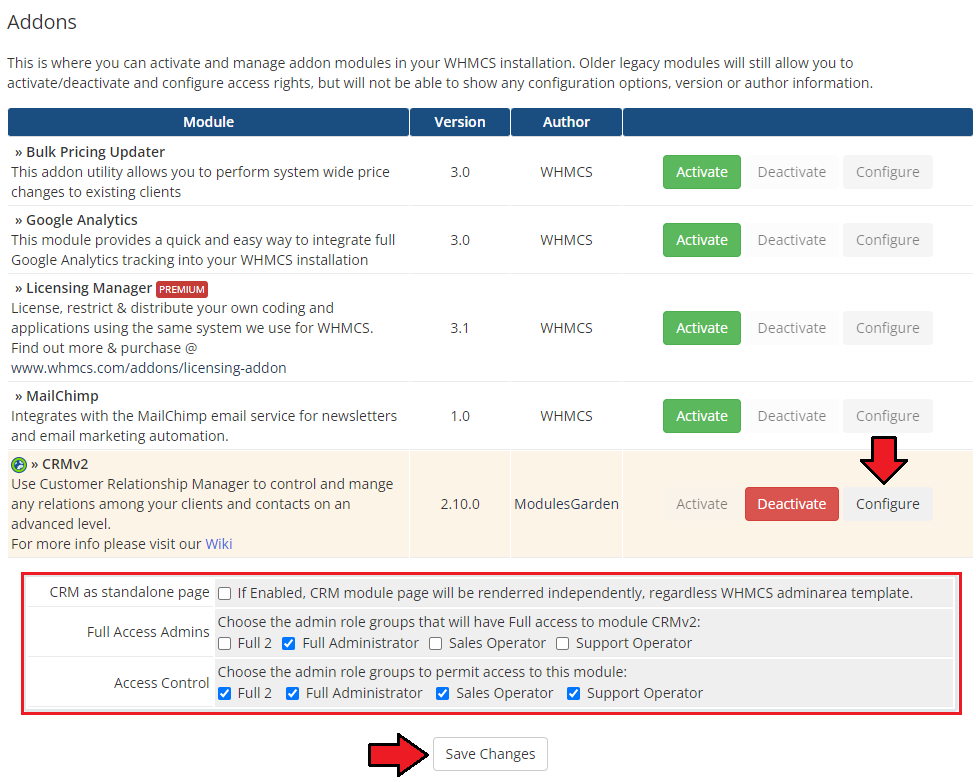
| 7. Next, you need to permit access to this module. To do so, click on the 'Configure' button and tick checkboxes to assign desired admin roles. |
|
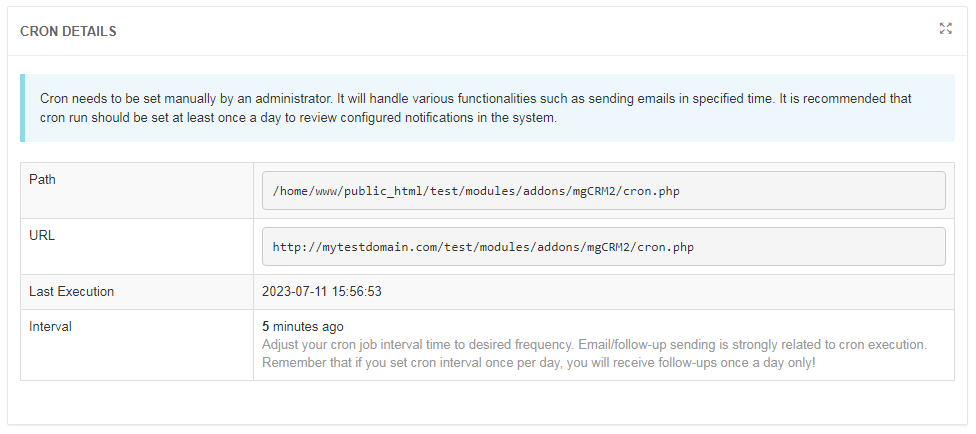
| 8. Now, you have to set up a cron job, which can be found in CRM Addon → 'Settings' → 'General' → 'System Overview'. We advise to set up the cron as frequently as possible to send email notifications, 5 minutes interval is recommended. |
|
| 9. You have just successfully installed CRM For WHMCS! You can access your module in 'Addons' → 'CRM'. |
Configuration and Management
| CRM For WHMCS is a module which allows you and your staff to manage relations with your current as well as possible clients in one place. |
Dashboard
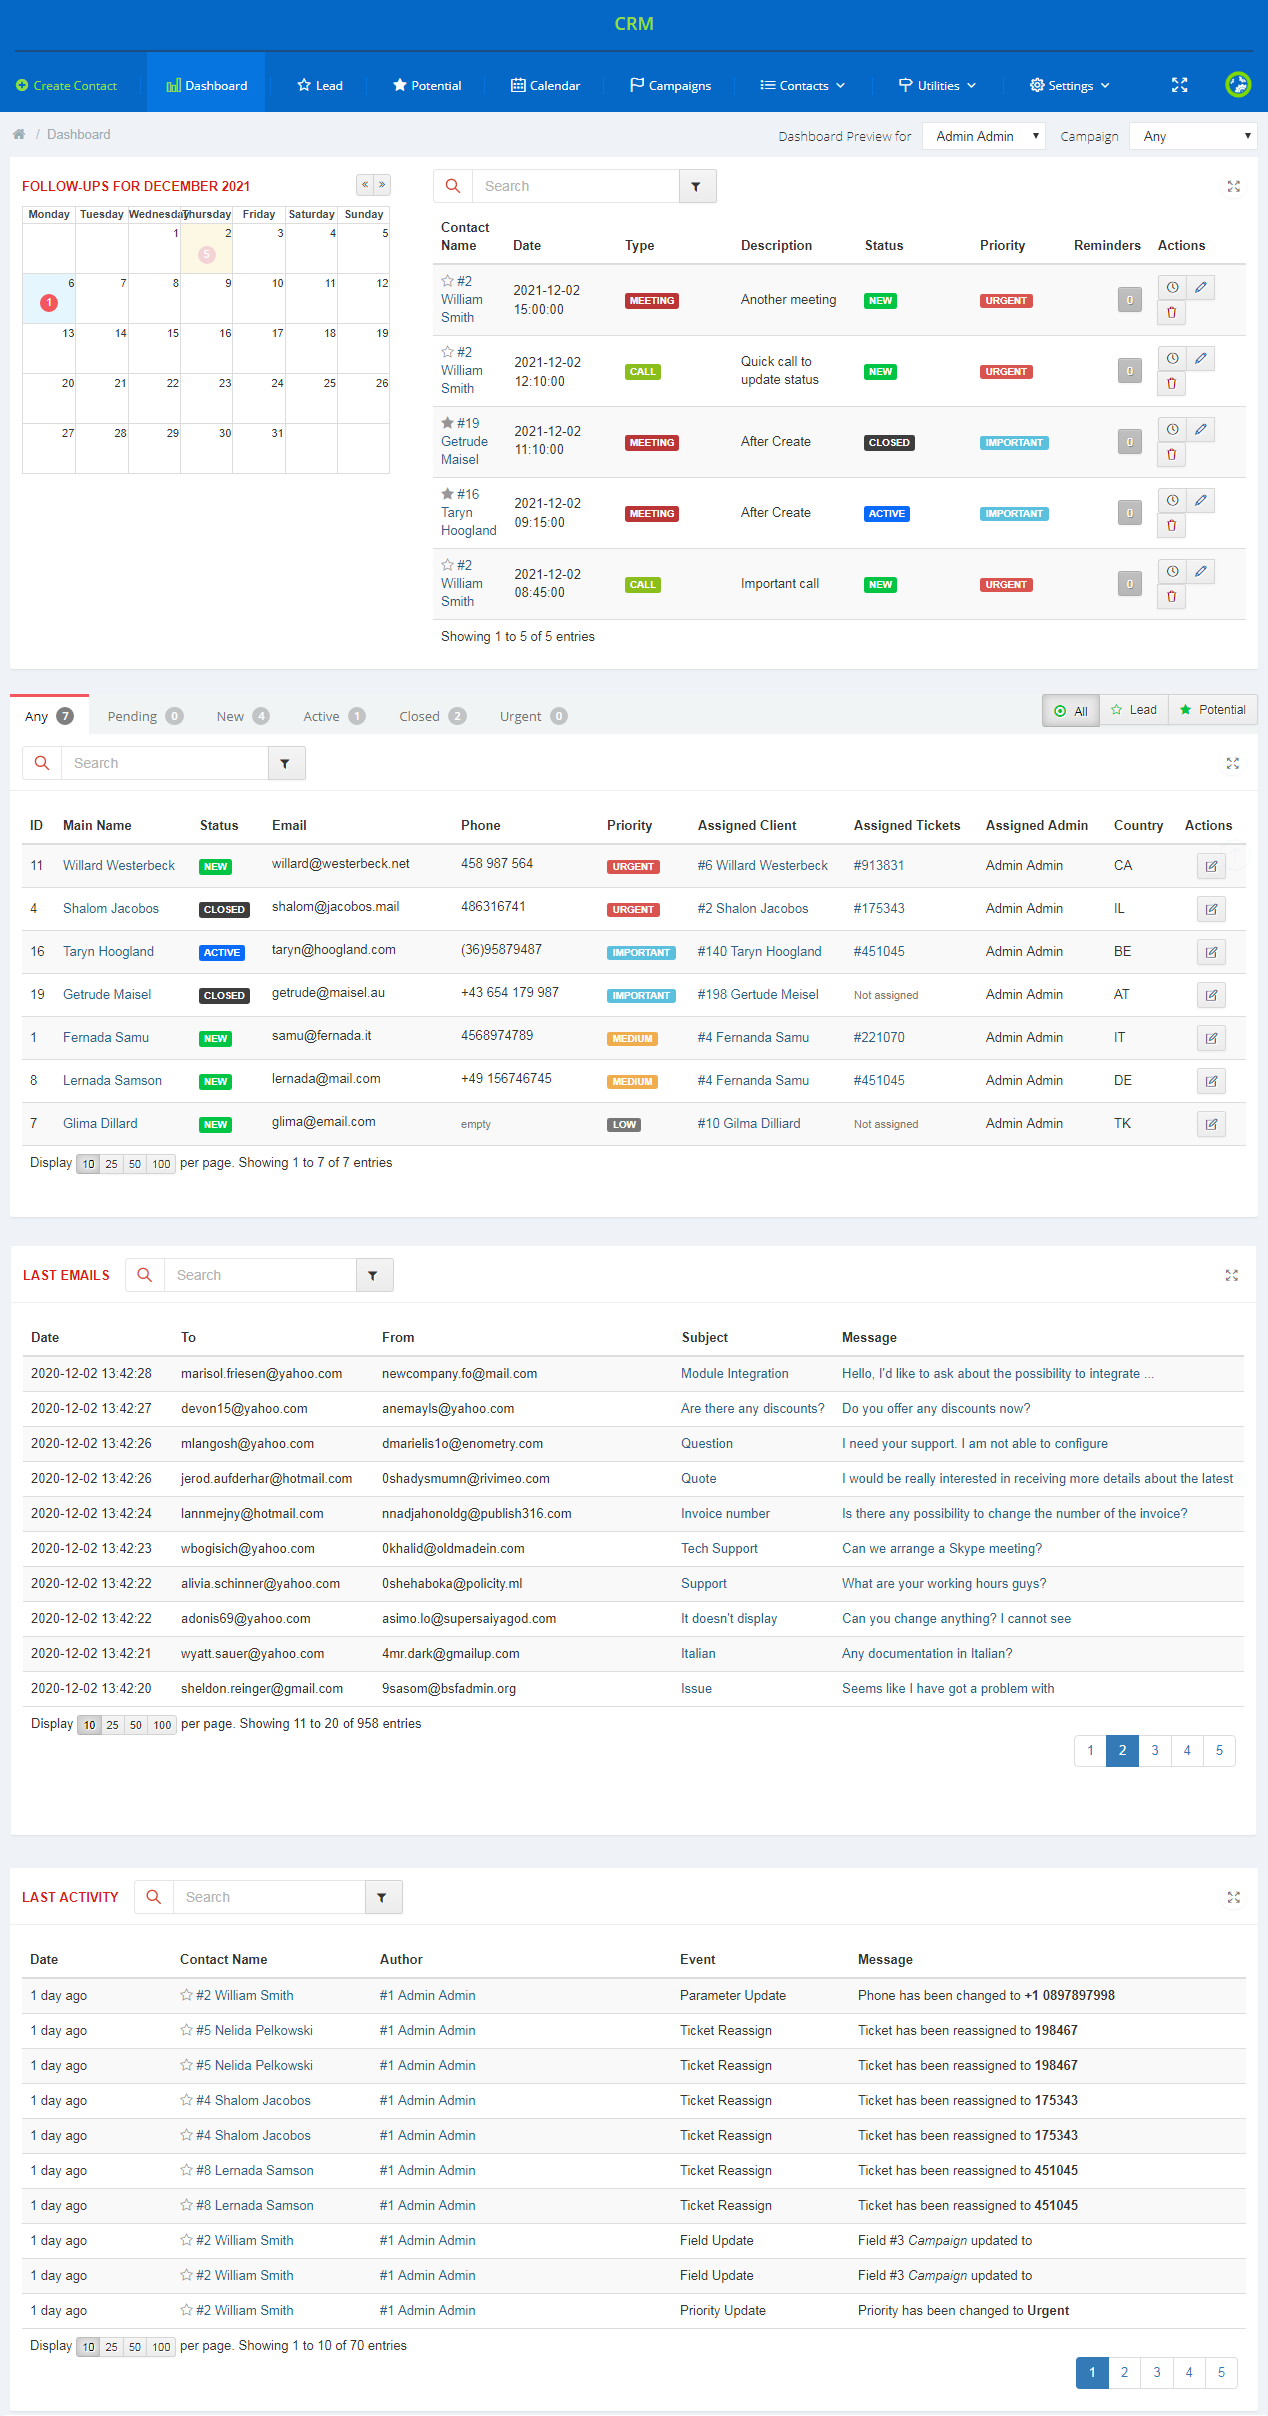
| When you proceed to 'Addons' → 'CRMv2', you are automatically moved to the application dashboard.
From there you have a quick preview of the most important information in your CRM. |
|
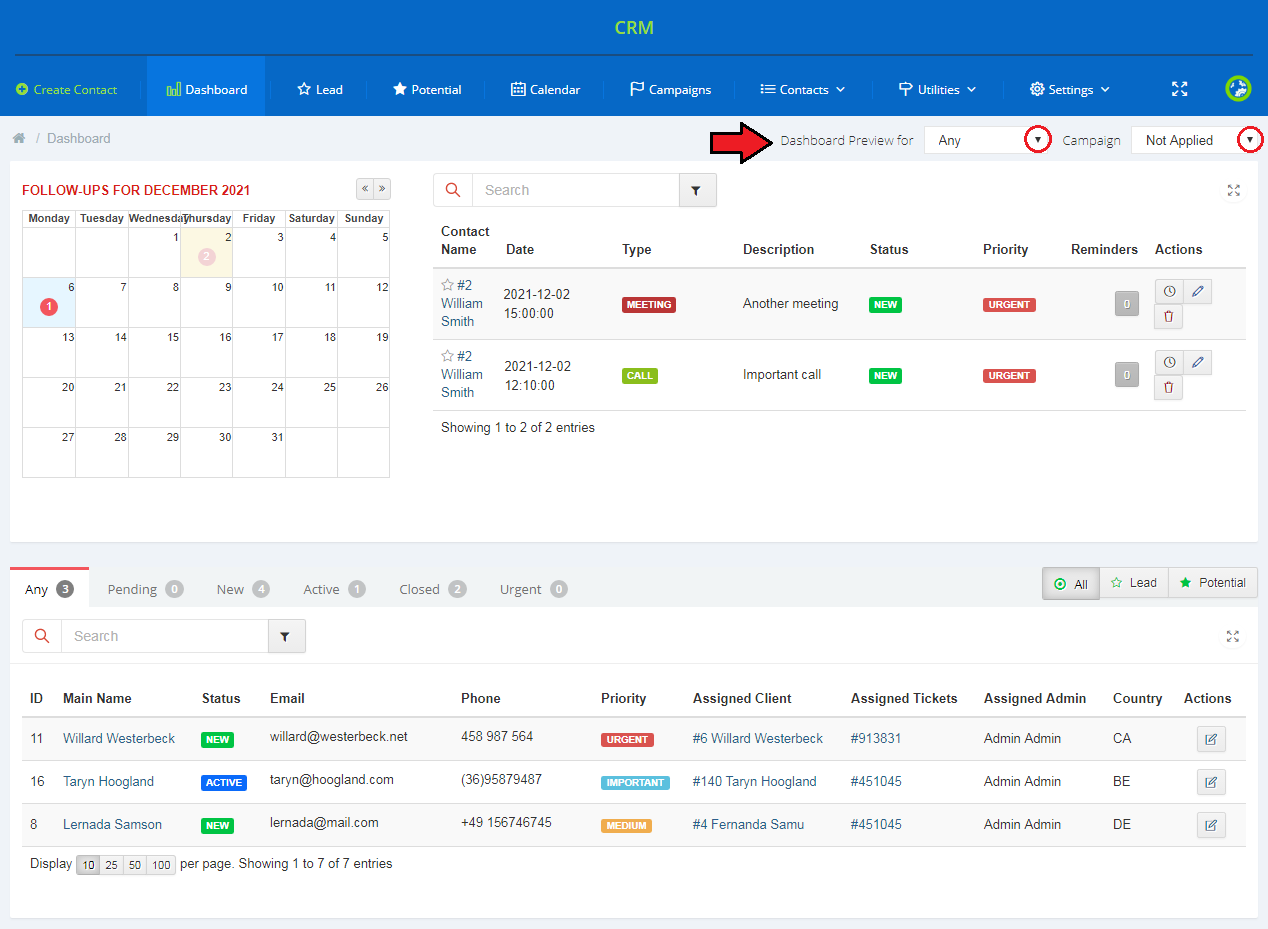
| It is possible to adjust the dashboard view according to applied filters. For example, preview the dashboard of a selected administrator. Choose '--Any' if you want to display information for all administrators You may also add campaign filters. Simply choose which campaign records shall be viewed. Select '--Not Applied' to disable this filter. |
|
Standalone Mode
| Use the cross-arrows icon to switch into the standalone mode. Your CRM module pages will be then possible to access from outside of WHMCS. Press it again to return to the WHMCS view. |
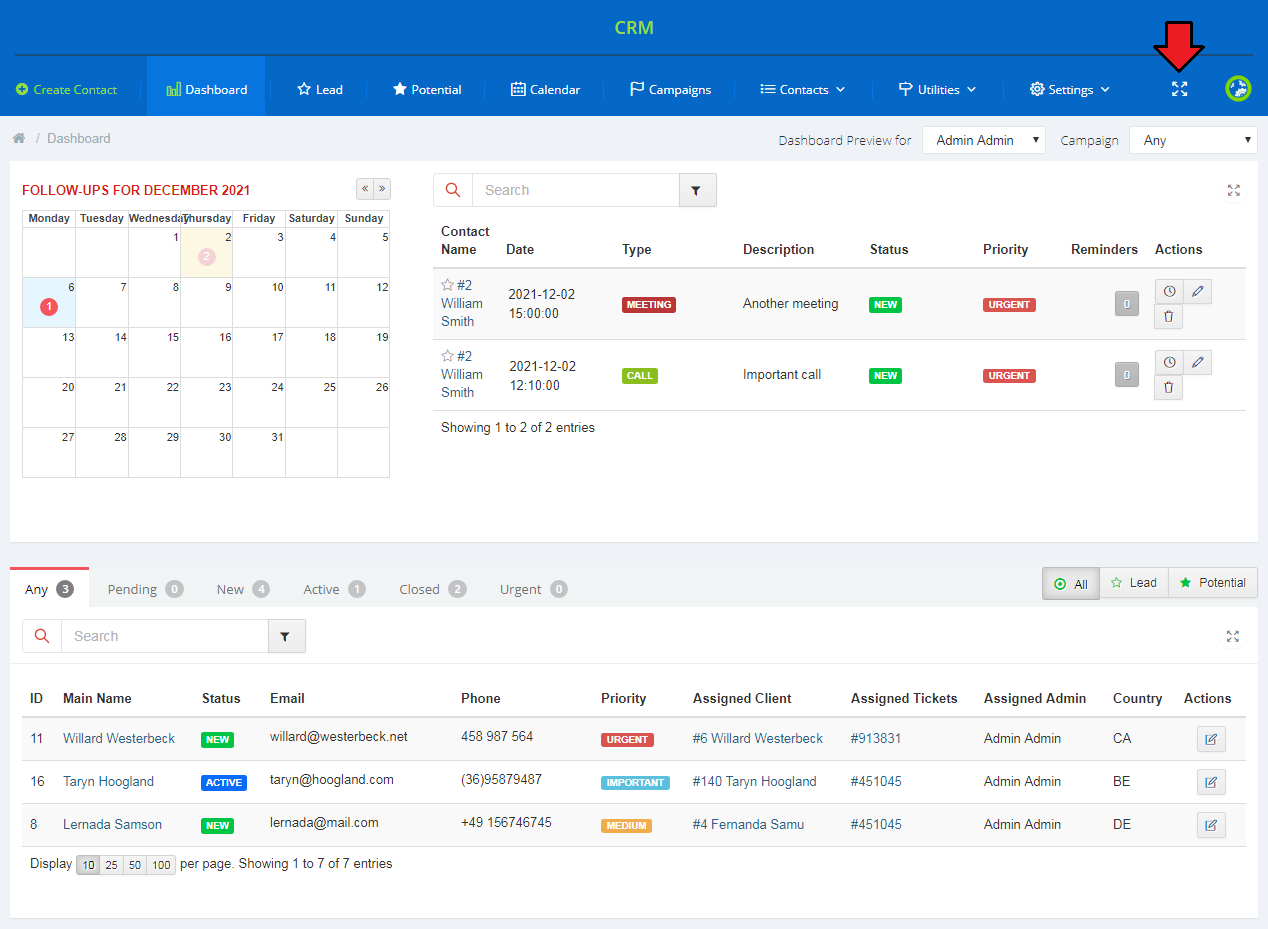
|
Contacts
Create Contact
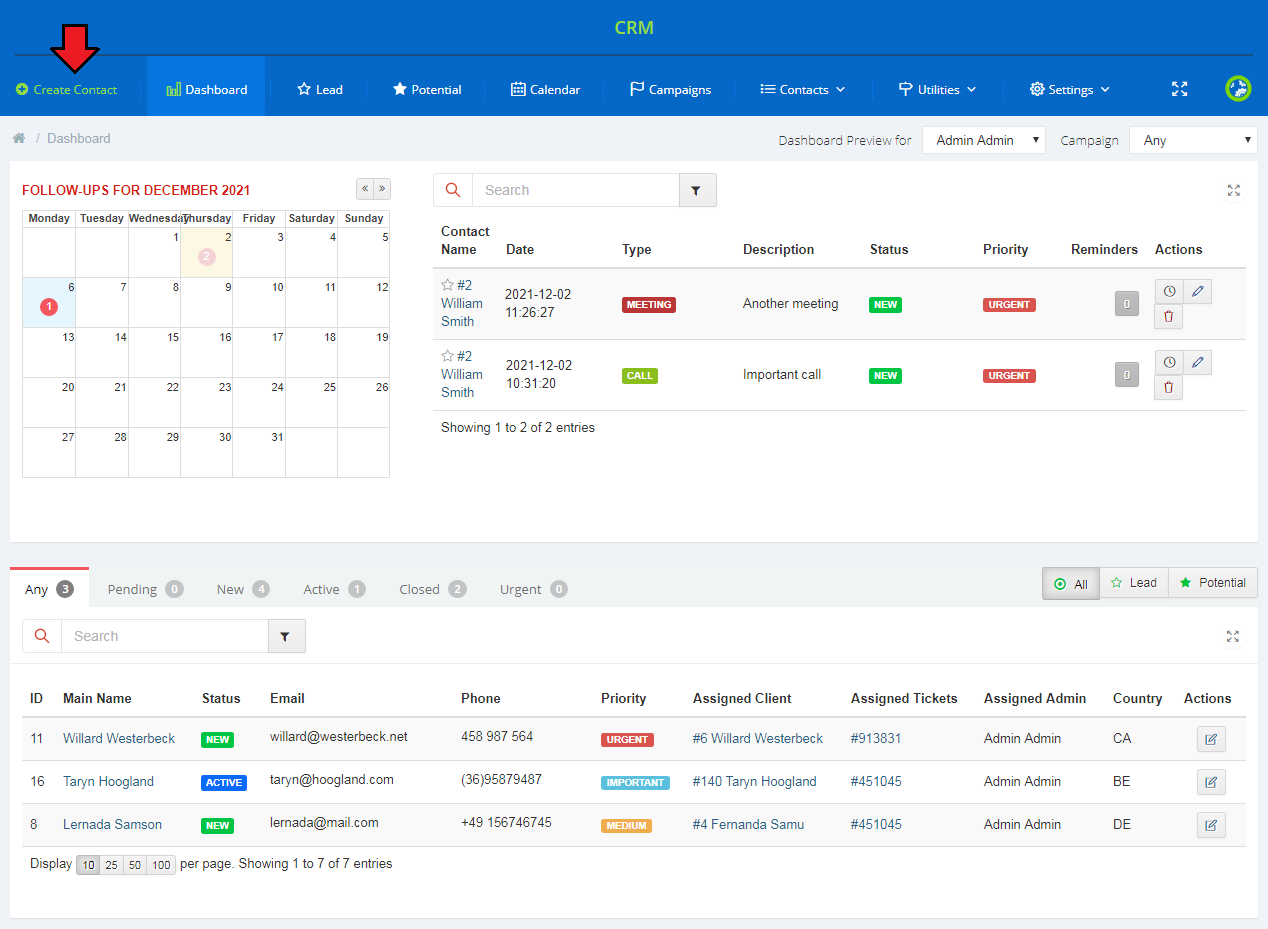
| To create a new contact, press the button marked on the screen below. |
|
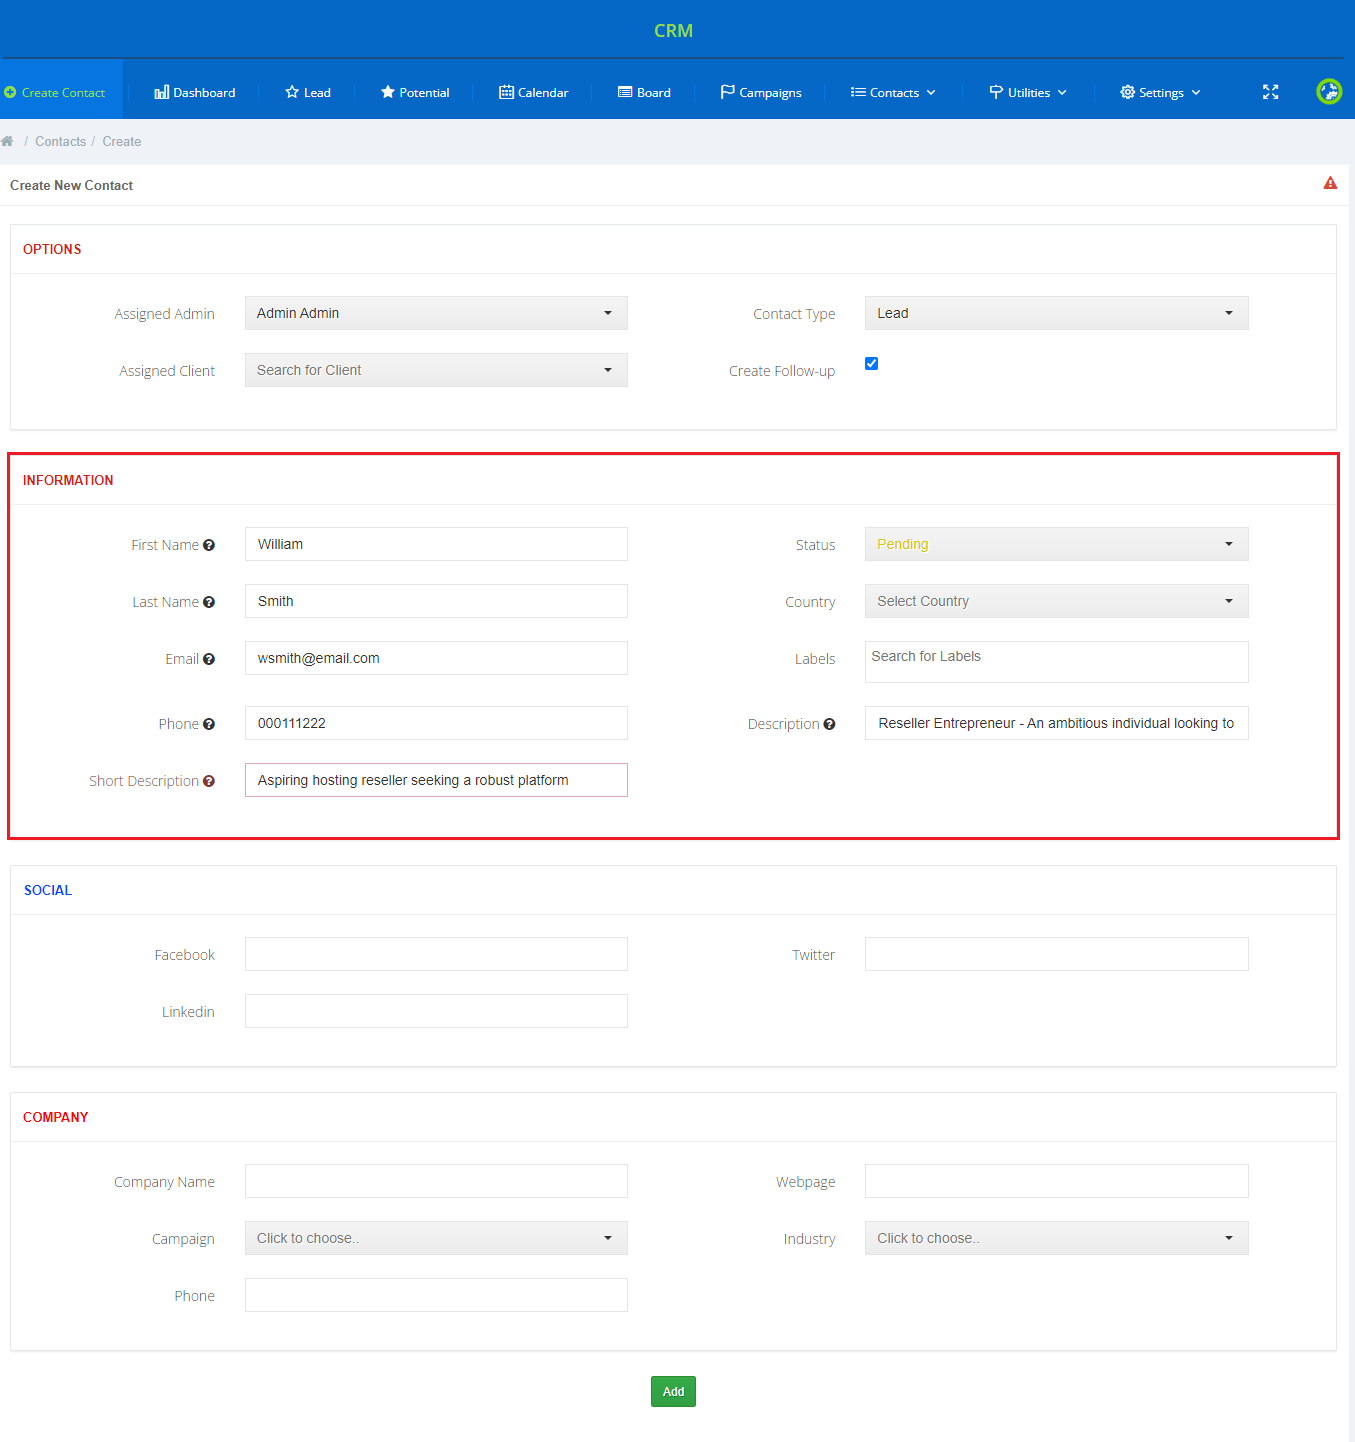
| You will be moved to a contact creation form. As you can see below, fields are divided into two sections: Options and Information. Fill out the form and press 'Add' to add new contact to the list. If you have previously added and enabled custom fields, they will be visible here as well. Note: Only staff members with full privileges can assign admins to the contacts. |
|
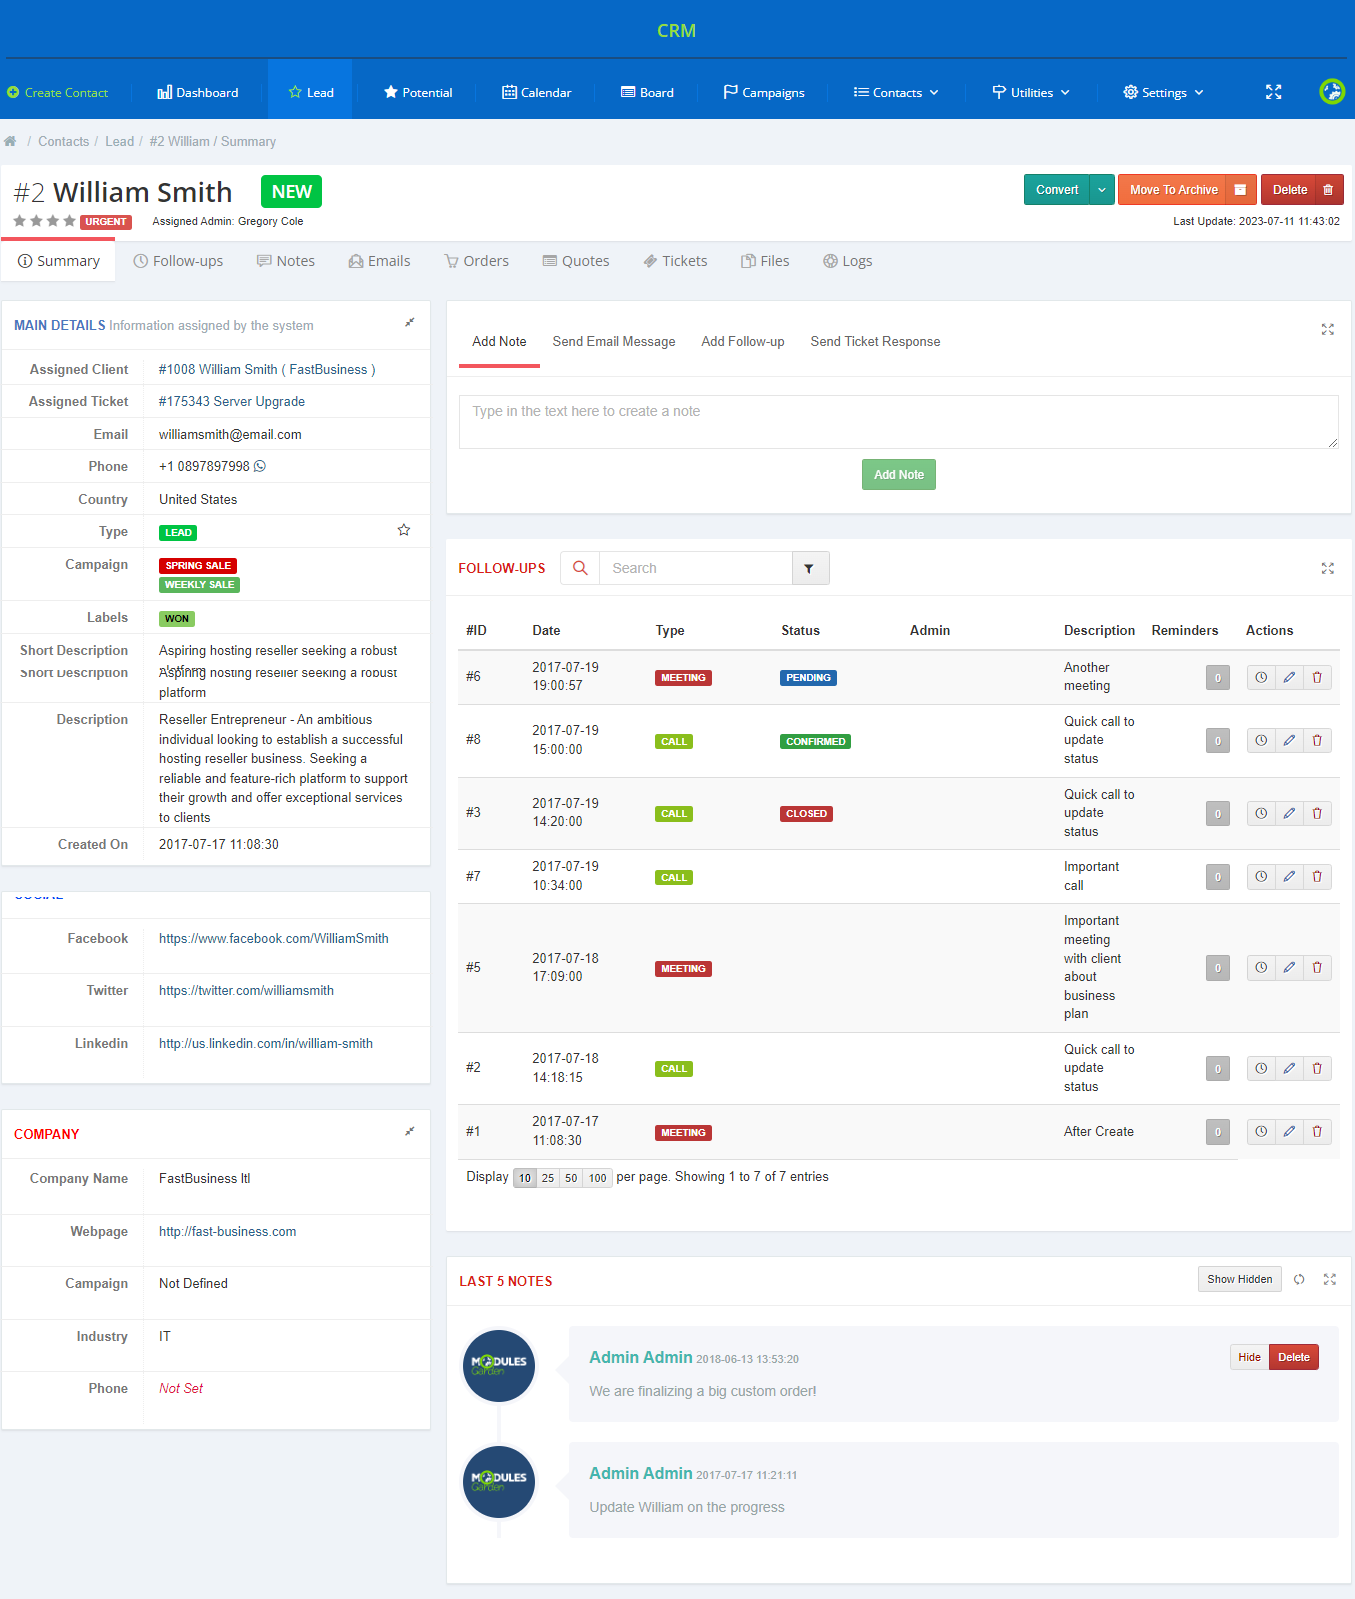
| Immediately after a new contact has been added, you will be moved to its summary where you can find/edit some additional data. Read more about them in the following section. |
|
Manage Contacts
| In the 'Actions' column you will find a list of useful operations which can be performed on a contact. When clicking on the dropdown menu, you will see such options as 'Convert To Potential/Partners' , 'Move To Archive' and 'Delete' . |
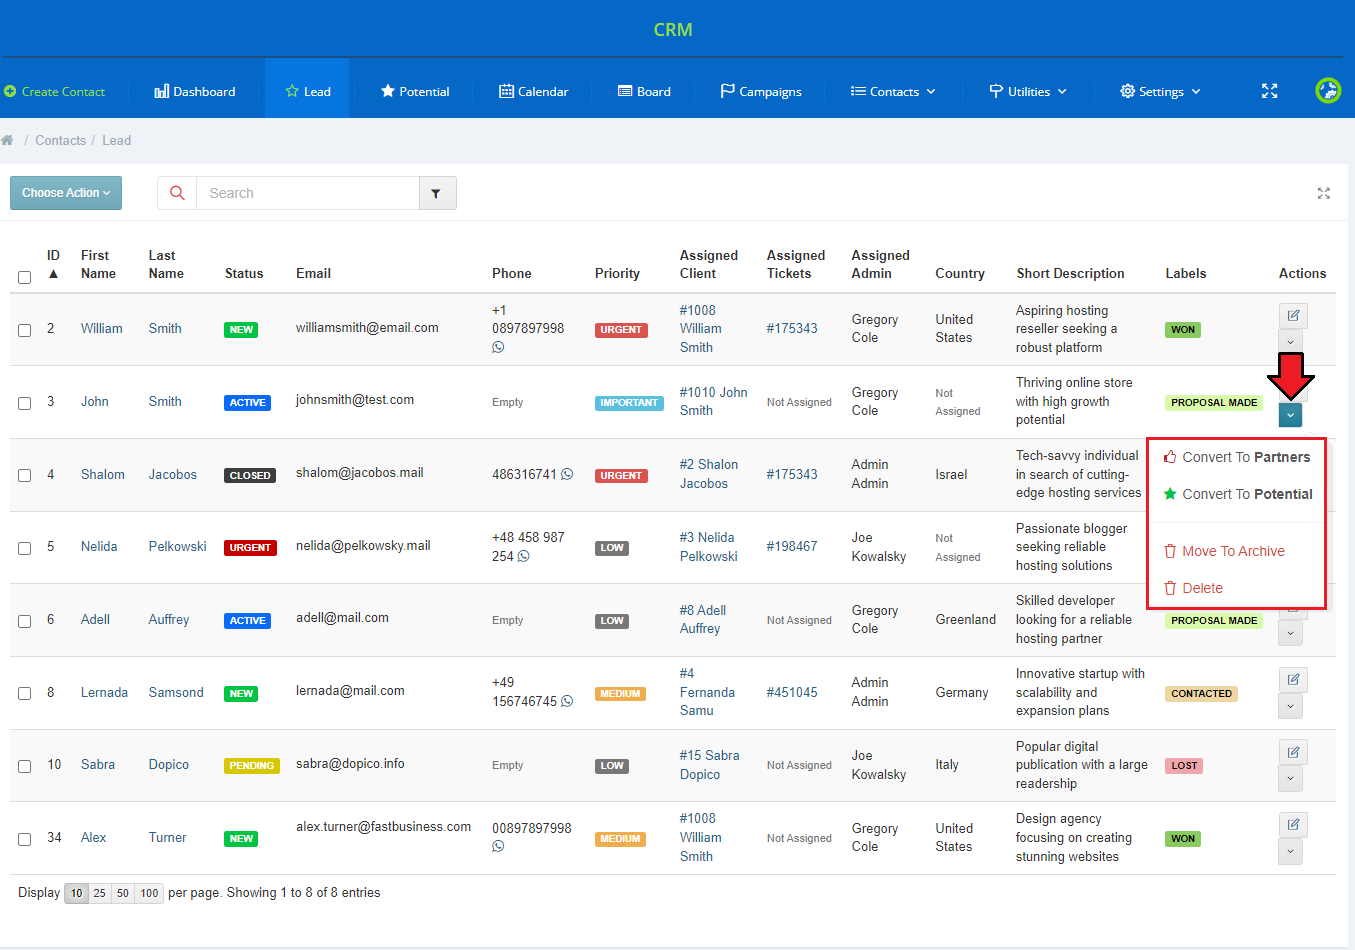
|
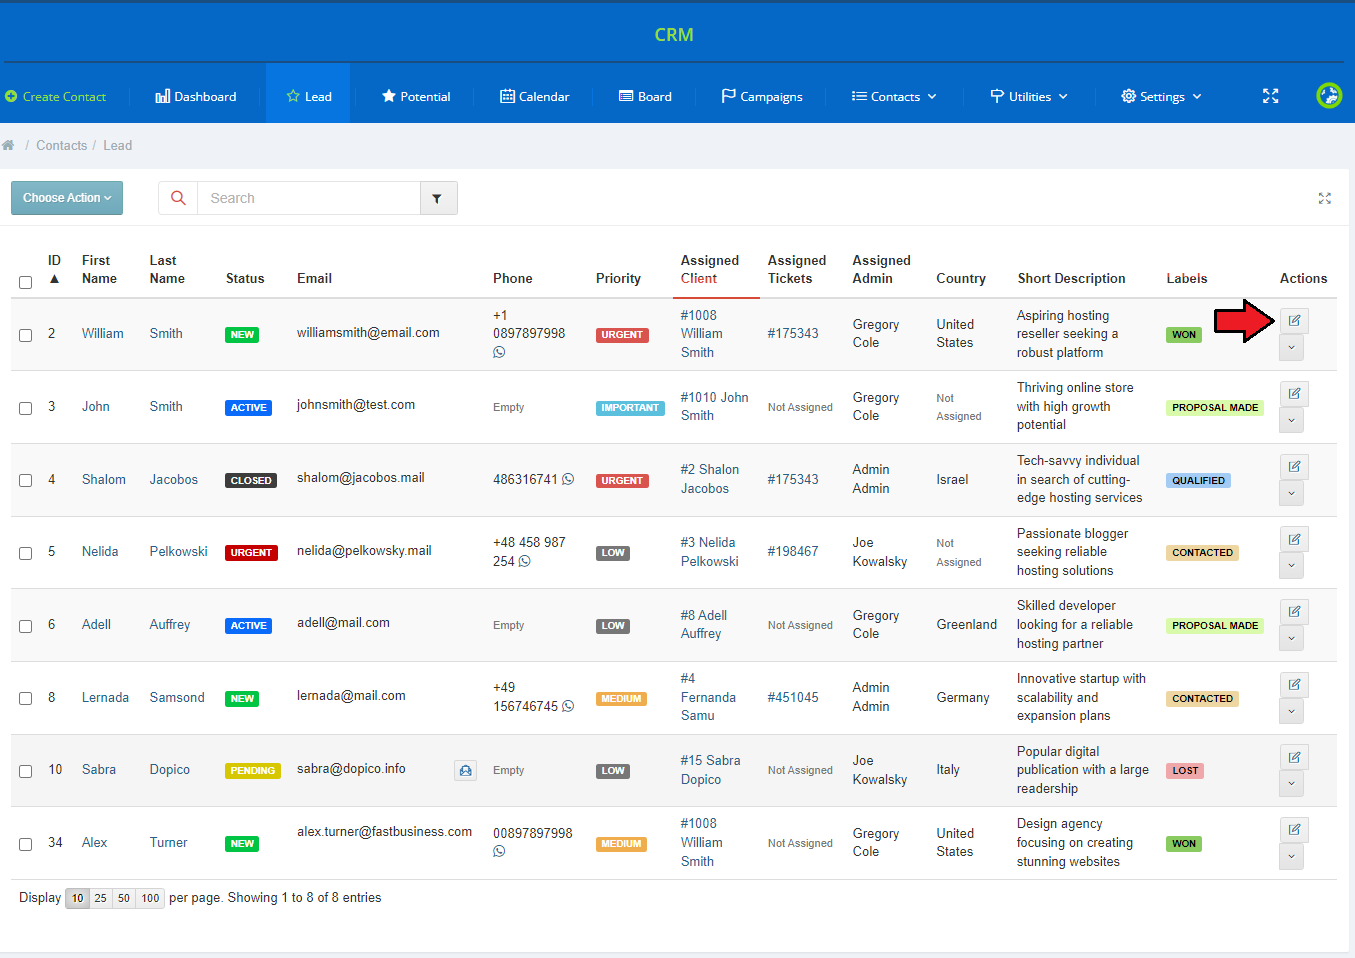
| Now, let us proceed to the contact itself. Press the pencil icon to move to the contact's summary page. |
|
| You can also filter your contacts by e.g. typing in a client's phone number into the 'Search' field. |

|
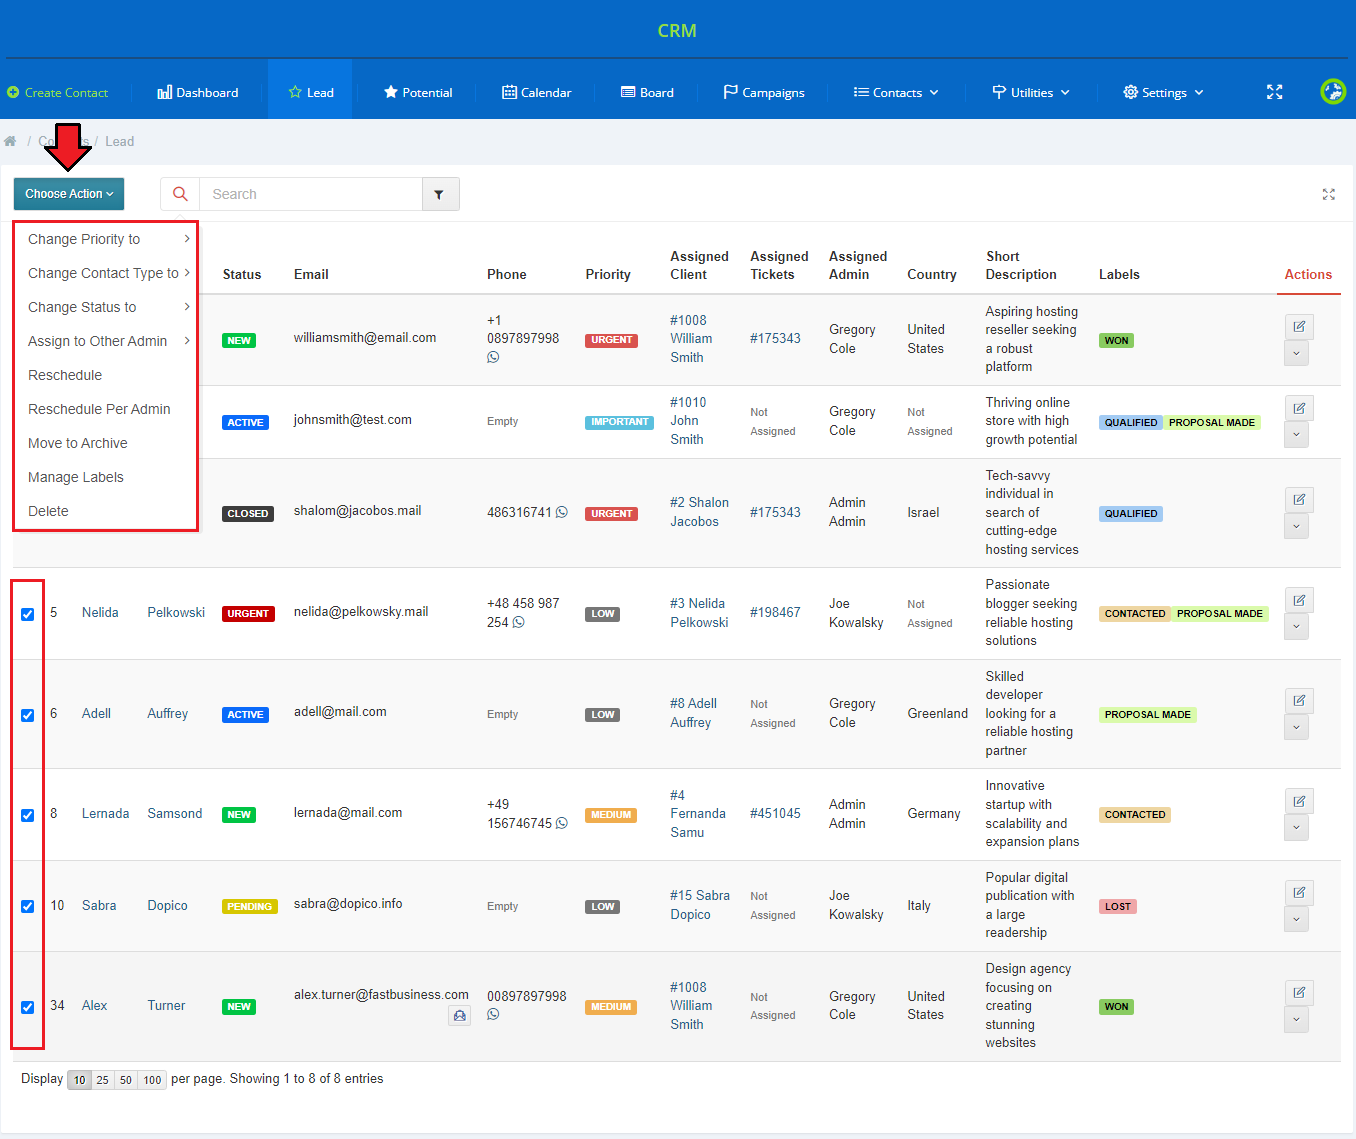
| You can also perform bulk actions on multiple contacts at once. Note: You must previously select at least one lead on the list to activate the 'Choose Action' button marked on the below screen. |
|
Summary
| To edit any of the options in the contact summary page, simply press a pencil icon that appears when you hover your mouse cursor over the option. In this way, you may reassign the administrator, alter the name and change the current status. Mark the appropriate number of stars to change the contact's priority:
|

|
As mentioned above, when you press the pencil icon, you may select the current status of the contact. You can choose from:
Every time you edit any information, please press the green confirmation button to save the changes. |

|
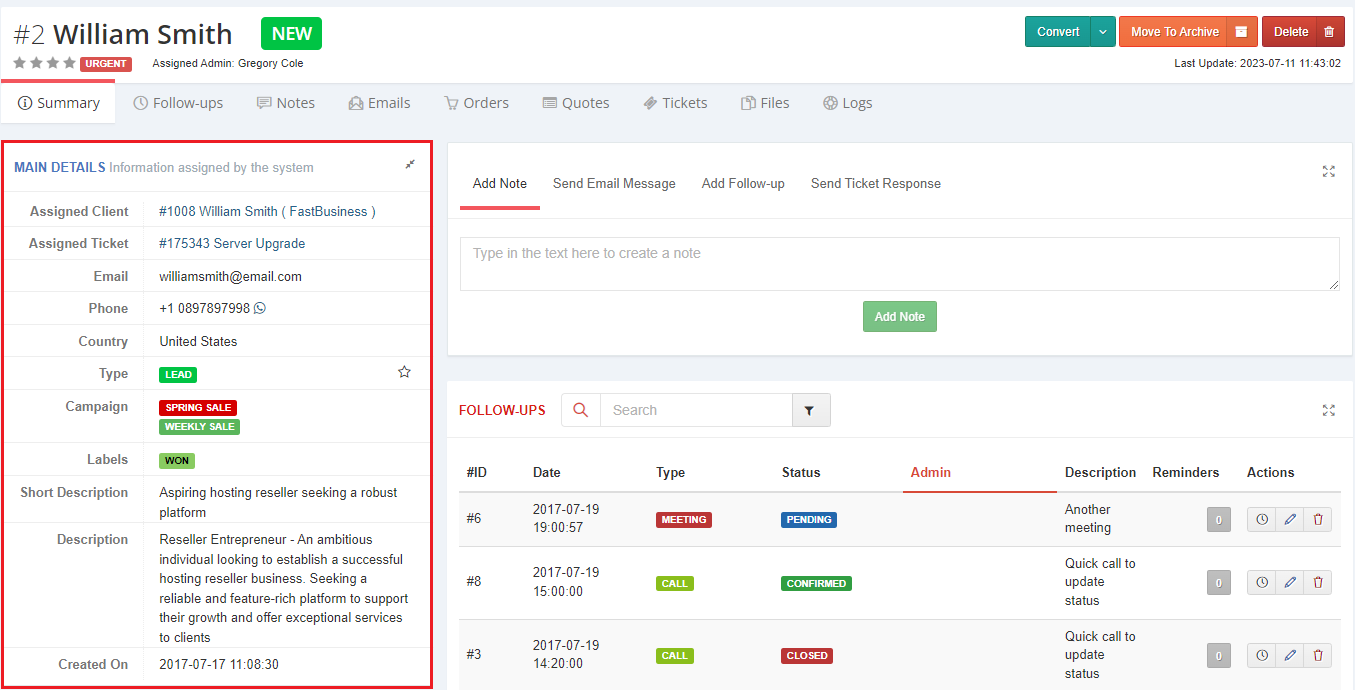
| In the area marked on the following screen, you can preview the assigned client, ticket on the basis of which the contact was created, contact details, and any campaigns the client belongs to. |
|
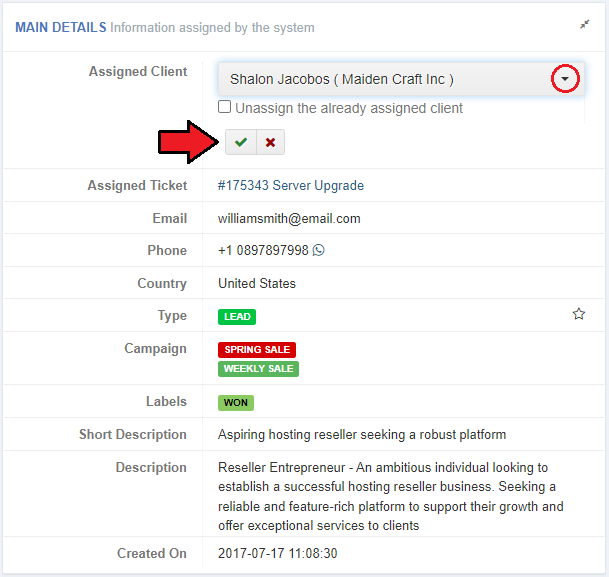
| The module allows you to assign a client account to the contact. You can do it in two ways: by creating a new contact or by selecting an existing client and assigning him/her to the contact. |
|
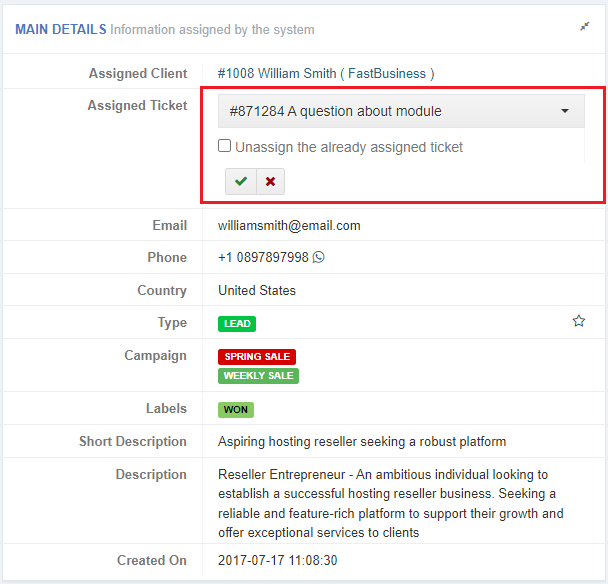
| In the same way, you may assign a support ticket to a contact. Then, you can make a background check on the client in an easy and quick way. |
|
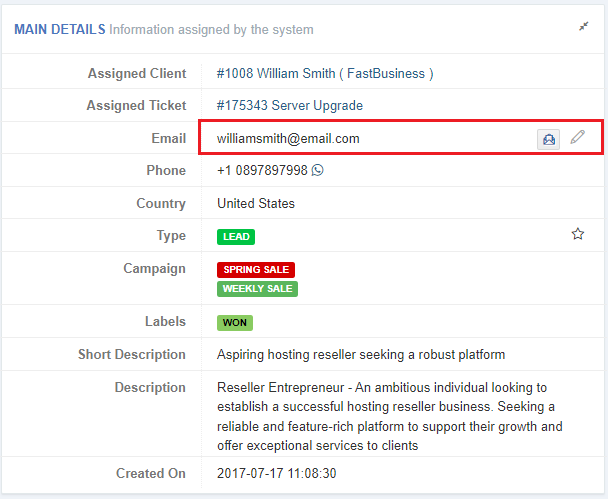
| When you hover over the email address of a contact, two icons will appear. Press the first one and you will be redirected to the section which allows you to send email messages. If you decide to use the edit icon instead, you will be able to type in any email address. |
|
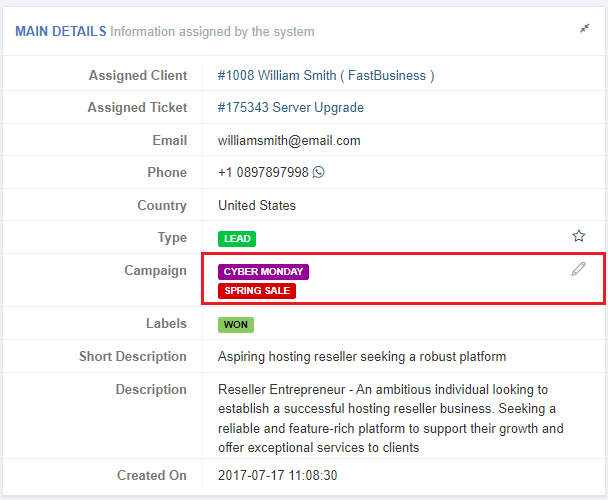
| Just like with clients and tickets, you may also assign your contact to a campaign (if you have any). When assigned, campaign details will appear in a separate widget. |
|
In the 'Summary' page you can also find all your created notes, the list of follow-ups and quickly perform actions like:
|
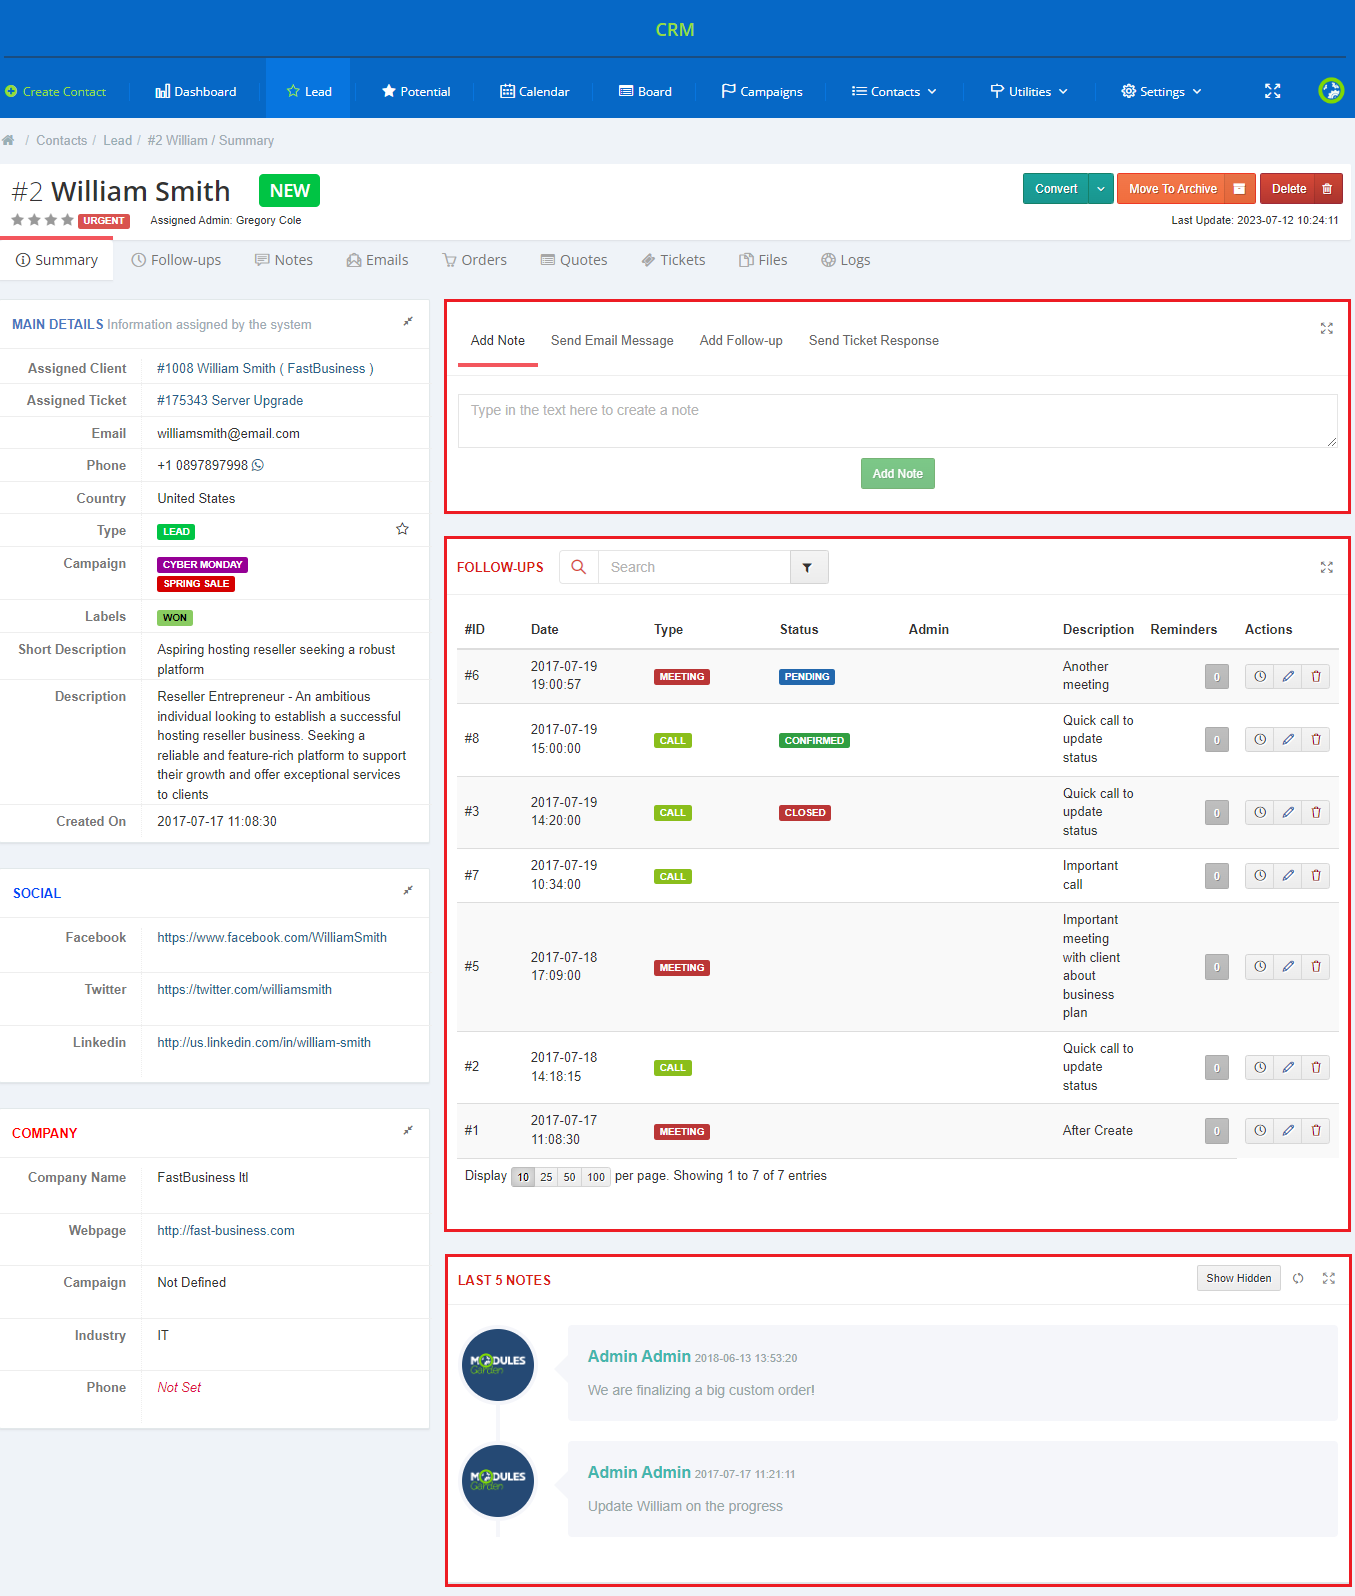
|
Follow-ups
| Follow-ups allow you to send email templates or text messages to contacts and staff members and create ToDo entries. Any follow-up can be rescheduled (1.) or removed (2.) using buttons in the 'Actions' column. |

|
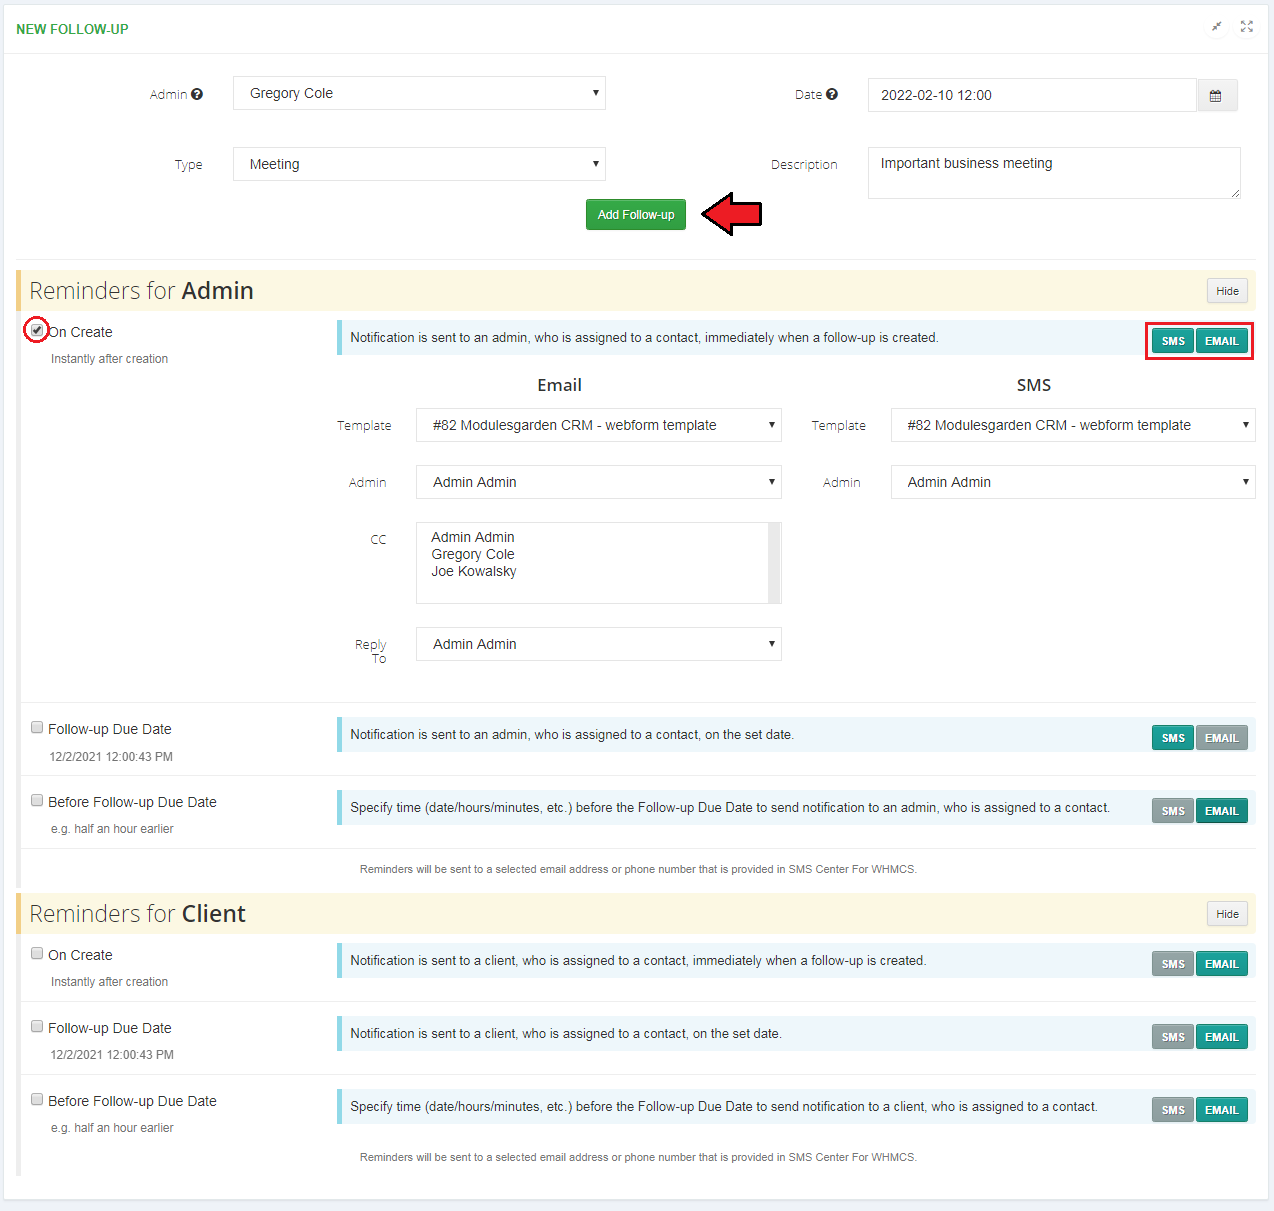
| To add a new follow-up, fill out the 'New Follow-up' form. Here you can define:
|

|
| The last step is to define reminders. We will briefly describe each of them below.
Reminders for Administrators
Reminders for Clients
Choose whether you wish to send reminders via email or SMS (if SMS Center For WHMCS is activated) or both. |
|
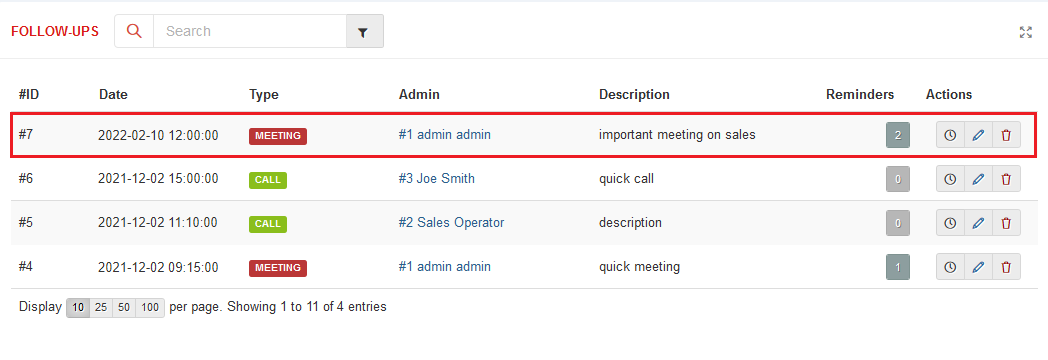
| Added follow-up will be displayed on the list of all follow-ups of the contact. Use action buttons to delete, reschedule or edit the follow-up. |
|
| In order to reschedule a follow-up, you will always need to provide a reason. |

|
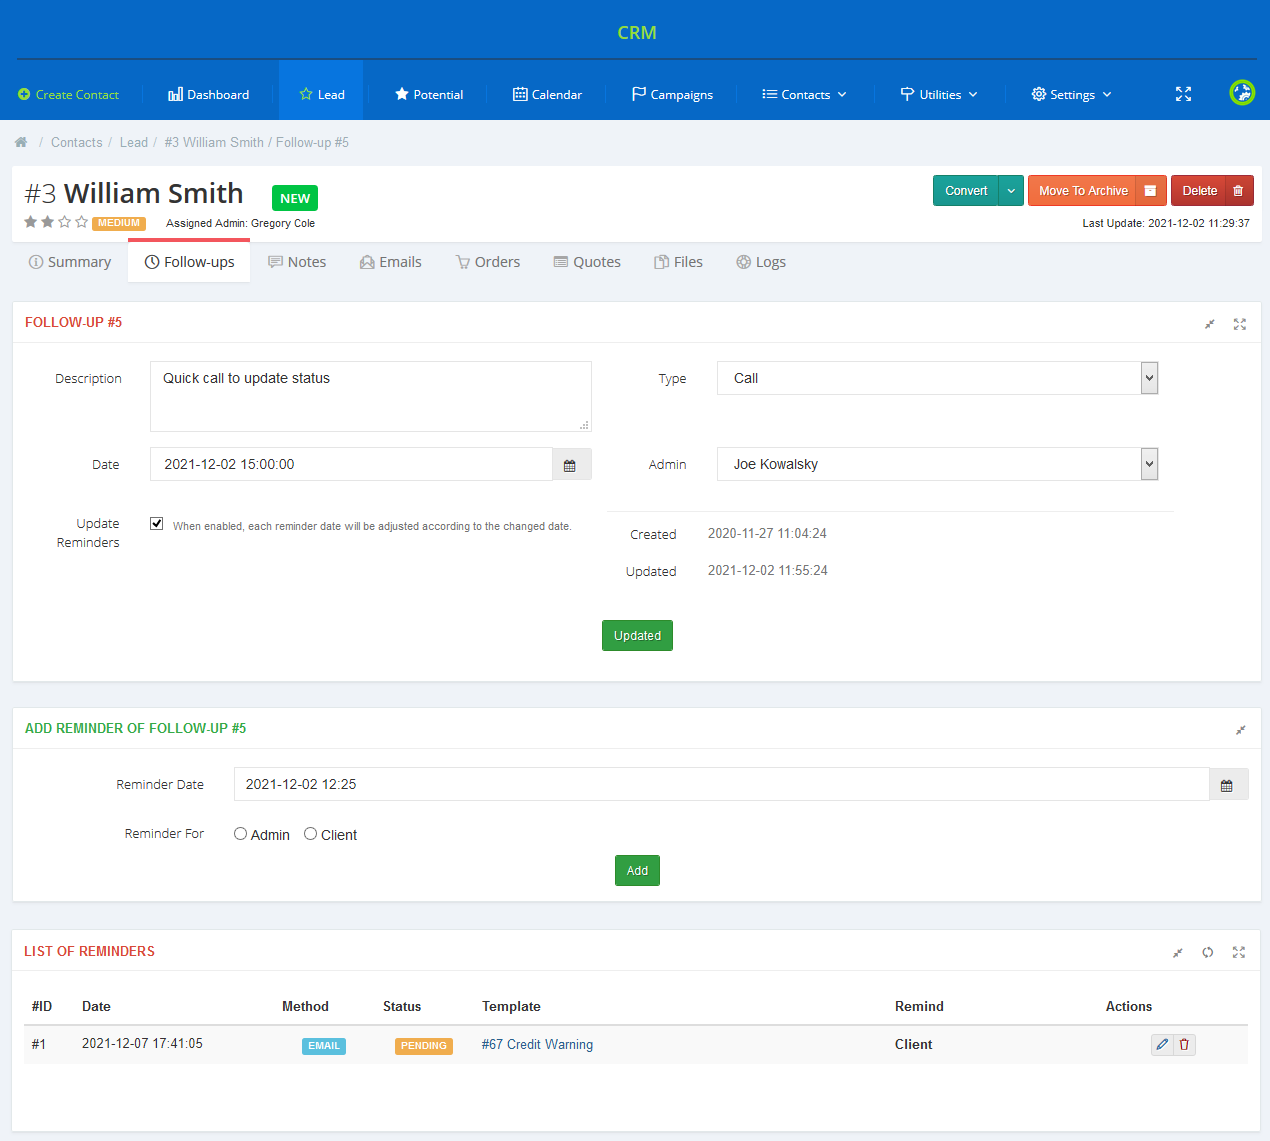
Edit follow-up details:
|
|
Notes
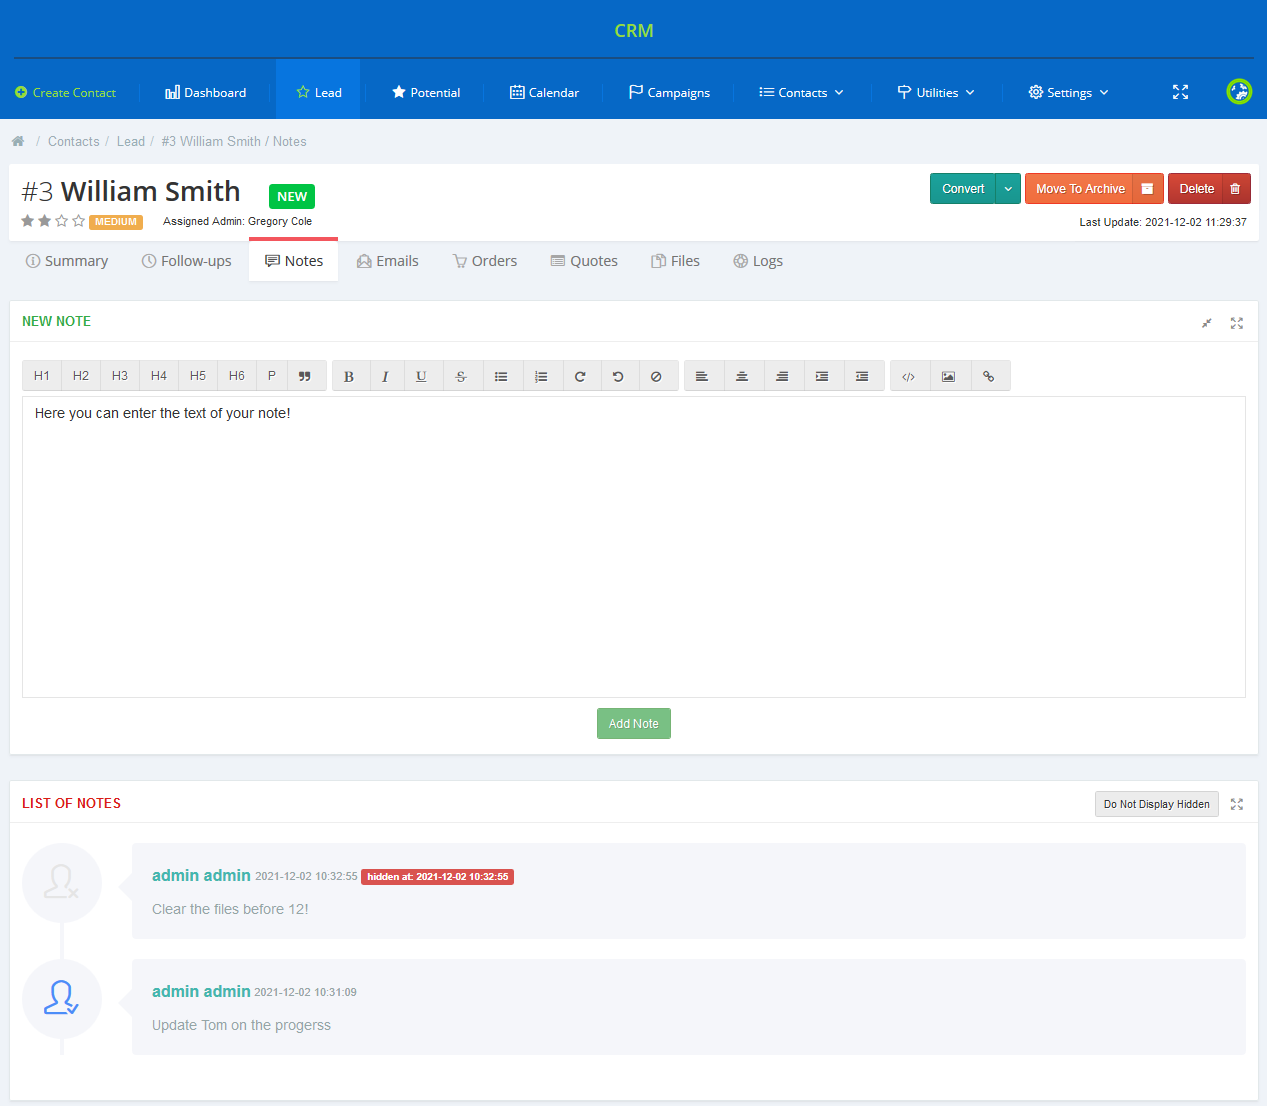
| 'Notes' section enables you to make and manage notes about the contact. On the following screen you can see how to add an exemplary note. |
|
| Any existing note can be modified and hidden as presented below. |

|
| Please note that only hidden notes can be deleted. To show hidden notes, press 'Display Hidden'. |

|
Emails
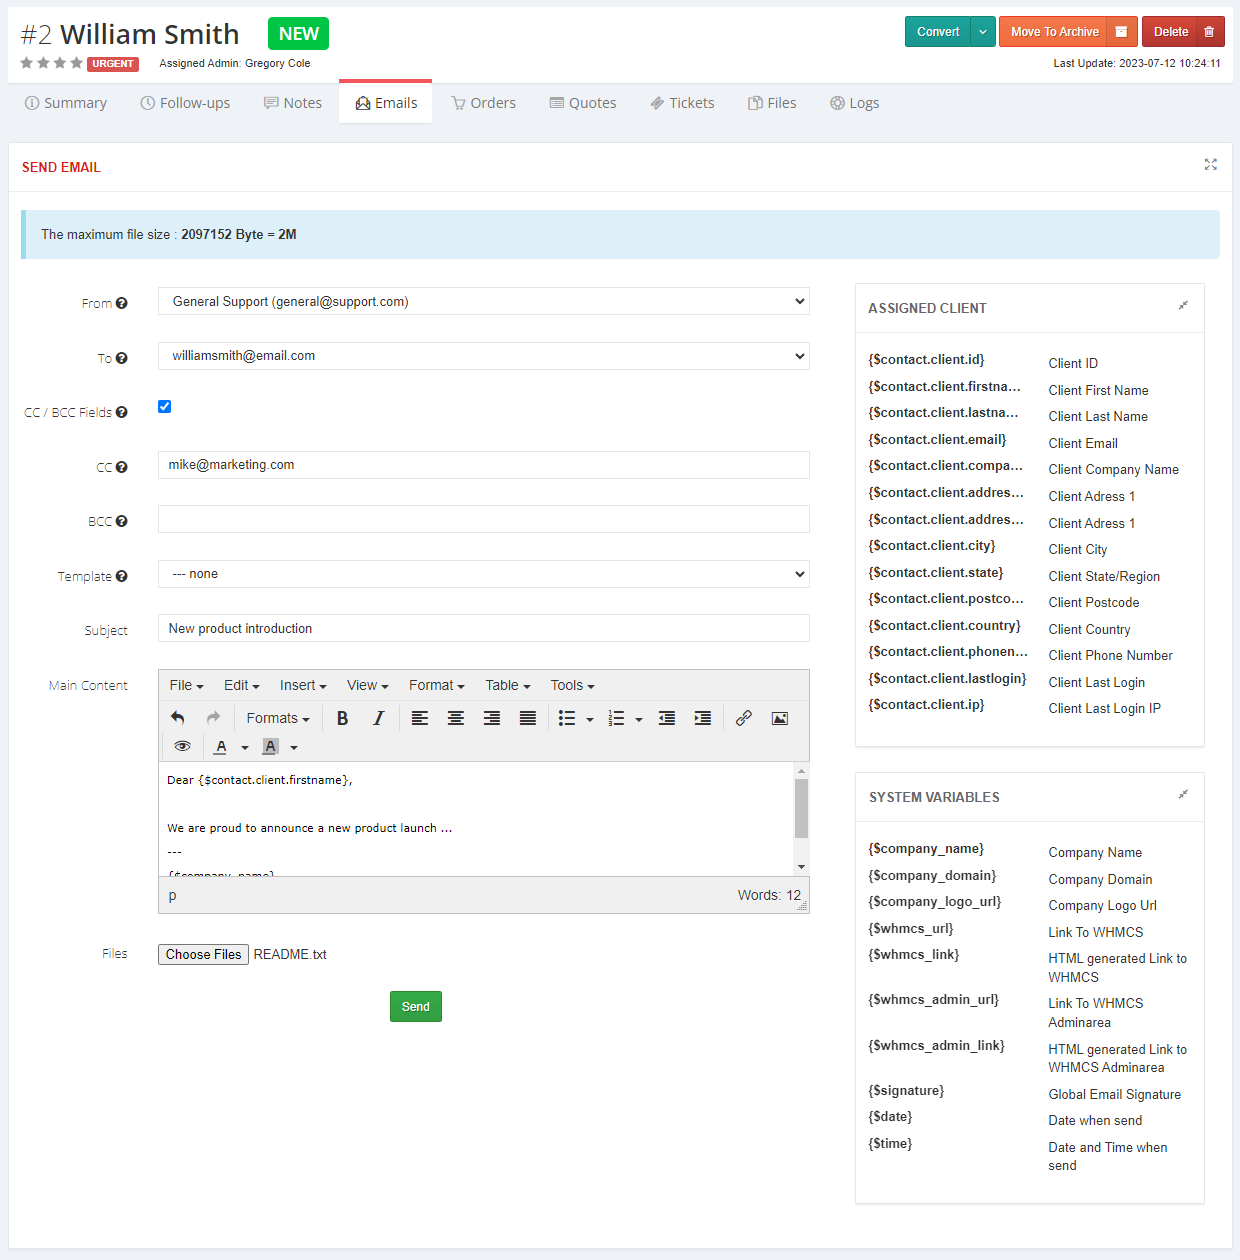
| Any staff member can send an email from the profile of any contact. As you can see, you can manually fill out the email subject and content as well as attach files and quotes. Note: The maximum attachment size is based on the 'upload_max_filesize' and 'post_max_size' records from your 'php.ini' configuration file. |
|
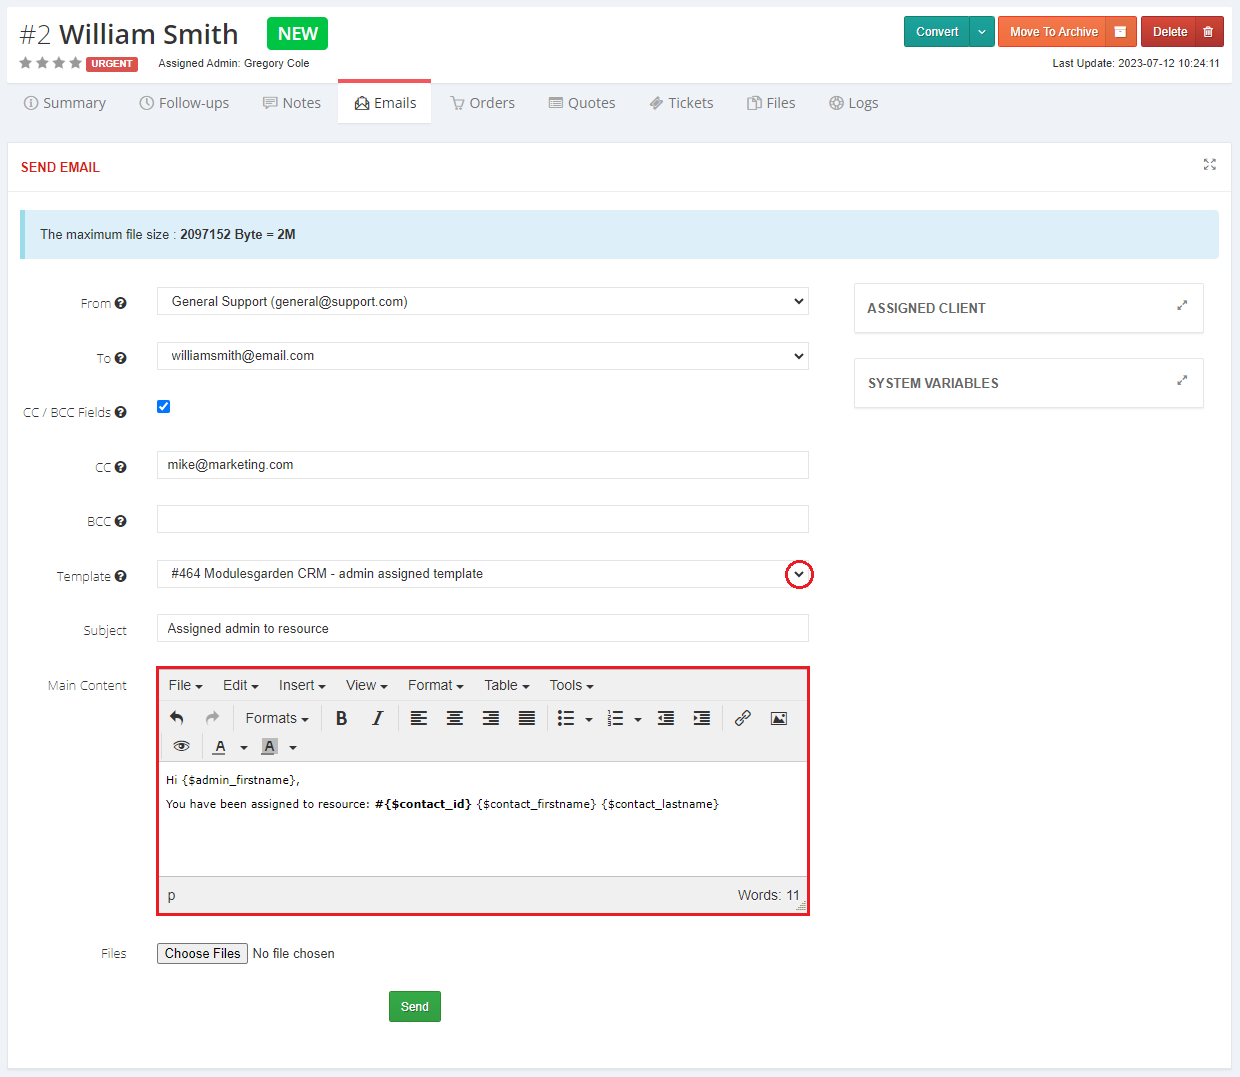
| Alternatively, you can choose one of the WHMCS email templates (from the 'CRM Messages' group type) to be sent. You can also select the mailbox from which the message will be sent. These mailboxes are obtained from the CRM 'Mailboxes' , WHMCS 'Support Departments' and 'General Settings' sections. |
|
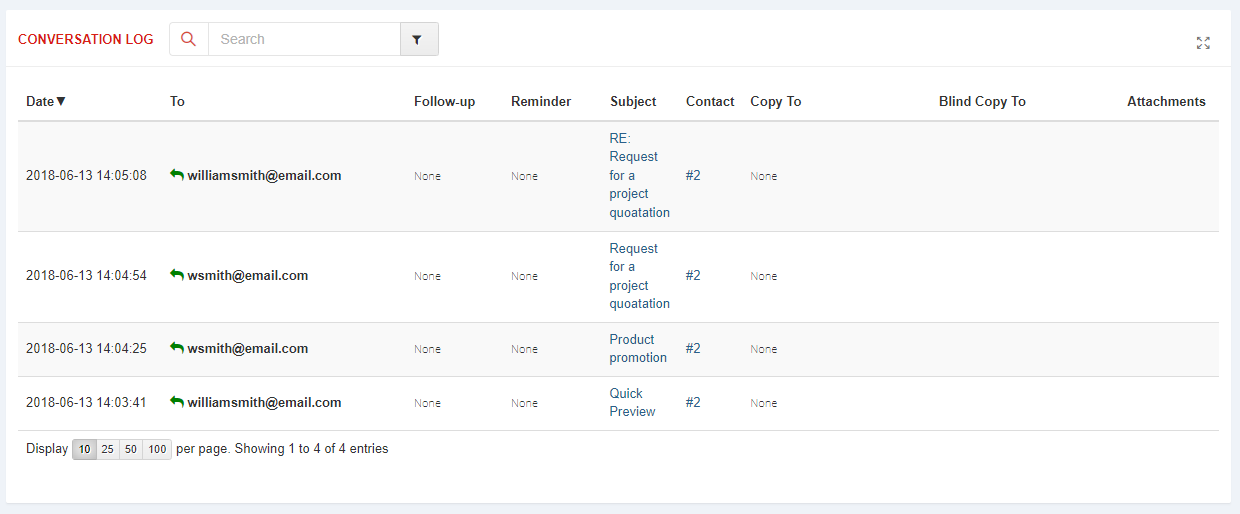
| At the bottom of the emails section you will find 'Conversation Log' . It contains all messages sent to the customer (marked with a green arrow) as well incoming messages (marked with a red arrow), if they have been configured in Mailboxes. |
|
Orders
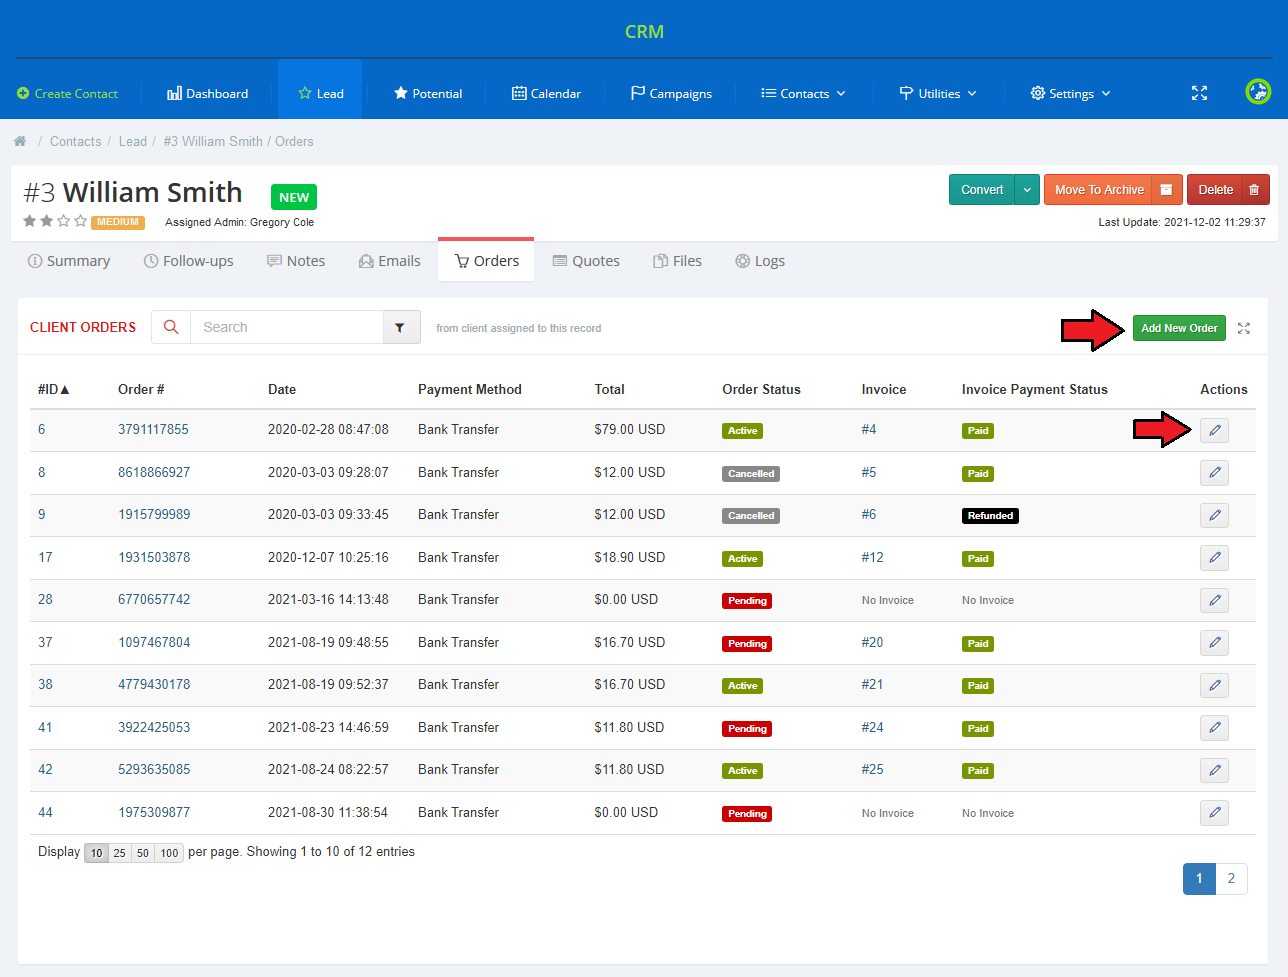
| Move to orders page where you can place orders for the contact. Press 'Add New Order' and you will be redirected to your WHMCS page where an order can be placed. Preview details of all orders and edit them if required. |
|
Quotes
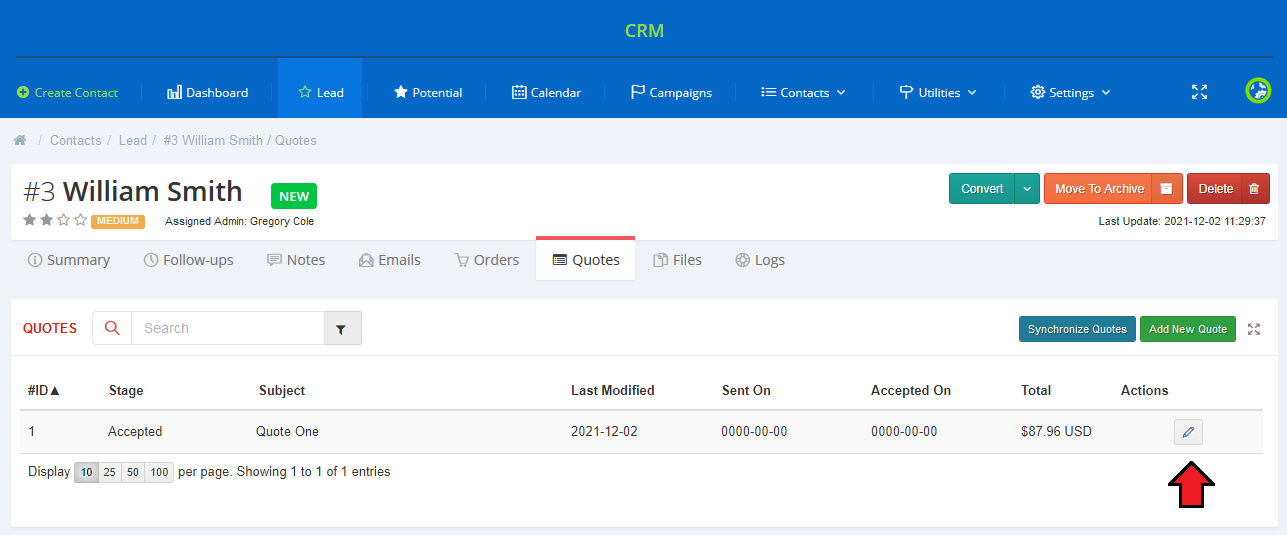
| Quotes can be created for each CRM contact. As you can see on the screen below, in the 'Quotes' section of the contact page, brief information about quotes assigned to the contact is displayed. |
|
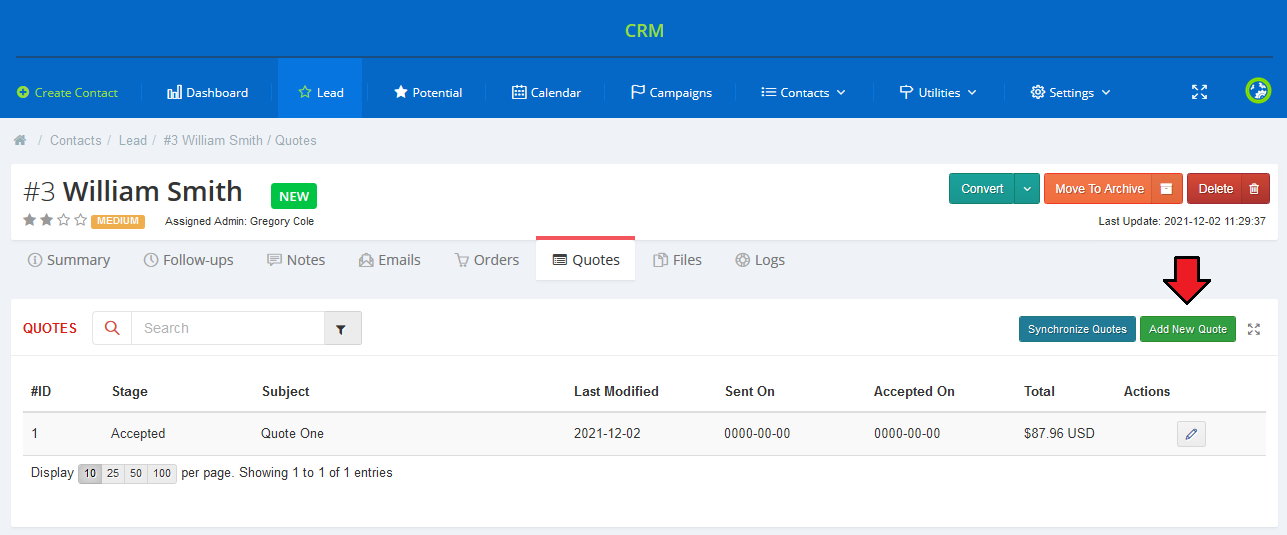
| You can also create a new quote for the contact. To do so, press 'Add New Quote' as shown on the following screen. |
|
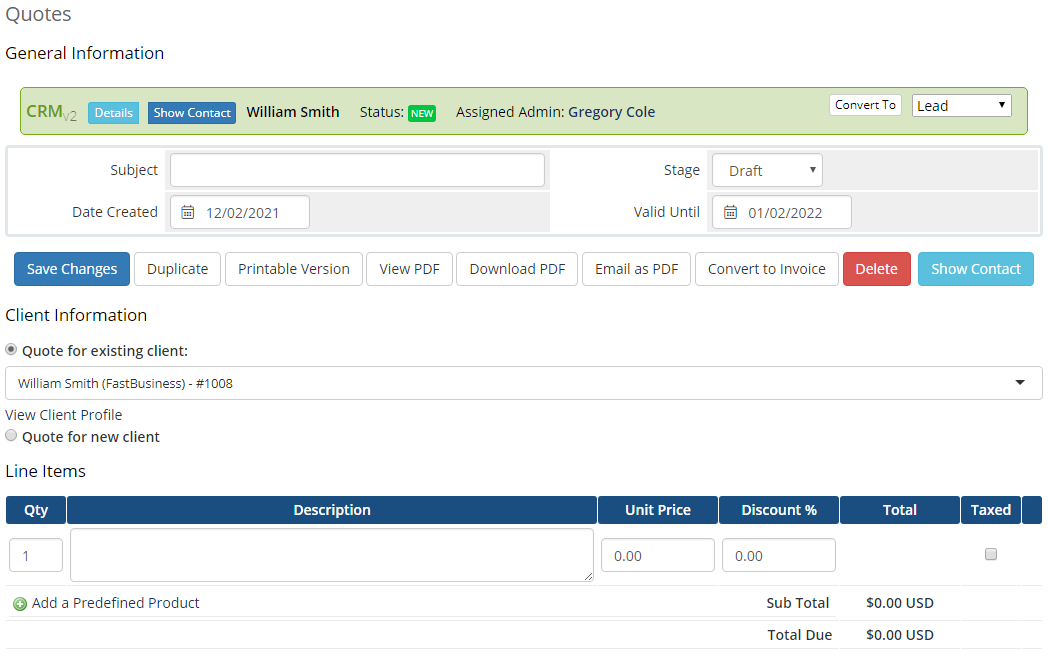
| Now, create a quote for your contact. You can do it in two ways. If a client is assigned to the contact, they will be automatically linked to the quote. |
|
Tickets
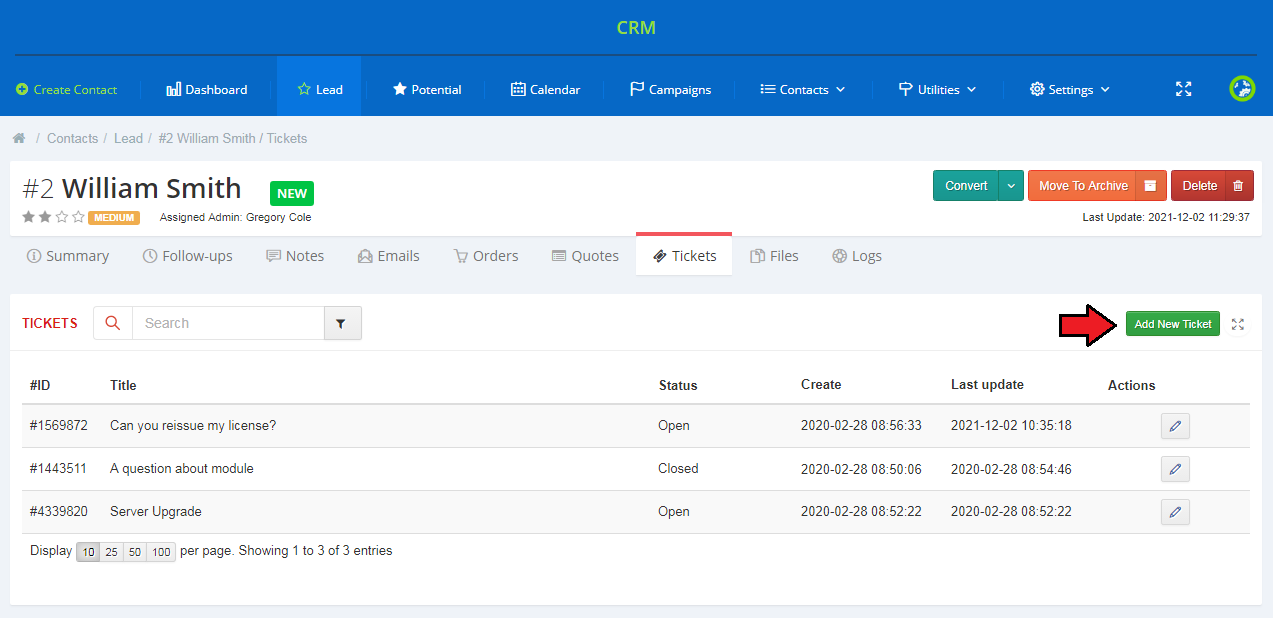
| The 'Tickets' tab displays all tickets created by a client. If you want to create a new ticket for the client manually, click 'Add New Ticket'. |
|
Files
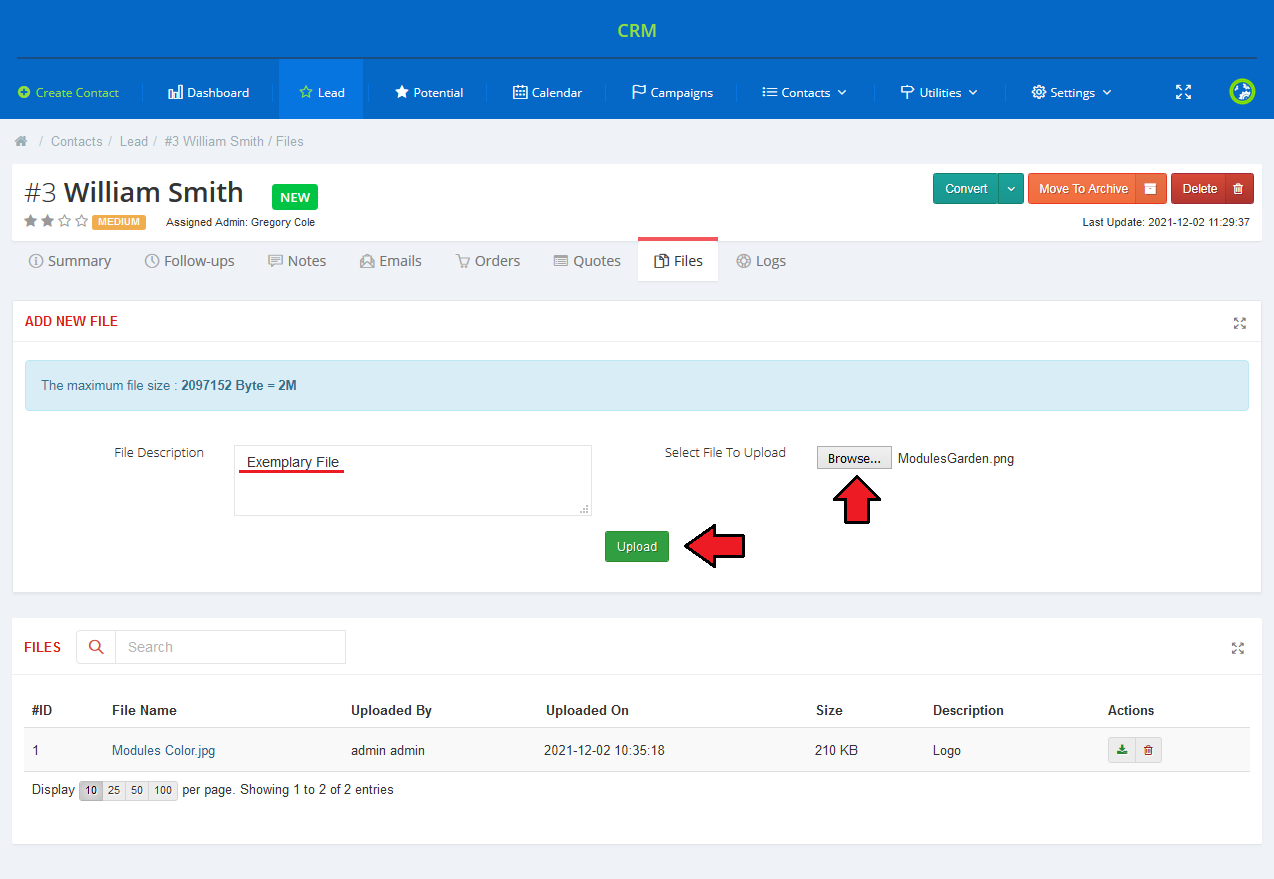
| The 'Files' tab allows you to upload and manage files related to your contact. To upload a new file, select the file to upload and describe it shortly. Then press 'Upload'.
|
|
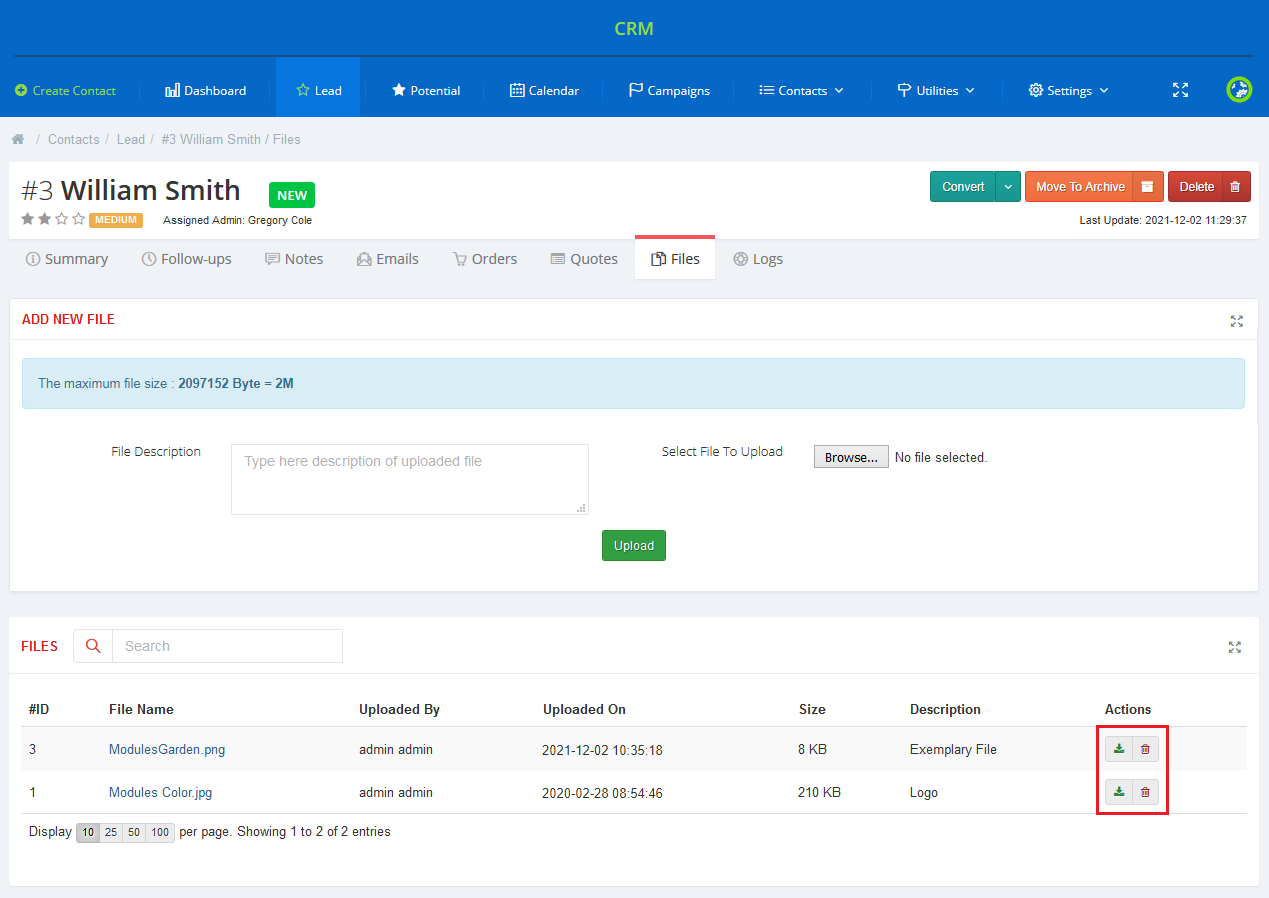
| Any uploaded file can be downloaded from CRM by pressing its name or using action icons. It can be also removed by clicking on the dustbin icon. |
|
Logs
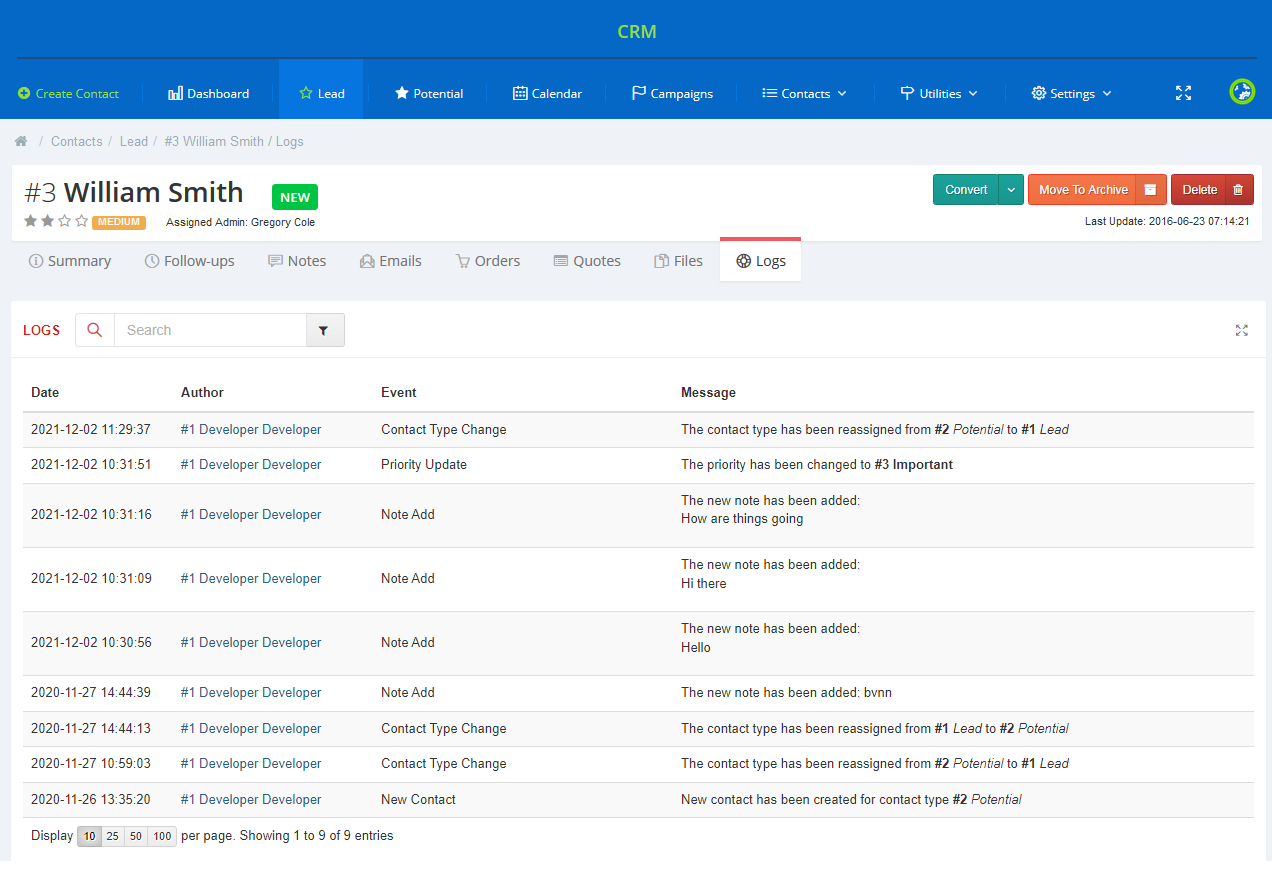
| To view the latest actions performed on the contact, go to the 'Logs' tab. As you can see, it contains all details you might be interested in. |
|
| The 'Logs' page, apart form displaying all logs concerning the contact, contains also a search box. The search option allows you to find logs on actions performed by specific administrators, at a desired time and related to specific events. |

|
Calendar
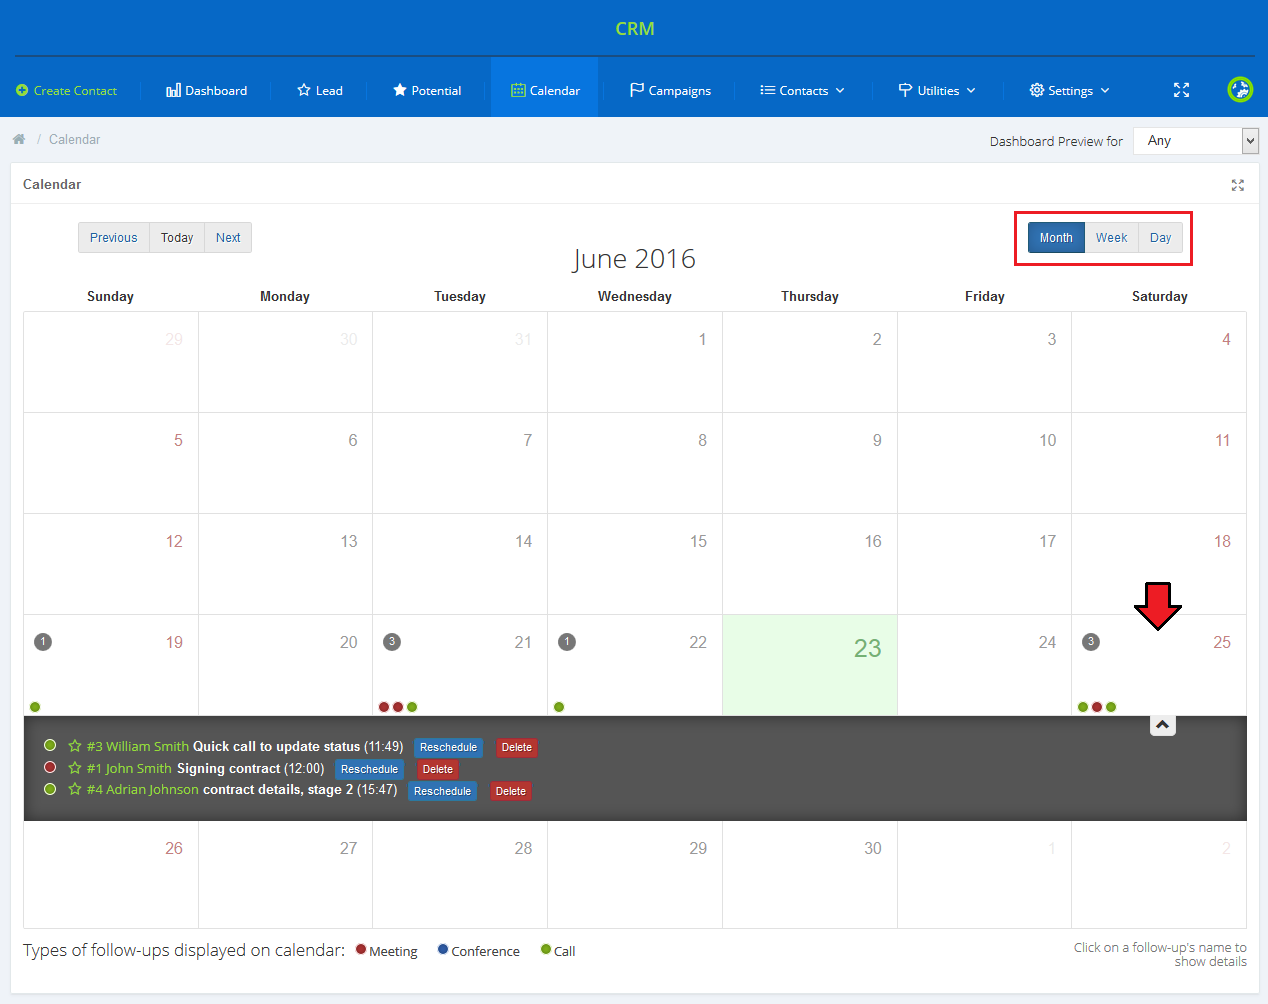
| Move to the 'Calendar' tab to access a fully manageable and adjustable calendar. Switch between days, month and week view to have a clear and precise insight into your scheduled events (click on a selected day to see the details). |
|
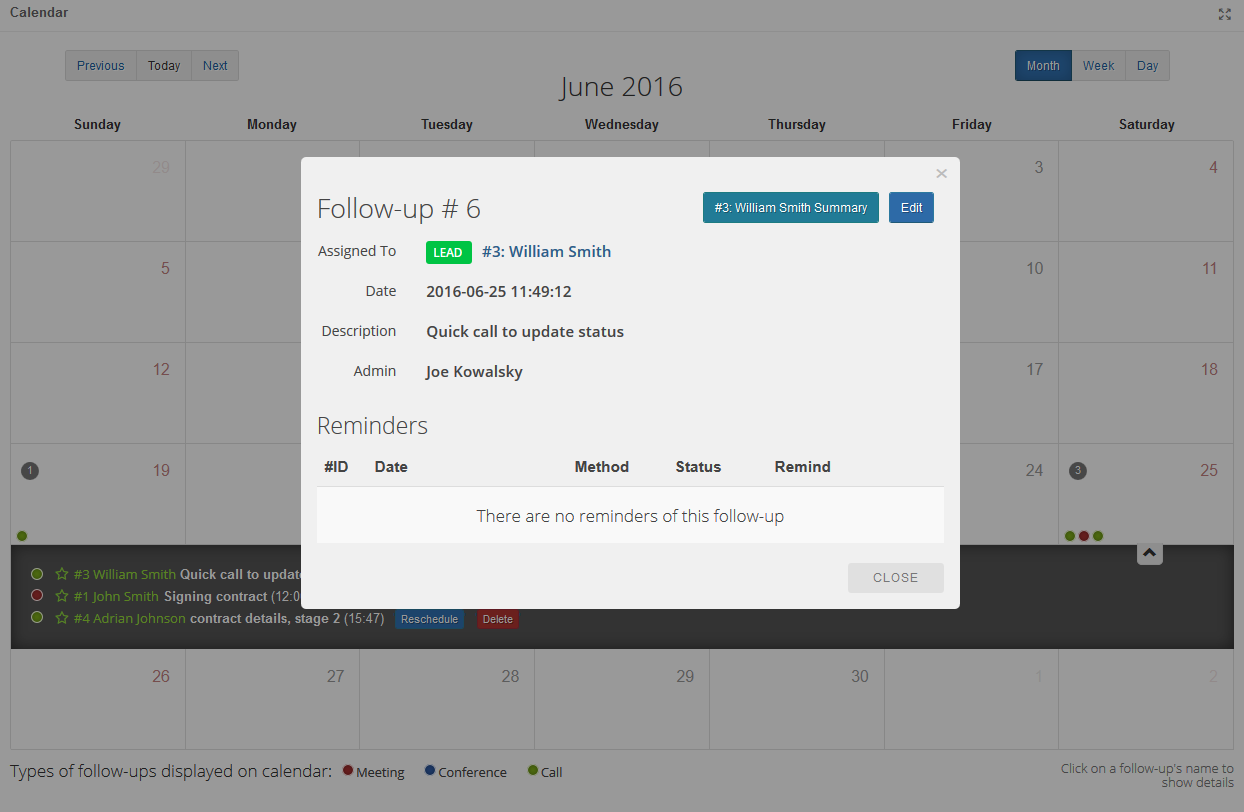
| Under the calendar you will notice a legend of follow-up types displayed in the calendar. Click on any follow-up to see its details. |
|
Board
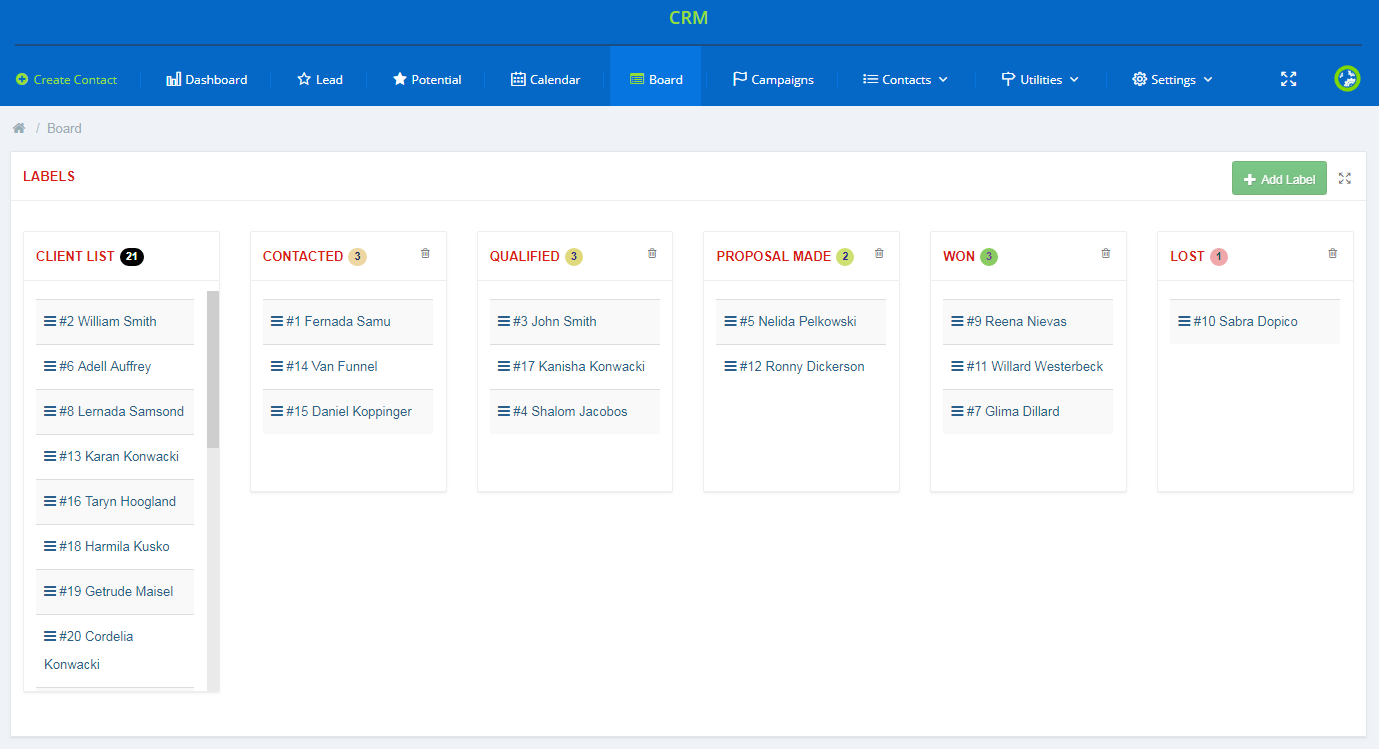
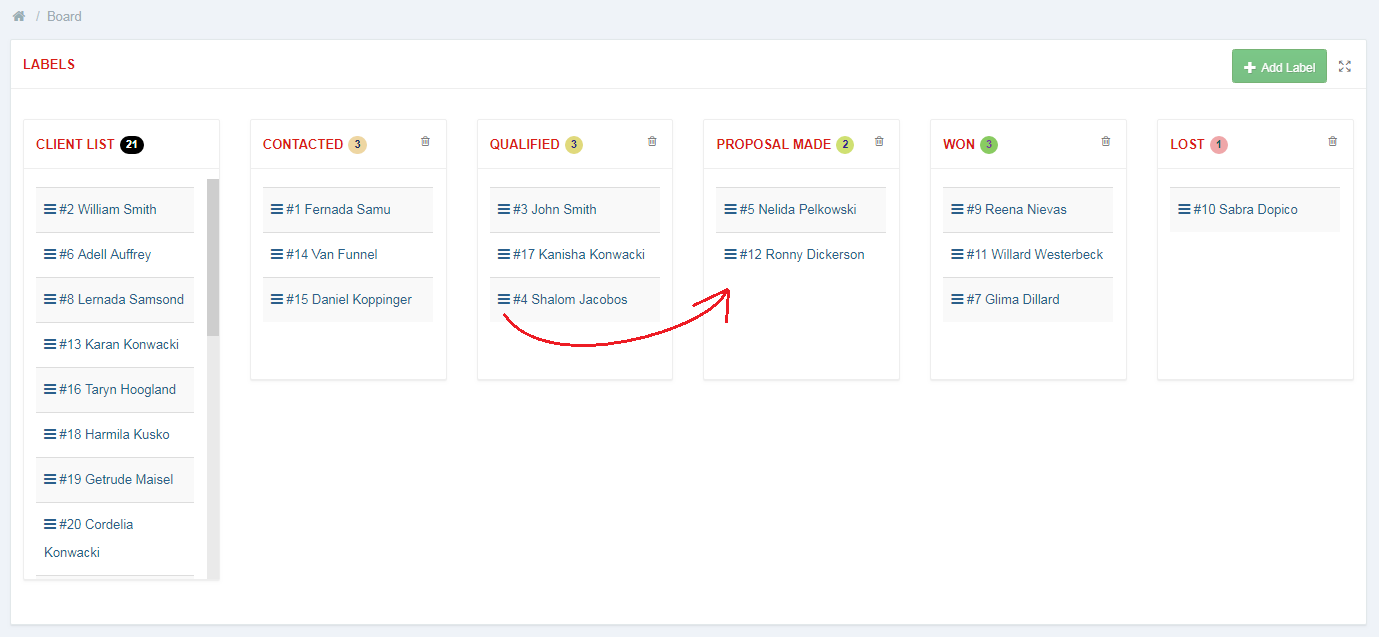
| 'Board' tab can be used to conveniently present the current stage of business relationships with your contacts. Using the drag & drop feature, you can easily move your contacts from one column to another. |
|
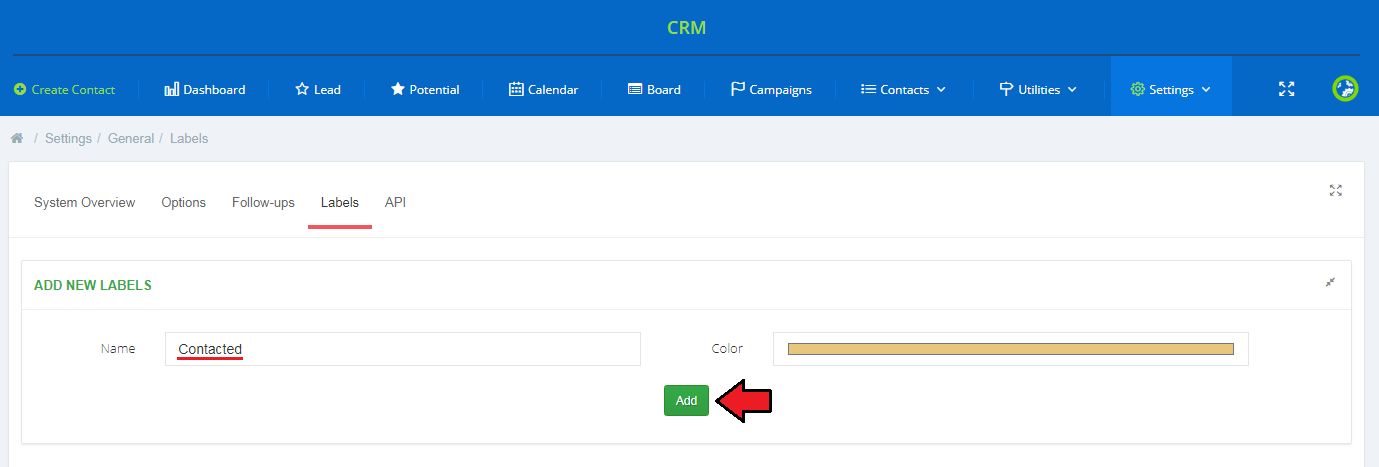
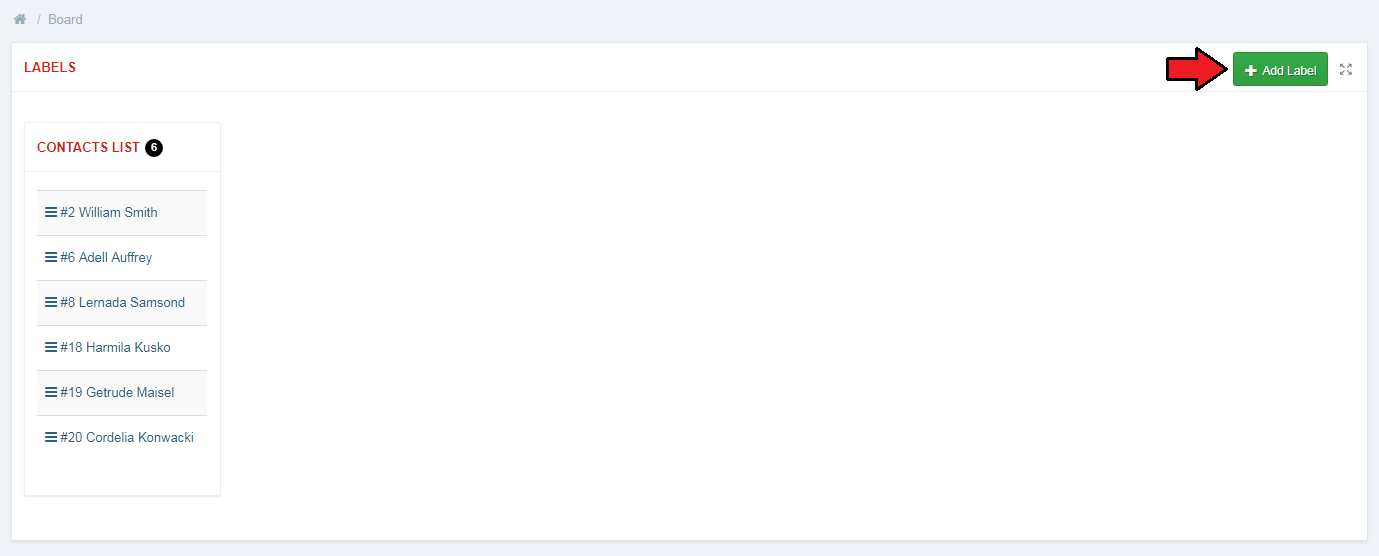
| By default, when you open the board for the first time, the only available column will be the 'Contact list' . To add new columns, you must first add them in the 'Settings' → ' General' → 'Labels' section. |
|
| Now return to 'Board' . Click 'Add Label' to add your just created label as a new column. |
|
| Confirm and repeat this step until you reach the desired number of columns. |

|
| Finally, the use drag & drop feature to move your contacts between columns. |
|
Campaigns
| Another functionality that CRM For WHMCS has to offer is the possibility to create customized campaigns. If you decide to apply this option, you will be able to create various campaigns with selected contacts included and filtered according to your personal configurations. |
Add Campaign
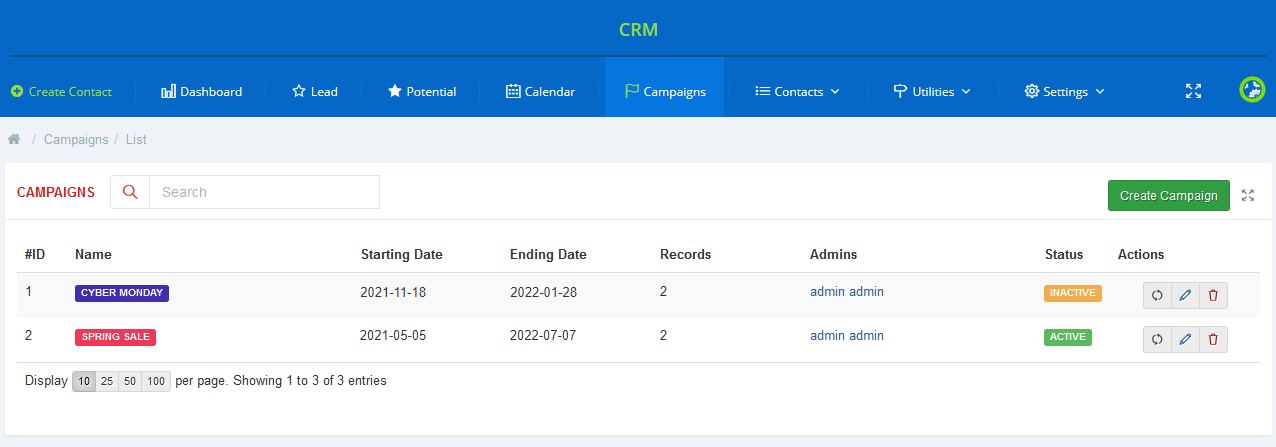
| In order to add a new campaign, use the 'Create Campaigns' button. |
|
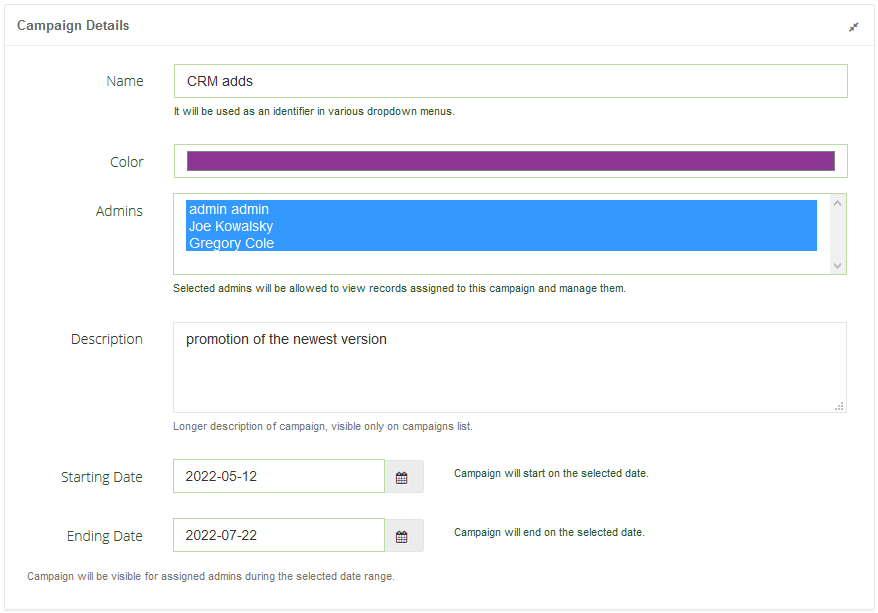
| Start with filling out some basic data about the campaign such as name and description. Select a color that will be used to distinguish this particular campaign from others. Assign admins who will have access to the campaign entries, and provide beginning and ending dates. |
|
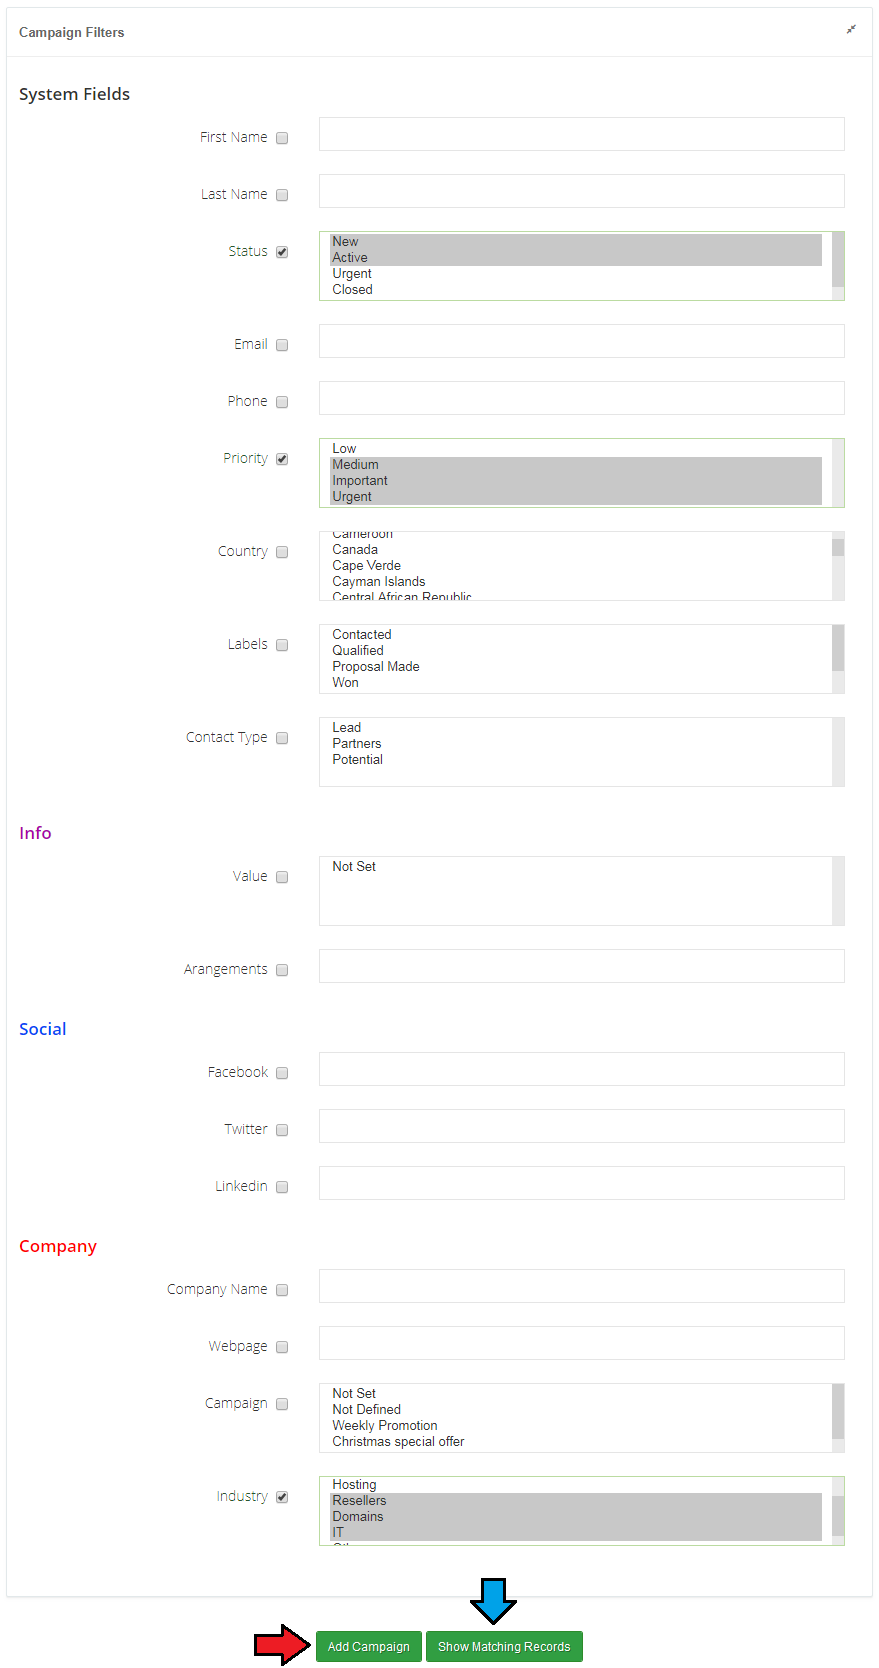
| In the second part, you will need to select filters to assign desired record to this campaign. You may use both predefined system fields and your own custom fields. Finally, press 'Add Campaign'. |
|
Campaigns List
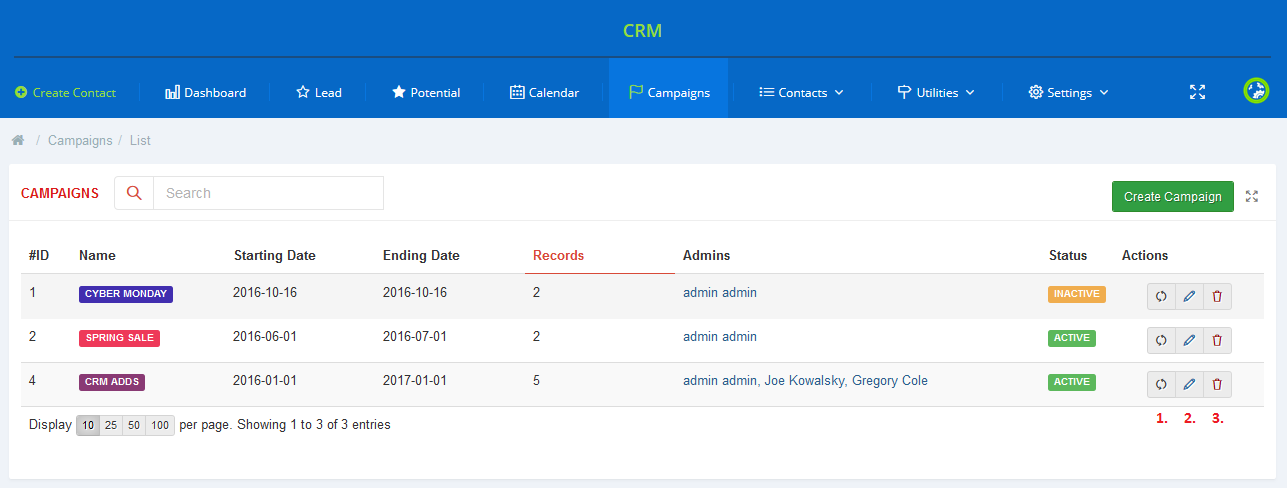
| Find all created campaigns stored together on a convenient list with the most crucial data close at hand. Use action buttons to: |
|
Settings
| Due to the wide variety of possible configurations, the 'Settings' section has been moved underneath to make the presentation more precise. In the 'Settings' → 'General' page of the module you can check its current status, enable major features and define follow-up settings. |
General
System Overview
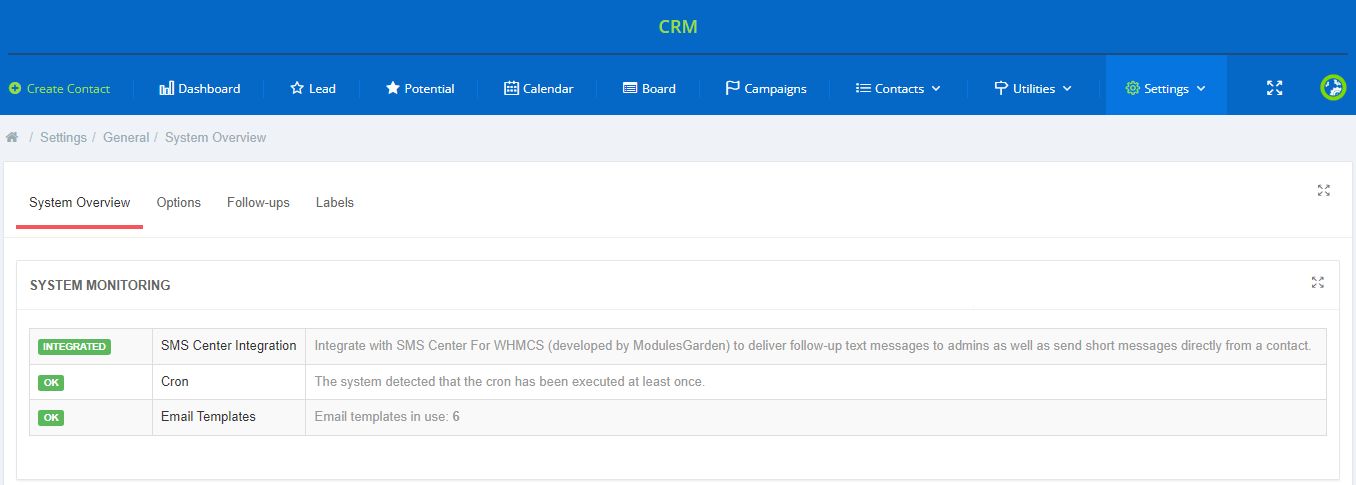
Under System Overview you can find information about:
|
|
| In 'Cron Details', you can find all information about the cron such as its path, last execution date and interval between cron runs. |

|
Options
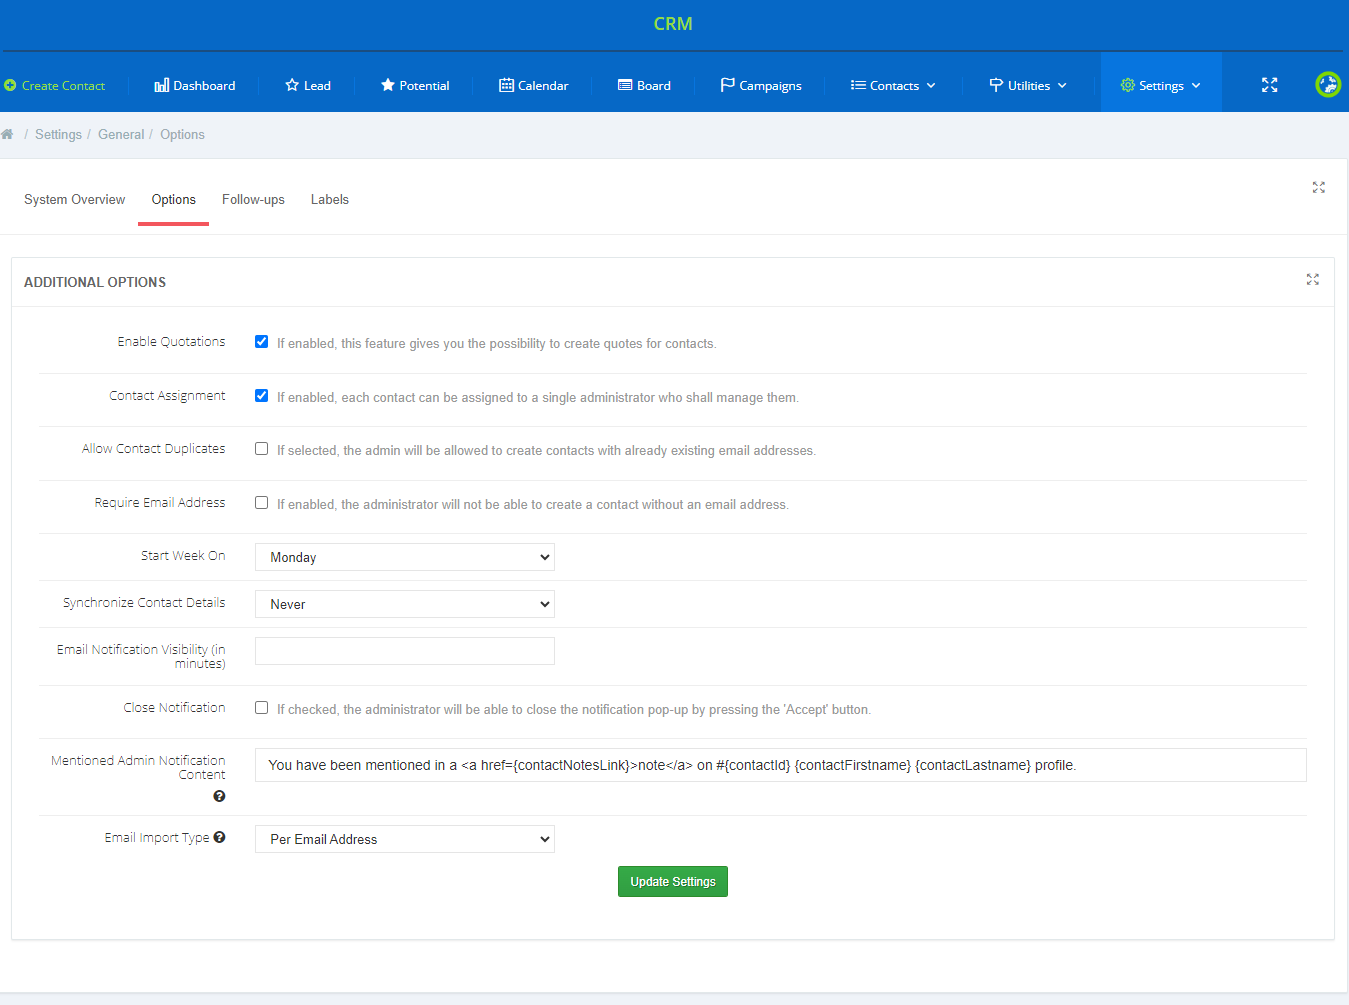
In 'Additional Options' , you may:
|
|
Follow-ups
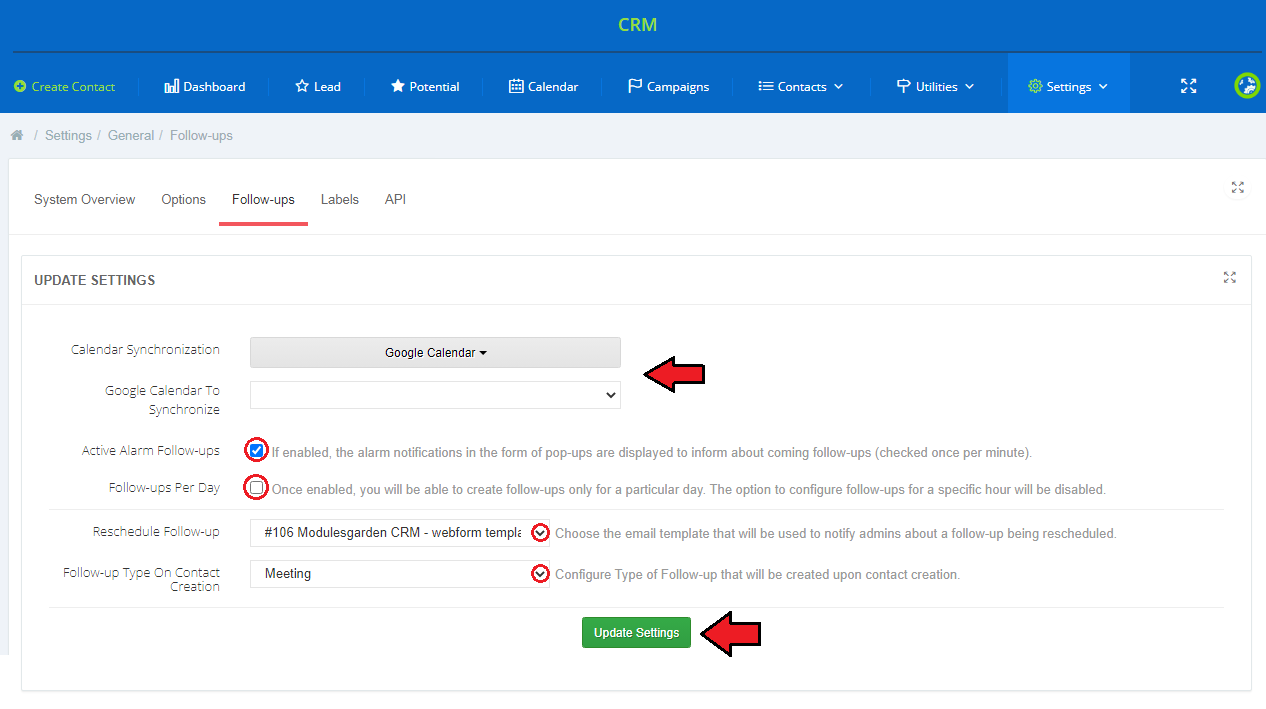
| In the next section of General Settings there are few options allowing to configure follow-ups. First, activate alarms which will show pop-up notifications on forthcoming follow ups.
Next, select the 'Follow-up Per Day' option if you want the follow-up to be set on a given day only, not a specific hour. |
|
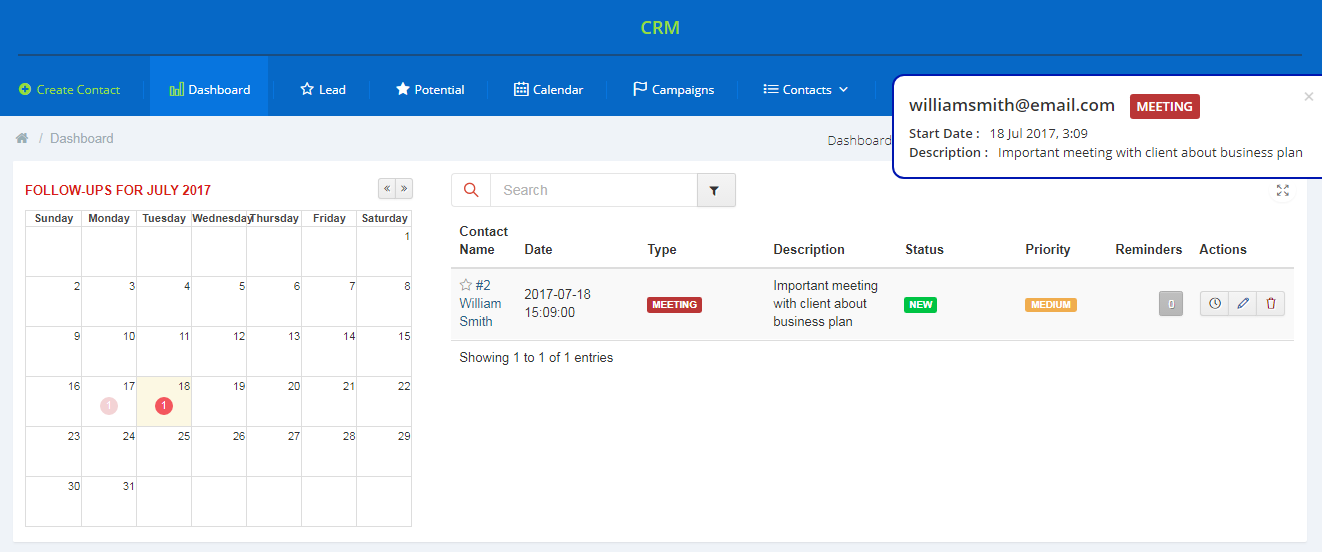
| If you enable follow-up alarms, the pop-up notifications will be presented like on the screen below: |
|
| Additionally, you can enable follow-ups synchronization with WHMCS and Google Calendar . No additional configuration is required for the WHMCS calendar. To configure Google Calendar, follow the steps described here. |

|
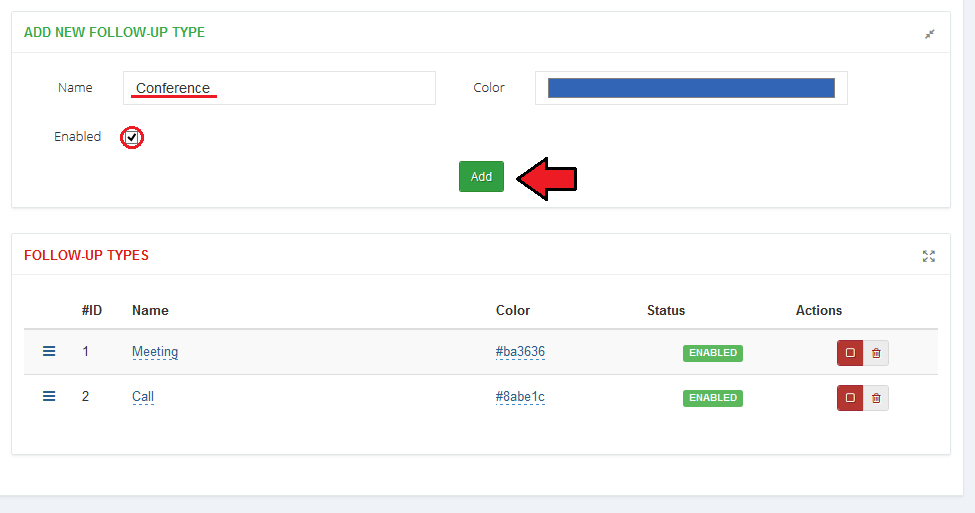
| At the end, you can add a new follow-up type by entering its name, assigning a color and finally enabling it. Once added, you will see it on the list of available follow-up types below. |
|
Google Calendar Authorization
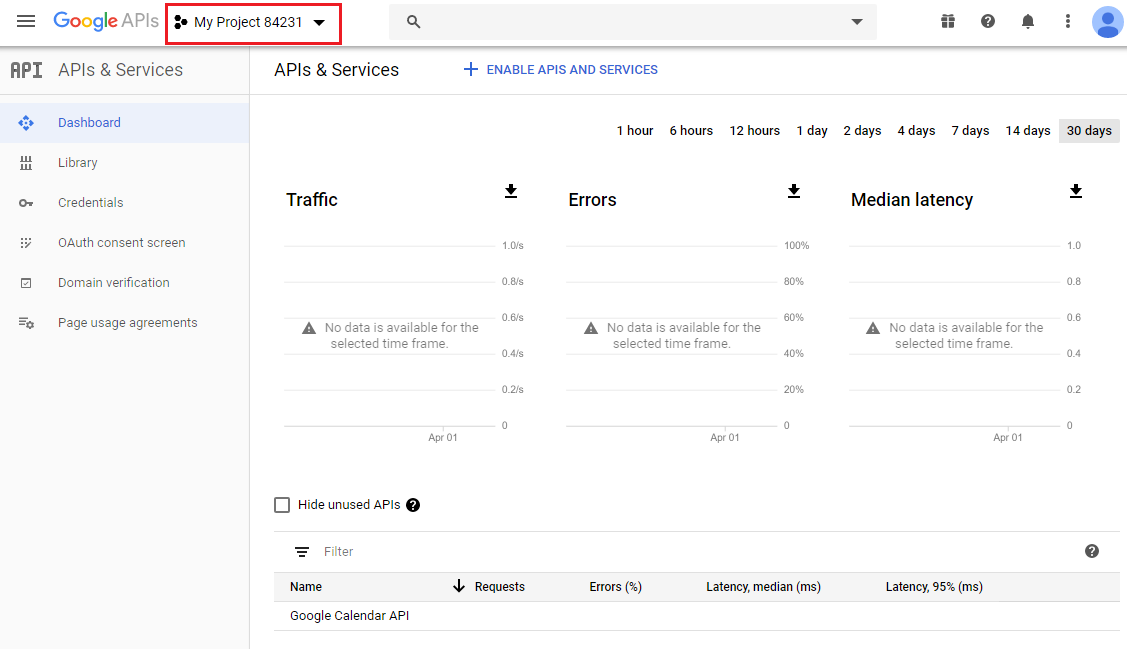
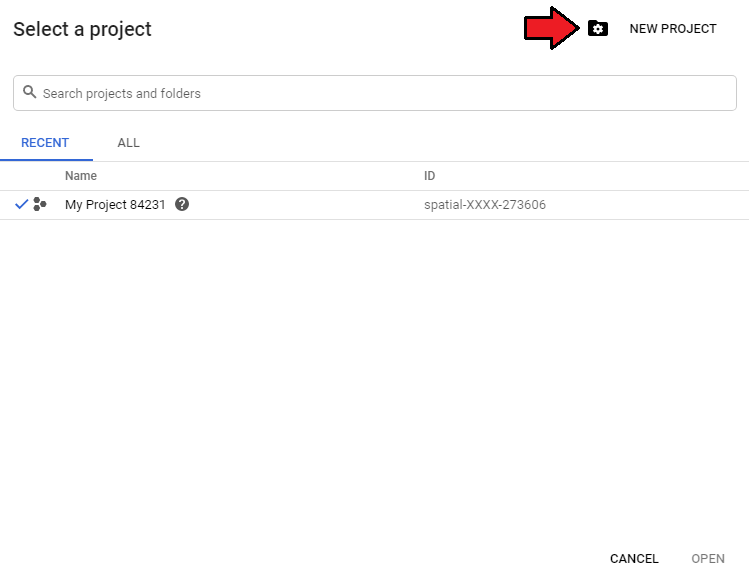
| If you want to allow synchronization of your Google calendar with your CRM, you must firstly go through a few steps described below. Start from moving to 'Google API Manager' and log in to get your 'Client ID' and 'Client Secret', these data will be necessary in the next steps. |
|
| Now, click 'New Project' . |
|
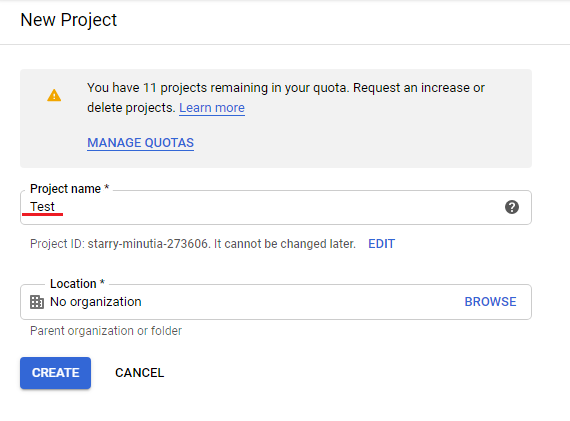
| Then, provide a name of your project and press 'Create' . |
|
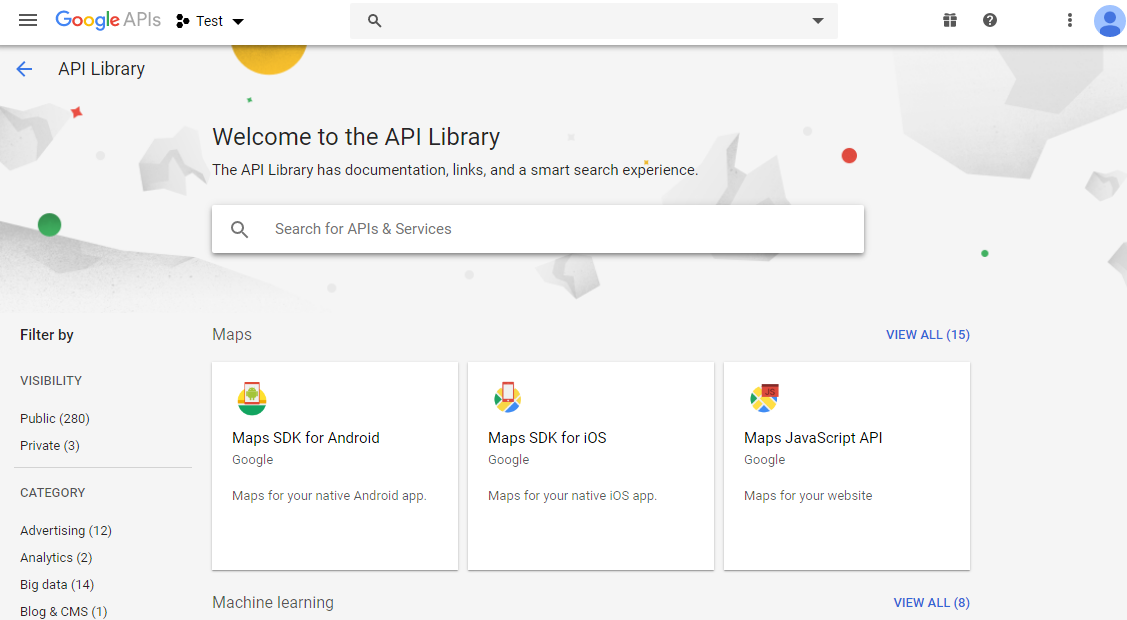
| Proceed to 'Library' and type 'Google Calendar API' in the search box. |
|
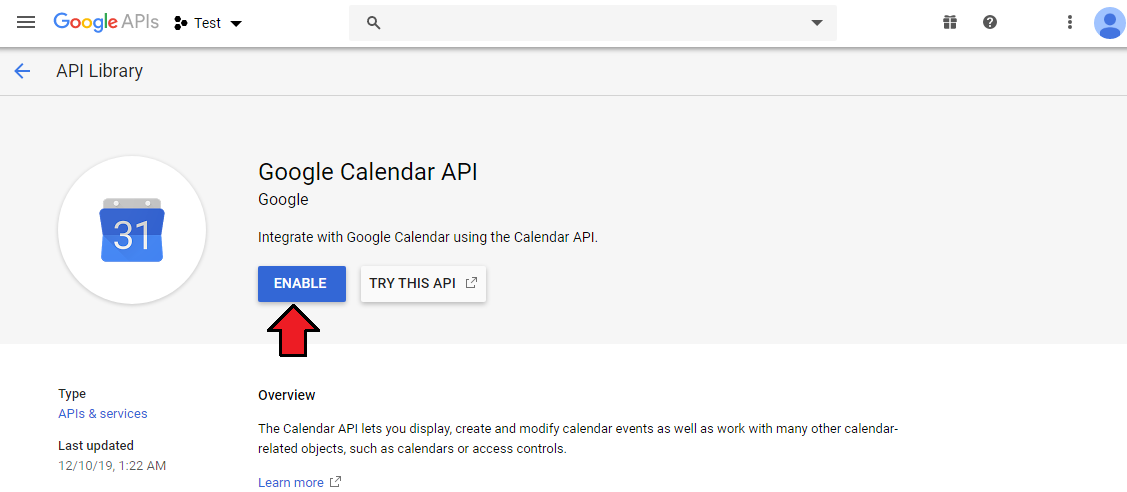
| Now, press the 'Enable' button as shown below. |
|
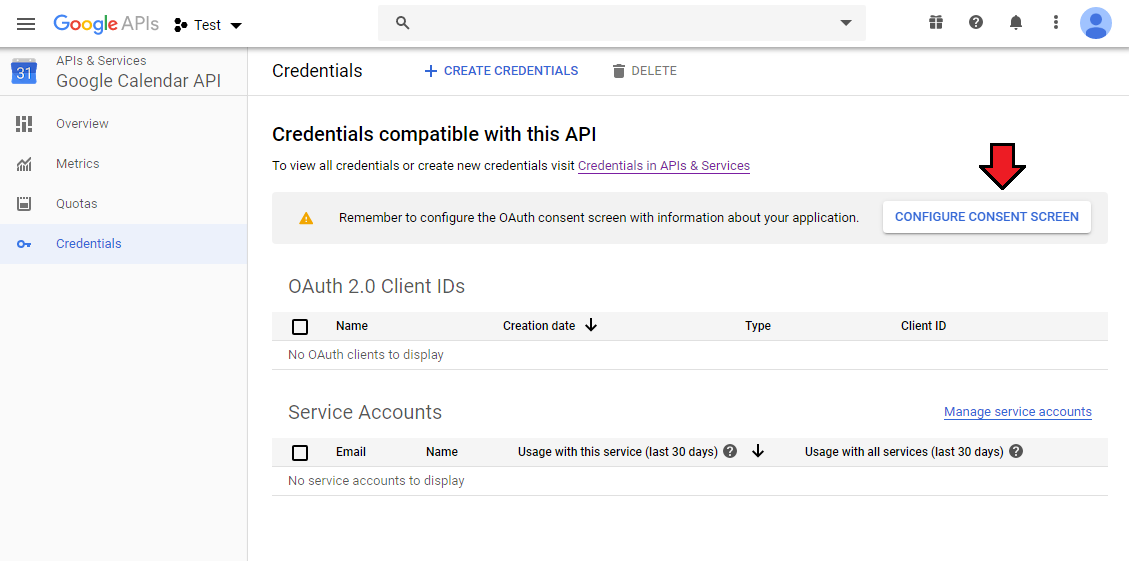
| Here, you need to 'Configure Consent Screen' . |
|
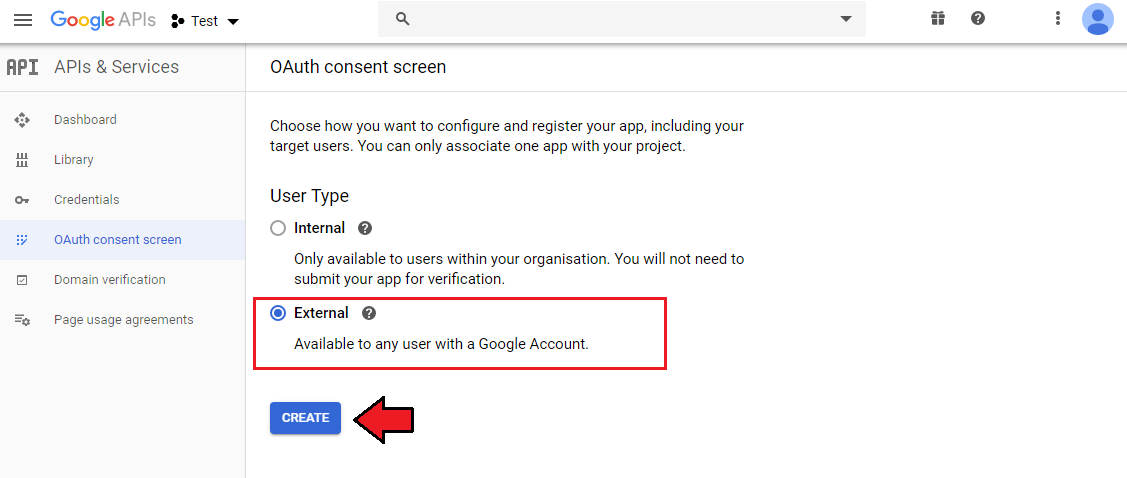
Choose the preferred 'User Type' and confirm by clicking 'Create' .
|
|
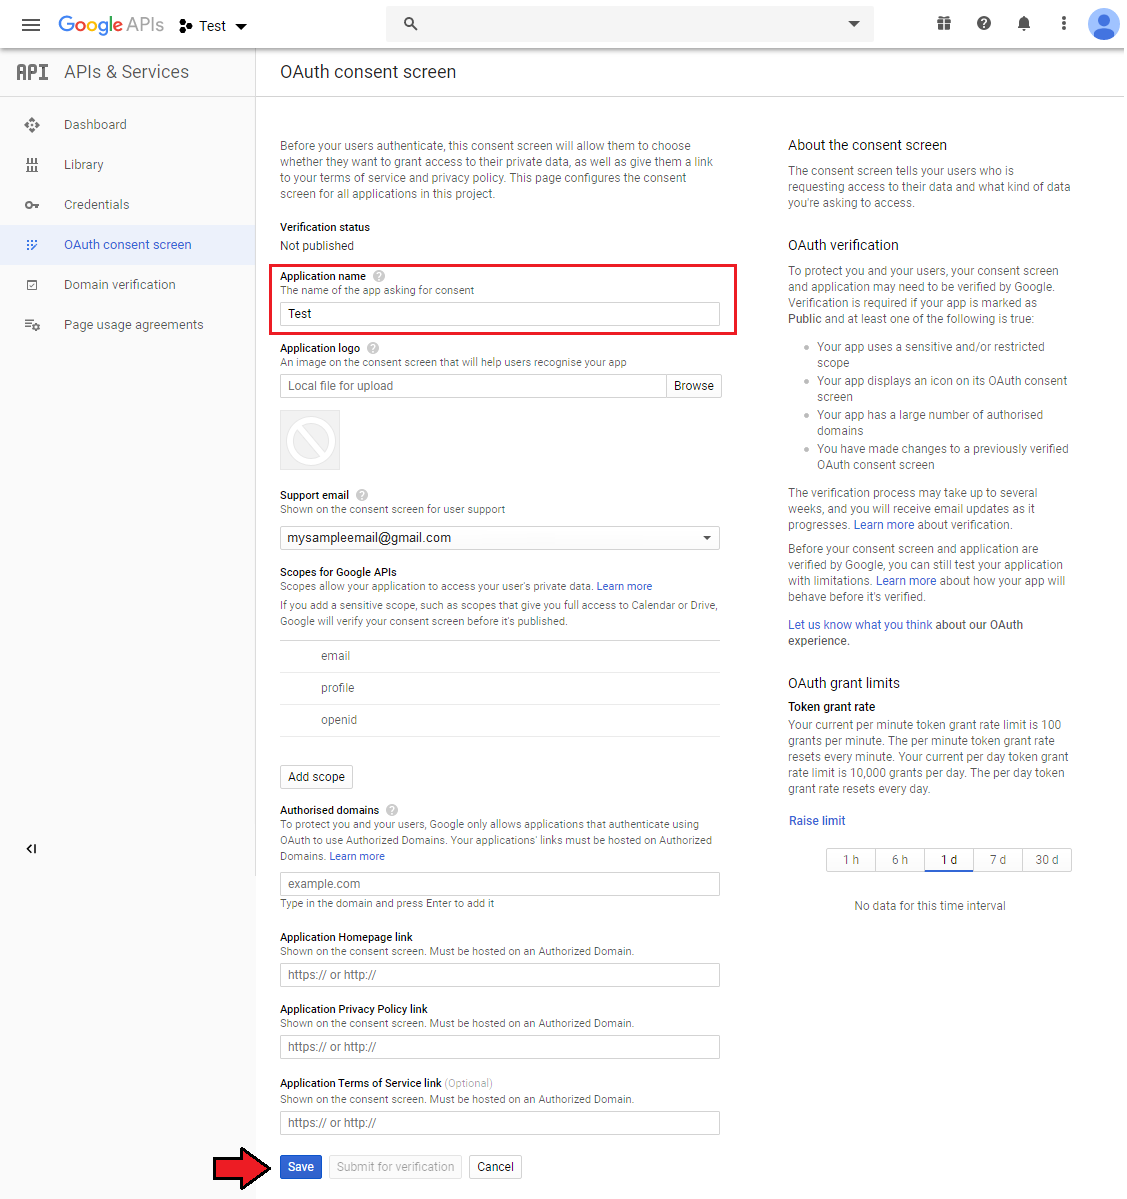
| In the next step, provide the details of your application and save changes. |
|
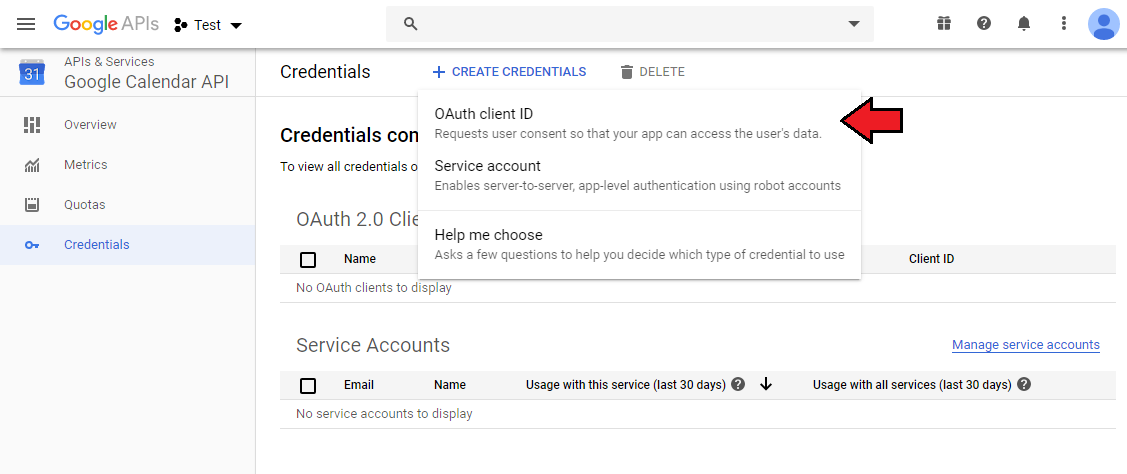
| When ready, come back to your 'Google Calendar API' and click 'Create Credentials' and select 'OAuth client ID' . |
|
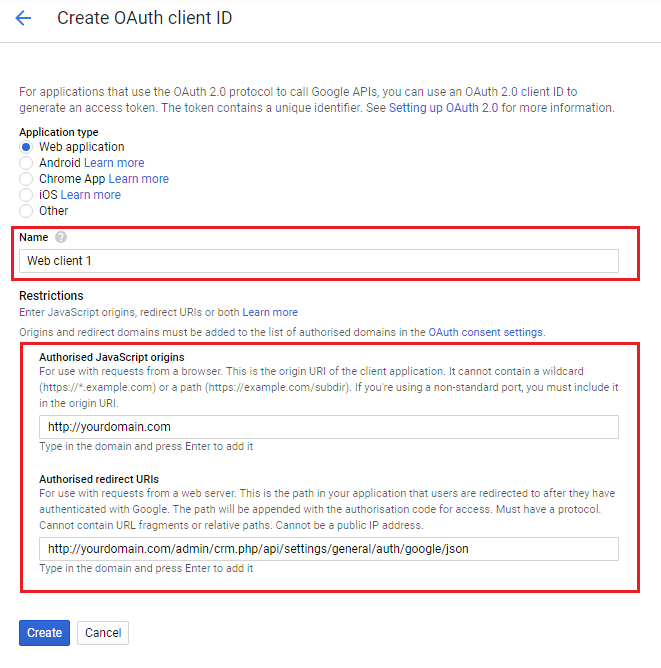
Next, provide the project name, your main website URL and callback URL in the following format:http://yourdomain.com/admin/crm.php/api/settings/general/auth/google/json Note that your 'admin' folder might also have a custom name. |
|
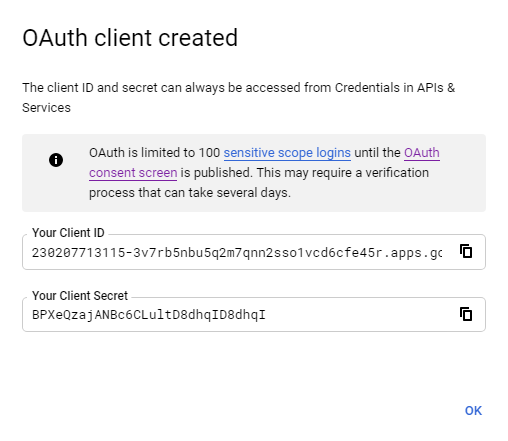
| Once created, you will obtain your 'client ID and 'client secret'. |
|
| Now, copy and paste them into your CRM authorization settings: 'Addon' → 'Settings' → 'General' → 'Follow-ups' → 'AUTHORIZATION FOR GOOGLE CALENDAR API' Press the 'Authorization' button. |

|
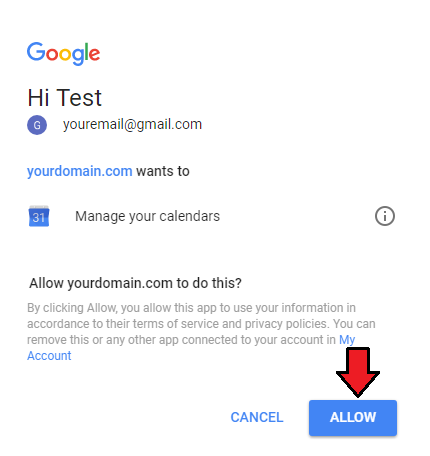
| Next, allow the authorization. |
|
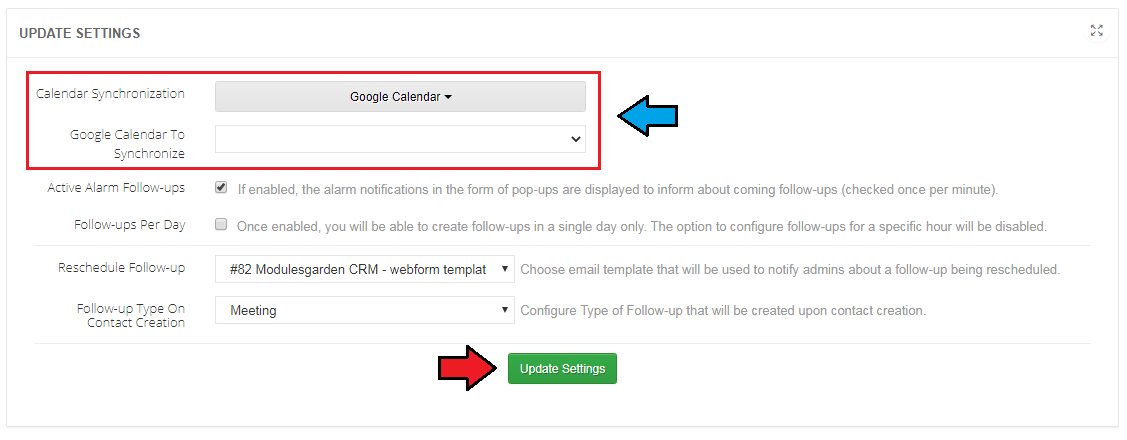
| In the last step, enable "Calendar Synchronization". Define which module should synchronize with Google Calendar (if there are multiple Google Calendars created for one account).
Select Google Calendar from the dropdown menu and click on 'Update Settings'. |
|
| Your Google calendar should be now synchronized with CRM follow-ups. Please note that this synchronization will work only for newly created follow-ups and only in one direction, that is from CRM module to Google Calendar. |
Labels
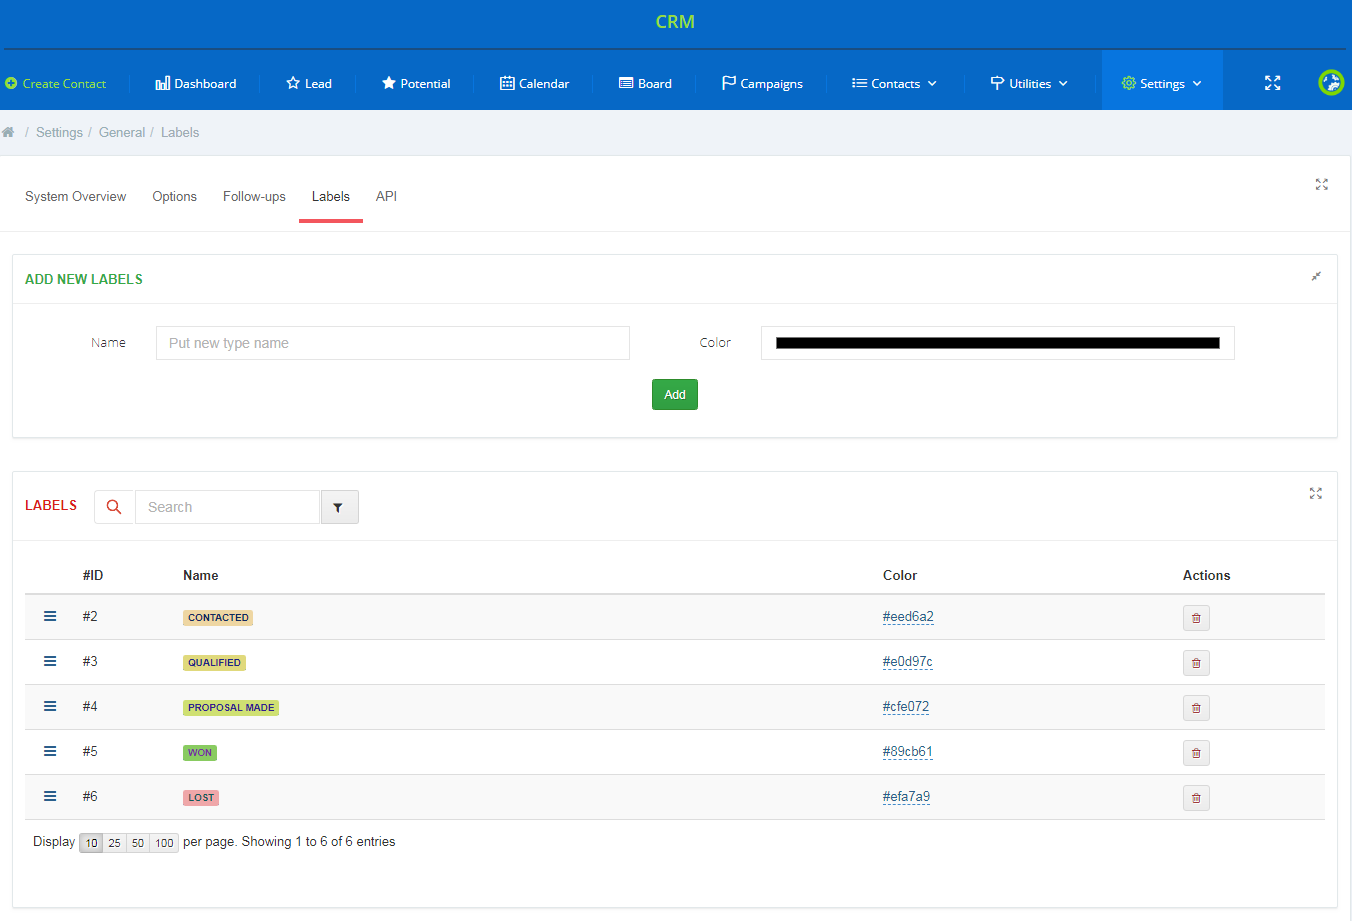
| Here you can add your own different coloured labels, which can then be assigned to your contacts for easier identification. Labels can also be used as columns on the Board view. Click here for more information. |
|
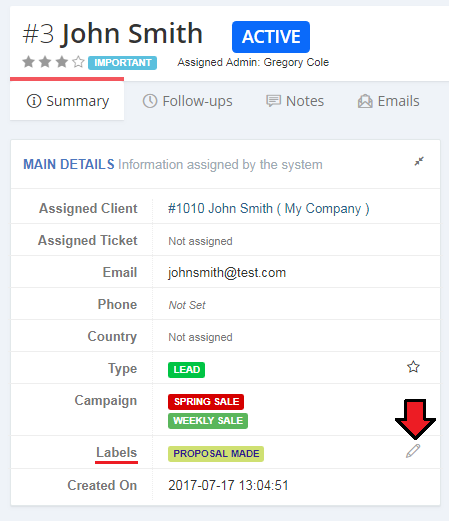
| Once you have created labels, you can assign them directly from the contact view. Note: If you want, you can also assign multiple labels to a single contact. |
|
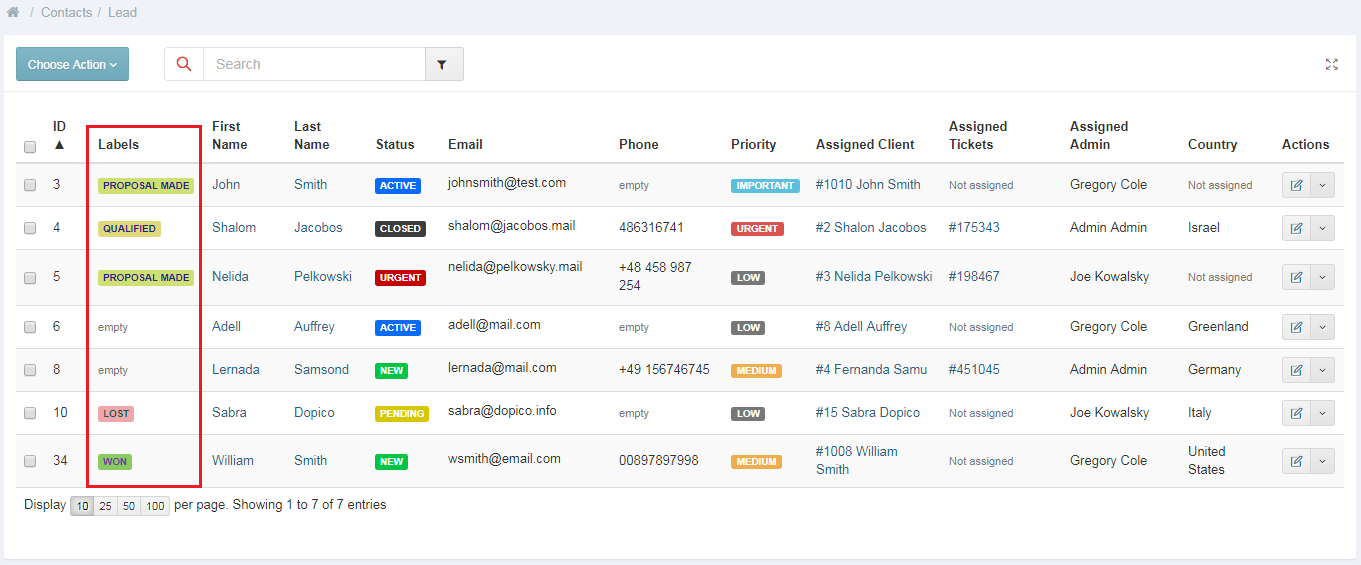
| You can also display labels e.g. on the list of your contacts, by adding this field in the 'Fields' View' section. |
|
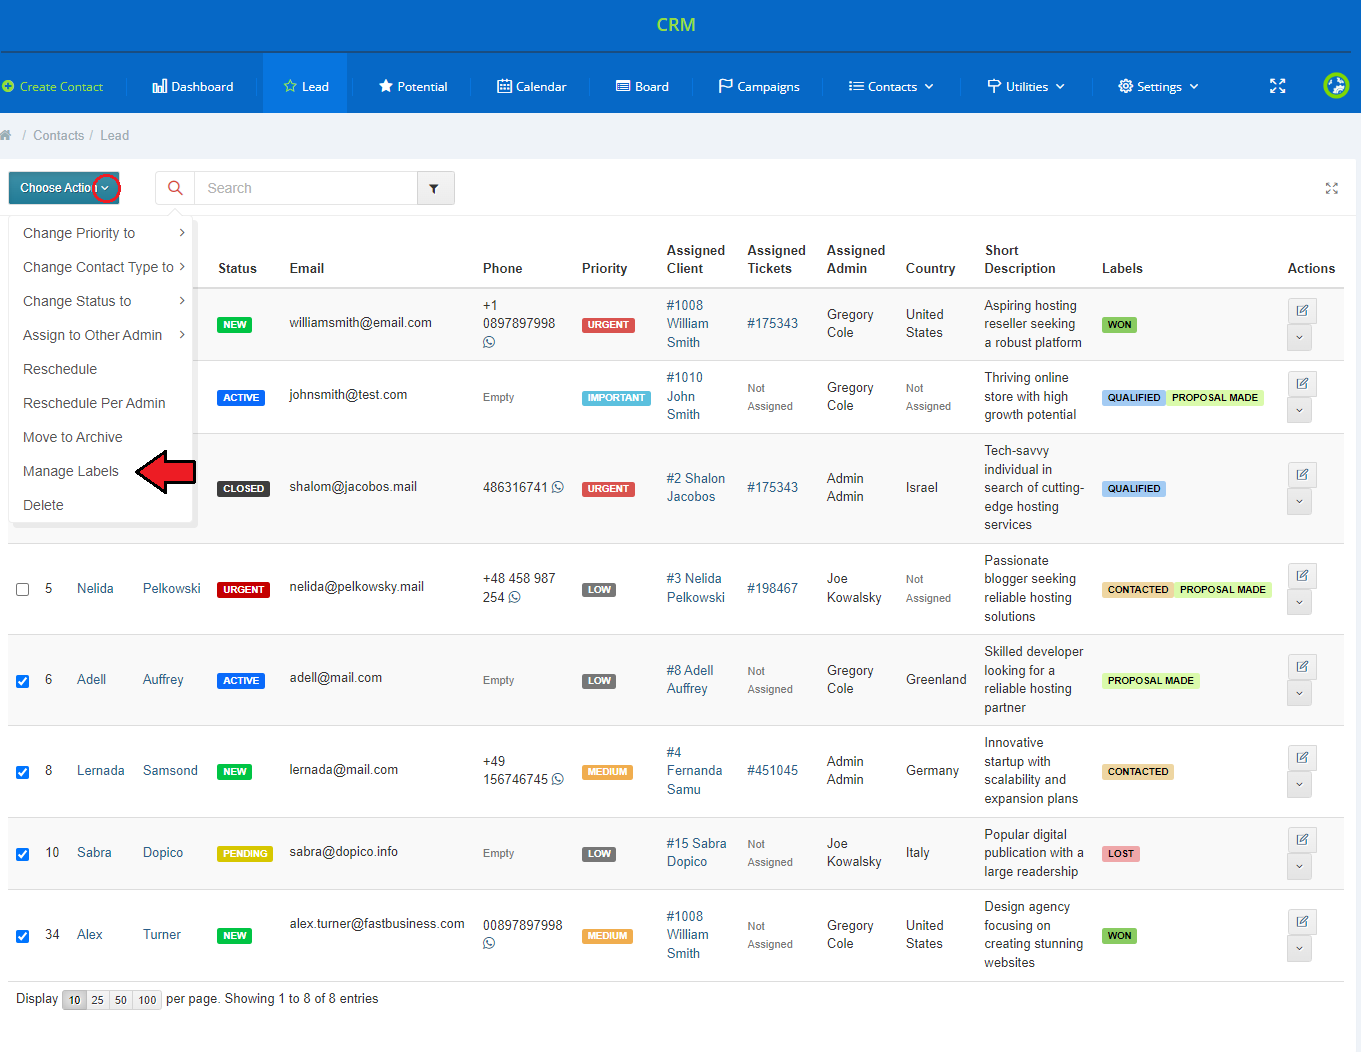
Use the mass action menu to manage multiple labels for numerous contacts at once. Select the labels and choose one of the allowed actions:
|
|

|
Personal
Personal Settings
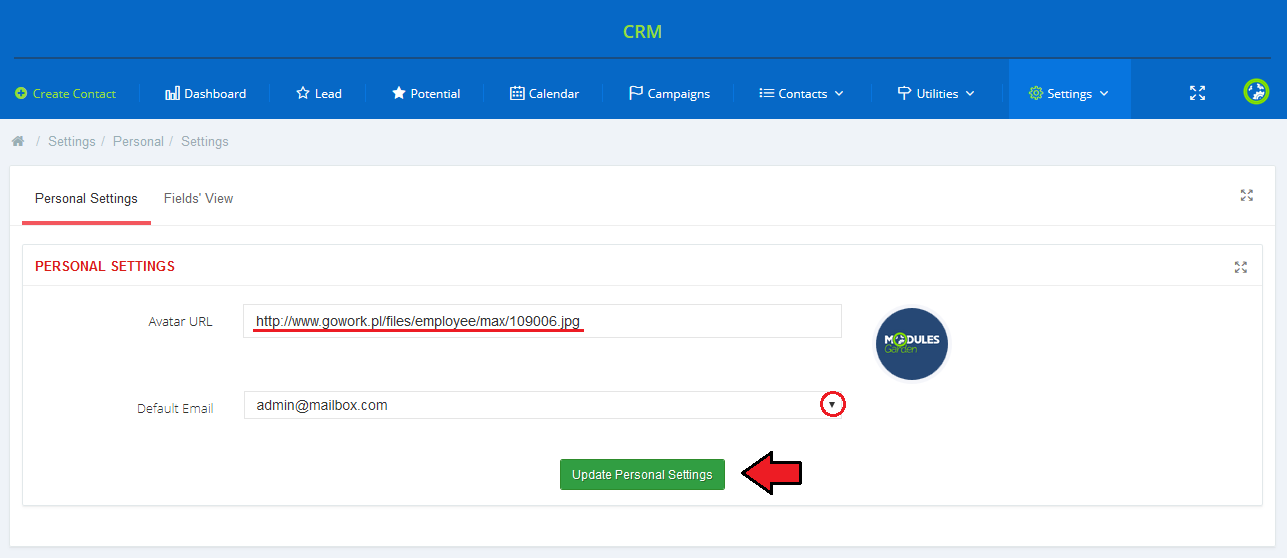
| Provide URL to your avatar in order to personalize your CRM according to your needs. Also, choose the email address which will be used by default when sending email to a contact. |
|
Fields' View
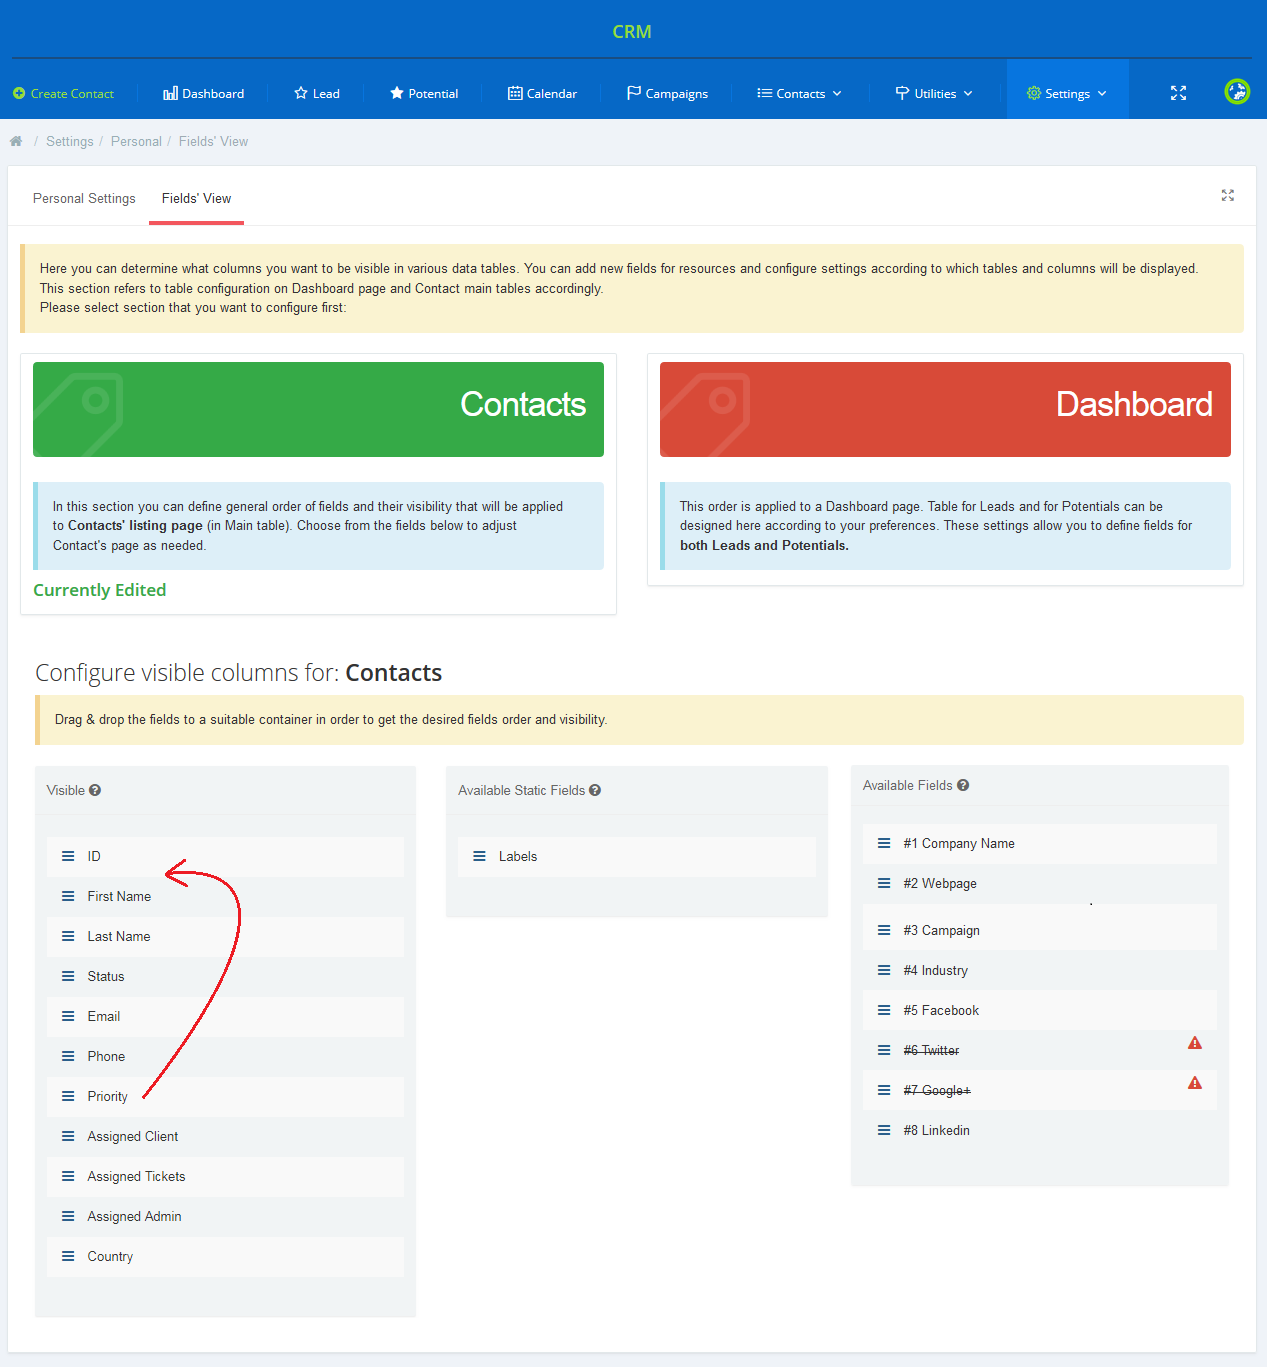
| In this place you may decide which columns and in what order they will appear in each of the available sections (Contact page and Dashboard). Click on every section one by one to set its view. Drag and drop available fields to create a perfect configuration. |
|
Mailboxes
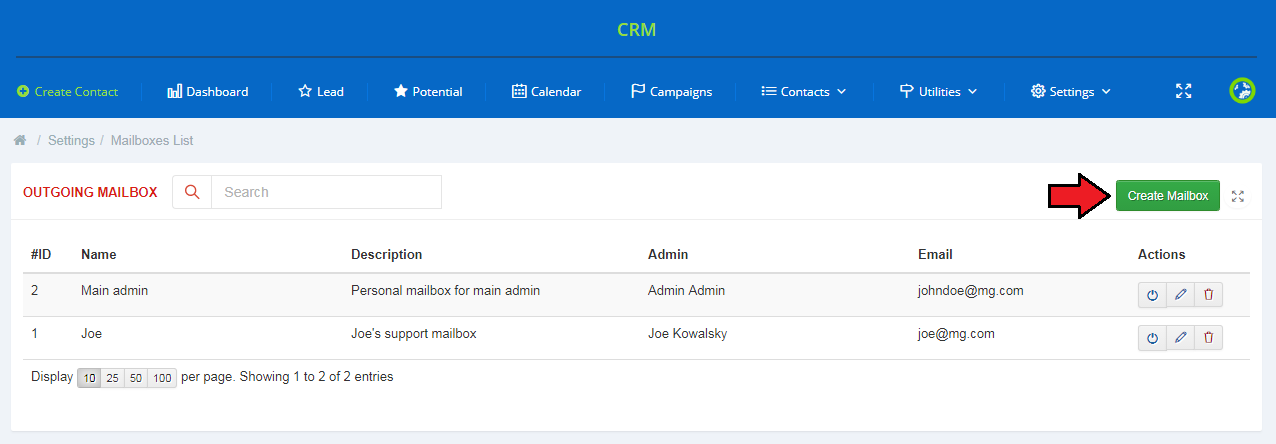
| In this section, custom mailboxes can be added and then assigned to administrators who can then use them as default for sending emails to contacts or receiving emails directly through the CRM module. This also might be handy if you want to use different mailboxes than those configured in the WHMCS settings. |
|
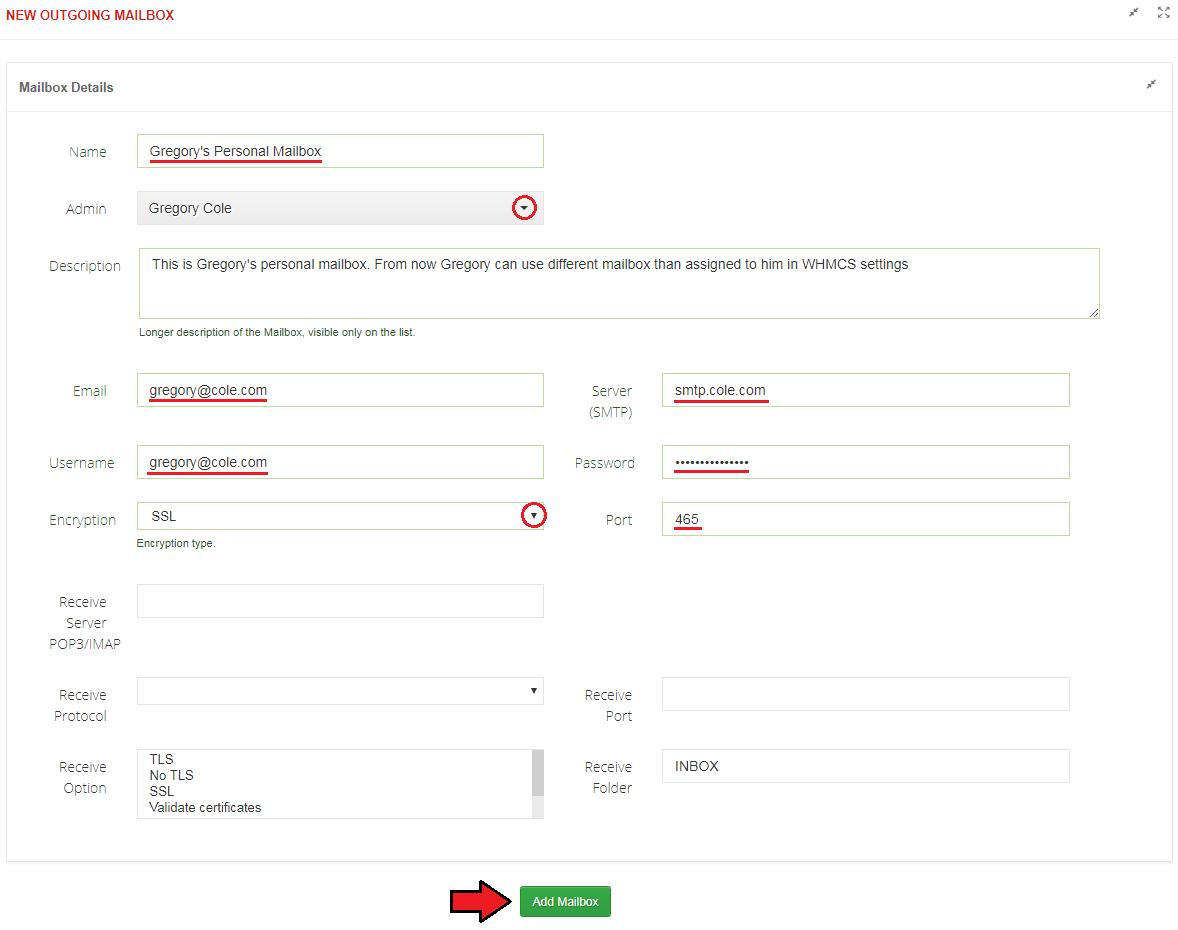
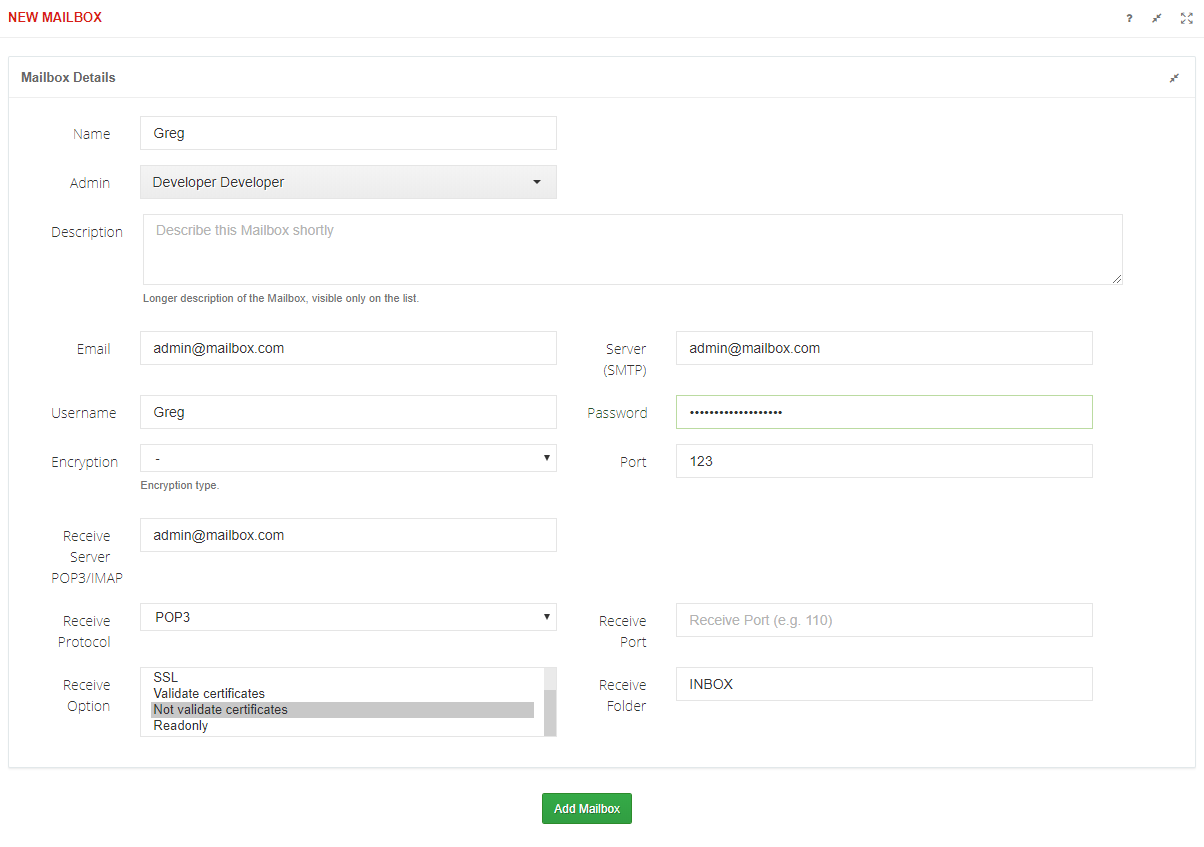
| If you want to configure outgoing mailbox, provide the name that will be shown in the contact's mail message. Next, choose the admin to whom the mailbox shall be assigned and fill in the remaining fields with your mailbox data configuration. Press the 'Add Mailbox' button when ready. |
|
| From now on, when the admin wants to send an email to a contact, they will be able to use the configured mailbox. |
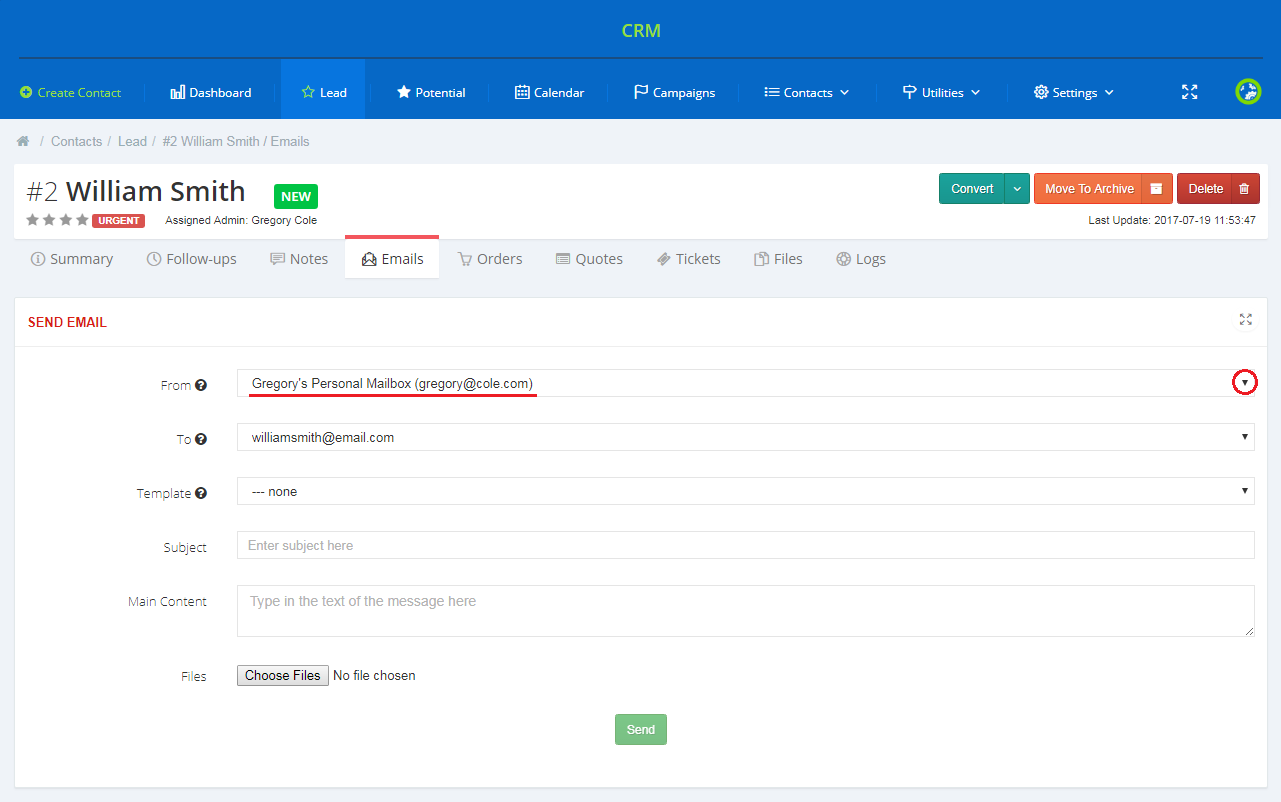
|
| For incoming mailbox, additionally provide your POP3 or IMAP server, choose receive protocol with security options, define port as well as receive folder. Note: You can select multiple receive options if required by your mailbox. |
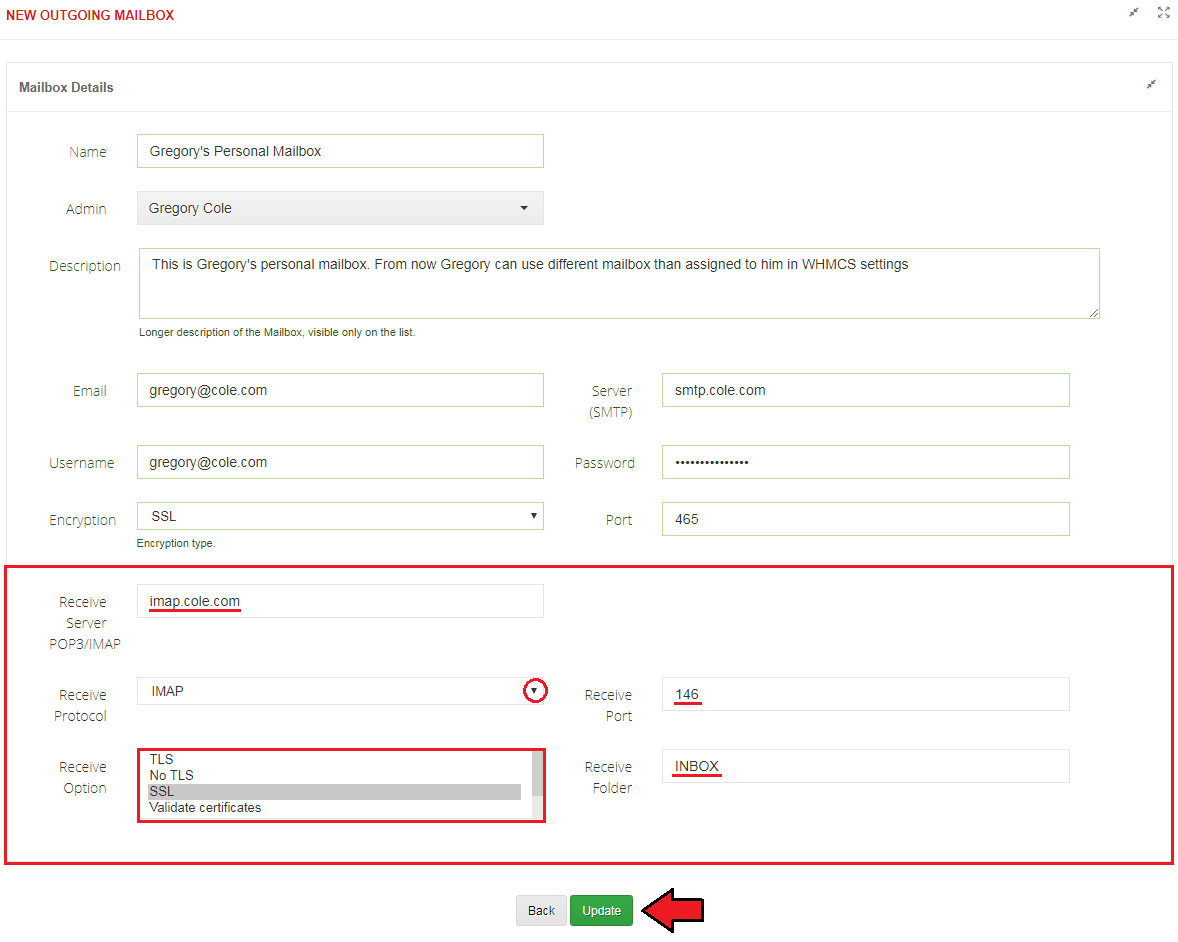
|
| From now on, when the contact sends a email message to a mailbox address, it will be shown on the contact's emails tab at the 'Conversation Log' as well as in the 'Utilities' → 'Received Messages' section. By clicking on the email subject, a new window with the content of the received message will appear. |

|
Created mailboxes can be managed. Use the action buttons to:
|
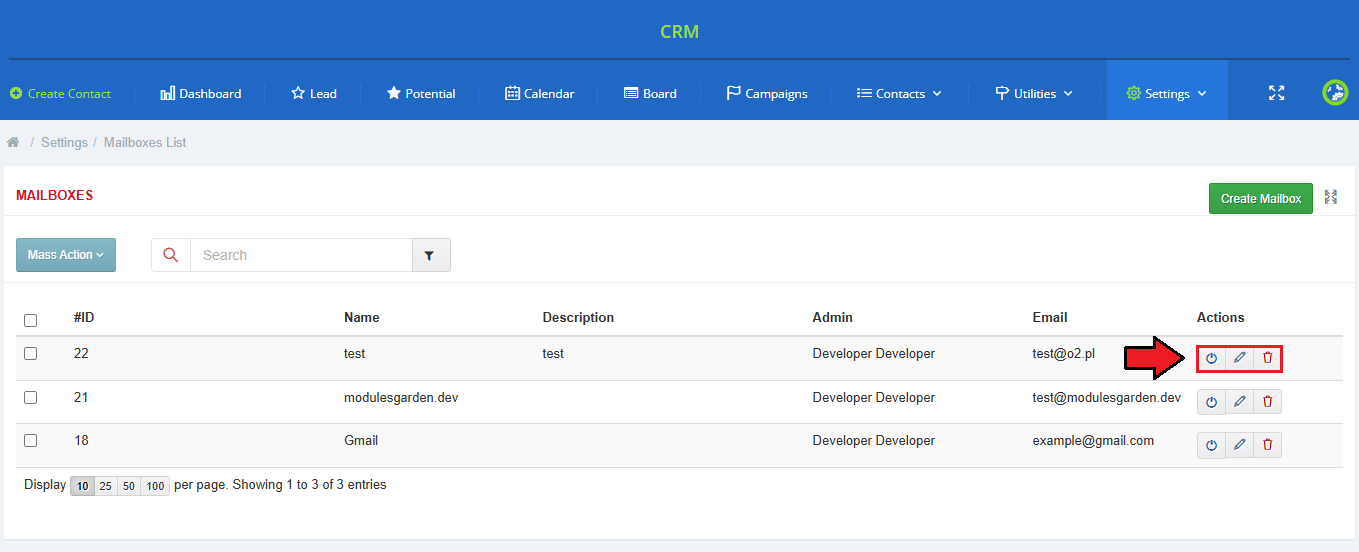
|
| Multiple mailboxes can be deleted at once using the mass action function. |
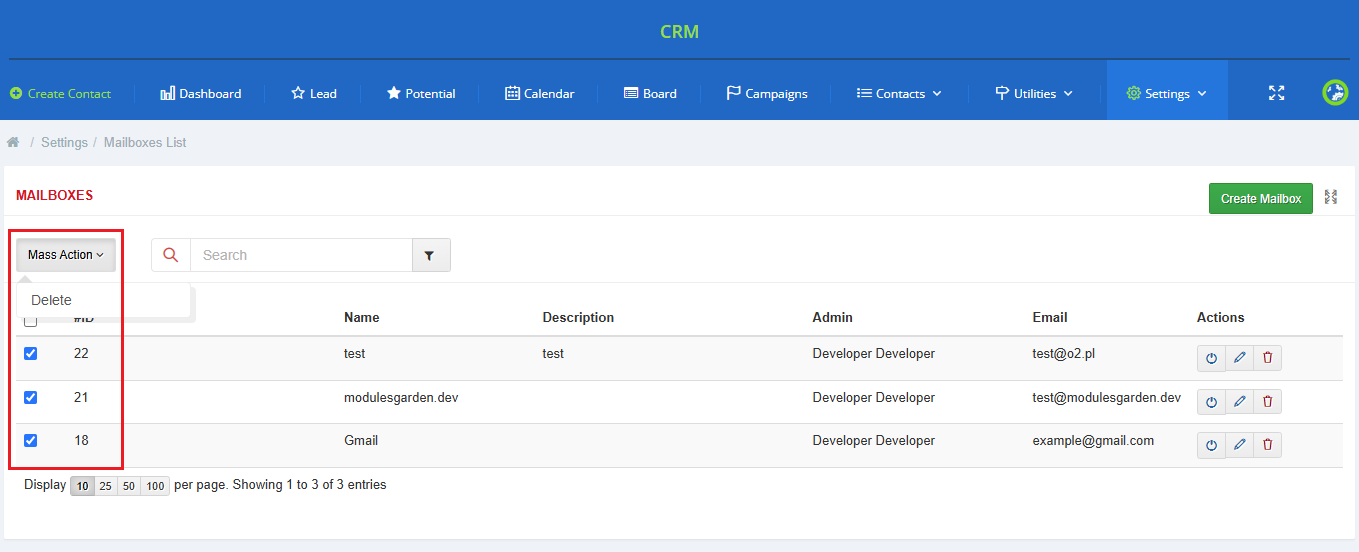
|
Google Mailbox Manual
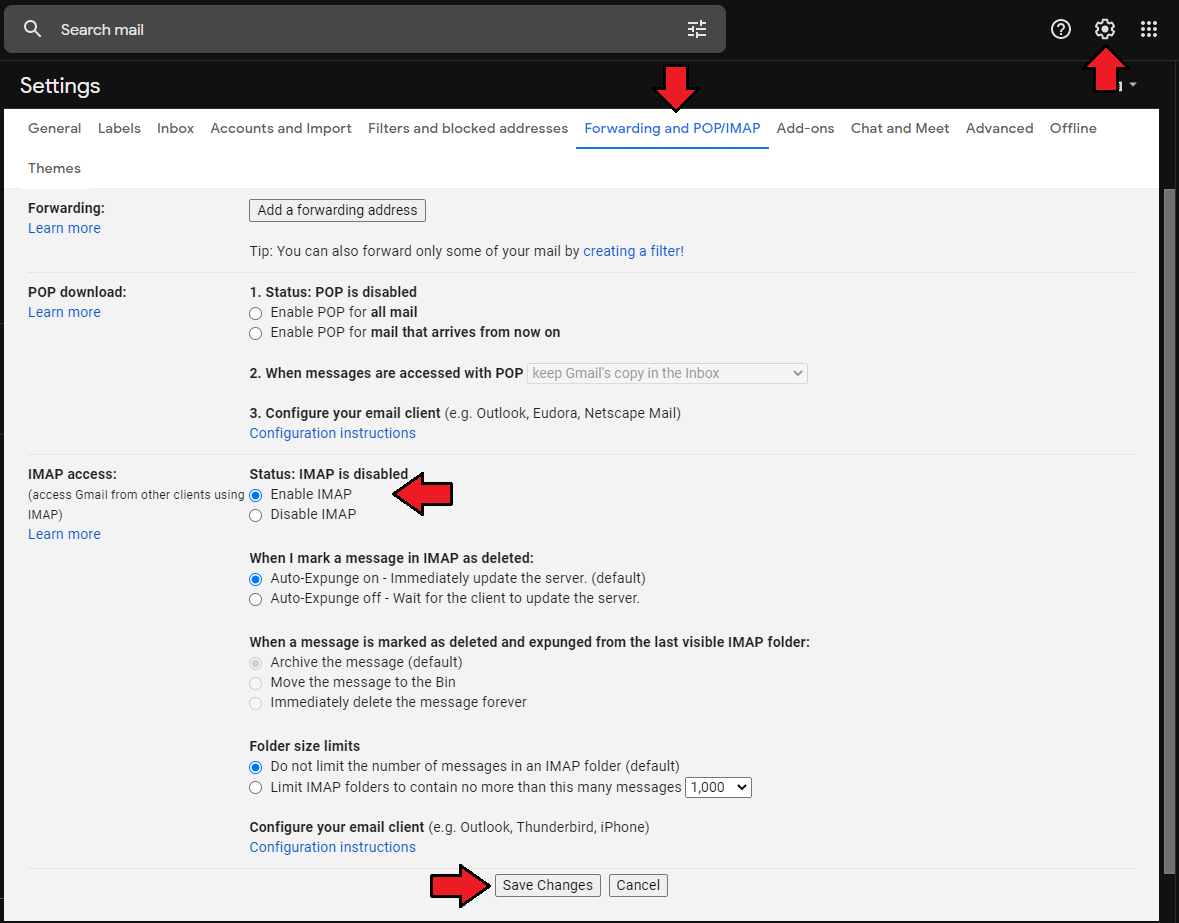
| If you want to enable a Google mailbox, please follow the instructions below: Note: Gmail API currently does not support email attachments. 1. First of all, enable IMAP for the Gmail account that you are going to integrate.
|
|
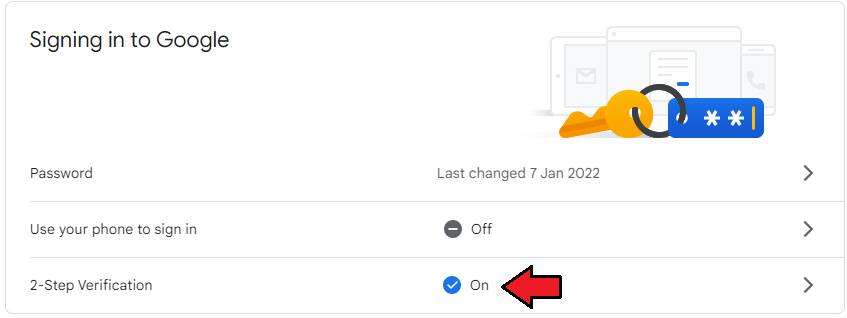
2. Enable 2-Step Verification:
|
|
3. Follow the steps presented in the Google Calendar Authorization section to:
|
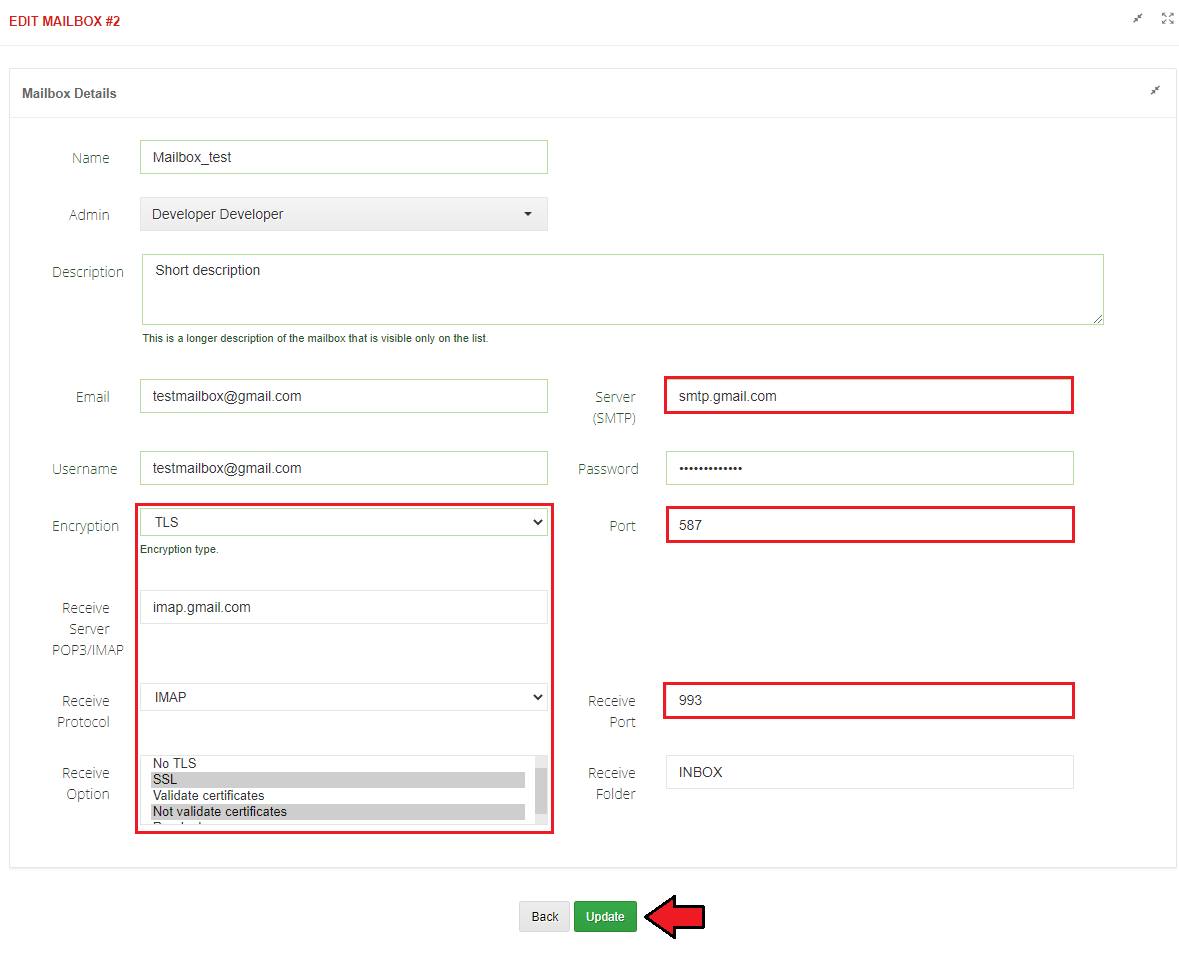
| 4. Move to your 'WHMCS' → 'Addons' → 'CRMv2' → 'Settings' → 'Mailboxes' → 'Create Mailbox'. There configure the gmail mailbox with the required data. Enter your mailbox access data, and then fill in the rest of the options according to the formula below:
Press the 'Update' button when ready. |
|
| 4. Finally, check the connection. Click the button highlighted below. If everything is working properly, an appropriate message will appear. |

|
Fields
| Manage 'Fields' fully, add new fields, group them, define statuses and map existing fields. |
List Of Fields
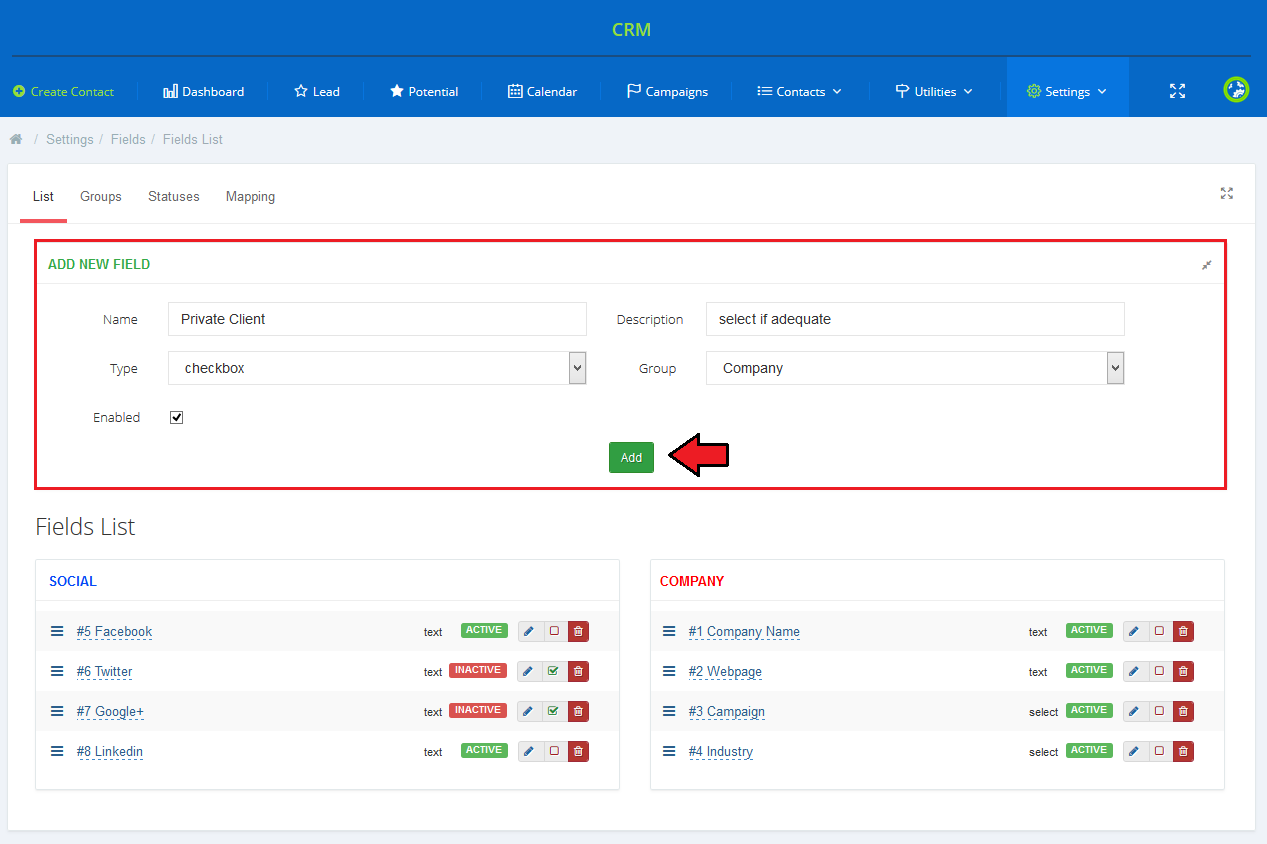
| Each field, regardless of its type, has its name, description, assigned group and, obviously, its type. Available types and validators for each of the types (seen when editing an existing field):
On the following screen you can see an example of a dropdown type custom field. Note: Fields can be also used for a web forms. |
|
Groups
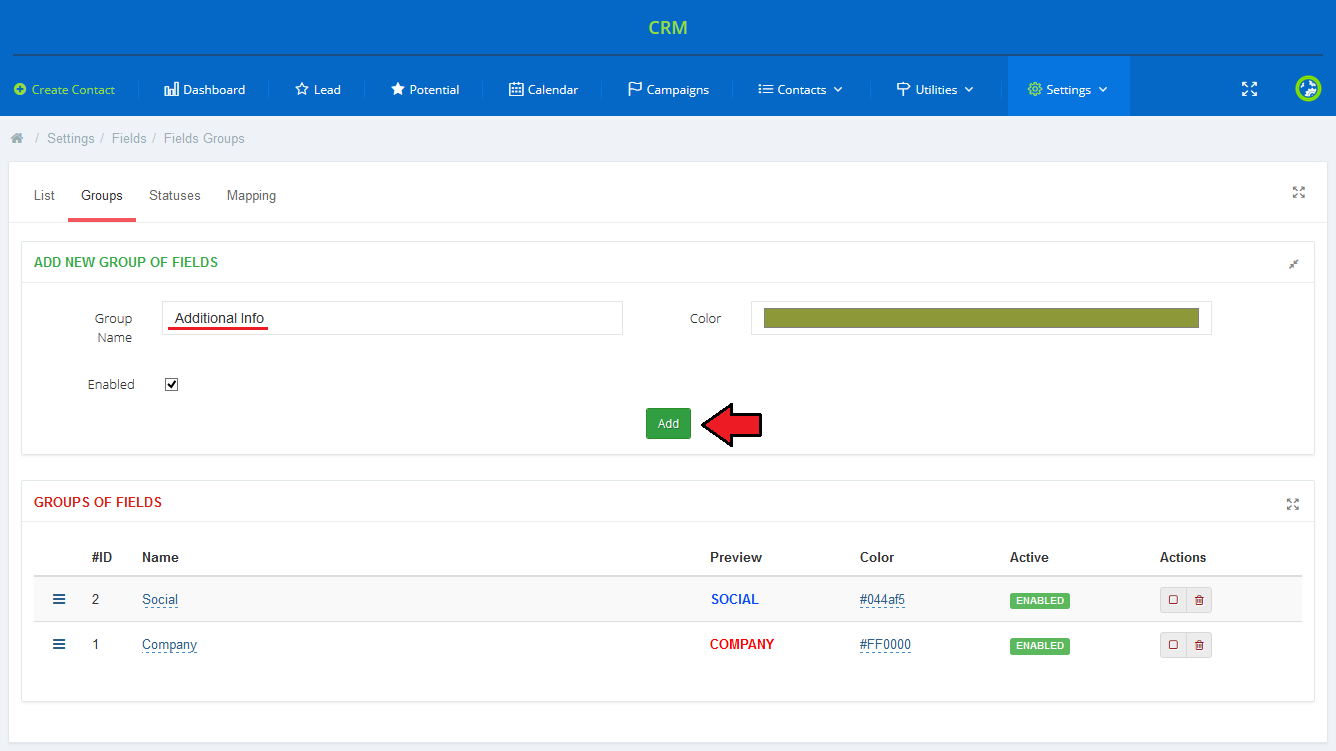
| This is the place where groups are created to segregate fields. Once you already know how you want to group your fields, create an adequate group. Name it, assign a color and enable to start using it. |
|
Status
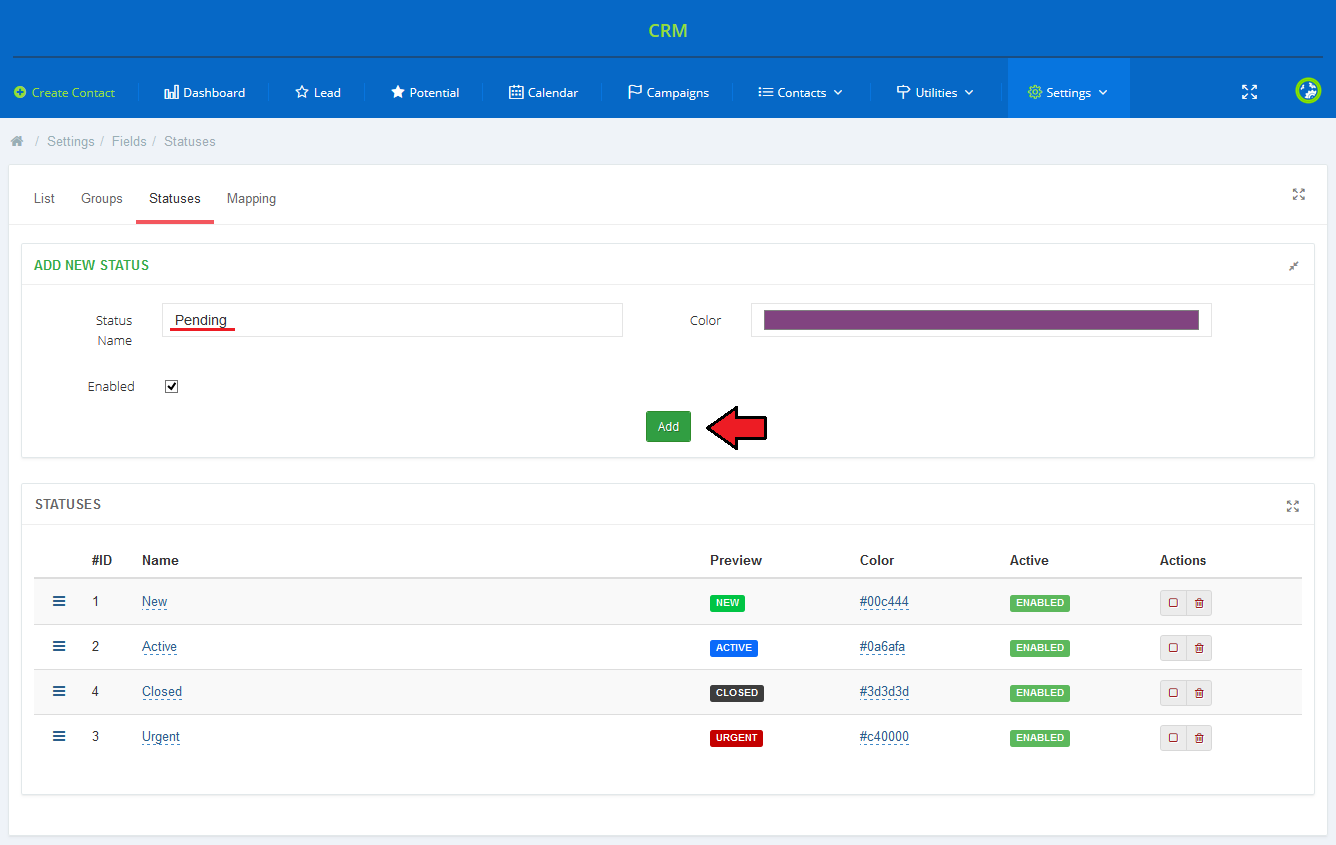
| Similarly to groups, in this section you also may add statuses that later on will be used to segregate fields. Name the new status, assign a color and enable to start using it. |
|
Fields Mapping
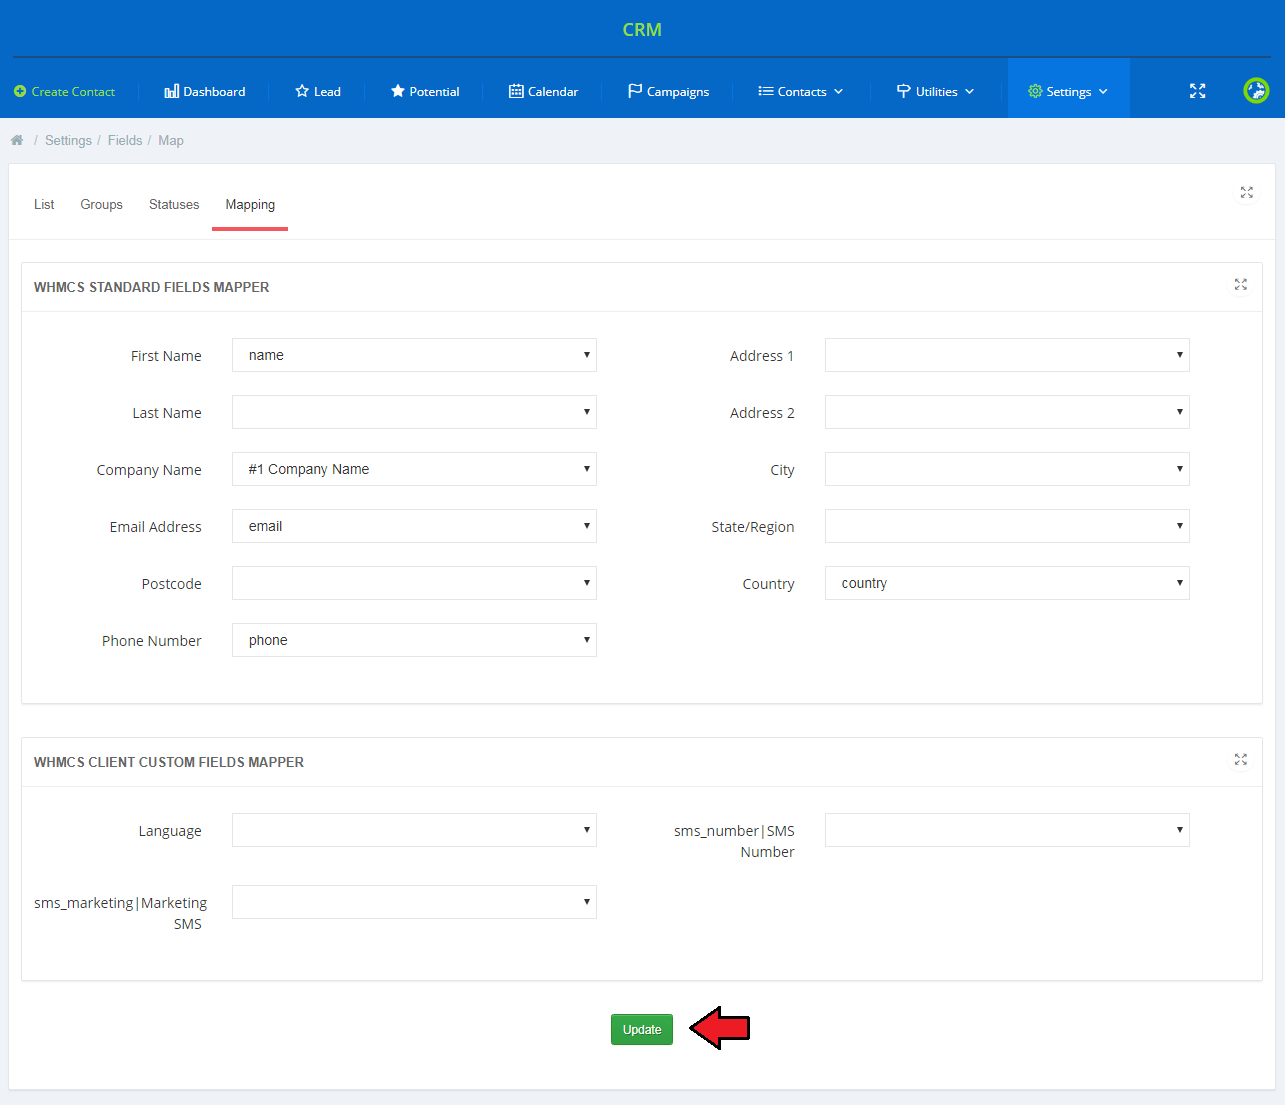
| 'Fields Mapping' option allows you to connect CRM fields with WHMCS standard or client custom fields. In this way, during creation of a contact from client's ticket or a adding client from a contact, mapped fields will be automatically filled out. |
|
Contact Types
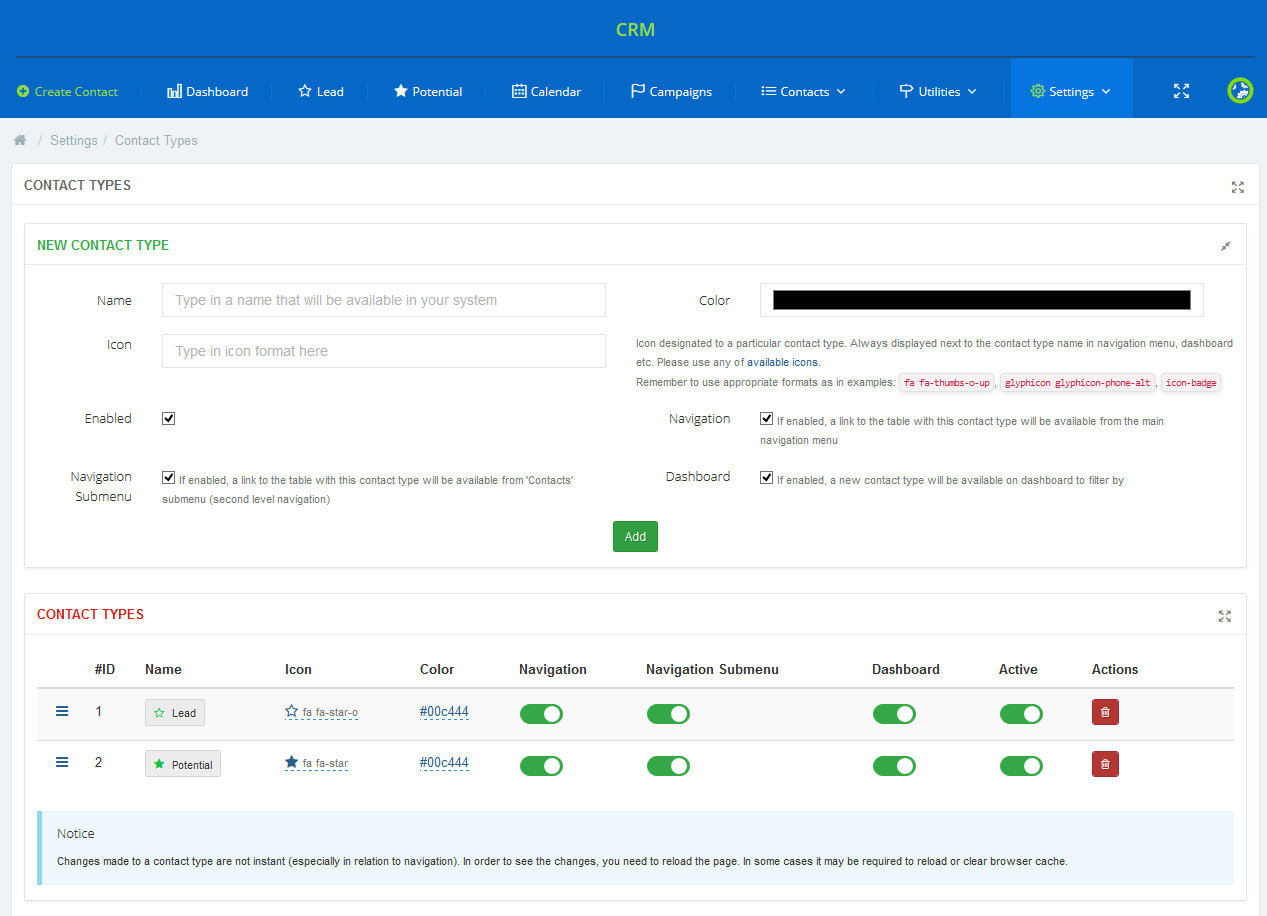
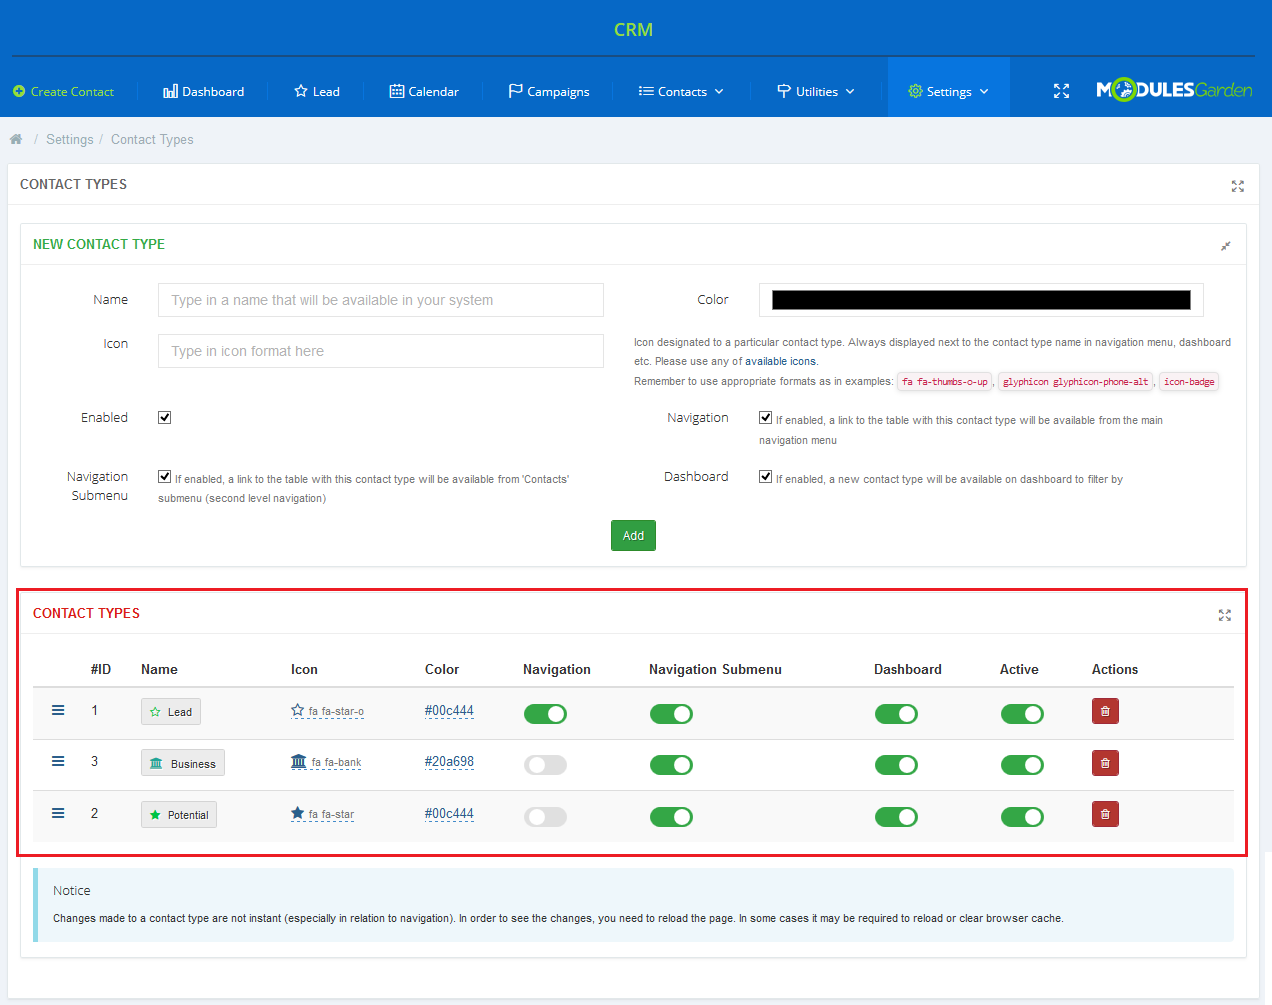
| 'Leads' and 'Potentials' are the only predefined contact types that are available from the moment you start using your CRM. However, to make CRM For WHMCS even more customizable and user-friendly, we have implemented a function allowing you to create and manage your own contact types as well. |
|
Add New
To add a new type, simply fill out the form as shown on the screen below.
Press the 'Add' button to finish the process. |

|
Contacts Management
| Under the creation form there is a list of all available contact types, together with the predefined 'Leads' and 'Potentials'. Here you can fully customize your contact by:
Important! |
|
| If you want to delete a contact type, you will be asked to choose another type to which any contacts from the deleted type will be reassigned to. If you do not want to reassign the contacts to another type, you can move them to the archive. To do so, simply select the 'Move to Archive' option. |

|
Permissions
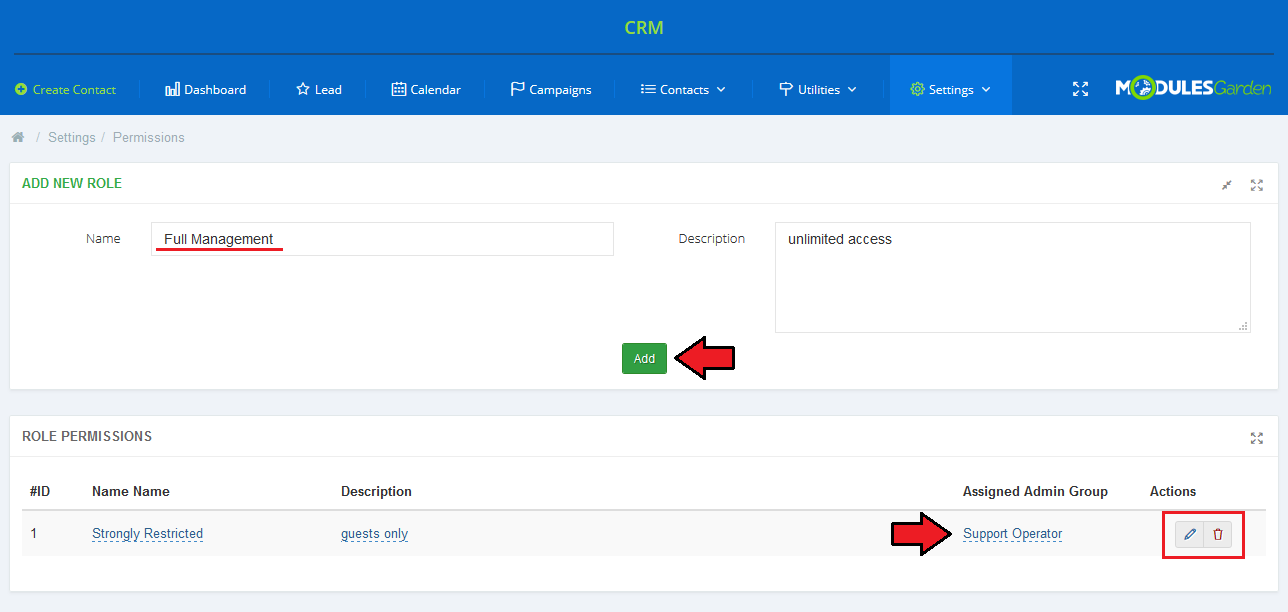
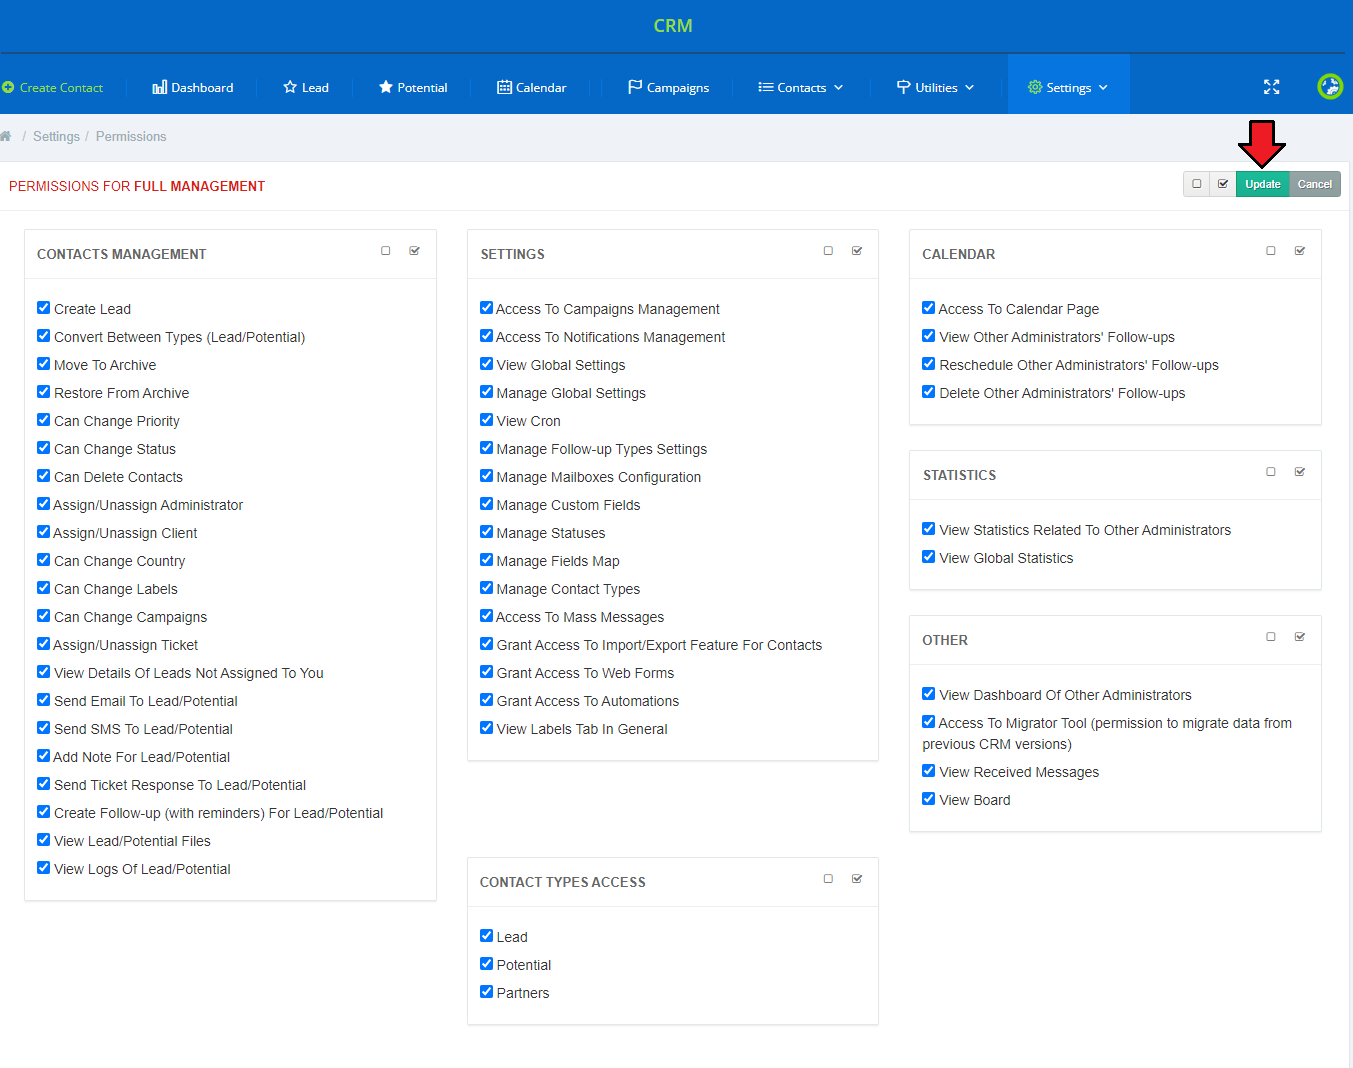
| The last section in the 'Settings' tab is responsible for assigning permissions to certain roles of group of administrators. Select permissions for each existing role. |
|
| Once you have added a new role, use action buttons to move the page where you can choose particular permissions for the group. Select the one you need and 'Update' the settings. |
|
Import/Export
Export File
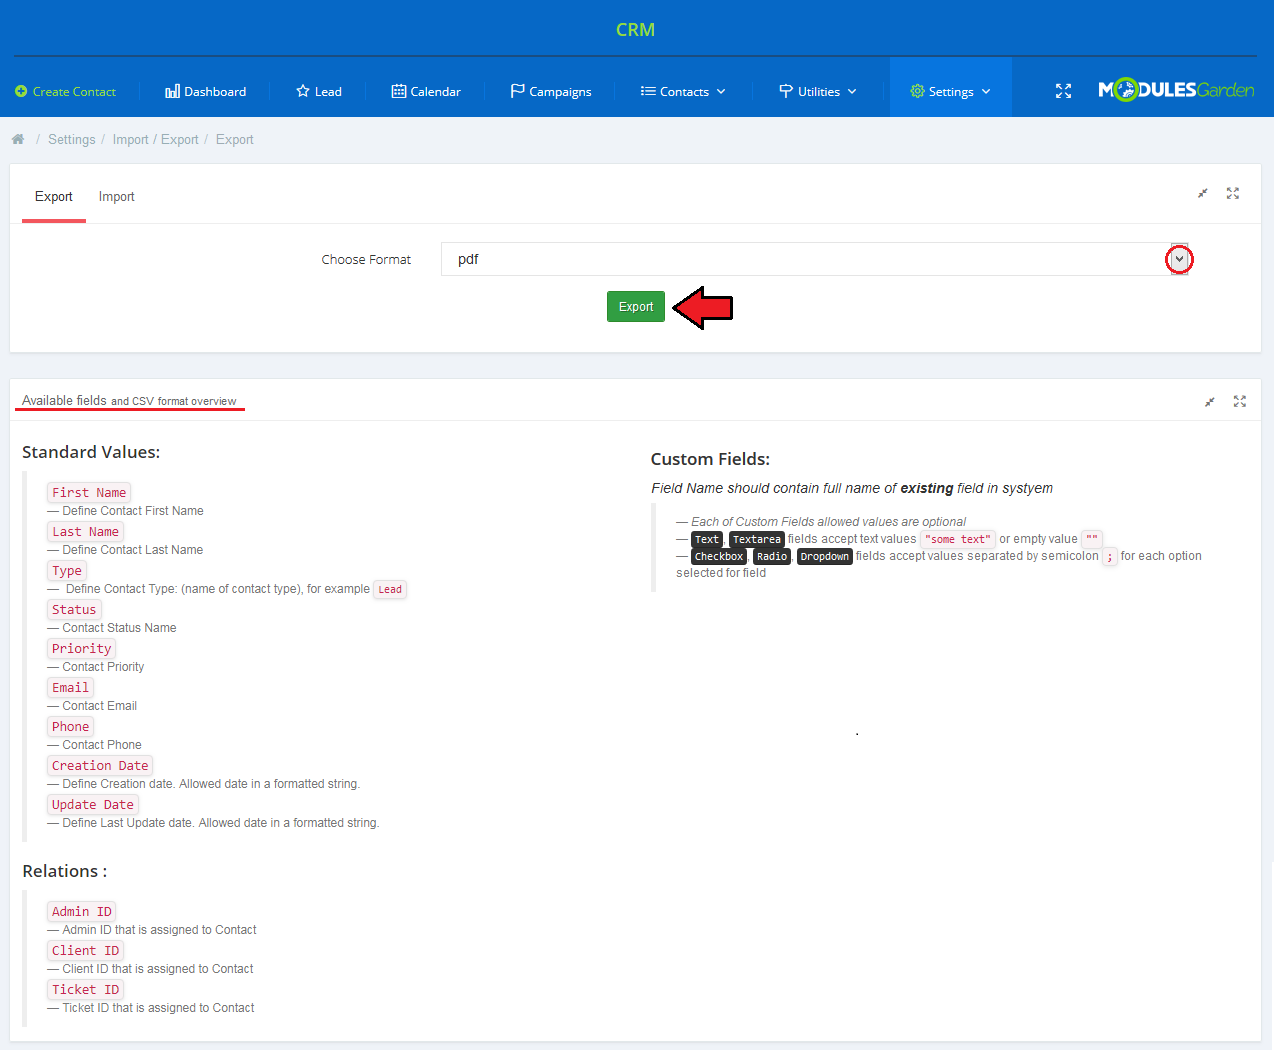
| In order to export a file from your CRM system, simply choose a target file format (CSV, XLS, XLSX, ODS or PDF) and press the 'Export' button. A file with the complete list of contacts available in your system along with their details such as name, type, priority, phone etc will be downloaded shortly. A list of available fields that can be included in the file for either import or export are available underneath. Important: It is required that you use only the fields that are visible underneath. In case you name your columns in any other way, the import action will fail! |
|
Import File
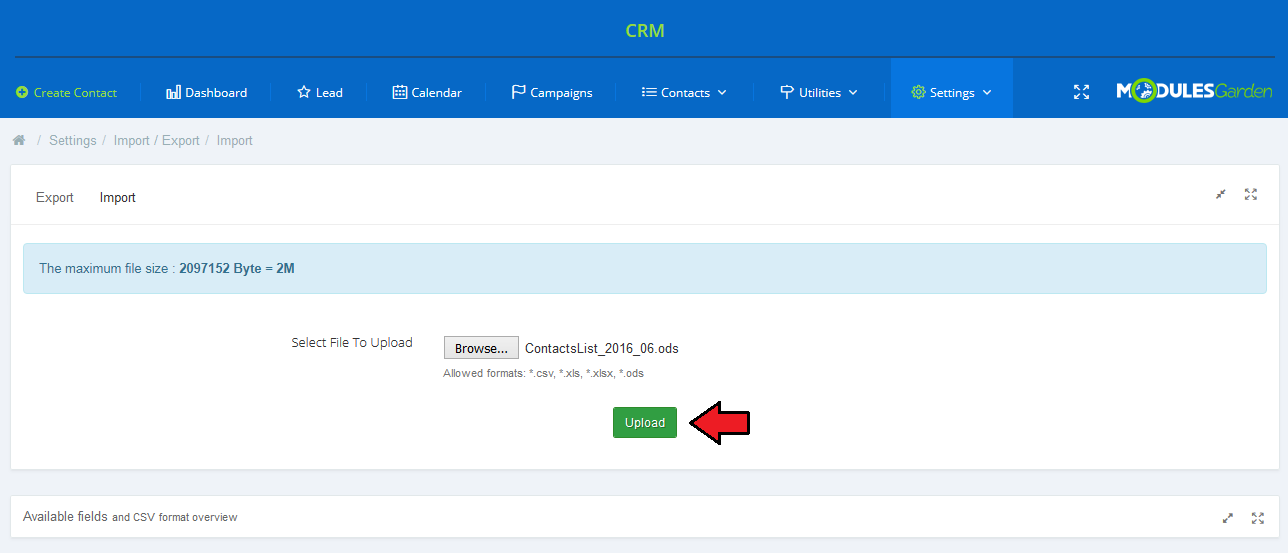
| In order to import a file to your CRM system, simply select a file from your disc and press the 'Upload' button. A file with uploaded list of contacts will be available shortly. Note: You can upload files of 'csv', 'xls', 'xlsx' or 'ods' formats only. |
|
Web Forms
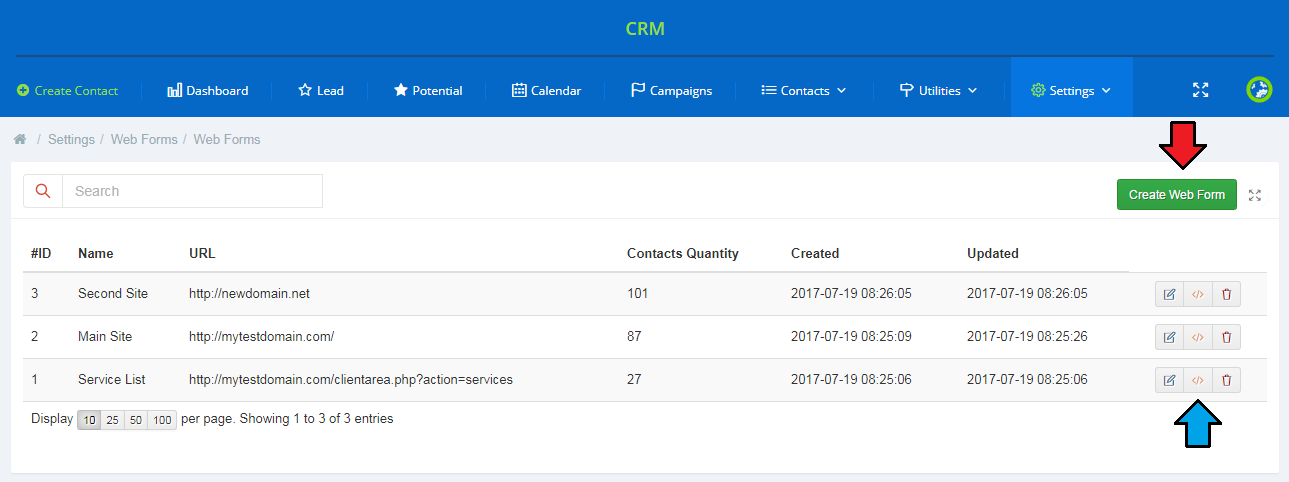
| Web Forms give your the possibility to collect contacts' details from different sources. In your CRM you may generate sample web forms which you can then locate in your external sites. Proceed to 'Settings' → 'Web Forms'. You will find there a list of all already created web forms. You may edit or delete them at any time. Press the button marked on the screen to create a new web form. |
|
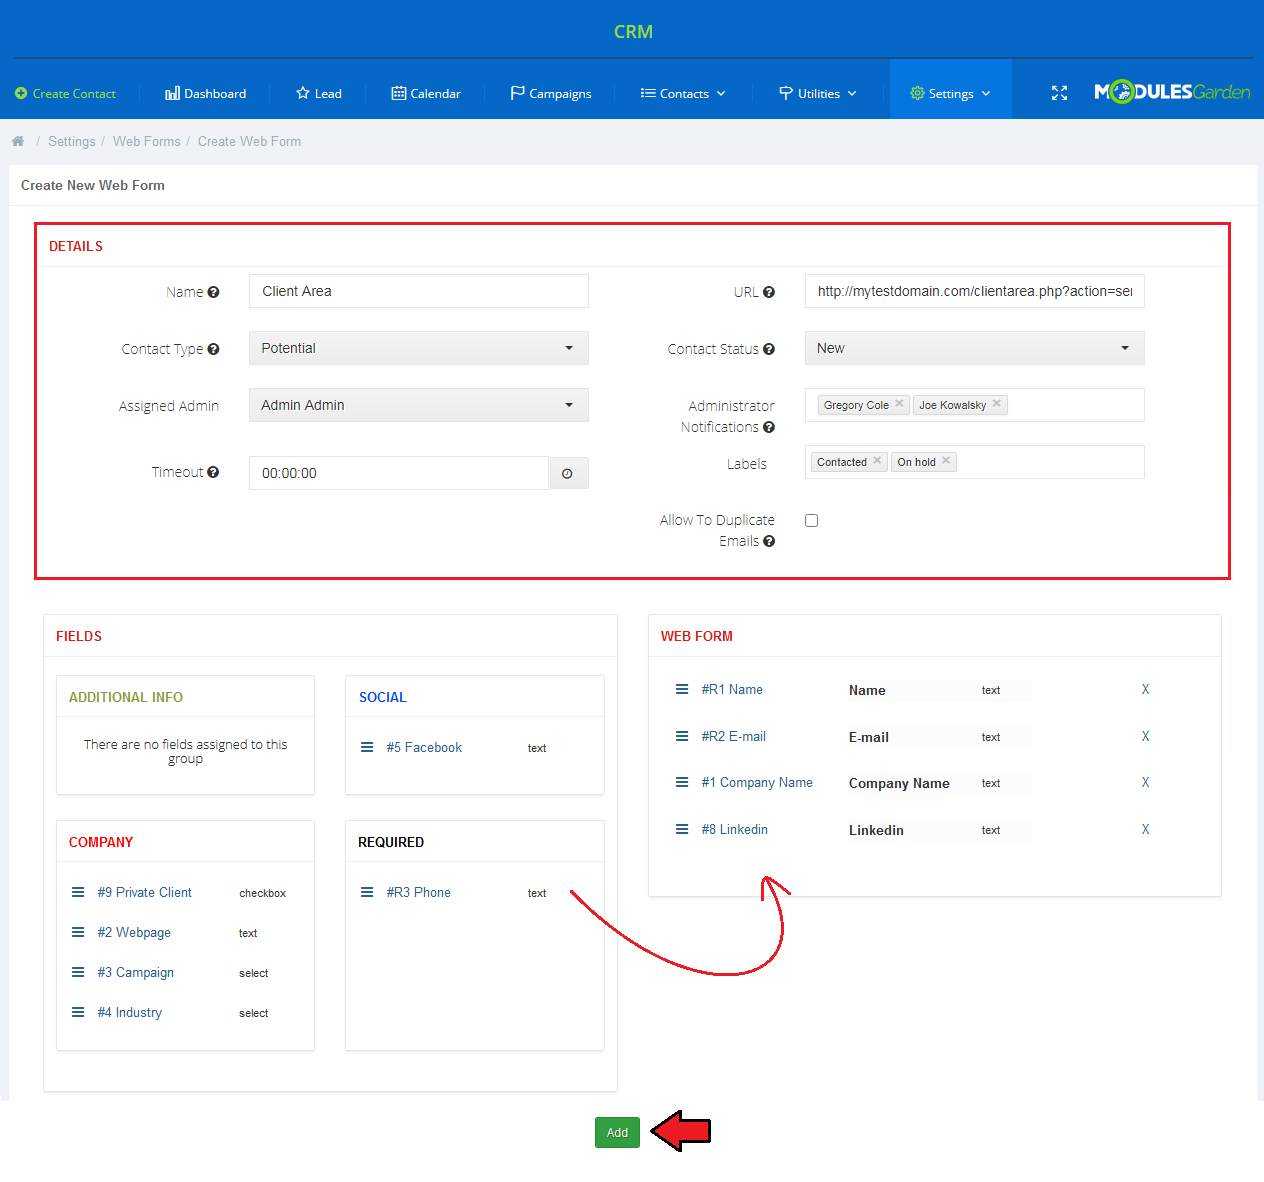
To generate a web form, you must provide some basic details:
Additionally, you may select fields that will be visible to fill out. Drag a field and drop it in the currently created web form box. |
|
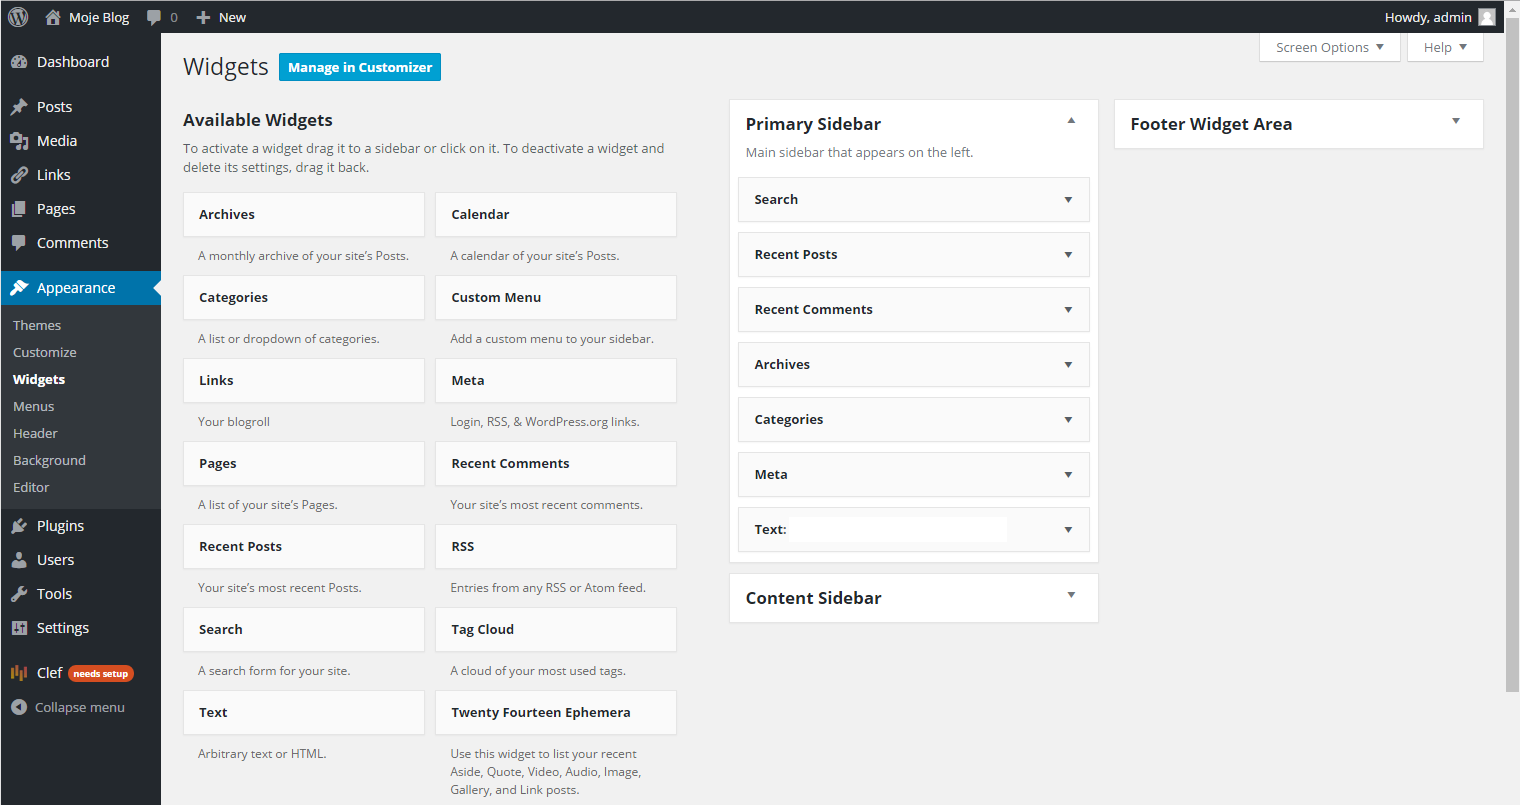
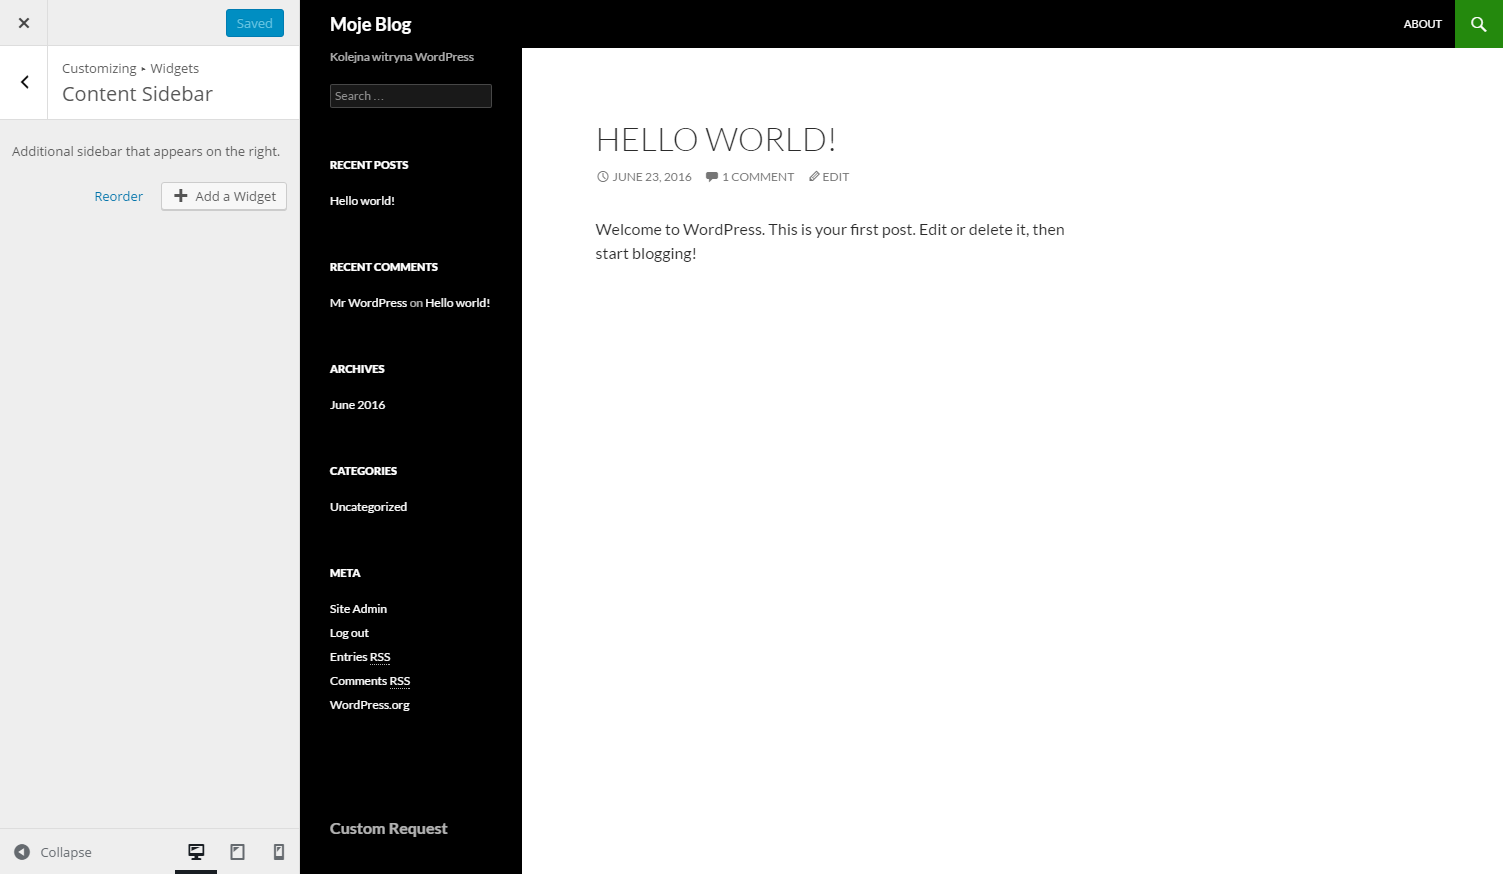
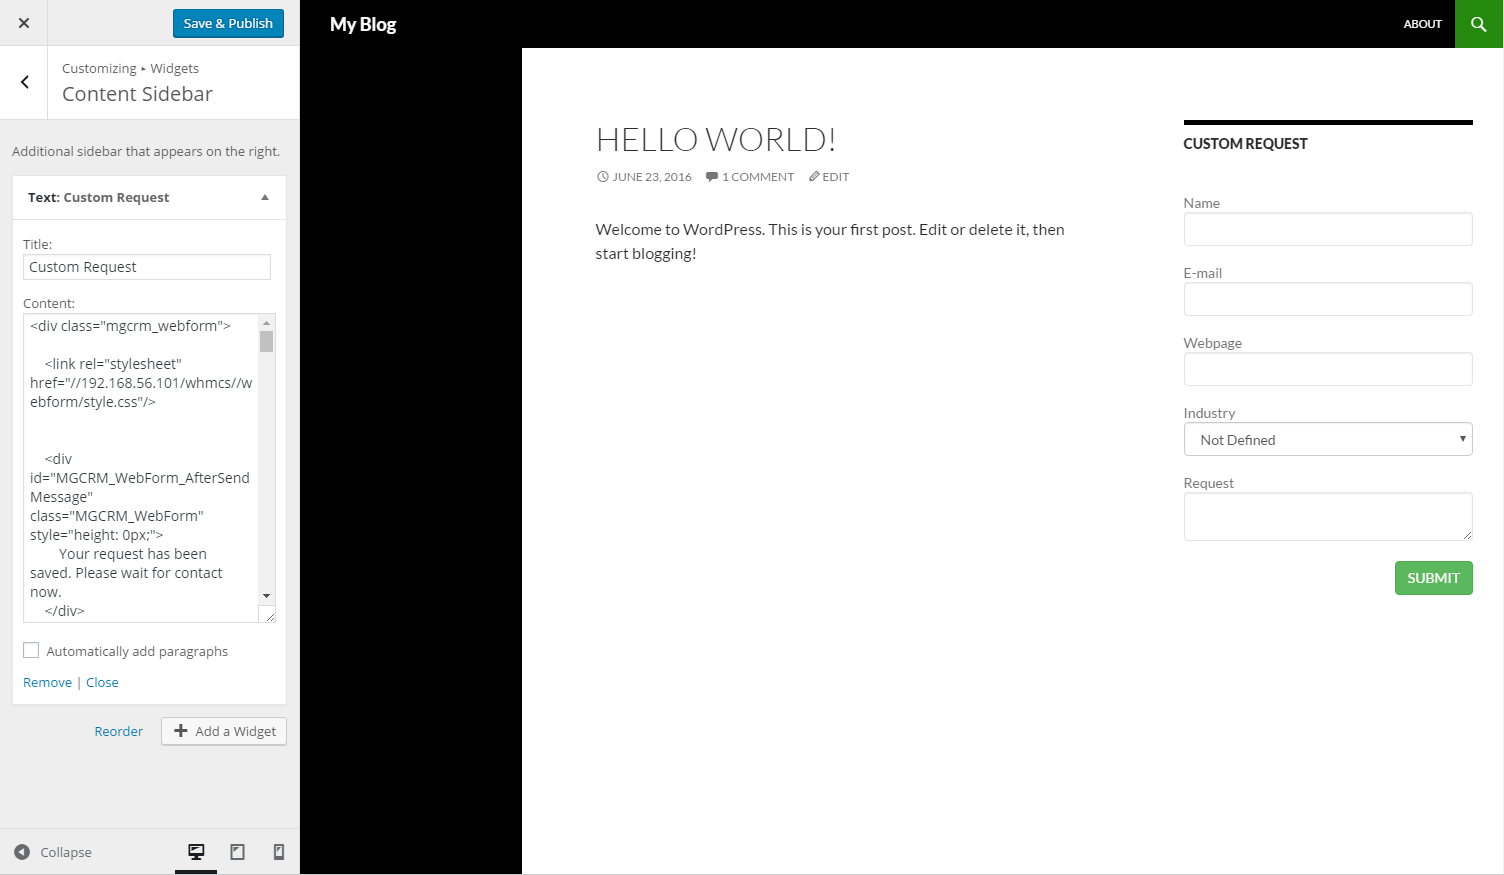
| Once your web form draft is ready, you have to manually add it to the desired location. Underneath, you will find a sample instruction on how to add a web form as a widget to the WordPress application. 1. Log in to your admin area on your WordPress. |
|
|
3. Select 'Widgets' → 'Content Sidebar'. |
|
|
5. Title your widget. |
|
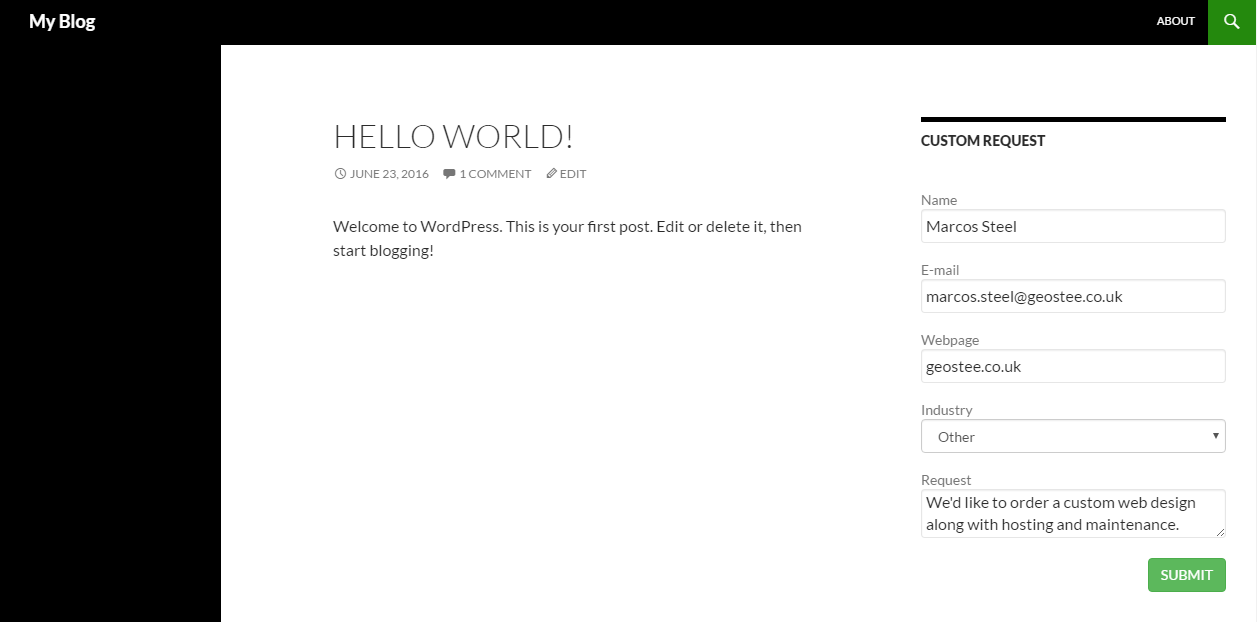
| Congratulations! Your web form with empty fields that can be filled out by your clients is ready for use. If your clients provide the required data, new contacts will be automatically added to your CRM. |
|
Automations
| Automations allows cron to automatically add reminders and follow-ups based on the chosen rules. To start, you need to first create a new automations group. |

|
| Enter a new group name, enable the option and press the 'Add' button. |

|
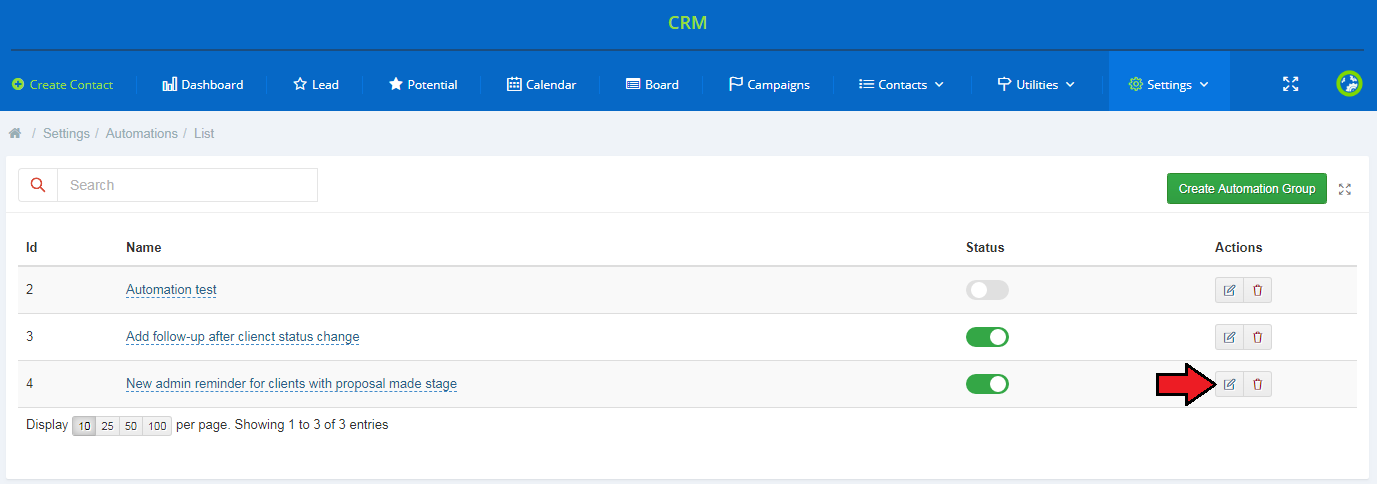
| Now, move back to the automation group list and press 'Edit' next to a newly created group. |
|
| You can now start adding new rules to the group. First, press the 'Edit Rules' button. |

|
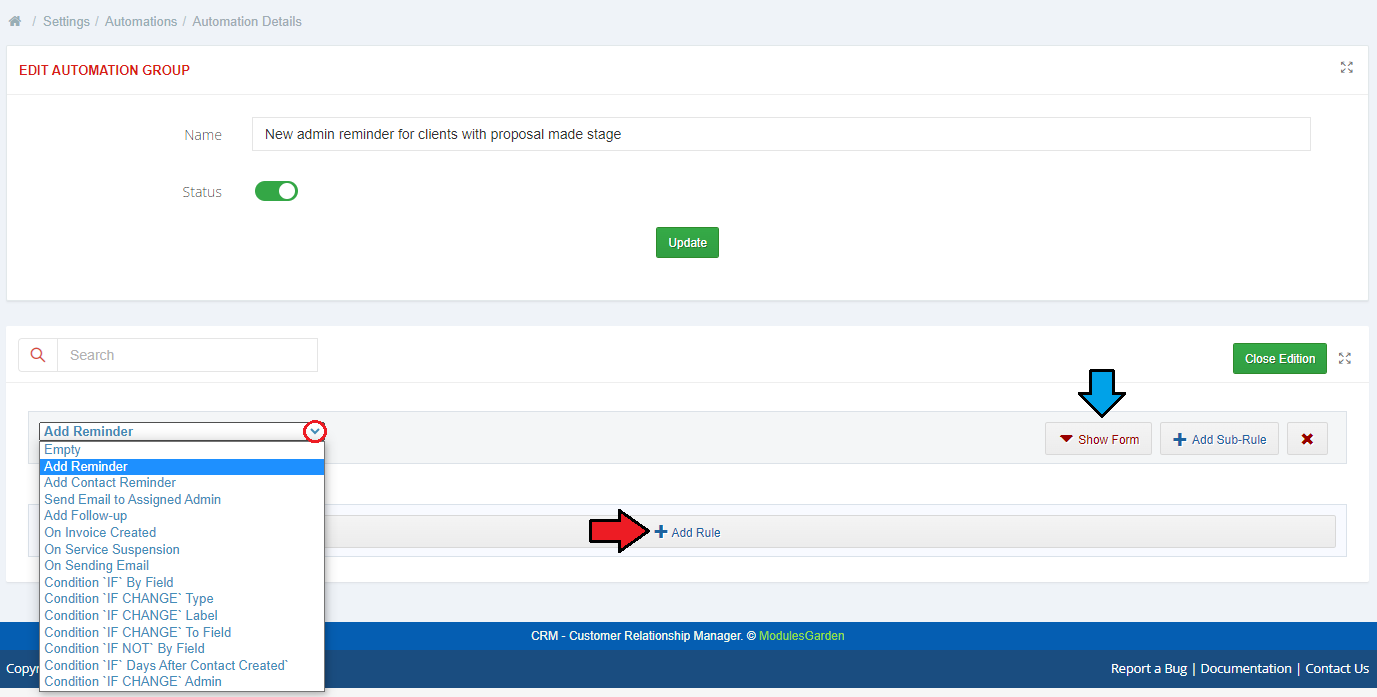
| Now, click on 'Add Rule' and then select a new condition from the dropdown. Afterward, press 'Show Form' to expand triggers for the selected condition. |
|
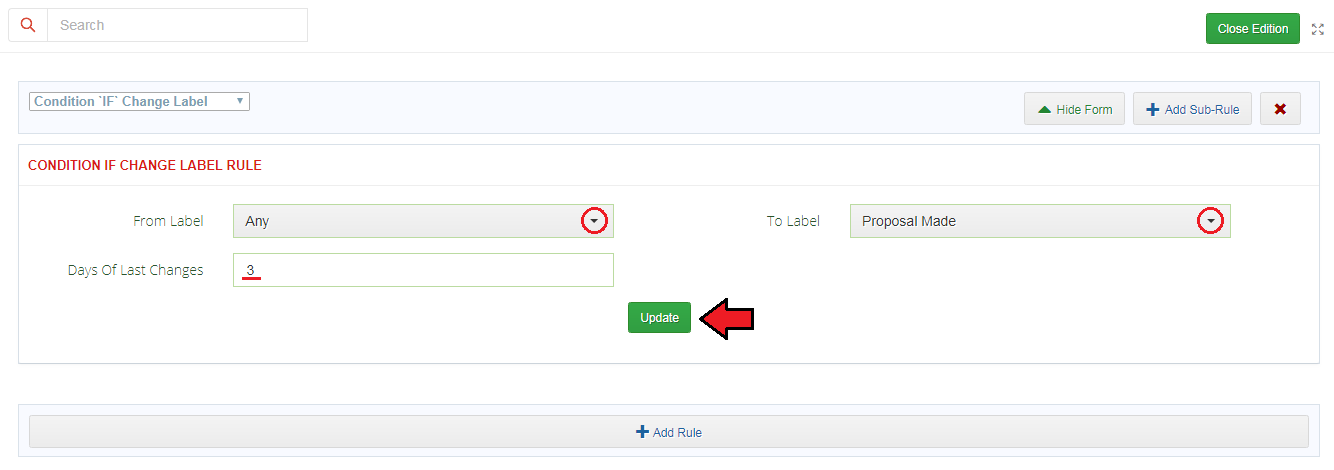
| Depending on the chosen condition, select desired triggers and press 'Update' to save changes. List of available conditions:
|
|
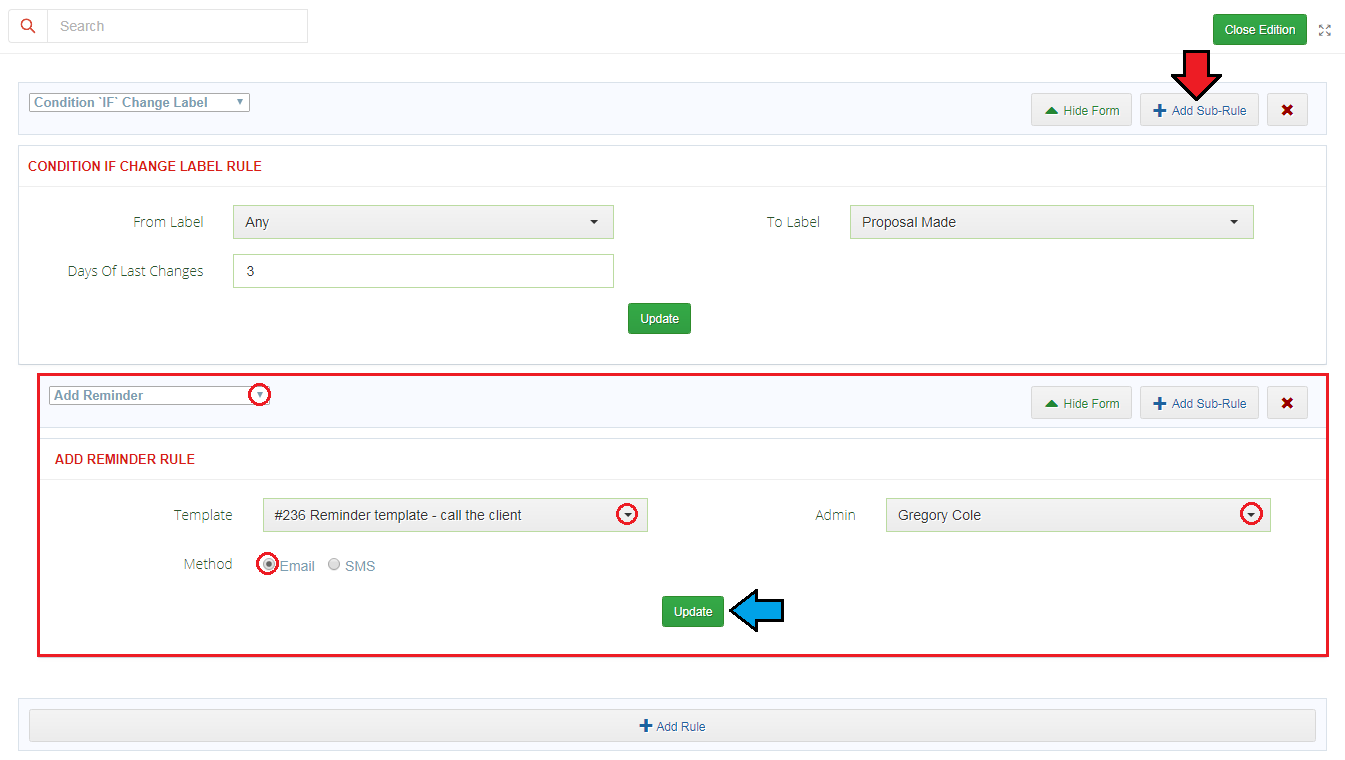
| Now, to set the action that will be triggered after the provided condition, you need to add a new sub-rule to it. Add the desired action in the same manner as you added a condition before. |
|
| This is an example of a simple rule. When a 'Proposal Made' label is assigned to the contact, then an email reminder will be sent to the administrator. When enabled the next time, when the cron is iterated, the rule group will be triggered. Note: You can insert as many sub-rule into rules, and events into other sub-rules as you want, but make sure that the conditions you specify are correct so that the whole automation group can be still triggered. Important: In the current version of the module, the automation actions are not logged in any way |
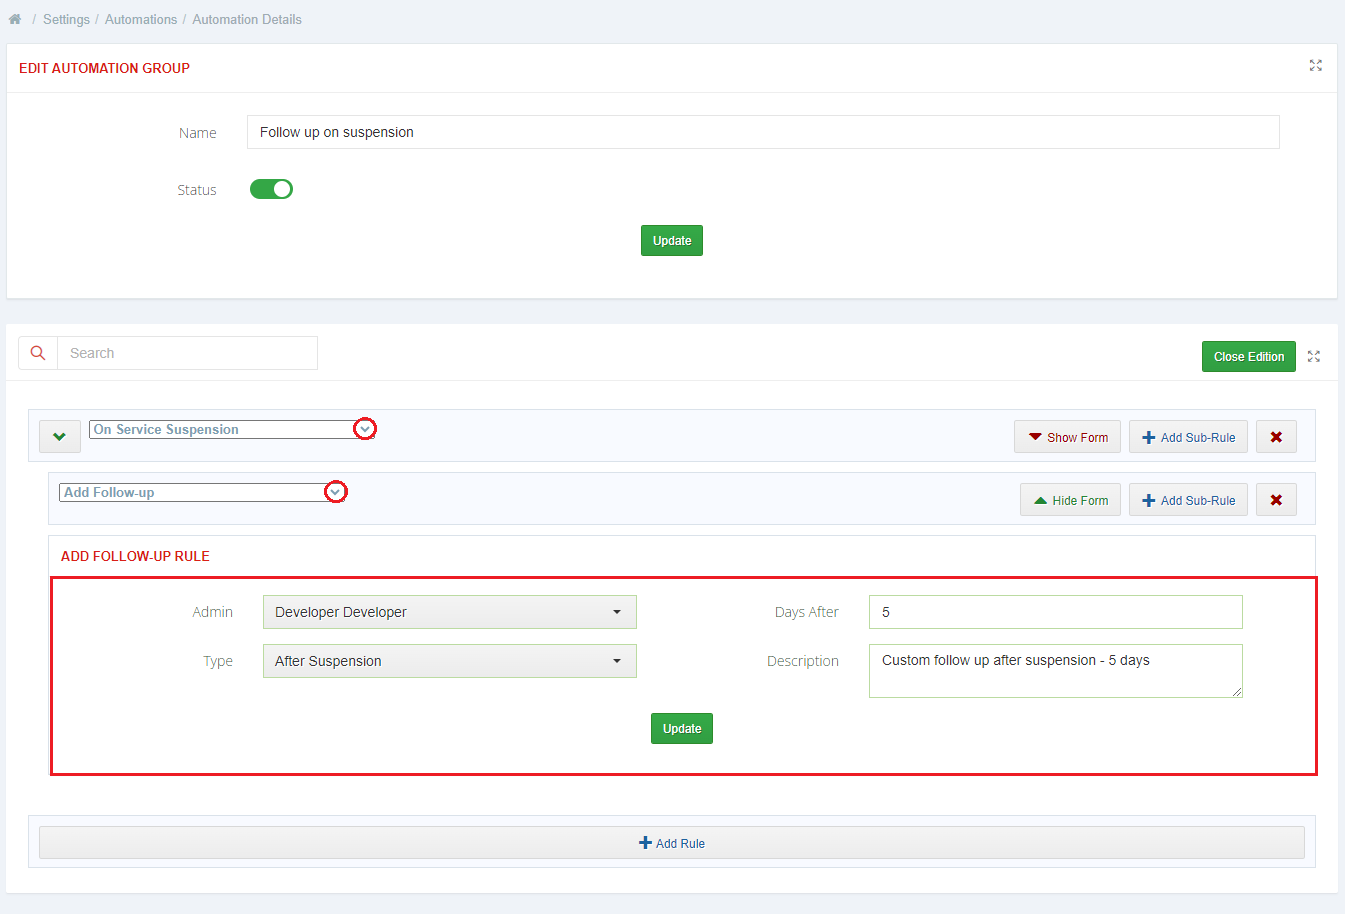
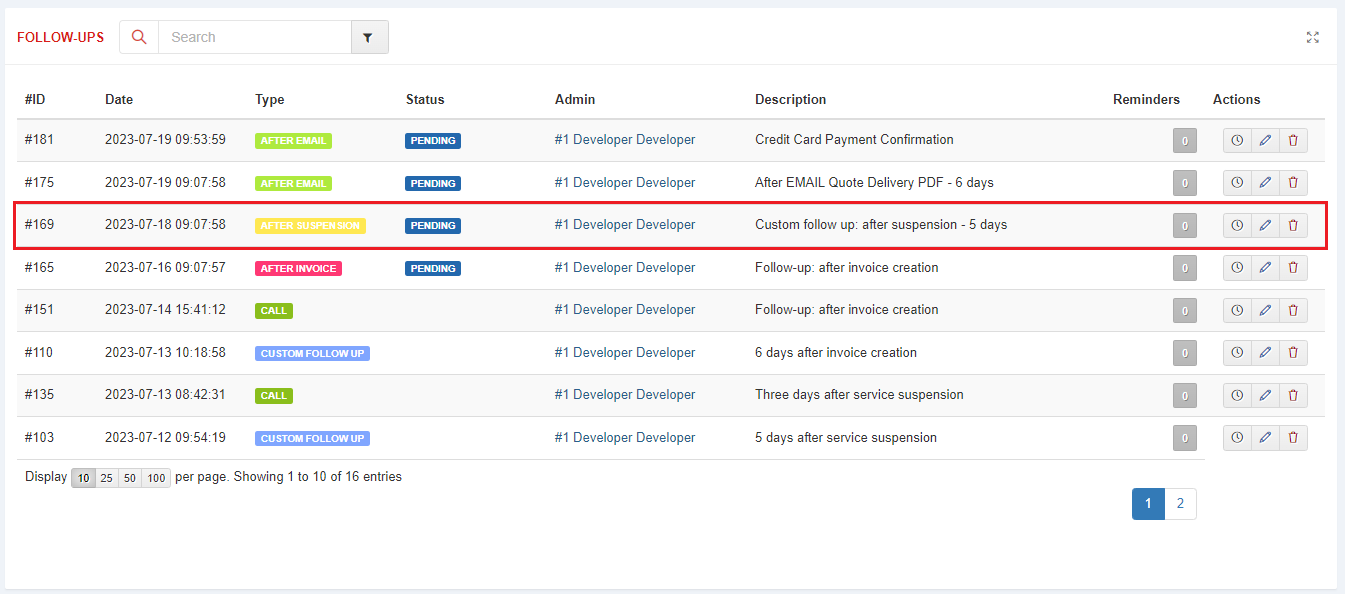
| Example 2: Schedule a follow-up on service suspension: In CRM, you have the capability to schedule follow-ups that are automatically generated based on specific triggers. Exemplary configuration: |
|
| After the successful cron execution, in the above example, a new follow-up will be added exactly 5 days after the service is suspended. |
|
Utilities
Statistics
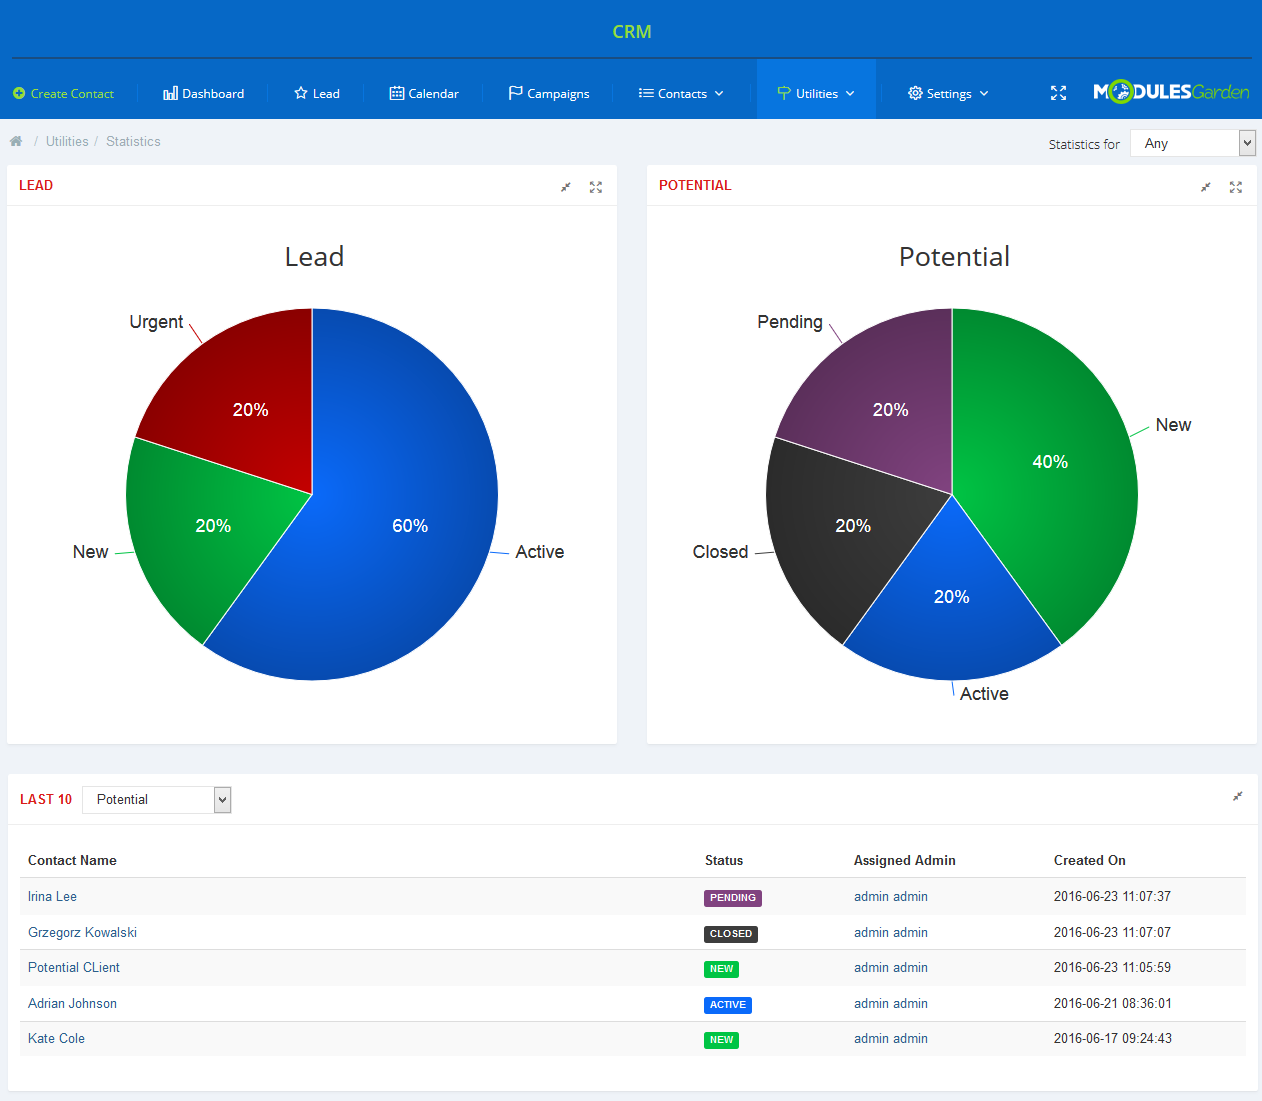
| 'Statistics' contains graphs concerning all your contacts.
The available graphs show for example: the number of contacts per status, new contacts per admin, per month and per day. In 'Statistics' you can find the overall information such as graphs concerning contacts with a chosen status. |
|
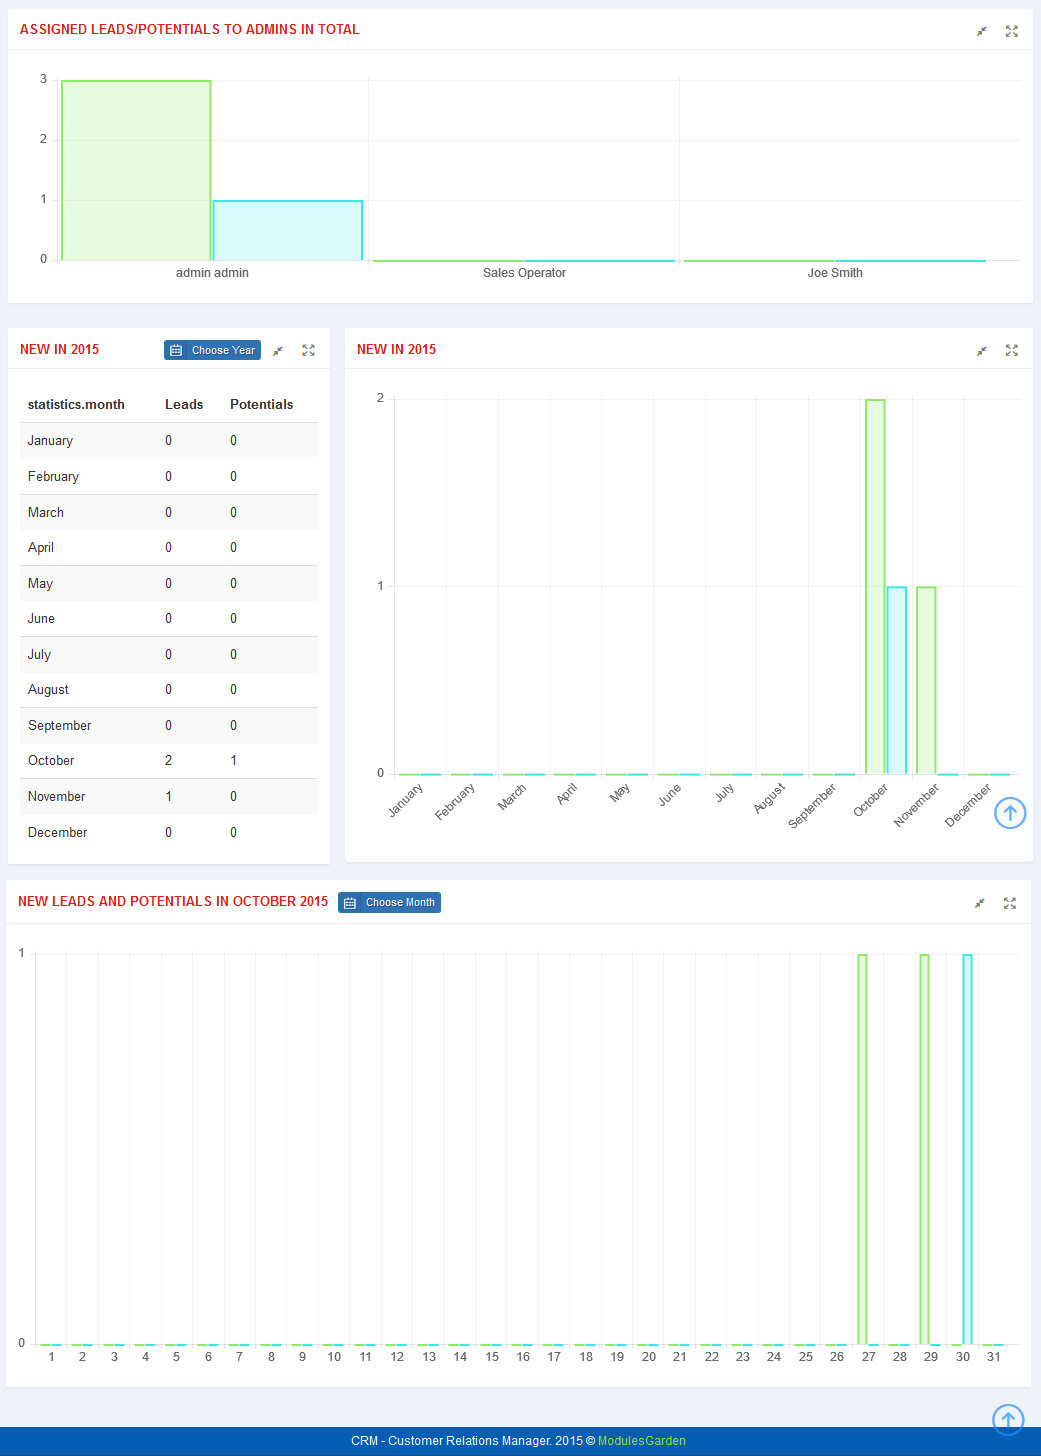
| There are also graphs and statistics tables presenting the number of contacts added within certain periods of time (year/month). |
|
Notifications
| In this section, you can manage any notifications that shall be delivered to any administrator depending on the configuration. Let us check how it works. Press 'Create Notification' to begin. |

|
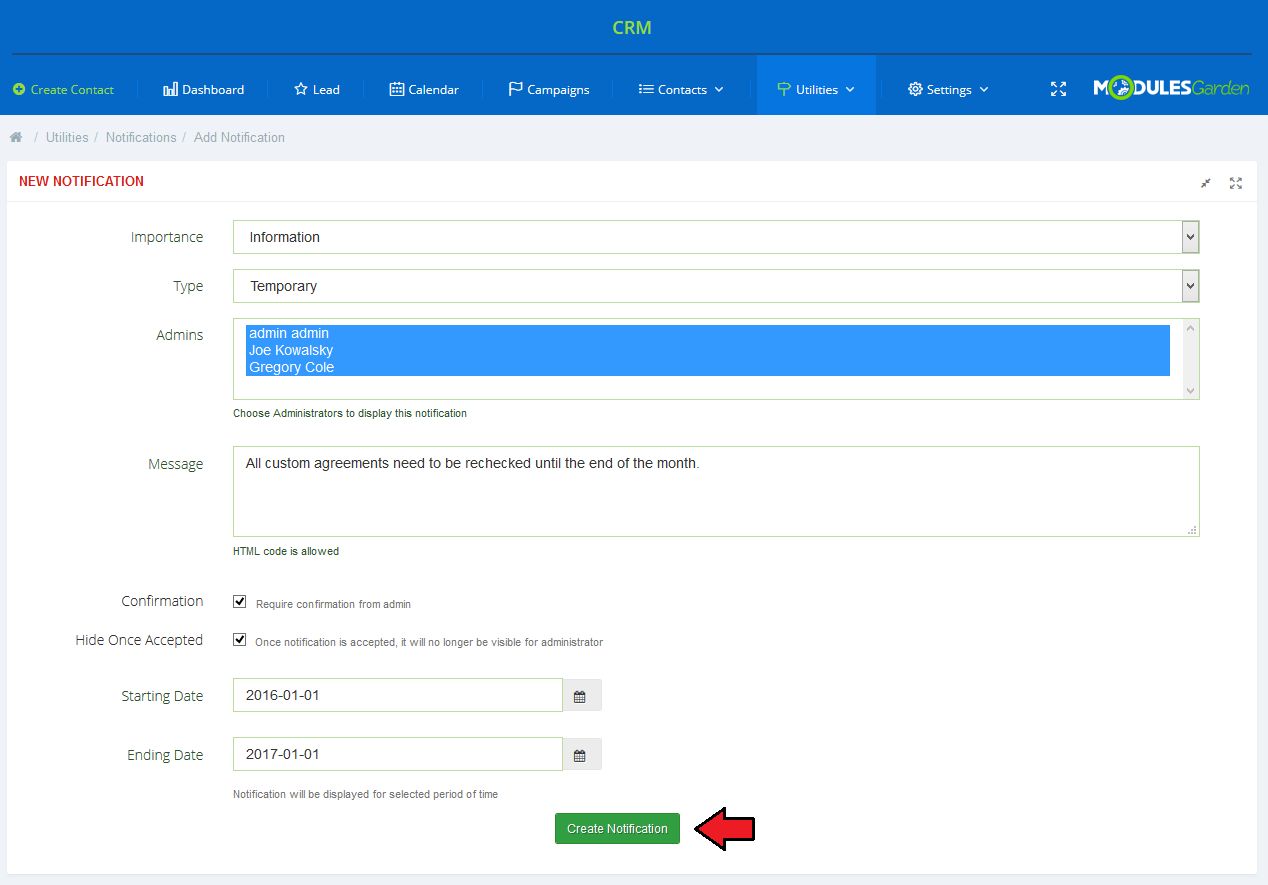
You will be moved to the 'New Notification' creation form. Fill out the data to tailor the notifications perfectly to your needs.
Press the 'Create Notification' button when ready. |
|
| A newly created notification form is now visible on the list of all notifications in the system. You may easily edit the notification (you will be moved to the creation form where you can make any changes) or delete useless notifications. |
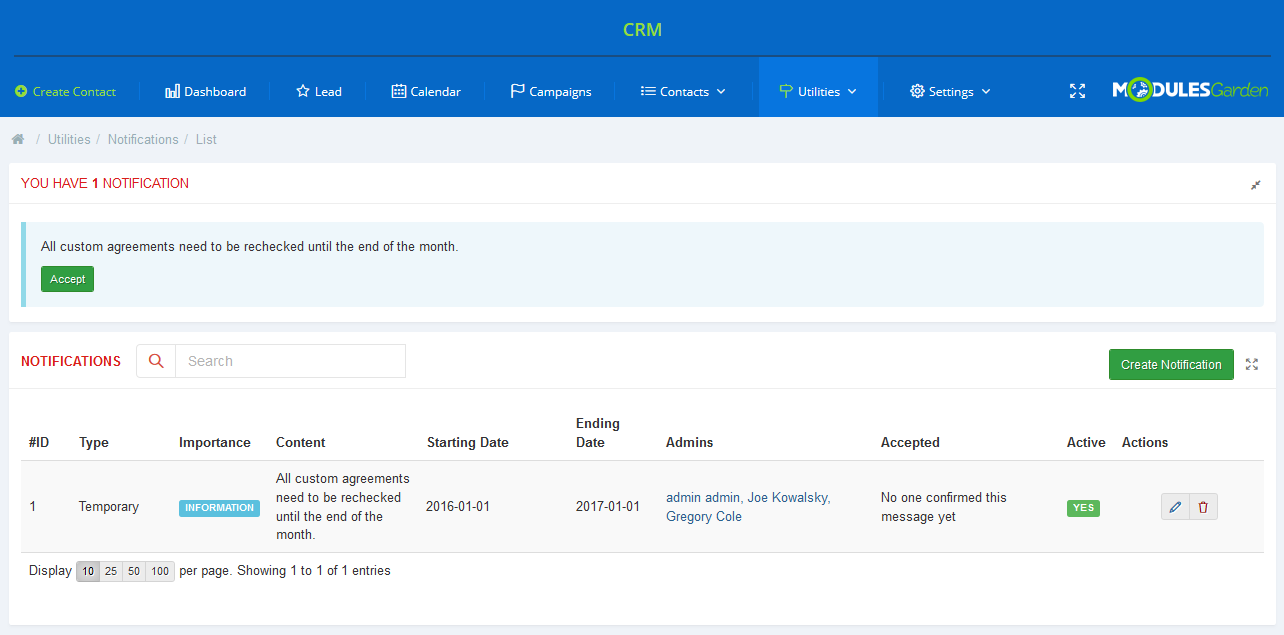
|
| Created notifications are visible to admins on any page of their CRM system. 'Accept' your notifications if it is required. Such info boxes like on the screen below will be visible until the specified in the configuration 'Ending Date' option has been selected, |
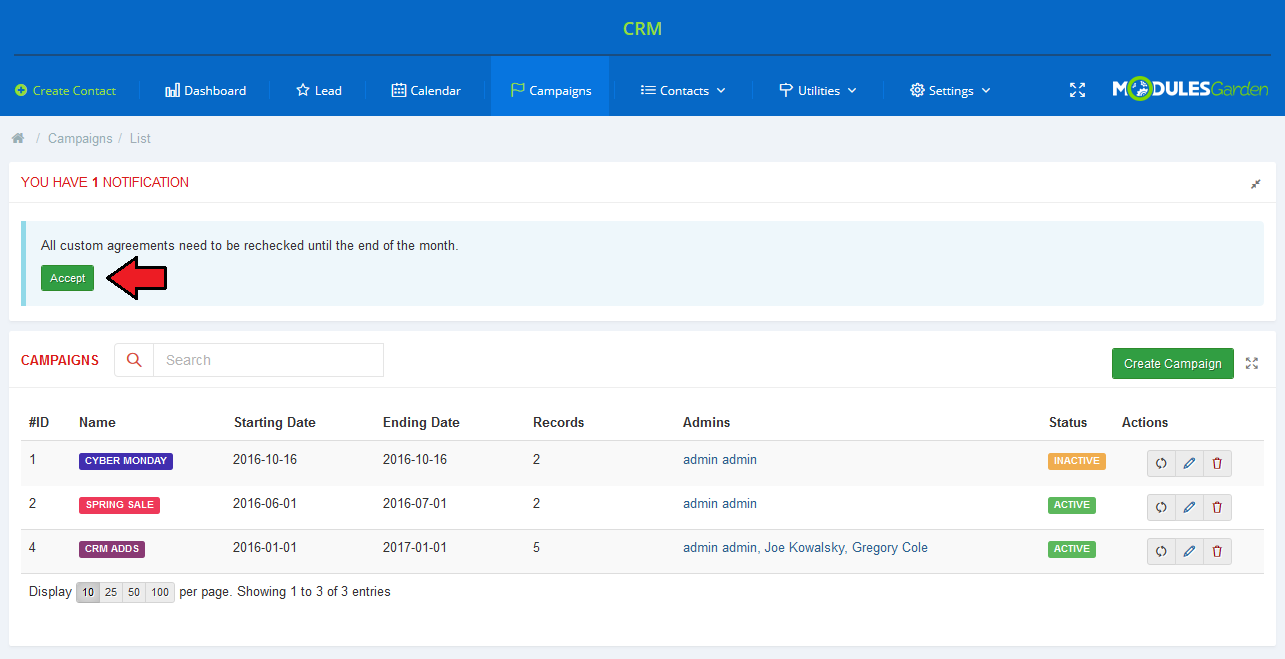
|
Mass Messages
| Configure mass message templates that can be used in your campaigns. Press 'Create Mass Message' and fill out the template form. |

|
|
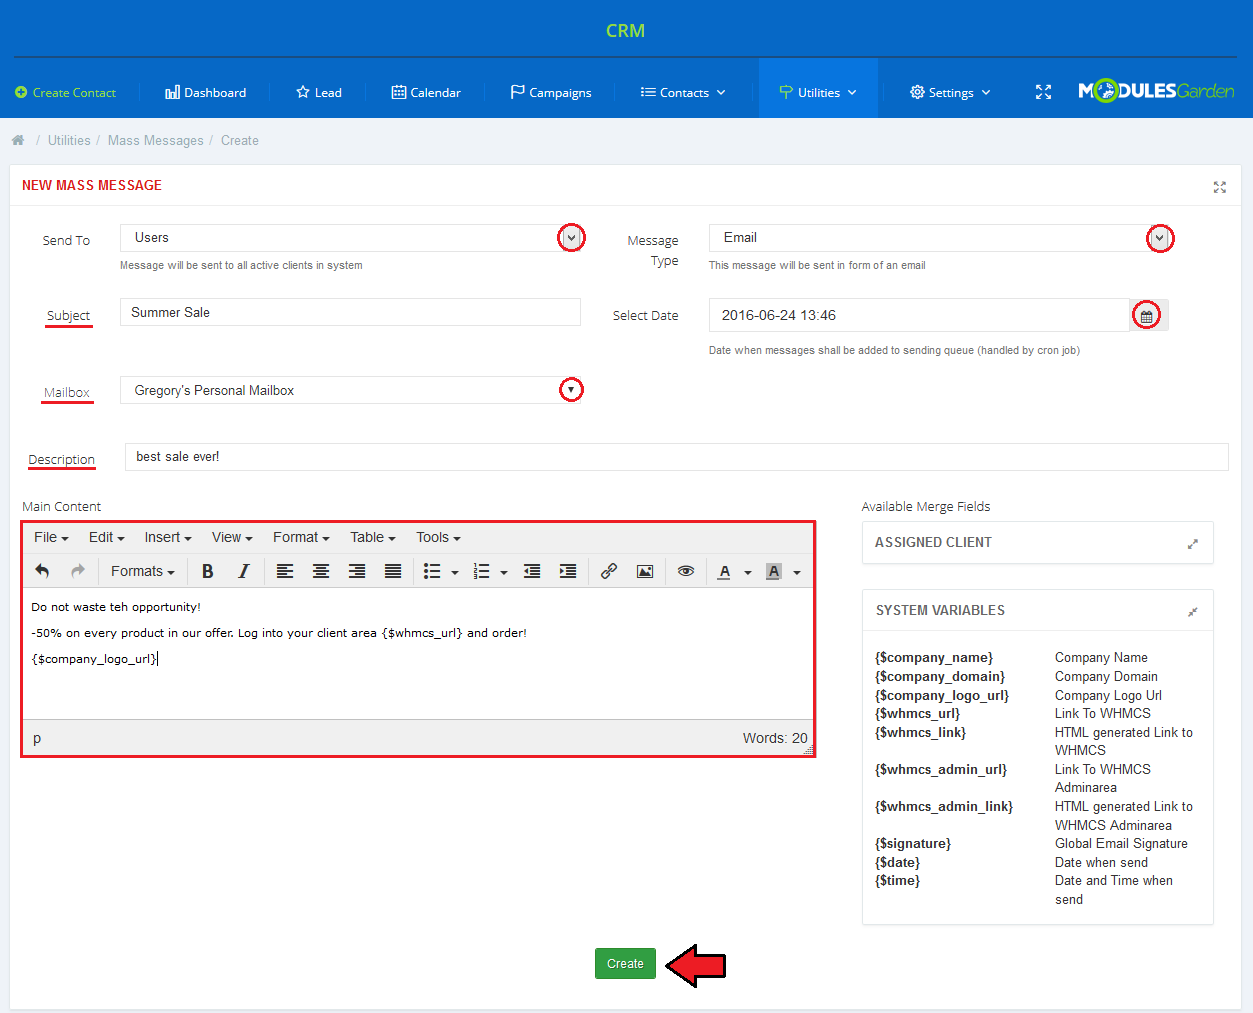
|
| Once added, mass message template will be visible on the list. You will find there short info on each template. Use action buttons to edit or remove a template. |
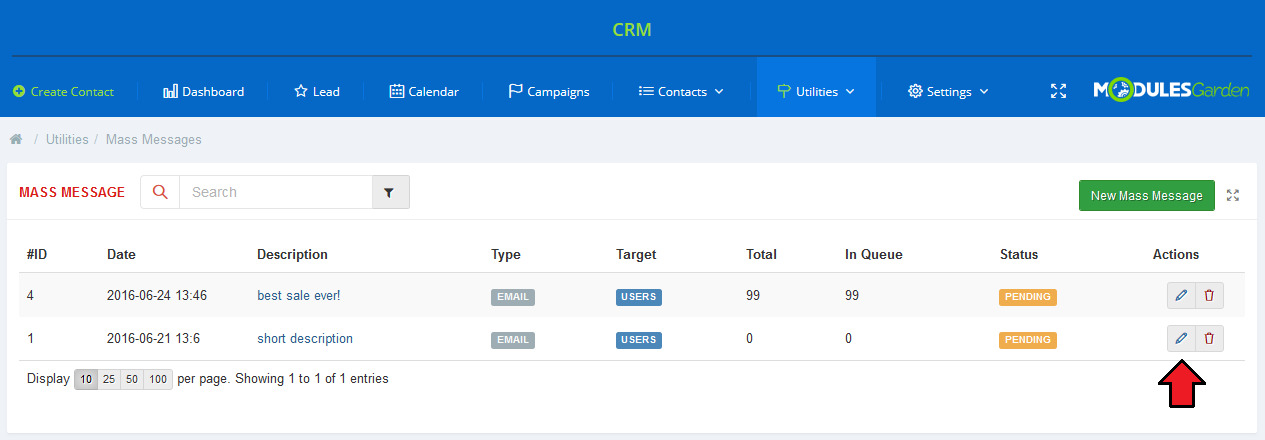
|
Archive
| In the archive you will find the list of no longer used contacts. Use action buttons to delete them completely or convert back to a contact. |
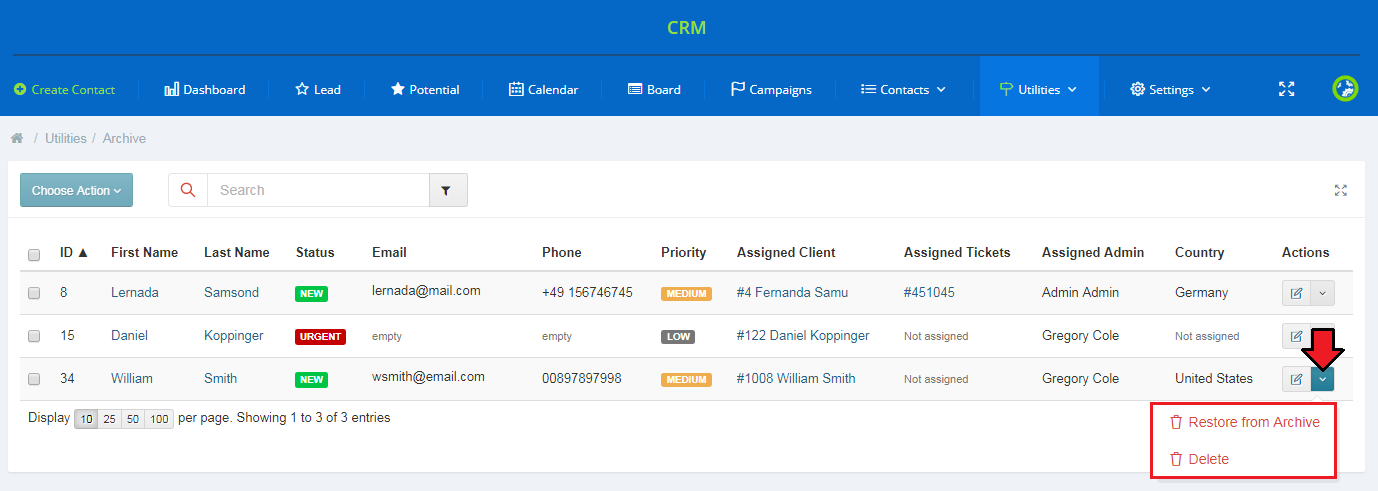
|
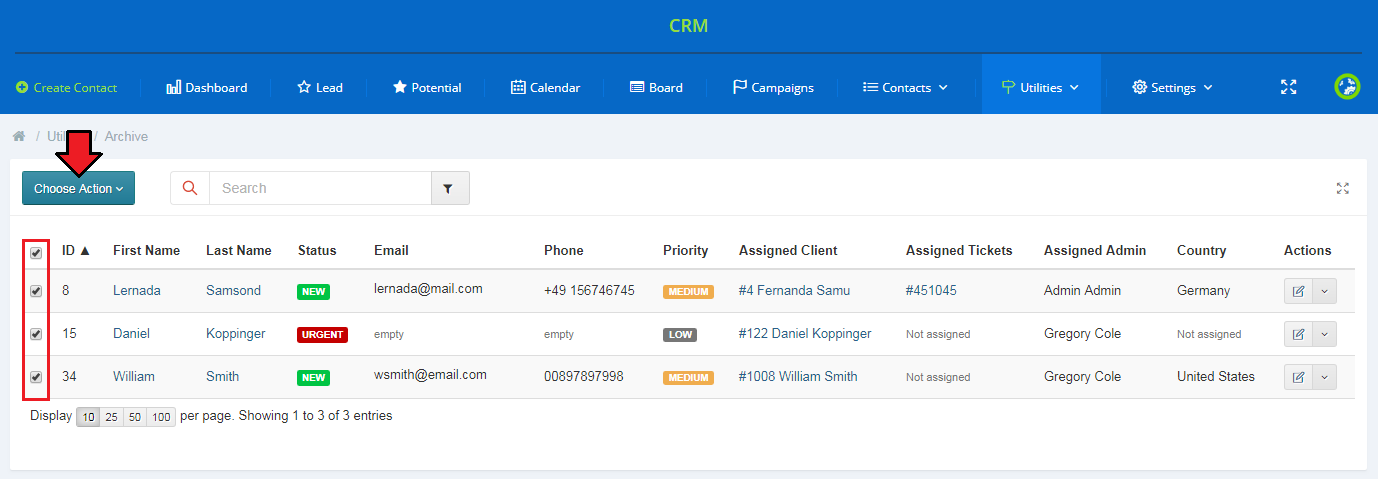
| You can also perform the same action on multiple selected contacts at once. |
|
Received Messages
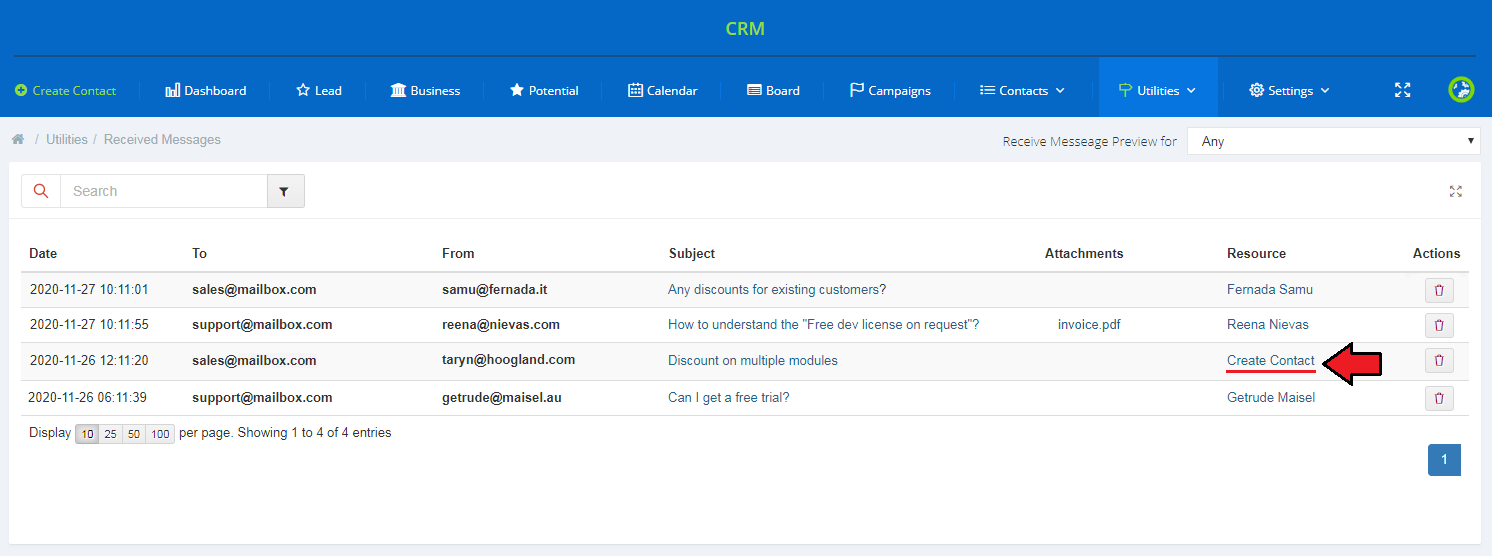
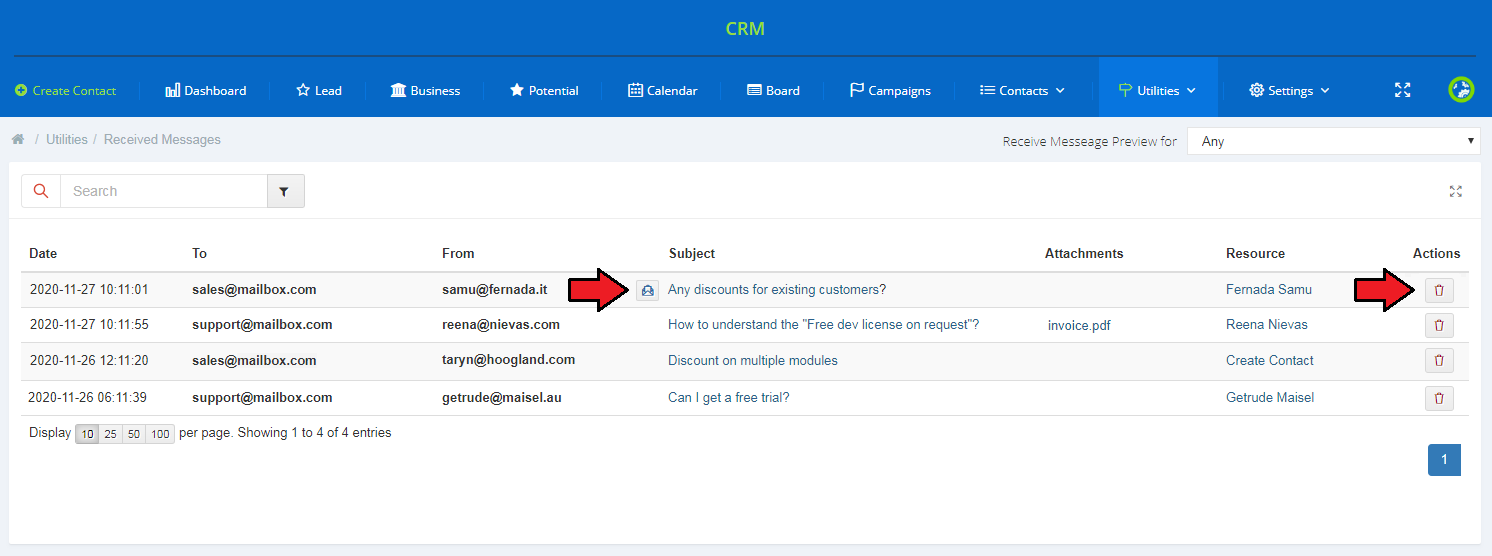
| In the 'Received Messages' section you have access to all received messages stored in your incoming mailboxes. In addition, in the 'Resource' column you will see the name of the clients if their email addresses are already linked to the CRM contacts. However, if the received message is coming from an unknown email address, you can directly create a new CRM contact by clicking 'Create Contact' . |
|
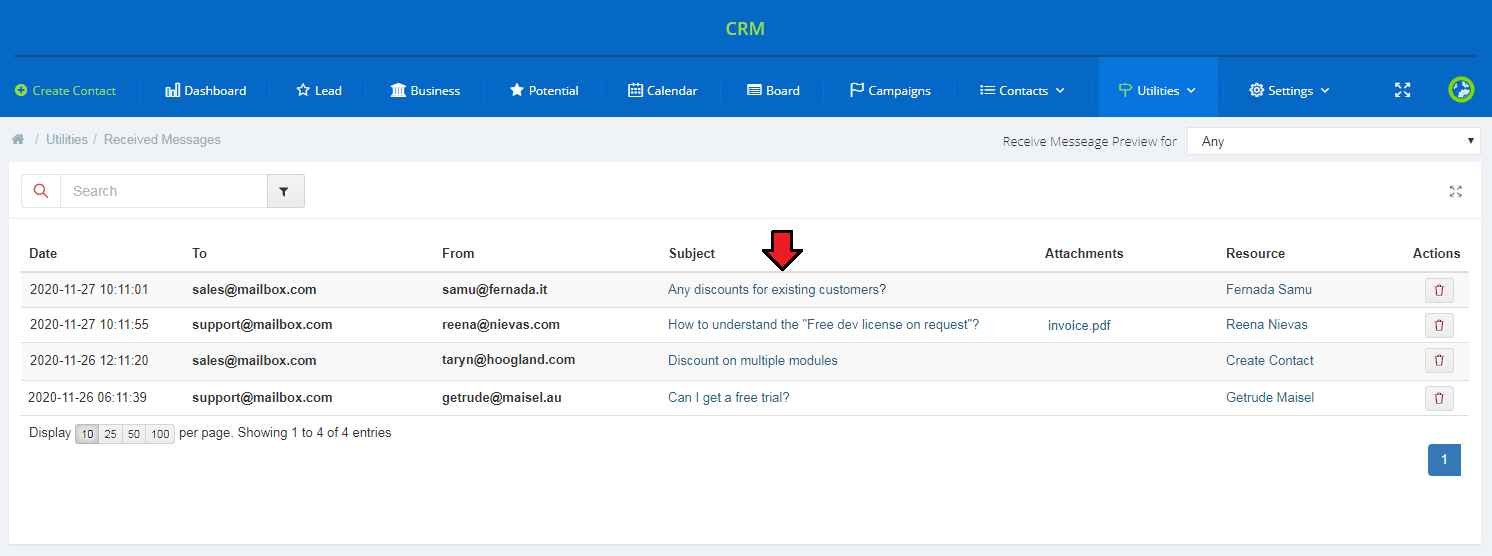
| Of course, you can also view the received messages by clicking on their subject, which will open a new window with their content. |
|
| You can also respond to the email or delete it with the action buttons. |
|
Tickets
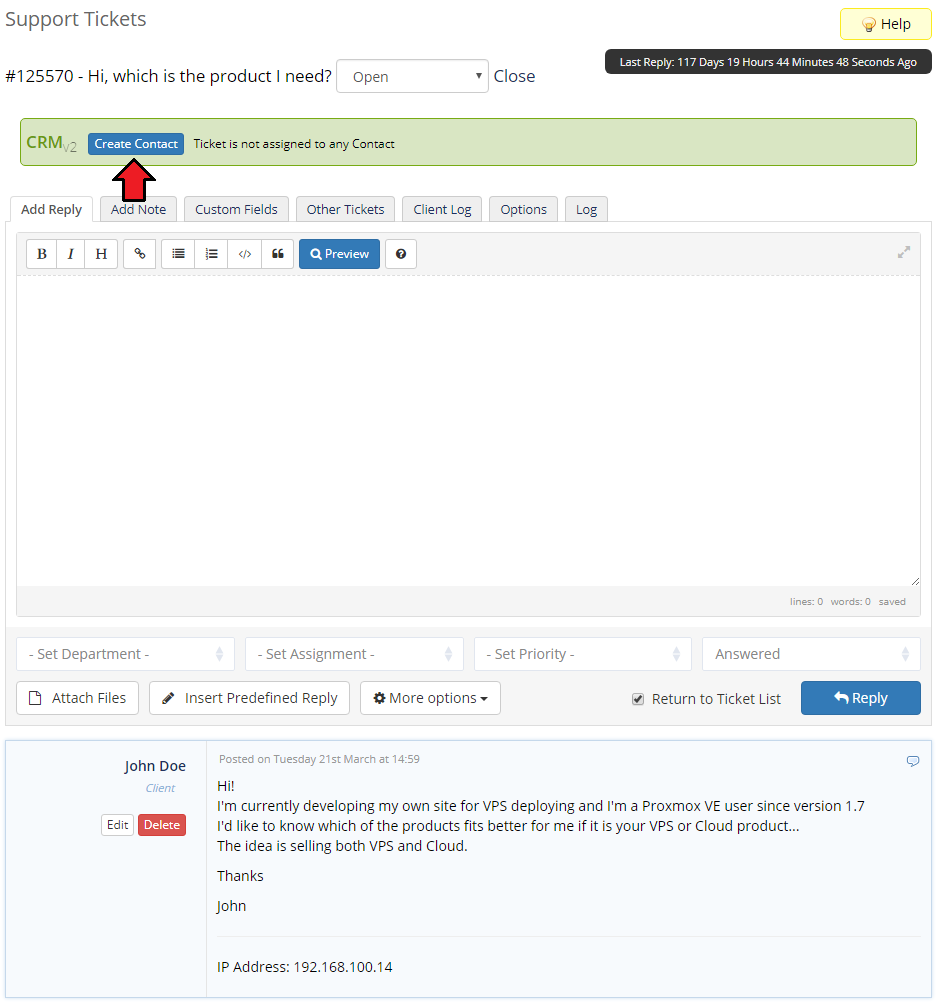
| Our module offers additional integration in your WHMCS support tickets system. As you can see on the screen below, your support operators can convert tickets directly into Contact Lead. |
|
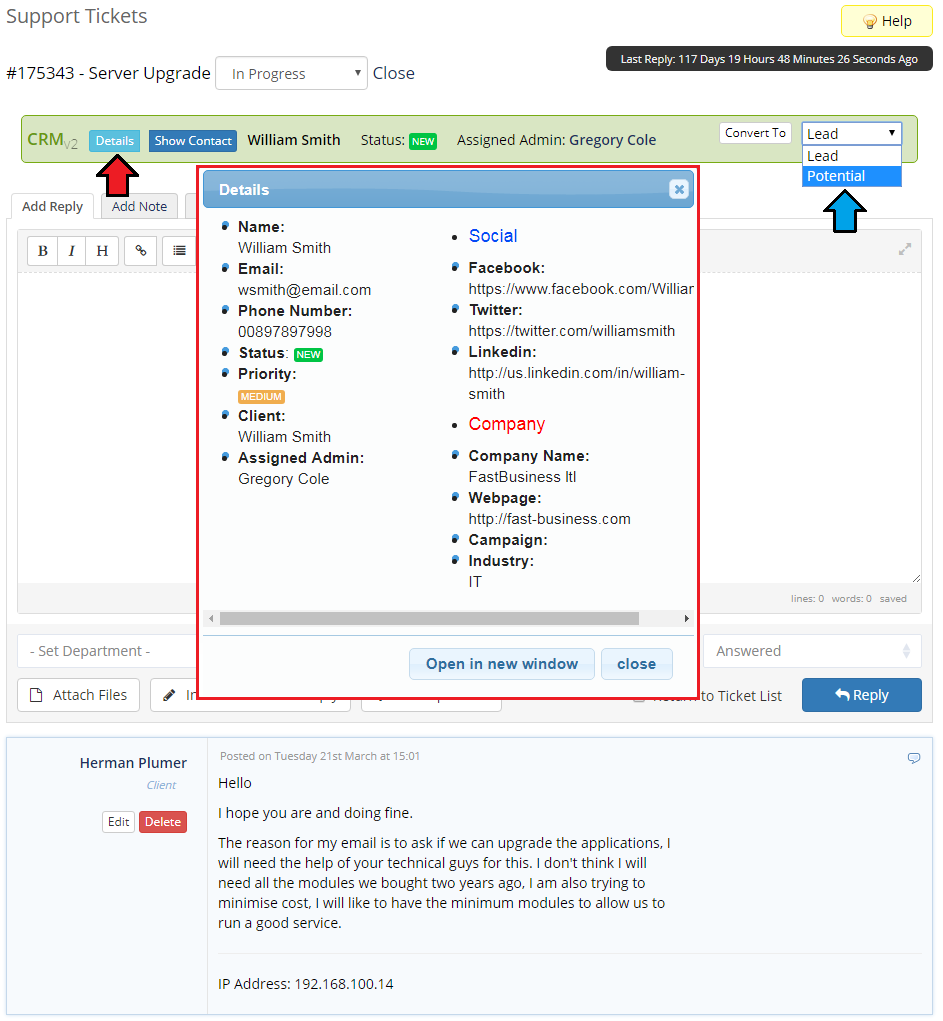
| Any ticket from a given client will be displayed with the contact name, status and assigned staff member. Additionally, after pressing 'Details' , extended information about the contact will be displayed in a pop-up. |
|
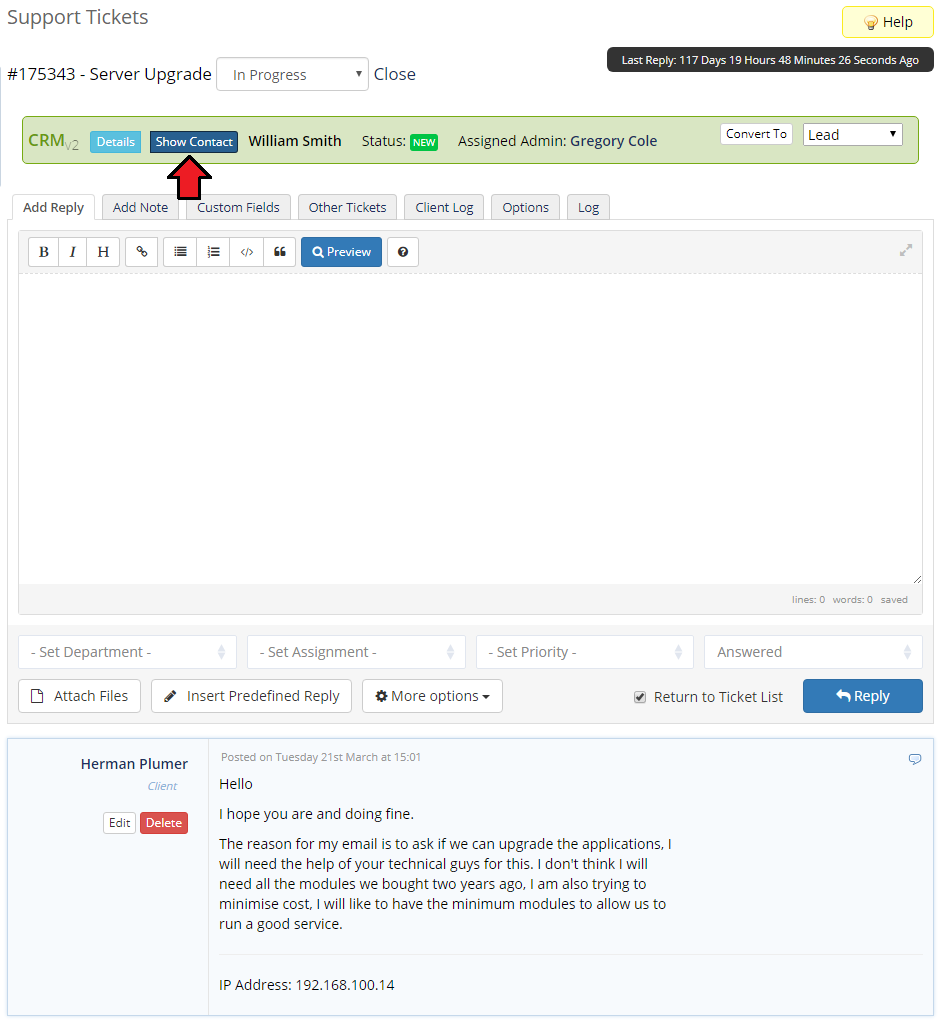
| Your staff will be also able to quickly move to the contact profile in CRM For WHMCS by pressing 'Show Contact' . |
|
WHMCS Notifications Integration
| CRM For WHMCS is the module that supports built-in WHMCS notifications. If you wish to find out more about WHMCS notifications, please refer to this page |
Exemplary Slack Configuration
| In this section, we will provide you with exemplary configuration of Slack. Please remember that the following instruction is only an illustration of what the configuration process might look like. |
| Firstly, you need to add a new application to your Slack account. To do so, log in to your Slack account and then go to https://api.slack.com/. Next, click on the 'Start Building' button as shown below. |
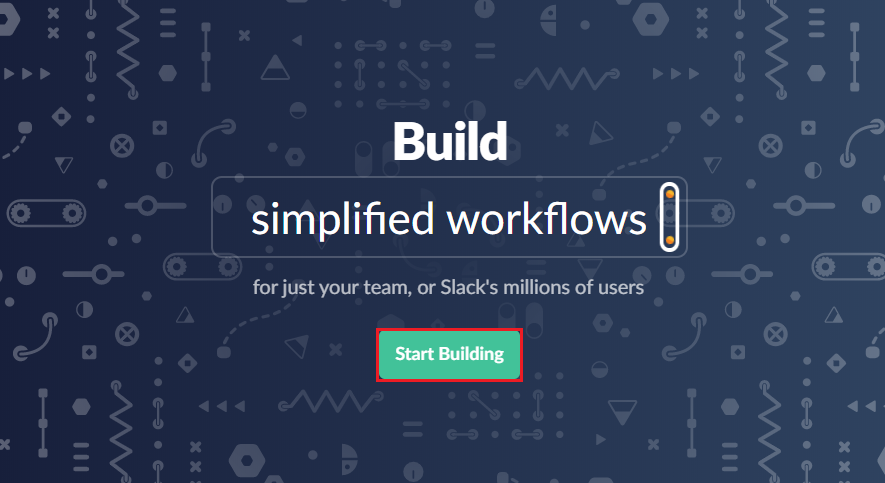
|
| A new popup window will show up. Here, you should complete an 'App Name' and choose the 'Development Slack Workspace' from the dropdown menu. Once ready, press 'Create App' . |
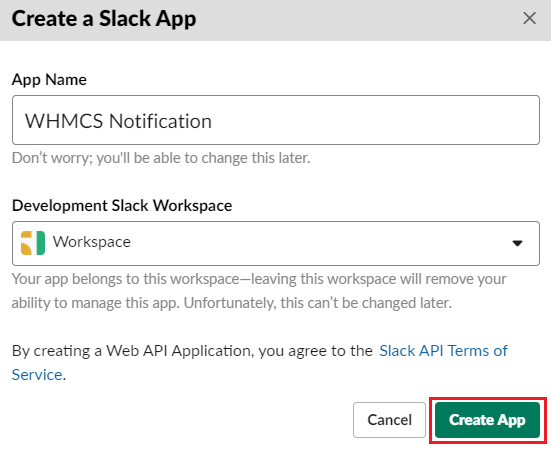
|
| The next step is to set up appropriate permissions. Proceed to 'Basic Information' → 'Permissions' . |
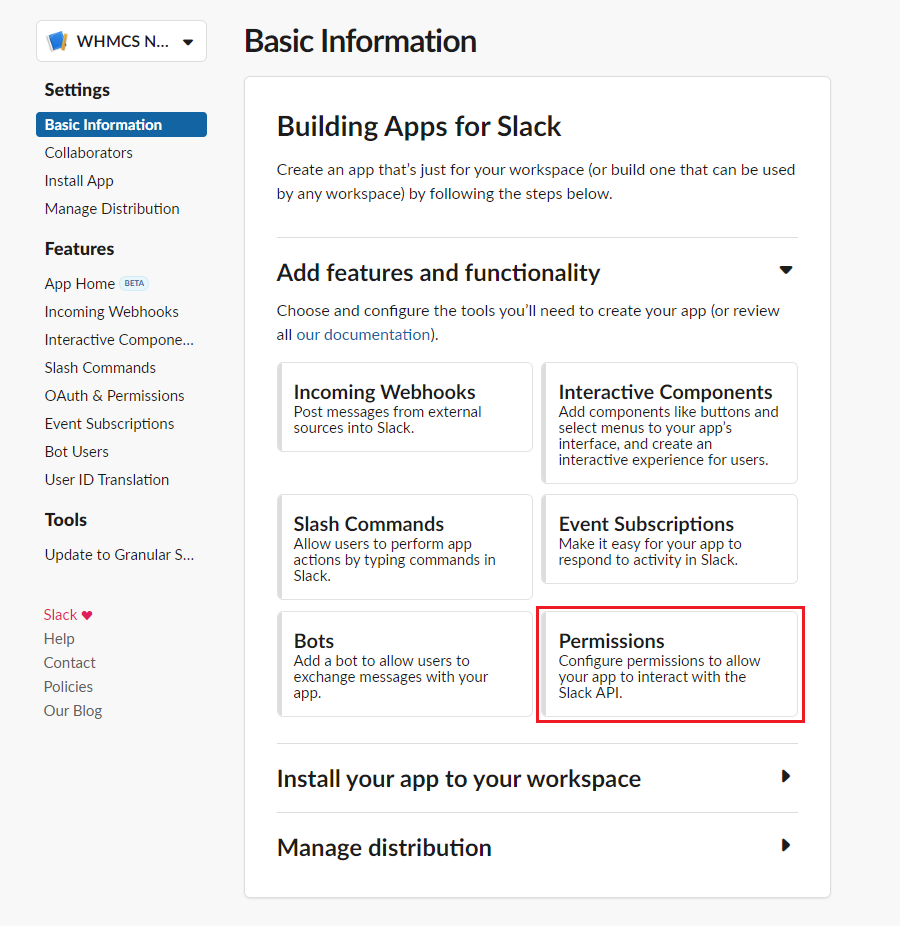
|
| You will be redirected to the 'OAuth & Permissions' section, where the 'Scopes' tab is available. To continue, click 'Add an OAuth Scope' . |
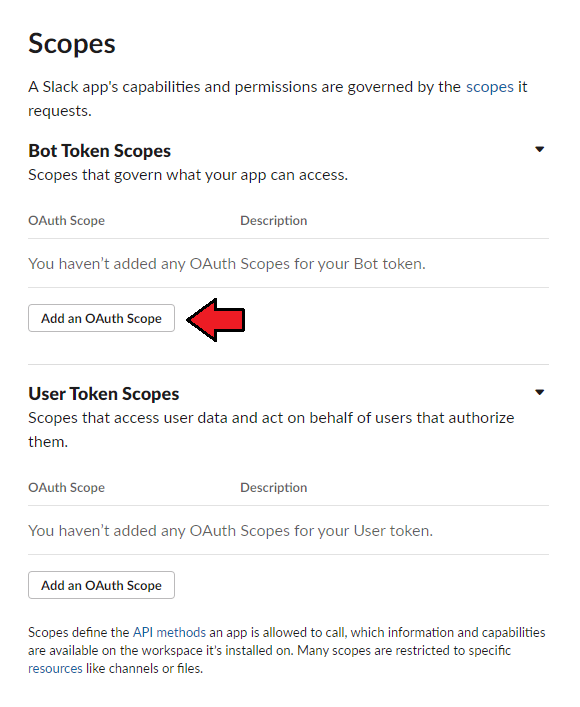
|
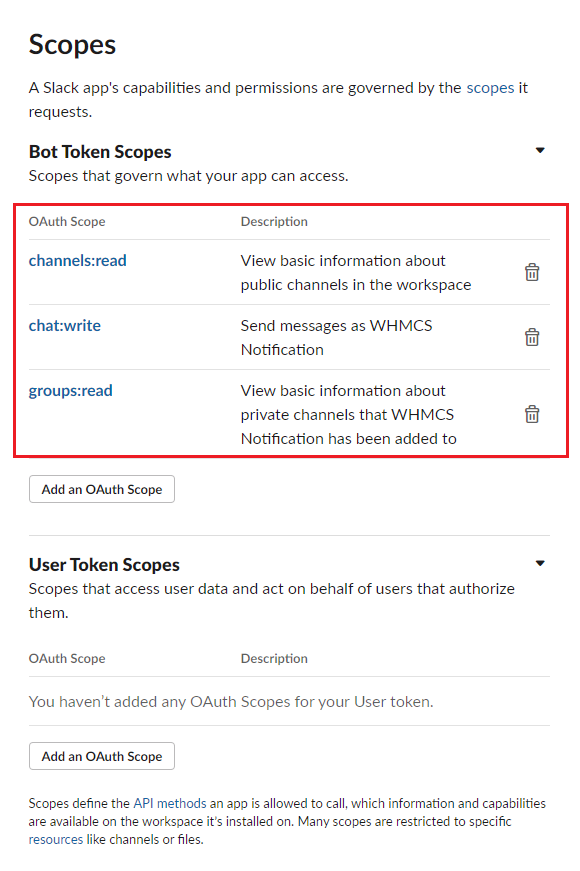
Search the following permissions and add them.
|
|
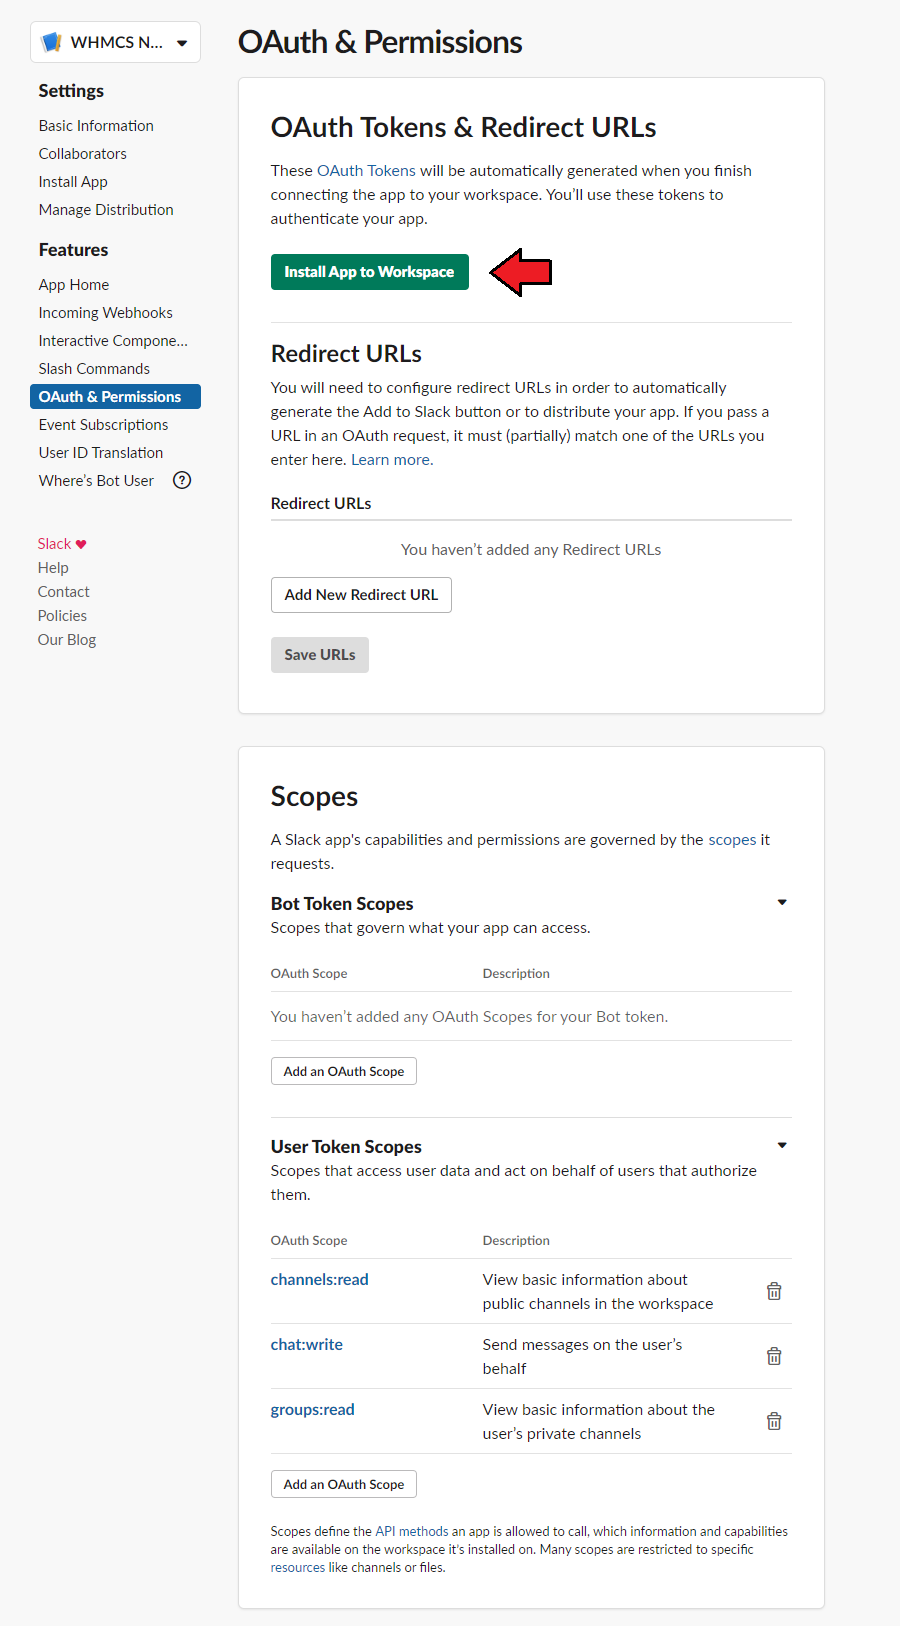
| When the above permissions are attached, you must confirm changes by pressing the 'Install App to Workspace' button. |
|
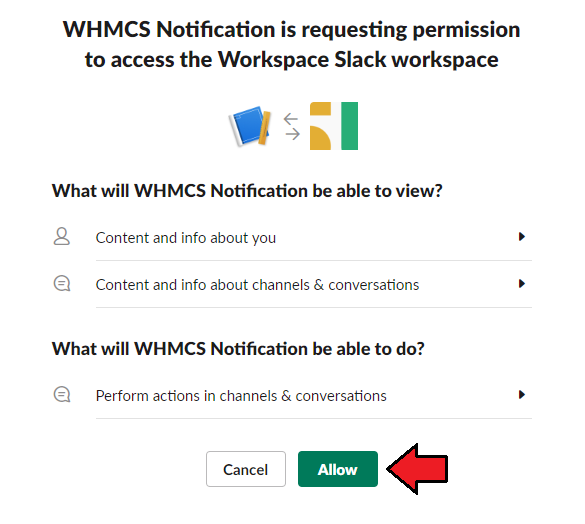
| You will be asked to grant a permission as follows. To carry on, press 'Allow' . |
|
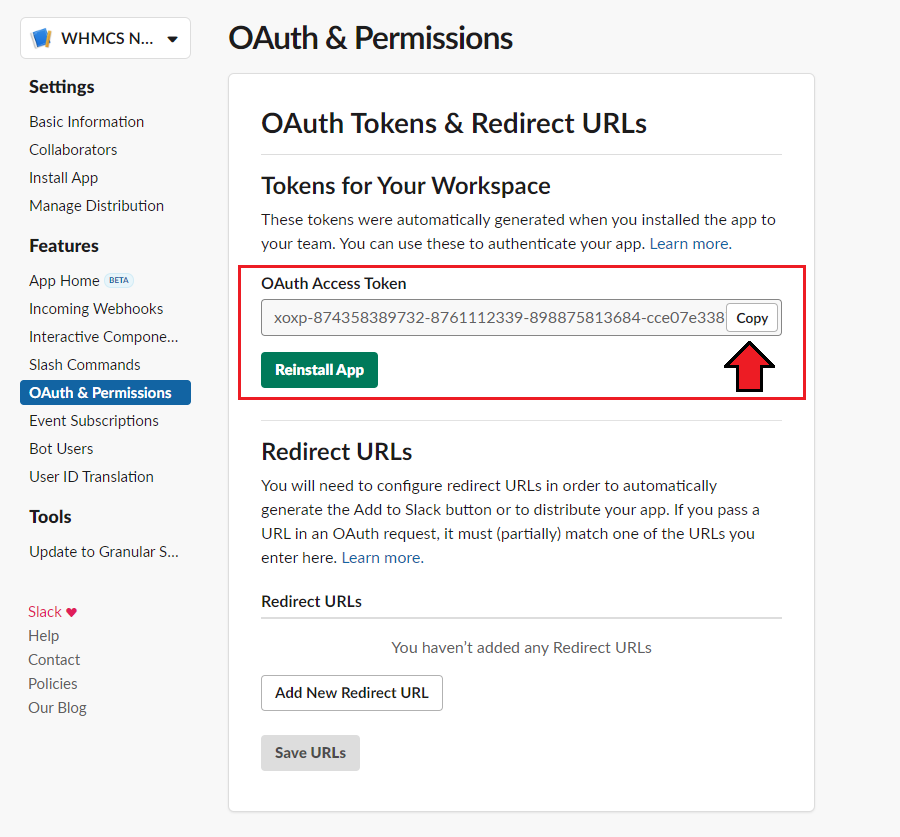
| Copy the 'OAuth Access Token' which will be generated in this step. |
|
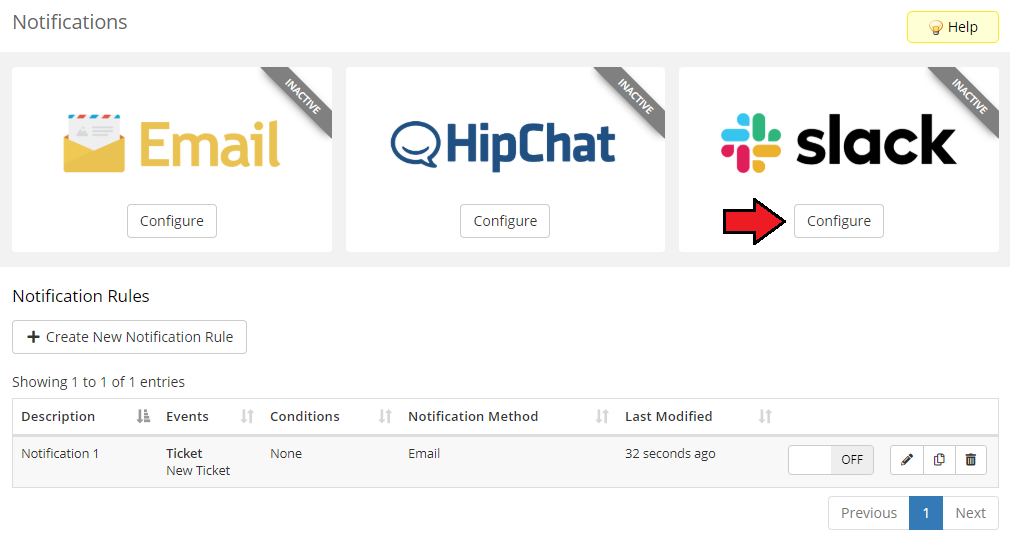
| Proceed to your WHMCS → Setup → Notifications → Slack and click on the 'Configure' button as presented below. |
|
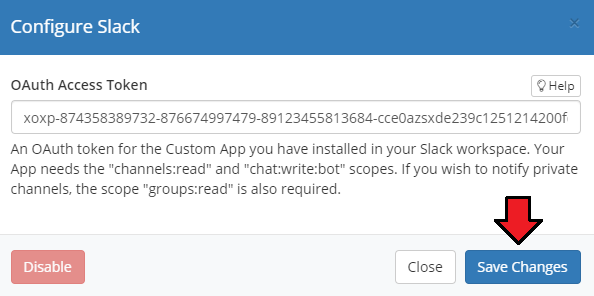
| Provide the 'OAuth Access Token' which you copied previously. When ready, save changes. If the connection is established properly, the active status will appear on the Slack icon. |
|
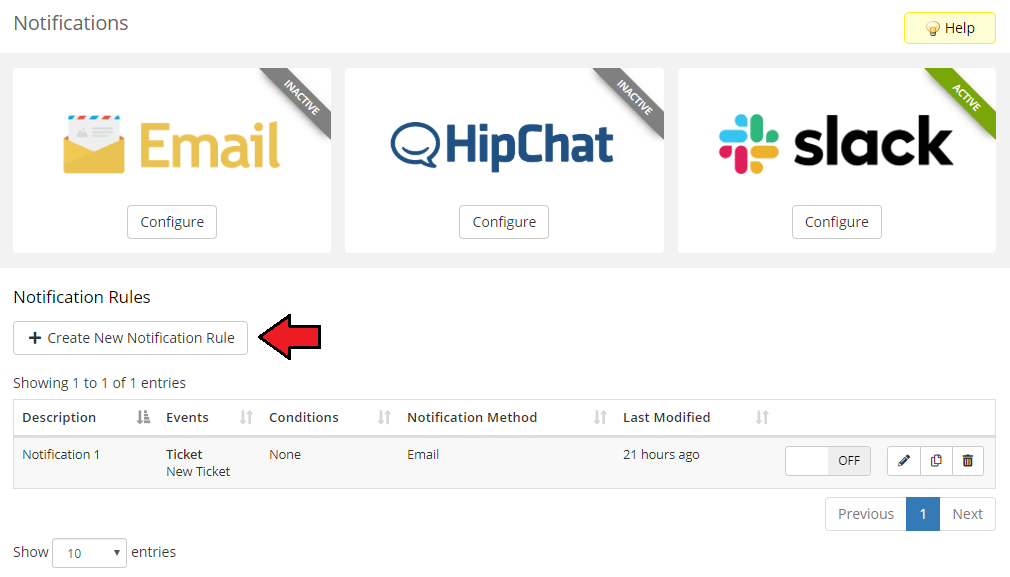
| Now, a new notification rule can be created here. |
|
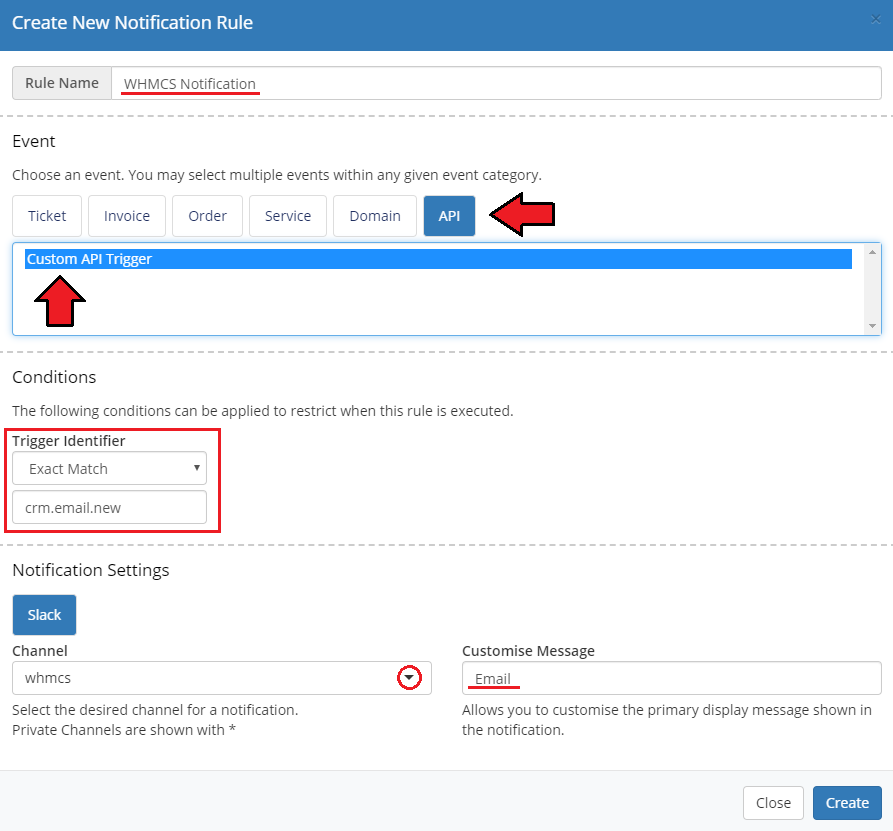
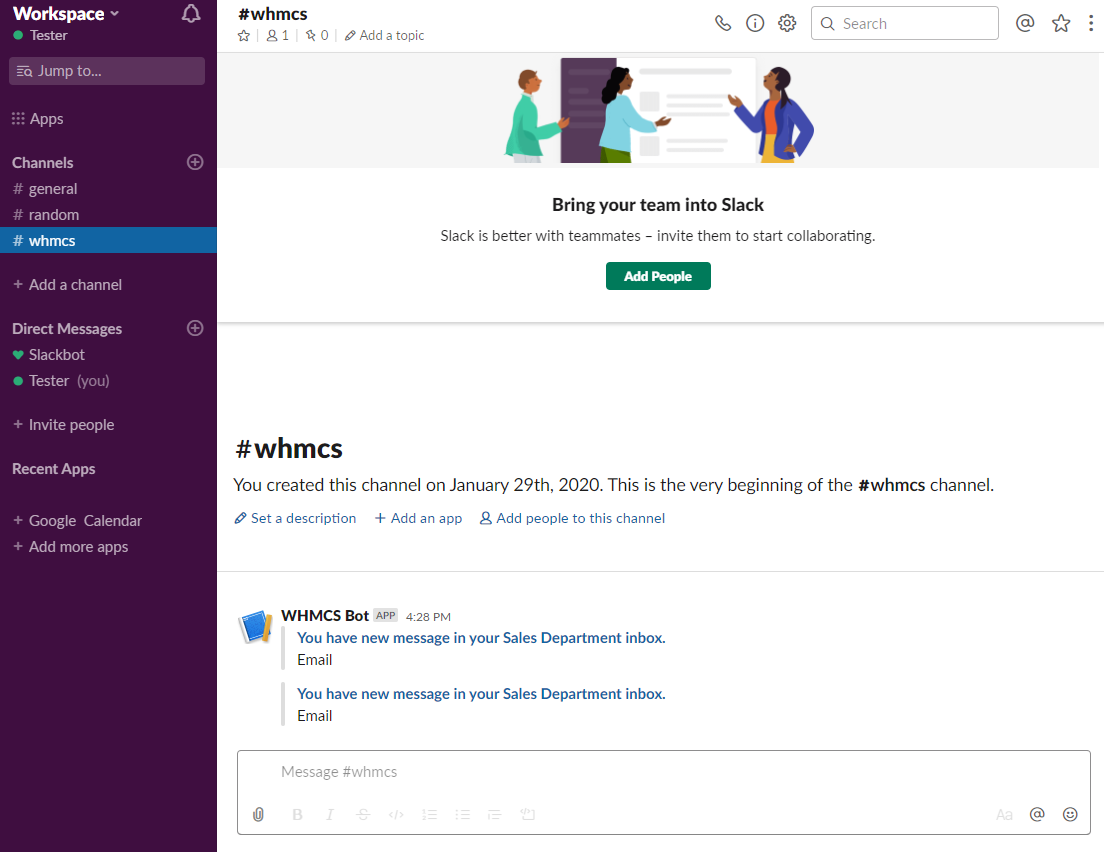
| In the newly opened window, provide the rule name, then choose 'API' from the 'Event' tab and click on 'Custom API Trigger' as underlined on the presented screen. Next, choose the 'Trigger Identifier' from the dropdown menu. Finally, select 'whmcs' as your 'Channel' and provide a desirable display message which will be shown in the notification. Make sure that you completed all required data and press 'Create' . |
|
| The final step is to configure your mailbox. Open CRM For WHMCS, go to 'Settings' → 'Mailboxes' and click 'Create Mailbox' . Once you fill in the data, press the 'Update' button. |
|
| If the configuration process has been successful, after running a cron job, you should receive new emails on your Slack which was chosen during the configuration process. |
|
| If you want to check more details about the configuration of notifications, please go to this page |
Workflow
| In order to familiarize you with the module even better, we are presenting here a sample workflow. In the beginning, let us point the differences between privilege groups:
|

|
| Storytelling Let us assume we have admin X with full privileges and admin Y who has permissions limited to a sales person.
|
Supported Variables
| The full list of supported variables for reminders and email templates: |
|
Reminders:
|
|
|
Email Templates:
|
|
Admin related (supported when sent to admin only):
|
| Some variables are of the 'array' type, and include variables of their own: |
{$contact.notes}:
|
{$contact.labels}:
|
Tips
| 1. If you want to see a specific part of your CRM, a single widget only, use full-screen mode for widgets. You will find it in the top right corner of each widget. |
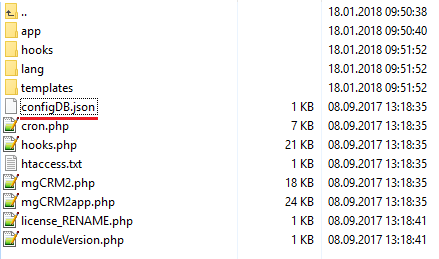
| 2. In the addon directory you can find the 'configDB.json' file which is used to setup by default the UTF-8 coalition and character set encoding for the module. You can simply edit this file according to your needs, or remove it to force the module to automatically obtain the configuration from your database source. |
|
The default content of this file contains the following lines:
{
   "collation": "utf8_unicode_ci",
   "charset": "utf8"
}
|
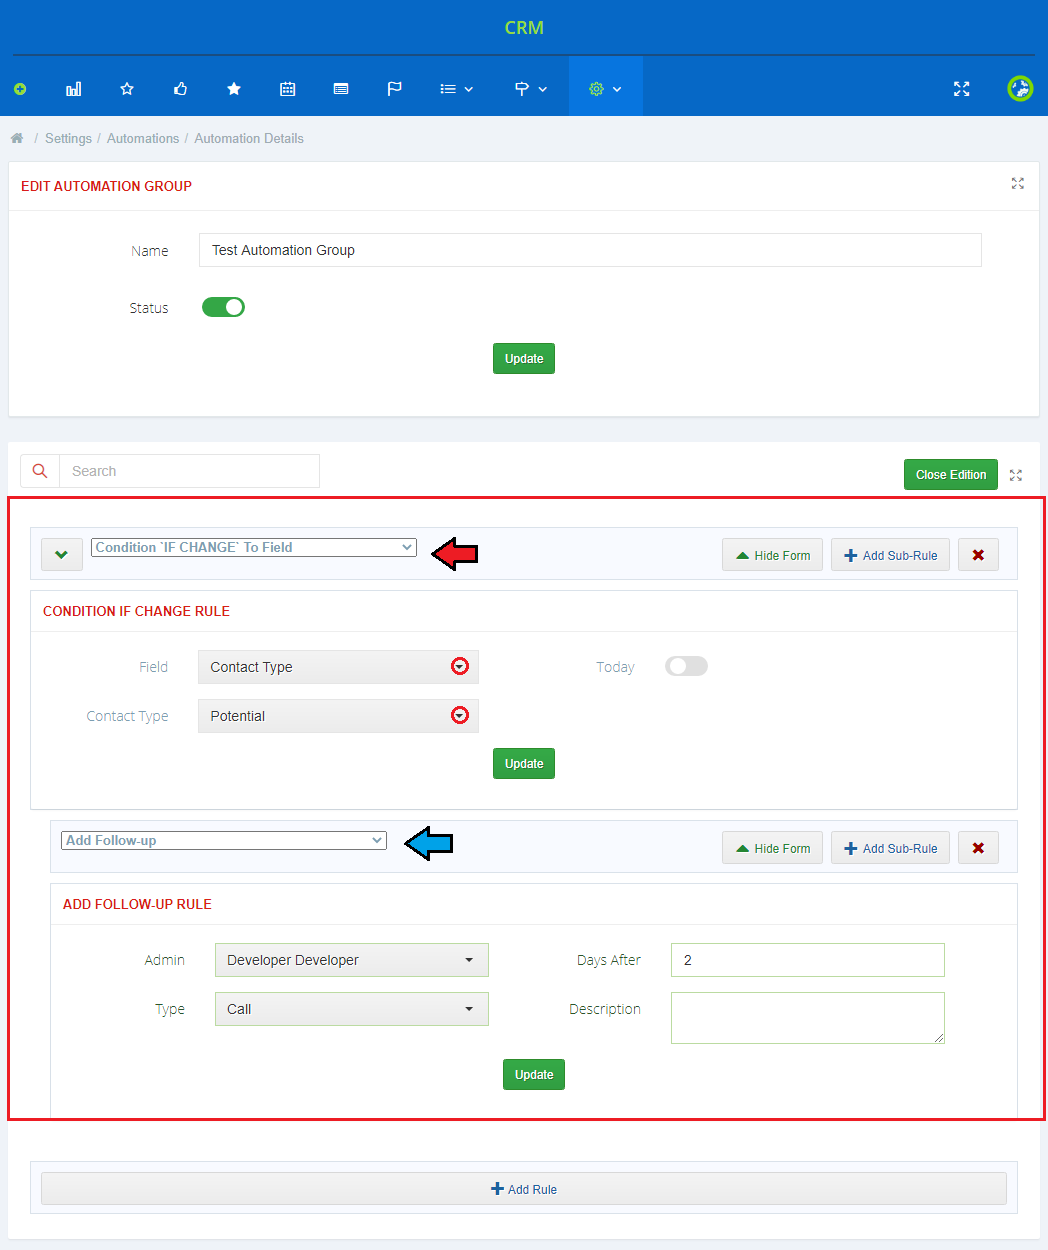
| 3. The module allows you to prepare automated follow-ups. As an example, you can set follow-up reminders every X days after the contact type has been changed. Simply, proceed to the 'Settings' → 'Automations' and add a new automation group. |
|
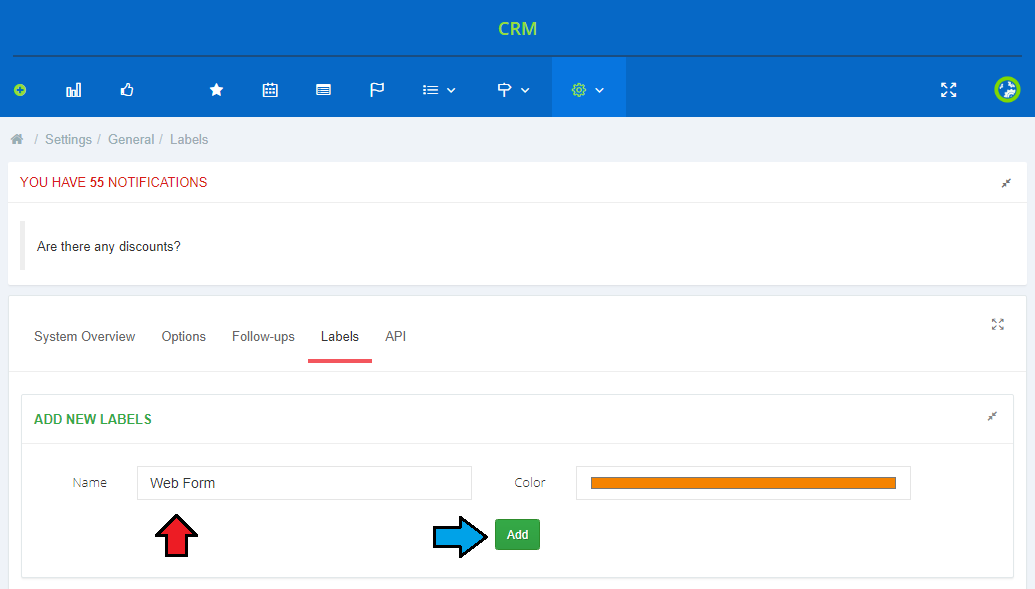
| 4. It is possible to send emails to clients that are collected by the 'Web Form' option. Firstly, add a new label for contacts created by the web form. Let’s name it 'Web Form' . |
|
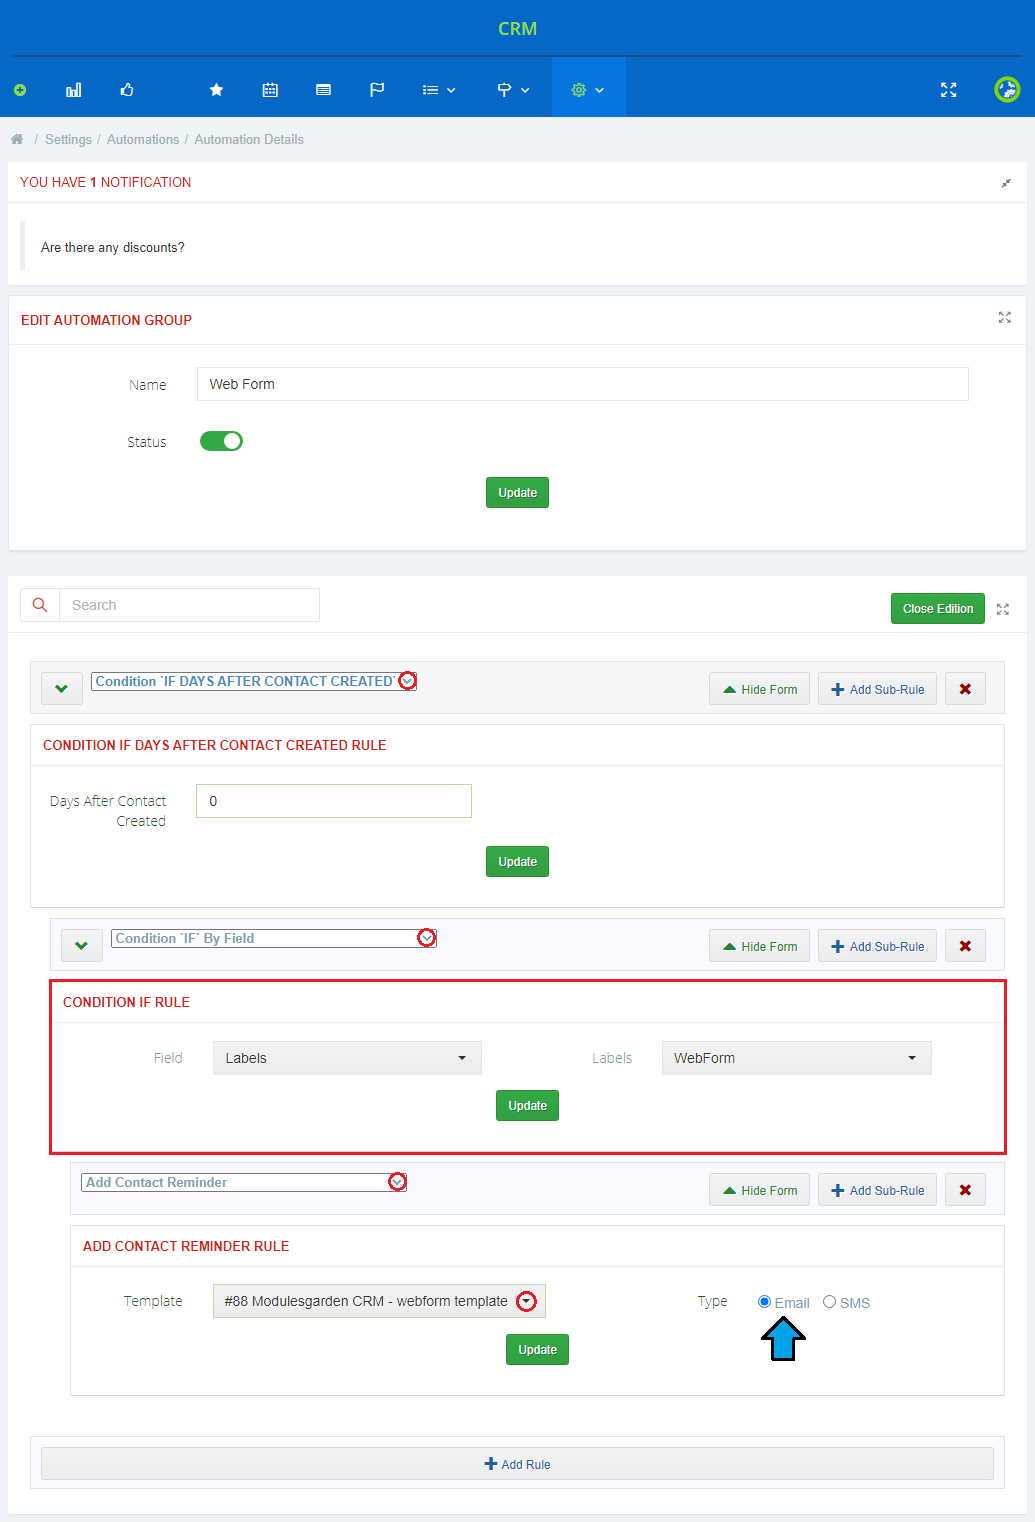
| Once you do this, you can now set a new automation group. Follow the example below to make sure that you complete all the necessary details. Thanks to this option, clients with the 'Web Form' label will receive email messages with the template you set here. |
|
5. To import all your WHMCS clients, you need to run the following cron command: php -q /your_WHMCS/modules/addons/mgCRM2/cron.php ImportClients |
Update Instructions
| An essential guidance through the process of updating the module is offered here. Ensure successful completion of the module update by carefully following each step, thereby preventing data loss or any unforeseen issues. |
Migration
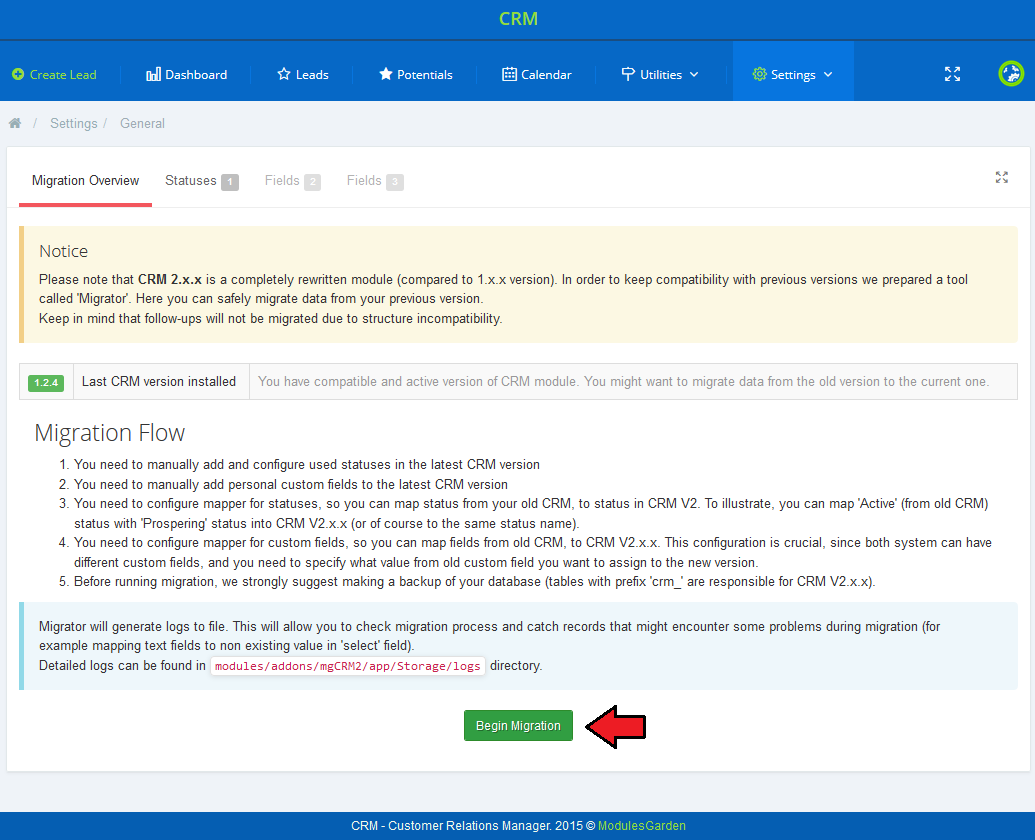
| If you have already used any of the previous versions of CRM, the very first thing that you need to do with your module before moving to any further is migrating the data from previous CRM to CRM V2.0.0. To do so, move to 'Addons' → 'CRM' → 'Settings' → 'Migrator'. Please note that not all data can be migrated due to some incompatibility between systems.
|
|
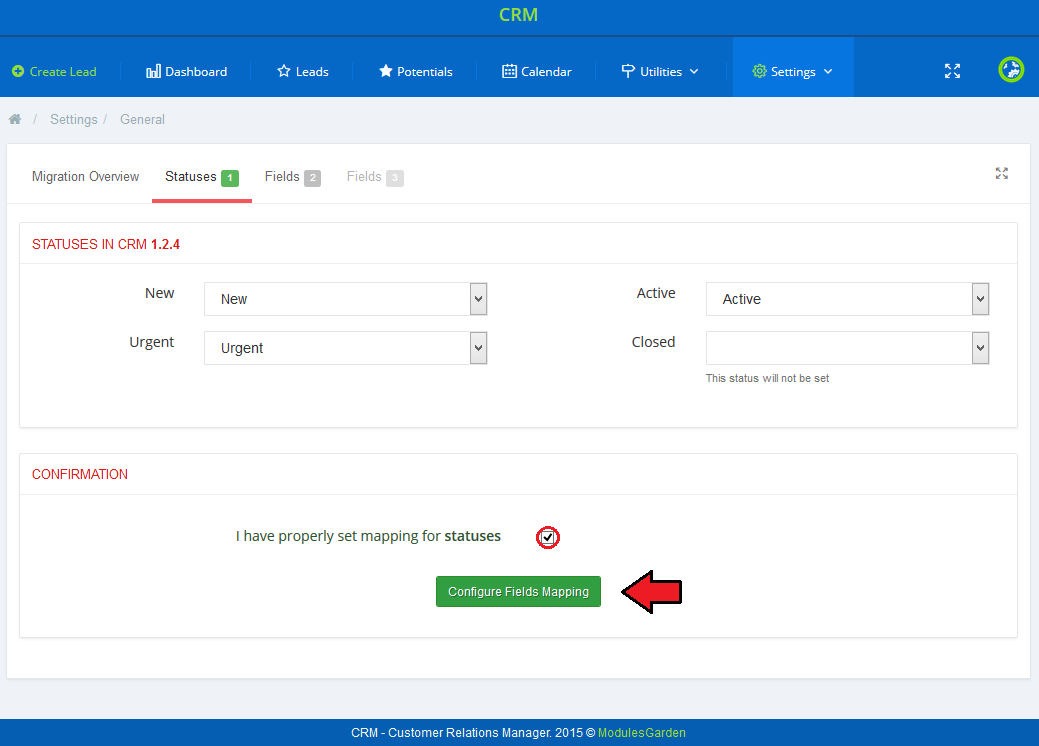
| Prepare mapping of statuses used in CRM V 1.2.4 that you wish to map to CRM V2.x. Confirm that you have finished the mapping correctly and then move to custom fields mapping configuration. |
|
| Display map fields used in CRM V 1.2.4, confirm proper configuration and move to the last step. |
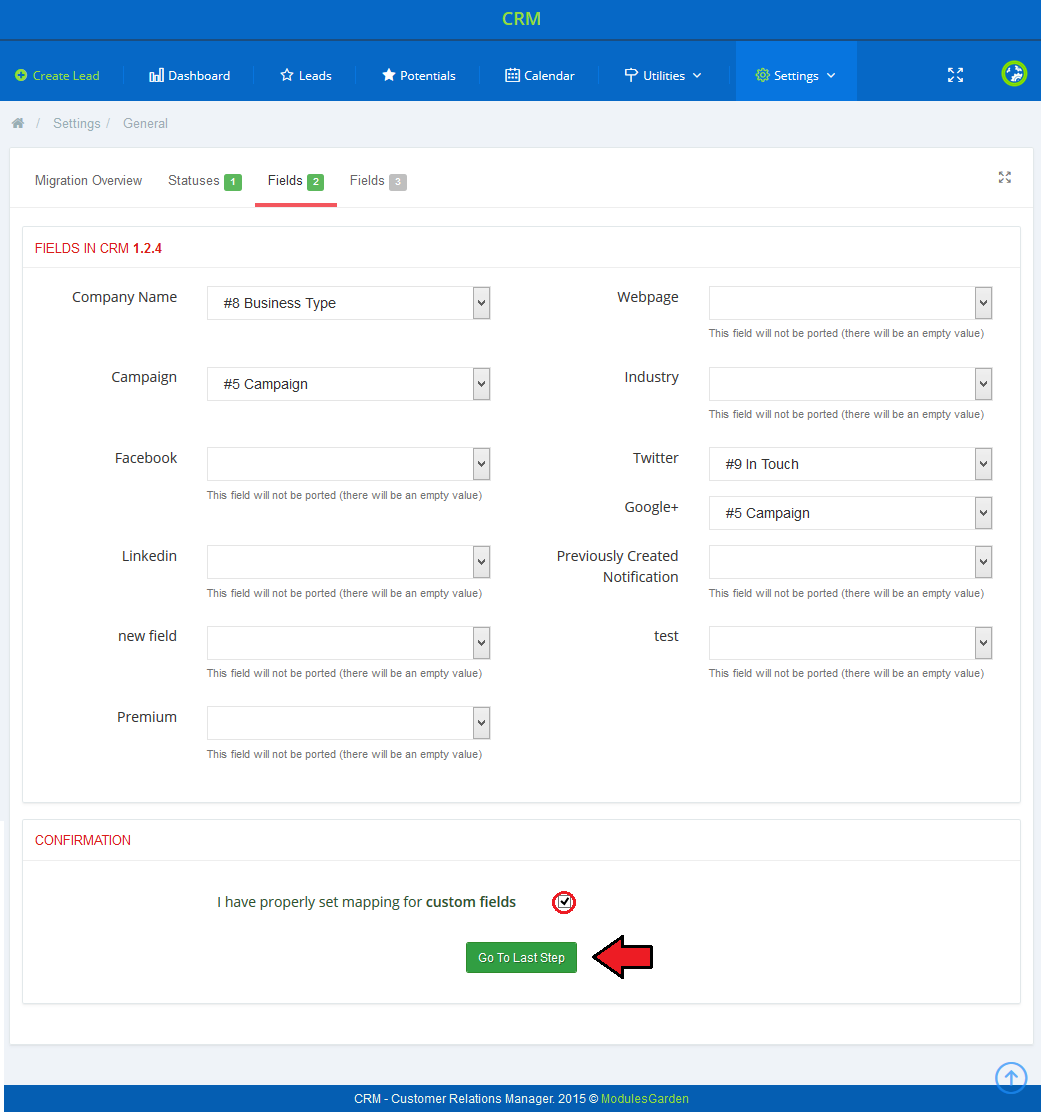
|
| Read carefully all the information about migration consequences, and if you agree with them, start the migration. |
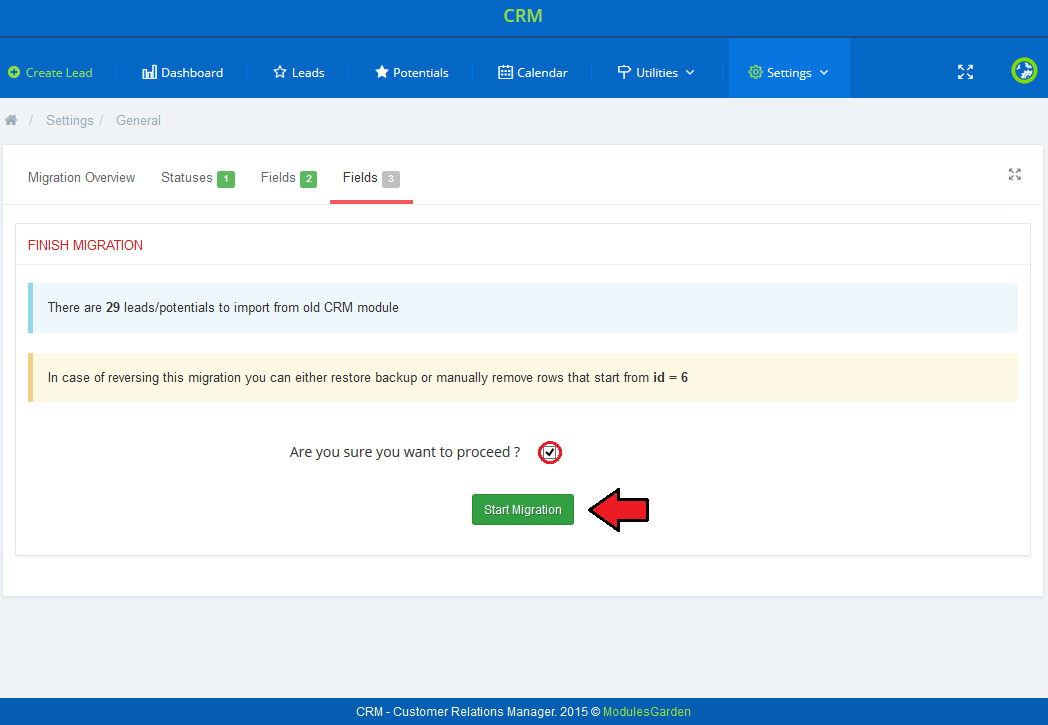
|
| Congratulations! You have successfully migrated your database from previous CRM to the latest version! Now, you can enjoy a much improved management of your contacts with potential clients. |
Upgrade Guide
| Seeking a solution that offers greater flexibility, customization tailored to your precise needs, and unrestricted availability? There is an option that not only proves to be cost-effective in the long run but also includes prioritized support services, making it a truly valuable investment. Opt for the Open Source version of your CRM For WHMCS module to unlock these benefits. Follow a comprehensive guide covering the transition process, the advantages it brings, and step-by-step instructions on what to do next after the order has been successfully finalized. |
Common Problems
| 1. When you have problems with connection, check whether your SELinux or firewall does not block ports. |
| 2. In case you have problems with your CRM, for example empty tables, no follow-ups in the calendar or you cannot add a new status, group, or follow-up, please make sure that your .htaccess or vhost do not block the module in any way. Underneath there is an exemplary input of a .htaccess file, which will unblock the connections and methods: RewriteCond %{REQUEST_FILENAME} !-f
RewriteCond %{REQUEST_FILENAME} !-d
RewriteRule ^(.*)crm.php(.*)$ /admin/crm.php [QSA, L]
<Limit PUT DELETE OPTIONS>
Order allow,deny
Allow from all
</Limit>
Nginx rewriting rule to pass CRM request trough crm.php file: location ~ ^/admin/crm.php/ {
try_files $uri $uri.html $uri/ /admin/crm.php;
}
Please note that admin folder may have a custom name. Remember to adjust its input to your naming. |
| 3. If you get an error saying that 'Directory <your_whmcs>/modules/addons/mgCRM2/app/Storage is NOT Writable. Unable to continue.' , please make sure that this folder has writable permissions set. |
| 4. If you keep getting the '404 Not Found' or 'Internal Server Error 500' message, please verify whether the file '<your_whmcs>/admin/crm.php' has its permissions fixed similarly to the remaining files in this folder. (usually 644) Please note that the admin folder may have a custom name. |
| 5. If you cannot see the import and export options for the .XLSX or .ODS formats, please make sure you have the PHP Zip library installed on your server. Otherwise, you will not be able to use these extensions. |
| 6. We do not recommend using CRM For WHMCS module either with Multibrand For WHMCS or with Resellers Center For WHMCS. Integration between these modules is hampered due to specific features of each one of them and their individual work flow. |
| 7. If you enabled 'Synchronization Contact Details Upon Change' option here, and the changes do not synchronize,
please refresh your page or use the Ctrl+Shift+R keyboard shortcut to perform a hard reload of your page. |