Proxmox Proxy Application
Contents |
About Proxmox Proxy Application
| The purpose of maintaining and utilizing the 'Proxmox Proxy' application is to separate the user from the server infrastructure. To use the console without a proxy, users require access to, for example, the Proxmox server. However, with proxy enabled this requirement is eliminated. Before you begin the process of connecting the console to the server through a proxy, you need to download the proxy application file. |
- Supported Connections:
| ✔ Proxmox VE VPS & Cloud For WHMCS |
| ✔ Proxmox VE Cloud VPS For WHMCS |
| ✔ Virtuozzo Hybrid Server For WHMCS |
Proxmox Proxy Installation For Console Connection
| 1. Create a new VPS server, which you may run on a Proxmox server. It is advised to use the KVM virtualization type. Warning! The used VPS may NOT have any services running, such as: PHP, WebServer (e.g. apache, nginx) or MySQL server. |
2. Configure the network on the virtual machine, and make sure the network works correctly, to do so you may use the below command:
ping modulesgarden.com If everything is fine, ensure that basic server security settings have been established. |
| 3. Log into the machine on which you are going to set up proxy. |
| 4. Install the docker engine and the docker compose:
https://docs.docker.com/engine/install/ |
| 5. Upload the application files into a proper directory, eg: /root/proxmox-proxy (create if needed). Then unzip the files. |
6. Move to the following catalog:
cd /root/proxmox-proxy Note that the exact directory depends on the previous step where you uploaded the files. |
| 7. Purchase or generate your own SSL certificate, and then use the certificate to overwrite the following files: 'nginx/localhost.crt' and 'nginx/localhost.key' . |
| 8. Find the 'example.env' file and rename it to '.env'. Then open the just renamed '.env' file and provide a random set of signs to create the database and root passwords: DB_PASSWORD and MYSQL_ROOT_PASSWORD |
9. Run the below command:docker-compose up --build -d |
10. Move to docker container:
docker exec -it proxyphp bash and run the installation script: php -q /var/www/html/installer.php install When ready, find the API Key and keep it safe, you will need it later on when pasting the data into the module addon, see point 12 for details. |
11. Check if the MTU of the docker interface (usually docker0) is lower or equal to the MTU of the main network interface (usually eth0) with the following command:
ifconfig If the MTU of the docker is higher than the MTU of the main network interface, create a new file: /etc/docker/daemon.json and include the MTU value that is lower than the MTU of the main network interface, like this: {
"mtu": 1400
}
|
12. Next, copy your machine IP address to WHMCS. You may check the IP address using the below command:
ip a Note: Remember to check the IP address in your virtual machine, not in the proxyphp container. |
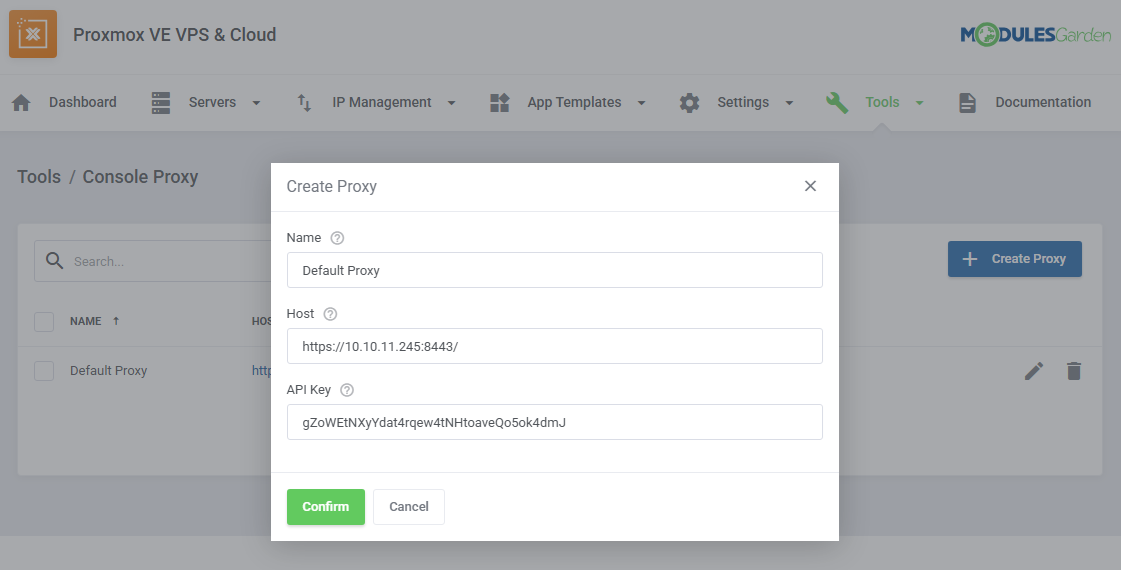
| 13. Configure all the required data in the module addon in your WHMCS. Below we will illustrate the proxy configuration based on the Proxmox VE VPS & Cloud addon example. For other modules, this section may look slightly different. Go to: Addons → Proxmox VE VPS & Cloud Addon → Tools → Console Proxy.
|

|
| Next, go to: Addons → Proxmox VE VPS & Cloud Addon → Settings → General Settings. At the bottom, locate the Console Proxy section and select the desired connection from the Proxmox Proxy dropdown - includes all connections added in step above. |

|
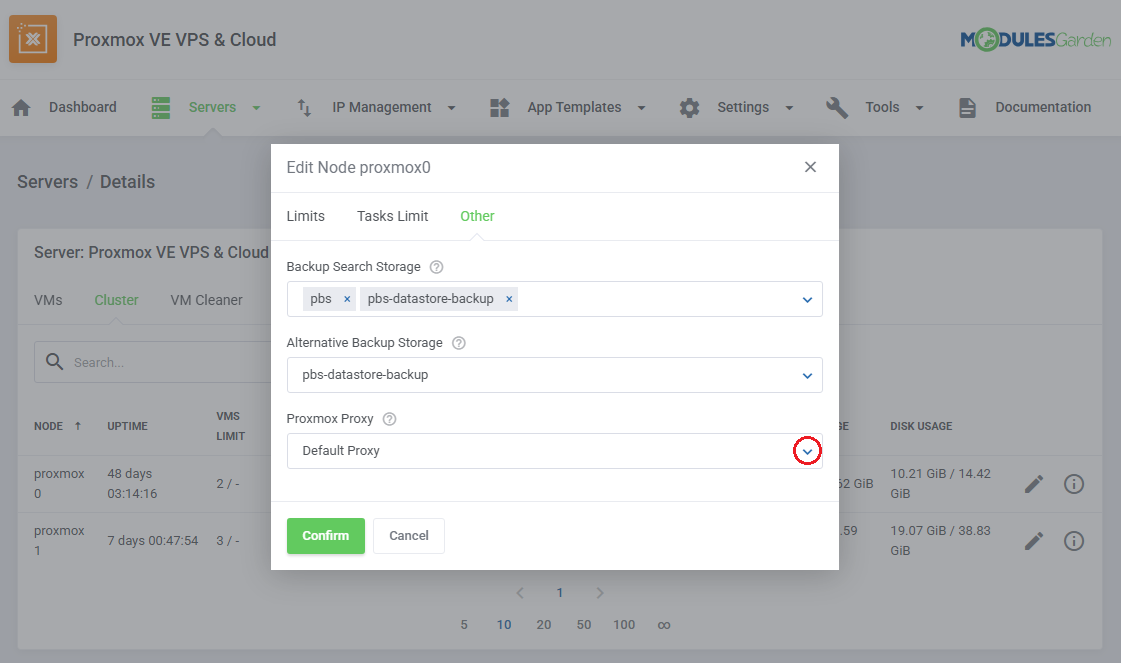
| You can also assign a separate proxy to each node individually. To do this, open the server details → Cluster tab → Node Details → Other tab and assign a proxy there in the Proxmox Proxy dropdown. If no proxy is set at the node level, the one selected in General Settings will be used by default. |

|
| 14. Make sure the server works. In order to do so, please open the address: https://{vmip}:8443. Remember to replace {vmip} with a valid virtual machine IP address, for example: https://192.168.8.113:8443/ |
| 15. Finally, try to open the noVNC console on your WHMCS Proxmox product to check if the proxy configuration is working properly. |
Important: If your certificate expires in the meantime, you will need to buy/generate a new one and follow the below steps:
docker-compose up --build -d |
Note: If you ever encounter an iconcube error while rerunning the 'docker-compose up' command, delete all local docker images related to your docker file using the following command and try again.
$ docker rmi -f $(docker images -a -q) |
Proxmox Proxy Update
| Updating the Proxmox Proxy Application - by ModulesGarden When a new version of the proxmox proxy application is released, follow these steps to complete the update process:
docker-compose pull docker-compose down docker-compose up -d --build |
| Container Update - by Third-Party Vendor The Proxmox proxy is an application developed by ModulesGarden, relying on Docker containers provided by third-party vendors. docker-compose pull docker-compose down docker-compose up -d --build Important: In case of container update, there is no need to configure anything in the proxmox proxy application itself. |
Proxmox Proxy Management
To understand how the Proxmox Proxy application operates, consider the following steps:
|
Increased Security
To enhance the security of your infrastructure, we recommend implementing the following measures:
|