Support Tickets Allocator For WHMCS has reached End of Support (EOS) and is no longer actively maintained. The module remains available for purchase, including the Open Source version and License Upgrade at a discounted price. Current license subscriptions continue and stay valid for future renewals.
Support Tickets Allocator For WHMCS is designed to automate the process of allocating tickets among departments and admin users.
The allocation is performed on the basis of three determinants (keywords, products, and ticket priorities) within the office hours, which can be configured for each department.
The module will allow you to set the limit of tickets opened per admin. It also has the option to send automatic notifications as reminders that a ticket remains unanswered.
Moreover, you will be able to set the deadline for a reply. If the destined admin user exceeds it, the ticket is reassigned to another staff member.
|
| ✔ Assign Tickets Basing On Defined Rules Automatically
|
| ✔ Move Tickets Between Departments If No Assignee Is Found
|
| ✔ Define Tickets Movement Between Departments Using Reserve Departments
|
| ✔ Reassign Ticket If 'No Reply Time' Has Passed
|
| ✔ Send Email And Slack No Reply Notifications
|
| ✔ Assign Tickets In Departments Within Their Office Hours Only
|
| ✔ Create Rules Defining Tickets Assignment
|
| ✔ Define Department Office Hours And Reserve Department
|
| ✔ Define Lines Of Support Per Department
|
| ✔ Assign Slack Channel For Each Department
|
| ✔ Allow Assignment To Offline Administrators
|
| ✔ Trigger Office Hours Usage
|
| ✔ Allow Tickets Movement Between Departments
|
| ✔ Define Backup Department For Tickets Movement
|
| ✔ Allow Tickets Rejection
|
| ✔ Configure Email Notifications
|
| ✔ Configure Slack Notifications
|
| ✔ Define Reassignment Time
|
| ✔ View Brief Summary Of Tickets Assignment
|
| ✔ Define Keywords And Relations Between Them
|
| ✔ Set Up Maximum Tickets Limit
|
| ✔ Choose Products Triggering Rule Without Keyword Check
|
| ✔ Choose Ticket Priorities Required For Checking Rule
|
| ✔ Slack Integration - Notify Admins About Awaiting Tickets Via Slack
|
| ✔ Supports PHP 8.2 Back To PHP 7.4
|
| ✔ Supports WHMCS V8.11 Back To WHMCS V8.8
|
| ✔ Requires ionCube Loader V13 Or Later
|
Installation
Support Tickets Allocator For WHMCS has reached End of Support (EOS) and is no longer actively maintained. The module remains available for purchase, including the Open Source version and License Upgrade at a discounted price. Current license subscriptions continue and stay valid for future renewals.
This tutorial will show you how to successfully install and configure Support Tickets Allocator For WHMCS.
We will guide you step by step through the whole installation and configuration process.
|
| 1. Log in to our client area and download the module.
|
2. In the downloaded file you might find one or two packages that support different PHP versions.
In the most recent versions of the module, you will find only one package that supports PHP 7.2 and later.
|
Previous updates of the module may contain two packages dedicated to various PHP versions.
The first one supports PHP 5.6 up to PHP 7.1, and the second one addresses PHP 7.2 up to PHP 7.4.
Note: Keep in mind that PHP versions 5.6 up to 7.1 are no longer officially supported and their security issues are not fixed or released anymore. Find more info here.
|
| Note: You can check the current PHP version in your WHMCS. To do so, proceed to 'Utilities' → 'System' → 'PHP Info'.
|
3. Extract the package and upload its content into the main WHMCS directory.
The content of the package to upload should look like this.
|
4. When you install Tickets Allocator For WHMCS for the first time you have to rename 'license_RENAME.php' file.
The file is located in 'modules/addons/SupportTicketsAllocator/license_RENAME.php' . Rename it from 'license_RENAME.php' to 'license.php' .
|
5. In order to configure your license key, you have to edit the previously renamed 'license.php' file.
Enter your license key between quotation marks as presented on the following screen. You can find your license key in our client area → 'My Products' .
|
6. Now you have to activate the module in your WHMCS system.
Log in to your WHMCS admin area. Go to 'Setup' → 'Addon Modules' . Afterwards, find 'Support Tickets Allocator' and press 'Activate' button.
|
7. In the next step, you need to permit access to this module.
To do so click on 'Configure' button, tick 'Access Control' near desired admin role groups, and press 'Save Changes' .
|
8. You have just successfully installed Support Tickets Allocator For WHMCS!
You can access your module under 'Addons' → 'Support Tickets Allocator' .
|
Configuration and Management
Support Tickets Allocator For WHMCS will coordinate and systematize the work of your support team through the most efficient and dynamic allocation of tickets to adequate people.
Additionally, you can adjust the allocation rules according to your personal and business needs.
|
Configuration
| We can move now to the proper configuration of the module itself. In the 'Configurations' page you can set all rules according to which tickets will be allocated to certain departments and then admin users.
|
Cron Jobs
First of all, you need to set up a Cron Job. We suggest that it should be run every 5 minutes to keep track of all tickets as they arise.
Every cron job run will detect all unassigned tickets and attempt to allocate them to the most adequate admin users in accordance with the rules set.
|
| Let's have a look now at the rules you may issue.
|
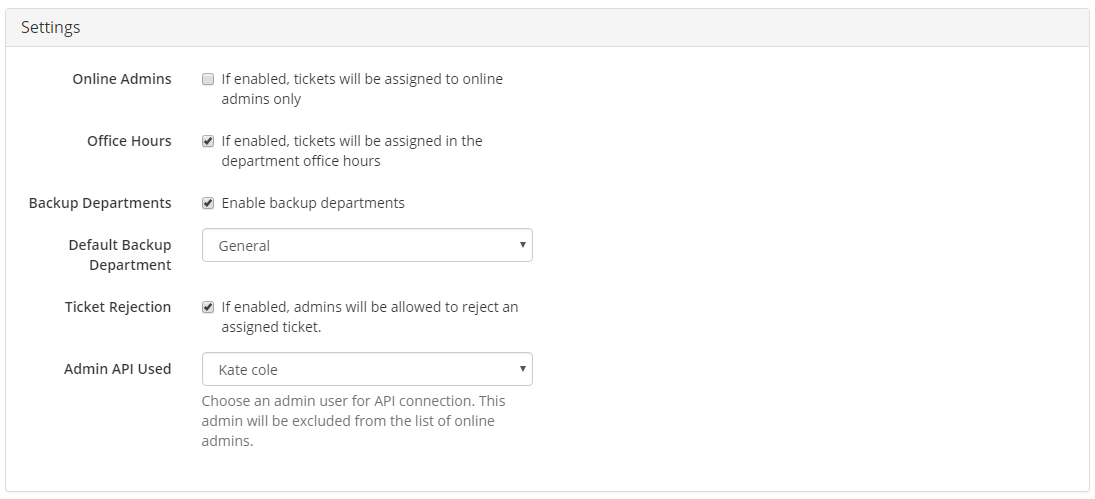
Settings
In the 'Settings' part you can state which rules should be enabled and taken into consideration while allocating tickets:
- Online Admins - decide if tickets will be assigned to both online and offline administrators or to online administrators only.
- Office Hours - decide if tickets will be allocated into departments with respect to the hours departments work. You can declare the hours later on.
- Backup Departments - decide if backup departments will be allowed. Enabling this option, you can define backup departments that will be second in line to be chosen to allocate the ticket to.
Provided the first department does not currently correspond with the requirements.
- Default Backup Department - state here a department that will be automatically chosen to allocate the ticket to if no other backup department meets the conditions.
- Ticket Rejection - decide if admin users should have the right to refuse or accept the tickets directed to them.
- Admin API User - enter here an admin user who will not be visible as a logged-in user and will not be included in the allocation process.
|
|
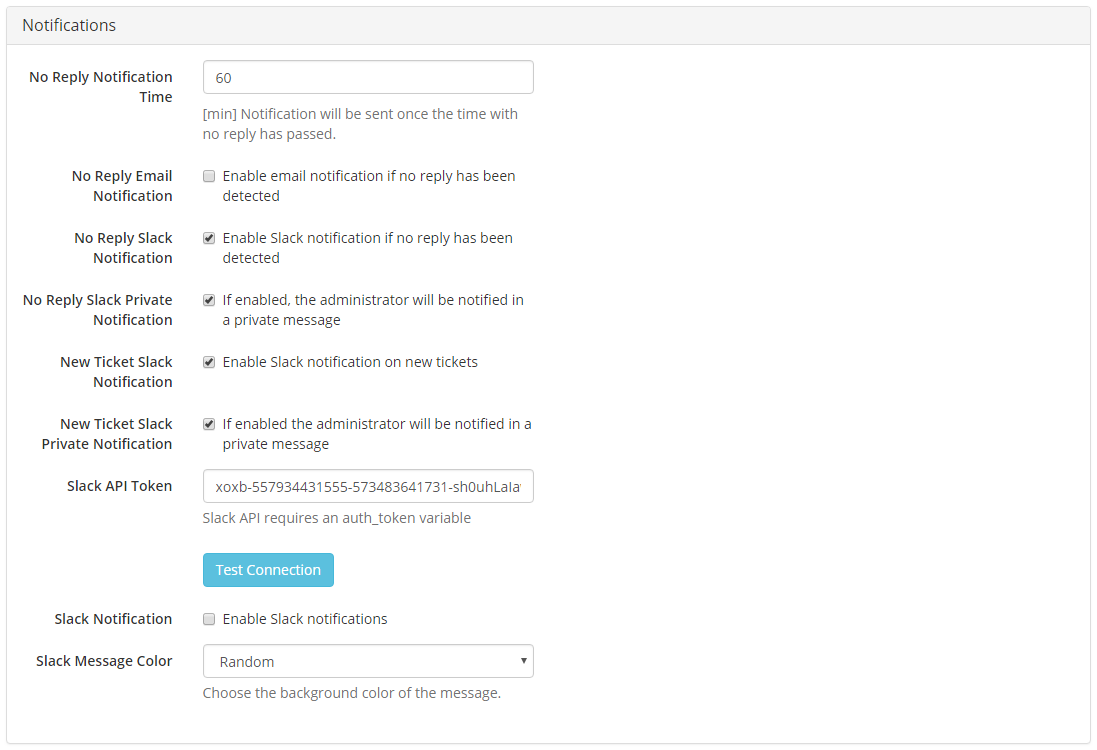
Notifications
Set 'Notifications' standards:
- No Reply Notification Time - notification will be sent to an admin user if the assigned ticket remains unanswered for the specified here period of time
- No Reply Email Notification - email reminder will be sent to an admin user if the assigned ticket remains unanswered
- No Reply Slack Notification - reminder will be sent to an admin user through Slack if the assigned ticket remains unanswered
- No Reply Slack Private Notification - private reminder will be sent to an admin user through Slack if the assigned ticket remains unanswered
- New Ticket Slack Notification - notification about new tickets will be sent to an admin user through Slack
- New Ticket Slack Private Notification - private notification about new tickets will be sent to an admin user through Slack
- Slack API Token - if you enabled Slack Notification, enter Slack API variable here to connect; test the connection then.
Learn how to generate the keys in a section dedicated to Slack Integration
- Slack Notify - defines if notifications will be sent via Slack
- Slack Message Color - allows you to define notification background colors
Important: The administrator must use the same email address in Slack as in WHMCS system. Otherwise, users will not be matched and notification about private messages will not be sent.
|
|
Tickets
Manage 'Tickets' set-up here:
- Maximum Tickets - define the upper limit number of tickets an admin user can have assigned
- No Reply Time - If a ticket remains unanswered for a specified here time period, it will be redirected to another available admin user
|
Departments
In 'Departments' tab you can view and edit all the support departments that exist in your WHMCS system.
On the following screen you can see a list of departments with:
- name of the department
- its email address
- assigned admin users
- office hours - if enabled
|
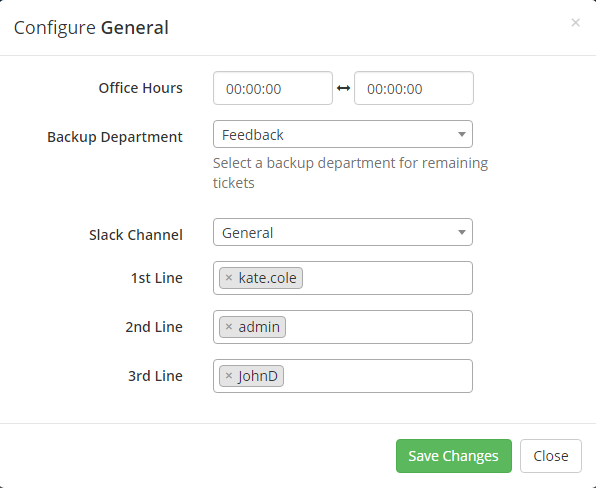
Configure department's settings:
1. Define working hours of the department - provided option 'Office Hours' has been enabled.
2. Choose 'Reserve Department' - in case the number of allocated tickets has been exceeded or the department is currently beyond its office hours,
- the ticket will be redirected to this reserve department - provided option 'Reserve Departments' has been enabled.
3. Assign Slack channel to a department.
4. Define lines of support - You can define the manner in which tickets will be assigned to administrators.
|
|
Module tries to assign ticket to admins from 1st line of support, then 2nd and at the end to 3rd line.
However, each line of support ticket assignment is divided into 4 steps. This means that every administrator must undergo a check before the next step is reviewed.
Steps:
- Ticket can be assigned on the basis of a rule that includes a product and keywords.
- Ticket can be assigned on the basis of a rule that includes a product only.
- Ticket can be assigned on the basis of a rule that includes keywords.
- Ticket can be assigned on the basis of a rule that includes only the number of tickets the admin can have assigned.
|
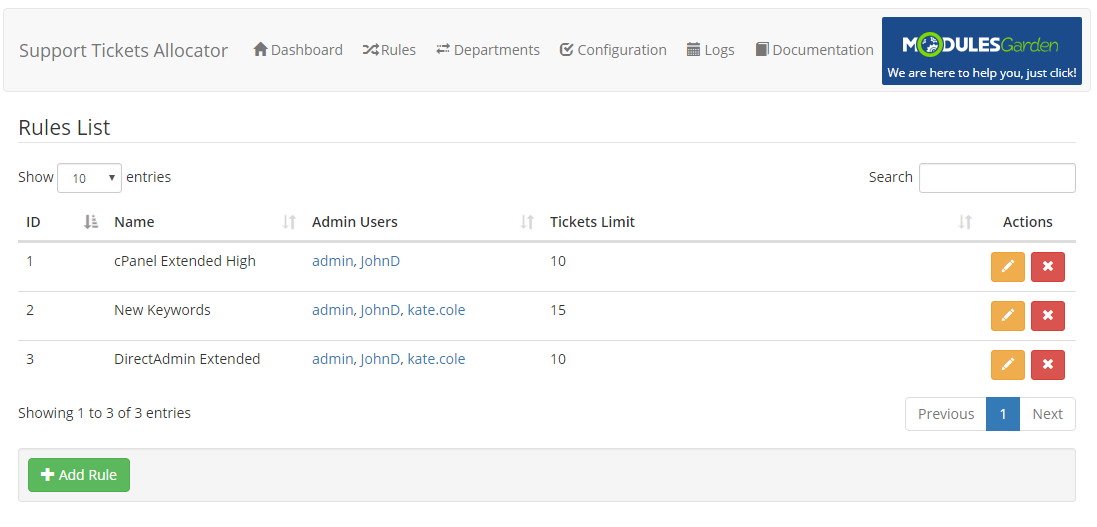
Rules
In the 'Rules' section, you are allowed to add new management rules, edit the already existing ones and delete them if no longer needed.
In order to add new rule specifications follow these steps:
|
|
|
1.Press Add Rule button.
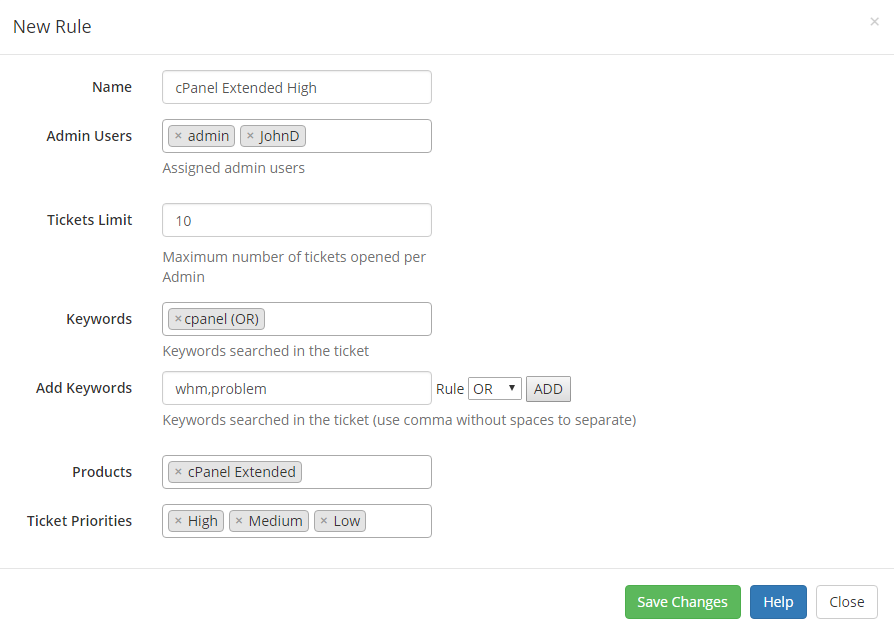
2.Fill in the necessary data in the box that will appear:
- Name - name the new rule
- Admin Users - assign admins that will belong to that group
- Maximum Tickets - define the upper limit of tickets that can be assigned to a user within this rule
- Add Keywords - define words which if appear in a ticket will be a key factor in the assignment process
- This field is not obligatory.
- Keyword adding rules:
- use a comma to add more than one word
- AND - all added words must appear in a ticket
- OR - at least one of the added words must appear in a ticket
- Products - enumerate products here, tickets concerning only these products will be assigned to this group of admin users
- This field is not obligatory, if you leave it blank, tickets concerning any products will be assigned to this administrator group.
- Ticket Priorities - only tickets with declared here priorities can be assigned according to this group of admin users
- This field is not obligatory, if you leave it blank, tickets of any priority will be assigned to admin users from this group.
|
|
If you have already added some rules, you will see their list with name, assigned admin users, and maximum number of allowed tickets.
Edit or delete rule specifications at any time if you wish.
|
Dashboard
In the main view of Support Ticket Allocator For WHMCS you will find the most crucial information gathered into three simple, clear, and convenient boards.
We will skip through them quickly now to make sure everything is comprehensible.
|
Summary
The 'Summary' table includes current tickets assignment statistics:
- number of currently opened tickets
- number of successfully assigned tickets
- number of tickets that are not assigned yet
- actual time on server.
|
Automation
The 'Automation' table includes information concerning Cron Jobs:
- when cron was run for the last time
- time period last cron covered
- number of tickets assigned in the last cron run
- number of tickets still not unassigned
- tickets that do not match any allocation rules
- percentage efficiency of assignments.
|
Staff Online
This table has a list of currently logged-in admin users, except for the user enumerated as Admin API User, with basic data on them:
- Admin Username
- number of tickets assigned to the user
- groups to which the admin is assigned
- number of tickets that still can be assigned to the admin user per group.
|
Staff Offline
Table including a list of all admin users, except the user enumerated as Admin API User and the currently logged-in ones:
- Admin Username
- number of tickets assigned to the user
- groups to which the admin is assigned
- number of tickets that still can be assigned to the admin user per group.
|
Tickets Rejection
This module allows admins to reject any ticket if 'Ticket Rejection' is enabled.
- This can be useful while experimenting with keywords.
- Rejected ticket will not be assigned to the admin again unless rejection is canceled.
|
| Any rejection can be canceled by the admin from the same place.
|
Logs
The 'Logs' section provides all information concerning any actions that took place in the system.
You will find entries with an ID number of the ticket, the date of the action, and a short description of the action, such as:
- tickets assigned
- information on notifications sent
- inability to assign tickets
- ticket rejection, etc.
Logs are updated with every Cron run and on every action taken, for example when a new ticket has been submitted.
You can delete a single entry or all entries at once.
|
Documentation
If you press the 'Documentation' tab, you will be straightforwardly redirected to the site you are currently reading.
Read the articles to find all you need to know to use the Support Tickets Allocator For WHMCS in full.
|
Slack Integration
Slack API Tokens
| In case you wish to integrate the module with the Slack tool, you will need to generate some data directly in Slack. Follow the steps below to generate the tokens.
|
| 2. Fill in the application name and choose your workspace, then press 'Create App' button.
|
| 3. In the next step choose tool: 'Bots' which you will need to configure in a moment.
|
| 4. Now, you will be redirected to the 'App Home' section. Click on the 'Review Scopes To Add' button.
|
5. In the 'Scopes' section, you need to add appropriate scopes for both 'Bot Token' as well as 'User Token' .
The required scopes are:
- channels:read
- chat:write
- users:read
|
6. Once added, proceed to 'OAuth Tokens & Redirect URLs' section and press ' Install To Workspace' .
|
| 7. Now, you will be asked to grant access to your workspace. Click 'Allow' .
|
8. Two types of keys will appear immediately:
'User' token, the first one on the screen below, and 'Bot' token (recommended to use).
Copy it and keep it safe as it will be necessary during the module configuration.
Important: In case when, for some reason, you decide to use an API token of "Legacy" type, you must be aware that private notifications to users will NOT be sent.
Only the ones sent to channels will be delivered correctly.
|
| 9. If you would like to modify a 'Bot Name' , you can come back to the 'App Home' section and click on the 'Edit' button as presented below.
|
Notifications
If you have enabled Slack notifications in the model configuration, you will be informed about tickets in the appropriate Slack channel.
That is how an exemplary notification may look like:
|
Logic
The module may seem complicated, below you can find two graphs illustrating how the module works.
Note 1: Following graphs do not show the usage of the failover department. It is used when all other reserve departments are checked.
Note 2: The module tries to assign tickets to an admin from the failover department if the previous assignment try fails.
A ticket is left unassigned until the next cron run if this also fails.
Note 3: The module sorts admins from departments by lines of support and according to the below steps:
- Tickets can be assigned on the basis of a rule that includes a product and keywords.
- Tickets can be assigned on the basis of a rule that includes a product only.
- Tickets can be assigned on the basis of a rule that includes keywords.
- Tickets can be assigned on the basis of a rule that includes only the number of tickets the admin can have assigned.
|
Update Instructions
An essential guidance through the process of updating the module is offered here.
Ensure successful completion of the module update by carefully following each step, thereby preventing data loss or any unforeseen issues.
Additionally, you will find a current list of supplementary actions necessary for a smooth update process there.
|
Upgrade Guide
Seeking a solution that offers greater flexibility, customization tailored to your precise needs, and unrestricted availability?
There is an option that not only proves to be cost-effective in the long run but also includes prioritized support services, making it a truly valuable investment.
Opt for the Open Source version of your Support Tickets Allocator For WHMCS module to unlock these benefits.
Simply click on either the Get Source Code or Upgrade To Lifetime button found on the product's page in our client area to complete the one-step upgrade process, with a dedicated discount already applied.
Follow a comprehensive guide covering the transition process, the advantages it brings, and step-by-step instructions on what to do next after the order has been successfully finalized.
|
Common Problems
| 1. In case of connection problems, please check whether your SELinux or firewall does not block ports.
|


