Payment Gateway Allocator For WHMCS
Contents |
About Payment Gateway Allocator For WHMCS
| Payment Gateway Allocator For WHMCS allows you to swap the available payment gateways and oblige single clients to cover their fees via a gateway of your preference. Set up the switching rules depending on the country and the state from which your customers are, their currency or a due invoice amount. The module supports all kinds of payment gateways, countries, states and currencies from all over the world. |
- Admin Area Features:
| ✔ Set Switching Rules Per Payment Gateway And WHMCS Client Group |
| ✔ Set Default Redirect Payment Gateways |
| ✔ Set Default Credit Card Payment Gateways |
| ✔ Add New Switching Rules To Payment Gateway Depending On Clients': |
| ✔ Country |
| ✔ State |
| ✔ Currency |
| ✔ Invoice Amount Threshold |
| ✔ Switch Gateways Based On Allowed And Blocked Rule Types |
| ✔ Copy Rule Settings From One Gateway To Another |
| ✔ Exclude Chosen Clients From Gateway Switching Rules |
| ✔ Toggle Payment Gateways Module Usage Only - Hide All Other Payment Gateways |
| ✔ Toggle Limitation Of Payment Gateways Depending On Country And State |
| ✔ Toggle Fallback Plan To Display WHMCS Default Payment Gateways If No Switching Rules Are Met |
- Client Area Features:
| ✔ Pay Through Personalized Payment Gateways Adjusted To Location, Currency And Order Amount |
| ✔ Change Payment Method Conveniently |
- General Info:
| ✔ Supports All Redirect And Credit Card Payment Gateways |
| ✔ Supports Every Country, State And Currency |
| ✔ Multi-Language Support |
| ✔ Supports PHP 8.3 Back To PHP 8.1 |
| ✔ Supports WHMCS Themes "Six", "Twenty-One" And "Lagom WHMCS Client Theme" |
| ✔ Supports WHMCS V8.13 Back To WHMCS V8.10 |
| ✔ Requires ionCube Loader V14 Or Later |
| ✔ Easy Module Upgrade To Open Source Version |
Installation and Configuration
| This tutorial will show you how to successfully install and configure Payment Gateway Allocator For WHMCS. We will guide you step by step through the whole installation and configuration process. |
Installation
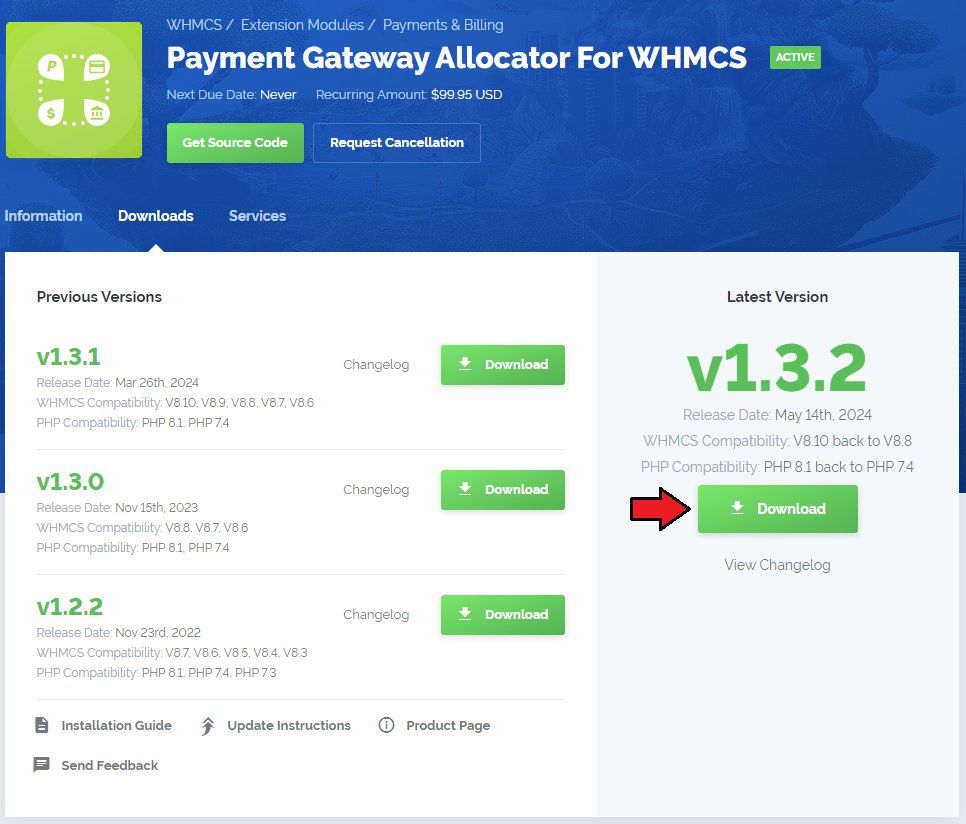
| 1. Log in to our client area and download the module. |
|
| 2. Extract the package and upload its content into the main WHMCS directory.
The content of the package to upload should look like this. |
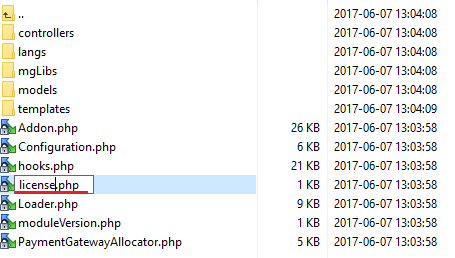
| 3. When you install Payment Gateway Allocator For WHMCS for the first time you have to rename 'license_RENAME.php' file. File is located in 'modules/addons/PaymentGatewayAllocator/license_RENAME.php'. Rename it from 'license_RENAME.php' to 'license.php'. |
|
| 4. In order to configure your license key, you have to edit the previously renamed 'license.php' file. Enter your license key between quotation marks as presented on the following screen. You can find your license key in our client area → 'My Products'. |

|
Configuration of Addon
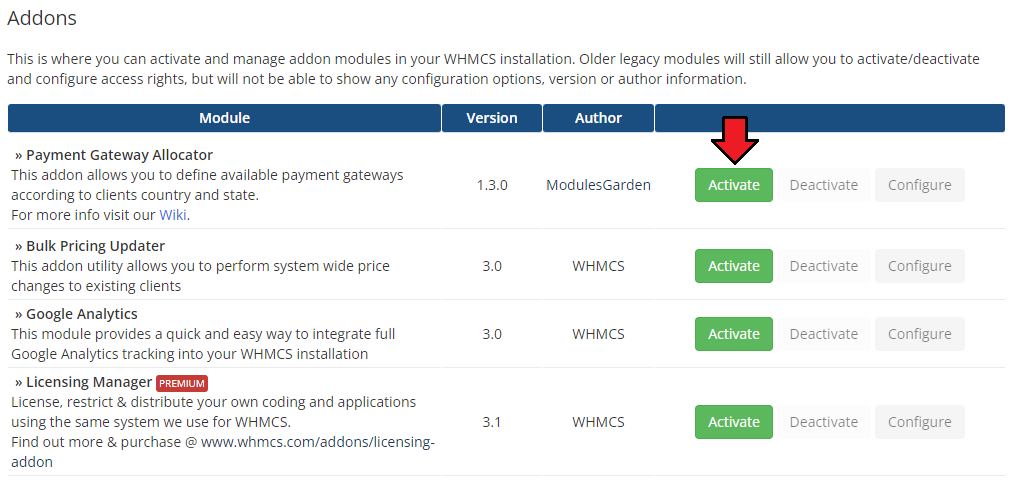
| 5. Now you have to activate the module in your WHMCS system. Log in to your WHMCS admin area. Go to 'Setup' → 'Addon Modules'. Afterwards, find 'Payment Gateway Allocator' and press 'Activate' button. |
|
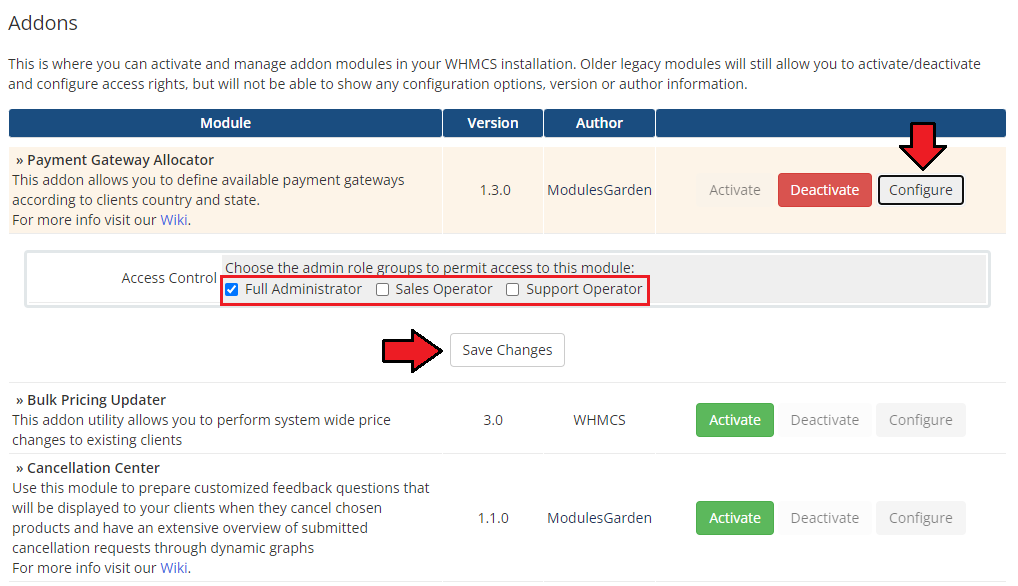
| 6. In the next step you need to permit access to this module. To do so click on 'Configure' button, tick 'Access Control' near desired admin role groups and press 'Save Changes'. |
|
Additional Steps Required
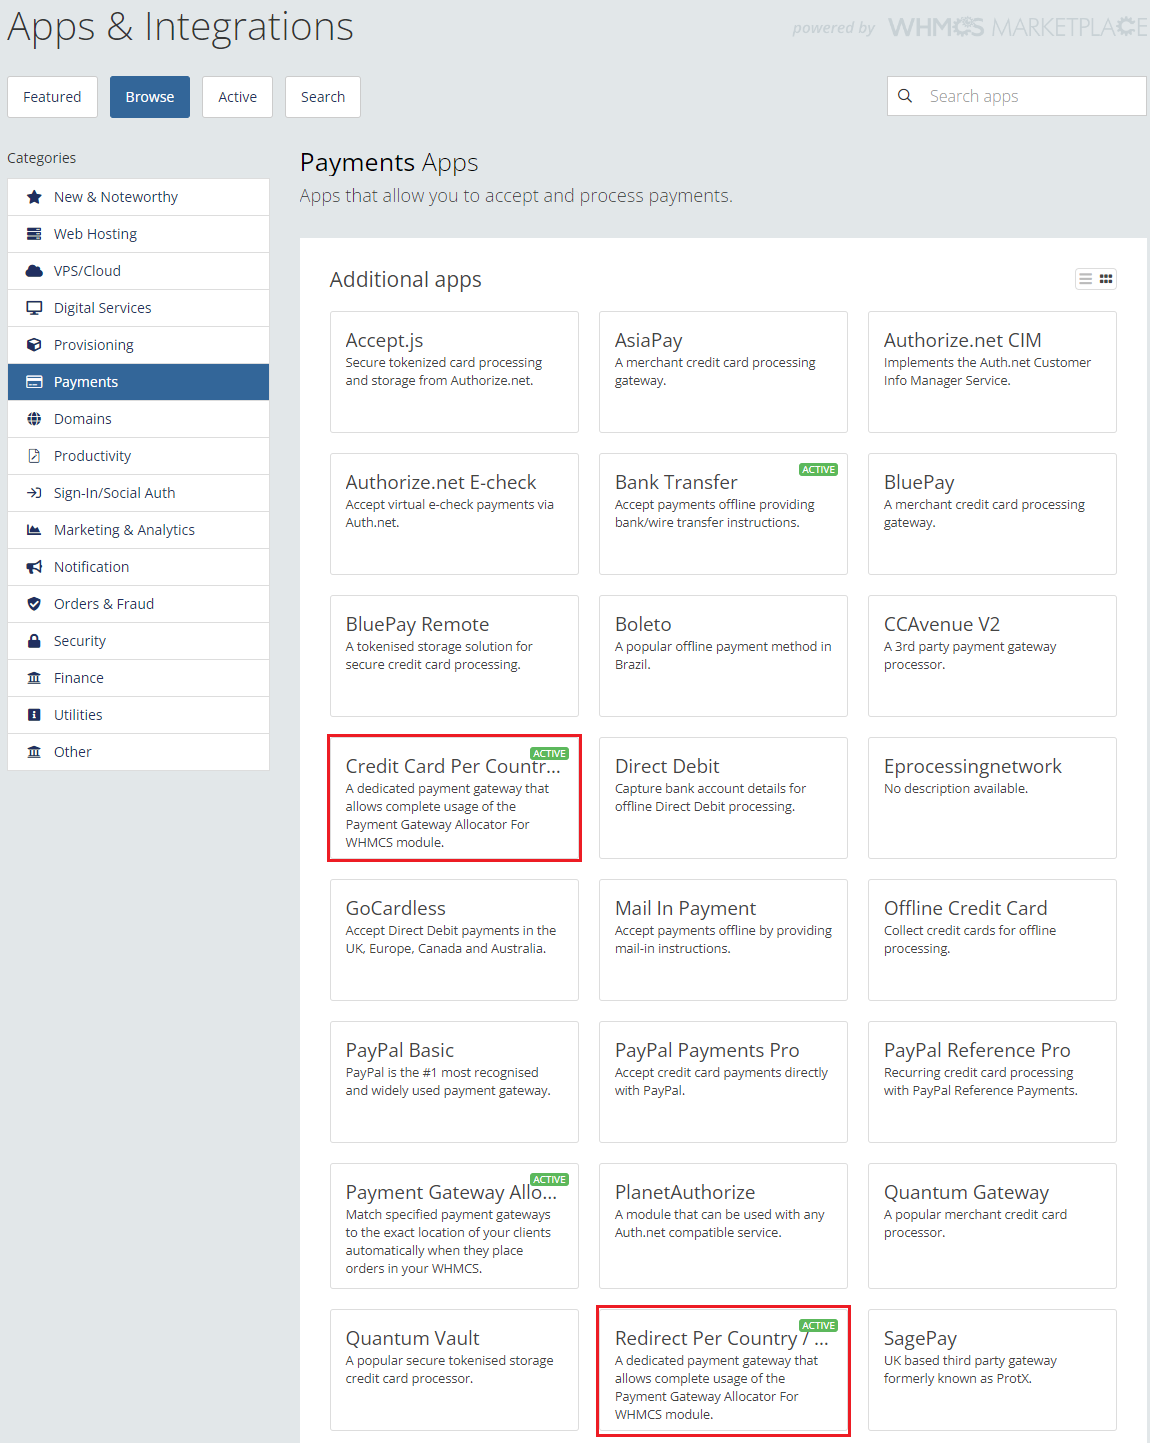
| 7. Now, proceed to 'Apps & Integrations' → 'Payments'. Find 'Redirect Per Country / State' and 'Credit Card Per Country / State' gateways and activate them. |
|
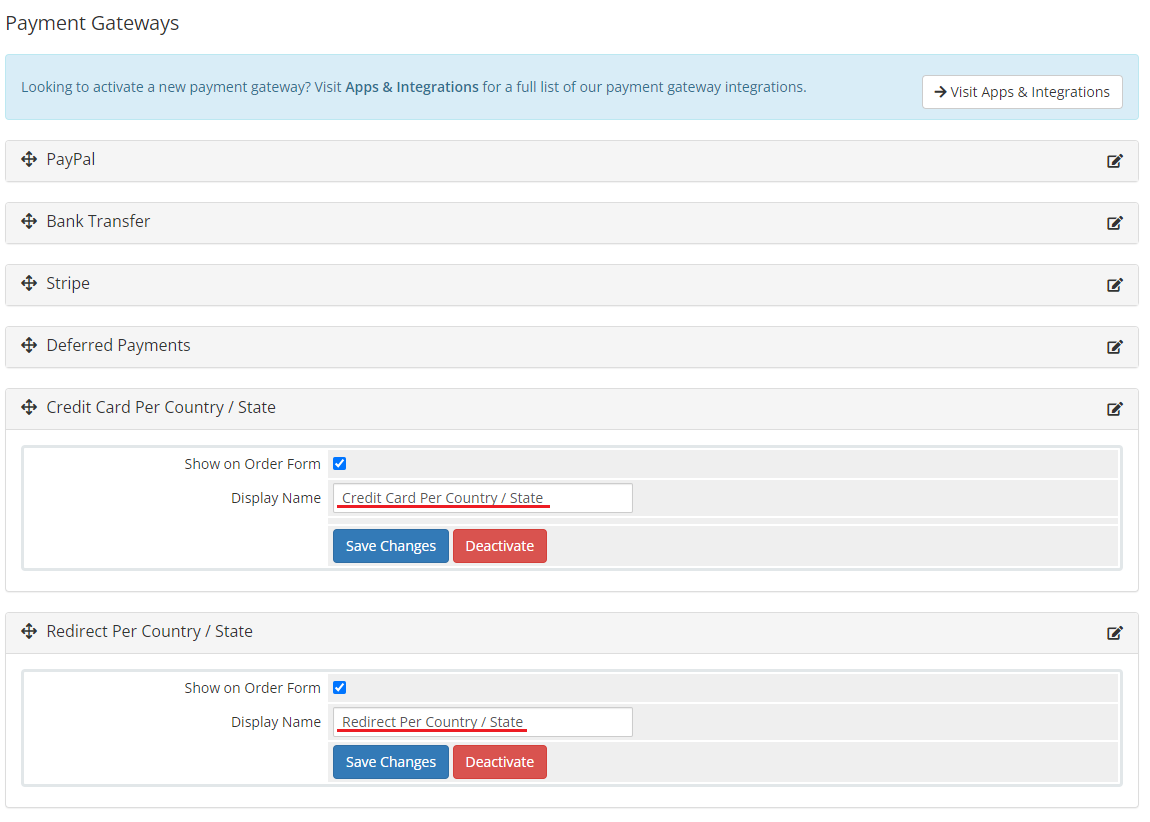
| 8. Afterwards, move to 'System Settings' → 'Payment Gateways' to rename the just activated gateways. These gateways will be used in place of any other gateway and forward all data to a gateway depending on configuration of Payment Gateway Allocator. |
|
| 9. You have just successfully installed Payment Gateway Allocator For WHMCS! |
Management
| In this section we will show you the possibilities of Payment Gateway Allocator For WHMCS. Our module allows you to define the availability of your payment gateways depending on your customers' country or state. |
Settings
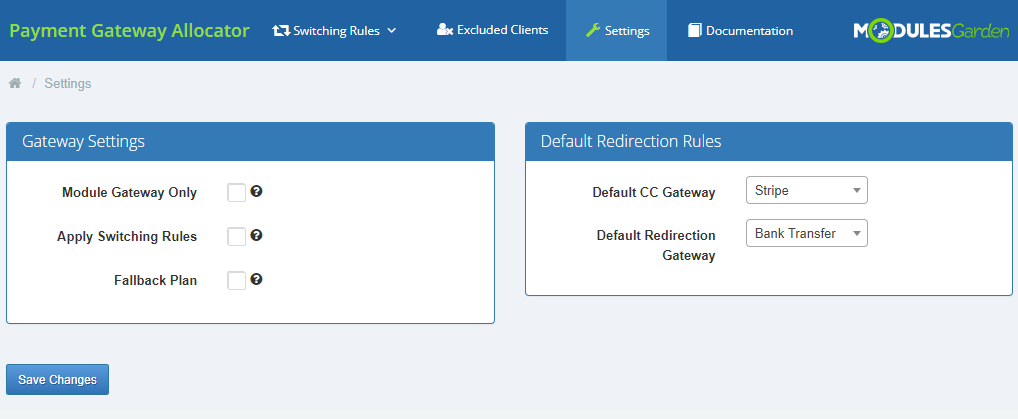
| At the 'Settings' tab you can set up the module's behavior. Configure gateway settings and default redirection rules. |
|
| In 'Gateway Settings' select whether you want to allow only the two module gateways: 'Credit Card Per Country / State' and 'Redirect Per Country / State'. Note: In order for the module to work correctly, you need to enable one of the options available in the 'Gateway Settings' section.
|

|
| Still, you have to set up 'Default Redirection Rules', no matter which option is selected in 'Gateway Settings'. Choose:
Do not forget to save the changes when ready! |

|
Excluded Users
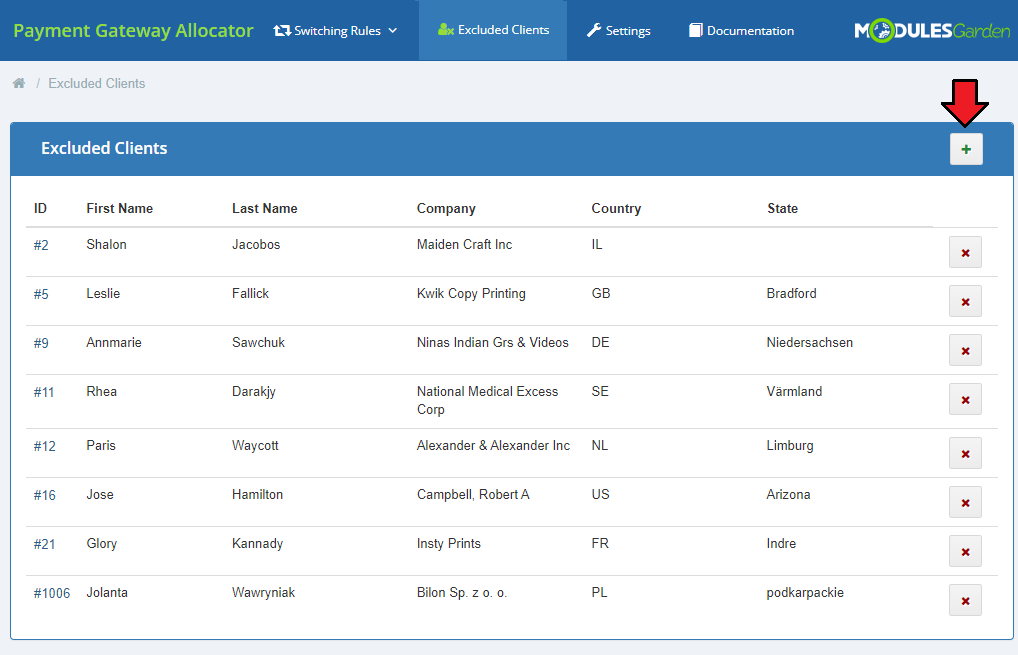
| In the 'Excluded Clients' section, you can list clients who will be skipped when validating the gateway rules. Add clients to the list. |
|
| Choose a clients from the list. Add client one by one. |

|
Switching Rules
| This module provides the flexibility to configure switching rules in two distinct manners. First, priority is given to client group rules, where assignments within a WHMCS client group take precedence. If a client belongs to a group with assigned rules, the allocation is determined based on these specifications. |
Gateway Switches
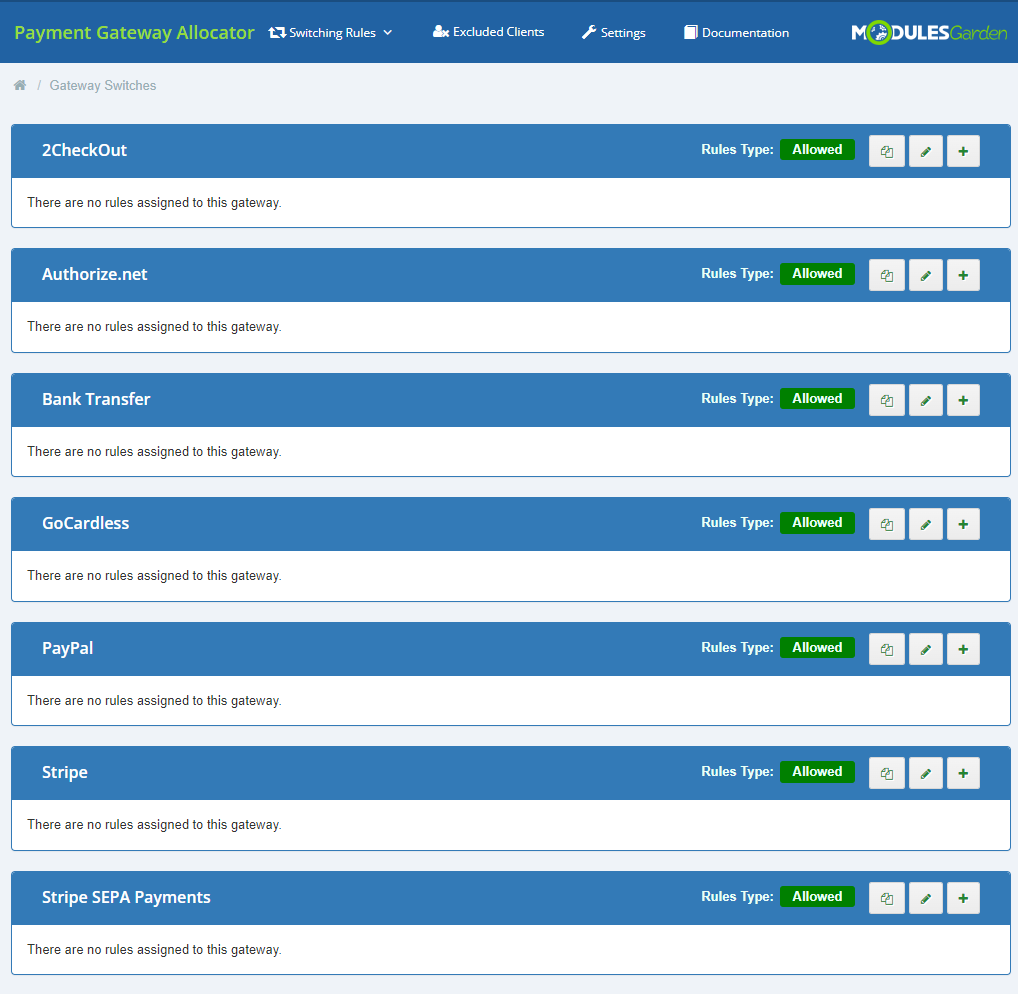
| 'Gateways Switches' tab allows you to define basic switching rules per payment gateway. You will find there a list of all active gateways in your system. Precise instructions on how to create allocation rules can be found in the Creating New Switching Rules section below. |
|
Client Groups
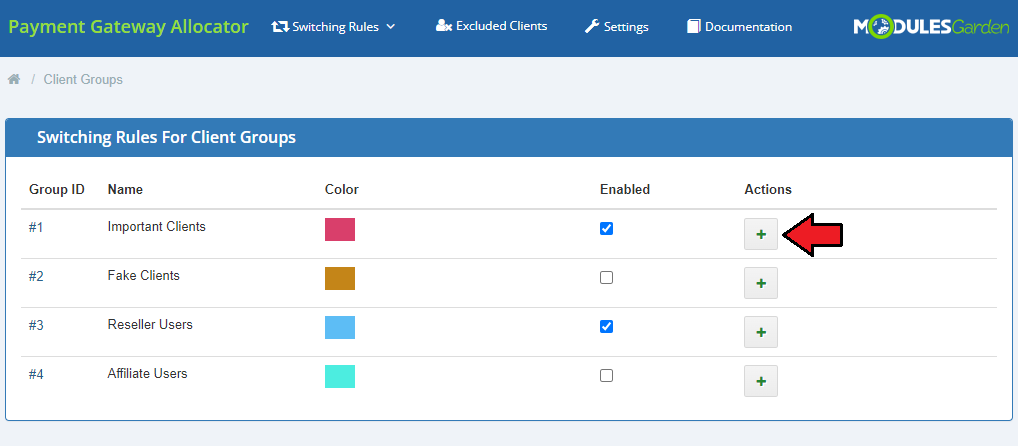
| Once you proceed to this section you will instantly see all the available in your WHMCS client groups (more here). Here you may define the payment gateway switching rules per each client group. You may assign rules to all your client groups or only some of them. Remember to set the client group status to 'Enabled', otherwise, the group rules will not be taken into account when allocating the payment gateway. Press the "+" button to manage the selected group switching rules. |
|
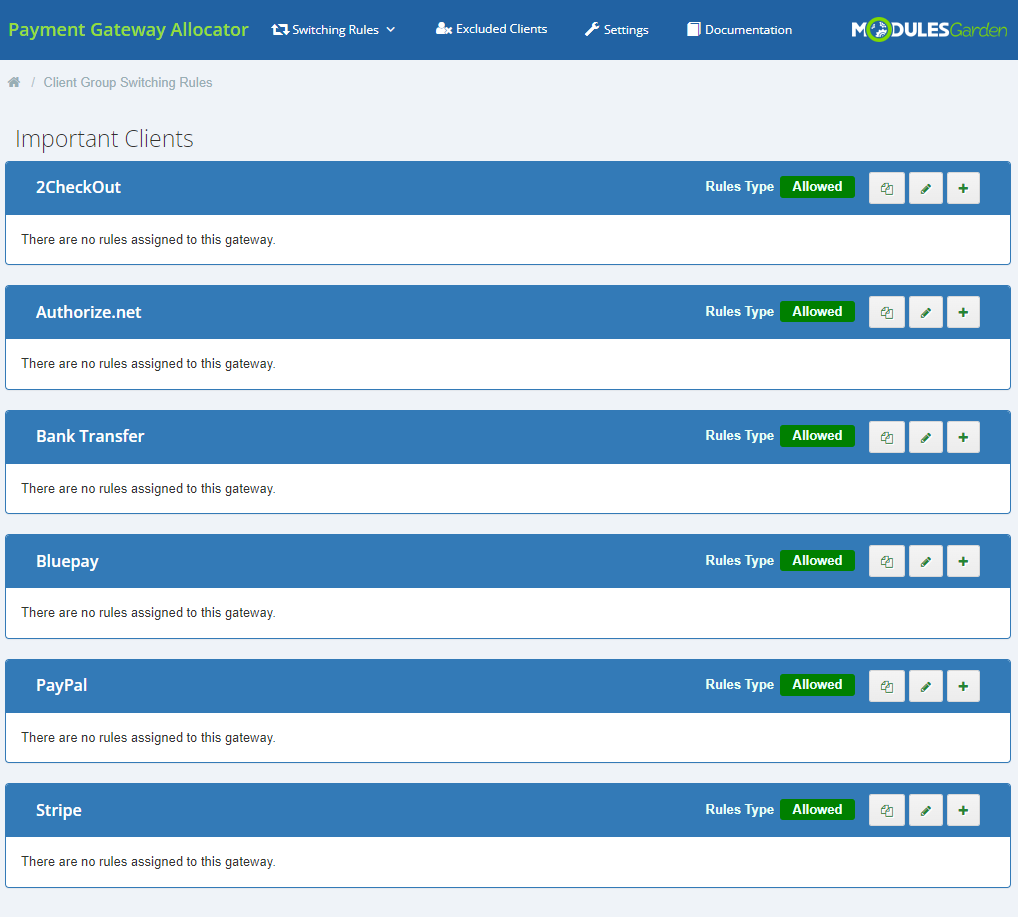
| As you can see on the screen below, available payment gateways have no switching rules created yet. Create rules, manage or copy existing rules between payment gateways. Precise instructions on how to create rules can be found in the Creating New Switching Rules section right below. |
|
Creating New Switching Rules
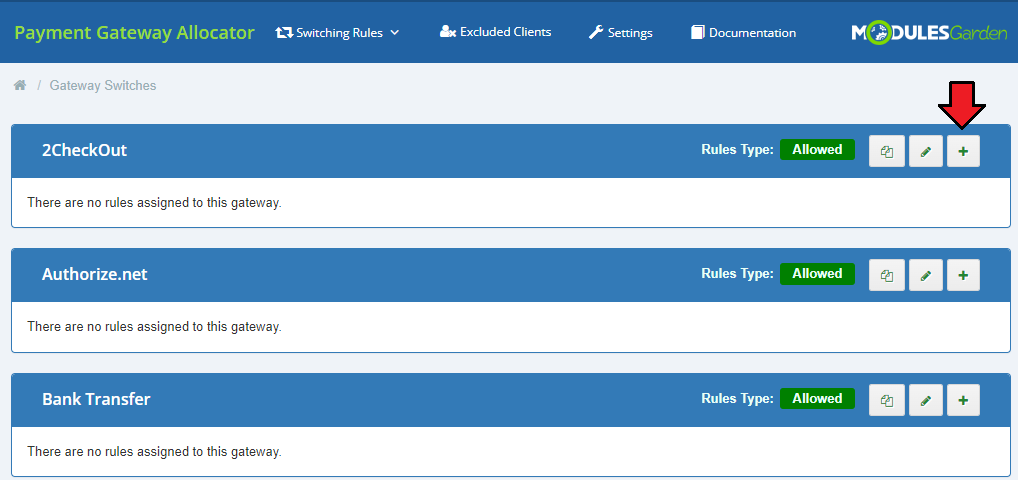
| All the described below steps to create switching rules are accurate for both the 'Gateway Switches' and 'Client Groups'. To limit access to a selected payment gateway, press the '+' button. |
|
| Select a country and state (optional). The gateway will be available for clients who make purchases in that region only.
Press 'Add' to complete. |

|
| Repeat the process for all gateways you wish to limit. Use action buttons to edit rules or delete them. |
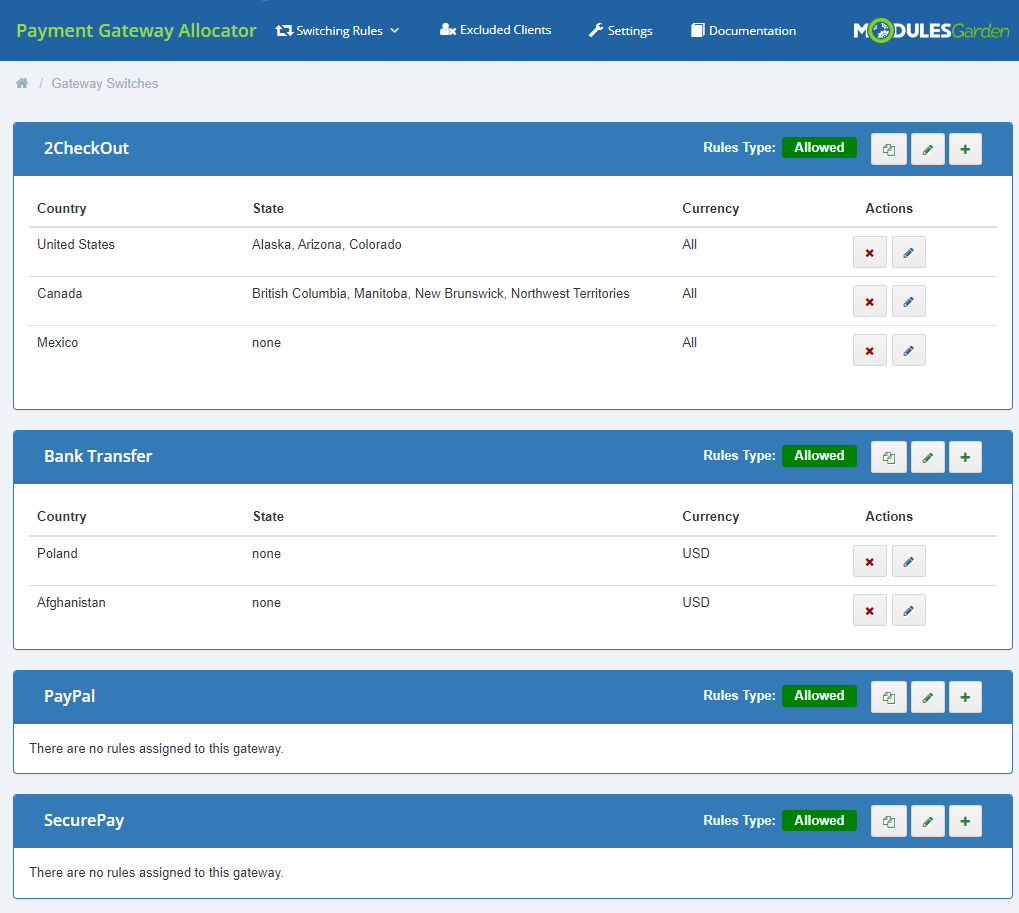
|
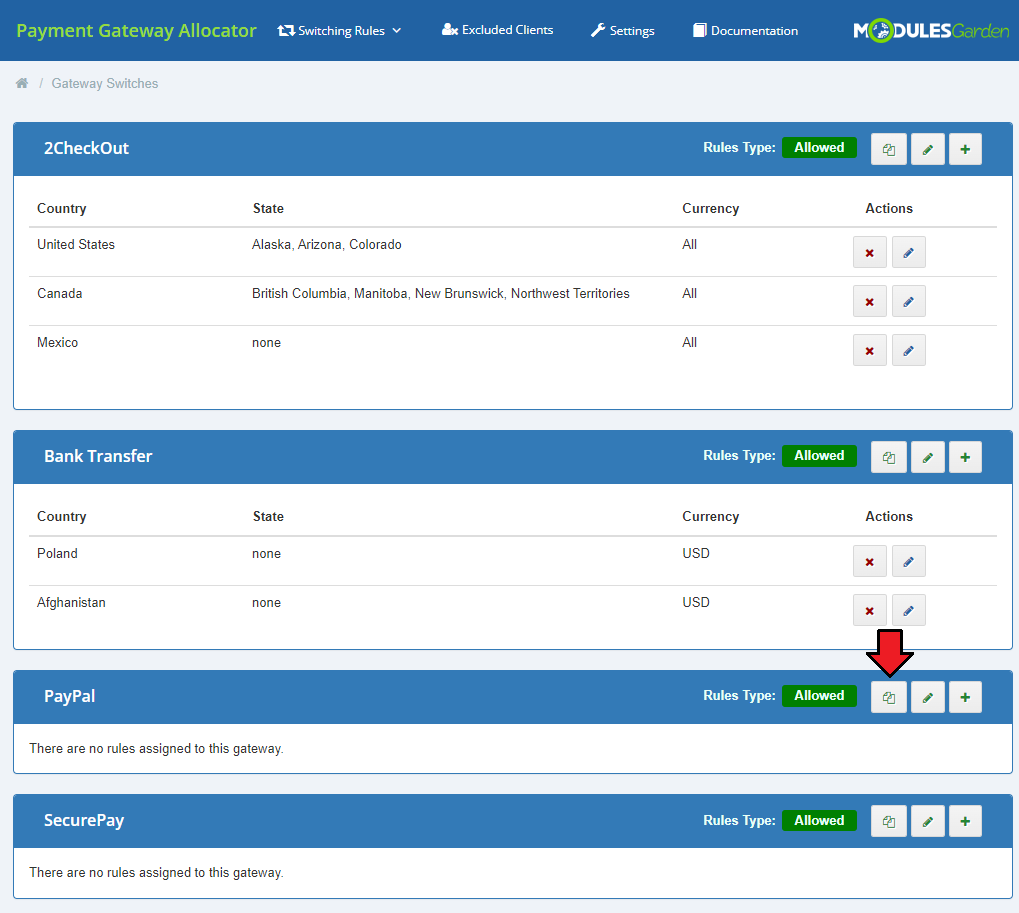
| Perform the above steps for all active gateways that you wish to use. You may add rules per single gateway manually or copy rules from another gateway. To do so, simply press the marked button and choose the gateway whose rules you are going to copy. Remember to save the changes when ready. |
|

|
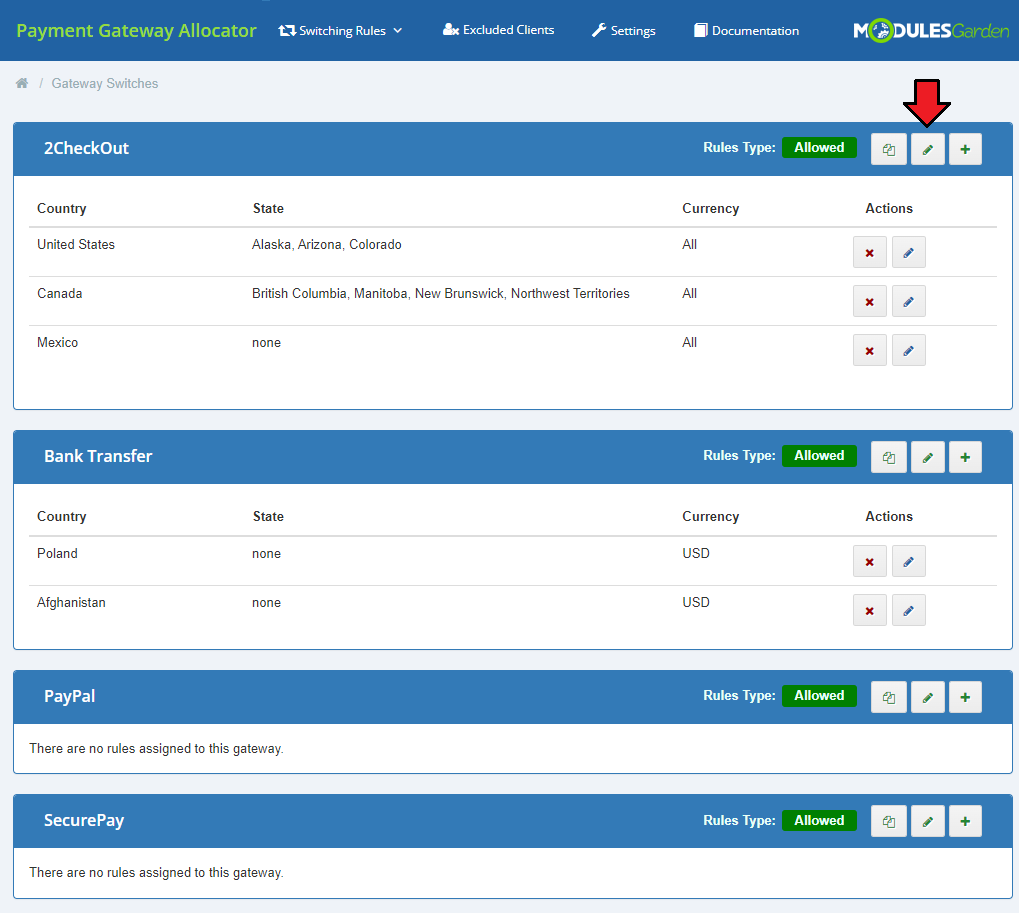
| Edit the rule, to move to the gateway settings. |
|
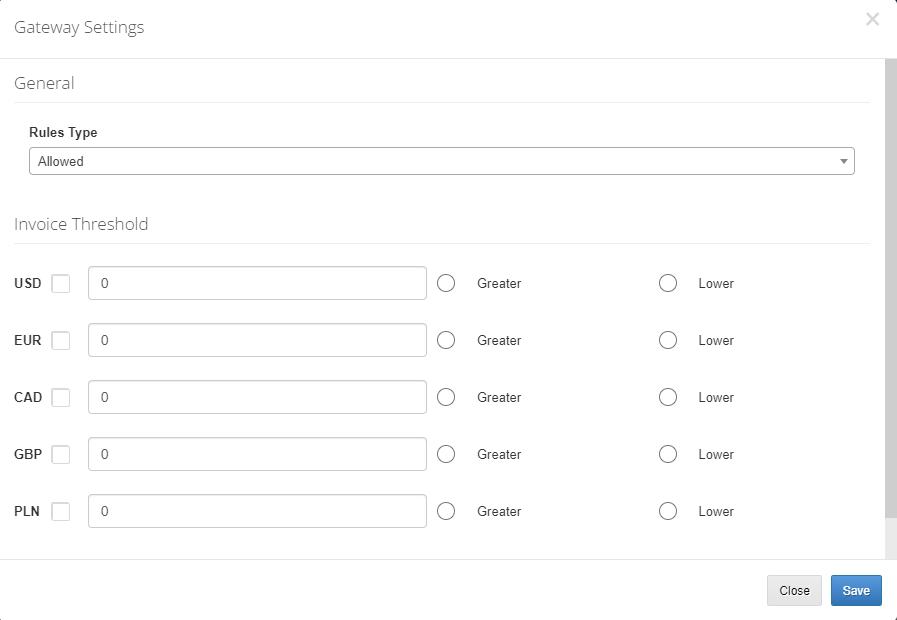
There define the gateway rules type:
Define the invoice threshold per enabled currency, provide the invoice value, and mark 'Greater' or 'Lower' to specify the rule performance. |
|
Payment Gateways On The Order Form
| Payment Gateway Allocator For WHMCS affects only client area. Let's take a look at how the addon affects the payment process. |
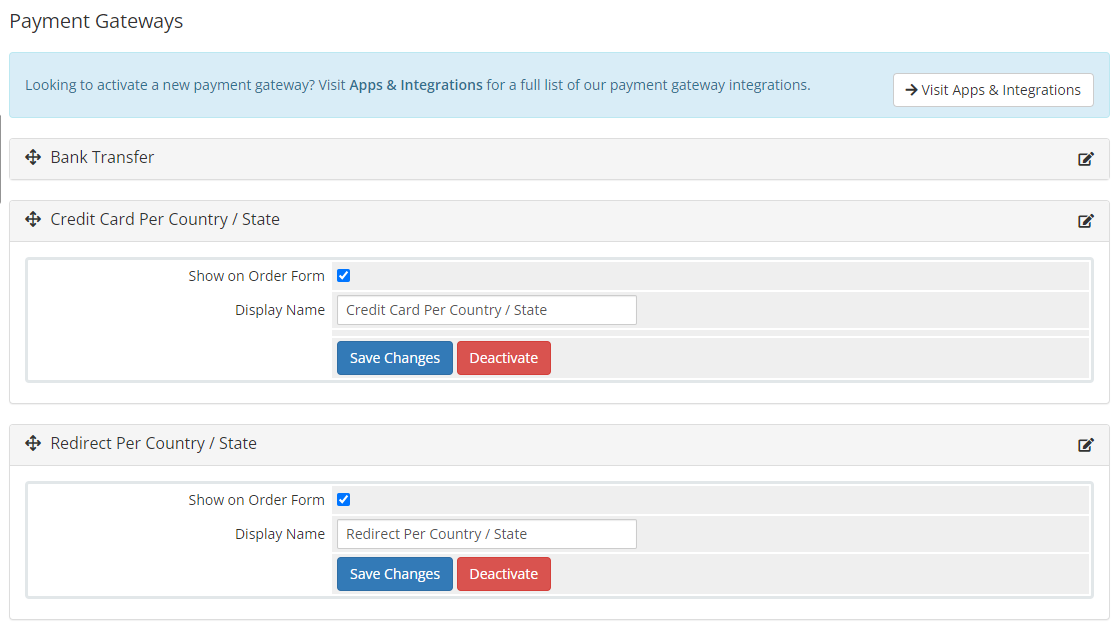
| Case One: 'Credit Card Per Country / State' and 'Redirect Per Country / State' payment methods have been activated. |
|
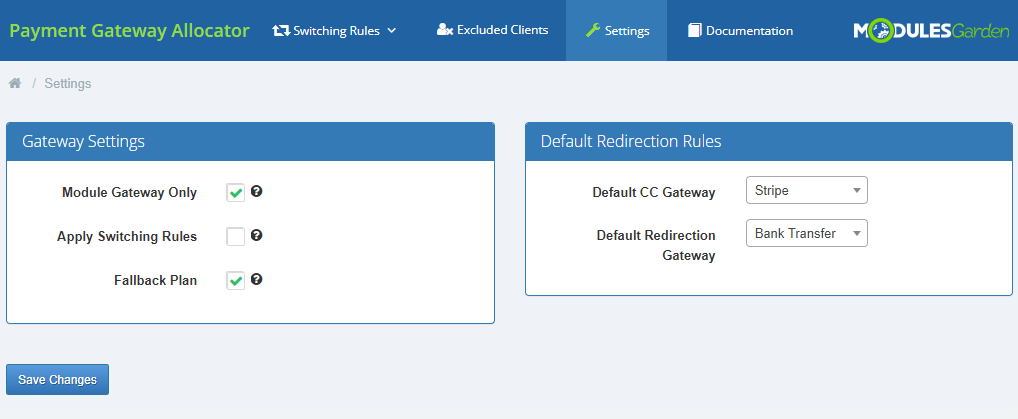
| In 'Setting' section option 'Module Gateway Only' has been selected together with two default gateways for 'Credit Card' and 'Redirection' payments. |
|
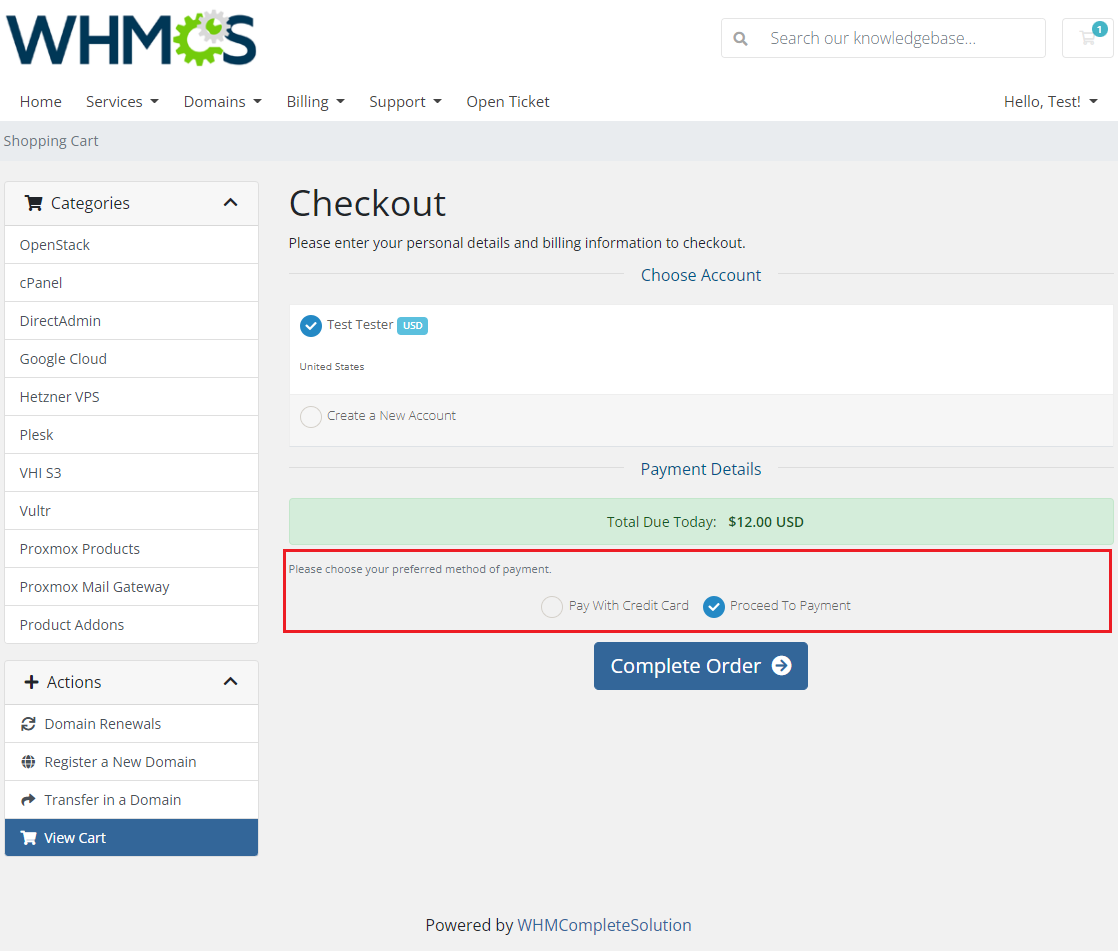
Consequently, client may now choose only between:
|
|
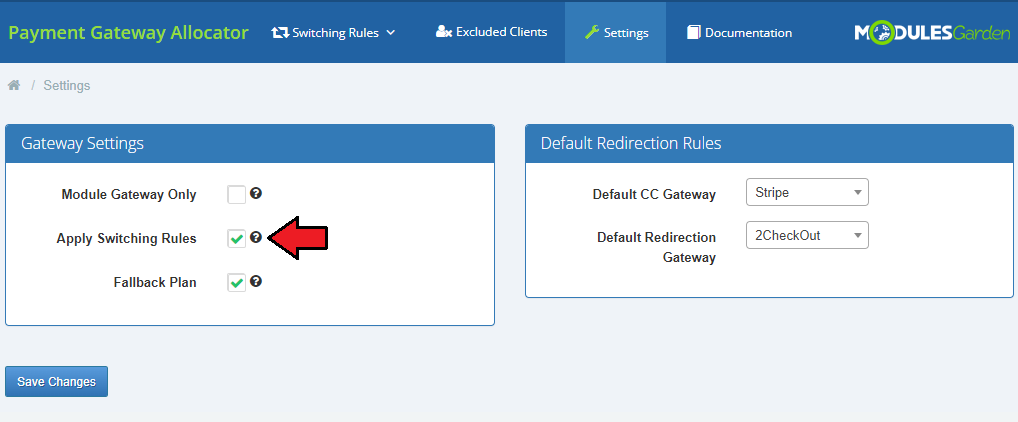
| Case Two: In another scenario, in 'Settings' section of the module 'Apply Switching Rules' option is selected. |
|
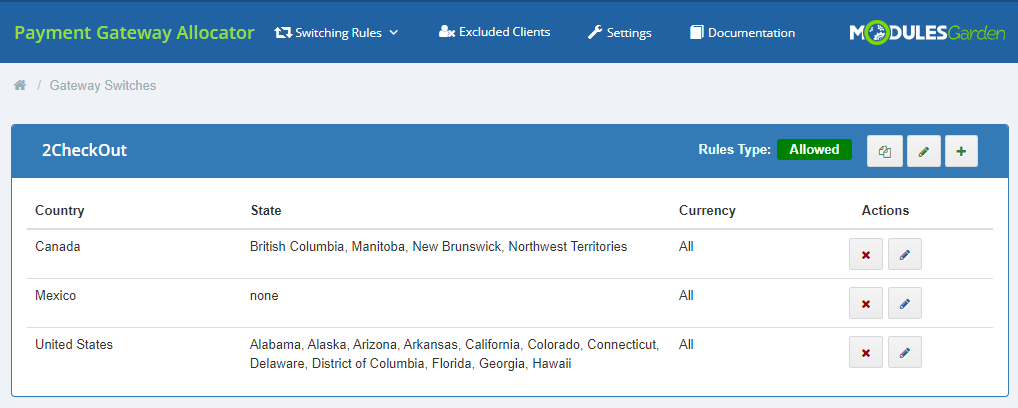
| In 'Gateway Switches' section, there is a rule forcing clients from United States to pay with '2CheckOut' payment gateway. |
|
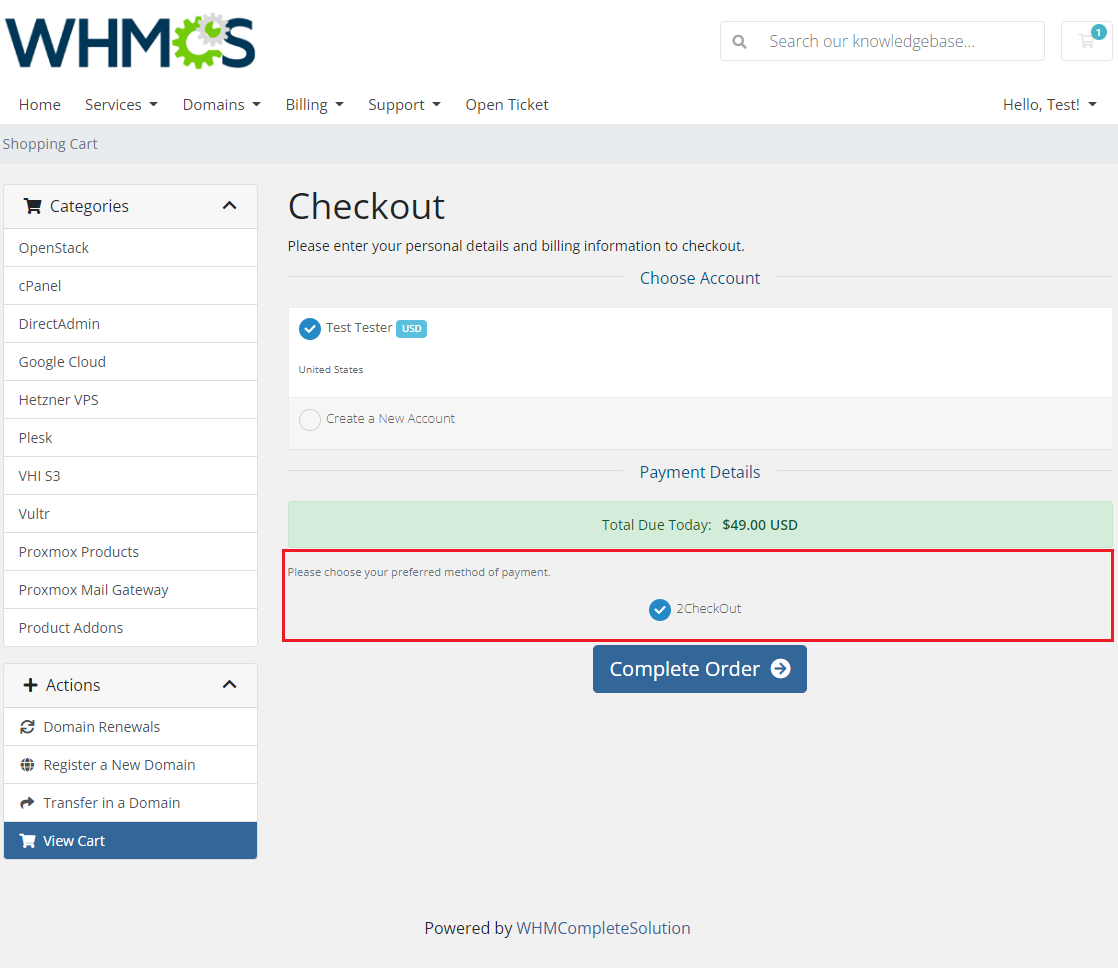
| Consequently, client Test Tester, who is from USA, has no choice, but to pay with the enforced by the admin payment gateway. |
|
| In a similar scenario, for an unlogged customer intending to create a new account with the selected country set as the United States, the available payment gateway will be '2CheckOut' as well. However, should the client choose another country, the list of available payment gateways will automatically refresh based on any detected switching rules. |
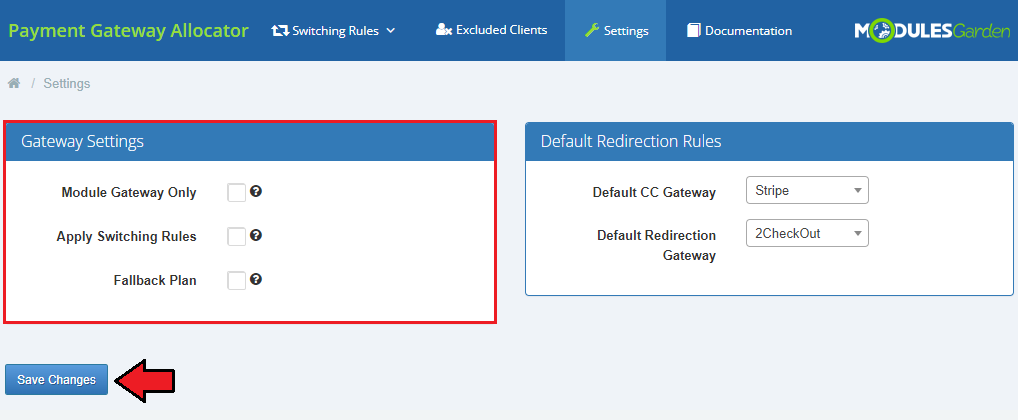
| Case Three: To allow all gateways in the client area, proceed to the addon → 'Settings' page and clear the settings. |
|
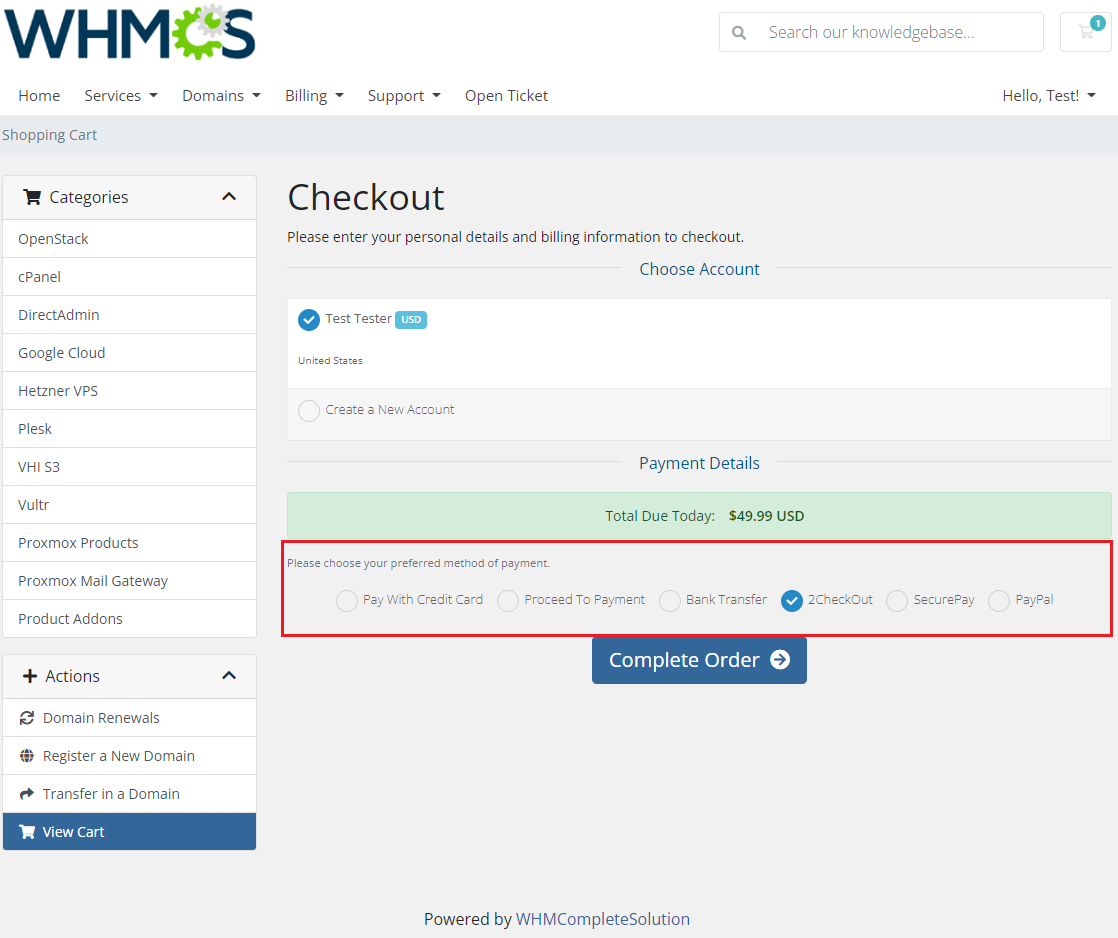
| Let's check payment options in the client area once again. Now, your clients are able to pay using every active payment gateway. However, when selecting 'Pay With Credit Card' or 'Proceed To Payment' option, client will be redirected to a gateway keeping any switching rules. |
|
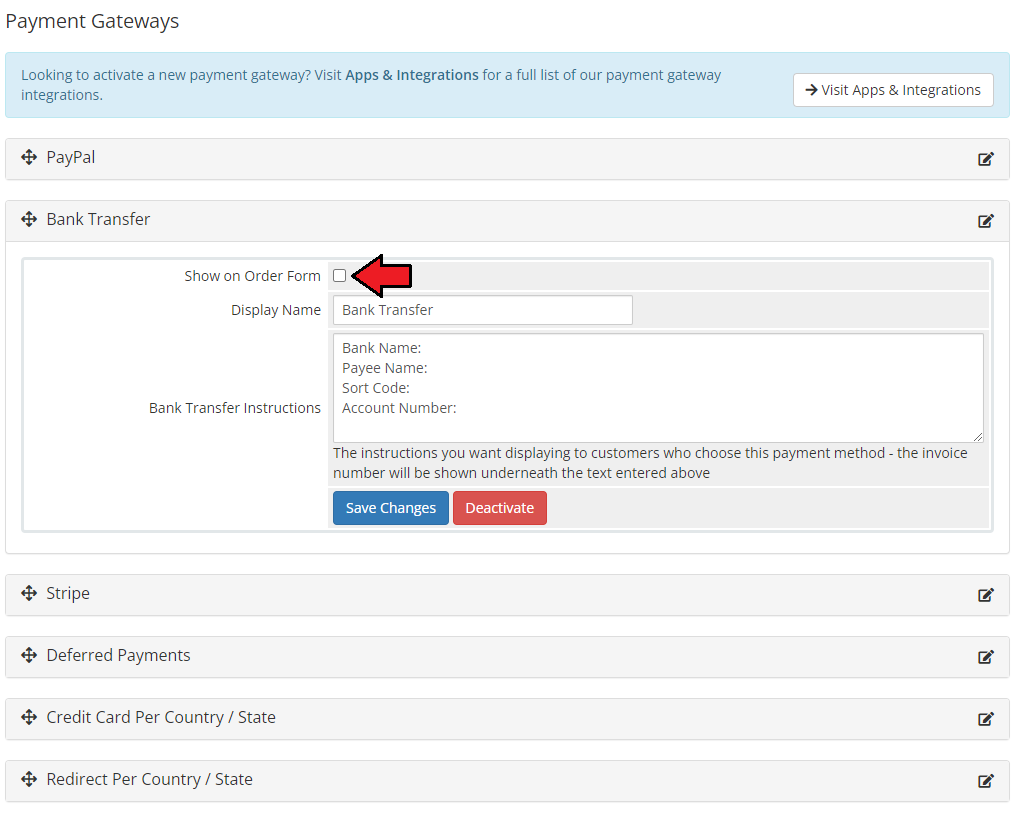
| If you wish to hide only part of the gateways, for example only those for which switching rules are set, proceed to 'Setup' → 'Payments' → 'Payment Gateways'. Afterwards, uncheck 'Show On Order Form' checkbox next to the desired gateway and press 'Save Changes'. Repeat this step for each gateway you wish to hide from the client area. |
|
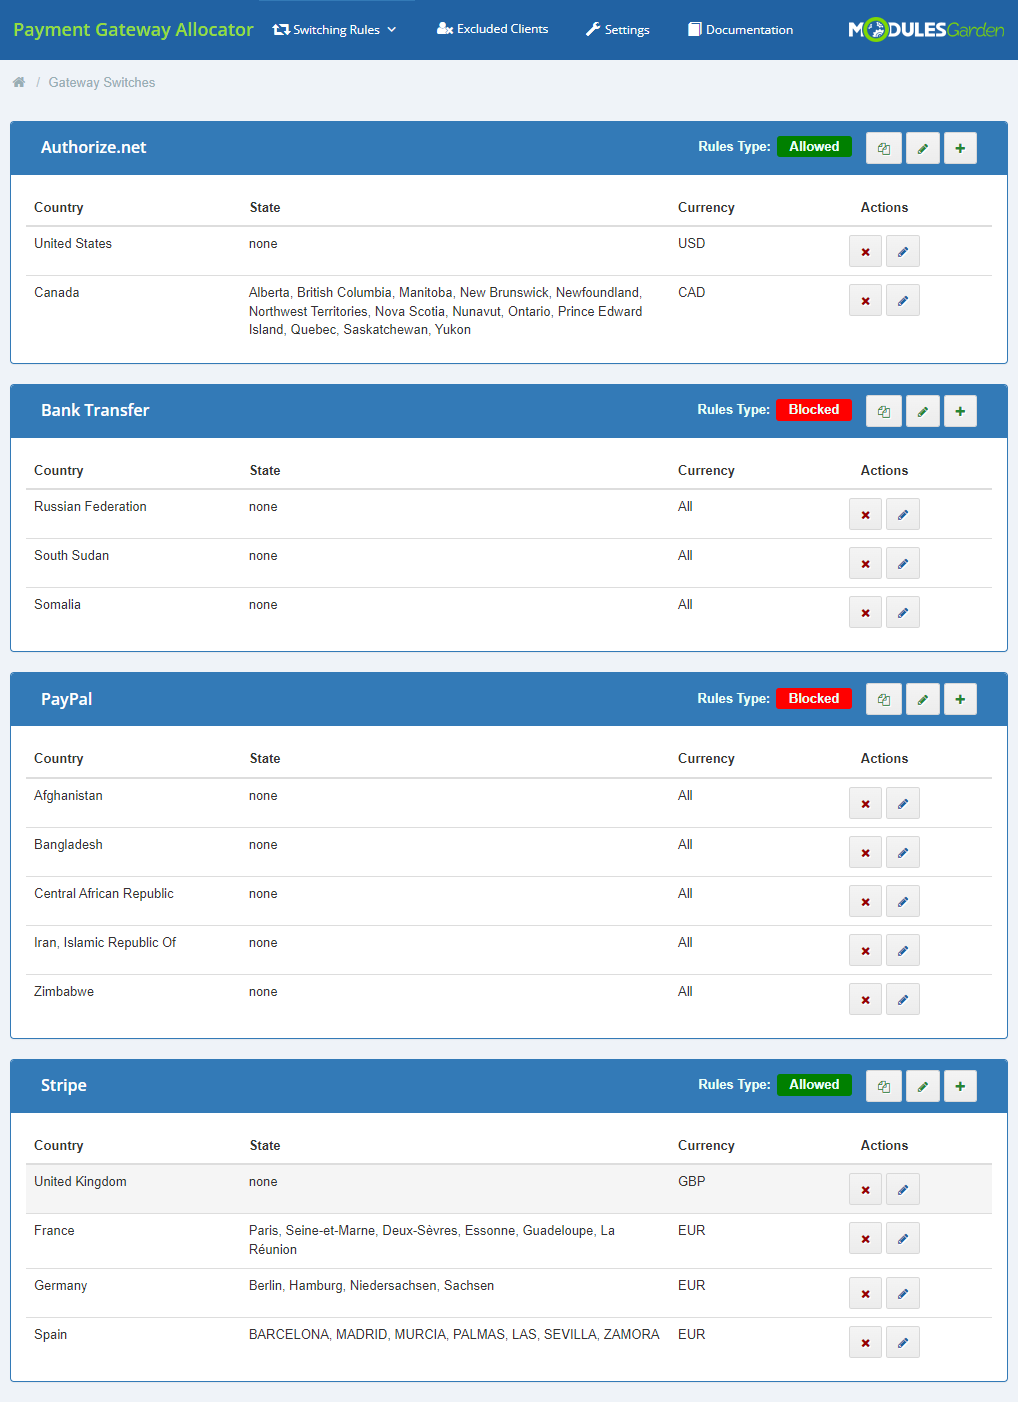
| Case Four: 'Authorize.net' gateway is marked as 'Allowed' for added rules. |
|
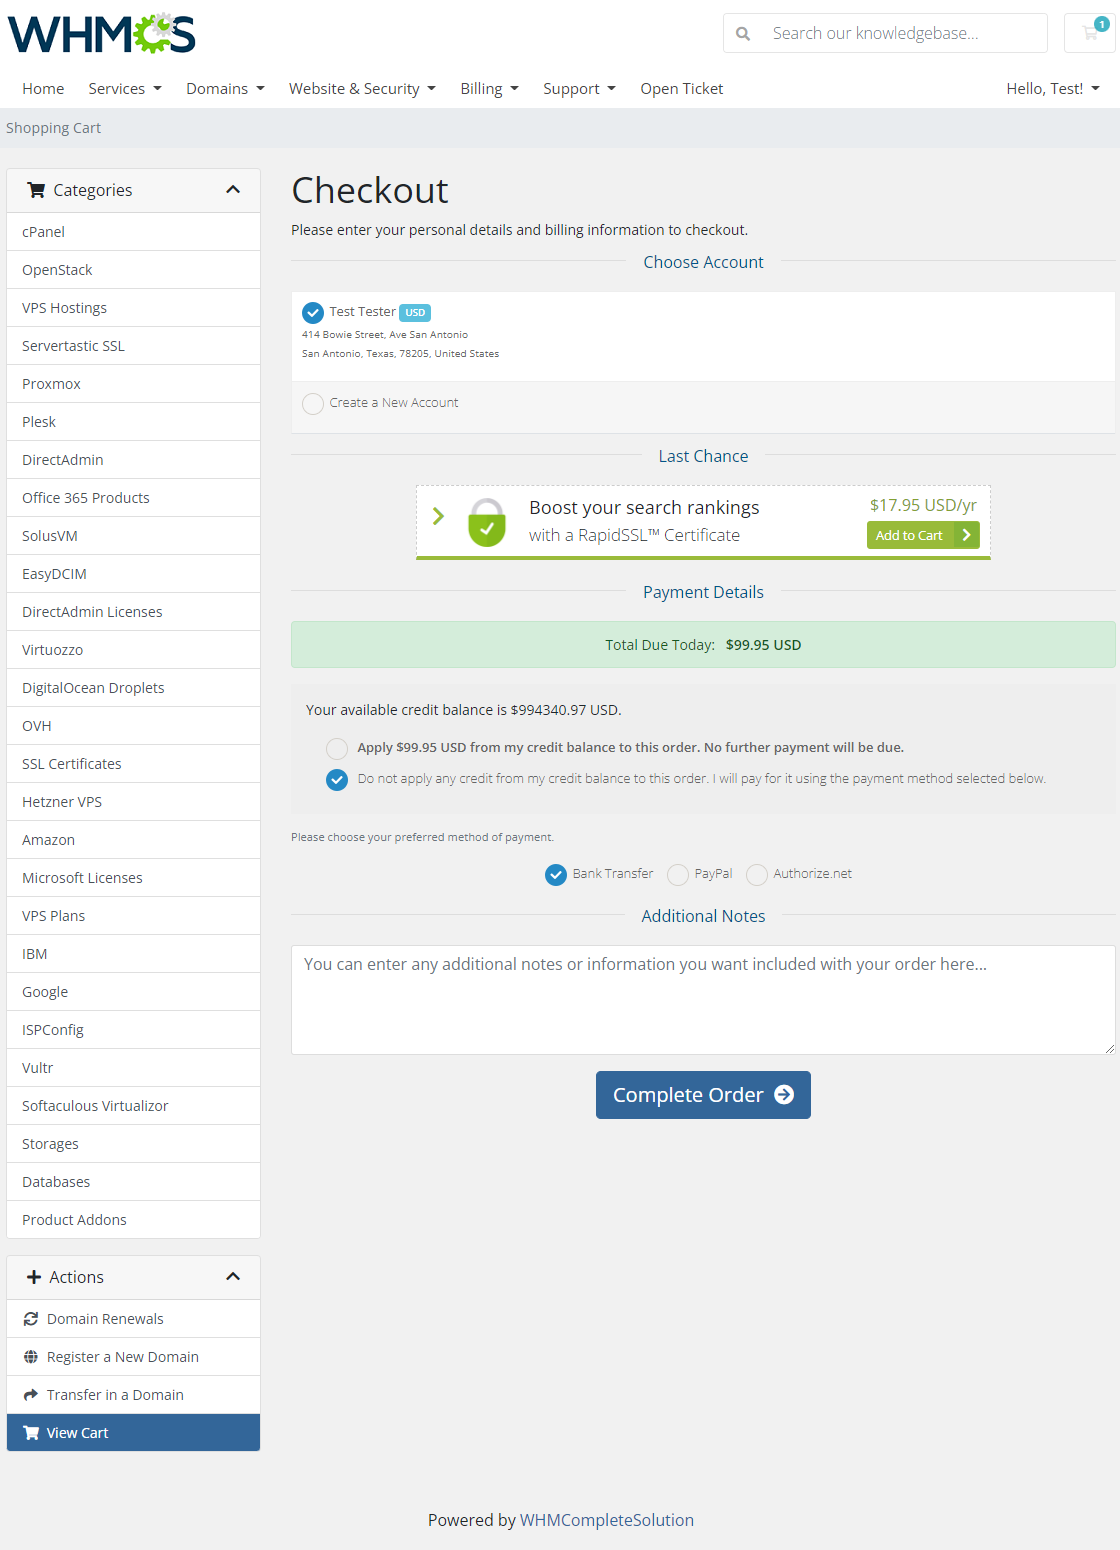
| Taking into account the above gateways settings and rules, a client from USA is allowed to choose among three gateways as visible on the screen below: |
|
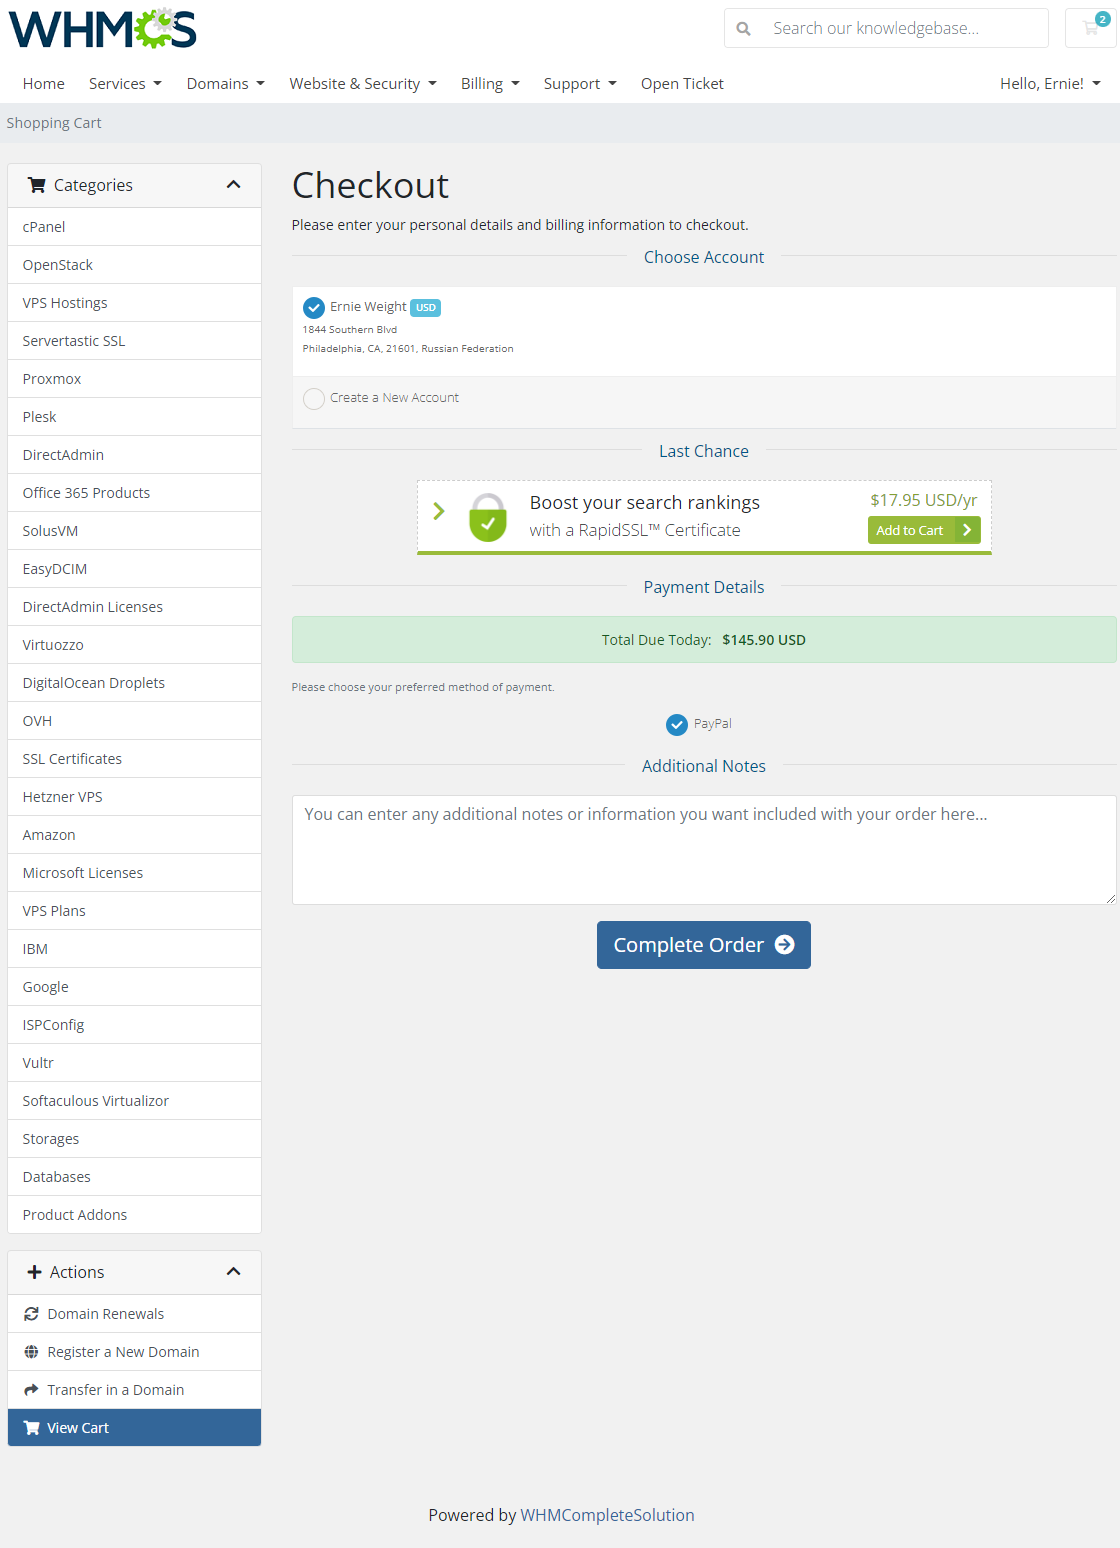
| The same settings and rules bring the following consequences for a client from Russian Federation, that is, such client is allowed to use only one payment gateway. |
|
Tips
| 1. If you wish to forbid card payment or redirect payment, deactivate the related gateway in 'Setup' → 'Payments' → 'Payment Gateways'. |
| 2. In order to enable a gateway for all countries, simply set the single gateway 'Rules Type' to Blocked. |
Update Instructions
| An essential guidance through the process of updating the module is offered here. Ensure successful completion of the module update by carefully following each step, thereby preventing data loss or any unforeseen issues. |
Upgrade Guide
| Seeking a solution that offers greater flexibility, customization tailored to your precise needs, and unrestricted availability? There is an option that not only proves to be cost-effective in the long run but also includes prioritized support services, making it a truly valuable investment. Opt for the Open Source version of your Payment Gateway Allocator For WHMCS module to unlock these benefits. Follow a comprehensive guide covering the transition process, the advantages it brings, and step-by-step instructions on what to do next after the order has been successfully finalized. |
Common Problems
| 1. When you have problems with connection, check whether your SELinux or firewall does not block ports. |