Premium Support Tickets For WHMCS has reached End of Support (EOS) and is no longer actively maintained. The module remains available for purchase, including the Open Source version and License Upgrade at a discounted price. Current license subscriptions continue and stay valid for future renewals.
Premium Support Tickets For WHMCS will allow you to control access to your support services and charge fees for submitting tickets into certain departments.
The module enables your clients to purchase products and product addons containing Support Credit Points used for opening support tickets in chosen departments.
At the same time, you will be free to establish rules for credit points application, and closely supervise each action taken by your customers.
|
| ✔ Store And Manage Support Credit Points:
|
| ✔ Dedicated Points - Used Only For Specific Departments
|
| ✔ Shared Points - Used Freely Among All Selected Departments
|
| ✔ Add Support Credit Points Upon Ordering Specified Product Or Addon - Depending On Applied Rule
|
| ✔ Remove Fixed Number Of Support Credit Points Upon Ticket Opening
|
| ✔ Block Ticket Opening If Client Has Insufficient Number Of Support Credit Points
|
| ✔ Define Number Of Support Credit Points Required To Open Ticket - According To Chosen Department And Priority
|
| ✔ Define Shared Points Departments
|
| ✔ Create/Edit/Remove Rules
|
| ✔ View Support Credit Points Owned By Clients
|
| ✔ Modify Number Of Support Credit Points Owned By Clients
|
| ✔ Order Support Credit Points
|
| ✔ View Available Support Credit Points Per Ticket Department
|
| ✔ View Number Of Support Credit Points Required To Open Ticket - According To Chosen Department And Priority
|
| ✔ Set Rule Type - Product/Product Group/Product Addon
|
| ✔ Define Items That Shall Be Ordered By Client To Obtain Support Credit Points
|
| ✔ Define Number Of Dedicated Points And Select Departments They Should Be Added To
|
| ✔ Define Number Of Shared Points To Be Applied To Client's Account
|
| ✔ Define If Support Credit Points Are Added To Client's Account Once Or After Each Billing Cycle
|
| ✔ Supports PHP 8.2 Back To PHP 7.4
|
| ✔ Supports WHMCS Themes "Six", "Twenty-One" And "Lagom WHMCS Client Theme"
|
| ✔ Supports WHMCS V8.11 Back To WHMCS V8.8
|
| ✔ Requires ionCube Loader V13 Or Later
|
Installation
Premium Support Tickets For WHMCS has reached End of Support (EOS) and is no longer actively maintained. The module remains available for purchase, including the Open Source version and License Upgrade at a discounted price. Current license subscriptions continue and stay valid for future renewals.
This tutorial will show you how to successfully install and configure Premium Support Tickets For WHMCS.
We will guide you step by step through the whole installation and configuration process.
|
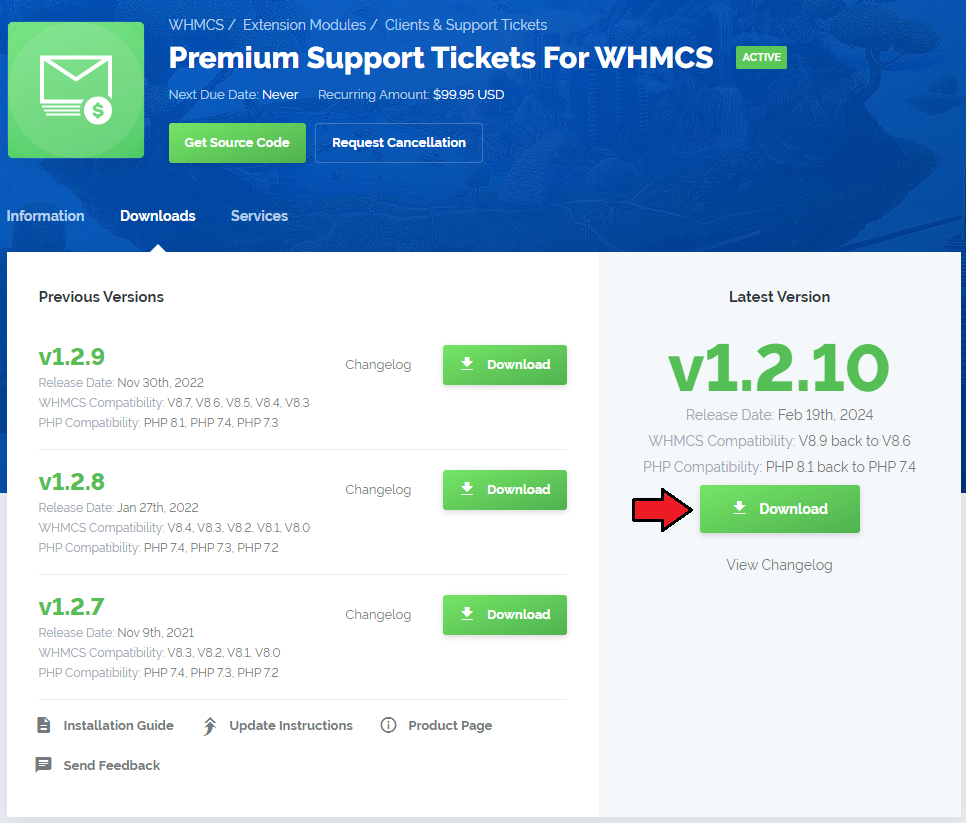
| 1. Log in to our client area and download the module.
|
2. In the downloaded file you might find one or two packages that support different PHP versions.
In the most recent versions of the module, you will find only one package that supports PHP 7.2 and later.
|
Previous updates of the module may contain two packages dedicated to various PHP versions.
The first one that supports PHP 5.6 up to PHP 7.1, and the second one addressed to PHP 7.2 up to PHP 7.4.
Note: Keep in mind that PHP versions 5.6 up to 7.1 are no longer officially supported and their security issues are not fixed or released any more. Find more info here.
|
| Note: You can check the current PHP version in your WHMCS. To do so, proceed to 'Utilities' → 'System' → 'PHP Info'.
|
3. Extract the package and upload its content into the main WHMCS directory.
The content of the package to upload should look like this.
|
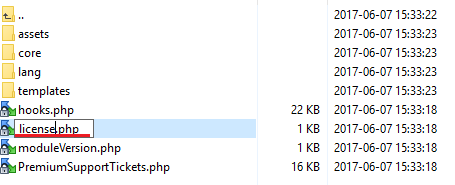
4. When you install Premium Support Tickets For WHMCS for the first time you have to rename 'license_RENAME.php' file.
File is located in '/modules/addons/PremiumSupportTickets/license_RENAME.php'. Rename it from 'license_RENAME.php' to 'license.php' .
|
5. In order to configure your license key, you have to edit a previously renamed 'license.php' file.
Enter your license key between quotation marks as presented on the following screen. You can find your license key in our client area → 'My Products'.
|
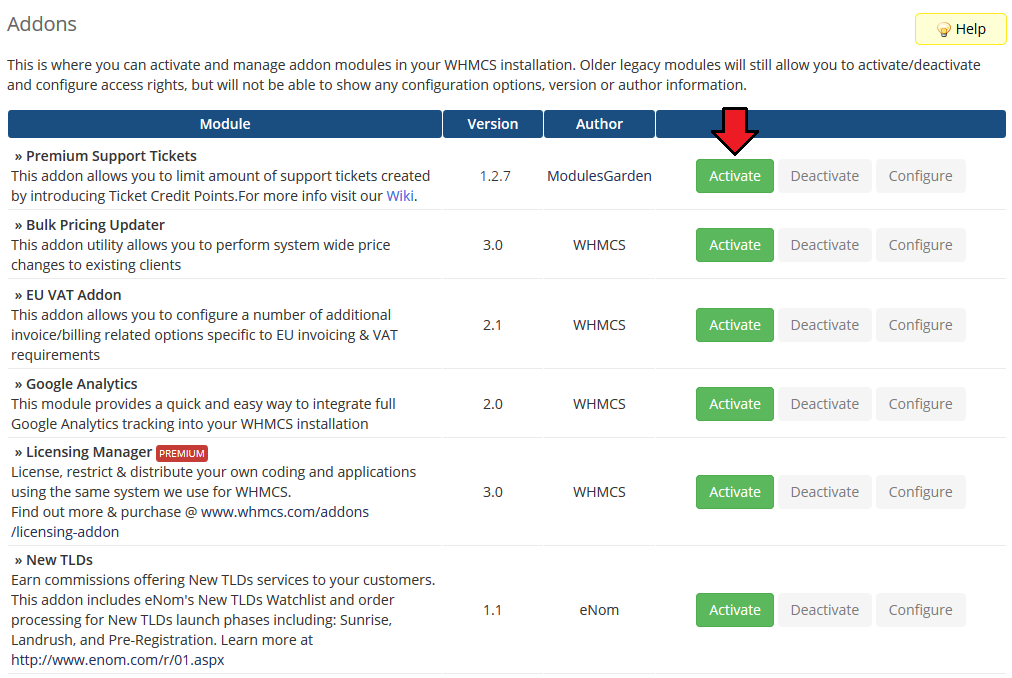
6. Now you have to activate the module in your WHMCS system.
Log in to your WHMCS admin area. Go to 'Setup' → 'Addon Modules'. Afterwards, find 'Premium Support Tickets' and press 'Activate' button.
|
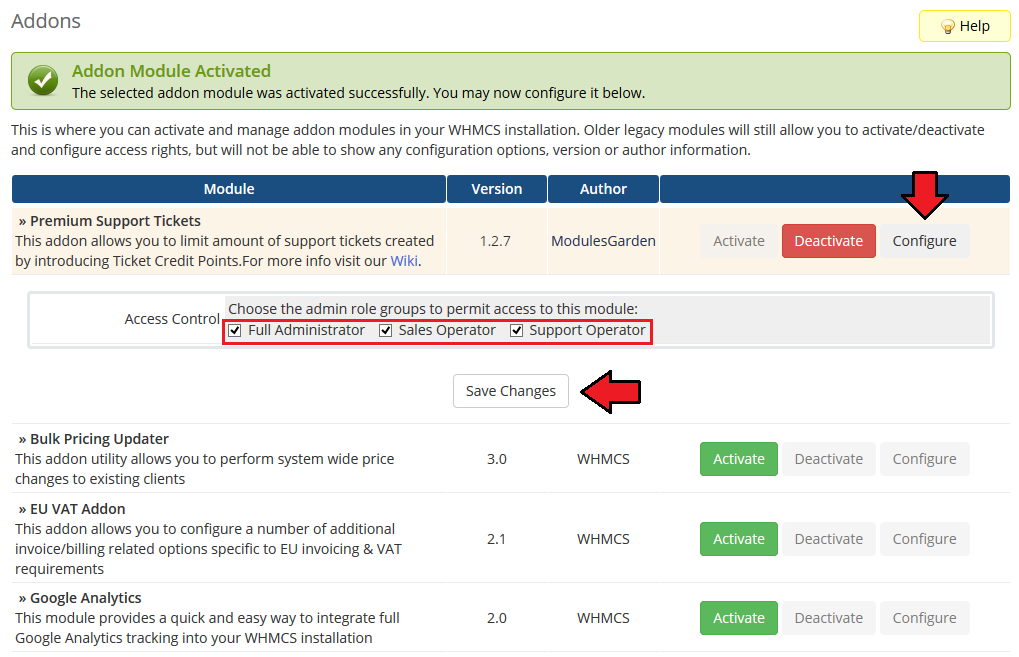
7. In the next step you need to permit access to this module.
To do so click on 'Configure' button, tick 'Access Control' near desired admin role groups and press 'Save Changes'.
|
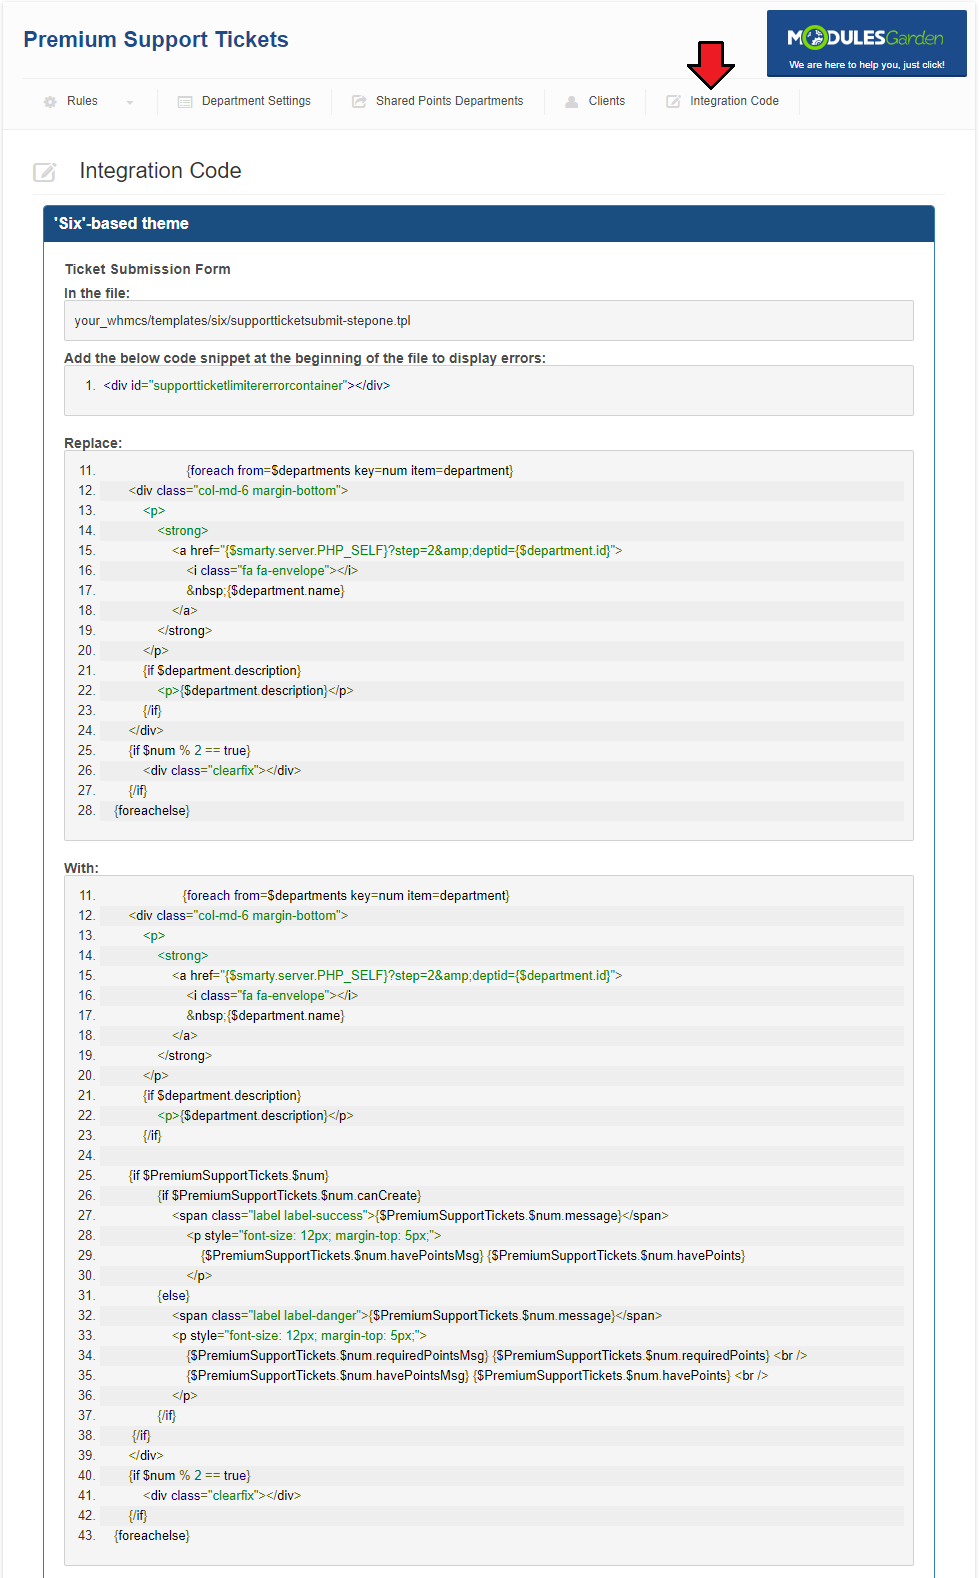
8. Proceed to 'Addons' → 'Premium Support Tickets' → 'Integration Code' and follow steps listed there to apply code snippets to the theme you are using
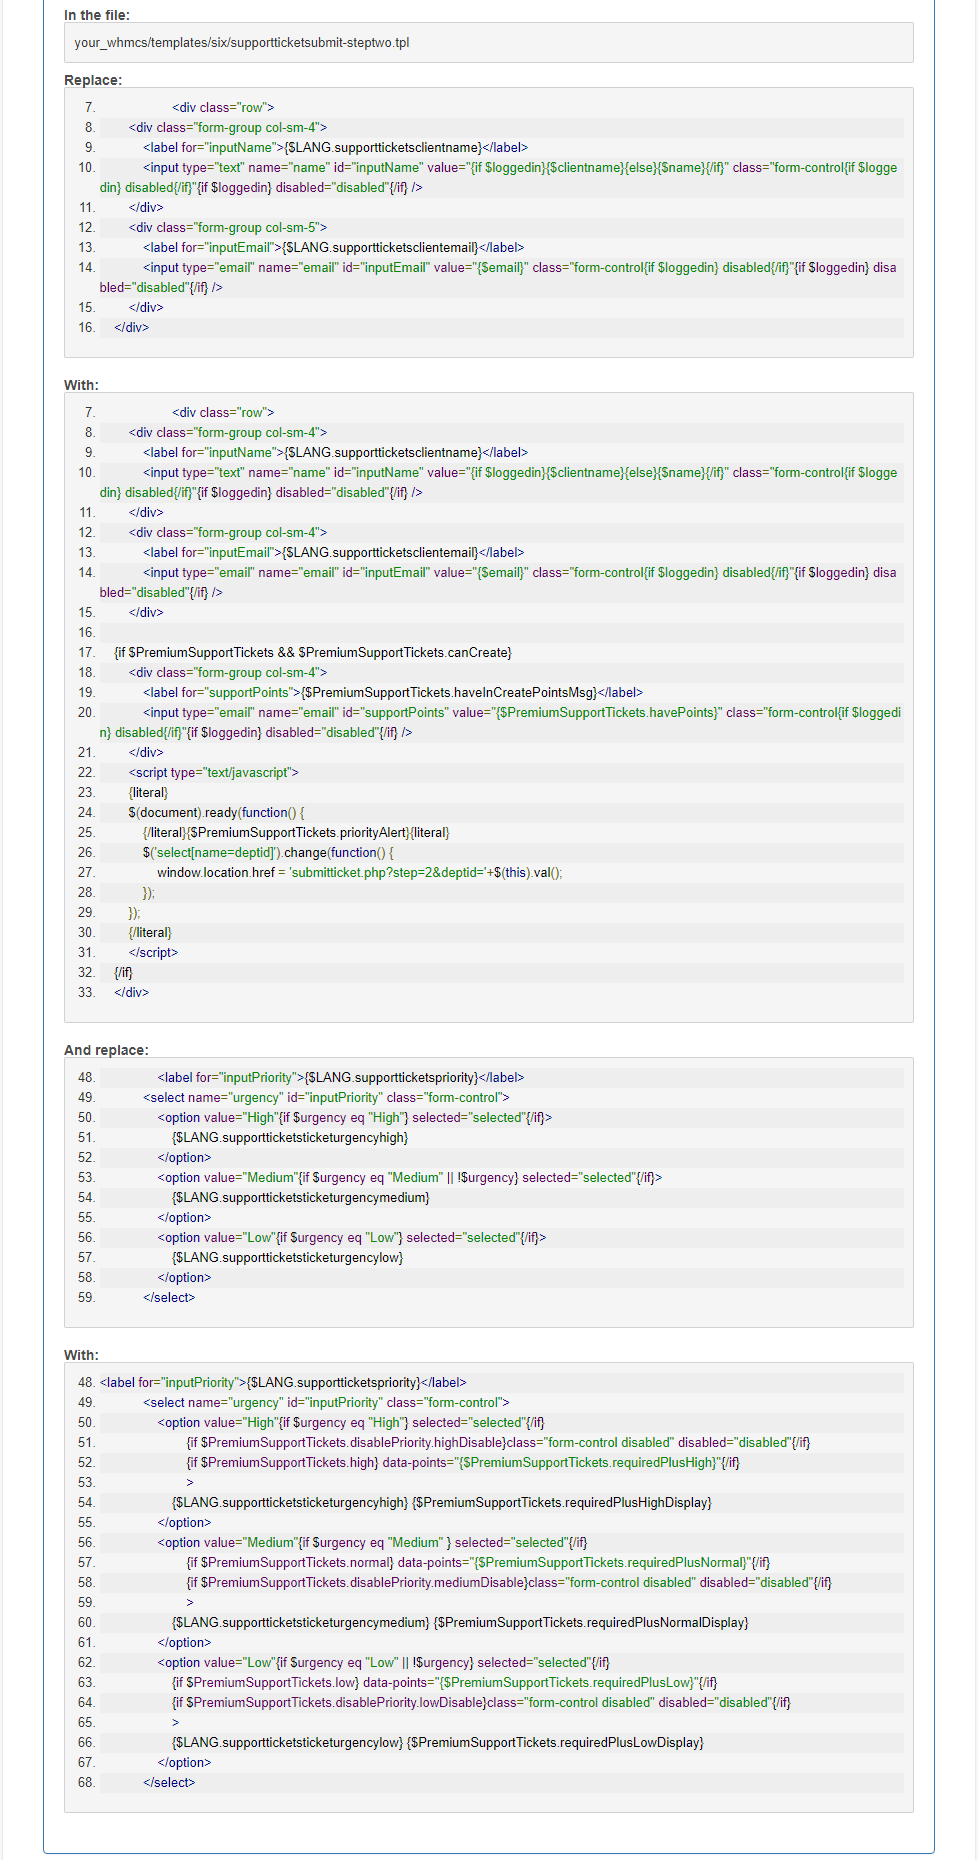
WHMCS theme 'Six':
Find and open file 'supportticketsubmit-stepone.tpl' located in the theme directory, follow the steps described below:
|
Find and open file 'supportticketsubmit-steptwo.tpl' located in the template directory you are using, follow the steps described below:
Please mind the lines numbers, they might differ in your files!
|
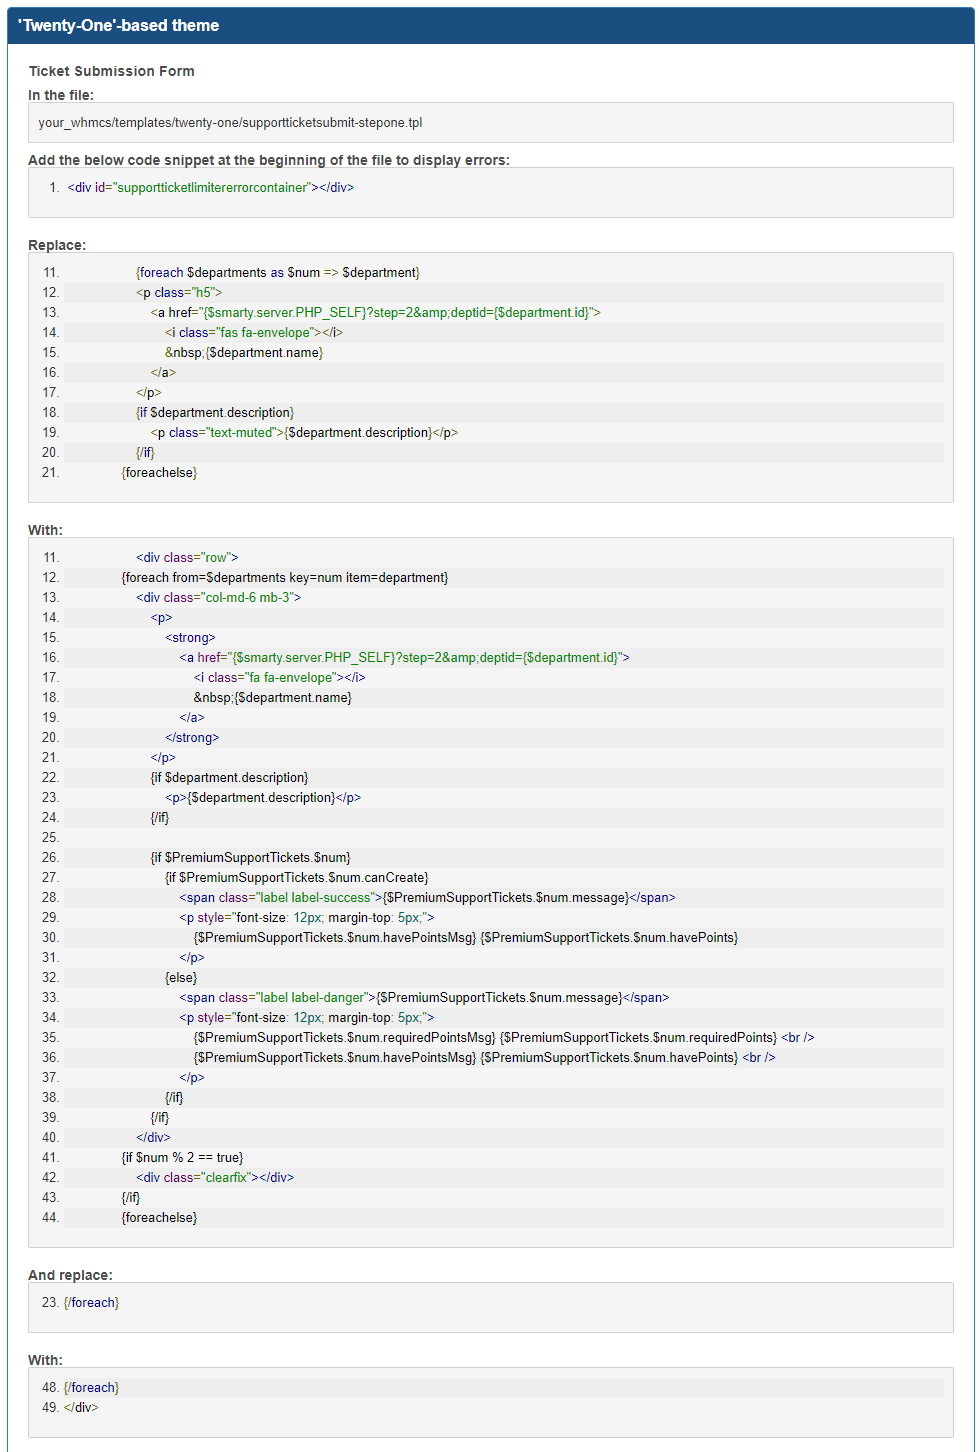
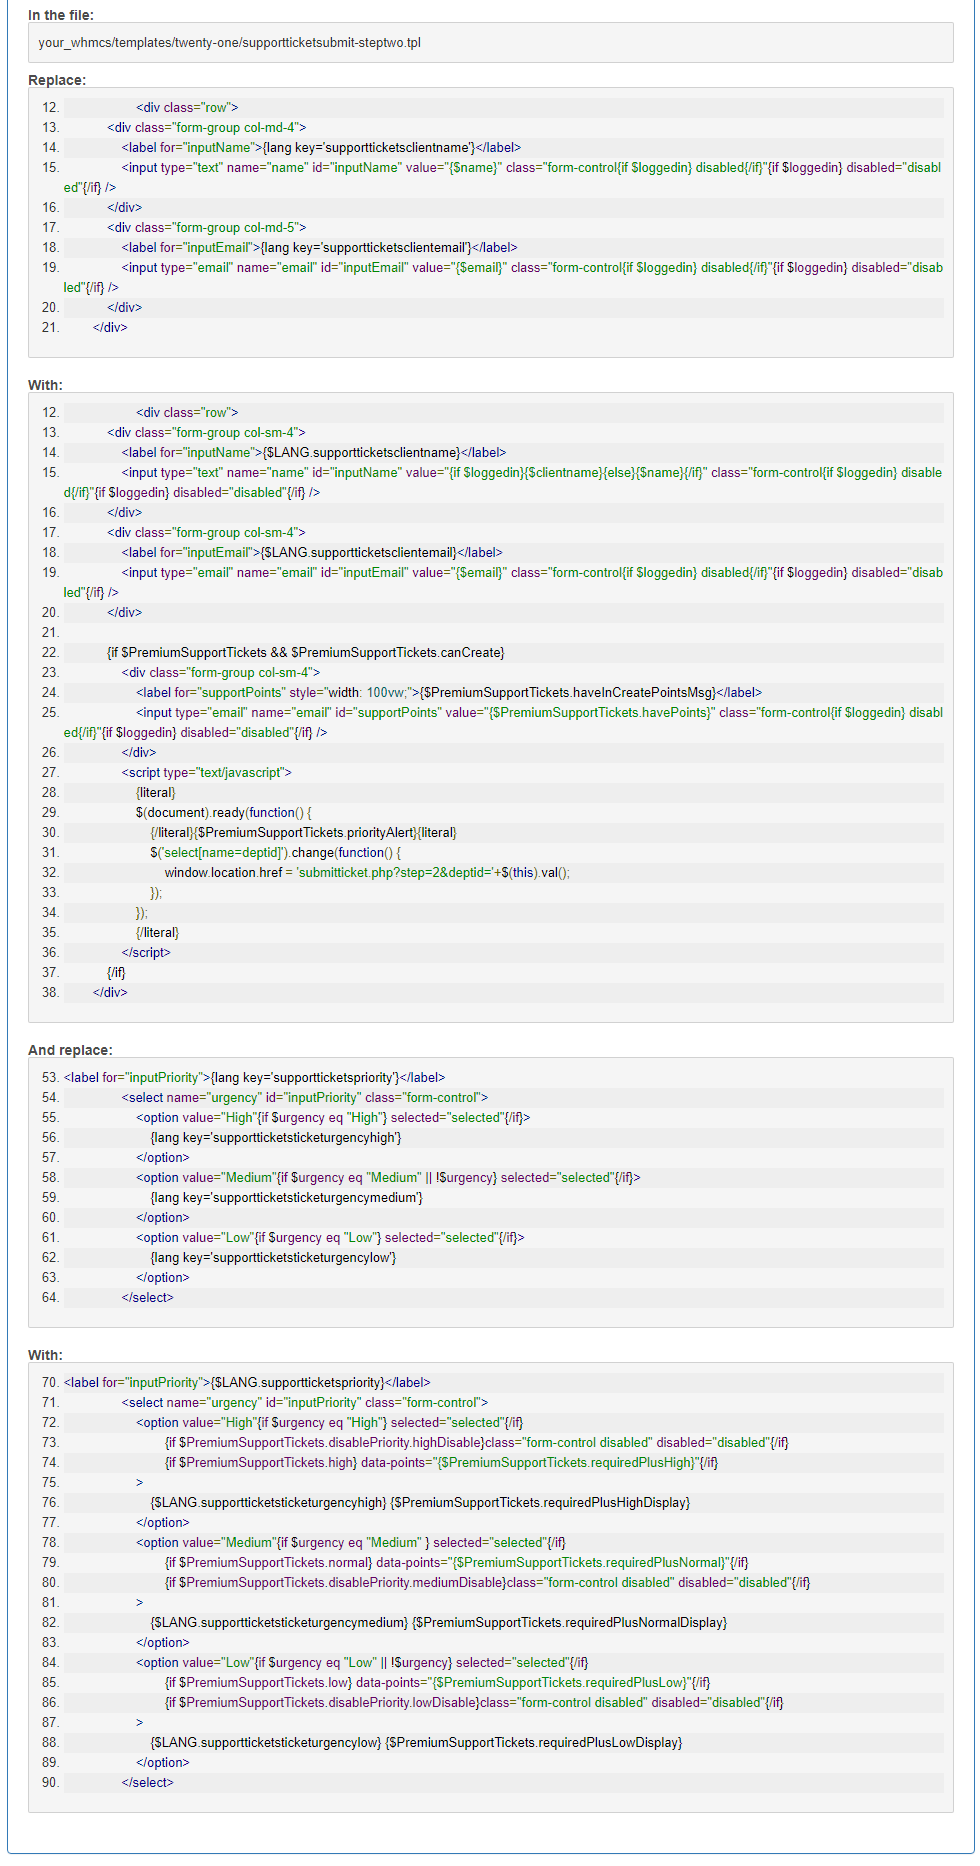
WHMCS theme 'Twenty-One':
Find and open file 'supportticketsubmit-stepone.tpl' located in the theme directory, follow the steps described below:
|
Find and open file 'supportticketsubmit-steptwo.tpl' located in the theme directory and follow the below steps:
Please mind the lines numbers, they might differ in your files!
|
| 9. You have just successfully installed Premium Support Tickets For WHMCS!
|
Configuration and Management
At this section we will show you possibilities of Premium Support Tickets For WHMCS.
Our module allows you to limit the quantity of new support tickets through introducing Support Credit Points.
Those Support Credit Points will be required to open new tickets.
The amount of Support Credit Points required to do so may vary depending on tickets' status and department they are created in.
Support Credit Points may be obtained along with your products or by ordering special products or product addons.
|
Rules List
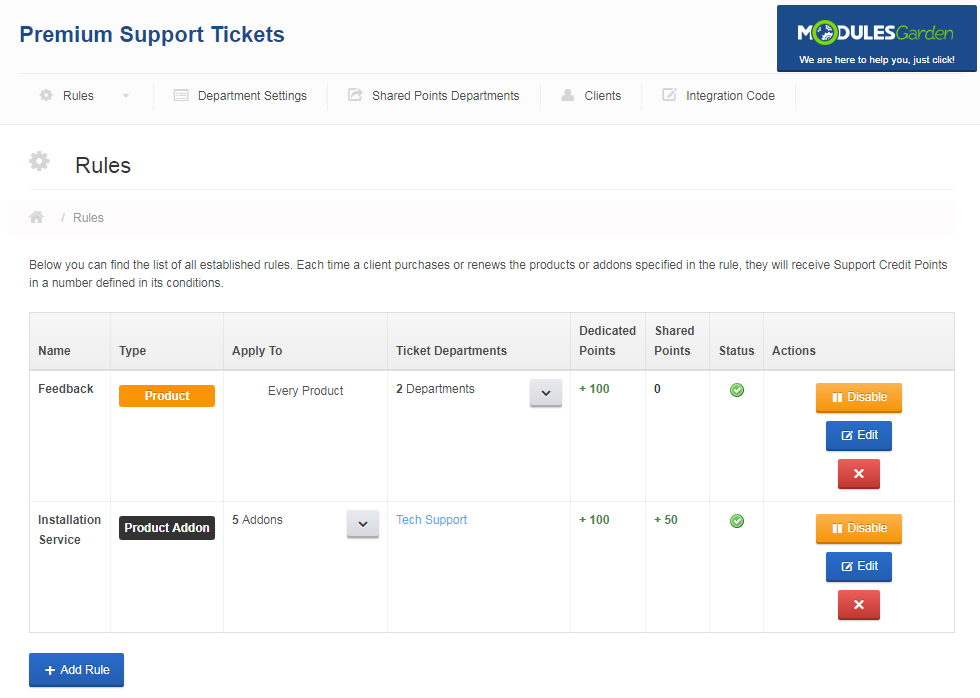
Rules section defines which products or product addons your clients can receive Support Credit Points for.
Additionally, they define which department they can be spent in and if they are granted one time or with product's each billing cycle.
As you can see, basic information related to the rules is listed under 'Rules' → 'Show Rules' tab.
|
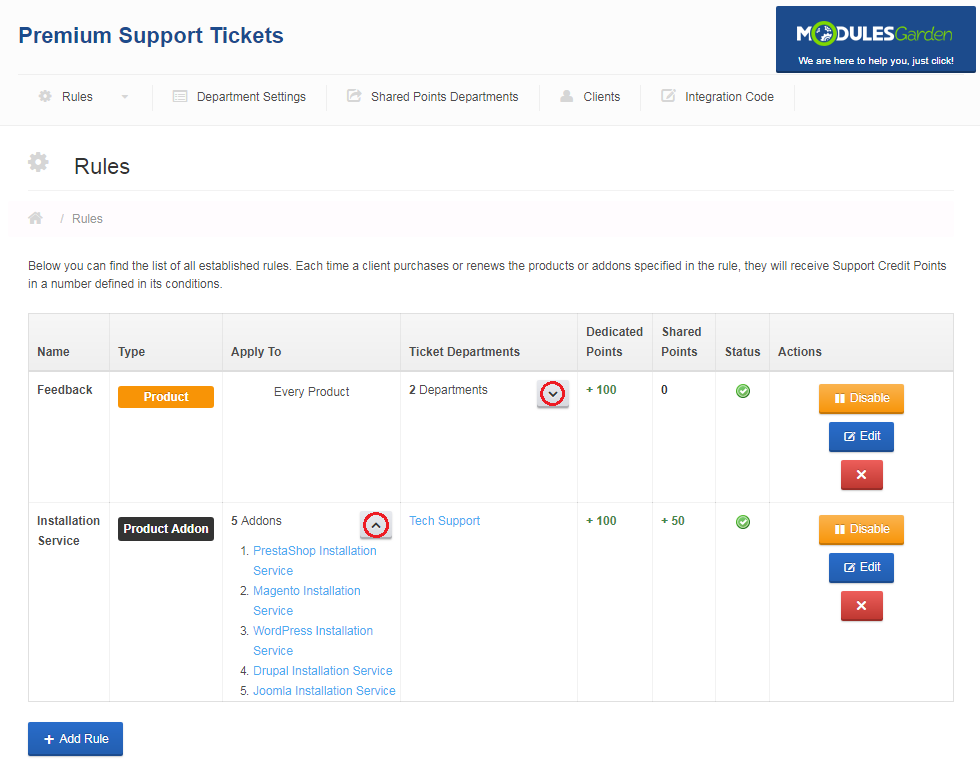
| You can view items assigned to the rule as well as departments, which Support Credit Points (Dedicated and Shared) will be granted to, by pressing buttons marked on the following screen.
|
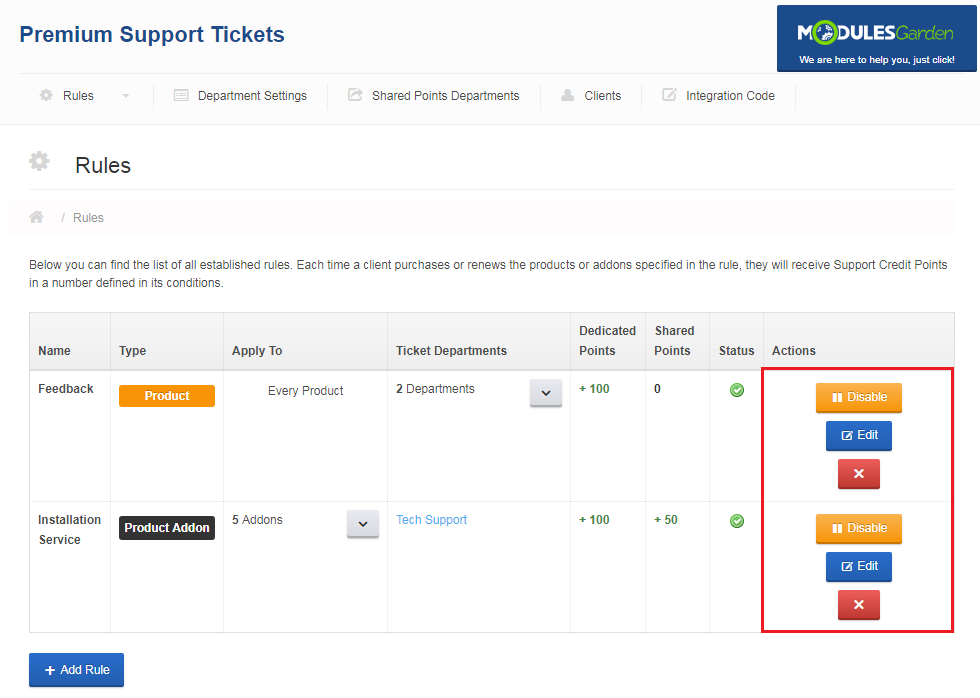
| Additionally, you can easily manage each of the rules by using buttons in the 'Actions' column.
|
Add Rule
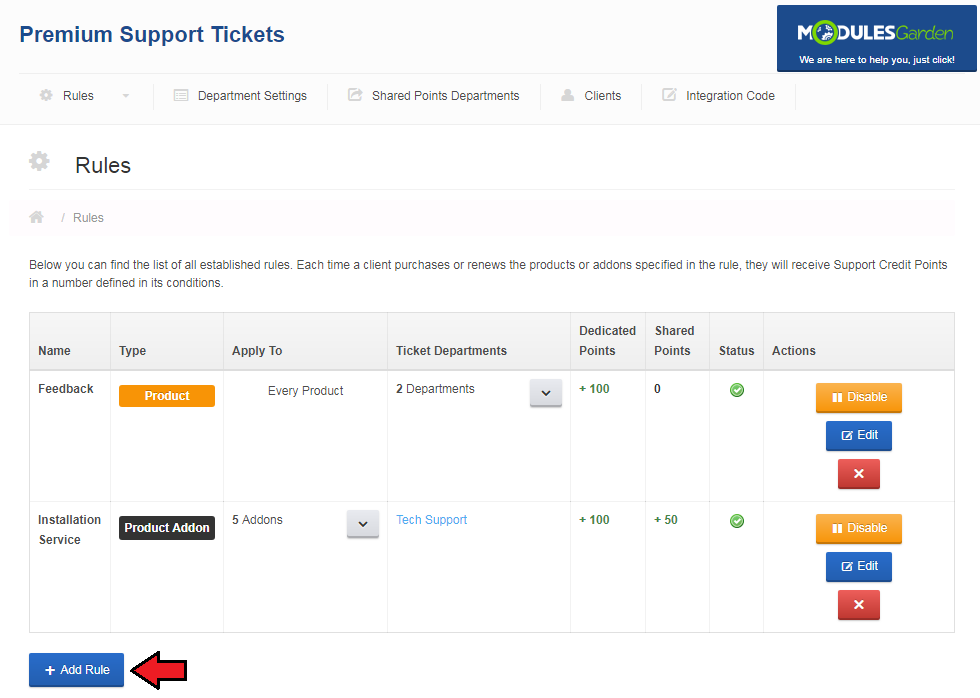
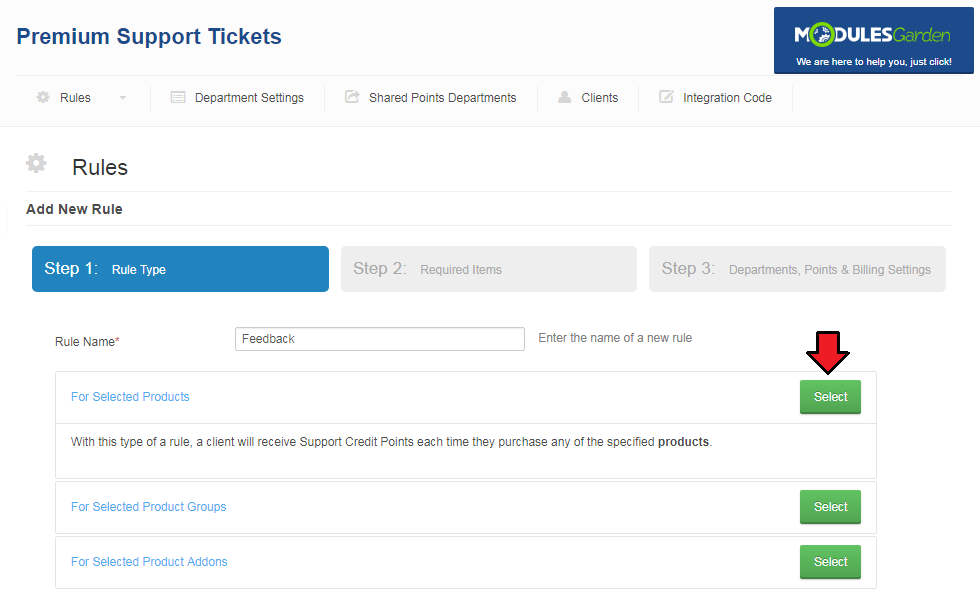
| Lets create a new rule by pressing 'Add Rule' to proceed.
|
Step 1. Fill in rule name and choose rule type through pressing 'Select' button next to the desired item.
Item type selected here defines the type of the item, for ordering which, your clients will receive Support Credit Points.
|
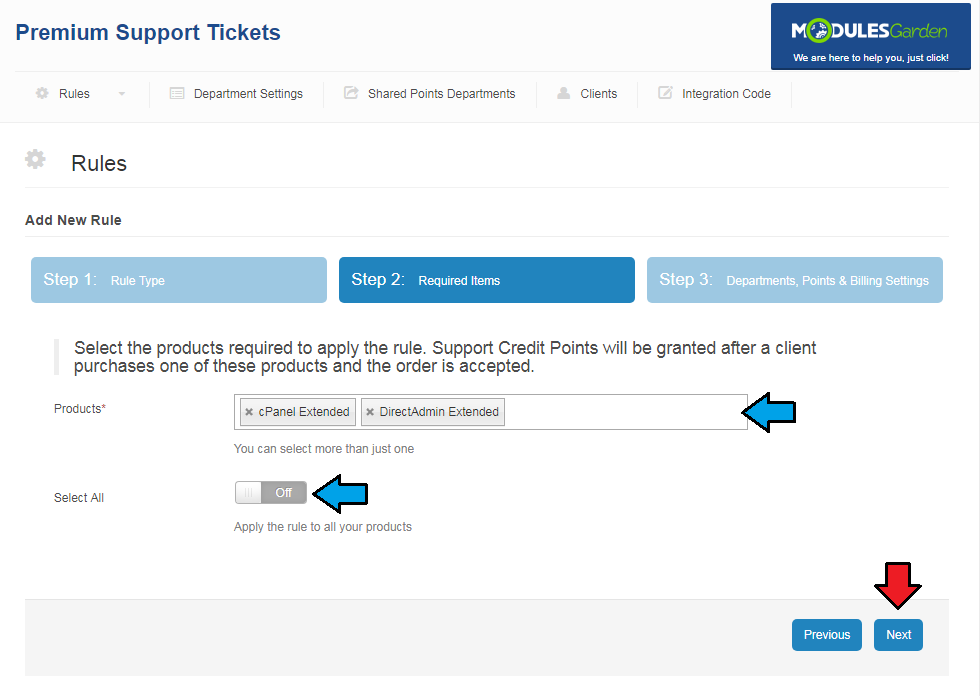
Step 2. Select items the order and activation of which will result in receiving Support Credit Points.
Alternatively, you can switch 'Select All' to 'On', then, this rule will be applied to all items in the selected items type.
Press 'Next' or 'Step 3' to continue.
|
|
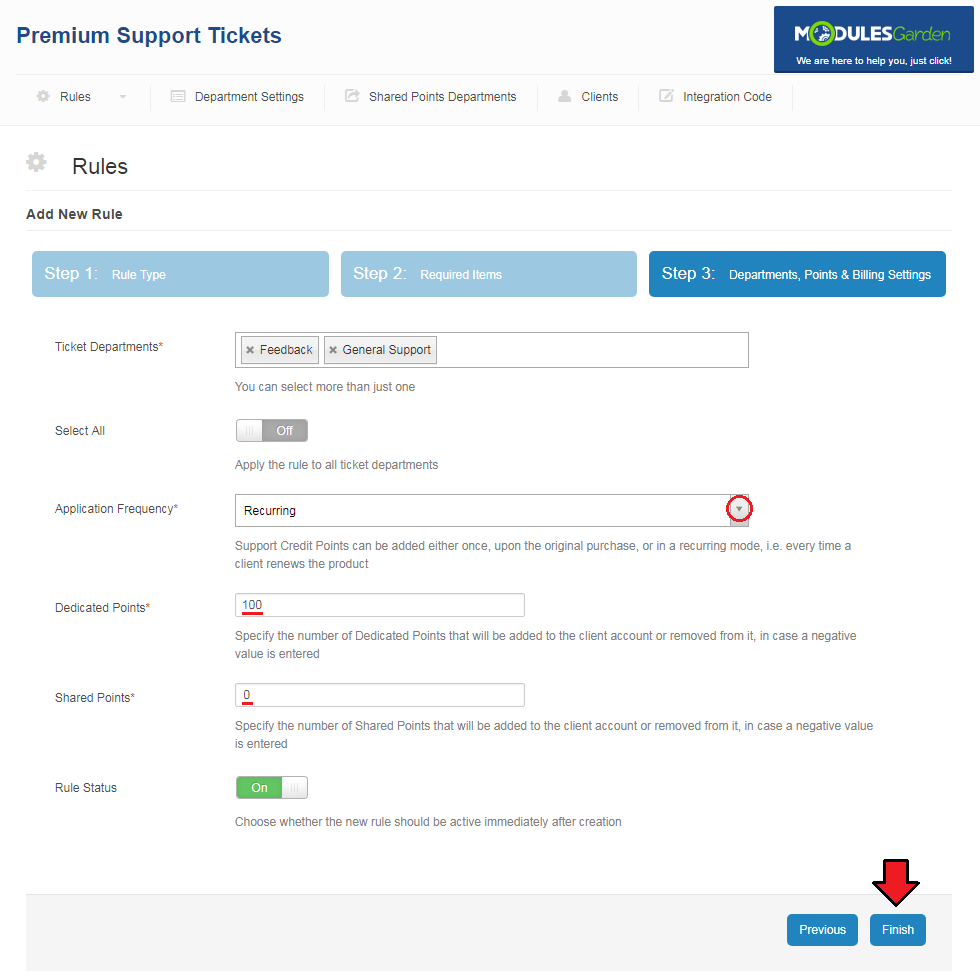
Step 3. Now, define departments to apply Support Credit Points to by selecting desired ones or switching 'Select All' to 'On'.
Next, select billing options for this rule, you can choose one time, for credits to be applied only for the fist bough of the product, or recurring, to apply them also every time the client renews it.
Finally fill in amount of 'Dedicated Points' and 'Points' which will be added by the rule to client's Support Credit Points and select the rule status.
Note: If you want points to be added only for one type (Shared or Dedicated), leave the second one to '0' value.
Go to Tips and Shared Points Departments section for more information on the differences between these types.
Confirm creation of this rule through pressing 'Finish' button.
|
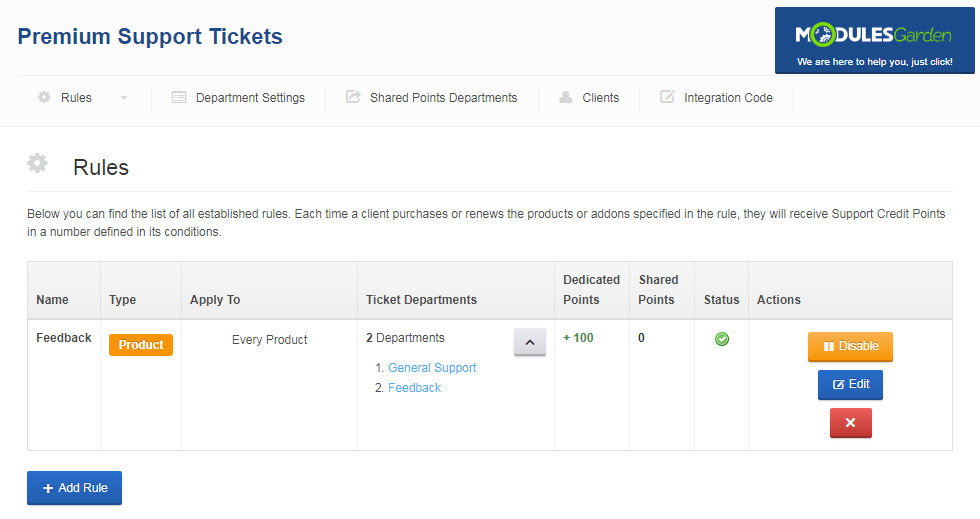
| As you can see on the following screen, the rule has been successfully added.
|
Department Settings
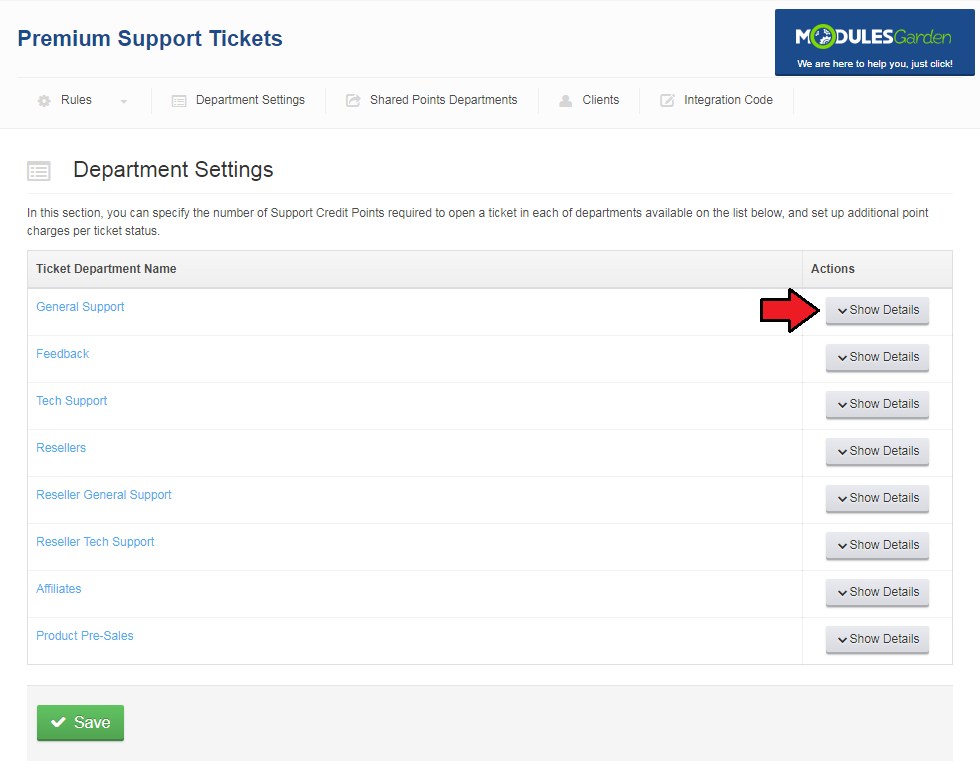
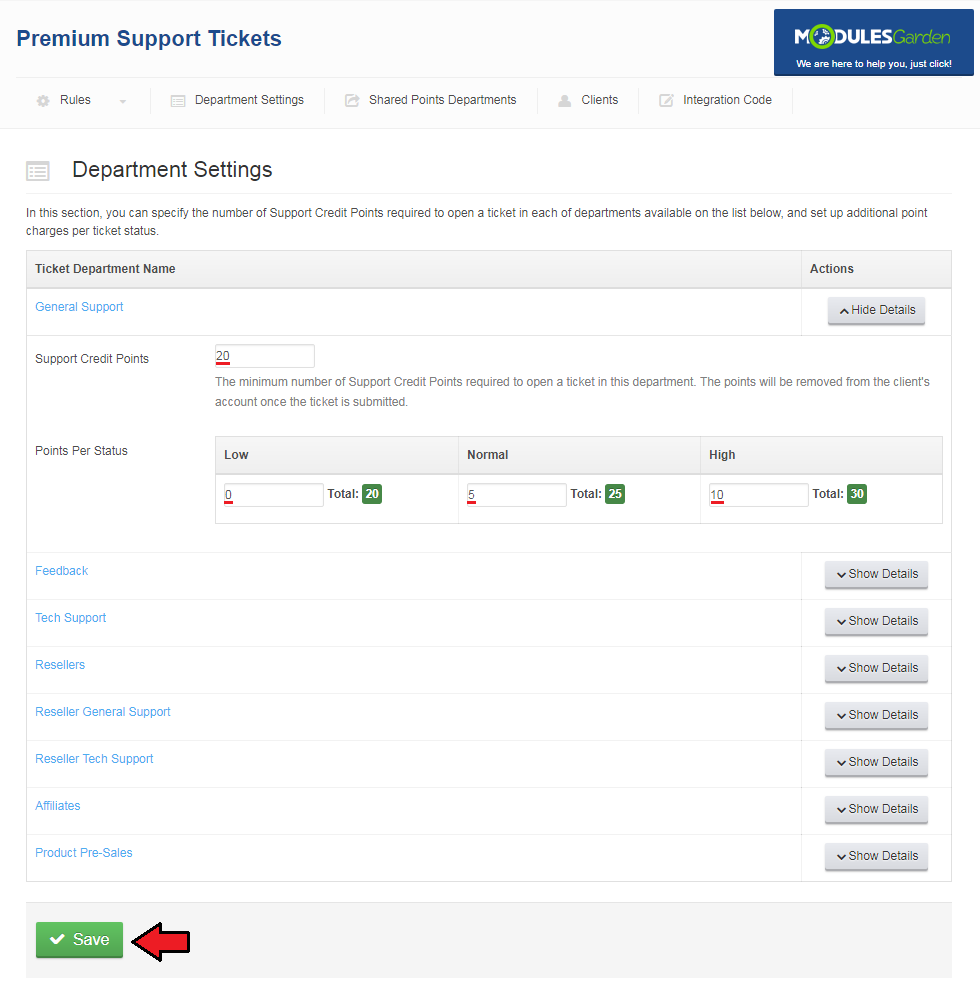
By default, all tickets are free to open. In the 'Department Settings' tab you can define price per ticket.
Let's set up Support Credit Points required to open tickets in the 'General Support' department.
Press 'Show Details' next to the selected department as shown on the following screen to proceed.
|
Now, start by defining base price per ticket, it will be added to the price per ticket status.
Afterwards, fill in the additional prices for low, normal and high status tickets. They will be sum up as 'Total' with the base price.
Confirm those settings through pressing 'Save'.
|
Shared Points Departments
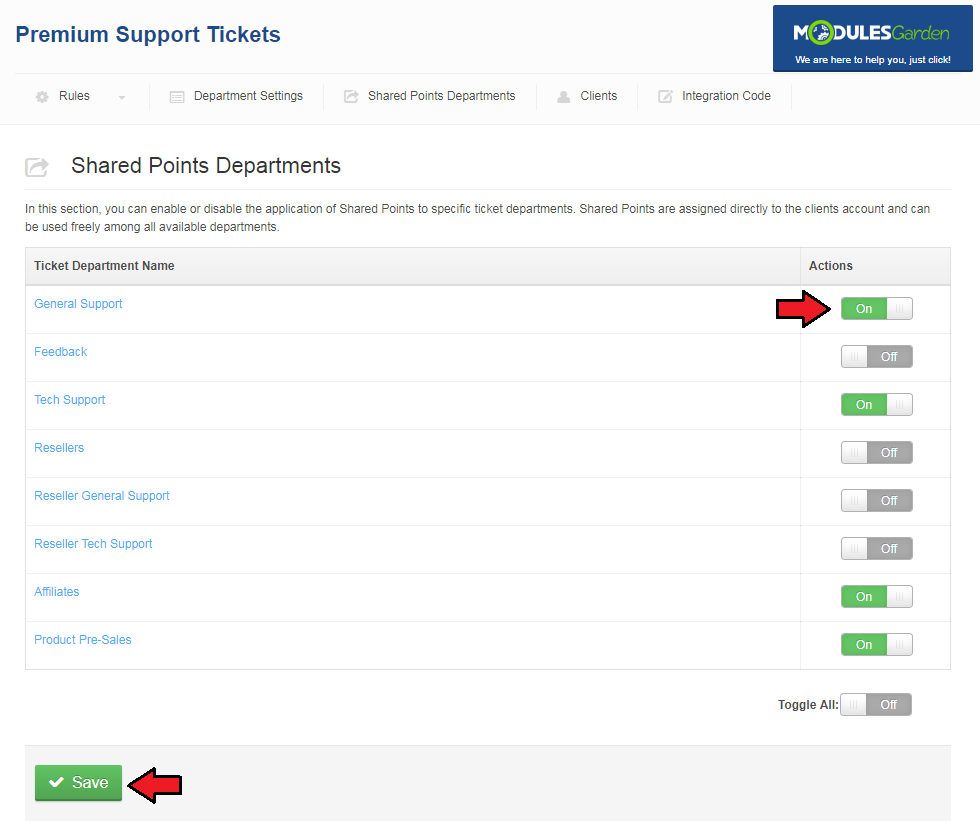
Shared Points are a common support credits that are assigned to a client's account, instead by a single support departments.
Thanks to this, the clients can freely distribute their shared credits among any departments you have selected here.
Once the departments are chosen, the Support Credit Points will be used from a shared balance to open a ticket.
Important: If you choose departments for Shared Points, this does not mean that their Dedicated Points will no longer be applied.
If the customer still owns a Dedicated Points for the specific department, then these credits will be used first and only after they've been run out, the Shared Points will be applied.
For this reason, the number of 'Support Credit Points' balance displayed next to the specific department is shown as the sum of the Dedicated Points and Shared Points.
Note: If you want, you can also not configure any Dedicated Points credits in the module, so all clients will only use their Shared Points freely for all chosen departments.
|
|
Clients
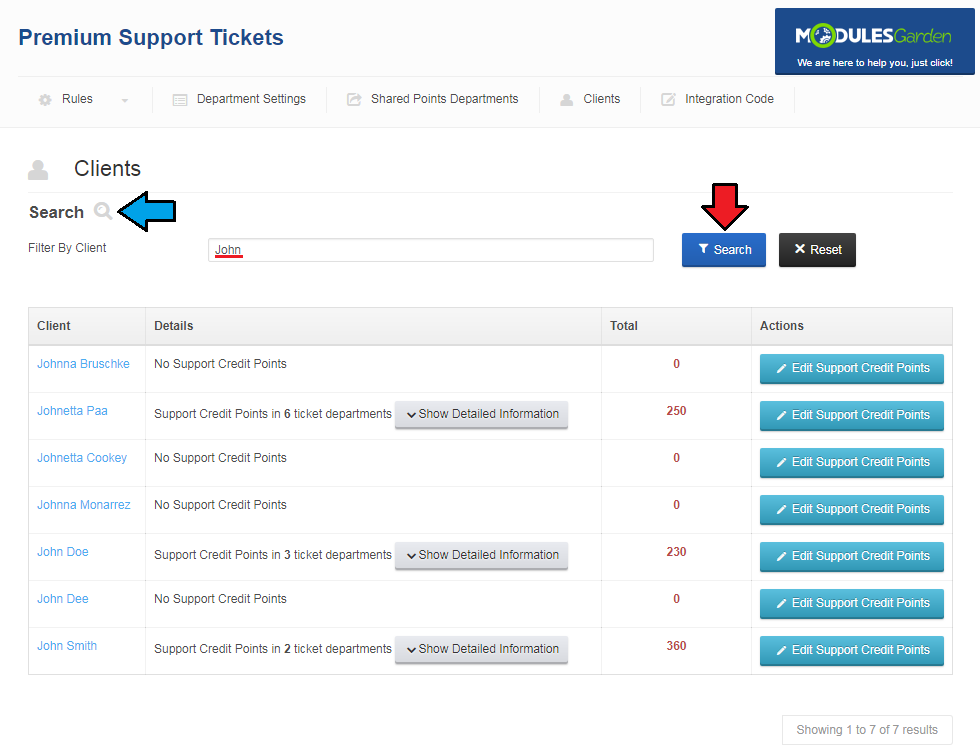
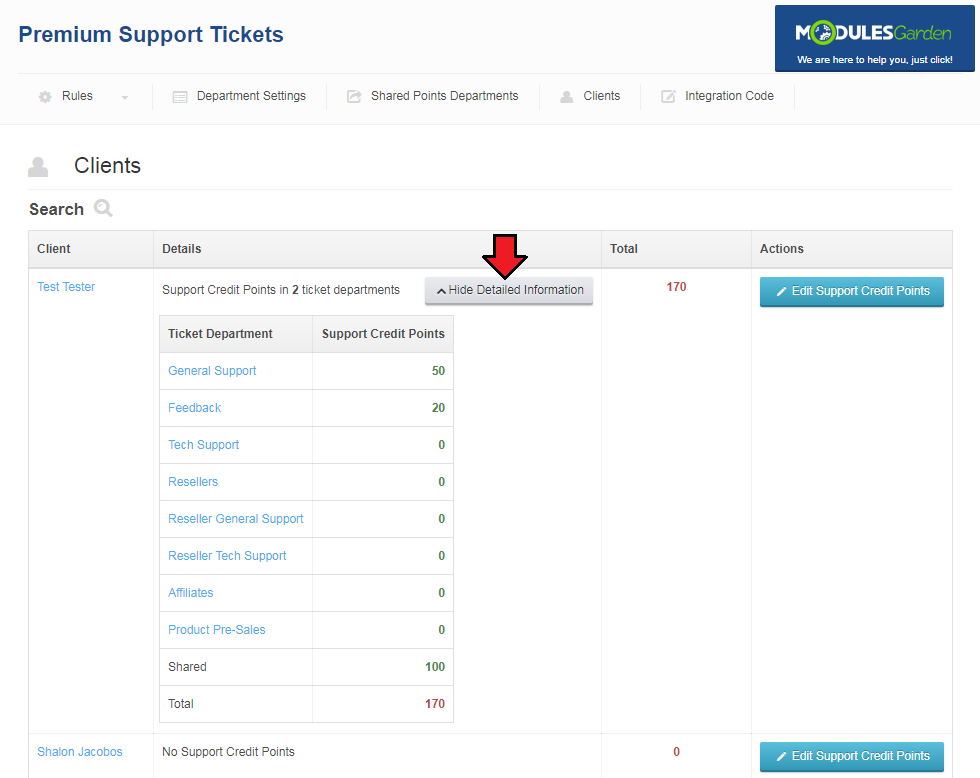
In the 'Clients' tab you can view the amount of Support Credit Points owned by your clients.
You can use filter to search for a specific client.
|
| To display/hide client's Support Credit Points, press 'Show Detailed Information' / 'Hide Detailed Information' as shown on the screen below.
|
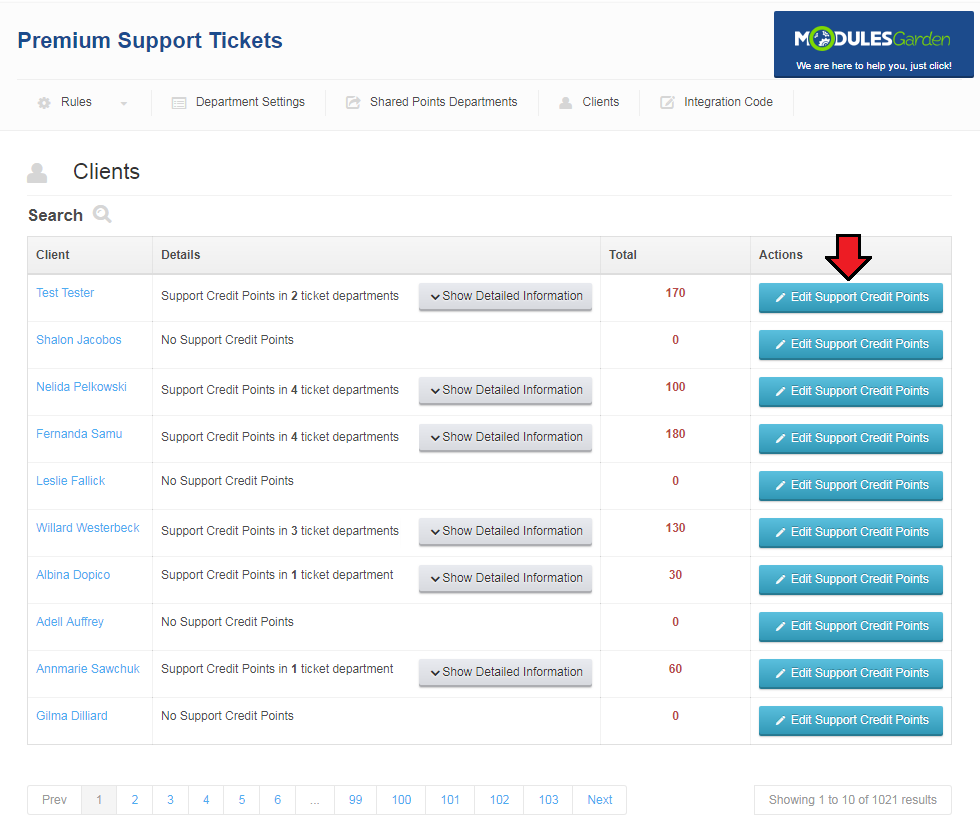
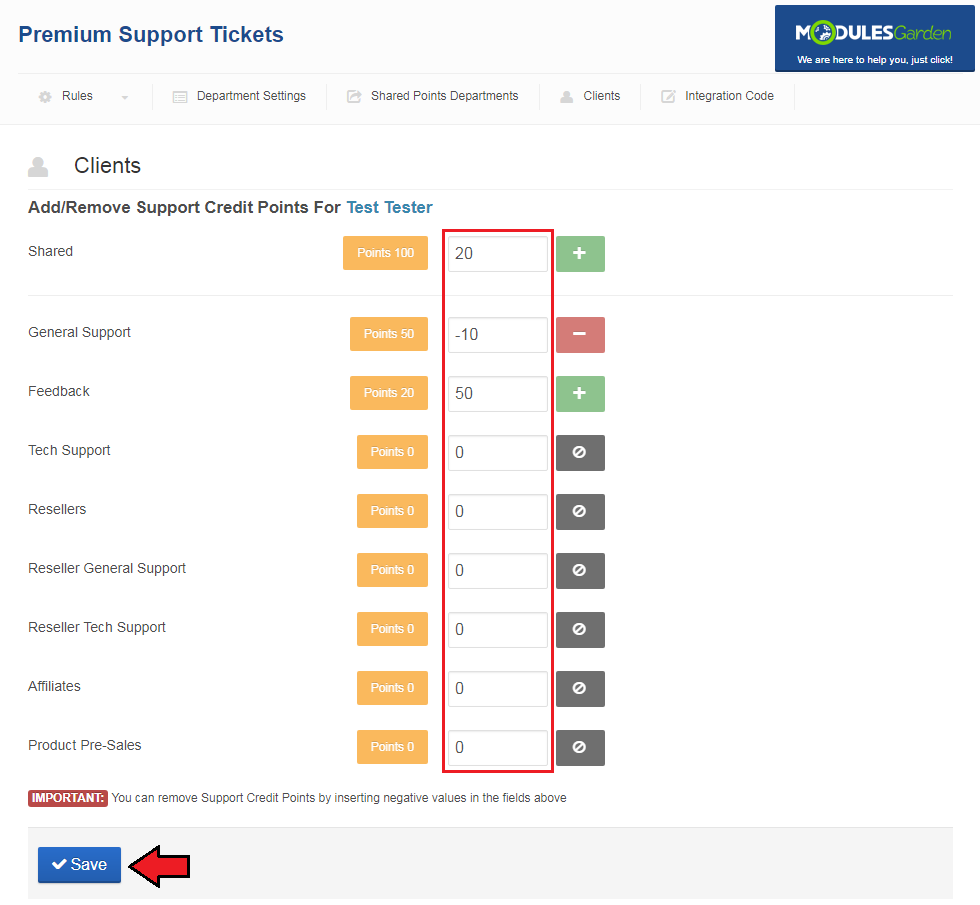
| You can also manually add/remove credit points to a client, press 'Modify Support Credit Points' to do so.
|
| Now, fill in the amount of Support Credit Points to be added or removed and then press 'Save'.
|
Client Area
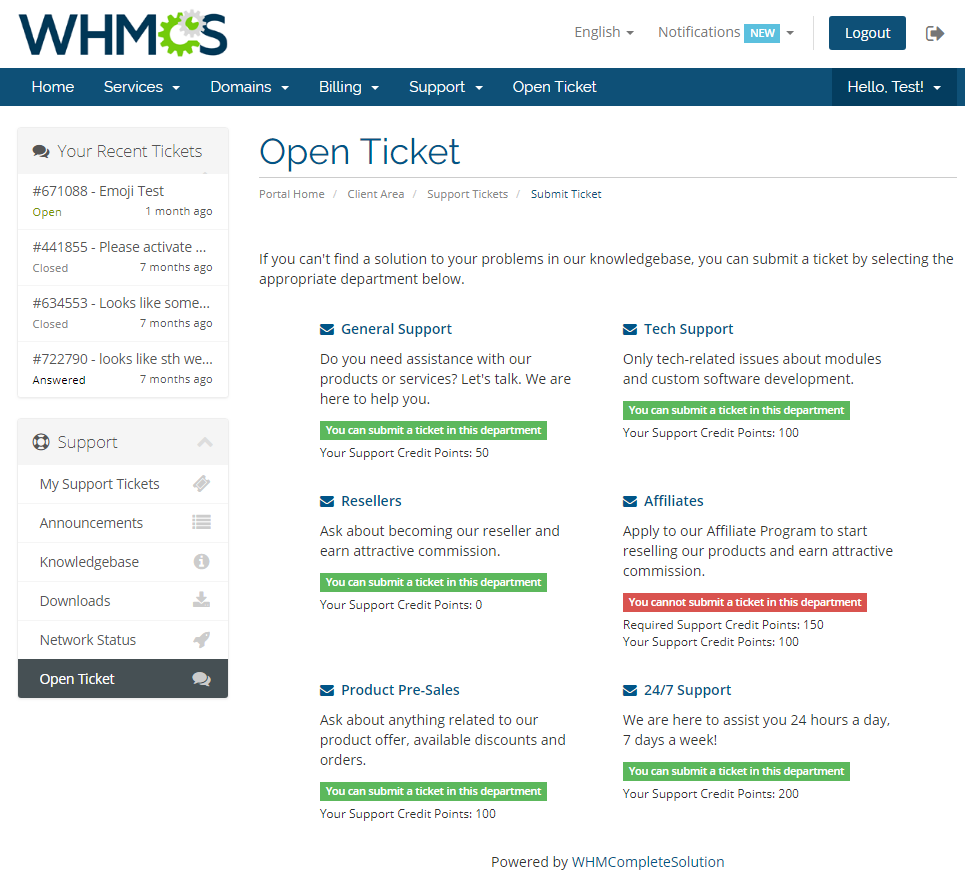
Let's proceed to the client area in order to create a ticket.
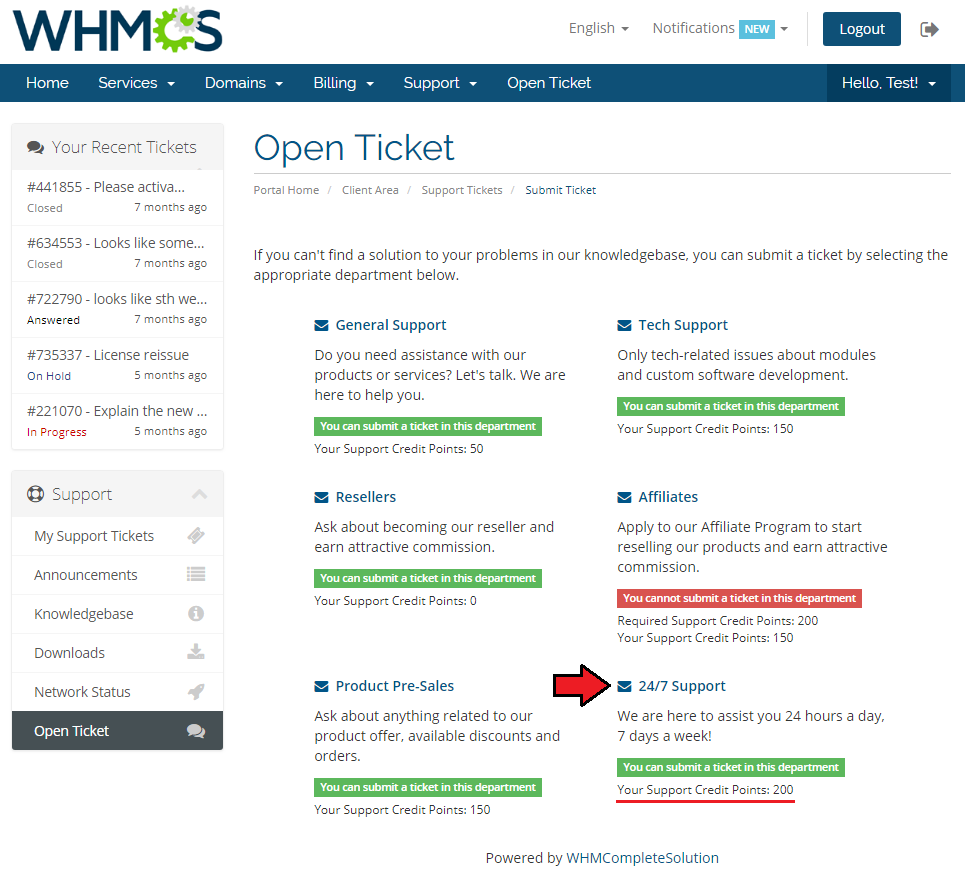
As you can see, one of the departments is unavailable because this client does not own any Support Ticket Points assigned to this department.
Let's create a ticket in '24/7 Support' department.
|
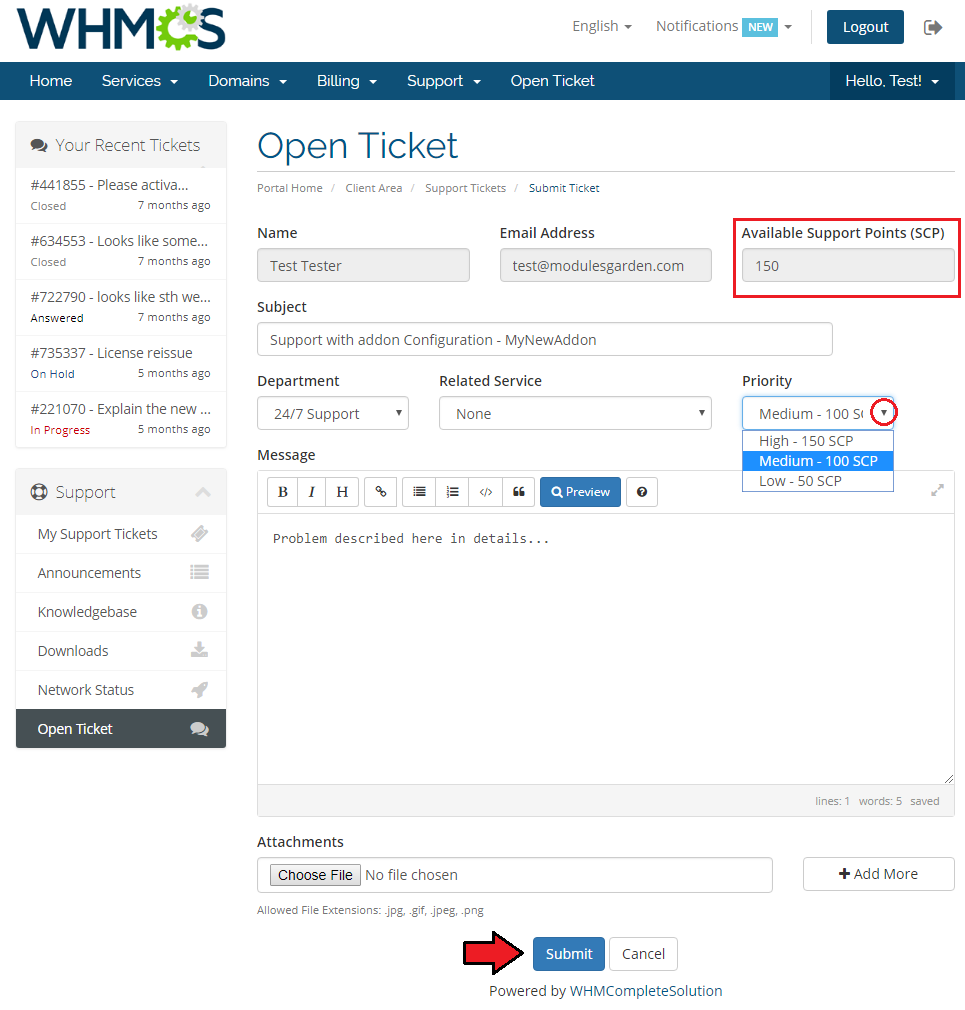
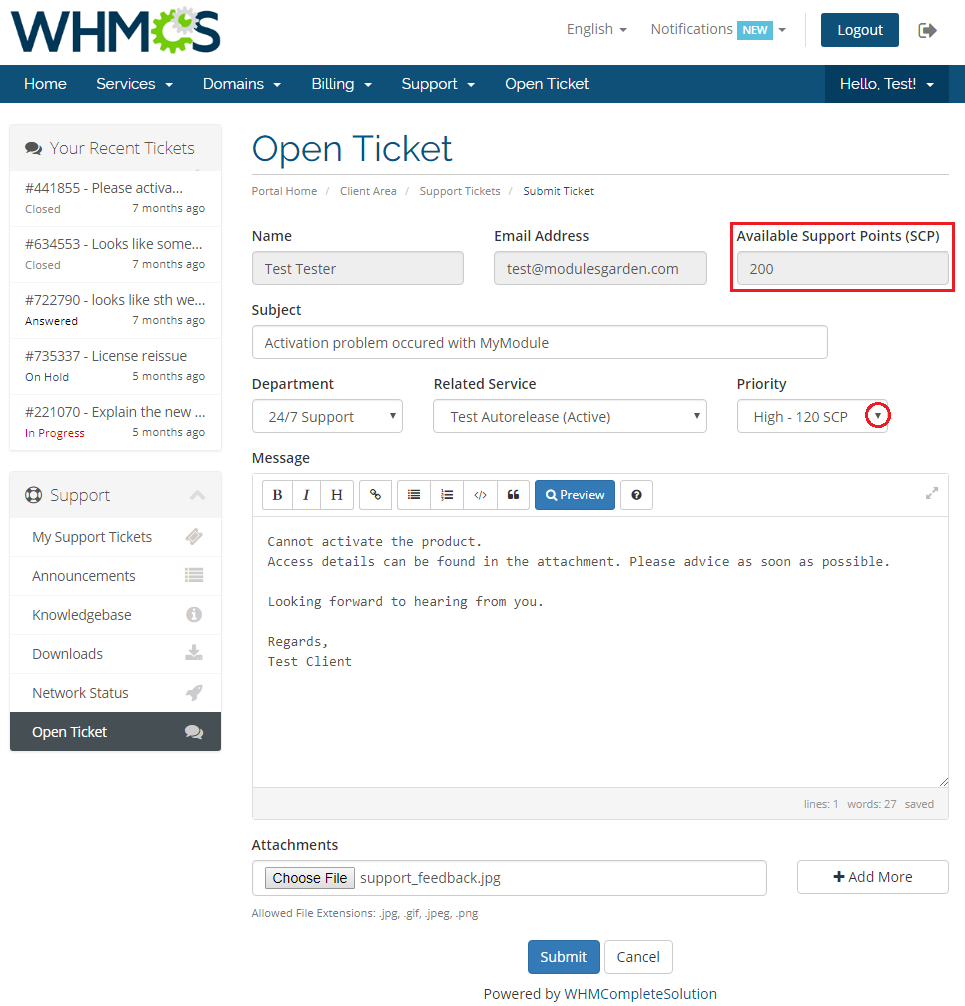
Clients can view their Support Credit Points for chosen department.
Additionally, they can see the price per each ticket priority as shown on the following screen.
|
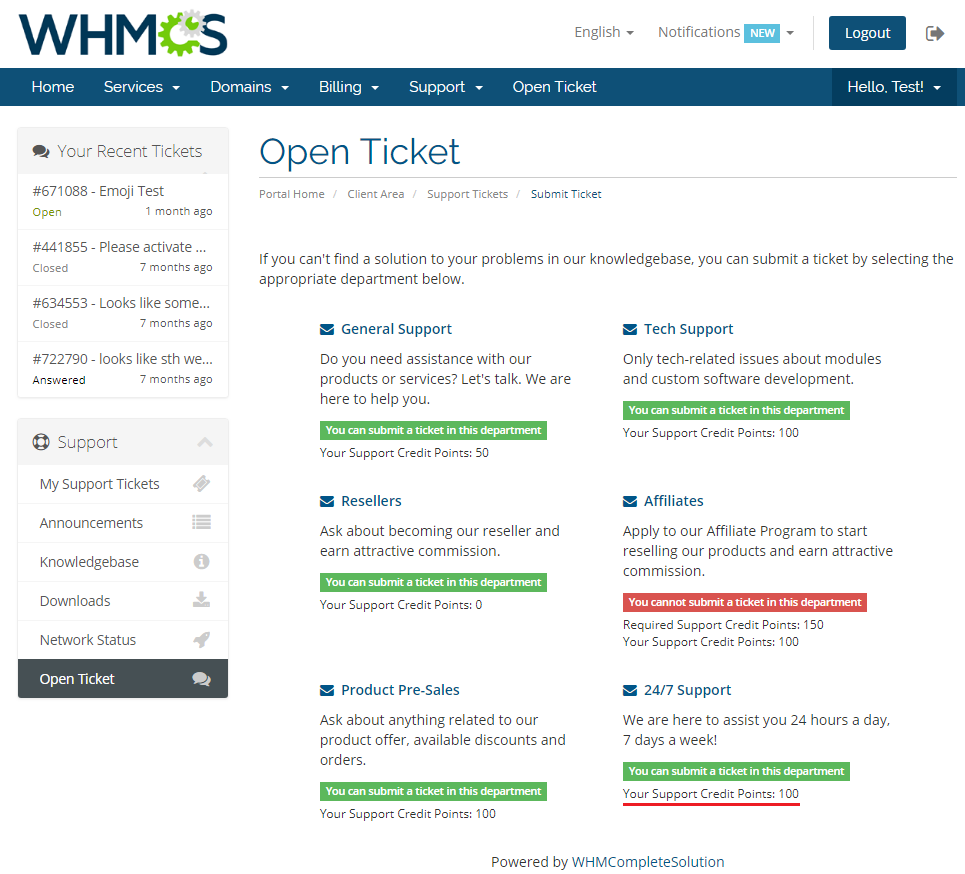
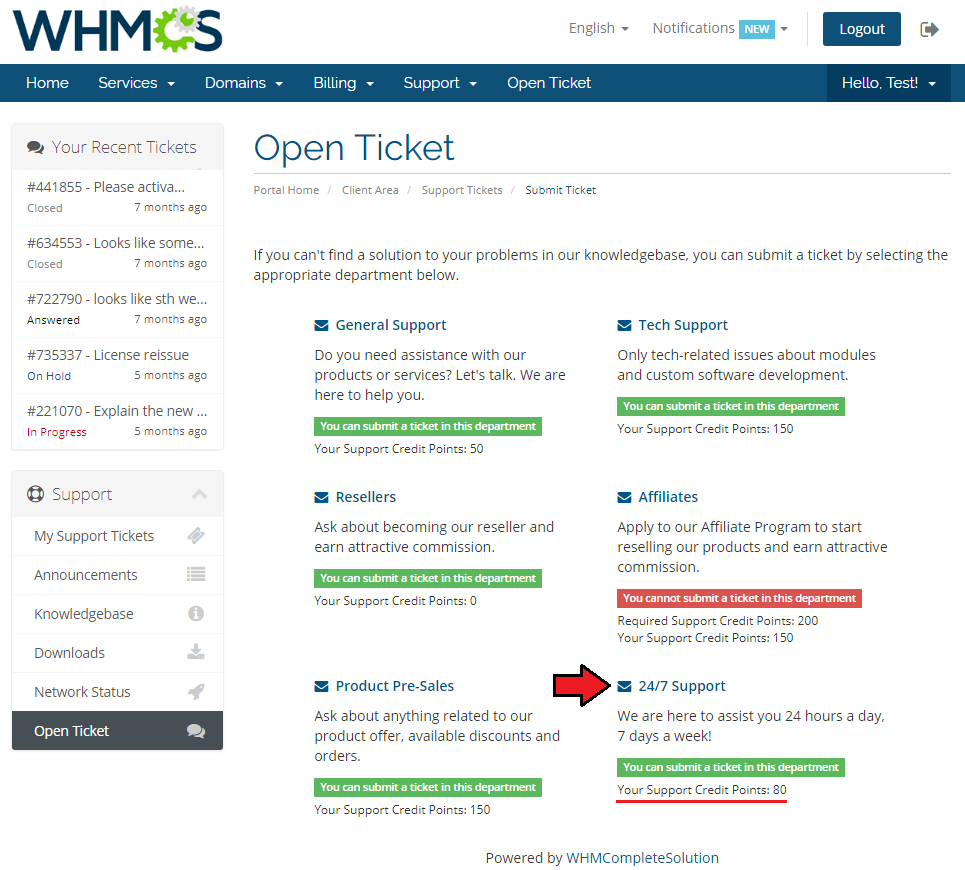
| As you can see the number of client's points in the department has been reduced from 200 to 100 once the ticket has been correctly submitted.
|
Sample Workflow
| In this section we will show you basic workflow of Premium Support Ticket For WHMCS usage.
|
New Product Department
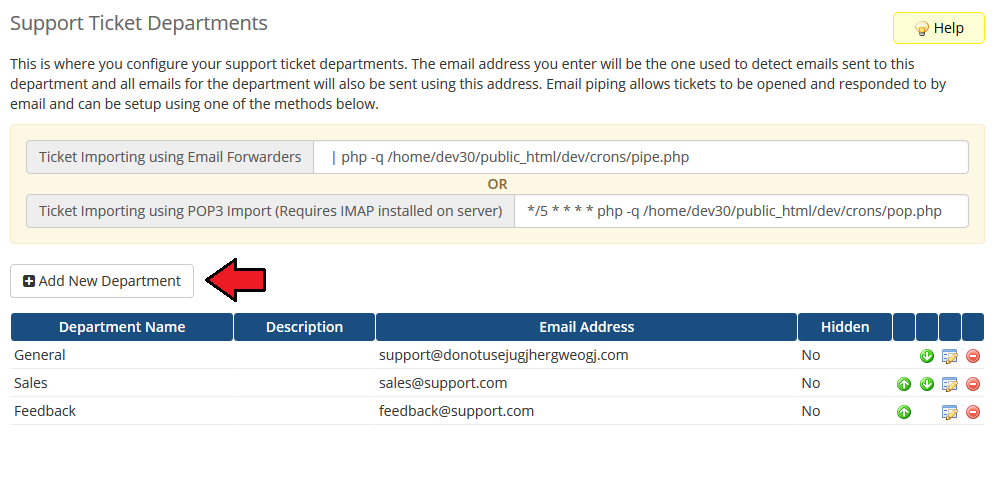
1. Let's start by creating a new ticket department, proceed to 'Setup' → 'Support' → 'Support Departments'.
Now, press 'Add New Department'.
|
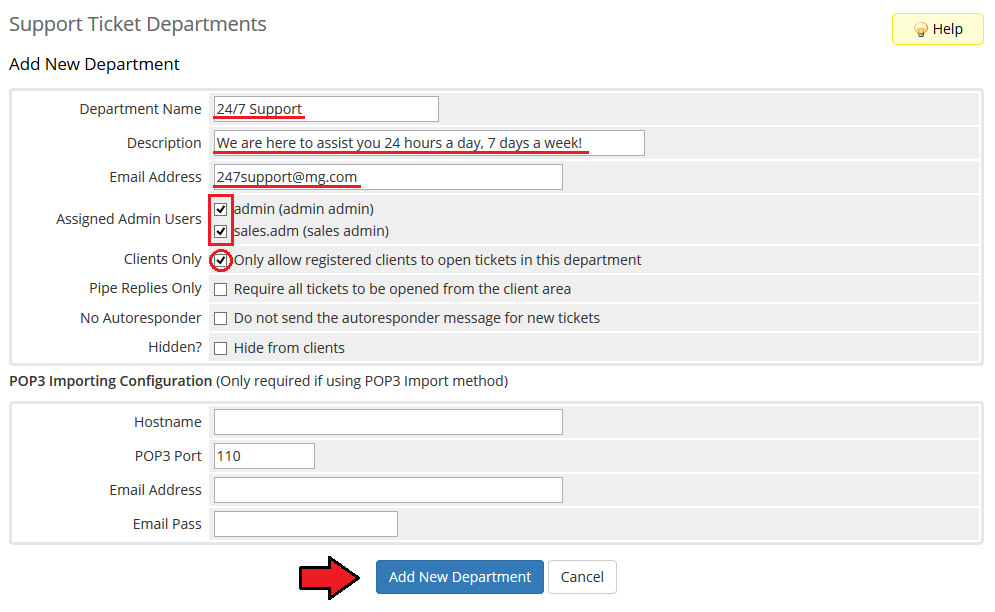
2. Fill in department name, description and email address.
Additionally, assign administrators to it, mark 'Clients Only' and press 'Add New Department'.
|
New Product Addon
3. Now, let's create a rule, which will add Support Credit Points to the new department.
In our case, Support Credit Points will be added through product addon.
Therefore, we need to create the product addon first.
Proceed to 'Setup' → 'Products/Services' → 'Product Addons' and press 'Add New Addon'.
|
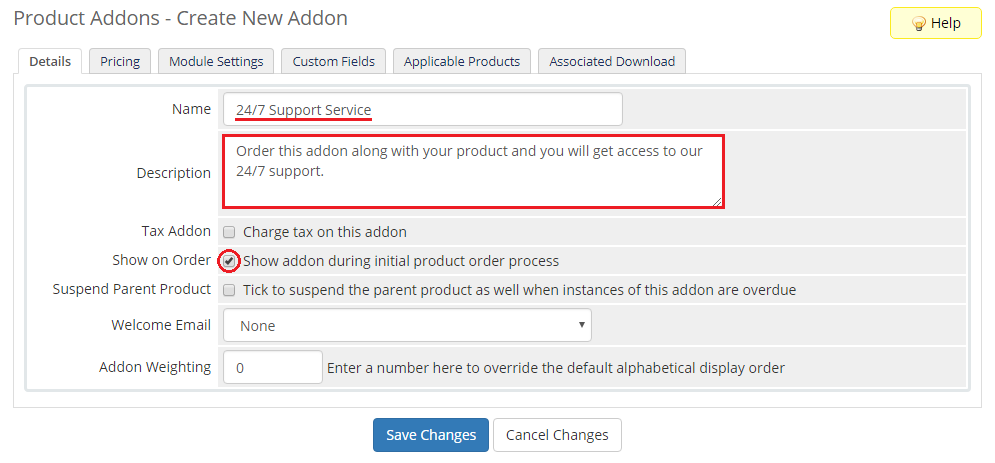
| 4. Fill in addon name and description. Additionally mark 'Show on Order' option.
|
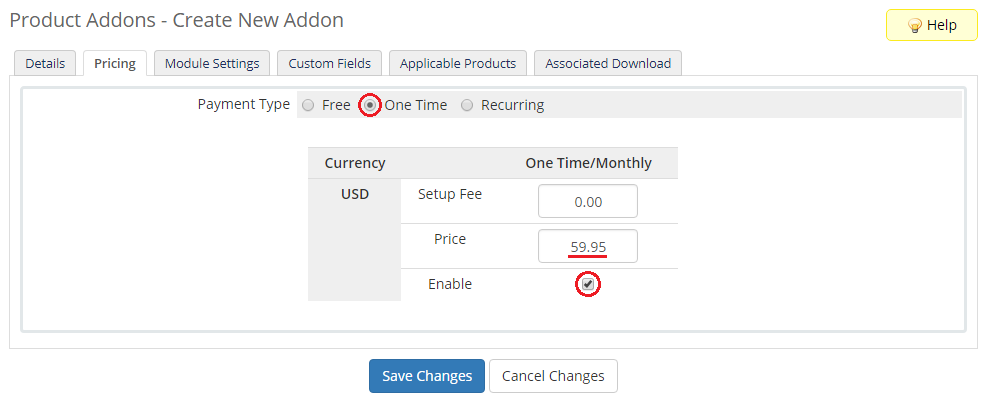
| 5. Move to the Pricing tab, choose one time billing type, and set the desired price.
|
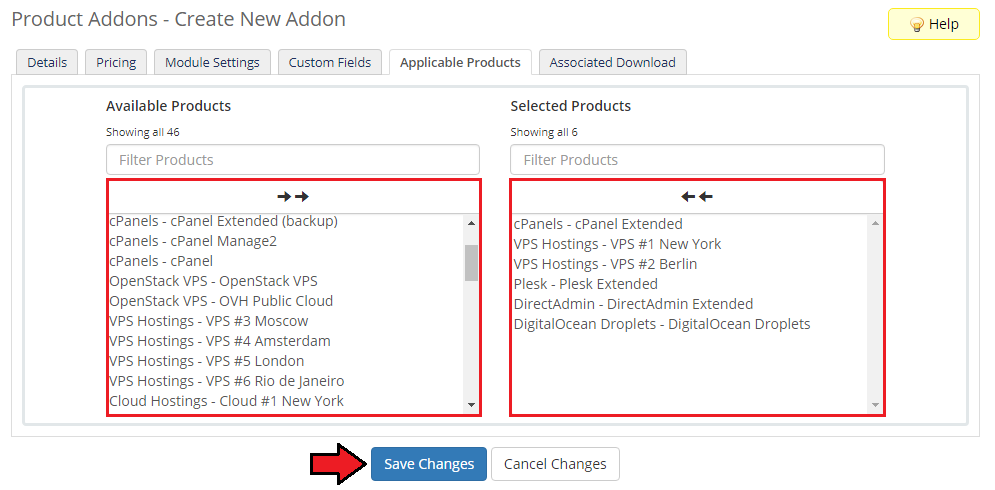
| 6. Finally in Applicable Products, assign desired services and proceed through pressing 'Save Changes' .
|
New Rule
- Go to 'Addons' → 'Premium Support Ticket' and press 'Add Rule'.
- Fill in the rule name and select 'Product Addon' rule type.
- Now, select previously created product addon and press 'Next'.
- Set up previously created department and select 'One Time' from 'Support Credit Points Frequency' dropdown menu.
Now, fill in 200 into 'Dedicated Points' or 'Shared Points' field and press 'Finish'.
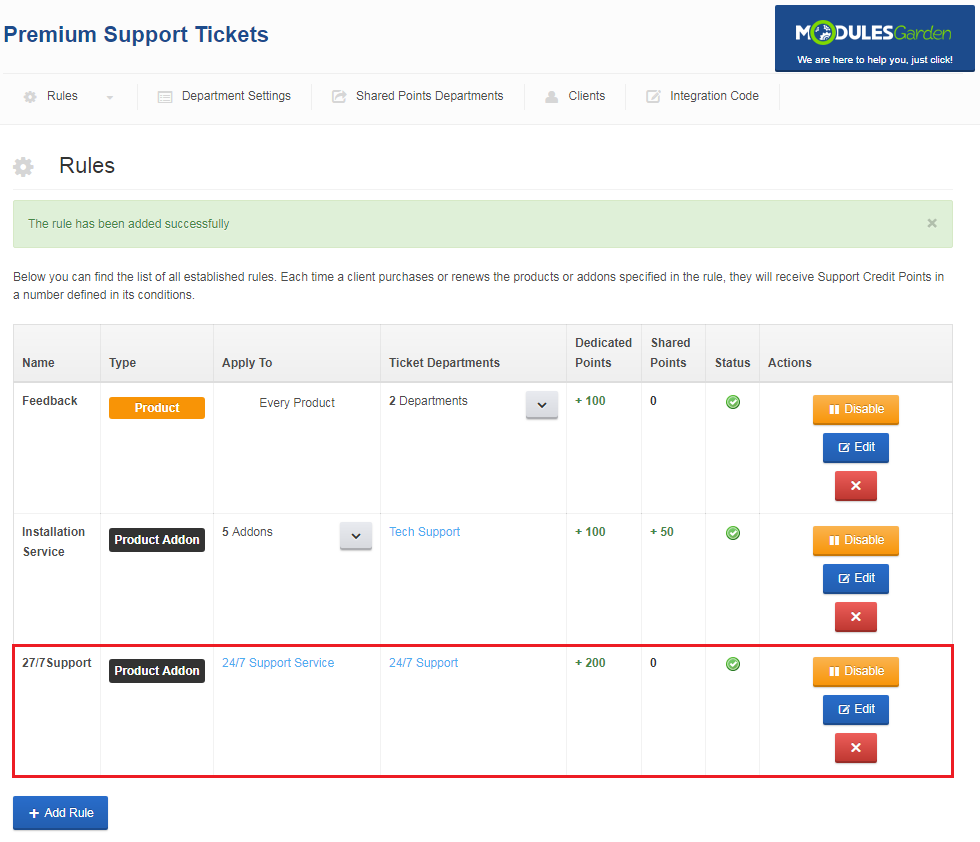
- As you can see, rule appeared in rule list and is ready for use.
|
Department Configuration
12. Let us now set up amount of points required to open tickets in the previously created departments.
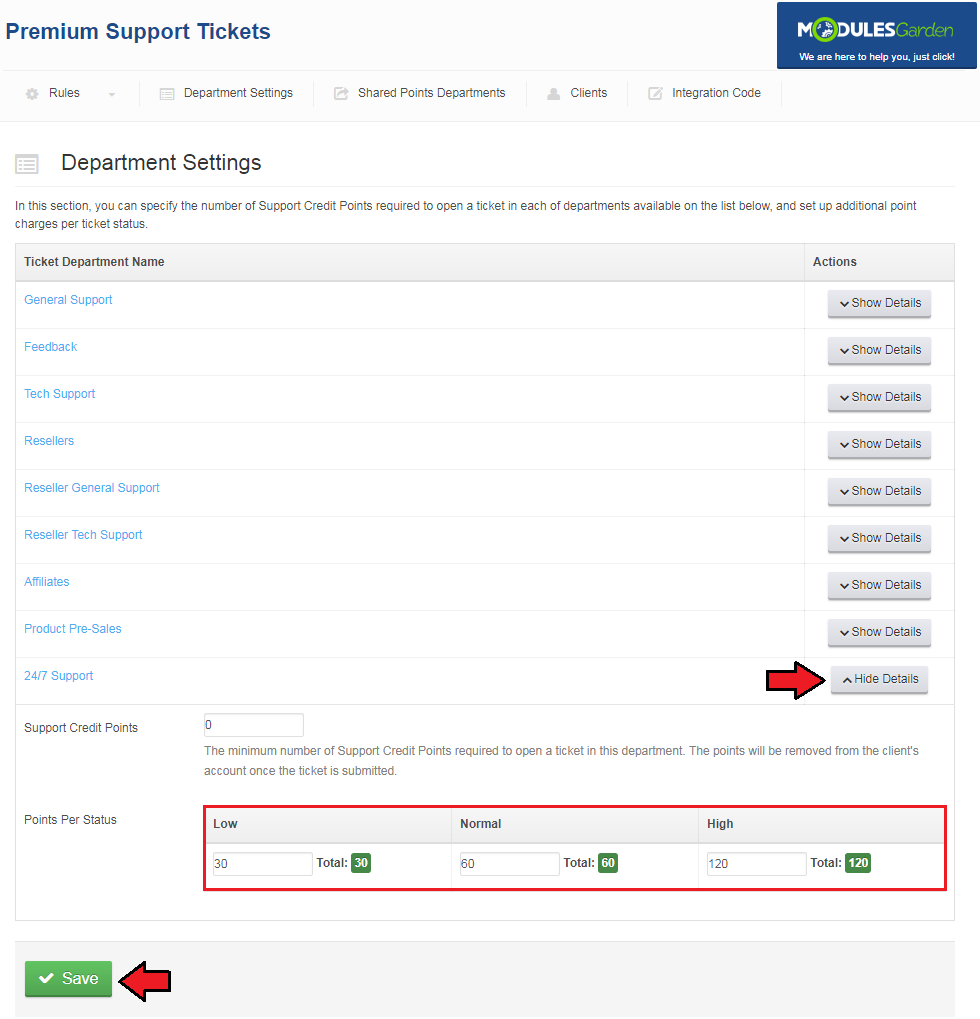
Proceed to the 'Department Settings' tab and press 'Show Details' next to the previously created department.
|
13. Leave 'Required Points' at 0, and fill in 'Low' , 'Normal' and 'High' ticket statuses with 30, 60 and 120 values respectively.
Press 'Save' to confirm changes.
|
Example Order
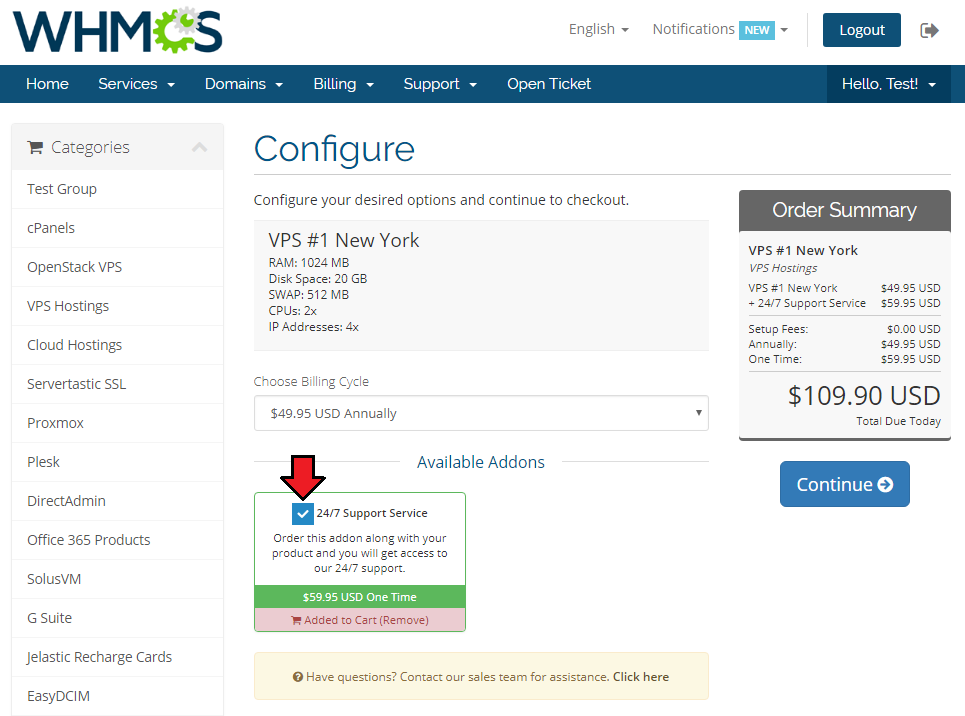
| 14. Log in to client account and order one of product with the previously created product addon.
|
New Ticket
15. After payment, both the product and product addon ordered along with it are now active.
200 Support Credit Points were granted to this account and now can be spent in the '24/7 Support' department.
|
16. Let us use Support Credit Points by opening a new ticket in the '24/7 Support' department with the 'High' status.
It will cost 120 Support Credit Points. There should be 200 points on your account so you can afford creating only one ticket with the 'High' status.
|
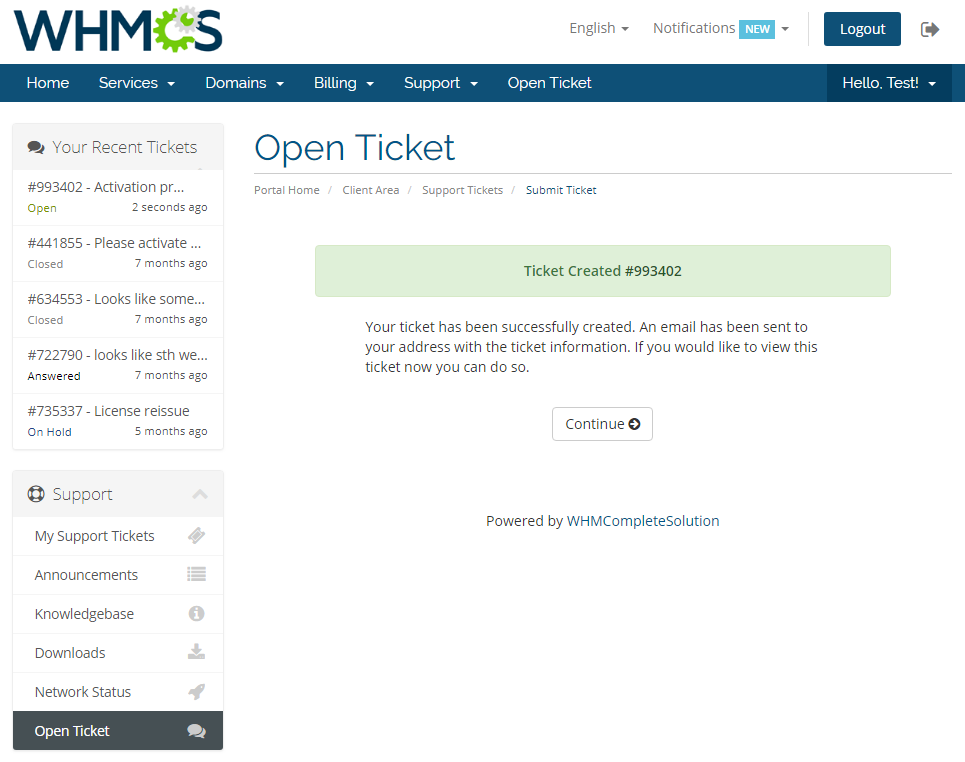
| 17. As you can see on the following screen, the ticket was successfully created.
|
| 18. Adequate number of Support Credit Points was removed from the '24/7 Support' department points bundle.
|
Tips
| 1. It is advised to set one of the departments as free of any charge. Remember to assign it the lowest priority of support to keep the other competitive.
|
2. Since version 1.2.0 of the module, there are two types of Support Credit Points:
- Dedicated Points - as in previous versions of the module, these credits are assigned to departments and can only be used for these specific ones when opening a ticket
- Shared Points - these credits are assigned to client's account and can be freely used among departments you previously enabled
However, if the client owns both types of support credits, they will be displayed as a sum under the Support Credits Points balance per department, with dedicated points being used first and shared points only afterwards.
|
Update Instructions
Essential guidance through the process of updating the module is offered here.
Ensure successful completion of the module update by carefully following each step, thereby preventing data loss or any unforeseen issues.
Additionally, you will find a current list of supplementary actions necessary for a smooth update process there.
If you are upgrading the module from a version prior to 1.2.0, there are also some minor changes with the code integration, so remember to apply it again.
|
Upgrade Guide
Seeking a solution that offers greater flexibility, customization tailored to your precise needs, and unrestricted availability?
There is an option that not only proves to be cost-effective in the long run but also includes prioritized support services, making it a truly valuable investment.
Opt for the Open Source version of your Premium Support Tickets For WHMCS module to unlock these benefits.
Simply click on either the Get Source Code or Upgrade To Lifetime button found on the product's page in our client area to complete the one-step upgrade process, with a dedicated discount already applied.
Follow a comprehensive guide covering the transition process, the advantages it brings, and step-by-step instructions on what to do next after the order has been successfully finalized.
|
Common Problems
| 1. When you have problems with connection, check whether your SELinux or firewall does not block ports.
|
