Amazon EC2 For WHMCS
Contents |
About Amazon EC2 For WHMCS
| Amazon EC2 For WHMCS will boost your AWS provisioning business by allowing automated management of Amazon EC2 instances in your WHMCS system. Your clients will be empowered to remotely start, stop, and reboot the server, as well as preview the assignment of IP addresses. |
- Admin Area Features:
| ✔ Create/Suspend/Unsuspend/Terminate Server |
| ✔ Start/Stop/Reboot Server |
| ✔ View Server Status And Details |
| ✔ View Assigned Network Interfaces And IP Addresses Details |
| ✔ View Scheduled Tasks |
| ✔ Configure Product Details: |
| ✔ Choose Region |
| ✔ Choose Amazon Machine Image (AMI) |
| ✔ Select From Amazon Database |
| ✔ Add Own Image By Providing AMI ID |
| ✔ Provide Custom Names For Added Images |
| ✔ Choose Instance Type |
| ✔ Enable Firewall |
| ✔ Select Security Groups |
| ✔ Define Number Of Firewall Rules |
| ✔ Define Number Of IPv4 Addresses |
| ✔ Define Tag Name |
| ✔ Toggle Capacity Reservation |
| ✔ Toggle Hibernation |
| ✔ Toggle API Request Logging |
| ✔ Shut Down VM Before Upgrade |
| ✔ Provide User Data Script |
| ✔ Choose User Data File |
| ✔ Choose Subnet |
| ✔ Choose Volume Type |
| ✔ Define Volume Size |
| ✔ Set Volume IOPS |
| ✔ Set Email Template After Server Creation |
| ✔ Select Bandwidth Metrics Period |
| ✔ Define Client Area Configuration |
| ✔ Show Windows Password |
| ✔ Hide DNS Name |
| ✔ Hide Scheduled Tasks |
| ✔ Hide IPv6 |
| ✔ Enable Firewall Configuration |
| ✔ Generate Configurable Options |
| ✔ Run API Connection Test |
- Client Area Features:
| ✔ Start/Stop/Reboot Server |
| ✔ View Server Status And Details |
| ✔ View Assigned Network Interfaces And IP Addresses Details |
| ✔ View Scheduled Tasks |
| ✔ Create/Manage Firewall Rules |
| ✔ Provide SSH Key During Order |
| ✔ Provide SSH Key To Decode Windows Password |
| ✔ Get/Provide SSH Key For Already Created Instance |
- Configurable Options:
| ✔ Region |
| ✔ Instance Type |
| ✔ Amazon Machine Image (AMI) |
| ✔ Number Of IPv4 Addresses |
| ✔ Volume Size [GB] |
| ✔ Volume Type |
| ✔ Number Of Firewall Rules |
| ✔ User Data |
- General Info:
| ✔ Integrated With Server Allocator For WHMCS - Automatic Assignment Of Most Suitable Servers To Products |
| ✔ Multi-Language Support |
| ✔ Supports PHP 8.3 Back To PHP V8.1 |
| ✔ Supports WHMCS Themes "Six" And "Twenty-One" |
| ✔ Supports WHMCS V8.13 Back To WHMCS V8.10 |
| ✔ Requires ionCube Loader V14 Or Later |
| ✔ Easy Module Upgrade To Open Source Version |
Installation and Configuration
| This tutorial will show you how to successfully install and configure Amazon EC2 For WHMCS smoothly. We will guide you step by step through the whole process. |
Installation
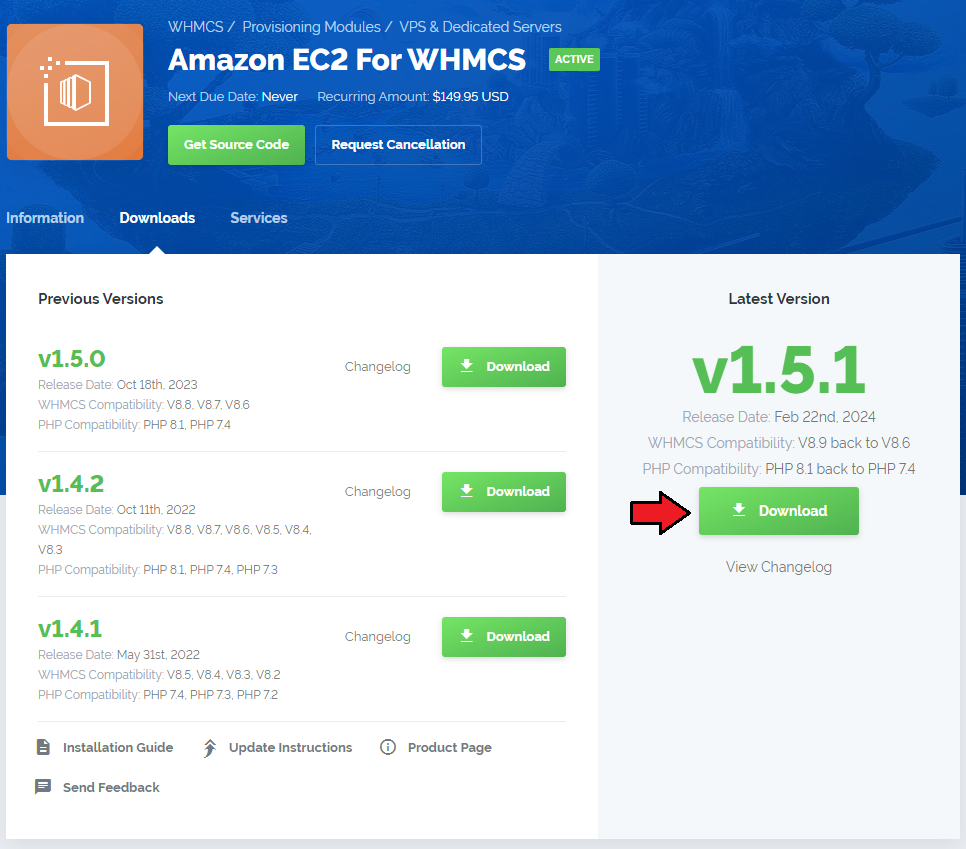
| 1. Log in to our client area and download the module. |
|
| 2. Upload and extract the extension into the main WHMCS directory. Extracted files in your WHMCS directory should look like this: |
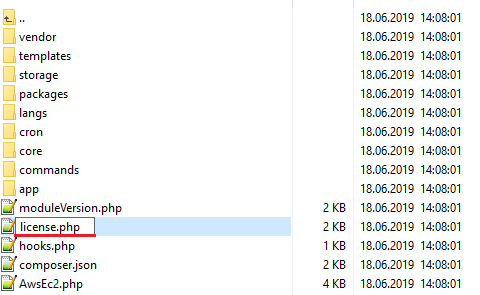
| 3. When you install Amazon EC2 For WHMCS for the first time, you have to rename the 'license_RENAME.php' file. The file is located in '/yourWHMCS/modules/servers/AwsEc2/license_RENAME.php'. Rename it from 'license_RENAME.php' to 'license.php'. |
|
| 4. In order to configure your license key, you have to edit the previously renamed 'license.php' file. Enter your license key between the quotation marks as presented on the following screen. |

|
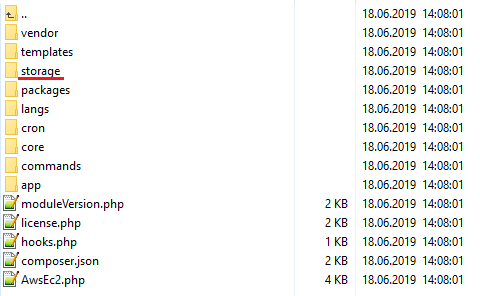
| 5. Now, set up the 'storage' folder as recursively writable. This folder is available at '/yourWHMCS/modules/servers/AwsEc2/'. |
|
| 6. The last step is setting up the queue cron job. It will be used to execute module commands such as: create, terminate or change package. php -q /yourWHMCS/modules/servers/AwsEc2/cron/cron.php queue It is suggested to run the cron every 5 minutes. |
Configuration of Server
| Before you can go on, you must generate your Amazon EC2 access details. You will need them to connect with the server successfully. Underneath, you will find instructions where to find them. |
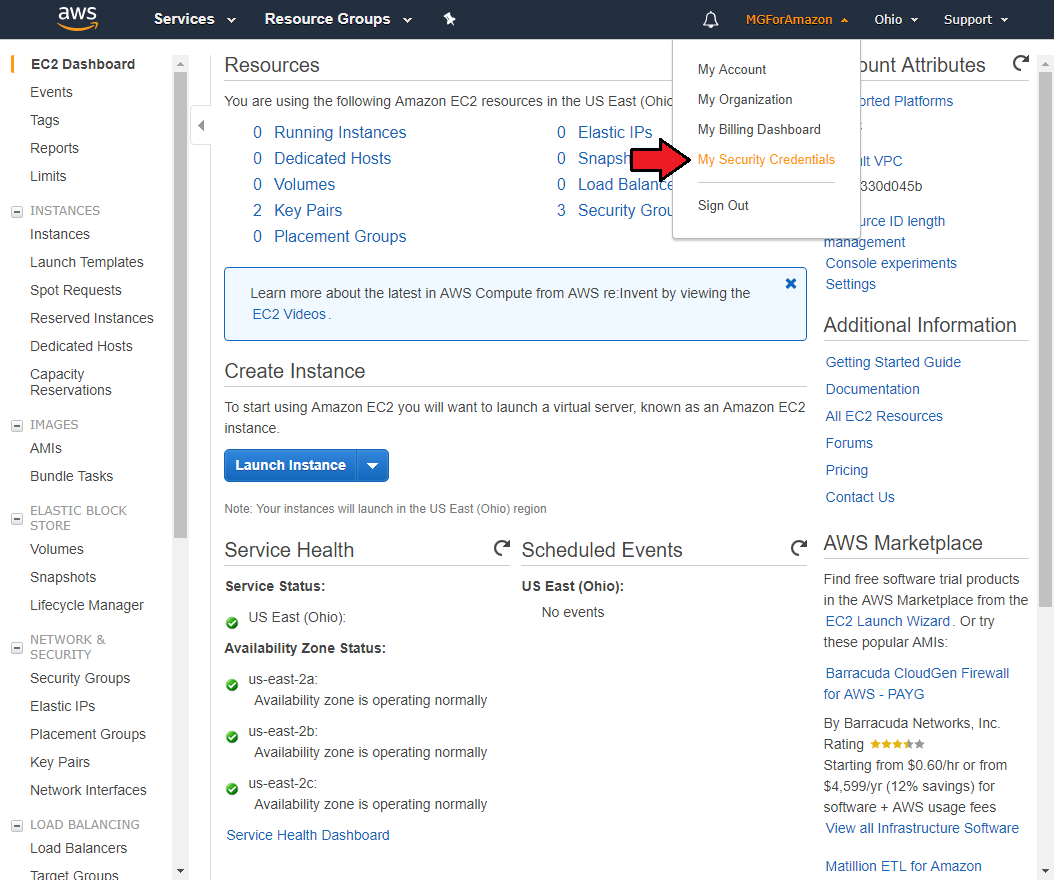
| 7. Firstly, log into your Amazon EC2 account and find 'My Security Credentials' section under your account name dropdown. |
|
| 8. There, move to 'Access Keys (access key ID and secret access key) section. |
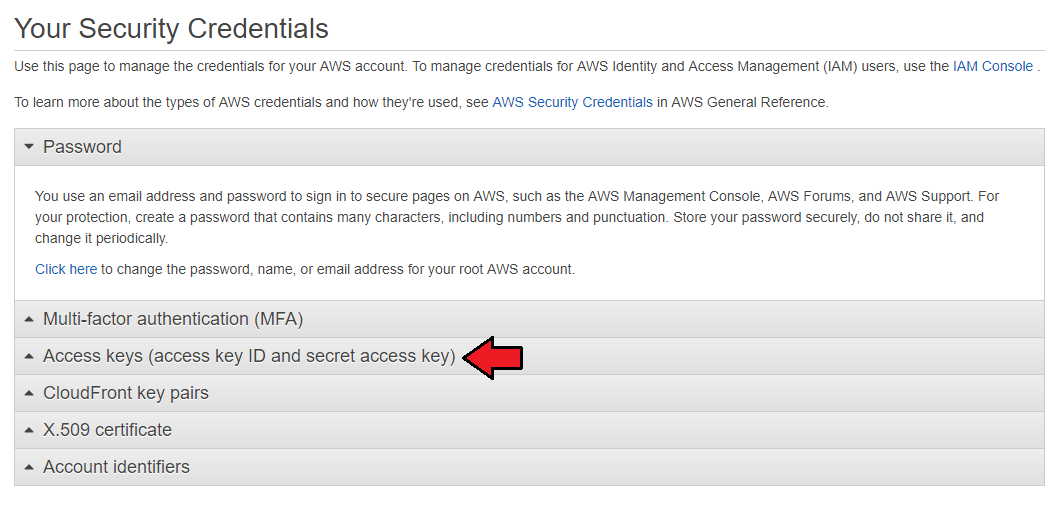
|
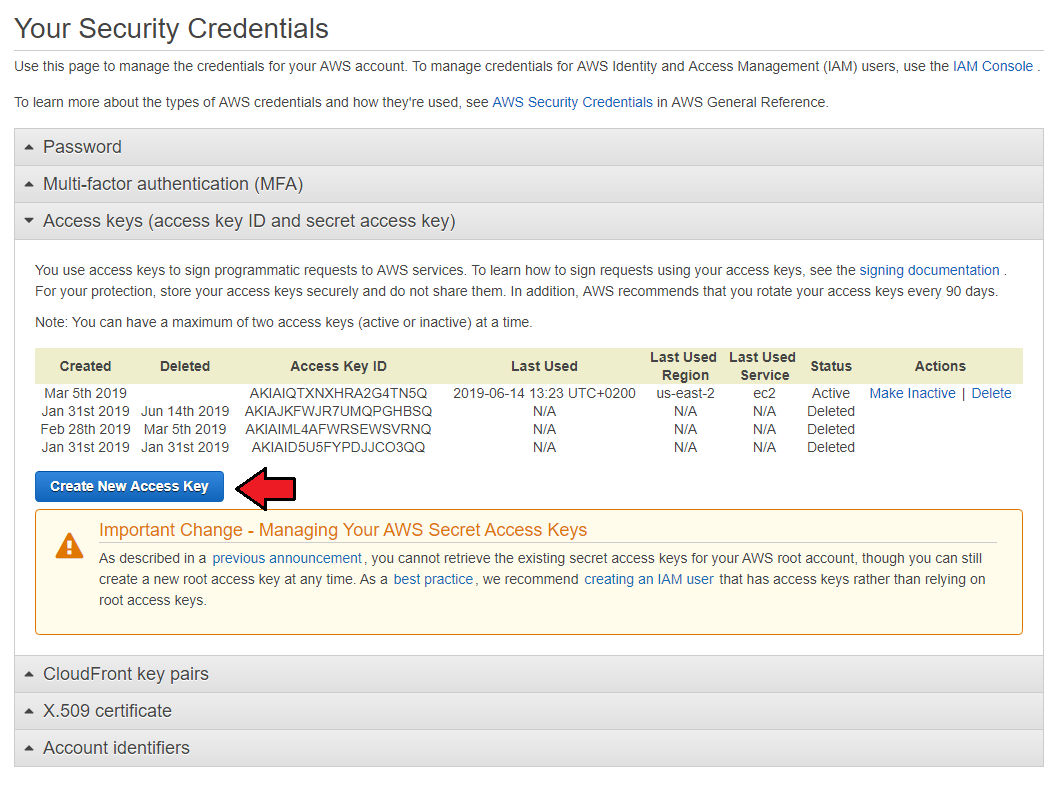
| 9. If you do not have yet any active keys, then press 'Create New Access Key' button to generate a new set of details. |
|
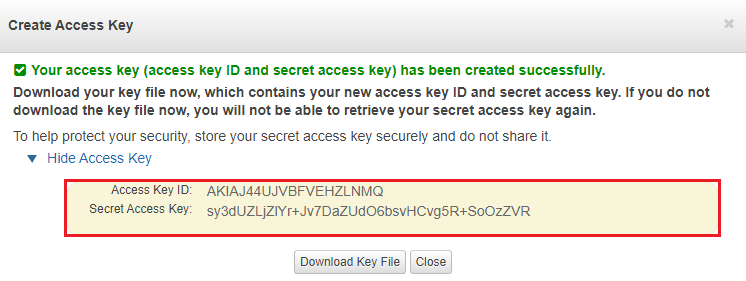
| 10. A modal with Access Key ID and Secret Access Key will appear, so copy it and keep safe. You may also download a file with the details. Note that this is the only place where you can later on find the corresponding secret key, it will not be visible next to the Key ID in the panel. |
|
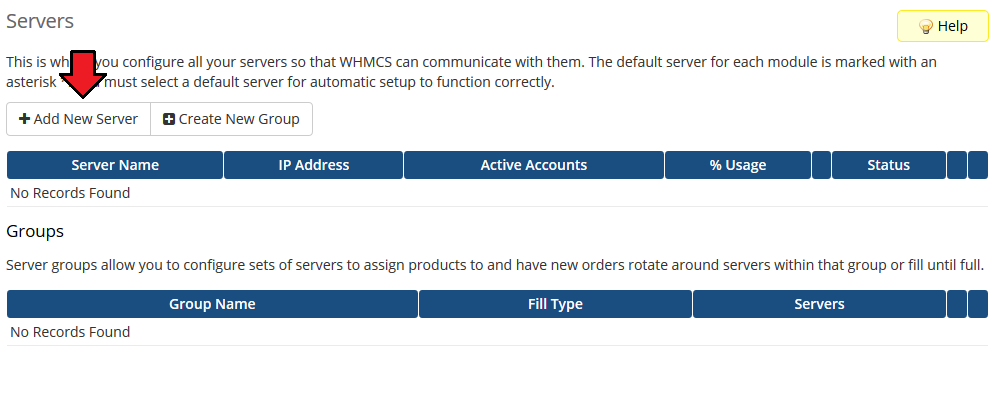
| 11. Now, log in to your WHMCS and proceed to 'Setup' → 'Products/Services' → 'Servers' and press 'Add New Server'. |
|
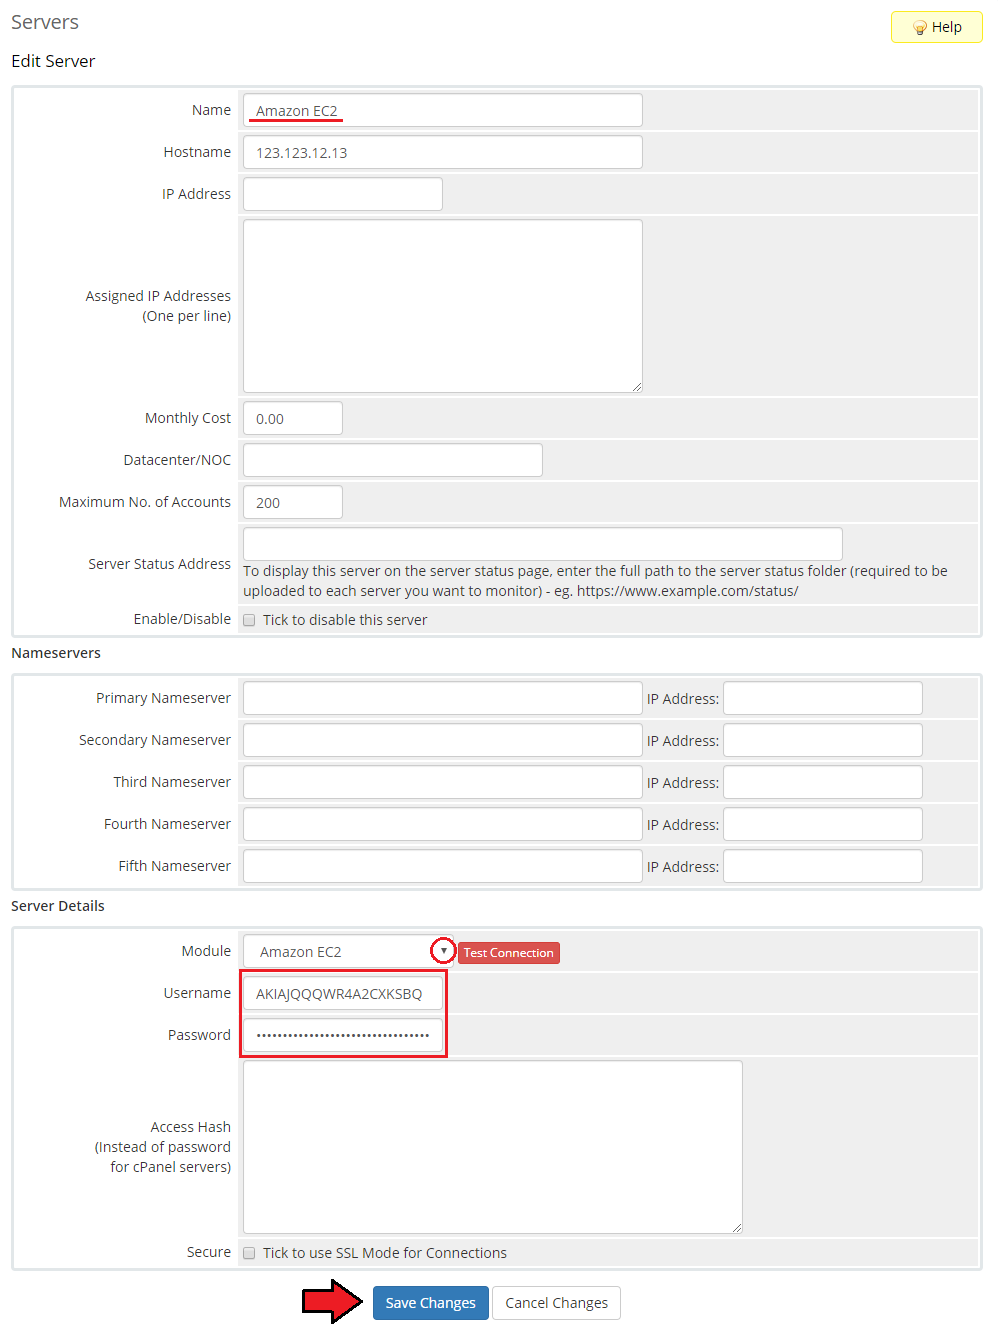
| 12. Next, enter your server name and select 'Amazon EC2' from the 'Type' field. Now, provide the previously generated 'Access Key ID' and 'Secret Access Key'. Then check the connection. If successful, save the changes. |
|
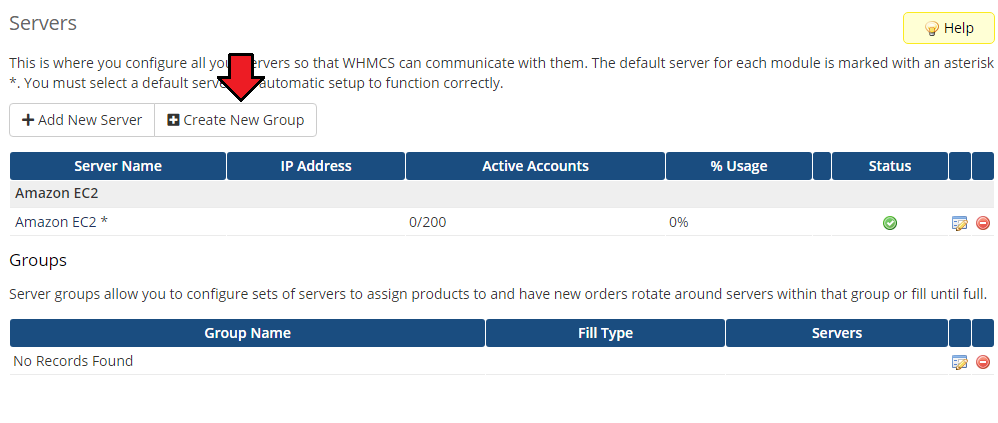
| 13. It is time to create a server group. To do so, click on 'Create New Group' . |
|
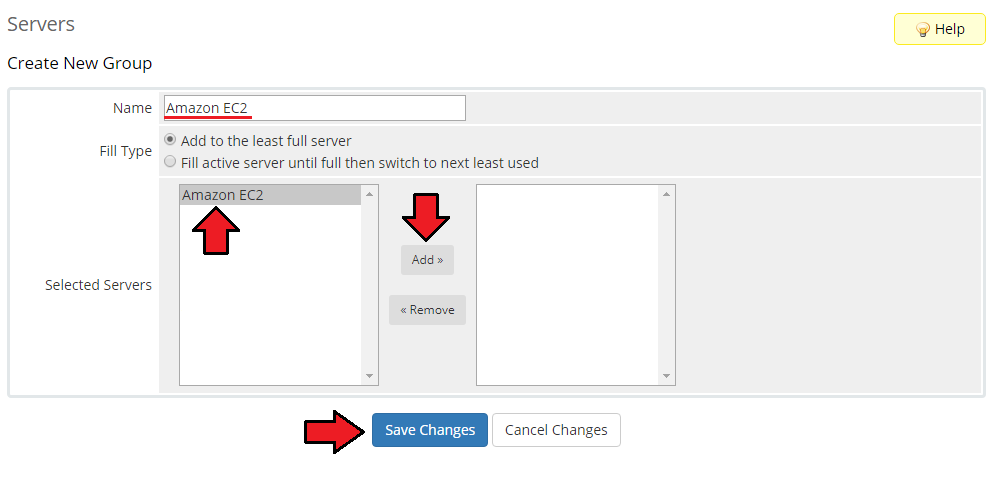
| 14. Enter a name, click on your previously created server, press 'Add' and afterward 'Save Changes' . |
|
Configuration of Product
| 15. In order to create and configure a product, go to 'Setup' → 'Products/Services' → 'Products/Services'. Click on 'Create a New Group'. |

|
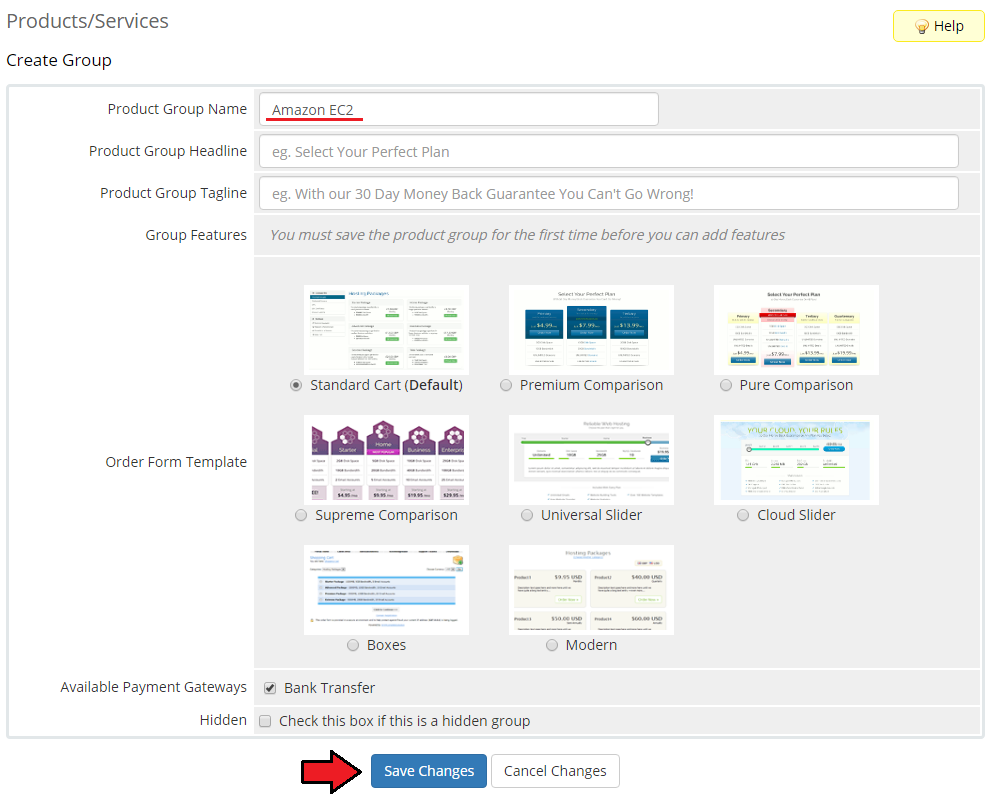
| 16. Enter your product group name and press 'Save Changes'. |
|
| 17. Once you have a product group, you can create a new product. To do so, first click on 'Create a New Product'. |

|
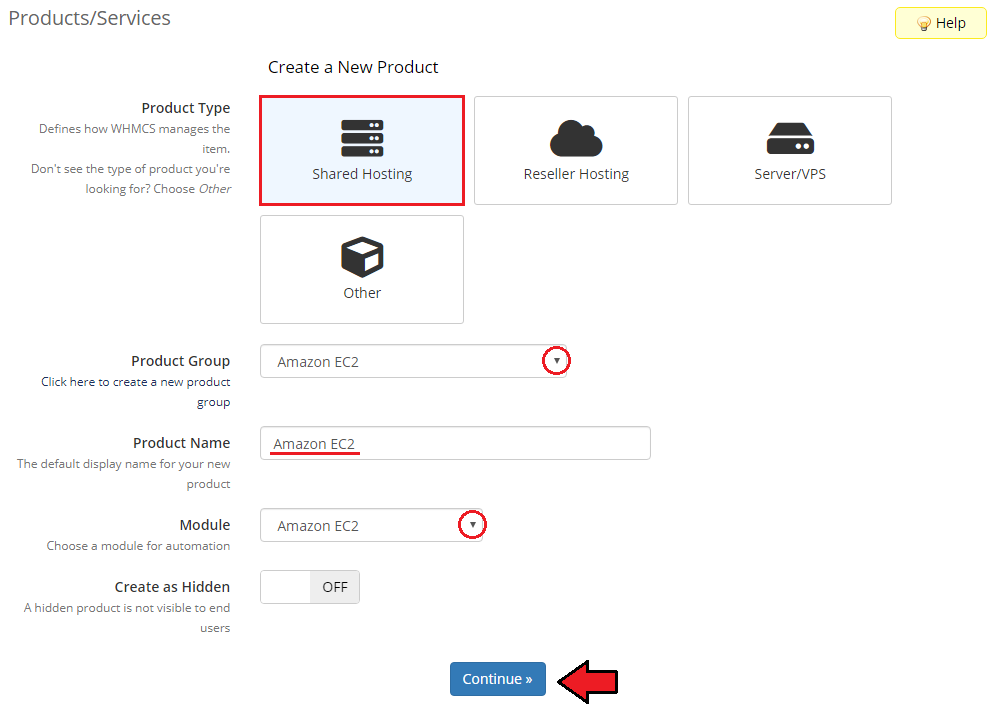
| 18. Afterward, choose your product type, enter your product name, choose module and the product group from the dropdown menus. Press 'Continue'. |
|
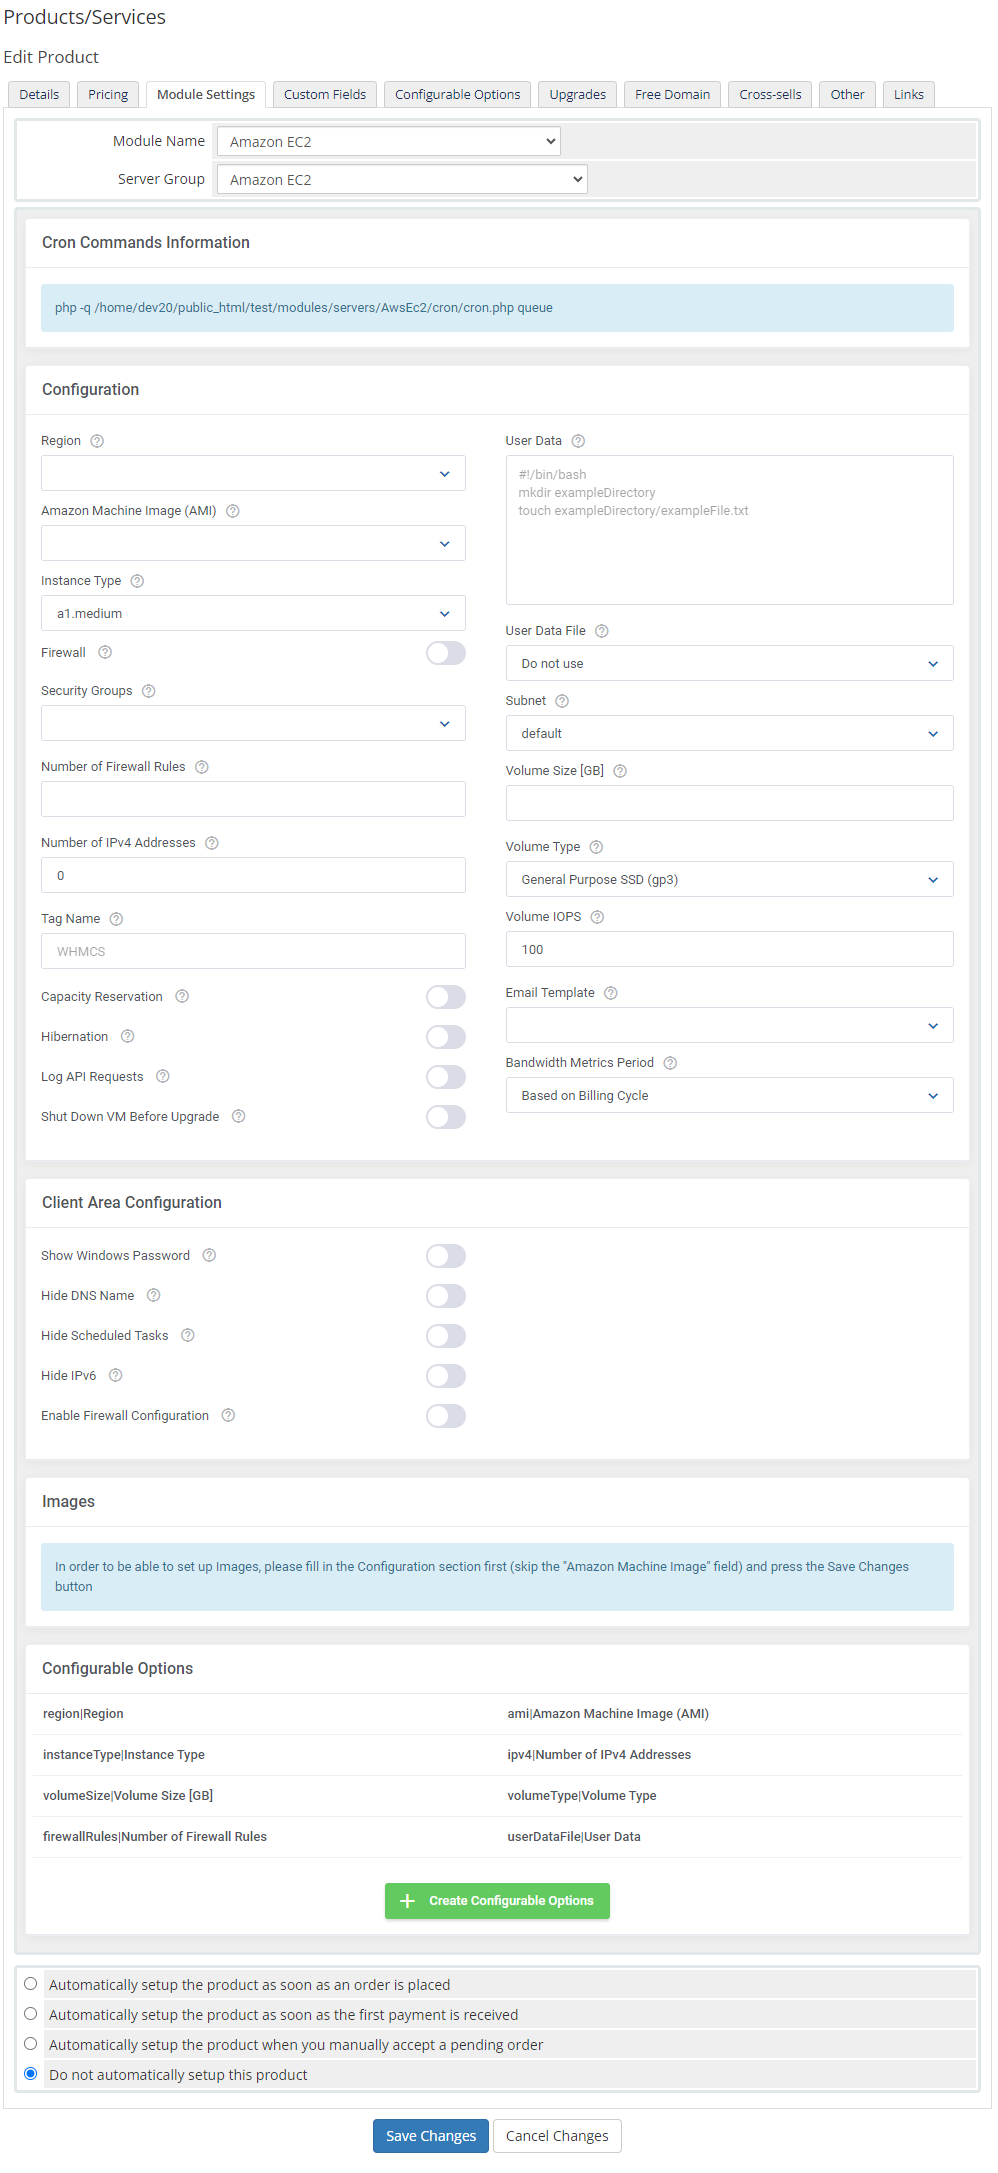
| 19. Now, go to the 'Module Settings' section, choose your previously created server group from the dropdown menu. The module should automatically save and reload the settings. If not, click on the 'Save Changes' option manually. |
|
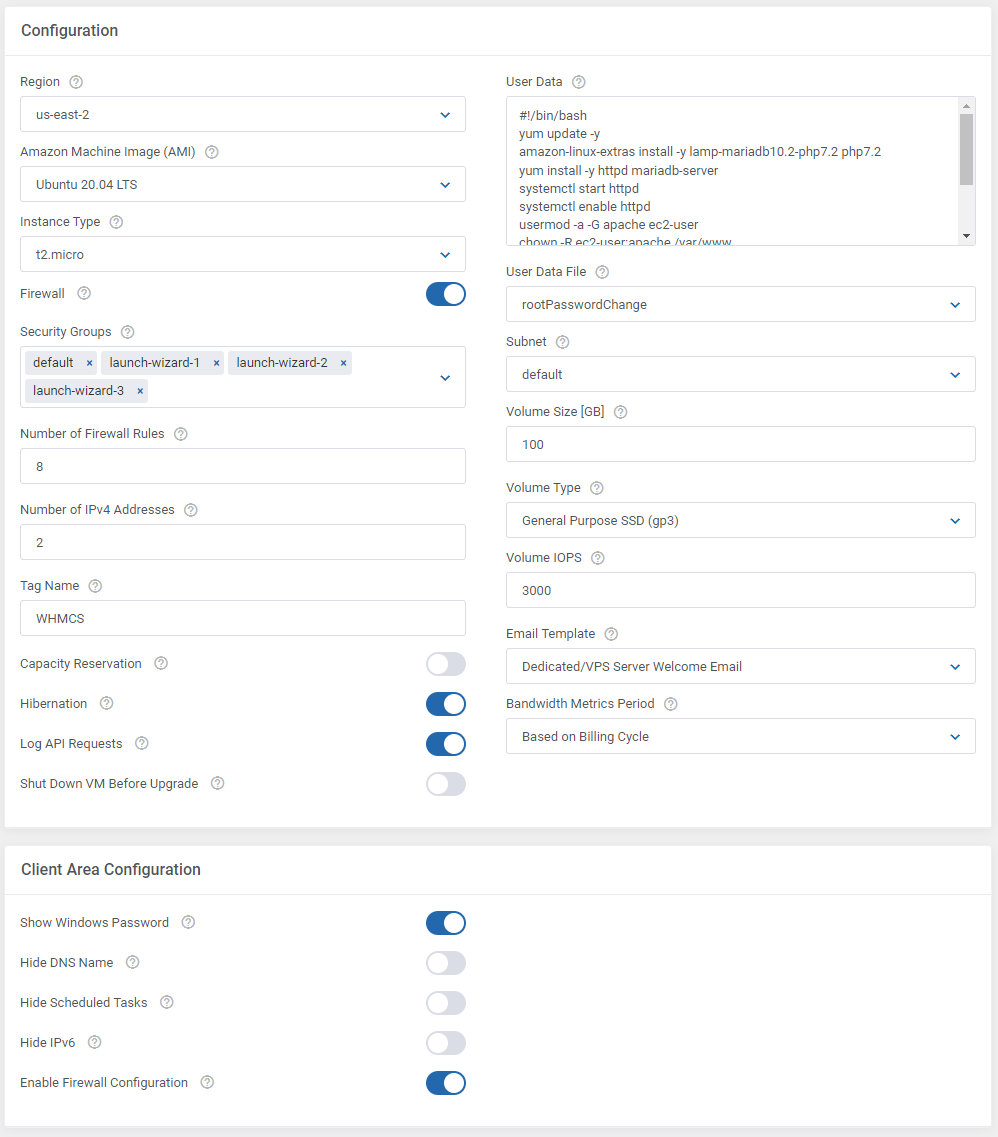
| 20. Now, you can start configuring the settings of the server you sell. Just like when creating a new virtual machine in your EC2 panel, here also you can configure such options as:
Client Area Configuration:
|
|
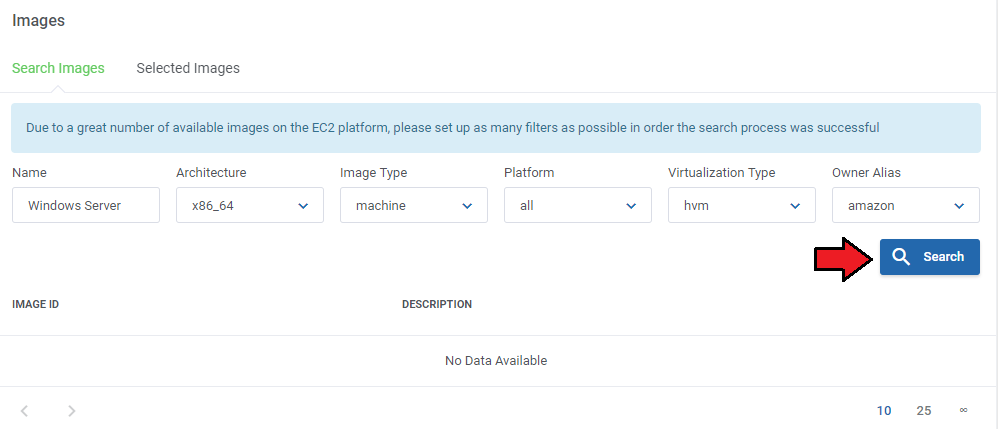
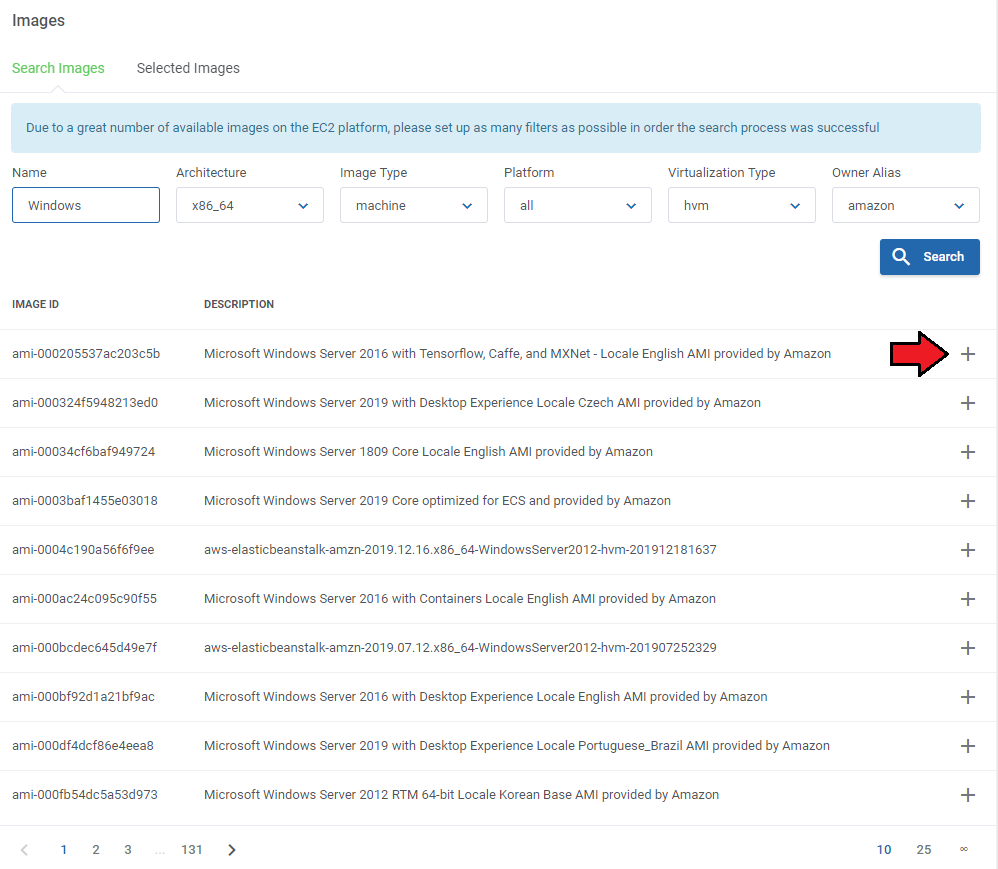
| 21. The following section is dedicated to Images. Here, you may look for and then select single images to be added to the list. They will be available to choose from in the Amazon Machine Images (AMI) field in the main configuration of the product. First of all, enter as many details as possible to find the images you are interested in. Press the search button when ready. |
|
| When the list of available images appears, press 'Add' next to the one you wish to add to the list of selected. |
|
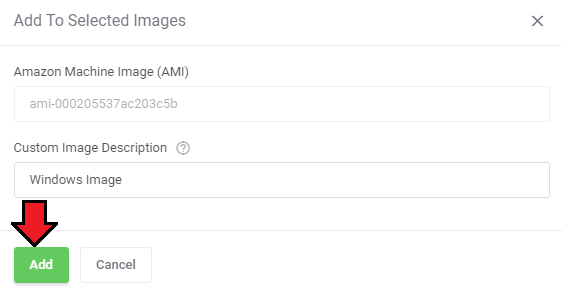
| Enter a custom name if you wish and confirm the action. |
|
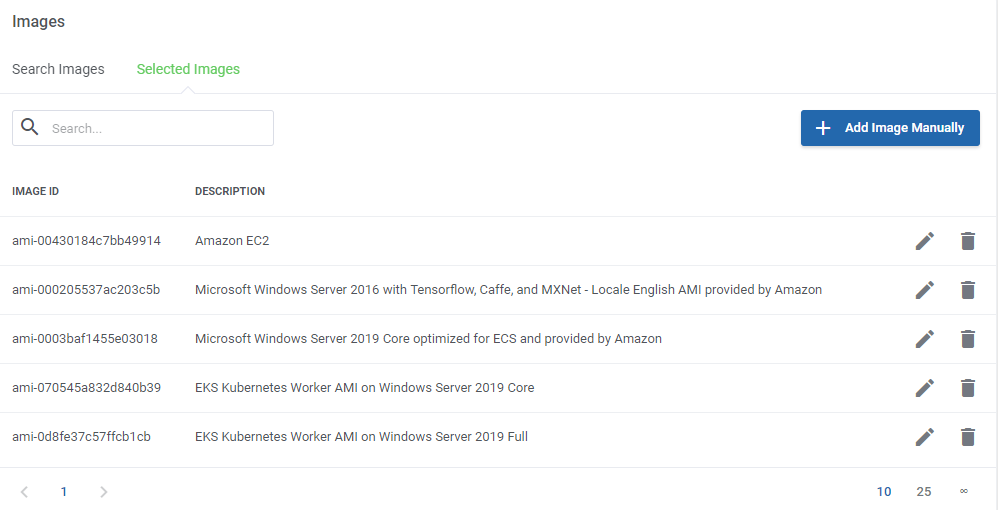
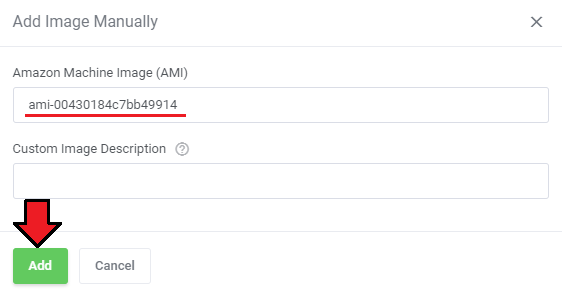
| On the list of selected, there are all images that you have added, and which will be available to select from when setting up the Amazon Machine Images (AMI) configuration field. It is also possible to add images manually here. Simply enter the image ID. |
|
| When found, press the 'Add' button. |
|
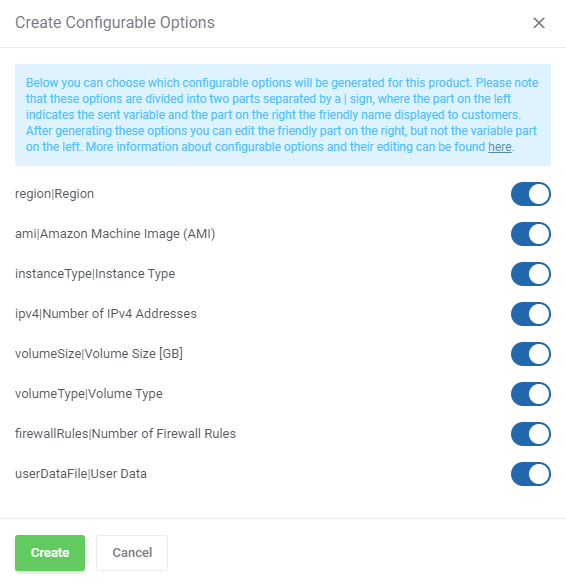
| 22. At the end of the configuration process, you can decide whether you want to generate configurable options for the product. Configurable options can be used by your clients to select each virtual machine parameters individually during order placement. |

|
| If you decide to use configurable options, press on the 'Create' button and select which options you want to generate. Note that the configuration for disabled options will still be taken from the configuration of the main product. More information about how to use configurable options can be found here or in the official WHMCS documentation. |
|
SSH Keys
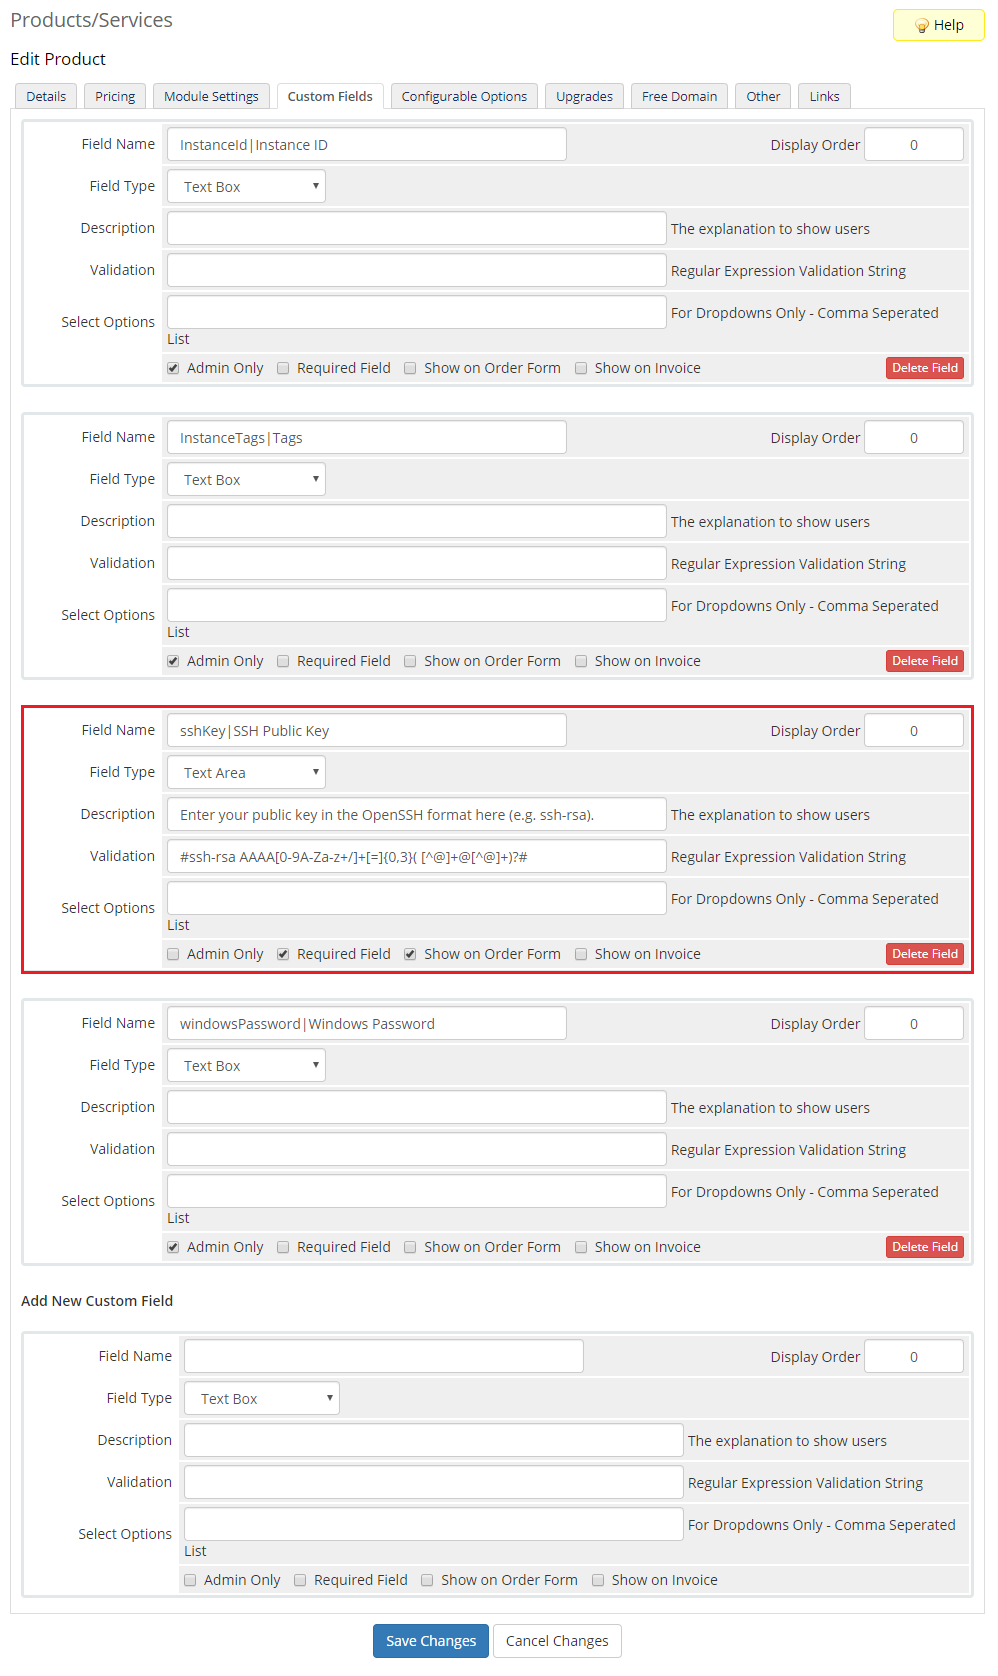
| In the 'Custom Fields' tab you will find the 'SSH Public Key' field which is displayed to clients on the order form by default. The following formats are supported:
Create an RSA key. Amazon EC2 does not accept DSA keys. The supported lengths are 1024, 2048, and 4096. If you would like to limit the possibility of entering the key e.g. only to the 'ssh-rsa' format, you can use the regular expression in the validation field, such as: #ssh-rsa AAAA[0-9A-Za-z+/]+[=]{0,3}( [^@]+@[^@]+)?#
Remember that API allows such action only once, during the initial VM creation. |
|
User Data Scripts
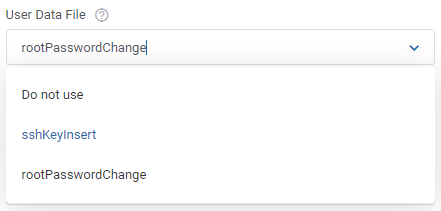
| User data is arbitrary data that can be executed during Amazon EC2 virtual machine creation, typically during the first boot of the server. This allows you to perform tasks or run scripts as the root user which can be extremely useful when provisioning a server. You can provide your own scripts using 'cloud-config' or 'Bash', keep in mind that module parameters are supported and may be used in the script files. |

|
| Once you create your own script, it can be chosen for product execution. You can provide multiple scripts for configurable options, but only one can be chosen for Amazon EC2 server creation. |
|
Management
Admin Area
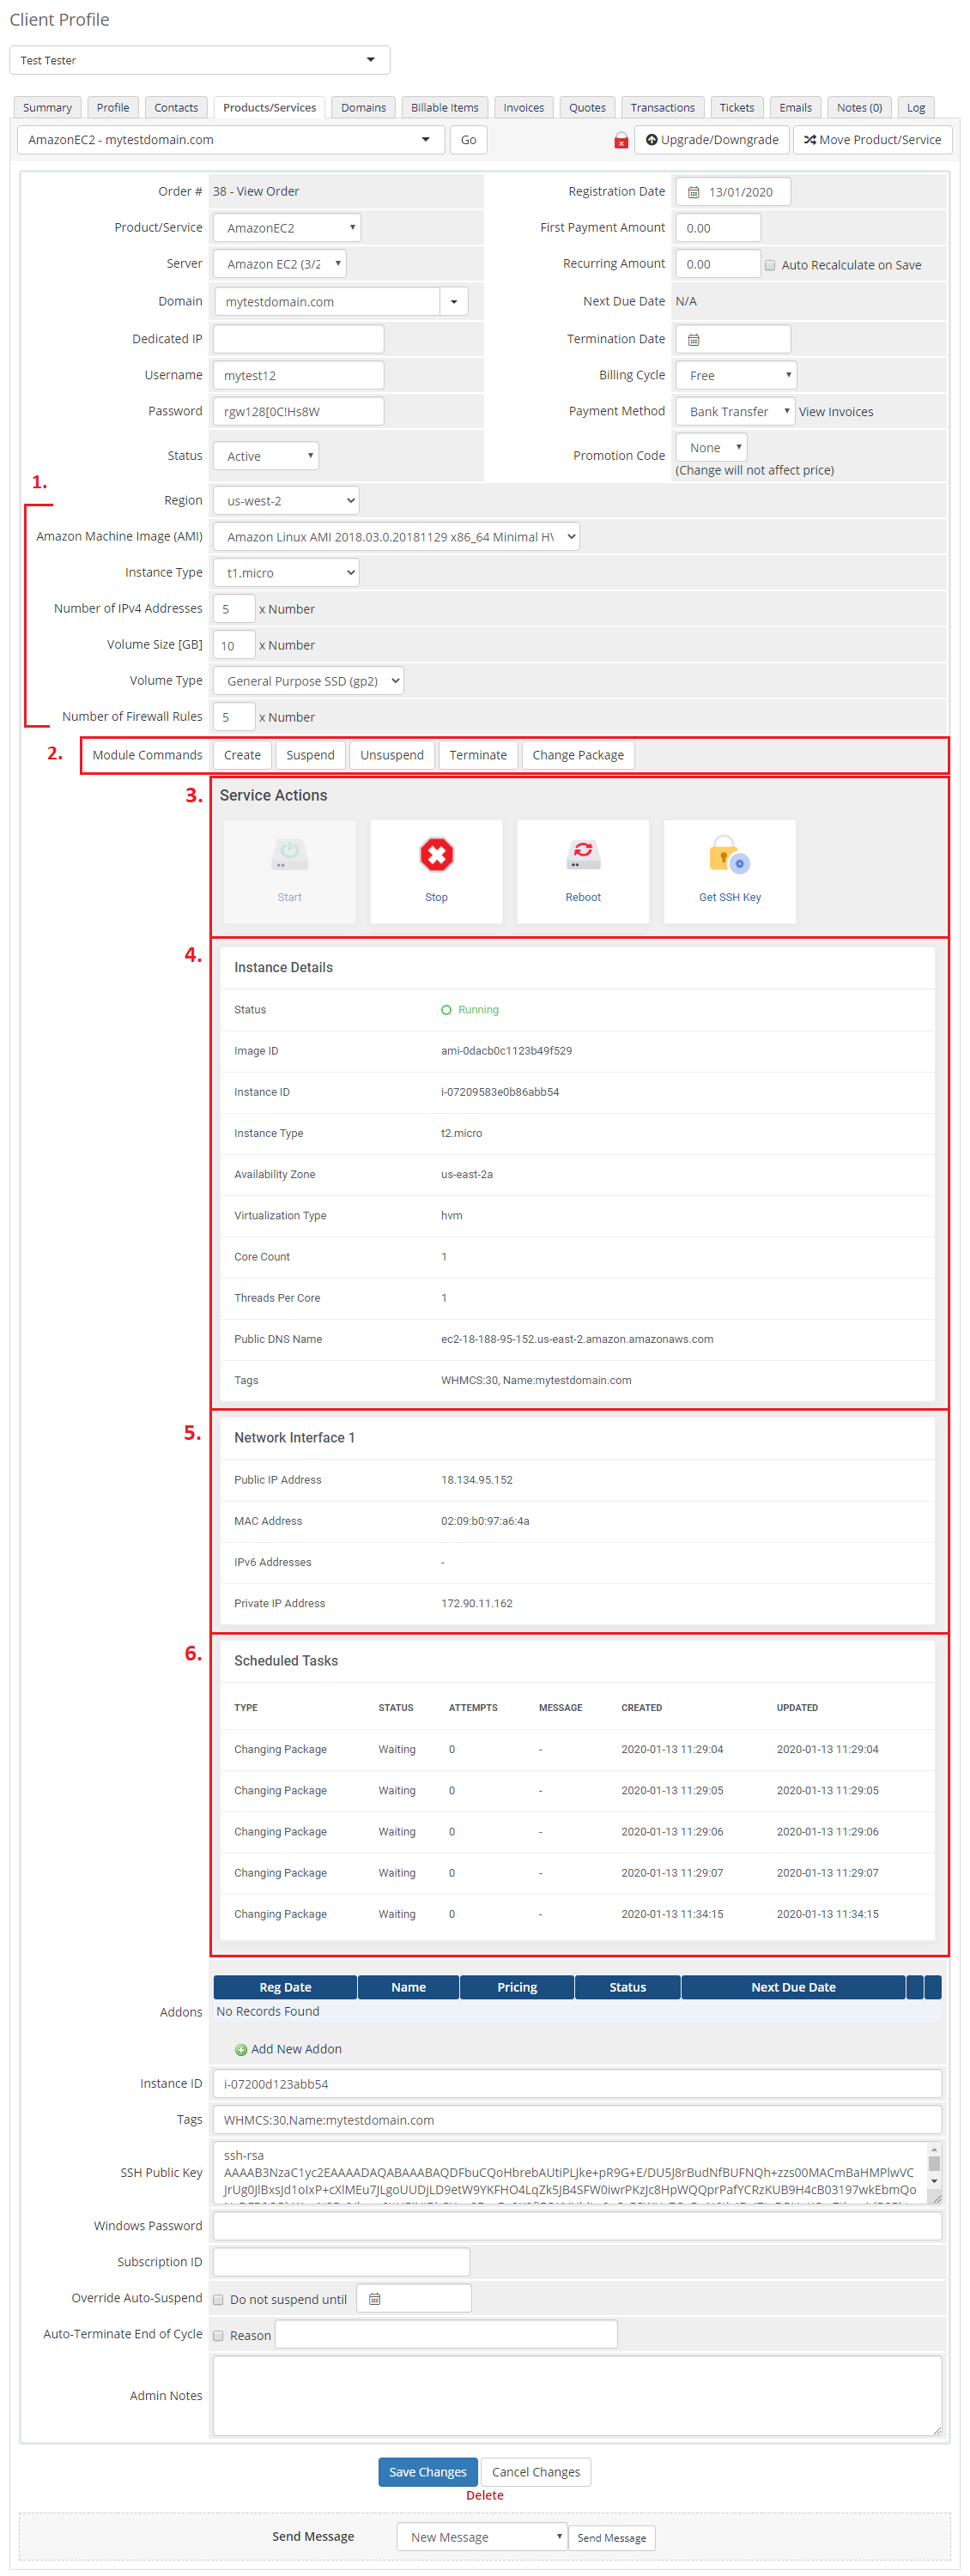
| Amazon EC2 For WHMCS allows you to monitor and manage your customer server instance from the admin area of your WHMCS system. This includes supervision of such features as:
|
|
Ordering
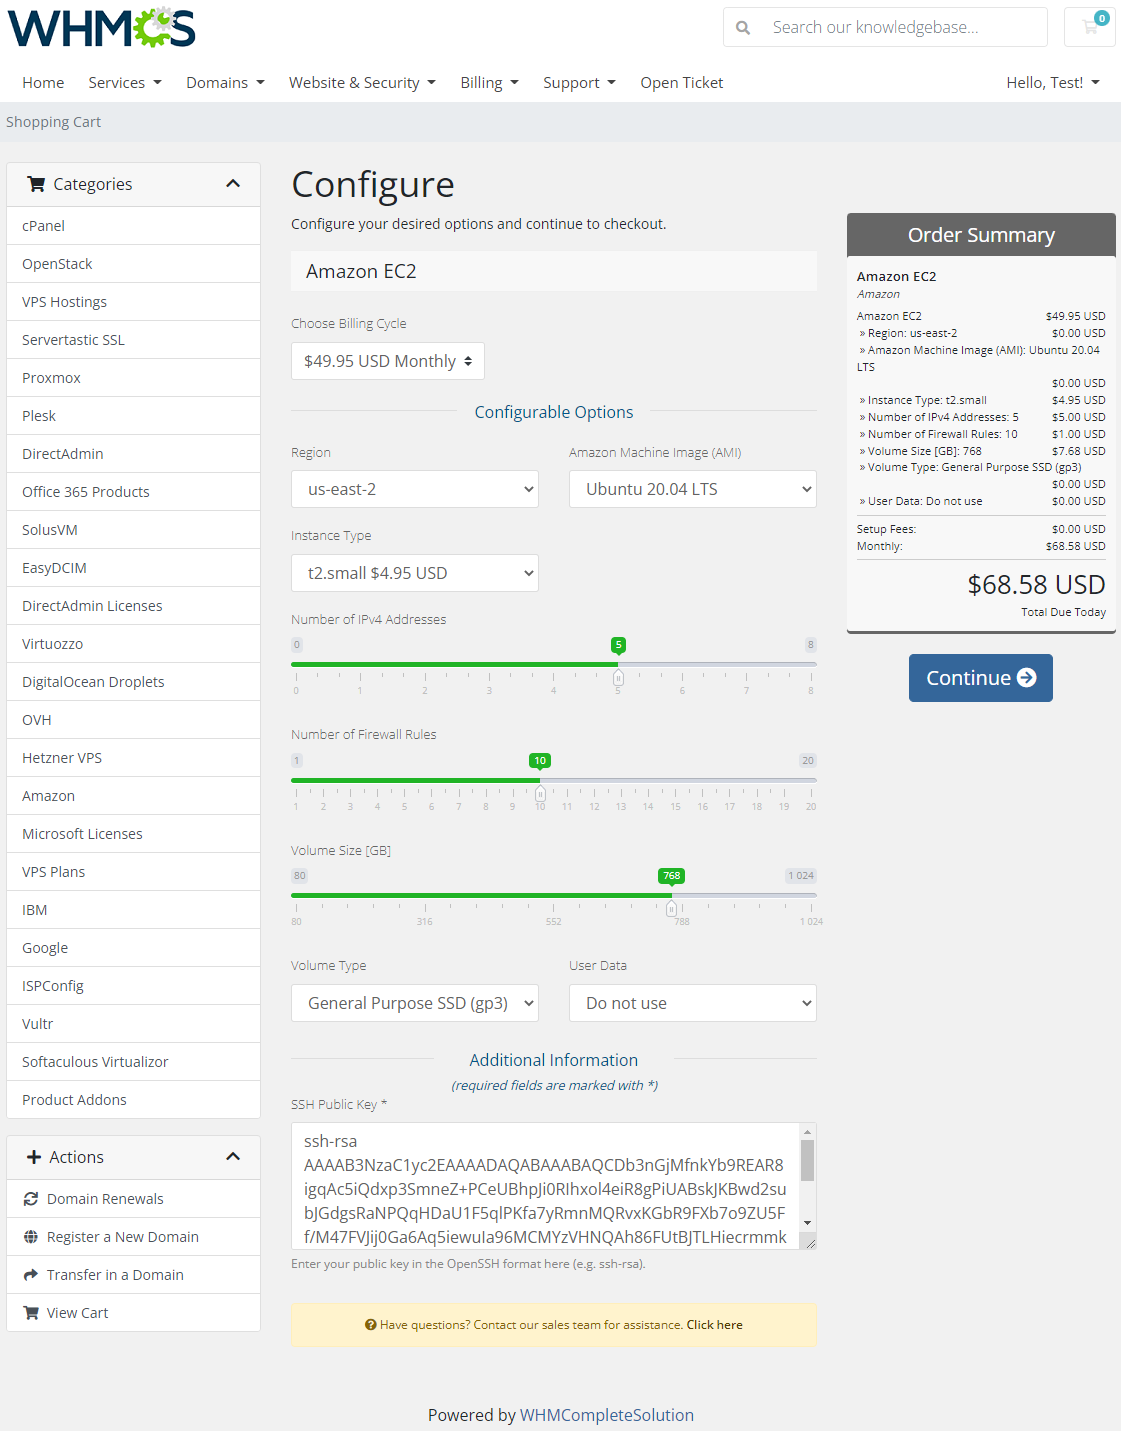
| Thanks to configurable options, you are able to offer a product which your clients can tailor according to their needs. Additionally, you are able to set up pricing for each configurable option, which makes your offer even more competitive. At this moment you also have to provide the SSH key. Note that this key should be in one of the OpenSSH standard formats which are supported by API, e.g. ssh-rsa. |
|
Importing Existing Instance
| In this section, you can find short instruction on how to connect one of your clients to your already existing instance in the Amazon EC2 panel. Take the following steps to make sure that the process will be carried out properly. 1. Firstly, manually create an order for your customer in WHMCS. Choose a client and in the summary, view click on the ' Add New Order' button. Next, select a 'Product/Service' and press 'Submit Order' .
The above-mentioned information has to be consistent with the data from your Amazon EC2 panel. Now, complete these fields as presented below. |
| 3. If the completed data is correct, after refreshing the page, you will see the attached instance from Amazon EC2. Important! Remember to manually add other missing parameters of the instance such as domains, credentials, IP Addresses, configurable options, SSH Key, billing cycle, etc. so they match the parameters of the attached instance from Amazon EC2. |
Client Area
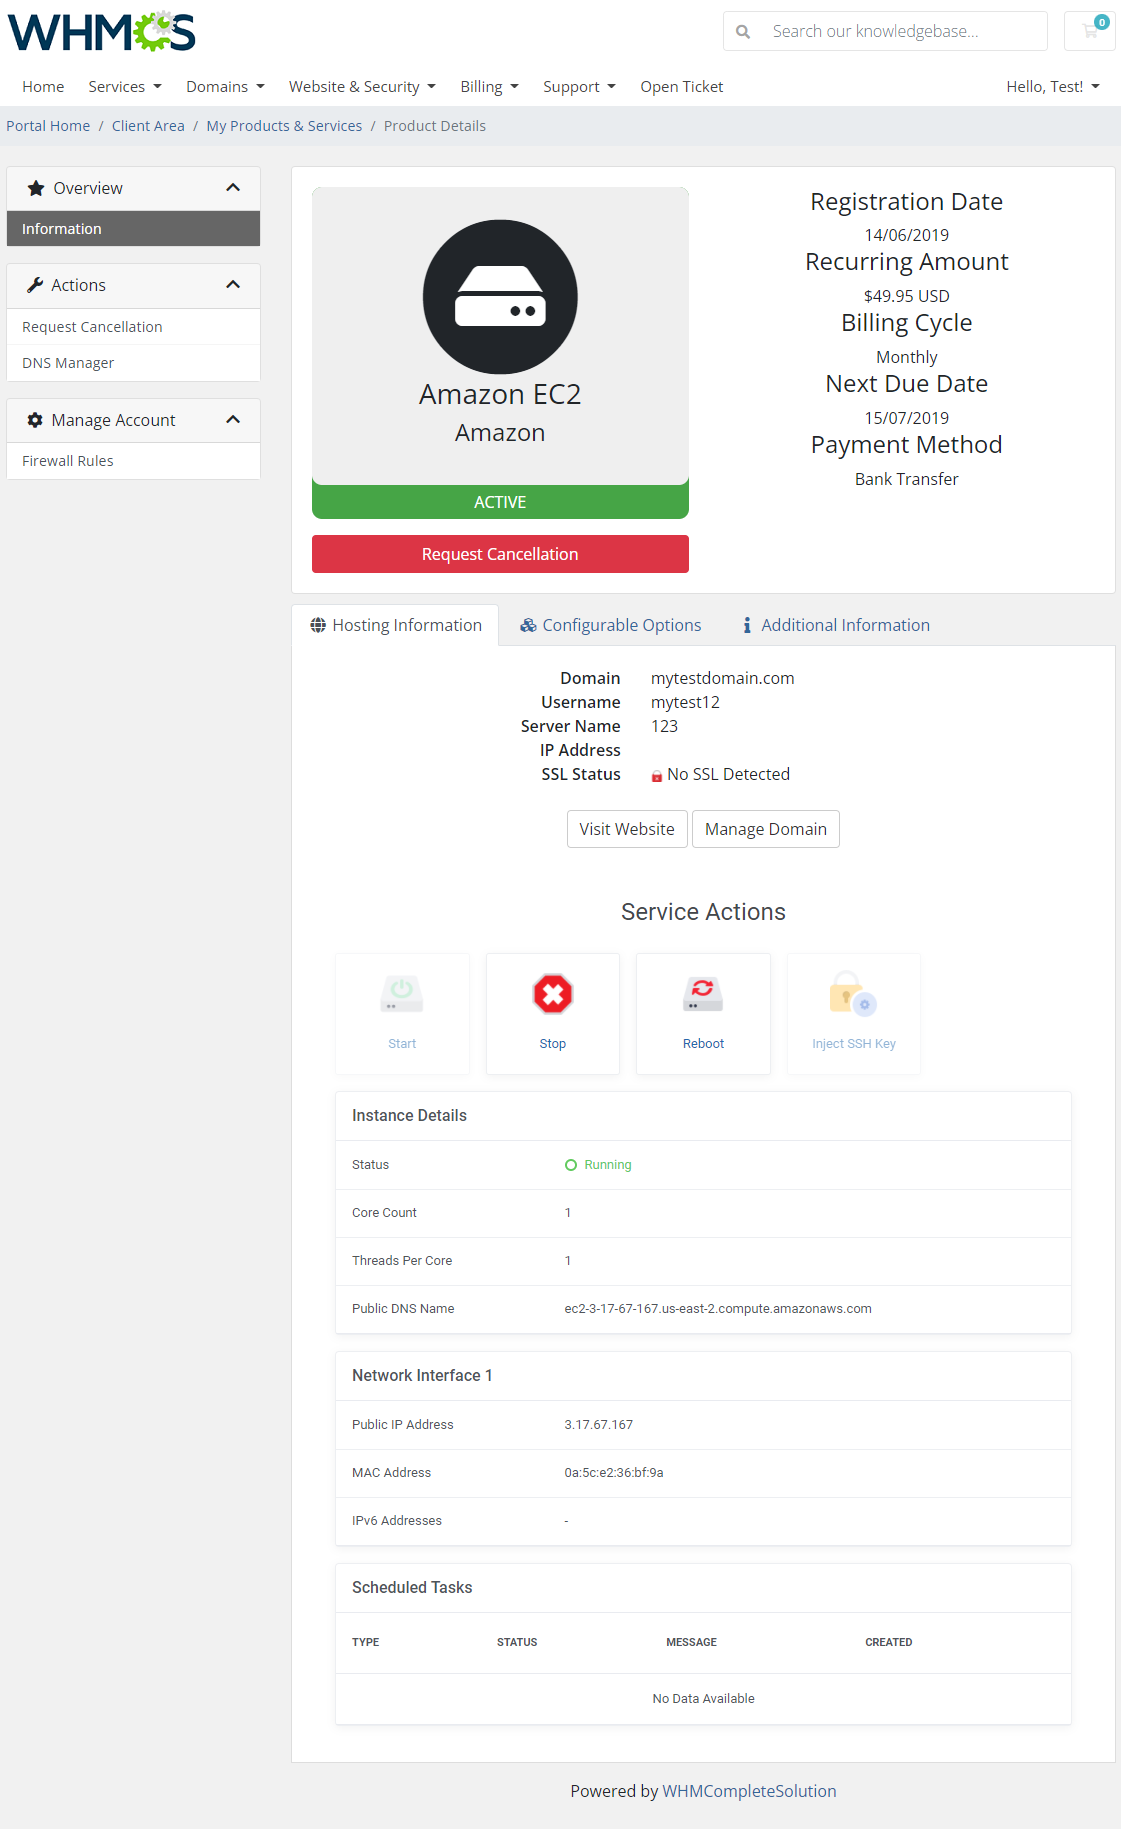
| The client area interface of Amazon EC2 should look like the one on the screen below. As you can see, the control panel contains useful details of the managed server. The module allows your customers to easily start, stop and reboot their server instance through pressing the corresponding buttons. |
|
Firewall Rules
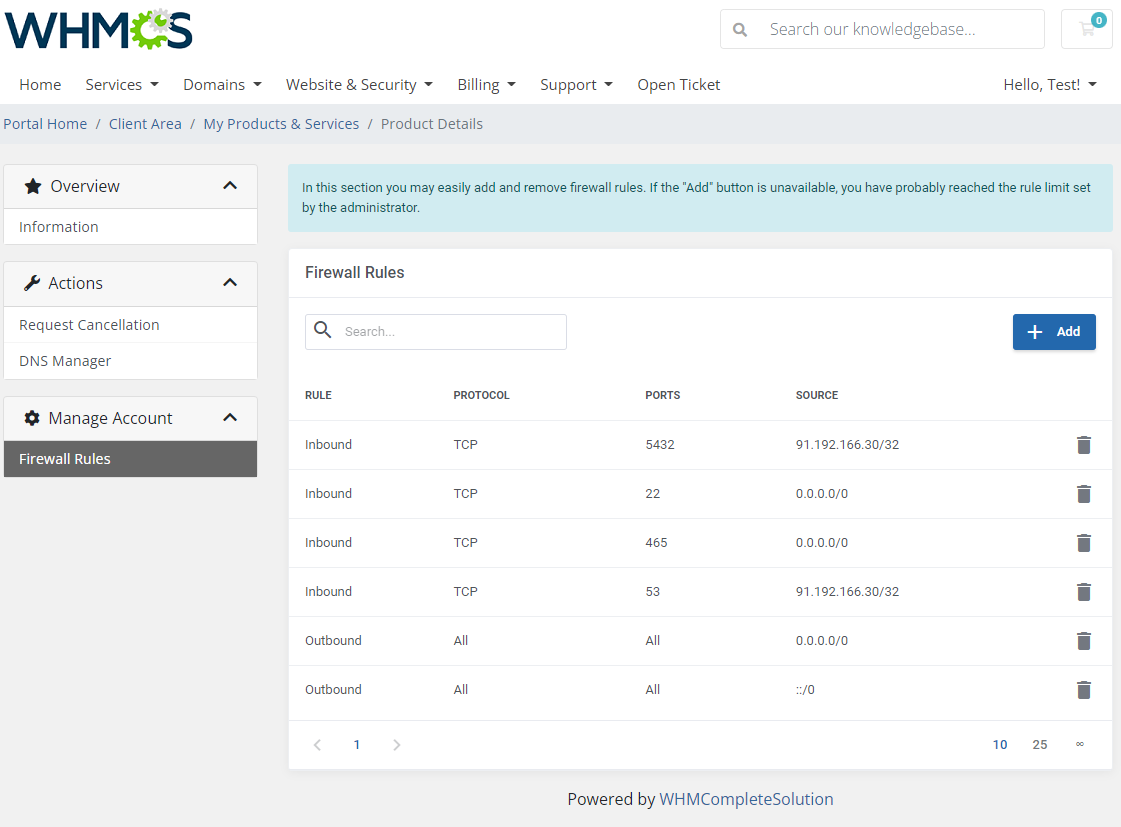
| Under the 'Firewall Rules' section, you may quickly add as well as remove 'Firewall Rules' . Note: Please remember that if the 'Add' button is unavailable, you have probably reached the rule limit set by the administrator. |
|
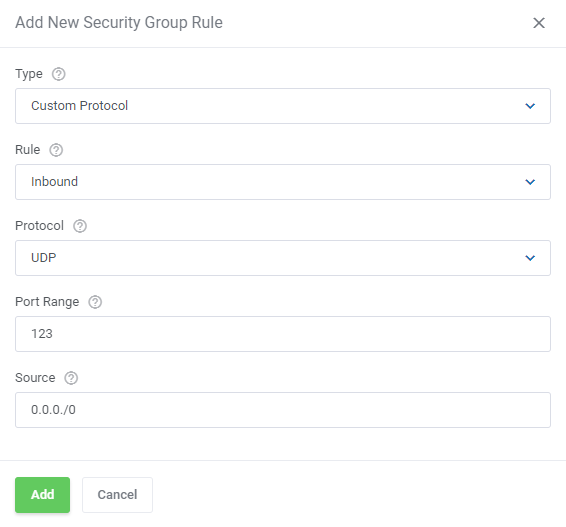
| Complete the details of your new security group rule and confirm by clicking 'Add' . |
|
Use Cases
| This section showcases practical examples of how the module can be implemented in various scenarios. It presents specific situations that represent common use cases and demonstrates how the module's capabilities can be utilized in real-world applications. |
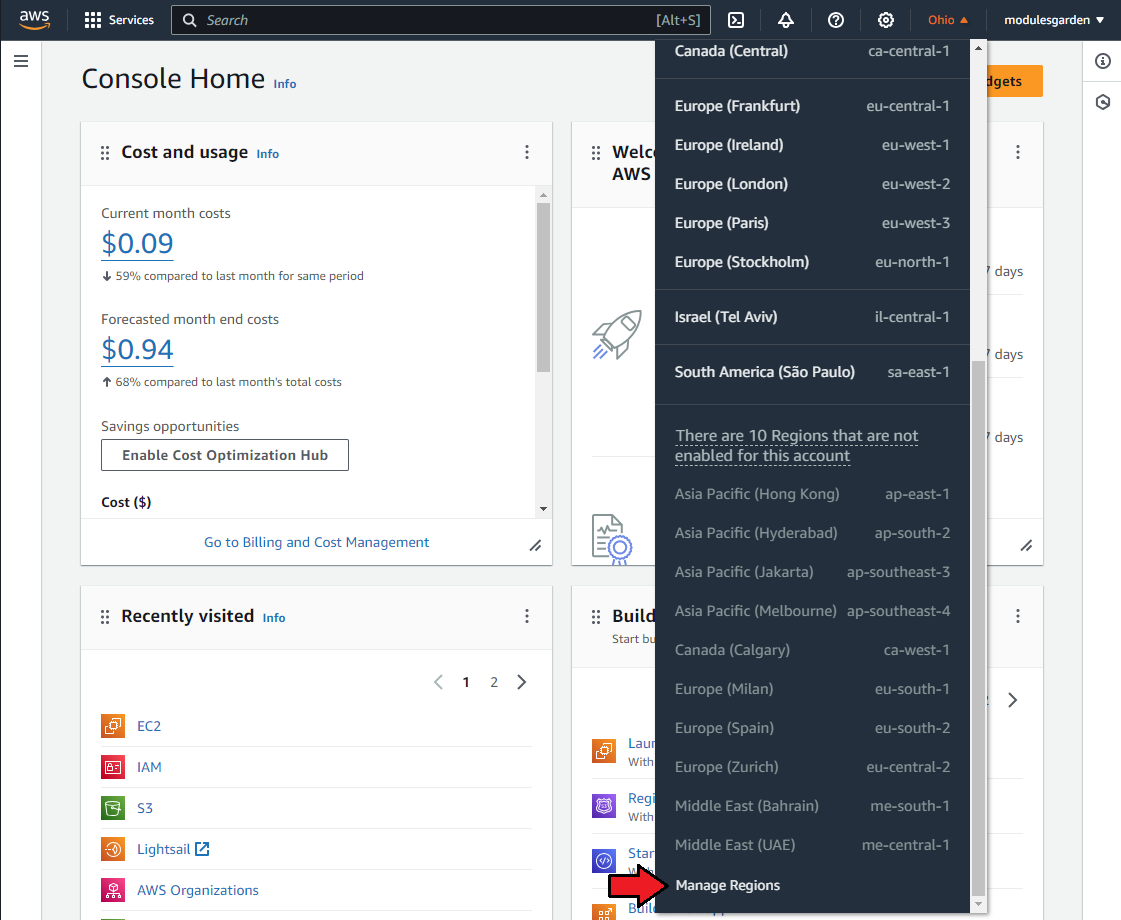
| Some regions are enabled by default in the Amazon EC2 panel while others are not. Each region has to be enabled first, before it can be picked while setting up a product in the Amazon EC2 For WHMCS module. Thankfully this issue can be quite easily fixed, allowing you to sell virtual machines located in more regions, expanding your business opportunities. Please follow the instructions below to add more regions. First, log in to your Amazon EC2 panel and find the 'manage regions' section of the account settings. |
|
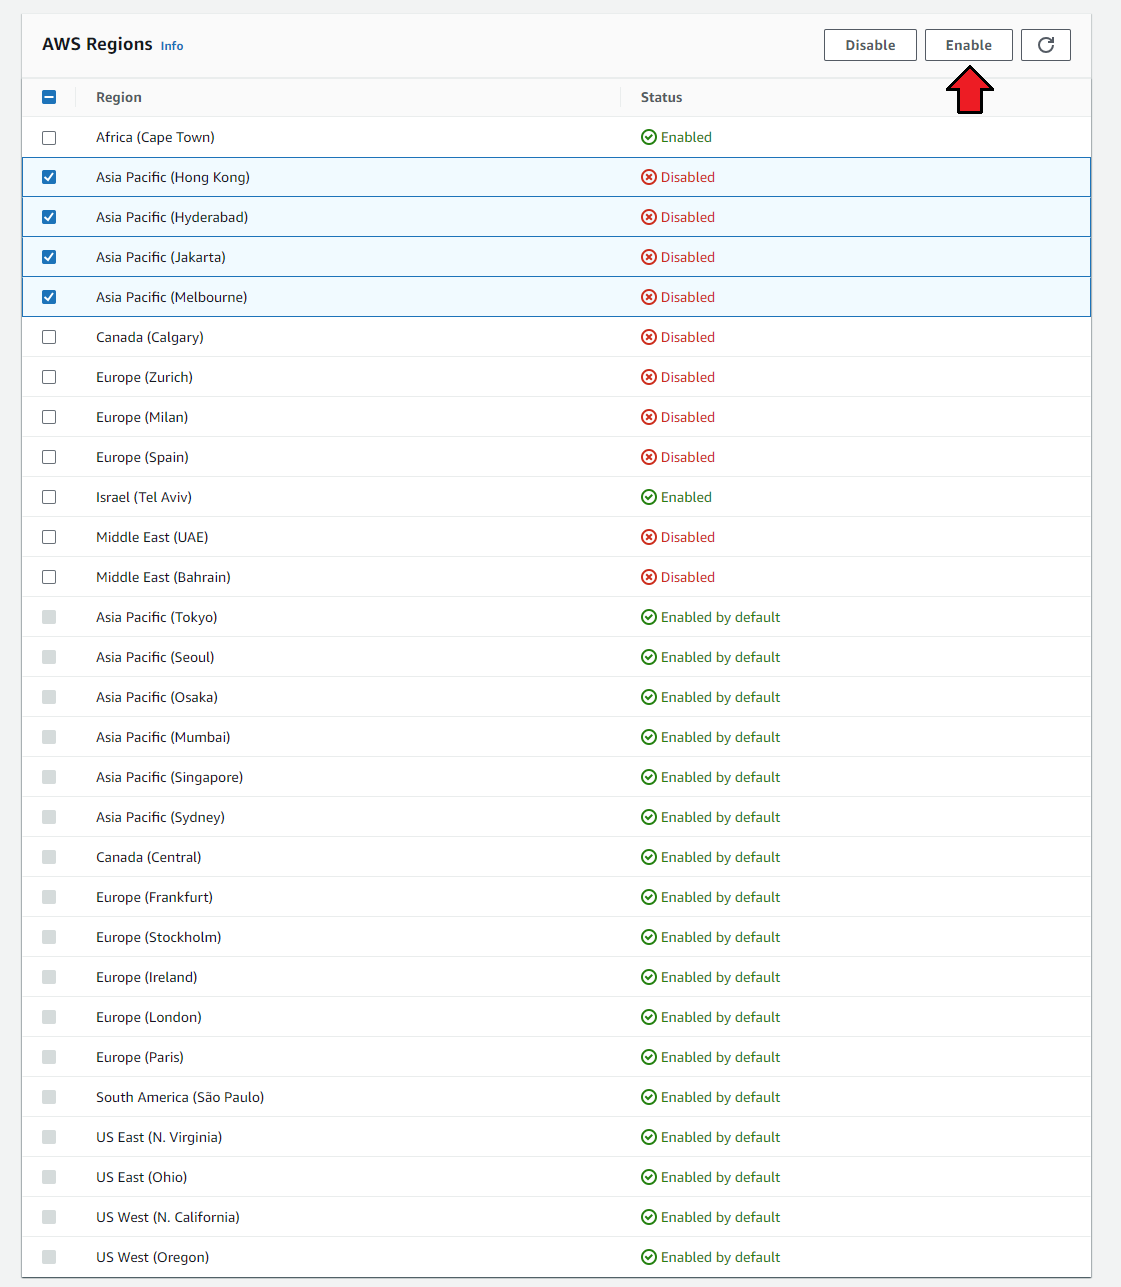
| Select the regions you would like to add, then click on 'Enable'. The process of including the new regions into your account may take about 15 minutes. |
|
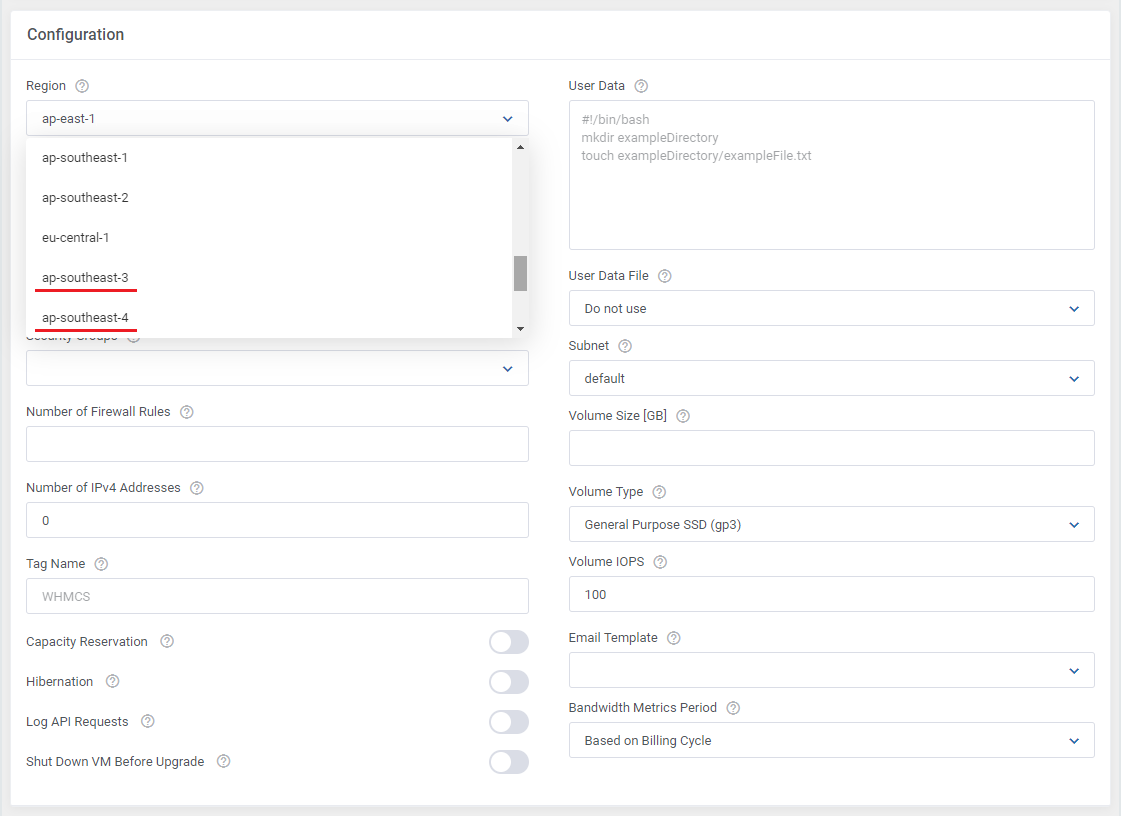
| After the new regions are added to your account, you will be able to see them on the region dropdown list in the product module settings. You can now create products and configure them with the inclusion of new regions. |
|
Tips
| 1. You must firstly stop the machine to let the change package action be successfully completed. |
| 2. In case you need to generate any of the configurable options once again, you must delete the previously created one. Only then it will be possible to generate a new configurable option. Read more about configurable options here. |
| 3. Amazon EC2 module supports all the default WHMCS marge field variables, they can be freely used in the welcome email template. Read more about module parameters here. The module also supports the below listed AWS variables: 'AmiLaunchIndex', 'ImageId', 'InstanceId', 'InstanceType', 'KeyName', 'Monitoring_State', 'Placement_AvailabilityZone', 'Placement_GroupName', 'Placement_Tenancy', 'PrivateDnsName', 'PrivateIpAddress', 'ProductCodes', 'PublicDnsName', 'State_Code', 'State_Name', 'StateTransitionReason', 'SubnetId', 'VpcId', 'Architecture', 'BlockDeviceMappings', 'ClientToken', 'EbsOptimized', 'EnaSupport', 'Hypervisor', 'NetworkInterfaces_0_Attachment_AttachmentId', 'NetworkInterfaces_0_Attachment_DeleteOnTermination', 'NetworkInterfaces_0_Attachment_DeviceIndex', 'NetworkInterfaces_0_Attachment_Status', 'NetworkInterfaces_0_Description', 'NetworkInterfaces_0_Groups_0_GroupName', 'NetworkInterfaces_0_Groups_0_GroupId', 'NetworkInterfaces_0_Ipv6Addresses', 'NetworkInterfaces_0_MacAddress', 'NetworkInterfaces_0_NetworkInterfaceId', 'NetworkInterfaces_0_OwnerId', 'NetworkInterfaces_0_PrivateDnsName', 'NetworkInterfaces_0_PrivateIpAddress', 'NetworkInterfaces_0_PrivateIpAddresses_0_Primary', 'NetworkInterfaces_0_PrivateIpAddresses_0_PrivateDnsName', 'NetworkInterfaces_0_PrivateIpAddresses_0_PrivateIpAddress', 'NetworkInterfaces_0_SourceDestCheck', 'NetworkInterfaces_0_Status', 'NetworkInterfaces_0_SubnetId', 'NetworkInterfaces_0_VpcId', 'NetworkInterfaces_0_InterfaceType', 'RootDeviceName', 'RootDeviceType', 'SecurityGroups_0_GroupName', 'SecurityGroups_0_GroupId', 'SourceDestCheck', 'StateReason_Code', 'StateReason_Message', 'Tags_0_Key', 'Tags_0_Value', 'Tags_1_Key', 'Tags_1_Value', 'VirtualizationType', 'CpuOptions_CoreCount', 'CpuOptions_ThreadsPerCore', 'CapacityReservationSpecification_CapacityReservationPreference', 'HibernationOptions_Configured', 'MetadataOptions_State', 'MetadataOptions_HttpTokens', 'MetadataOptions_HttpPutResponseHopLimit', 'MetadataOptions_HttpEndpoint' |
4. Utilizing the 'Show Windows Password' option in the Client Area:
|
| 5. When creating a virtual machine without a firewall but with a security group (other than the default), you won't be able to activate the firewall rules through the module. This action is only possible directly within the panel. |
Update Instructions
| An essential guidance through the process of updating the module is offered here. Ensure successful completion of the module update by carefully following each step, thereby preventing data loss or any unforeseen issues. |
Upgrade Guide
| Seeking a solution that offers greater flexibility, customization tailored to your precise needs, and unrestricted availability? There is an option that not only proves to be cost-effective in the long run but also includes prioritized support services, making it a truly valuable investment. Opt for the Open Source version of your Amazon EC2 For WHMCS module to unlock these benefits. Follow a comprehensive guide covering the transition process, the advantages it brings, and step-by-step instructions on what to do next after the order has been successfully finalized. |
Common Problems
| 1. When you have problems with connection, check whether your SELinux or firewall does not block ports. |