Product Feedback Center For WHMCS
Contents |
About Product Feedback Center For WHMCS
| Product Feedback Center For WHMCS allows to quick gather the opinion of your clients on the products you offer, support services you deliver and any other aspects of your business that you only wish to ask about. The module will empower you to design short questionnaires that will help you collect targeted feedback from clients and compose rules to show the survey just to a closed group of clients. |
- Client Area Features:
| ✔ Fill Out Custom Surveys With Questions: |
| ✔ On Product/Service: |
| ✔ As Standalone Feedback Form |
| ✔ On Cancellation Requests |
| ✔ In Questionnaires Form Displayed When Specific Rules Are Met |
| ✔ In Support Ticket Feedback Form |
- Admin Area Features:
| ✔ View Dashboard Summary: |
| ✔ Latest Cancellation Surveys |
| ✔ Latest Feedback Surveys |
| ✔ Latest Support Survey Requests |
| ✔ Latest Questionnaire Requests |
| ✔ Cancellation Surveys Per Product |
| ✔ Cancellation Surveys Per Product Group |
| ✔ Feedback Surveys Per Product |
| ✔ Feedback Surveys Per Product Group |
| ✔ Support Feedback Requests Per Department |
| ✔ Questionnaire Requests Per Questionnaire Group |
| ✔ Create Question Groups And Relations For: |
| ✔ Cancellation Requests |
| ✔ Products Feedback |
| ✔ Support Tickets |
| ✔ Questionnaires |
| ✔ Customize Surveys: |
| ✔ Provide Group Name And Description |
| ✔ Provide Message Displayed To Clients Above Survey |
| ✔ Customize Message Text And Alert Bar Color |
| ✔ Add Multiple Language Versions To Provided Messages |
| ✔ Create And Assign Questions To Groups |
| ✔ Provide Question Name |
| ✔ Choose Question Type: |
| ✔ Confirmation |
| ✔ Text |
| ✔ Select |
| ✔ Multi-Select |
| ✔ Scale |
| ✔ Custom Scale |
| ✔ Toggle Question Status |
| ✔ Add Question Description |
| ✔ Toggle Question To Be Optional |
| ✔ Display Question Based On Answer Selected In Another Parent Question |
| ✔ Define Characters Limit For Text Type Answers |
| ✔ Randomize Order Of Answer Options For Confirmation, Select And Multi-Select Question Types |
| ✔ Pin Last Answer |
| ✔ Set Minimum, Maximum Or Exact Number Of Required Answers For Multi-Select Question Type |
| ✔ Toggle Horizontal Or Vertical Display Of Scale And Custom Scale Question Types |
| ✔ Add Available Answer Options To Questions |
| ✔ Add Multiple Language Versions To Provided Questions |
| ✔ Create Relations And Rules To Display Surveys: |
| ✔ Cancellations: |
| ✔ Assign Created Question Groups To Products/Services And Product Groups |
| ✔ Choose Whether "End Of Billing Period" Option Should Be Disabled Until Specified Time |
| ✔ Hide WHMCS Cancellation Reason From Questionnaire Form |
| ✔ Product Feedback: |
| ✔ Assign Created Question Groups To Products/Services And Product Groups |
| ✔ Support Feedback: |
| ✔ Assign Created Question Groups To Specific Departments |
| ✔ Questionnaire: |
| ✔ Assign Created Question Groups Based On Activation Rules: |
| ✔ Client Owned Products, Product Addons, And Domain TLDs |
| ✔ Assignment To Client Group |
| ✔ New Customer Defined With Number Of Days To Pass Since Registration |
| ✔ Old Customer Defined With Number Of Days After Registration |
| ✔ Provide Short Name Displayed In "Available Questionnaires" Table |
| ✔ Toggle One-Time Access |
| ✔ View/Delete Answers Submitted By Clients |
| ✔ Export Surveys Feedback To CSV File |
| ✔ Send Email Message To Client On Ticket Closure Event With Feedback Request |
| ✔ Access Submitted Answers Directly From WHMCS Cancellation Requests List |
- General Info:
| ✔ Multi-Language Support |
| ✔ Supports PHP 8.2 Back To PHP 8.1 |
| ✔ Supports WHMCS Themes "Six" And "Twenty-One" |
| ✔ Supports WHMCS V8.12 Back To WHMCS V8.9 |
| ✔ Requires ionCube Loader V13 Or Later |
| ✔ Easy Module Upgrade To Open Source Version |
Installation
| This tutorial will show you how to successfully install and configure Product Feedback Center For WHMCS. We will guide you step by step through the whole installation and configuration process. |
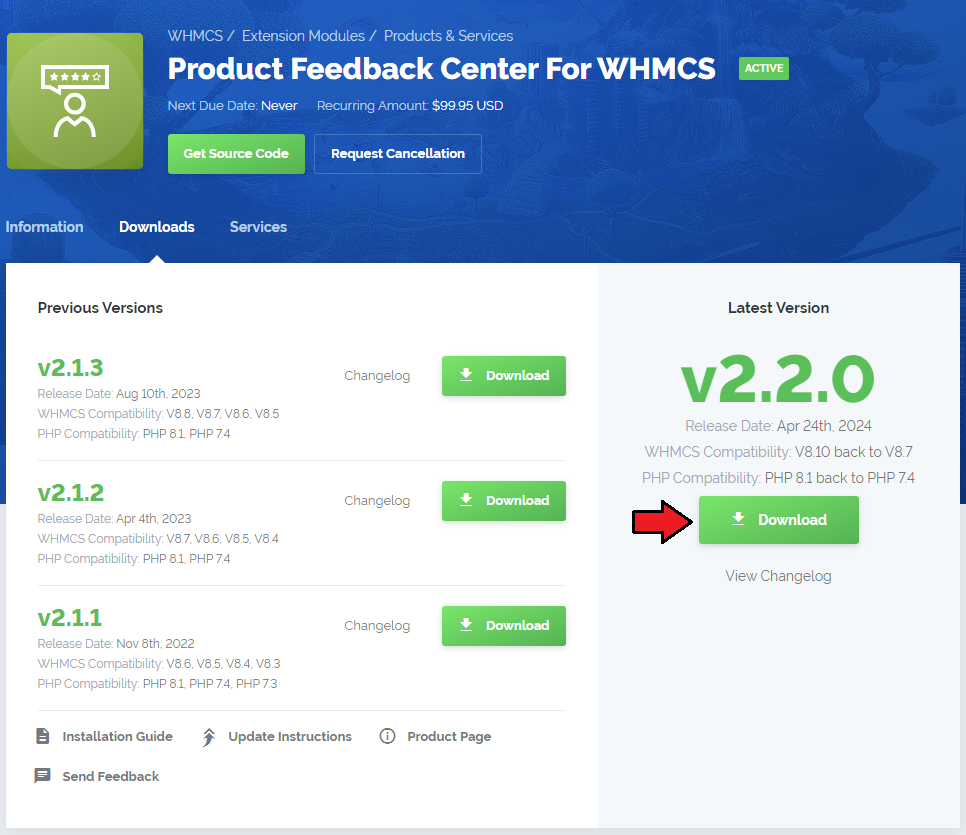
| 1. Log in to our client area and download the module. |
|
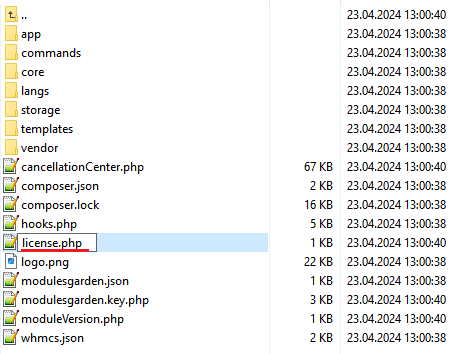
| 2. Upload and extract the extension into the main WHMCS directory. Extracted files in your WHMCS directory should look like this: |
| 3. When you install Product Feedback Center For WHMCS for the first time, you have to rename the 'license_RENAME.php' file. This file is located in 'modules/addons/cancellationCenter/license_RENAME.php'. Rename it from 'license_RENAME.php' to 'license.php'. |
|
| 4. In order to configure your license key, you have to edit the previously renamed 'license.php' file. Enter your license key between the quotation marks as presented on the following screen. You can find your license key in our client area → 'My Products'. |

|
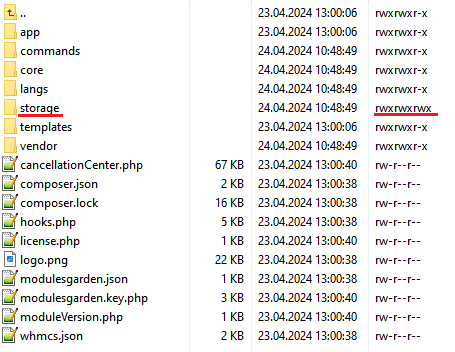
| 5. In the next step, set up the 'storage' folder as recursively writable. This folder is available at 'your_whmcs/modules/addons/cancellationCenter/' . |
|
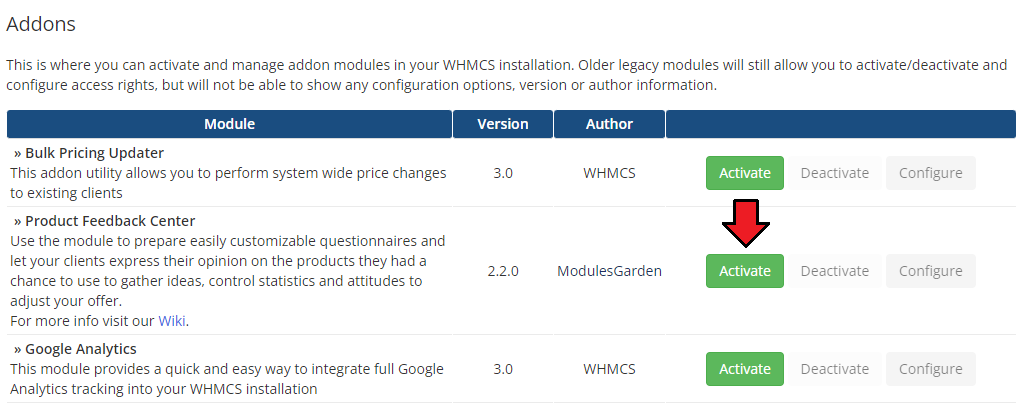
| 6. Now you have to activate the module in your WHMCS system. Log in to your WHMCS admin area. Go to 'System Settings' → 'Addon Modules'. Afterwards, find 'Product Feedback Center' and press the 'Activate' button. |
|
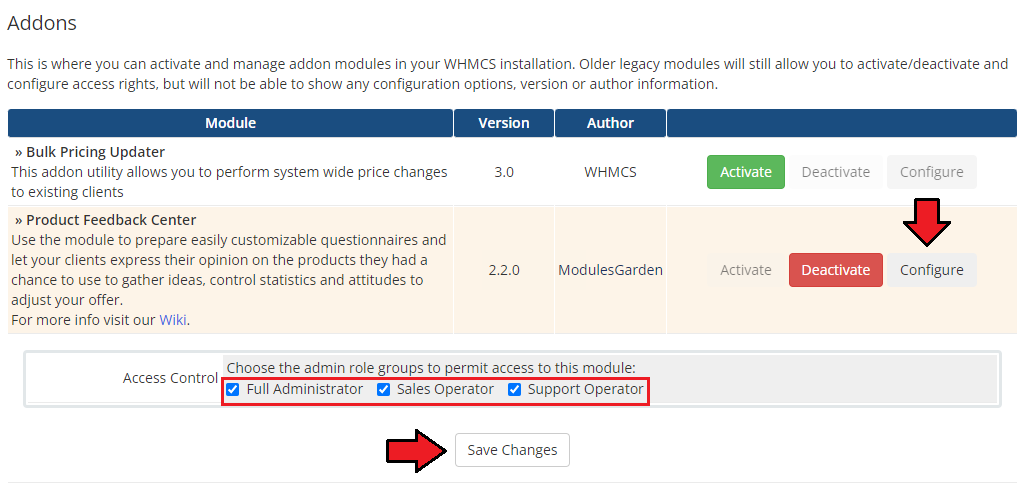
| 7. In the next step you need to permit access to this module. To do so, click on the 'Configure' button, tick 'Full Administrator' and press 'Save Changes'. |
|
| 8. You have just successfully installed Product Feedback Center For WHMCS! You can access your module at 'Addons' → 'Product Feedback Center'. |

|
Configuration and Management
| Product Feedback Center For WHMCS allows you to create simple forms with questions and possible answers that will be displayed when a customer submits a cancellation request. Additionally, in the module you can see summaries of the number of submitted requests and view the answers given. |
Dashboard
| In the dashboard you can find the summary graphs of recently submitted product cancellations and product feedback surveys. The first two graphs show the summary of cancellation and feedback requests in particular days from the past month. The next ones show cancellation and feedback requests per product or product groups submitted in the last 7 days. |

|
Cancellations
Client Cancellations
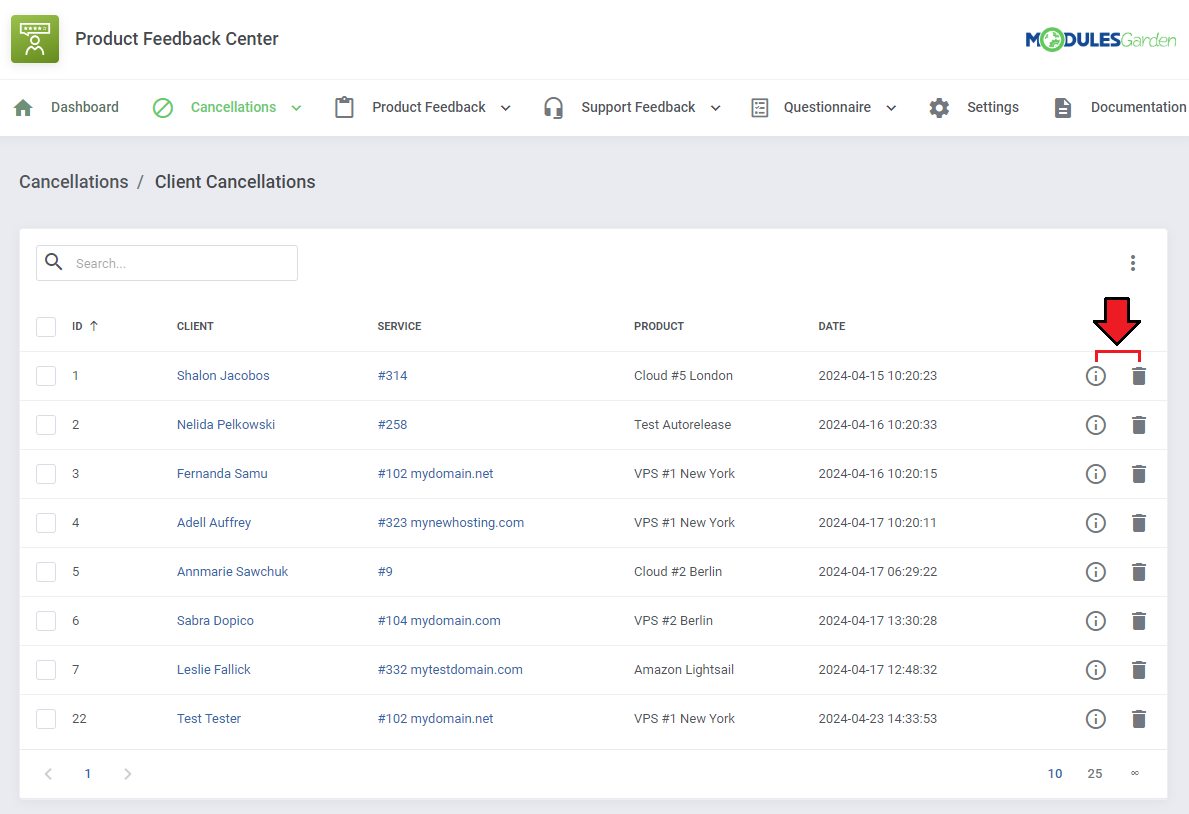
| In the 'Client Cancellations' section you will find a list of submitted product cancellation requests along with customer answers to the prepared sets of questions. Click on the 'Questions & Answers' icon to see the filled-in survey for the given request. |
|
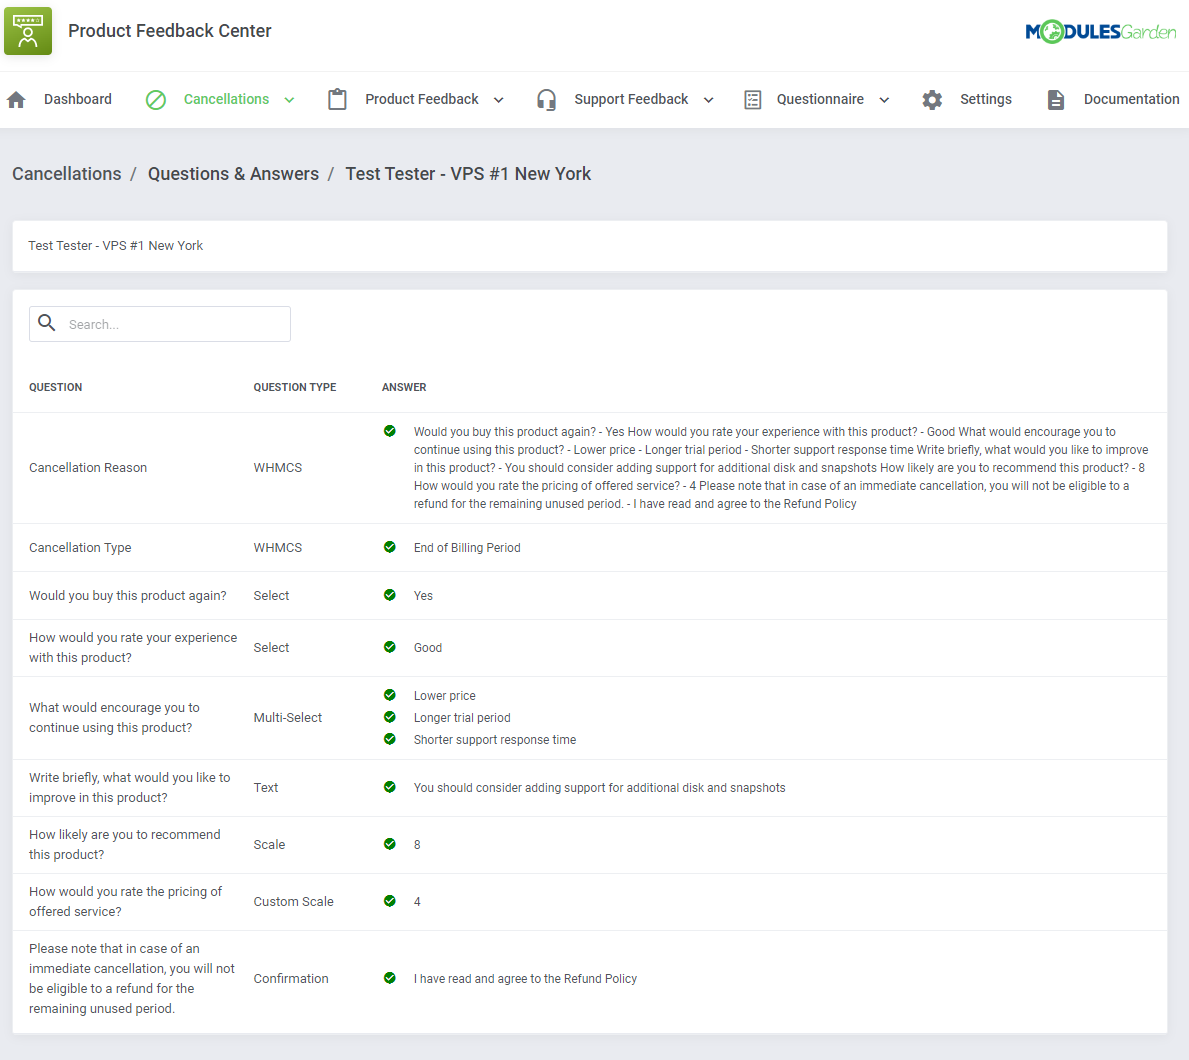
| You will see a preview of the questions asked, their type, and the answers given by the client. |
|
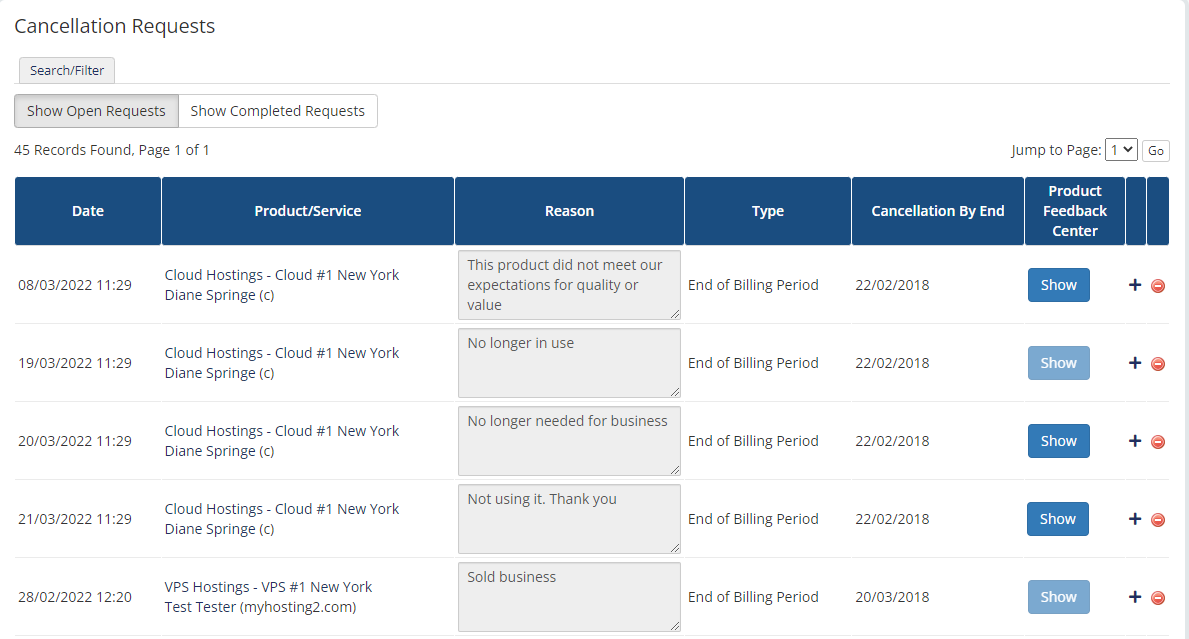
| The module also integrates with the WHMCS built-in list of cancellation requests. If the request for cancellation sent by the customer also contains a submitted survey, the active 'Show' button will appear in the table. Press this button to be transferred directly to the completed questionnaire. |
|
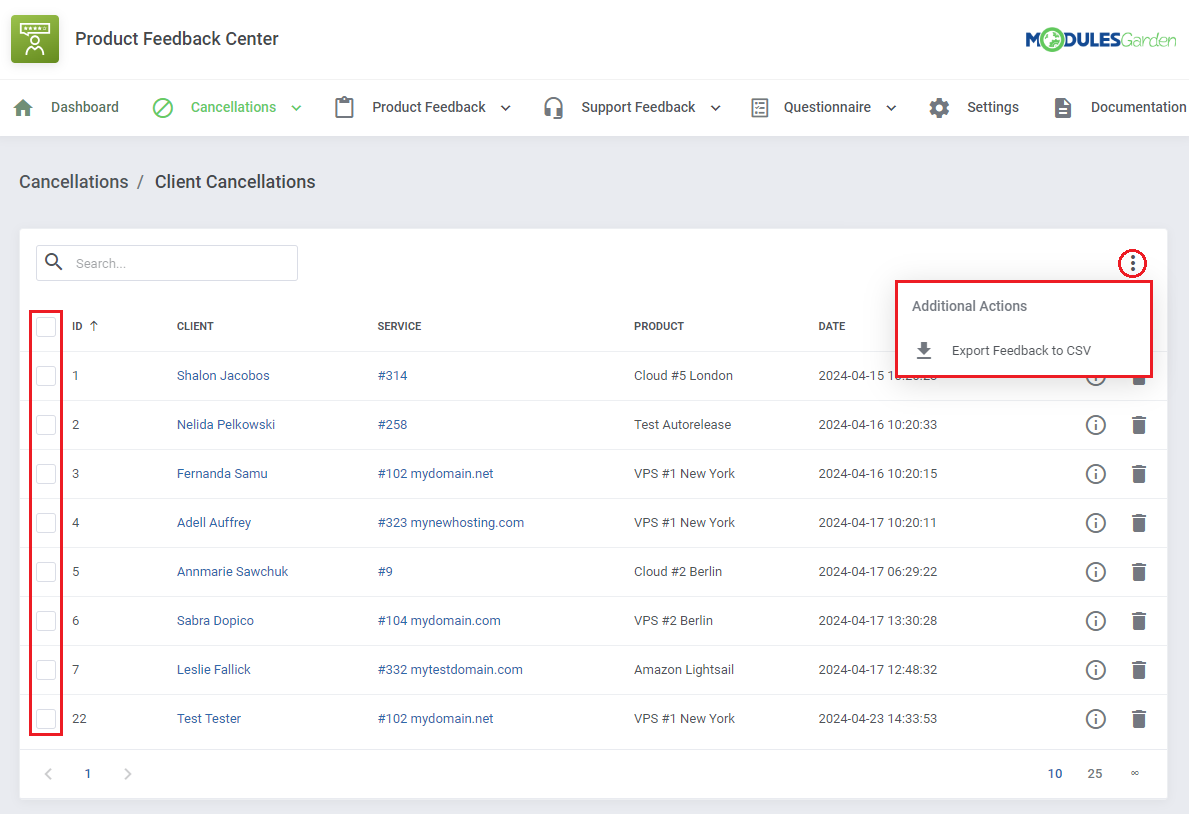
| Moreover, you can export feedback to a compiled '.csv' file, either select multiple requests by utilizing the mass action feature or click on 'Additional Actions' and define the date range for selection. |
|
Cancellations Groups
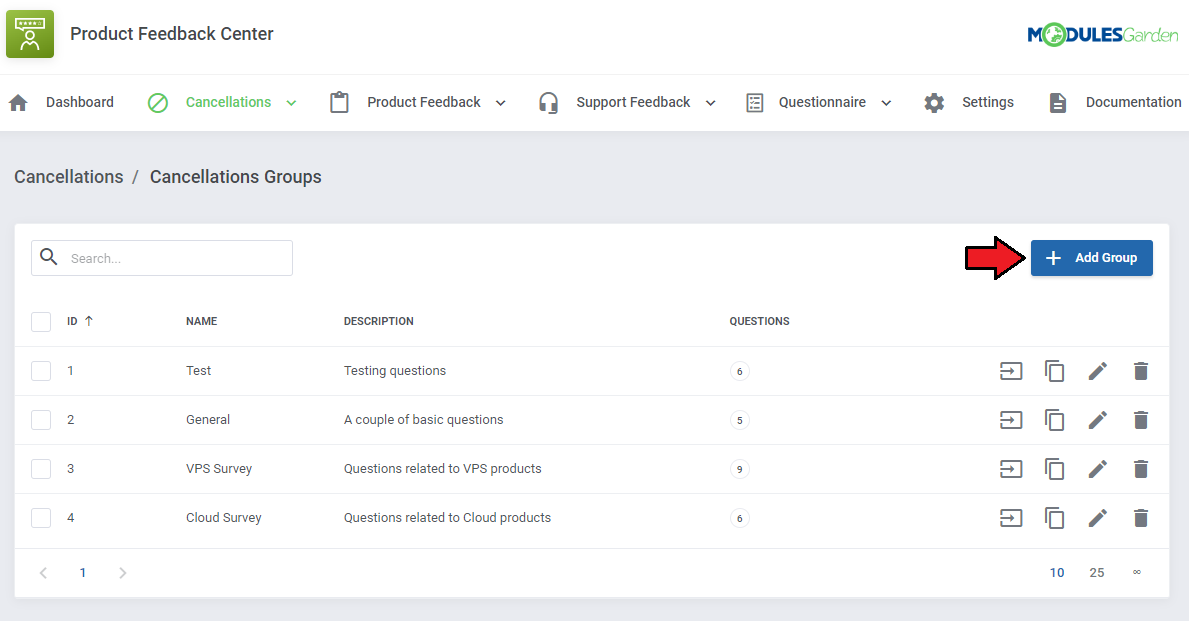
| Before you start adding questions and answers, you need to create a questionnaire group first. The Cancellation Groups are created in order to assign them to individual products at a later date. With the groups you can create different sets of questions for different products. Go to the 'Cancellation Groups' section and click the 'Add Group' button. |
|
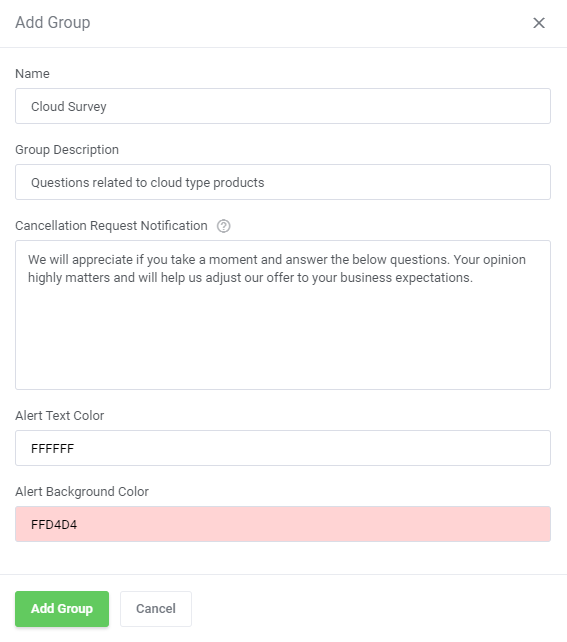
| Next, give the group a name and provide a description. You can also enter a message for clients that will appear above the survey. You may now also adjust the text and background color of the displayed alert. Press 'Add Group' when ready. |
|
Configuration of Questions and Answers
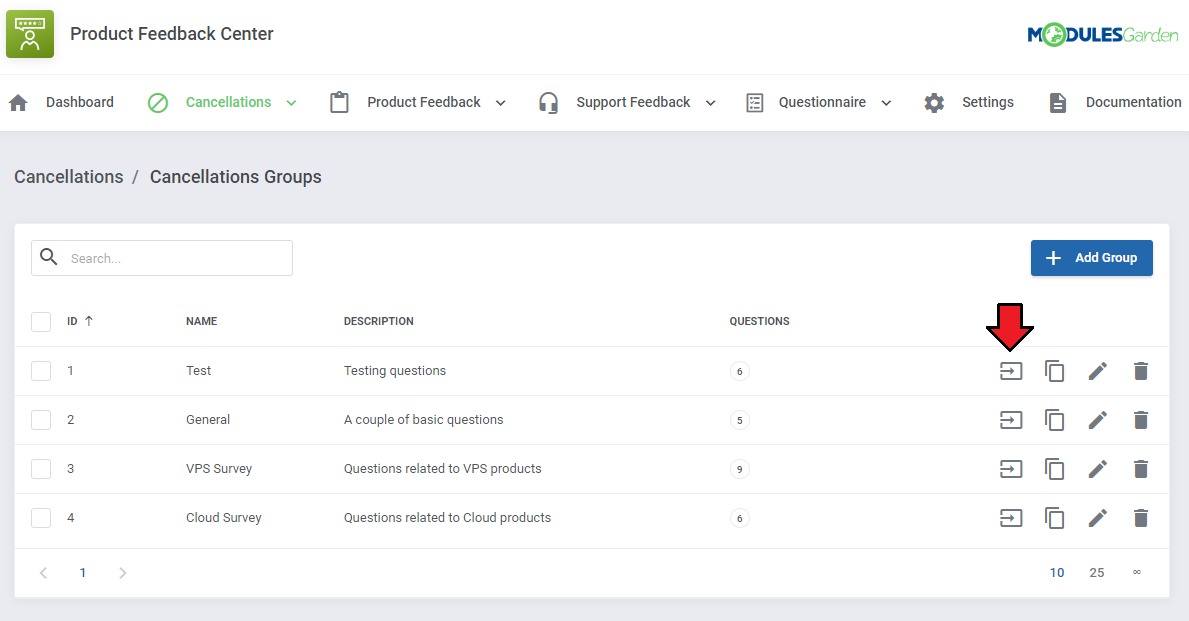
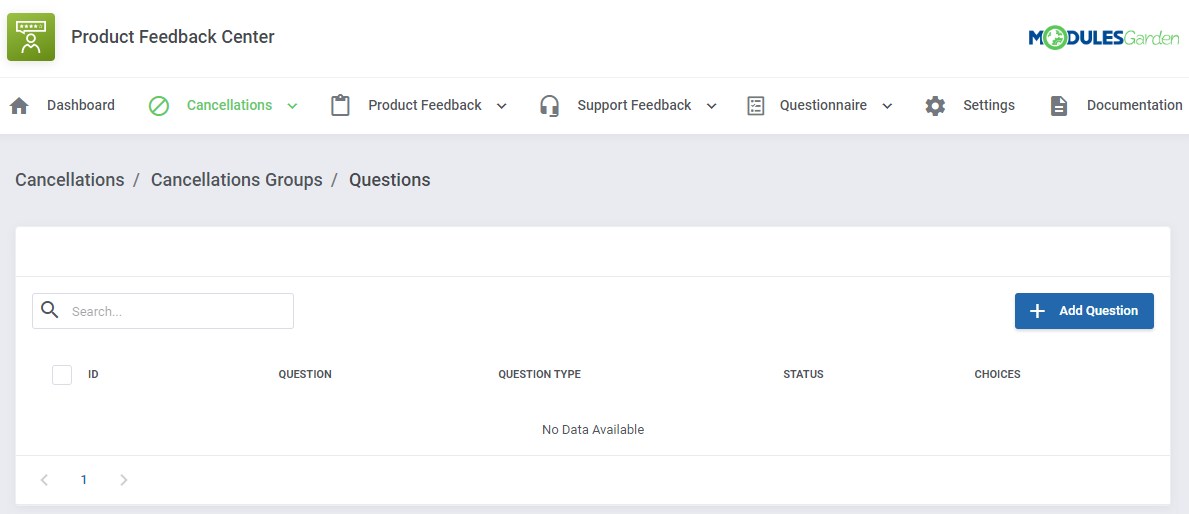
| When you create a new question group, you will be automatically redirected to the page where questions can be formed. You can also access this page by clicking on the 'Questions' icon next to the chosen record on the groups list. |
|
| Now click the 'Add Question' button. |
|
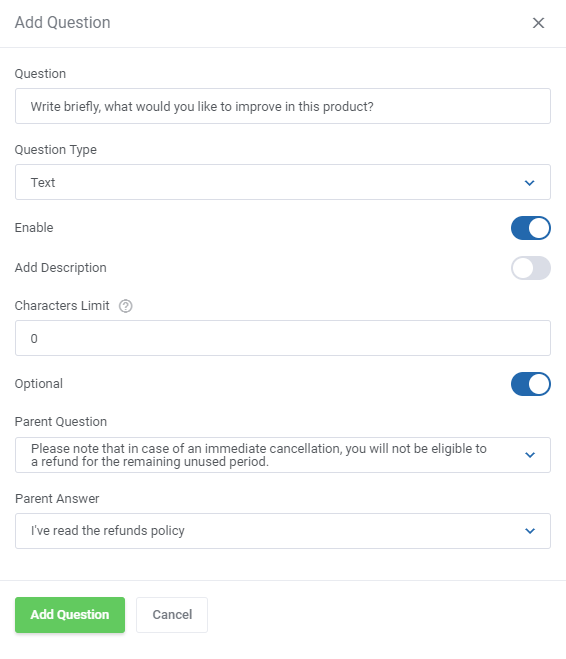
| Enter the first question you want to ask clients and select its type.
You can choose between the following types:
Define additional options of the newly created questions. Note that available settings highly depend on the previously chosen type:
|
|
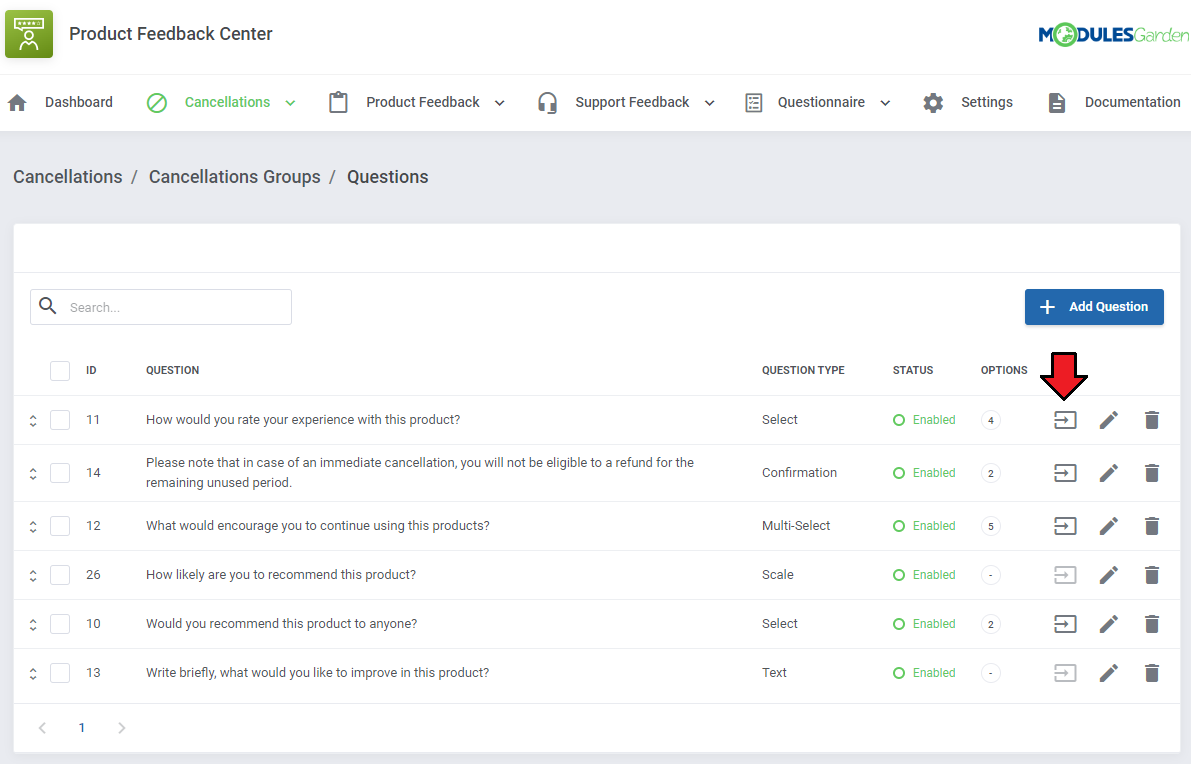
| After creating the question you will be automatically redirected to the page where you can formulate available answer options (except for the 'Text' question type). You will also be able to access this page by clicking the 'Options' icon for the chosen record in the questions list. |
|
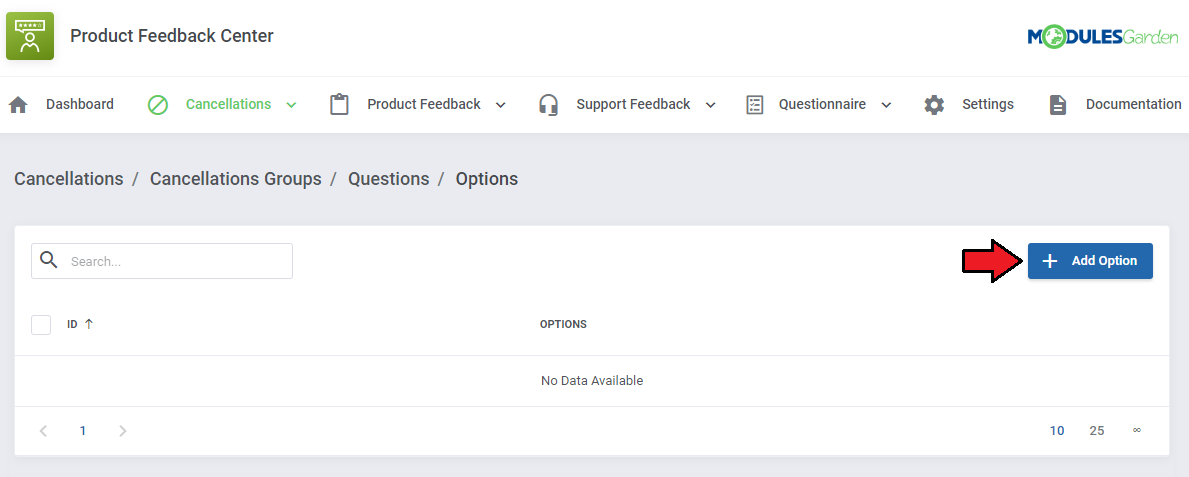
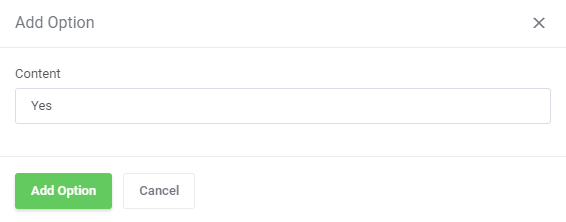
| Next press the 'Add Option' button and create as many answer options as you need for your question. |
|
|
| Repeat the above steps until you create the desired number of questions and answers. |
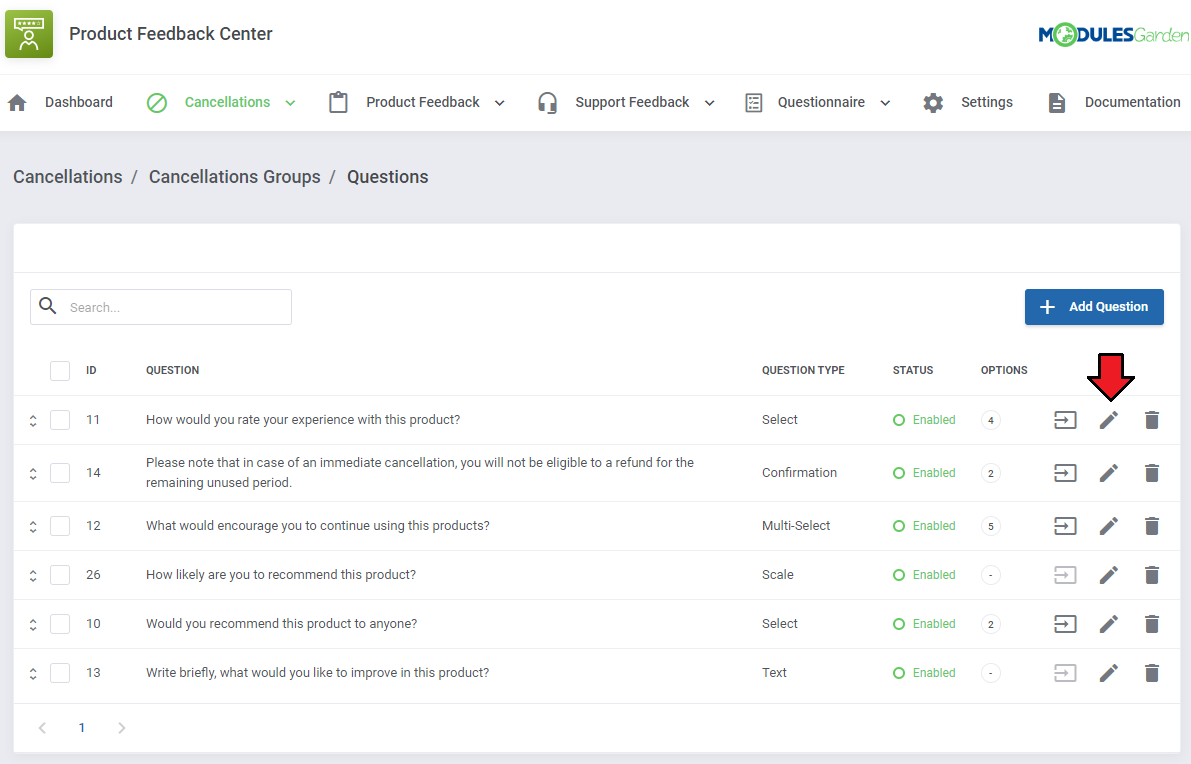
| If you want to personalize the questions for your clients, you may create their versions in different languages. All you need to do is edit the question and add its language translation. |
|
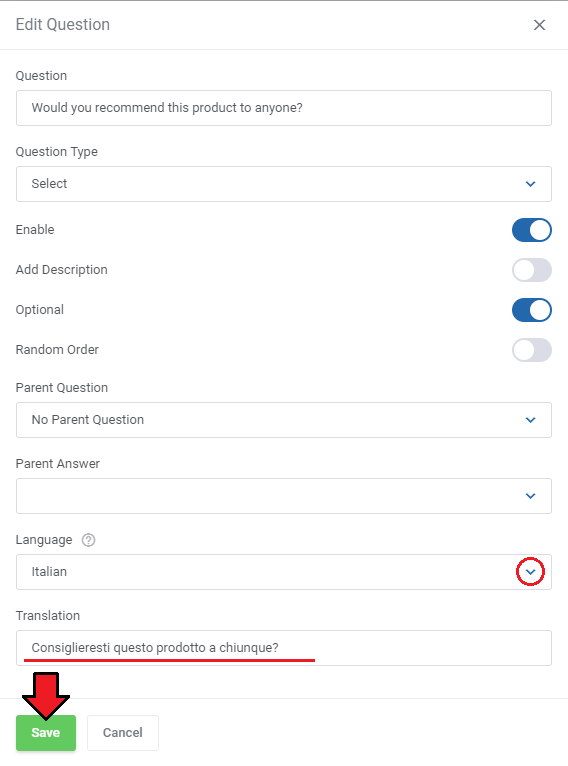
| Change the language to any of the available and then type in its translated version in the text field. Please refer to Tip 2 in 'Tips' section to learn how to enable numerous languages in your WHMCS system. |
|
| You may add numerous translations here. Simply select another language from the drop down menu and a new empty field will appear, type in the translated question there. Depending on the client's preferred language in the client area, the questions will be displayed in an adequate language, provided such translation has been added here. |
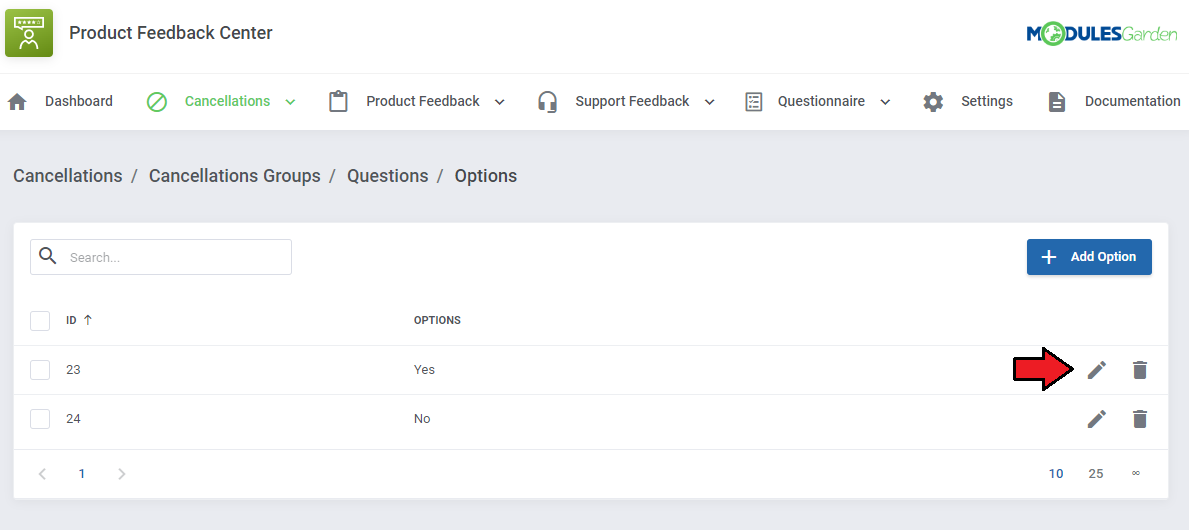
| If you decided to add translations to questions of the select, multi-select or confirmation type, do not forget to translate its possible answer options as well. You may do that in the same way as question translations, simply edit the required option, select the required language add the translated answer. |
|
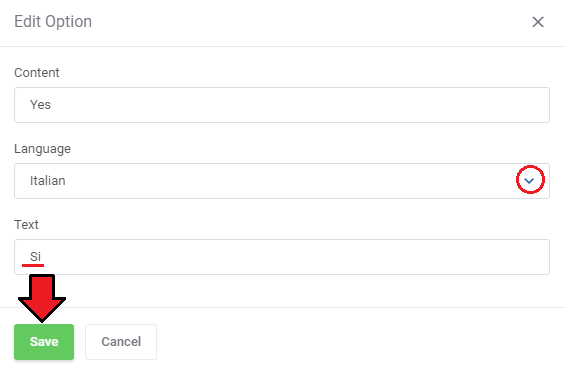
|
| If you need to create more question groups with questions and answers that are similar to the existing ones, you can speed up the process by using the 'Clone' option. |
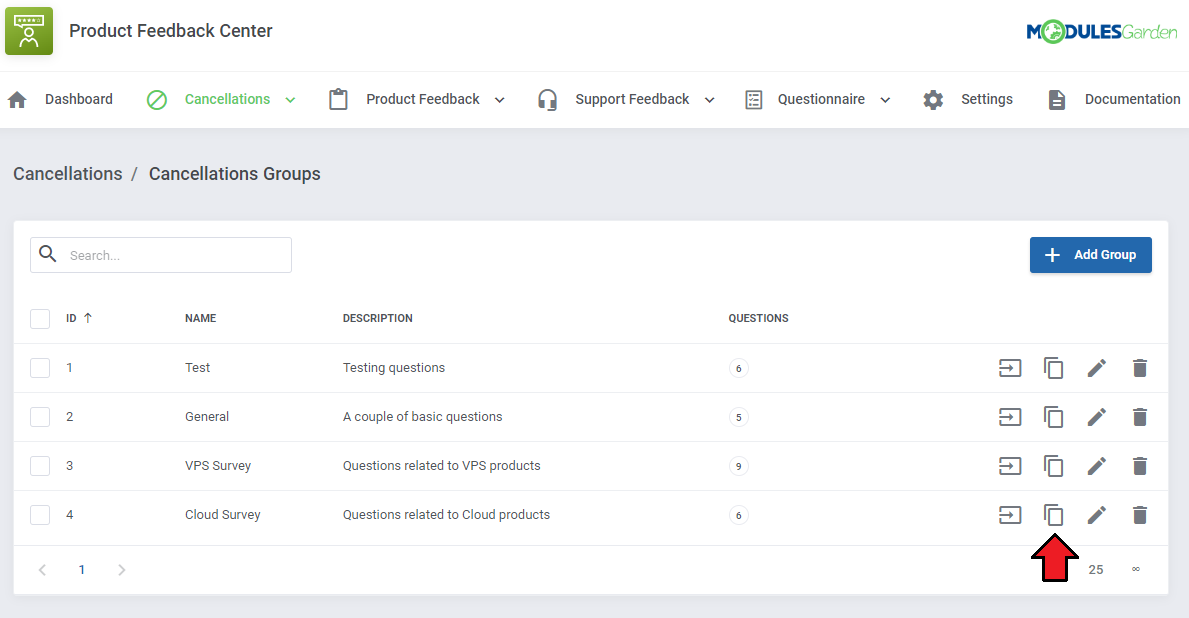
|
| Enter the new name and description of the group. All previously created questions and answers will be automatically added to the new group, which you will now be able to modify independently. |
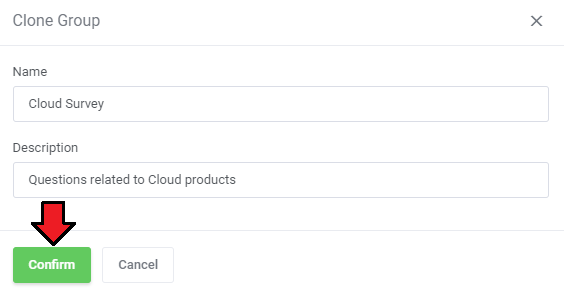
|
Product Relations
| Once you have created a group (or groups) of questions, in the 'Groups' section you can choose which services you want to assign them to. Only after assigning a questionnaire group to a product, products or product groups the survey will be displayed in the client area when submitting a cancellation request. Press 'Create Relation' to start. |
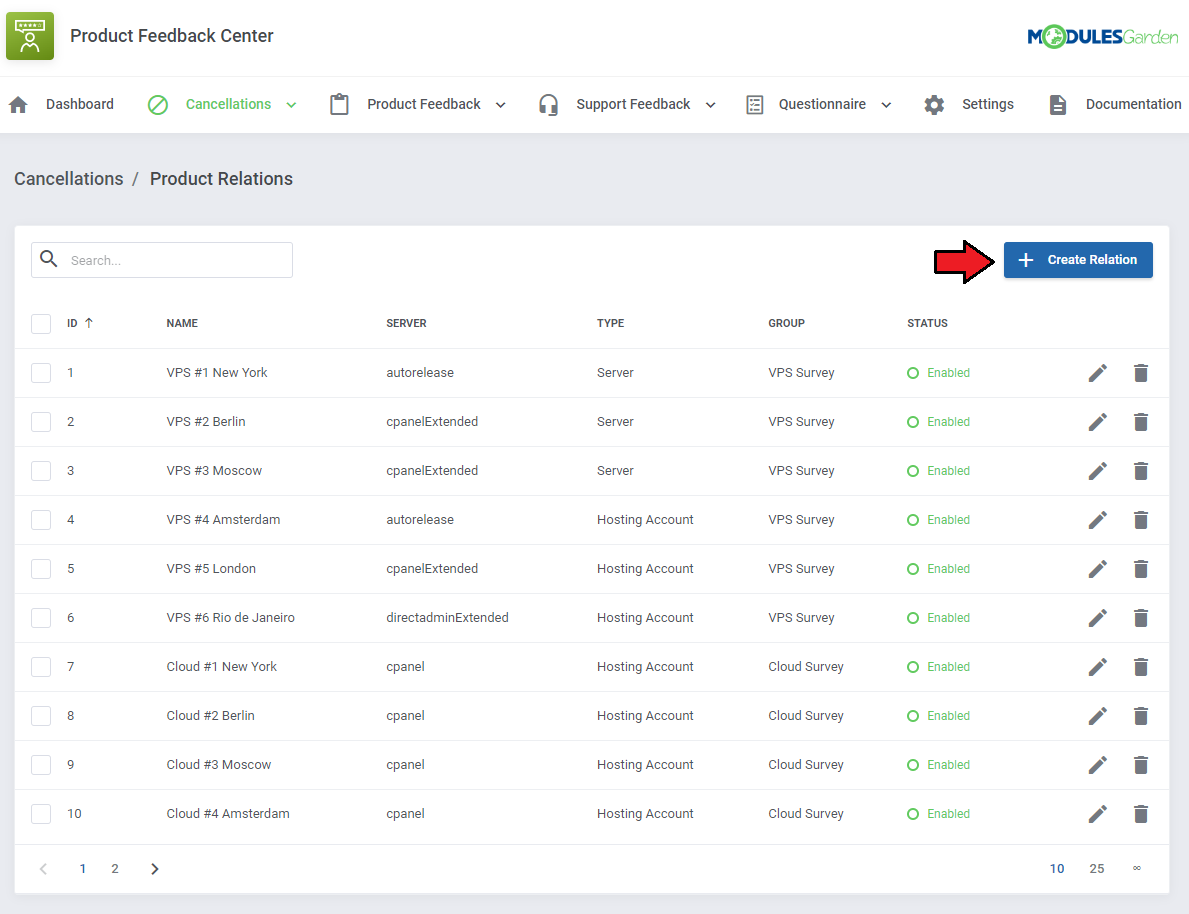
|
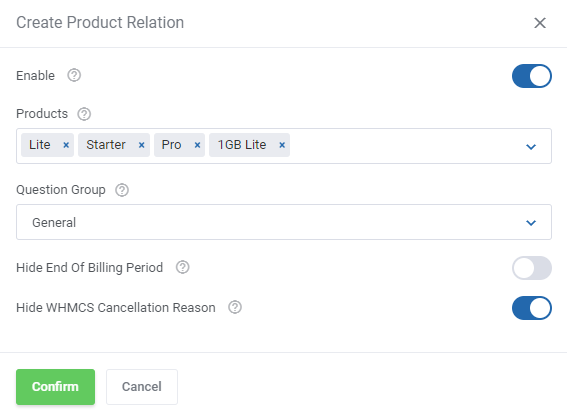
| Select the question group and the products to which you want to assign it. |
|
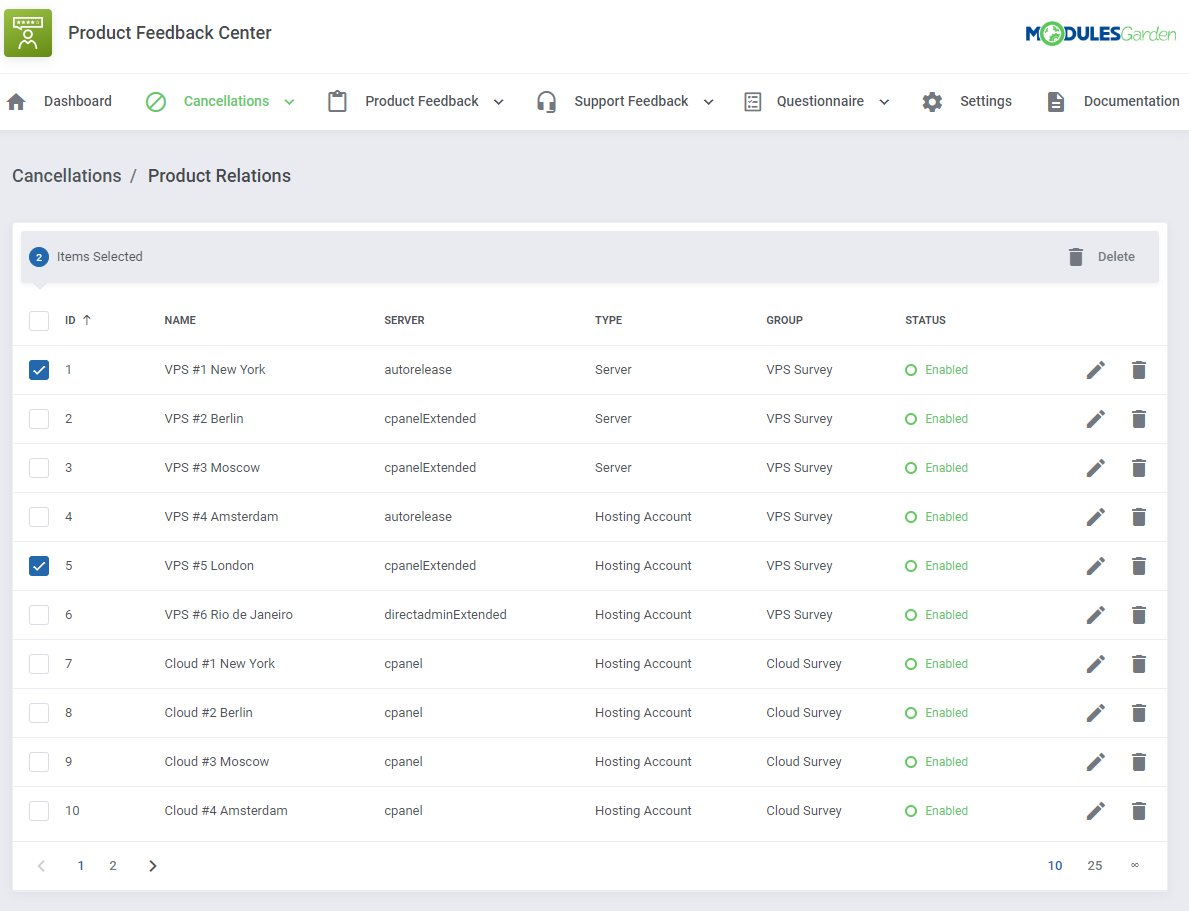
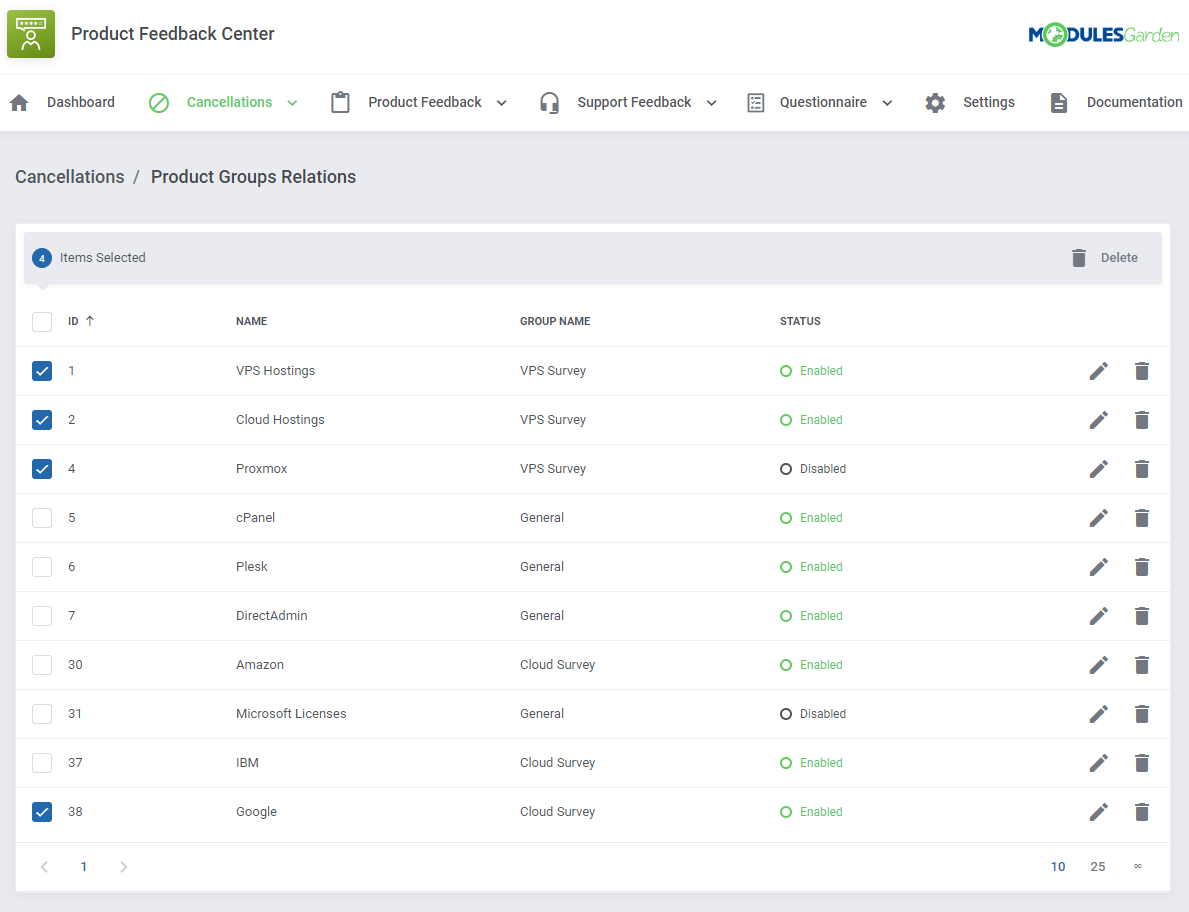
| After creating the relation to selected products, you will be able to manage each of them separately, including the option to view the current status of relation. You can also delete many relations at once using mass actions. |
|
Product Groups Relations
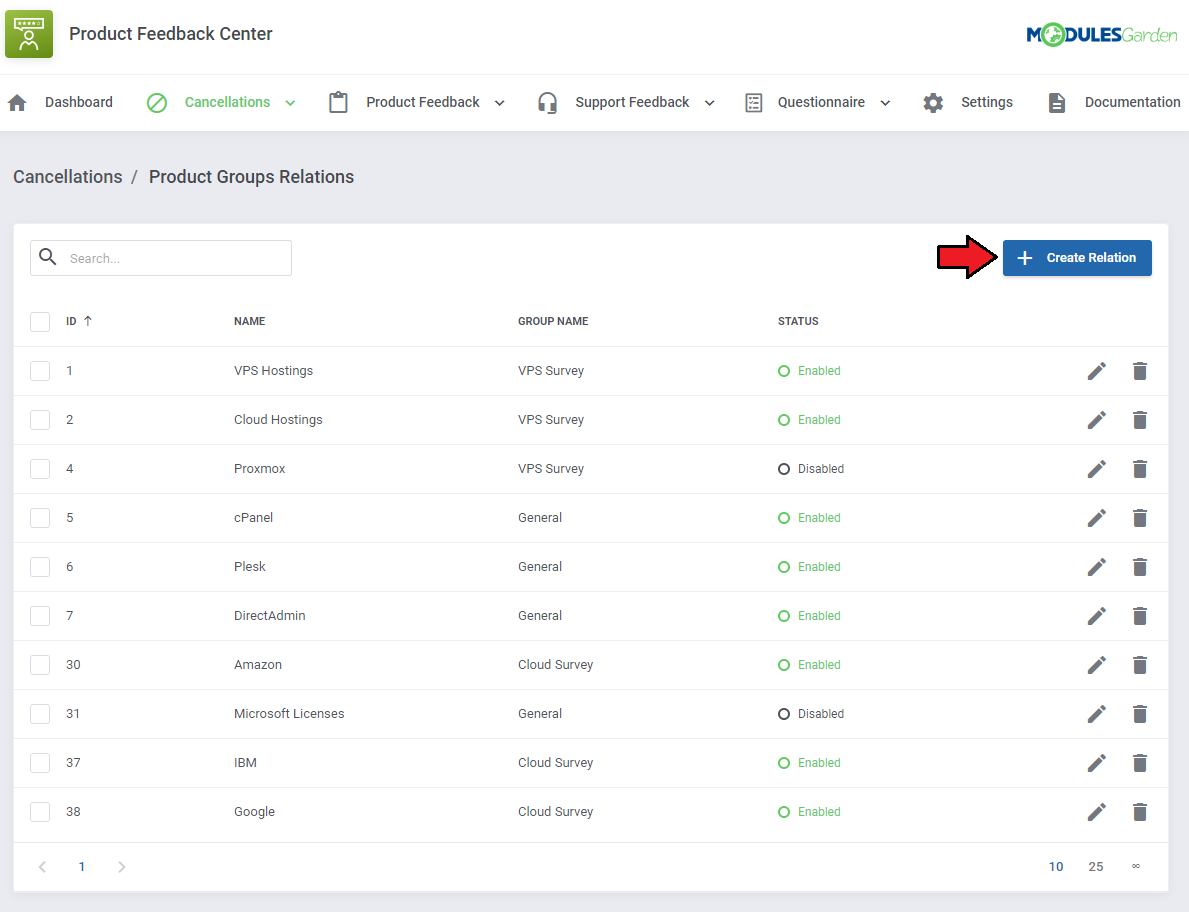
| Press 'Create Relation' to start. |
|
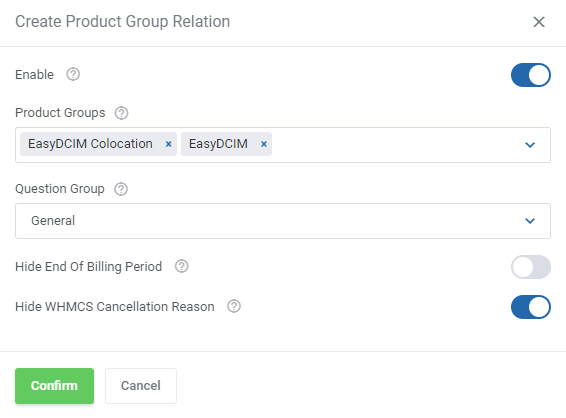
| Select the question group and the product groups to which you want to assign it. At this point you may also enable the option 'Hide End Of Billing Period' and hide the WHMCS inbuilt 'Briefly describe your reason for cancellation' that is displayed in the client area when requesting product cancellation. |
|
| After creating the relation to selected product groups, you will be able to manage each of them separately, including the option to view the current status of relation. You can also delete many relations at once using mass actions. |
|
Product Feedback
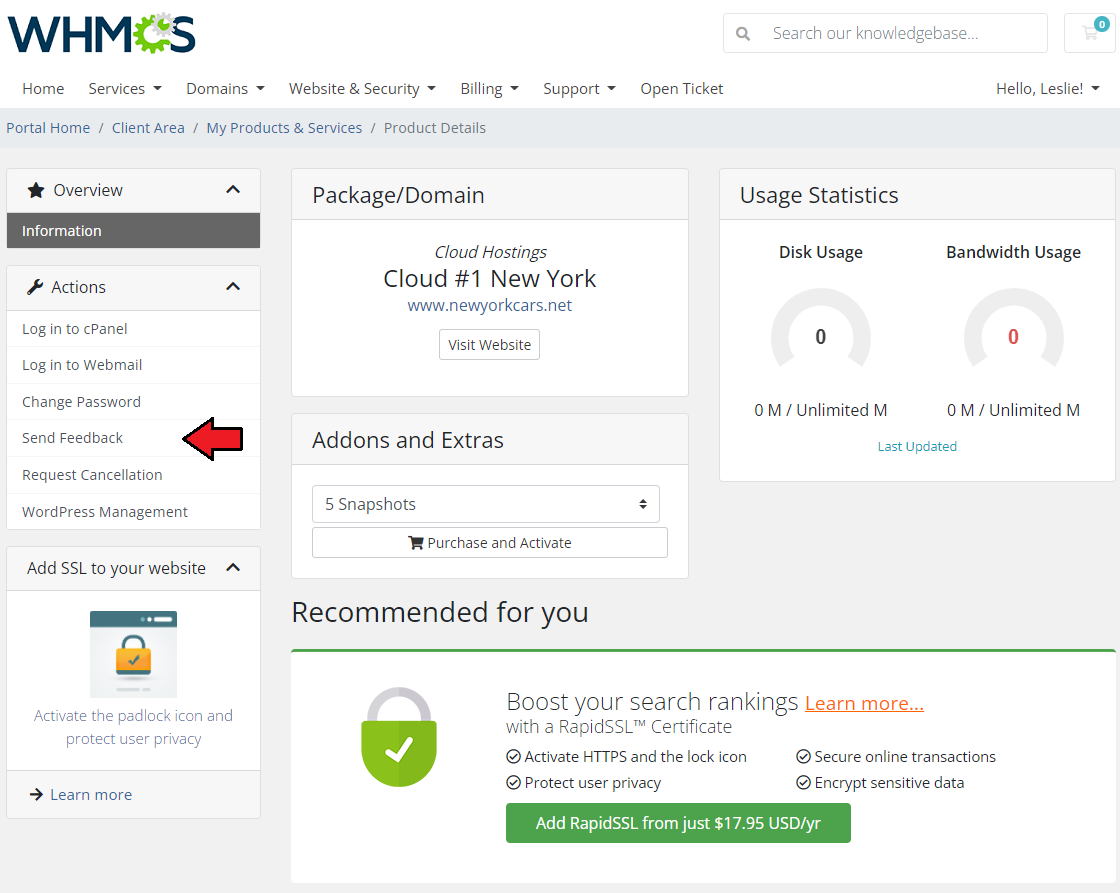
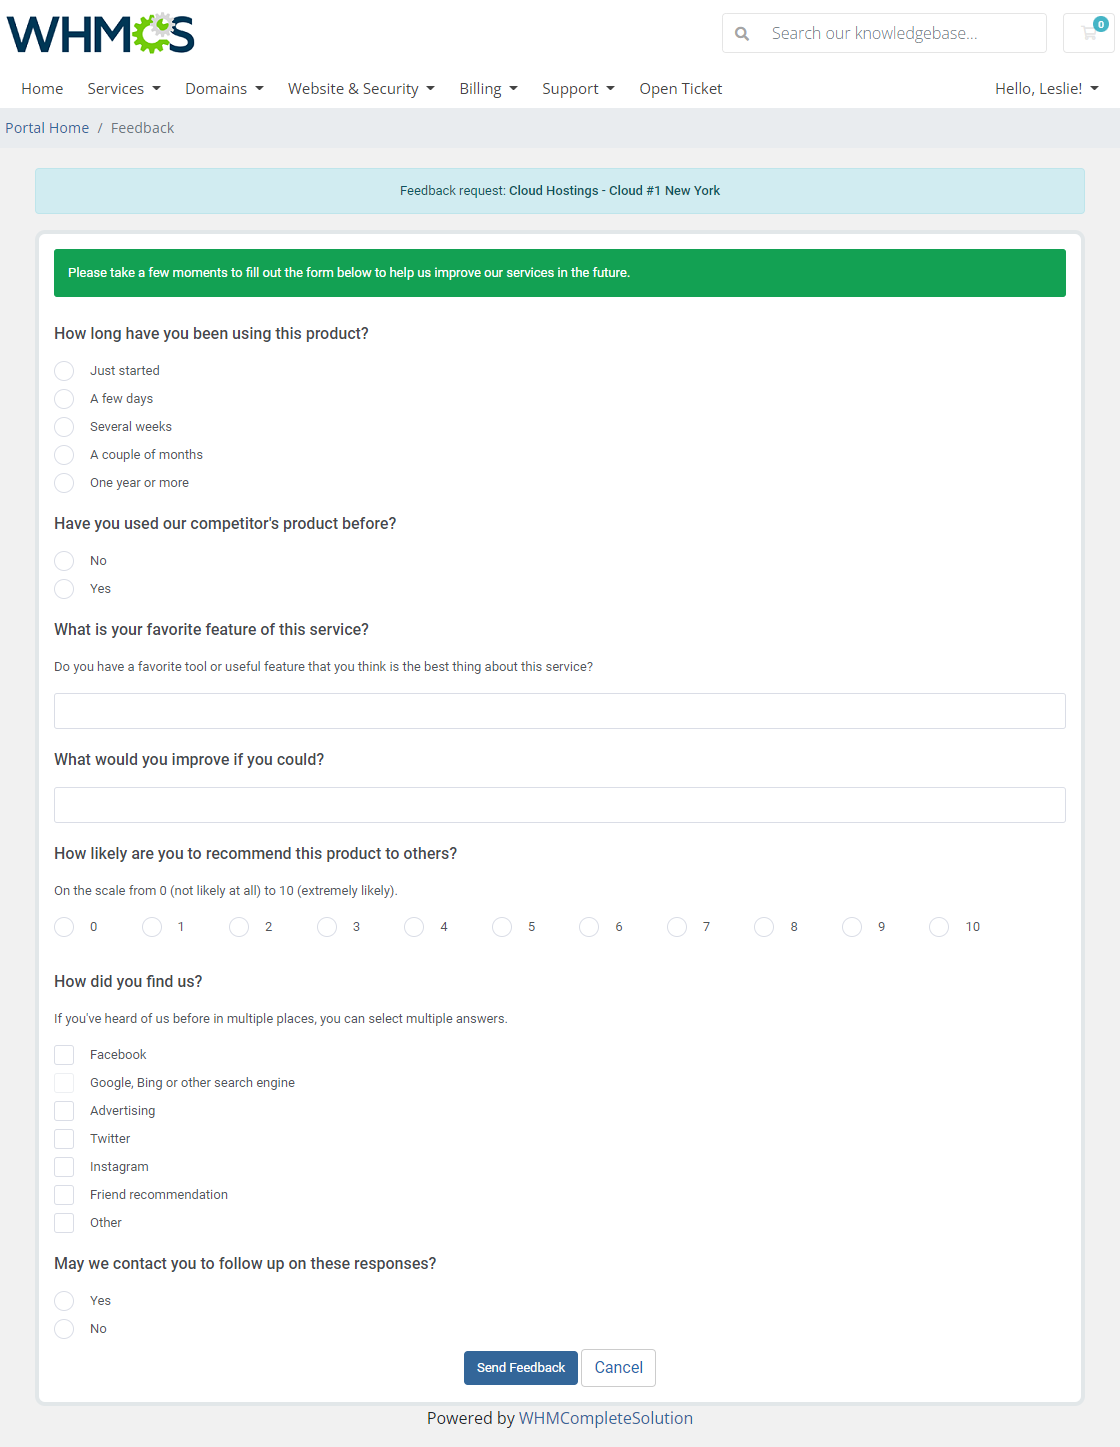
| The 'Feedback' section is dedicated to creating surveys for clients to let them express their opinion on the products that are currently using. If a certain product has teh survey assigned, the client has access to 'Send Feedback' section in the client area and may rate the product at any moment. |
|
|
Product: Client Feedback
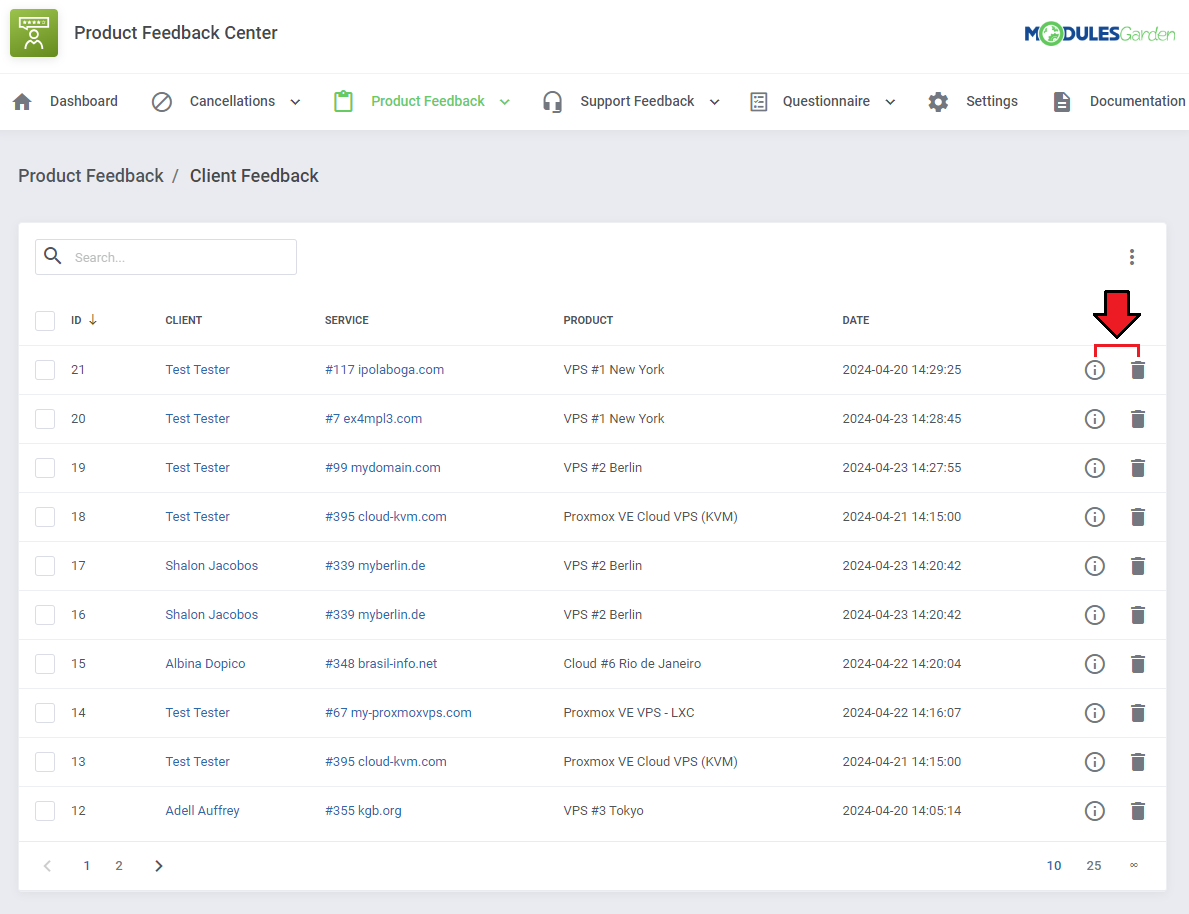
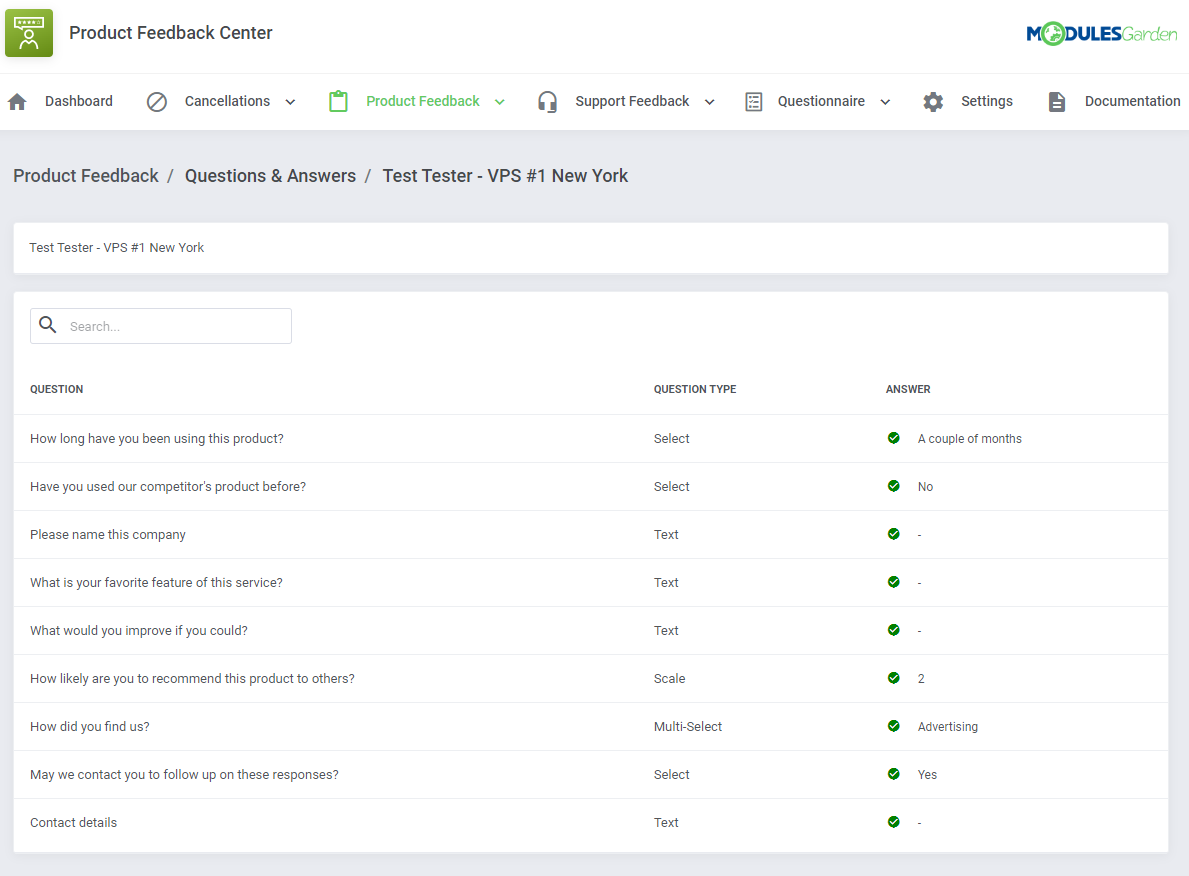
| Move to 'Feedback' → 'Client Feedback' section, you will find there a list of submitted product feedback with the customer answers to the prepared sets of questions. Click on the 'Questions & Answers' icon to see the filled-in survey for the given feedback. |
|
| You will see a preview of the questions asked, their type, and the answers given by the client. |
|
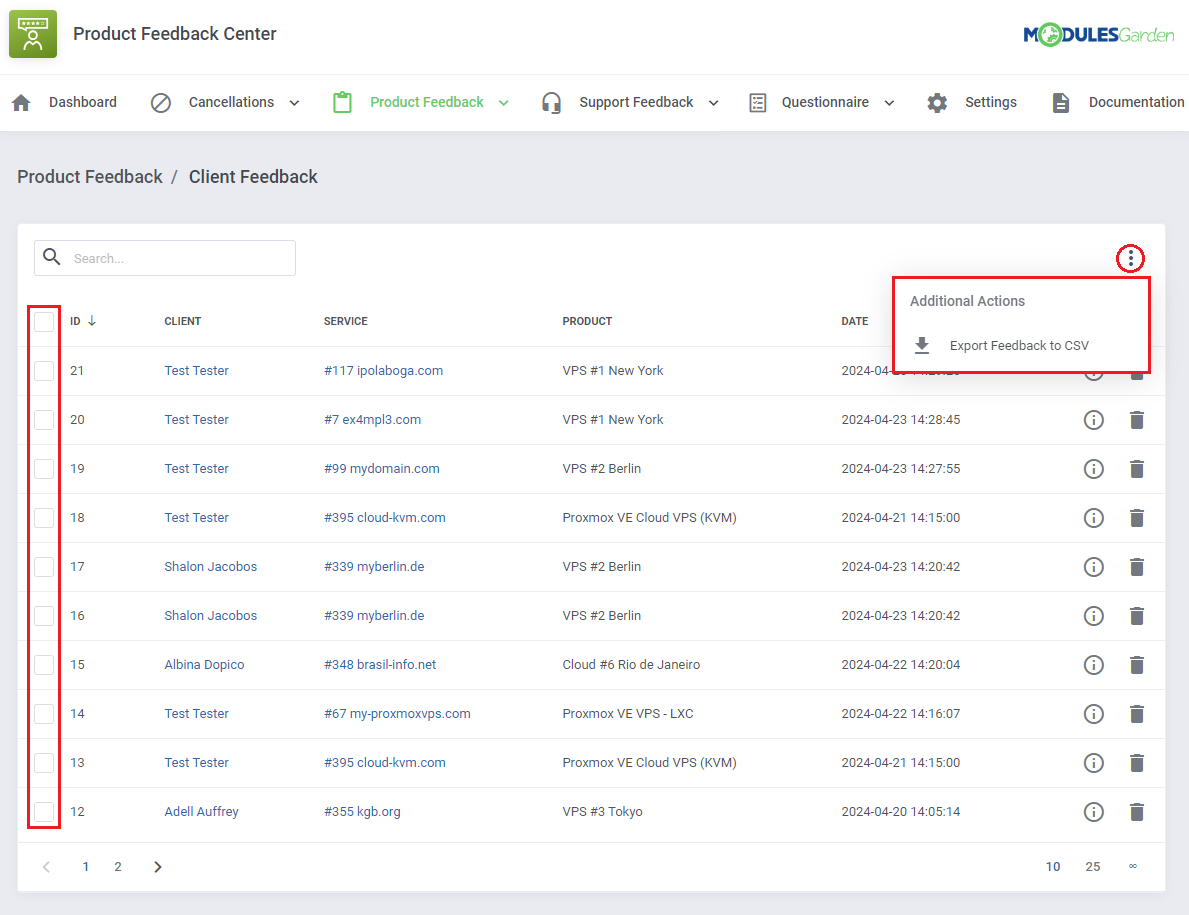
| Moreover, you can export feedback to a compiled '.csv' file, either select multiple requests by utilizing the mass action feature or click on 'Additional Actions' and define the date range for selection. |
|
Product Feedback: Groups, Product And Product Groups Relations
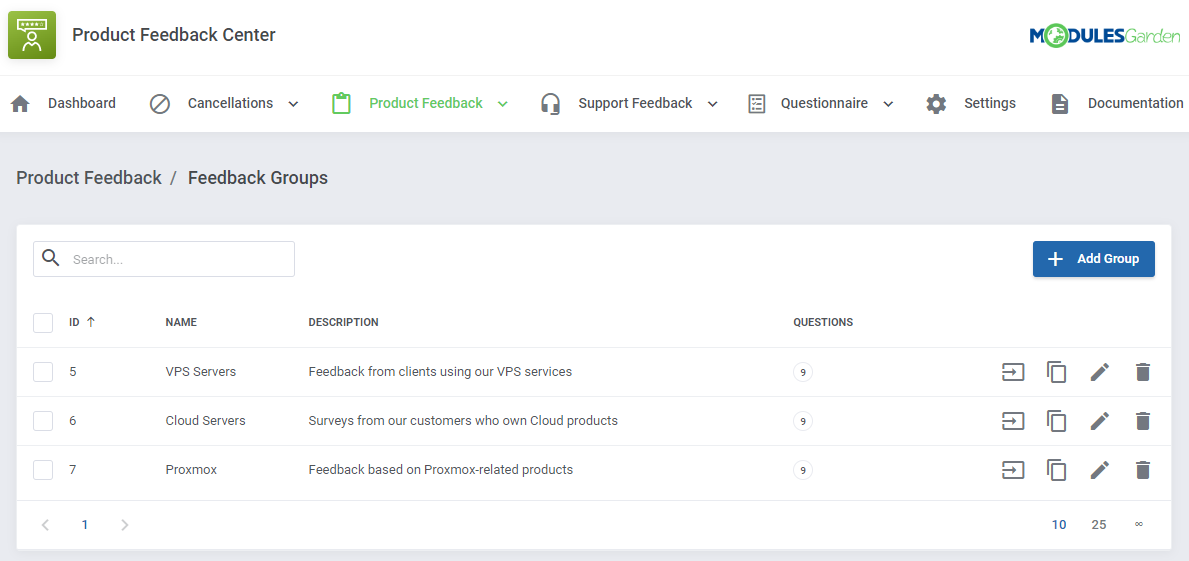
| Before you let your clients give feedback on single products they use, you need to configure the whole net of products, product groups and questions. Feedback Groups are created in exactly the same way as the Cancellations Groups. |
|
Survey Configuration
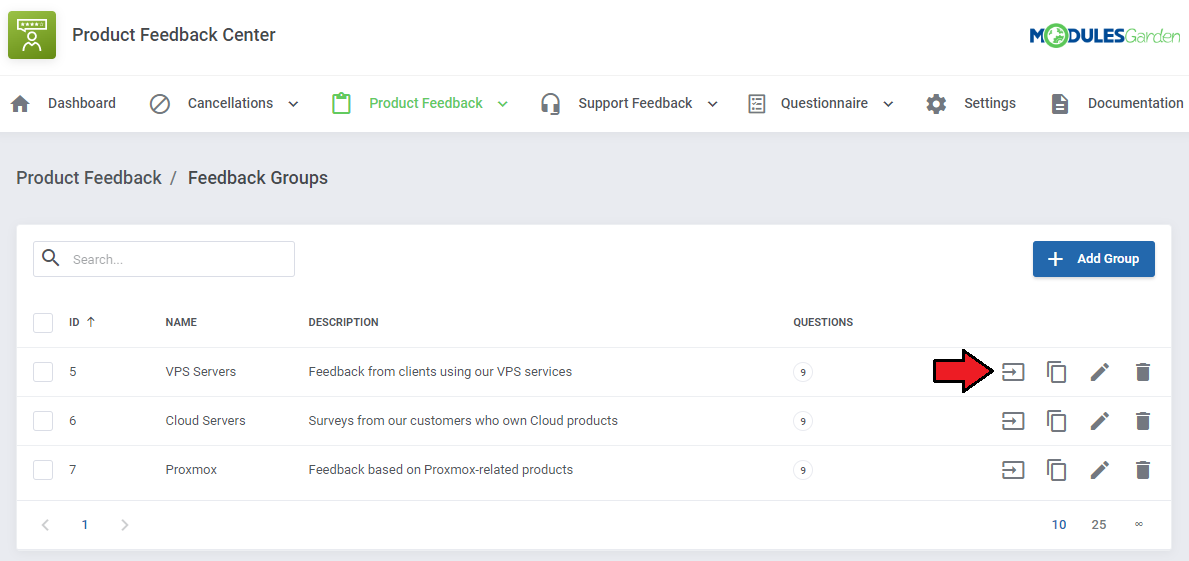
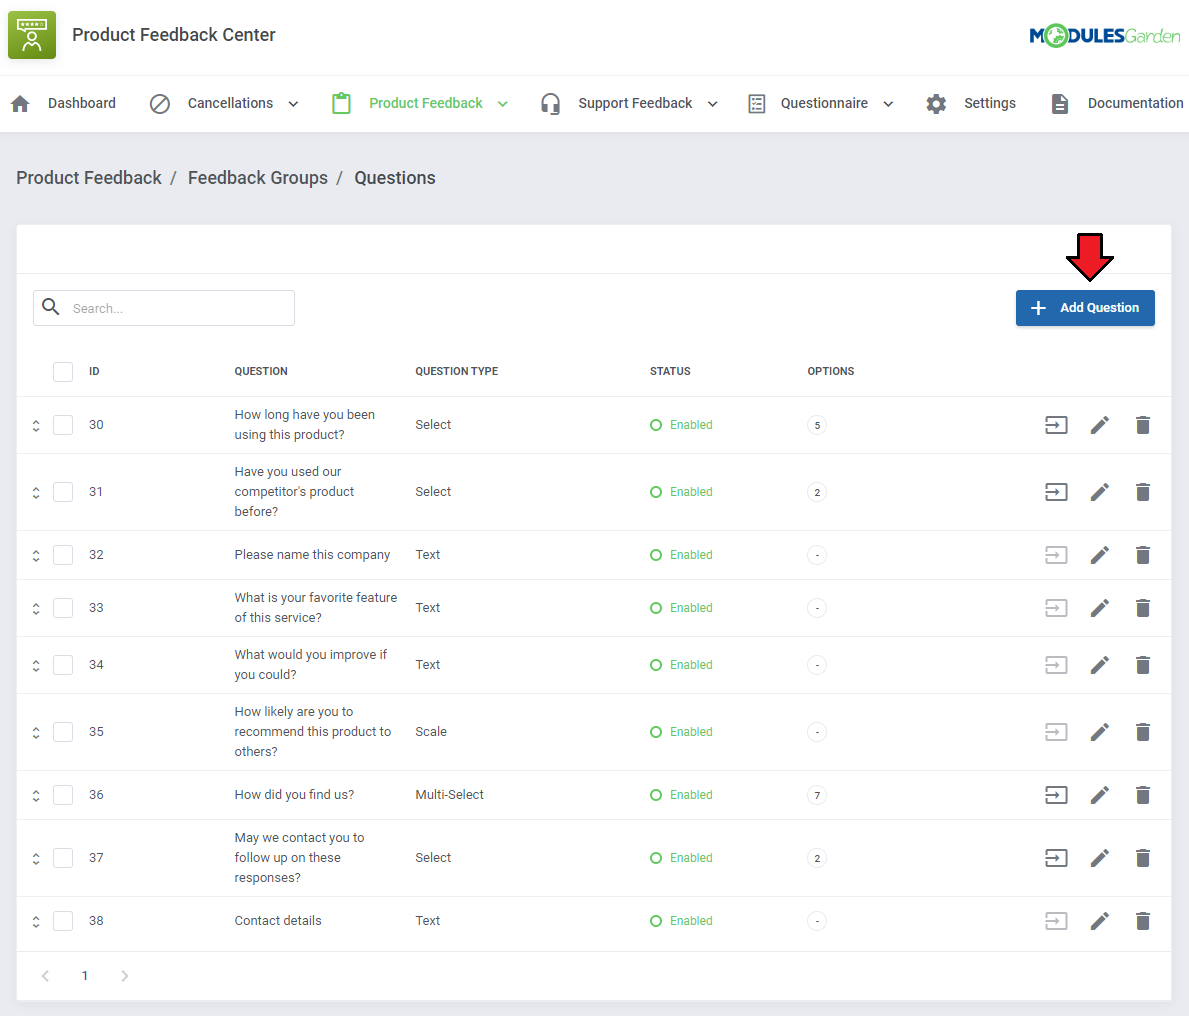
| When you create a new question group, you will be automatically redirected to the page where questions can be formed. You can also access this page by clicking on the 'Questions' icon for the chosen record in the groups list. |
|
| Now click the 'Add Question' button. |
|
| Enter the first question you want to ask clients and select its type.
You can choose between the following types:
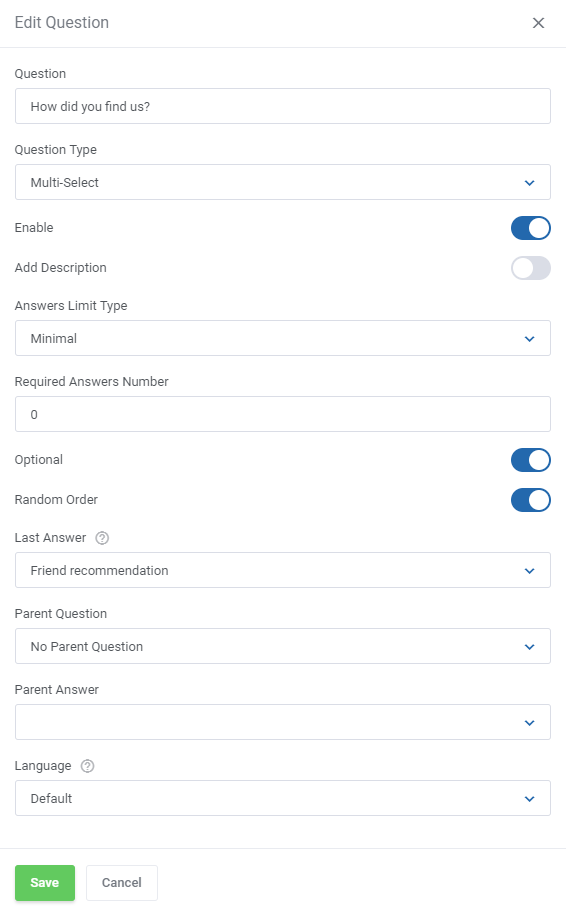
Define additional options of the newly created questions. Note that available settings highly depend on the previously chosen type:
Below you can see an example of Multi-Select question type: |
|
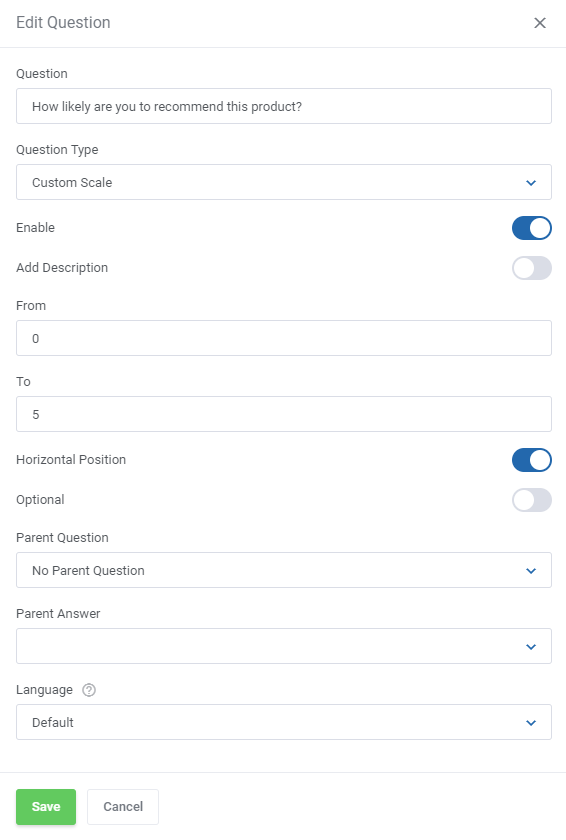
| Custom Scale type, with available rating from 0 to 5. The position of the scale is horizontal. |
|
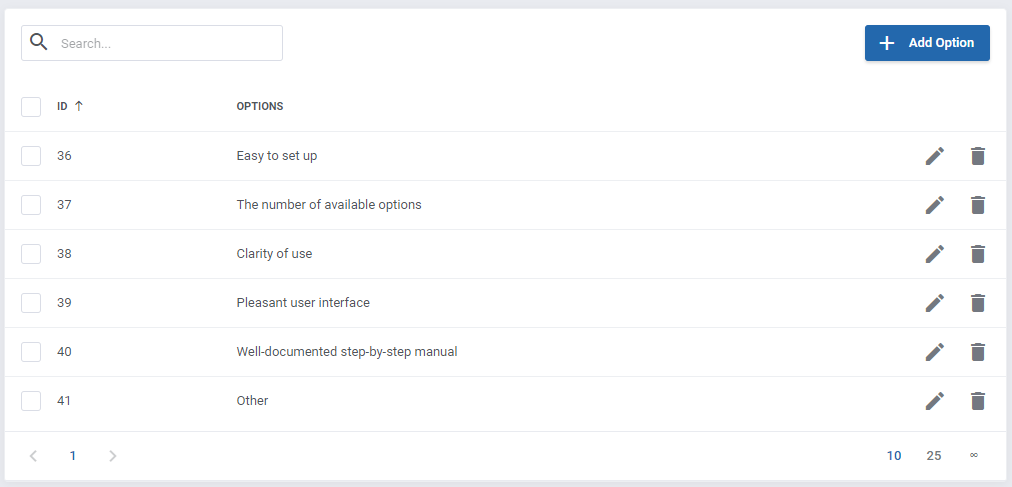
| After creating the question you will be automatically redirected to the page where you can formulate available answer options (except for the 'Text' question type). You will also be able to access this page by clicking the 'Options' icon for the chosen record in the questions list. |
|
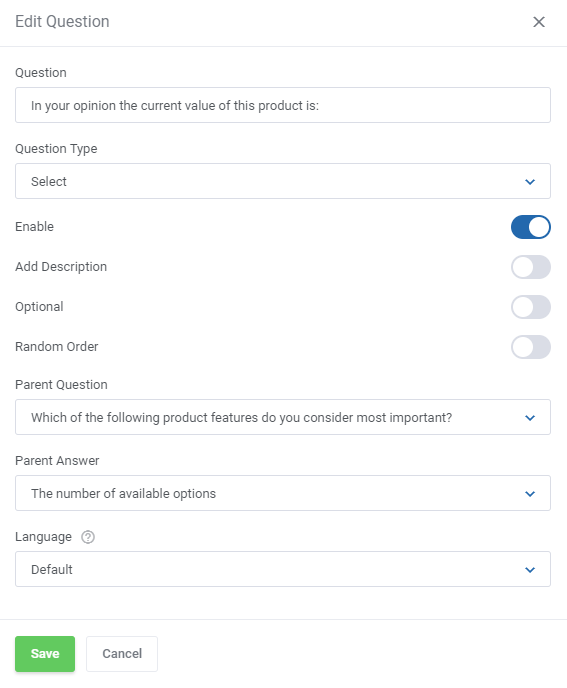
| Again, you may personalize the questions for your clients, you may create their versions in different languages. Change their status or delete. Select question type with pointed 'Parent Question' and 'Parent Answer' to force showing this question only after pointing a required answer. |
|
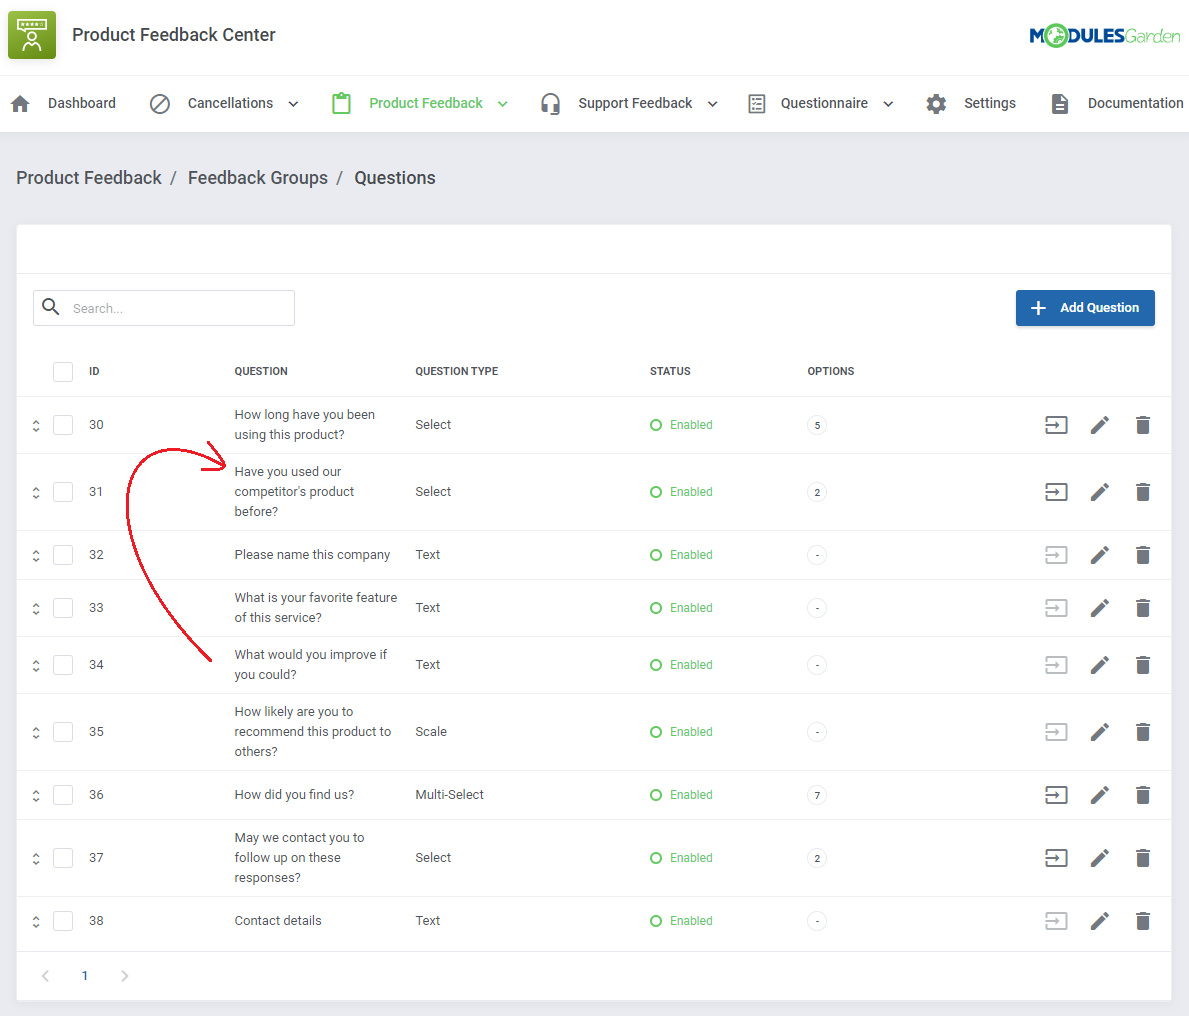
| Created questions can be easily re-positioned with a 'Drag&Drop' functionality. Simply drag a single questions and drop in a place where you wish to locate it. |
|
Support Feedback
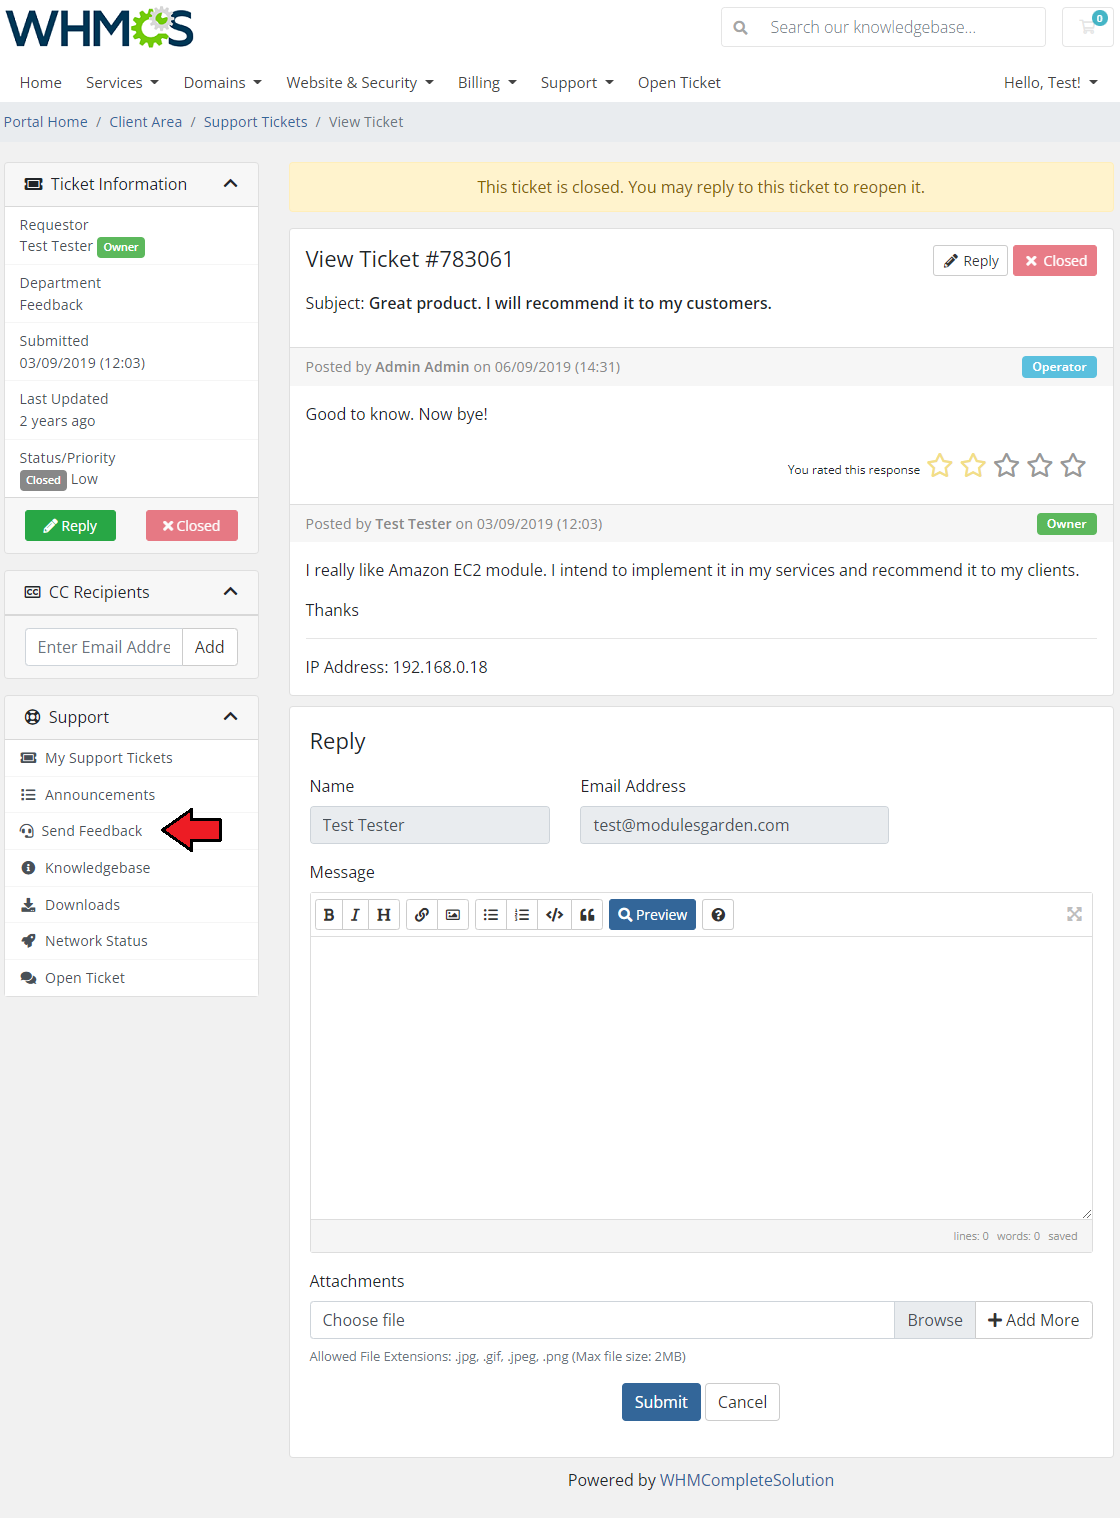
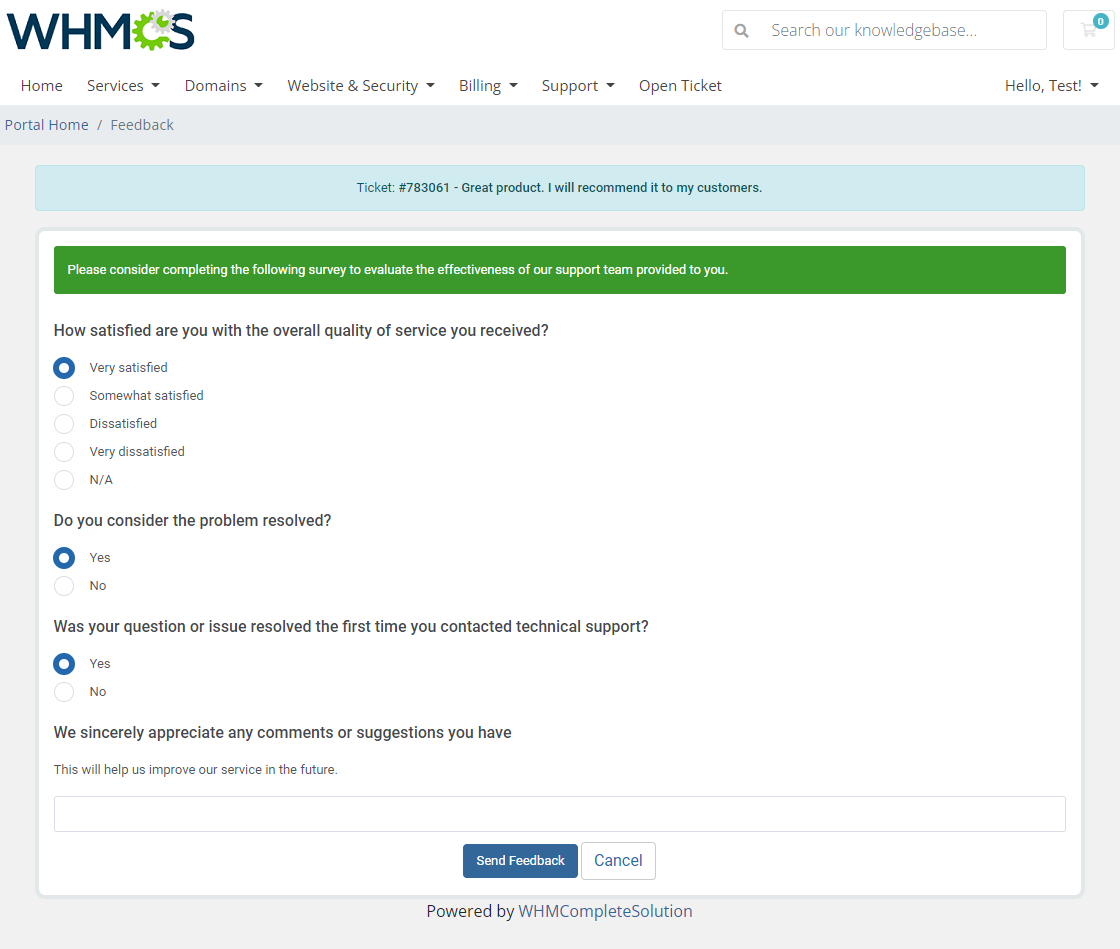
| The 'Support Feedback' section is dedicated to creating surveys for clients to let them express their opinion on their tickets and the way they are handled by our staff. Once a ticket gets the 'Closed' status, a client may rate it by sending feedback with the previously prepared survey. |
|
|
Support: Client Feedback
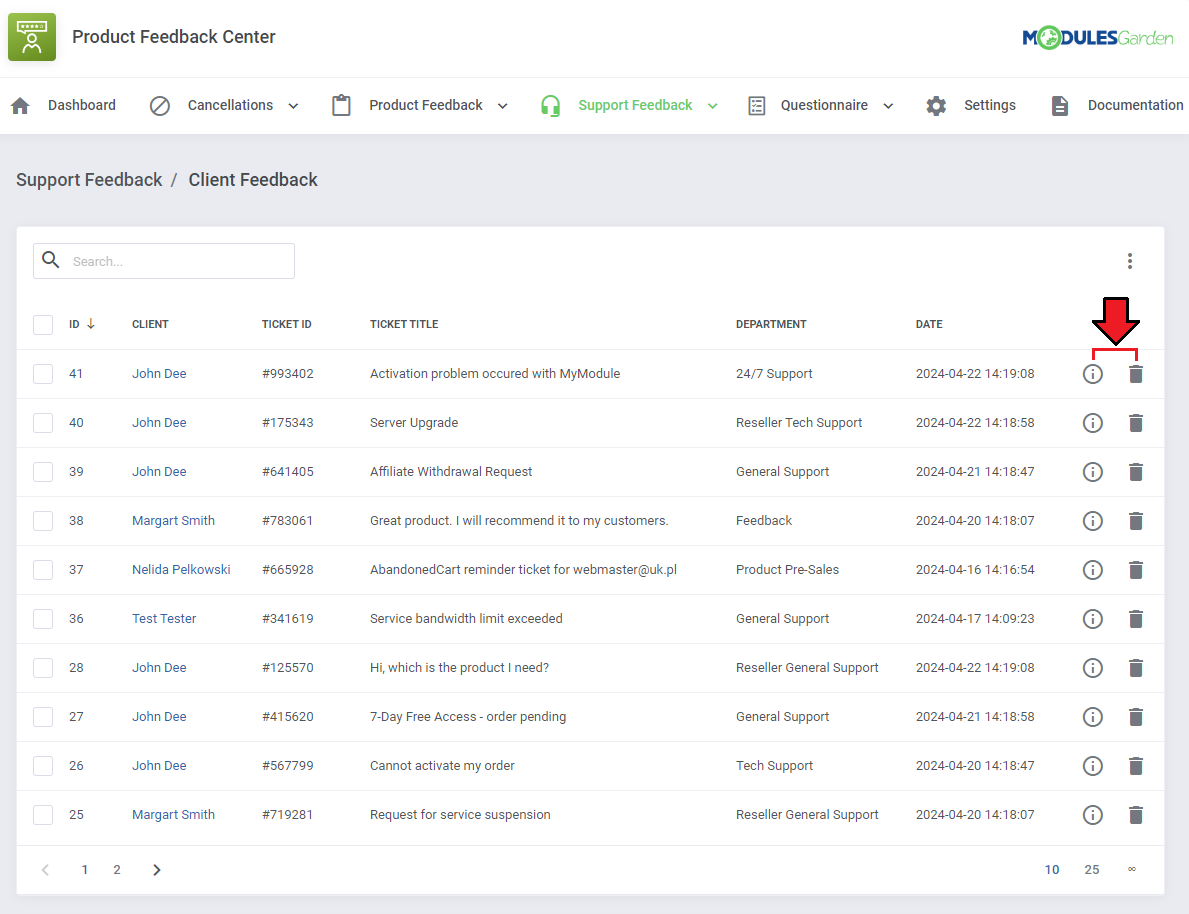
| Move to 'Support Feedback' → 'Client Feedback' section, you will find there a list of submitted support feedback surveys with the customer answers to the prepared sets of questions. Click on the 'Questions & Answers' icon to see the filled-in survey for the given feedback. |
|
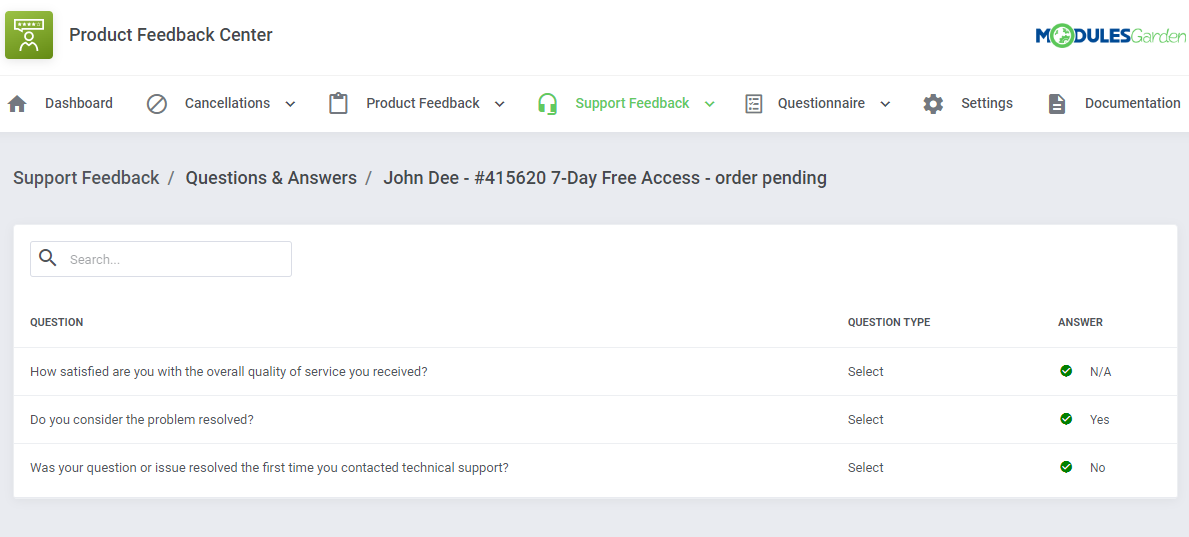
| You will see a preview of the questions asked, their type, and the answers given by the client. |
|
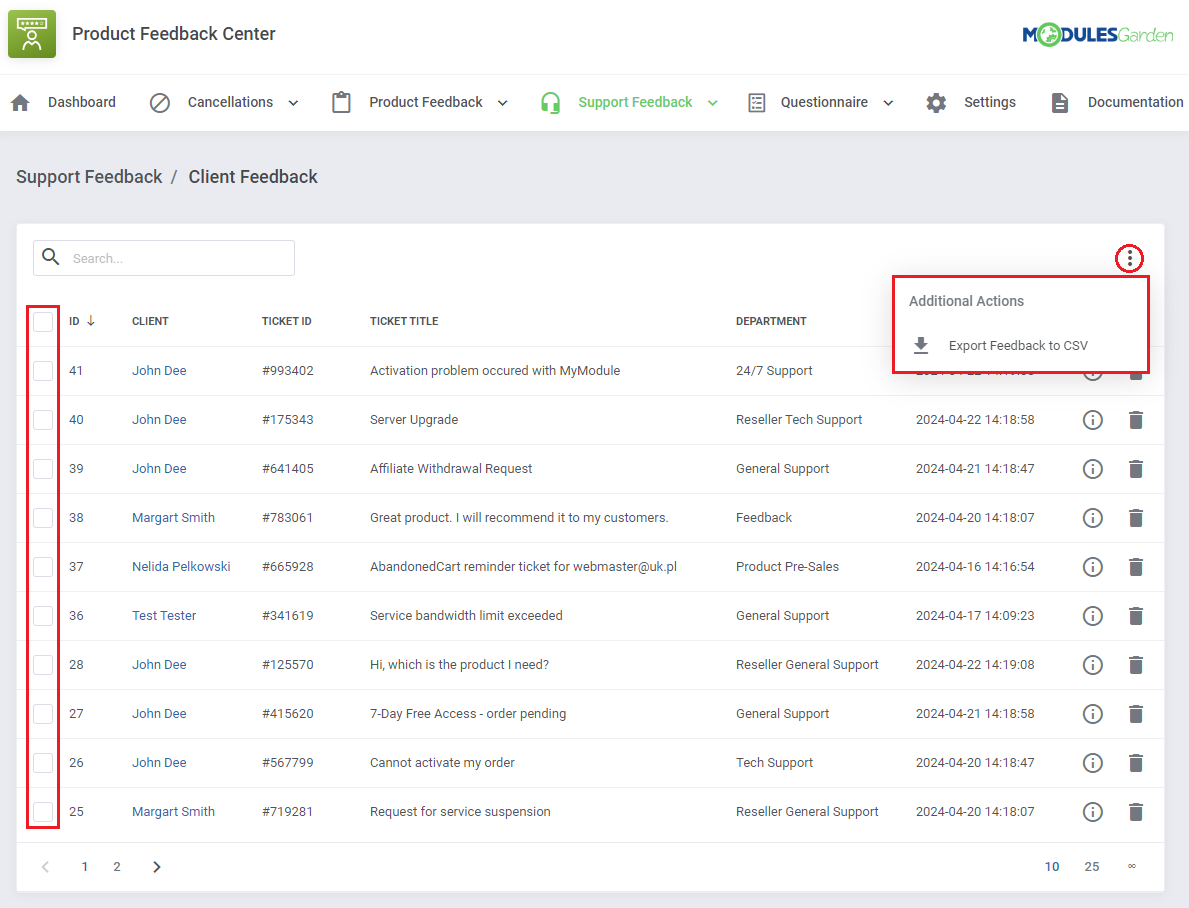
| Moreover, you can export feedback to a compiled '.csv' file, either select multiple requests by utilizing the mass action feature or click on 'Additional Actions' and define the date range for selection. |
|
Support Feedback: Groups And Department Relations
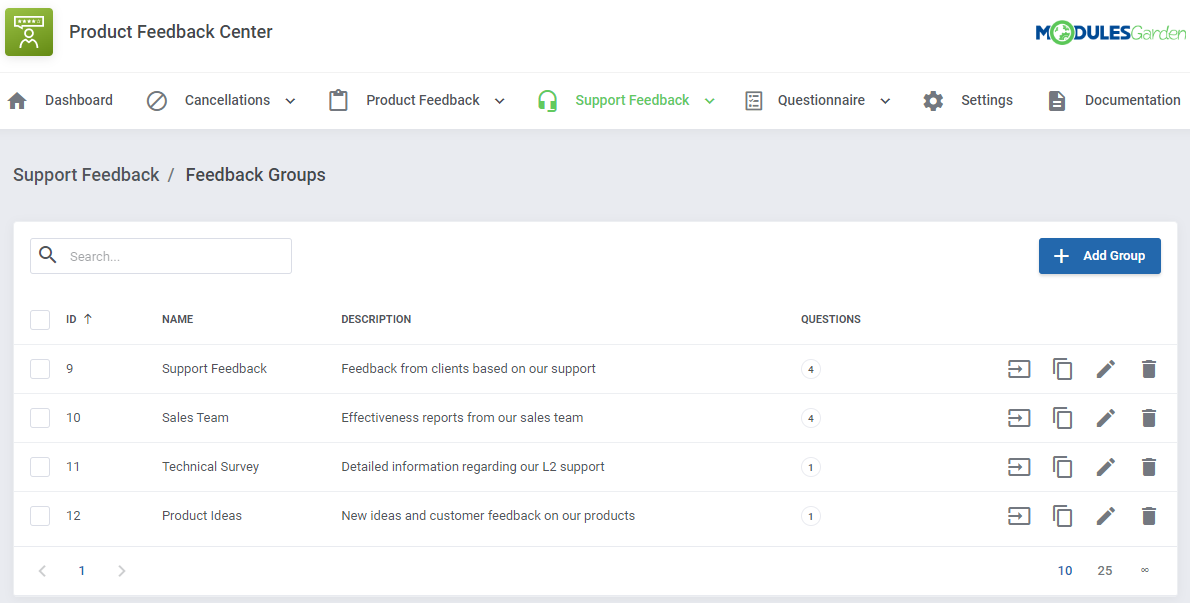
| Before you let your clients give feedback on a single, closed ticket, you need to configure the whole net of groups and questions. Support: Feedback Groups and Department Reations are created in exactly the same way as the Cancellations And Product Feedback Groups. |
|
Questionnaire
Questionnaire: Client Feedback
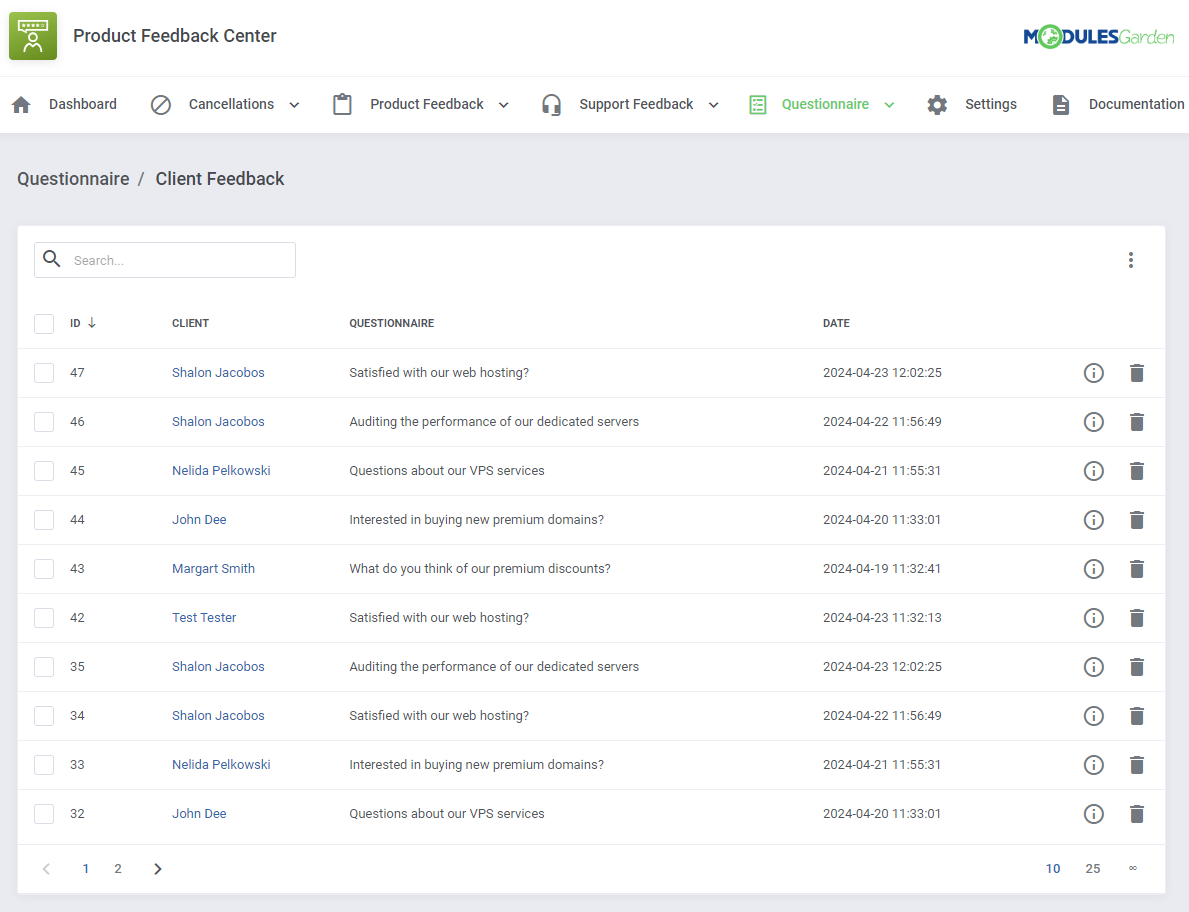
| This section is dedicated to unrelated questionnaires that can be freely configured here and then displayed to clients based on certain parameters. Such as: owned products, product addons or domains, account registration date or client group assignment. Just like in the case of the previously described sections: Cancellations, Product and Support Feedback, the very first section is dedicated to the already submitted surveys by clients. |
|
Question Groups
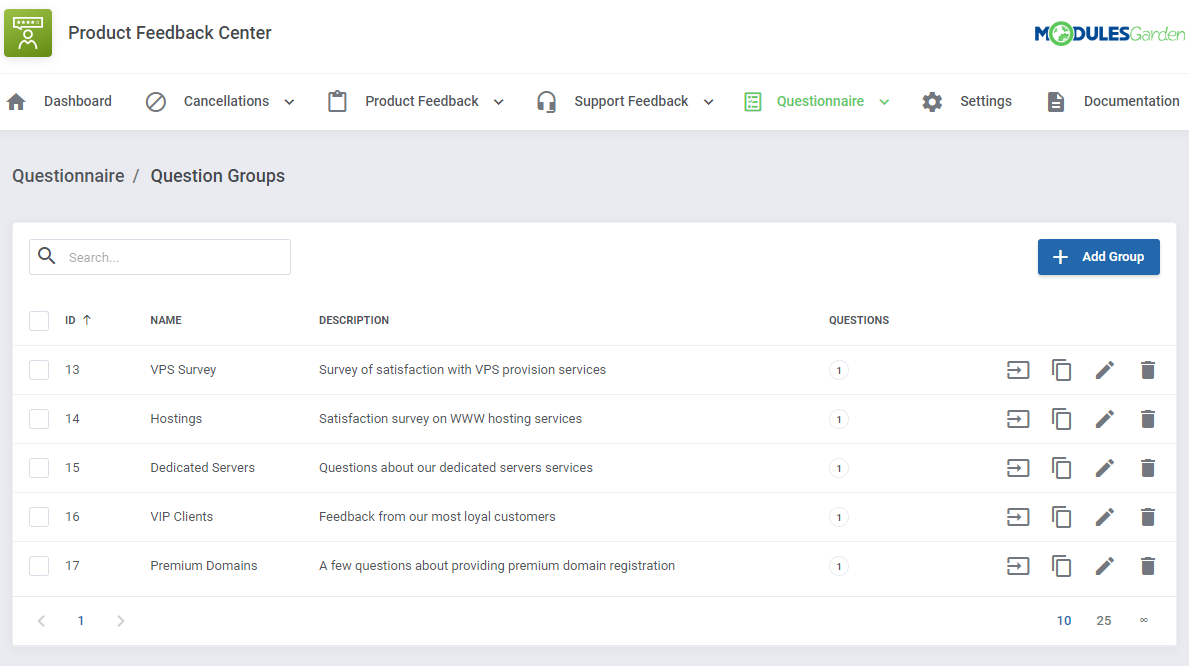
| To begin, you must start with creating groups and questions with options to choose, in case of select and multi select question type. To learn all about configuring Questions&Answers please refer to section: Survey Configuration above. |
|
Questionnaire Relations
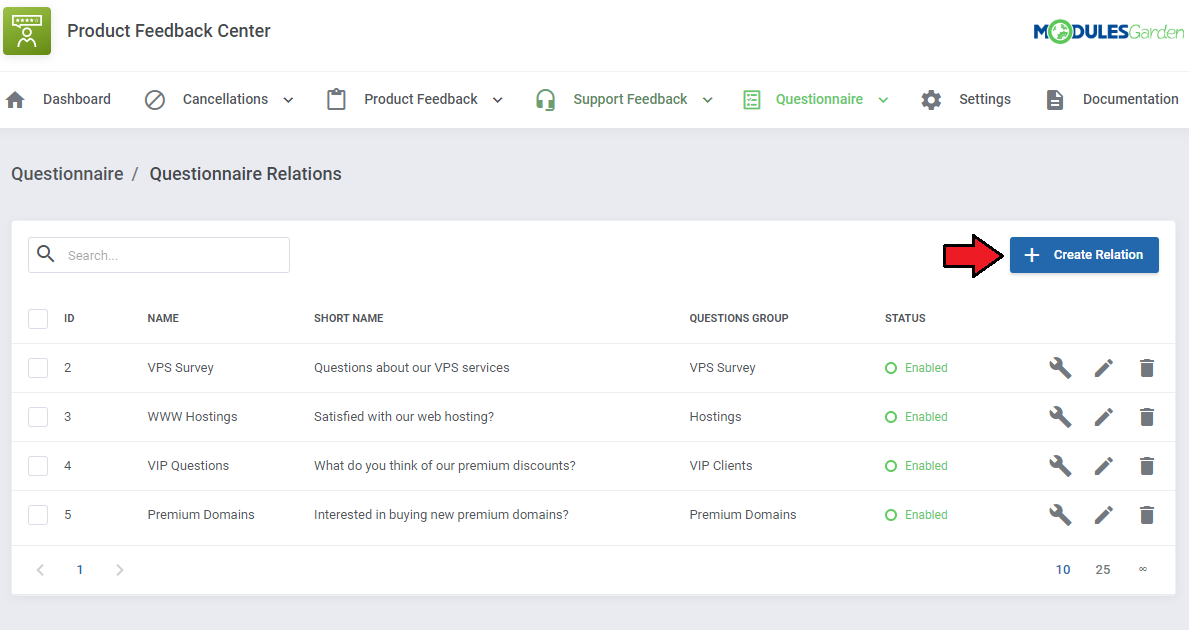
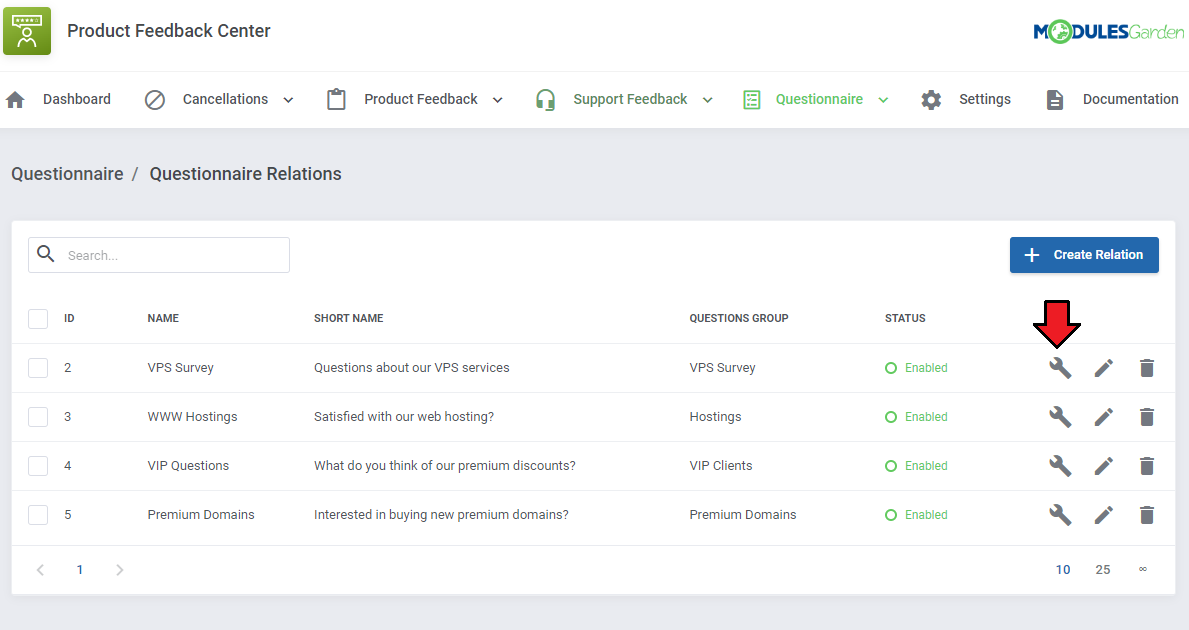
| Under "Questionnaire Relations" you have to arrange all the relations and activation rules to show the survey to single clients based on their owned services, domains etc. Press 'Create' to form the first relation. |
|
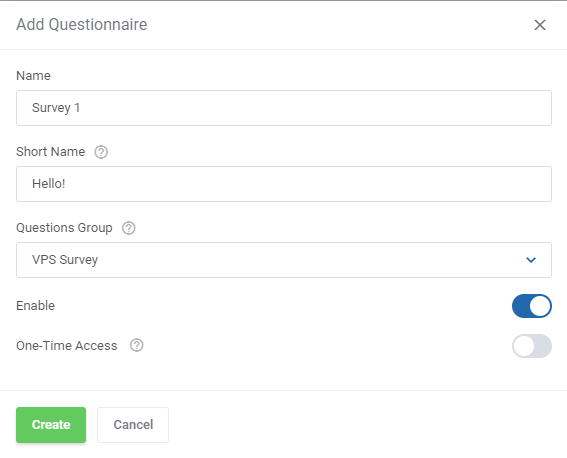
Fill out all the required data:
|
|
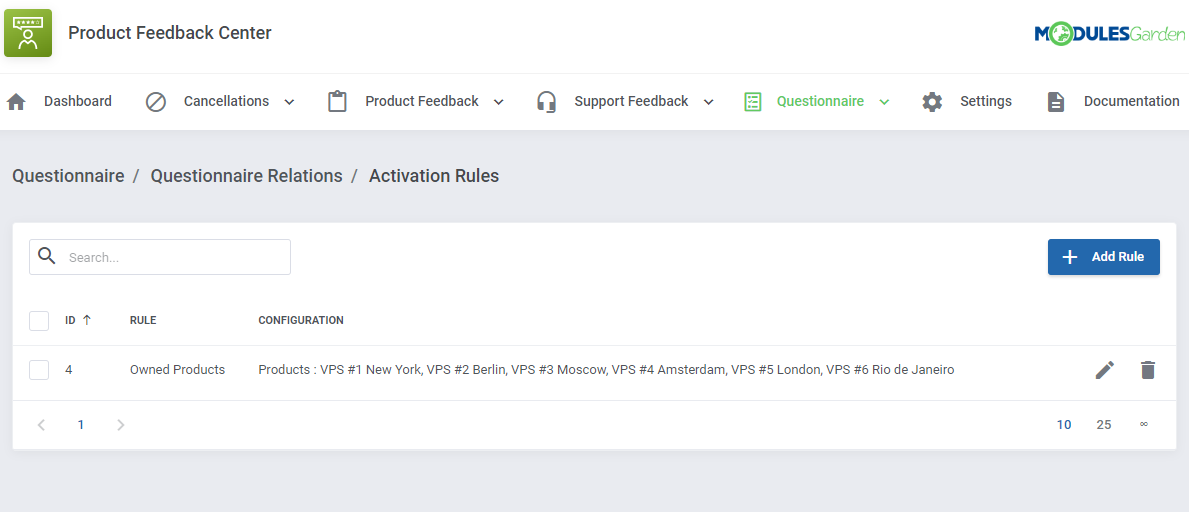
| When ready, move to the section responsible for assigning activation rules. Press 'Add Rule' to see available options. |
|
|
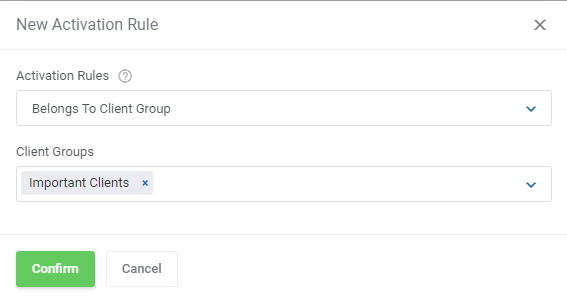
Available rules that can trigger the survey visibility for a single client:
Important: In order to display the question ire to a client, all active rules must be met, NOT any of them. |
|
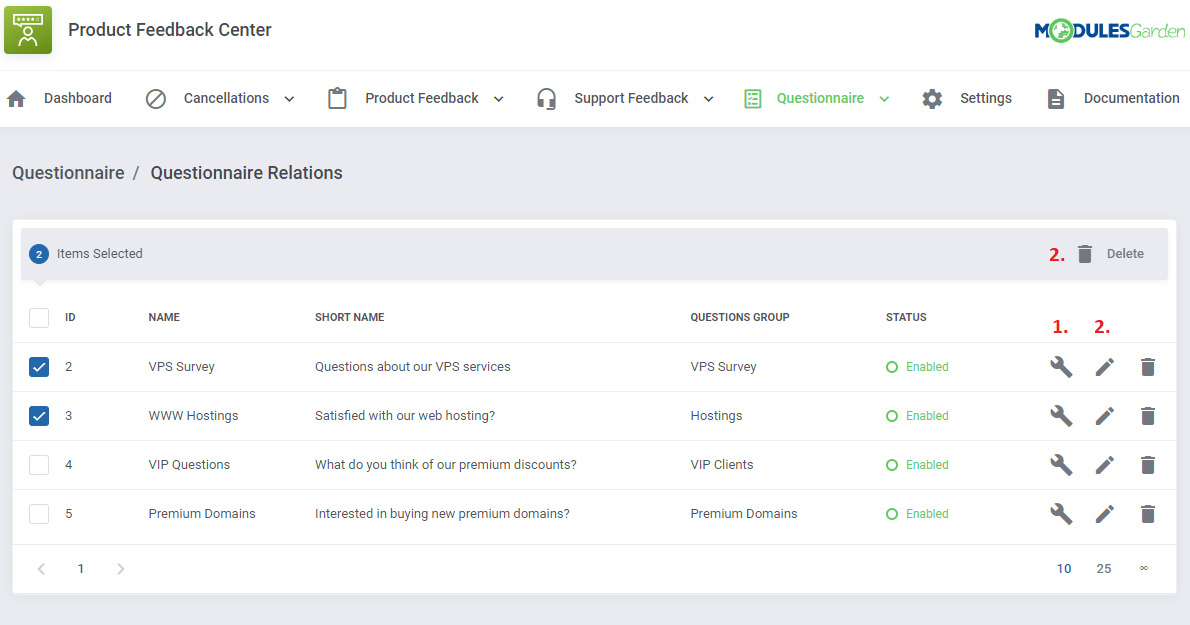
| Create as many rules as needed, you may always delete (2.) them or alter(1.) their configuration. |
|
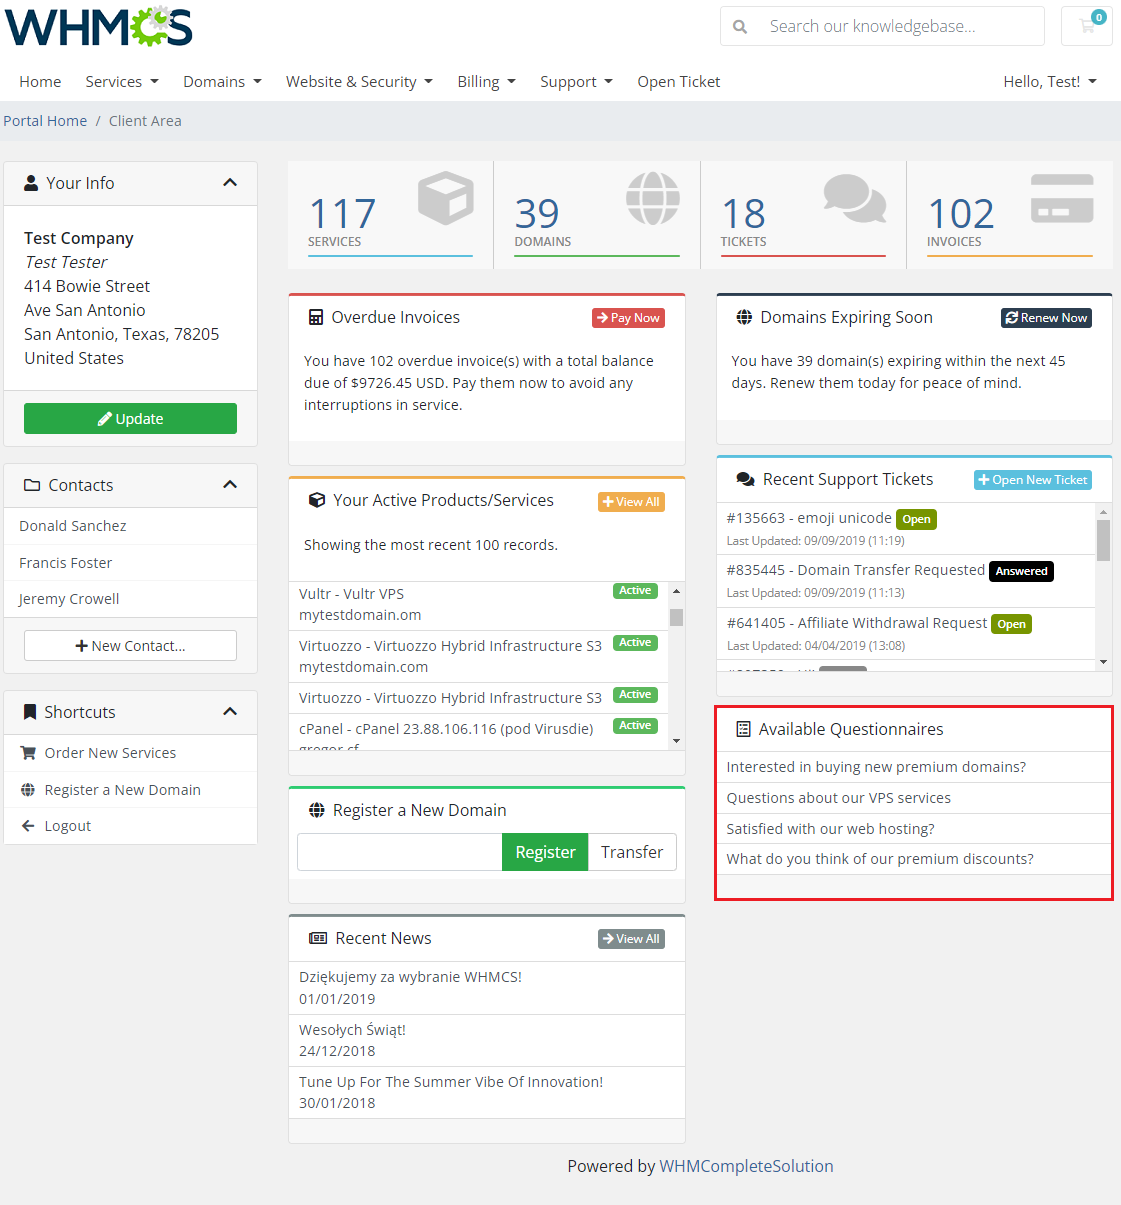
| Localize the survey applicable to a single client, if the activation rules are met, at the client area home page. |
|
Settings
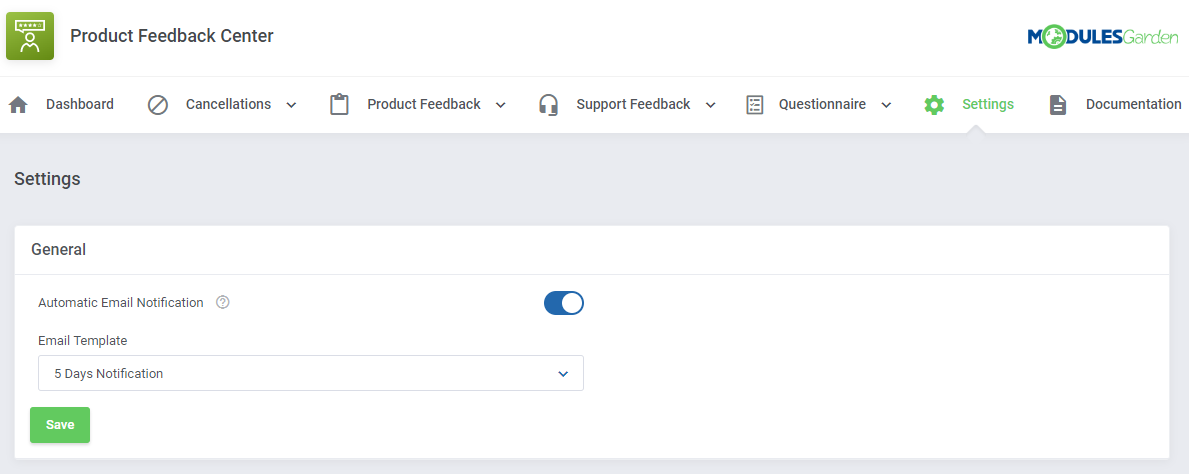
| 'Settings' → 'General' section allows to quickly configure email notifications supported by the module. You may enable the Automatic Email Notification option - then an email message will be delivered to clients when a related ticket is closed with a feedback survey request. |
|
| Email Template - pick one of the available system templates. You may find them and modify at: 'System Settings' → 'System' → 'Email Templates' in your WHMCS. Surely, you may create your own, new template in teh 'General' templates section, instead of modifying any of the existing ones. Additional variables to add into the template in order to allow sending the link to a survey once a ticket has been closed: {$client_name}
{$feedback_link}
|
Client Area
Request Cancellation
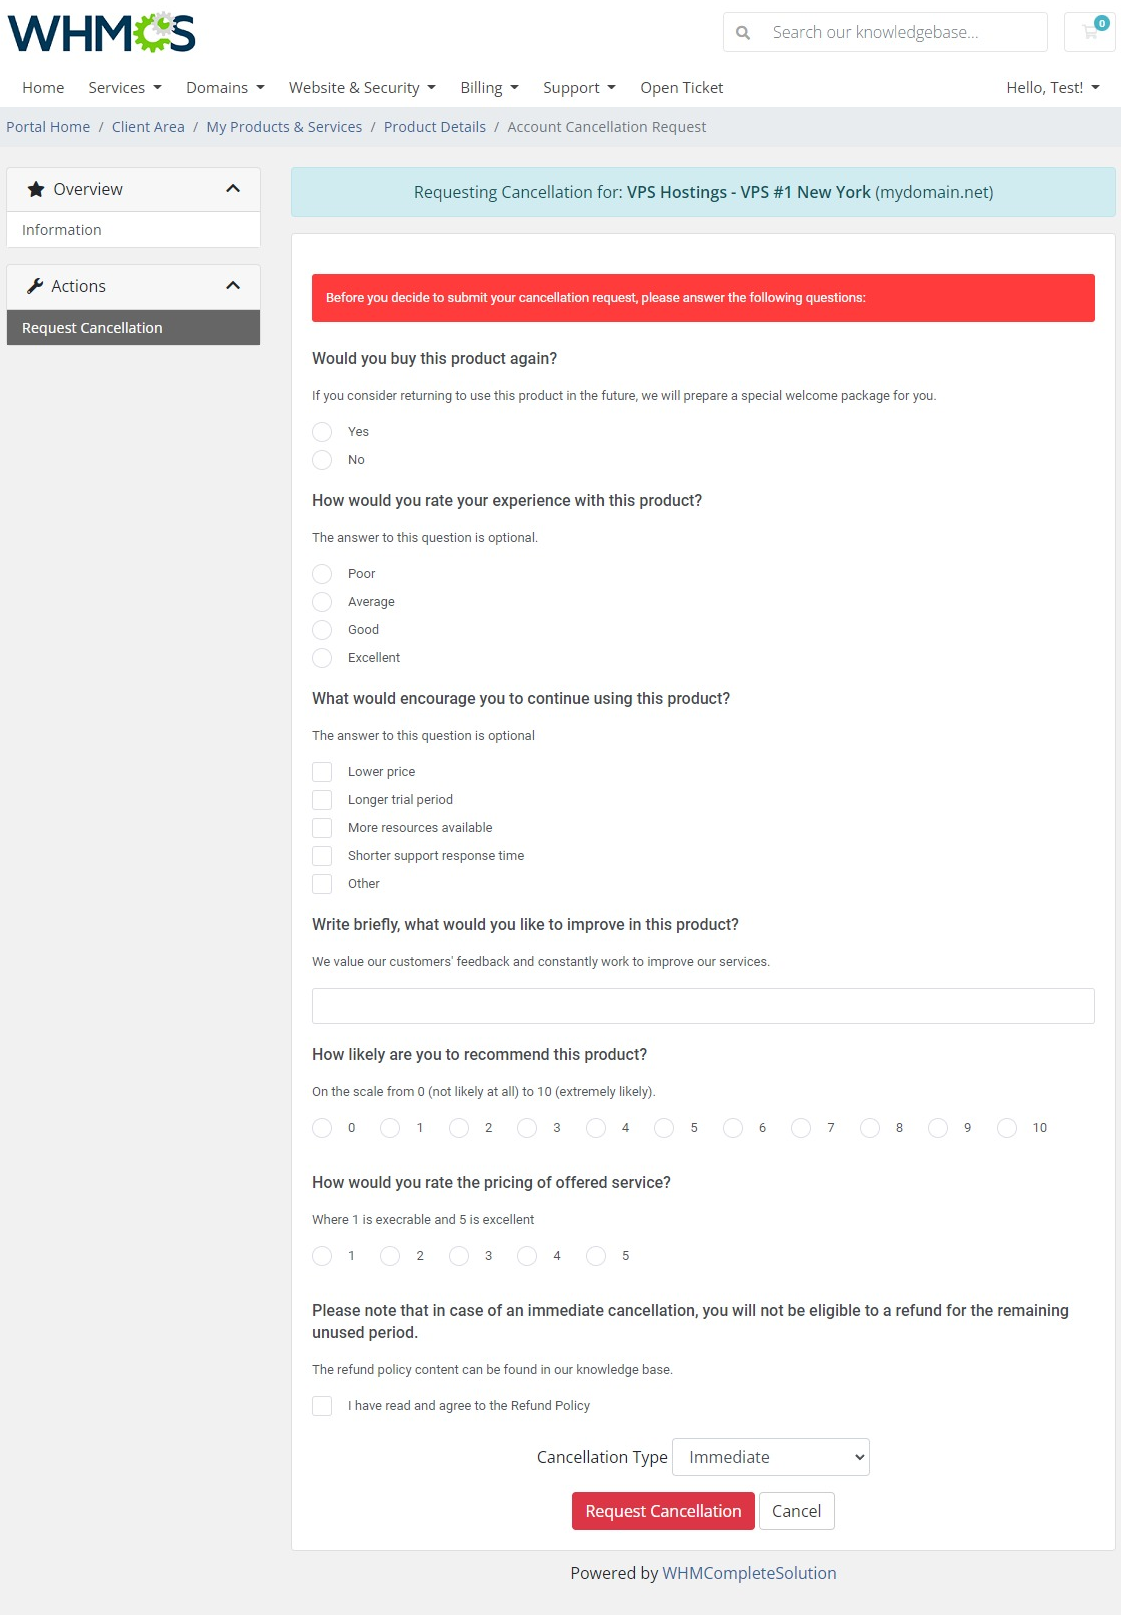
| For products that have been assigned a relation with a particular question group, the given survey form will be included in the 'Request Cancellation' section. Please note that clients will be required to answer each of the prepared questions, before they will be able to submit the cancellation request. |
|
Send Product Feedback
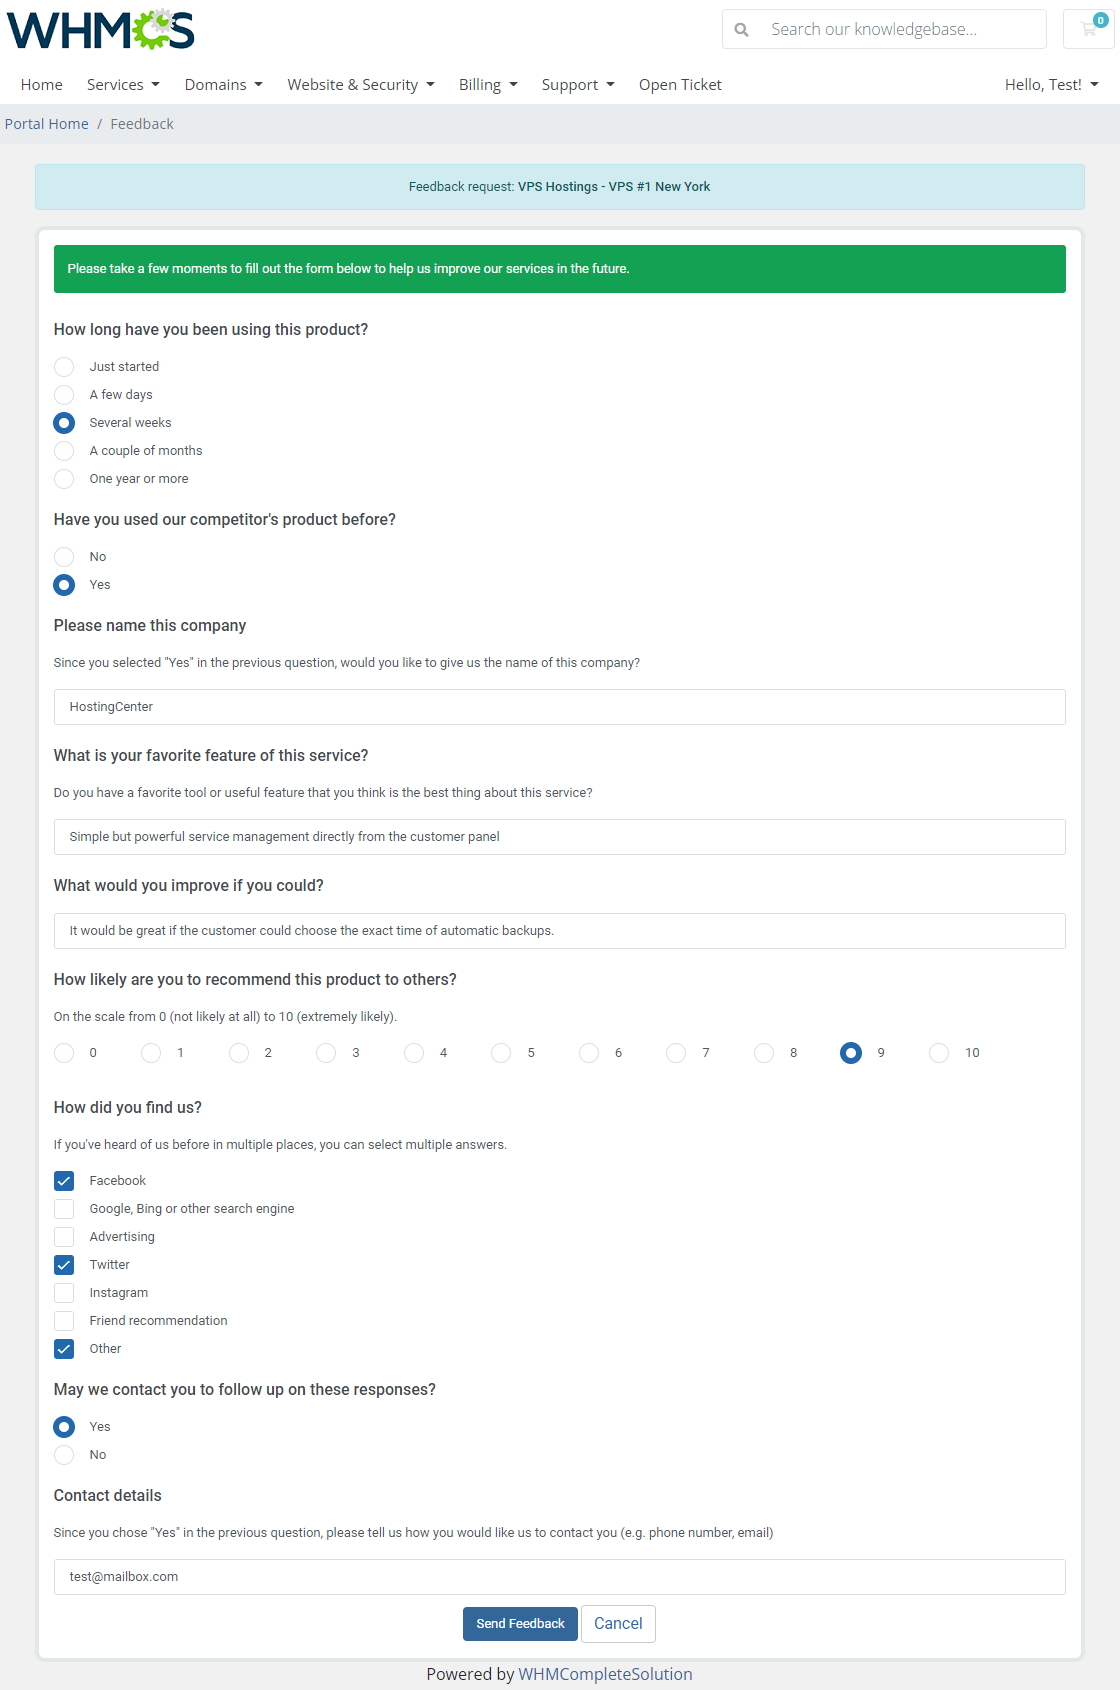
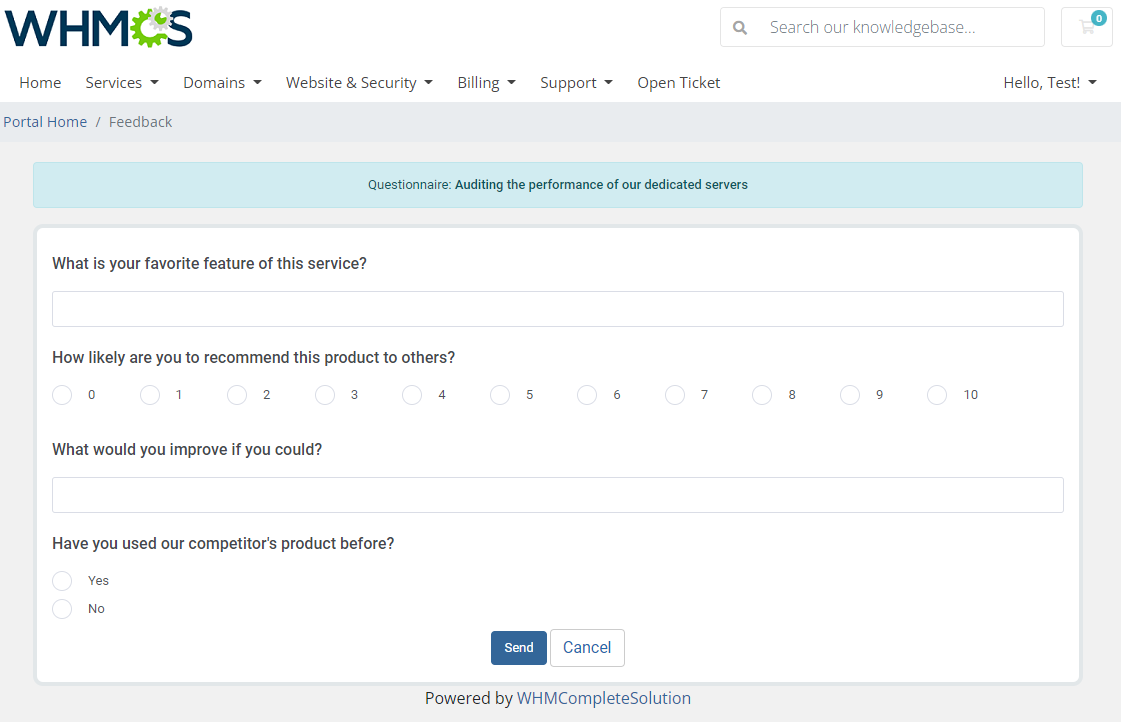
| For products that have been assigned a relation with a particular question group, the given survey form will be included in the 'Send Feedback' section. Note that an opinion on a single product or group of products may be sent only once. Think twice before you submit an answer! |
|
Rate Support Services
| Are you satisfied with the ticket response time? All of the submitted issues have been solved right away? Share your opinion with your admin to praise, or just the opposite, disapprove and leave suggestions for the team. |

|

|
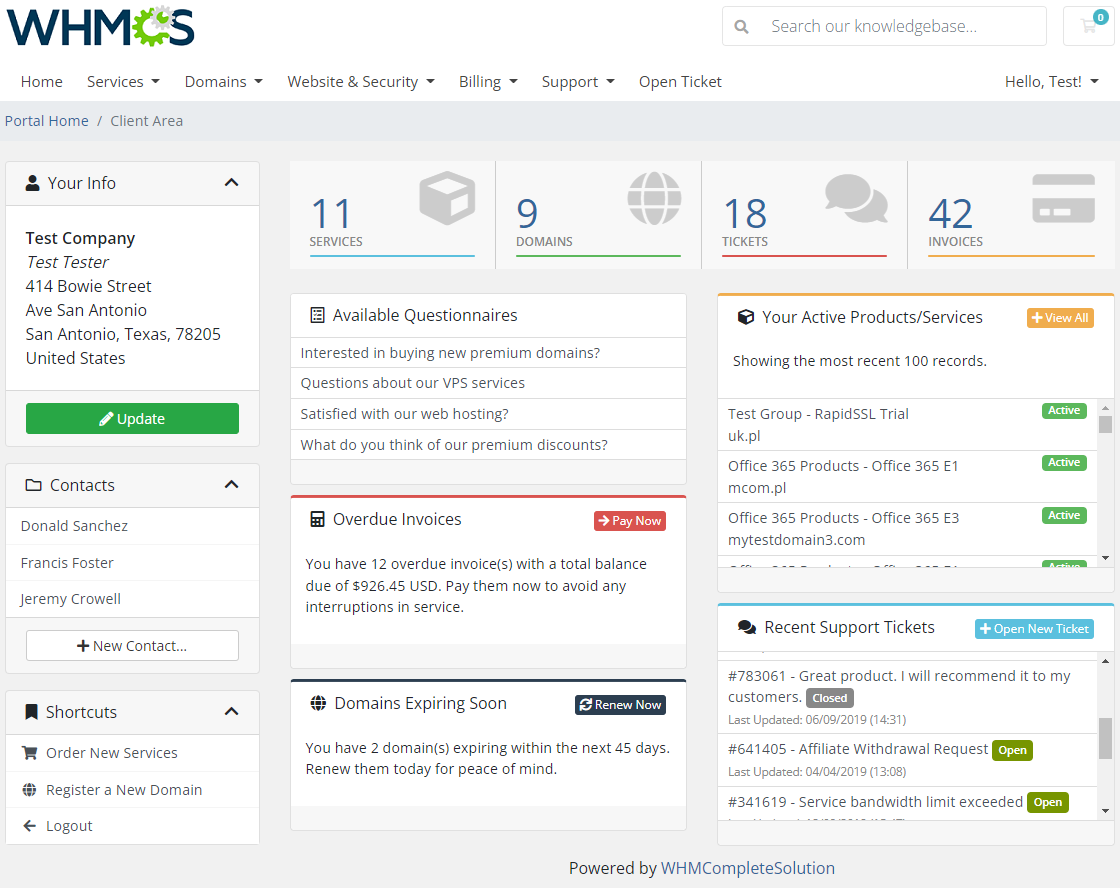
Available Questionnaires
| If only you meet the activation rules dictated by your admin, you will get access to all applicable questionnaires. Open whenever you wish and send your feedback. Keep in mind that some of the surveys may be submitted once only so rethink your answers! |
|
|
Tips
| 1. Please note that in the current version of the module, the customer has to answer all created and assigned questions to the product before submitting the cancellation request. Therefore, we do not recommend creating questions which seem to be optional. |
| 2. If you want to add translated questions and options in other than the default language, you must enable required languages in your WHMCS. To do so move to 'System Settings' → 'Email Templates' → 'Manage Languages'. There find and activate languages you need. They will be than avialle in the 'Language' dropdown in the addon. |
How To Use Language Overrides
| Incorporating language customizations - the module readily accommodates language overrides, allowing you to tailor the language files to your preferences. The language file english.php remains unencoded and can be modified to suit your needs. However, it's recommended to avoid altering the core file itself, and instead, leverage the capability of using overrides. |
Here's how to apply language overrides:
~/langs/overrides/english.php.
For example: Original yourWHMCS/modules/servers/moduleName/langs/english.php: $_LANG['Search'] = 'Search'; Override yourWHMCS/modules/servers/moduleName/langs/overrides/english.php: $_LANG['Search'] = 'Look for'; |
| By following these steps, you can seamlessly implement language customizations without altering the core language file, ensuring your changes will not be lost after every module update. Remember that some of the modules have more than one language file, located under /addons and /servers paths. You may create the override files for both of them. |
Update Instructions
| An essential guidance through the process of updating the module is offered here. Ensure successful completion of the module update by carefully following each step, thereby preventing data loss or any unforeseen issues. |
Upgrade Guide
| Seeking a solution that offers greater flexibility, customization tailored to your precise needs, and unrestricted availability? There is an option that not only proves to be cost-effective in the long run but also includes prioritized support services, making it a truly valuable investment. Opt for the Open Source version of your Product Feedback Center For WHMCS module to unlock these benefits. Follow a comprehensive guide covering the transition process, the advantages it brings, and step-by-step instructions on what to do next after the order has been successfully finalized. |
Common Problems
| 1. In case of connection problems, please check whether your SELinux or firewall does not block ports. |