Multibrand For WHMCS
About Multibrand For WHMCS
| Multibrand For WHMCS will allow you to manage multiple brands on multiple websites while using just one WHMCS license.
The module will allow you to easily personalize each brand by adjusting its client area template, logo, language and many other elements. |
- Addon Features:
| ✔ User-Friendly Management Of Multiple Brands |
| ✔ Easy Modification Of Existing Brands |
| ✔ Assign Ticket Departments To Brands |
| ✔ Assign Ticket Piping Email Addresses To Brands |
| ✔ Configure Payment Gateways For Each Brand |
| ✔ Configure Email Templates For Each Brand |
| ✔ Configure SMTP Mailboxes For Each Brand |
| ✔ Set Up Pricing Of Products, Addons, And Domains For Each Brand |
| ✔ Define Product Bundles For Each Brand |
| ✔ Define Promotions For Each Brand |
| ✔ Display And Migrate Clients Between Brands |
| ✔ Display And Manage Relations: |
| ✔ Announcements |
| ✔ Billable Items |
| ✔ Downloads |
| ✔ Emails |
| ✔ Invoices |
| ✔ Knowledgebase |
| ✔ Quotes |
| ✔ Services |
| ✔ Tickets |
| ✔ Toggle Brand Switcher |
| ✔ Toggle Invoice Branding |
| ✔ Toggle Brand Status |
| ✔ Toggle Auto Client Assignment |
| ✔ Toggle Pricing Branding |
| ✔ Toggle SMTP Settings Branding |
| ✔ View Monthly And Total Sales Per Brand |
| ✔ View Dynamic Statistics On Each Brand |
| ✔ View Logs |
- Admin Area Features:
| ✔ Order Branded Products |
| ✔ Create Branded Clients |
| ✔ Create Branded Invoices |
| ✔ Create Branded Billable Items |
| ✔ Create Branded Quotes |
| ✔ Open Branded Tickets |
| ✔ Create Branded Announcements |
| ✔ Add Branded Knowledgebase Articles |
| ✔ Add Branded Downloads |
| ✔ Send Branded Email Message To Single Or Multiple Clients |
| ✔ Send Branded Password Reset Emails |
| ✔ Display Brand Labels On The Lists: |
| ✔ Announcements |
| ✔ Cancellation Requests |
| ✔ Clients |
| ✔ Domain Registrations |
| ✔ Downloads |
| ✔ Invoices |
| ✔ Knowledgebase Articles |
| ✔ Orders |
| ✔ Service Addons |
| ✔ Tickets |
| ✔ Display Branded Invoice Number |
| ✔ Invoice Selected Items On Client Summary |
| ✔ Log In As Client To Chosen Brand |
- Client Area Features:
| ✔ Display Client Area Template And Default Language Depending On Brand |
| ✔ Access Services, Invoices, Downloads, Ticket Departments, And Payment Gateways Assigned To Brand |
| ✔ View Knowledgebase Articles And Announcements Assigned To Brand |
| ✔ Receive Branded Emails And Invoices |
| ✔ Assign Clients Automatically Upon Registration To Brand |
| ✔ Toggle Auto Assignment Of Clients When Logging In To Different Brand |
| ✔ Allow Clients To Switch Between Brands Using Dedicated Menu |
- Brand Configuration:
| ✔ Set Up Brand Name |
| ✔ Brand Company Name |
| ✔ Brand Domain Address |
| ✔ Brand System URL |
| ✔ Brand Logo |
| ✔ Brand Default Language |
| ✔ Brand Template |
| ✔ Brand Order Template |
| ✔ Brand Address |
| ✔ Brand Signature |
| ✔ Brand Email Address |
| ✔ Brand Ticket Departments |
| ✔ Brand Graph Color |
| ✔ Brand Terms Of Service URL |
| ✔ Brand Invoice Sequential Number, Format And Pay To Text |
| ✔ Toggle Proforma Invoicing |
| ✔ Toggle Zero Invoices Number Branding |
| ✔ Choose Default And Available Currencies Per Brand |
| ✔ Set Up Branded Or Normal Payment Gateways |
| ✔ Brand Email CSS Styling And Content |
| ✔ Brand Email Templates In Various Languages |
| ✔ Brand Affiliate URLs |
- Branded Payment Gateways:
| ✔ 2Checkout |
| ✔ Authorize.Net |
| ✔ Bank Transfer |
| ✔ Checkout.com |
| ✔ Payflow Pro |
| ✔ PayPal Checkout |
| ✔ PayPal REST |
| ✔ Stripe |
| ✔ WePay |
- General Info:
| ✔ Integrated With MetricsCube - Business Intelligence Platform For WHMCS |
| ✔ Integrated With SMS Center For WHMCS - Send Personalized SMS Messages Based On Clients Brands |
| ✔ Multi-Currency Support |
| ✔ Multi-Language Support |
| ✔ Supports PHP 8.2 Back To PHP 8.1 |
| ✔ Supports WHMCS Themes "Six", "Twenty-One" And "Lagom WHMCS Client Theme" |
| ✔ Supports WHMCS V8.12 Back To WHMCS V8.9 |
| ✔ Requires ionCube Loader V14 Or Later |
| ✔ Easy Module Upgrade To Open Source Version |
Installation
| This tutorial will show you how to successfully install and configure Multibrand For WHMCS. We will guide you step by step through the whole installation and configuration process. |
Installation
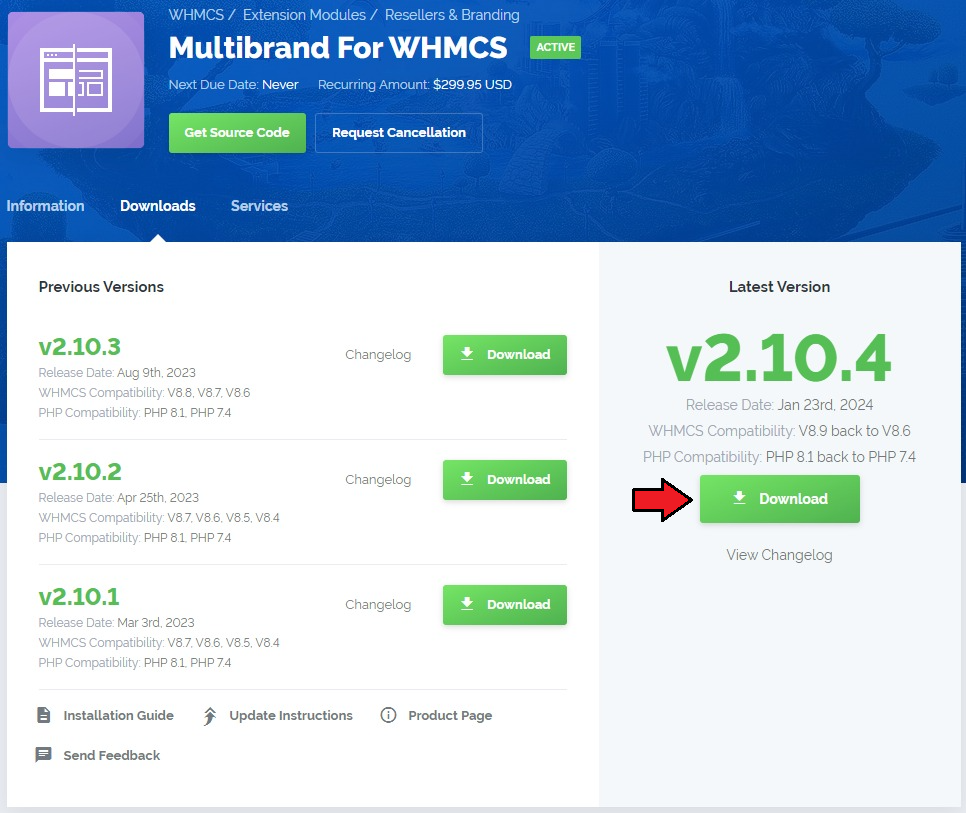
| 1. Log in to our client area and download the module. |
|
| 2. Extract the package and upload its content into the main WHMCS directory.
The content of the package to upload should look like this. |

|
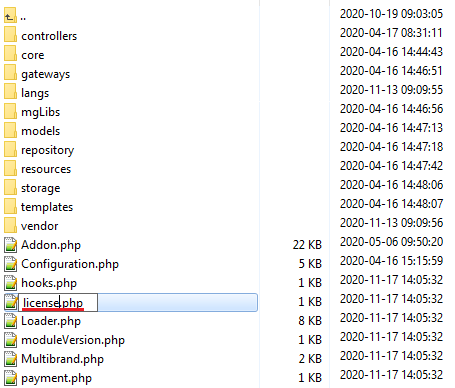
| 3. When you install Multibrand For WHMCS for the first time, you have to rename the 'license_RENAME.php' file. The file is located in 'modules/addons/Multibrand/license_RENAME.php'. Rename it from 'license_RENAME.php' to 'license.php'. |
|
| 4. In order to configure your license key, you have to edit the previously renamed 'license.php' file. Enter your license key between quotation marks as presented on the following screen. You can find your license key in our client area → 'My Products'. |

|
Additional Settings
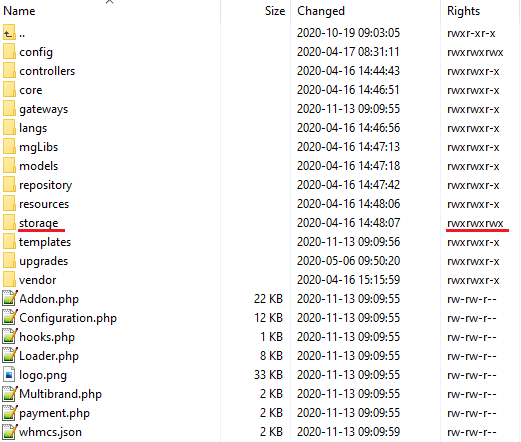
| 5. Now, set up the 'config' and 'storage' folders as recursively writable. This folder is available at 'your_whmcs/modules/addons/Multibrand/' . |
|
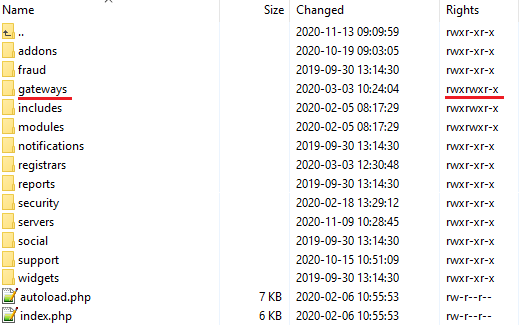
| 6. You will also need to set up 'gateways' and 'callback' folders as writable. The 'gateways' folder is located in 'your_whmcs/modules/' and the 'callback' folder in 'your_whmcs/modules/gateways' (do NOT mistake the folders with those located in the Multibrand addon) |
|
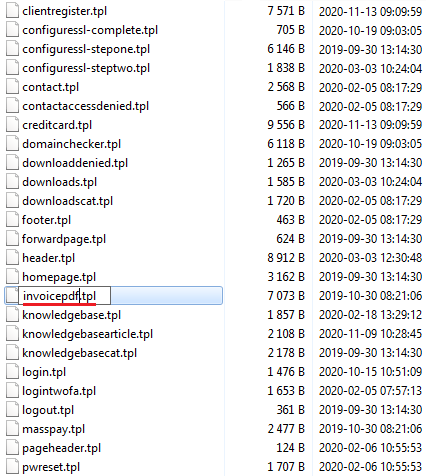
| 7. The next step is replacing the 'invoicepdf.tpl' file with 'invoicepdf_rename.tpl' for each of the templates used. The 'invoicepdf_rename.tpl' file is located in the 'your_whmcs/templates/six/' folder. |
|
Activating Addon Module
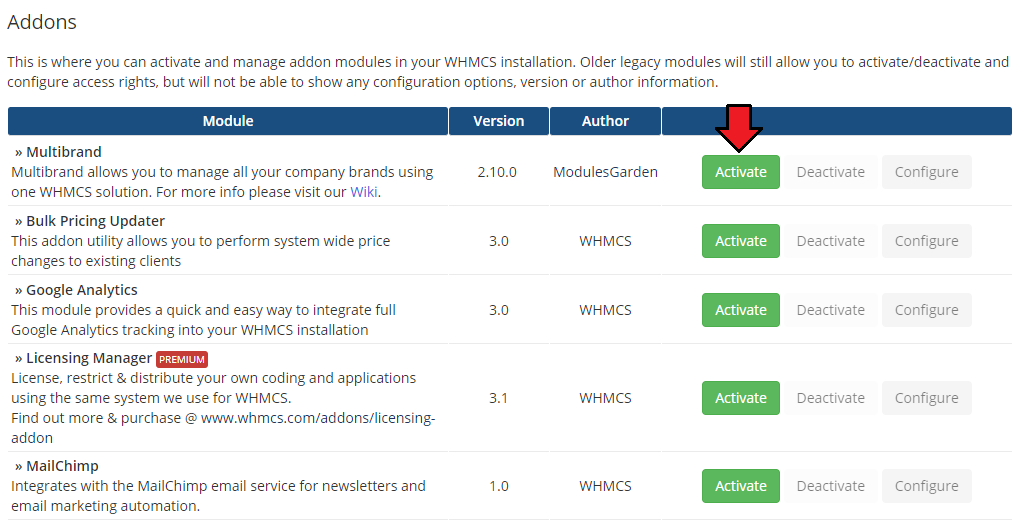
| 8. Now, you have to activate the module in your WHMCS system. Log in to your WHMCS admin area. Go to 'Setup' → 'Addon Modules'. Afterward, find 'Multibrand' and press the 'Activate' button. |
|
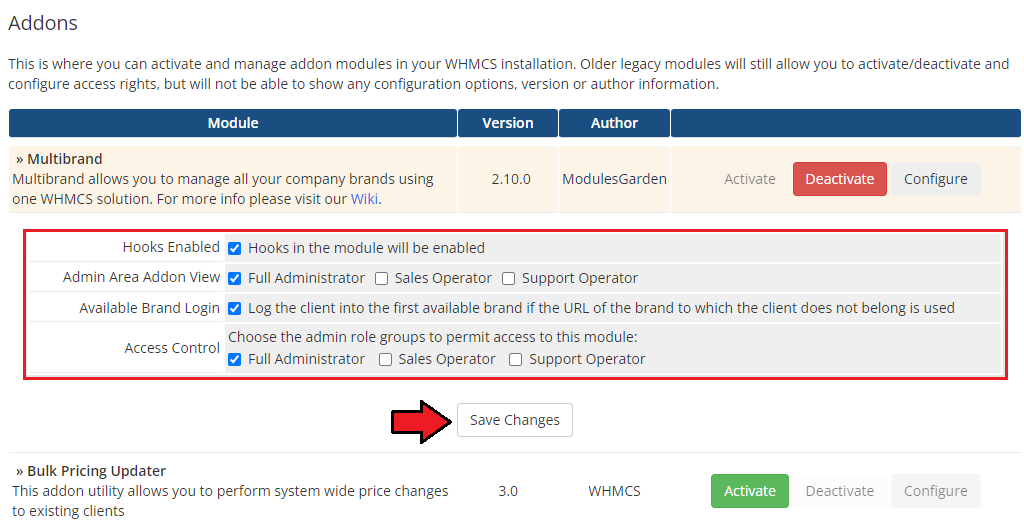
| 9. In the next step, you need to enable the hooks and grant access to this module. To do so, click on the 'Configure' button, go to the 'Access Control' area and check the required group of administrators. Press 'Save Changes'. |
|
Integration Code
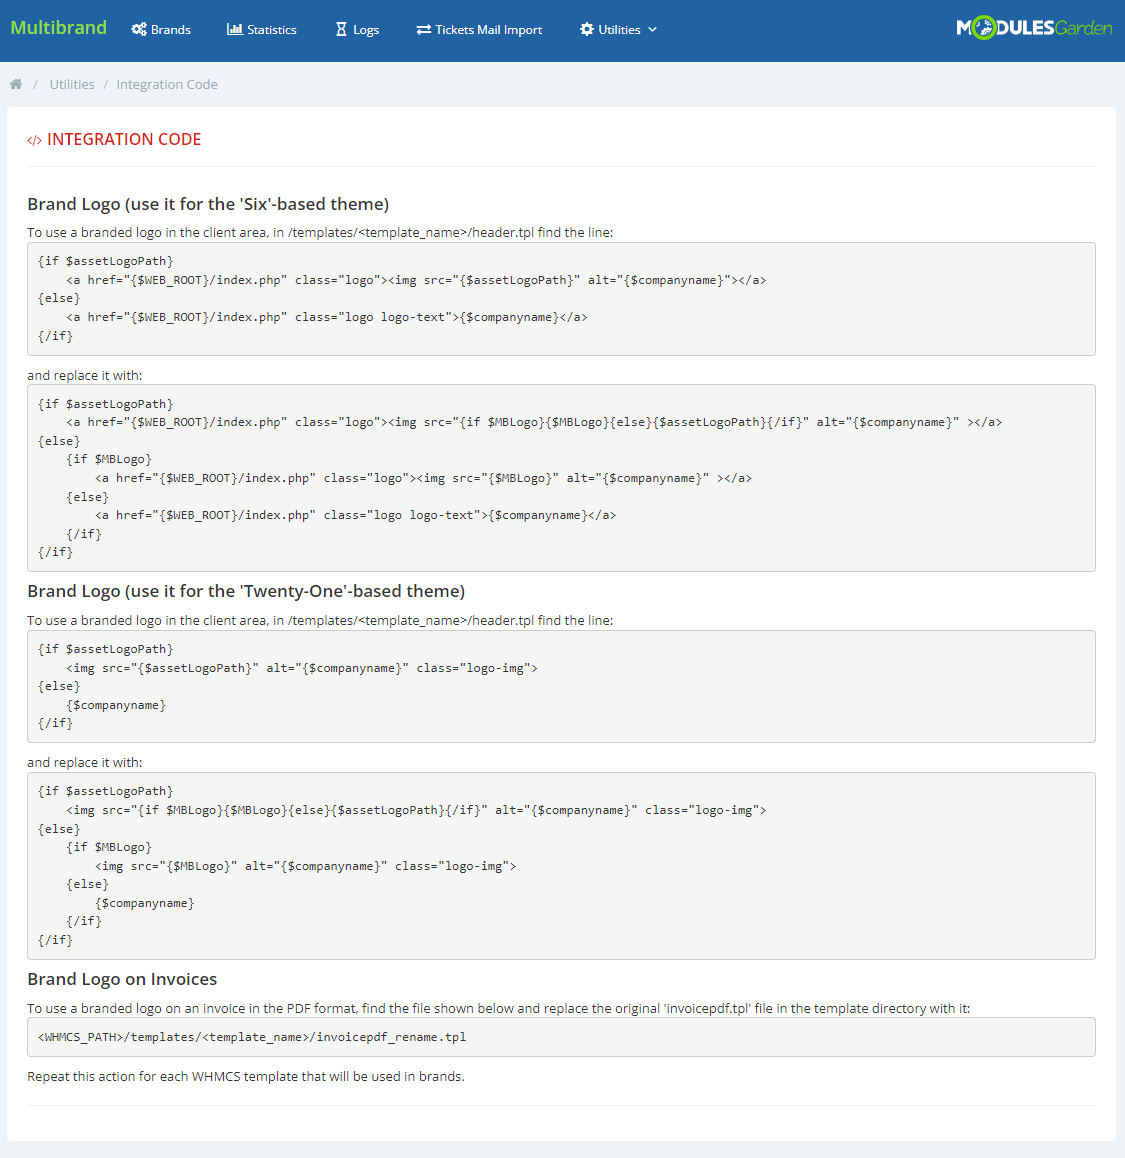
| 10. You can now access your Multibrand For WHMCS module. Simply go to 'Addons' → 'Multibrand'. But, before you can start using the module, you still need to set up the 'Integration Code'. It is required for the correct logo branding and it should be done for all brand templates that you want to use. |
|
| 11. And that is all, you have completed the installation of the module. |
Configuration and Management
| In this section we will show you how to properly set up and use Multibrand For WHMCS. |
Brands
| In the 'Brands' tab you can create and manage your brands using a single instance of the WHMCS platform. Note: If you have not used any of previous Multibrand versions before, after the module's activation, the first brand will be created automatically by default based on the main settings of your WHMCS. |
New Brand
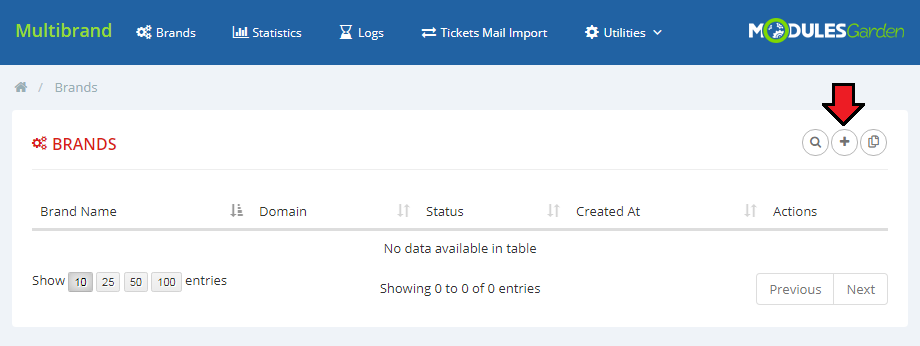
| Let us start by creating a new brand. For that purpose, go to the 'Brands' tab and press 'Add a new brand' |
|
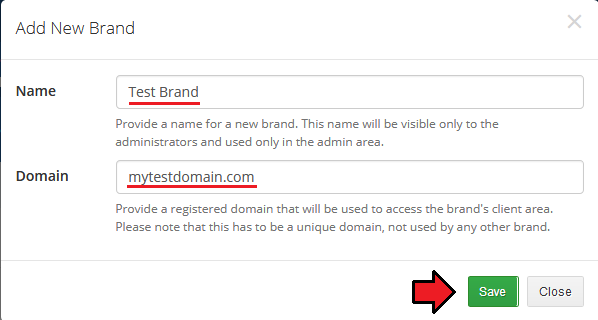
| Fill out the brands's 'Name' and 'Domain' with desired values and press the 'Save' button. |
|
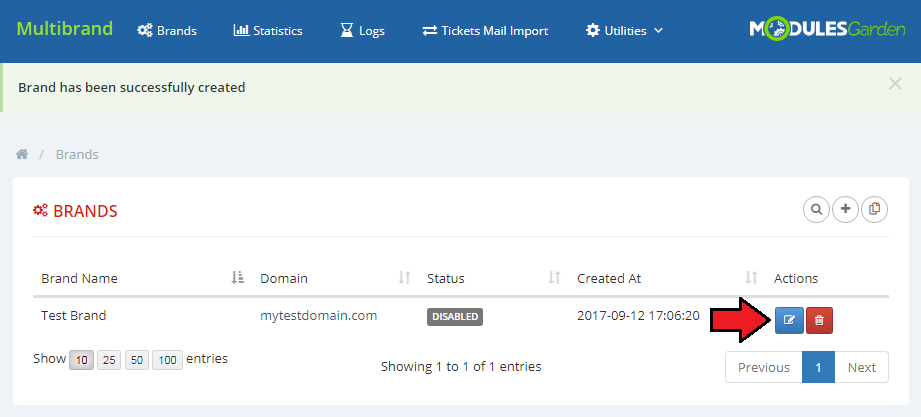
| Your first brand is ready. Remember that you can duplicate your brands at any time. Next, click the 'Edit' ' |
|
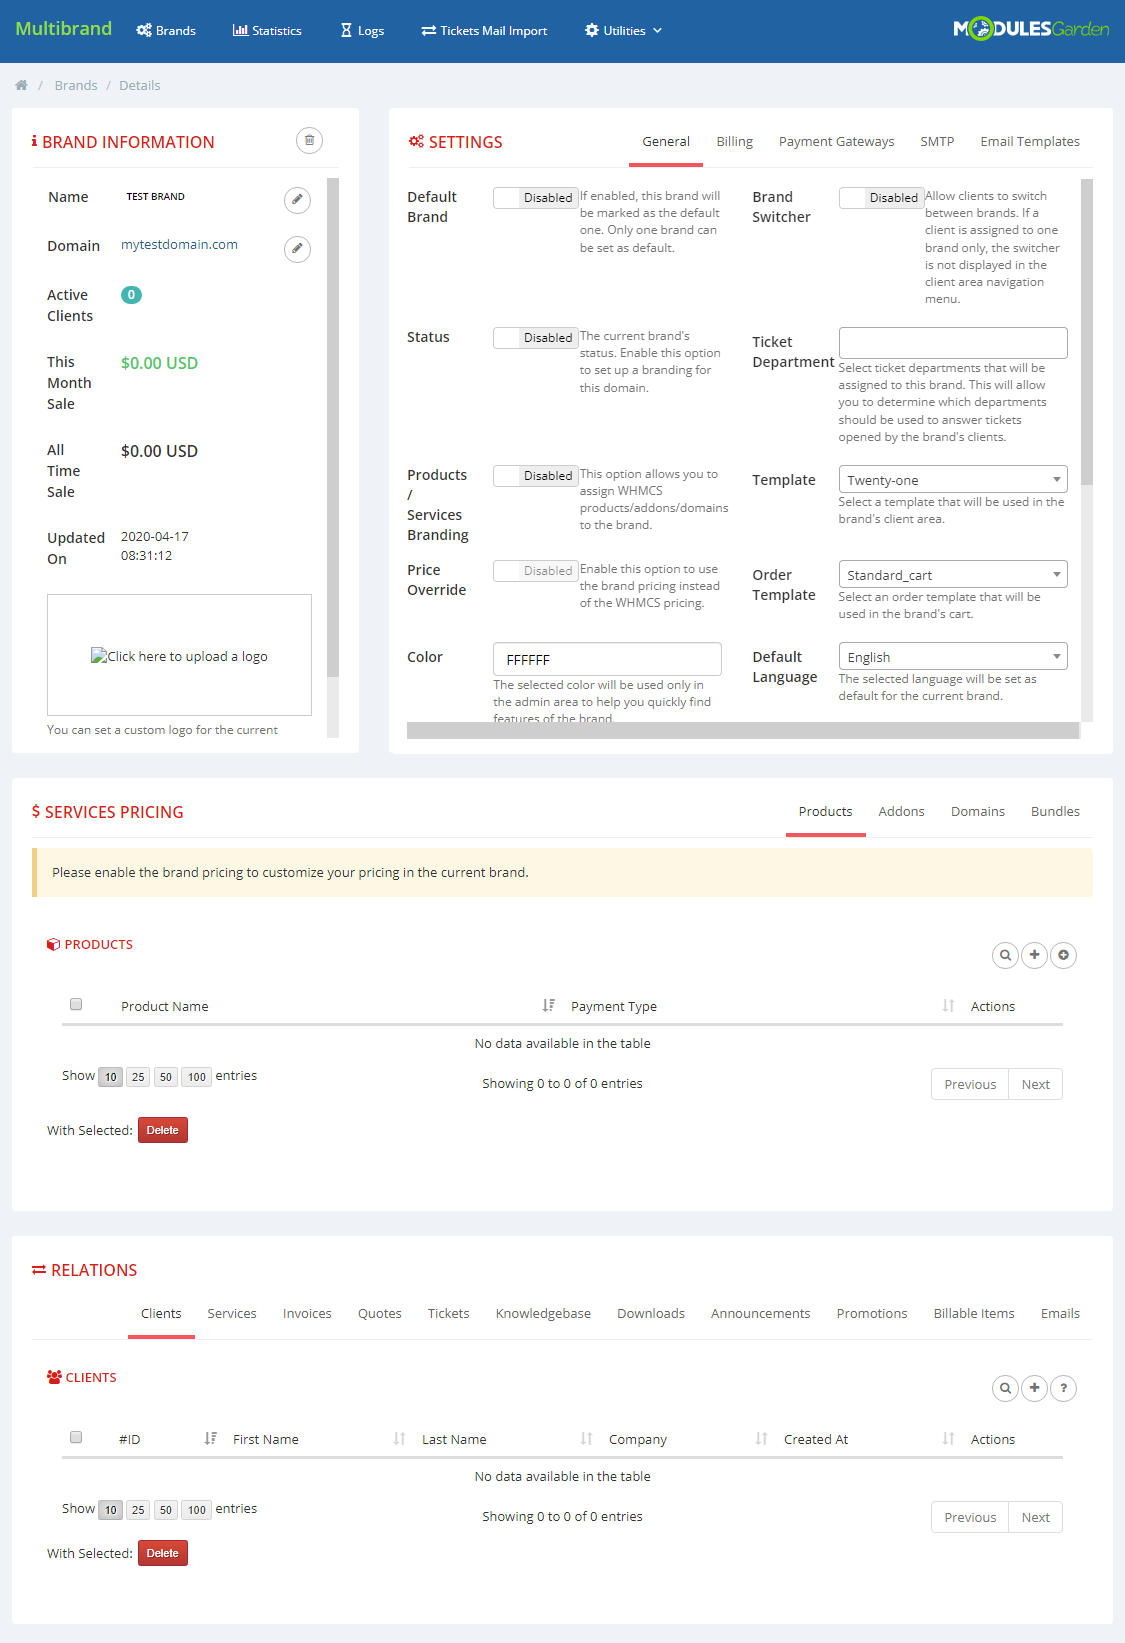
| You will be moved to the brand configuration area, where you can manage your brand's information and settings. |
|
|
Note: Once the configuration of your brand is complete, you will need to set up a CNAME DNS record before the brand is published (status - enabled). |
Brand Information
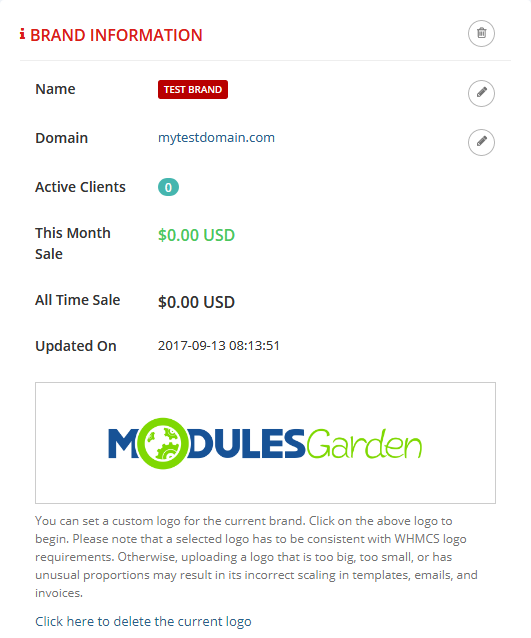
| In the 'Brand Information' window, you can edit the brand name, domain name and custom logo. In addition, you can see the current month's revenue, total sales and the last update. |
|
Settings
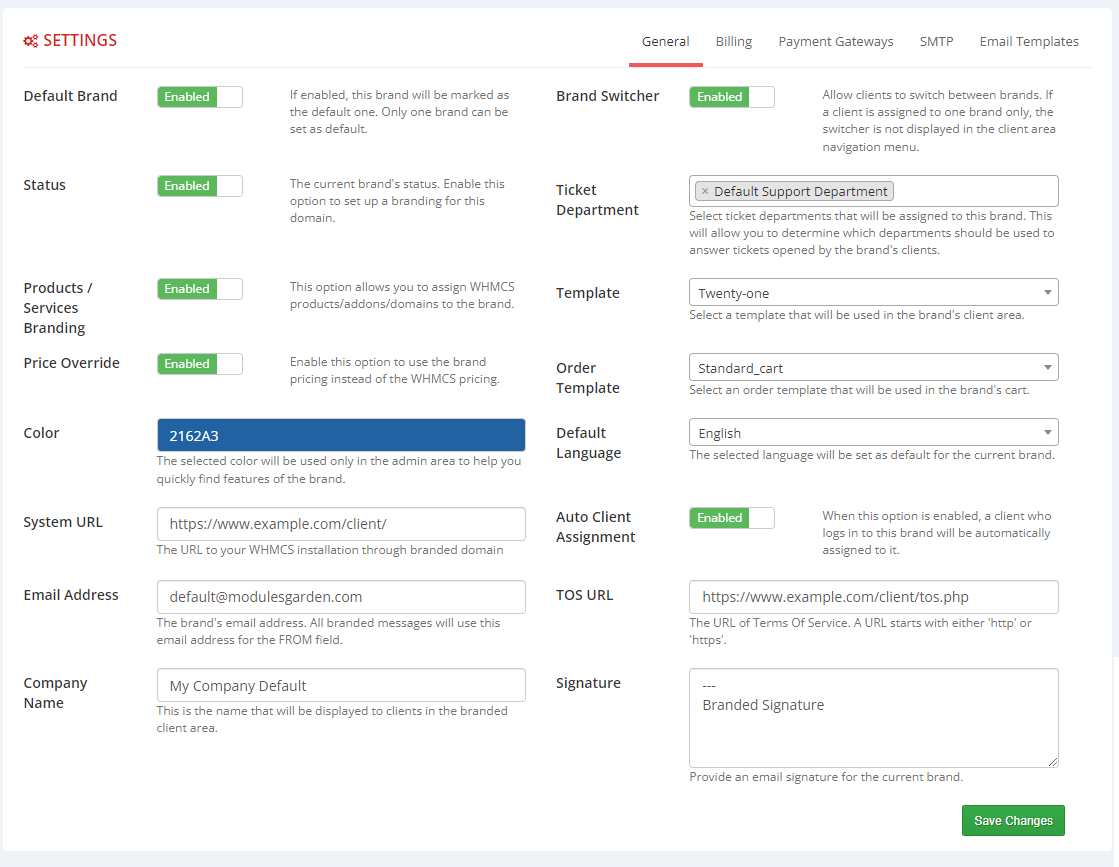
| In this window you will be able to configure the most important settings of your brand, including billing, payment gateways, SMTP and email templates configuration. |
General
| In the general settings, you will configure the main options of a brand. First, fill out the brand's 'Email Address', 'Company Name' and 'TOS URL' . Next, choose the brand's 'Color', 'Ticket Departments' , 'Default Language', 'Template' and 'Order Template' . |
|
Billings
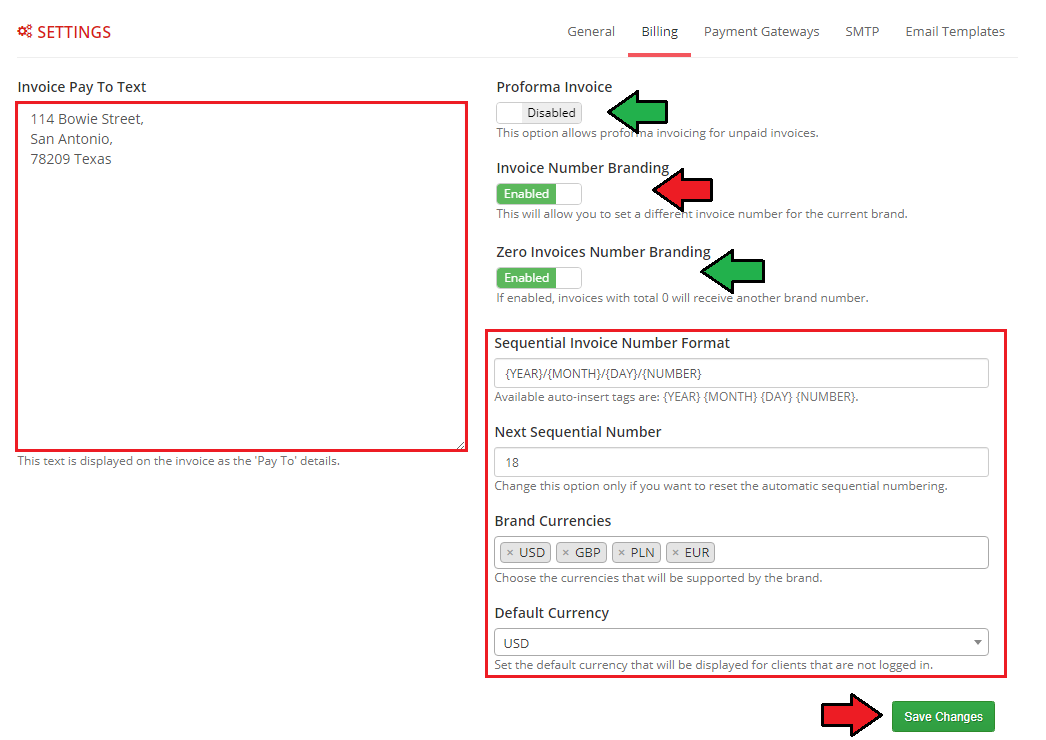
In the 'Billing' settings, you can configure the design of your invoices.
Note: Remember to complete the 'Additional Settings' step during the module's installation to render the PDF invoices branded as well. |
|
Payment Gateways
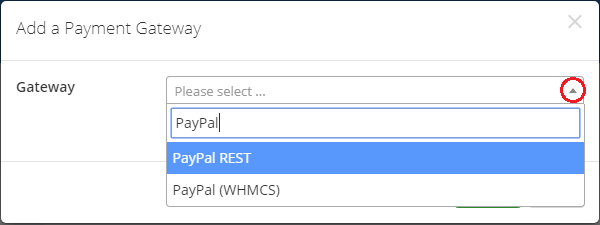
| This tab allows you to configure a payment gateway for the brand operating independently of the one configured in WHMCS. You can check the list of the currently available gateways in the Feature List. |

|
| Next, choose the desired gateway from the list and click on the 'Confirm' button. |
|
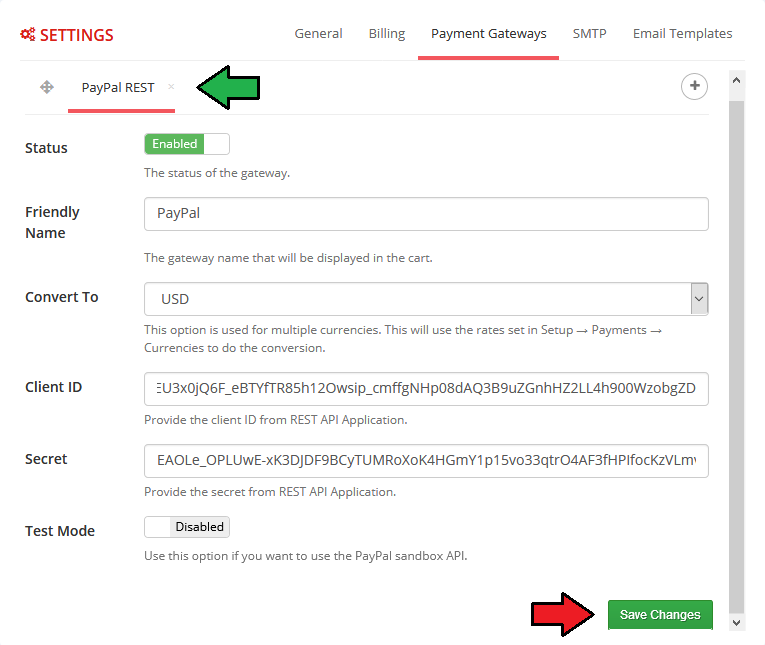
| Finally, fill out the payment gateway settings according to the details received from the provider. Save the configuration and activate the gateway. |
|
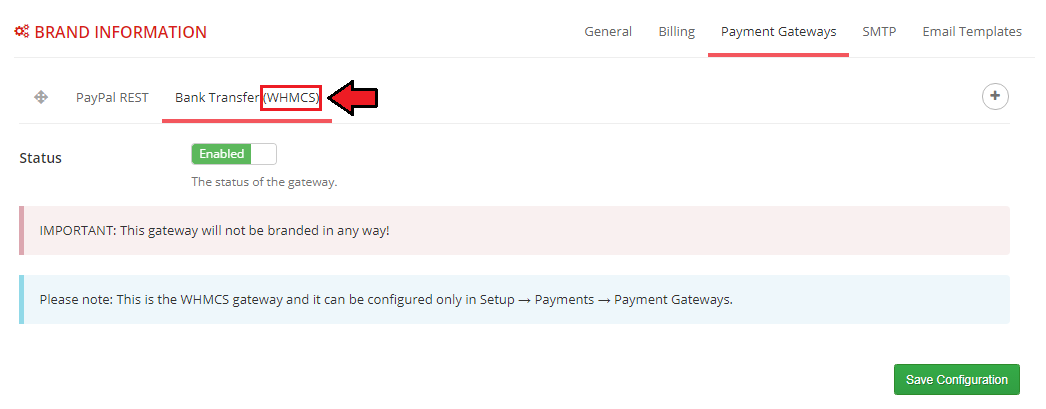
| Note: Multibrand For WHMCS can work with any gateway available within your WHMCS system. These gates will have a (WHMCS) label. The only limitation is that these payment gateways use the same settings for all brands. |
|
SMTP
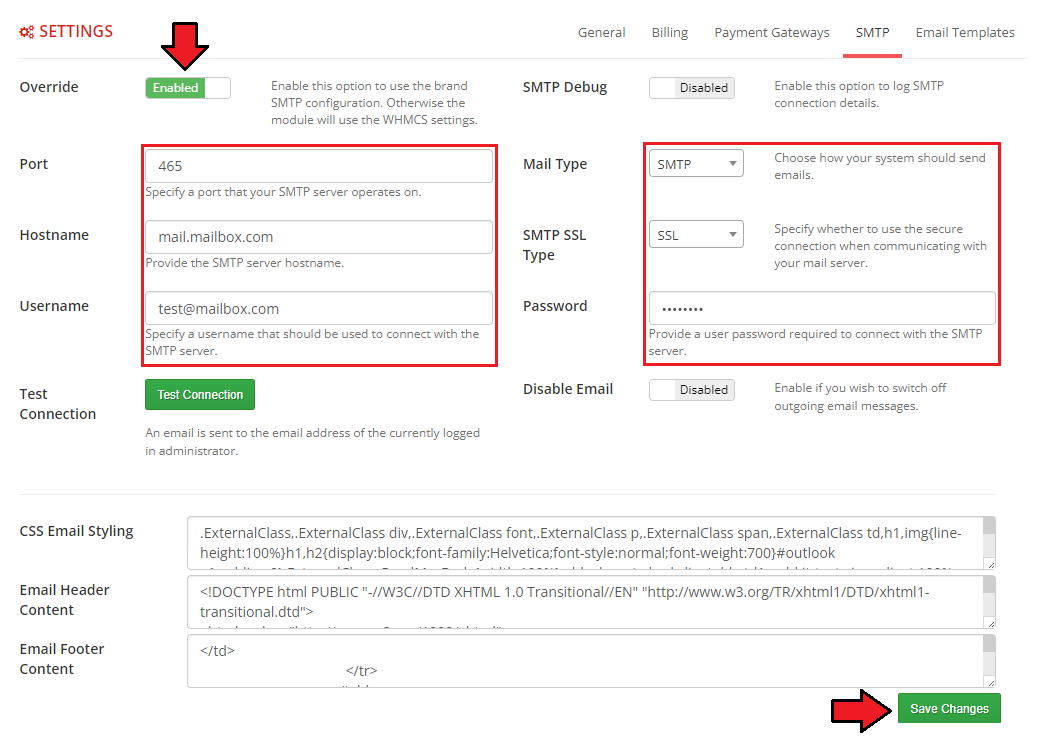
| If you would like your brand to use an outgoing email configuration which is different from the one in the main WHMCS settings, you can do it here. In addition, you can set your custom CSS email styling as well as the header and footer content. |
|
Note: Please remember that the following merge fields can be used for 'Email Header Content' as well as 'Email Footer Content' .
|
Email Templates
|
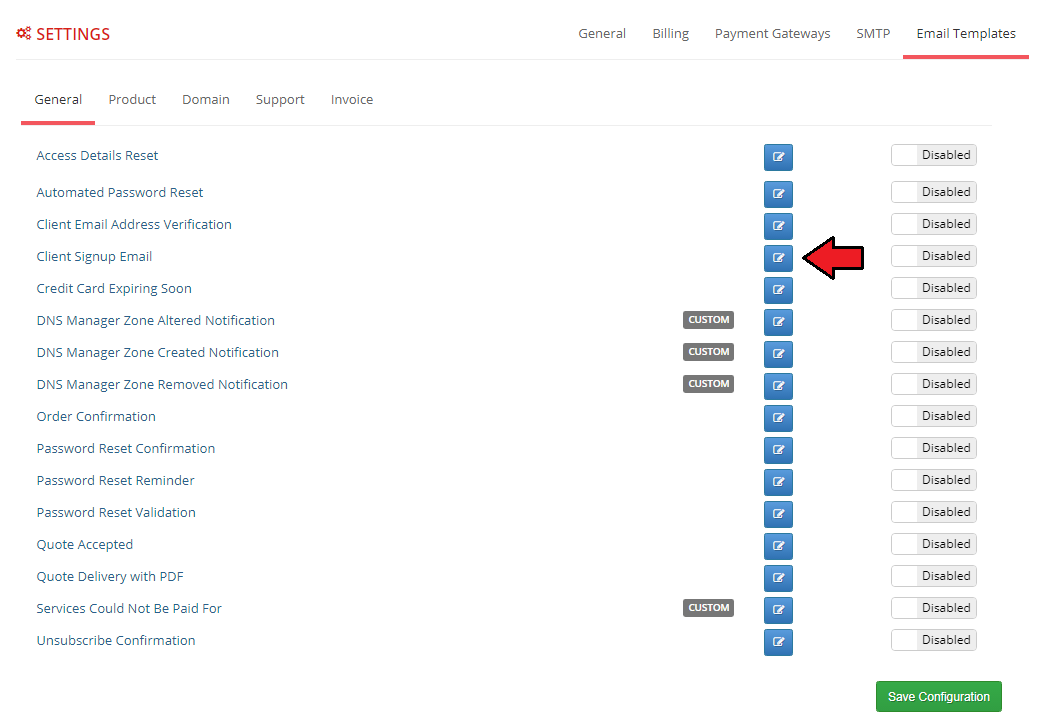
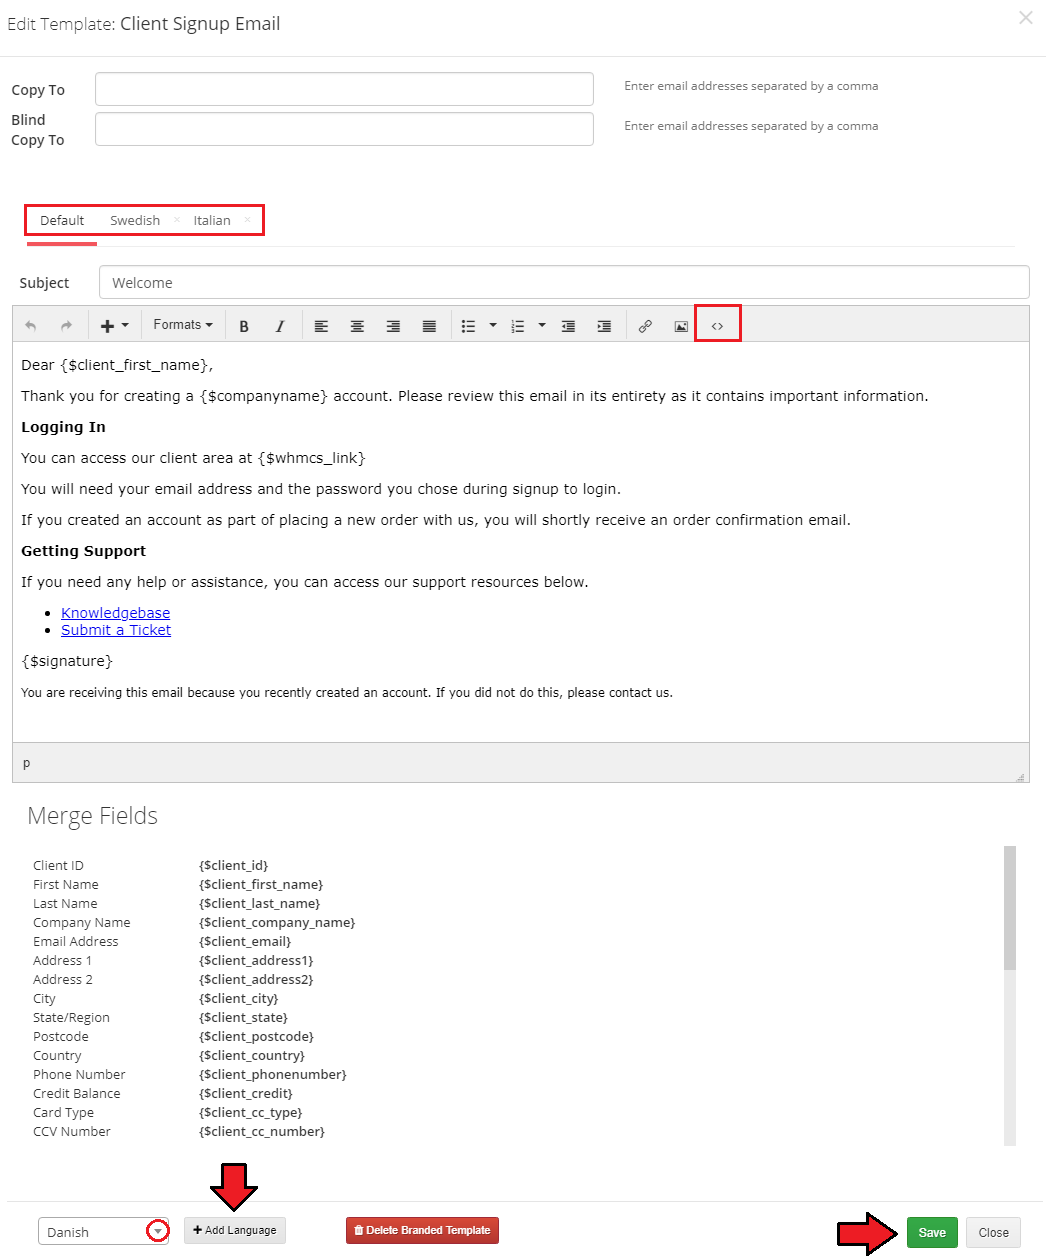
| Next, type in the email addresses to send the copy and, if needed, the blind copy to, enter the desired subject and message content. You can also create more versions, in different languages. Additionally, along with editing the source code of a template you can use the available merge fields tags just like in the standard email templates. |
|
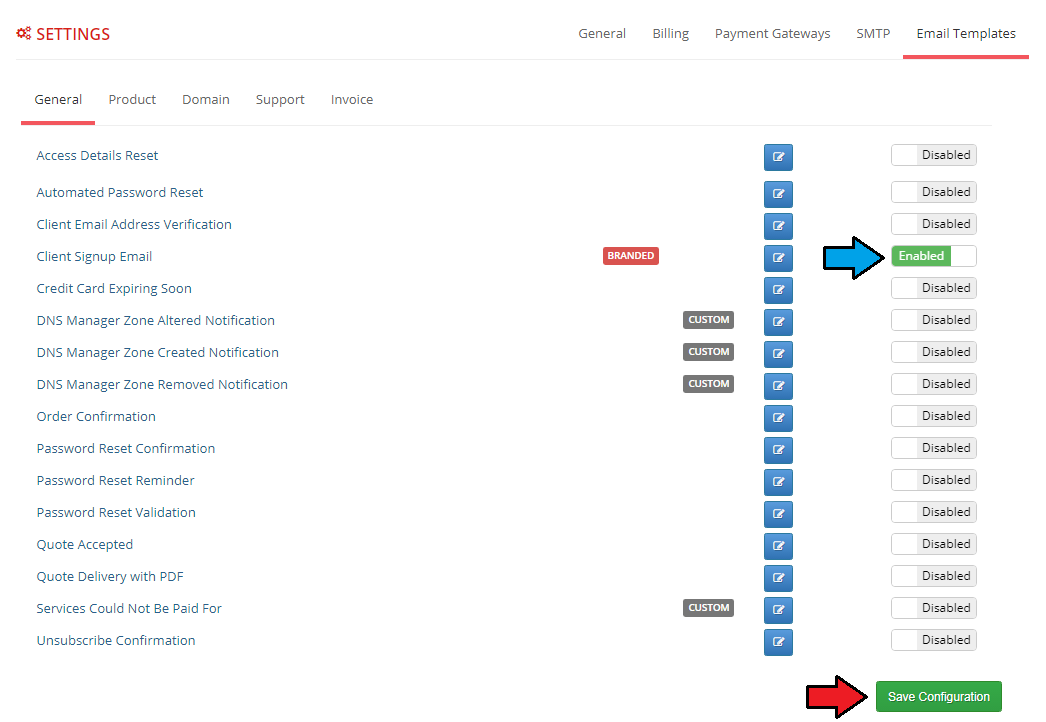
| Finally, enable the edited template and save the configuration. You will see the 'Branded' label next to the edited template. If you would like to restore the default template, simply return to its edition and click the 'Delete Template' button. |
|
Services Pricing

|
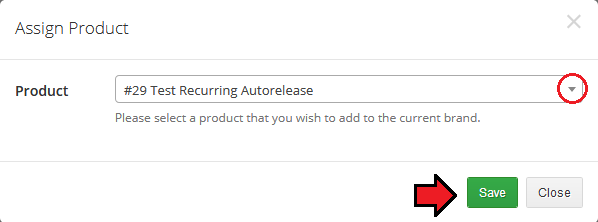
| Select the product for which you want to set branded prices and click 'Save' . |
|
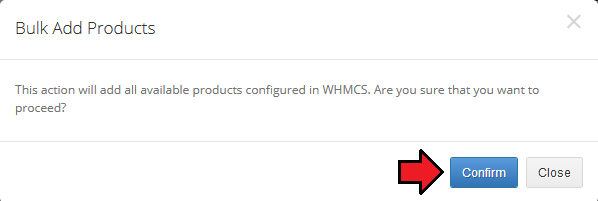
| Or you can add all your products at once thanks to 'Bulk Action' , just press the button marked with the red arrow. |
|
| Next, open the pricing editor of the chosen product. |

|
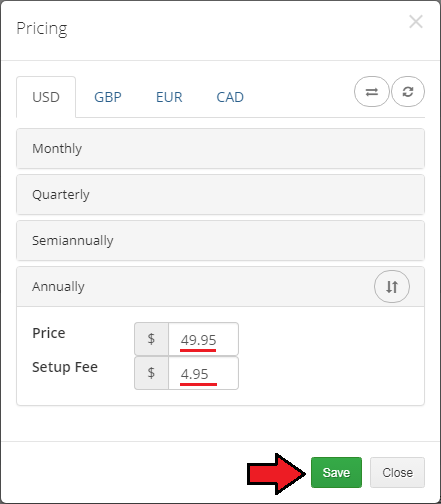
| Here you can configure the desired prices in selected billing cycles and currencies. You can also automatically fill out the amounts from the main product and update them, refreshing the currencies rate. Note: Availability of billing cycles, prices and currencies to be edited depends on their main configuration in WHMCS. |
|
| From now on, the pricing for this product will be branded. You can also configure pricing for addons and domains in the same way. |
Relations
| In this section you can see which Clients, Services, Invoices, Quotes, Tickets, Knowledgebase, Downloads, Announcements, Promotions, Billable Items and Emails are assigned to this brand. In addition, you can manually manage, assign and unassign selected items to the brand. Note: Currently there is no option of mass management, assigning and unassigning selected items to the brand. This functionality is planned to be implemented in future releases. Additionally, if you would like to change any relation between brands, remember that first you have to unassign (delete) that relation from the previous brand, and only then can you add that relation to the second brand. |
Clients
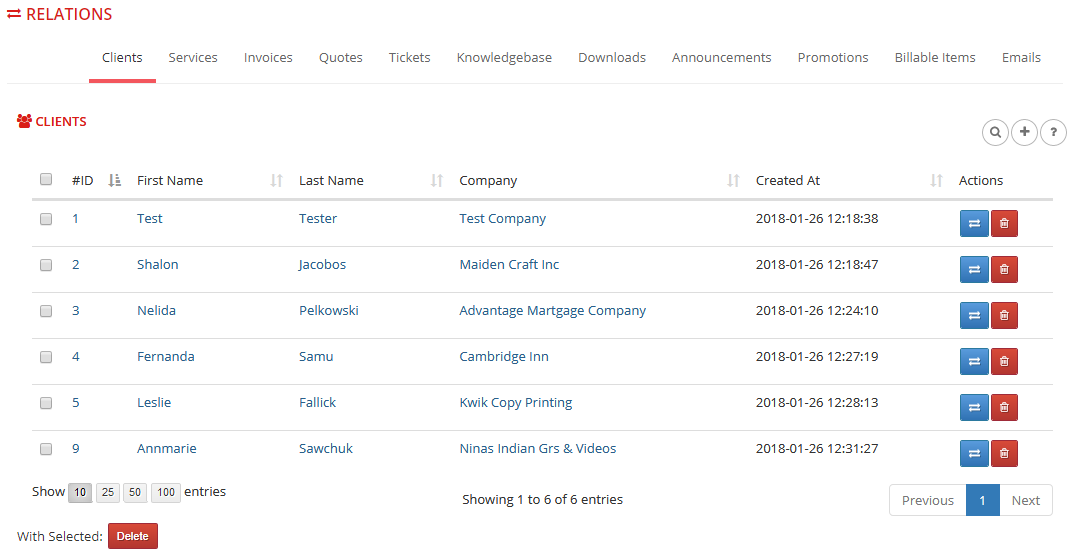
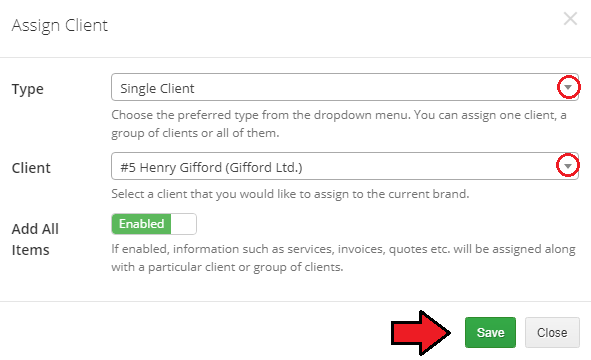
| In the 'Clients' tab you can see customers who are assigned to the brand and the date on which they were assigned. Assignment takes place at the moment of client's registration for the branded domain. You can also manually assign the already existing customers to the brand or migrate them to another. Note: If the 'Auto Client Assign' option is enabled, then the customers who are already registered in one of the brands and try to log in to another brand will also be automatically assigned to it. |
|
|
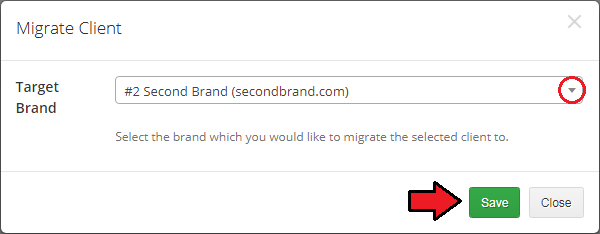
| You can also migrate the customers from this brand to another one. Click on the 'Migrate' |
|
| And finally, if you want to delete a customer's relationship with this brand, click the 'Delete' |
Services
| In the 'Services' tab you can see which Services & Products, Addons and Domains have a relation with this brand. These are automatically added to the brand while ordering from the branded domain. |
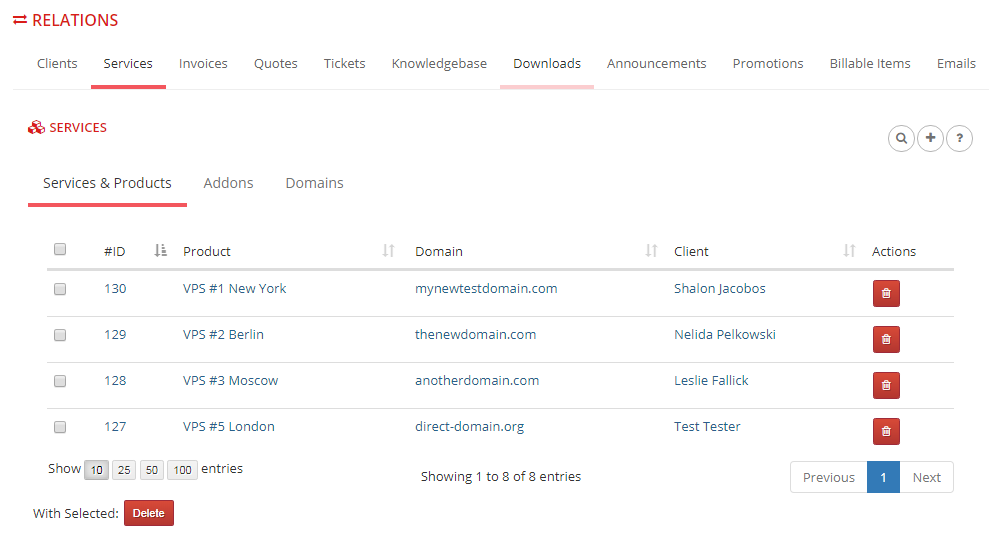
|
| You can also manually add a relation for a service that is not branded yet. Press the 'Add' |
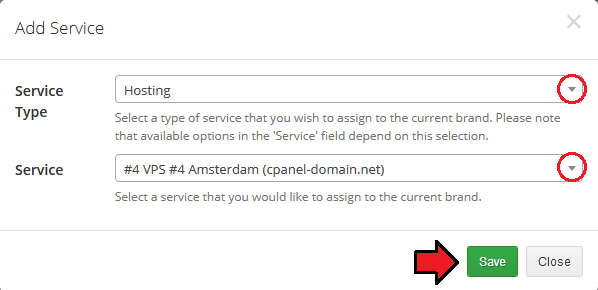
|
| Again, if you want to delete a service relation with the brand, press 'Delete' |
Invoices
| In this tab you can see which invoices have a relation with your brand. These invoices are automatically added to the brand after an order has been created from the branded domain. |
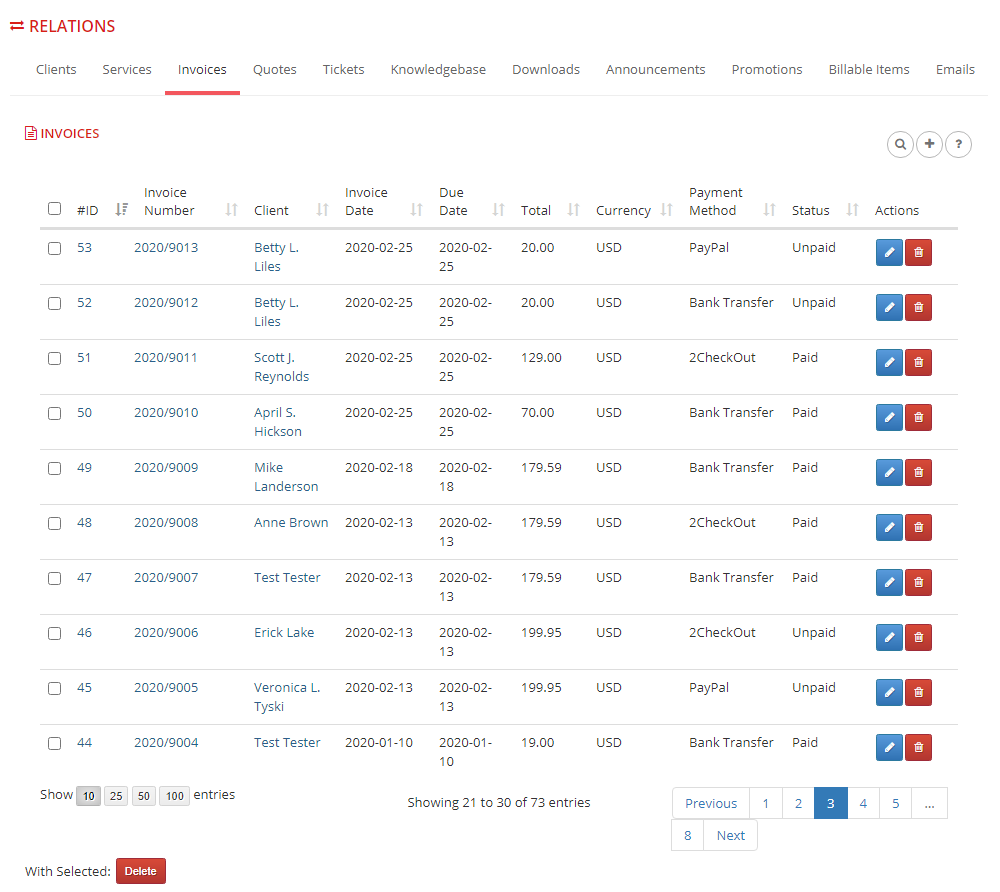
|
| You can also manually add a relation for the invoice that is not branded yet. Press 'Add' |
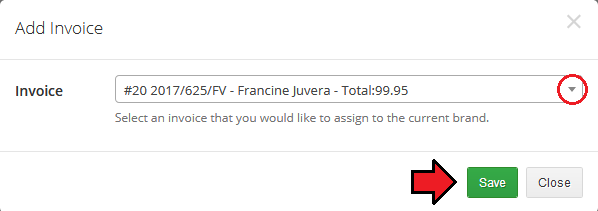
|
| If you want to delete an invoice relation with the brand, press the 'Delete' |
Quotes
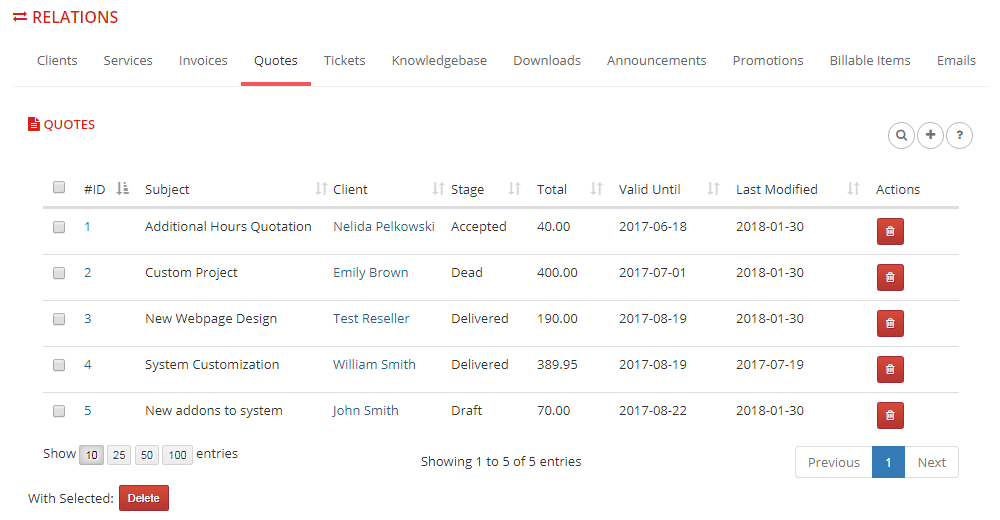
| In this tab you can see which quotes have a relation with your brand. These are automatically added to the brand after an order has been created from the branded domain. |
|
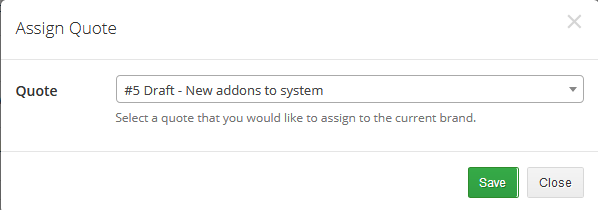
| You can also manually add a relation for the quote that is not branded yet. Press 'Add' |
|
| If you want to delete a quote relation with the brand, press the 'Delete' |
Tickets
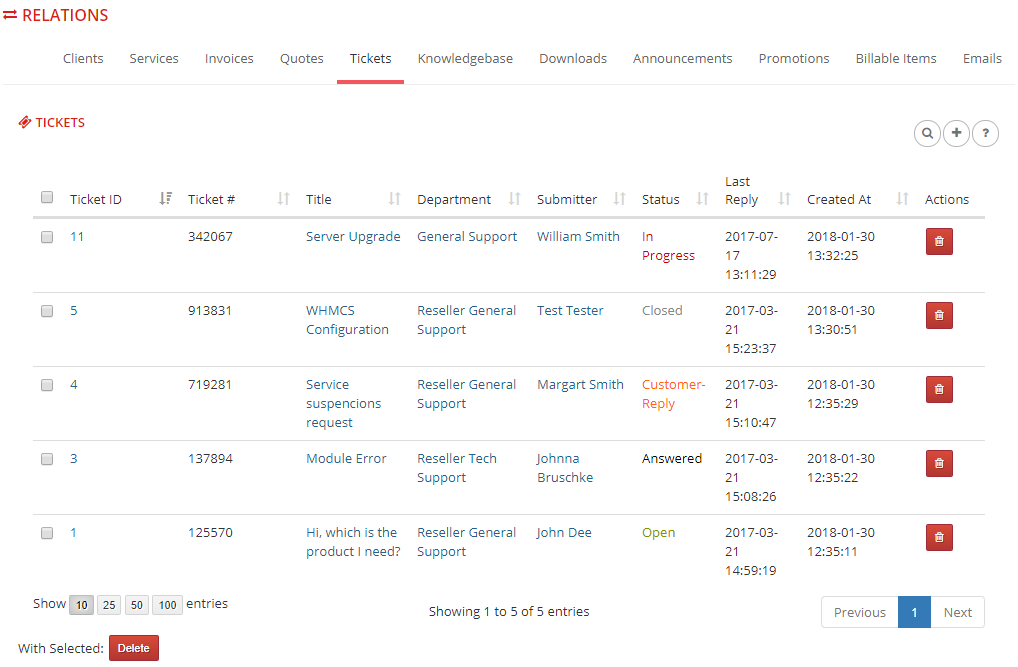
| In this tab you can see which tickets have a relation with the brand. These tickets are automatically branded after a ticket has been opened in one of the earlier branded departments. |
|
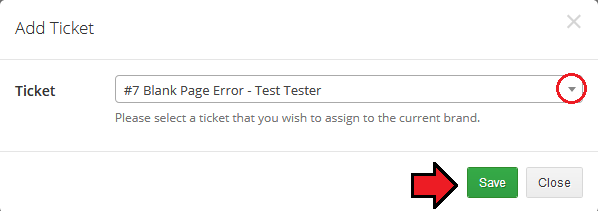
| You can also manually add a relation for the ticket that is not branded yet. Click on 'Add' |
|
| If you want to delete a ticket relation with the brand, press the 'Delete' |
Knowledgebase
| In this tab you can see which of your knowledgebase articles have a relation with the brand. In addition, here you can find various statistics of views, useful points, number of votes and the date of assignment to the brand. |
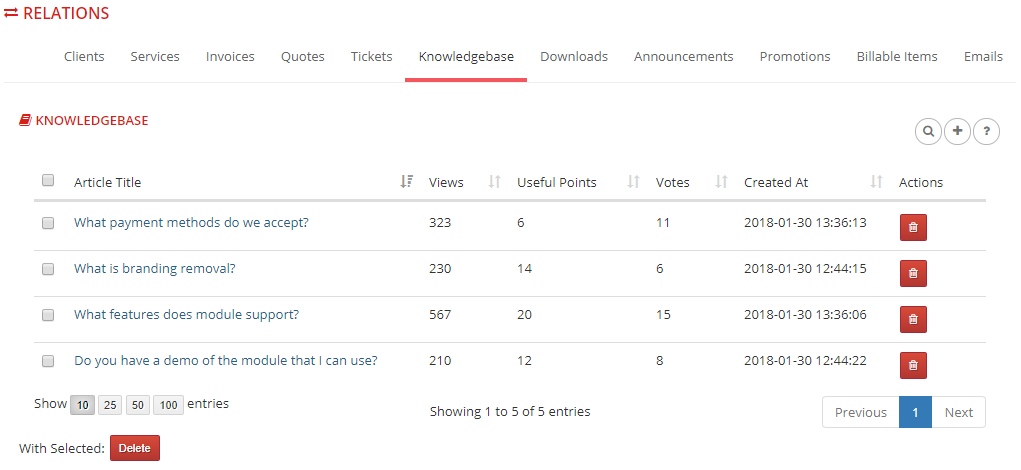
|
| To add a relation for the knowledgebase articles, press 'Add' |
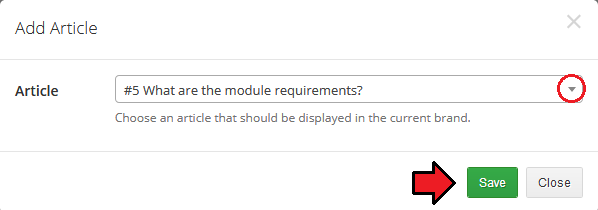
|
| If you want to delete a knowledgebase article relation with the brand, press the 'Delete' |
Downloads
| In this tab you can see which of your files available for download have a relation with the brand. In addition, here you can find a download category, type, number of downloads and the date of assignment to the brand. |
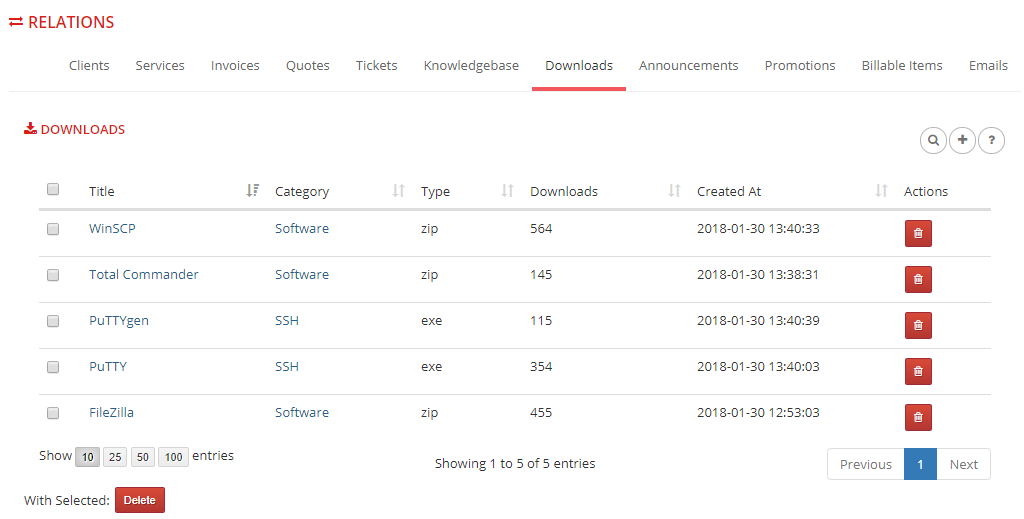
|
| To add a relation for the download, press the 'Add' |
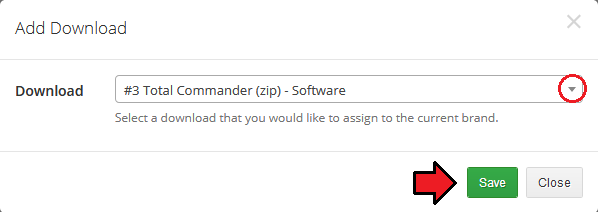
|
| If you want to delete a download relation with the brand, press 'Delete' |
Announcements
| In this tab you can see which of your announcements have a relation with the brand. In addition, here you can find the date of announcement creation, assignment to the brand and the published status. |
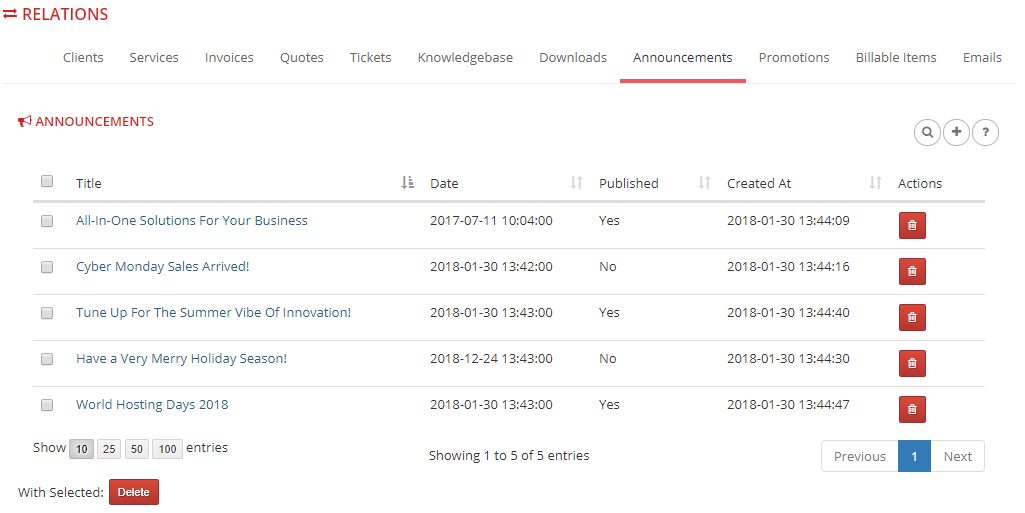
|
| To add a relation for the announcement, press the 'Add' |
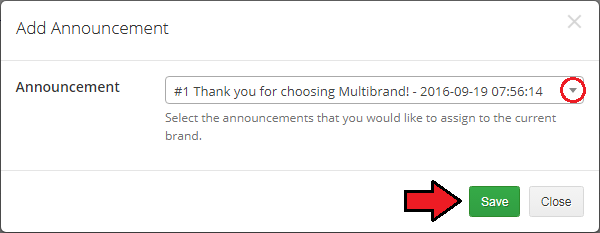
|
| If you want to delete an announcement relation with the brand, click on the 'Delete' |
Promotions
| In 'Promotions' you can assign promotions to specific brands. |
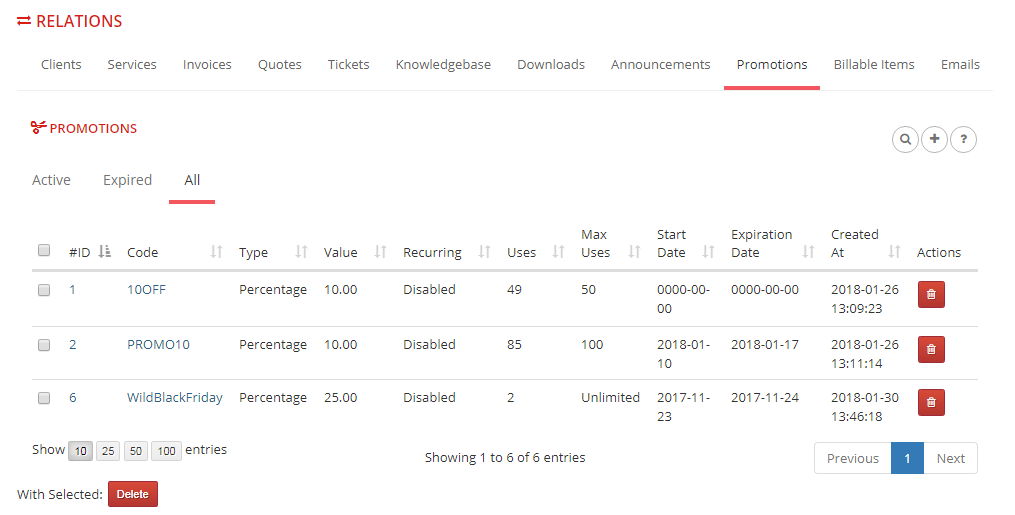
|
| To add a promotion, press the 'Add' |
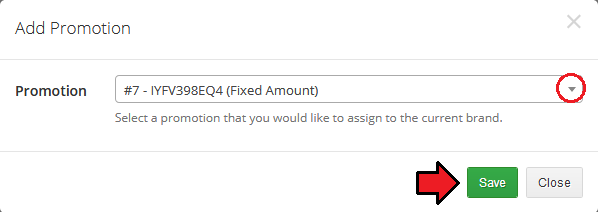
|
| If you want to delete a promotion relation with the brand, click on the 'Delete' |
Billable Items
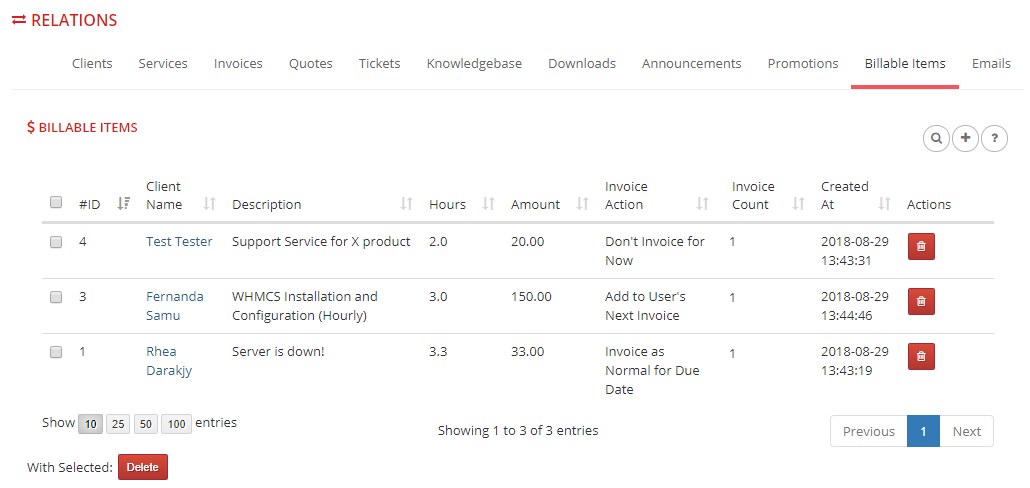
| Under this tab you can see the list of created relations with billable items containing the client name, hours, and invoice details. |
|
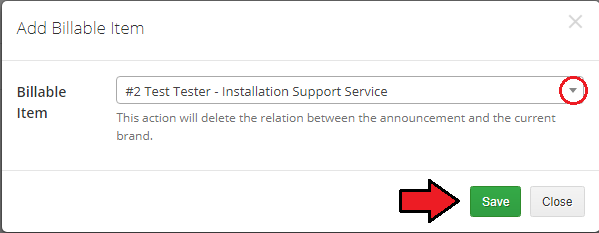
| To add a billable, press the 'Add' |
|
| If you want to delete the relation between the billable item and the brand, click on the 'Delete' |
Emails
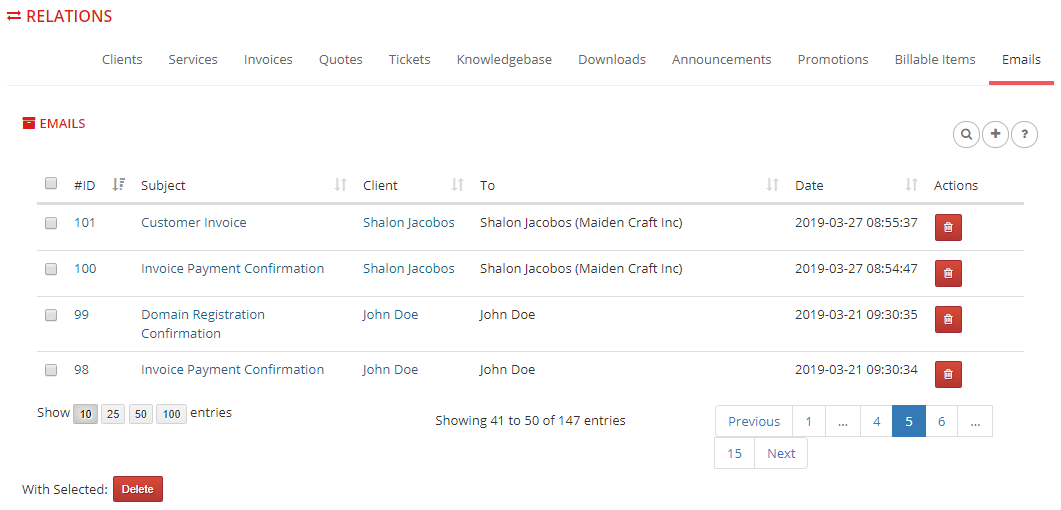
| The last tab contains the list of all branded email messages that have been sent to your clients. |
|
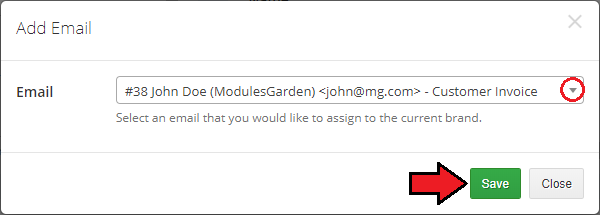
| To add an email message to a chosen brand manually, press the 'Add' |
|
| If you want to delete the relation between the email message and the brand, click on the 'Delete' |
Statistics
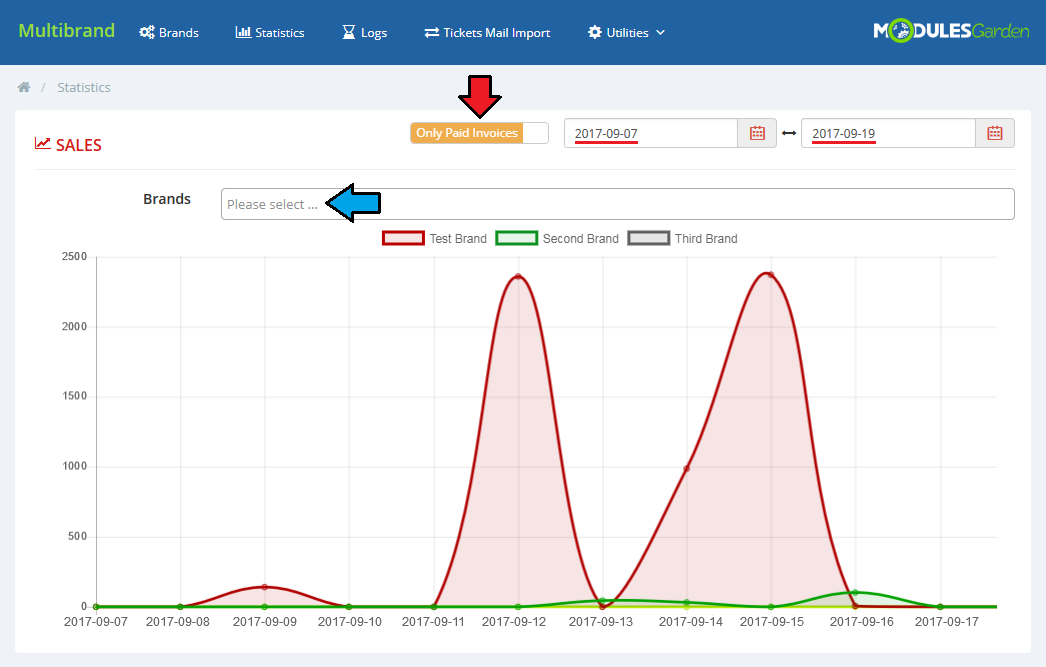
| In the 'Statistics' section you will find sales charts of selected brands. You can filter them by the date period and selected brands as well as choose whether to display statistics based on the paid invoices only or all invoices altogether (the unpaid ones included). |
|
Logs
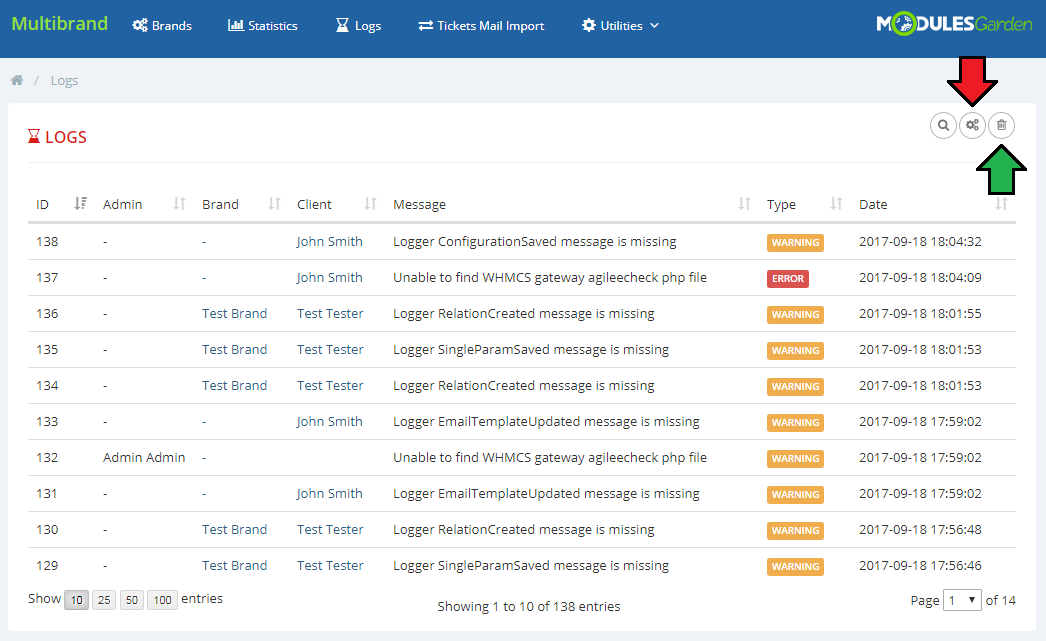
| 'Logs' section allows you to view warnings and errors related to your brands. Owing to the automation settings you can remove all logs or automatically delete them at a chosen time. |
|
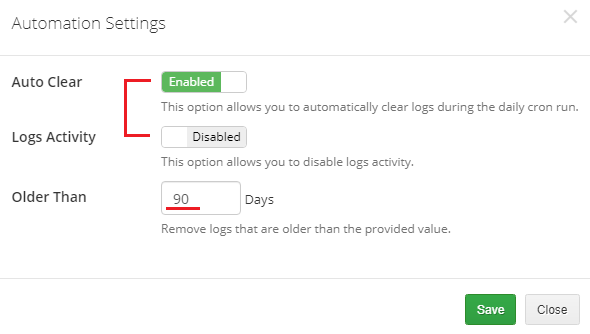
| The 'Auto Clear' option enables you to clear logs on the daily cron run. You can also enter a fixed number of days so when that time passes, the logs are automatically removed. |
|
Tickets Mail Import
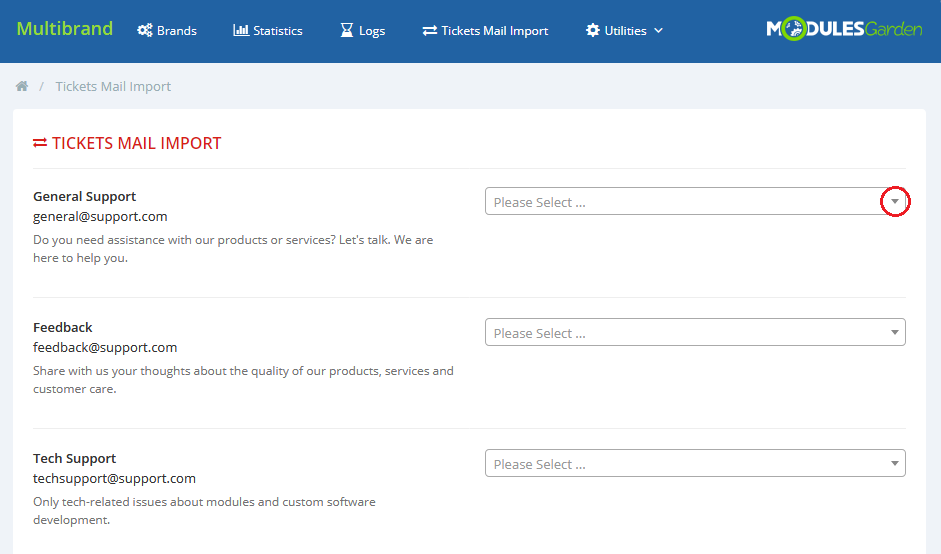
| The following section enables you to automatically define a brand email relation in order to automatically import messages sent to an email address into the support ticket system. Accordingly, clients will be able to open and reply to tickets outside the client area. |
|
Branded Admin Area Functionalities
The module allows you to display information about the brand on the list of:
You can also directly select the brand when adding a new:
In the following sections you can find examples of such integration. |
Membership
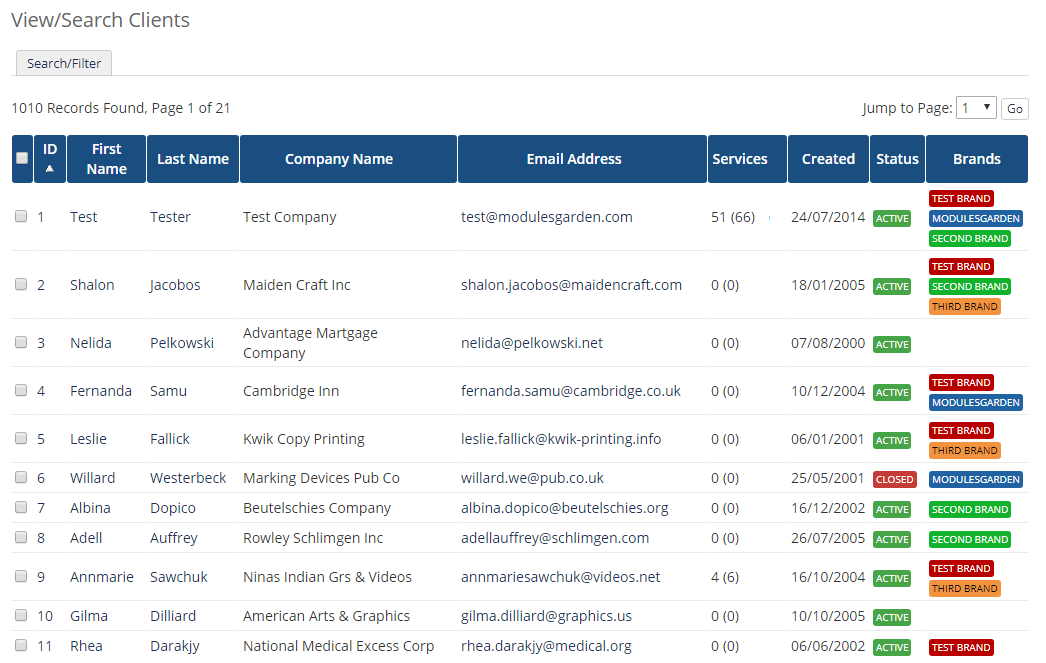
| Multibrand For WHMCS makes the management of WHMCS easier through the introduction of the 'Brand Details' column. This column informs you about the membership of clients and invoices to a certain brand (more details will be added soon). |
|
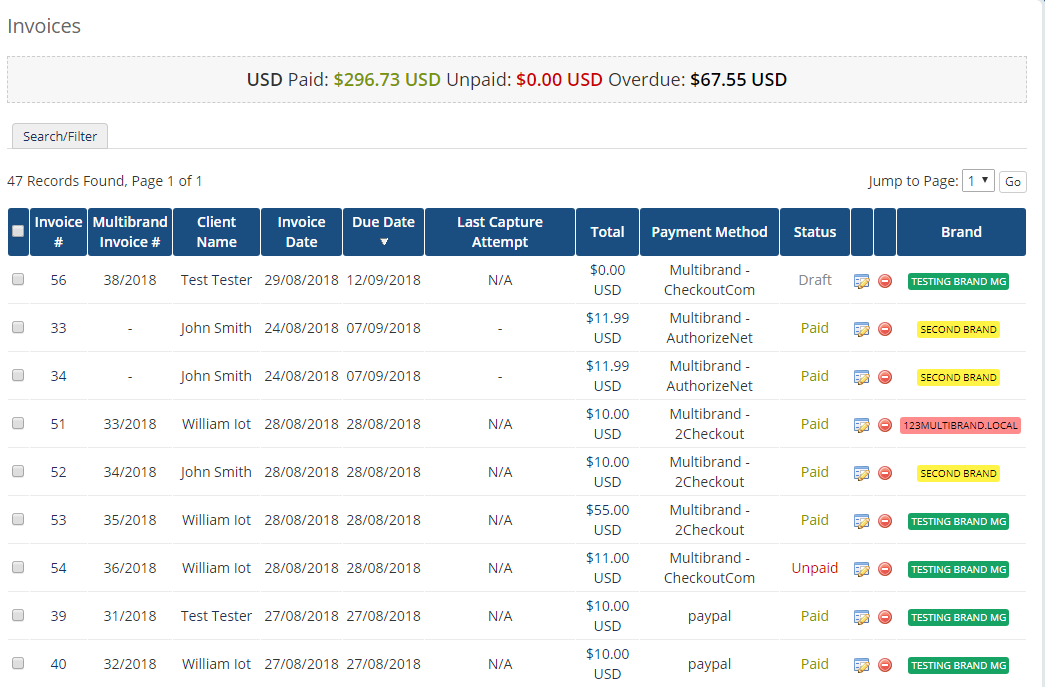
| It looks similar in the 'Invoice List'. |
|
Client Profile
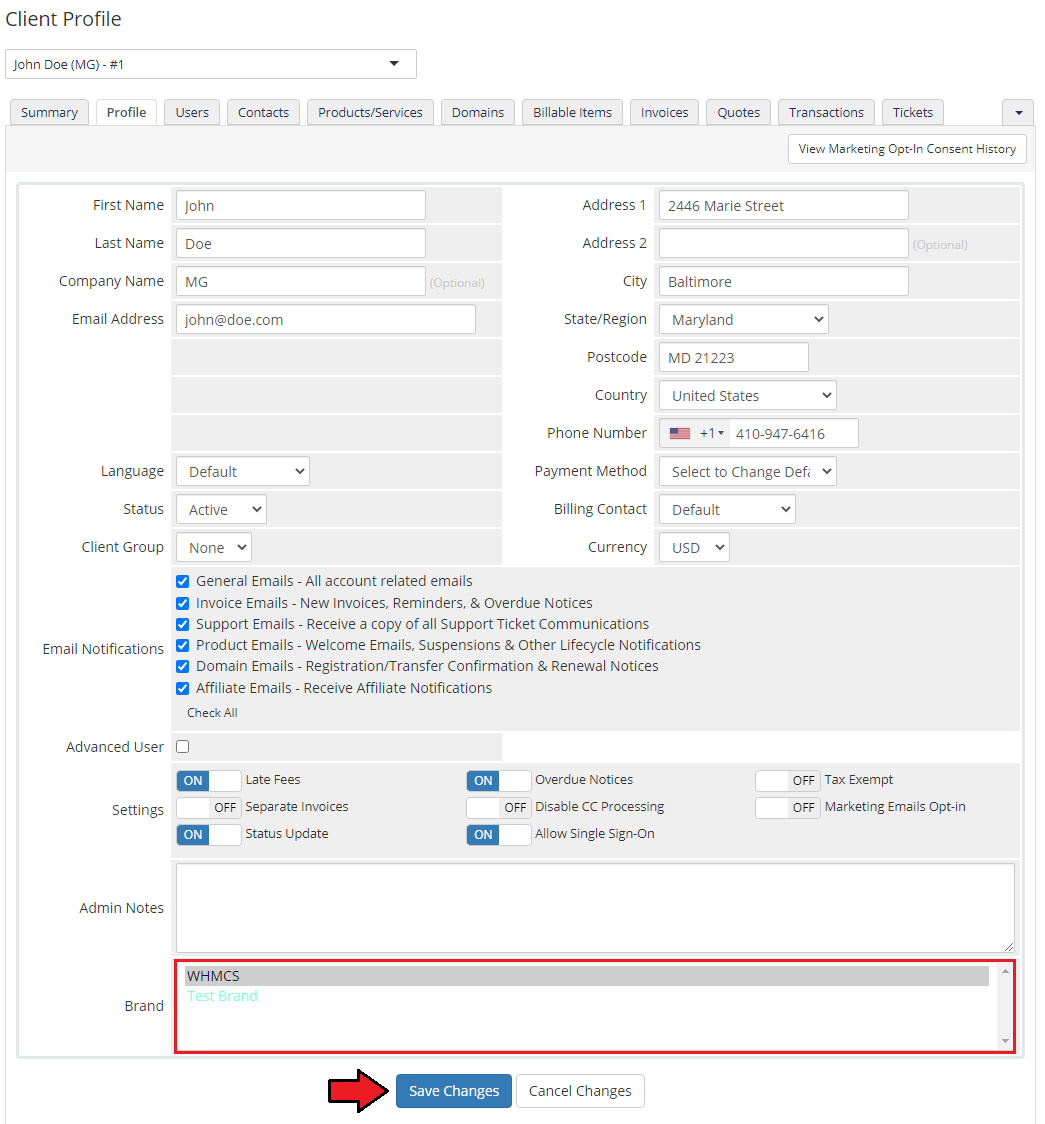
| In the client's 'Profile' tab you also have the possibility to choose customer brand assignment. |
|
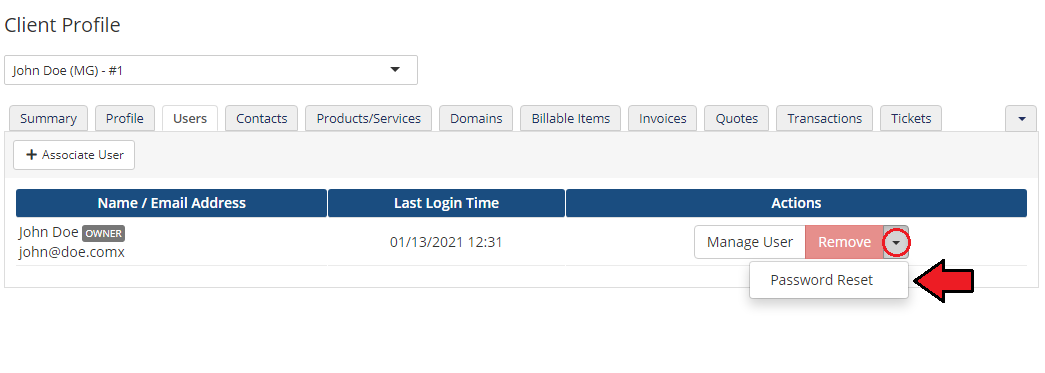
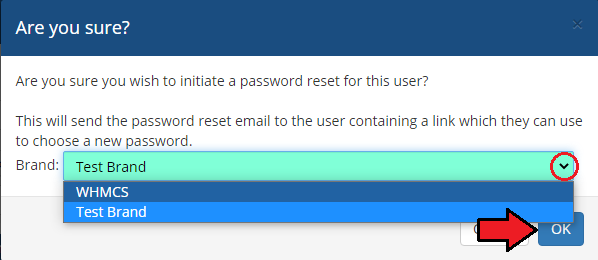
| Select branding email messages when resetting their password. Find this option in 'Users' tab in the 'Manage User' dropdown menu: |
|
|
Order Creation
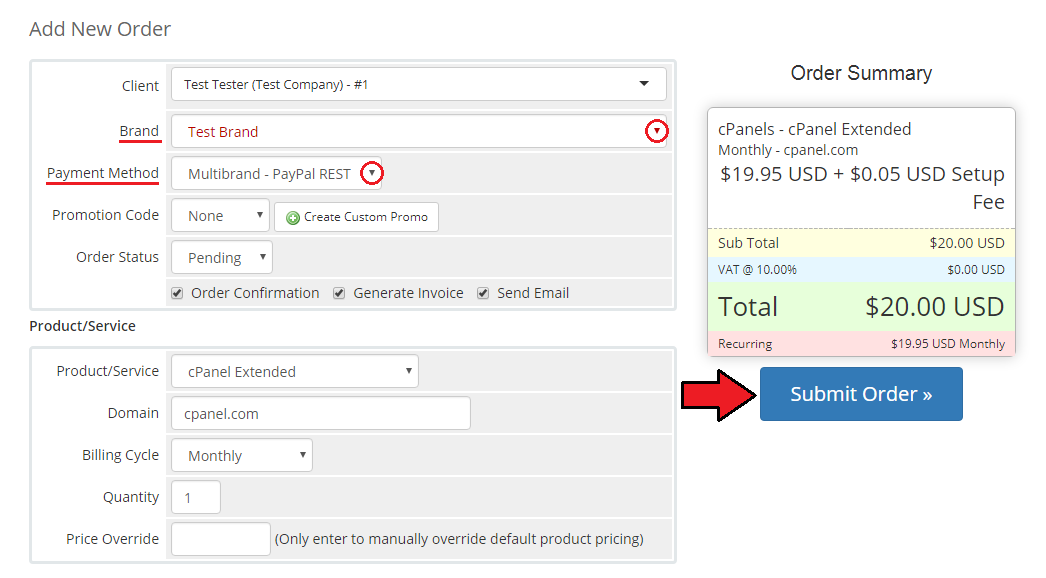
| If the administrator wants to manually create an order for a client, he/she can directly create a relation with the selected brand (provided that the client belongs to it). Additionally, they can also assign a payment gateway available in the given brand. |
|
Invoices
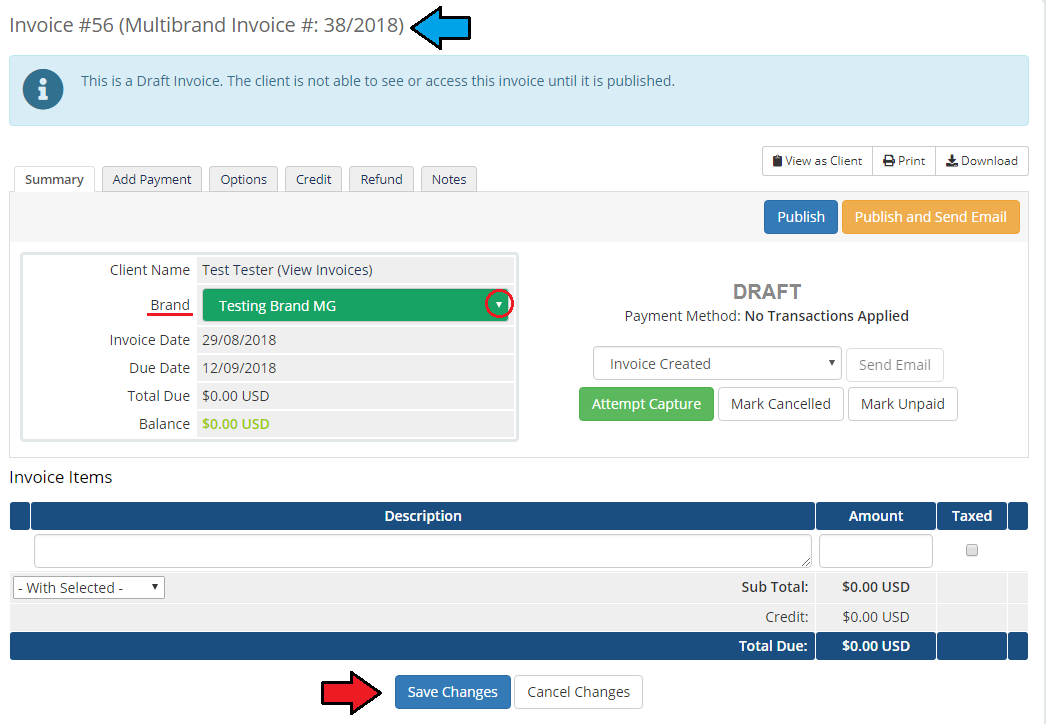
| If the administrator creates a new invoice for a customer, he/she has the possibility to select a direct relationship with the given brand. |
|
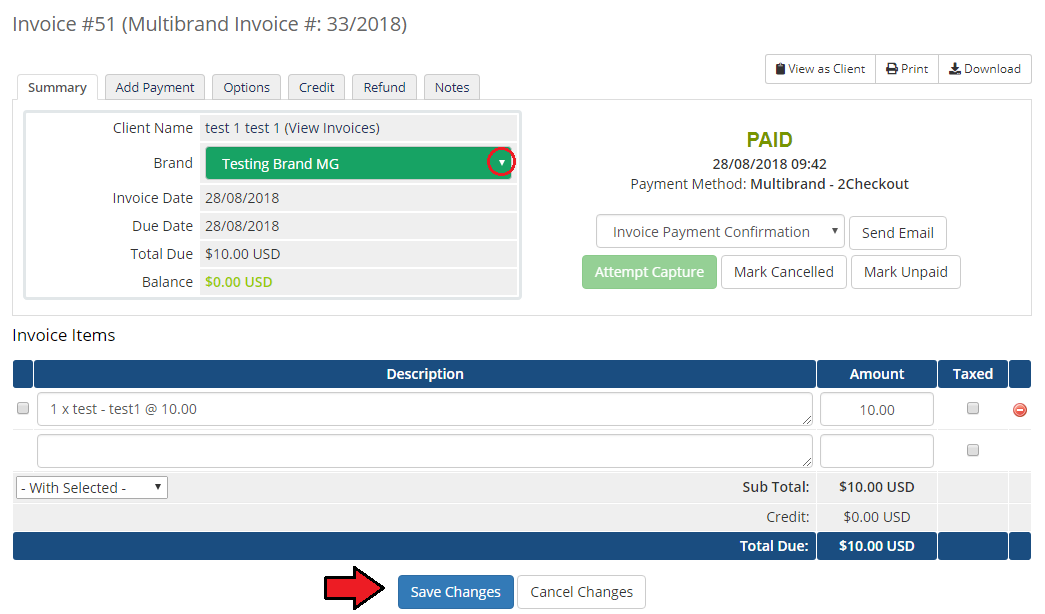
| Additionally, there is also a possibility to change the brand relation directly for the previously created invoices. |
|
| In other categories, the integration with brands is applied similarly. |
Branded Client Area
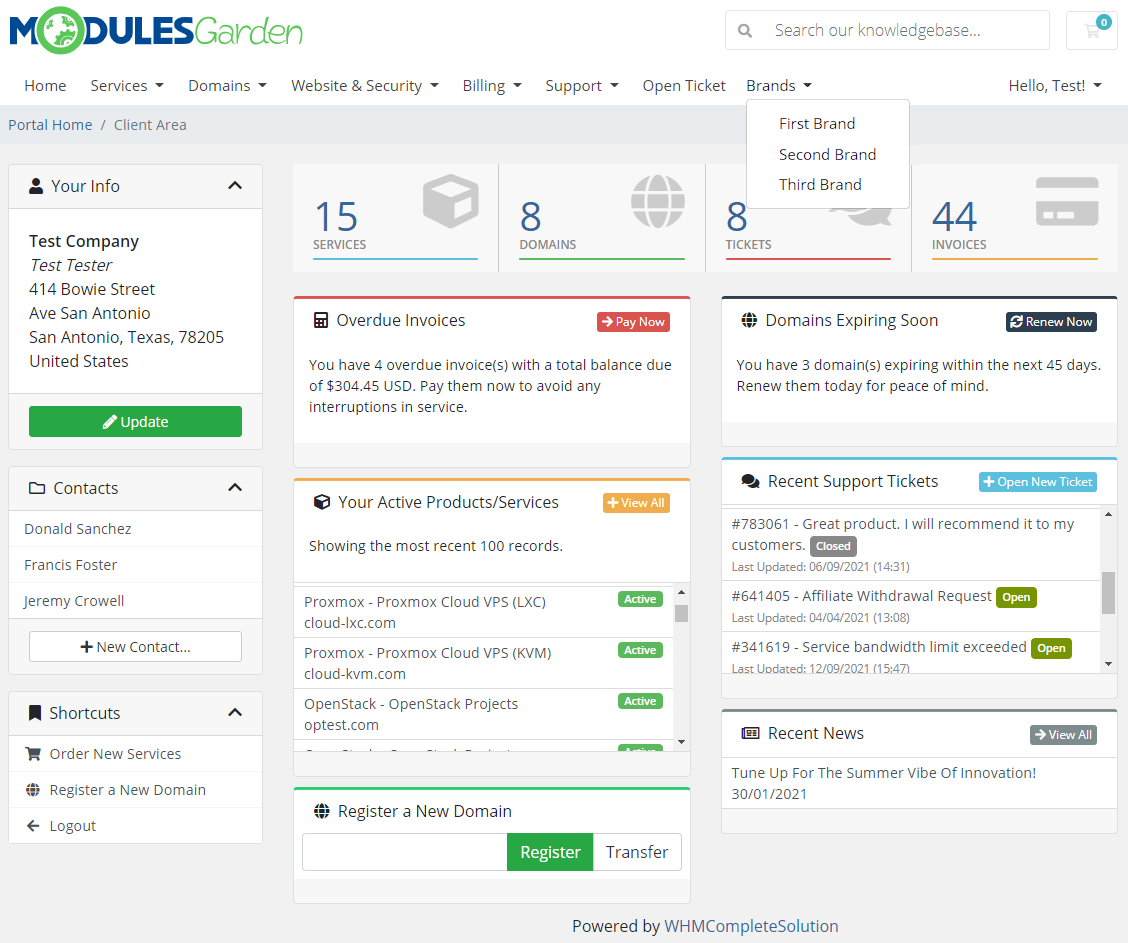
| Multibrand For WHMCS offers multiple client areas in one solution and allows you to have your clients assigned to them. For example, each brand domain can have a separate template, logo, language, services and invoices. |
|
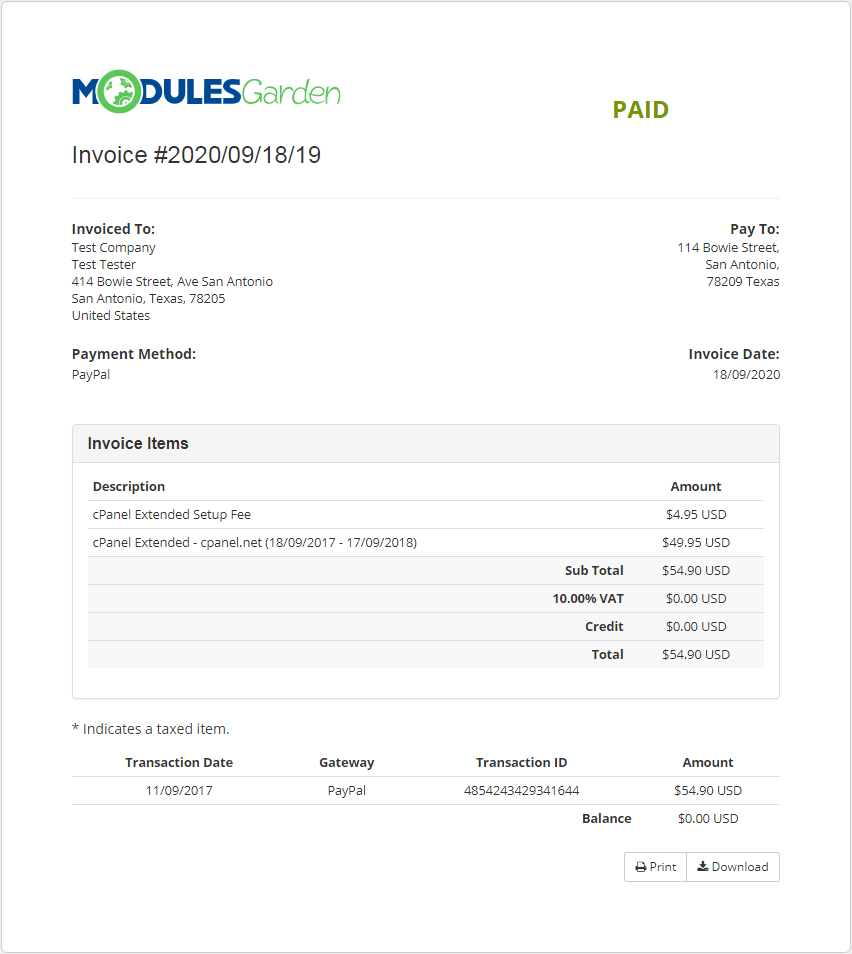
| On the following screen you can see invoices generated for a brand. |
|
Branded Emails
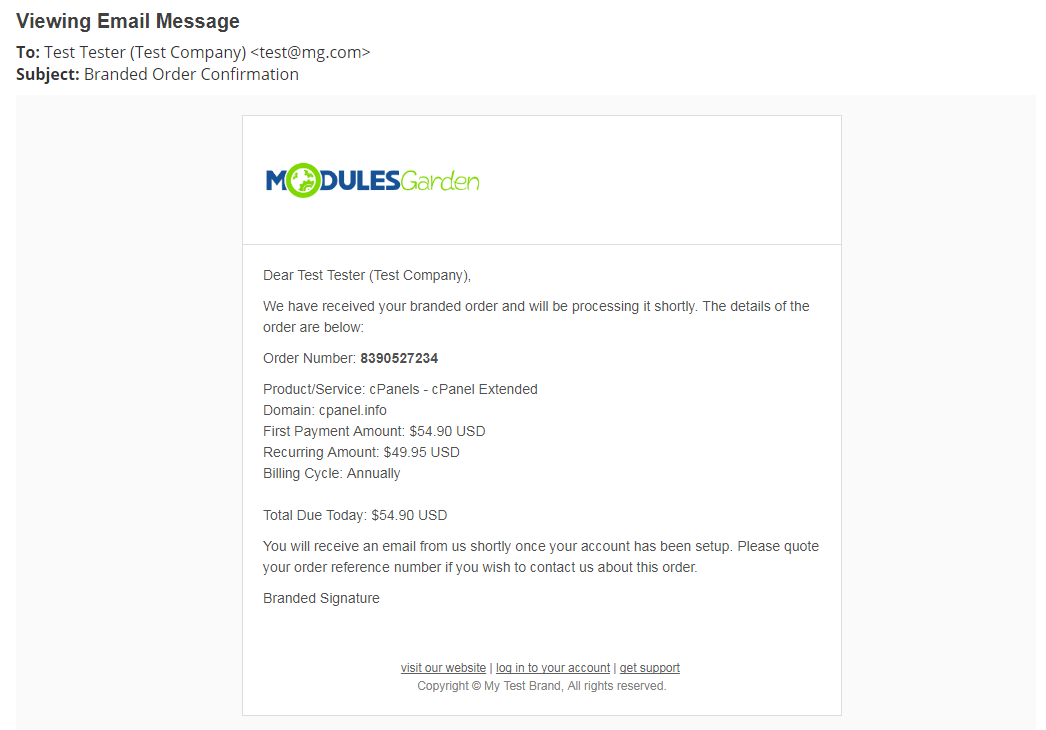
| Brand configuration applies also to emails sent to clients. If you have enabled branding of a given template, the email sent to the client will be sent using the mailbox specified in the SMTP settings of the given brand. |
|
| You will find more information in the branded Email Templates configuration. |
Branded Domains & Aliases Configuration
| In this section you will find guides on how to create branded domains and aliases in popular control panels. Please keep in mind that there are multiple combinations, that may occur. Take a closer look to find a perfect solution for your case. |
Apache2 / NGINX
If there is no cPanel/DirectAdmin/Plesk panel on your server, then all you need to do is modify the current configuration:
|
cPanel / DirectAdmin / Plesk Servers
Same Server + One Account/Subscription
| This configuration of Same server + One Account/Subscription assumes that all domains are added within one account/subscription on a given server. In this case, simply add an additional domain so that it points to the same directory as the WHMCS main domain points to. If a given panel has 'Aliases' option in its offer, you can also use it. |
Same Server + Multiple Accounts/Subscriptions
| Such scenario (Same Server + Multiple Accounts/Subscriptions) is not feasible. This is due to the way web panels work (separation of users), not the module limitations. |
Separate Server
| A separate server - in this situation the branded domain is added to other DNS server. It might be added to, for example cloudflare, or it is added and used on another server, for example cPanel or DirectAdmin. Take a look at the exemplary situation. Let's say there are two domains:
In order to process it correctly, follow the below steps:
|
SSL Certificate
| In this section you will find all information about the SSL certificate in WHMCS required to use Multibrand For WHMCS properly. If either your branded domains or WHMCS domain use the SSL connection, they should also support one of the below certificates.
This is the way WHMCS works. It cannot be considered the limitation of our module which uses the 'WHMCS System URL' scheme. |
cPanel
| Installing the SSL certificate for domains managed from cPanel consists of the following steps: |
| 1. Log in to your cPanel and press 'SSL/TSLS Manager' under the 'Security' section. |
| 2. Click on 'Manage SSL sites' under 'Install and Manage SSL for your site (HTTPS)'. |
| 3. (installing the certificate) Select the domain, paste the certificate along with the private key, and save the settings. |
| 4. (using the already installed certificate) Select the certificate from 'Browse Certificates' , and save the settings. |
| Alternatively, you can enable the AutoSSL solution that will automatically install domain-validated SSL certificates. Go here for more information. Note: AutoSSL function is unlikely to work for the CNAME entries, and therefore you should use virtual hosts (vhosts) instead. |
Branding Limitations
Version 2.4.0
| With the aim of better stability and support for future improvements, Multibrand For WHMCS has been completely rewritten in the 2.0 version. For this reason, some of the functionalities are not yet available or are operating in a limited way.
|
WHMCS
In this section we will list those elements of WHMCS that cannot be branded or may be working in an improper way.
|
WHMCS Modules and Others
In this section we will list the WHMCS modules and other services which do not support multibranding or do not cooperate with Multibrand For WHMCS at all.
|
Integration with MetricsCube
|
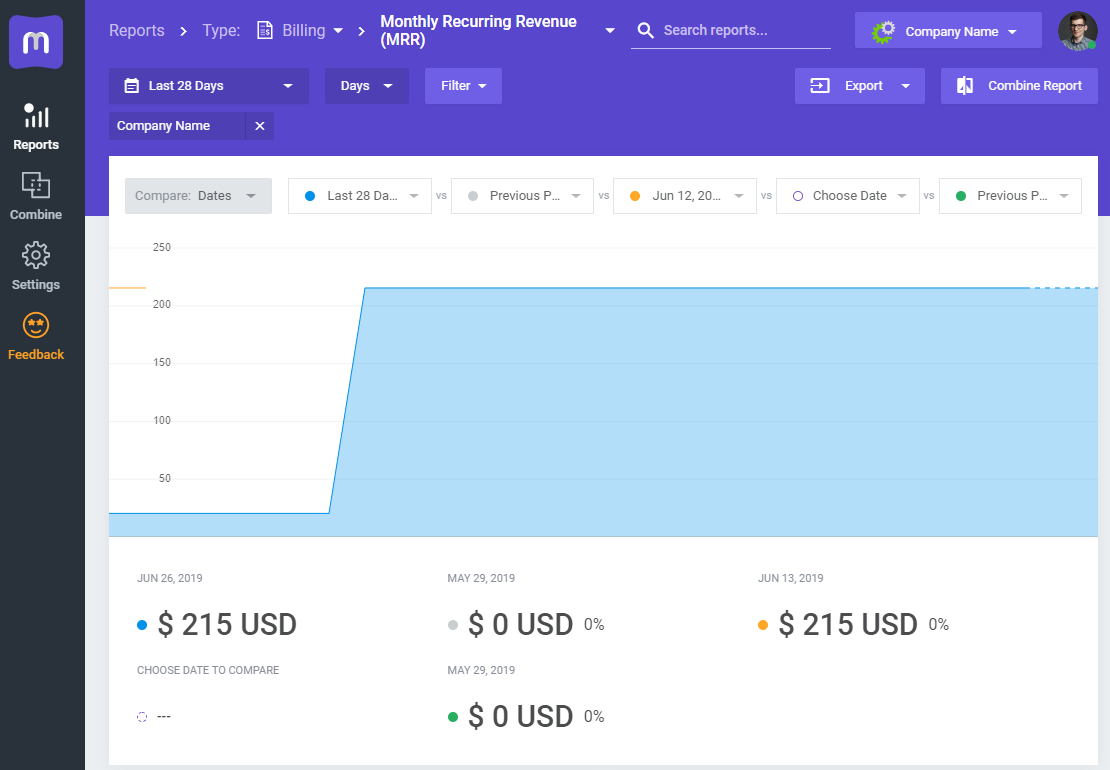
MetricsCube is a platform that will empower you to gain insight into your business almost effortlessly. Multibrand For WHMCS module can be very easily integrated with this external platform. |
|
Module Hooks
The Multibrand For WHMCS module supports the use of hooks to customize its functionality. Below is a list of available hooks, including their parameters and usage:
|
| Each hook must be saved in a PHP file with the same name as the hook. For example: for the EmailPreSend hook, create a file named EmailPreSend.php. Exemplary hook code: <?PHP
return [
function($params)
{
return ["company_name" => "Mulibrand®"]
}
]
|
| Adding hooks:
Hooks should be added to the following directory: ./includes/hooks/multibrand/ MGModule\Multibrand\Core\EventManager::addHook($hook_name, $callable); |
Tips
| 1. The logo image is usually hard coded into the WHMCS template files. In order to use the logo file provided in the 'Multibrand For WHMCS' module, find the proper line in the template file and replace it with '{$logo}' variable. |
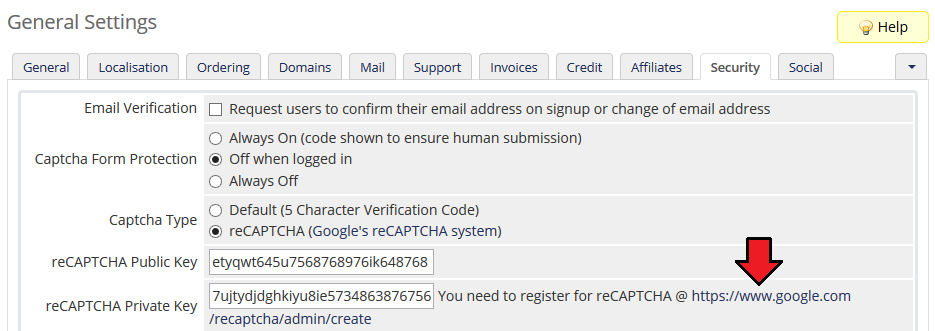
| 2. If you want Captcha security option to be displayed in your client area for all branded domains, you need to configure each of those domains in your Google Account as well. |
|
| 3. Note that it is not possible to merge tickets from different brands. |
| 4. Performing the 'Send Message' action on a clients list will result in sending branded emails only to the clients who are assigned to an individual brand. |
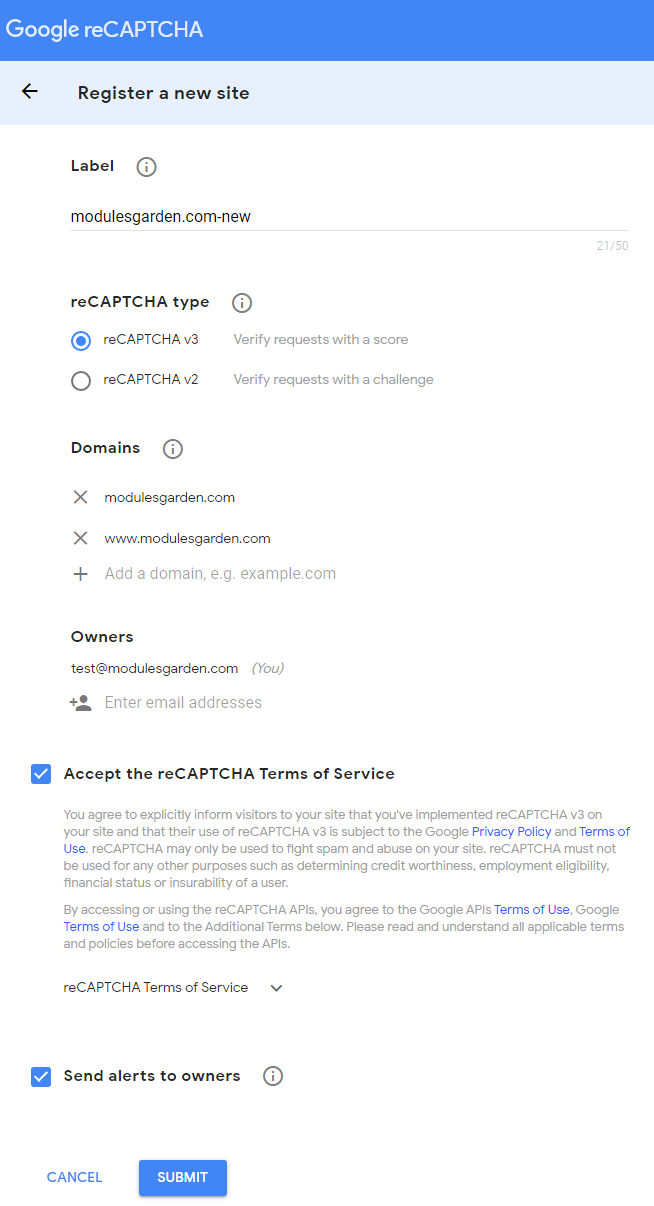
| 5. If you would like to use Google reCAPTCHA for brand storefronts, you need to add domain addresses of those brands to the reCAPTCHA configuration. To do so, please proceed here. |
|
| 6. Please remember that if you upload a brand logo that is too big, too small, or has unusual proportions, it may result in its incorrect scaling in templates, emails, or on invoices. To avoid that, please make sure that you are familiar with WHMCS logo requirements that can be found here. |
Update Instructions
| An essential guidance through the process of updating the module is offered here. In order to migrate the data from the 1.8.X version, simply activate the new module addon. |
Uninstallation Process
| If you no longer wish to use Multibrand For WHMCS, you may safely uninstall the module. Steps to follow to successfully and safely remove the module from your system: 1. Remove the integration code.
3. Remove all tables that begin with Multibrand_ from the database. That is all, the module is completely uninstalled now. |
Upgrade Guide
| Seeking a solution that offers greater flexibility, customization tailored to your precise needs, and unrestricted availability? There is an option that not only proves to be cost-effective in the long run but also includes prioritized support services, making it a truly valuable investment. Opt for the Open Source version of your Multibrand For WHMCS module to unlock these benefits. Follow a comprehensive guide covering the transition process, the advantages it brings, and step-by-step instructions on what to do next after the order has been successfully finalized. |
Common Problems
| 1. When you have problems with connection, check whether your SELinux or firewall does not block ports. |
| 2. If your CNAME record is not working, remember that the first domain name in the CNAME record should be a branded domain. The second one is the domain on which you have your WHMCS. The redirection goes from the first domain to the second. |
| 3. Please remember that Multibrand For WHMCS is guaranteed to work smoothly with 'Six', 'Twenty-One' And 'Lagom' templates. If you are using some custom template, please be mindful that the module may not combine well with it out of the box, which may result in unexpected errors. |
| 4. Since Multibrand For WHMCS and Resellers Center For WHMCS both come with separate pricing configuration, we do not recommend using them in one WHMCS installation. Due to possible malfunctions in branding, we also advise against using Multibrand For WHMCS with the following modules:
Integration between these modules is hampered because of the specific functions that each of them offers as well as their individual workflow. |
| 5. If you intend to use Hosting Renewals For WHMCS, please take note of the following issue concerning the module's discounts calculation. In order for the discounts to be based on the prices settled in Multibrand For WHMCS, you must set the Hosting Renewals 'Apply Recurring Amount From Service Settings' option to 'Enabled'. |
| 6. Integration between Domain Orders Extended For WHMCS and Multibrand For WHMCS module is slightly limited. Please be aware that only the main brand works flawlessly with the mentioned module, branding is not supported for Domain Orders Extended yet. |
| 7. If you are using HTTPS, remember to implement a redirect from HTTP to HTTPS on the branded domain. Otherwise, WHMCS will route visitors to the main WHMCS and not the brand. Keep in mind that when WHMCS creates the redirection, the domain is changed as well. |