Hosting Quota Notifications For WHMCS
Are you going to update your module to version 2.2.0?
Be sure to review our tips in "Update Instructions" to prevent any potential issues
Contents |
About Hosting Quota Notifications For WHMCS
| Hosting Quota Notifications For WHMCS allows to define rules on clients' services bandwidth and disk usage limits according to which automatic email notifications can be sent and tickets opened to let the clients know they have exceed the previously set service usage. Prepare ticket templates and their translations, use default email template or prepare your custom ones. |
- Module:
| ✔ Send Automated Notifications To Clients When They Exceed Defined Bandwidth And Disk Usage: |
| ✔ By Email |
| ✔ By Ticket |
| ✔ Display Daily Service Bandwidth And Disk Usage In Client And Admin Areas: |
| ✔ Resource Usage Records Table |
| ✔ Usage History Graph |
| ✔ Configure Notification Rules: |
| ✔ Enable/Disable Notification Rules |
| ✔ Choose Between Three Types Of Overages Calculation: |
| ✔ Tiered - Define Tiers Of Resource Usage |
| ✔ Fixed - Define Resource Usage In Specific Time Periods |
| ✔ Basic - Use Built-In WHMCS Overage Resource Usage |
| ✔ Assign Multiple Products To Single Notification Rule |
| ✔ Assign Default Email Template |
| ✔ Define Hours Interval Of Notification |
| ✔ Show Resource Usage In Client Area |
| ✔ Configure Steps Per Disk And Bandwidth Rule: |
| ✔ Define Resource Overage Values: |
| ✔ In Specific Unit (MB, GB, TB) |
| ✔ Based On Percentage Value Of WHMCS Soft Limit |
| ✔ Assign Email And Ticket Templates Per Notification Rule Step |
| ✔ Define Time Period Of Overage Calculation For Fixed Rule Step |
| ✔ Define Action Taken Upon Resource Usage Exceeding: |
| ✔ None |
| ✔ Auto-Suspend Product |
| ✔ Auto-Terminate Product |
| ✔ Configure Ticket Templates In Multiple Languages |
| ✔ View Daily Usage Of Specific Service |
| ✔ View Today, Last Week And Last Month Statistics Of: |
| ✔ Sent Email Notifications |
| ✔ Opened Tickets |
| ✔ Suspended Services |
| ✔ Terminated Services |
| ✔ Customize Module Language Files With "Translations" Tool |
| ✔ Control Staff Access Level To Specific Resources With ACL |
| ✔ View Logs Of Sent Notifications, Opened Tickets And Performed Actions |
- General Info:
| ✔ Multi-Language Support With Custom Translations Tool |
| ✔ Supports PHP 8.3 Back To PHP 8.1 |
| ✔ Supports WHMCS V8.13 Back To WHMCS V8.10 |
| ✔ Requires ionCube Loader V14 Or Later |
| ✔ Easy Module Upgrade To Open Source Version |
Installation
| This tutorial will show you how to successfully install and configure Hosting Quota Notifications For WHMCS. We will guide you step by step through the whole installation and configuration process. |
Installation
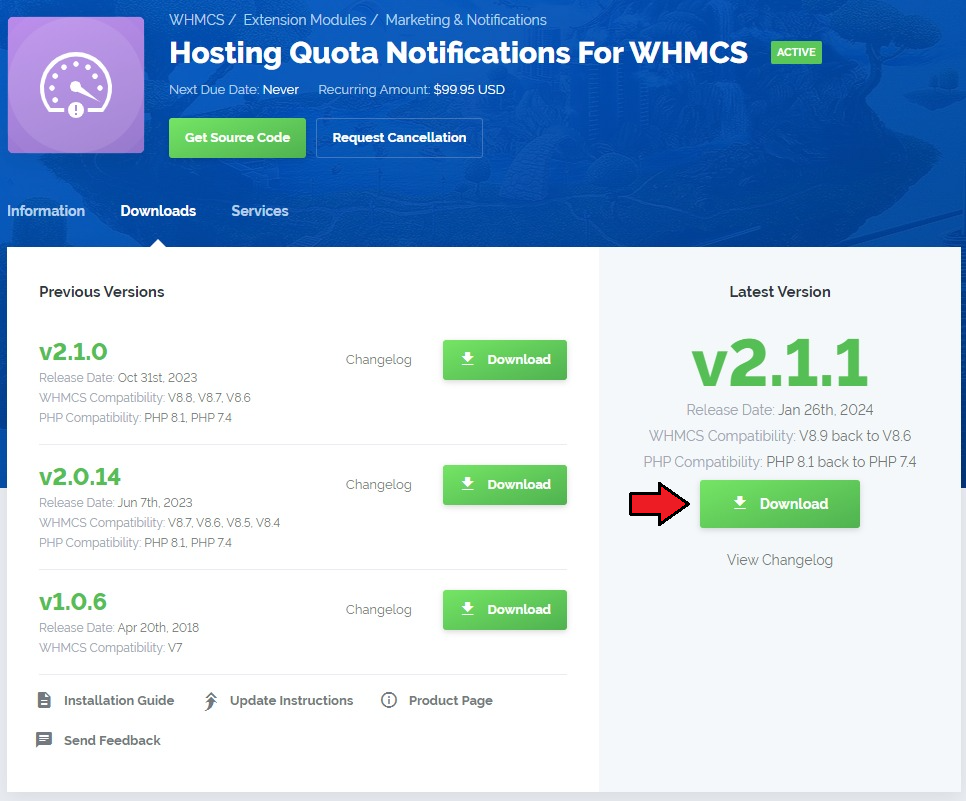
| 1. Log in to our client area and download the module. |
|
| 2. Extract the package and upload its content into the main WHMCS directory. The content of the package to upload should look like this. |
| 3. When you install Hosting Quota Notifications For WHMCS for the first time you have to rename the 'license_RENAME.php' file. The file is located in 'modules/addons/HostingQuotaNotifications/license_RENAME.php' . Rename it from 'license_RENAME.php' to 'license.php' . |
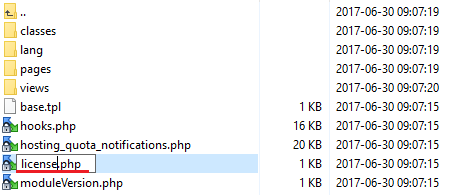
|
| 4. In order to configure your license key, you have to edit the previously renamed 'license.php' file. Enter your license key between quotation marks as presented on the following screen. You can find your license key in our client area → 'My Products' . |

|
Configuration of Addon
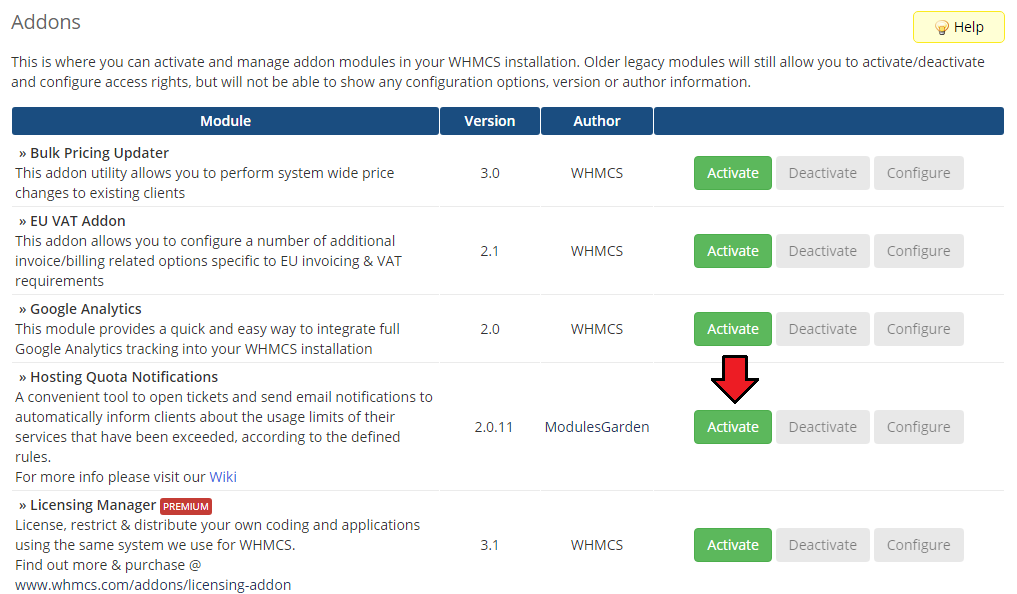
| 5. Now you have to activate the module in your WHMCS system. Log in to your WHMCS admin area. Go to 'Setup' → 'Addon Modules' . Afterwards, find 'Hosting Quota Notifications' and press the 'Activate' button. |
|
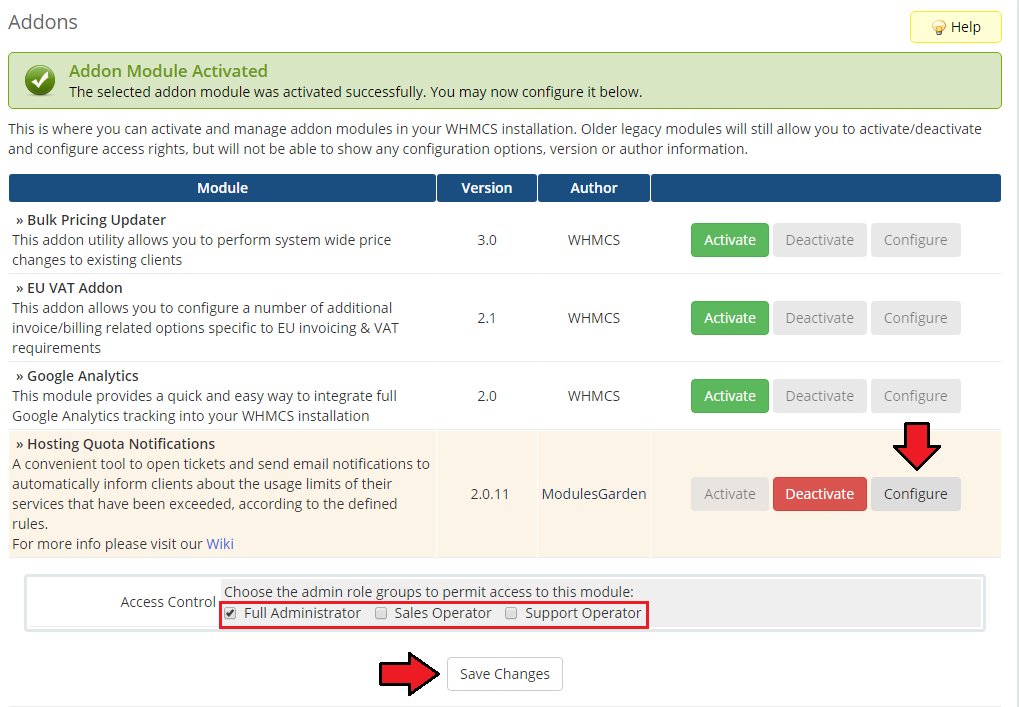
| 6. In the next step you need to permit access to this module. To do so click the 'Configure' button, tick 'Access Control' near required admin role groups and press 'Save Changes'. |
|
| 7. You have just successfully installed Hosting Quota Notifications For WHMCS! You can access your module at 'Addons' → 'Hosting Quota Notifications'. |
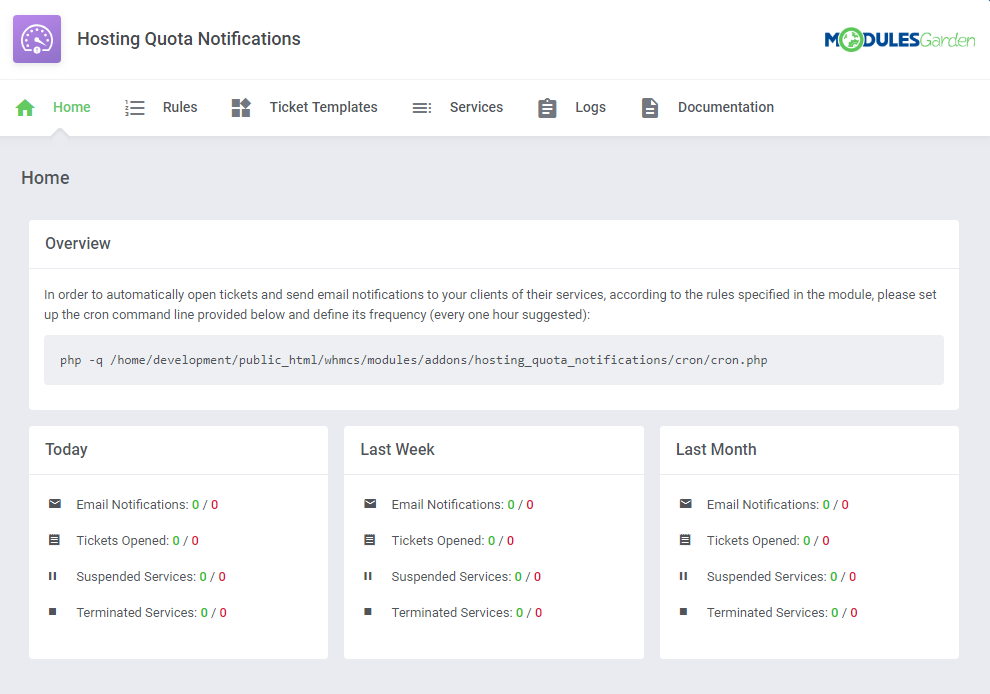
|
| 8. The last thing you still need to do before starting to use the module with its full potential is setting up a cron command line. You will find the cron line in the addon 'Home' page. One hour interval is suggested (due to hourly sent notifications). |
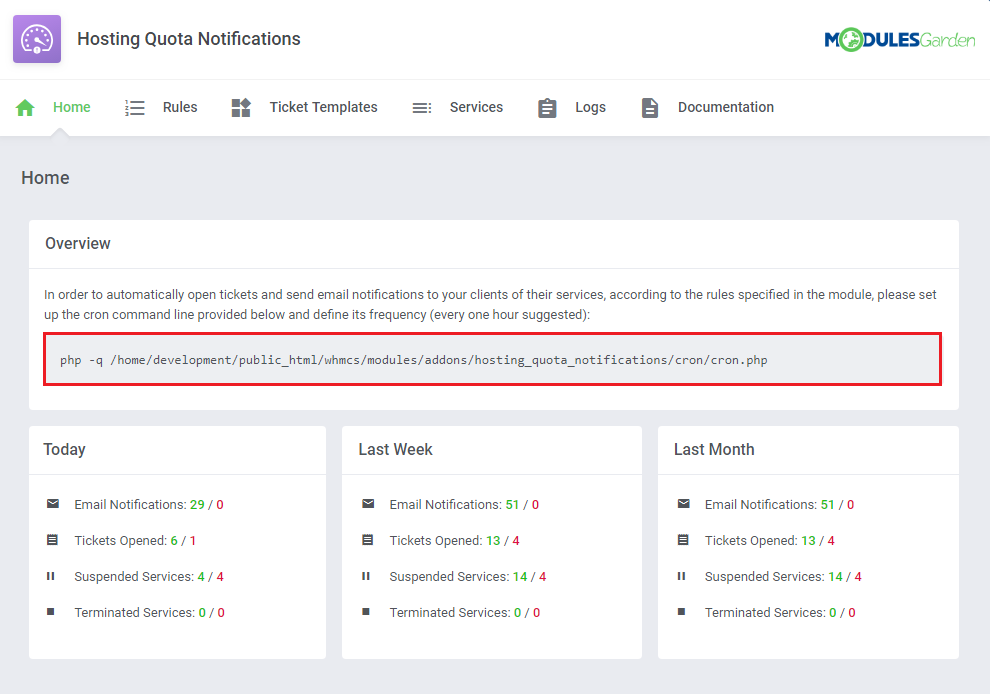
|
Configuration and Management
| In this section we will show you how to properly set up and use Hosting Quota Notifications For WHMCS to its full potential. |
Home
Dashboard of the addon includes statistics on the module actions attempts, either successful or failed.
|
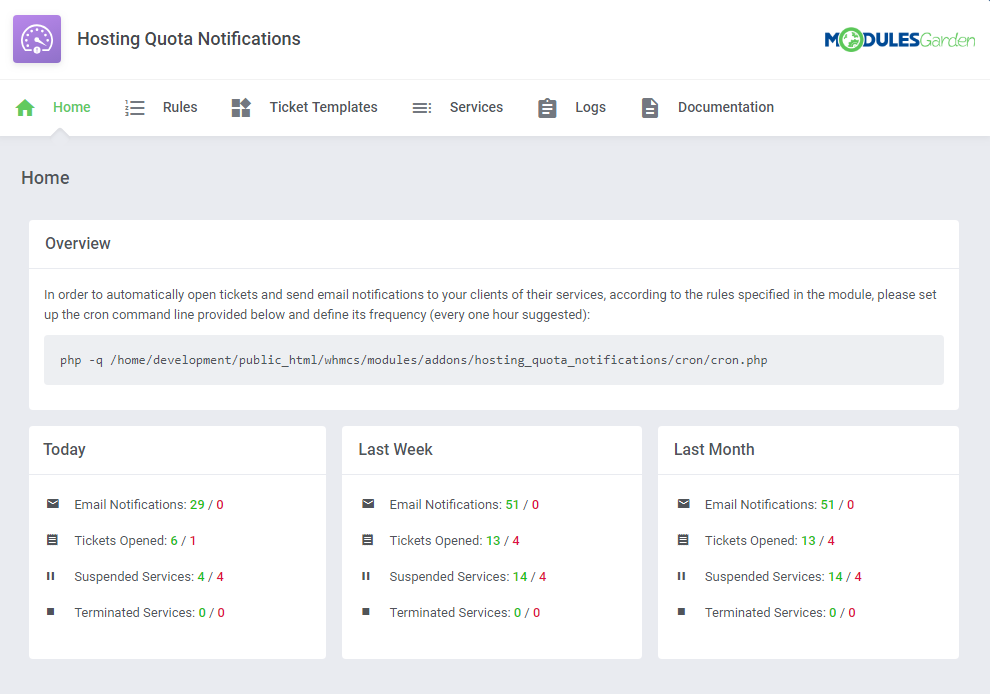
|
Rules
| This is a primary section which allows to create numerous rules according to which the services resource usage will be monitored and calculated and then adequate notifications sent. |
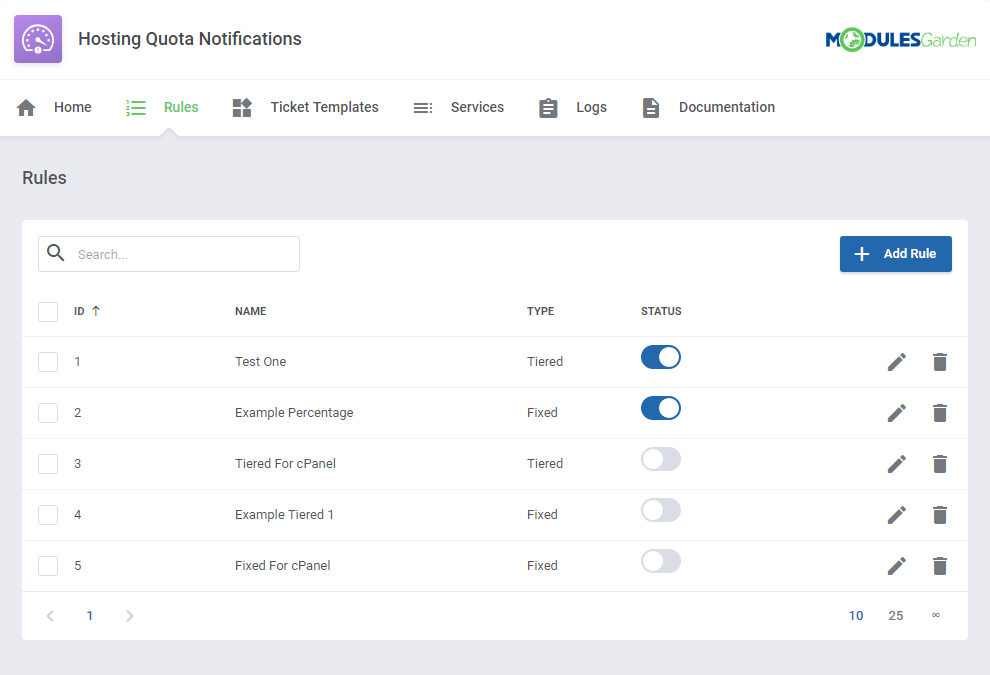
|
Rule Configuration
| Let us begin with creating an exemplary rule according to which disk usage of the selected service will be checked. Press 'Add Rule'. |
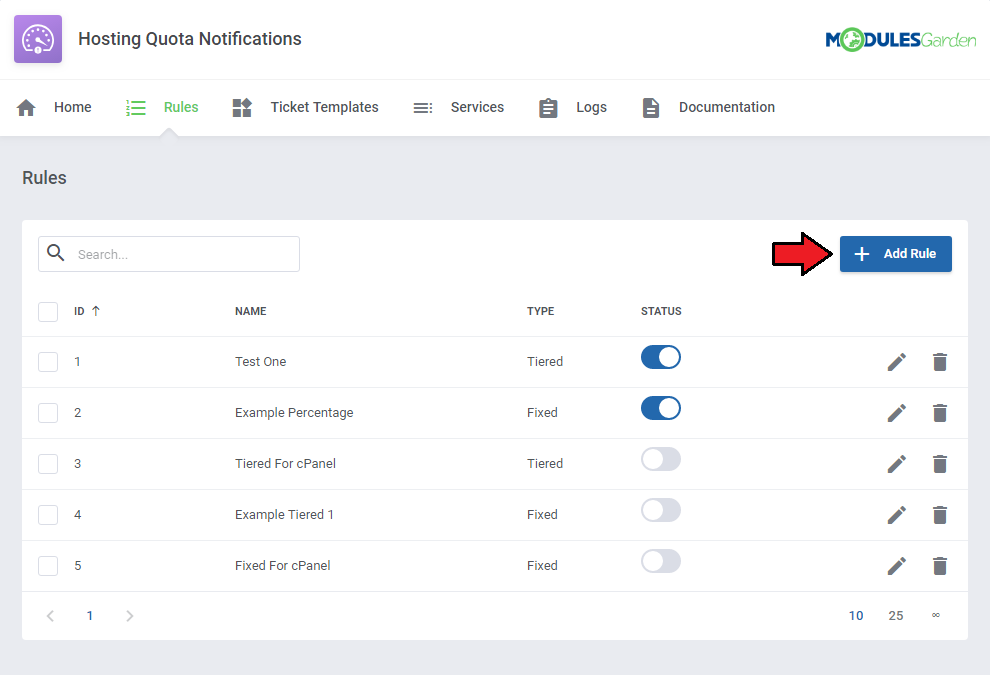
|
| Start with typing a custom name, selecting the usage calculating type: 'Tiered', 'Fixed' or 'Basic' (read more about these two methods here). Choose your products that this rule will cover. |
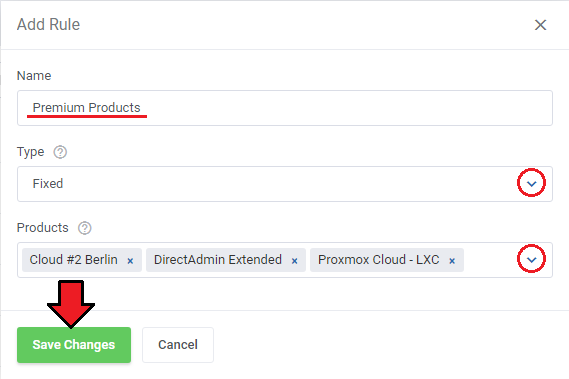
|
| Once you have saved the changes, you will be moved to the rule configuration page. Here you may:
Save the changes when ready. |
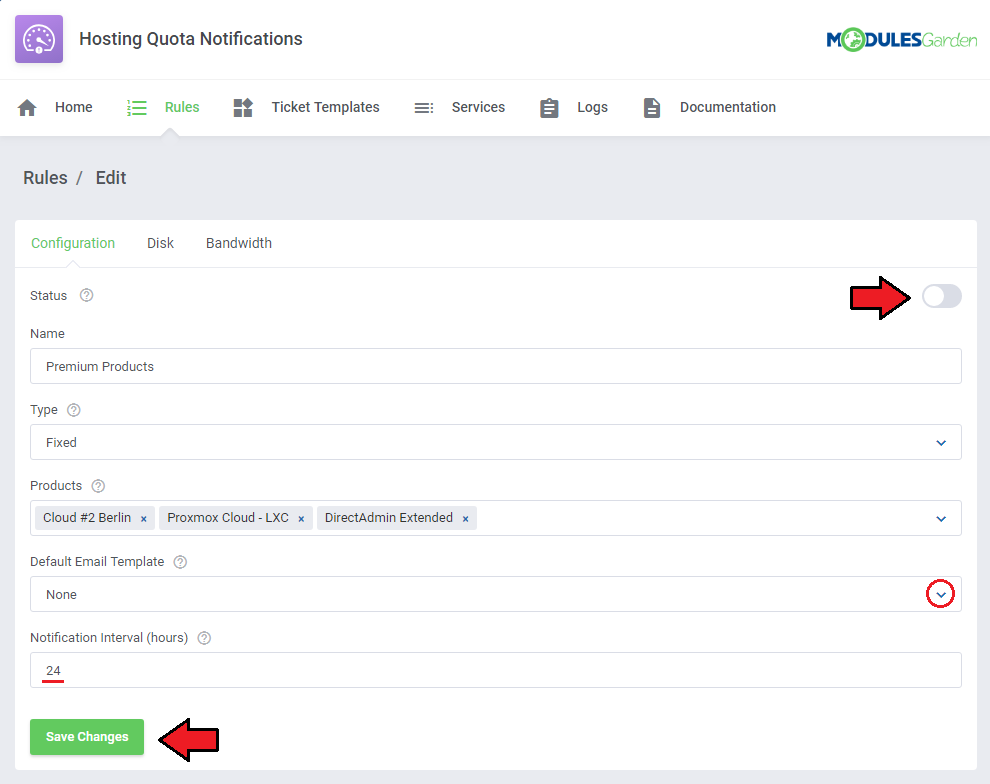
|
Steps Configuration
| Move to the next tab - 'Disk' to define steps conforming to which the usage will be verified. Press 'Add Step' to begin. |
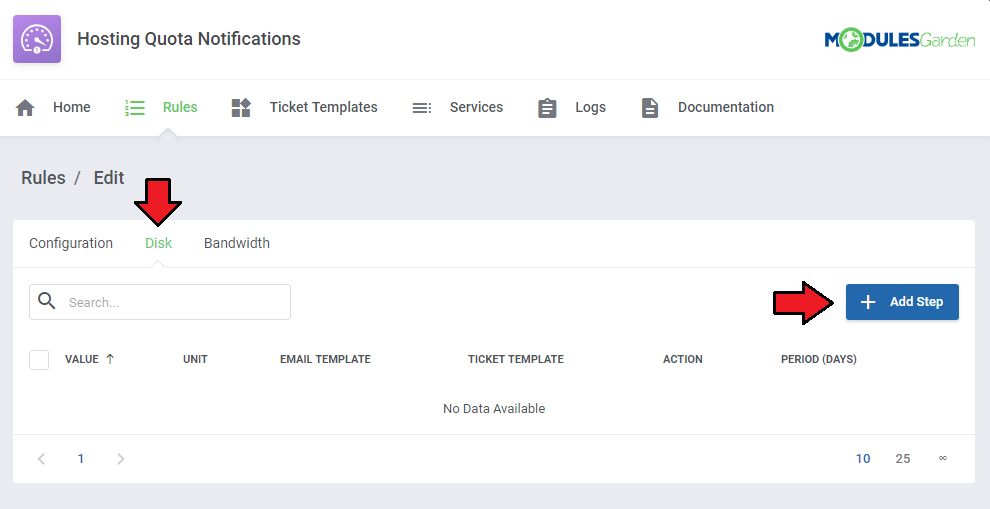
|
|
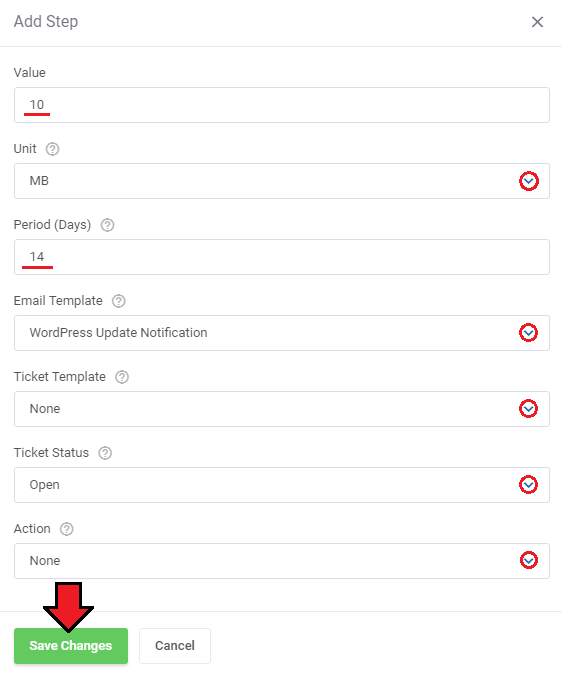
|
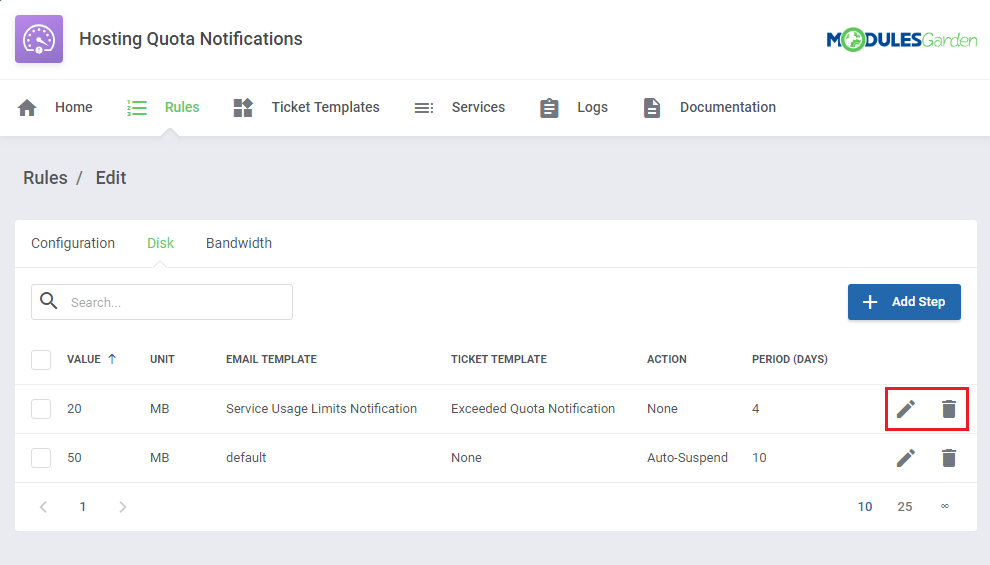
| Surely, you may add more steps for the same rule and force different actions on the services. You may edit the steps if needed or delete them. |
|
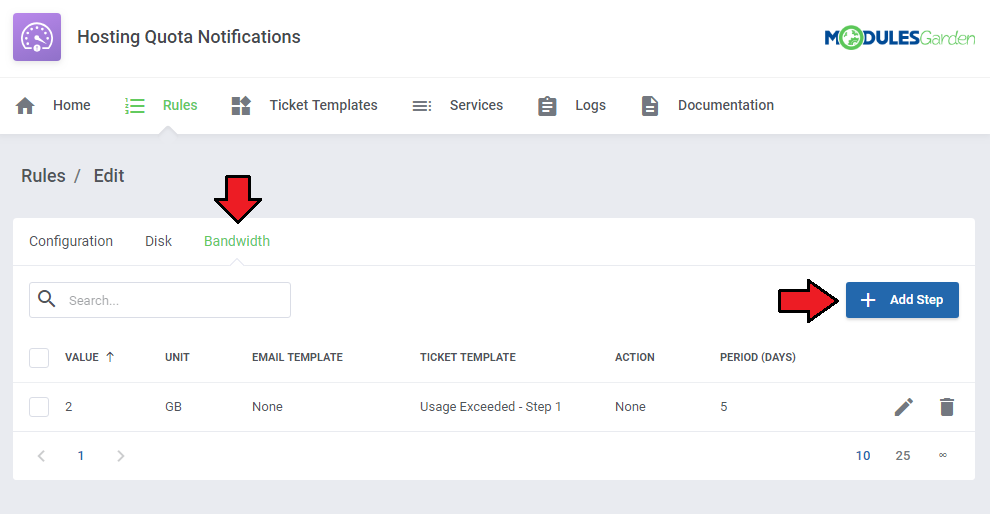
| Configure the steps for 'Bandwidth' usage limits in the very same way as in case of the described above 'Disk'. |
|
Calculation Methods
As mentioned above, there are three calculation types available: 'Fixed', 'Tiered' and 'Basic'. We will try to explain the main differences between them and show an example of a full calculation.
|
| Look at the table below to see the differences between these three types. |
| Day | Total Usage | Daily Usage |
|---|---|---|
| Day 1 | 10 MB | 10 MB |
| Day 2 | 30 MB | 20 MB |
| Day 3 | 40 MB | 10 MB |
| Day 4 | 45 MB | 5 MB |
Where:
|
|
|
|
Apart from the calculation type, you must also select a unit - MB, GB, TB or percentage.
|
Ticket Templates
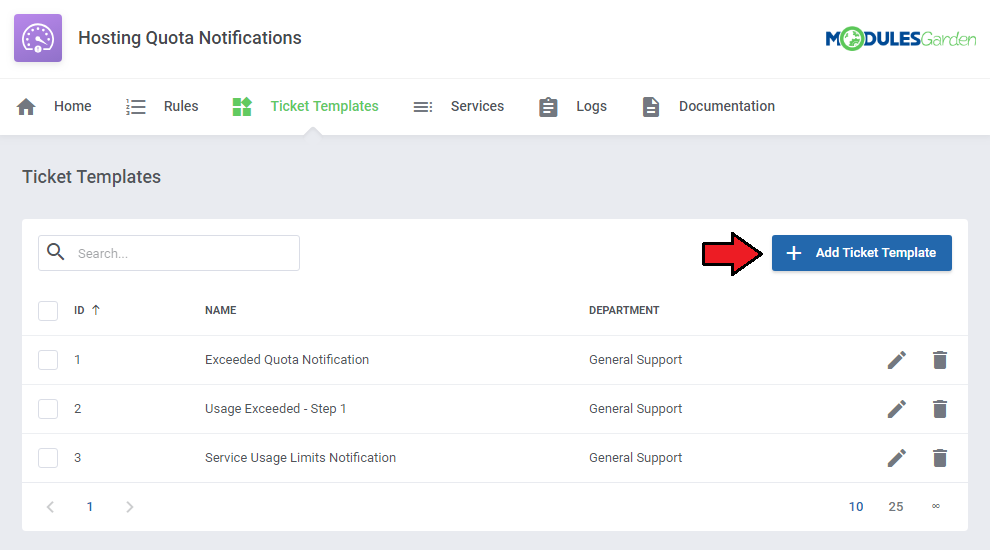
| The 'Ticket Templates' section gives you the opportunity to create as many templates that will be used to open informative tickets as needed. Press 'Add Ticket Template' to create one. |
|
| Type in the ticket template name, select a support department and support administrator to which the ticket will be automatically assigned. When ready, save changes. |
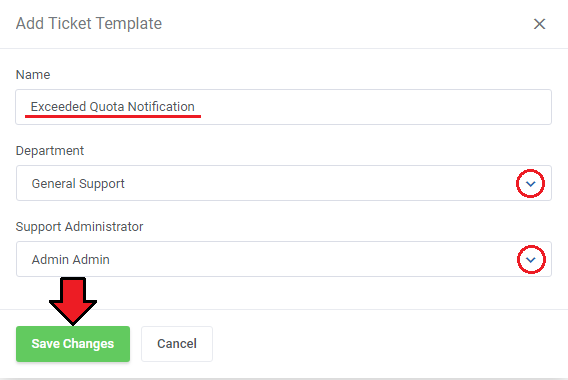
|
| You will be immediately moved to the template configuration page where you can again rename it as well as change the department. |
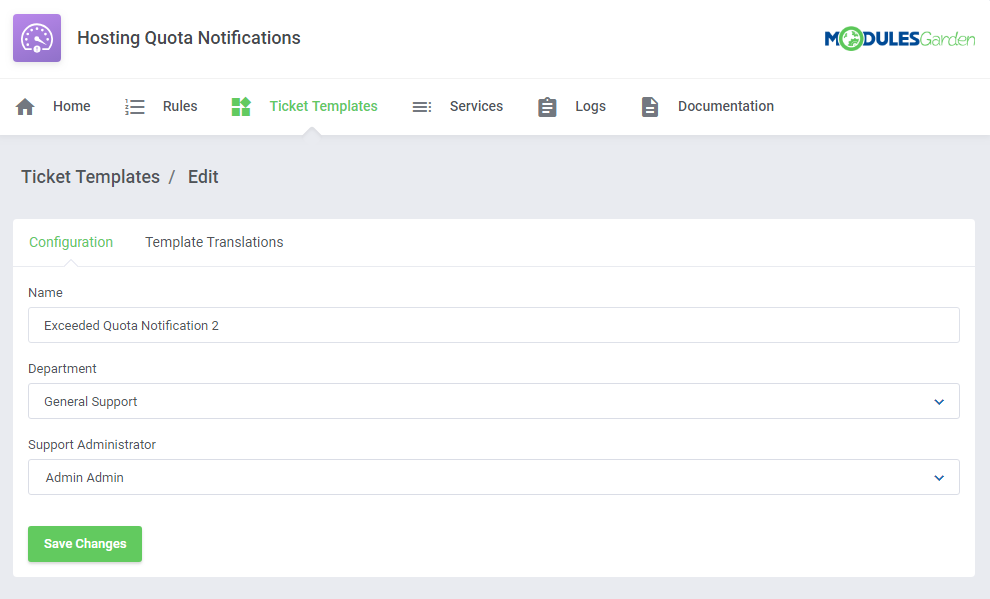
|
Ticket Template Translations
| Next, you need to proceed to the 'Template Translation' section. There you can provide the content of the template. Press 'Add Template Translation'. |
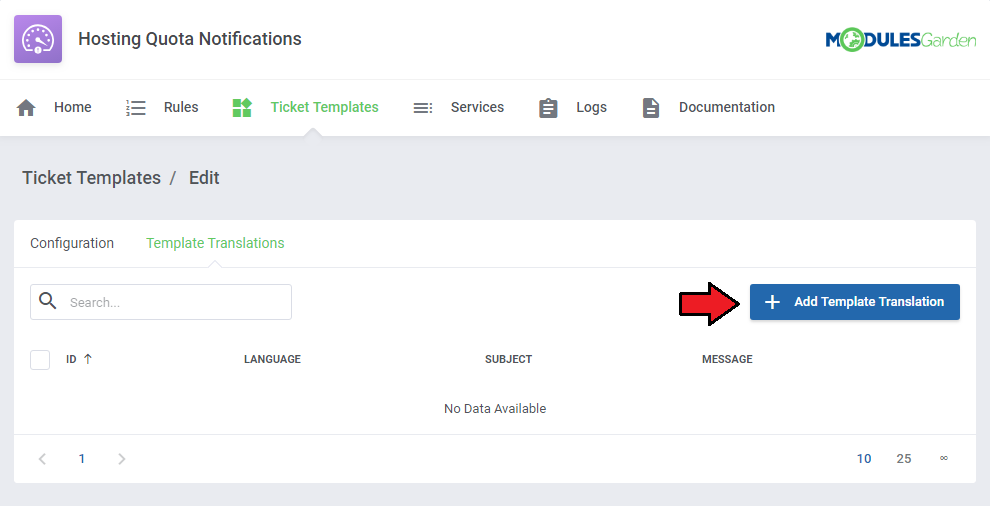
|
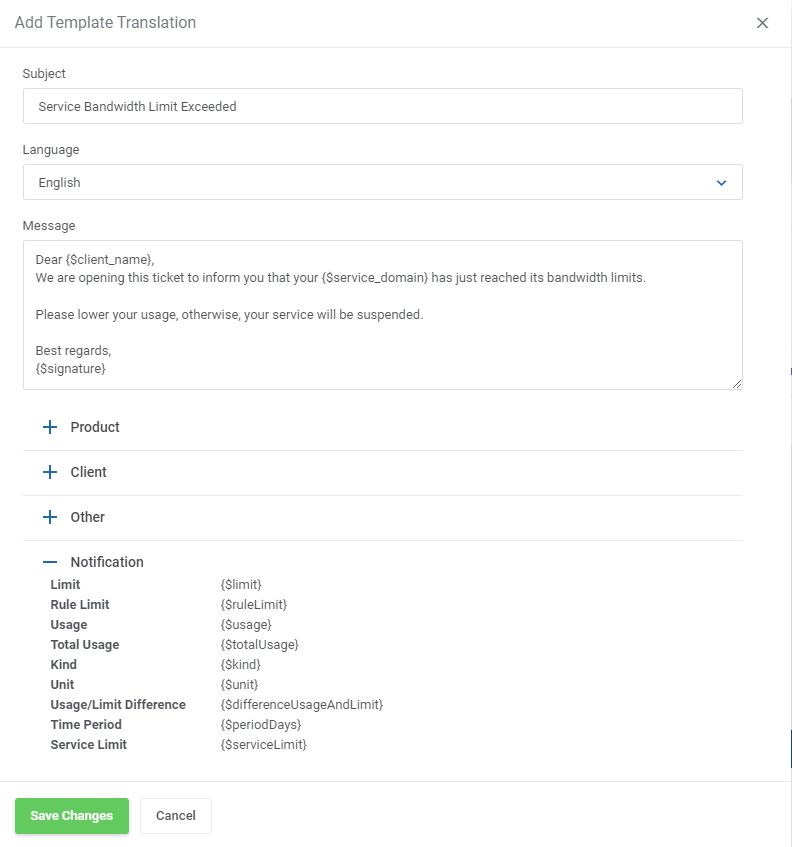
| Enter a template name, select language and type in the text in the 'Message' text field. If you select default language, then this template will be used in case there is no translation in the client's language. |
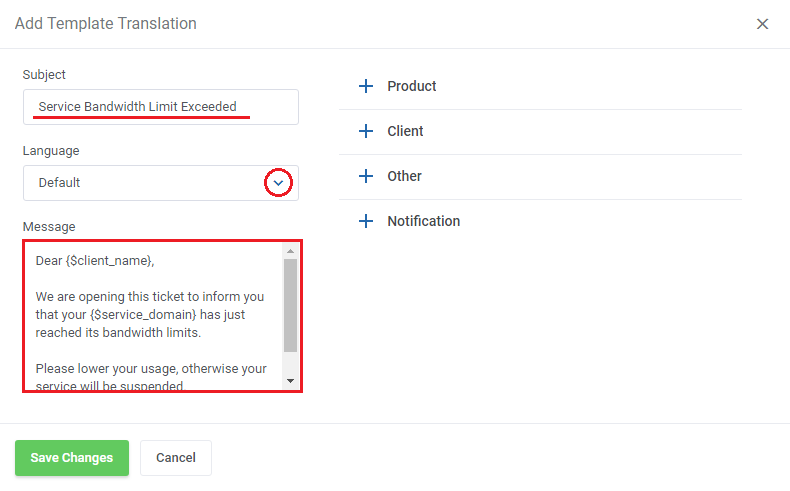
|
| There are numerous merge fields that you may use in the message to make it full and most informative. As you can see at the bottom, there is a list of special merge fields particularly designated for notifications. These are:
|
|
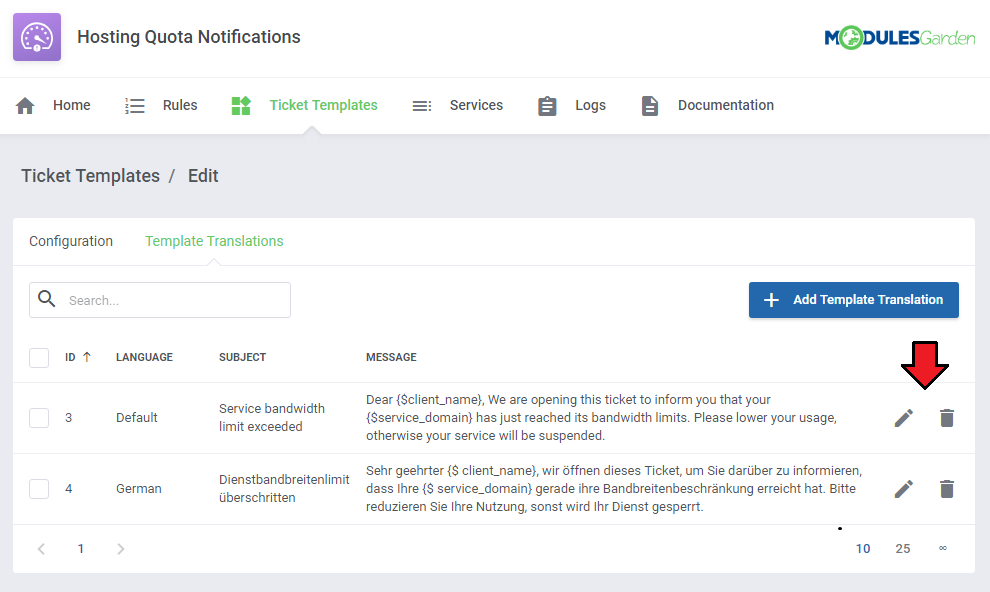
| Use action buttons to edit or delete the template translations. |
|
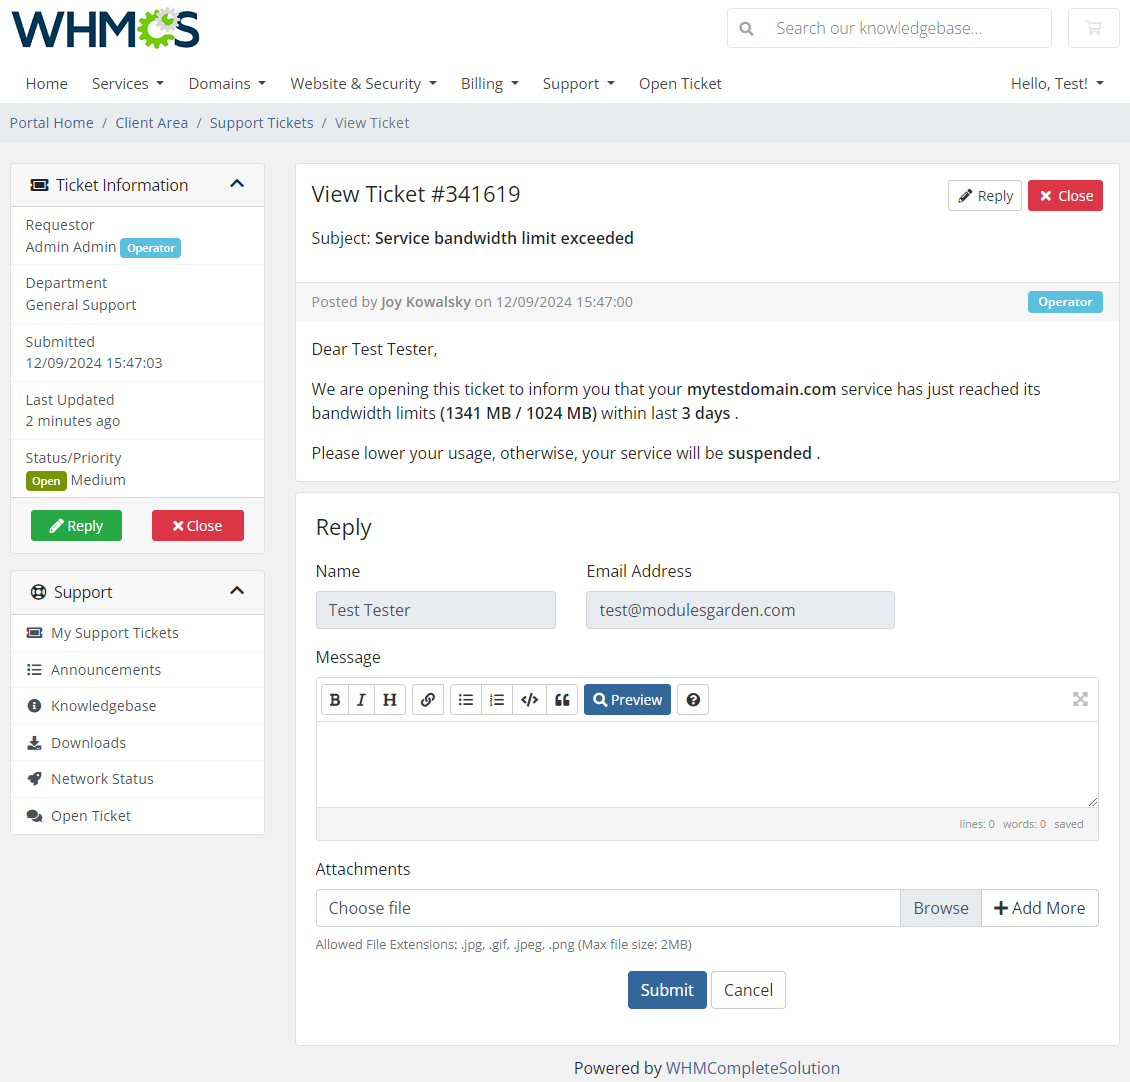
| That is what such an automatically opened ticket may look like in your client area. |
|
Services
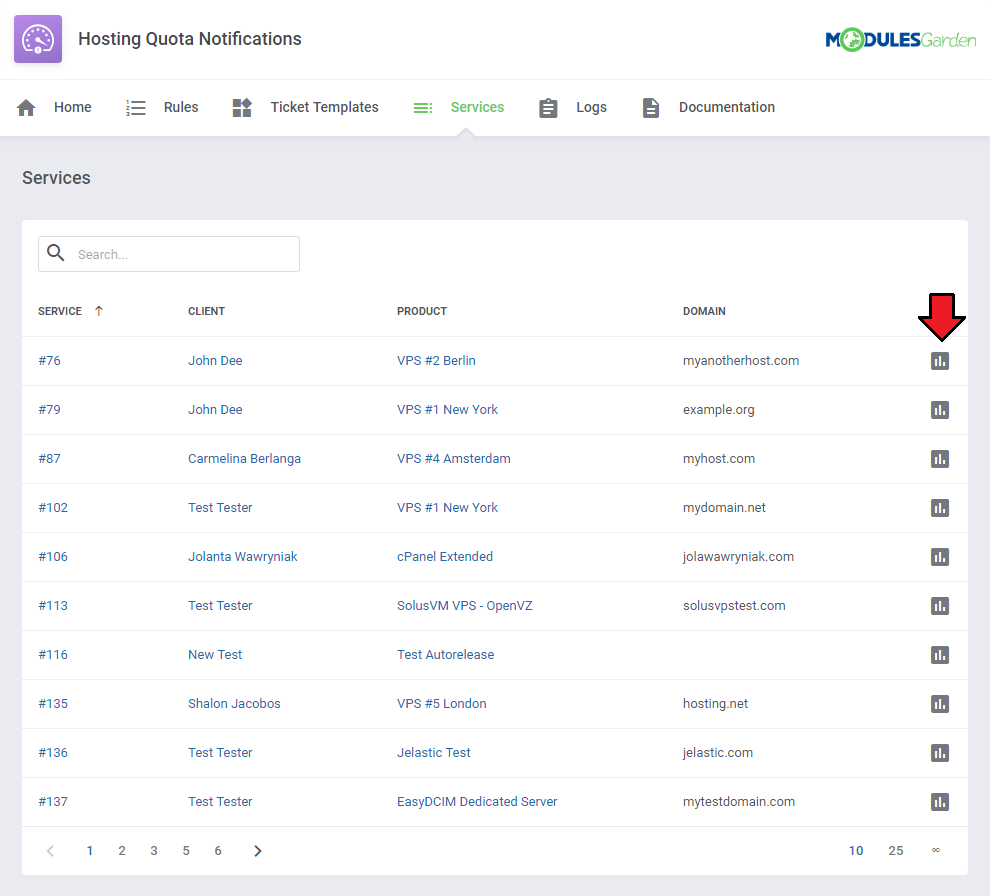
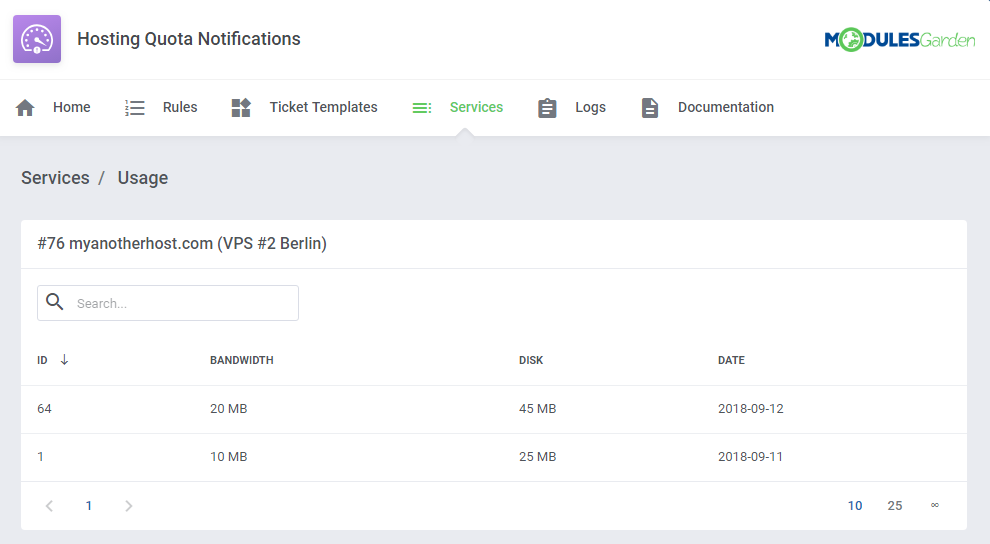
| Another section that we need to draw your attention to is called 'Services'. You will find there products which are included in any of your configured rules with disk or bandwidth usage. Press the icon marked on the screen below and you will get details on the current resource usage of the service per each day. |
|
| Check out the statistics on the disk and bandwidth usage per single product. Analyse the table and the generated graph. Please note that WHMCS updates the quote and traffic load once a day only. |
|
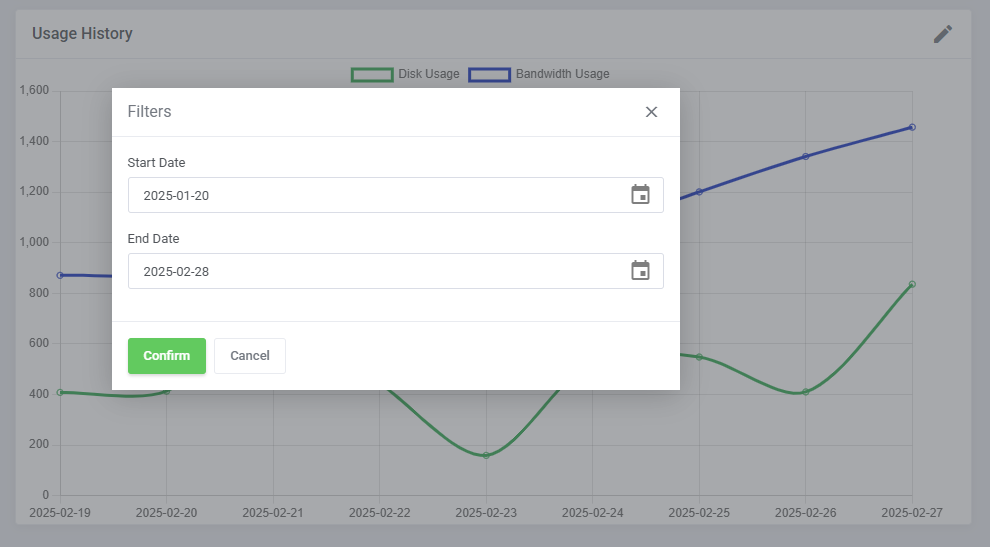
| By default, the graph displays usage data from the past 30 days. You can adjust the date range using the pencil icon. |
|
Client Area Product View
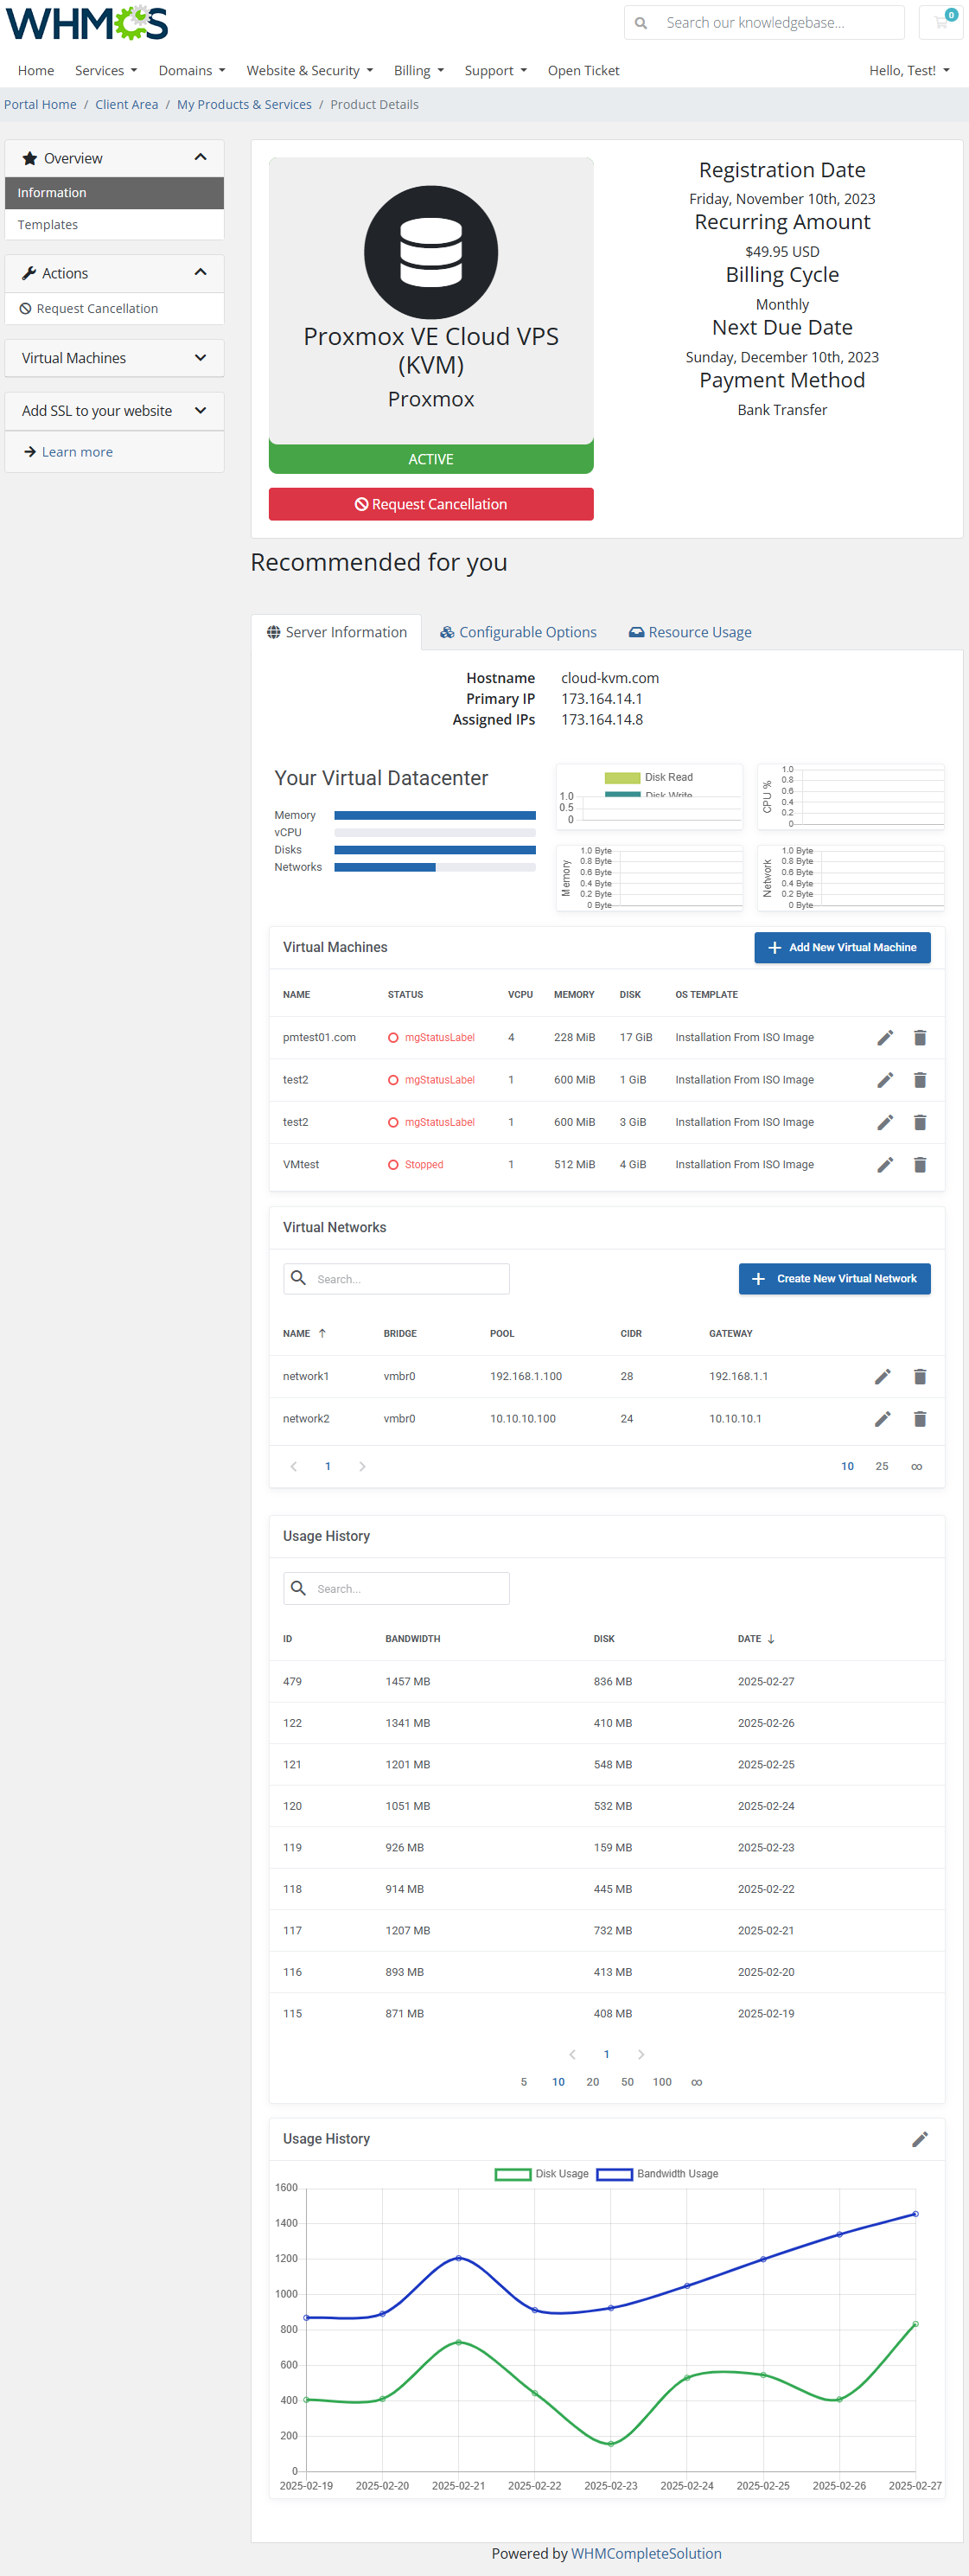
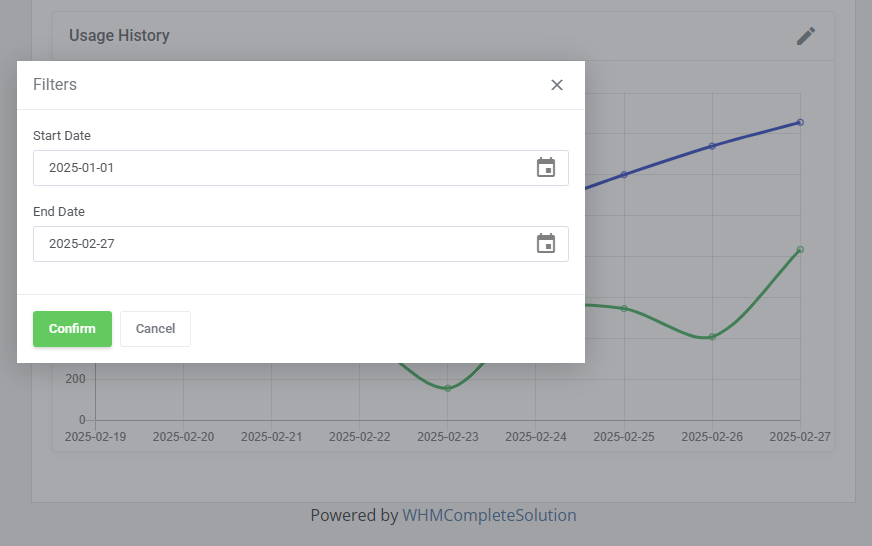
| On the product page in the client area, a table displays detailed service usage information. Below the table, you will find a graphical representation of the usage history. Clients can adjust the displayed date range using the pencil icon to focus on specific periods. |
|
|
Tools
Translations
| Customizing language files is now extremely easy with the "Translations" tool that is now available directly in the addon. Its user-friendly design makes managing various language file tweaks a smooth and efficient process. Prepare translations for the original English files with this handy built-in tool. For specific instructions on how to use this tool please refer to its dedicated article, you will find it here. |
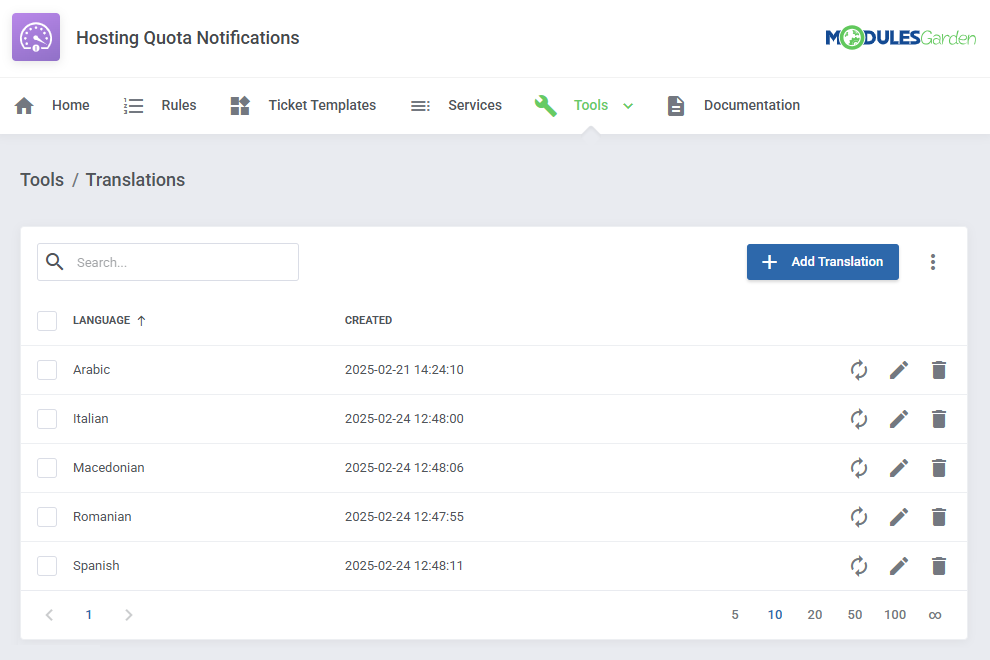
|
Access Control
| Ensure secure and tailored access to your module with the "Access Control" tool available in ModulesGarden addons. This feature allows you to assign permissions, define resource access for administrators, and track activities with detailed logs. |
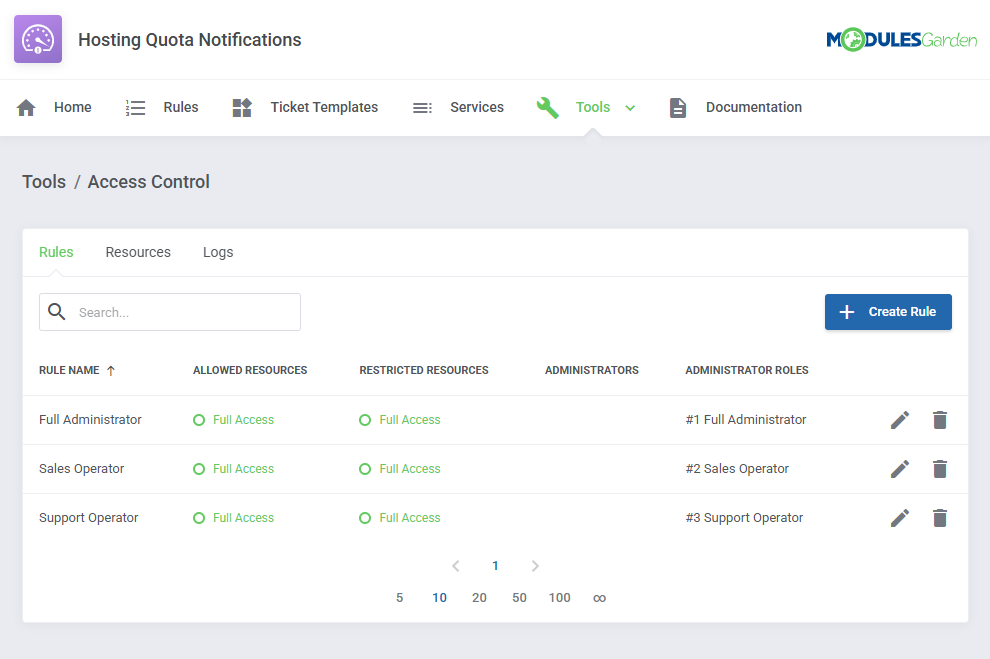
|
Logs
| Under the 'Logs' page, you can view information about sent notifications via email, opened tickets, errors, performed actions etc. |
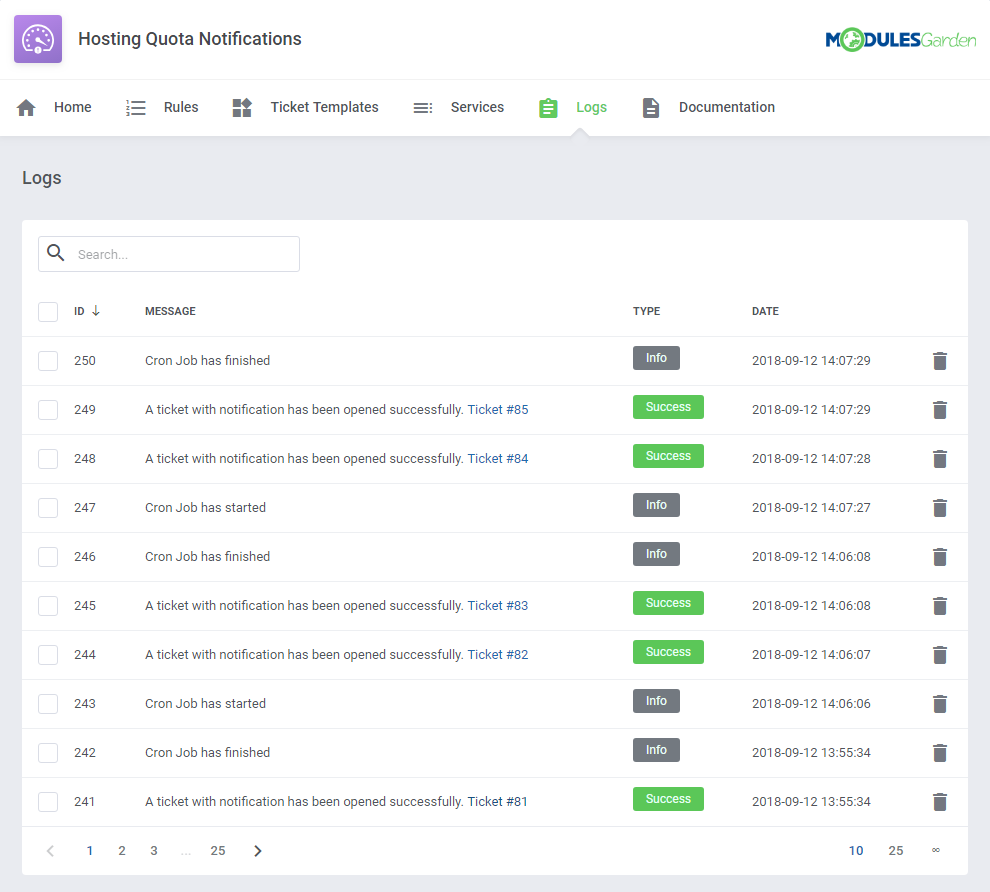
|
Use Cases
| In this section, you will find real-world examples of how to use the module's features. Check out the scenarios below to see the module in action. |
Monitor Resource Usage
| Hosting Quota Notifications For WHMCS can be used to help your clients monitor their resource usage. Follow this example to set up special notifications, that will be sent out whenever a client rapidly depletes a large amount of bandwidth or disk space. |
| Start by creating a rule. Open the addon and navigate to 'Rules' → 'Add Rule'. |
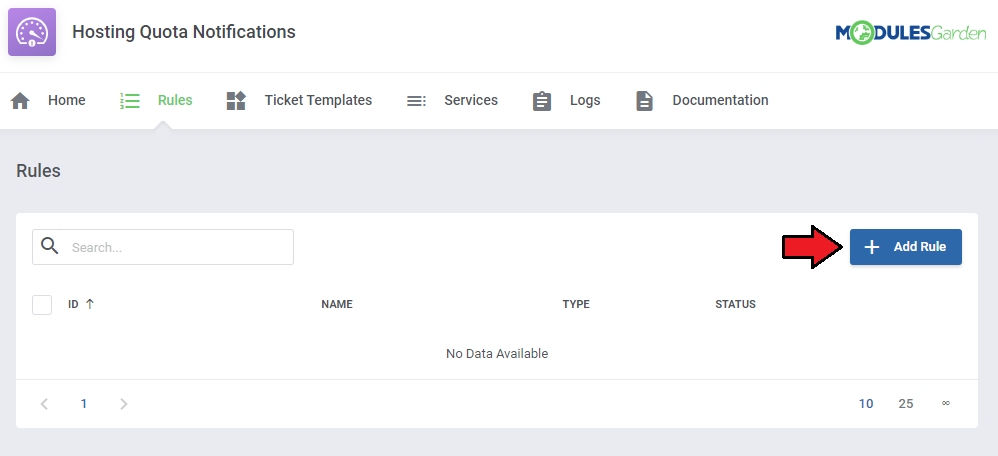
|
| Name the rule, select the 'Fixed' rule type, and pick the products you want to include. |
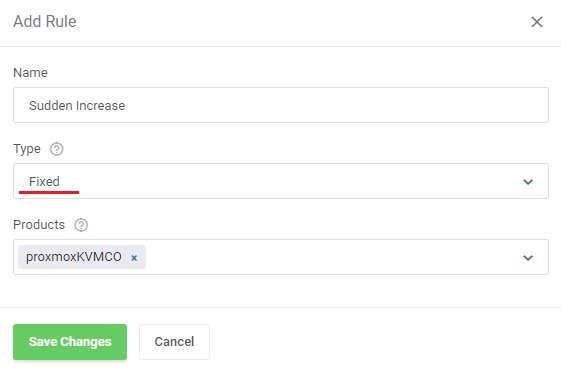
|
| Use the 'Edit Rule' button to specify the details. |
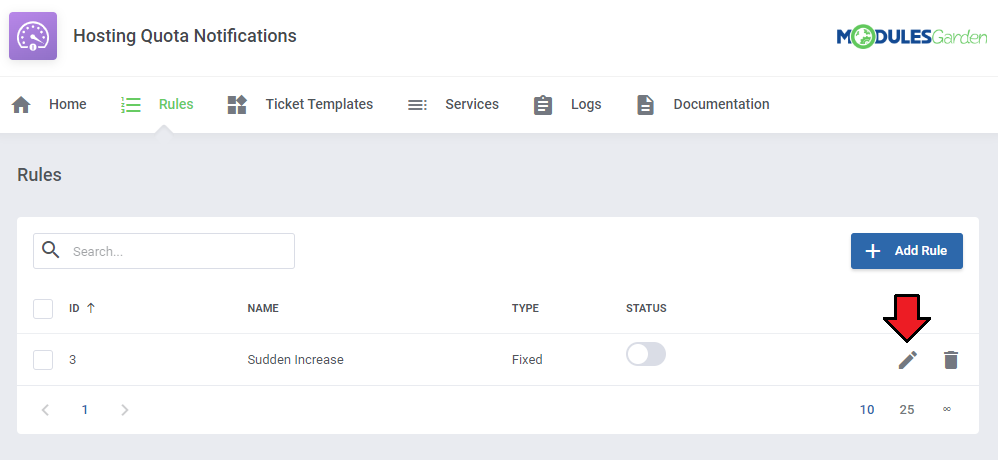
|
| Move to the 'Disk' or 'Bandwidth' tab, depending on what you want the notification to be on and 'Add Step'. You can also do both, simply repeat the process for the other tab. |
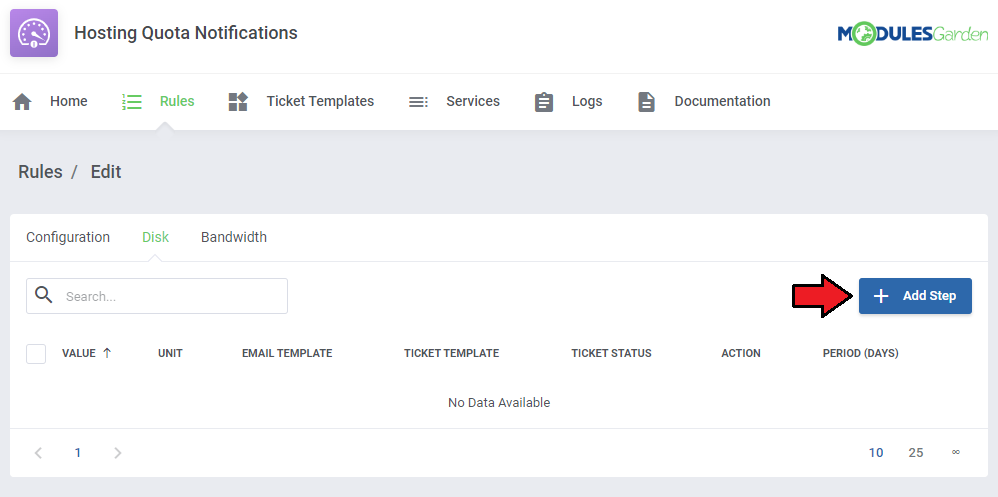
|
| Focus on 'Value', 'Unit' and 'Period' first. With the settings shown on the following screen, the notification will be sent every time the usage exceeds 10 GB in a day. |
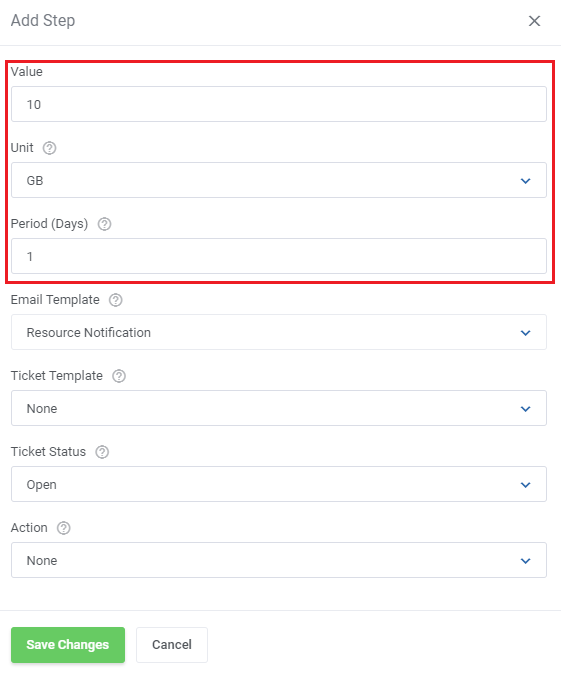
|
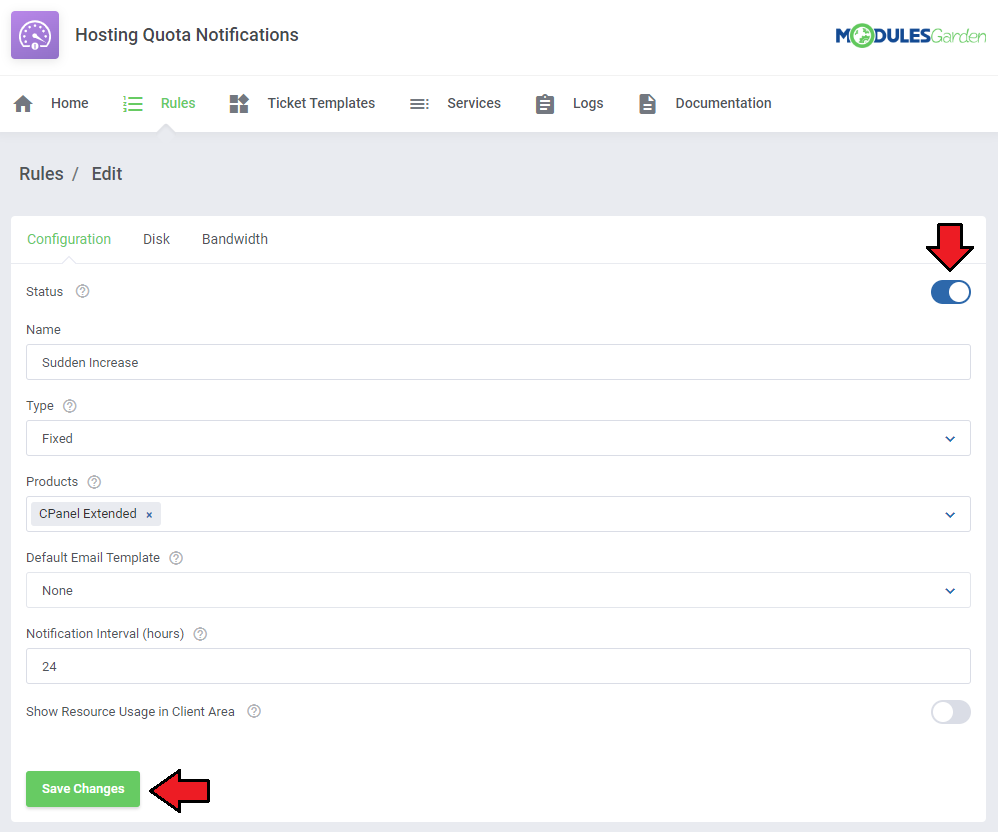
| Next, select an email template or a ticket template to be used for this rule. If you included a ticket template, select a ticket status as well. Note: If you have not already, take a look at the default email template described in the 'Tips' section. The included merge fields can be of use when composing custom email templates. You can include multiple steps to the rule in both the disk and bandwidth tab, to create a tiered notification system. |
|
Exceeded Bandwidth Usage
| When clients get close to their usage bandwidth limit. It is crucial to make them aware of the fact. Hosting Quota Notifications For WHMCS can help you do just that. See the use case below, on how to set up example rules for this scenario. |
| Start by creating a rule. Open the addon and navigate to 'Rules' → 'Add Rule'. |

|
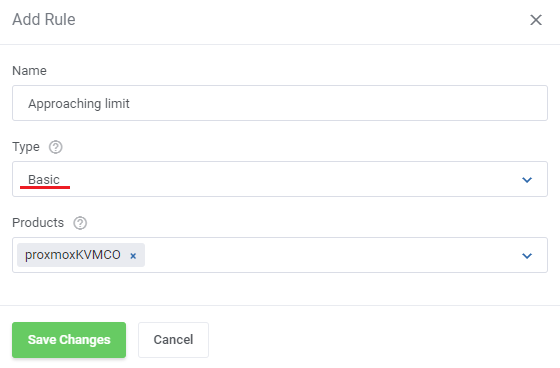
| Name the rule, select the 'Basic' rule type, and pick the products you want to include. |
|
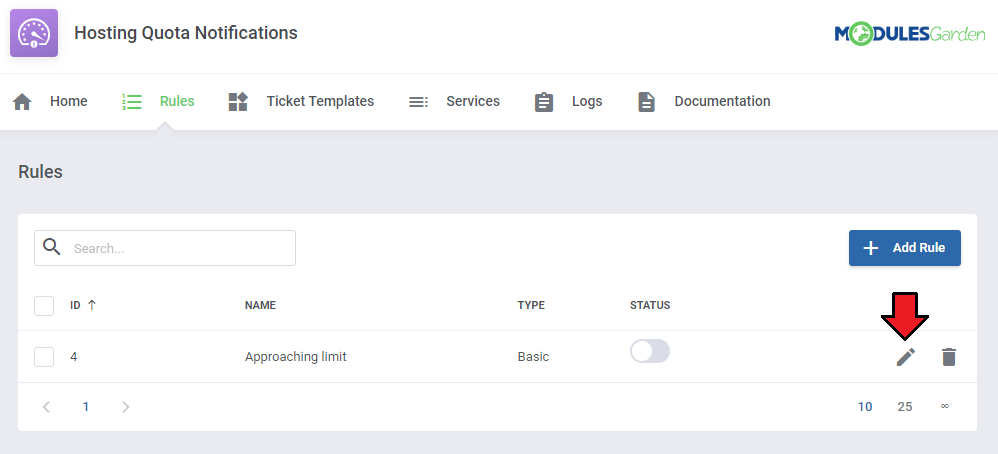
| Use the 'Edit Rule' button to specify the details. |
|
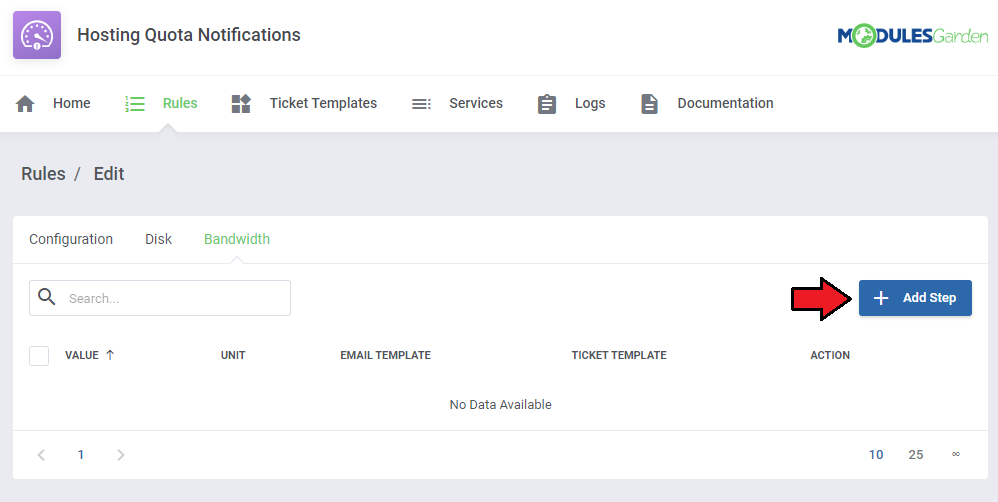
| Move to the 'Bandwidth' tab and 'Add Step'. |
|
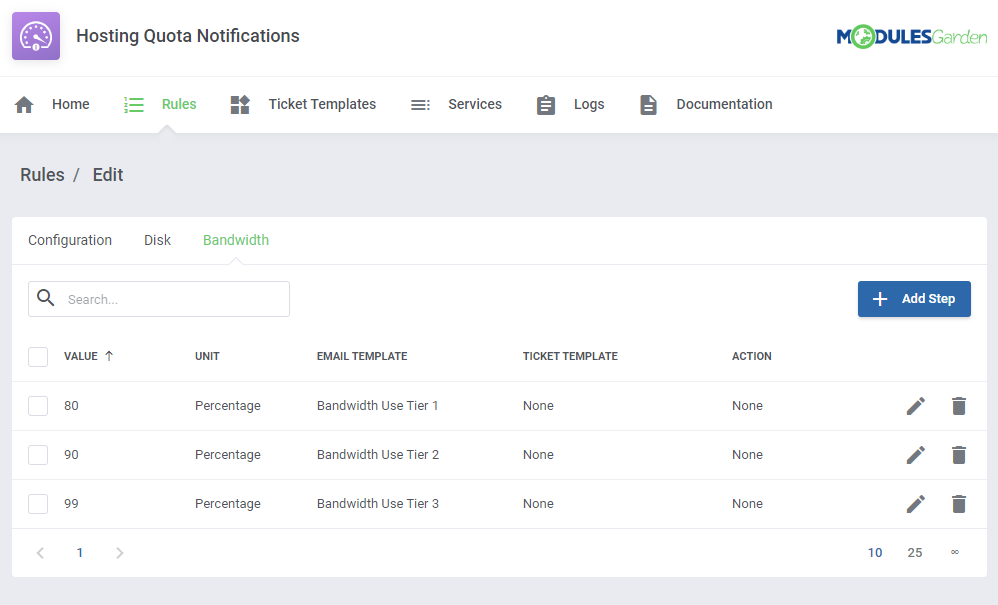
| Select the 'Percentage' unit, and 'Value' close to 100. We recommend setting three steps at 80, 90, and 99 percent. |
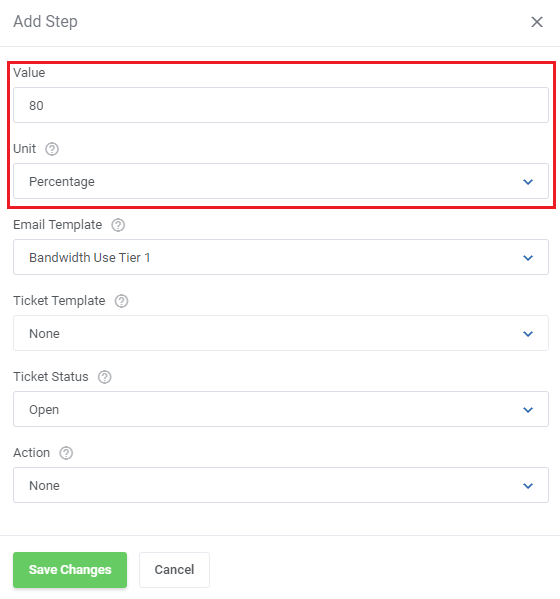
|
| Next, select an email template or a ticket template to be used for this rule. If you included a ticket template, select a ticket status as well. Note: If you have not already, take a look at the default email template described in the 'Tips' section. The included merge fields can be of use when composing custom email templates. The notifications will help your clients make sure they have enough bandwidth for their needs. |
|
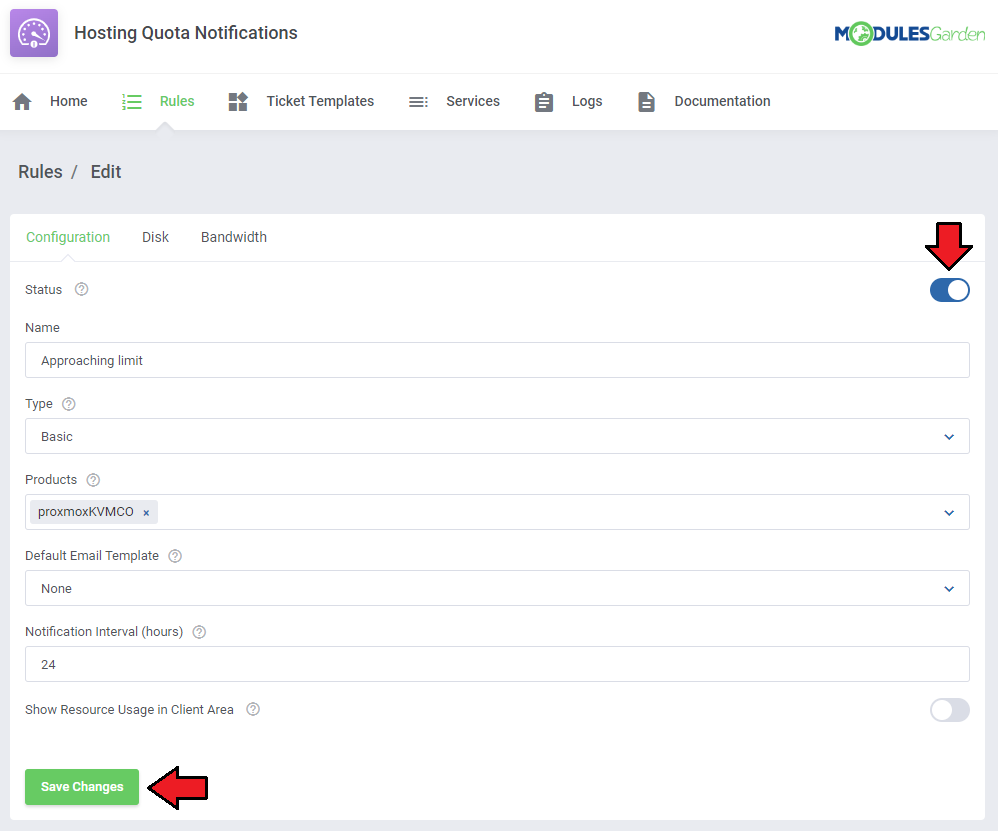
| Remember to enable the rules when ready. |
|
Automatic Suspension
| Hosting Quota Notifications For WHMCS can automatically suspend or terminate the service of clients that used up all of their resources. Follow this example to set up an additional rule to perform the suspension automatically. |
| Start by creating a rule. Open the addon and navigate to 'Rules' → 'Add Rule'. |

|
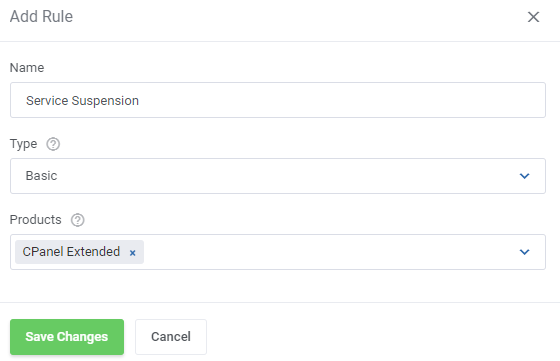
| Name the rule, select the 'Basic' rule type, and pick the products you want to include. |
|
| Move to the 'Bandwidth' tab and press 'Add Step' button. |

|
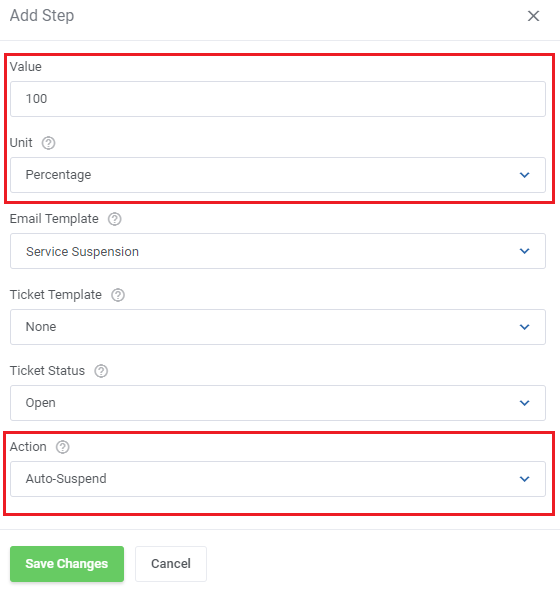
| Focus on 'Value', 'Unit' and 'Action' first. Set 'Unit' to 'Percentage', 'Value' to '100', and 'Action' to 'Auto-Suspend' or 'Auto-Terminate'. |
|
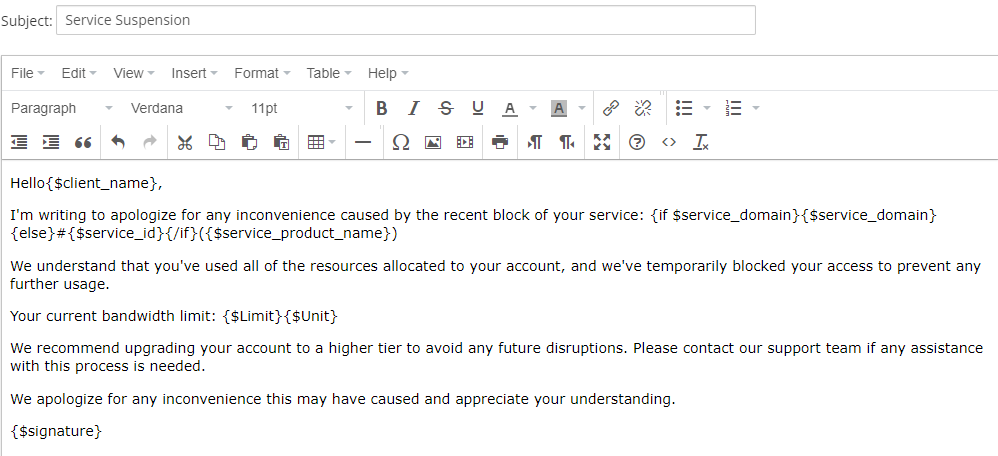
| Next, select an email template or a ticket template to be used for this rule. If you included a ticket template, select ticket status as well. Note: If you have not already, take a look at the default email template described in the 'Tips' section. The included merge fields can be of use when composing custom email templates. Here is an example email for this situation. |
|
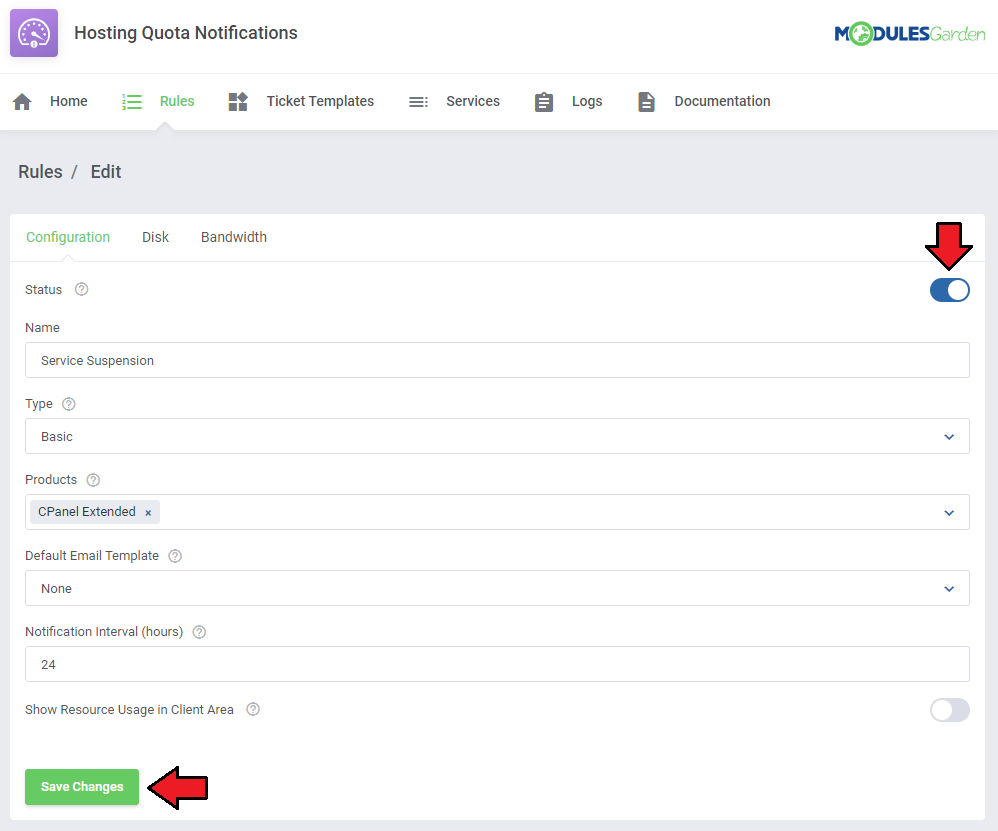
| Remember to enable the rule when ready. |
|
Tips
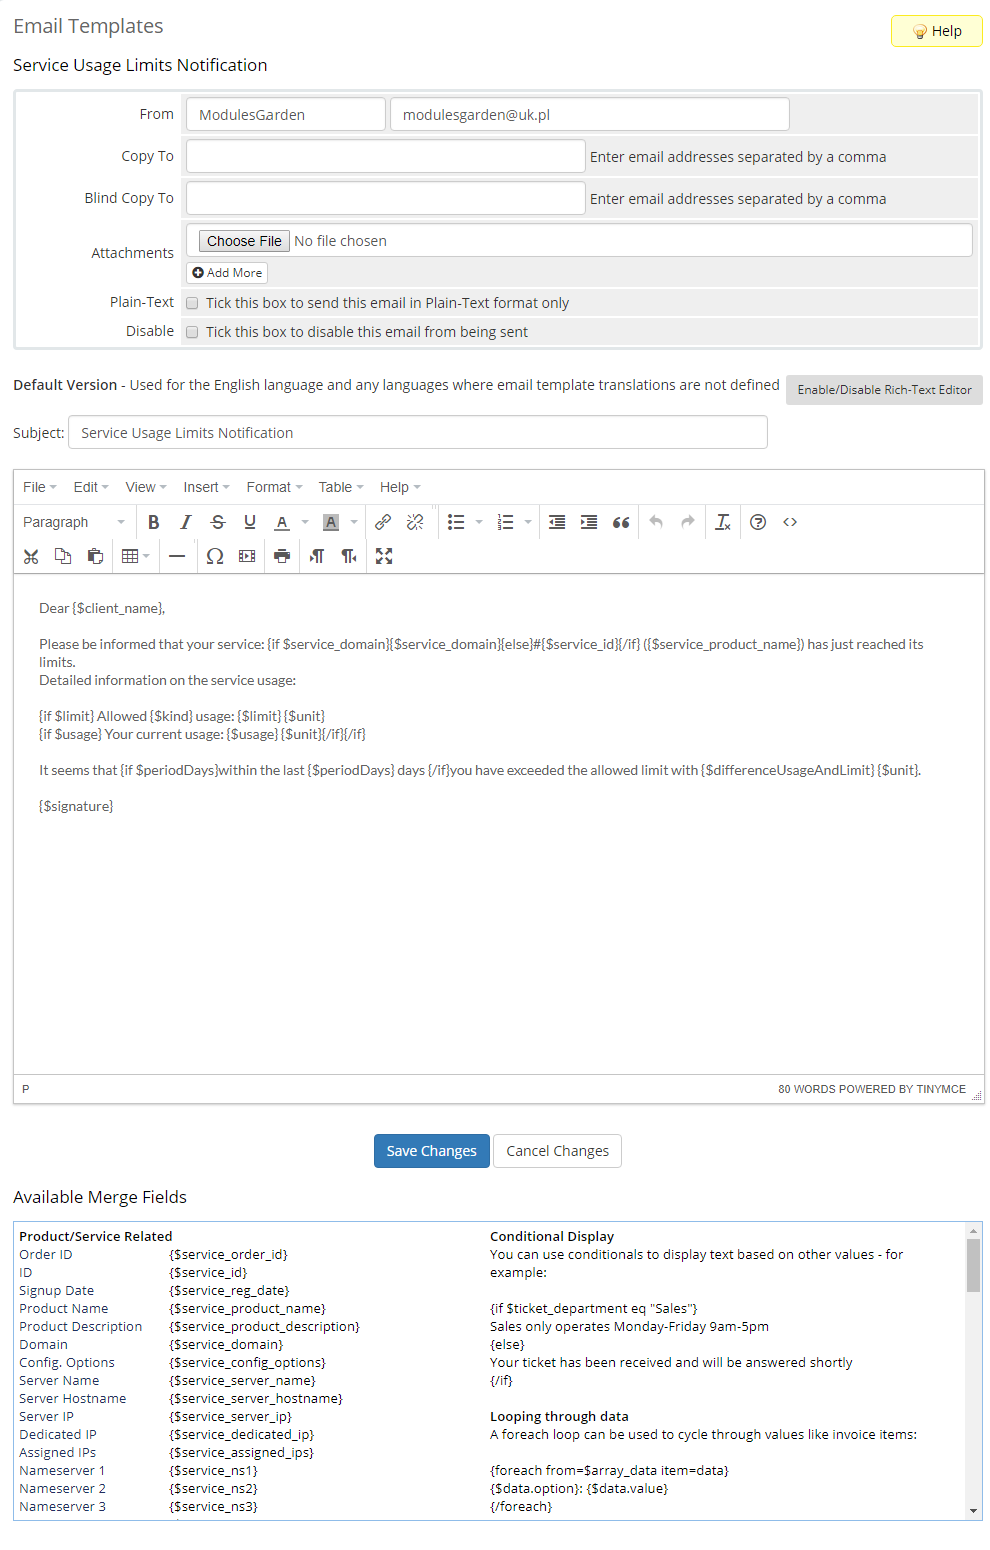
| 1. There is one default email template that may be used to send email notifications. Find 'Service Usage Limits Notification' at WHMCS → Setup → Email Templates → Product/Service Messages. You may edit the template freely, using special merge fields and create new ones on its basis. Allowed module special merge fields:
|
|
| That is what the email message may look like when delivered: |
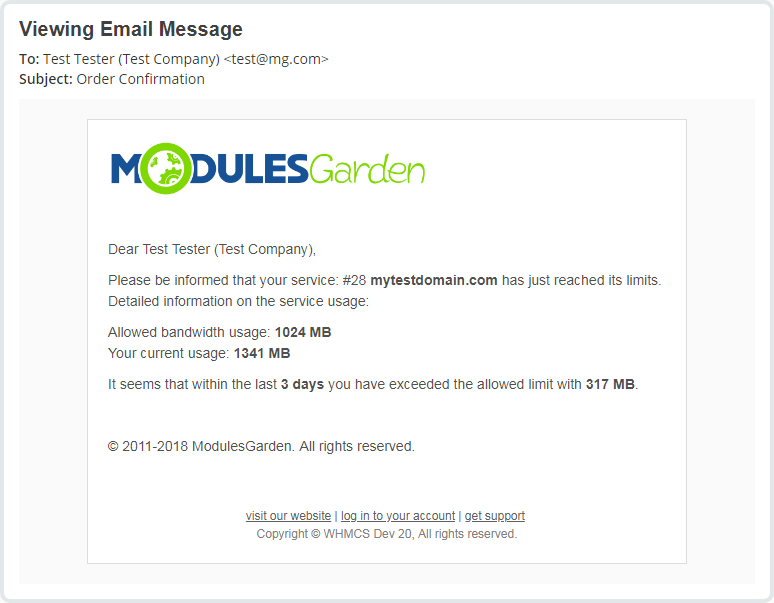
|
| 2. When configuring a ticket template you need to select an admin to which it will be assigned. However, the ticket will be automatically opened by a randomly selected administrator. |
| 3. There is the possibility to limit 'Logs' to a particular number of days. With the following cron command, you can delete 'Logs' older than X days. As an example, we want to remove 'Logs' older than 2 days. Of course, you can provide any number of days. php -q /yourWHMCS/modules/addons/hosting_quota_notifications/cron/cron.php DeleteLogs --older-than 2 Please remember that DeleteLogs cron job is deprecated and will be removed in future versions of the addon. To automatically delete logs, use the "Clear automatically" option in the Tools/Logs section. |
| 4. It is possible to customize the "Usage Graphs" colors, check below to learn how to do that. By default, the graphs use the following colors:
To change these colors, modify the usageGraphs: diskColor: '#a334a1' # Customize Disk Usage graph color bandwidthColor: '#c79c2e' # Customize Bandwidth Usage graph color After saving the changes, the new colors will be applied automatically to the graphs in the addon, admin and client area service pages. |
Update Instructions
| An essential guidance through the process of updating the module is offered here. Ensure successful completion of the module update by carefully following each step, thereby preventing data loss or any unforeseen issues. |
Update Instructions To Version 2.2.0
| When upgrading your module to version 2.2.0 please follow the below described steps to avoid losing andy data. Before proceeding, ensure that you have a backup of your current installation to prevent data loss.
|
| Handling issues during update If the old module was deactivated before the upgrade (which is not recommended) or if the upgrade process fails for any reason, you can attempt recovery using the cron script.
|
Upgrade Guide
| Seeking a solution that offers greater flexibility, customization tailored to your precise needs, and unrestricted availability? There is an option that not only proves to be cost-effective in the long run but also includes prioritized support services, making it a truly valuable investment. Opt for the Open Source version of your Hosting Quota Notifications For WHMCS module to unlock these benefits. Follow a comprehensive guide covering the transition process, the advantages it brings, and step-by-step instructions on what to do next after the order has been successfully finalized. |
Common Problems
| 1. When you have problems with connection, check whether your SELinux or firewall does not block ports. |
| 2. We do not recommend using Hosting Quota Notifications For WHMCS module either with Multibrand For WHMCS or with Resellers Center For WHMCS. Integration between these modules is hampered due to specific features of each one of them and their individual work flow. |