DigitalOcean Droplets For WHMCS
Contents |
About DigitalOcean Droplets For WHMCS
| DigitalOcean Droplets For WHMCS is a tool of invaluable usefulness which will allow you to provide Droplets to your audience in a completely automated manner. The module will empower your clients to exert full control over their virtual machines through such actions as power on/off, reboot, server rebuild and many more. |
- Admin Area Features:
| ✔ Create/Suspend/Unsuspend/Terminate Server |
| ✔ Resize Server By Changing Size Slug For Droplet Plan |
| ✔ Power On/Power Off/Shut Down/Reboot Server |
| ✔ Reset Server Password |
| ✔ Toggle Automatic Backups |
| ✔ Enable Private Networking |
| ✔ Enable Reserved IP Addresses |
| ✔ Enable IPv6 |
| ✔ Change Server Hostname |
| ✔ View Server Status And Details |
| ✔ View Server Network Information |
| ✔ View/Create/Restore/Delete Snapshots |
| ✔ View And Restore Backups |
| ✔ Rebuild Server With Chosen OS Distribution |
| ✔ View Tasks History |
| ✔ Configure Product Details: |
| ✔ Choose Project |
| ✔ Choose Region |
| ✔ Choose Size Slug Plan |
| ✔ Choose OS Image |
| ✔ Define Additional Volume Size |
| ✔ Define Snapshots Limit |
| ✔ Define Firewalls Limit |
| ✔ Define Inbound/Outbound/Total Firewall Rules Limit |
| ✔ Define Droplet Tags |
| ✔ Provide Random Domain Prefix |
| ✔ Provide Firewall Prefix |
| ✔ Choose Master SSH Key |
| ✔ Toggle Automatic Backups |
| ✔ Toggle Monitoring |
| ✔ Toggle Reserved IP Addresses |
| ✔ Toggle IPv6 Addresses |
| ✔ Toggle Private Networking |
| ✔ Toggle Waiting For IP Address Assignment |
| ✔ User Data - Execute Custom Cloud-Config Or Bash Script To Customize Server On First Boot |
| ✔ Allow SSH Key Inserting - Enable Logging In To Server Without Password |
| ✔ Choose Features Available In Client Area: |
| ✔ Rebuild Droplet |
| ✔ Snapshots |
| ✔ Tasks History |
| ✔ Backups |
| ✔ Firewalls |
| ✔ Graphs |
| ✔ Select Available Images To Rebuild Droplet: |
| ✔ OS Distributions |
| ✔ One-Click Install Apps |
| ✔ Snapshots |
| ✔ Change Hostname |
| ✔ Rebuild Initially Chosen Image Only |
| ✔ Power On |
| ✔ Power Off |
| ✔ Shut Down |
| ✔ Reboot |
| ✔ Reset Password |
| ✔ Generate Configurable Options |
| ✔ Choose Welcome Email And Password Reset Email Templates |
| ✔ Configure Email Piping |
| ✔ Run Server Connection Test |
| ✔ Toggle Debug For Logging API Requests And Responses |
- Client Area Features:
| ✔ Power On/Power Off/Shut Down/Reboot Server |
| ✔ View Server Status And Details |
| ✔ View Server Network Information |
| ✔ View/Create/Restore/Delete Snapshots |
| ✔ View And Restore Backups |
| ✔ Rebuild Server With Chosen: |
| ✔ OS Distribution |
| ✔ One-Click App |
| ✔ Administrator's Snapshot |
| ✔ View/Create/Edit/Delete Firewalls And Inbound/Outbound Rules For: |
| ✔ TCP Protocol |
| ✔ UDP Protocol |
| ✔ ICMP Protocol |
| ✔ Reset Server Password |
| ✔ Change Server Hostname |
| ✔ View Tasks History |
| ✔ View Resources Graphs: |
| ✔ CPU Usage |
| ✔ Memory Usage |
| ✔ Average Load |
| ✔ Disk Usage |
| ✔ Bandwidth Usage |
| ✔ Choose Server Parameters During Order |
| ✔ Provide SSH Key During Order |
| ✔ Receive Email Notification After VM Creation And Password Reset |
- Configurable Options:
| ✔ Region |
| ✔ Image |
| ✔ Additional Volume Size |
| ✔ Monitoring |
| ✔ Private Networking |
| ✔ Reserve IP Addresses |
| ✔ Firewalls Limit |
| ✔ Inbound Rules |
| ✔ Outbound Rules |
| ✔ Total Rules |
| ✔ Size Slug Plan |
| ✔ Snapshots Limit |
| ✔ Backups |
| ✔ IPv6 |
| ✔ User Data |
- General Info:
| ✔ Supports Both Standard Droplets And CPU Optimized Droplets Types |
| ✔ Integrated With Advanced Billing For WHMCS - Actual Server Resource Usage Billing |
| ✔ Integrated With DNS Manager For WHMCS - Manage DNS Records On DigitalOcean Directly |
| ✔ Integrated With Server Allocator For WHMCS - Automatic Assignment Of Most Suitable Servers To Products |
| ✔ Multi-Language Support |
| ✔ Supports PHP 8.3 Back To PHP 8.1 |
| ✔ Supports WHMCS Themes "Six", "Twenty-One" And "Lagom WHMCS Client Theme" |
| ✔ Supports WHMCS V8.13 Back To WHMCS V8.10 |
| ✔ Requires ionCube Loader V14 Or Later |
| ✔ Easy Module Upgrade To Open Source Version |
Installation and Configuration
| This tutorial will show you how to successfully install and configure DigitalOcean Droplets For WHMCS. We will guide you step by step through the whole installation and configuration process. |
Installation
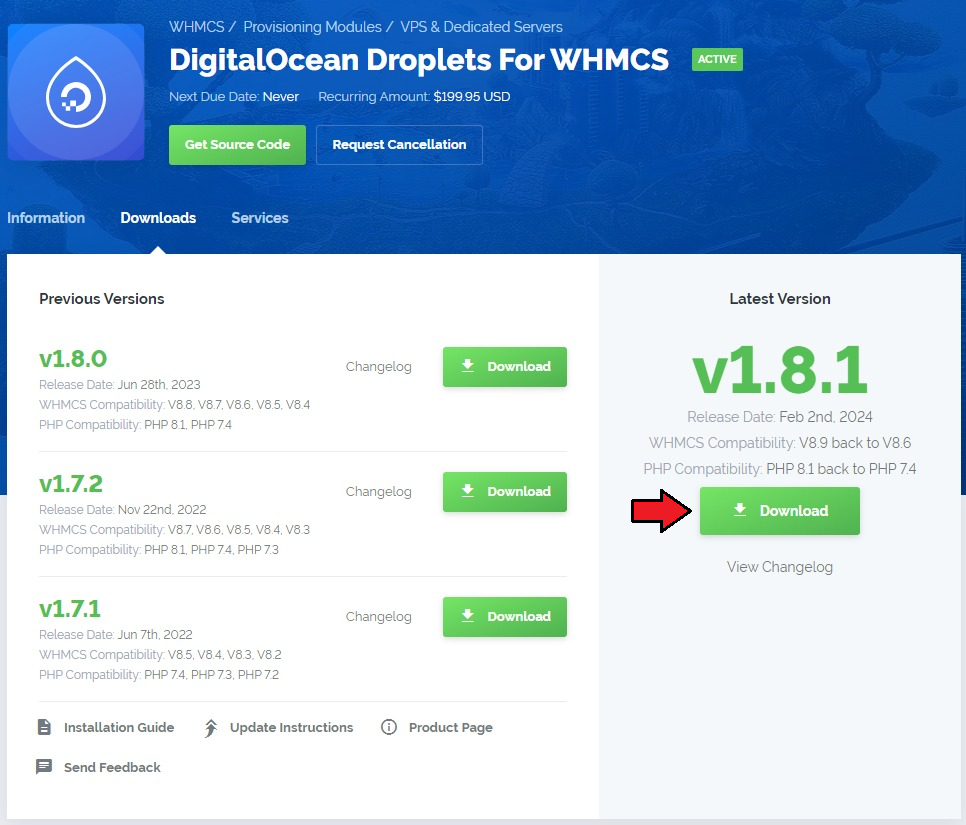
| 1. Log in to our client area and download the module. |
|
| 2. In the downloaded file you might find one or two packages that support different PHP versions. In the most recent versions of the module, you will find only one package that supports PHP 7.4 and later. |
| Previous updates of the module may contain two packages dedicated to various PHP versions. The first one that supports PHP 5.6 up to PHP 7.3, and the second one addressed to PHP 7.2 up to PHP 7.4. |

|
| Note: You can check the current PHP version in your WHMCS. To do so, proceed to 'Utilities' → 'System' → 'PHP Info'. |
| 3. Extract the package and upload its content into the main WHMCS directory.
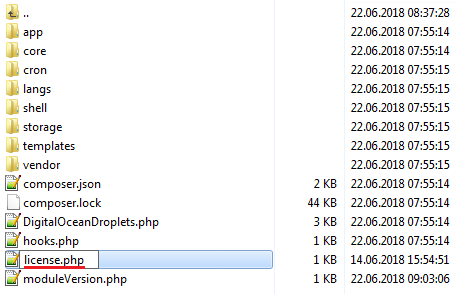
The content of the package to upload should look like this. |
| 4. When you install DigitalOcean Droplets For WHMCS for the first time, you have to rename the 'license_RENAME.php' file. The file is located in 'modules/servers/DigitalOceanDroplets/license_RENAME.php'. Rename it from 'license_RENAME.php' to 'license.php'. |
|
| 5. In order to configure your license key, you have to edit the previously renamed 'license.php' file. Enter your license key between the quotation marks as presented on the following screen. |

|
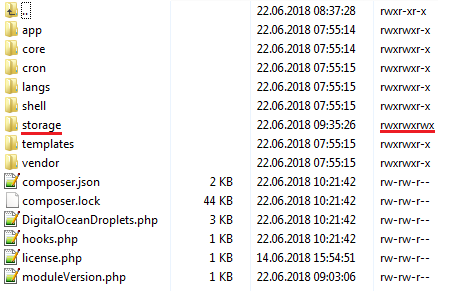
| 6. Now, set up the 'storage' folder as recursively writable. This folder is available at '/your_whmcs/modules/servers/DigitalOceanDroplets/'. |
|
7. The last step is setting up three cron jobs.
|
Configuration of Server
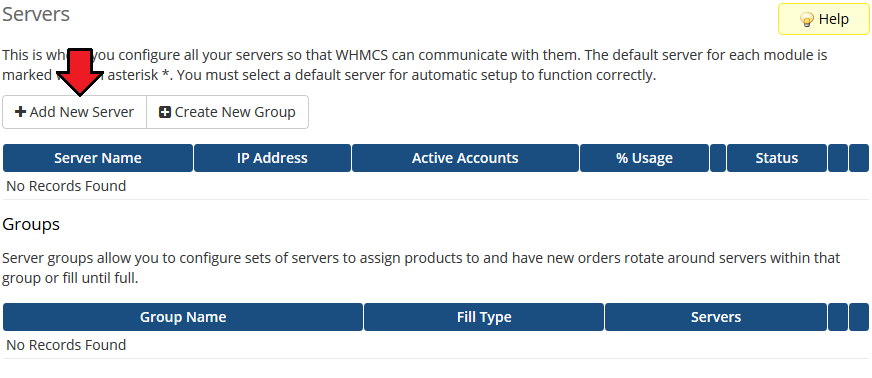
| 8. Now, we will show you how to configure a new product. Go to 'Setup' → 'Products/Services' → 'Servers' and press 'Add New Server' . Note: If you have WHMCS V7.8.X or later, we recommend using your 'previous experience' of the server configuration instead of the new wizard tool. |
|
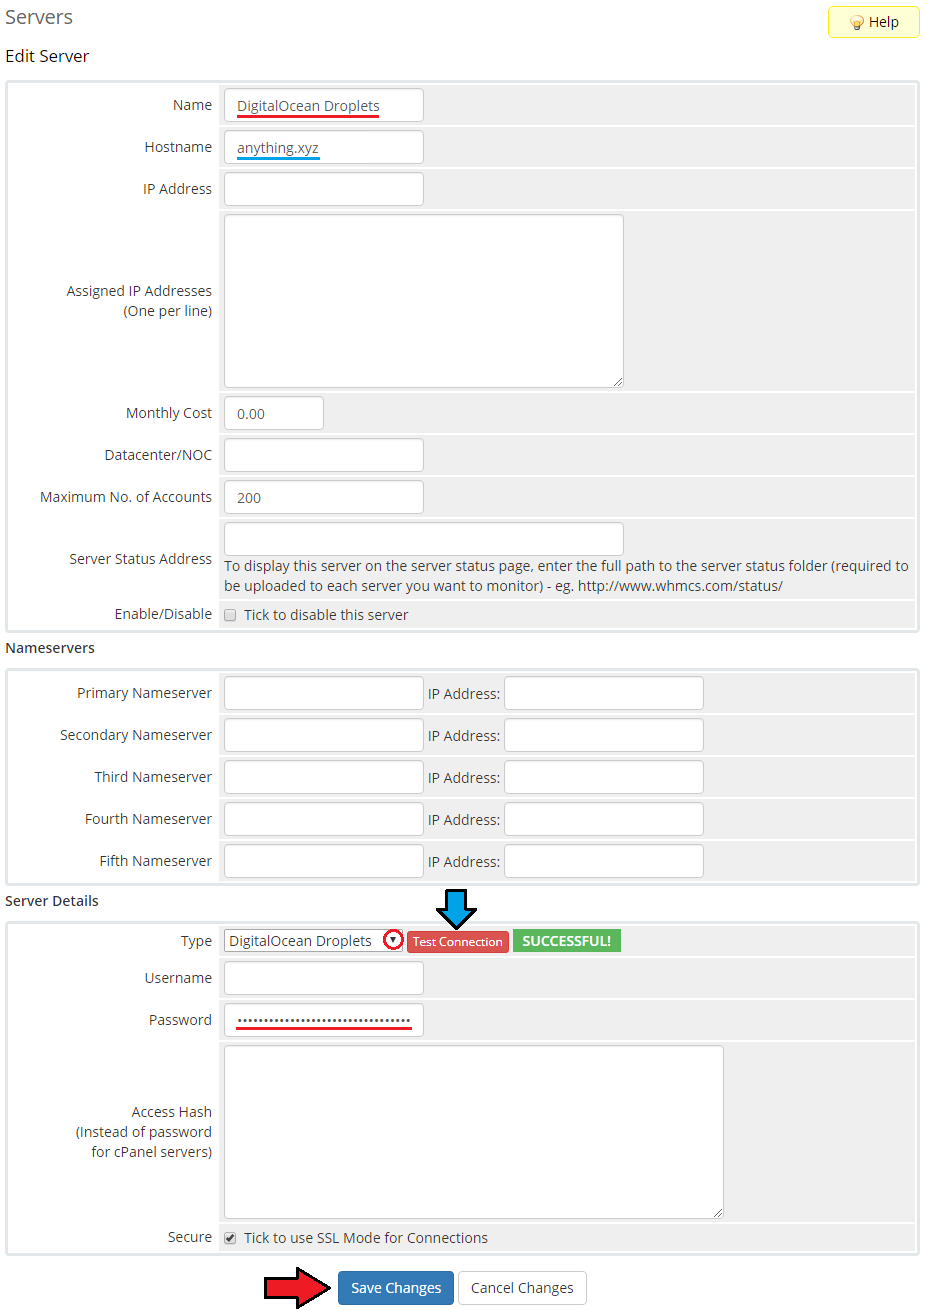
| 9. Next, enter your server name and select 'DigitalOcean Droplets' from the 'Type' field. Now, in the 'Password' field provide your DigitalOcean API token and check the connection. If successful, save changes. Note: To find your API token, log in to your DigitalOcean panel and go to the API section where you can generate a new token. Note 2: The 'Hostname' field is not used by the module, but if you use WHMCS V7.8.X, then a fatal error may occur when trying to save server settings without providing any hostname or IP address details. |
|
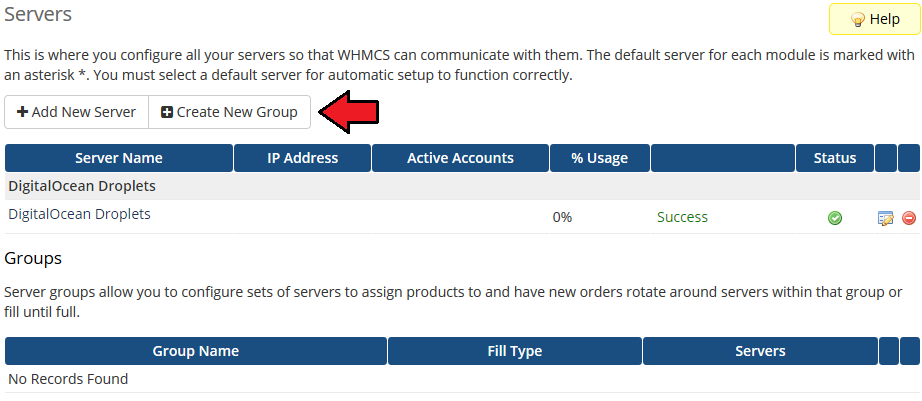
| 10. It is time to create a server group. To do so, click on 'Create Server Group' . |
|
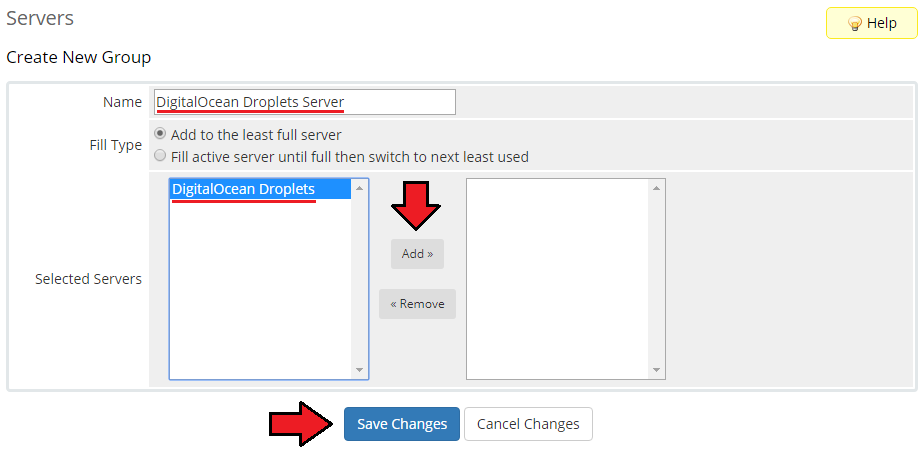
| 11. Enter a name, click on your previously created server, press 'Add' and afterward 'Save Changes' . |
|
Configuration of Product
| 12. In order to create and configure a product, go to 'Setup' → 'Products/Services' → 'Products/Services' . Click on 'Create a New Group' . |

|
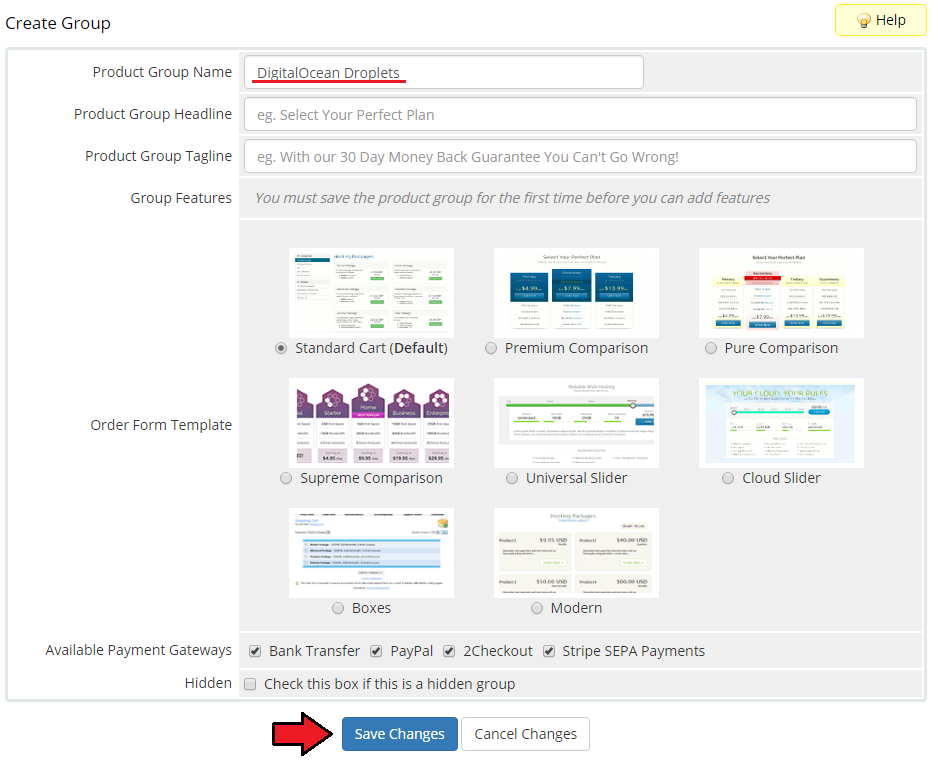
| 13. Enter your product group name and press 'Save Changes' . |
|
| 14. Once you have a product group, you can create a new product. To do so, first click on 'Create a New Product' . |

|
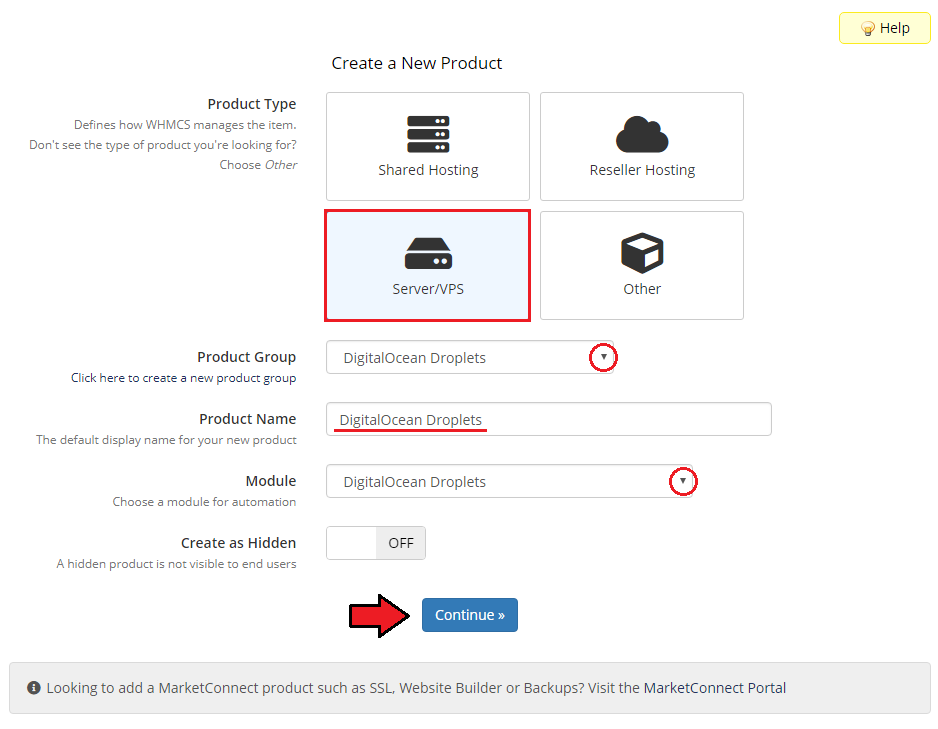
| 15. Afterward, choose your product type, enter your product name and choose the product group from the dropdown menu. Press 'Continue'. |
|
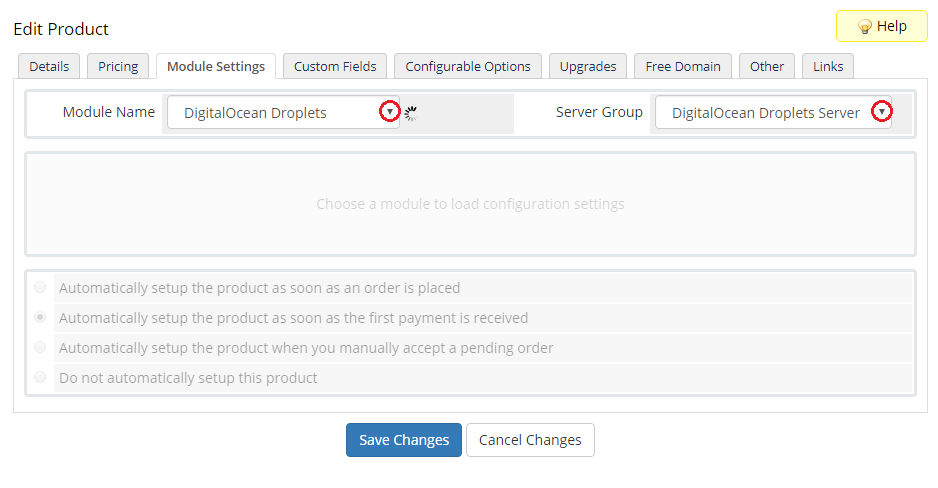
| 16. Now, go to the 'Module Settings' section, choose both your previously created server group from the dropdown menu. The module should automatically save and reload the settings. If not, click on the 'Save Changes' option manually. |
|
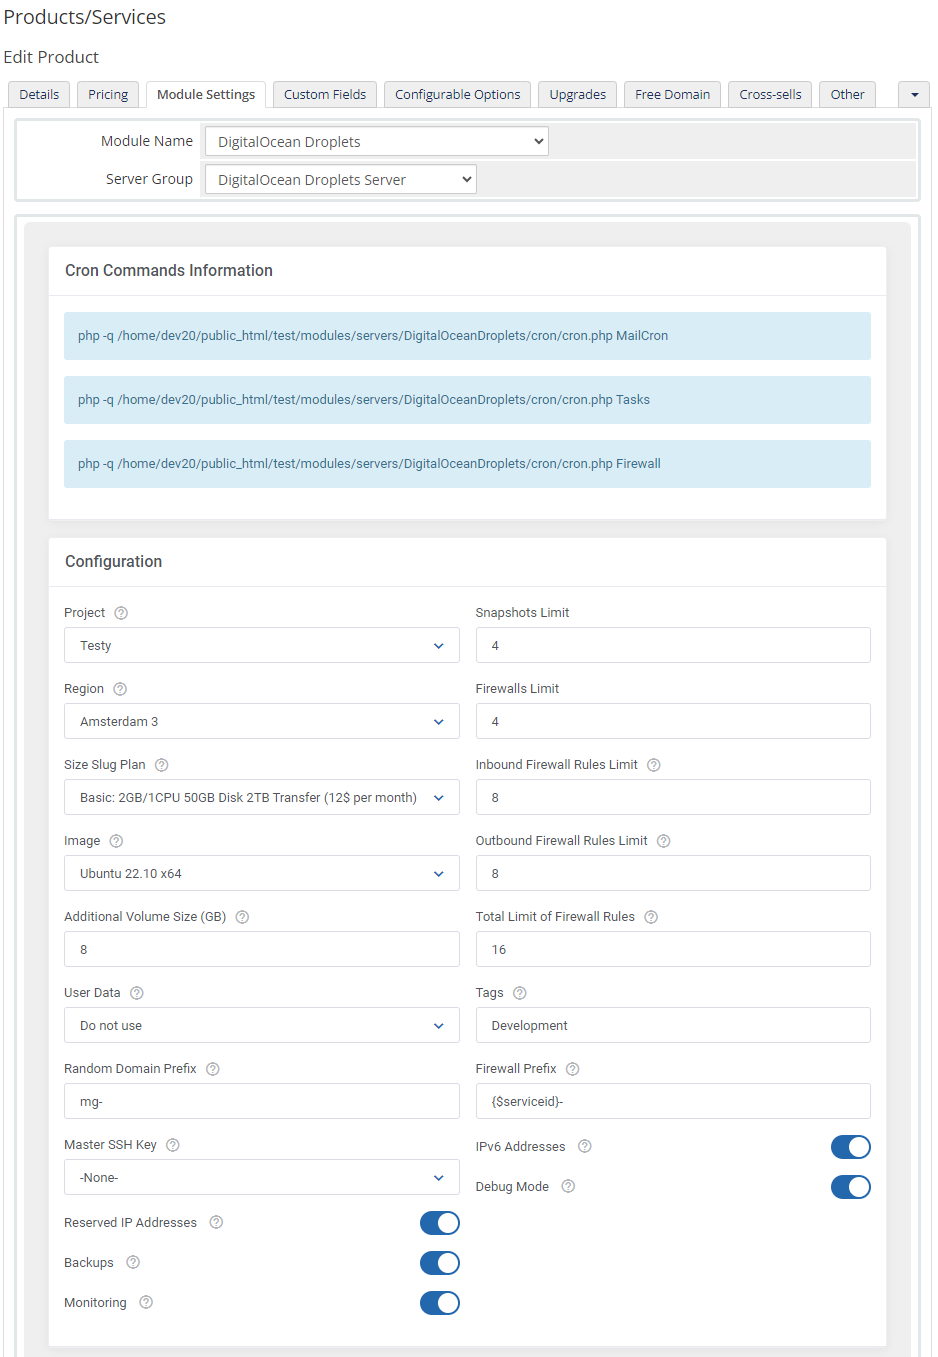
| 17. Now, you can start configuring the settings of the Droplet you sell. Just like when creating a new virtual machine in your DigitalOcean panel, here also you can configure such options as:
Important: Before providing any extra features to your WHMCS clients, remember to familiarize yourself with the additional costs that may be applied to your DigitalOcean account. |
|
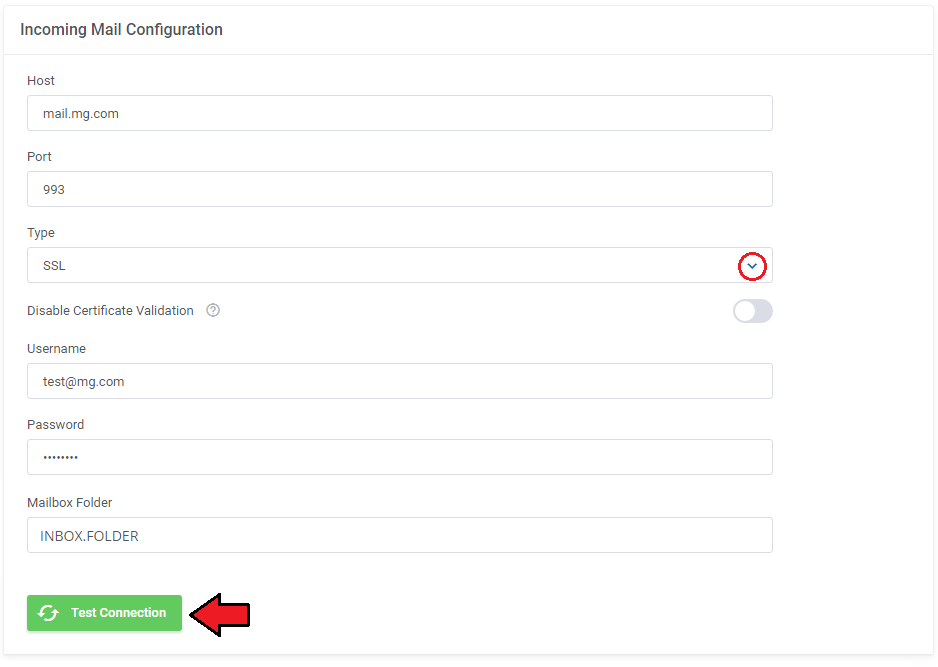
| 18. Afterward, set up incoming mail configuration. Due to API limitations, all emails with Droplet credentials can only be sent to your DigitalOcean profile email address set in the panel here. Note: Even though the module filters the received messages in your mailbox, we recommend that you use a separate mailbox for your main DigitalOcean profile account to avoid any issues with non-DigitalOcean content. After setting up the dedicated mailbox, provide its valid credentials below and test whether the connection has been established correctly. Note: There is available an option to 'Disable Certificate Validation'. Please toggle this option ONLY if you are having troubles with the connection. The certificate validation will be omitted when connecting to an email box. Important! Please note that you need to provide a full path to the proper directory in the 'Mailbox Folder' field. Separate different directories with a dot (for example INBOX.FOLDER). |
|
| Once the connection is successful, remember to save your module settings. From now on, the cron set during the last stage of the module's installation should periodically check that mailbox for DigitalOcean messages. If any new emails are received, they will be then converted to your email template and sent to the corresponding client. The default email templates for product creation and password reset can be specified below. Take a look at the Tips section - tip no 4, and check the template content. |

|
| 19. The following section is dedicated to the Client Area Features. You will find here six options that can be enabled and then will be available to your clients in their client area. These options are:
|
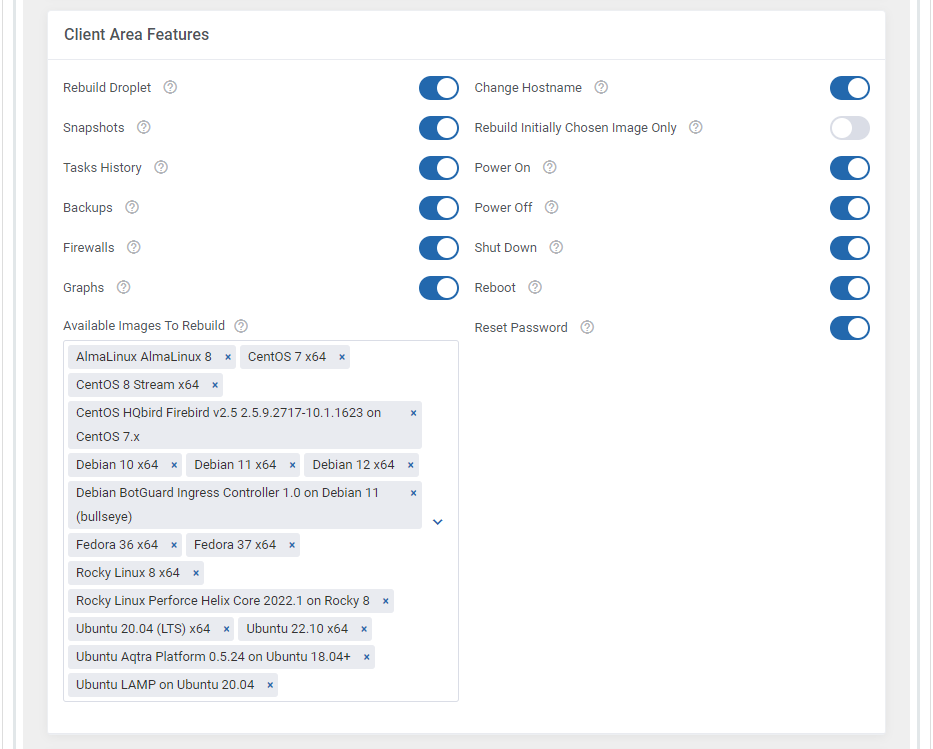
|
| 20. At the end of the configuration process, you can decide whether you want to generate configurable options for the product. Configurable options can be used by your clients to select each Droplet parameter individually during order placement. Note: When upgrading to version 1.8.0, please remember to update the configurable options related to "Floating IPs" as these have been replaced with the "Reserved IPs" option. |
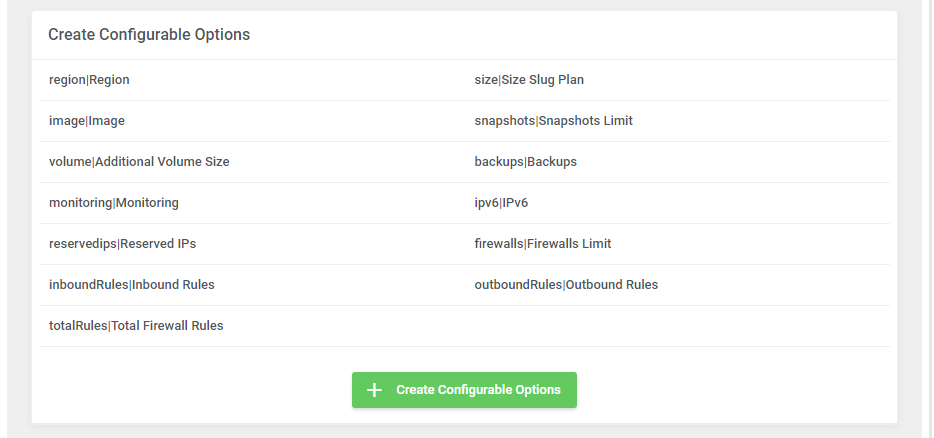
|
| If you decide to use configurable options, press on the 'Create' button and select which options you want to generate. Note that the configuration for disabled options will still be taken from the configuration of the main product. More information about how to use configurable options can be found here or in the official WHMCS documentation. |
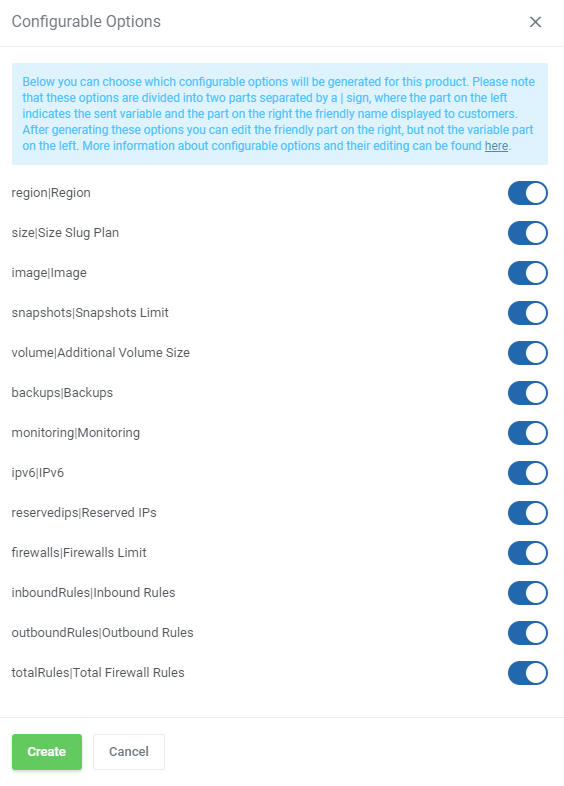
|
SSH Keys
| In the 'Custom Fields' tab you will find a 'SSH Public Key' field which is displayed to clients on the order form by default. This field is optional. It allows your clients to insert their public key in order to be able to log in to Droplet without using a password.
If you would like to limit the possibility of entering the key e.g. only to the 'ssh-rsa' format, you can use the regular expression in the validation field, such as: #ssh-rsa AAAA[0-9A-Za-z+/]+[=]{0,3}( [^@]+@[^@]+)?#
More information about how DigitalOcean handles SSH keys and how to create them can be found here. Important: During tests we discovered that some OS images such as 'CoreOS', 'CentOS' or 'FreeBSD', may require the SSH key to create a Droplet. Please also note that when the SSH key is provided, DigitalOcean may not send the welcome email after Droplet creation. |
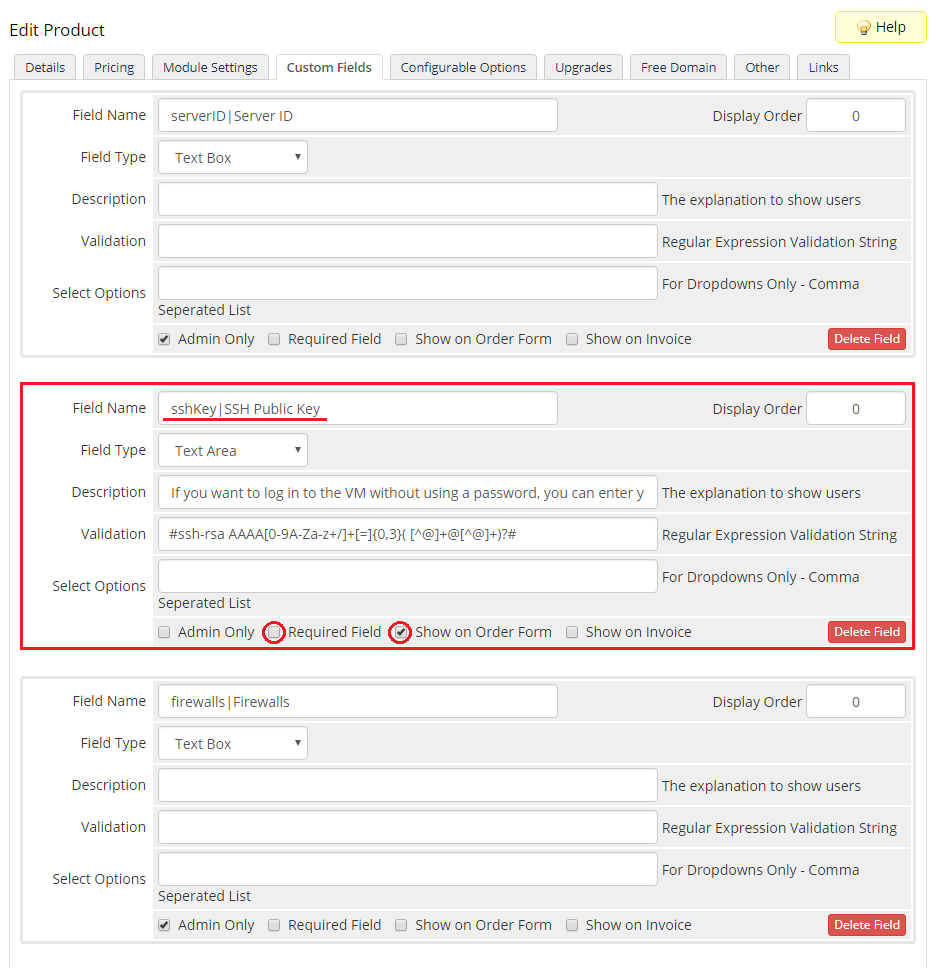
|
User Data Scripts
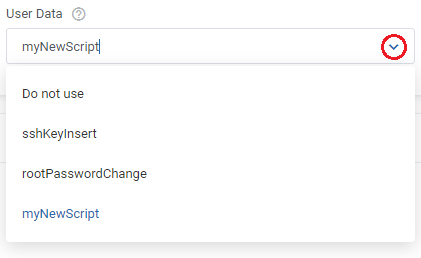
| User data is arbitrary data that can be executed during Droplet creation, typically during the first boot of a cloud server. This allows you to perform tasks or run scripts as the root user which can be extremely useful when provisioning a server. You can provide your own scripts using 'cloud-config' or 'Bash'. By default, we provide two exemplary scripts for changing the OS password or inserting SSH key, which you can use as a reference. |

|
| Once you create your own script, it can be chosen for product execution. You can provide multiple scripts for configurable options, but only one can be chosen for Droplet creation. Remember that the scripts you provide should be compatible with the given distribution. |
|
Management
Admin Area
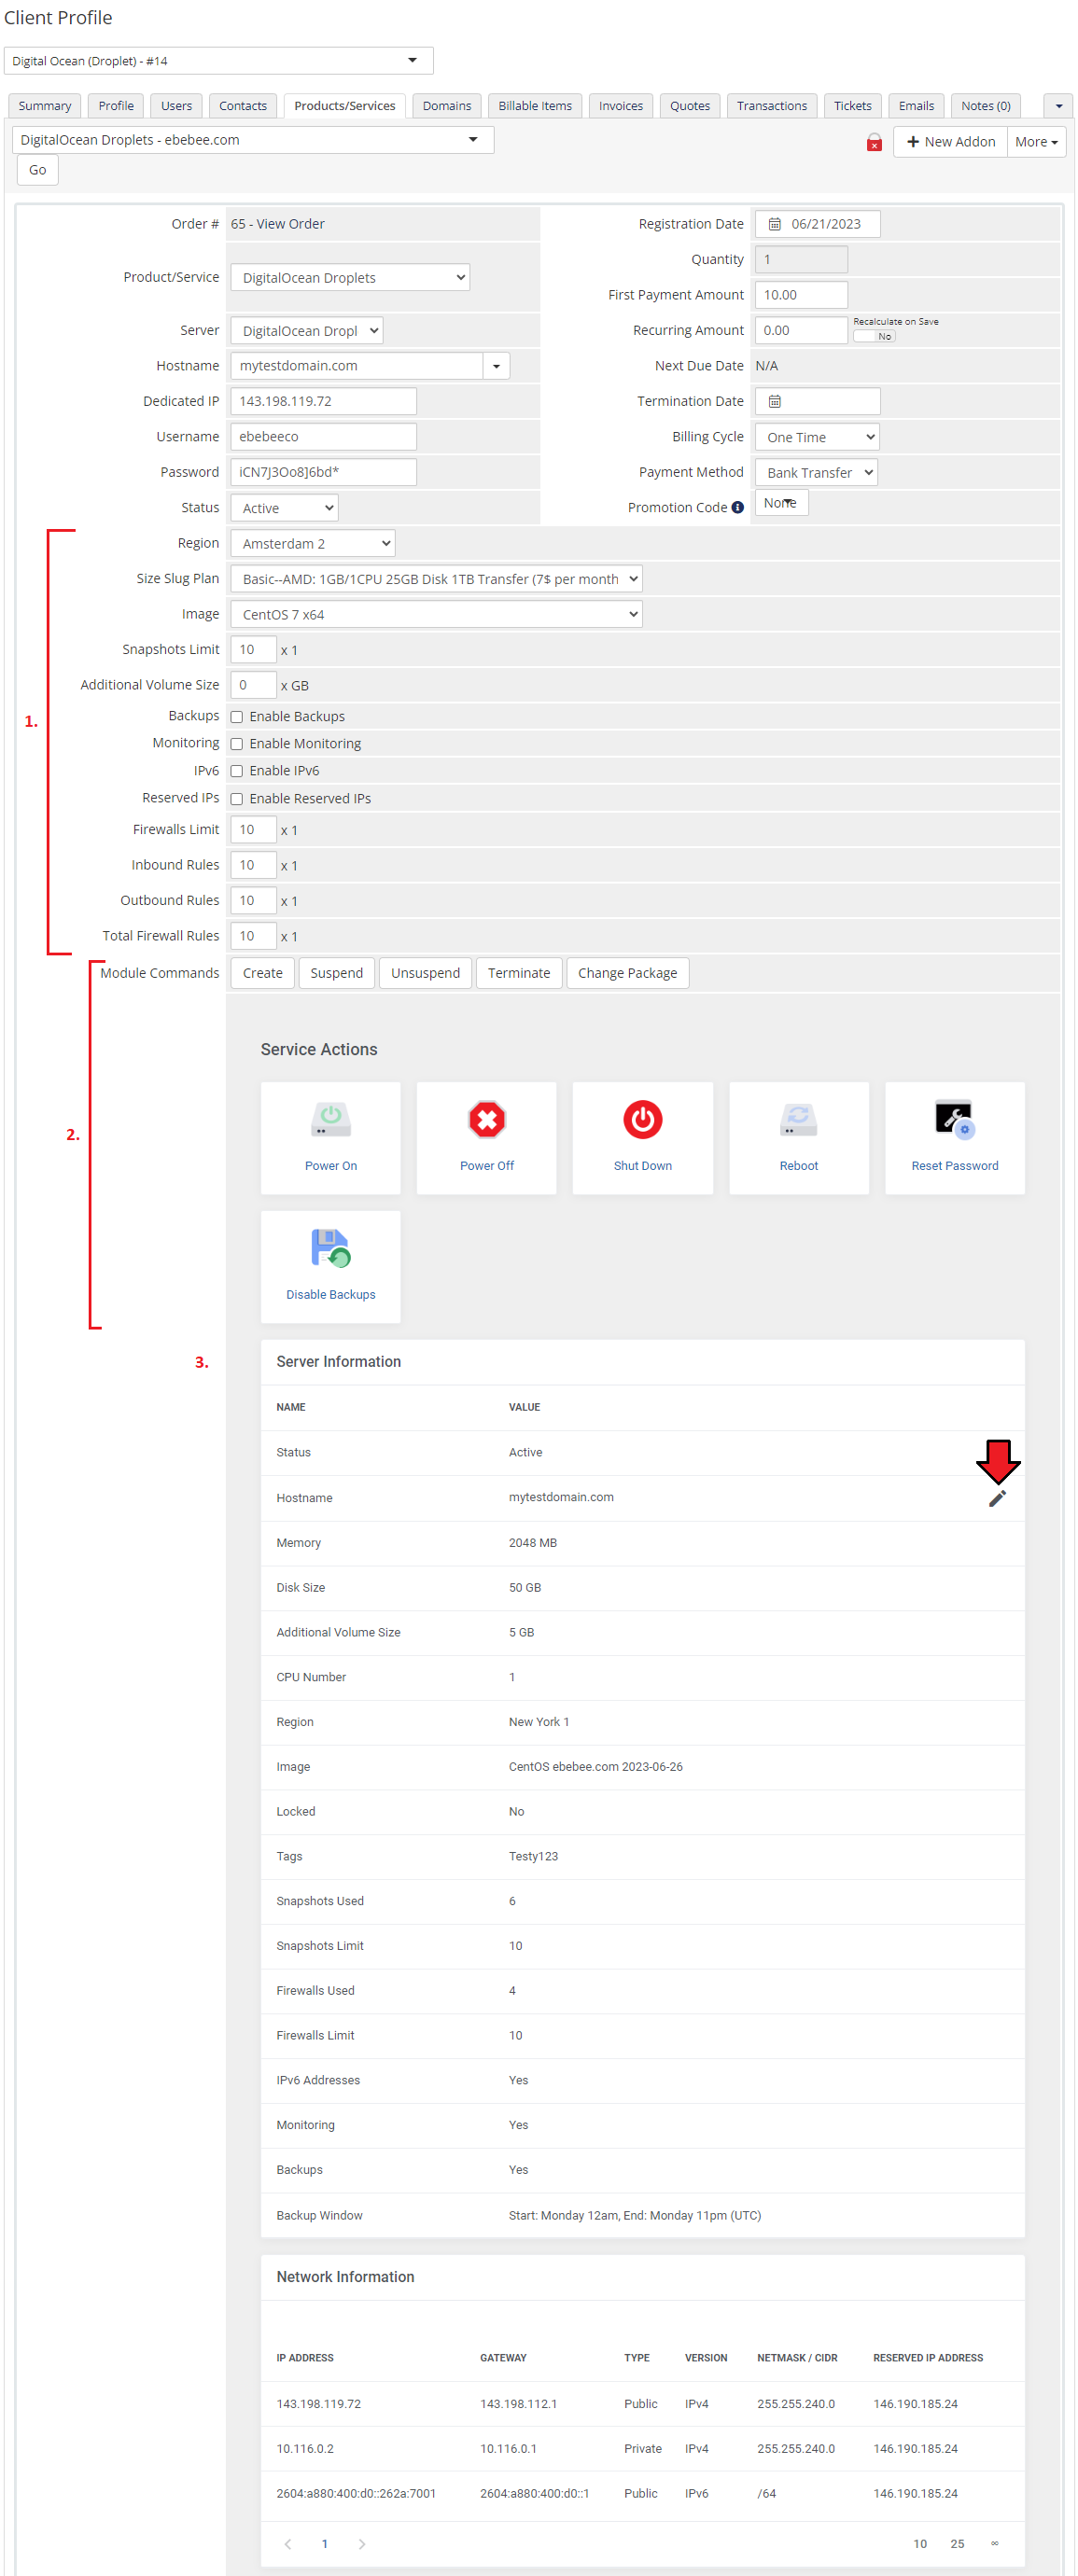
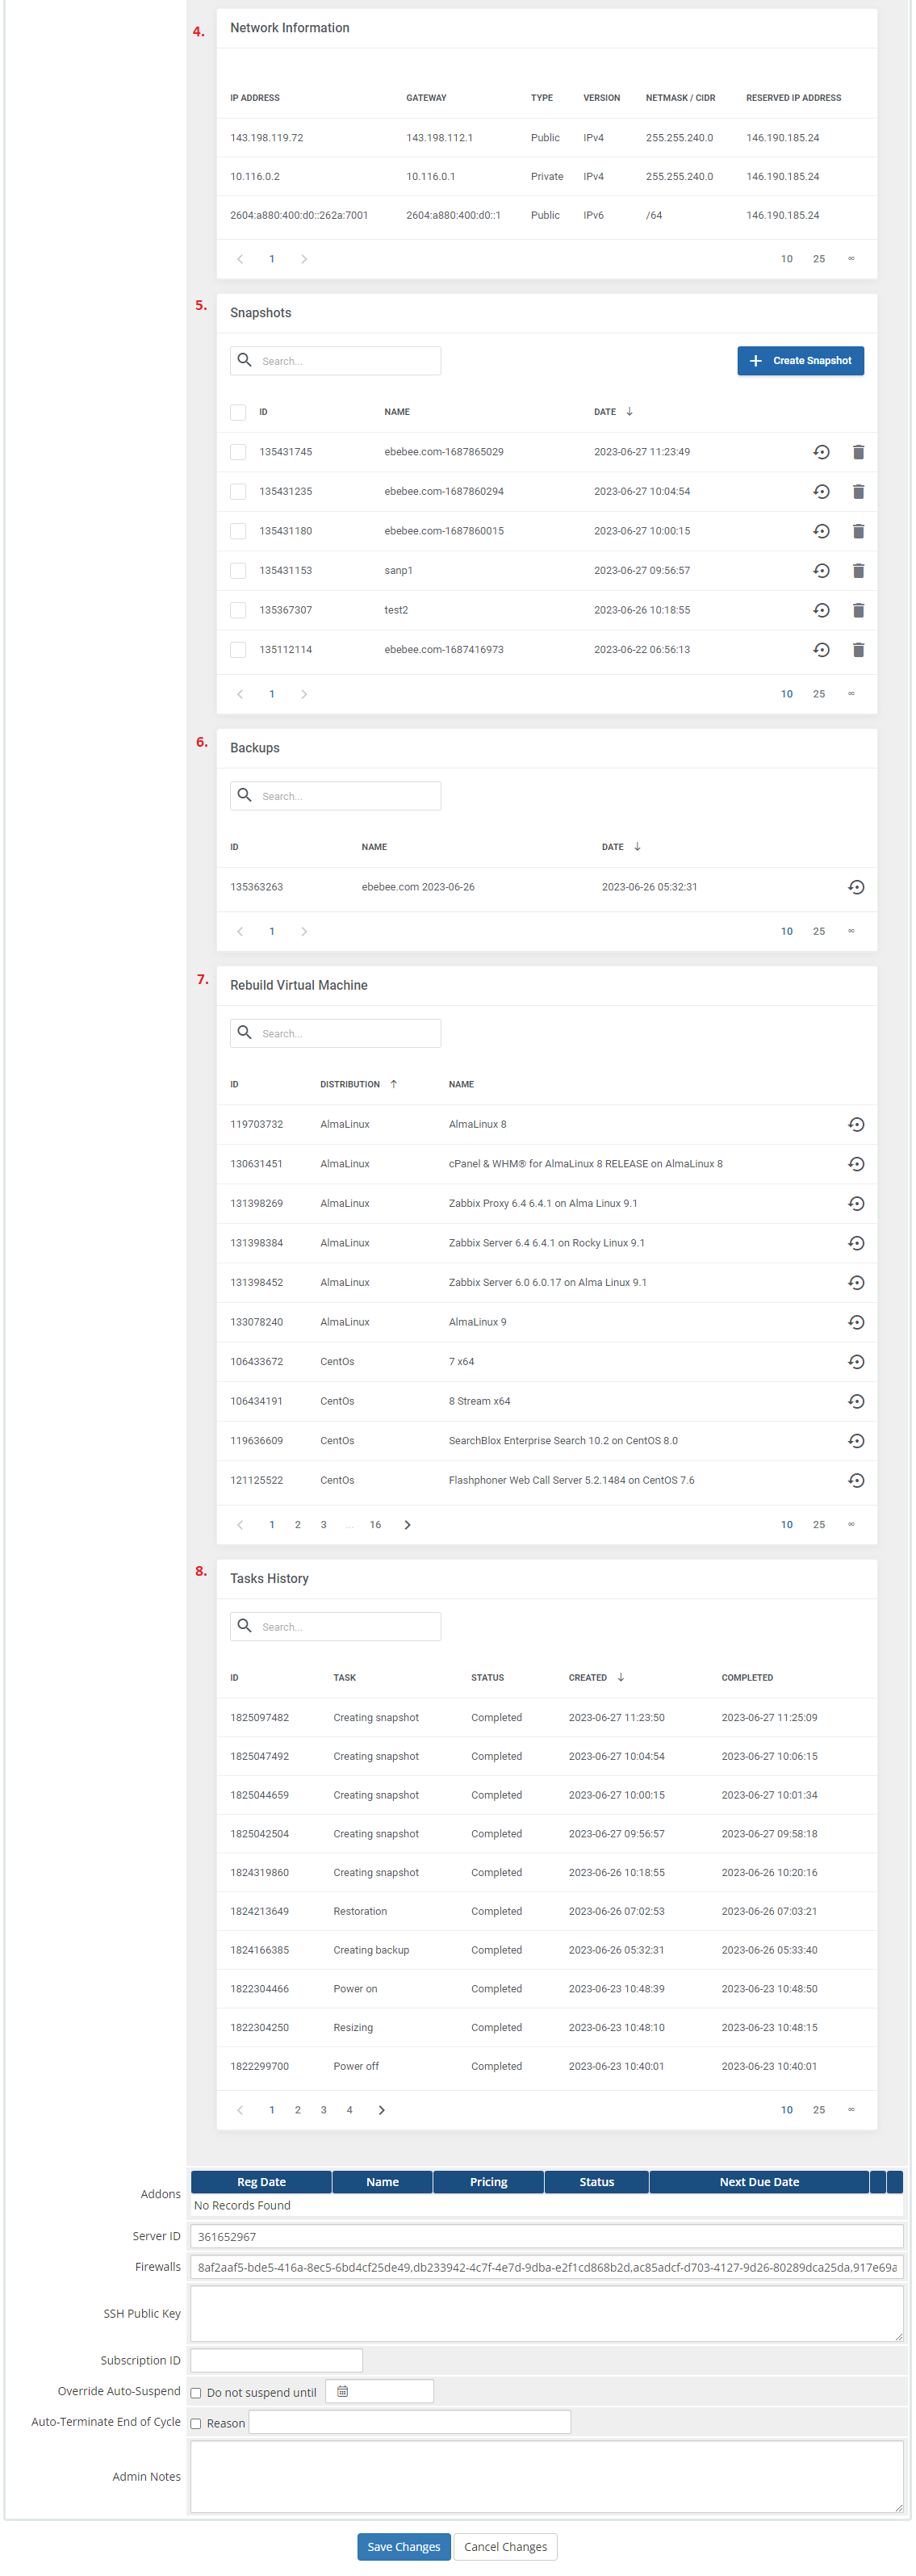
| DigitalOcean Droplets For WHMCS allows you to monitor and manage your customer Droplets from the admin area of your WHMCS system. This includes supervision of such features like:
Note: If "Random Domain Prefix" is provided in the module settings then the "Hostname" field, if empty, will be automatically filled in by the module after triggering the "Create" command. |
|
|
|
Ordering
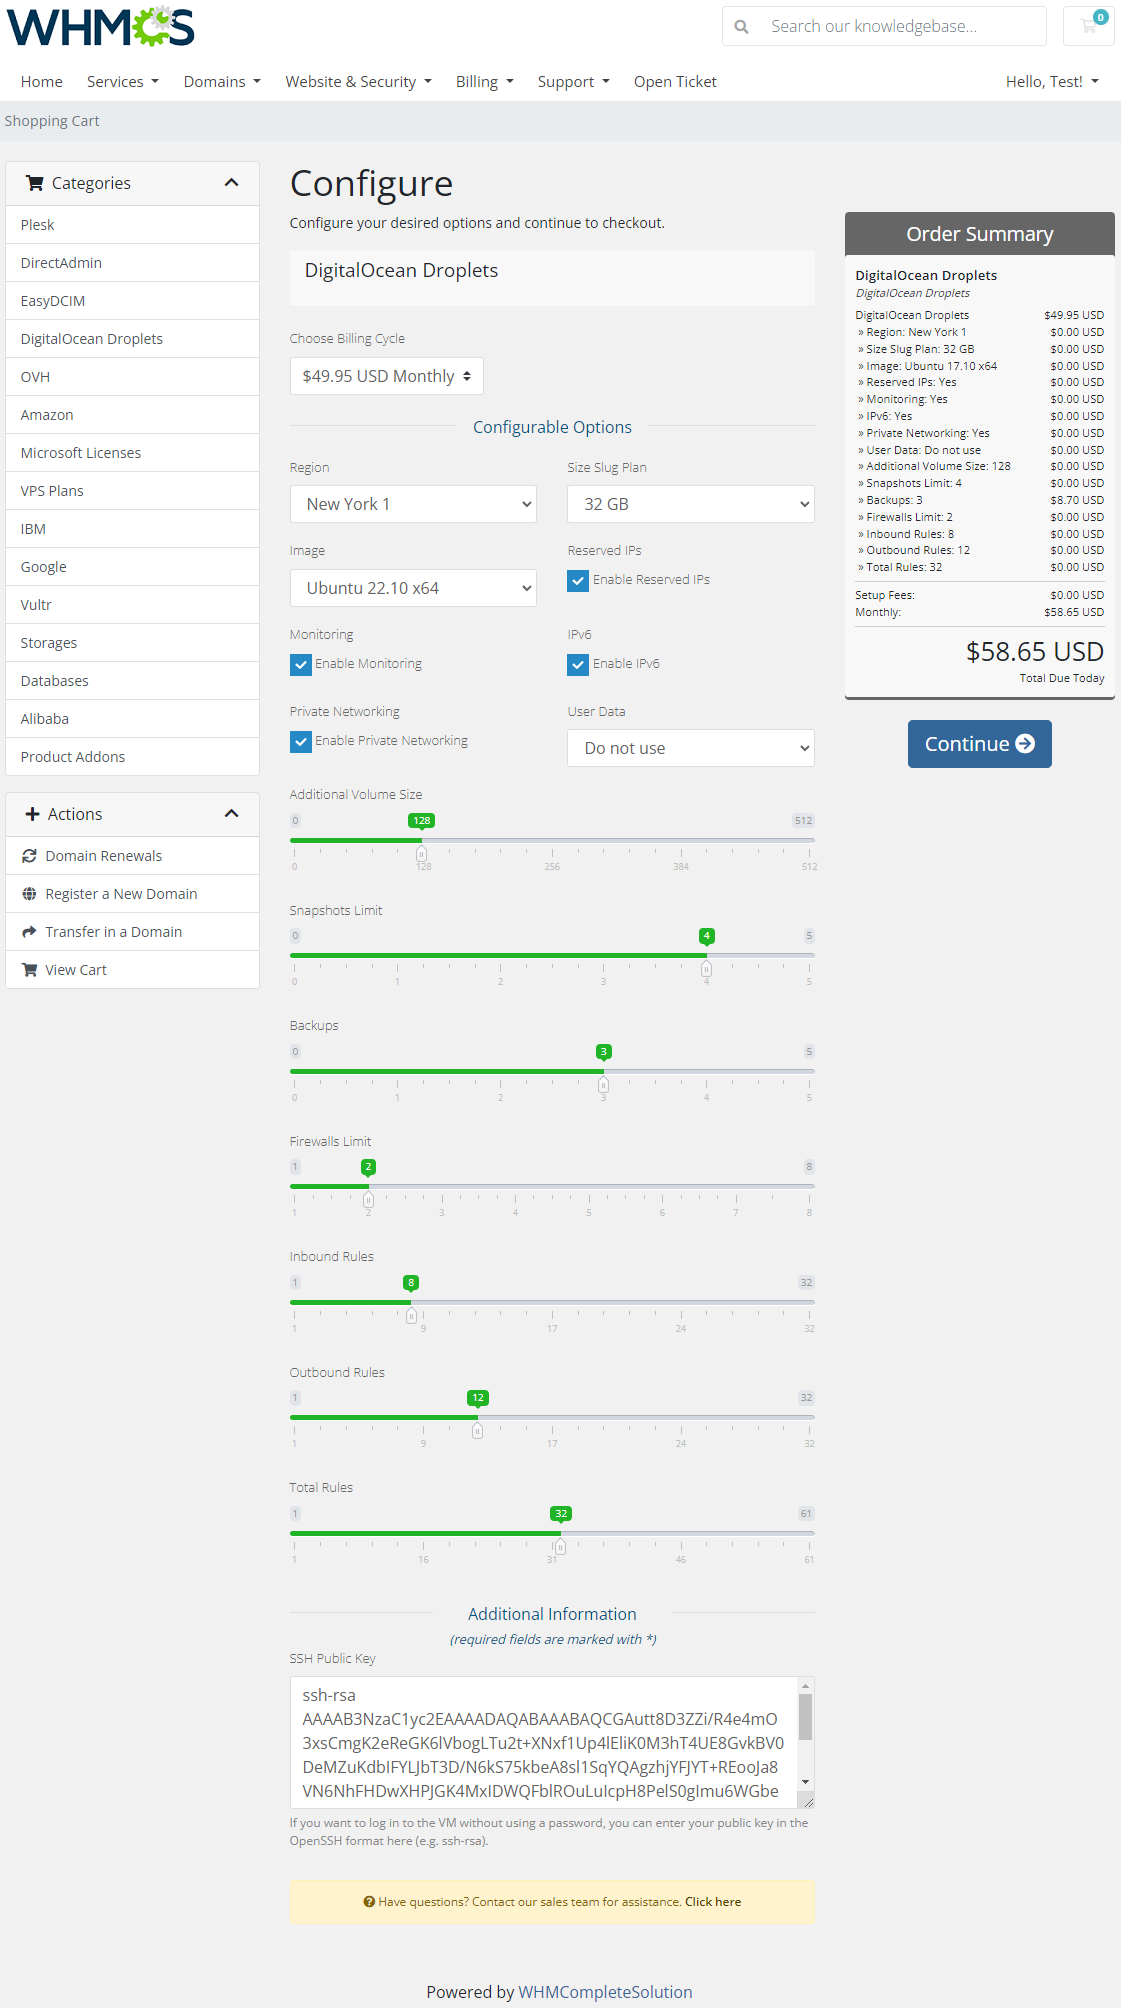
| Owing to configurable options, you are able to offer a product which your clients can tailor according to their needs. Additionally, you are able to set up pricing for each configurable option, which makes your offer even more competitive. Based on the custom SSH key field configuration, you might also insert your public SSH key, which will allow you to log in to a Droplet without the need to use the password. After the order placement and successful VM creation, the Droplet credentials will be sent to the client's email address according to the set cron execution intervals. |
|
Client Area
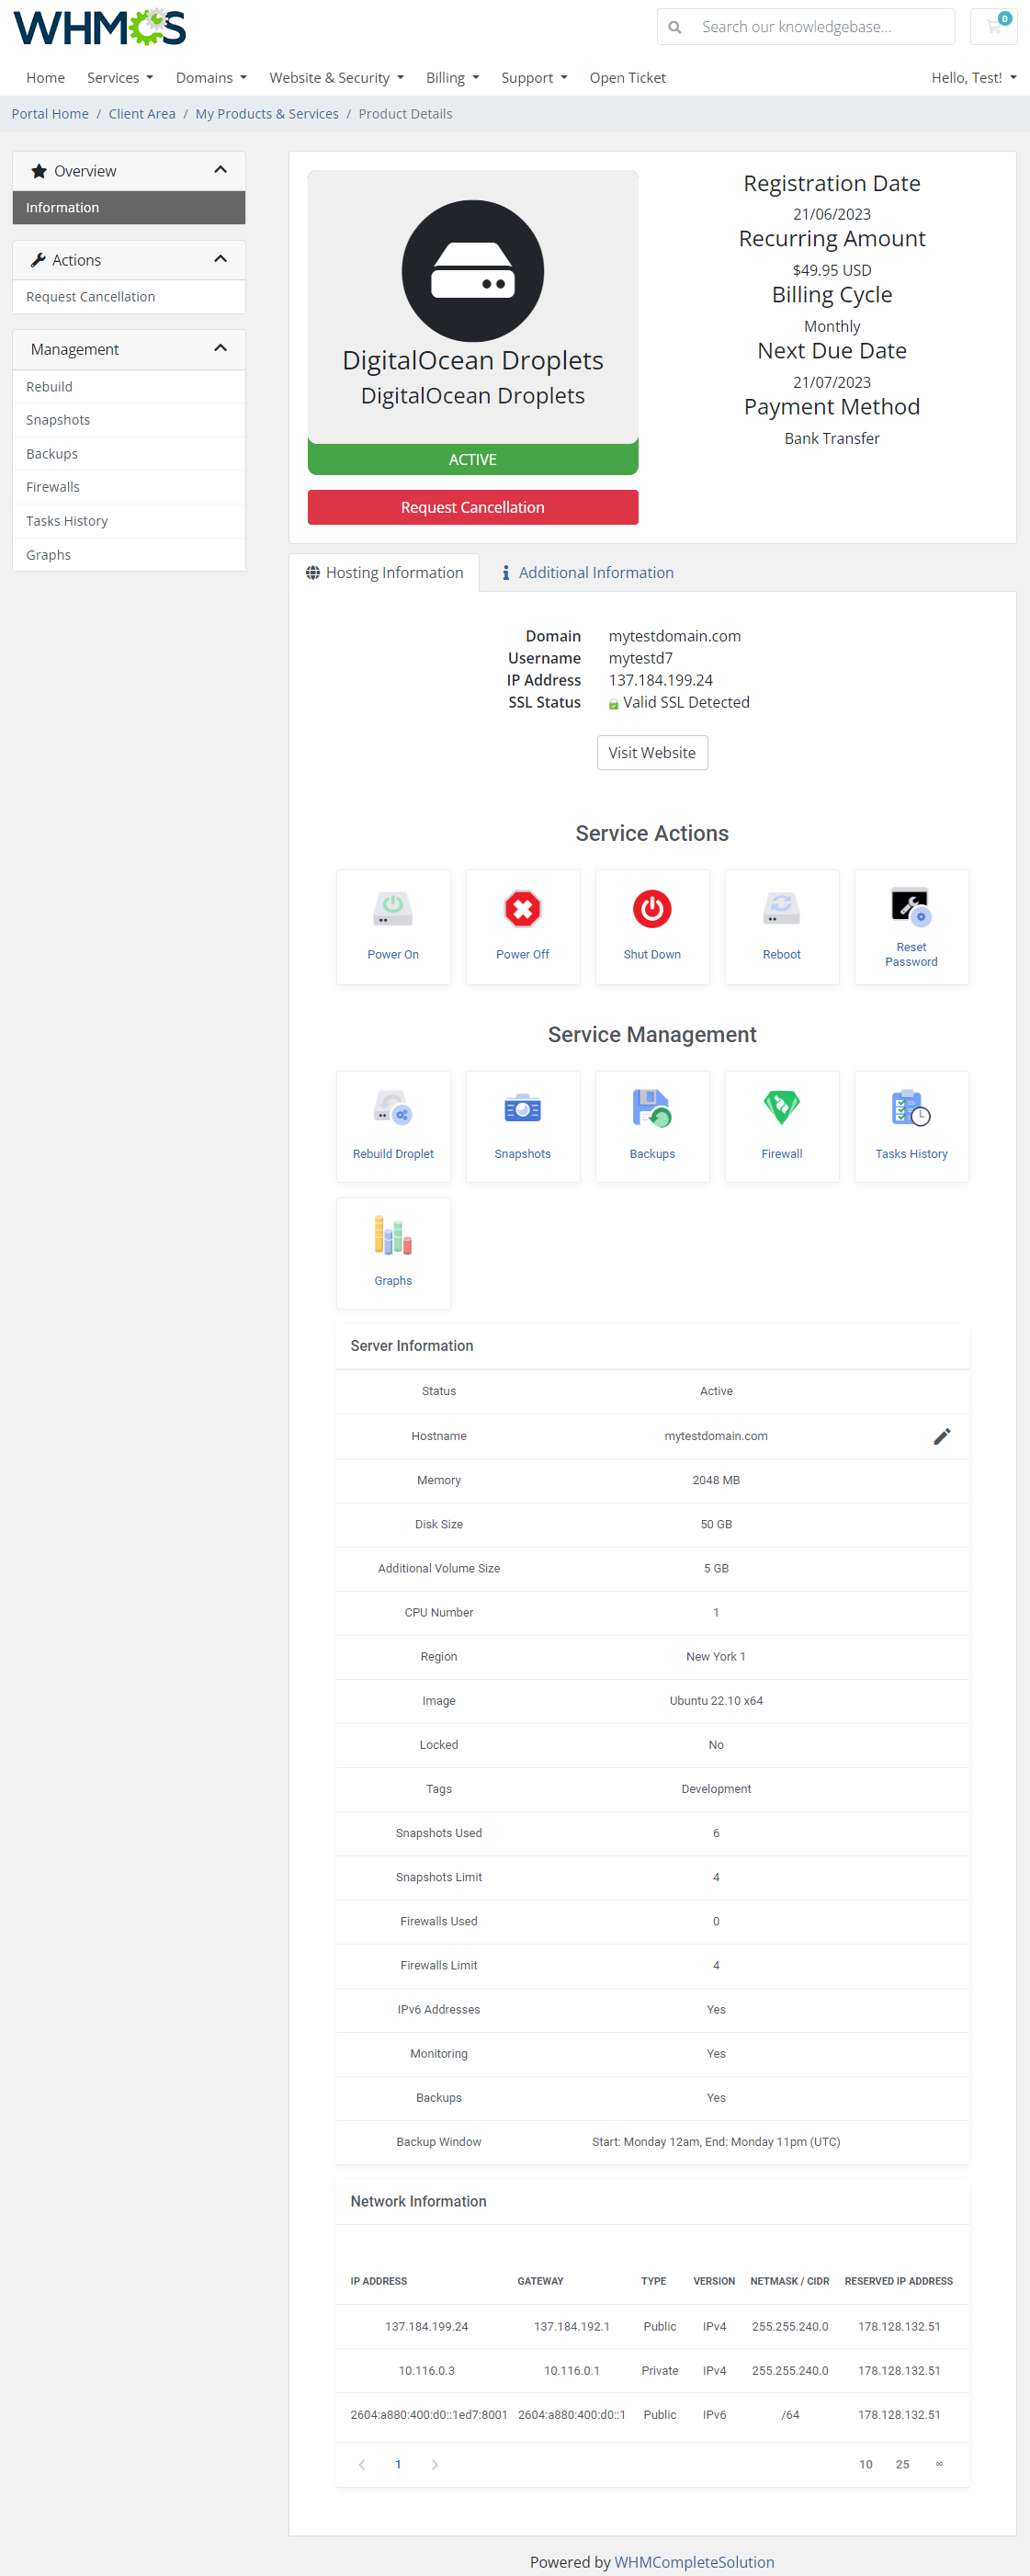
| Client area interface of DigitalOcean Droplets should look like the one on the screen below. As you can see, the control panel contains useful options required for managing a Droplet. The module allows your customers to easily power on/off, shutdown, reboot and reset password of their servers through pressing the corresponding buttons. |
|
Rebuild Droplet
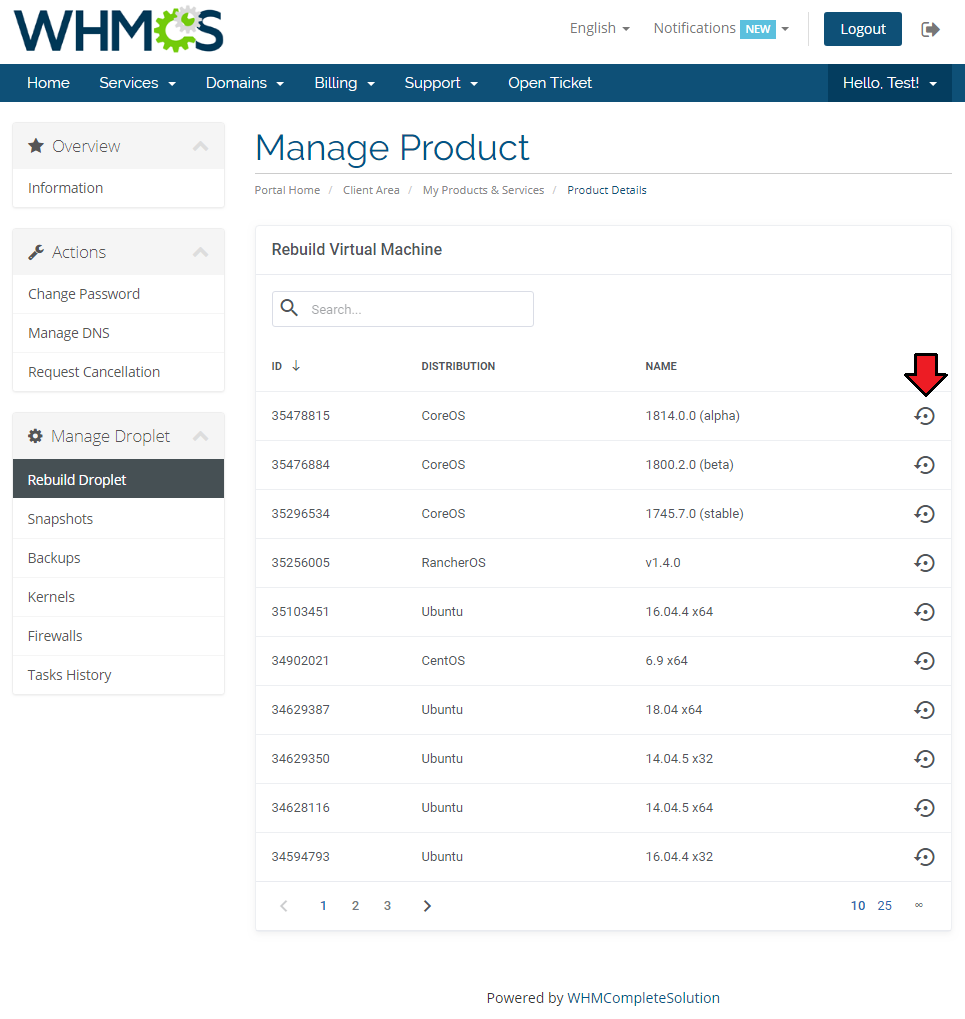
| This feature allows your clients to rebuild their virtual machine and change a server's OS image. Press the shown below button in order to reinstall your server to the chosen image and confirm your choice. |
|
Snapshots
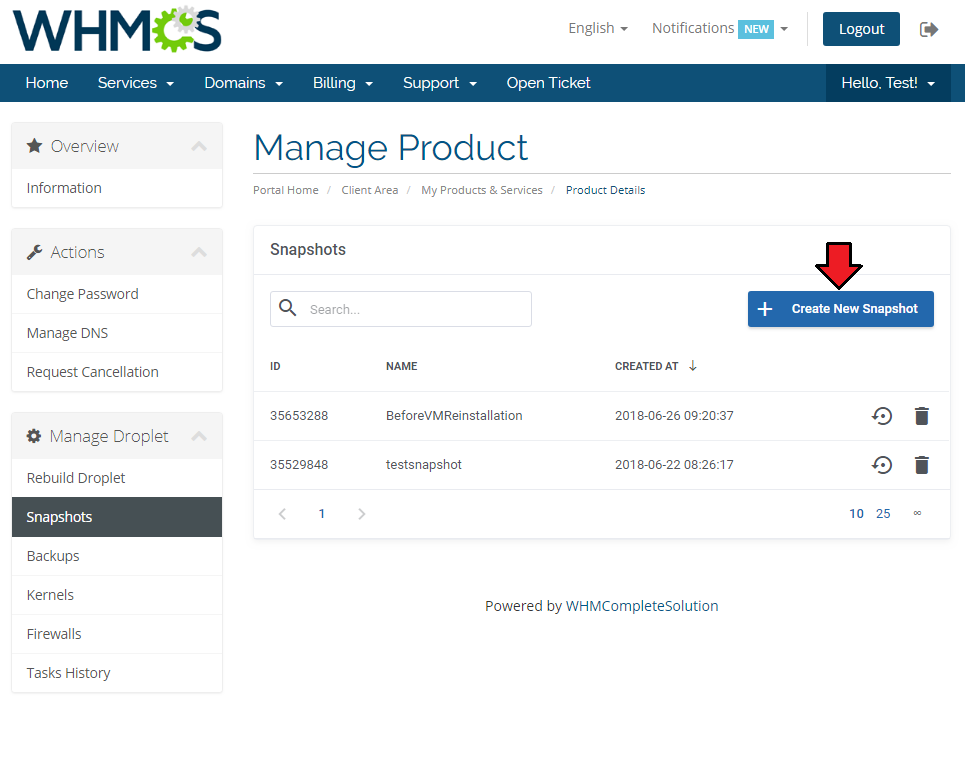
| Use snapshots to save the current contents of the virtual machine memory. You may use them later to restore the VM's settings. |
|
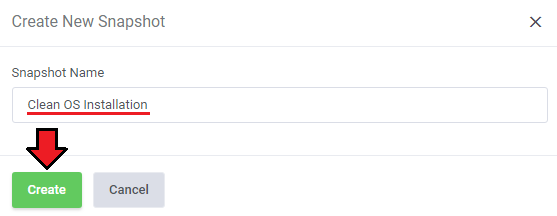
| Press the 'Create New Snapshot' button and enter the unique snapshot name. Please note that the spaces in the snapshot name will be ignored by the API and saved as a single string name anyway . |
|
| Creating a snapshot may take a while, so it will not appear on the list right away. Its progress status can be tracked in Tasks History or by refreshing the snapshot list manually. |
Backups
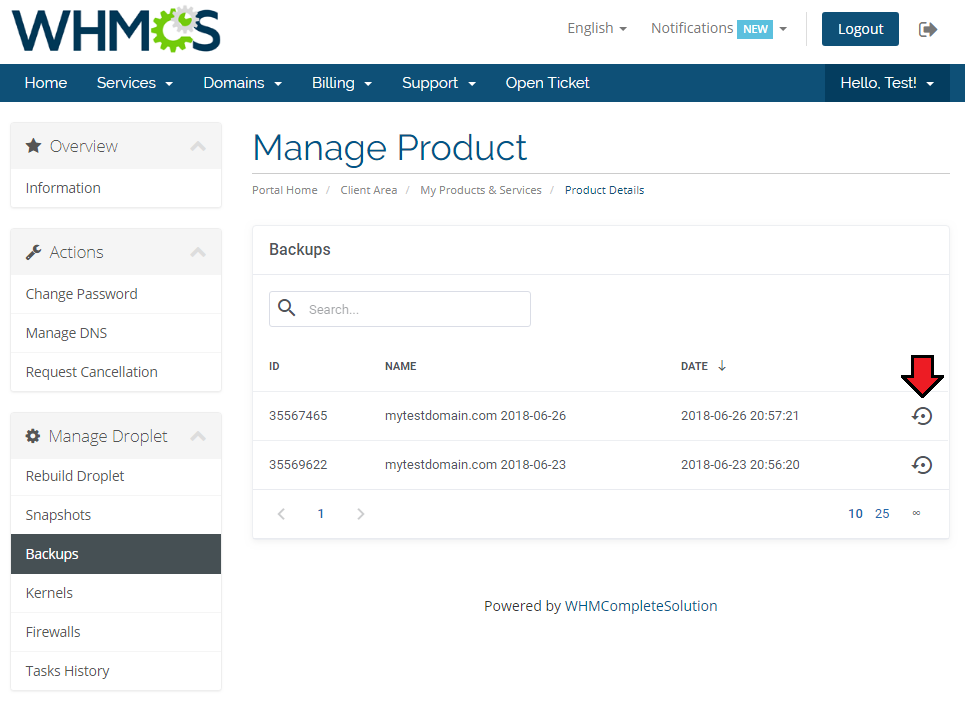
| If the automatic backups have been enabled for the Droplets products, then your client will be able to restore them from this section. DigitalOcean uses a snapshot-based backup system. This provides system-level backups of a server without powering it down. Note: This process happens automatically within a pre-determined scheduling window, and is completed in the background while the Droplet is running. |
|
Firewalls
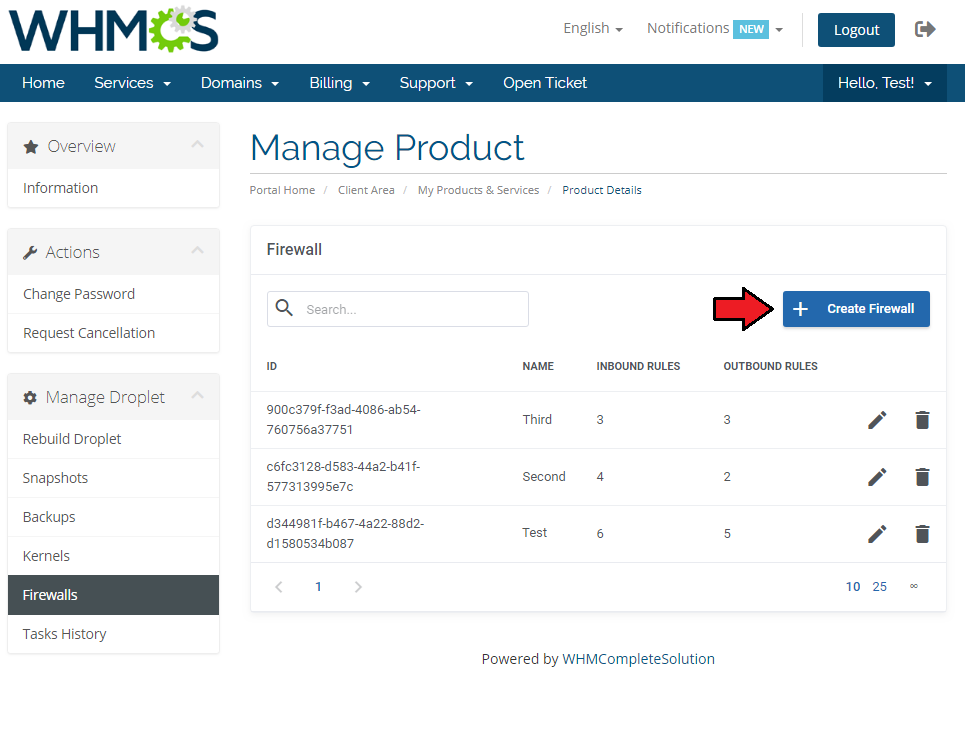
| 'Firewalls' section allows to view and create firewalls that will protect your Droplet from external attacks. Press 'Create Firewall' button to create one. |
|
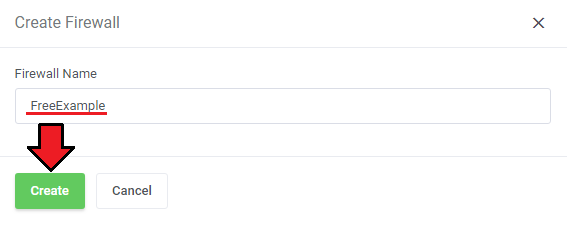
| Type in a unique name. You cannot provide a 'Firewall Name' that is already used by another Droplet. |
|
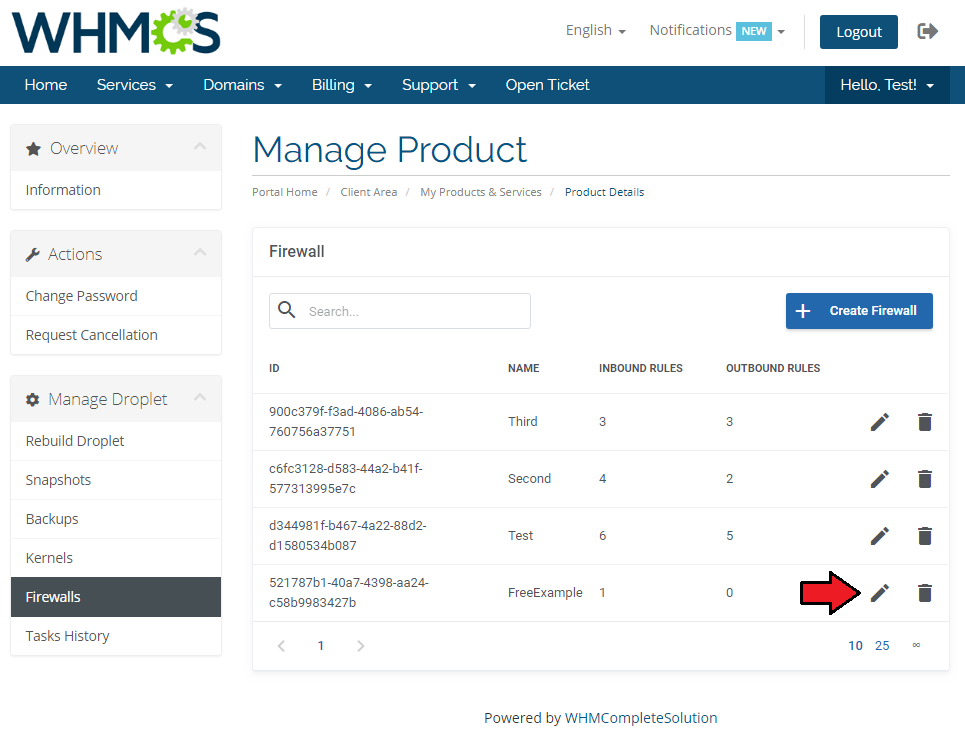
| A new firewall will appear on the list, note that it will have an ID assigned and a default inbound rule automatically created. Press 'Edit' icon to move to the firewall rules management page. |
|
Firewall Rules
| Every newly created firewall has a default, exemplary rule created. To create your own rules, just click the marked button. |
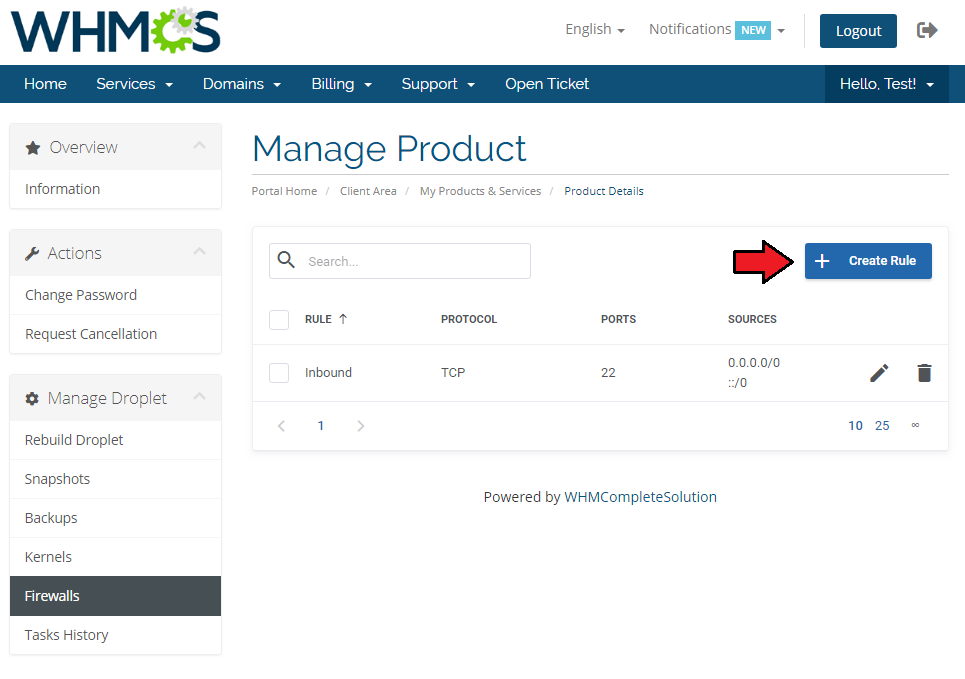
|
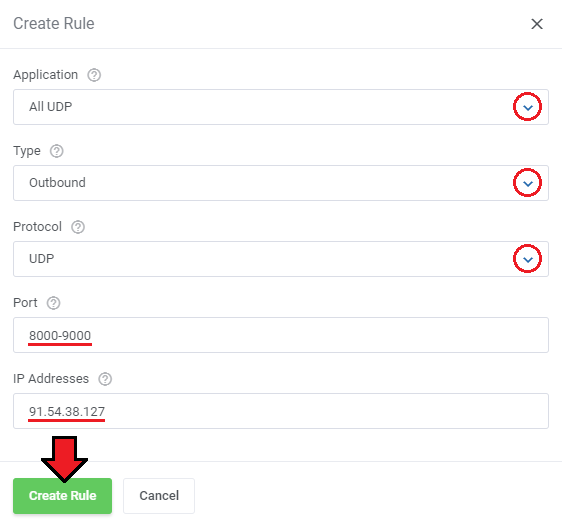
Finally, setup the rule by selecting:
|
|
Tasks History
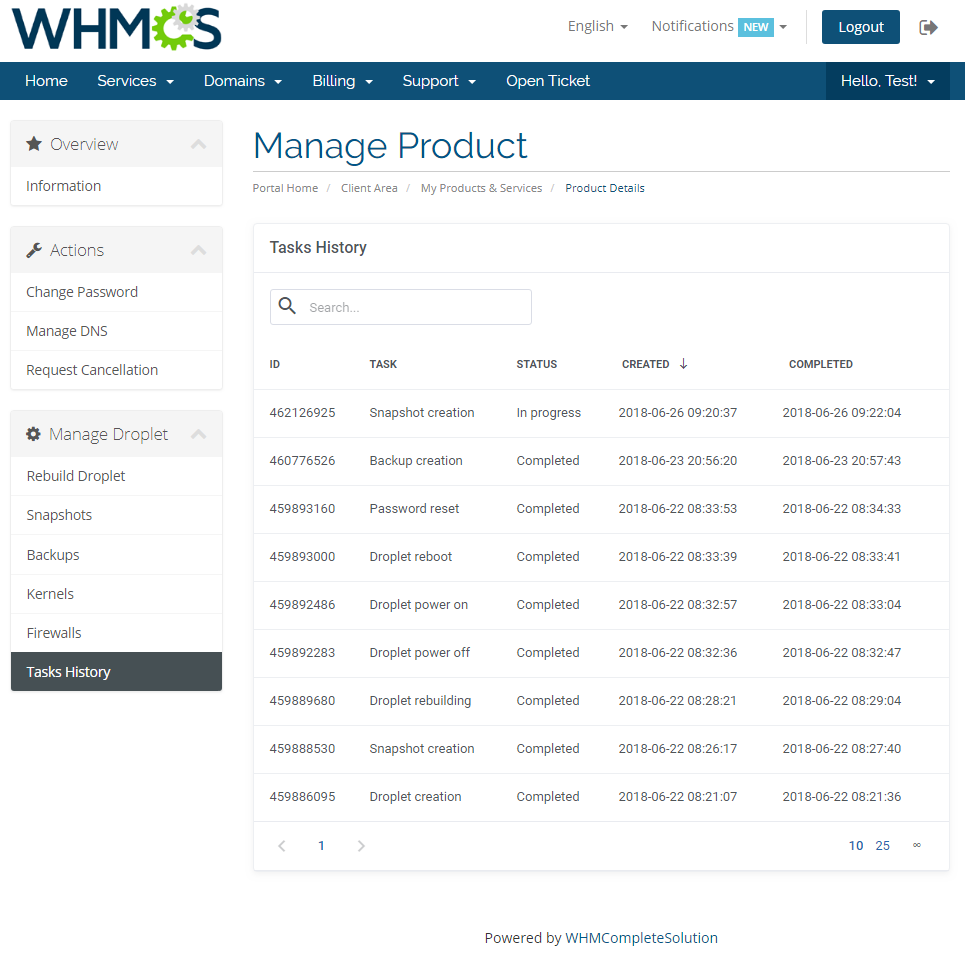
| Tasks history allows you to view all tasks performed on your VM with the current progress status. Please note that these actions are also collected from the DigitalOcean API. |
|
Graphs
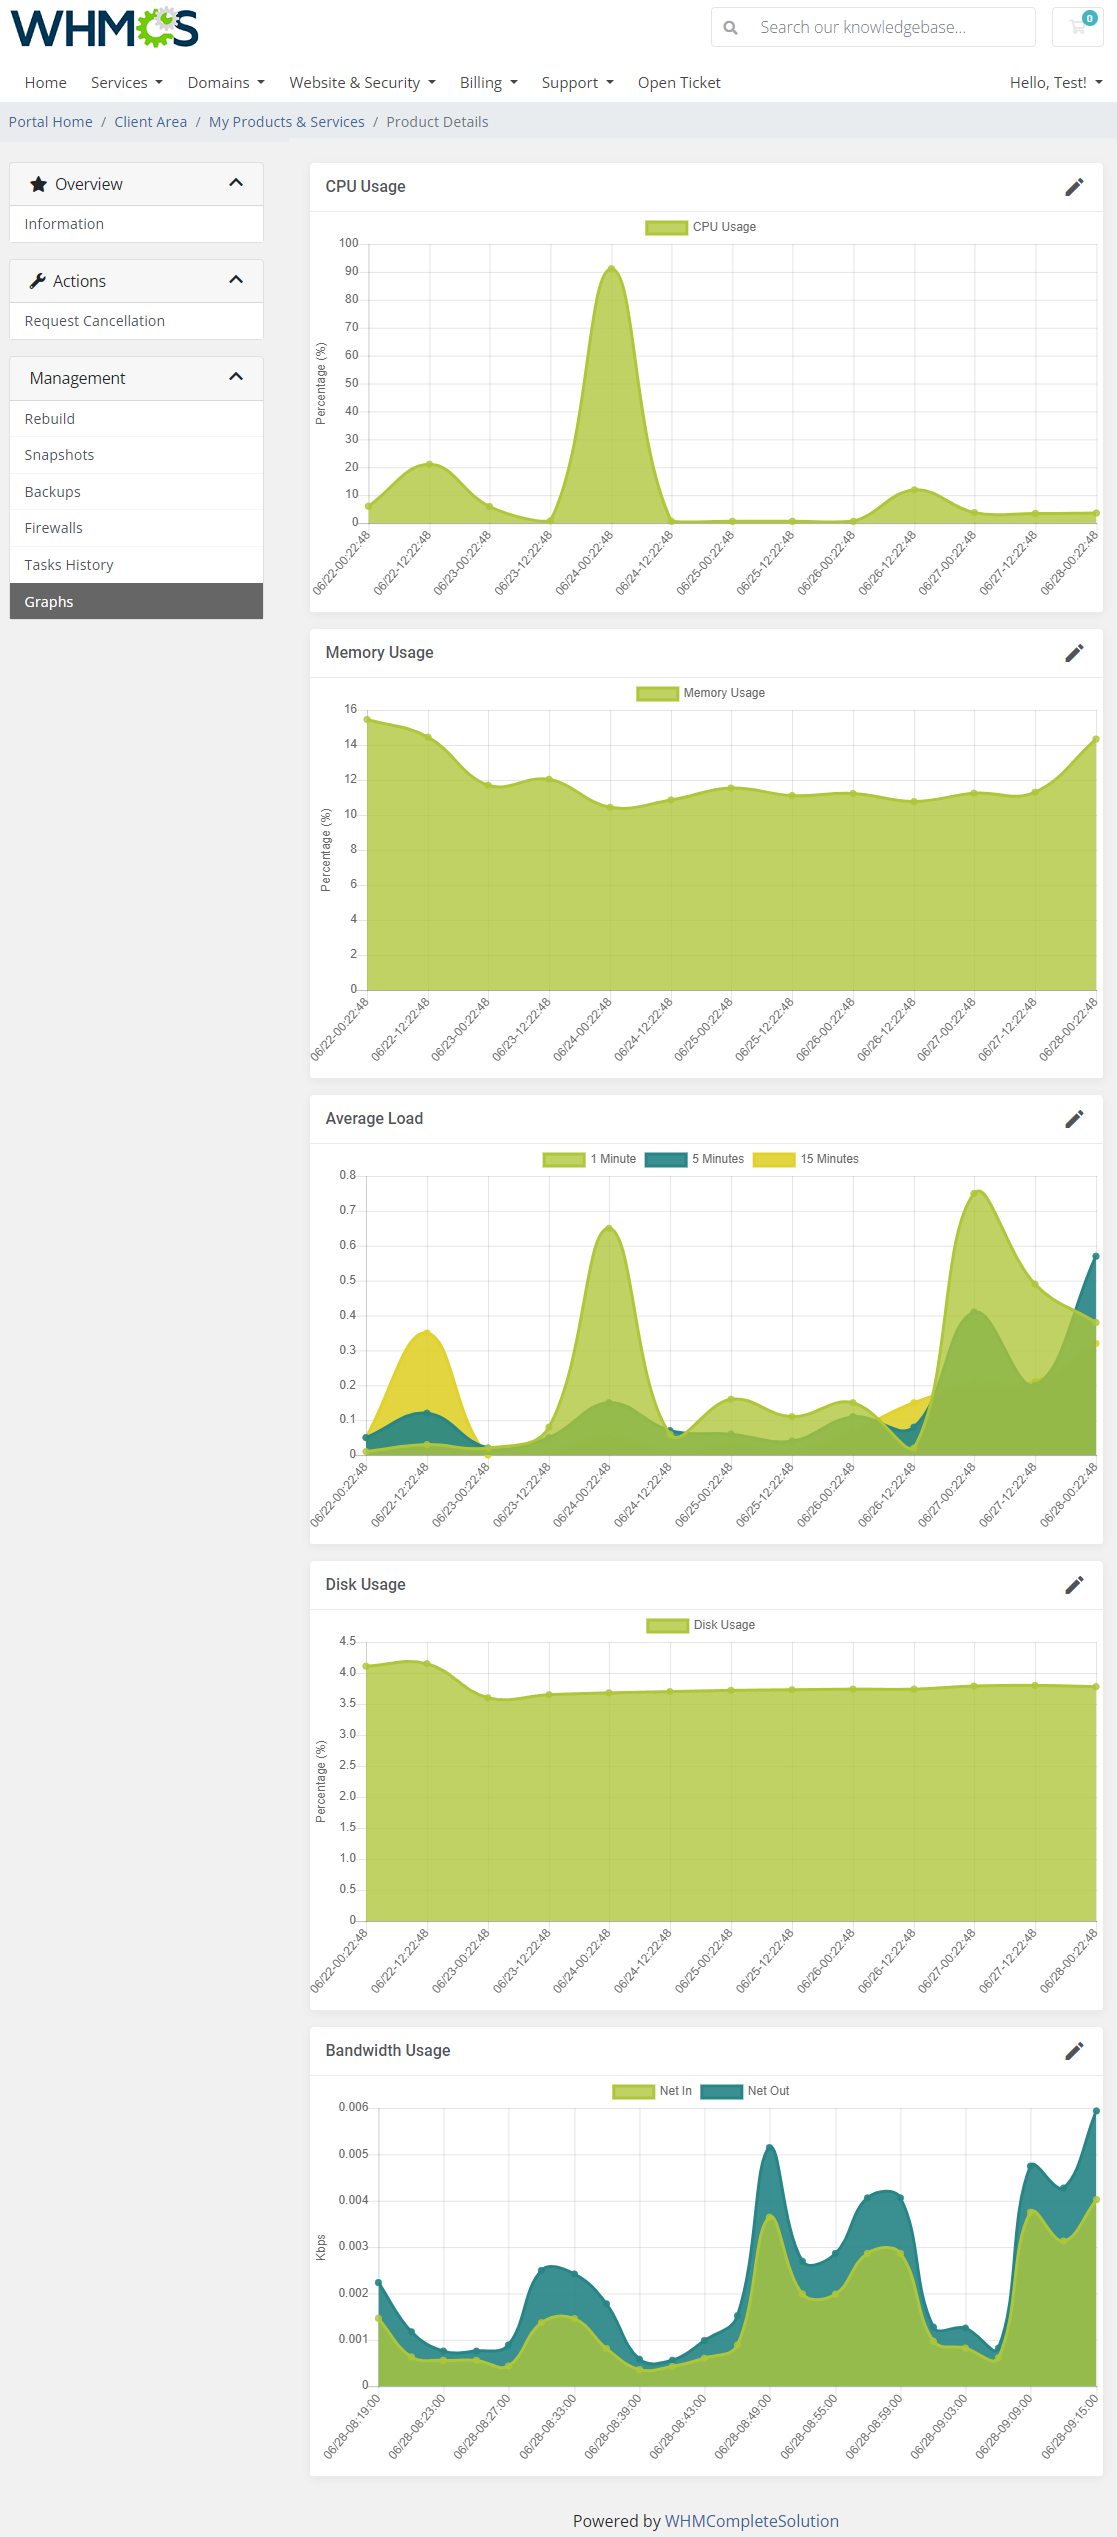
Once entering the 'Graphs' section, clients will be moved to the page with the generated graphs showing:
|
|
Importing Existing Droplet
| In this section, you can find short instruction on how to connect one of your clients to your already existing Droplet in DigitalOcean. Take the following steps to make sure that the process will be carried out properly. 1. Firstly, manually create an order for your customer in WHMCS. Choose a client and in the summary, view click on the ' Add New Order' button. Next, select a 'Product/Service' and press 'Submit Order' .
The above-mentioned information has to be consistent with the data from your DigitalOcean panel. Now, complete these fields as presented below. |

|
| 3. If the completed data is correct, after refreshing the page, you will see the attached Droplet from DigitalOcean. Important! Remember to manually add other missing parameters of the instance such as domains, credentials, IP Addresses, configurable options, SSH Key, billing cycle, etc. so they match the parameters of the attached Droplet from DigitalOcean. |
Tips
| 1. You can use the DNS Manager For WHMCS module to manage your Droplet DNS records. It already has a built-in support for DigitalOcean DNS server. |
| 2. Some of the features like IPv6, private networking or monitoring can only be activated once and cannot be disabled later on. Use these features wisely as they can increase your Droplets maintenance costs. |
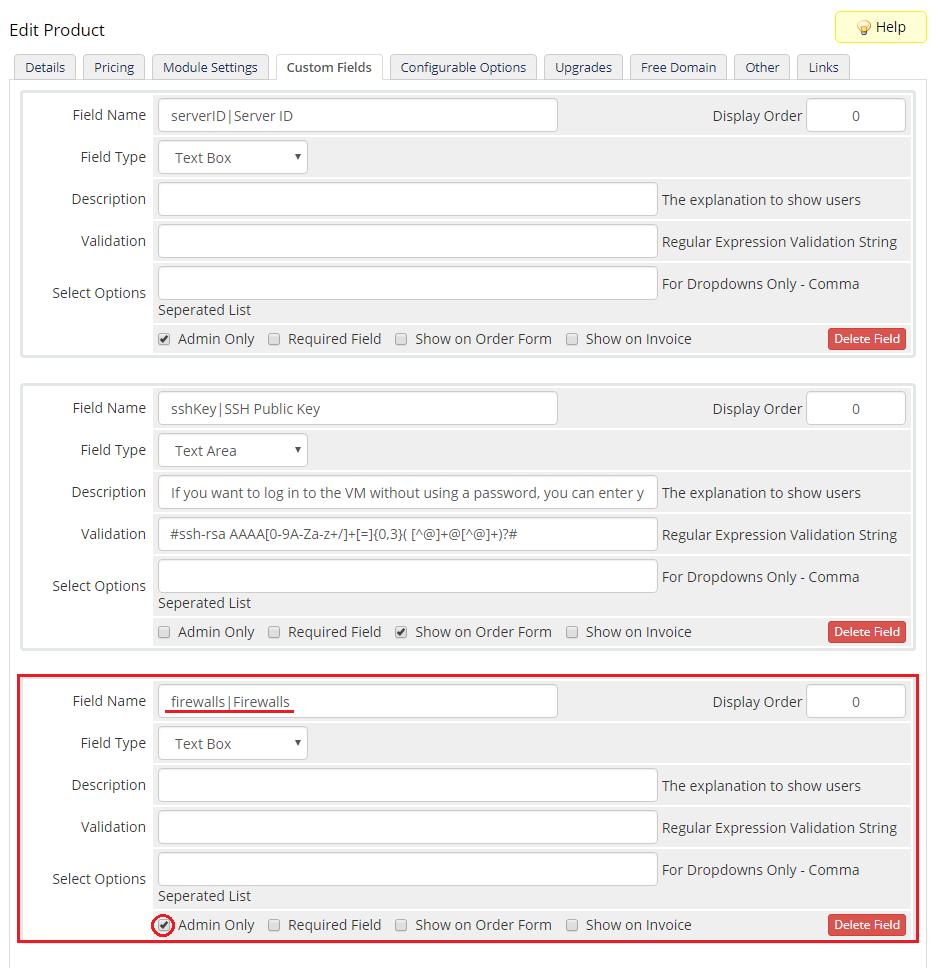
| 3. There is an additional custom field named 'Firewalls'. It should be generated automatically when you upgrade the product. In case something goes wrong, please add the custom field manually. Take a look at the screen below to check its specification. |
|
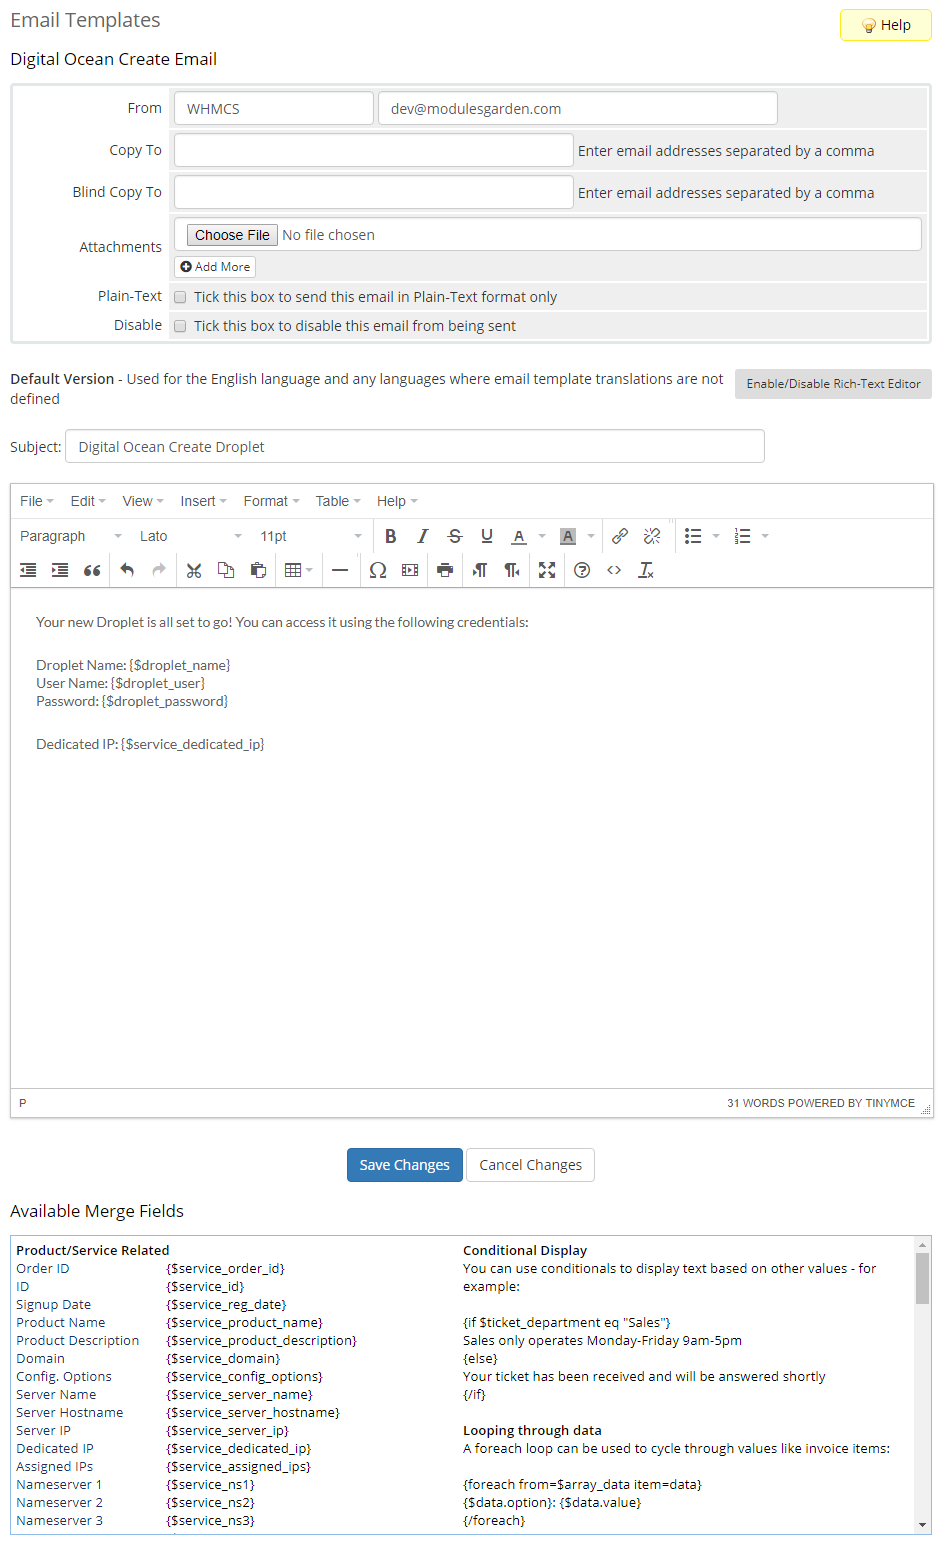
4. 'DigitalOcean Droplet Create Droplet' email template includes information on:
Please note that the last merge field has been added into the template in version 1.3.0. In case you started using the module earlier, you may add it manually. |
|
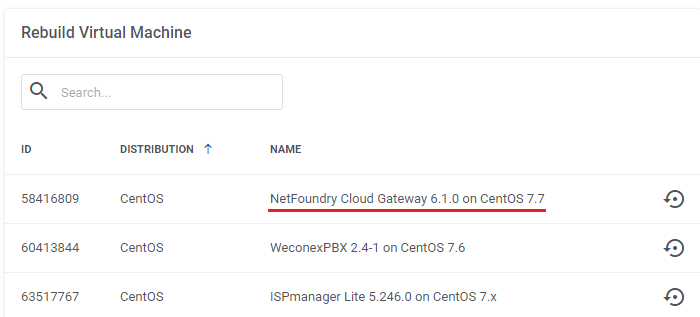
| 5. There is the possibility to change a name of the particular OS that is visible in the 'Rebuild Droplet' section in both admin and client area. Firstly, find the language file that is located here your_whmcs/modules/servers/DigitalOceanDroplets/langs |
|
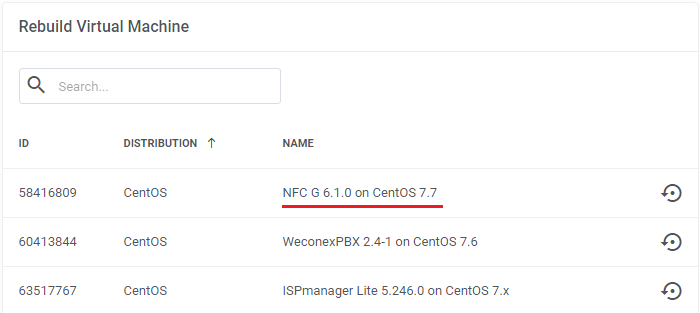
| To do so, we need to add this line to the lang file: Remember that you can only modify the second part of the line after the = sign. $_LANG['NetFoundry Cloud Gateway 6.1.0 on CentOS 7.7'] = "NFC G 6.1.0 on CentOS 7.7"; |
| As a result, the name is changed. |
|
| 6. List of supported operating systems and applications. Note that the below lists are current as of February 2022 and could be updated since then: |
| Operating System Name | |
|---|---|
| CentOS 7 x64 | FreeBSD 12.2 zfs x64 |
| CentOS 8 Stream x64 | RancherOS 1.5.8 x64 |
| Debian 11 x64 | Rocky Linux RockyLinux 8.4 x64 |
| Debian 9 x64 | Rocky Linux RockyLinux 8.5 x64 |
| Fedora 34 x64 | Ubuntu 18.04 (LTS) x64 |
| Fedora 35 x64 | Ubuntu 20.04 (LTS) x64 |
| Application Name | ||
|---|---|---|
| Acra 0.85.0 on Ubuntu 18.04 | Hasura GraphQL on Ubuntu 18.04 | PhpMyAdmin 5.0.3 on Ubuntu 20.04 |
| Airbyte 0.30.25 on Ubuntu 20.04 | Hector dev test 2 0.0.1 on Ubuntu 20.10 | PhpMyAdmin on Ubuntu 18.04 |
| Akaunting on Ubuntu 18.04 | hector inmutable slugs 2 yeeeeeet 1.0.0 on Ubuntu 20.01 | Plesk (CentOS) 18.0 on CentOS 7.7 |
| Akaunting on Ubuntu 20.04 | hector-test-image-slug | Plesk (CentOS) 18.0 on CentOS 7.9 |
| Ant Media Server Community Edition 2.1.0 on Ubuntu 18.04 | Helpy 2.4 on Ubuntu 18.04 | Plesk 17.8 on CentOS 7 |
| Ant Media Server Community Edition 2.4.1 on Ubuntu 18.04 | Helpy Pro 3.2.7.1 on Ubuntu 18.04 | Plesk 18.0 on Ubuntu 20.04 |
| Ant Media Server Enterprise Edition 2.2.1 on Ubuntu 18.04 | HoneyDB Agent on Debian 9 | Plesk 18.0 on Ubuntu 20.04 |
| Ant Media Server Enterprise Edition 2.4.1 on Ubuntu 18.04 | Hubs Cloud Personal 1.1.0 on Ubuntu 18.04 | Plone In A Box™ 5.2.2 on Ubuntu 20.04 (LTS) |
| ApisCP 3.2 on CentOS 8.2 | HumHub 1.10.2 on Debian 10 | Prometheus 2.9.2 on Ubuntu 18.04 |
| ApisCP 3.2 on CentOS 8.2 | Hyperledger Fabric Cloud Lab 1.4.2 on Ubuntu 18.04 | Purdm 0.3a on Ubuntu 18.04 |
| Appsmith 1.5 on Ubuntu 20.04 | Influx TICK on Ubuntu 18.04 | PyboxTech-Med 1.75 on Ubuntu 20.04 |
| Appwrite 0.12.0 on Ubuntu 20.04 | Invoice Ninja 1.0.0 on Ubuntu 18.0.4 | Python/Django Quickstart 1.1 on Ubuntu 18.04 |
| Appwrite 0.7.0 on Ubuntu 18.04 | Invoice Ninja 5 on Ubuntu 20.0.4 | QCObjects 2.1.157 on Ubuntu 18.04 |
| authentik 2022.1.3 on Ubuntu 20.04 | IOTA Hornet Node on Ubuntu 20.04 | QloApps 1.5.0 on Ubuntu 18.04 |
| AutoPanel - Wordpress Automation 1 on Ubuntu 20.04.2 LTS | ISPmanager 6.8.2 on CentOS 7.x | QuestDB 6.1.2 on Ubuntu 20.04 |
| AzuraCast 0.11.2 on Ubuntu 20.04 | ISPmanager Lite 5.246.0 on CentOS 7.x | Reblaze WAF 2.12.10 on Ubuntu 18.04 |
| AzuraCast 0.12 on Ubuntu 20.04 | Izenda 3.3.1 on Ubuntu 18.04 | Redash 8.0.0 on Ubuntu 18.04 |
| Bagisto on Ubuntu 18.04 | Jelastic PaaS 6.0-5 on Centos 7 | Repman 0.4.1 on Ubuntu 18.04 (LTS) |
| bcoin on Ubuntu 18.04 | JetBackup 5 on CentOS 7.9 | Restyaboard (CentOS) 0.6.8 on CentOS 7.6 |
| BigBlueButton Server 2.2 on Ubuntu 16.04 | Jitsi Server 2.0.6726 on Ubuntu 20.04 | Restyaboard (CentOS) 0.6.9 on CentOS 7.6 |
| Bitwarden 1.32.0 on Ubuntu 18.04 | Jitsi Server 2.1-273 on Ubuntu 18.04 | Restyaboard (CentOS) 1.7 on CentOS 7 |
| Botpress 12.9.1 on Ubuntu 18.04 | Kasm Workspaces 1.10.0 on Ubuntu 18.04 | Restyaboard 0.6.8 on Ubuntu 16.04 |
| Buddy on Ubuntu 18.04 | Kepler Builder 1.0.10 on Ubuntu 18.04 | Restyaboard 0.6.9 on Ubuntu 18.04 |
| Budibase 1.0.0 on Ubuntu 20.04 | Krill 0.6.0 on Ubuntu 18.04 | Restyaboard 1.7 on Ubuntu 20.04 |
| Bugfender 2020.2.0 on Ubuntu 18.04 | Kubernetes 1.19 1.19.7-001 on Ubuntu 20.04 | RethinkDB (Fantasia) 2.3.7 on Ubuntu 18.04 |
| Bugfender 2021.1.0 on Ubuntu 20.04 | LAMP on Ubuntu 18.04 | RethinkDB 2.4.1 on Ubuntu 18.04 |
| Caddy 2.2.1 on Ubuntu 18.04 | LAMP on Ubuntu 20.04 | Rocket.Chat 2.4.9 on Ubuntu 18.04 |
| CapRover 1.10.1 on Ubuntu 18.04 | Laravel 7.20.0 on Ubuntu 20.04 | Rocket.Chat 4.1.2 on Ubuntu 20.04 |
| CAST AI Kubernetes 1.18 1.18.6-7 on Ubuntu 20.04 | LEMP 42 on Ubuntu 20.04 | Roxy-WI 4.5.1 on CentOS 7 |
| Chamilo 1.11.10 on Ubuntu 18.04 | LEMP on Ubuntu 18.04 | RStudio + H2O 1.2 on Ubuntu 18.04 |
| Chevereto 1.3.0 on Ubuntu 20.04 | Linux Alf.io 2.0-M3-2112-2 on Rocky Linux 8.5 | RStudio + PkgDev 1.2 on Ubuntu 18.04 |
| Chevereto-Free 1.6.2 on Ubuntu 20.04 | Linux ApisCP 3.2 on Rocky Linux 8.5 | RStudio + Stan 1.2 on Ubuntu 18.04 |
| CloudBees Jenkins on Ubuntu 18.04 | Live Helper Chat 3.84 on Centos 7.8.2003 | RStudio 1.2 on Ubuntu 18.04 |
| CloudPanel 1 1.0.4 on Debian 10.7 | Magento 2 Open Source 1.3.1 on Ubuntu 20.04 (LTS) | RStudio 1.4 on Ubuntu 20.04 |
| CloudPanel 1 1.0.5 on Debian 10.8 | Magento 2 Open Source 1.5.1 on Ubuntu 20.04 (LTS) | Ruby on Rails 6.0.3.4 on Ubuntu 20.04 |
| CloudPanel 1 1.0.7 on Debian 10.11 | Mailcoach 3.0 on Ubuntu 18.04 | Ruby on Rails on Ubuntu 18.04 |
| Cloudron 6.0.1 on Ubuntu 20.04 | Mailcoach 4.0 on Ubuntu 20.04 | RunCloud-18.04 on Ubuntu 18.04 |
| Cloudron 7.0.4 on Ubuntu 20.04 | Mastodon 3.1.3 on Ubuntu 18.04 | RunCloud-20.04 on Ubuntu 20.04 |
| ClusterControl 1.9.2 on Ubuntu 20.04 | Matrix (Synapse backend) 0.1.3 on Debian 10 (buster) | Saltcorn 0.6.0 on Ubuntu 20.04 |
| code-server 3.0.2 on Ubuntu 18.04 | Mattermost 5.16.3 on Ubuntu 18.04 | Sandfly Security 3.2.0 on Ubuntu 20.04 |
| Coin Collector by PowerTrader.net 1.2 on Ubuntu 20.04 | MeiliSearch 0.25.2 on Debian 10 (buster) | SearchBlox Enterprise Search 9.2.1 on CentOS 7.6 |
| Computing for COVID 3 on Ubuntu 18.04.4 LTS | Meltano 1.15.0 on Ubuntu 18.04 | Selenoid 1.10.0 on Ubuntu 18.04 |
| Countly Analytics 20.04.1 on Ubuntu 18.04 | Meltano 1.31.0 on Ubuntu 18.04 | ServerWand 1.0 on Ubuntu 18.04 |
| cPanel & WHM® 84.0.14 on CentOS 7.6 | Memgraph on Debian 9.7 | ShinyProxy 2.4.0 on Ubuntu 20.04 |
| cPanel & WHM® 92.0.11 on CentOS 7.6 | Metabase 0.41.6 on Ubuntu 18.04 | ShinyProxy 2.6.0.1 on Ubuntu 20.04 |
| cPanel & WHM® RELEASE on CentOS 7.9 | Microweber 1.2.0 on Ubuntu 20.04 | Shopware on Ubuntu 18.04 |
| CSMM 1.20.2 on Ubuntu 20.04 | Microweber 1.2.10 on Ubuntu 20.04 | SimpleX server 0.4.1 on Ubuntu 20.04 |
| CUBITE lilac on Ubuntu 20.04 | Minecraft: Bedrock Edition 1.0 on Ubuntu 20.04 (LTS) | Skaffolder 3.0 on Ubuntu 18.04 |
| Curiosity 0.12549 on Ubuntu 16.04 | Minecraft: Java Edition Server 1.0 on Ubuntu 18.04 | Snapt Aria 2.0.0 on Ubuntu 18.04 |
| CyberPanel 2.0.3 on Ubuntu 20.04 | Mist 4.6.2 on Ubuntu 20.04 | Snapt Nova ADC (Load Balancer, WAF) 1.0.0 on Ubuntu 18.04 |
| CyberPanel 2.1.1 on Ubuntu 20.04 | MongoDB 4.0.3 on Ubuntu 18.04 | Solder.io 0.7.6 on Ubuntu 18.04.5 |
| CyberPanel Joomla 3.0.10 on Ubuntu 20.04 | MongoDB 4.4.1 on Ubuntu 20.04 | SolidInvoice 2.0.3 on Ubuntu 18.04 |
| CyberScore 5.0.1 on Ubuntu 18.04.3 | moodle 3.10 on Debian 10 | Speckle Server 2 on Ubuntu 20.04 |
| DeadLetter Facial Recognition on Ubuntu 18.04 | MySQL 8.0.21 on Ubuntu 20.04 | Spotipo 3.4.13 on Ubuntu 18.04 |
| Decentralized Internet 5.3.5 on Ubuntu 18.04 | MySQL on Ubuntu 18.04 | Strapi 3.1.0 on Ubuntu 18.04 |
| Directus 9 on Ubuntu 18.04 | Nakama 2.7.0 on Ubuntu 18.04 | Supabase Postgres 0.15.0 on Ubuntu 18.04 |
| Discourse 2.5.0.beta3 on Ubuntu 18.04 | NetBox 2.10.4 on Ubuntu 20.04 | Supabase Realtime 0.7.5 on Ubuntu 18.04 |
| Discourse on Ubuntu 20.04 | NetFoundry Zero Trust Networking 7.3.0 on CentOS 7.8 | Teleport 8.0.1 on Ubuntu 20.04 |
| Django 2.2.12 on Ubuntu 20.04 | NethServer 7.9.2009 on CentOS 7.x | ThePlanMinder PostgreSQL 1.03 on Ubuntu 20.04 |
| Django 3.2 LTS 3.2.4 on Ubuntu 20.04 | Netmaker 0.9.1 on Ubuntu 20.04 | ThingsBoard CE on Ubuntu 18.04 |
| Docker 19.03.12 on Ubuntu 18.04 | Nimbella Lite on Ubuntu 18.04 | ThingsBoard PE on Ubuntu 18.04 |
| Docker 19.03.12 on Ubuntu 20.04 | Ninjam on Debian 10.0 x64 | titra 0.9.8 on Ubuntu 18.04 |
| Dokku 0.17.9 on Ubuntu 18.04 | NirvaShare 1.5.7 on Ubuntu 20.04 (LTS) | Traccar 4.10 on Ubuntu 20.04 |
| Dokku 0.21.4 on Ubuntu 20.04 | NKN Commercial 2.0 on Ubuntu 18.04 | TRASA 1.1.2 on Ubuntu 20.04 |
| Dokos 2.0.0 on Ubuntu 18.04 | node-army 3.0 on Ubuntu 20.04 | twigs 1.0.1 on Ubuntu 20.04 LTS |
| Doppler 1.0 on Ubuntu 20.04 (LTS) | node-army-3.0 3.0 on Ubuntu 20.04 (LTS) | UH VPN 1.2.0 on Ubuntu 20.04 |
| DSuhinin-App-1 1.0 on Ubuntu 18.04 | Node.js Quickstart 1.0 on Ubuntu 18.04 | UTunnel VPN 1.0.0 on Ubuntu 20.04 |
| EmailEngine 2.11.1 on Ubuntu 20.04 | NodeGame 7.1.0 on Ubuntu 18.04 | UXLens 0.7 on Ubuntu 18.04 |
| ERPNext 12.5.0 on Ubuntu 18.04 | NodeJS 12.18.1 on Ubuntu 20.04 | uzERP 1.26.6 on Ubuntu 18.04 |
| Erxes 0.17.6 on Ubuntu 18.04 | Onion Routed Cloud 14 on Ubuntu 18.04 | Varbase 8.7.11 on Ubuntu 18.04 |
| Everlife.AI 2.2.0 on Ubuntu 20.04 | Onjection Jenkins 2.164.3 on Ubuntu 16.04 | Varnish Cache 6.0.10 on Ubuntu 18.04 |
| FastNetMon 2.0 on Ubuntu 18.04 | ONLYOFFICE Docs 7.0.0 on Ubuntu 20.04 LTS | VictoriaMetrics Single 1.71.0 on Ubuntu 20.04 |
| FASTPANEL 1.9+deb10p151 on Debian 10 | ONLYOFFICE Workspace 22.01.654 on Ubuntu 20.04 LTS | VitalPBX 3.0.4-1 on Centos 7.8 |
| Fathom on Ubuntu 18.04 | Open Source Social Network 6.1.0 on Ubuntu 18.04 | vitalpointz IoT Core Lite 1.2.0 on CentOS 7.6 |
| FileCloud 21.2.3 on Ubuntu 20.04 | Open Unlight 1.0.0.pre1 on Ubuntu 18.04 | Vodia Multi-tenant Cloud PBX 66 on Debian 10 x64 |
| filecoin-lotus 1.11.0 on Ubuntu 20.04 (LTS) | OpenBoxes 0.8.14 on Ubuntu 20.04 | WarpSpeed VPN 1.1.5 on Ubuntu 18.04 |
| filecoin-lotus 1.13.0 on Ubuntu 20.04 (LTS) | OpenCart 3.0.3 on Ubuntu 18.04 | Web-WordPress 5.7 on Ubuntu 20.04 |
| Flashphoner Web Call Server 5.2.780 on CentOS 7.6 | OpenCPU 2.2.4 on Ubuntu 20.04 | WebDNA Server 8.6.4 8.6.4 on Ubuntu 18.04 |
| Flexify.IO Multi-cloud / Migration 2.12.0 on Ubuntu 20.04 LTS | OpenFaaS on Ubuntu 18.04 | WebMaker Server 10.6 on Ubuntu 20.04 |
| Flexify.IO Multi-cloud / Migration 2.12.8 on Ubuntu 20.04 LTS | OpenLiteSpeed ClassicPress 1.2.0 on Ubuntu 20.04 | WeconexPBX 2.4-1 on CentOS 7.6 |
| Flipstarter 1.1.2 on Ubuntu 18.04 | OpenLiteSpeed Django 2.2.3 on Ubuntu 18.04 | Wiki.js 2.4.107 on Ubuntu 18.04 |
| flussonic 21.08.1 on Ubuntu 20.04 | OpenLiteSpeed Django 3.1.1 on Ubuntu 20.04 | Wireguardian VPN Access Server 2110.0 on Ubuntu 20.04 |
| Folding@home 0.0.1 on Ubuntu 18.04 | OpenLiteSpeed Django 3.2.11 on Ubuntu 20.04 | WireSpeed VPN 1.1.2 on Ubuntu 18.04 |
| Free Cost Management 1-1-326707216-master on Ubuntu 20.04 | OpenLiteSpeed Joomla 4.0.5 on Ubuntu 20.04 | WireSpeed VPN 1.1.3 on Ubuntu 18.04 |
| FreePBX® 15 on CentOS 7.6 | OpenLiteSpeed NodeJS 10.15.3 on Ubuntu 18.04 | WireSpeed VPN 1.1.5 on Ubuntu 18.04 |
| FreePBX® 16 on CentOS 7.8 | OpenLiteSpeed NodeJS 12.16.3 on Ubuntu 20.04 | WordPress 5.5.1 on Ubuntu 18.04 |
| Ghost on Ubuntu 18.04 | OpenLiteSpeed NodeJS 12.20.2 on Ubuntu 20.04 | WordPress 5.8 on Ubuntu 20.04 |
| Ghost on Ubuntu 20.04 | OpenLiteSpeed Rails 6.1.4.1 on Ubuntu 20.04 | Workarea 3.5.x on Ubuntu 18.04 |
| Gigantum Client 1.5.2 on Ubuntu 20.04 | OpenLiteSpeed WordPress 5.3 on Ubuntu 18.04 | WorkflowServer 2.5 on Ubuntu 18.04 |
| Gitea 1.13.1 on Ubuntu 20.04 | OpenLiteSpeed WordPress 5.6 on Ubuntu 20.04 | X-Cart 5.4.1.4 on CentOS 7.6 |
| Gitea 1.14.2 on Ubuntu 20.04 | OpenLiteSpeed WordPress 5.9 on Ubuntu 20.04 | Yacht 0.0.5-alpha on Ubuntu 20.04 |
| GitLab Enterprise Edition on Ubuntu 20.04 | OpenVPN + Pihole 1.1.1 on Ubuntu 18.04 | Zabbix proxy 5.0.6 on CentOS 8 |
| GitLab Enterprise Edition on Ubuntu 20.04 | OpenVPN Access Server 2.8.5 on Ubuntu 18.04 | Zabbix server 5.0.6 on CentOS 7 |
| Gluu Server CE 4.2.1 on Ubuntu 20.04 (LTS) | Owncast on Debian 10 | Zeromon Zabbix 4 on Ubuntu 18.04 |
| Grafana 7.2.0 on Ubuntu 18.04 | PacVim on Ubuntu 18.04 | ZesleCP 3.1.6 on CentOS 7.x |
| GrandNode 2.0 1.1.0 on Ubuntu 18.04 | Passbolt CE 2.13.5 on Ubuntu 18.04 | Znuny 6.2.2 on Debian 10 (buster) |
| GrandNode 4.90.0 on Ubuntu 18.04 | Passbolt CE 3.3.0-1 on Ubuntu 20.04 | Znuny LTS 6.0.39 on Debian 10 (buster) |
| gutiumtestapp_new_test 2 on Ubuntu 20.04 | Percona Monitoring and Management 2 2.21.0 on CentOS 7 | ZoomAdmin 2.0.1 on Ubuntu 18.04.03 |
| gutiumtestapp333 1 on Ubuntu 20.04 | Perforce Helix Core 2021.2.2220431 on CentOS 7.9 | Zulip 4.8 on Ubuntu 20.04 |
| HarperDB 2.3.0 on Ubuntu 18.04 | PhotoPrism on Ubuntu 20.04 |
Update Instructions
An essential guidance through the process of updating the module is offered here.
|
Upgrade Guide
| Seeking a solution that offers greater flexibility, customization tailored to your precise needs, and unrestricted availability? There is an option that not only proves to be cost-effective in the long run but also includes prioritized support services, making it a truly valuable investment. Opt for the Open Source version of your DigitalOcean Droplets For WHMCS module to unlock these benefits. Follow a comprehensive guide covering the transition process, the advantages it brings, and step-by-step instructions on what to do next after the order has been successfully finalized. |
Common Problems
| 1. When you have problems with connection, check whether your SELinux or firewall does not block ports. |
| 2. Certain OS distributions may cause the 'Action did not complete' error in task when trying to reset Droplet's password, even if the success notification is initially returned. This may be caused by the requirement to use the SSH key by given distribution instead of a password. |
| 3. Inserting the SSH key may prevent the welcome email being sent by DigitalOcean after Droplet creation. |
| 4. Some features like monitoring might not be supported by all configurations. Please try choosing for example a different region or distribution. |