WordPress Manager For WHMCS
Are you planning to update your WordPress Manager For WHMCS module to version 3.x?
Follow the instructions here for a smooth update.
Contents
|
About WordPress Manager For WHMCS
| WordPress Manager For WHMCS is a module that enables your customers to control and freely alter their WordPress instances right inside your WHMCS. Your clients will be able to add WordPress installations using instance images and custom scripts, perform WordPress updates, install themes and plugins, create staging instances and then push them live. |
- Admin Area:
| ✔ View Active WordPress Installations, Clients And Products Summary |
| ✔ View WordPress Installations List |
| ✔ Choose Supported Products: |
| ✔ Select API To Use: |
| ✔ Softaculous Auto Installer |
| ✔ WP Toolkit |
| ✔ WP-CLI Tool |
| ✔ Select Available Installation Scripts |
| ✔ Select Available Plugin Packages |
| ✔ Select Available Instance Images |
| ✔ Automatically Install: |
| ✔ WordPress After Service Creation: |
| ✔ Based On Installation Script |
| ✔ Based On Instance Image |
| ✔ Custom Plugins |
| ✔ Custom Themes |
| ✔ Plugin Packages |
| ✔ Theme Packages |
| ✔ Toggle Blocked Plugins And Themes |
| ✔ Toggle Automatic Deletion Of Blocked Plugins And Themes |
| ✔ Set Scan Interval For Blacklists Cleaner |
| ✔ Define Default Theme To Be Enabled After Installation |
| ✔ Choose Custom Plugins And Themes: |
| ✔ Available To Clients |
| ✔ Automatically Installed |
| ✔ Choose Instance Images Available To Clients |
| ✔ Toggle Permission To Delete WordPress Auto-Installation |
| ✔ Define Protocol For WordPress Auto-Installation |
| ✔ Select Welcome Email Template |
| ✔ Define Installation Limit Per Hosting Account |
| ✔ Define Update WordPress Notification Mail Interval |
| ✔ Select Update WordPress Email Template |
| ✔ Toggle Debug Logs |
| ✔ Add/Remove Selected Plugins From Blacklist: |
| ✔ Prevent Blacklisted Plugins From Being Installed By Clients |
| ✔ Remove Blacklisted Plugins From Current Installations |
| ✔ Add/Remove Selected Themes From Blacklist: |
| ✔ Prevent Blacklisted Themes From Being Installed By Clients |
| ✔ Remove Blacklisted Themes From Current Installations |
| ✔ Define Client Area Features: |
| ✔ Management Options |
| ✔ Action Options |
| ✔ Plugins: |
| ✔ Create Plugin Packages: |
| ✔ Enter Package Name And Description |
| ✔ Choose Available Plugins |
| ✔ Add Custom Plugins |
| ✔ Themes: |
| ✔ Create Theme Packages: |
| ✔ Enter Package Name And Description |
| ✔ Choose Available Themes |
| ✔ Add Custom Themes |
| ✔ Create Instance Images: |
| ✔ From Local Or External Installation Source |
| ✔ Public Or Private |
| ✔ Access Module Tasks List And Logs |
| ✔ Provide Google API Token For PageSpeed Insights |
| ✔ Define Allowed Protocols For WordPress Instances To Be Used In Client Area |
| ✔ Enable Extended View Of Instances List |
| ✔ Enable And Customize WHMCS Client Home Page Widget |
| ✔ Customize Module Language Files With "Translations" Tool |
| ✔ Control Staff Access Level To Specific Resources With ACL |
| ✔ View And Manage Logs |
- Client Area:
| ✔ View/Create/Edit/Delete WordPress Installations |
| ✔ Using Simple List Of Instances |
| ✔ Using Extended View With Instances Preview Screenshots |
| ✔ View/Create/Edit/Delete WordPress Installations On Your Resellers Accounts: |
| ✔ cPanel |
| ✔ DirectAdmin |
| ✔ View List Of Recent WordPress Instances On WHMCS Client Home Page |
| ✔ Update Selected WordPress Installations To Newest Version In One Batch |
| ✔ Import WordPress Installation From Remote Server: |
| ✔ FTP Based Import |
| ✔ Username/Password Based Import |
| ✔ Create WordPress Installation Based On Instance Image |
| ✔ Log In To Admin Panel Of WordPress Instances |
| ✔ Receive Email Notifications And Get Visual Alerts When WordPress Update Is Available |
| ✔ View Installation Details: |
| ✔ Domain And URL |
| ✔ Product On Which Is Installed |
| ✔ WordPress Version |
| ✔ Site Name |
| ✔ Creation Date |
| ✔ Directory Path |
| ✔ Database Access Details |
| ✔ Debug Status |
| ✔ Instance Status |
| ✔ SSL Certificate Expiration Date |
| ✔ View Website Details Based On Google "PageSpeed Insights": |
| ✔ Desktop And Mobile Screengrab Thumbnails Of Website |
| ✔ General Performance Information |
| ✔ Page Statistics |
| ✔ Opportunities |
| ✔ Audit Passed Successfully |
| ✔ Diagnostics |
| ✔ Manage Installation: |
| ✔ Create/Restore/Download/Delete WordPress Backups |
| ✔ Browse/Install/Manage Themes |
| ✔ Search And Install Themes Directly From WordPress.com Base |
| ✔ Preview Theme Before Installation |
| ✔ Activate/Deactivate Installed Themes |
| ✔ Update Installed Themes |
| ✔ Browse, Install And Manage Plugins |
| ✔ Search And Install Plugins Directly From WordPress.com Base |
| ✔ Activate/Deactivate Installed Plugins |
| ✔ Update Installed Plugins |
| ✔ Browse And Install Plugin Packages |
| ✔ Perform Bulk Changes On Themes, Plugins, And Backups |
| ✔ View/Create/Edit/Delete WP Config Records |
| ✔ View/Create/Edit/Delete WordPress User Accounts With Specified Privileges |
| ✔ Perform Actions: |
| ✔ Log In To Control Panel |
| ✔ Access Credentials Setup |
| ✔ Clear Cache |
| ✔ Clone To New Domain |
| ✔ Update To Newest Version |
| ✔ Change Domain |
| ✔ Toggle Auto Upgrade Of: |
| ✔ WordPress Installation |
| ✔ WordPress Plugins |
| ✔ WordPress Themes |
| ✔ Create Staging |
| ✔ Push Staging To Live Environment |
| ✔ Enable/Disable SSL |
| ✔ Enable/Disable Debug Mode |
| ✔ Enable/Disable Maintenance Mode |
| ✔ Create Instance Image |
| ✔ Delete |
| ✔ Single Sign-On Into WordPress Panel From Product View |
- Supported Modules:
| ✔ cPanel (Root Access Required) |
| ✔ cPanel Extended - With Complete Integration |
| ✔ DirectAdmin (Admin Account Required) |
| ✔ DirectAdmin Extended |
| ✔ Plesk (Root Access Required) |
| ✔ Plesk Extended |
- Supported Integrations:
| ✔ Softaculous Auto Installer - Premium (cPanel, Plesk, DirectAdmin) |
| ✔ WP Toolkit (cPanel, Plesk) |
| ✔ WP-CLI Tool (DicrectAdmin) |
| ✔ View Wiki For Features And Limitations Comparison Across Integrations |
- General Info:
| ✔ Automatic Let's Encrypt SSL Installation (DirectAdmin Only) |
| ✔ Fully Integrated With Lagom WHMCS Client Theme |
| ✔ Multi-Language Support With Custom Translations Tool |
| ✔ Supports PHP 8.3 Back To PHP 8.1 |
| ✔ Supports WHMCS Themes "Six" And "Twenty-One" |
| ✔ Supports WHMCS V8.13 Back To WHMCS V8.10 |
| ✔ Requires ionCube Loader V14 Or Later |
| ✔ Easy Module Upgrade To Open Source Version |
Installation and Configuration
| In this short tutorial we will show you how to successfully install WordPress Manager For WHMCS. We will guide you step by step through the whole installation process. |
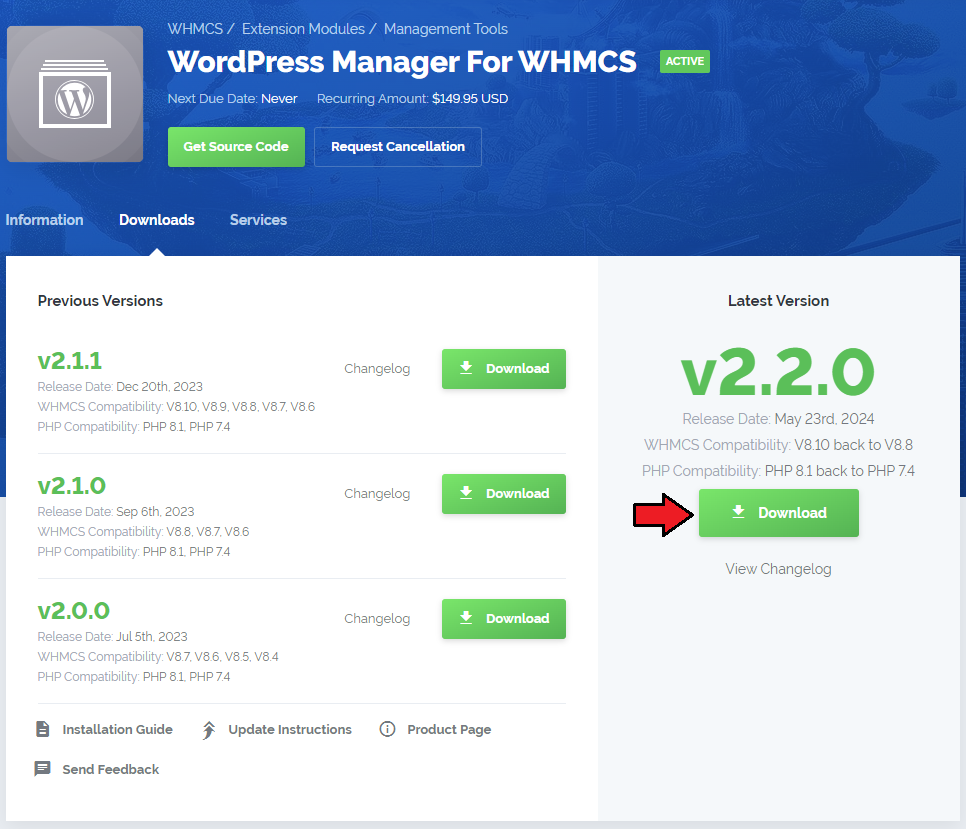
| 1. Log in to our client area and download the module. |
|
| 2. Extract the package in a safe location. The content of the package should look like this. |

|
cPanel (WHM) Installation
| Important: Root access is required to perform the installation successfully! |
| 1. Upload and extract the 'UploadToWHM' folder into the /root cPanel directory. Files in your cPanel /root/uploadToWHM/ directory should look like these on the following screen. |

|
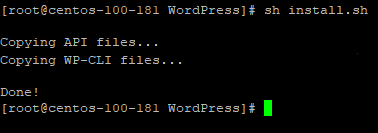
2. Once the module is uploaded, enter the /root/uploadToWHM/ catalog and run the following command in the console:sh install.sh After a brief moment you should see a confirmation that the plugin has been successfully installed. |
|
DirectAdmin Installation
| Important: Admin account is required to perform the installation successfully! |
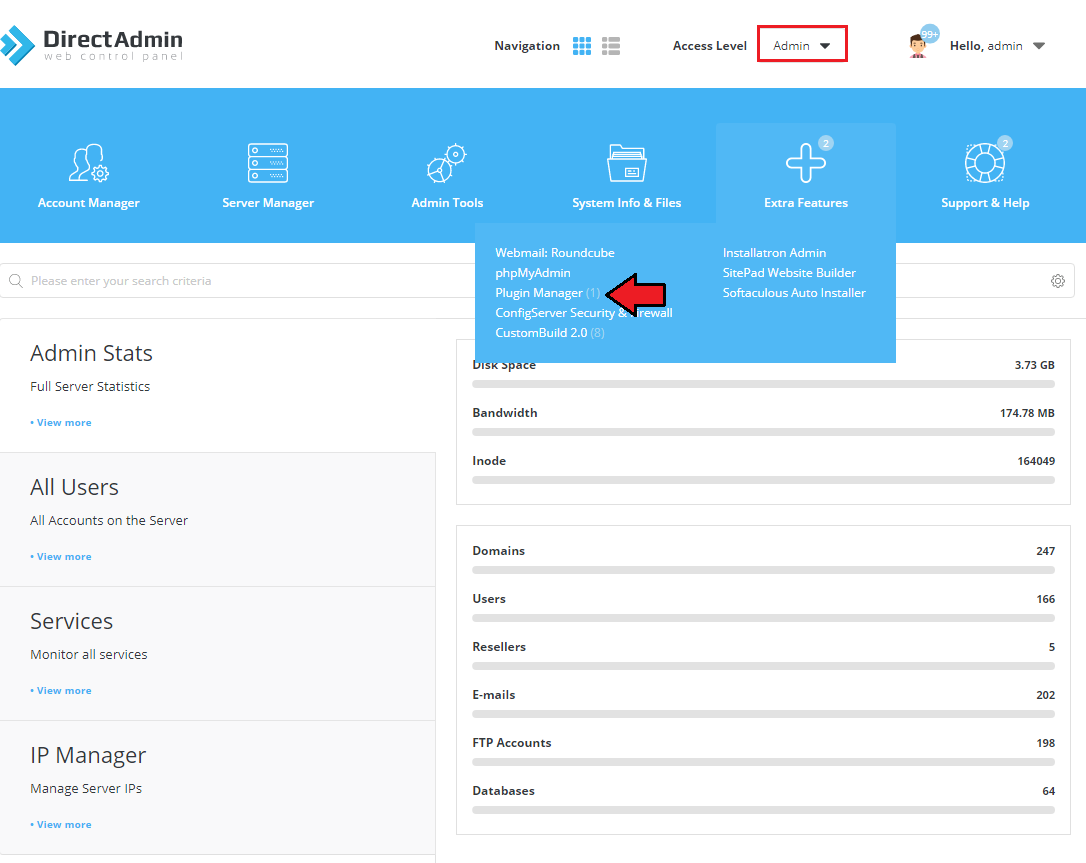
| 1. In the 'uploadToDirectAdmin' folder find the 'wordpress_cli.tar.gz' package. Next, log in to your DirectAdmin panel as an administrator and go to 'Plugin Manager' . |
|
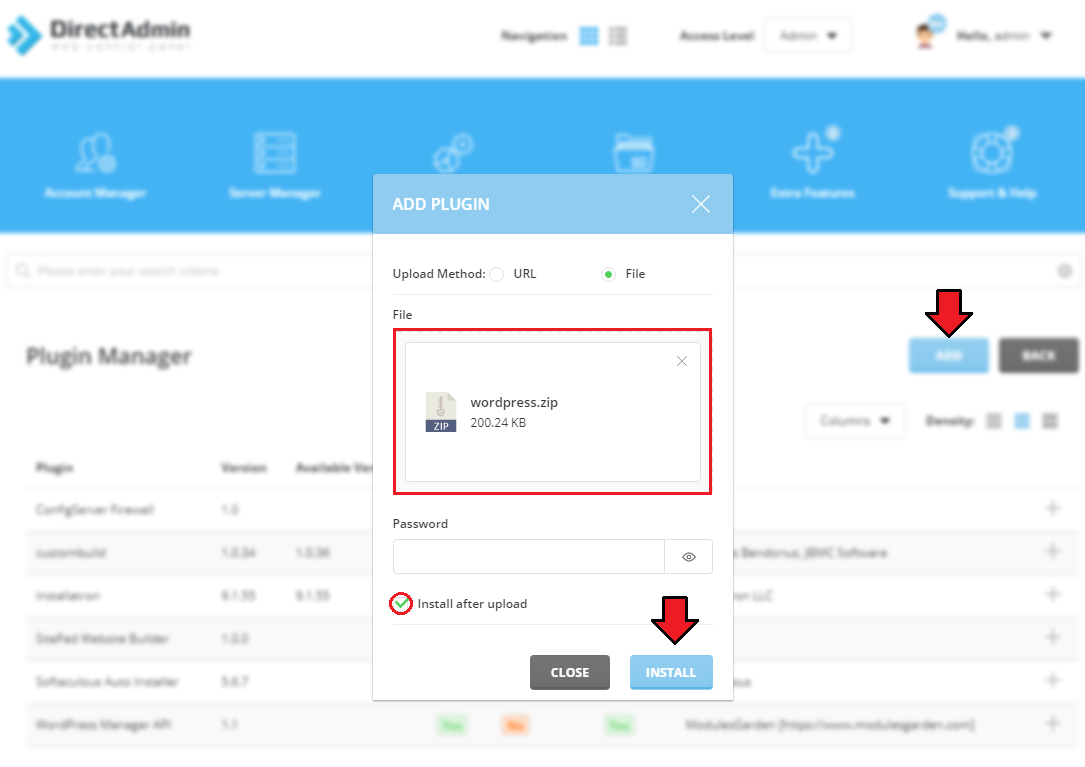
| 2. Once in the 'Add Plugin' , select the 'File' option and choose the 'wordpress_cli.tar.gz' package to upload. Additionally, mark the 'Install after upload' option and press the 'Add Plugin' button. |
|
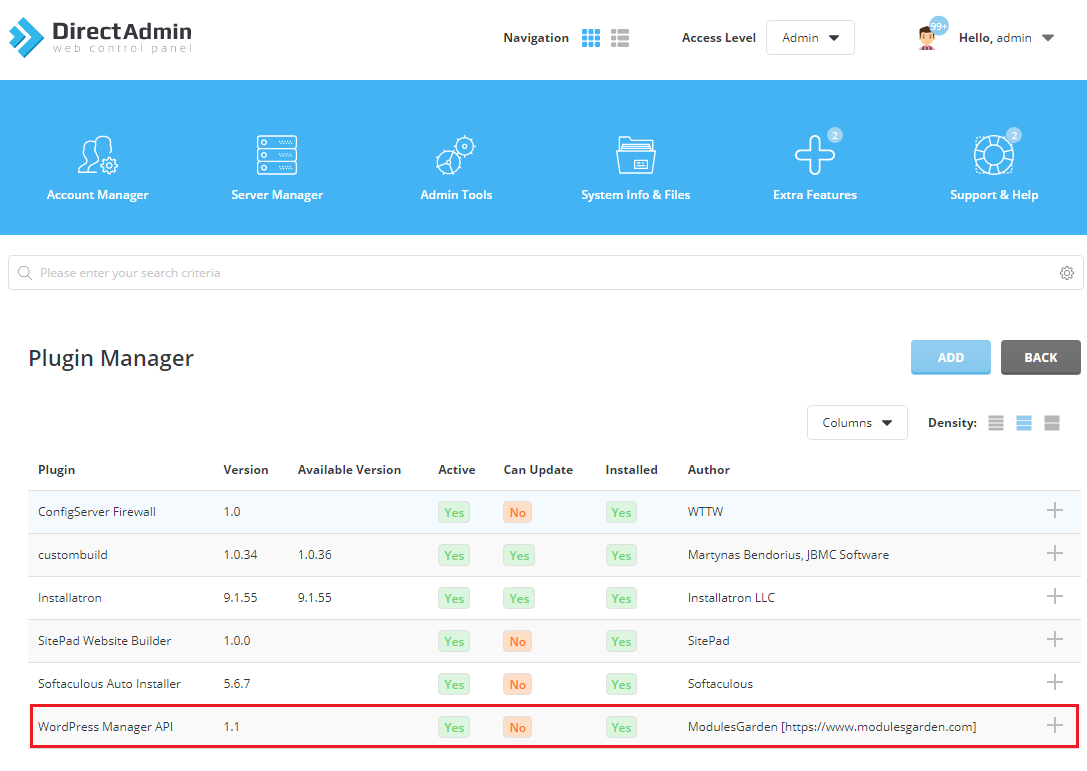
| 3. Once the plugin is uploaded and successfully installed, you should see it on the plugins list. |
|
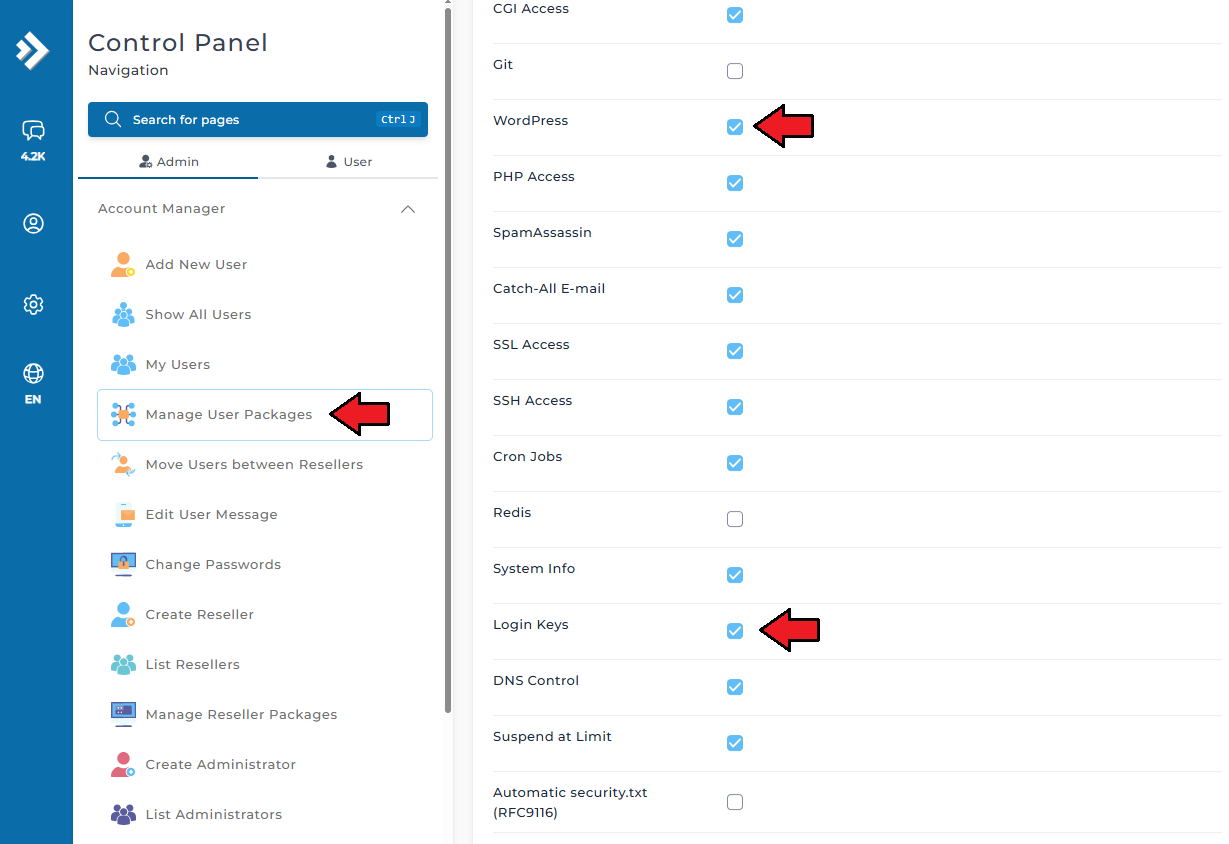
| To ensure proper authentication between the module and DirectAdmin, make sure the Login Keys option is enabled in the selected user package. You can verify this by logging into your DirectAdmin panel and navigating to: Admin → Account Manager → Manage User Packages. |
|
Plesk Installation
| Note: The current version of the module requires your Plesk server configured in WHMCS to use username and password as authentication to the Plesk API. We also recommended using Plesk version 17.8.11 at least. |
| Important: Root access is required to perform the installation successfully! |
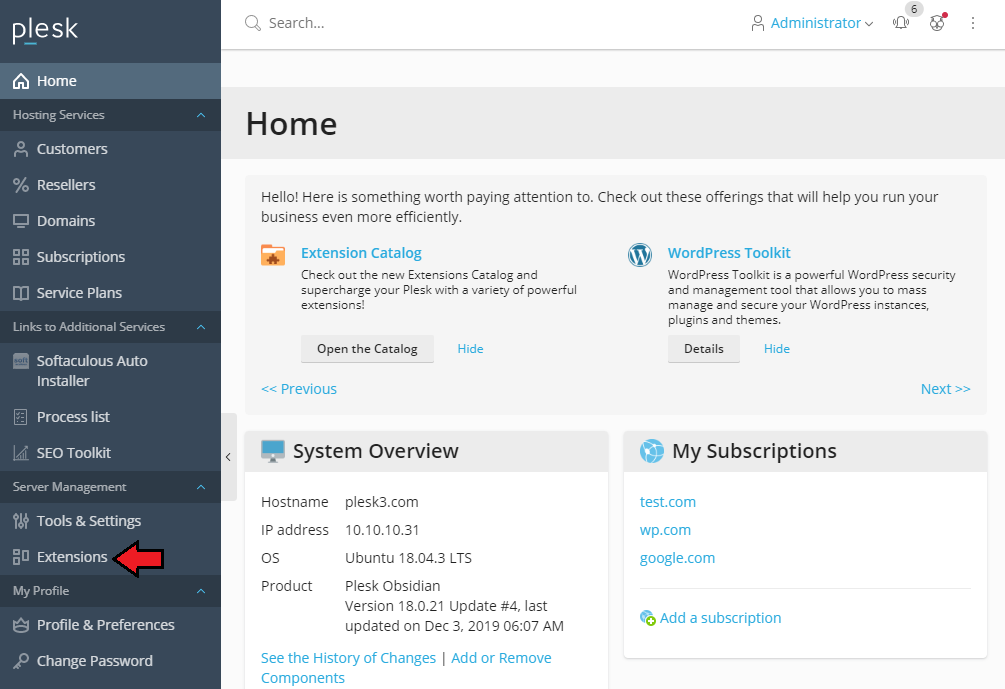
| 1. In the 'uploadToPlesk' folder find the 'wordpress-manager-cli-X.X-X.zip' package. Next, log in to your Plesk panel as an administrator and go to the 'Extensions' section. |
|
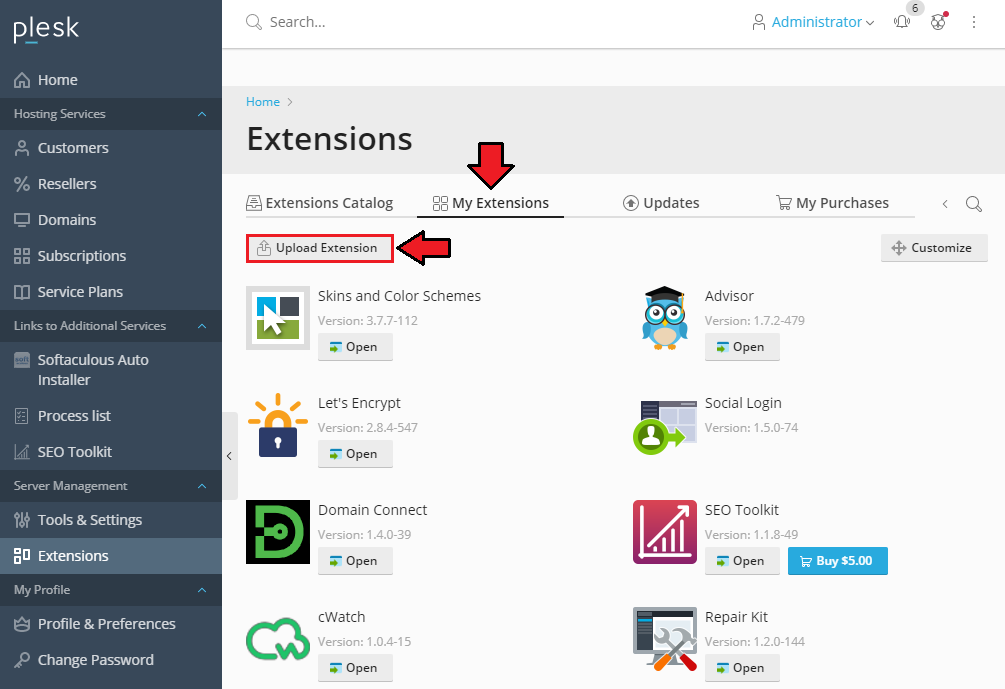
| 2. Once you are in the 'Extensions' section, go to the 'My Extensions' tab and select the 'Upload Extension' option. In the opened window choose the 'wordpress-manager-cli-X.X-X.zip' package to upload and press the 'OK' button. Important: If for some reason the 'Upload Extension' button is disabled, you will need to install the free panel.ini editor extension. |
|
| 3. Once the plugin is uploaded and successfully installed, you will see it on the plugins' list. |
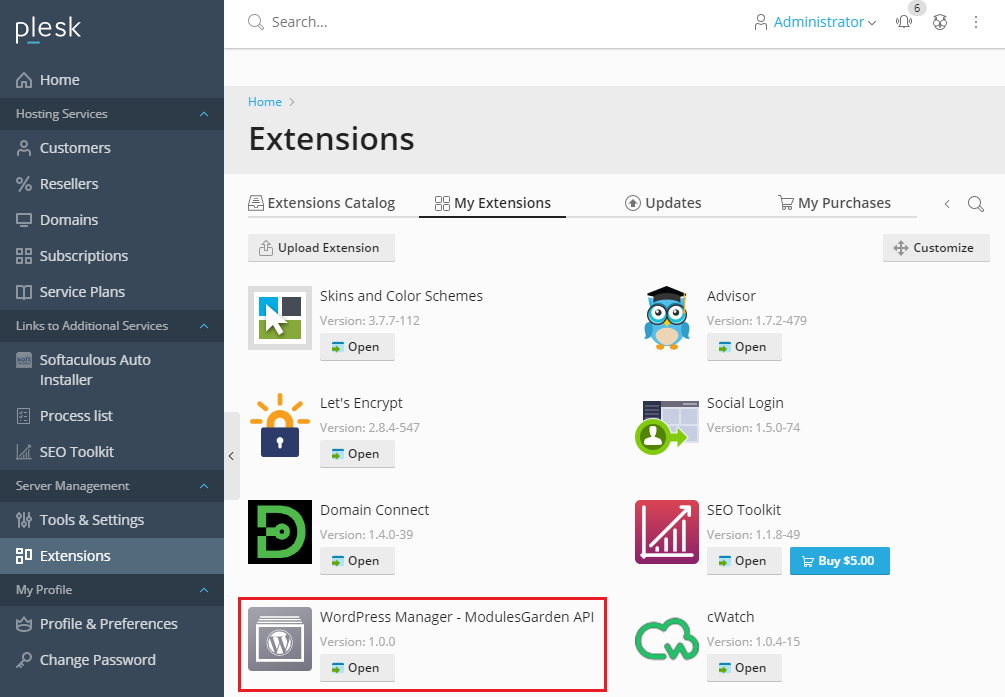
|
WHMCS Installation
| 1. Extract the 'modules' catalog into the main WHMCS directory. |

|
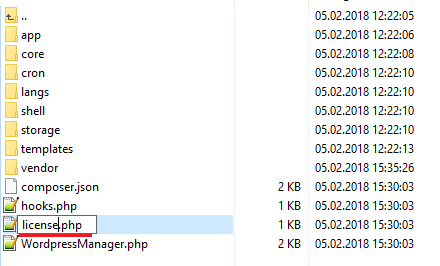
| 2. When you install WordPress Manager For WHMCS for the first time, you have to rename the 'license_RENAME.php' file. This file is located in 'modules/addons/wordpress_manager/license_RENAME.php'. Rename it from 'license_RENAME.php' to 'license.php'. |
|
| 3. In order to configure your license key, you have to edit the previously renamed 'license.php' file. Enter your license key between quotation marks as presented on the following screen. You can find your license key in our client area → 'My Products'. |

|
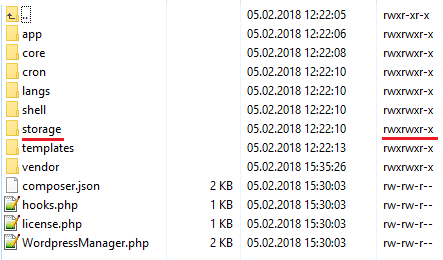
| 4. In the next step, set up the 'storage' folder as recursively writable. This folder is available at 'your_whmcs/modules/addons/WordpressManager/'. |
|
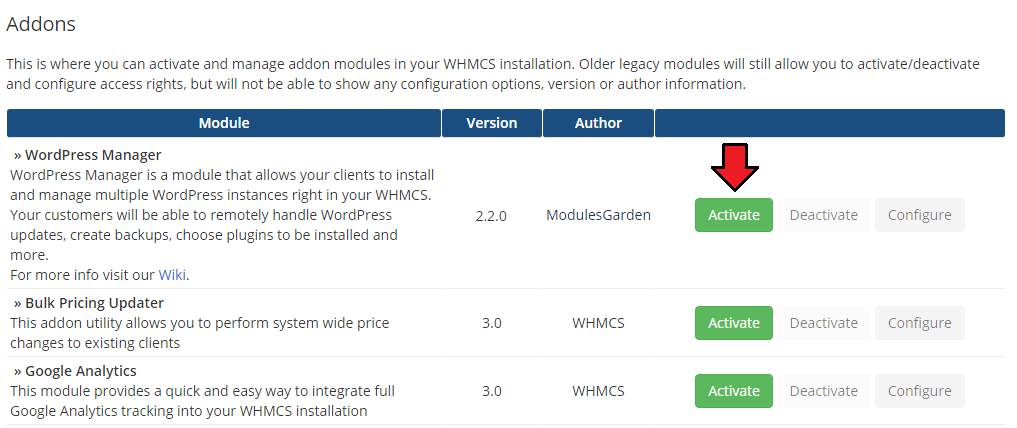
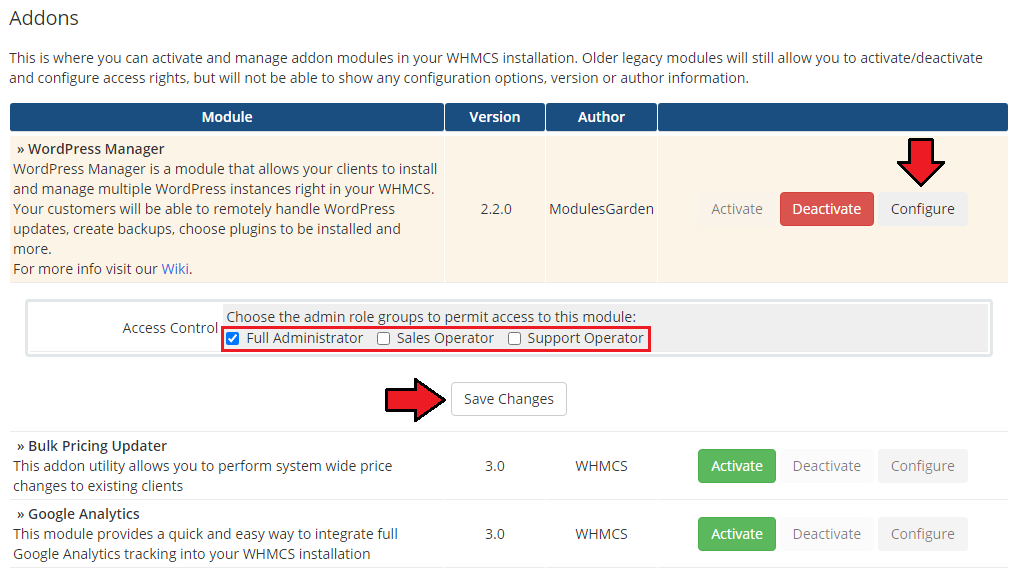
| 5. Now you have to activate the module in your WHMCS system. Log in to your WHMCS admin area. Click 'System Settings' , then choose 'Addon Modules'. |
|
| 6. Then, you need to permit access to this module. To do so, click on the 'Configure' button, choose 'Full Administrator' and press 'Save Changes'. |
|
7. Now you have to add cron jobs as shown below:
php -q /your_whmcs/modules/addons/WordpressManager/cron/cron.php Synchronize
php -q /your_whmcs/modules/addons/WordpressManager/cron/cron.php queue Do not forget to replace 'your_whmcs' with your WHMCS root location. |
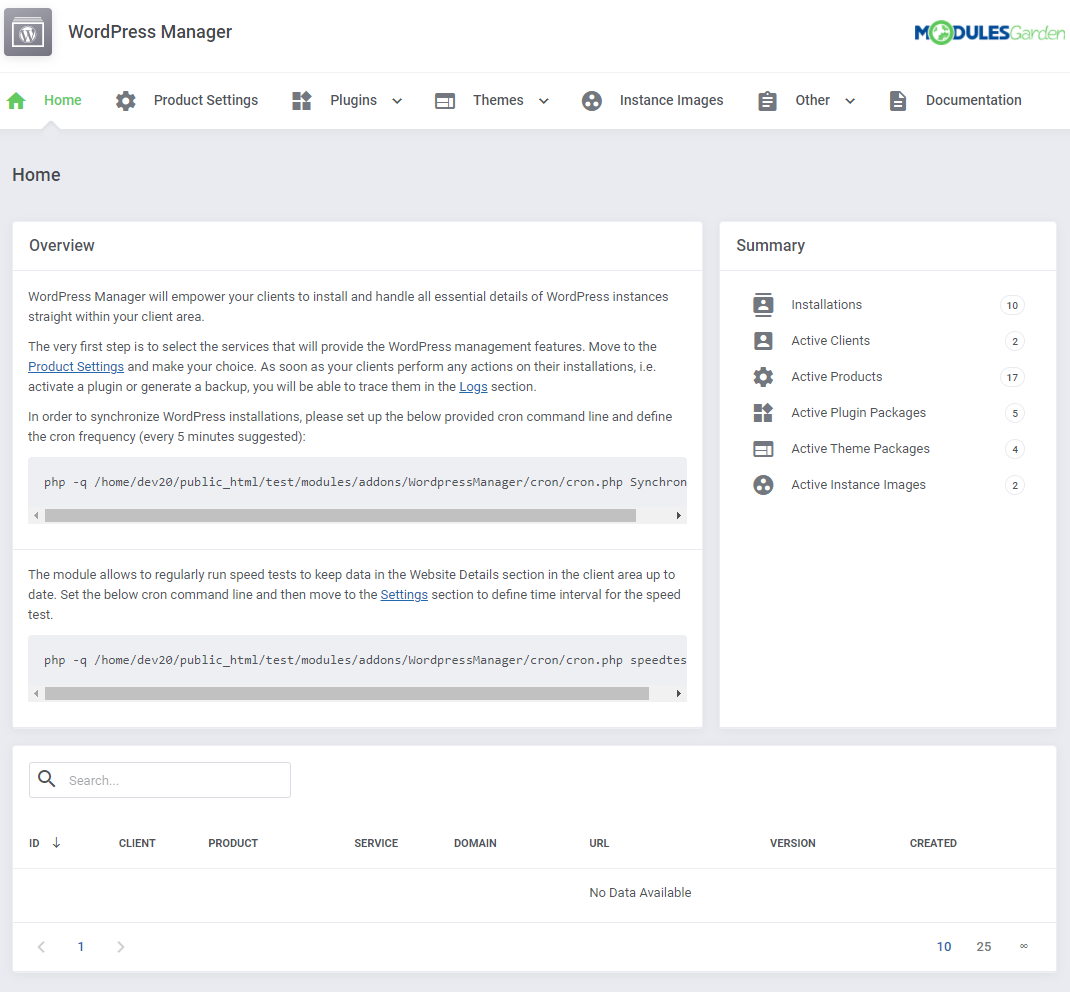
| 8. Good job! You have just successfully installed WordPress Manager For WHMCS! Now, in your WHMCS, press 'Addons' and then 'WordPress Manager'. |
|
Management
| This section has been divided into two main parts to allow full and, at the same time, easy understanding of the functionality of the whole module. In the first part 'Management of Addon' you will see a general outlook of the module's basic configuration, through the product management from the admin area. The second part describes additional settings and tools concerning WordPress installations that can be used while working in the client area. |
Admin Area
| Now that your module is already configured, you may access it at 'Addons' → 'WordPress Manager'. |
Home
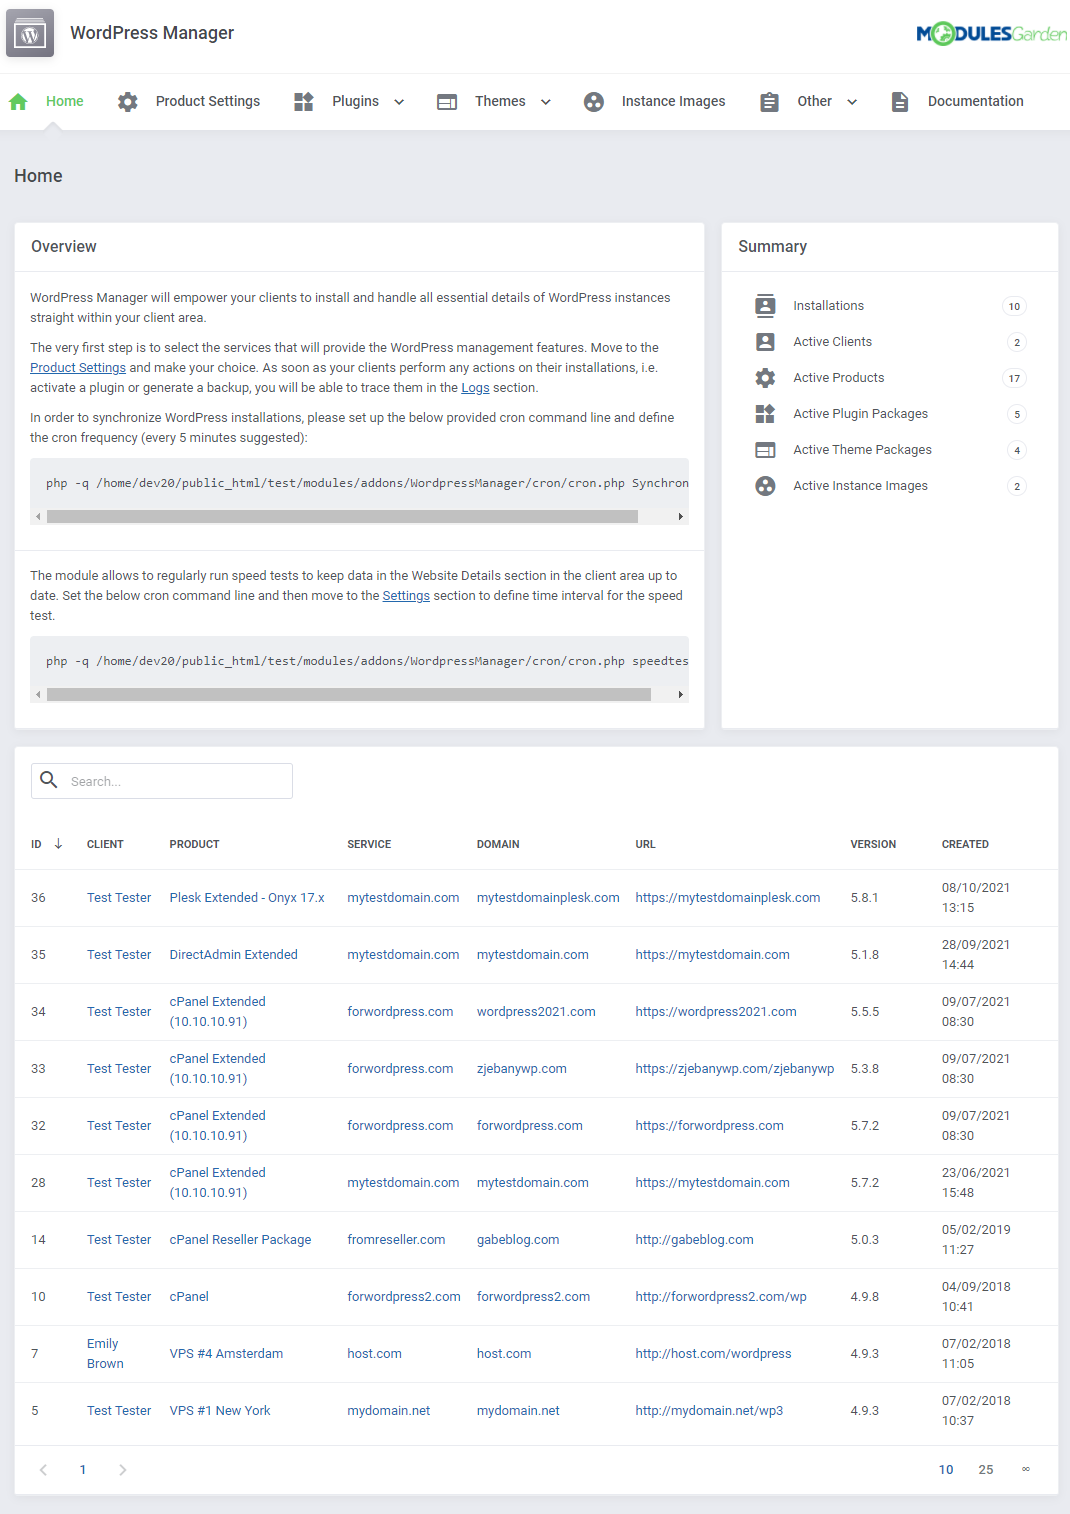
| The 'Home' section is the first open when entering the addon. You will see here a quick summary of the WordPress connected elements and a list of all active WordPress installations with any details on their installation. |
|
Product Settings
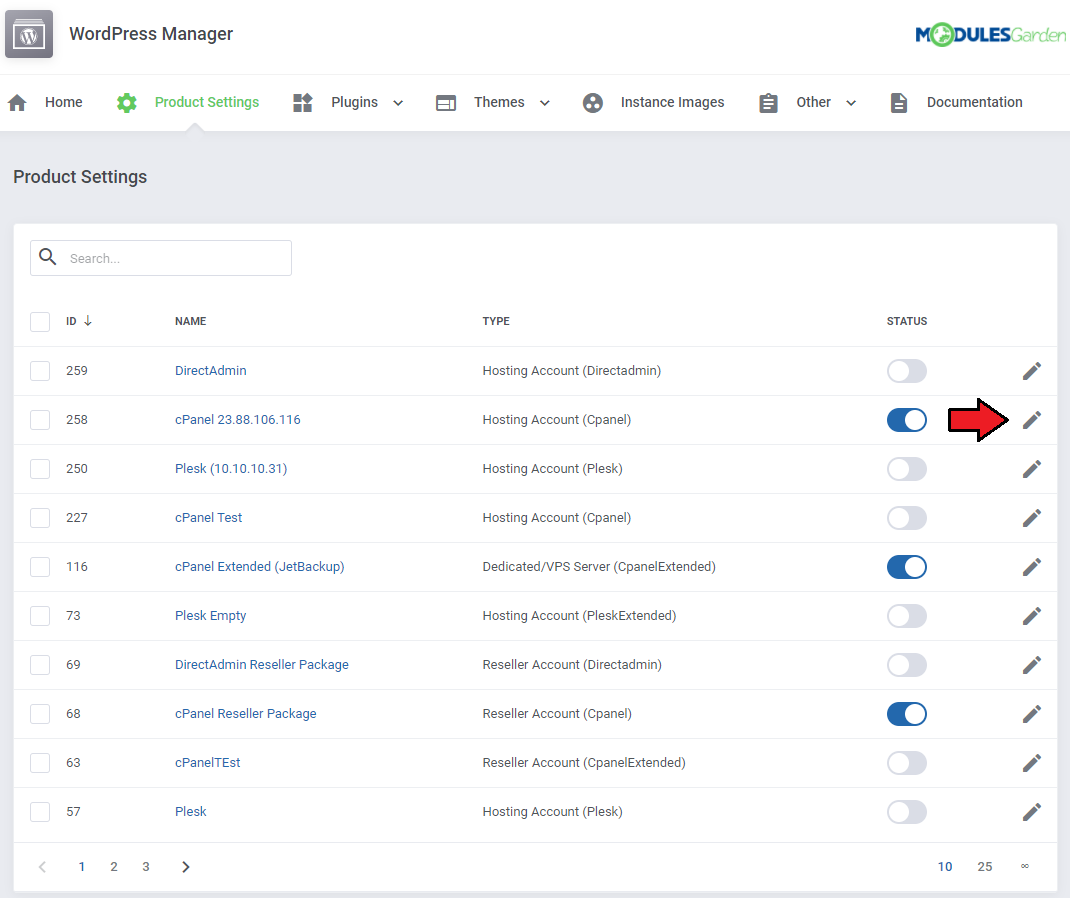
| In the 'Product Settings' section you can see the list of compatible products present in your system that WordPress can be configured with. Activate the products and press the 'Edit' icon marked on the screen below. |
|
General
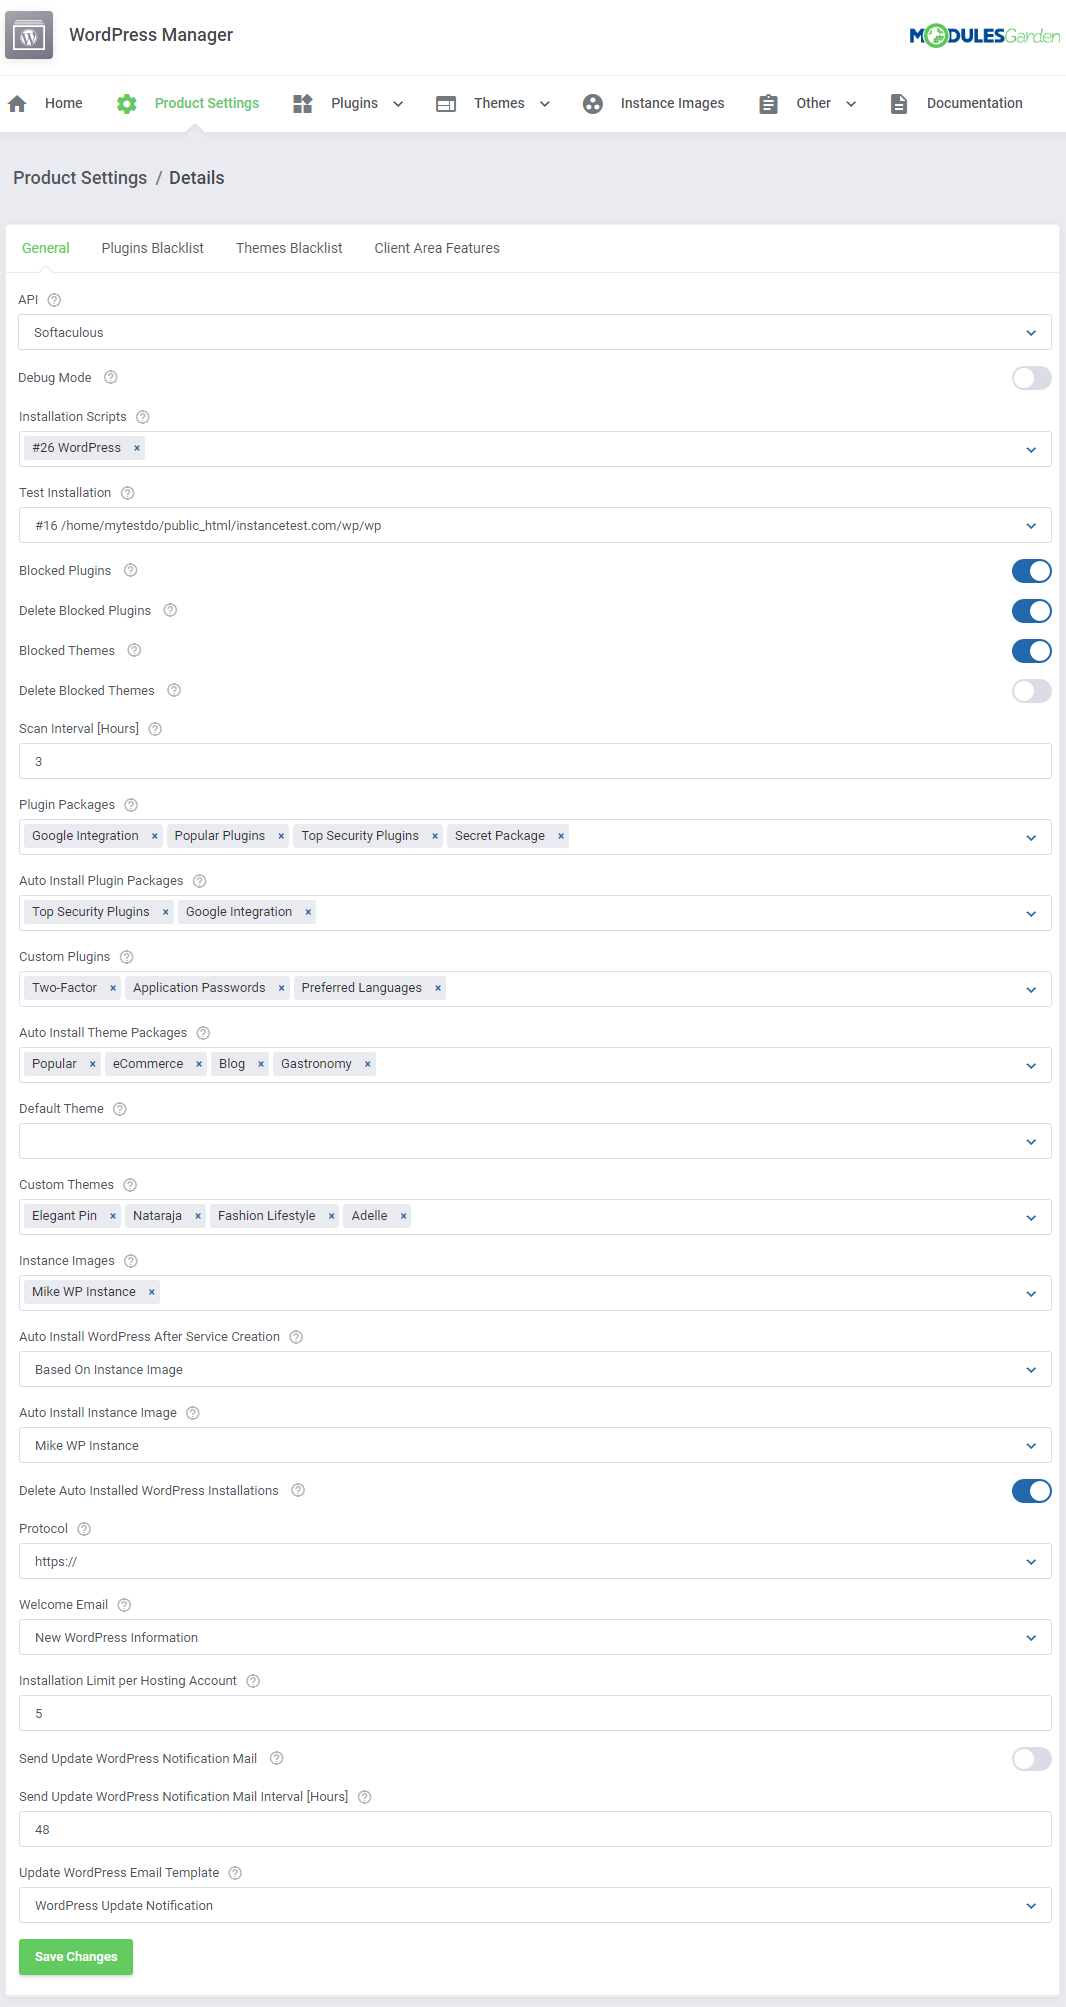
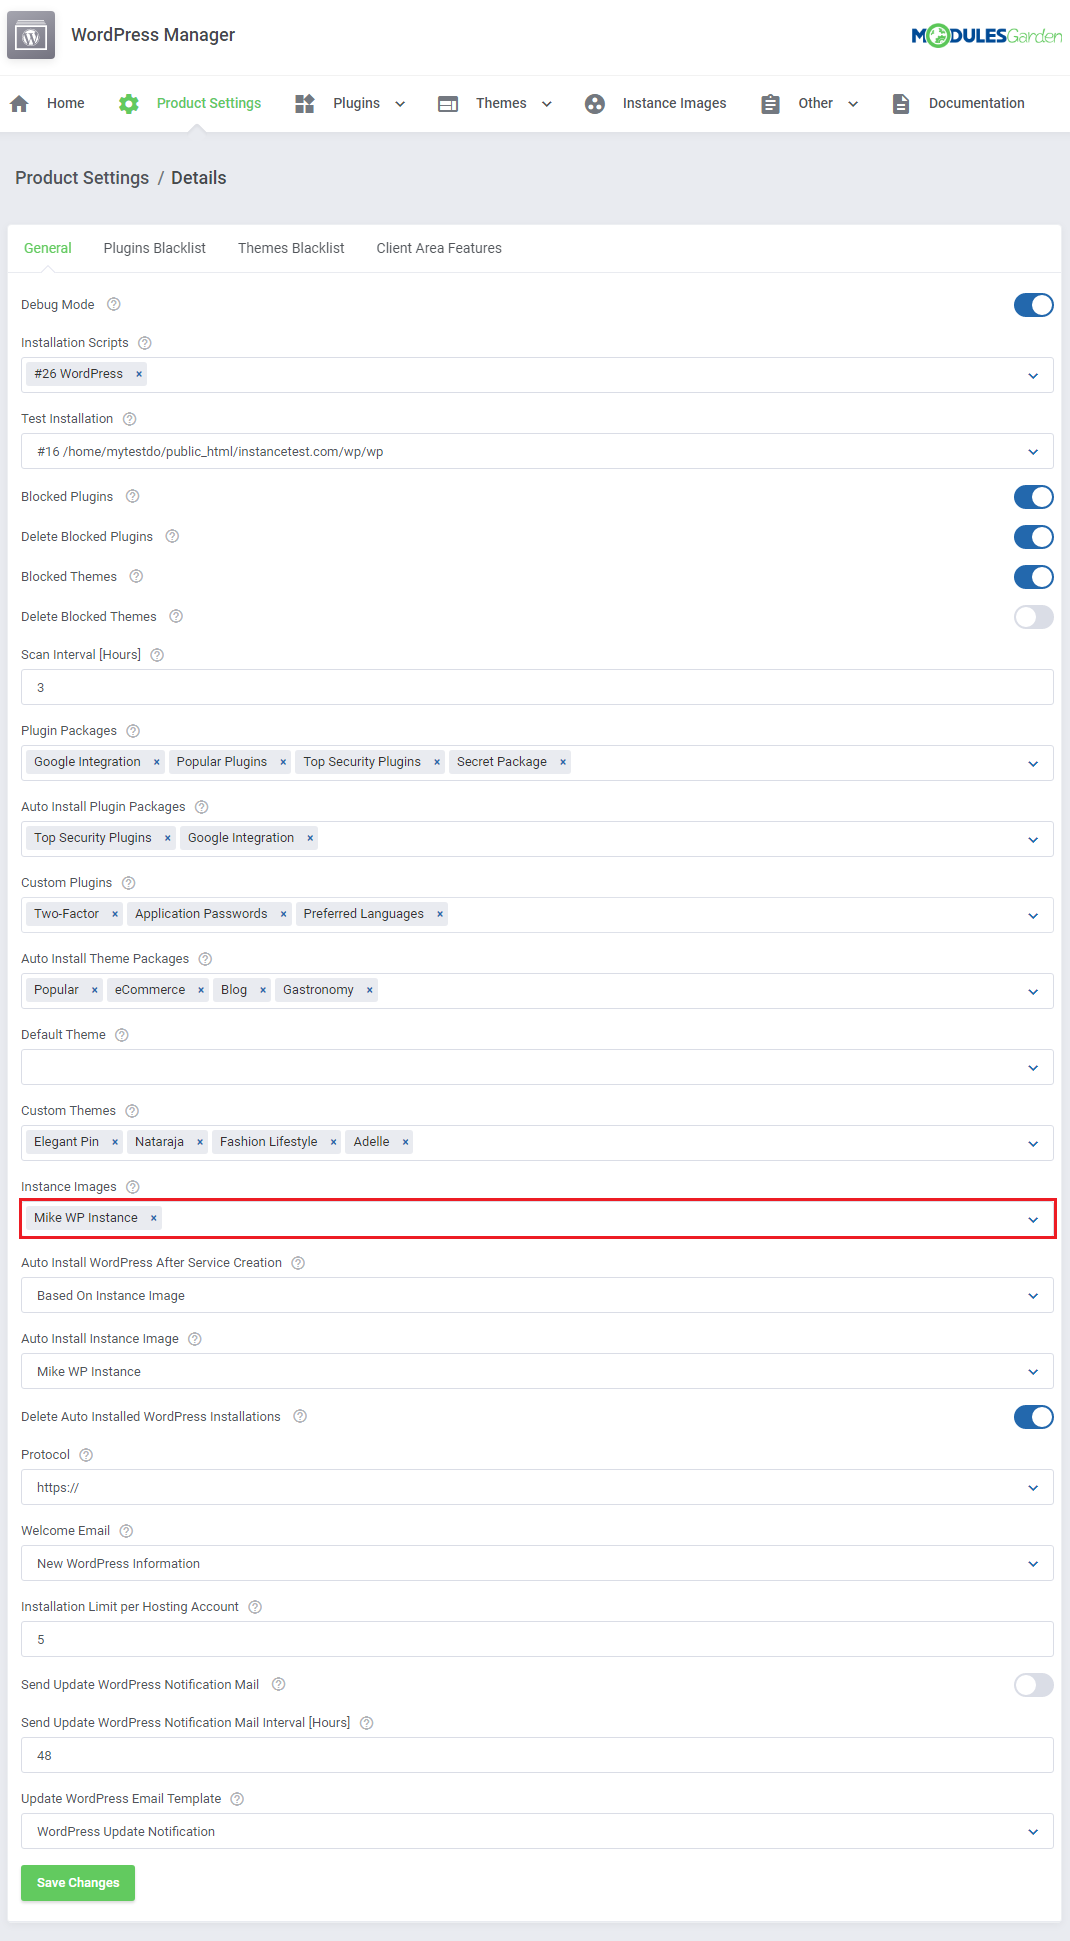
In the 'General' section you will need to set up some specific options concerning the plugins installation. Take a look at the below notes to learn about all of the possibilities.
Keep in mind that if an instance is imported (for example, when using "Based On Instance Image" automatic installation), it will overwrite the Auto Install Plugin/Theme Packages feature. |
|
| Note: By default, installation script names in the client area will be displayed without their IDs. If you still want to change their names to be more client-friendly, you can do it in a language file. Go to the Tips section and look for more details in the second point. |
Plugins Blacklist
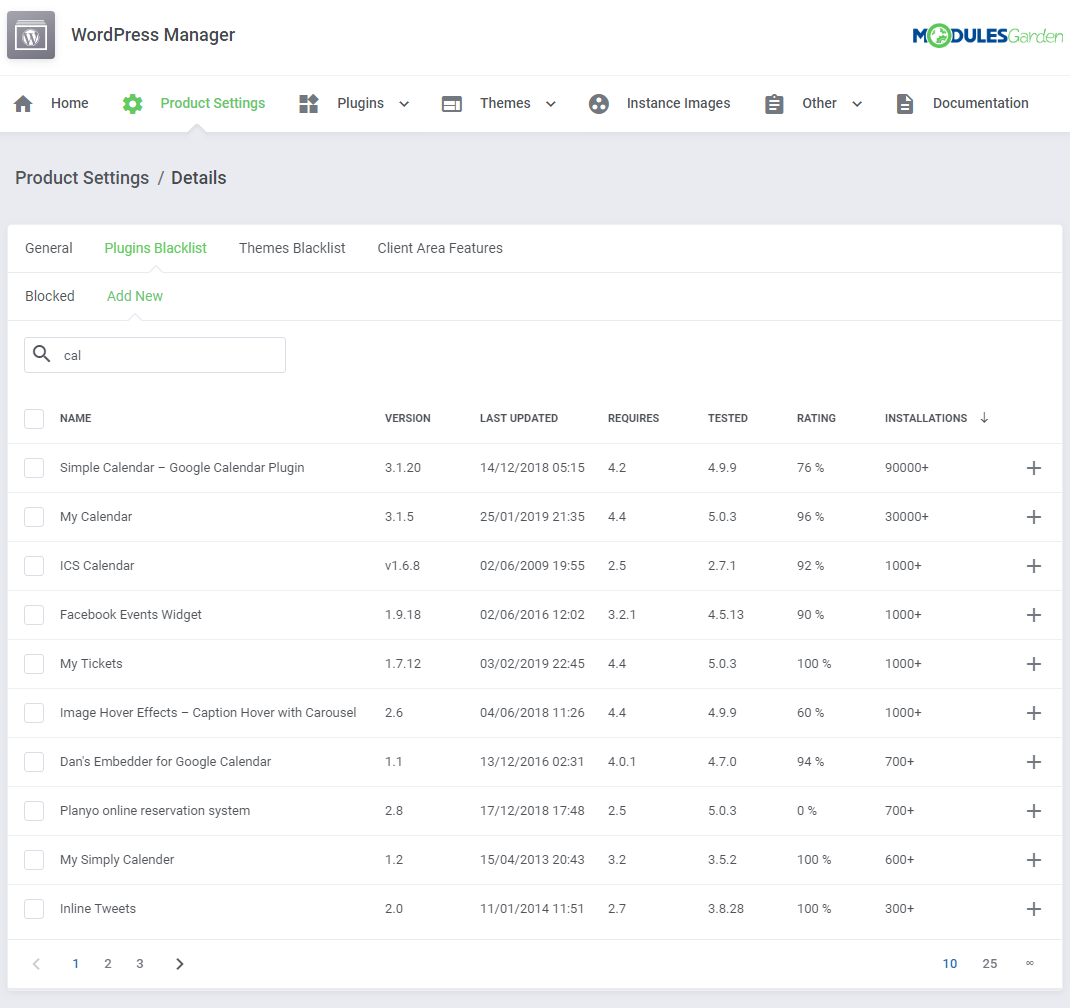
| This section of the Product Settings includes a list of blocked plugins - those which your clients are not allowed to install. In order to add a plugin to the list simply start typing its name in the search field and press enter to see the results. |
|
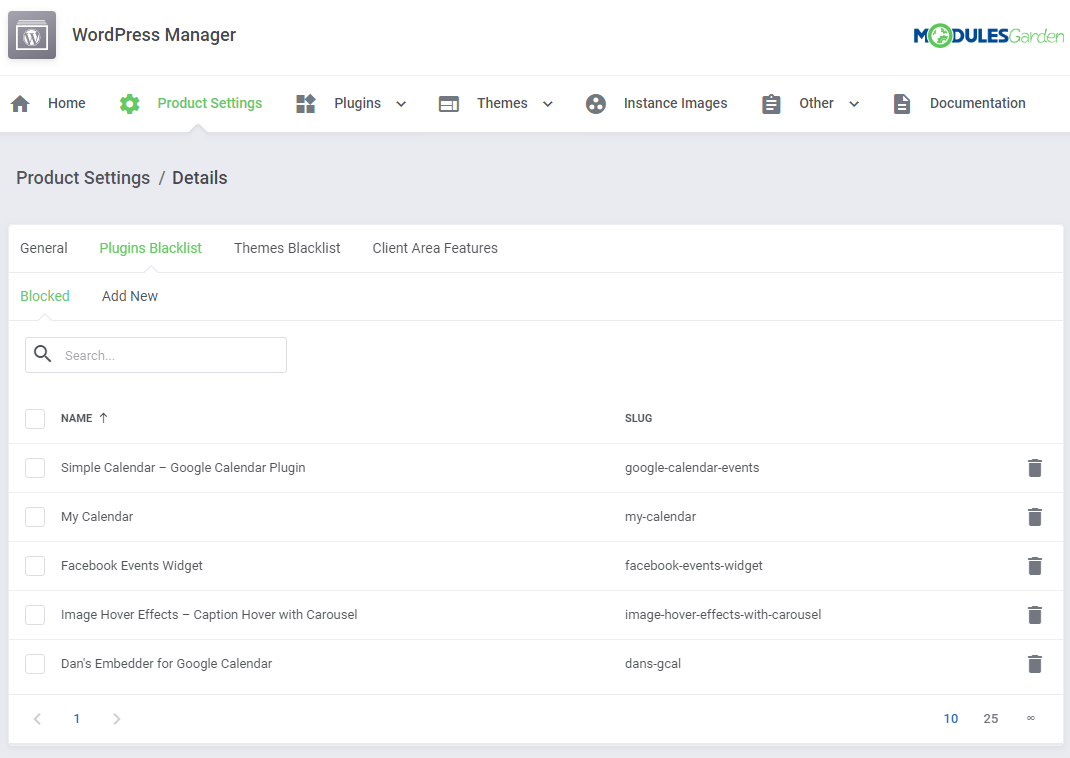
| Add the selected plugin to the blacklist. It will no longer be available for clients to install if the "Blocked Plugins" option has been enabled in the General section. |
|
Themes Blacklist
| This section of the Product Settings includes a list of blocked themes - those that your clients will not be able to install. |
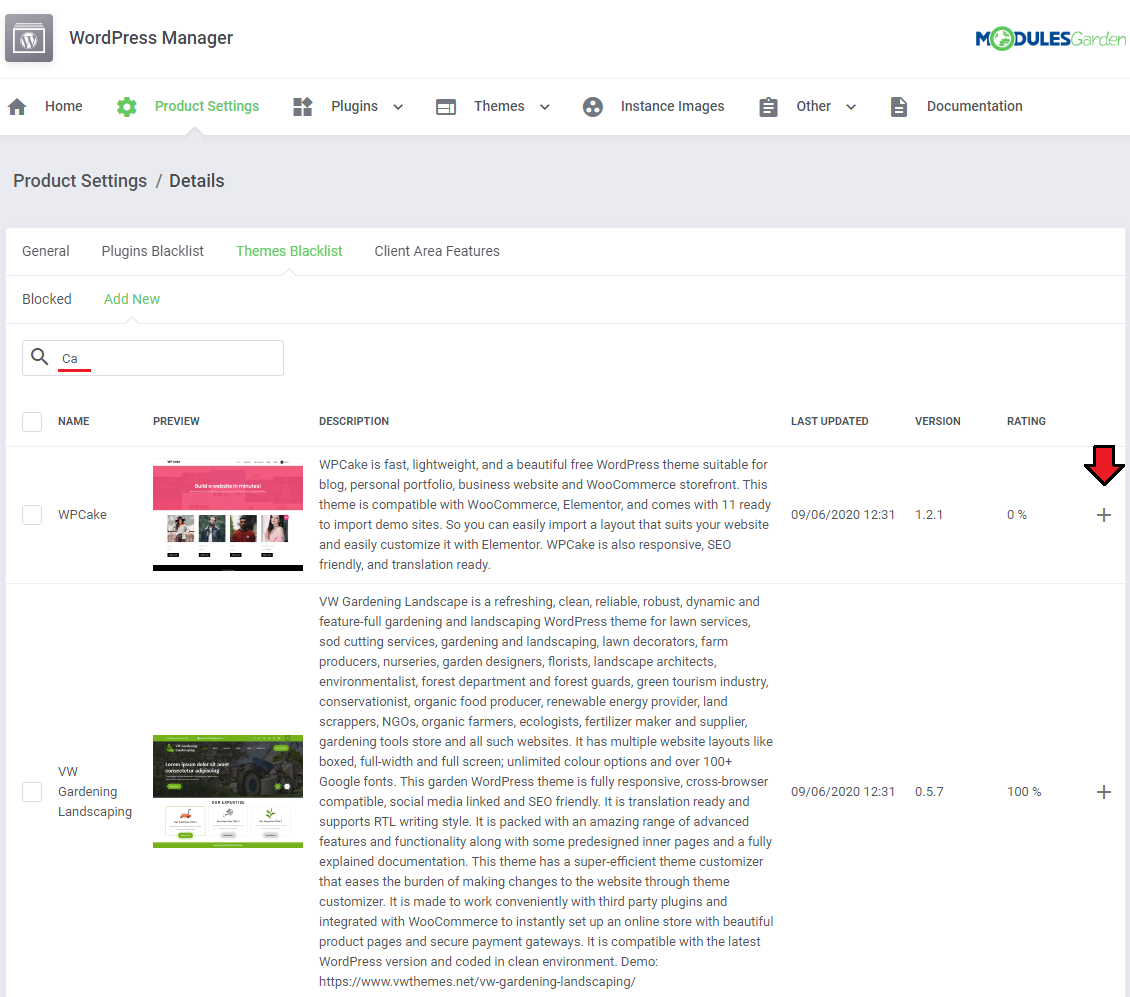
| If you want to add a theme to the list, simply start typing its name in the search field and press enter to see the results. Add the selected themes to the blacklist. |
|
| Your clients will not be able to install the previously added themes if the "Blocked Themes" option has been enabled in the General section. If you decide to remove the preferred themes from the 'Blocked' section, you may easily do this by clicking the appropriate button. |
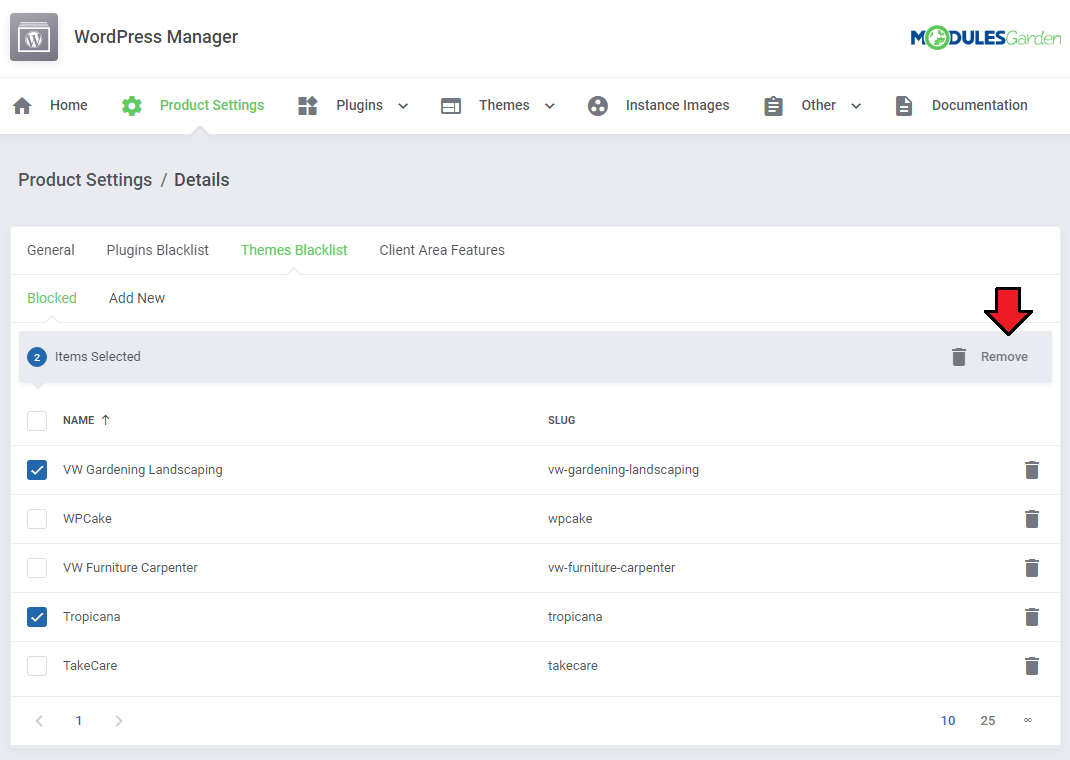
|
Client Area Features
| In this section, you can define which options should be enabled for clients. To make it easier, the available options are divided into two parts, the 'Management Options' and 'Action Options' . The screen below illustrates all available client area features. Please be aware that the final visible option in the client area depends on the selected API integration for your product. |
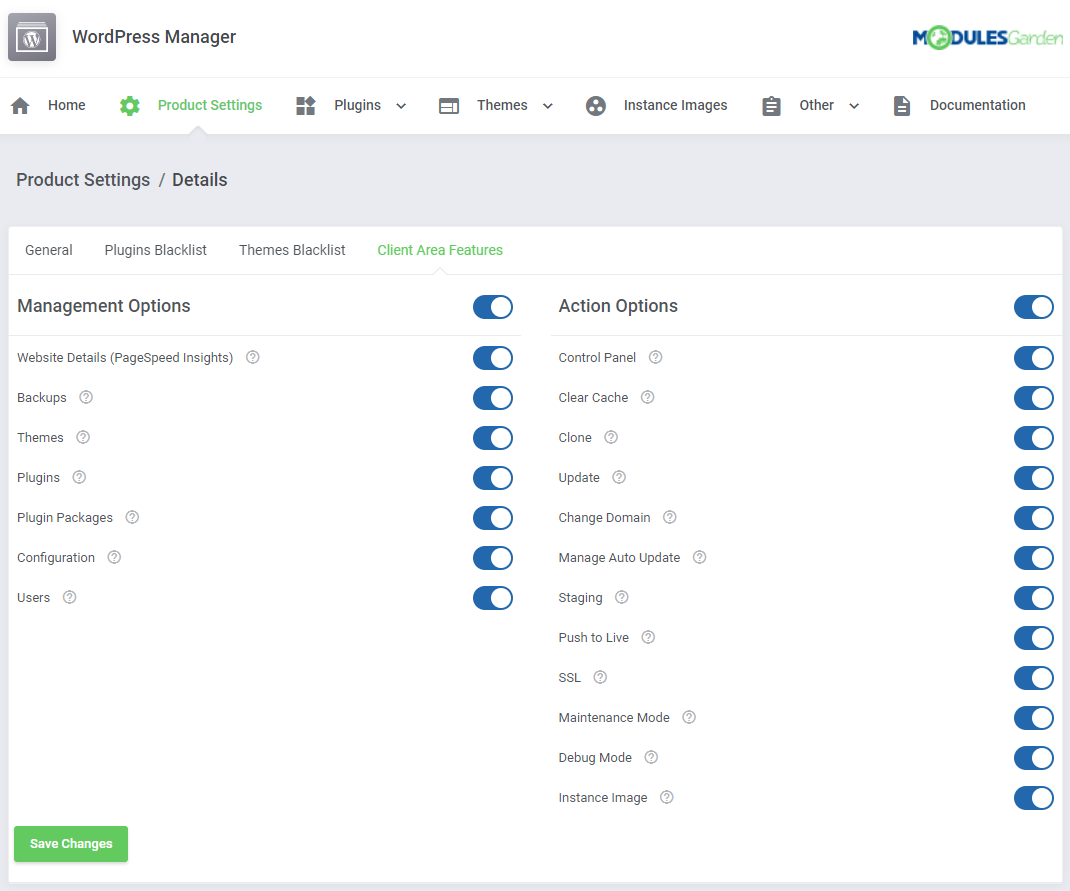
|
Plugins
| In the 'Plugins' section you may prepare ready-made packages selected by your plugins or prepare custom plugins and then offer them to install to your clients. In this quick and convenient way, your clients will be given an offer with perfectly adjusted and suitable plugins to shorten the time of searching and verification. |
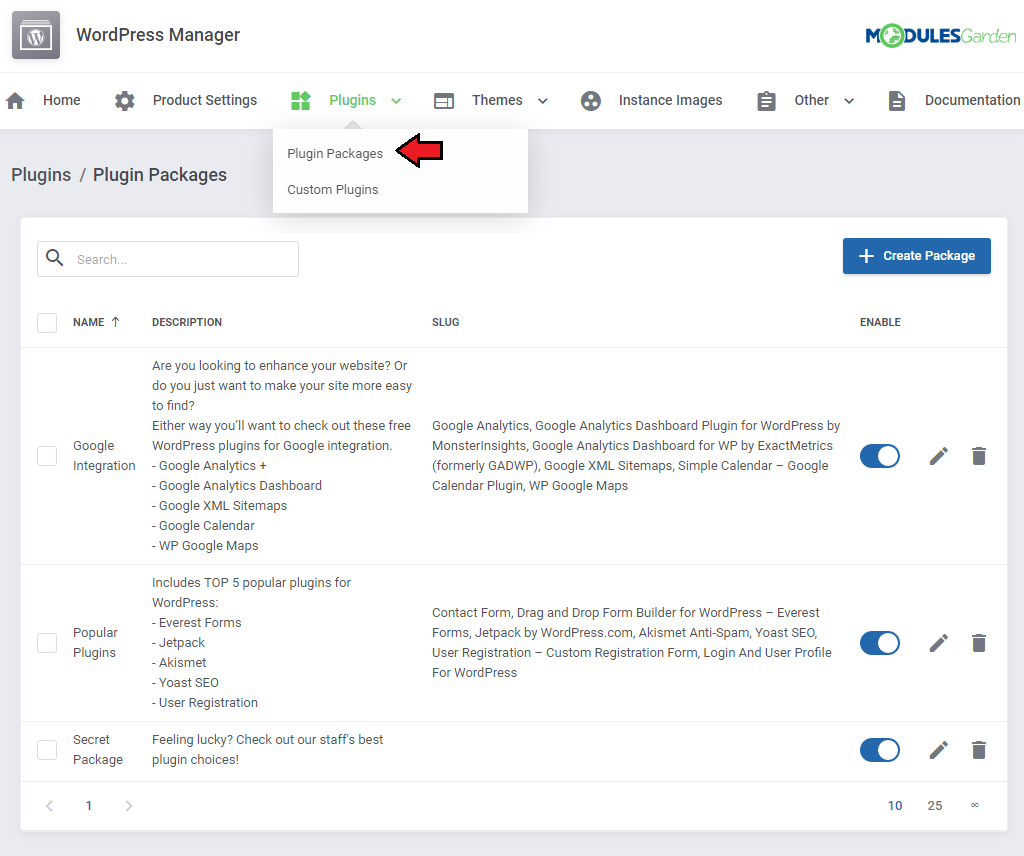
|
| In the 'General' part, enter the package name and describe the package in short. Save the changes and then move to the 'Plugins' tab. In this part you will also need to enable the package once it is prepared. |
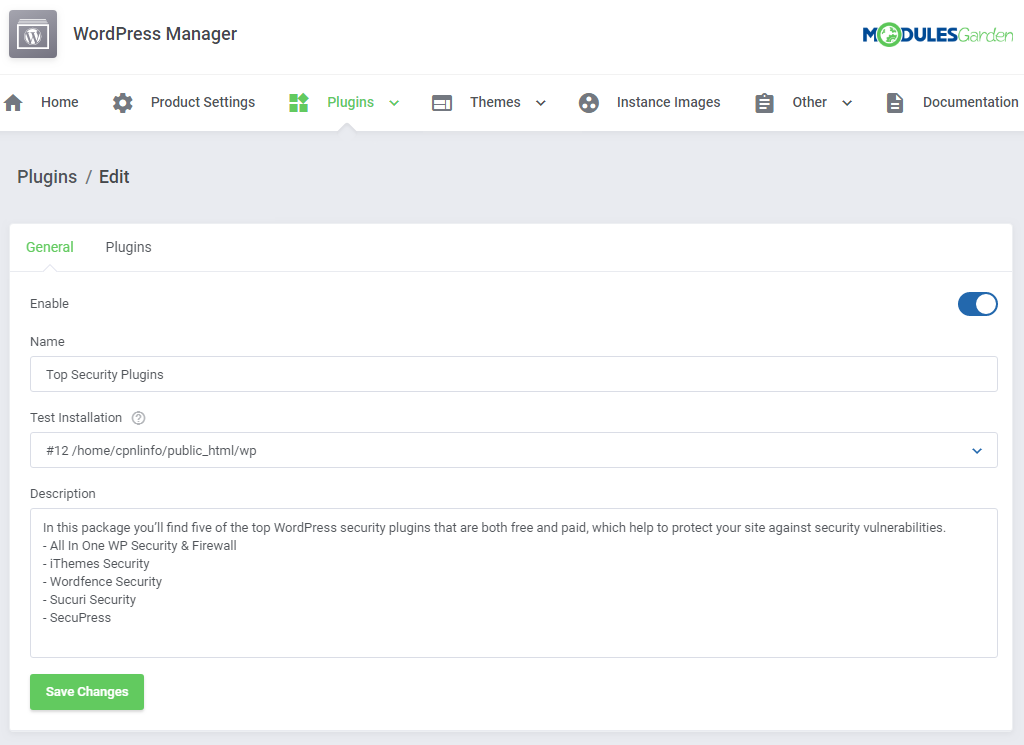
|
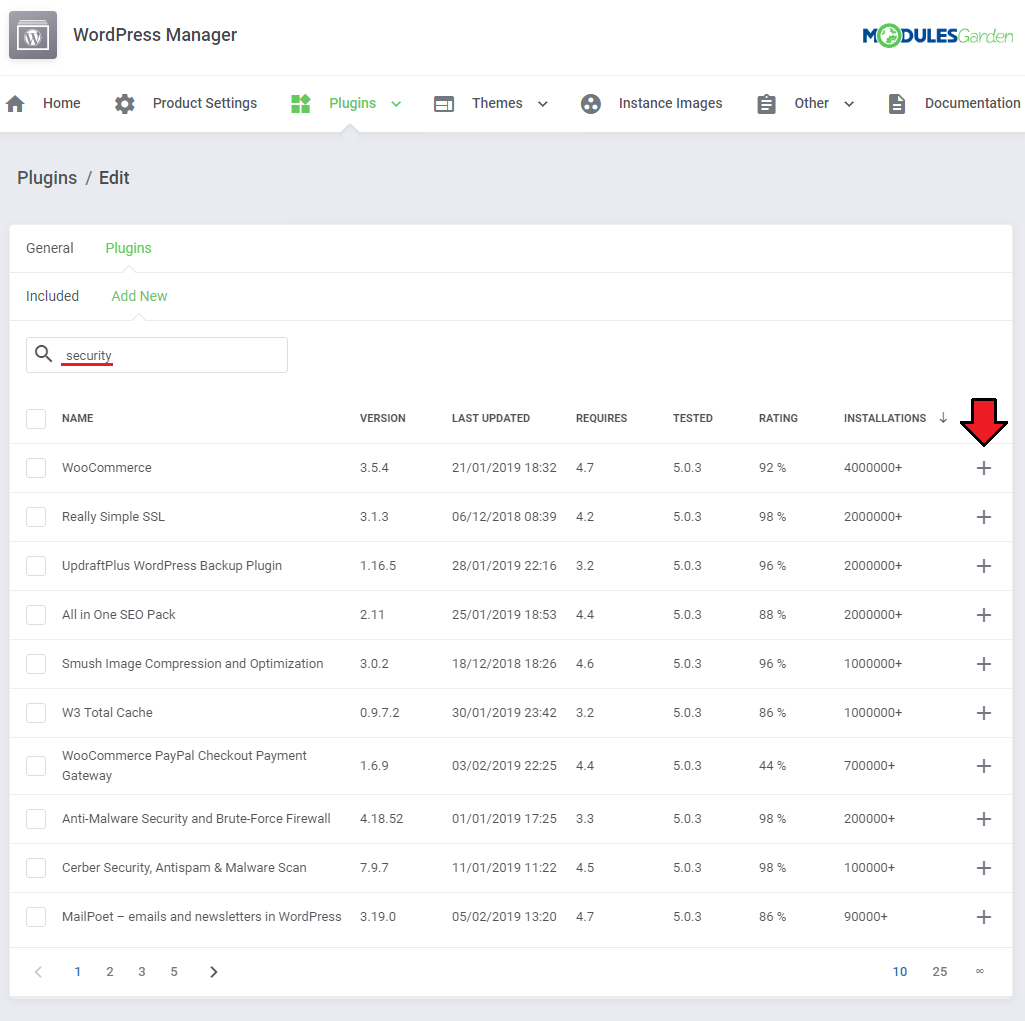
| Add plugins by searching through the existing ones, start typing the plugin name, press enter and the results will appear. Add a single plugin or use the mass action button to add plugins in bulk. |
|
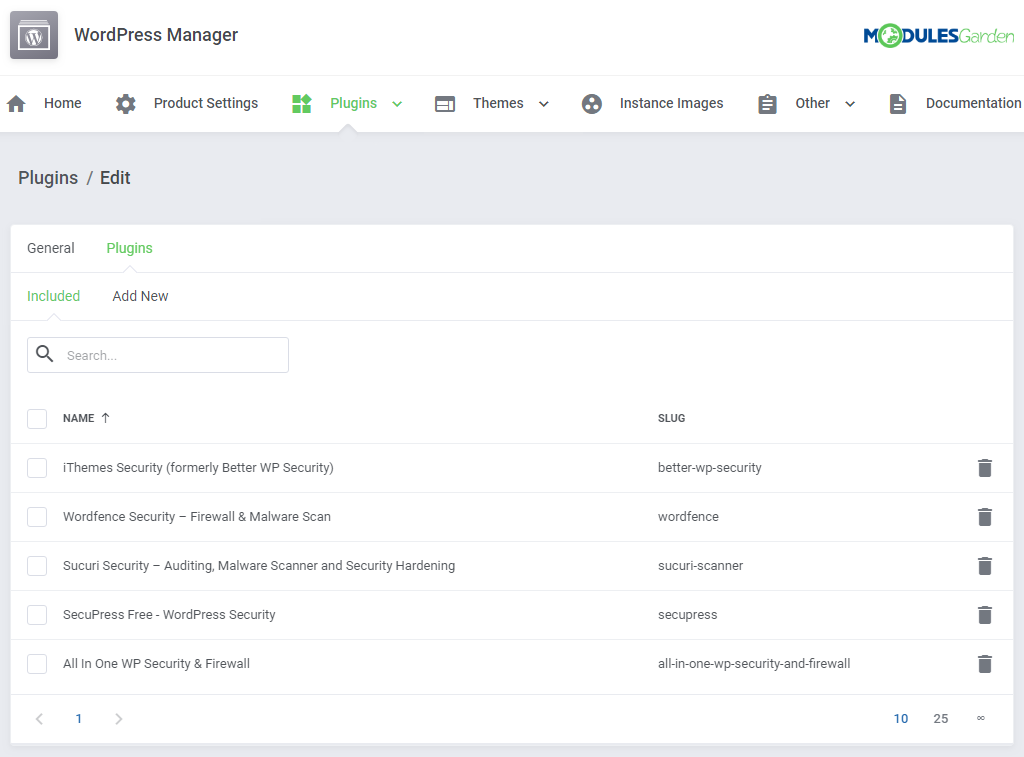
| Added plugins will appear on the list of included immediately. You may always delete any unwanted plugins when editing the package by pressing the bin icon. |
|
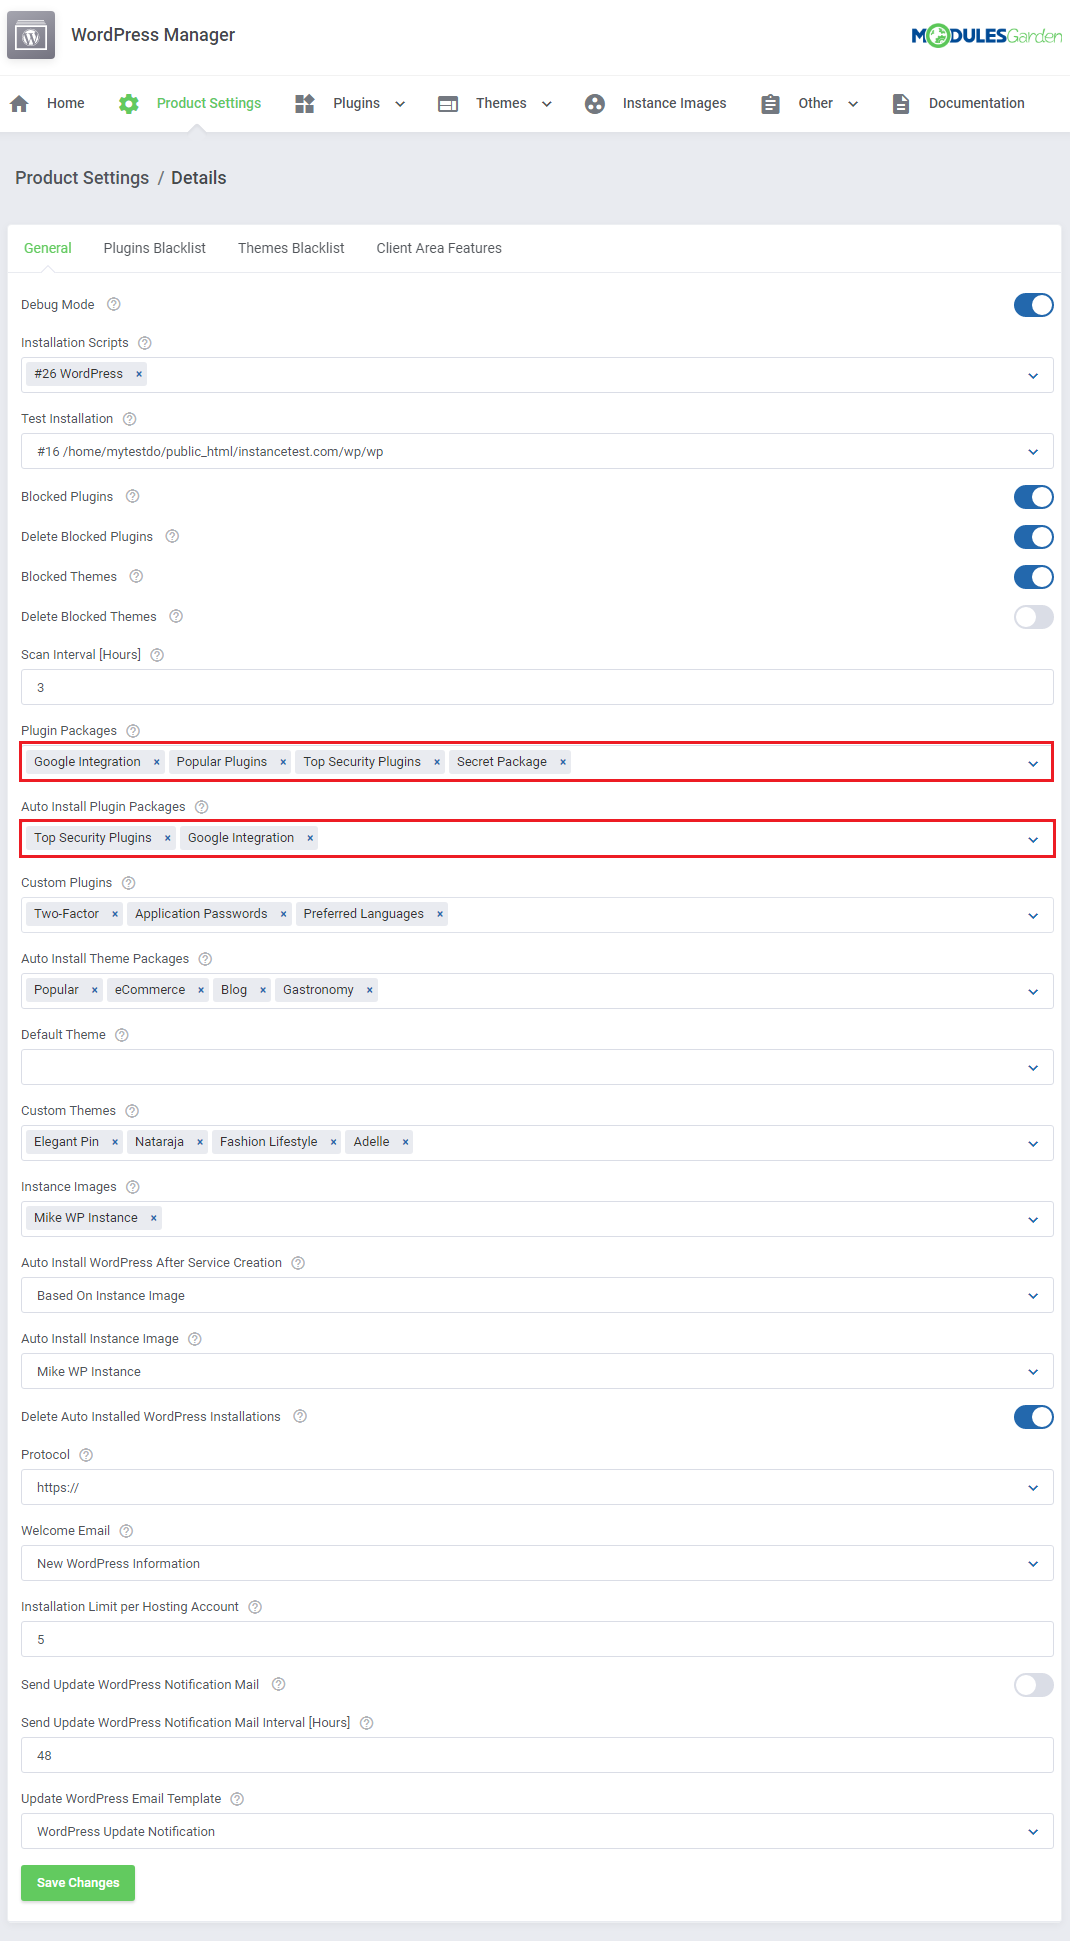
| Once you have the packages ready, move again to the General configuration of a product and select which of the packages will be available to choose from by clients or be automatically preinstalled for a single product. Surely, you may assign a different set of packages to each product. |
|
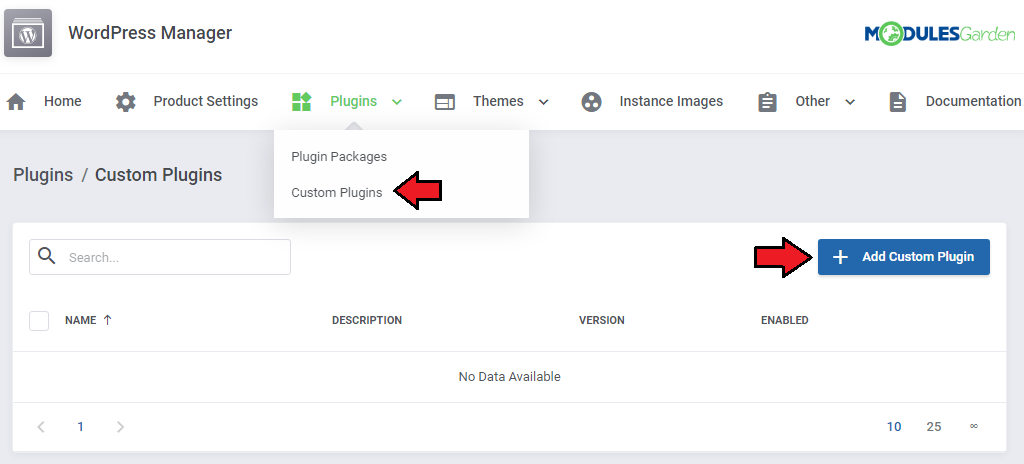
| There is also the possibility to add 'Custom Plugins' . Press the following button to do so. |
|
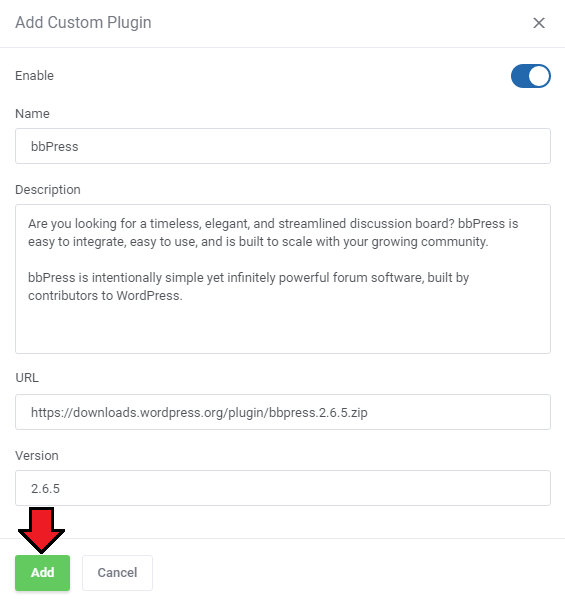
| Now, provide a name and description of your 'Custom Plugin' . Then, complete the 'URL' and finally define a version. |
|
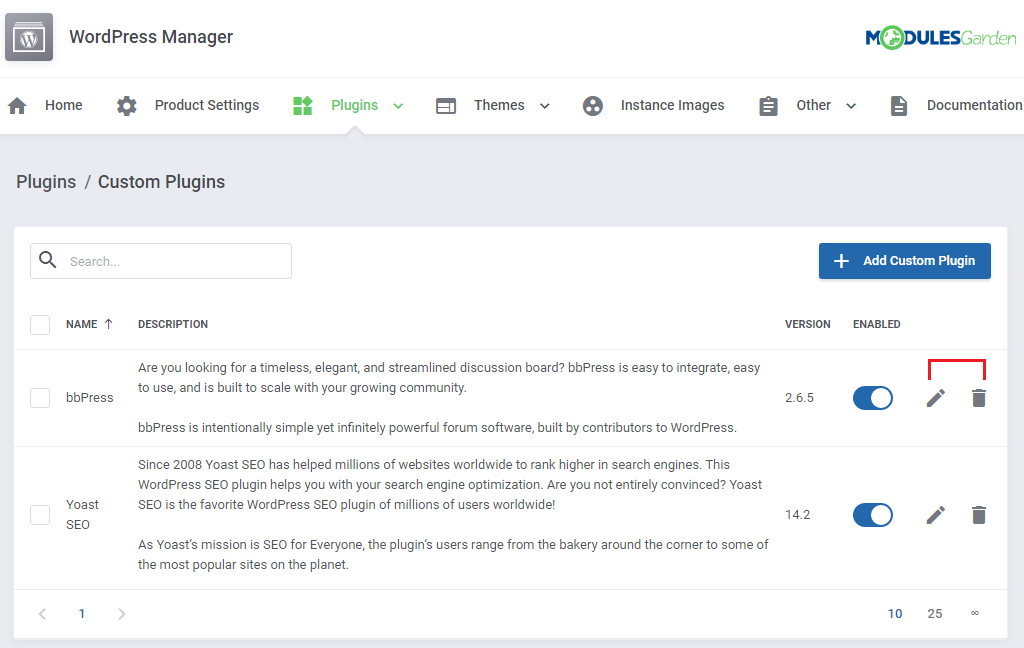
| If you wish to modify your 'Custom Plugins' , you can easily do this by pressing the 'Edit' button. |
|
Themes
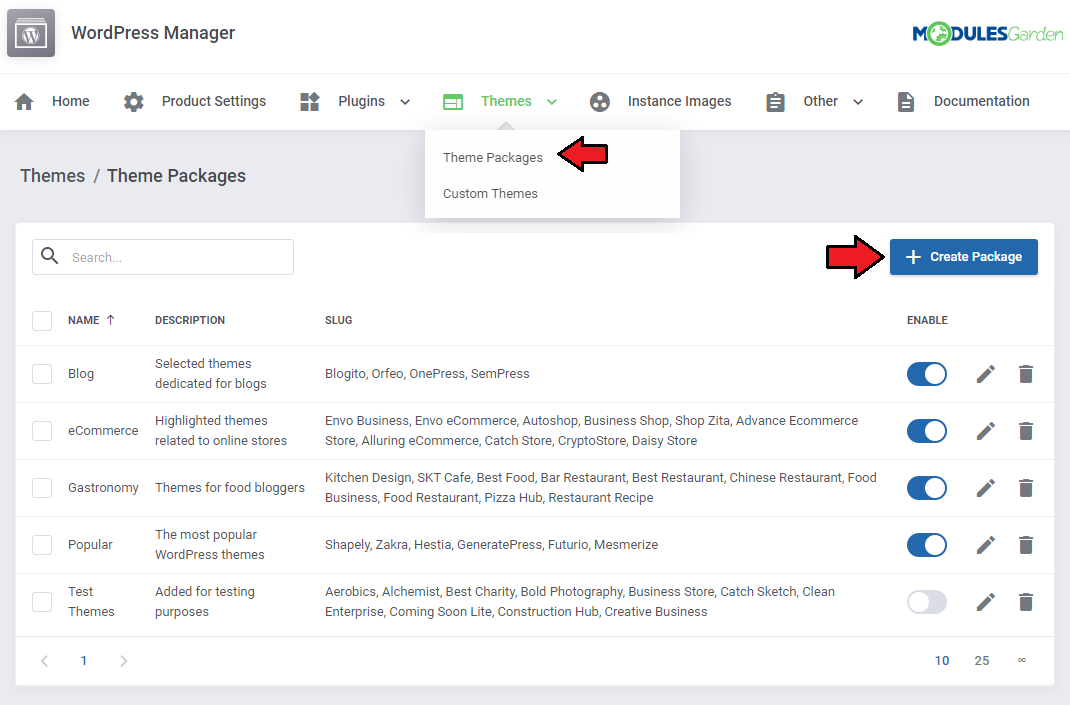
| In the 'Themes' section you may prepare ready-made packages selected by you themes or create your 'Custom Themes' and automatically install them along with the WordPress instance. In this quick and convenient way, your clients will have quick access to preinstalled themes on their WordPress without the need of searching them on their own. |
|
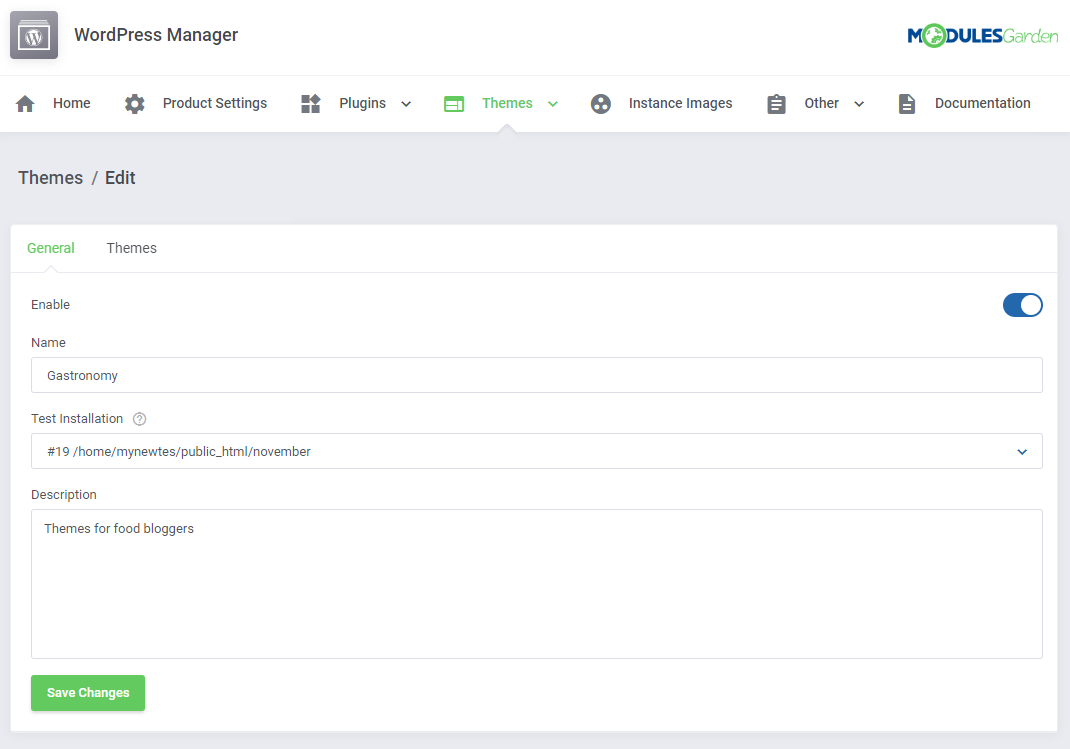
| In the 'General' part, enter the package name and describe the package in short. Save the changes and then move to the 'Themes' tab. In this part you will also need to enable the package once it is prepared. |
|
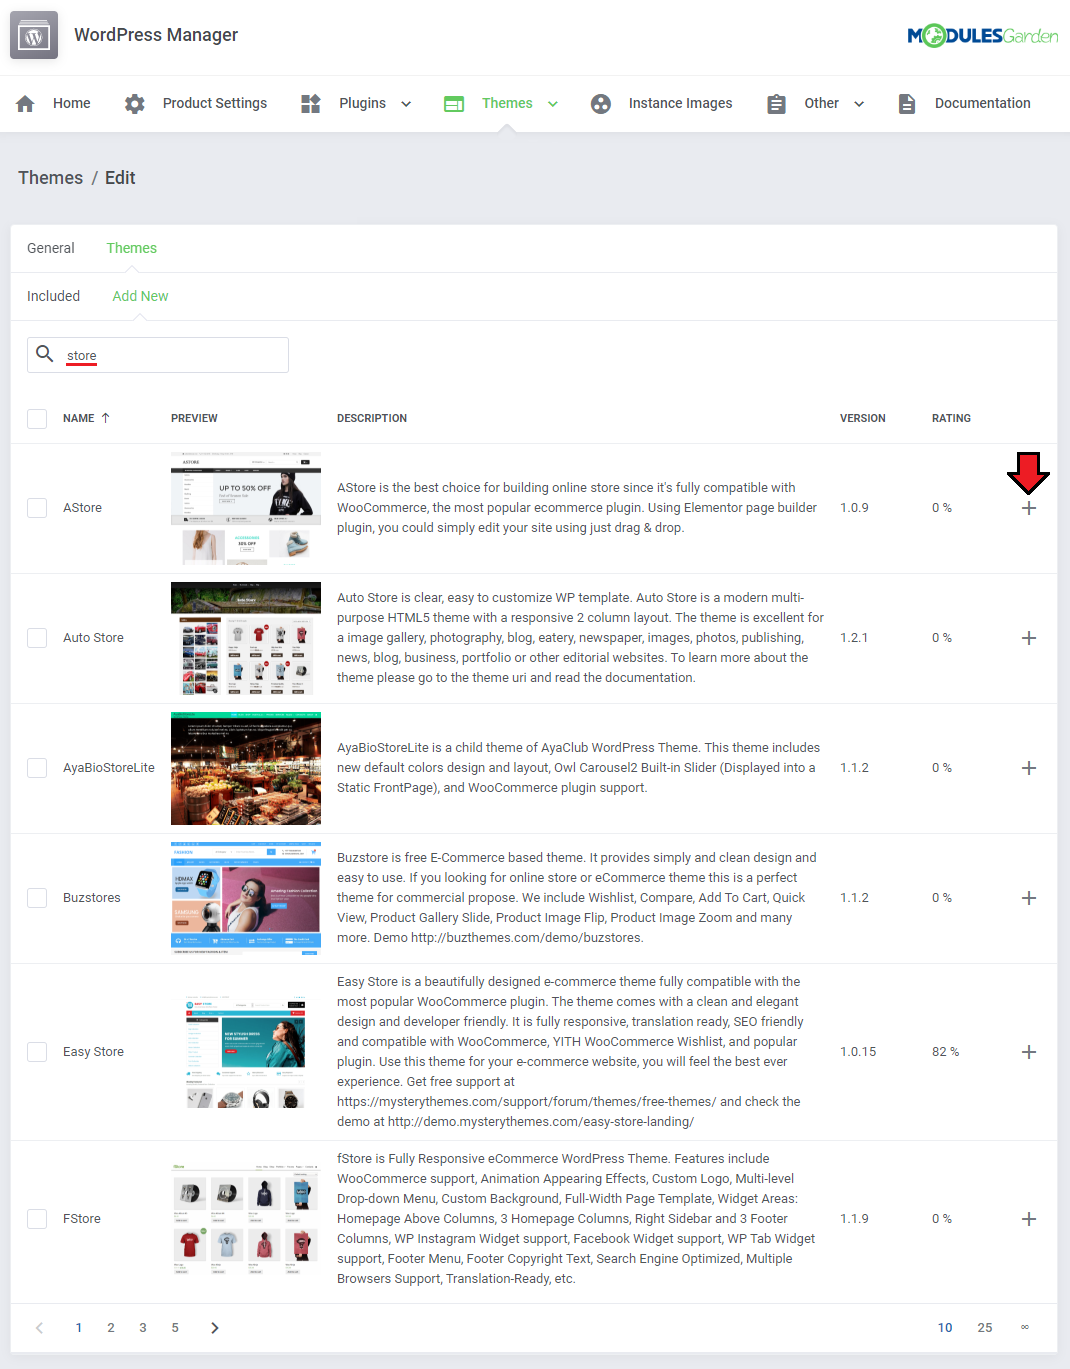
| Add themes by searching through the existing ones, start typing the theme name, press enter and the results will appear. Add a single theme or use the mass action button to add themes in bulk. |
|
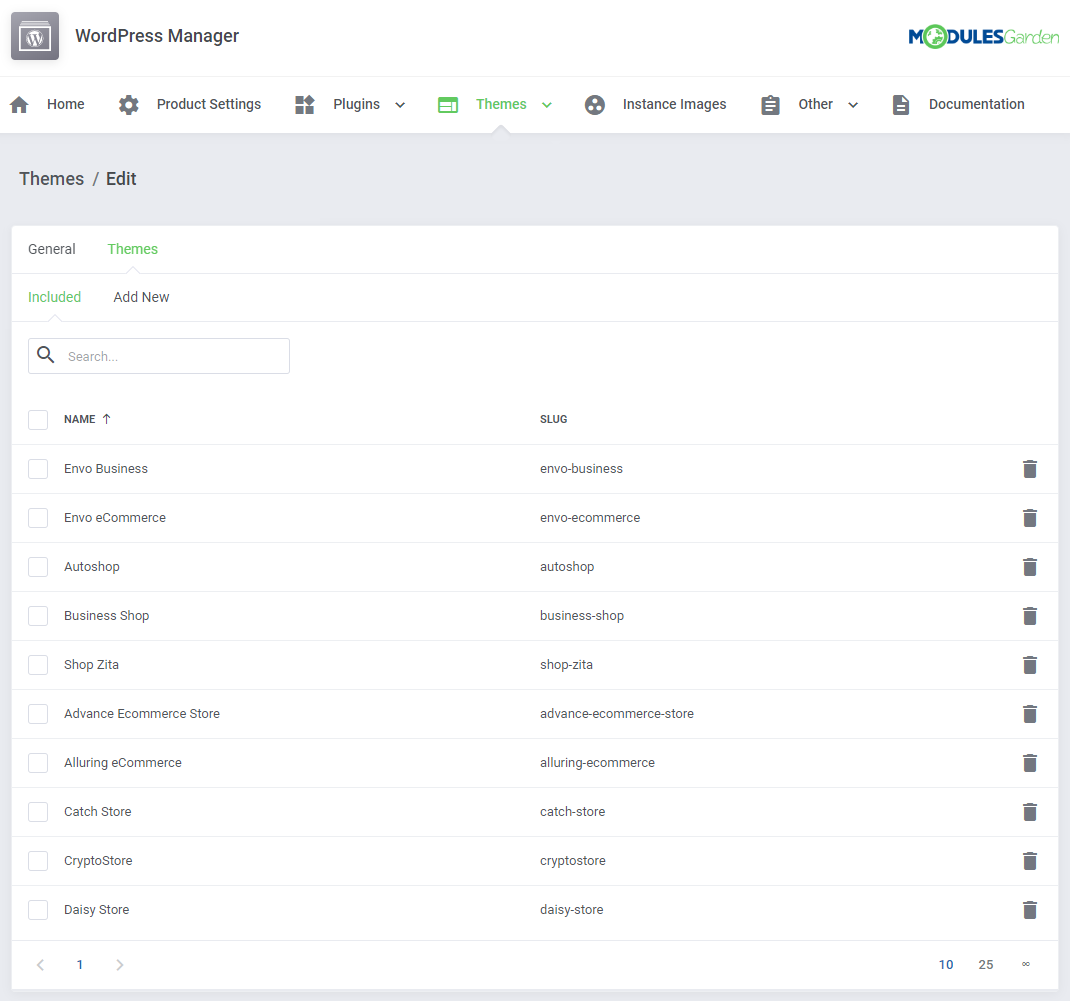
| Added themes will appear on the list of included immediately. You may always delete any unwanted themes when editing the package by pressing the bin icon. |
|
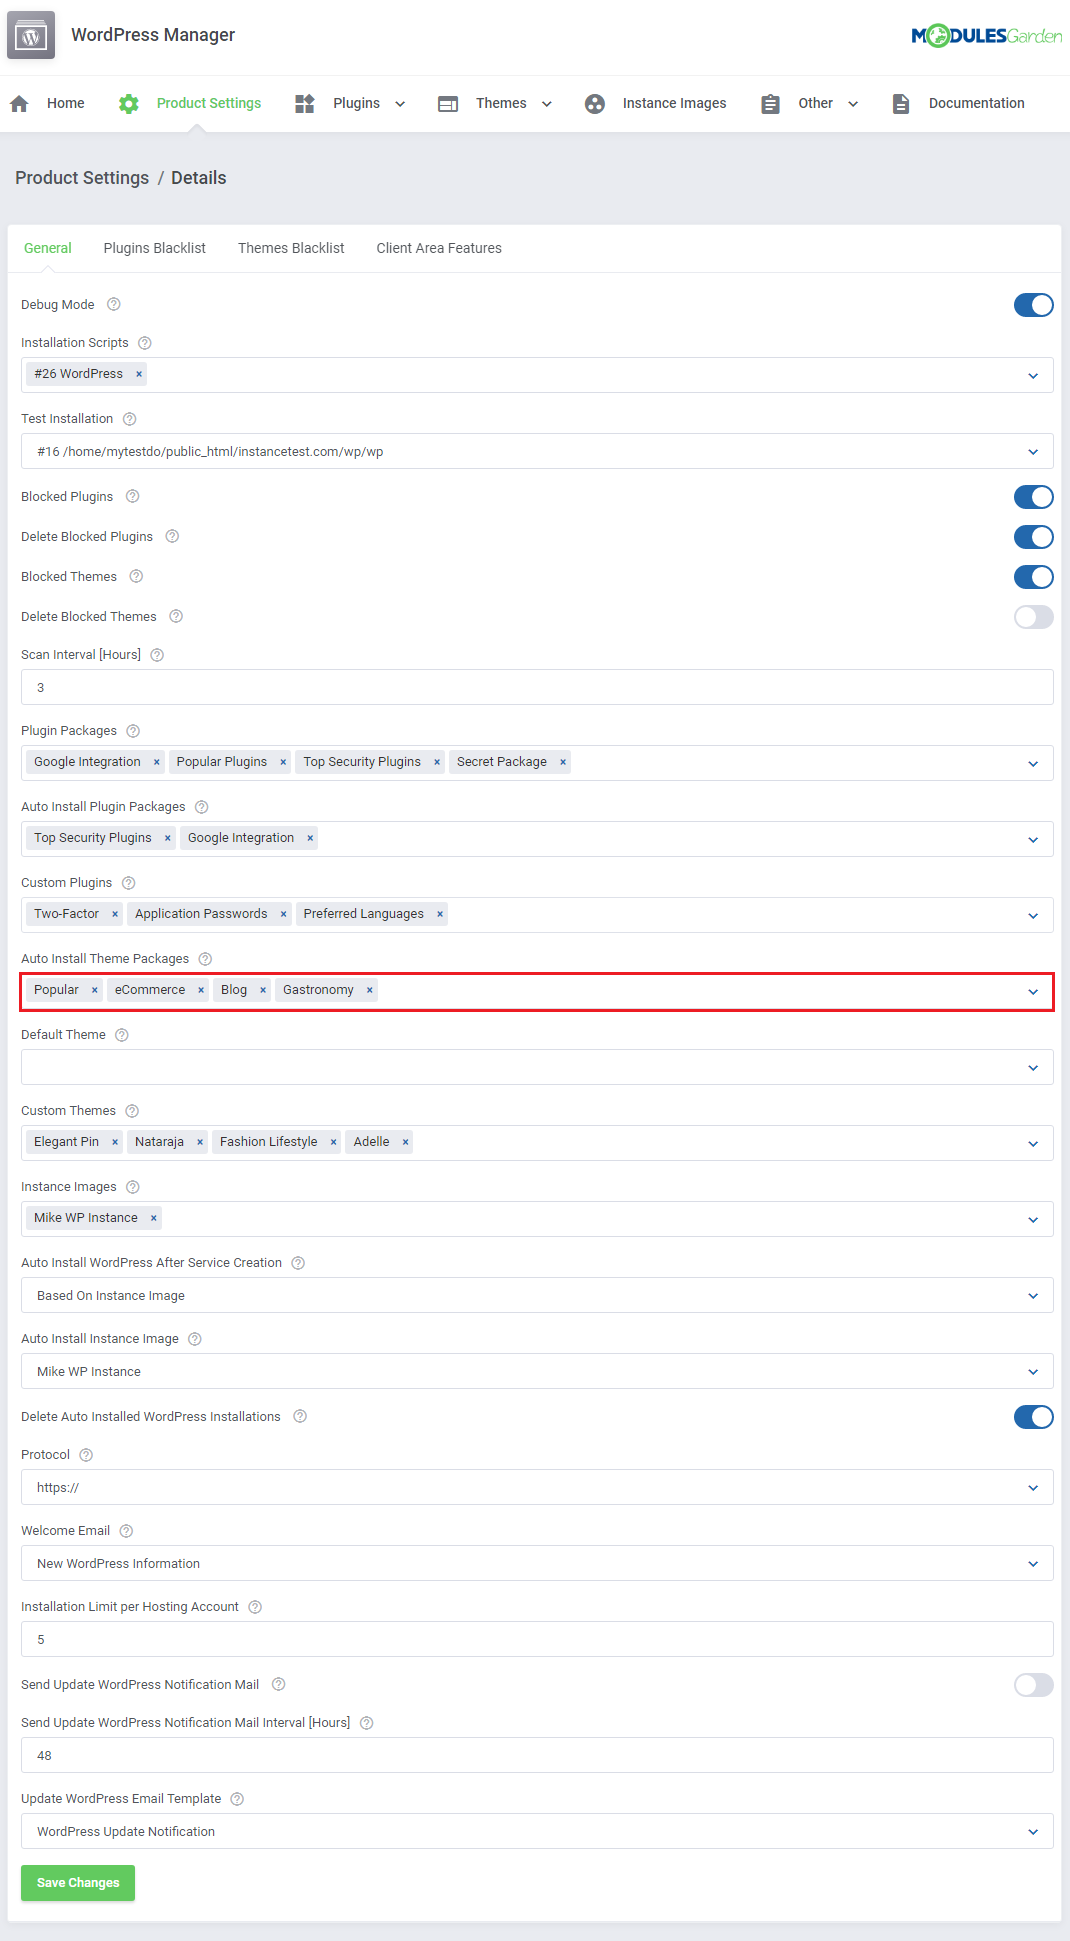
| Once you have the packages ready, move again to the General configuration of a product and select which of the packages will be installed automatically for a single product. Surely, you may assign a different set of packages to each product. |
|
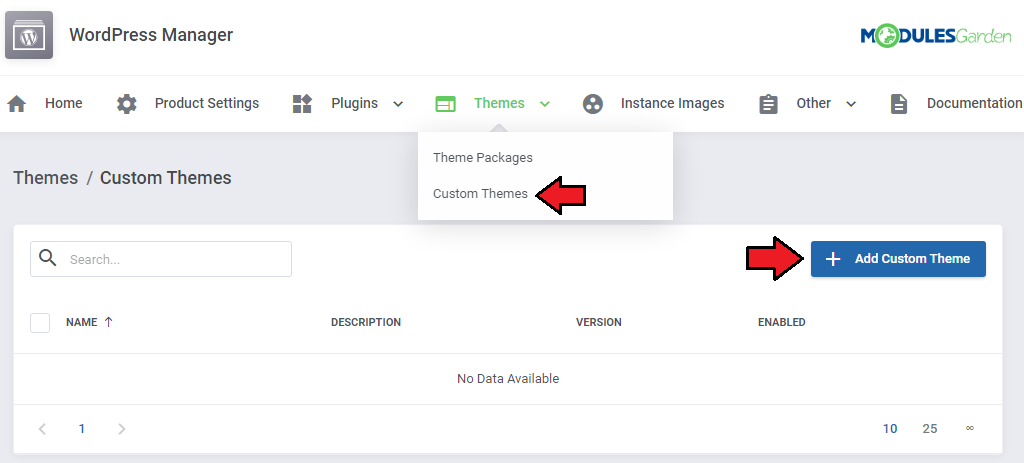
| There is also the possibility to add 'Custom Themes' . Press the following button to do so. |
|
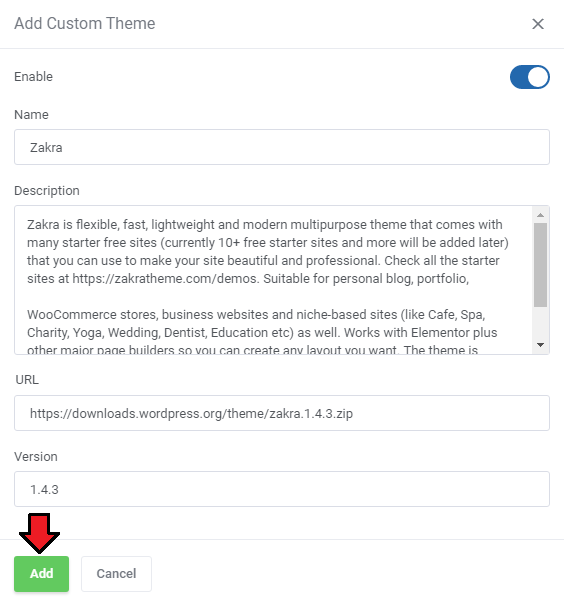
| Now, provide a name and description of your 'Custom Theme' . Then, complete the 'URL' and finally define a version. |
|
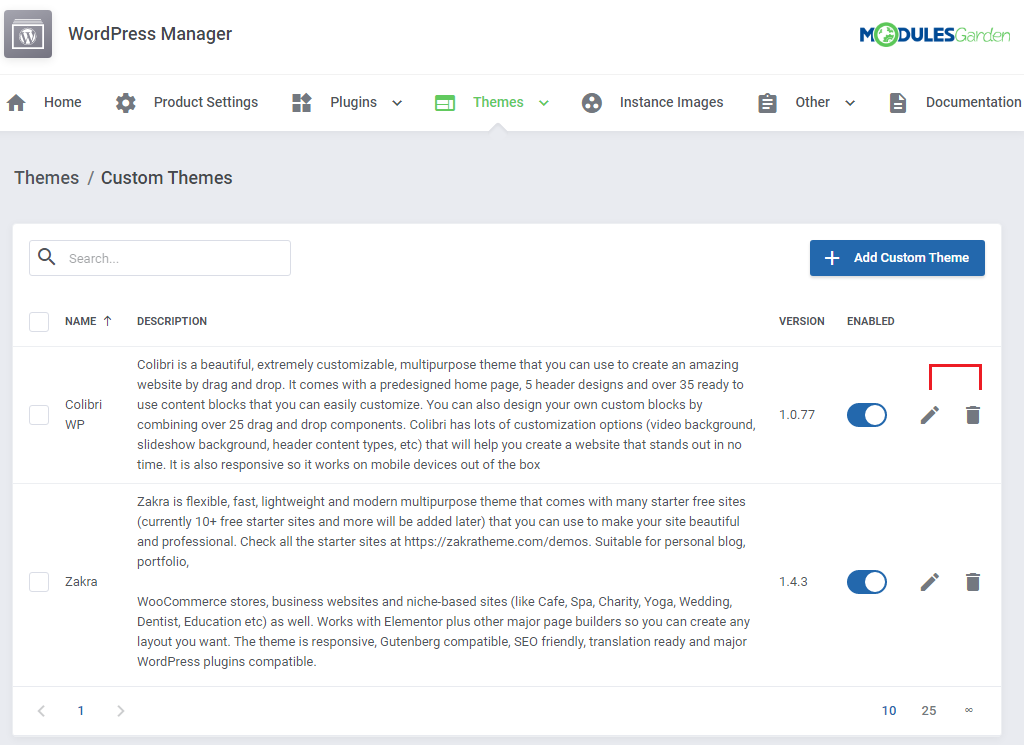
| If you wish to modify your 'Custom Themes' , you can easily do this by pressing the 'Edit' button. |
|
Instance Images
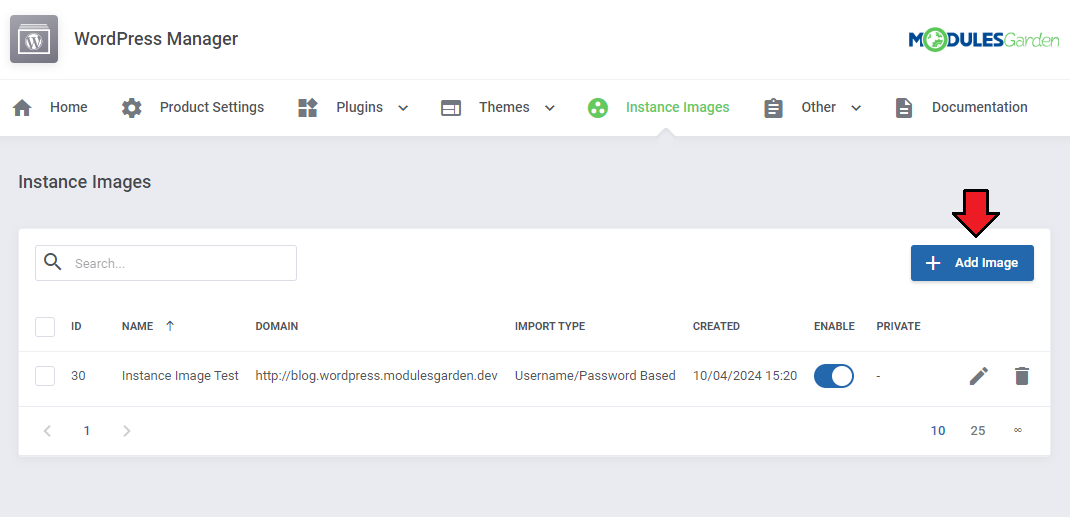
| This section is dedicated to WordPress images that are used to allow clients to add WordPress installations using these very images of WordPress. To create such an image, simply press the 'Add Image' button and then follow the steps described below. |
|
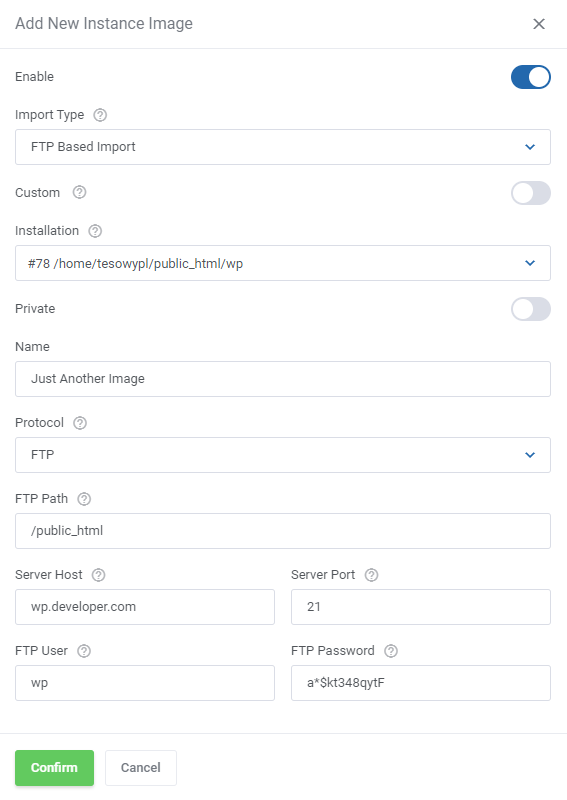
| In order to properly configure a new instance image you will need to set up the below options. Please be aware that to create such an instance image you will need to deliver full access data to a server with WordPress installations that will be used to create an image.
|
|
| Once you have the images ready, move again to the General configuration of a product and select which of the images will be available for a single product. Surely, you may assign different sets of images to each product. |
|
Other
Logs
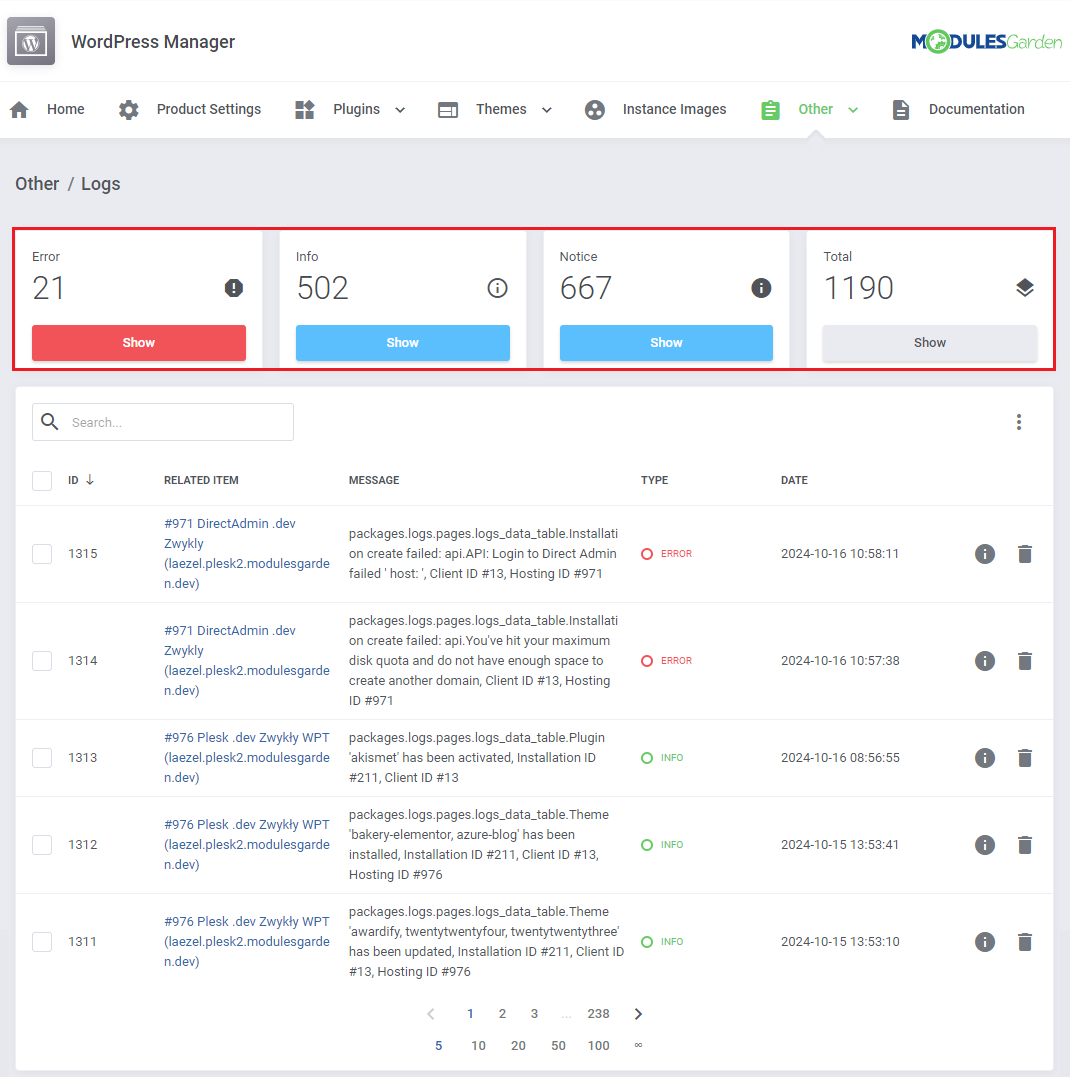
| The module activities are recorded in the section named 'Logs'. You can filter the logs by clicking on the 'Show' icons. |
|
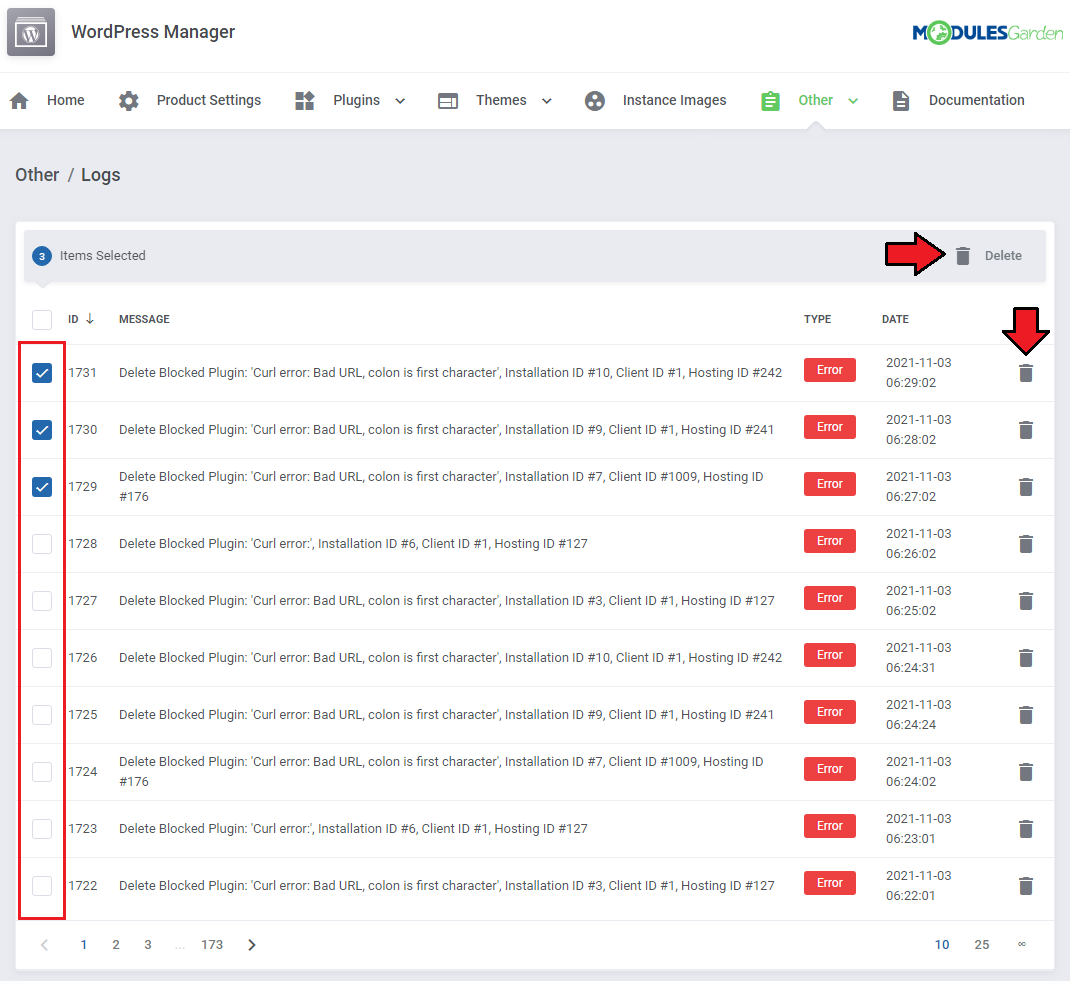
| All entries can be deleted at any time, just click the button marked on the screen below. Keep in mind that you can remove multiple logs at once. |
|
Tasks
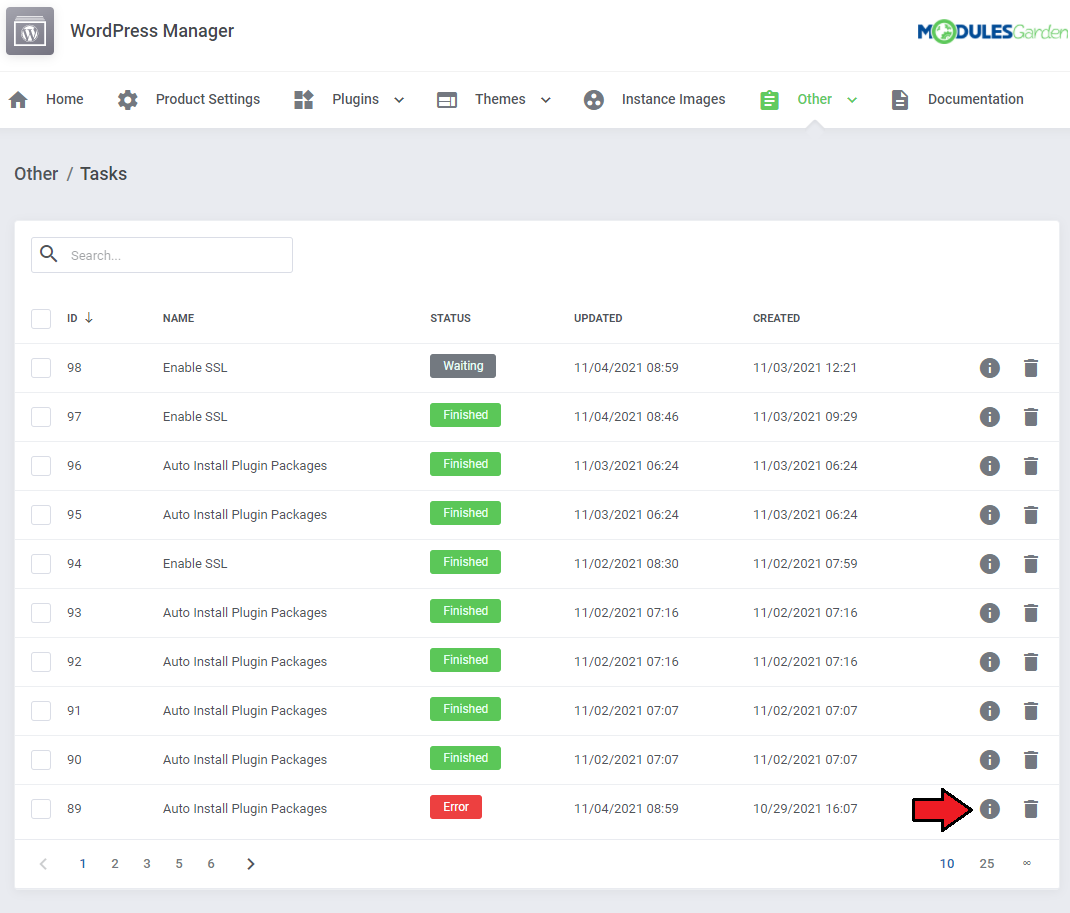
This section gives you the view on module tasks to enable SSL in two scenarios:
|
|
| Press the 'Information' button to get a quick view on the basic information on the task and log details. |
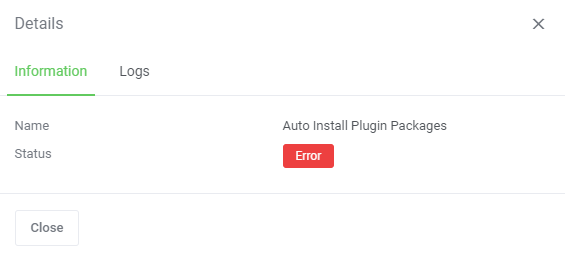
|
| Logs section will include information on errors only. If a task is completed successfully, no information will be included here. |
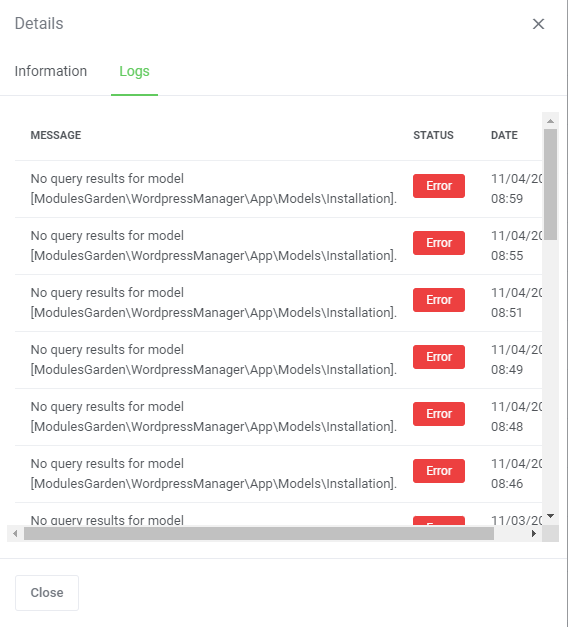
|
| All tasks can be deleted separately. To do that, just click the button marked on the screen below. Keep in mind that you can remove multiple tasks at once. |
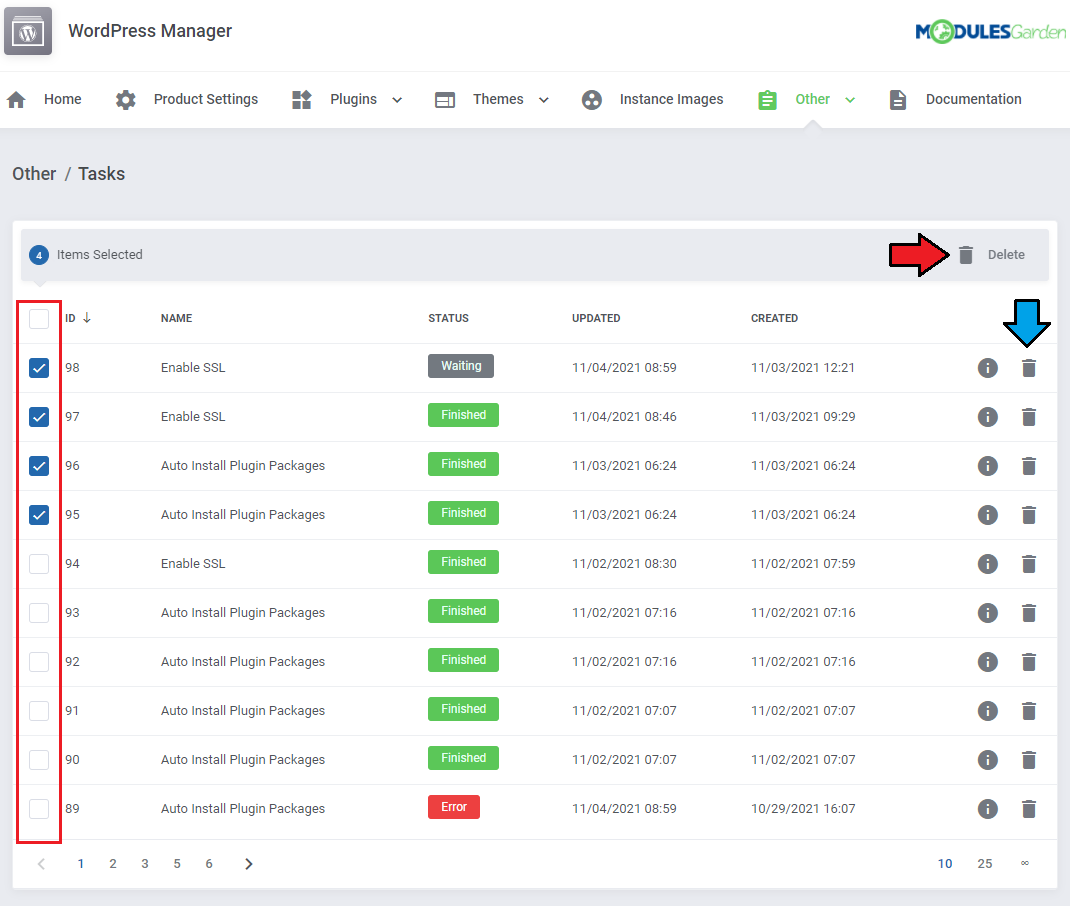
|
Settings
This section controls WHMCS-wide settings that you can configure to fit your client's needs.
|
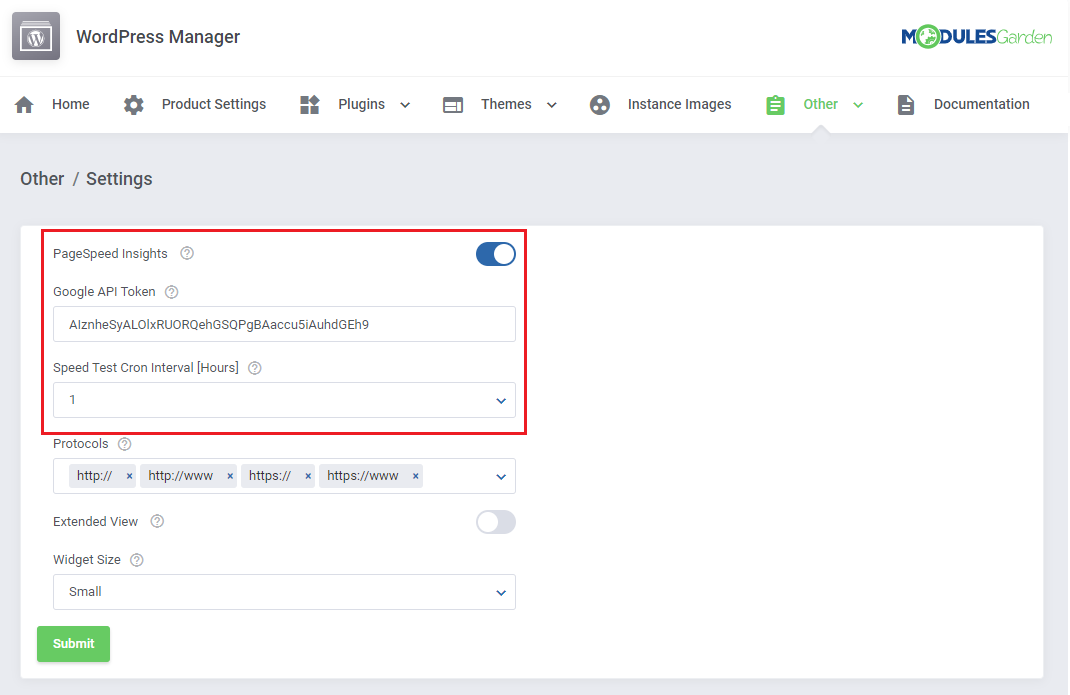
|
|
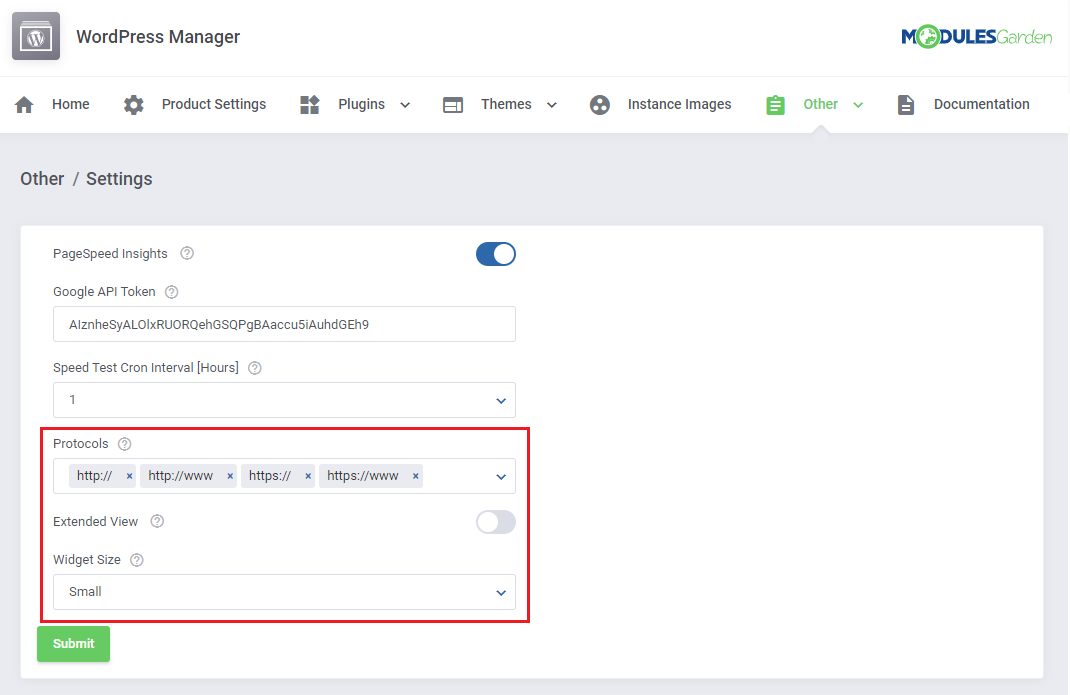
|
Google API Token
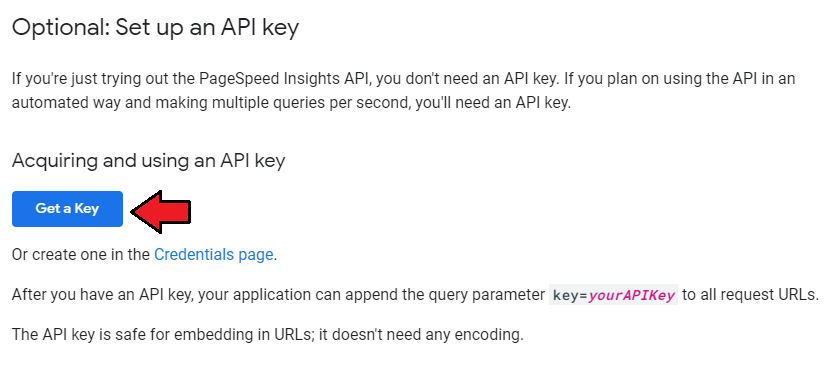
| In order to get your Google API token necessary for the Website Details section to work, open the following site: https://developers.google.com/speed/docs/insights/v5/get-started Scroll down to 'Acquiring and using an API key' section. There, press 'Get a Key' button: |
|
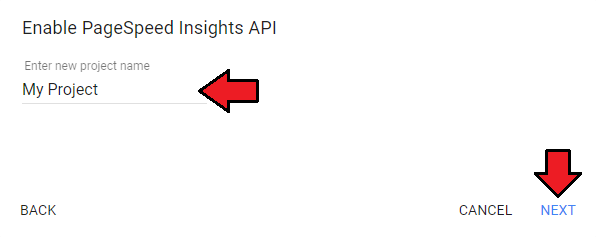
| 'Enable PageSpeed Insights API' modal will appear. Select your project or create a new one, and then press 'Next'. |
|
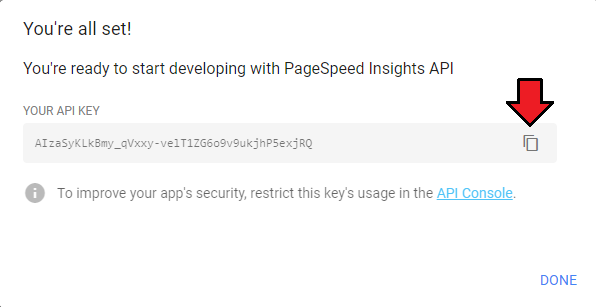
| That's all! Your Google API key is ready, copy it and paste in the 'Google API Token' field in the WordPress For WHMCS module Settings as described in the above section. |
|
Translations
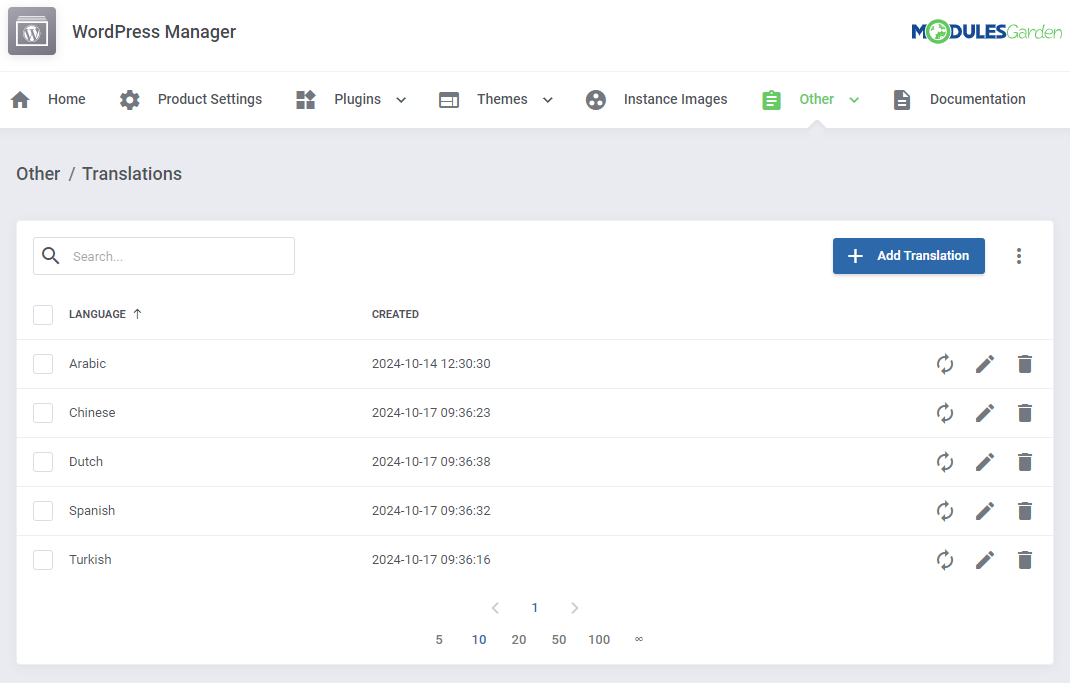
| Customizing language files is now extremely easy with the "Translations" tool that is now available directly in the addon. Its user-friendly design makes managing various language file tweaks a smooth and efficient process. Prepare translations for the original English files with this handy built-in tool. For specific instructions on how to use this tool please refer to its dedicated article, you will find it here. |
|
Access Control
| 'Access Control' allows you to specify and control exactly which sections of the module can be accessed by your administrators. The way it works is that you create access control rules in which you decide if a specific admin, or admin role has full access, or is restricted to only specific sections. |
Rules
|
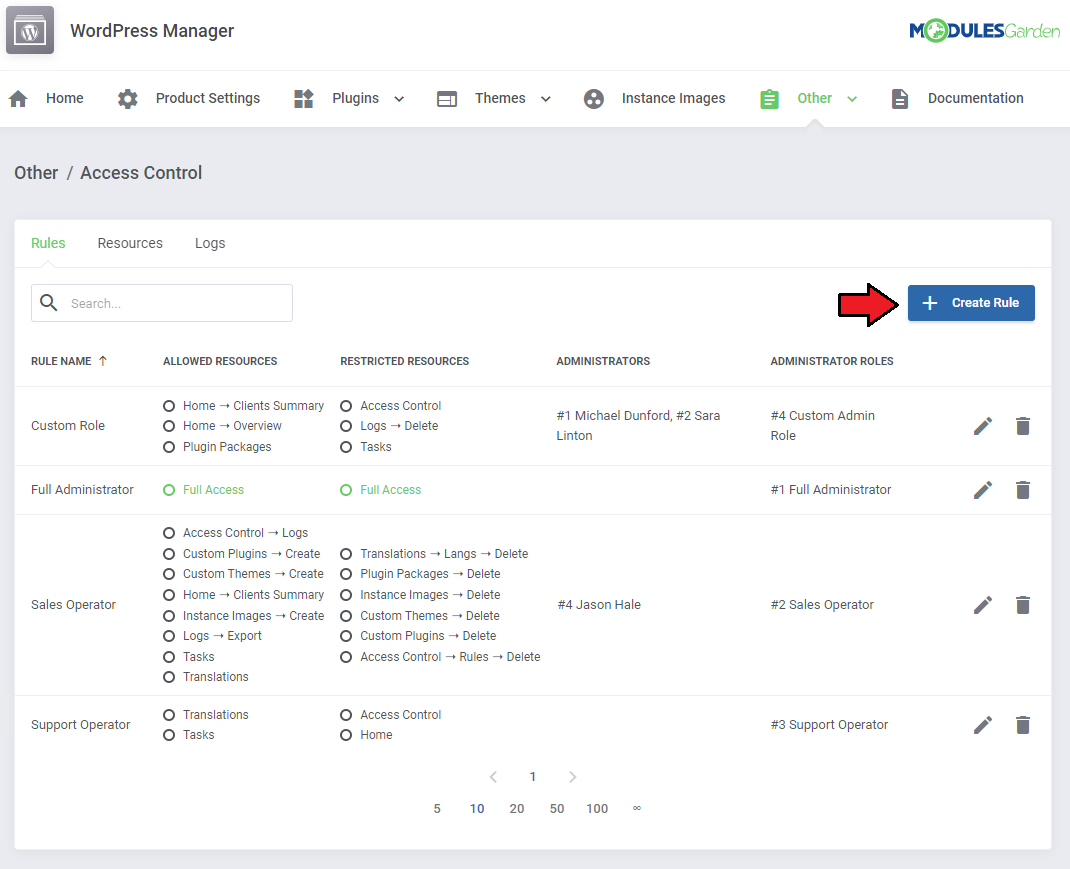
Start with creating a new rule, click on the 'Create Rule' button and a dedicated form will appear. Below you will find a description of every field required in the form. |
|
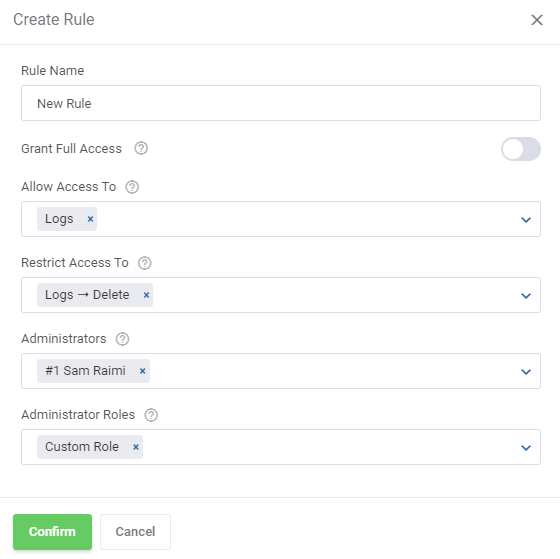
Fill out the following fields to create resources access rule:
Important: When picking specific sections, keep in mind that allowing a parent section will also allow all of its children. |
|
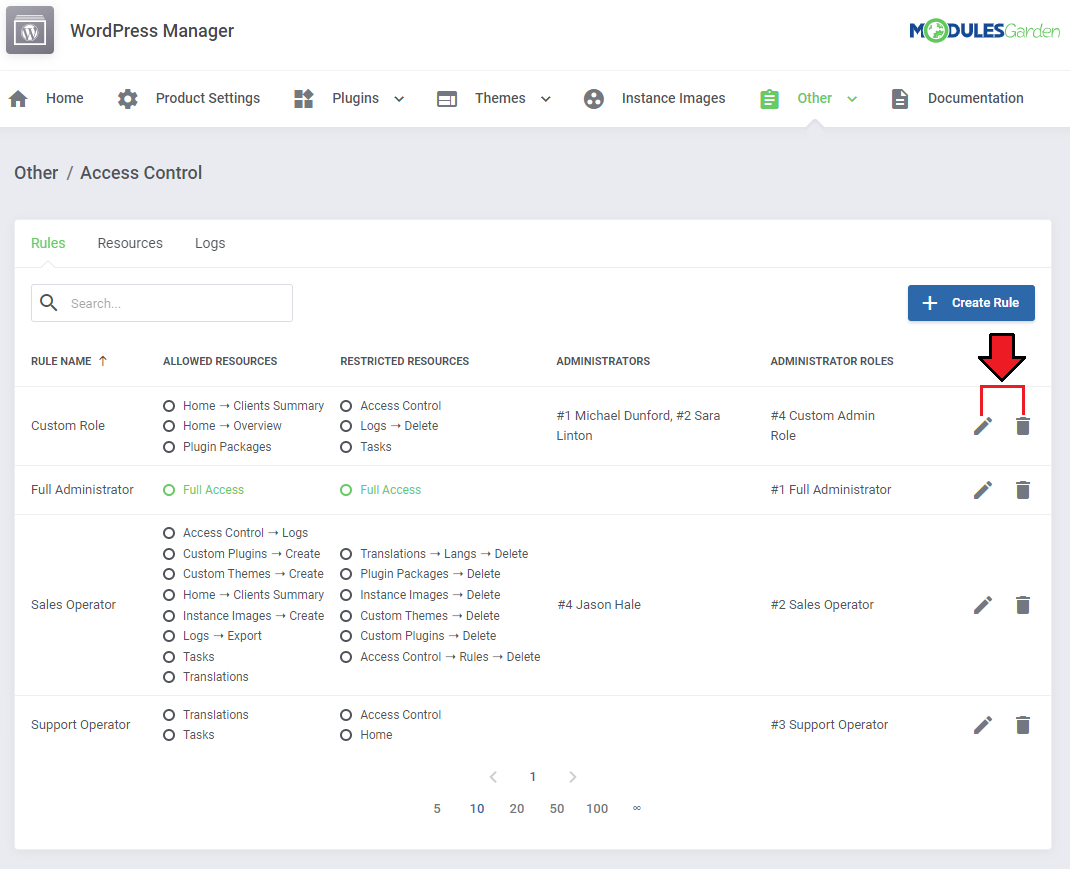
| To edit or delete existing rules, use the icons to the right. |
|
Resources
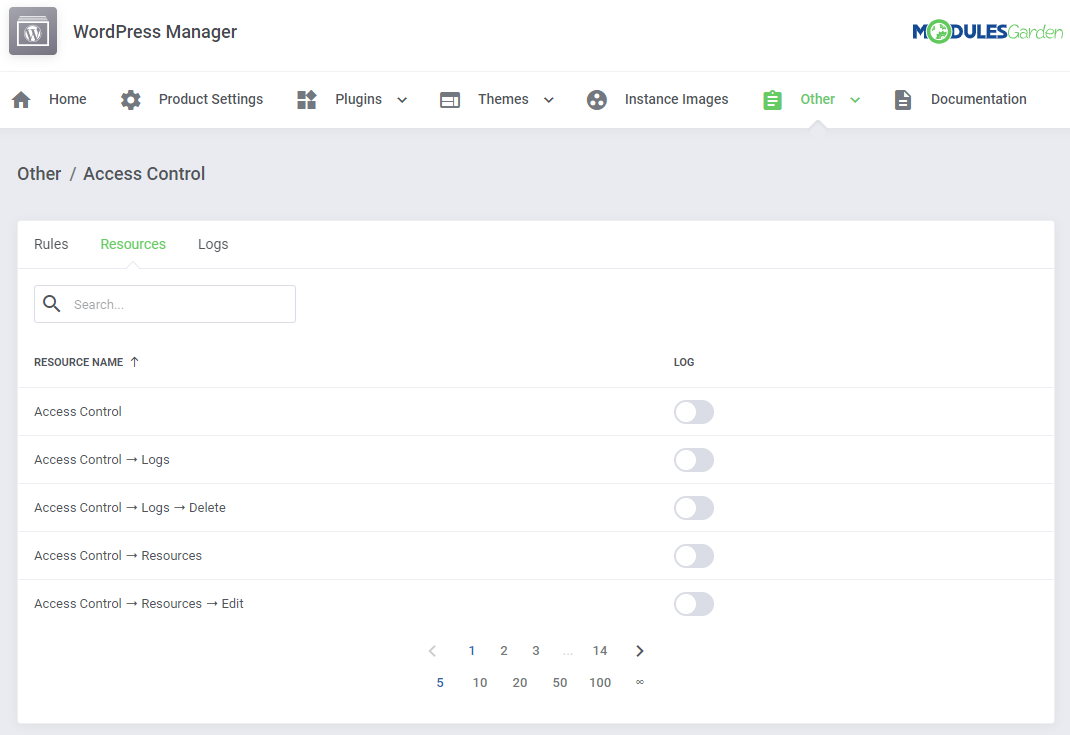
| Use the toggles in the 'Resources' section to specify which of them should be subject to logging, found in the 'Logs' section. Every time an administrator requests a toggled resource, it will be recorded. |
|
Access Control Logs
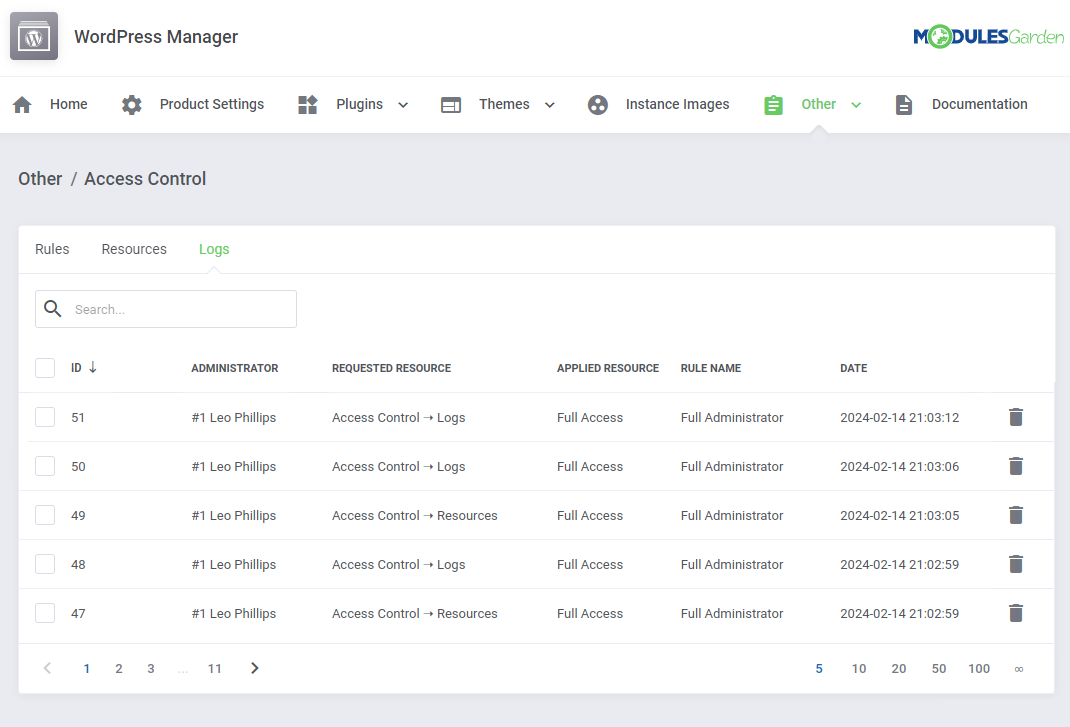
The logs section includes:
Use the trash bin icons to delete specific logs, or utilize the mass action function to delete multiple logs at once. |
|
Email Templates
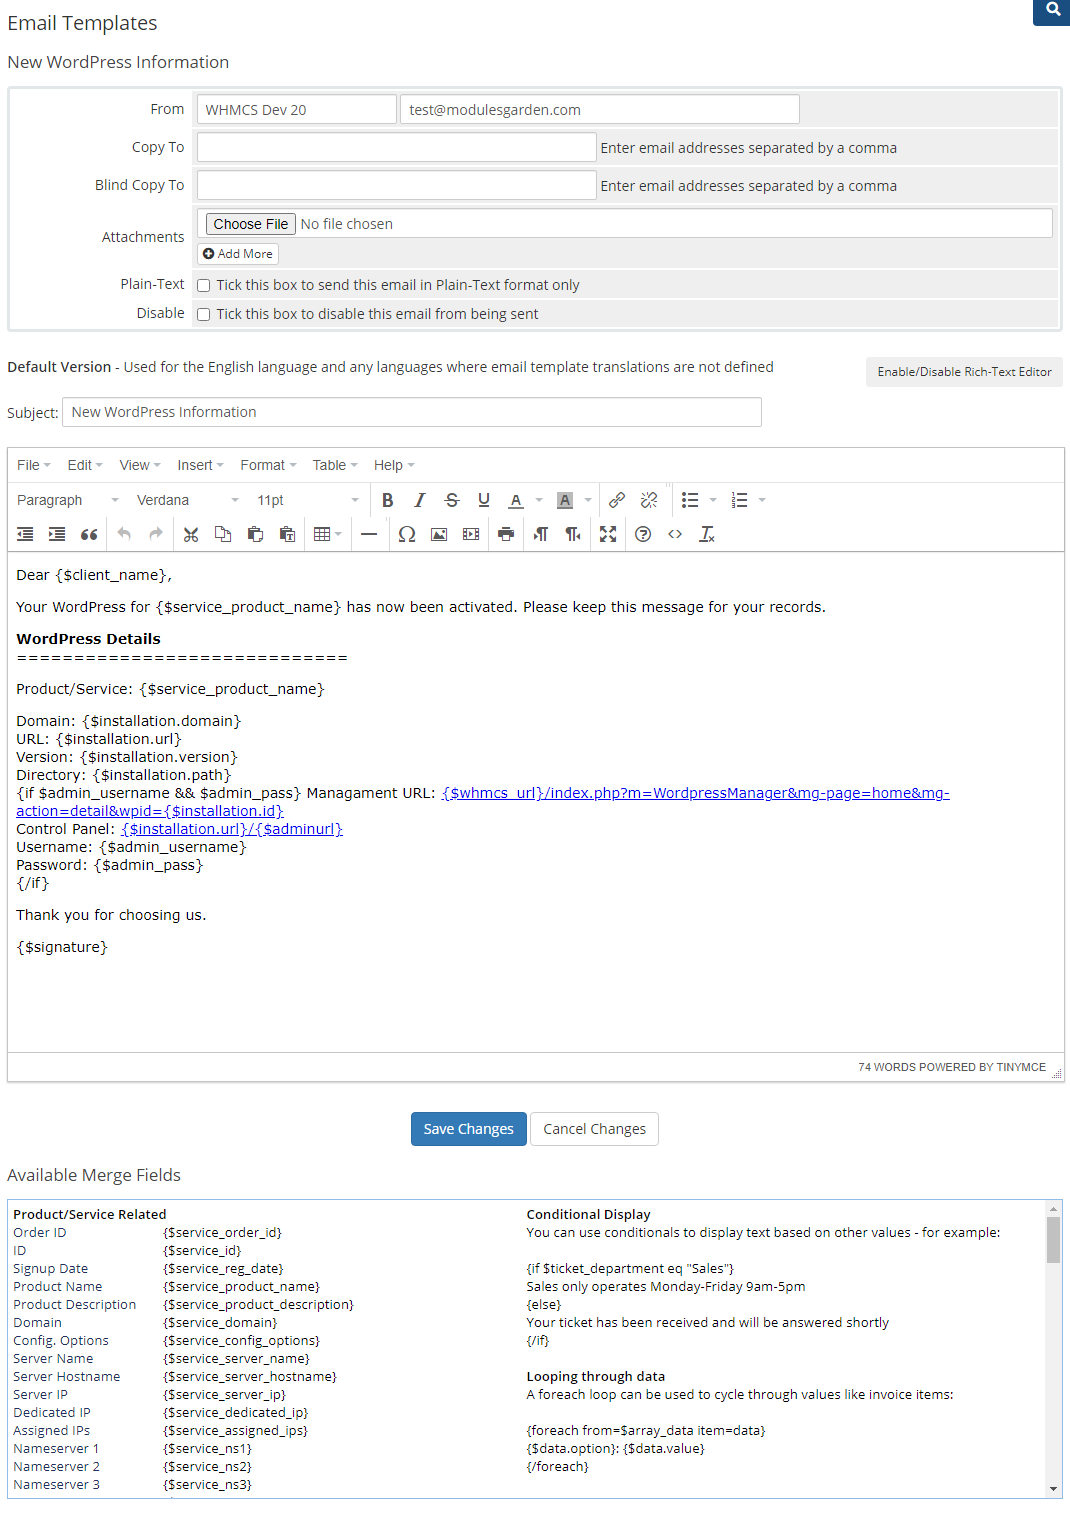
| By default, the module creates the 'New WordPress Information' email template You can find it in your WHMCS 'Setup' → 'Email Templates' section. This template can be used to send WordPress details to the customer when the automatic installation is enabled after the service creation. Additionally, you may use the merge fields variables, which will be replaced with the corresponding WordPress installation details when are sent to the customer:
|
|
Client Area
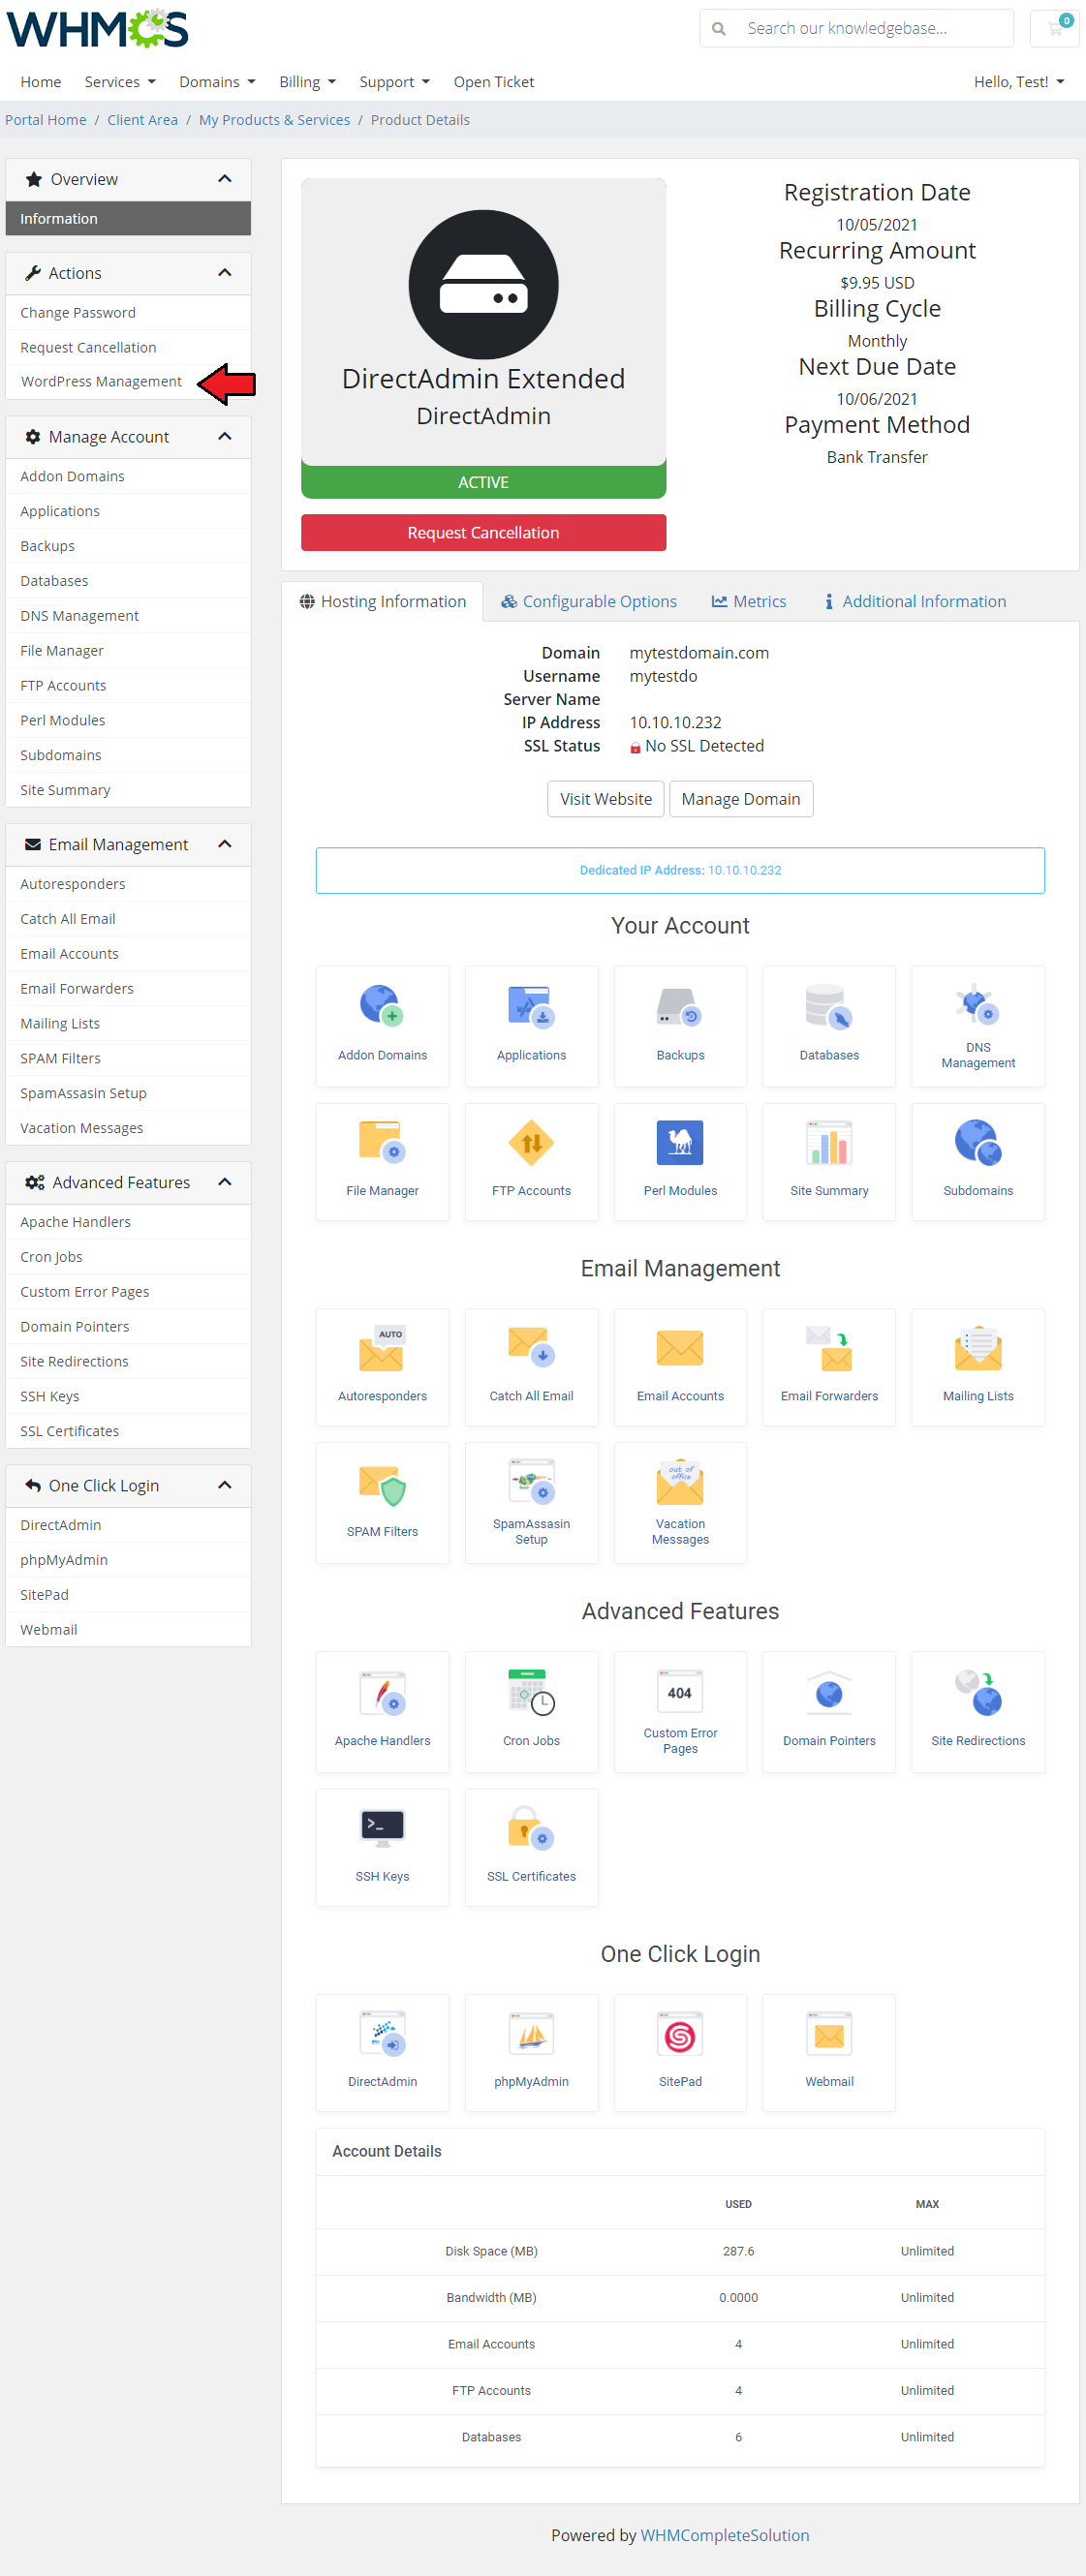
| Now that you already have the module configured, you may see the process of adding and managing the WordPress installations by your clients. In the client area, find and choose your product with WordPress management support and then move directly to the relative section. |
|
WordPress Installations
| Extended view, toggled by the admin in the module addon, read more here.
At the top of the page, you will find all WordPress installations located in dedicated segments. Every installation has its own section with screen grabs, installation details and instant access to action tools. |
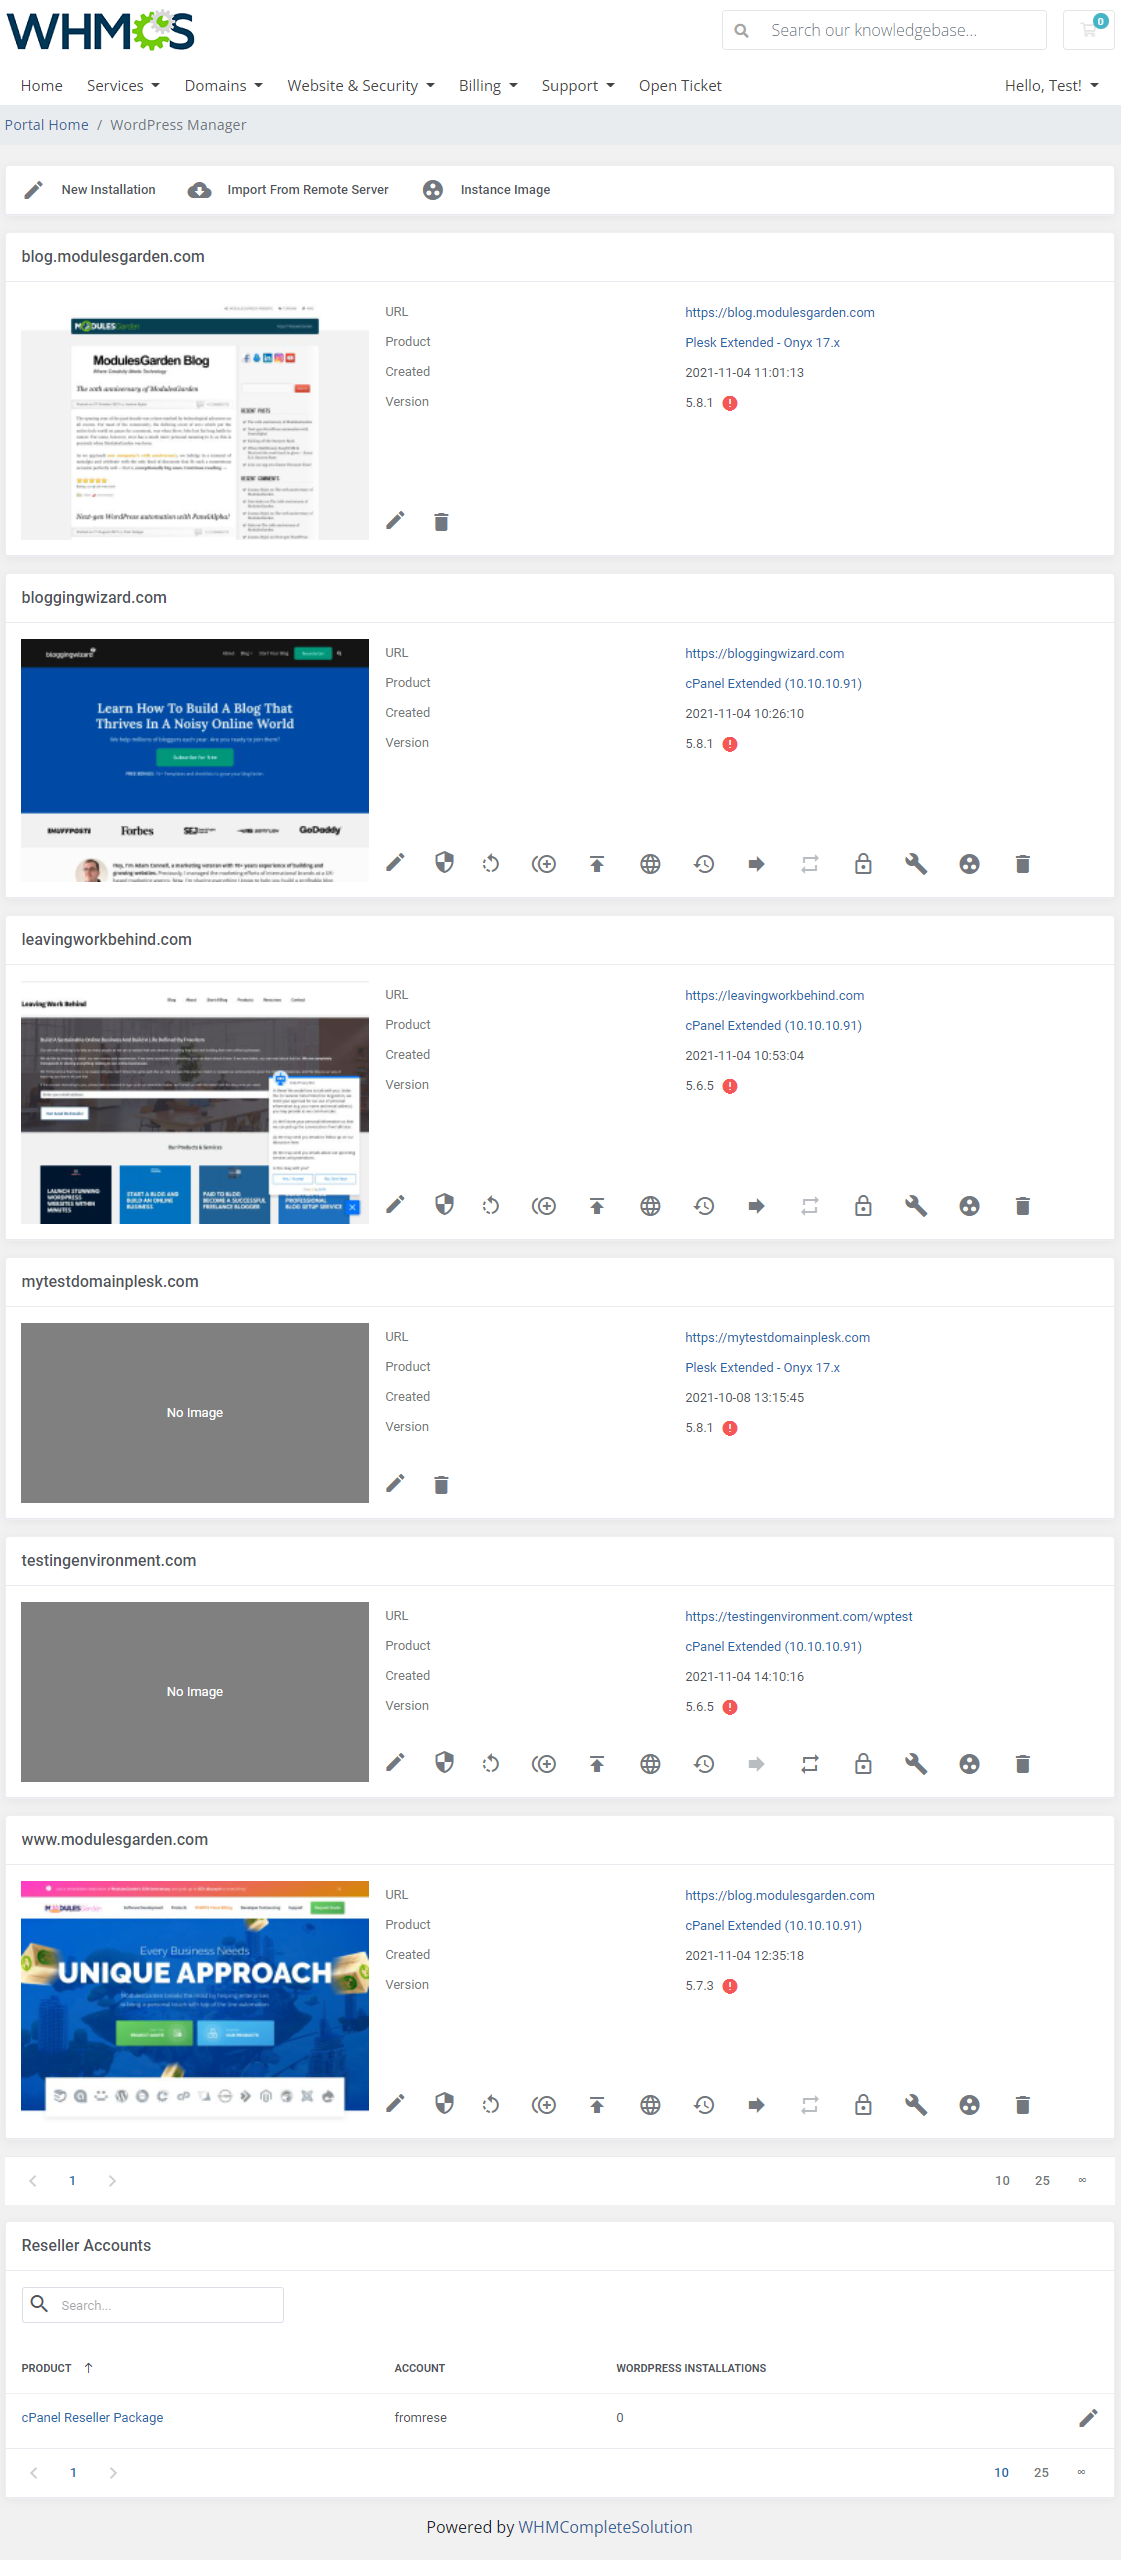
|
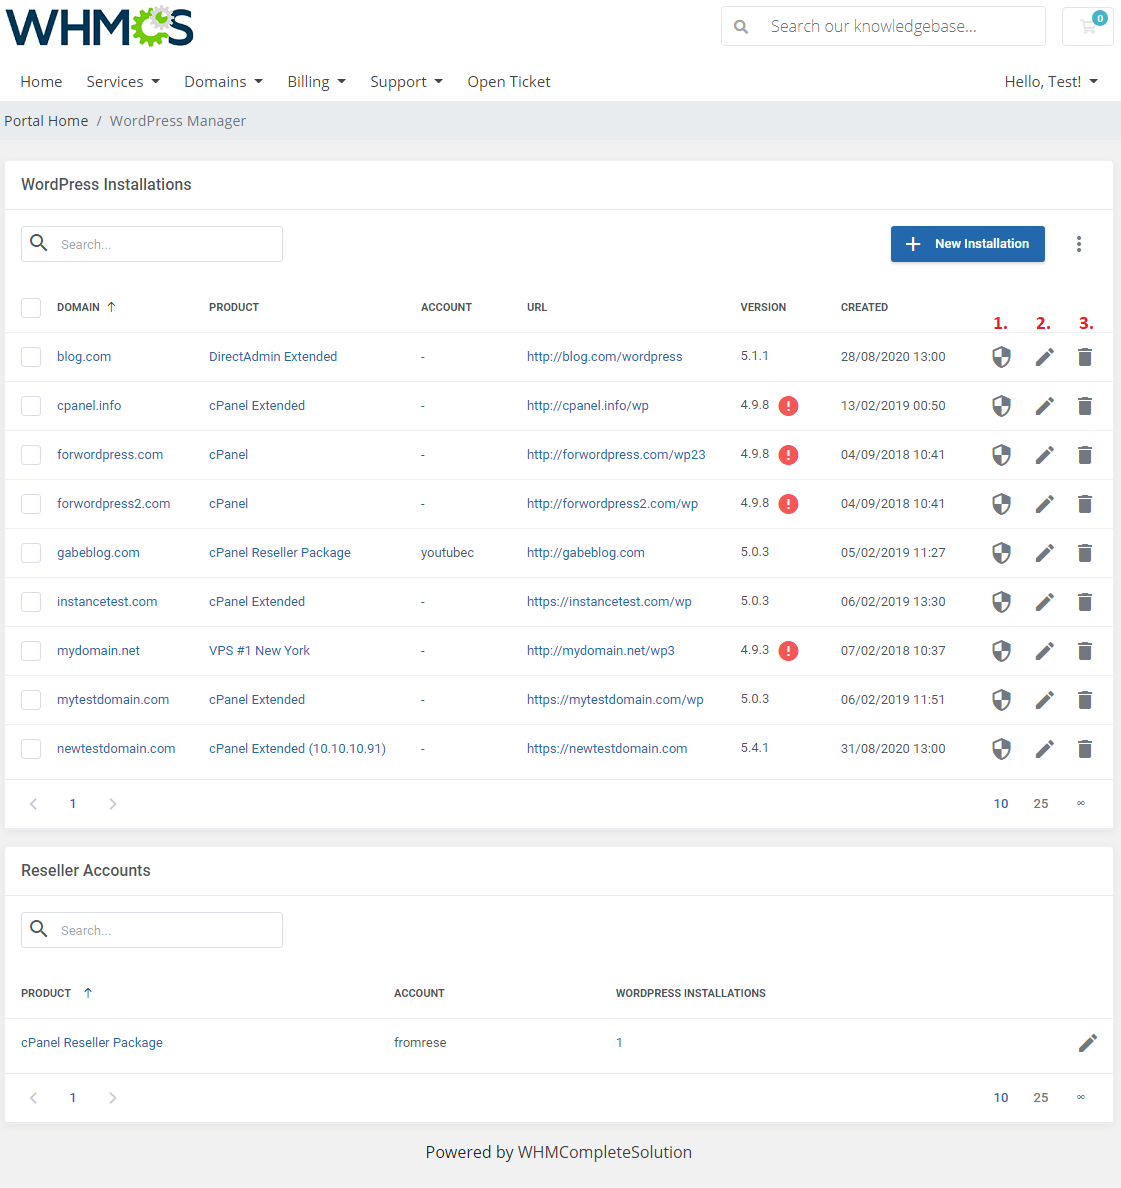
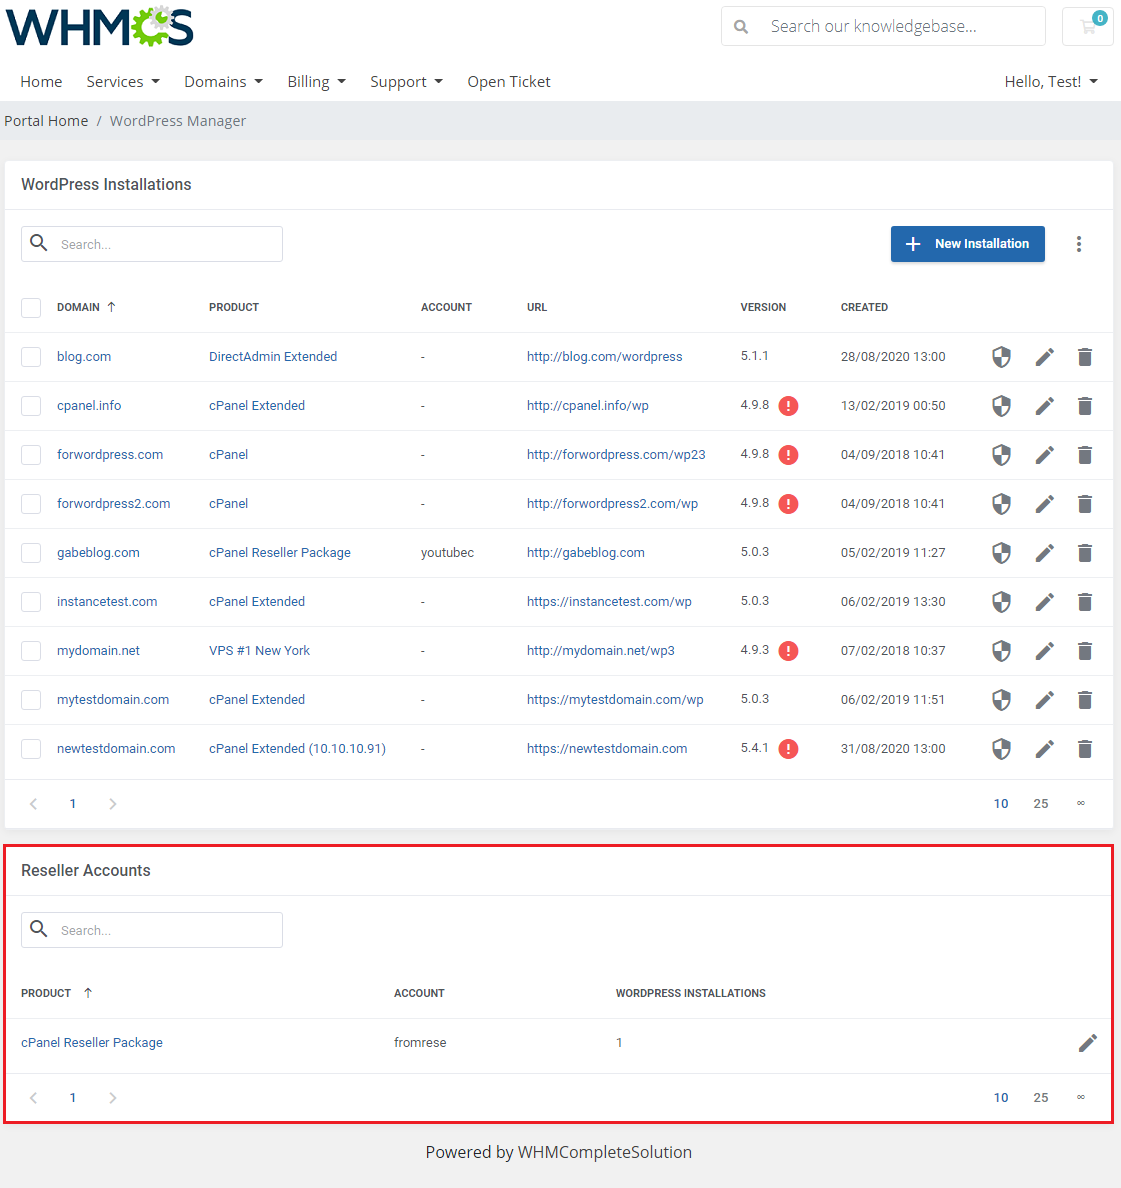
| The standard view of the WordPress Management page includes the very same information as the extended view, yet they are placed in a simple list form. Underneath the list, there is also a section dedicated to 'Reseller Accounts'. The former contains a list with basic information regarding every installation, including the domain, related product, URL, etc. |
|
Use action buttons marked on the screen to perform actions on a single installation:
Additional actions include:
|

|
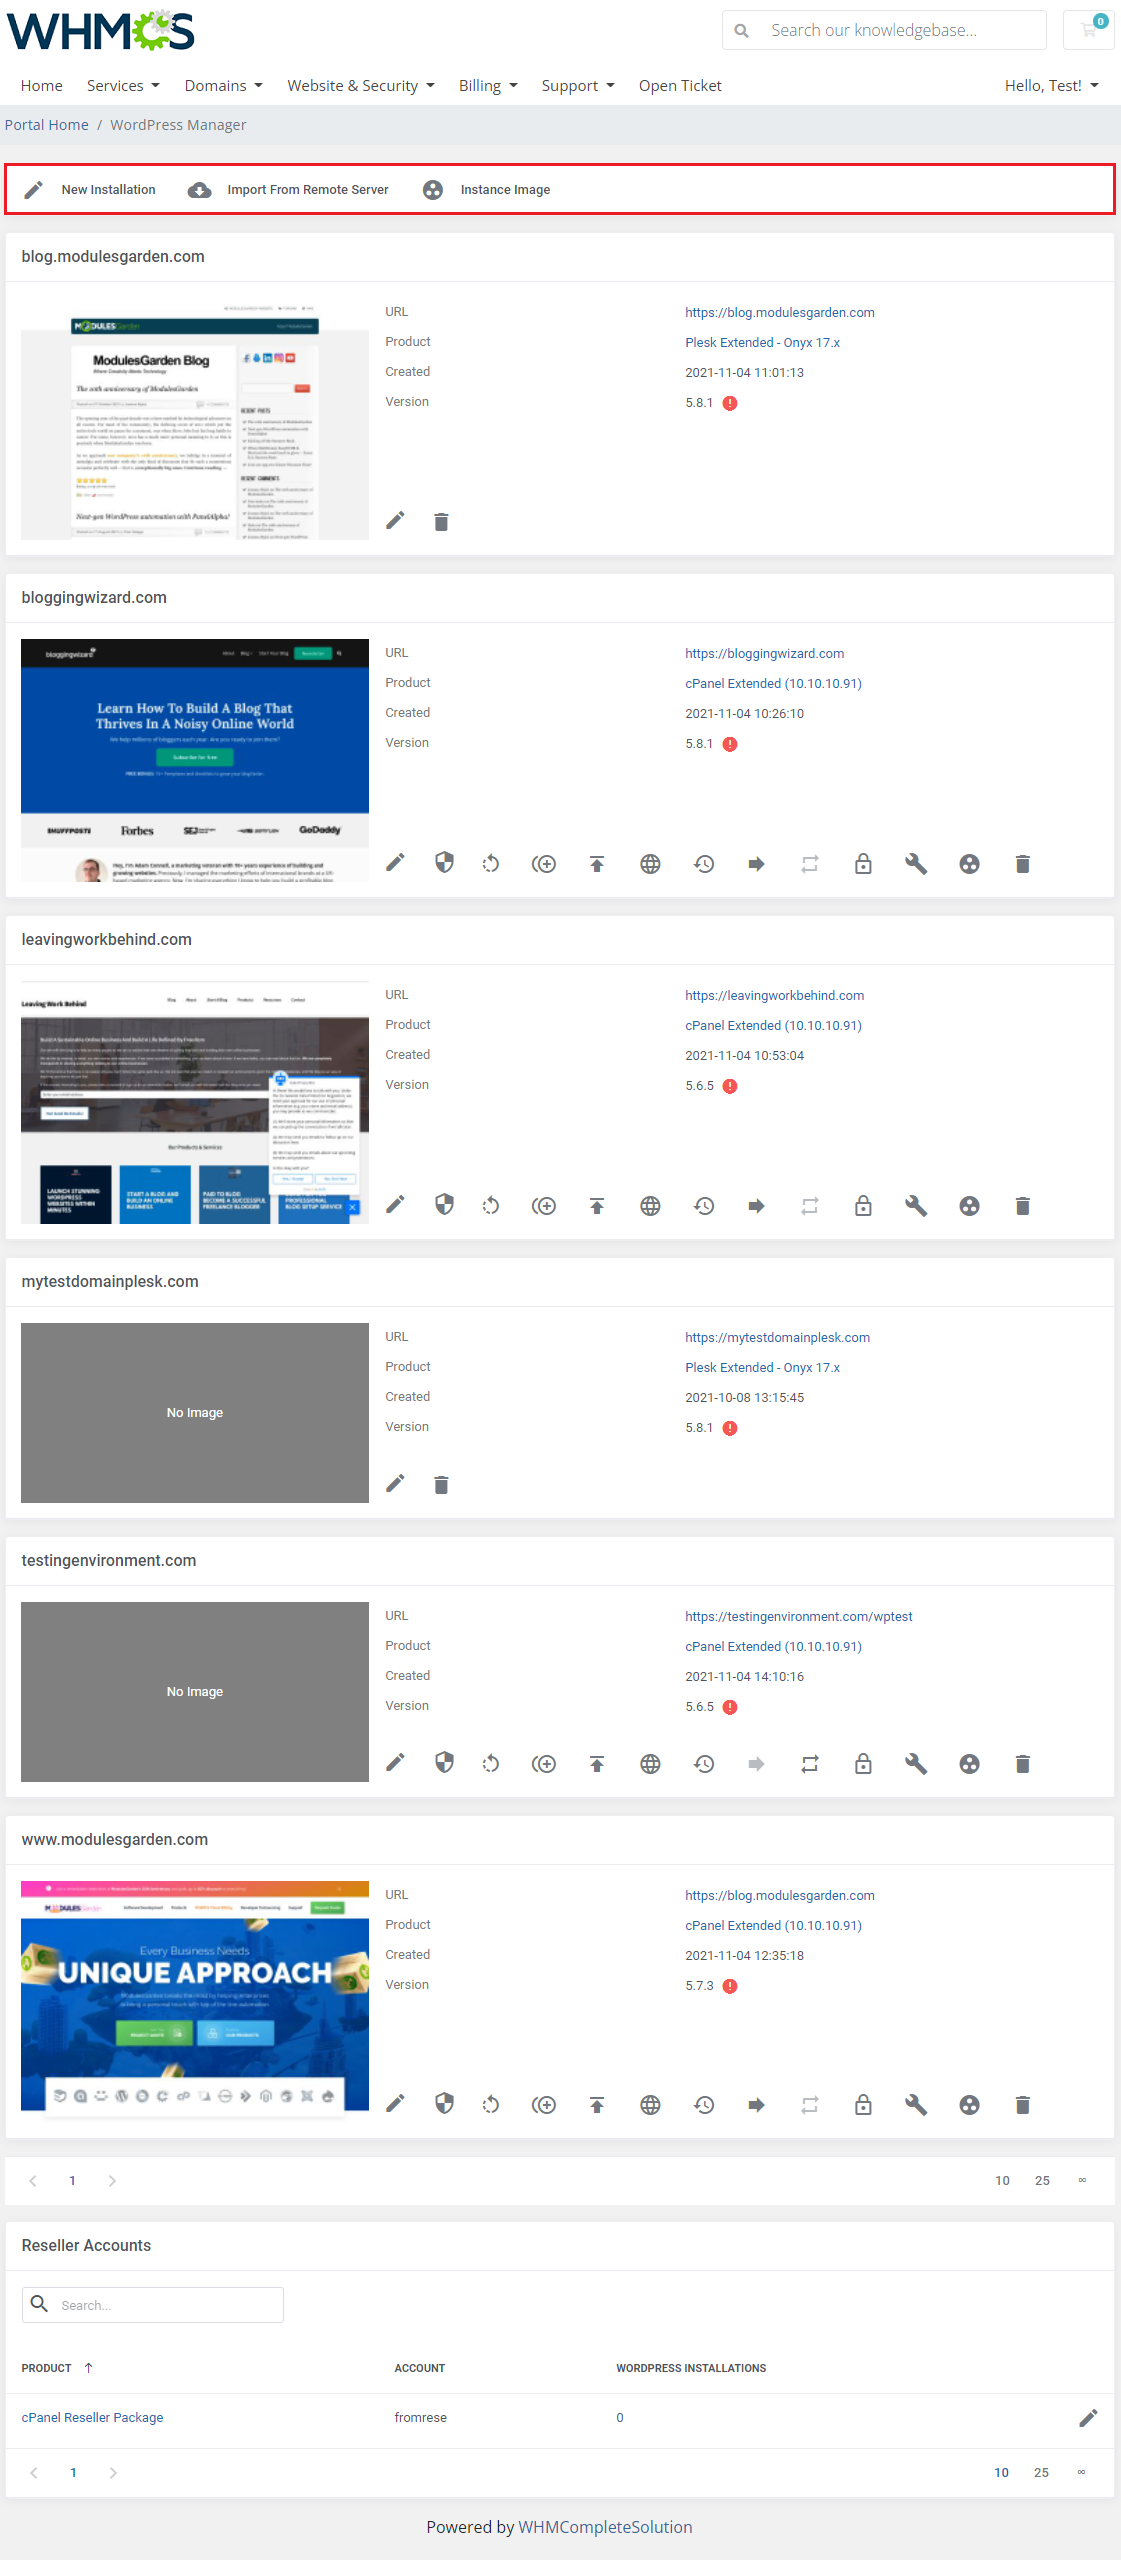
Among additional actions you will find the options to:
|
|
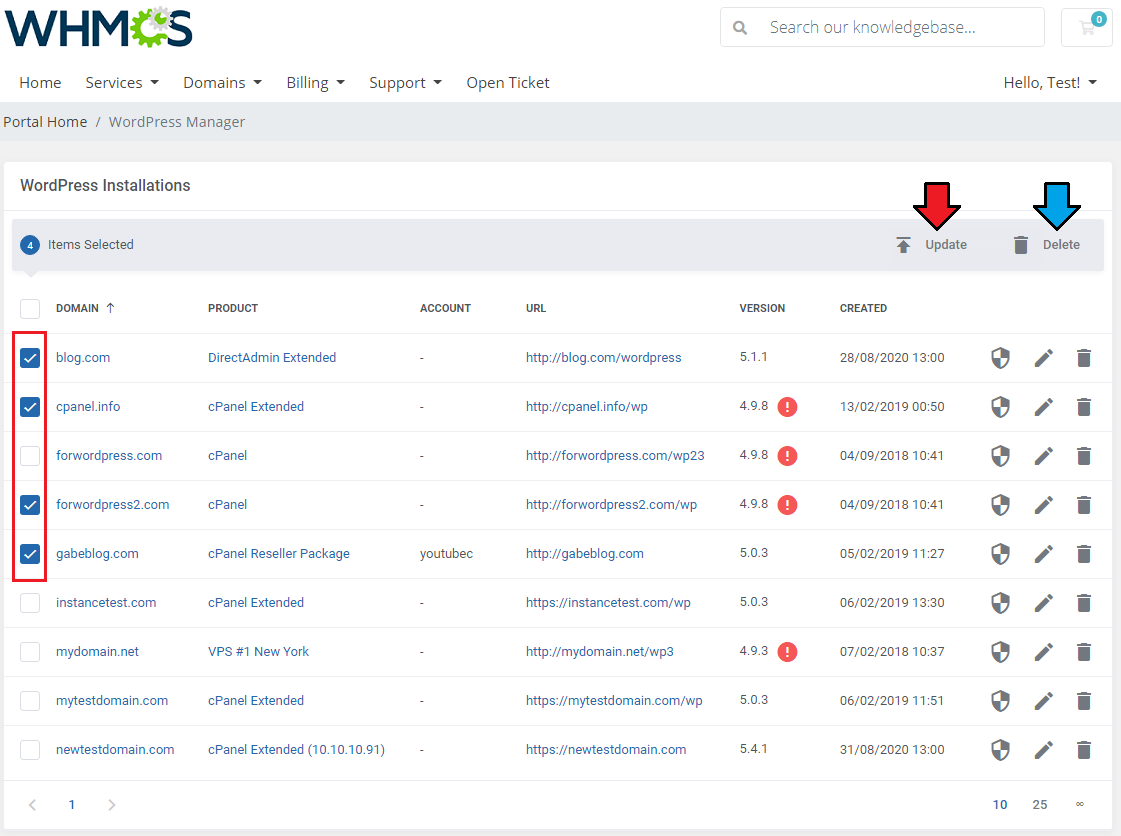
| You may also delete or update multiple WordPress instances to the newest version at once, use mass actions to do so (standard view only). |
|
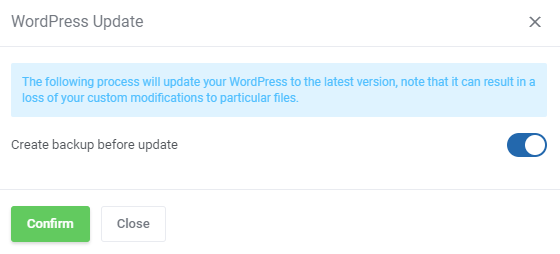
| If you wish, you may create a backup of the instances before processing the update. |
|
New Installations
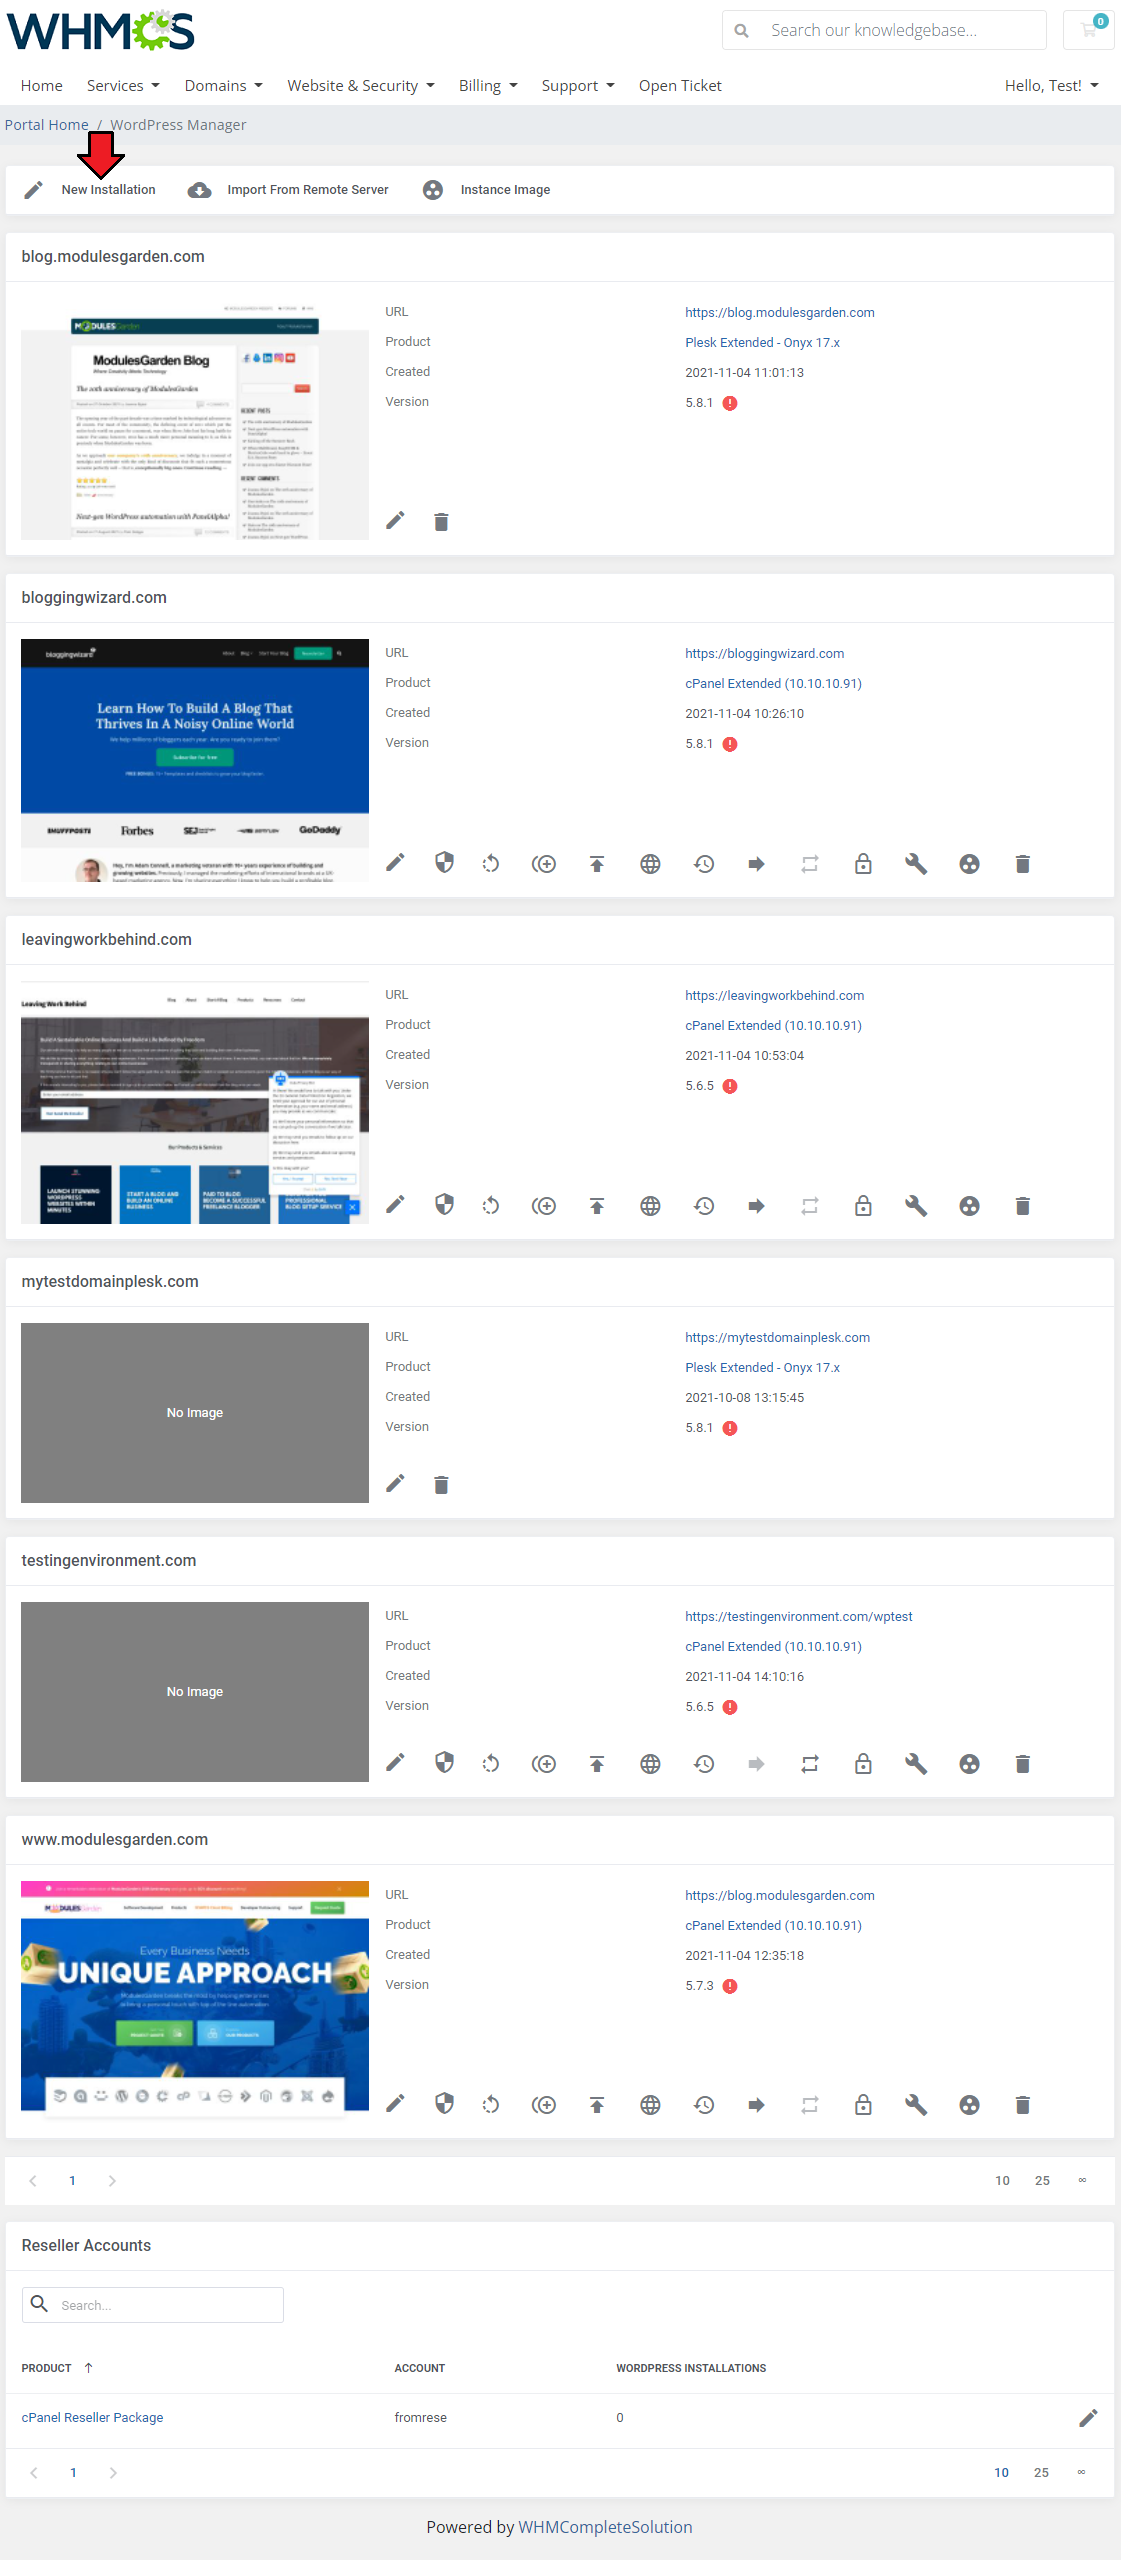
| As mentioned above, there are three ways to create a new WordPress Installation. The first basic way is to simply install a completely new and clean instance of WordPress. Press the button 'New Installation' marked on the screen below and read the instructions to see how to install a pure new instance. |
|
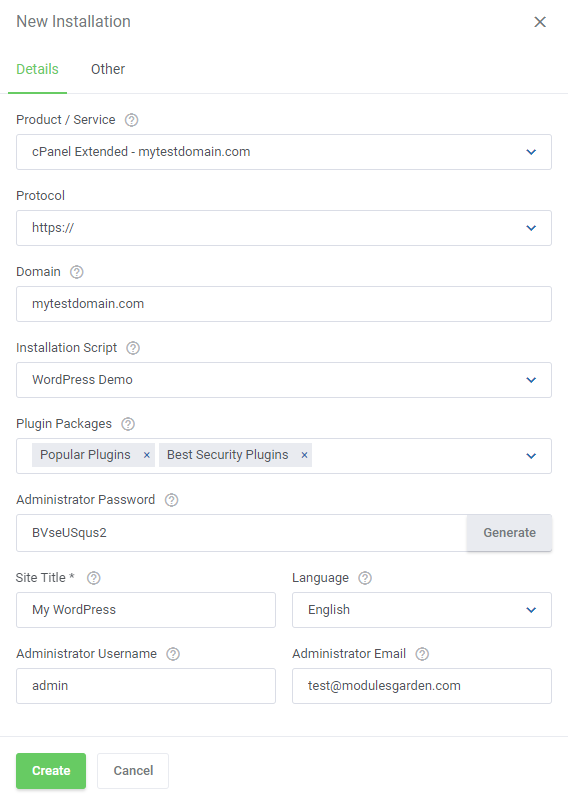
| A new window with two tabs will open. In the first Details tab, fill in the following fields:
|
|
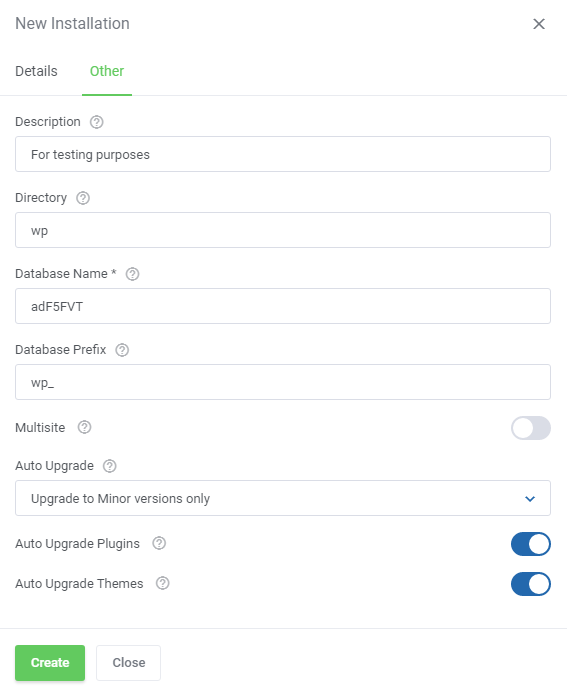
Complete the configuration by switching to the Other tab and enter the remaining fields (optional):
If you have entered all the data correctly, you can now press the 'Create' button to complete the installation. |
|
Import From Remote Server
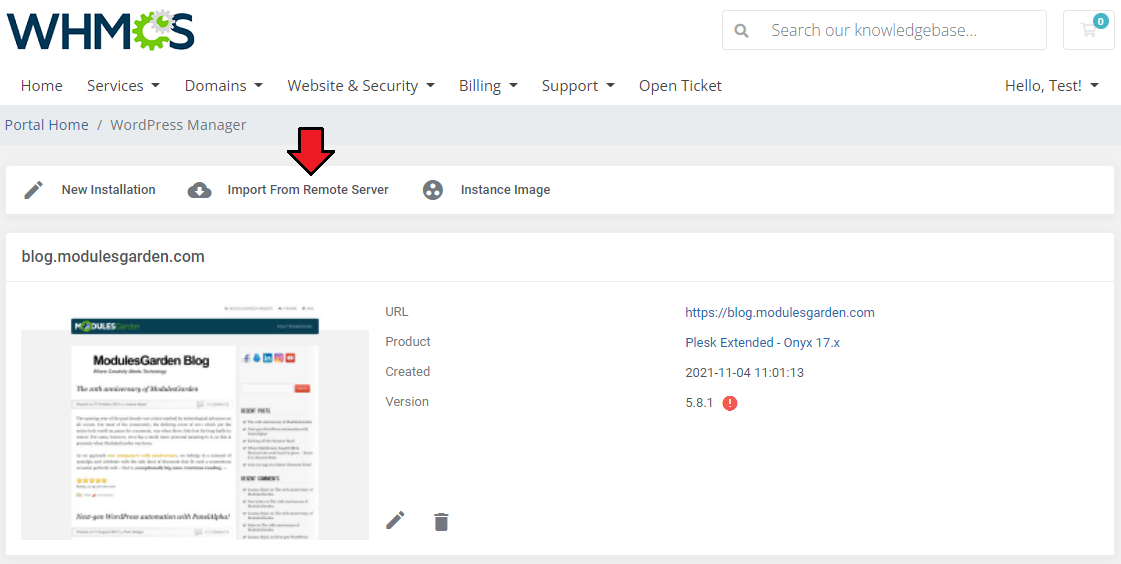
| The second way to add a new installation is by importing an existing installation from a remote FTP server. Press the additional actions button to find the redirection. |
|
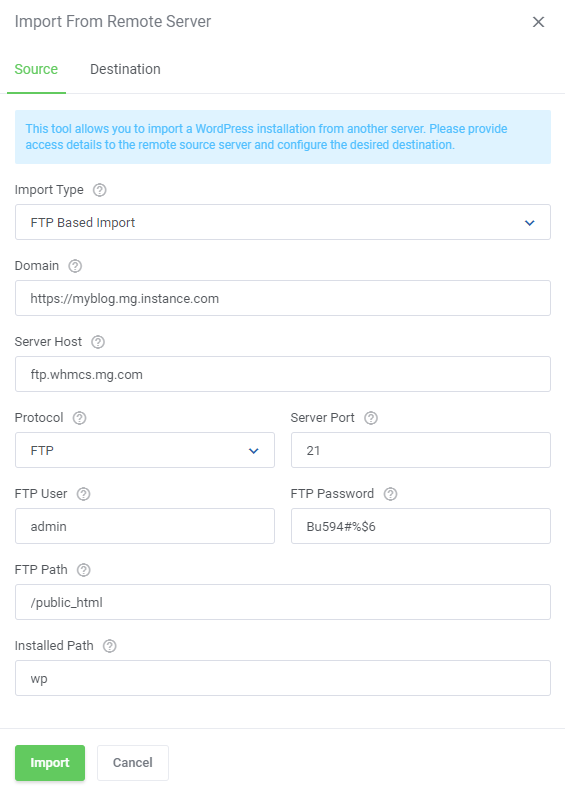
First of all, fill out the data on the source server:
For FTP Based Import provide:
|
|
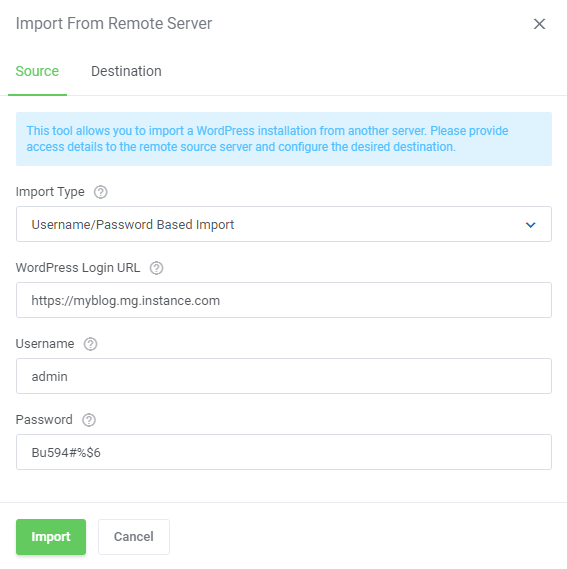
For Username/Password Based Import provide:
|
|
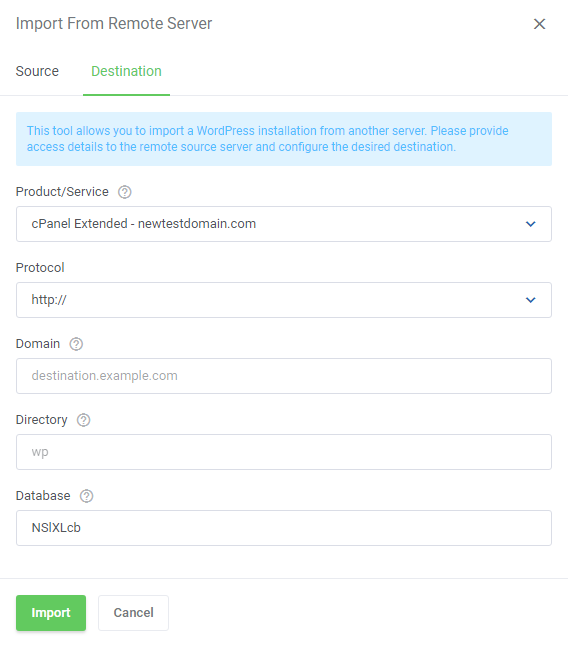
Then move to the other tab, to provide any data on the destination.
Press the 'Import' button to finalize the process. |
|
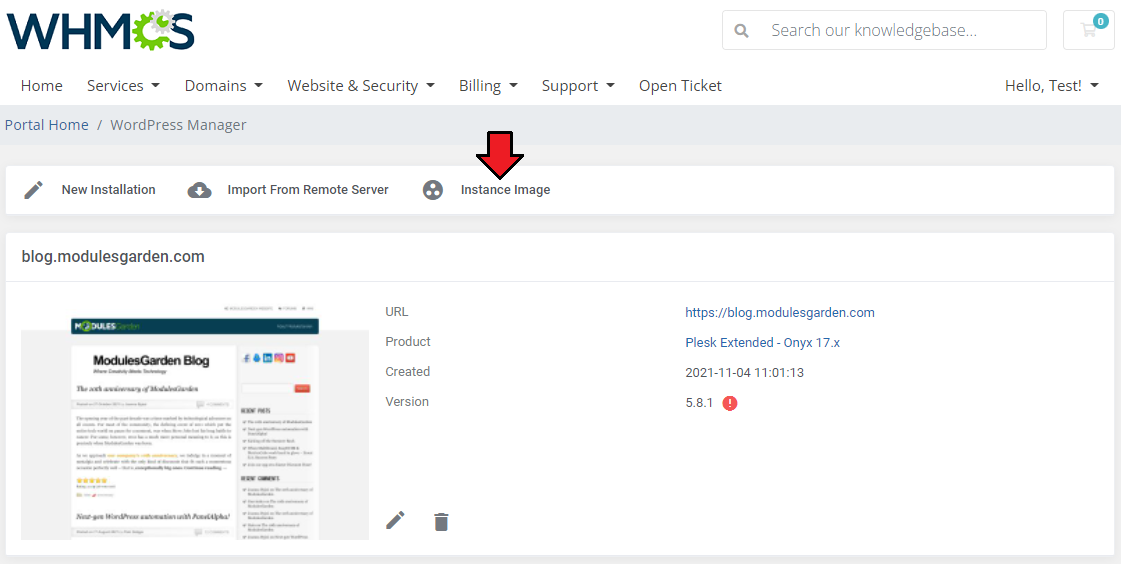
Instance Image
| It is also possible to use an existing instance image. |
|
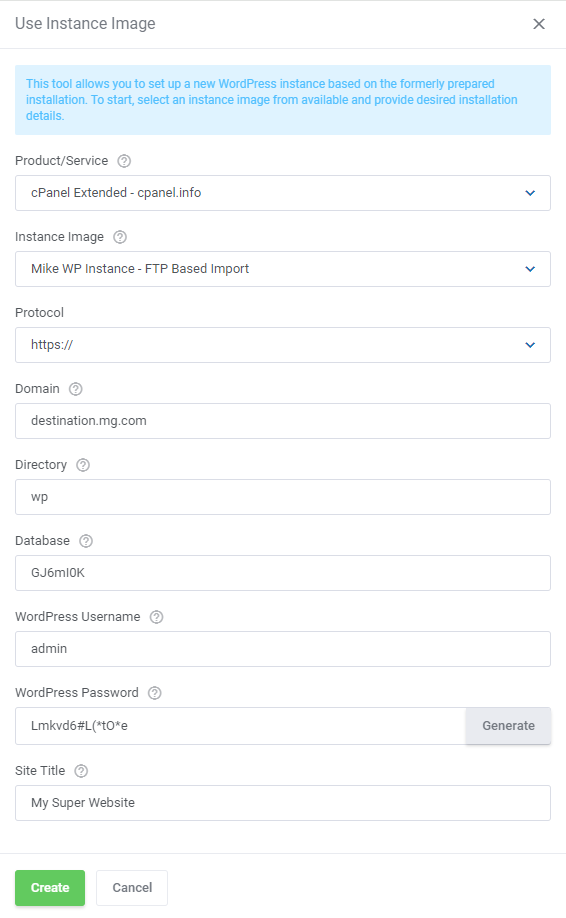
Provide the below enumerated and described details, then press 'Create' to complete:
Note: the process may take from a few up to a dozen or so minutes for the instance to appear on the list, depending on the instance size or complexity. |
|
Installation Management
| Once you have successfully created a new installation, you can edit its advanced options or simply remove it in case you no longer need it. Let us view the management options and available actions now. Note: Please be aware that deleting installations "(3)" is not possible from this section for the WP Toolkit for Plesk API. To delete an instance, you need to log into the Plesk panel. |

|
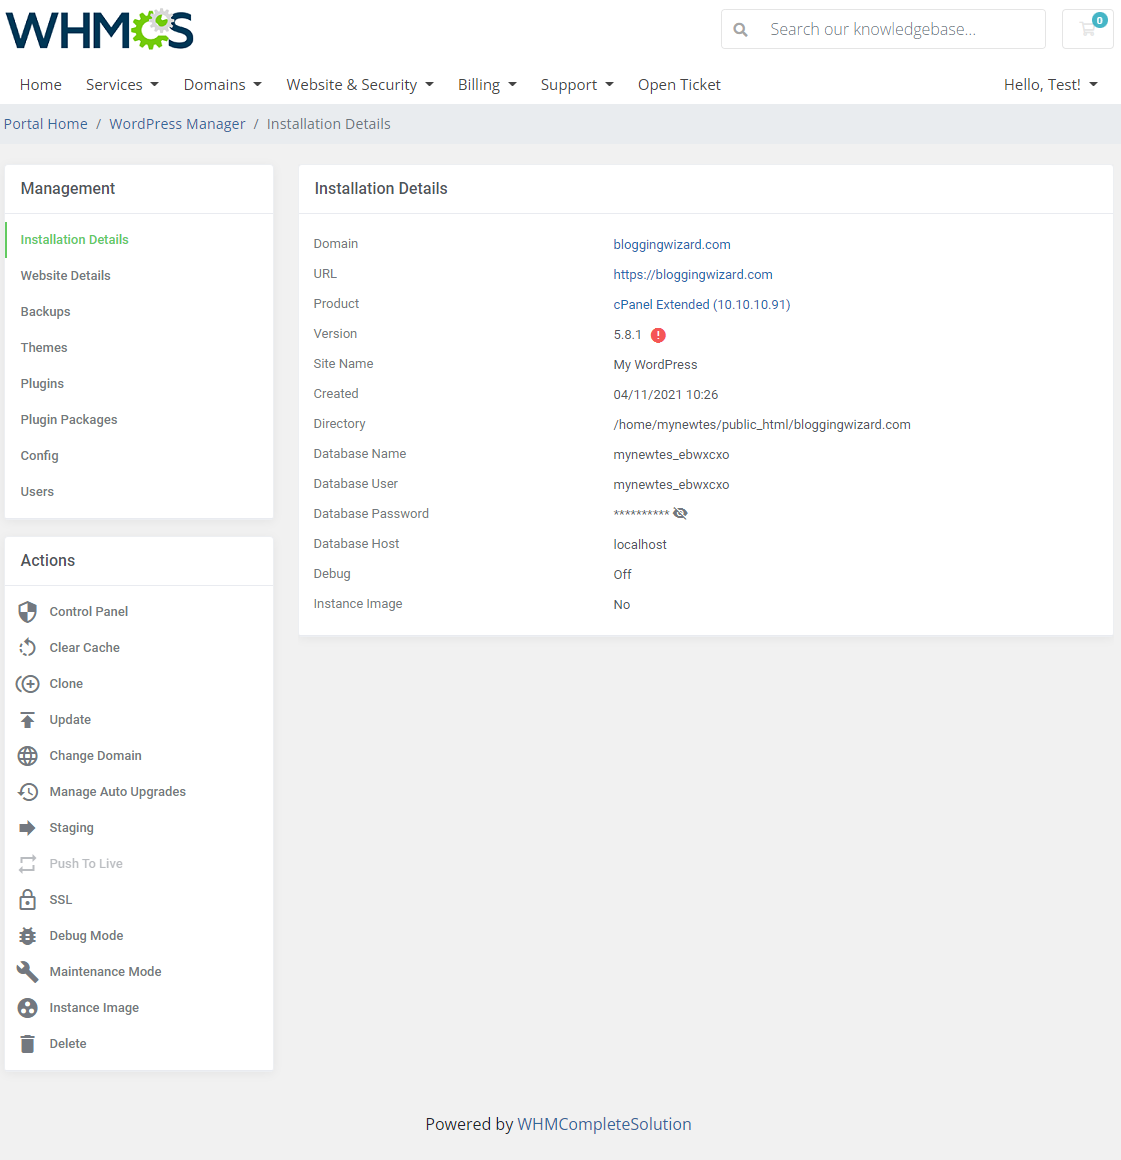
Installation Details
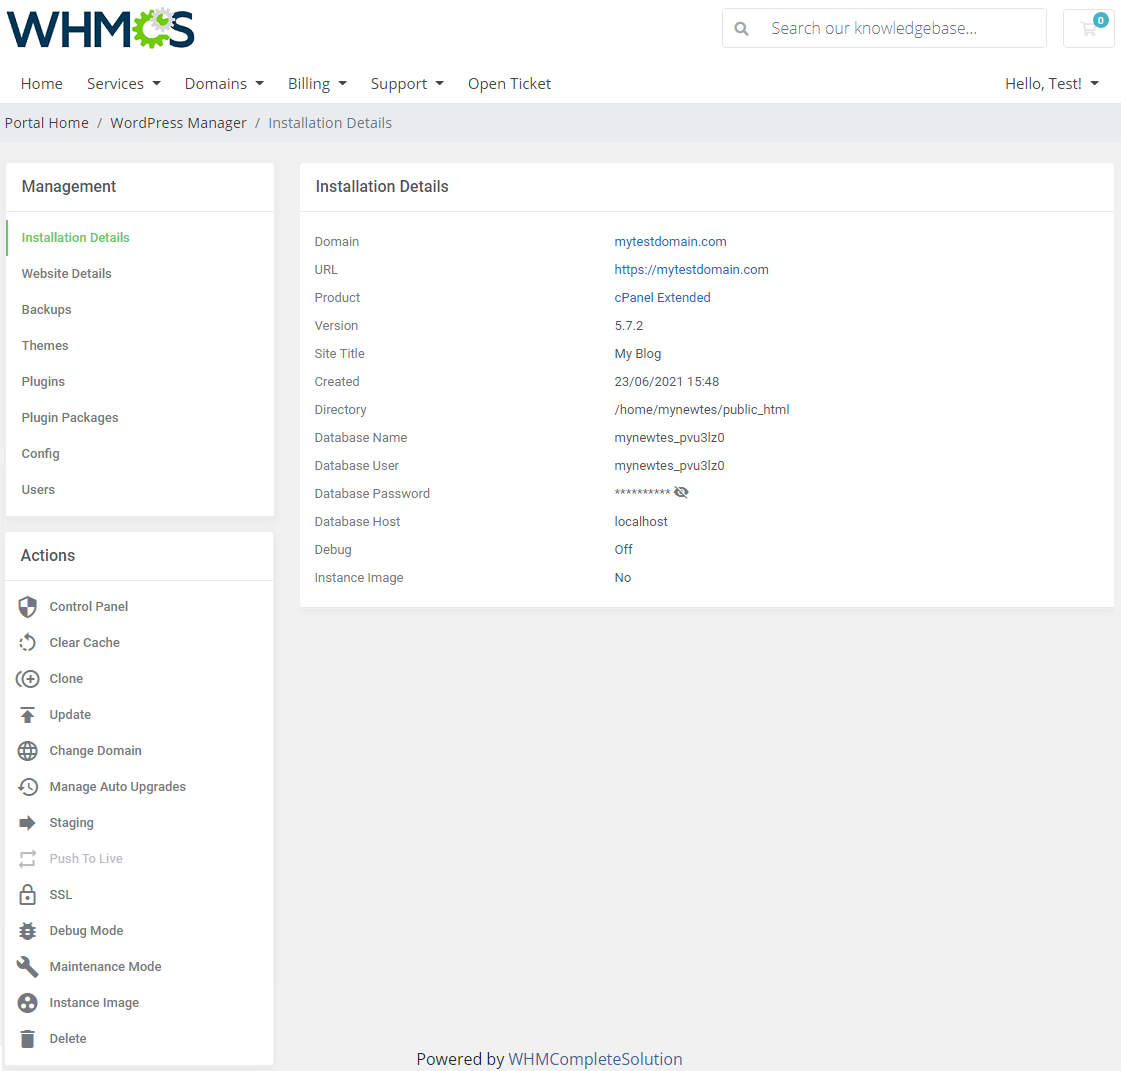
| On the very first page, when you enter the edit section, there is an exemplary configuration of your installation in the 'Management' section. You will find there all the basic information, such as domain and database details, available at hand. |
|
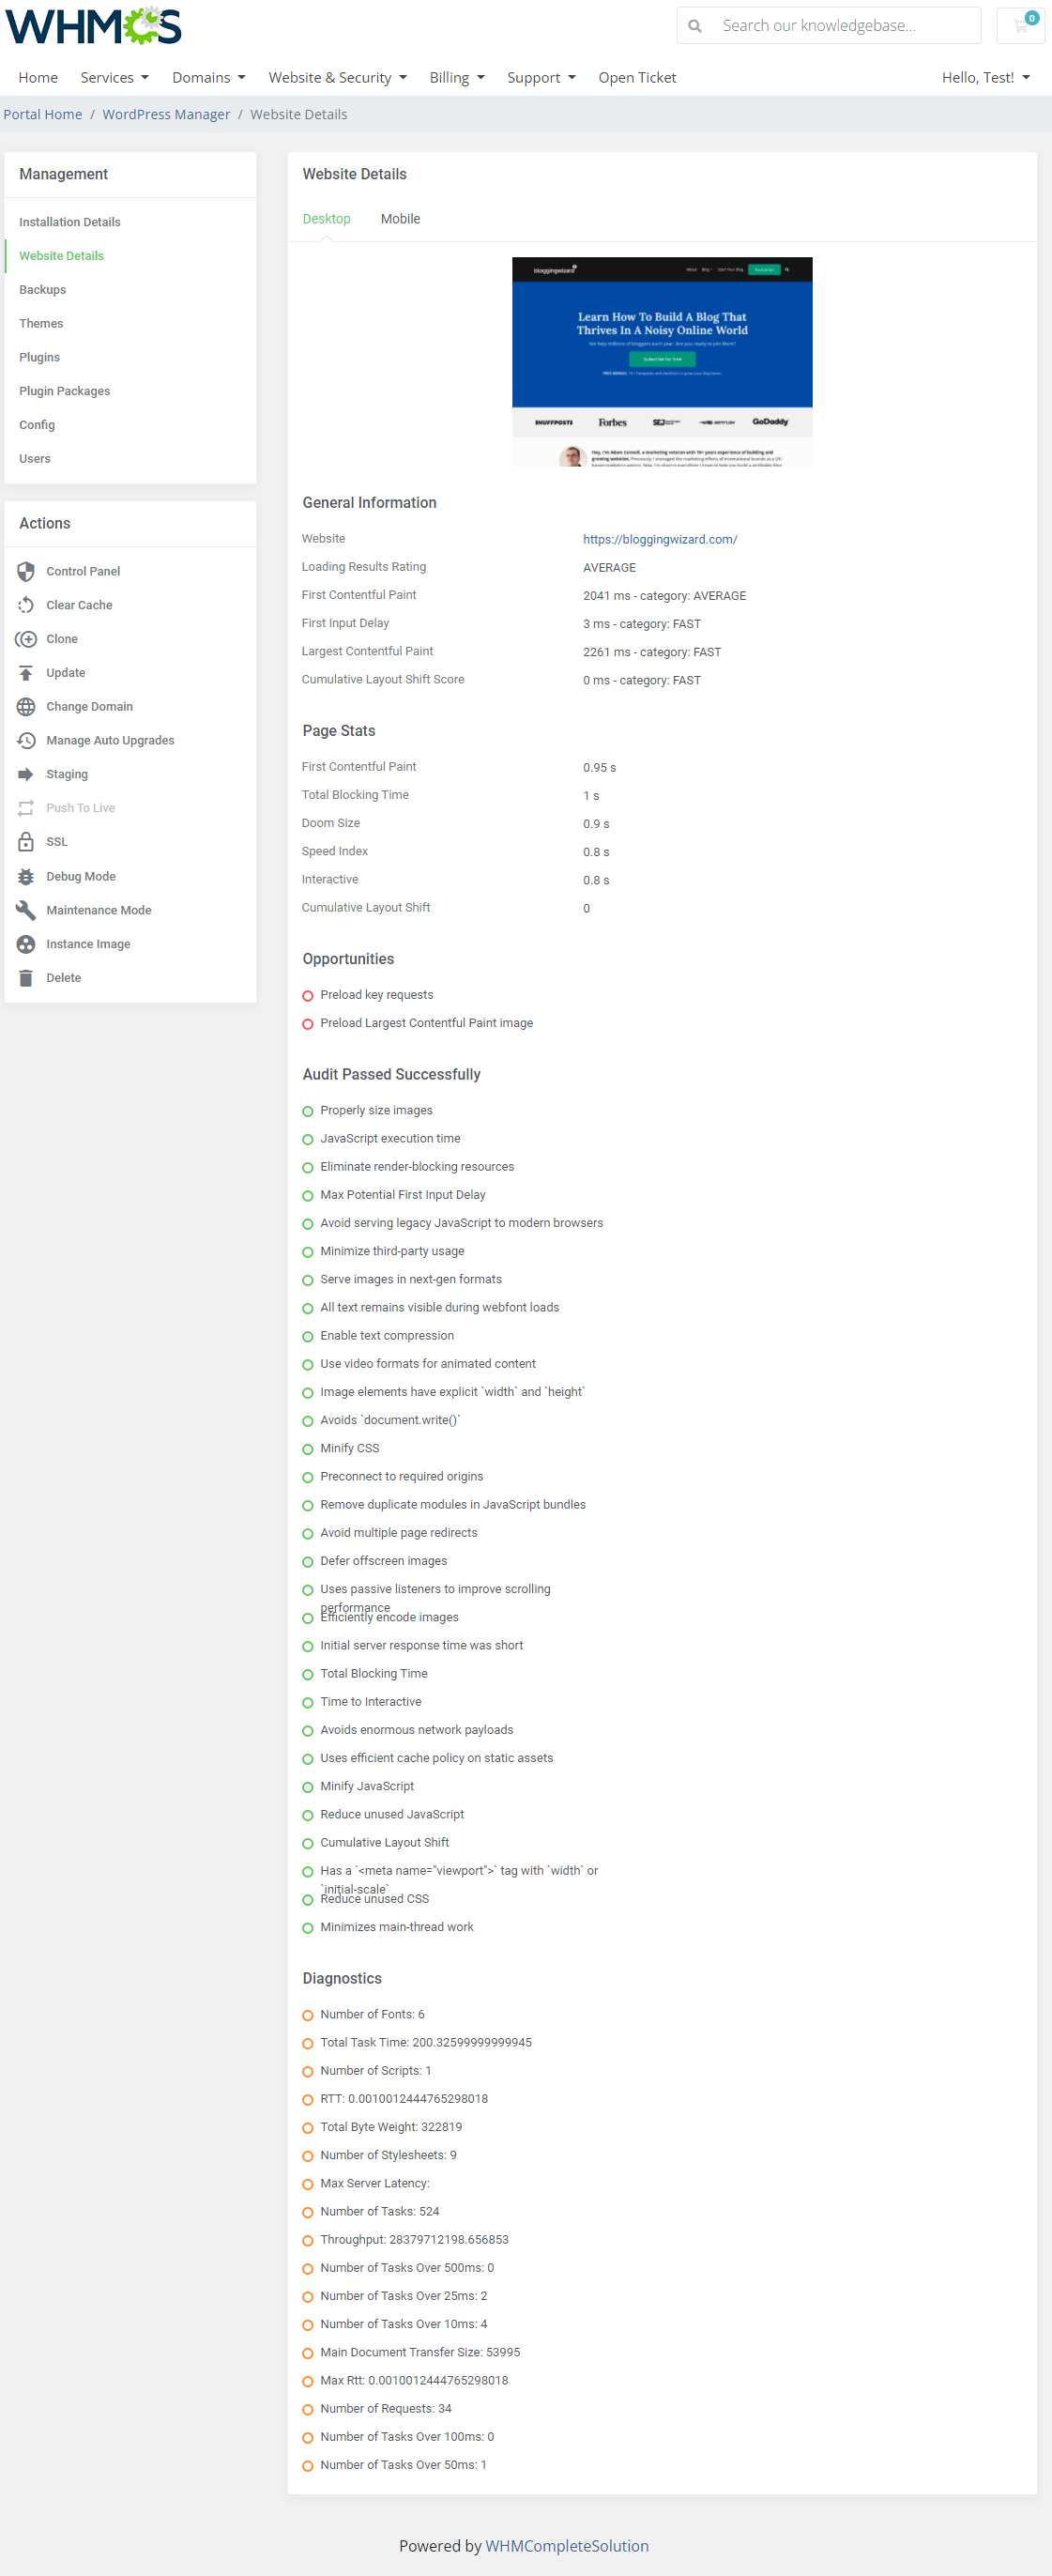
Website Details
| Desktop and mobile website details based on Google "PageSpeed Insights" statistics. This section requires to previously generate and provide the 'Google API Token'. Follow these instructions to learn how to do that. |
|
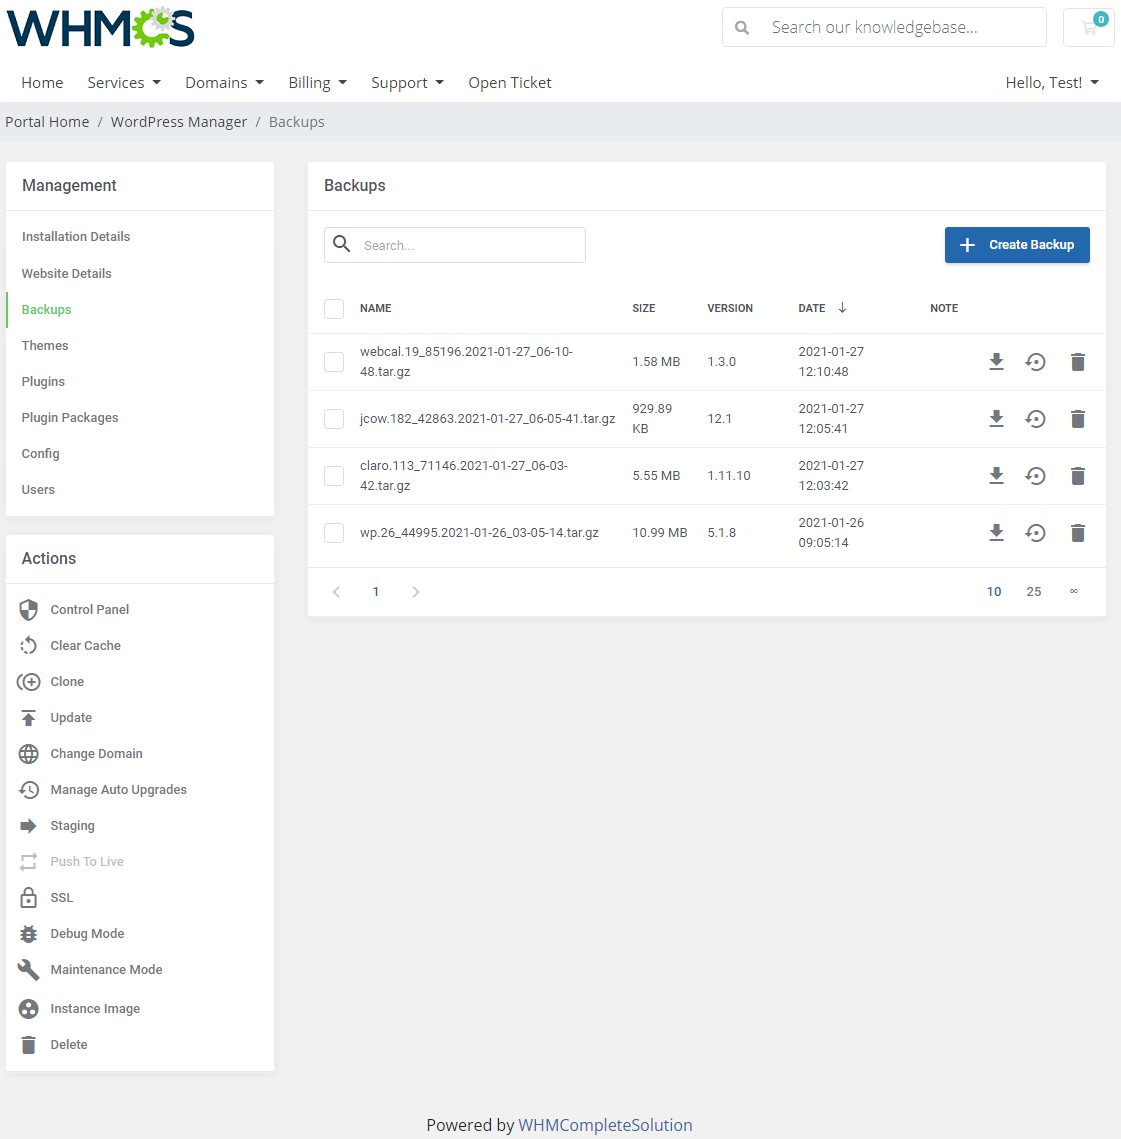
Backups
| As the name suggests, this section provides you with an ability to create backups. You are allowed to download, restore and delete a particular backup. |
|
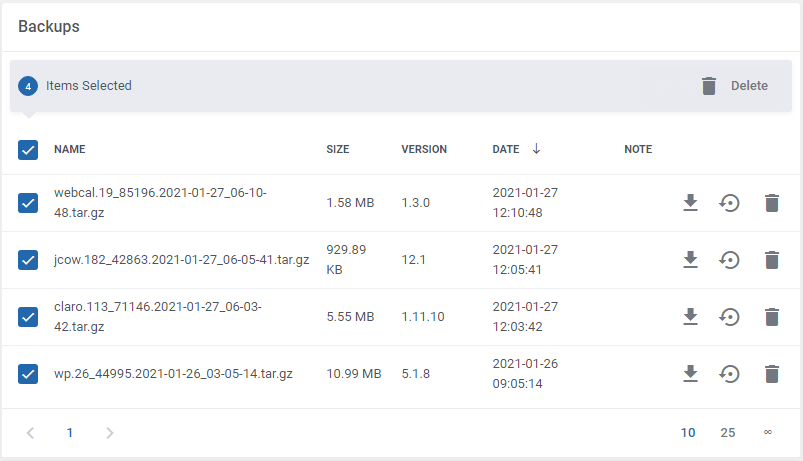
| Surely you can delete multiple backups at once. Take a look at the screenshot below. |
|
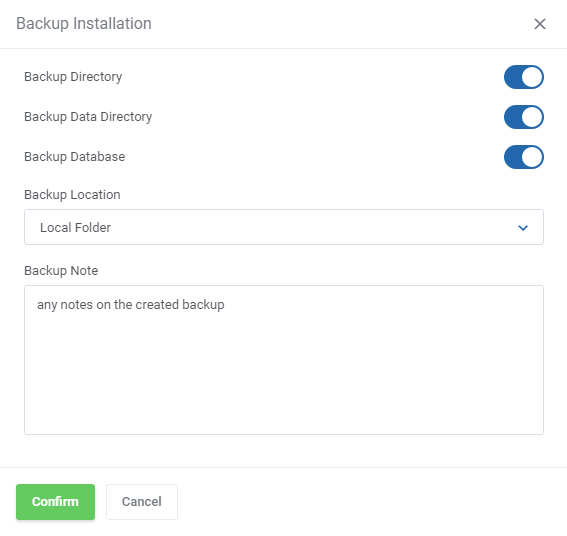
| When creating a backup installation, decide whether to the backup directory only, the data directory, or the database. Select location and then confirm the action. Note: Keep in mind that creating a backup might take a longer while. Backup will appear on the list when it is ready. |
|
Themes
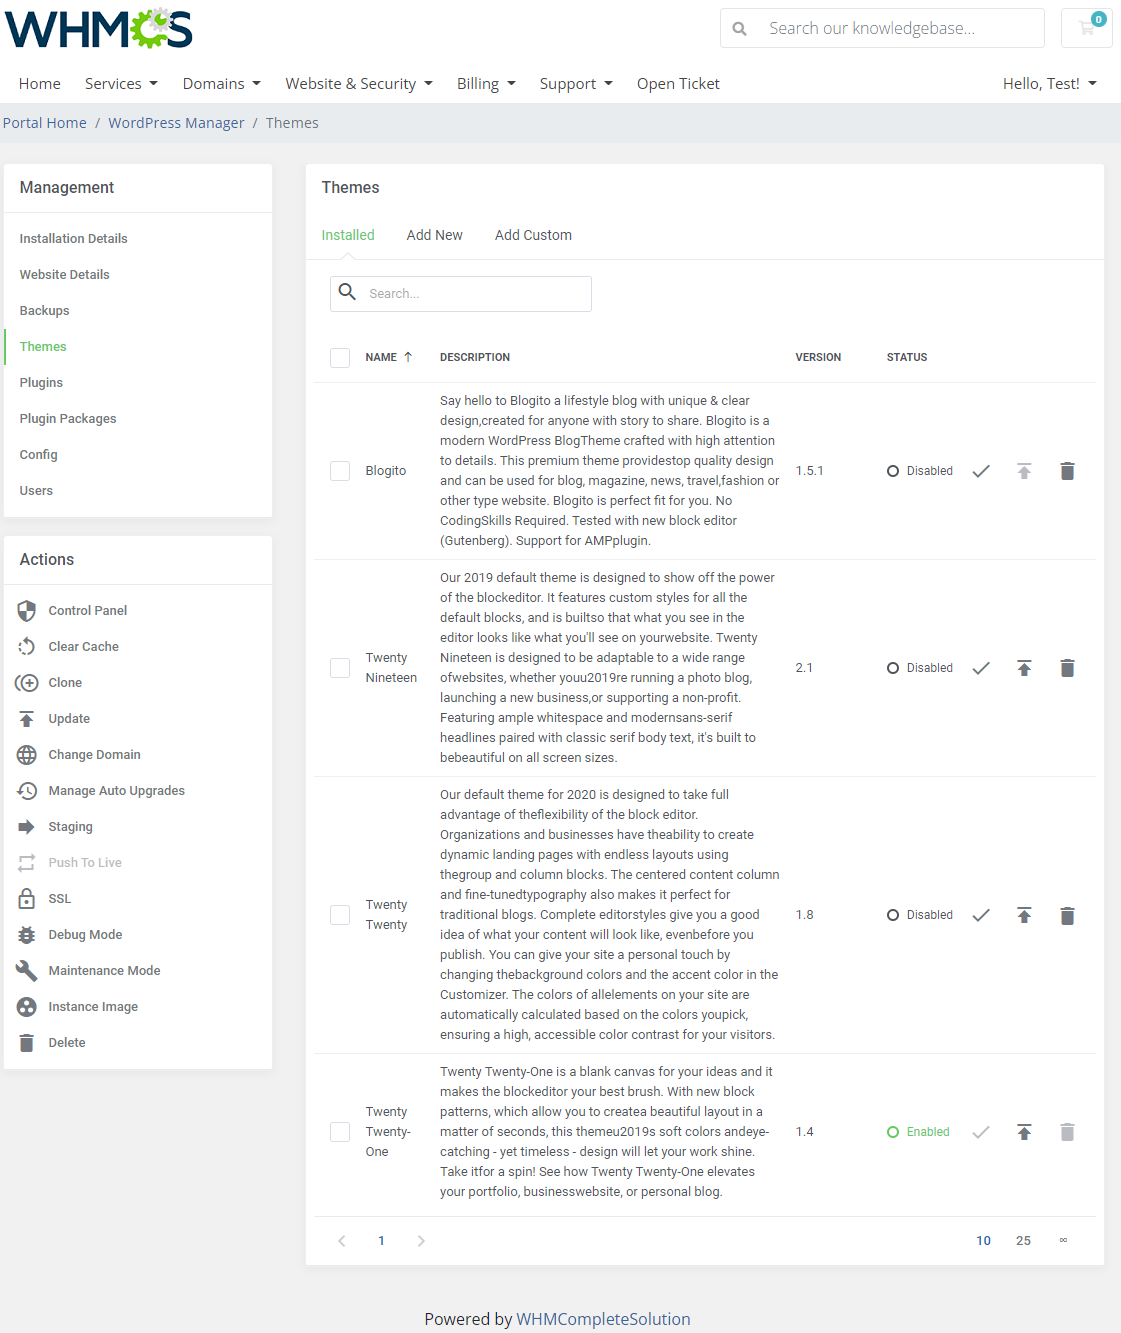
| Here you are enabled to activate, disable, update, and delete the existing theme. Add new themes to your WordPress installation in the 'Add New' tab. |
|
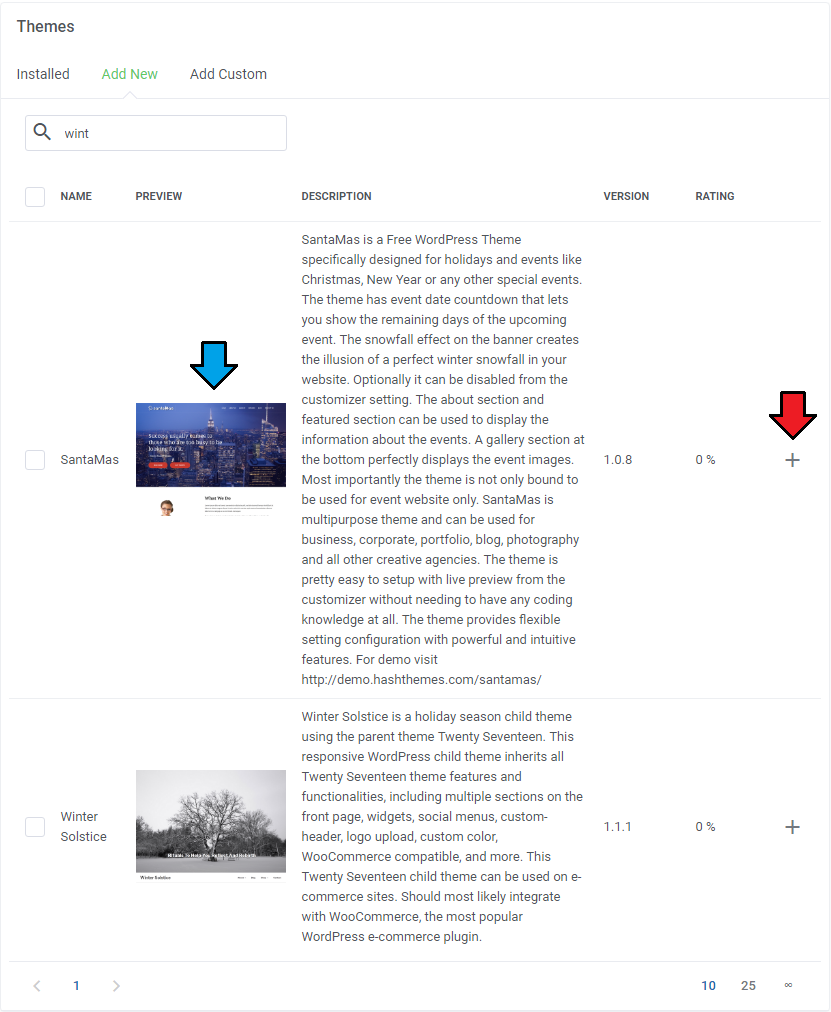
| In order to add a new theme, start typing in the desired theme's name in the search box, and press enter to see the actual results. You may press the theme thumbnail to preview the on wp-themes.com. Afterwards, press the icon marked on the screenshot below to continue. |
|
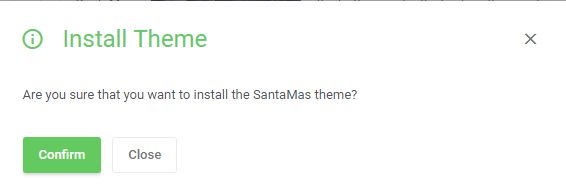
| Confirm the installation. |
|
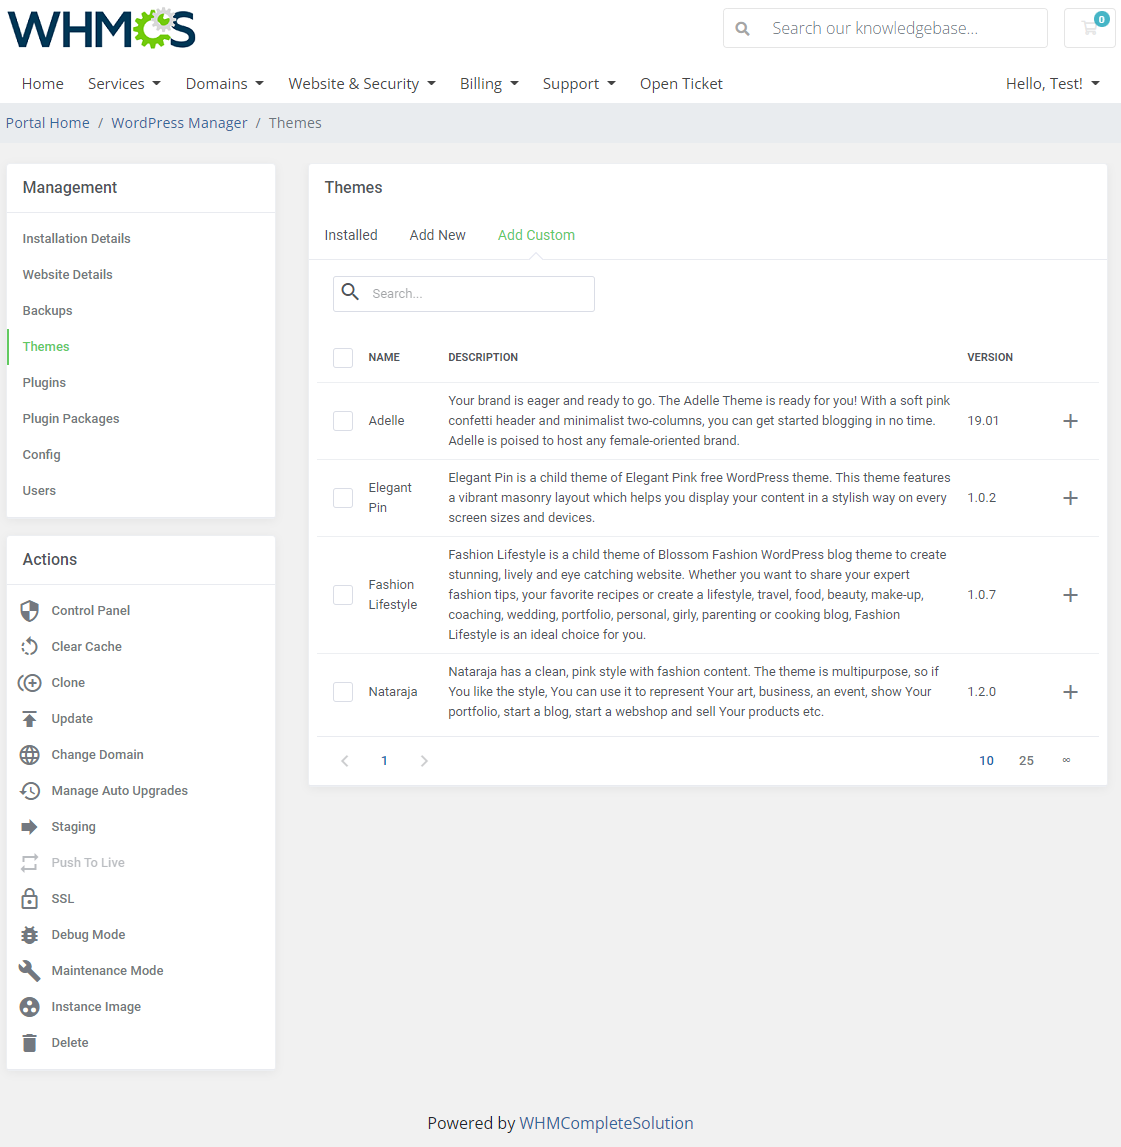
| If there are any 'Custom Themes' accessible for adding, they will be located here. |
|
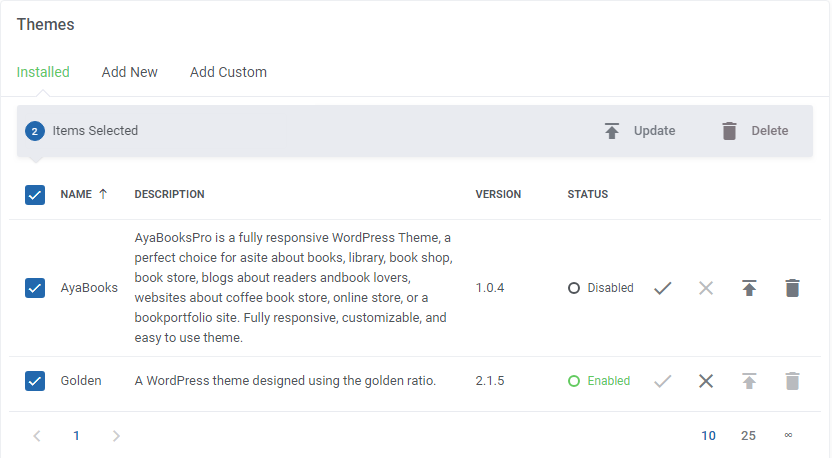
| Use 'Mass Action' buttons to update or delete numerous themes with a single click. |
|
Plugins
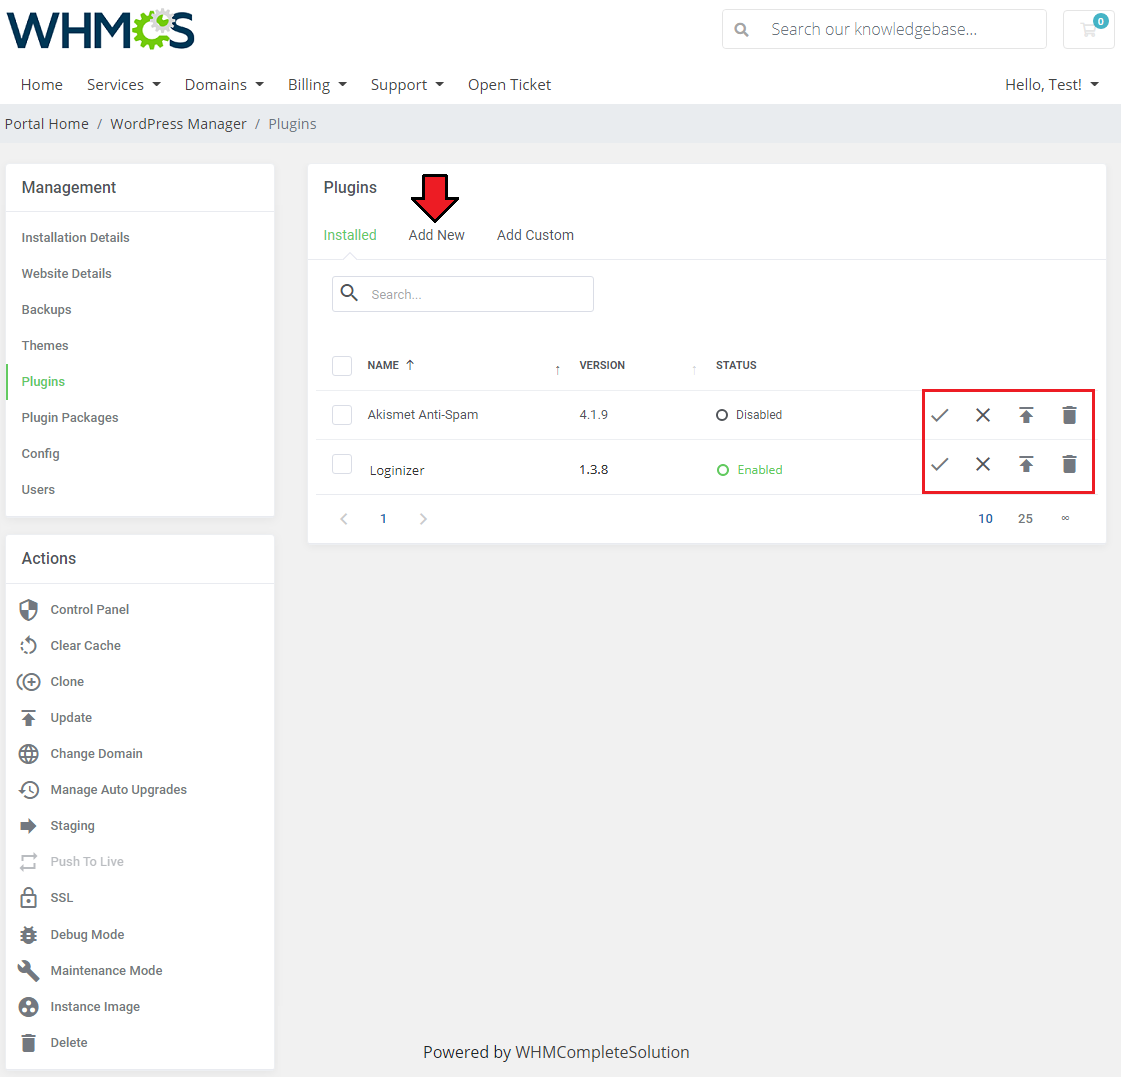
| Here you are enabled to activate, deactivate, delete or update the already existing plugins. You can also add new plugins to your WordPress installation in the 'Add New' tab. |
|
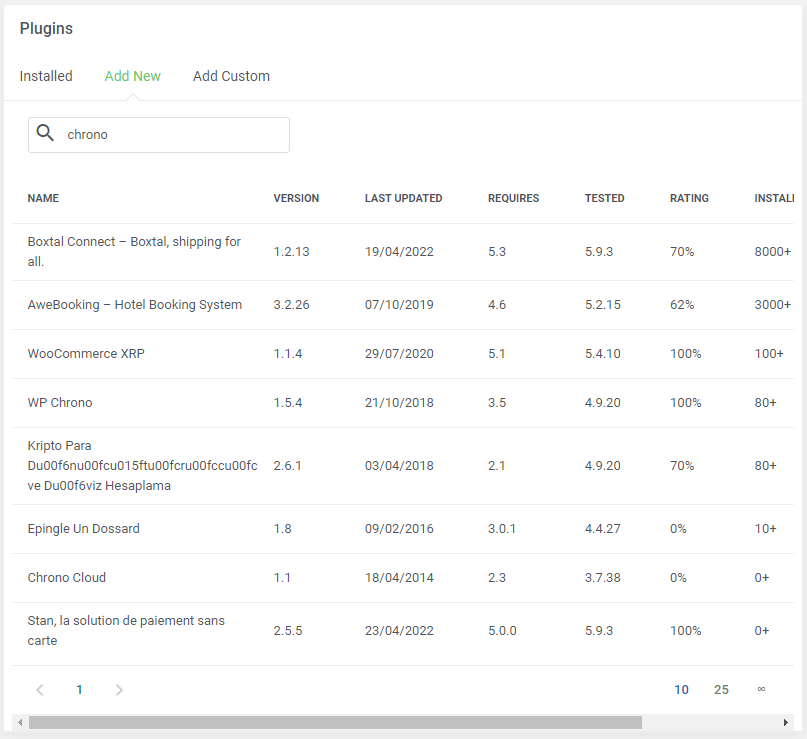
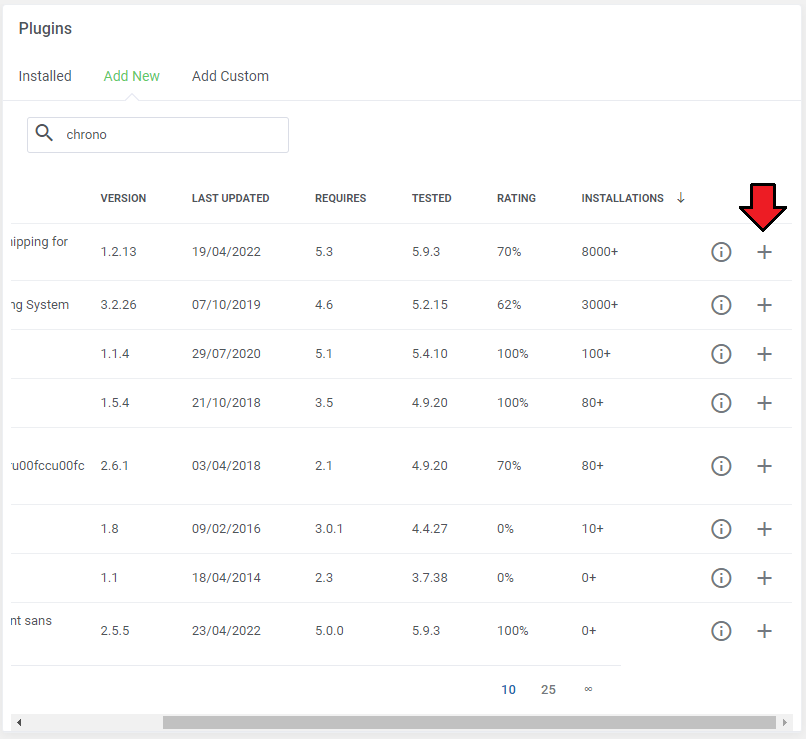
| To add a new plugin, you are required to type in at least the initial letters of the desired plugin's name into the search field to see the actual results. Afterwards, press the symbol marked on the screenshot below, and confirm your choice in the window that should be visible on your screen. |
|
|
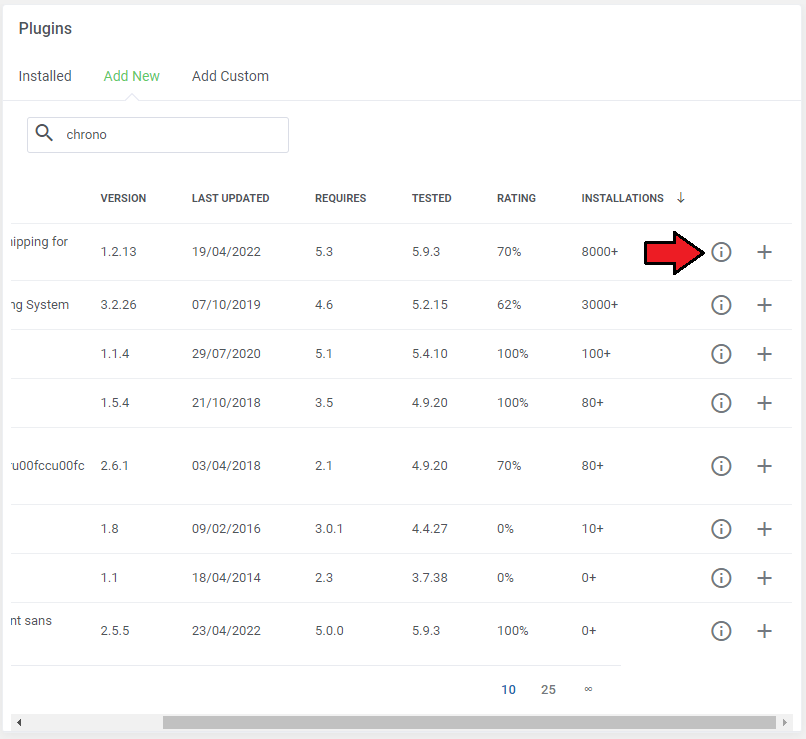
| Press the info icon to read its short description. |
|
| In case the plugin seems interesting, just press the 'Install' button. |

|
| There is also an option to add your custom plugins, simply press the adequate icon and confirm the action. |
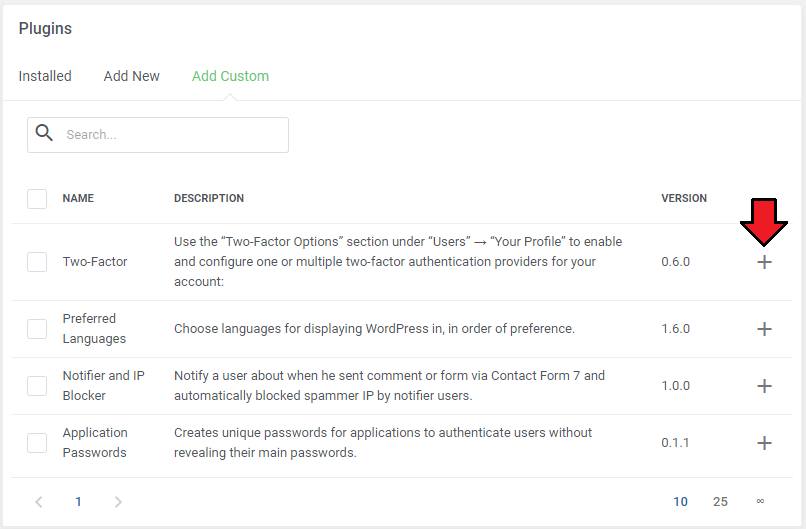
|
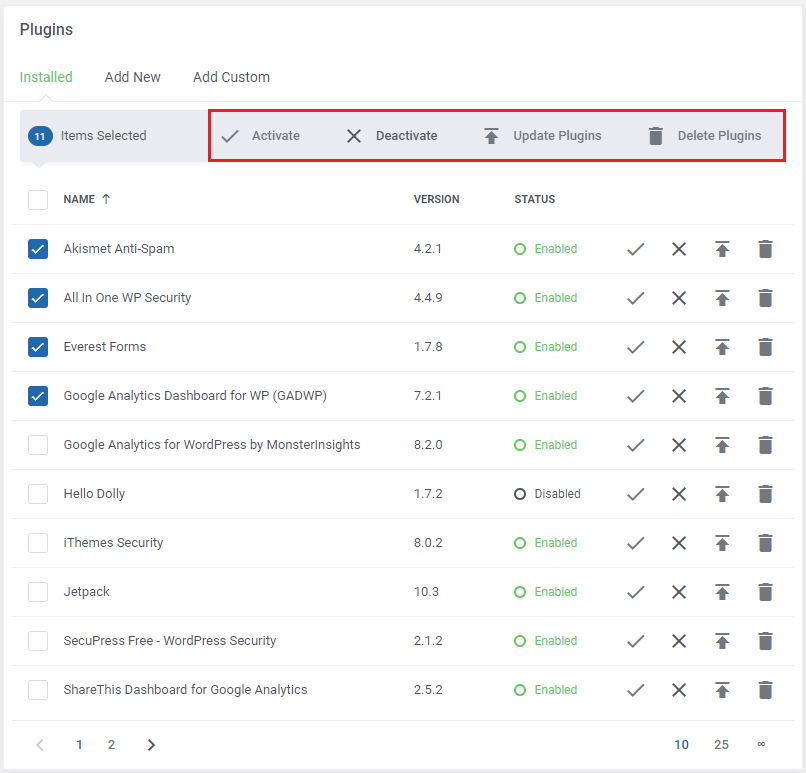
| The 'Mass Action' feature is also present in this section, so you will be able to handle multiple plugins more efficiently and at the same time. |
|
Plugin Packages
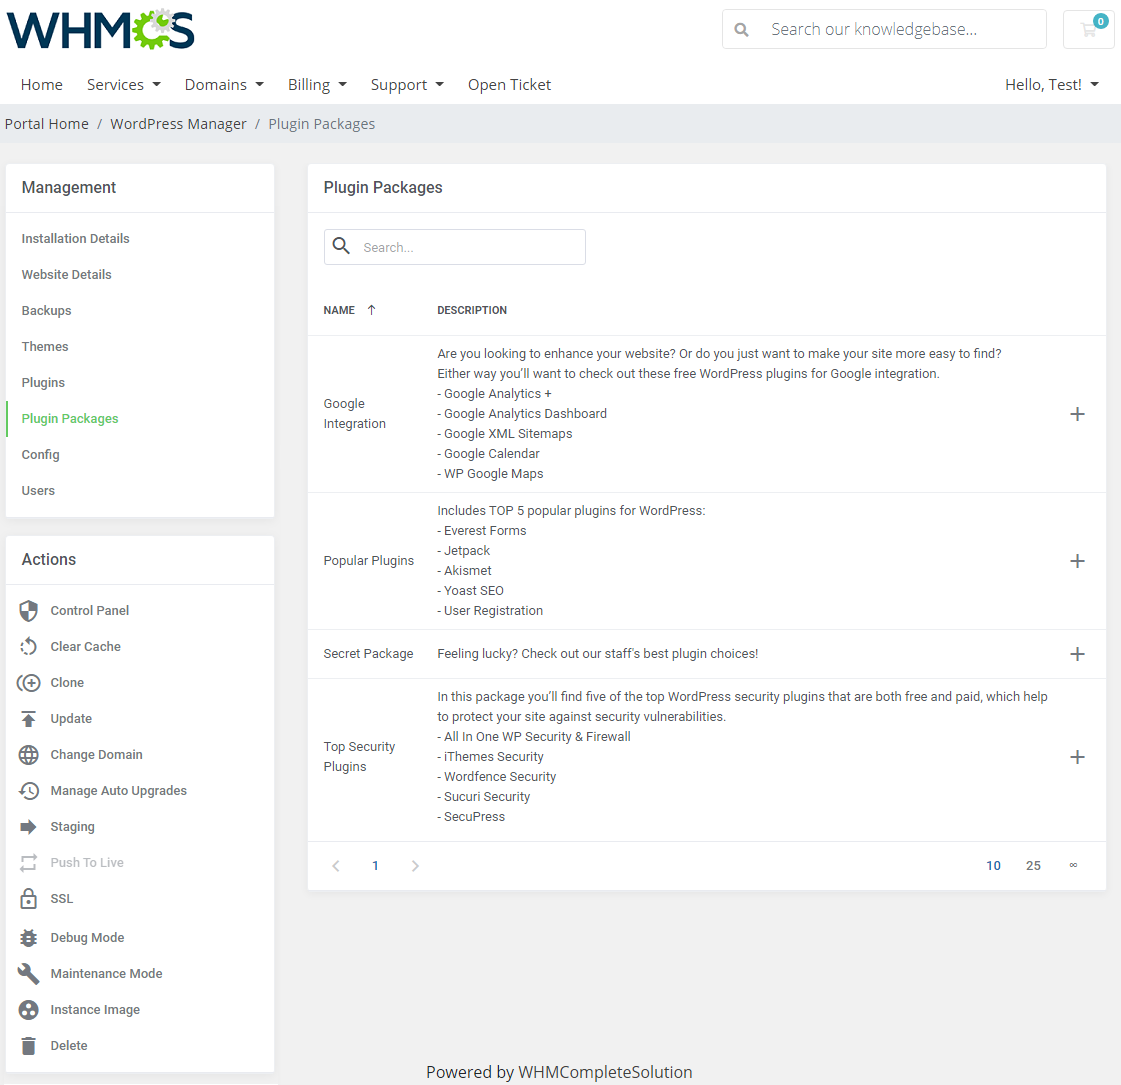
| Plugin Packages allow to install a bunch of pre-organized plugins at once. Information on how to prepare such packages can be found here. Simply press the '+' button to install the package with plugins that seems especially attractive to you. |
|
Config
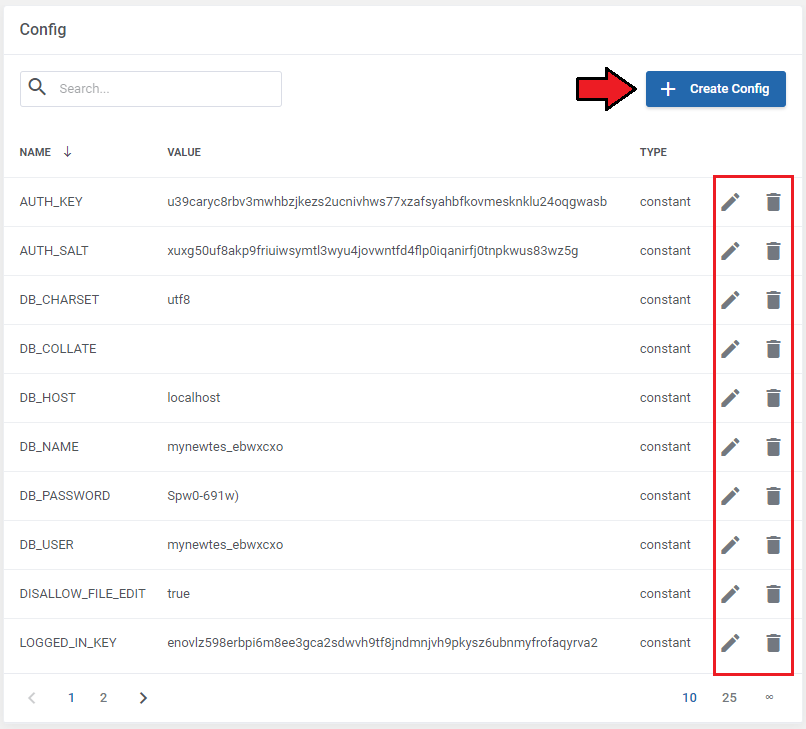
| In this section you can directly alter the records from the wp-config.php file. This file is located in the root of your WordPress file directory and contains your website's configuration details such as database connection information. You are allowed to edit or delete already existing config records as well as create new ones. Important: Be particularly careful when editing these config records! You can find more information about editing the 'wp-config.php' file here. |
|
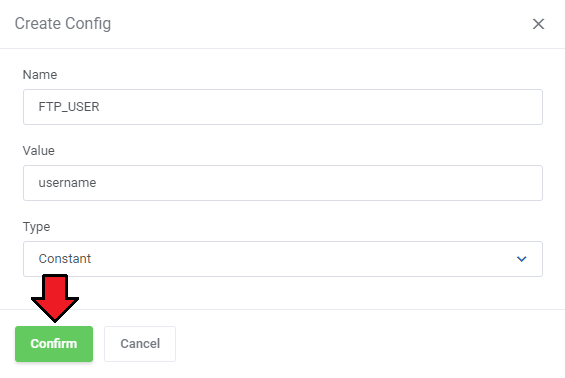
| When creating a new config record, enter its proper name, and value and choose one of the two available types ('Constant' or 'Variable'). |
|
Users
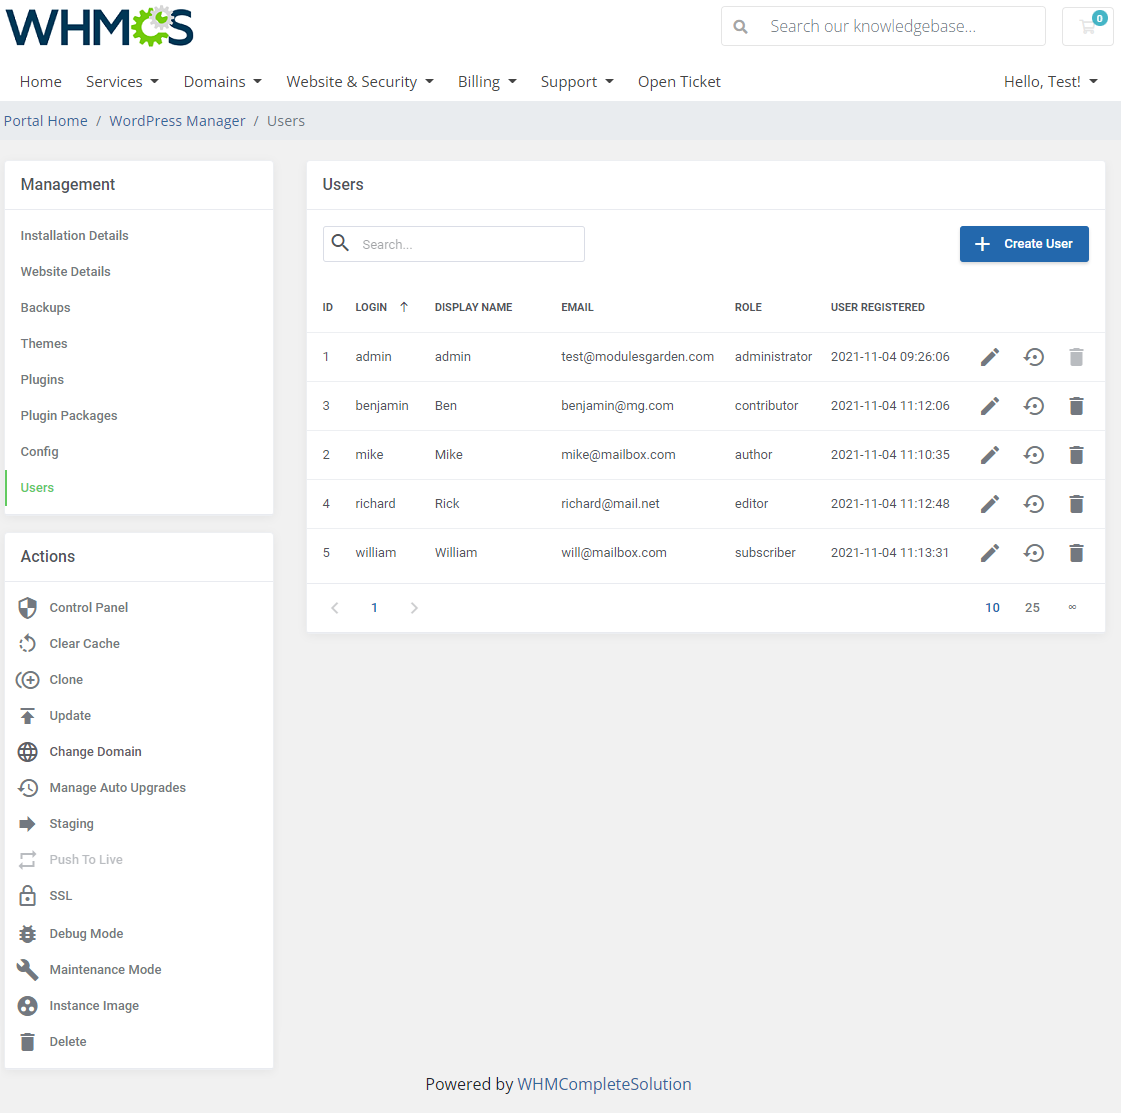
Enter this section to manage existing users and create new ones. You are allowed to perform the following actions on a single user:
|
|
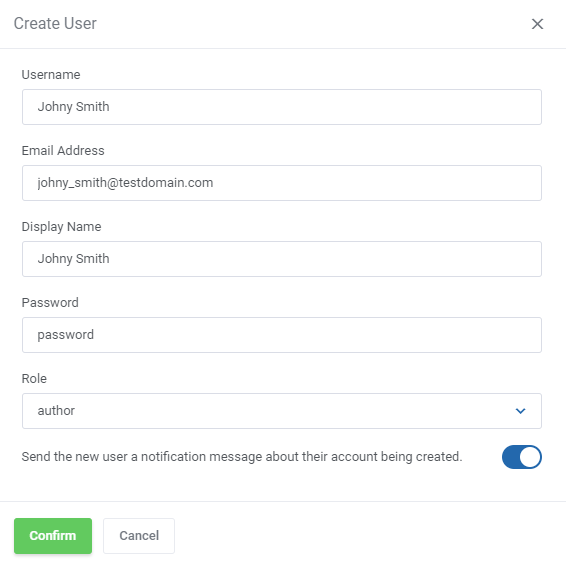
When creating a new user, you will have to provide the following data to complete:
|
|
Available Actions
In the 'Actions' area you can find the following options to:
Important: Please refer to the WP Toolkit Integration section for the list of troublesome features and make sure they are supported by the API you are using. Underneath you can find a detailed description of all the remaining actions. Please take a look. |
|
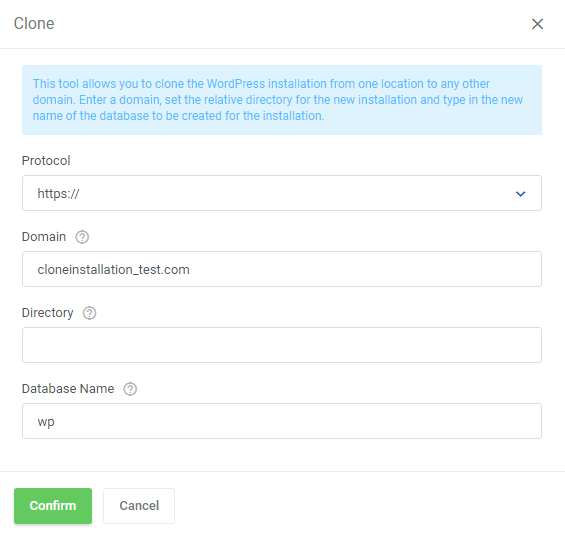
Clone
This action will result in cloning the installation to another domain. To clone the installation you need to:
The cloned installation will appear on the list of installations after a while. |
|
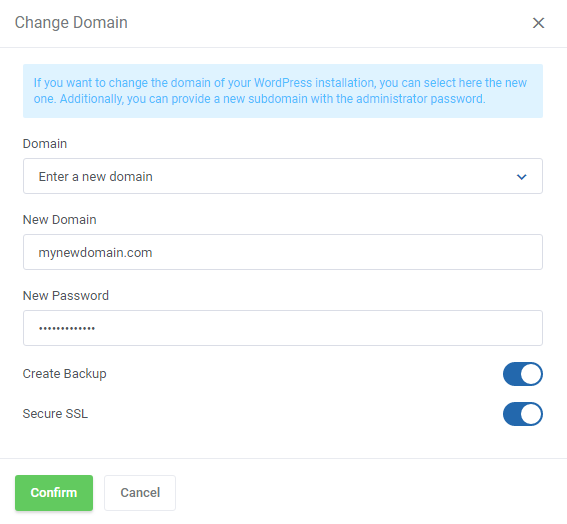
Change Domain
| If you want to change the domain of your WordPress installation, simply provide here a new one. Decide whether to create a backup at the same time and enable/disable SSL for the new domain. |
|
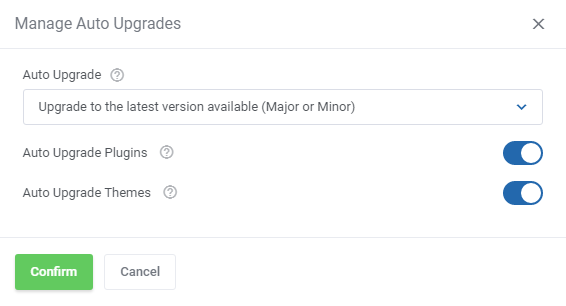
Manage Auto Upgrades
Set up the automatic upgrades rules. Here you may enable or disable automatic upgrades:
|
|
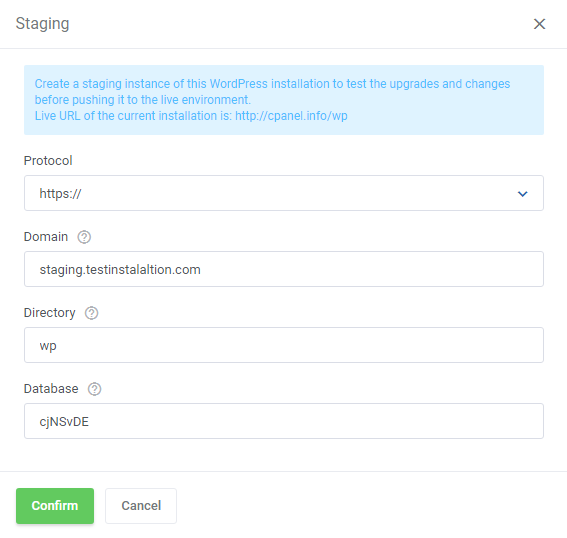
Staging
| Create staging instances from an application to test the upgrades or changes before using them in the live environment. |
|
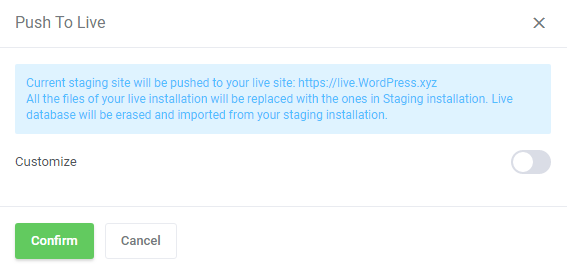
| Please be patient, as the whole process may take a few minutes. The staging instance will appear on the list of your installations after the first cron synchronization. Push the staging installation to the live environment once you are sure it works fine and changes suit your needs. |
|
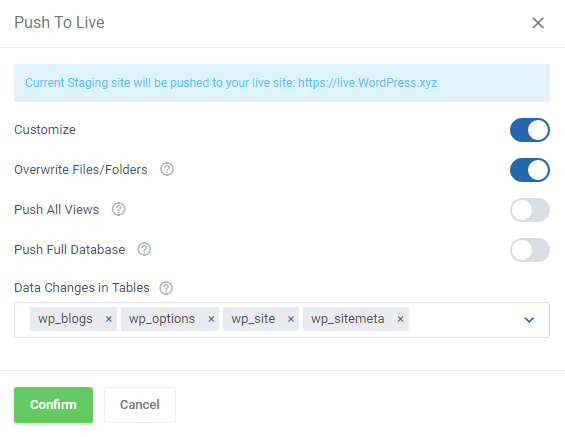
| In case you need to customize the installation before pushing it live simply toggle the 'Customize' option. Then define the specification and confirm to finish. |
|
SSL
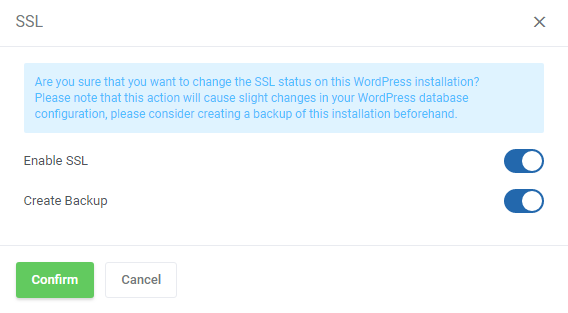
| Turn on or off SSL for the installation. Remember that enabling SSL will result in changes being made in your WordPress database configuration, it is advised to back up your installation. Along with enabling SSL, a free Let's Encrypt SSL will be installed on DirectAdmin products (note that this feature is not available for 'cPanel'). |
|
Debug Mode
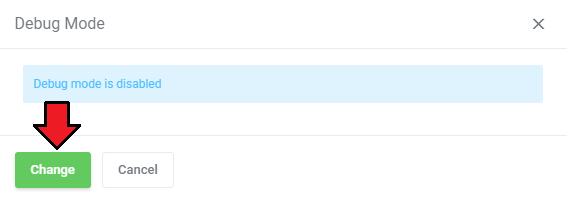
| Check whether the debug mode is currently enabled or disabled. Change the mode by pressing the 'Change' button. |
|
Maintenance Mode
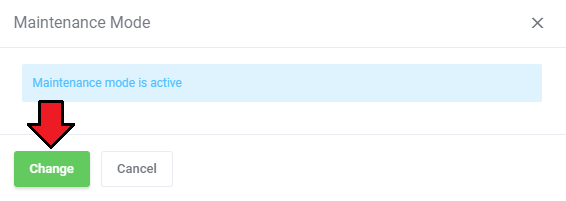
| Check the current status of the website, turn off/on maintenance mode according to your needs by pressing the 'Change' button. |
|
Instance Image
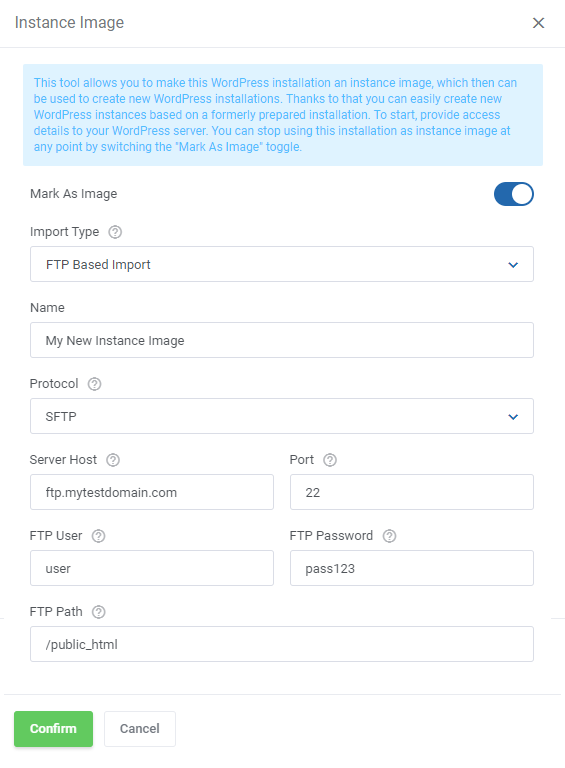
| Turn on instance image on the WordPress installation. Simply, toggle the 'Mark As Image' option and then fill in the below options. Note: The 'FTP Password' input is encoded in the database, which makes it completely safe and secure. |
|
Dashboard Widget
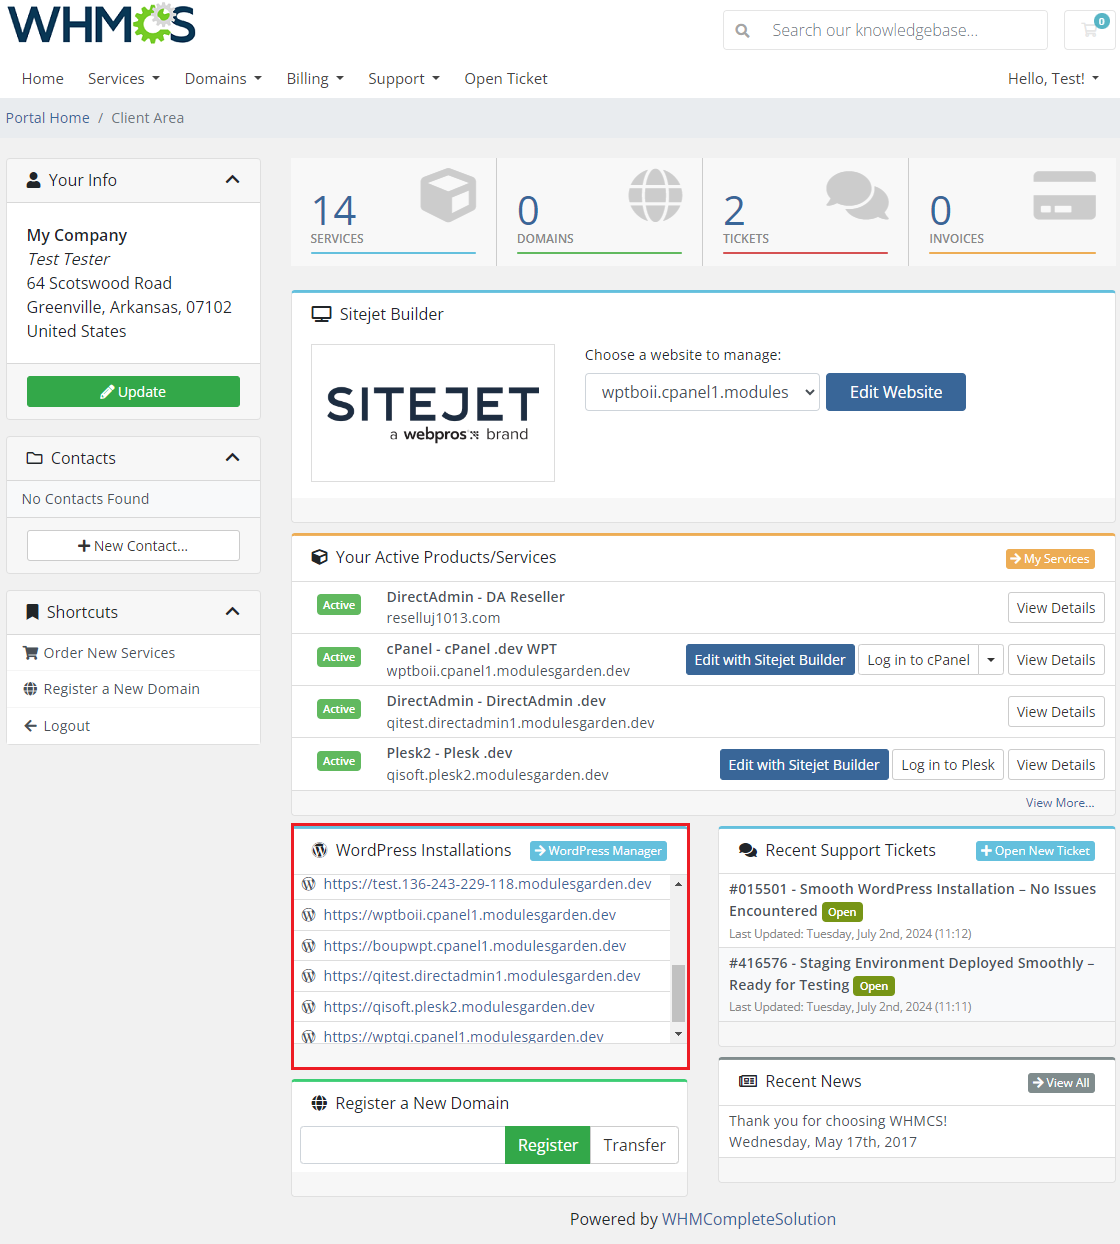
| WordPress Manager For WHMCS comes with a built-in widget displayed in the client area home page.
This allows the clients to see their installations at a glance. |
|
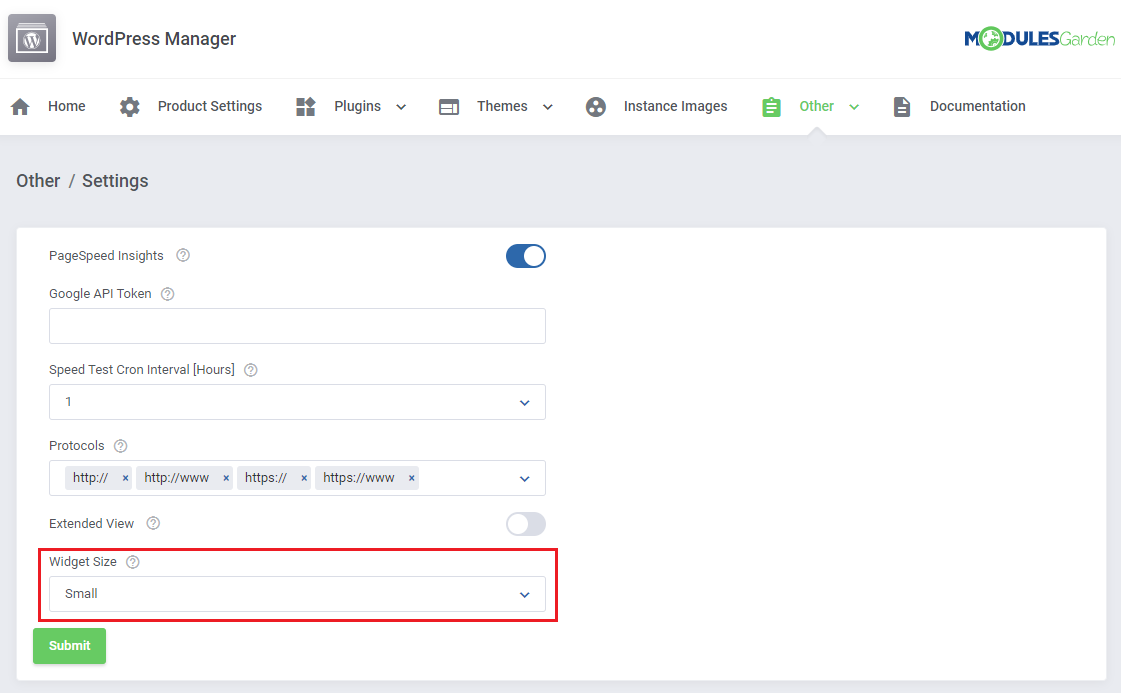
| The widget visibility can be configured in the admin area. Navigate to 'Addons' → ' WordPress Manager' → 'Other' → 'Settings' and find the 'Widget Size' option.
|
|
Reseller Accounts
| Existing Reseller's Accounts with the number of WordPress installations. Keep in mind that this section is visible only when such accounts exist in the client's cPanel or DirectAdmin panels. In case no such accounts have been detected, this section is hidden. Note: Plesk resellers accounts are not yet currently supported. The table includes the name of the product, reseller's account name on which the instances are installed as well as their number. |
|
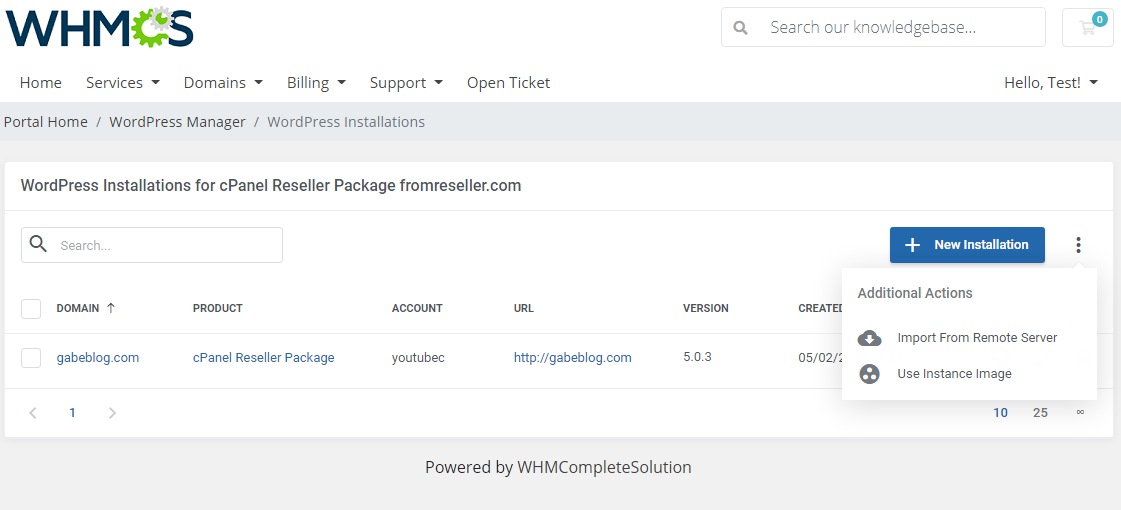
Press the edit icon to view the list of existing installations. Among other allowed actions there are:
|
|
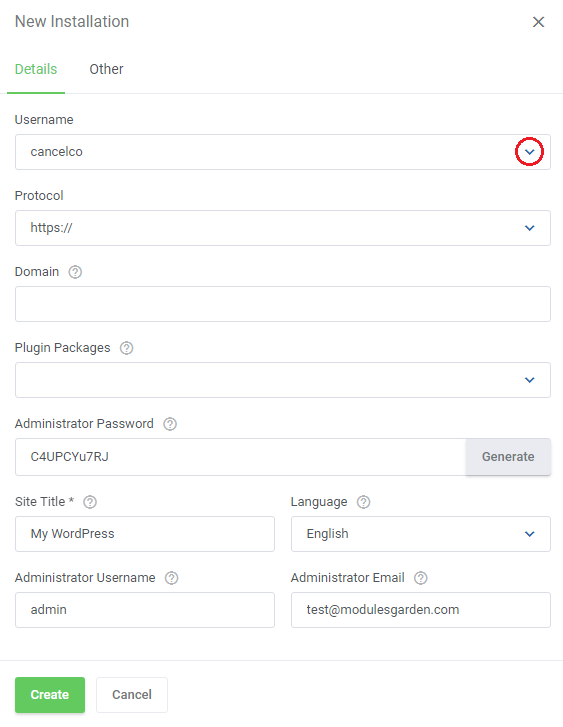
| The only difference is the need to select a customer when adding a new installation. If there is no username available here to choose, the reseller must create an extra account in the cPanel or DirectAdmin panels. All the remaining options are the same as in the case of standard WordPress installations described in the above sections. |
|
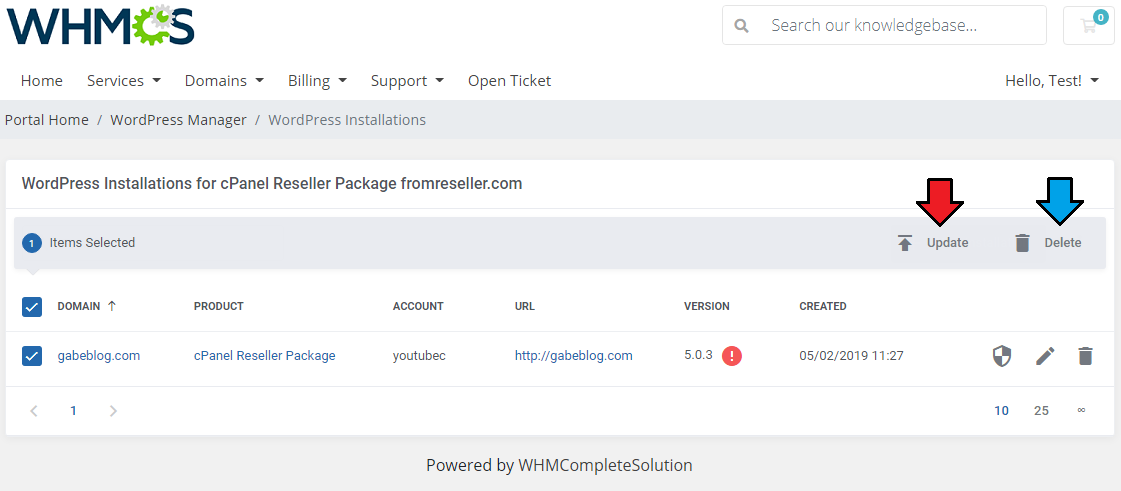
| Using mass actions you may also update multiple WordPress instances to the newest version at once or delete them. |
|
API Integration Comparison
Available API integartions:
Please note that if you are using the free version of WP Toolkit, certain features may not be accessible or fully functional within the WordPress Manager module. |
| Important! By default, all APIs support all features enumerated on the product features list, available at the top of this documentation. |
| List of troublesome features with API compatibility status: |
| Feature Name | Softaculous | WP Toolkit for Plesk | WP Toolkit for cPanel/WHM | WP-CLI Tool for DirectAdmin | |
|---|---|---|---|---|---|
| 1. | Clone an instance | ✔️ | ✔️ | ❌ | ❌ |
| 2. | Delete an instance | ✔️ | ❌ | ✔️ | ✔️ |
| 3. | Backups | ✔️ | ❌ (download) | ✔️ | ❌ |
| 4. | Push staging to live environment | ✔️ | ❌ | ❌ | ❌ |
| 5. | Create staging | ✔️ | ❌ | ❌ | ❌ |
| 6. | Use instance image | ✔️ | ✔️* | ✔️* | ✔️ |
| 7. | FTP Import | ✔️ | ✔️ | ✔️ | ❌ |
| 8. | Change Domain | ✔️ | ✔️ | ✔️ | ❌ |
| 9. | Automatic Plugin and Theme Upgrade/Downgrade | ✔️ | ✔️ | ✔️ | ❌* |
| 10. | Access setup section (Installation Details → Actions → Setup) |
❌ | ✔️ | ✔️ | ❌ |
| 11. | SSL | ✔️ | ❌ | ❌ | ❌ |
|
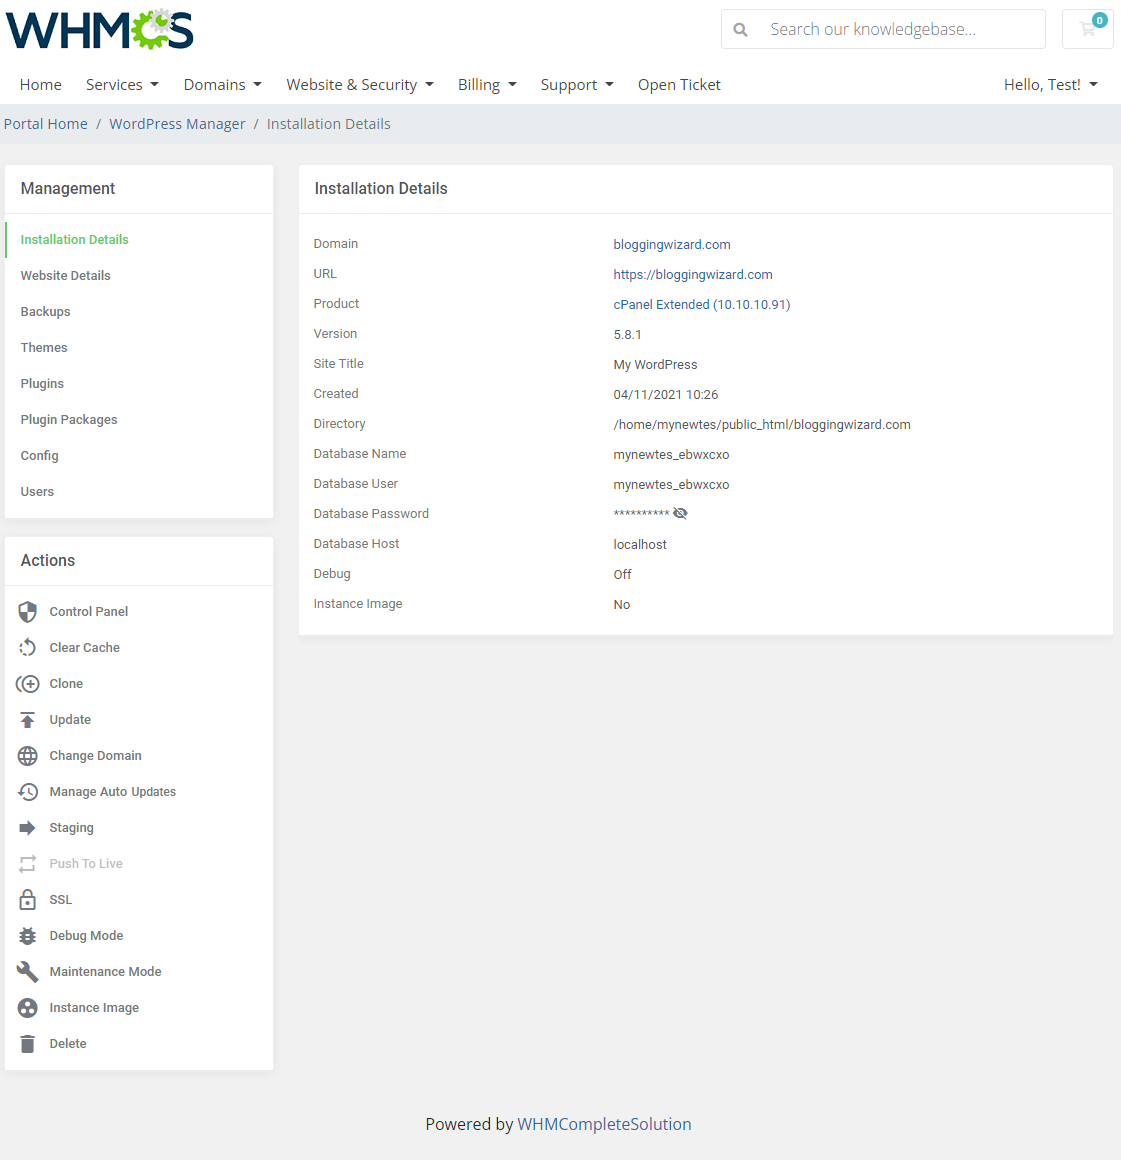
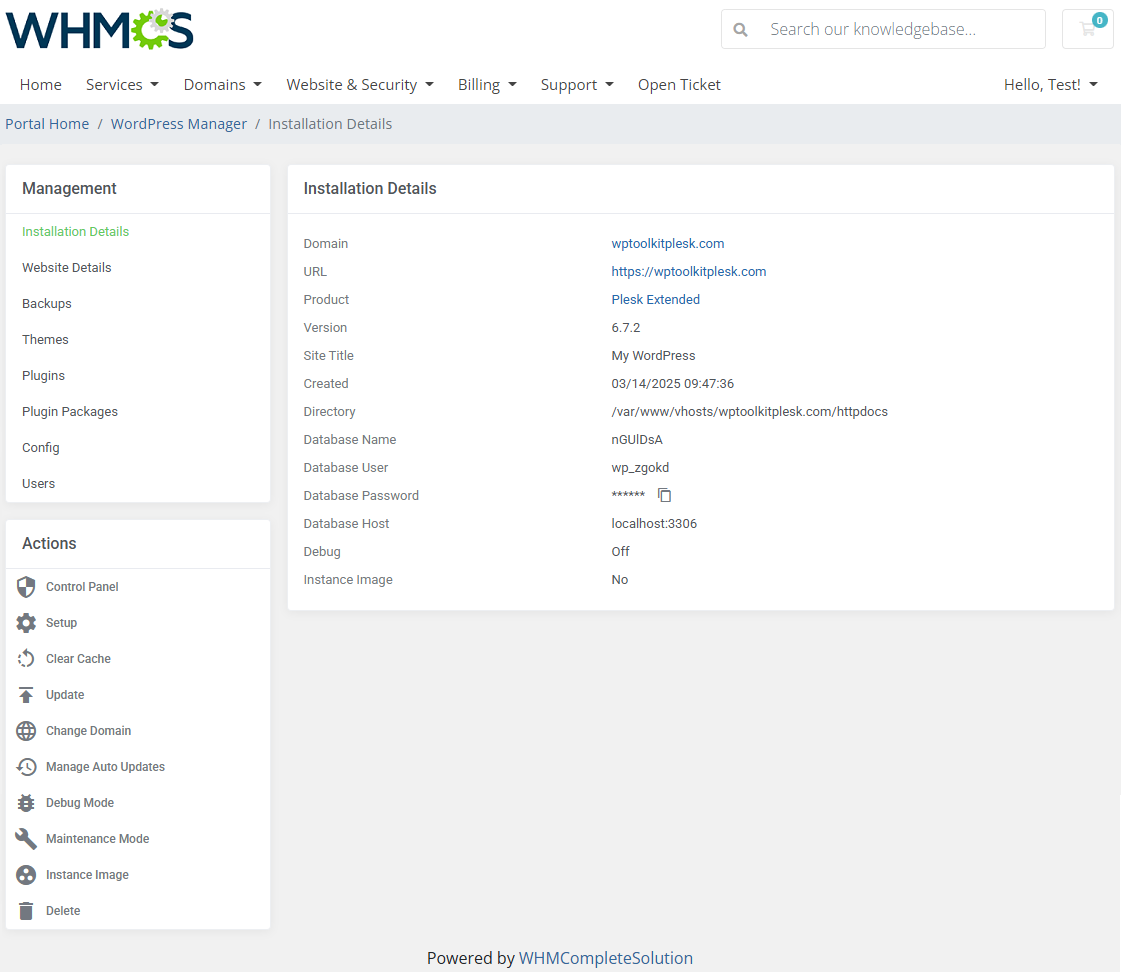
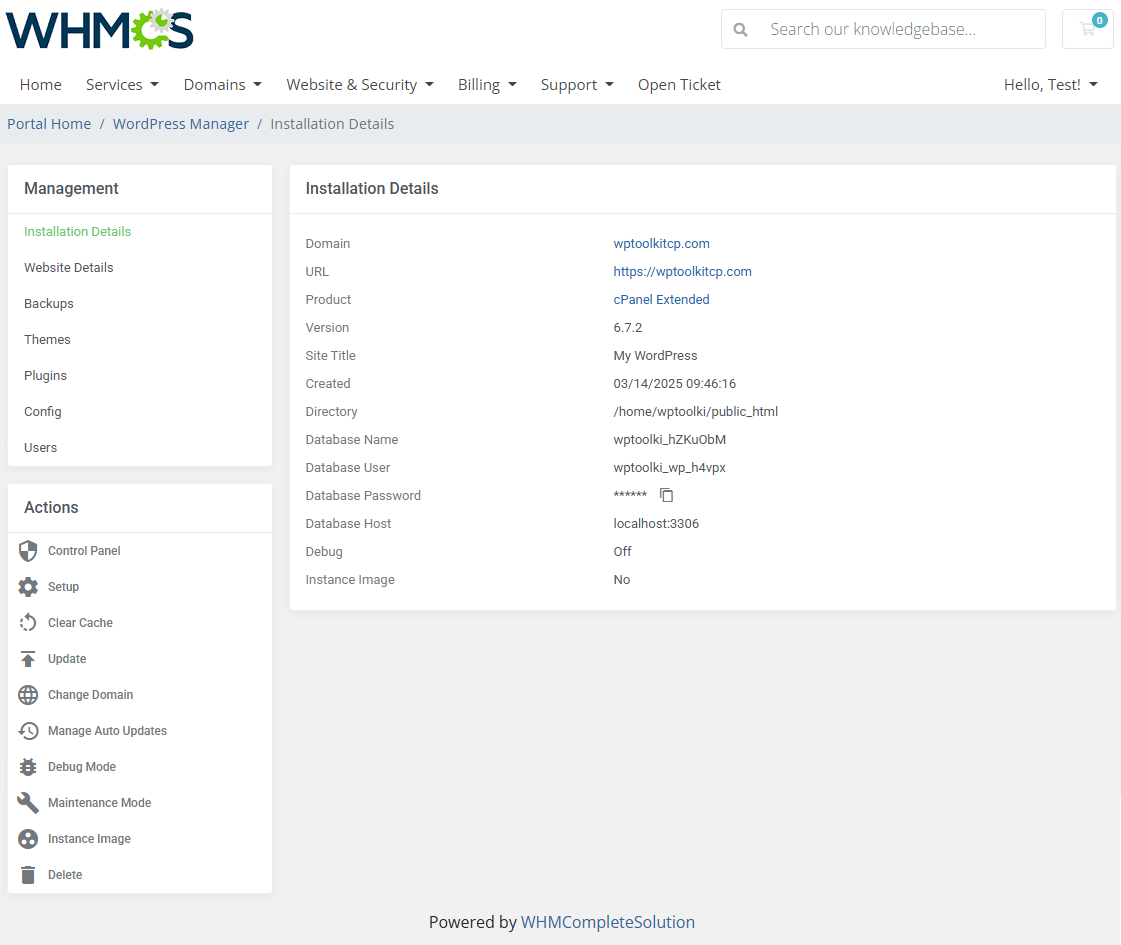
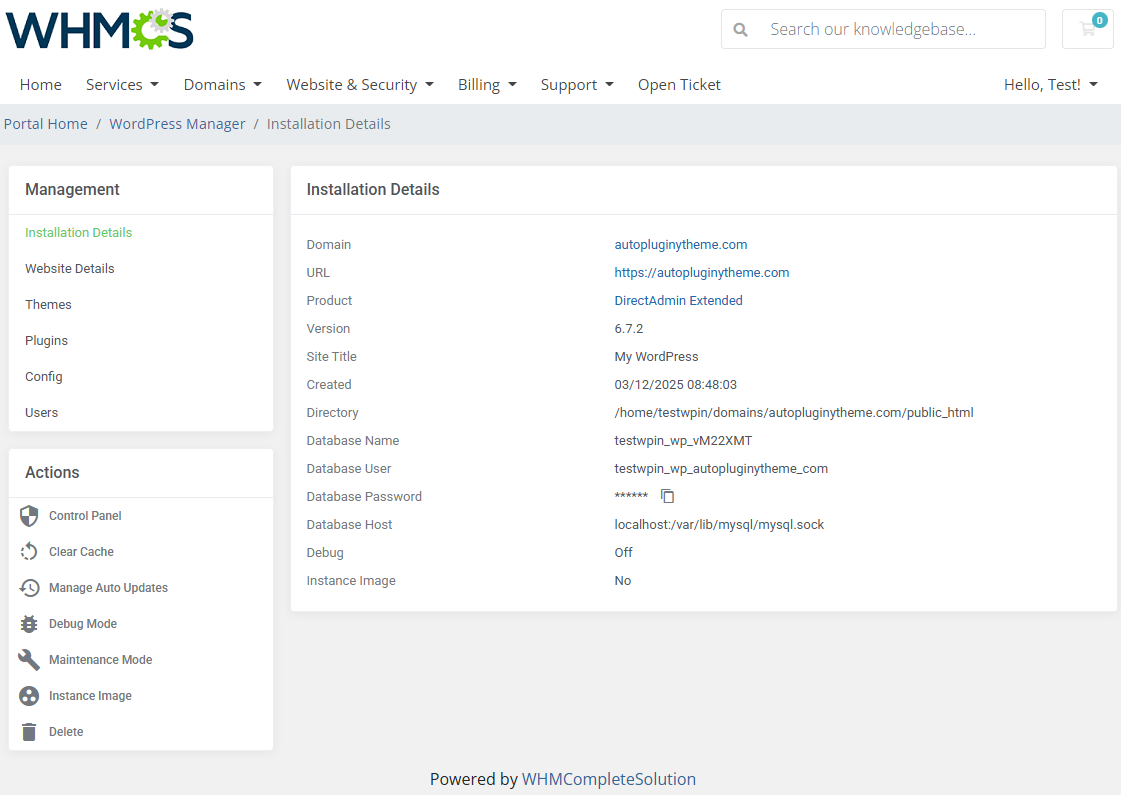
| WordPress installation details in the client area. Below are examples of how services might appear in the client area, showing different API integrations with all available features enabled.
|
|
|
|
|
|
|
|
Use Cases
| In this section, you will find real-life examples of using the module. We'll show you how the module's features can be put to work in different situations. See the scenarios below to see how the module can be used in practice. |
Automatic WordPress Installation
| Products in WordPress Manager For WHMCS can be set up to install new WordPress instances after service creation automatically. There are two basic methods for that purpose:
Navigate to 'Addons' → 'WordPress Manager' → 'Product Settings' → your product 'Details' page. For script-based installation: in the 'Auto Install WordPress After Service Creation' field, select the 'Based On Installation Script' option and pick a script from the dropdown field below. |
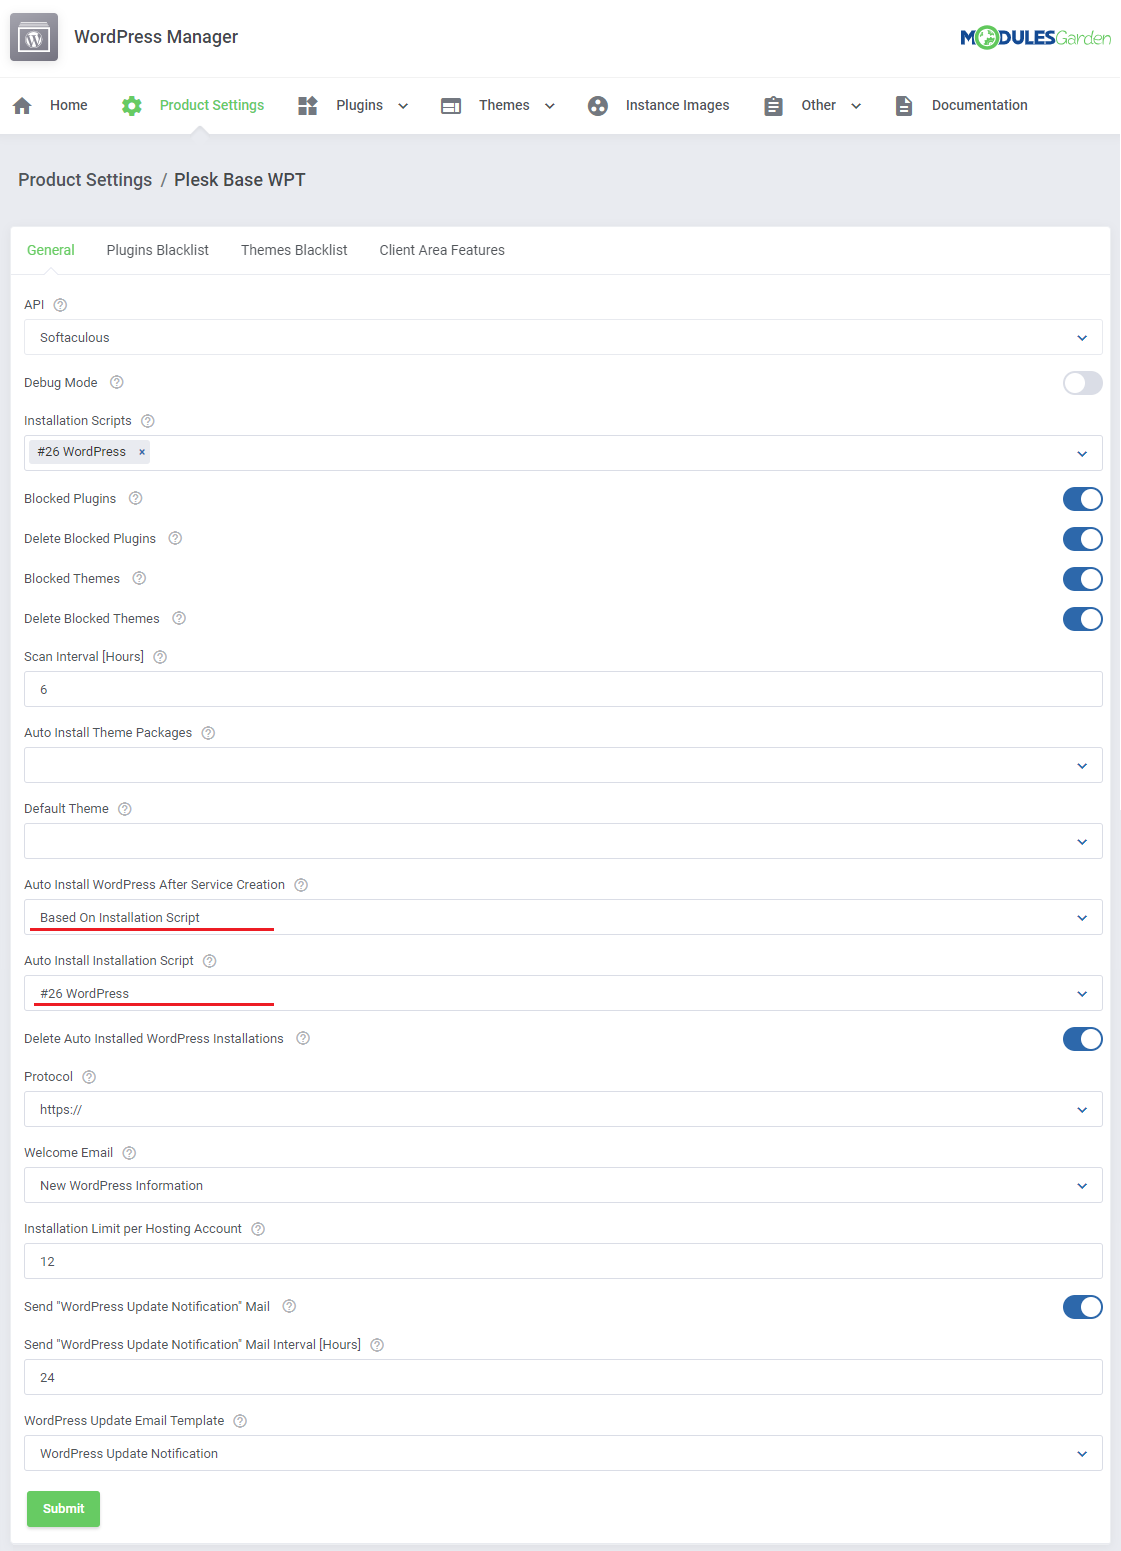
|
| For image-based installation: in the 'Auto Install WordPress After Service Creation' field, select the 'Based On Instance Image' option and pick an image from the dropdown field below. Note: If you do not have any instance image created yet, you can learn how to do that in the Instance Images section. |
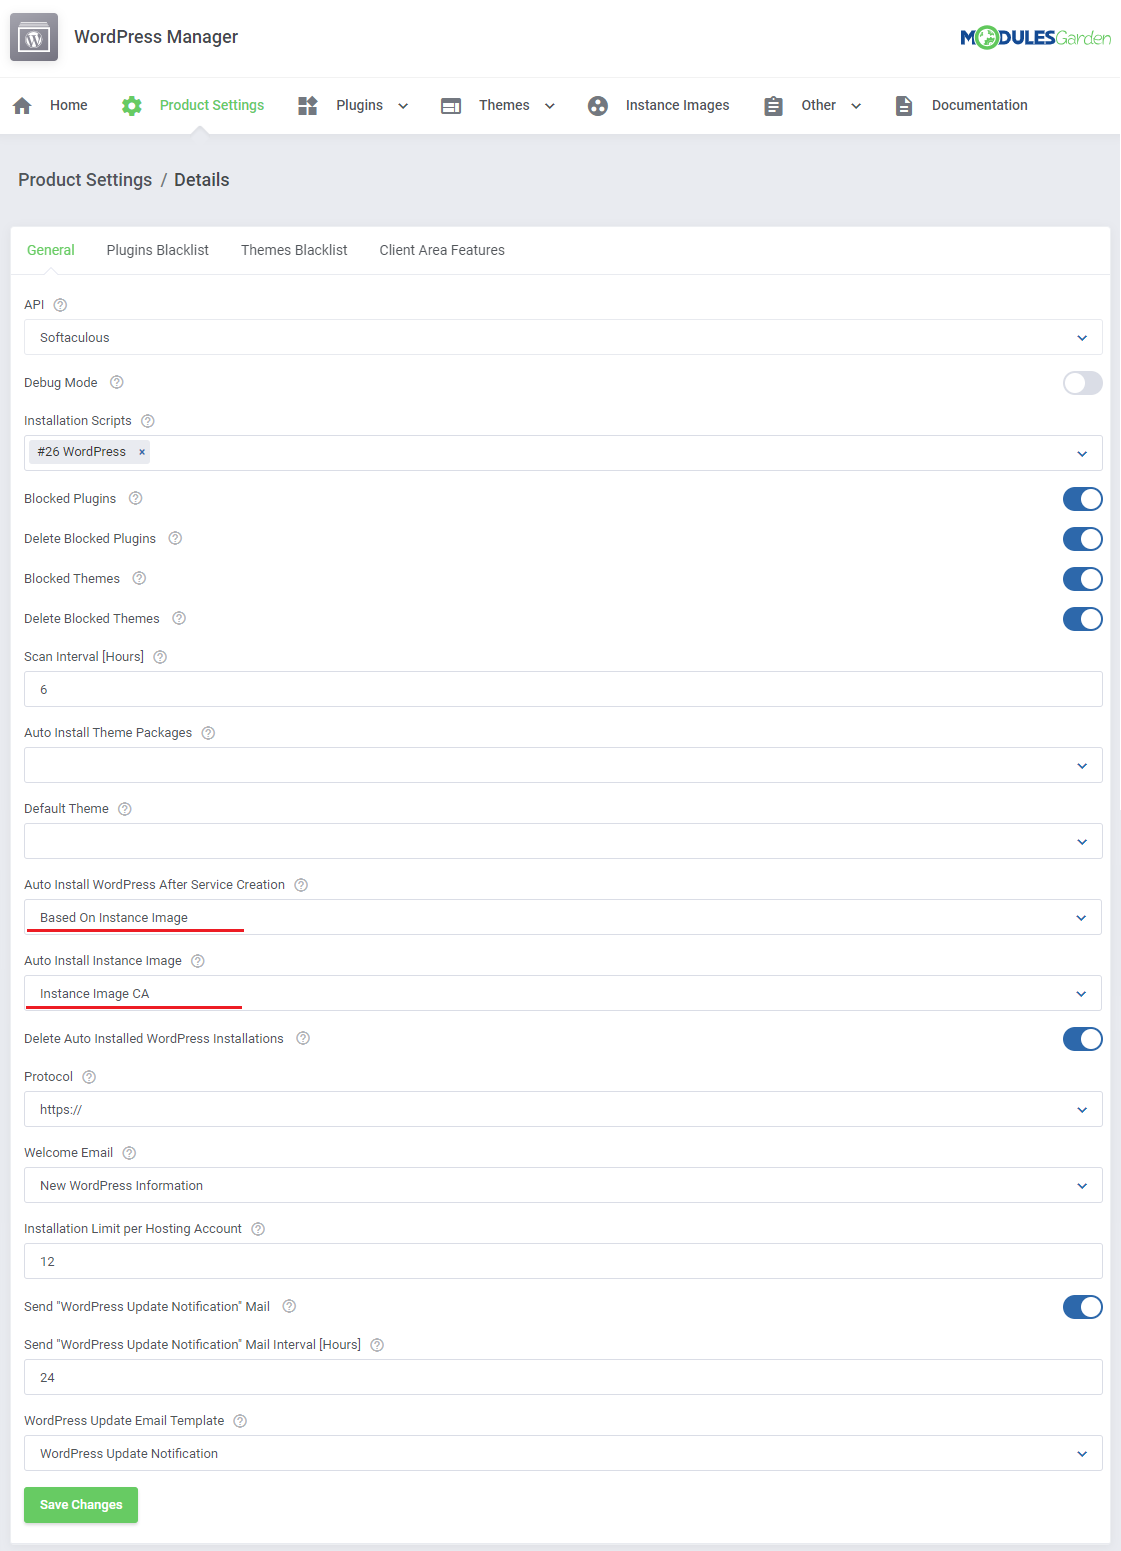
|
| Once the client orders the configured product, WordPress will be automatically installed according to the selected method. Furthermore, you may include custom fields that will allow users to set their own WordPress username, password, and site title. wp_username|Username or wp_user_id| User ID wp_password|Password or wp_user_password|Password wp_site_title|Site Title See tips (point 5) for more information on custom fields. |
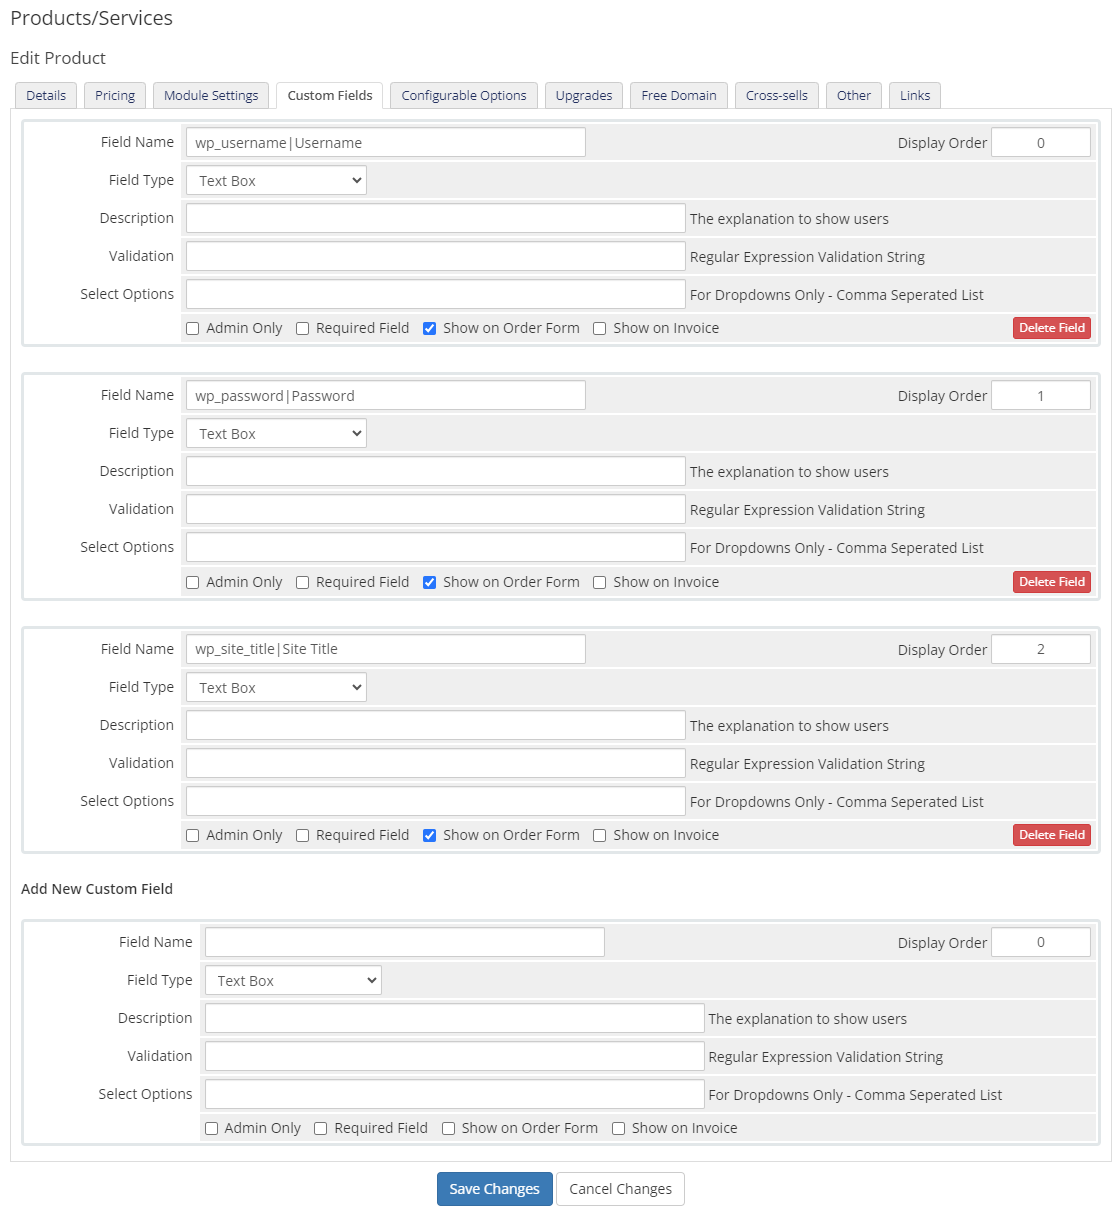
|
| If the custom fields are left empty, the credentials will be generated automatically for the client. |
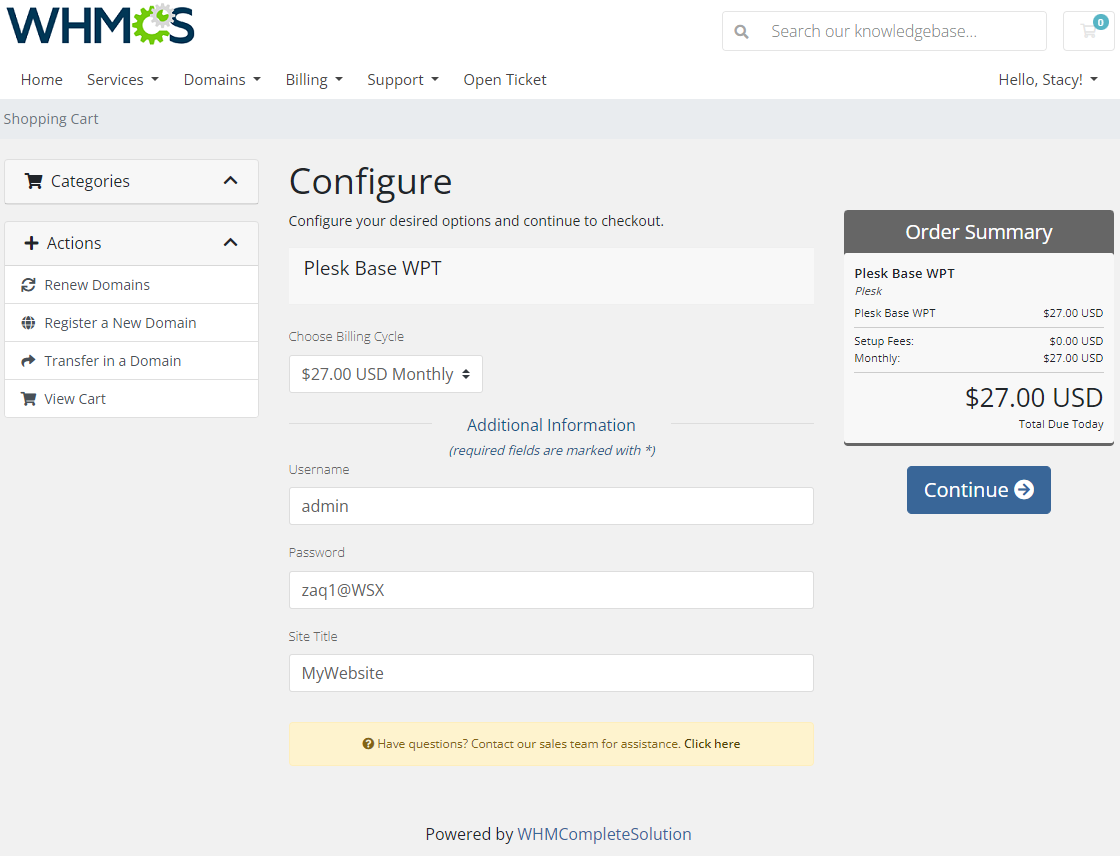
|
Instance Import During Order
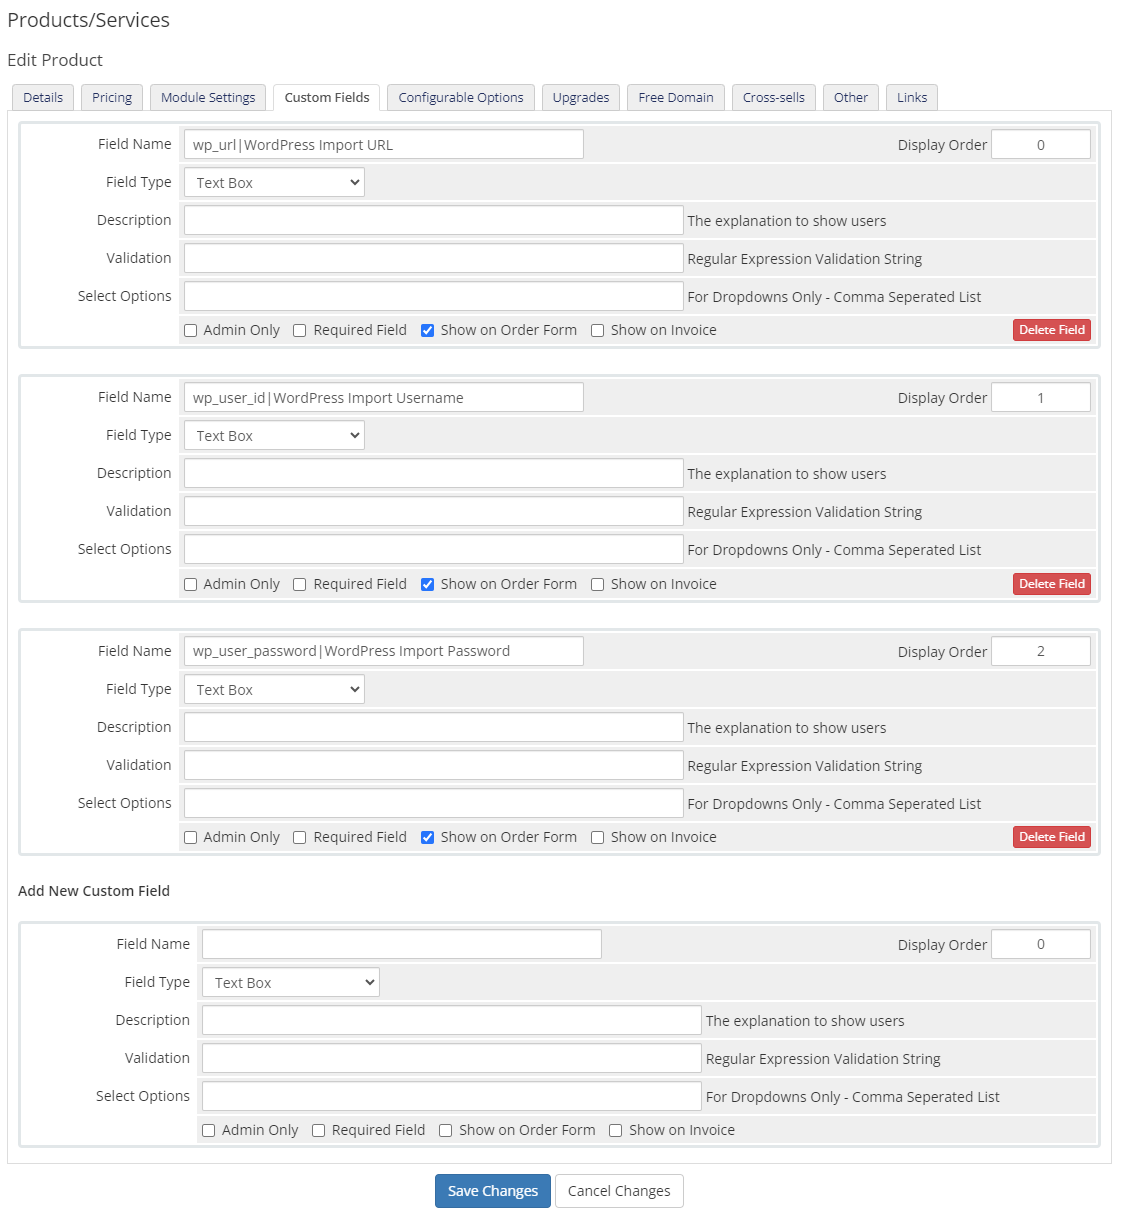
| While ordering products with WordPress Manager For WHMCS clients can migrate their WordPress installations seamlessly. To take advantage of this option you need to include import-related custom fields in the order form of your product. Navigate to 'System Settings' → 'Products/Services', edit your product, move to the 'Custom Fields' tab, and include the following custom fields.
You can change the display name of the field after the '|' sign. |
|
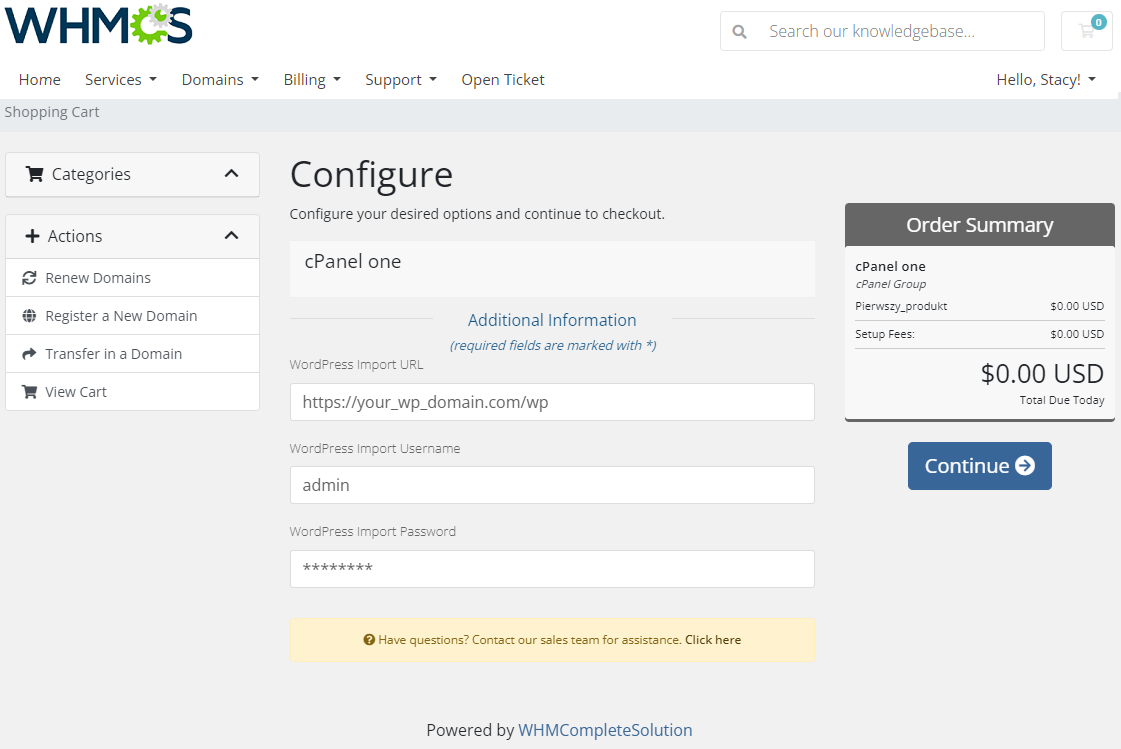
| Clients will be able to fill those fields during the order with their WordPress credentials, enabling the module to migrate their WordPress after the order is accepted (during the cron job run). Additionally, you may combine import-related custom fields with other custom fields found in point 5 of the Tips section. |
|
Migrating Existing Instances Via FTP
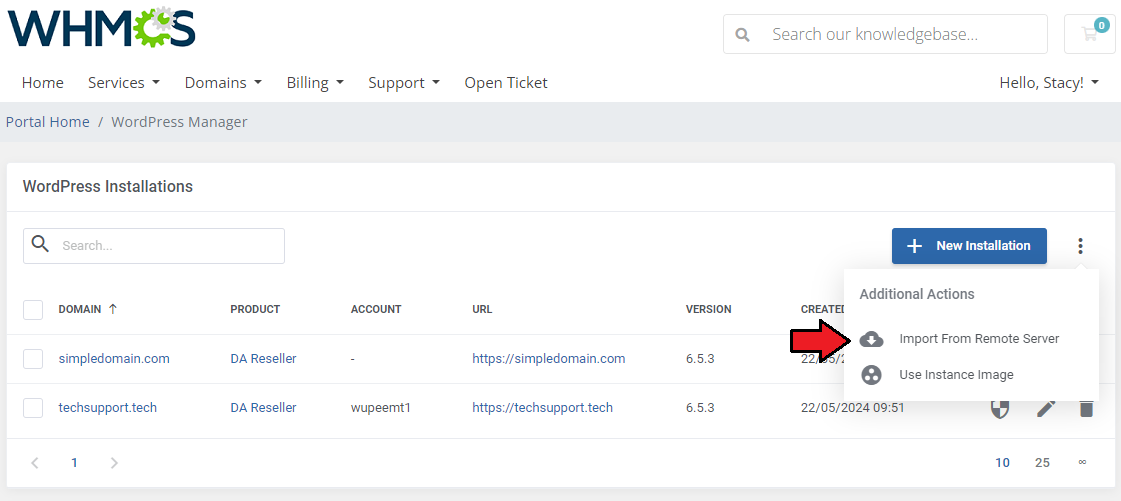
| WordPress instances located on other servers can easily be migrated to your server through FTP. All it takes is a few simple steps. First, open the WordPress Manager in the client area and select 'Import From Remote Server'. |
|
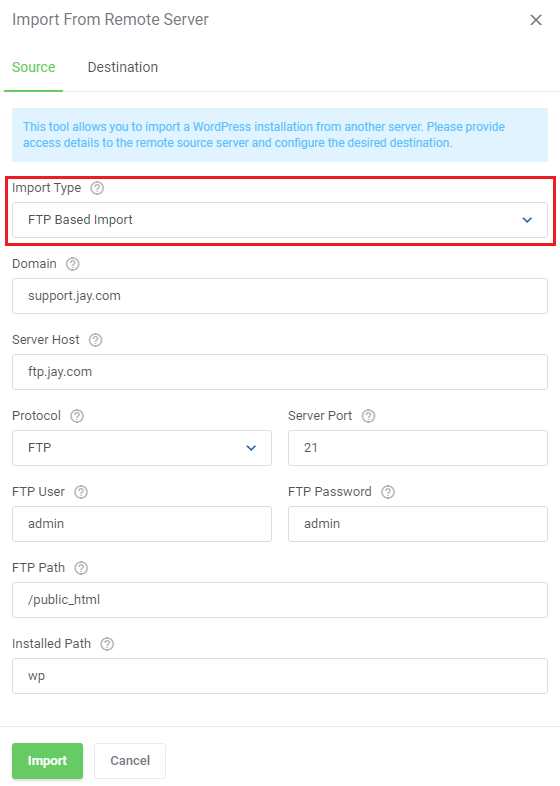
Select the FTP Based Import Type and provide the information necessary for the import:
|
|
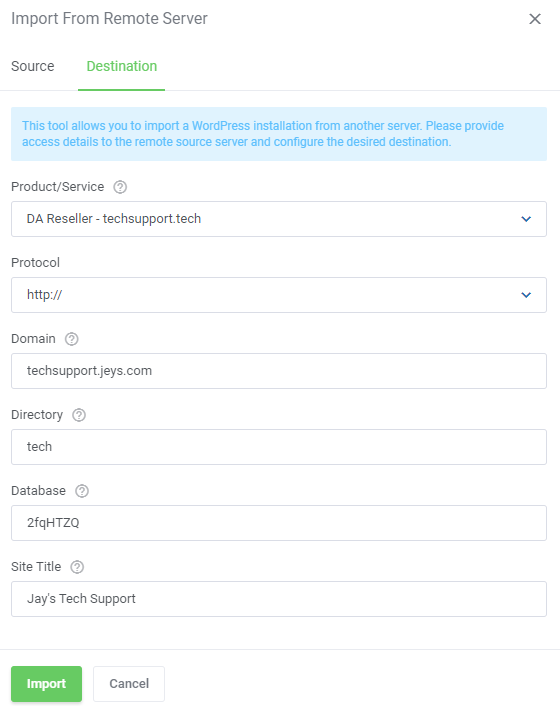
Move to the 'Destination' tab and fill in the desired details of the migrated instance:
Click on 'Import' to start the process. The instance should be migrated after the cron run. |
|
Migrating Existing Instances Using WordPress Credentials
| WordPress instances from third-party servers can also be migrated with just the WordPress account credentials. See the steps described below to see how easy it is. Start by opening the WordPress Manager in the client area and select 'Import From Remote Server'. |

|
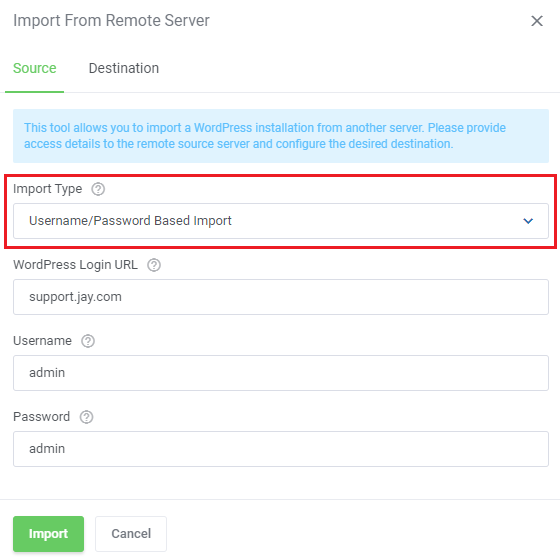
Select the Username/Password Based Import Type and provide your WordPress credentials:
|
|
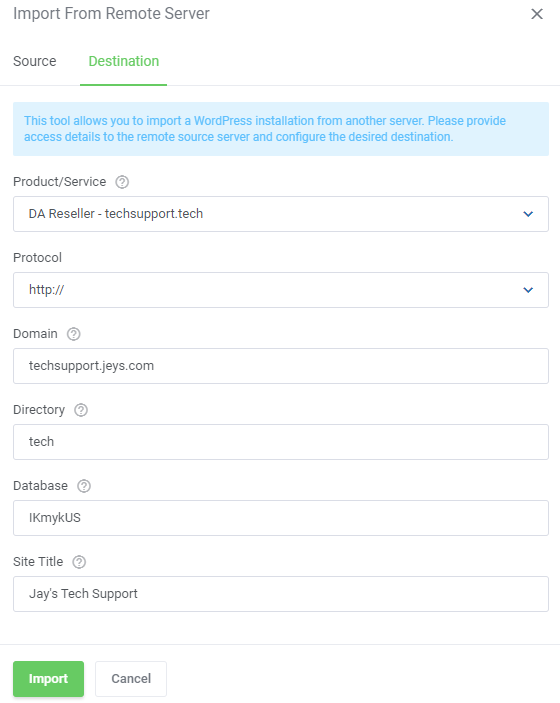
Next, open the 'Destination' tab and provide details regarding your desired installation after migration:
Click on 'Import' to start the process. The instance should be migrated after the cron run. |
|
Employing Instance Images
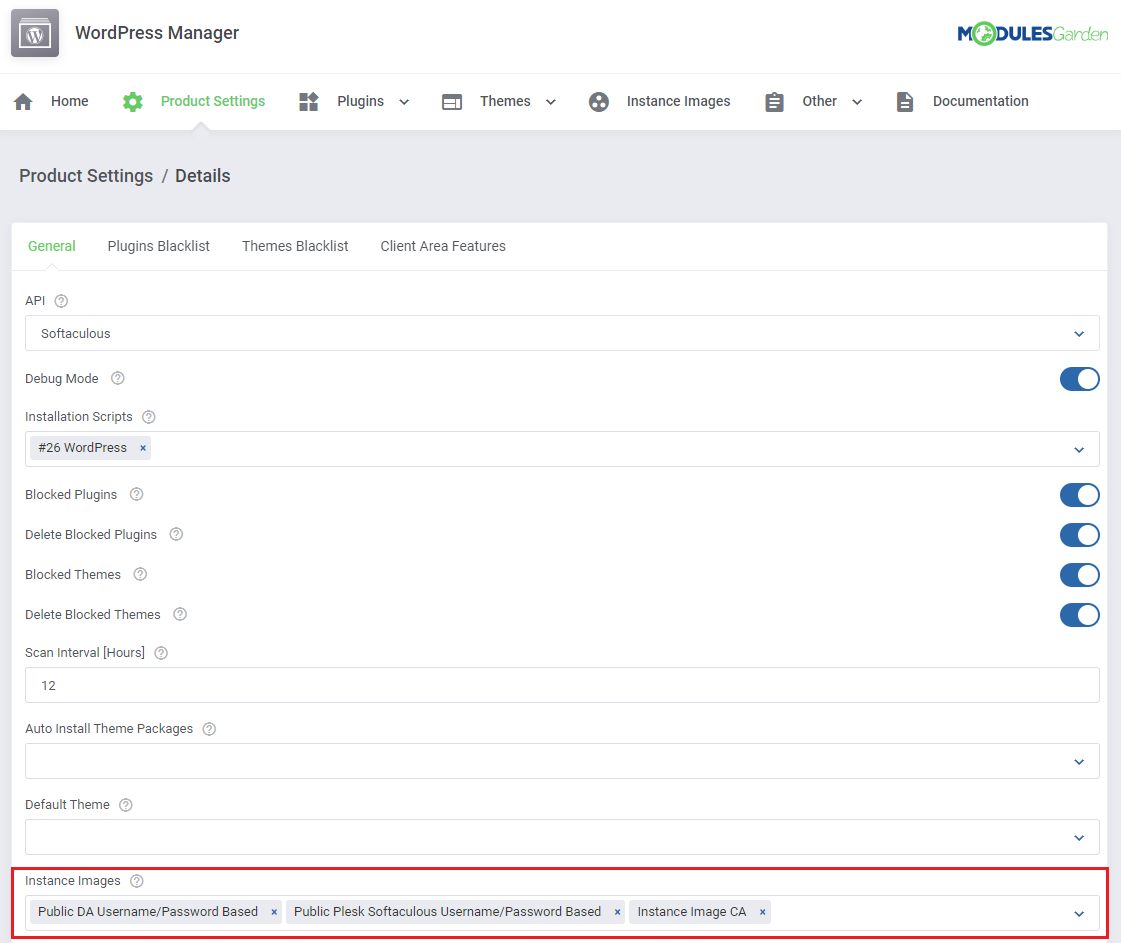
| WordPress Manager For WHMCS allows you to prepare ready-made WordPress instance images for your clients to use during or after an order. First, prepare instance images as described in the Instance Images section. Clients can also prepare their own instance images in the client area under 'Actions' → 'Instance Image'. |
|
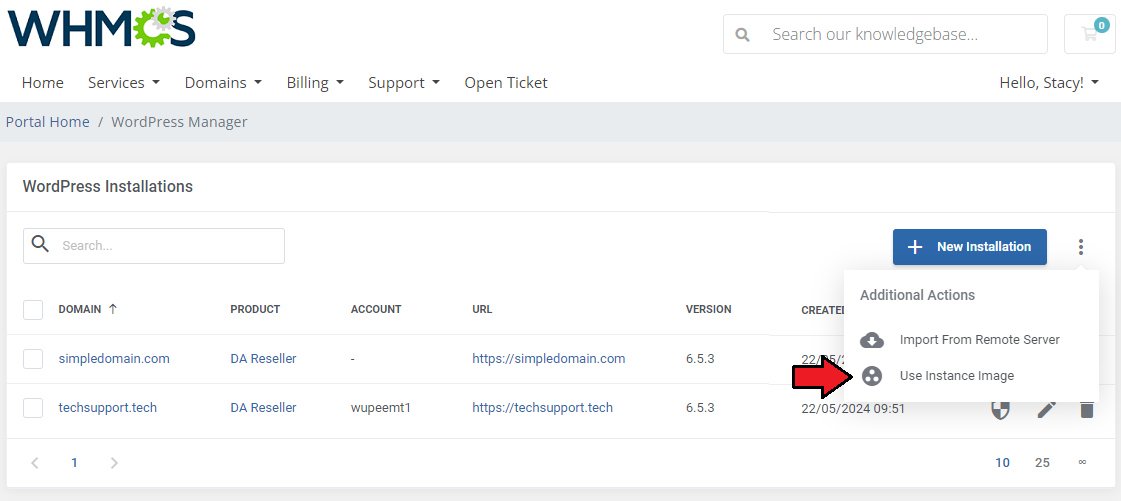
| After the instance images are prepared, clients with active services will be able to set up their WordPress installation from the included images in their client area. They can do that by clicking on the 'Use Instance Image' button. |
|
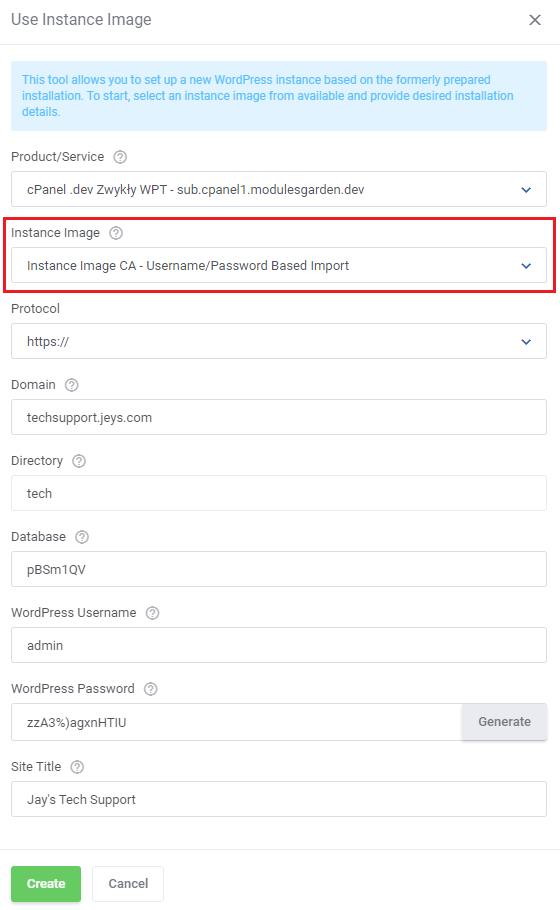
A new window will be displayed, fill in the necessary fields and click on 'Create' to set up the instance.
Click on 'Create' to start the process. The instance should be created after the cron run. |
|
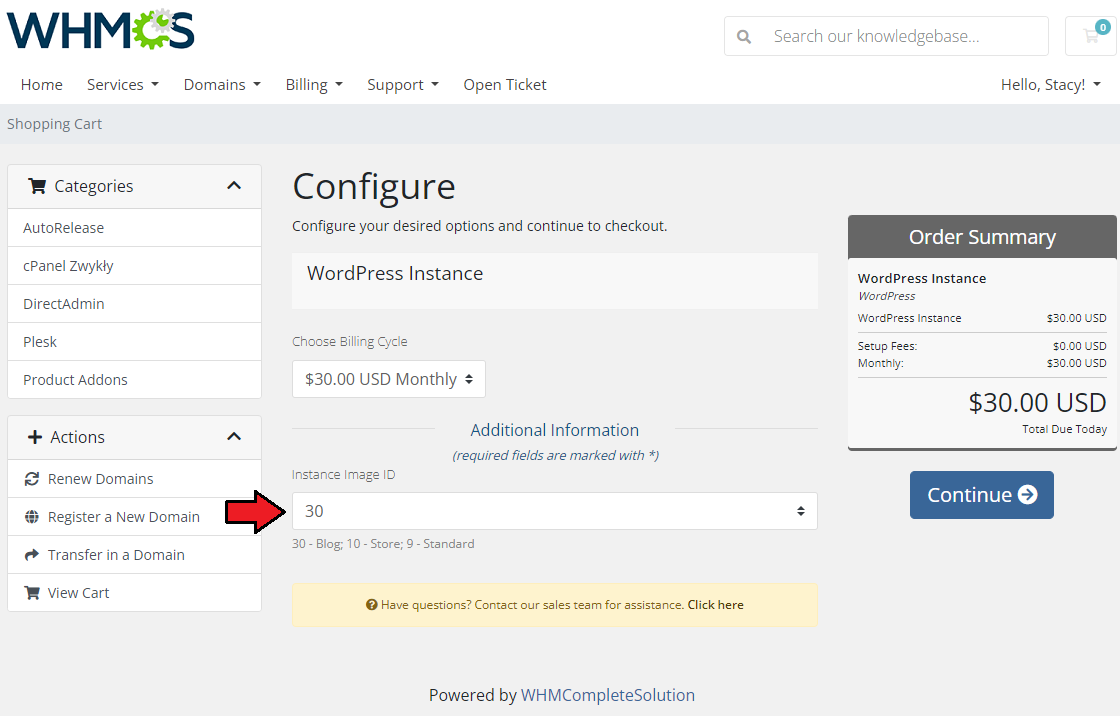
| The option to set up an instance from an image can also be selected from the order form if set beforehand. Three conditions need to be met for the instance images to be used during the order. |

|
| If all conditions are met, clients will be able to order instances to be set up from a range of images. |
|
Introducing Custom Software
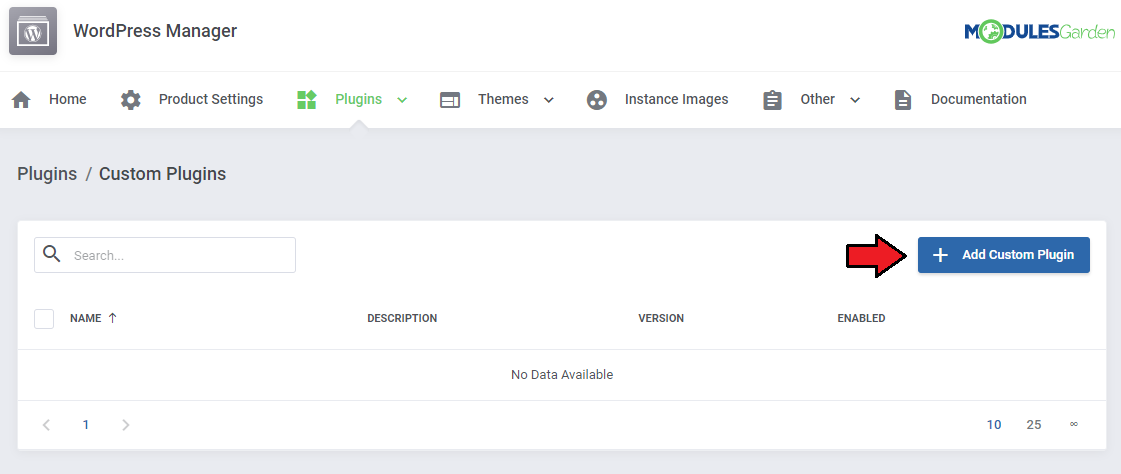
| With WordPress Manager For WHMCS you can introduce your clients to custom plugins and themes. This can be handy if you do not want to make your software public on the Marketplace, but still need to distribute it to your clients in a seamless way. We will install a custom plugin in the example, but the process also looks the same for custom themes. |
|
| Prepare a name and description of the module for your clients, include the URL to the plugin, and designate its version. |
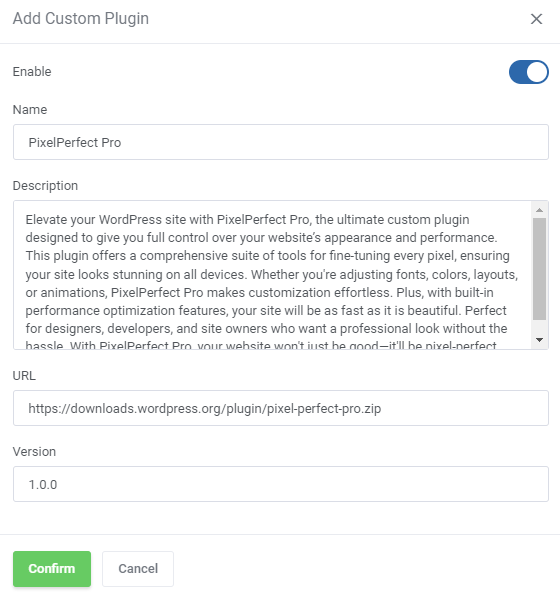
|
| Make sure your custom plugin is enabled. |
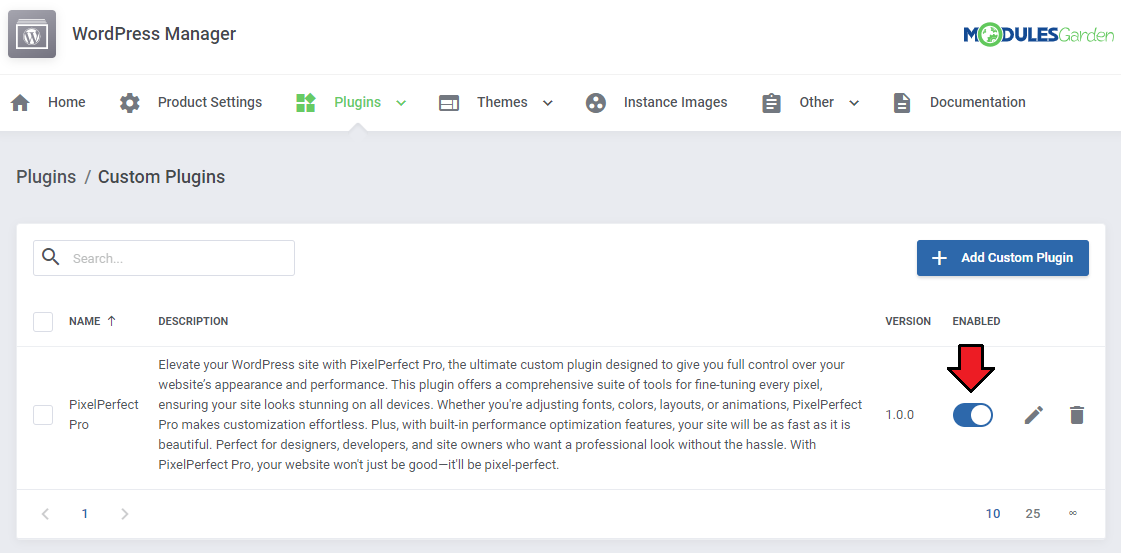
|
| Next, move to 'Product Settings' and edit the product that you want to include the plugin for. Under the 'General' tab find the 'Custom Plugins' (or 'Custom Themes' ) field and select your plugin. |
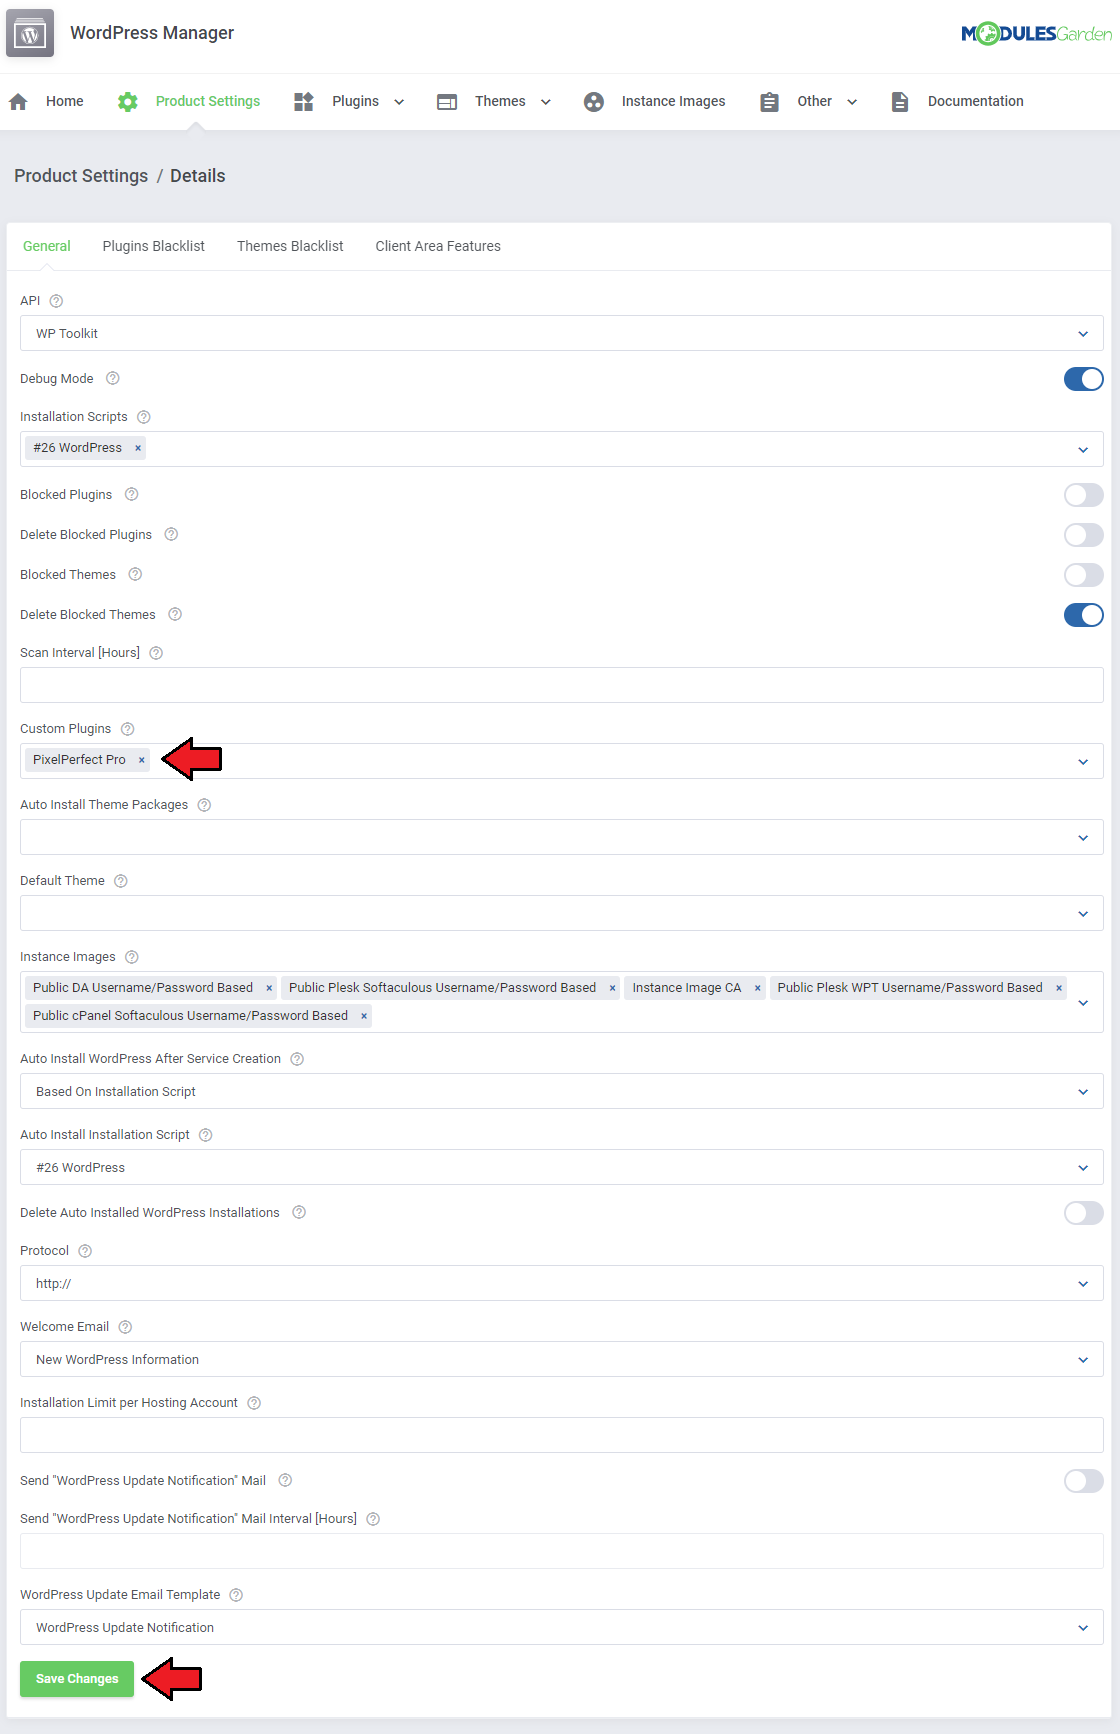
|
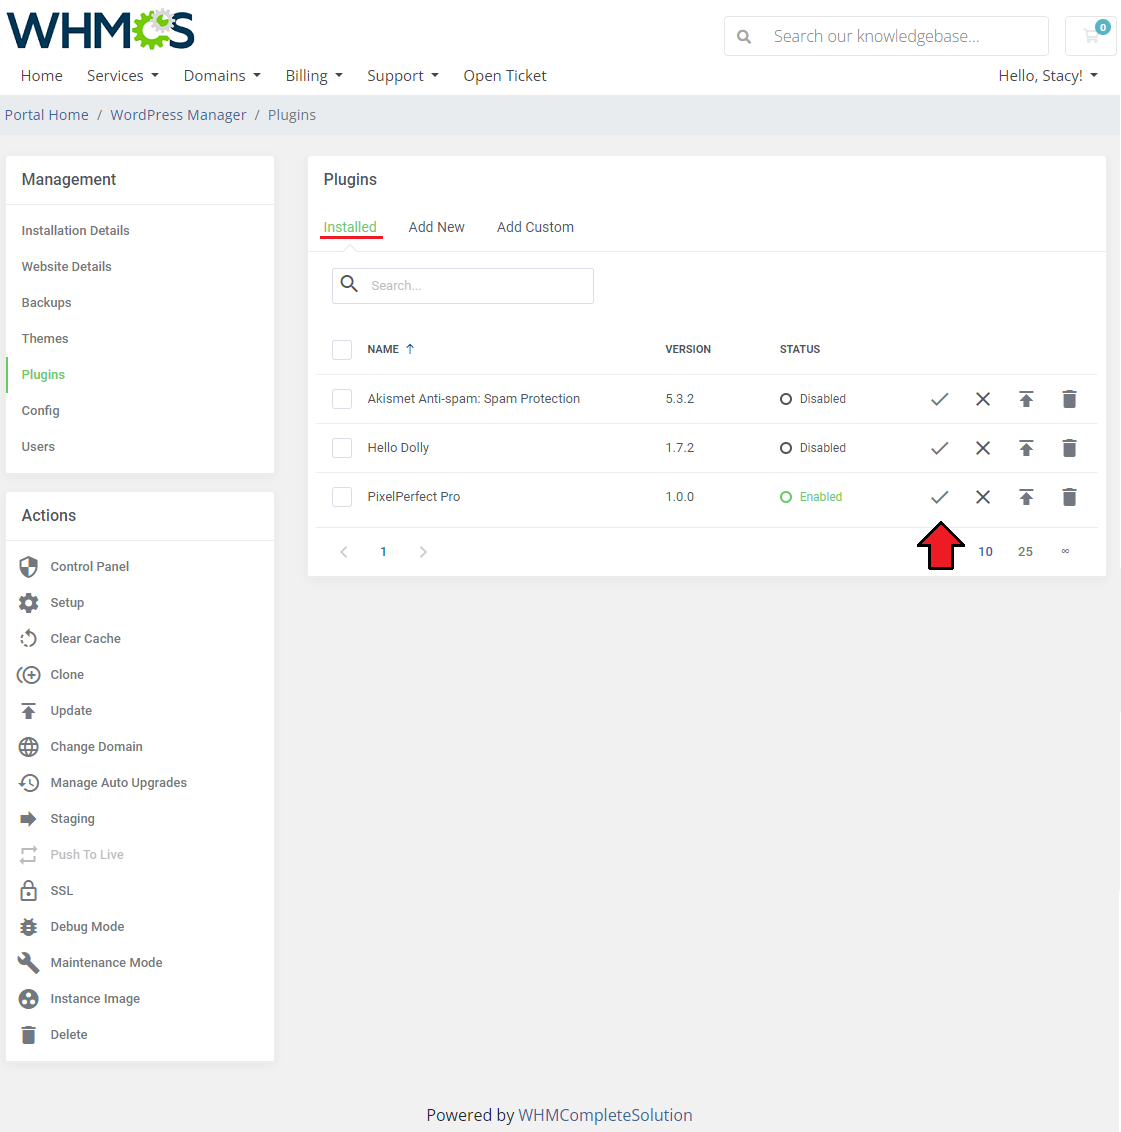
| From now on, your clients will be able to find the custom plugin you have included in their client area. All they have to do to install it is to click on the '+' icon. |
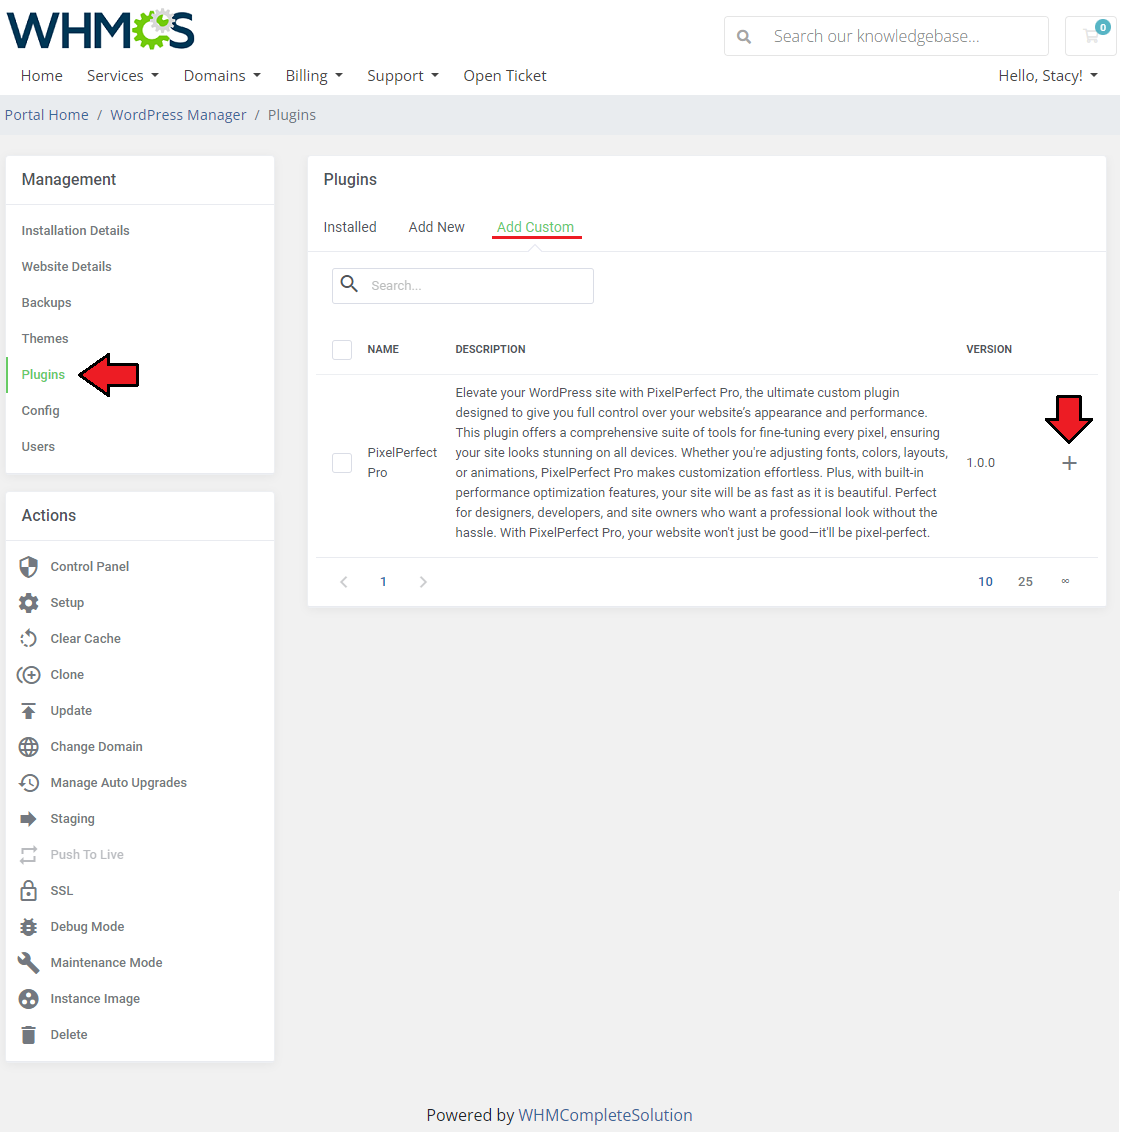
|
| The plugin should be visible on the 'Installed' list and can be activated or deactivated any time. |
|
Tips
1. In case you wish to remove one of your plugins from WHM, make sure you delete the additional content too:
/usr/local/cpanel/Cpanel/API/Wordpress.pm /usr/local/cpanel/share/WordPressManager/wp |
| 2. If you wish to change the names of your WordPress installation scripts to be more friendly in the client area, you can do this in a language file. Simply open your default 'english.php ' file located in '/yourWHMCS/modules/addons/WordpressManager/langs' directory and add a new language record in the following format: $_LANG['WordPress Script Name']="WordPress Friendly Name"; |
| 3. When using the WordPress Manager module with cPanel, you will also need to whitelist 'phar' support in your php.ini on the WHM server. You can do this by adding or editing the below record: suhosin.executor.include.whitelist = phar |
4. It is possible to set language for WordPress auto-installation. In the Product Custom Fields section you should complete:
en|English,ar|Arabic,zh_CN|Chinese,fr_FR|French,de_DE|German,el|Greek,it_IT|Italian,ja|Japanese,ko_KR|Korean,pl_PL|Polish,ru_RU|Russian,
sl_SI|Slovenian,sk_SK|Slovak,es_ES|Spanish,tr_TR|Turkish,uk|Ukrainian,vi|Vietnamese
|
| 5. Custom Fields used in the instance creation process: You can set a username and password for the administrator panel in WordPress and the Site Title of the installation using the following product custom fields.
For WordPress Quick Installation:
If a client completes the username and password, then the account will be created on the basis of the provided data. |
Language Overrides
| Incorporating language customizations - the module readily accommodates language overrides, allowing you to tailor the language files to your preferences. The language file english.php remains unencoded and can be modified to suit your needs. However, it's recommended to avoid altering the core file itself, and instead, leverage the capability of using overrides. Here's how to apply language overrides:
~/langs/overrides/english.php.
For example: Original yourWHMCS/modules/servers/moduleName/langs/english.php: $_LANG['Search'] = 'Search'; Override yourWHMCS/modules/servers/moduleName/langs/overrides/english.php: $_LANG['Search'] = 'Look for'; By following these steps, you can seamlessly implement language customizations without altering the core language file, ensuring your changes will not be lost after every module update. Remember that some of the modules have more than one language file, located under /addons and /servers paths. You may create the override files for both of them. |
Update Instructions
| An essential guidance through the process of updating the module is offered here. Important: If you are performing an update from a previous version of WordPress Manager with cPanel, you have to also update the files and run again the installation script on your WHM server. |
Updating the Module to Version 3.x
| Before updating to module version 3.x, ensure that there are no pending tasks in the queue to avoid migration issues. Follow the steps to ensure a smooth transition to version 3.x of the module:
|
Upgrade Guide
| Seeking a solution that offers greater flexibility, customization tailored to your precise needs, and unrestricted availability? There is an option that not only proves to be cost-effective in the long run but also includes prioritized support services, making it a truly valuable investment. Opt for the Open Source version of your WordPress Manager For WHMCS module to unlock these benefits. Follow a comprehensive guide covering the transition process, the advantages it brings, and step-by-step instructions on what to do next after the order has been successfully finalized. |
Common Problems
| 1. When you have problems with connection, check whether your SELinux or firewall does not block ports. |
| 2. If you do not see the config records, make sure that you have also updated the WHM files to the latest version. |
| 3. Installation of Let's Encrypt SSL is available only for DirectAdmin products. |
| 4. Native integration with cPanel Extended module works seamlessly except for one aspect, specifically access via 'Manage Account → WordPress Manager', where an issue is encountered. You may smoothly enter the WordPress Manager via: 'Actions → WordPress Management'. |
| 5. The module supports two APIs: Softaculus and WP Toolkit. If you are changing the API from WP Toolkit to Softaculous, when there are already existing installations, you must remember to synchronize the instances. Solution: Proceed to cPanel → Softaculous and press the "Scan" button. |

|
| When changing the API from Softaculous to WP Toolkit, trigger the scanning in cPanel → WP Toolkit: |

|
After the scan is successfully complete, wait until the data is synchronized in the module by running the following cron command:
php -q /yourWHMCS/modules/addons/WordpressManager/cron/cron.php Synchronize That is all, the installations can now be managed via target API. |
| 6. If you experience issues with the proper functionality of a Plesk-based module, one potential cause might be difficulties in retrieving the accurate external WHMCS IP address. To eliminate this as a factor, we recommend configuring the variable ipServerWhmcs with a specific IP address in the configuration file located at: app/config/configuration.yml. ipServerWhmcs: '123.456.78.910' |
7. If your instance is missing a protocol in its URL address, causing an error 404, make sure none of the protocols are disabled in the administrator panel of Softaculous:
If you want to restrict the usage of any given protocol, you can do that in the module addon itself, under 'Other' → 'Settings' → 'Protocols', by not including the chosen protocol. |
| 8. You may encounter the following error: 'Curl error: Failed to connect to (...) port XXXX: Connection refused', where XXXX is a port number. Solution: Ensure that the default ports are open on your server:
|
9. If you are using DirectAdmin with Softaculous and experience slow installation loading or delayed synchronization, run the following command on the DirectAdmin server:
da taskq --run='action=cleanup_expired_hash_url' |