Report Generator 3.X For WHMCS
Contents |
About Report Generator For WHMCS
| Report Generator For WHMCS allows you to generate and manage any kind of reports using inbuilt creators. The module lets you adjust reports to your needs through using various filters and even your own PHP code. |
- Admin Area Features:
| ✔ Generate Your Own Report Using One Of 3 Creators |
| ✔ View 30 Predefined Reports |
| ✔ Modify Report Results With Dynamic Filters |
| ✔ Generate PDF And CSV Files From Reports |
| ✔ Print Reports With A Print Preview |
| ✔ Schedule Automatic Reports With Specified Options Being Sent: |
| ✔ To Chosen Staff Members |
| ✔ To SFTP Server |
| ✔ Export & Import Reports Structure To File |
| ✔ Export Reports To XML File Format (Coming Soon) |
- Report Creation Features:
| ✔ Choose One Of 3 Creators: |
| ✔ Beginner: |
| ✔ Drag & Drop Editor |
| ✔ WHMCS Tables Only |
| ✔ Join Tables With Known Relations Only |
| ✔ Intermediate: |
| ✔ Drag & Drop Editor |
| ✔ All Tables Available |
| ✔ Modify Output With PHP |
| ✔ Advanced: |
| ✔ Write SQL Query |
| ✔ All Tables Available |
| ✔ Modify Output With PHP |
| ✔ Choose Section Display Type: |
| ✔ Data Table |
| ✔ Pie Chart |
| ✔ Area Chart |
| ✔ Column Chart |
| ✔ Create Multi-Section Reports |
| ✔ Clone Sections (Coming Soon) |
| ✔ Create Section Using Multiple Tables |
| ✔ Dynamic Filter Types: |
| ✔ Data Range Filter - Available On Report View |
| ✔ Dropdown Filter - Specify Available Options During Report Creation |
| ✔ Number Range Filter |
| ✔ Text Filter |
| ✔ Cron Date Filter - Define Date Range For Scheduled Reports |
| ✔ Live Preview Of Data Returned By Report Creator |
| ✔ Live Preview Of SQL Query Built By Report Creator |
| ✔ Live Preview Of Section Generated By Report Creator |
| ✔ Toggle Between Automatic & Manual Refreshing Of Generated Section |
- Additional Basic & Intermediate Creators Features:
| ✔ Mark Tables With Known Relations And Automatically Configure Join In Table |
| ✔ Advanced Conditioning: |
| ✔ Define Static Condition |
| ✔ Define Requested Relation Between Two Fields |
| ✔ Add Dynamic Filter As Condition |
| ✔ Output Field: |
| ✔ Field - Display Field As Is |
| ✔ Concat - Join Multiple Fields Into One |
| ✔ Substr - Display Only Part Of Chosen Field |
| ✔ Sum - Summarize All Values With The Same Value Of Group By Field |
| ✔ Count - Count All Values With The Same Value Of Group By Field |
| ✔ Max - Display Maximal Value Found Within Fields With The Same Value Of Group By Field |
| ✔ Min - Display Minimal Value Found Within Fields With The Same Value Of Group By Field |
| ✔ Avg - Display Average Of Fields With The Same Value Of Group By Field |
| ✔ Limit Amount Of Data Displayed On Report |
| ✔ Skip Chosen Amount Of First Records Displayed On Report |
- General Info:
| ✔ Report Migration Tool |
| ✔ Multi-Language Support |
| ✔ Supports PHP 5.6 Up To PHP 7.2 |
| ✔ Supports WHMCS V7 |
| ✔ Easy Module Upgrade To Open Source Version |
- Predefined Reports:
| ✔ 'Clients Information' Section: |
| ✔ Customers Per Country |
| ✔ Most Valuable Clients |
| ✔ Paid Orders Report |
| ✔ Orders Report |
| ✔ Created Panels Report |
| ✔ User Accounts Created: |
| ✔ Number Of Created User Accounts By Date |
| ✔ List Of User Accounts Created |
| ✔ Business Health Status: |
| ✔ Domain Renewals For The Time Period |
| ✔ Open Tickets For The Period |
| ✔ New Invoices For The Time Period |
| ✔ Invoice Reminders For The Time Period |
| ✔ Hosting Renewals |
| ✔ Suspended Services For The Time Period |
| ✔ Complete Cases: |
| ✔ Closed & Answered Status Tickets By The Staff Member |
| ✔ Tickets Stats In Time By The Staff Member |
| ✔ Completed To-Do List Tasks By The Staff Member |
| ✔ To-Do Tasks Stats Per Status By The Staff Member |
| ✔ Orders Summary |
| ✔ Tasks And Tickets In Progress: |
| ✔ General Tickets Statistics - For Selected Staff Member Or Team In Time |
| ✔ To-Do List - Tasks Per Status For Selected Staff Member Or Team In Time |
| ✔ To-Do List - Tasks In Progress For Selected Staff Member Or Team In Time |
| ✔ Unpaid Invoices |
| ✔ Client Payment History |
| ✔ 'Services' Section: |
| ✔ Product Income In Location |
| ✔ Income Per Country |
| ✔ MRR & Churn Metrics |
| ✔ MRR & Churn Per Product |
| ✔ Orders Number |
| ✔ Orders Over The Weekdays |
| ✔ Registered Services |
| ✔ Renewals Report |
| ✔ Tasks And Tickets In Progress: |
| ✔ Transferred Domains Report |
| ✔ 'CRM Related' Section: |
| ✔ WWW Created Panels Report |
| ✔ Traders Renewals Report |
| ✔ WWW Renewals Report |
| ✔ Leads Report |
| ✔ 'Staff Members' Section: |
| ✔ Tickets In Hours |
| ✔ Ticket Replies By Admin |
| ✔ Comments On Course Of Ticket Solving |
| ✔ Ratings Of Ticket Solving Course |
| ✔ Ticket Response Rating |
| ✔ Flexible Transactions Report |
Installation
| This tutorial will show you how to successfully install and configure Report Generator For WHMCS. We will guide you step by step through the whole installation and configuration process. |
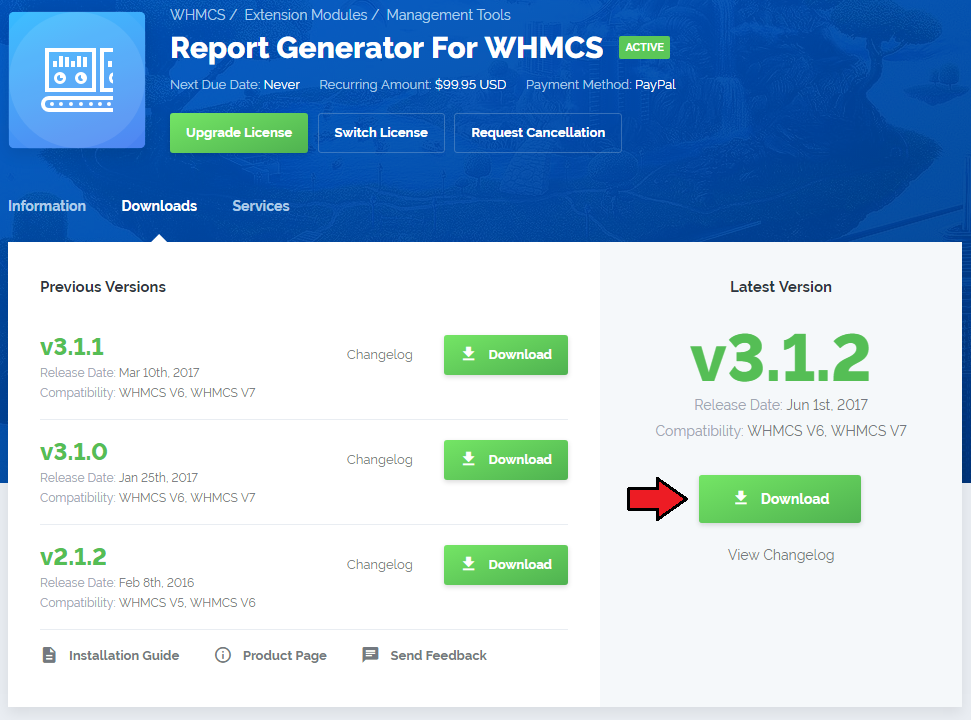
| 1. Log in to our client area and download the module. |
|
| 2. In the downloaded file you will find two packages that support different PHP versions. As presented on the screen below, the first one is dedicated to PHP 5.6 up to PHP 7.0, while the second one is aimed at PHP 7.1 up to PHP 7.2. It does not apply to open source versions. Note: You can check the current PHP version in your WHMCS. To do so, proceed to 'Utilities' › 'System' › 'PHP Info'. |

|
| 3. Extract the downloaded file and choose the one with the right PHP version. Upload and extract the PHP file into the main WHMCS directory. The content of PHP version files should look like this. |

|
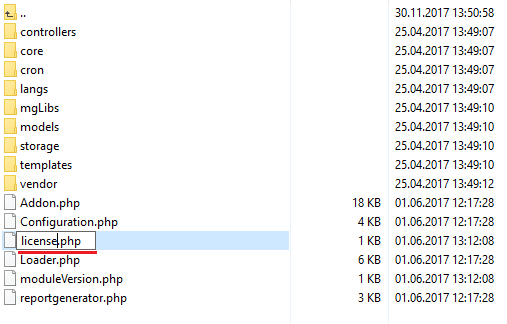
| 4. When you install Report Generator For WHMCS for the first time you have to rename 'license_RENAME.php' file. File is located in 'modules/addons/reportgenerator/license_RENAME.php'. Rename it from 'license_RENAME.php' to 'license.php'. |
|
| 5. In order to configure your license key, you have to edit a previously renamed 'license.php' file.' Enter your license key between quotation marks as presented on the following screen. You can find your license key in our client area → 'My Products'. |

|
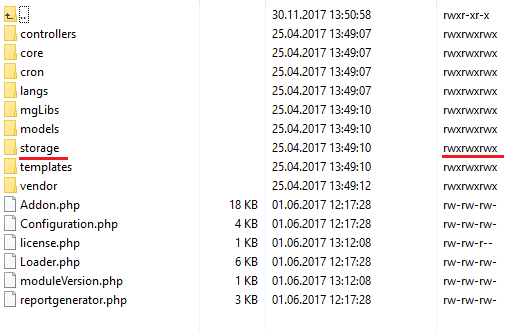
| 6. Now, set up the 'storage' folder as writable. This folder should be available at 'your_whmcs/modules/addons/reportgenerator/' . |
|
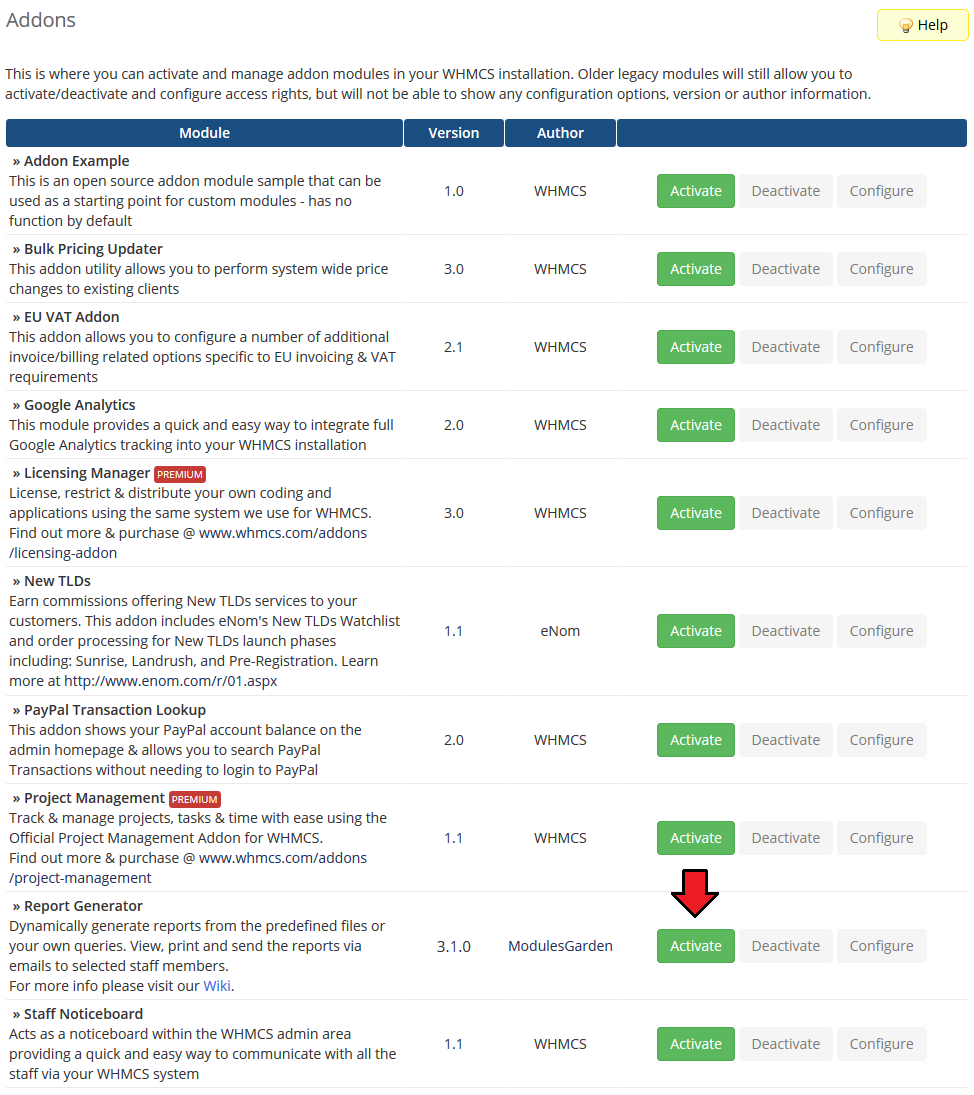
| 7. Now you have to activate the module in your WHMCS system. Log in to your WHMCS admin area. Go to 'Setup' → 'Addon Modules'. Afterwards, find 'Report Generator' and press 'Activate' button. |
|
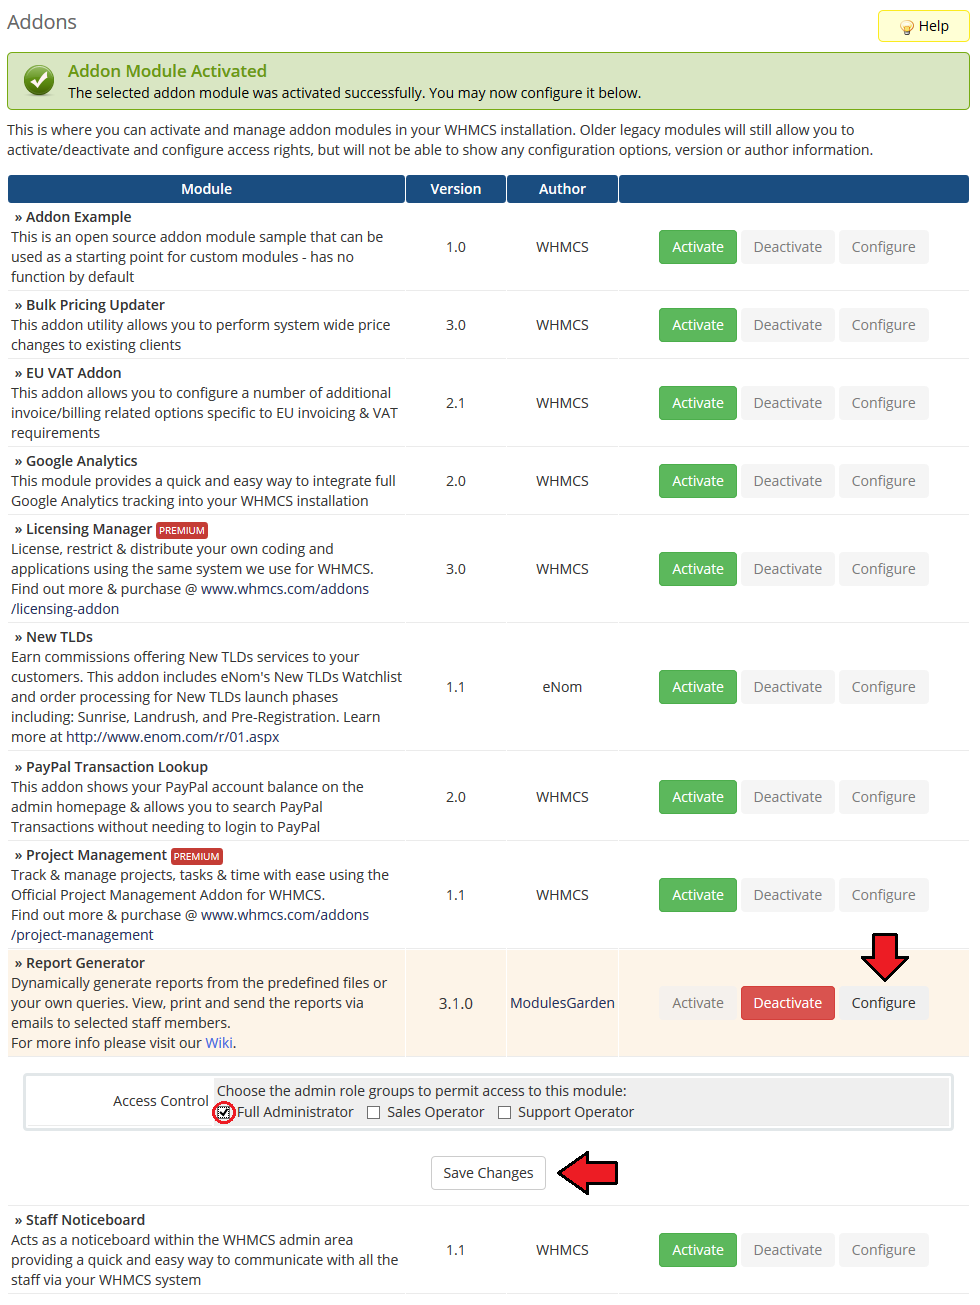
| 8. In the next step you need to permit access to this module. To do so, click on 'Configure' button, tick 'Full Administrator' and press 'Save Changes'. |
|
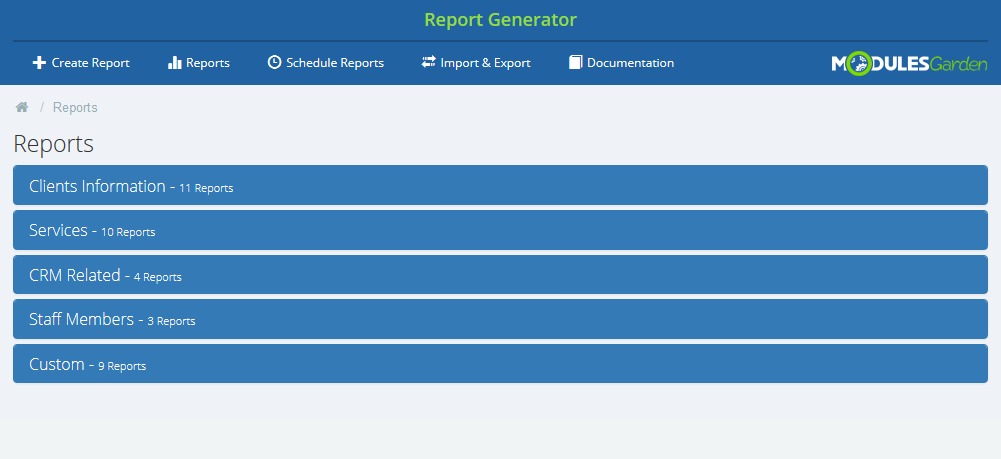
| 9. You have just successfully installed Report Generator! You can access the module at 'Addons' → 'Report Generator'. |
|
Configuration and Management
| Report Generator For WHMCS allows you to create custom reports using drag & drop WYSIWYG builder. Module also offers additional useful features like predefined reports, import/export of reports, generating reports in PDF and CSV, ability to send them to admins and much more. |
Predefined Reports
| 'Reports' the main section of the module, gives a preview of all available reports, those predefined as well as those you create by yourself. Predefined reports are divided into five categories plus custom reports if you have some. |
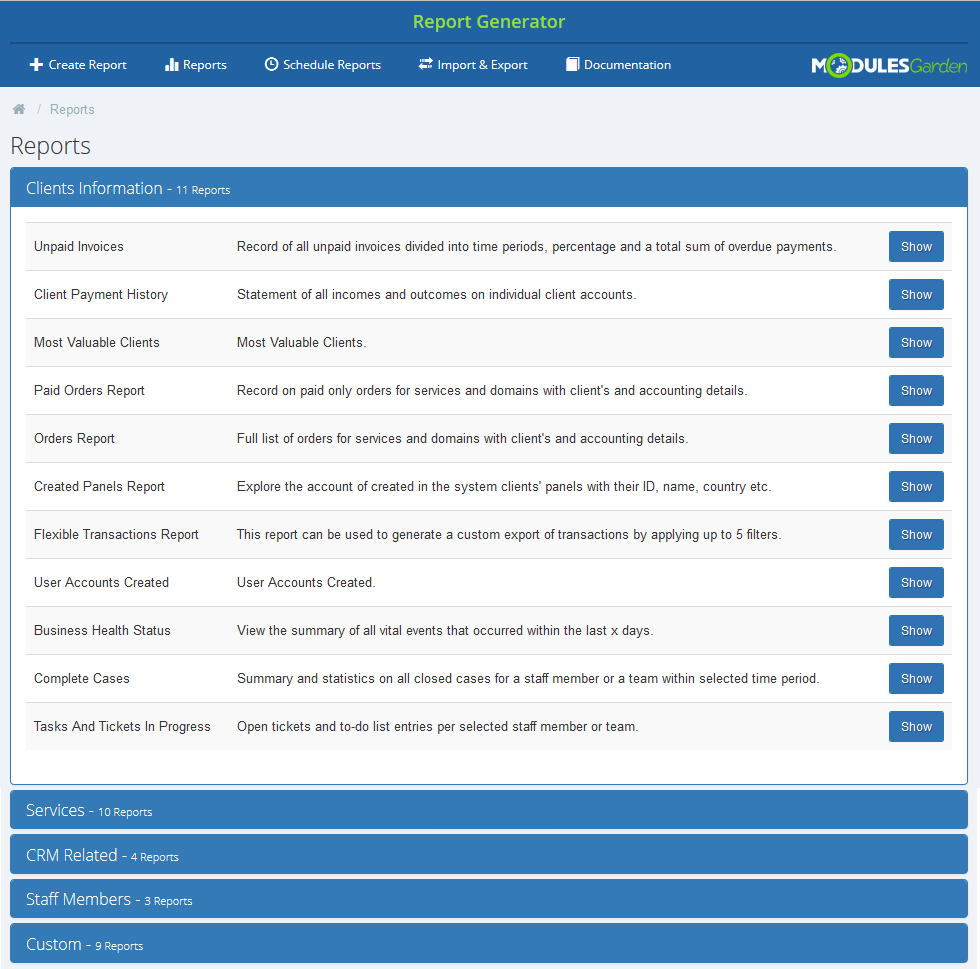
| Clients Information - eleven predefined reports that will show statistics on data related to your clients, for example statistics on placed orders, tasks, etc. |
|
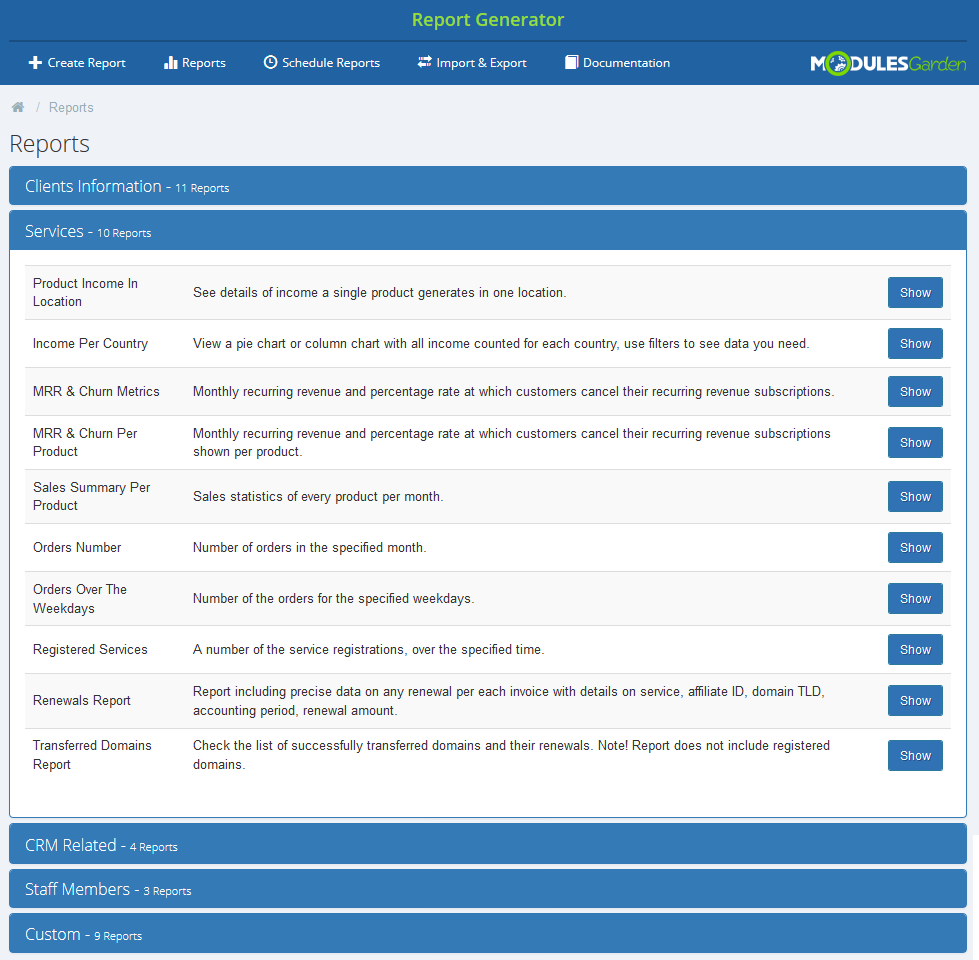
| Services - nine different reports ready to analyze any services related data like income, renewals or transfers in your system. |
|
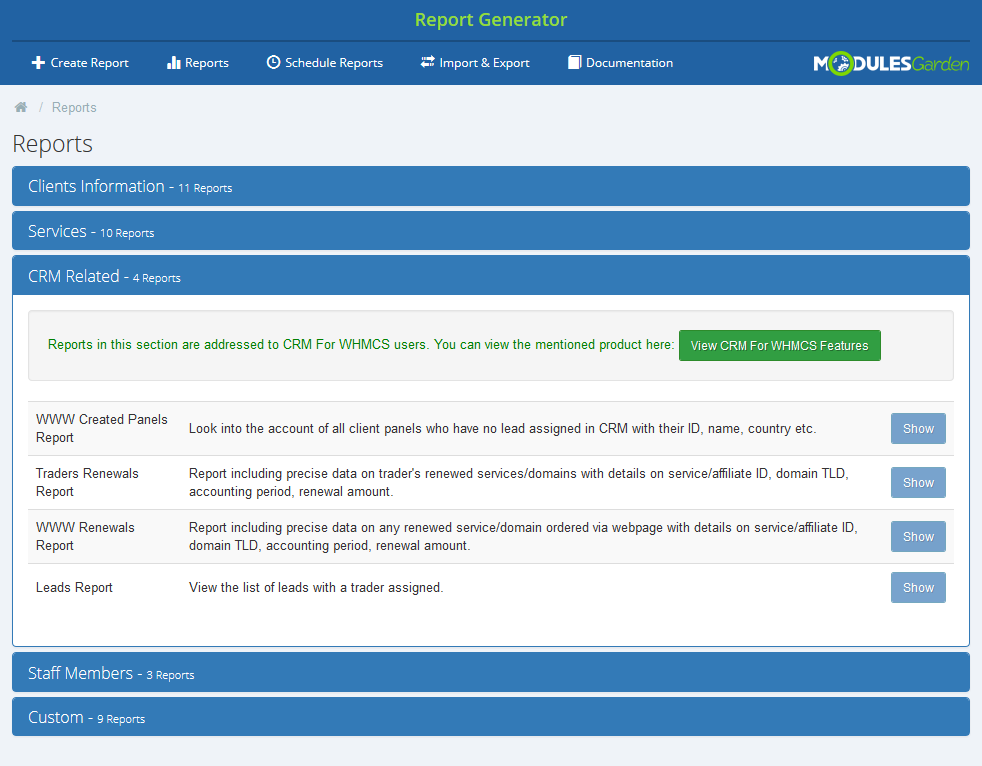
| CRM Related - four ground reports based on your CRM data. Please note that you can see them only if you are using our CRM For WHMCS module. More about CRM For WHMCS can be found here, instructions how to configure your CRM. |
|
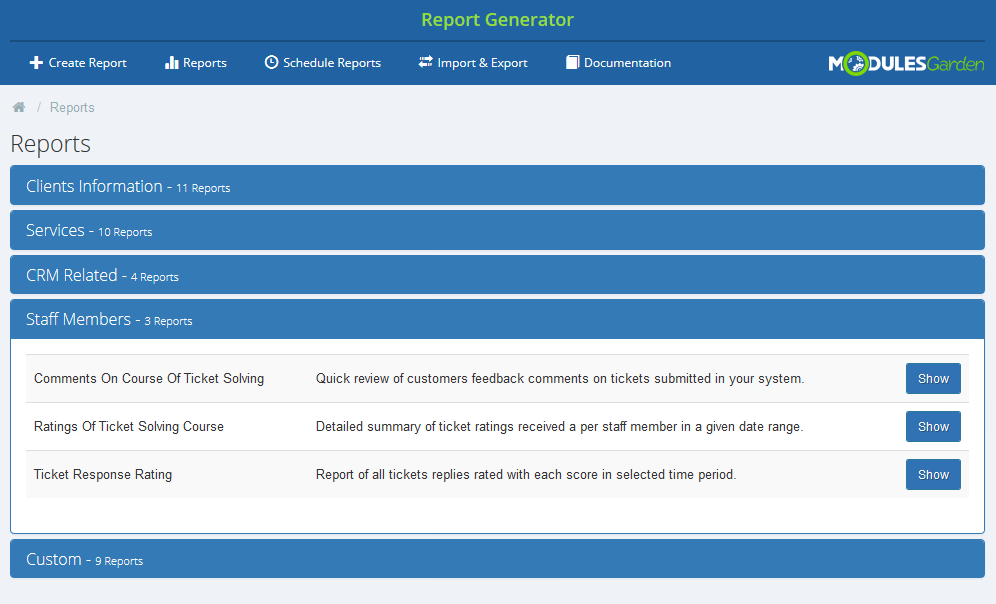
| Staff Members - three predefined reports related to staff members and tickets department. |
|
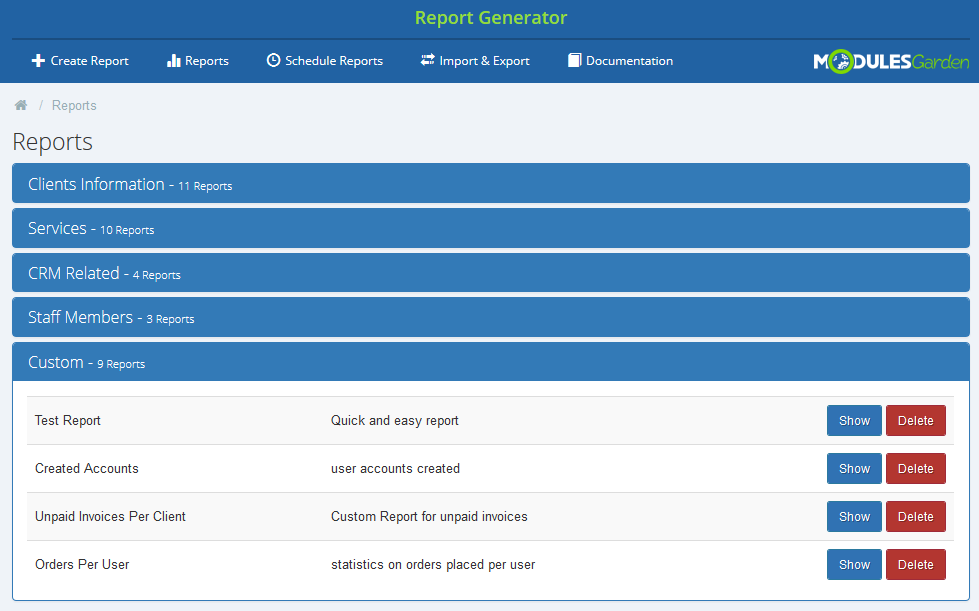
| Custom reports - all reports that you have personally created using our inbuilt creators. |
|
Report View
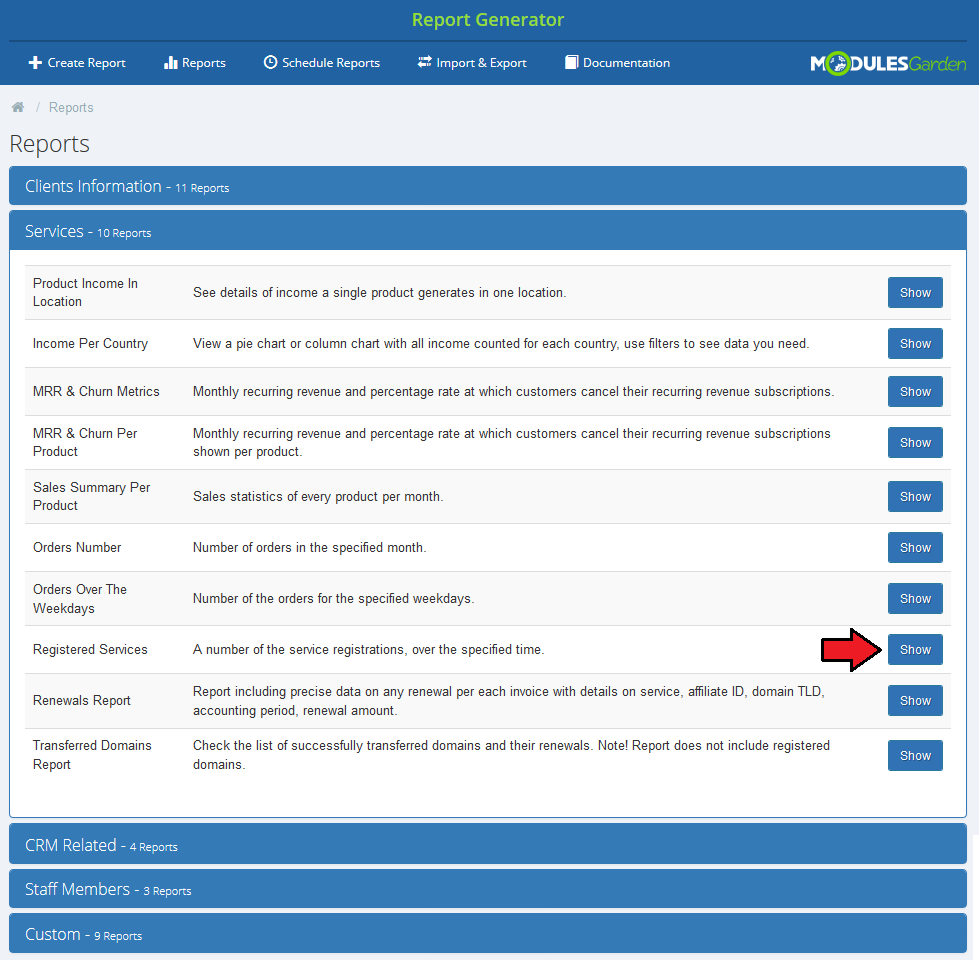
| Press 'Show' button next to a report you are interested in. |
|
| Depending on the type of report you choose, you can set the time frames within which you want to see the statistics. Provide the beginning and ending dates, then press 'Filter' button. Fresh report will be generated on the run. |
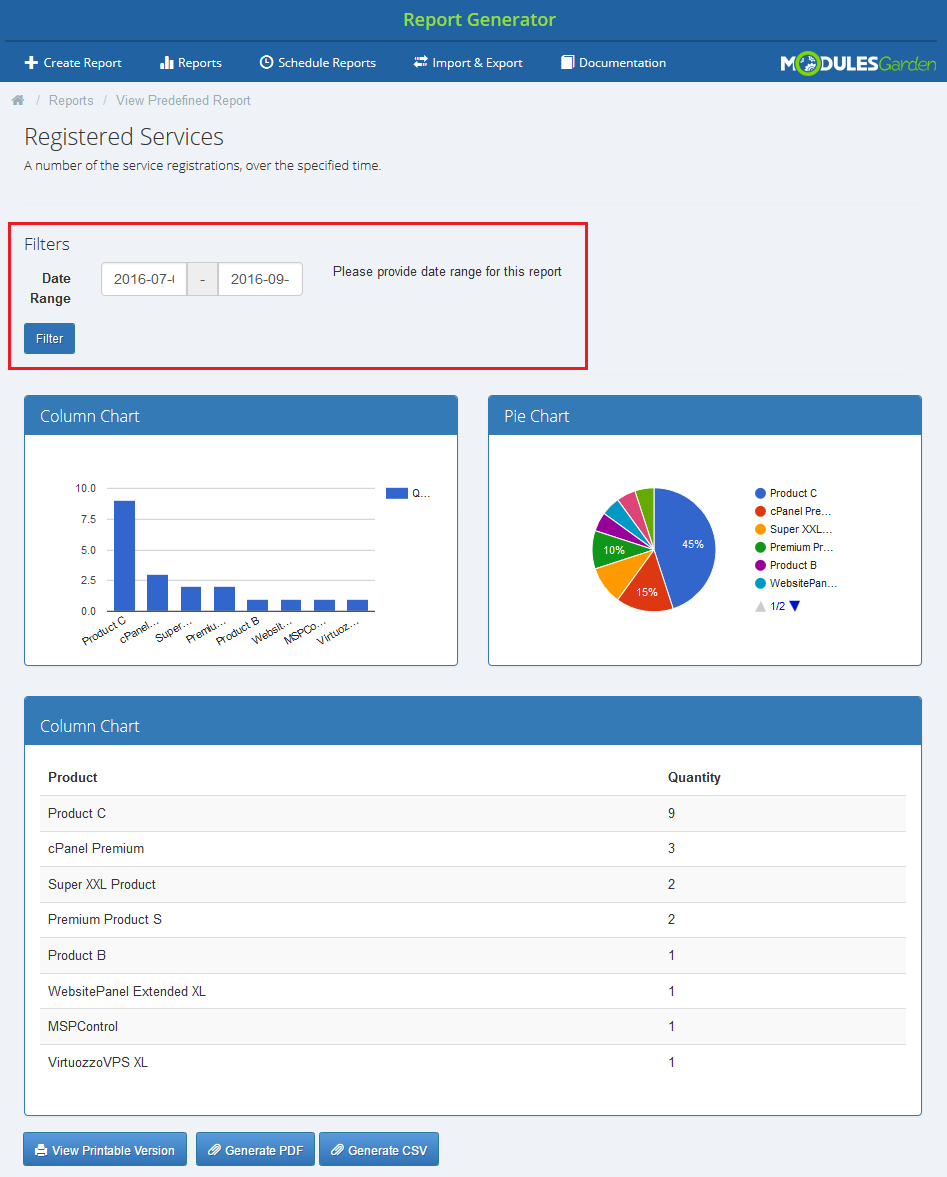
|
| In case of some reports, filtering is impossible due to the stable content of the report. |
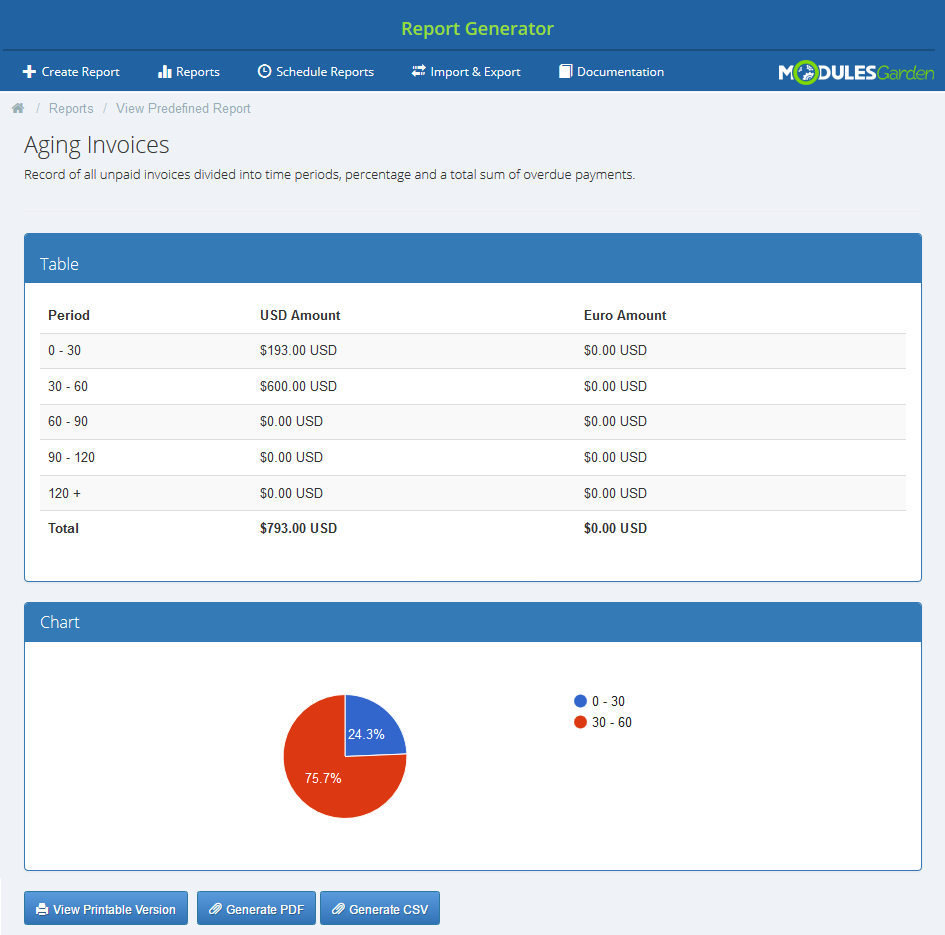
|
| You can always view a printable version of the report or generate a PDF or CSV which can be saved on your disk. |
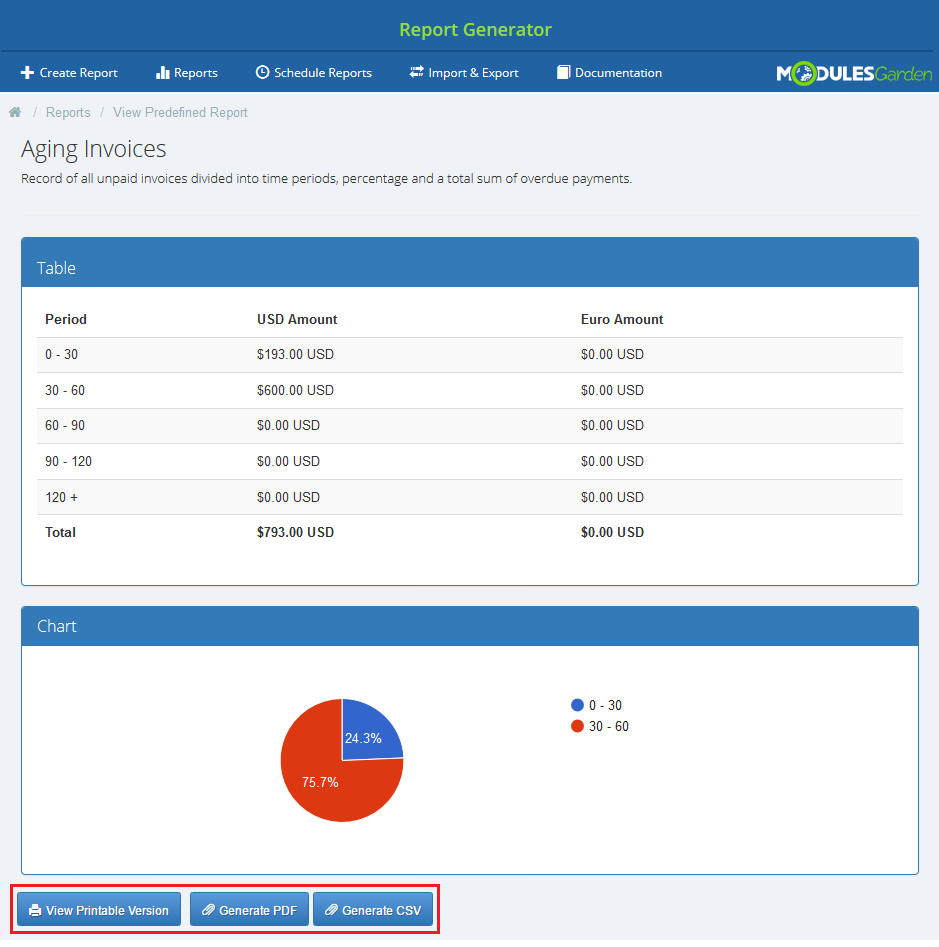
|
Creating Report
| In this section we will show you how to prepare a few exemplary reports. We will now show you how to develop three different reports, each one will slightly more complicated than the previous one. |
| Press 'Create Report'. |
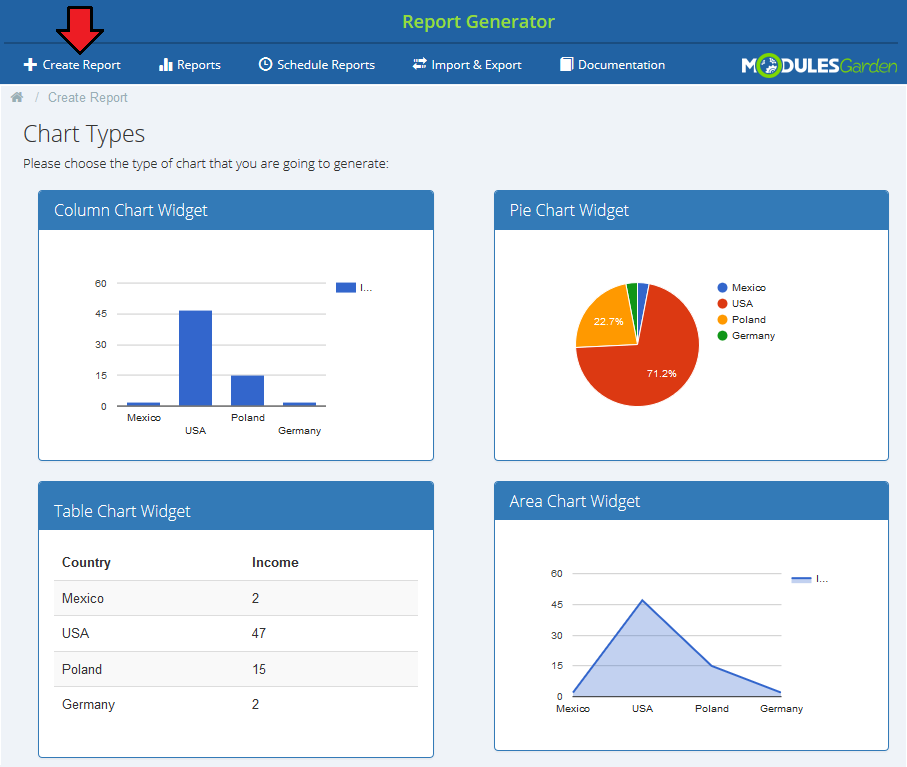
|
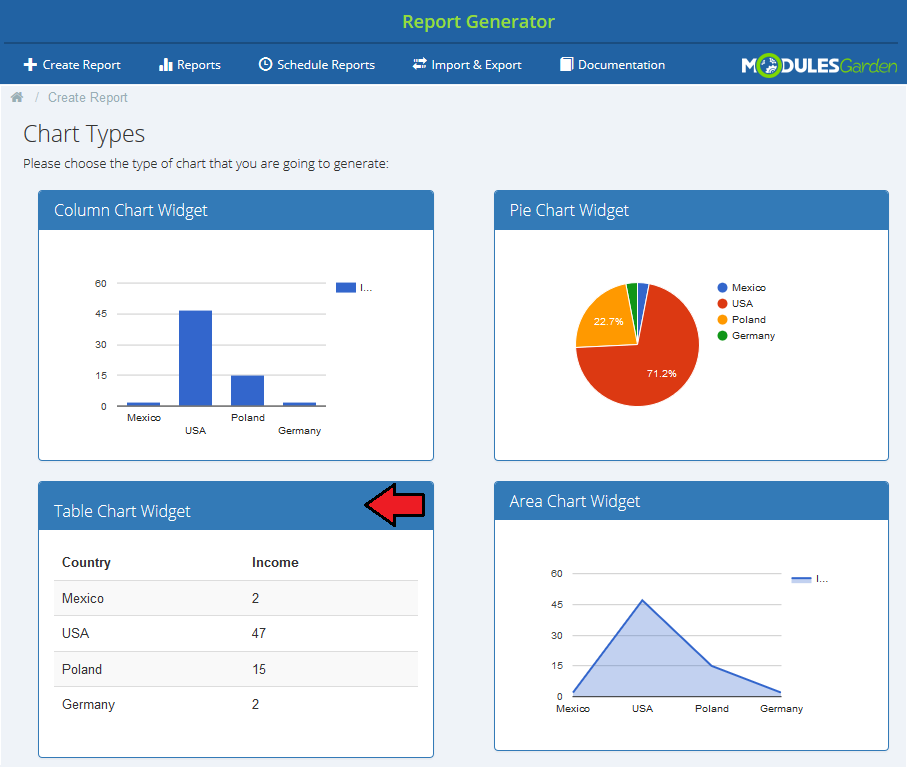
| Now select the type of chart that you wish to achieve in the final result. You may generate a 'Colum', 'Pie', 'Table' or 'Area' chart. For presentation purposes we will start with a Table chart. |
|
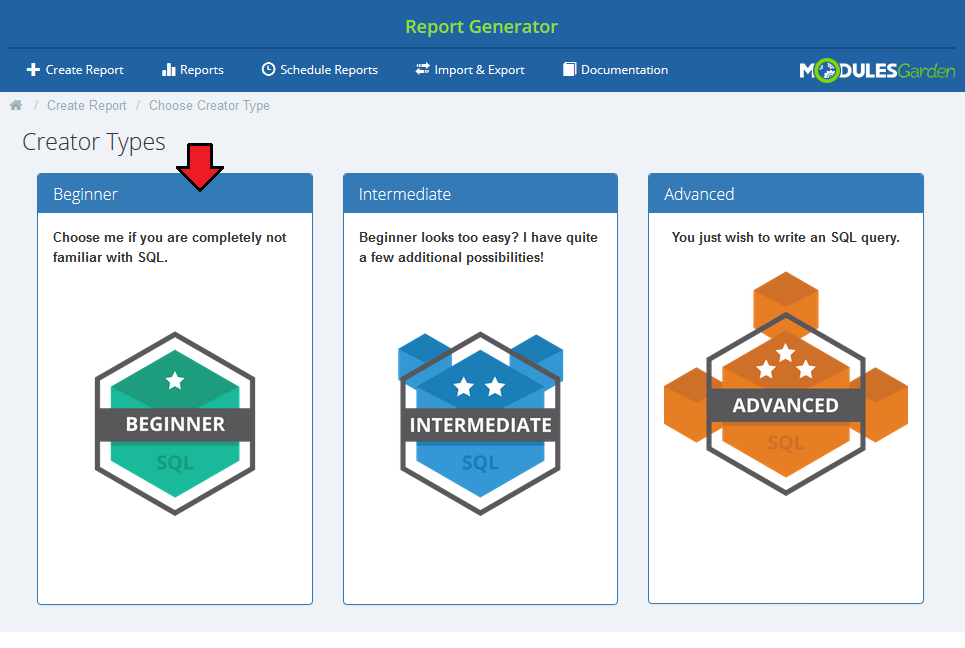
It is time to select the creator type. You can generate your report with:
Let's begin with the easiest one - 'Beginner'. |
|
Beginner - Unpaid Invoices Per Clients
| When you enter the creator, the first things you can see is a wide description table with example. When you are familiar with it, press and it will be automatically hidden. |
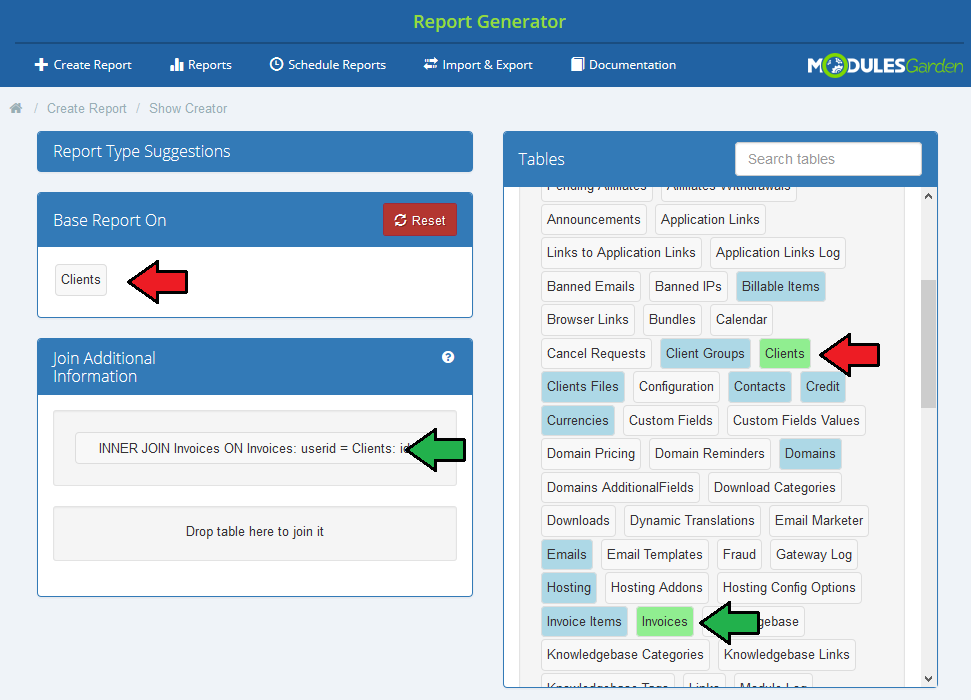
| The very first steps of creating a report is defining base table, only when it is selected, you may move to the next steps.br/>
Depending on what your report is going to analyze, you must now find appropriate table. |
|
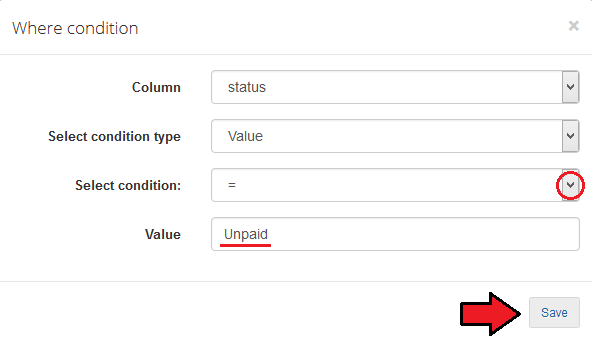
| Now, let's move to 'Display If' section. From available 'Fields' drag option that you want to select. |

|
| We have decided to drag 'Status' and provide its value: 'Unpaid'. Then only unpaid invoices will be taken into consideration in the final report. |
|
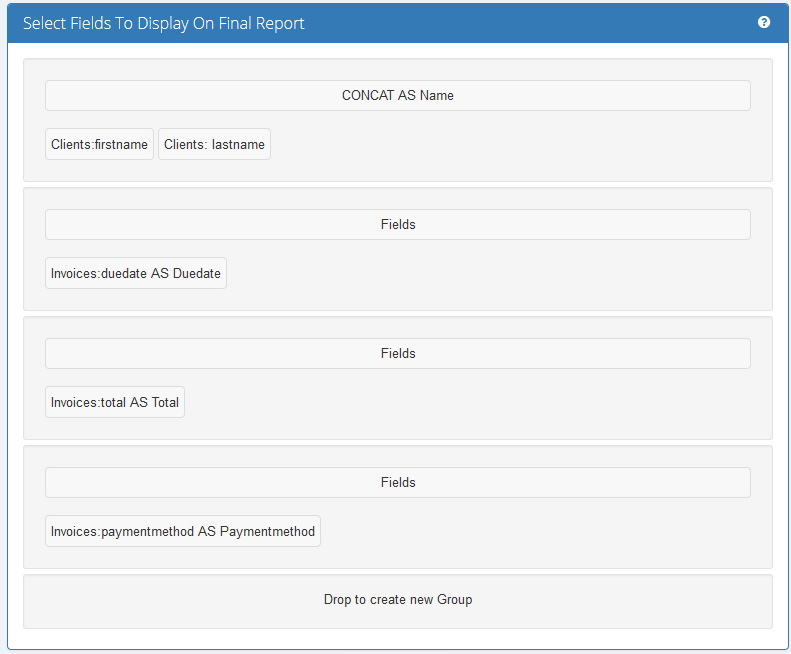
| Let's move to 'Select Fields To Display On Final Report' section. Drag from ' Fields' ' section any ones that you wish to see on your report. |
|
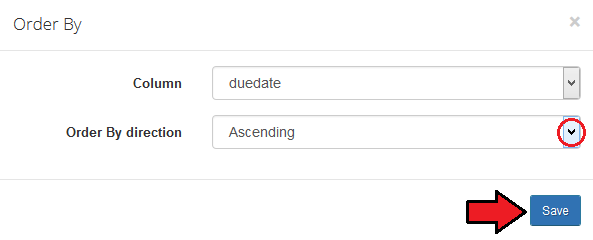
| You can also decide the way the entries will be sorted. On the screen below you can see sorting by invoice due date in descending order. |
|
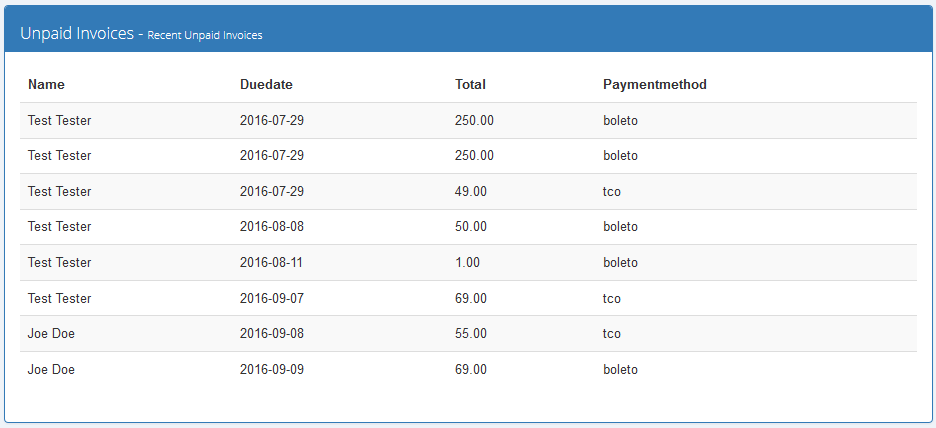
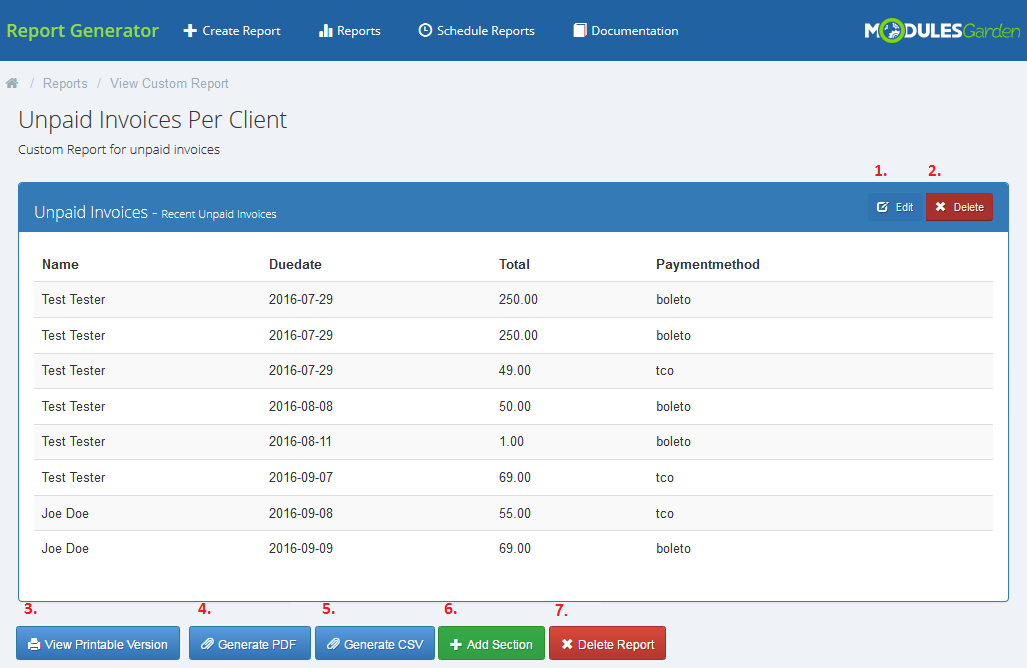
| Let's check how our report will look like. You can see there a list of clients, due date of their unpaid invoices together with the amount to pay and a selected payment method. |
|
| Take a look at the full creator view. Save the changes when your report is ready. Apart form the options used to generate this report, there are also 'Group By' and ' Limit'. |

|
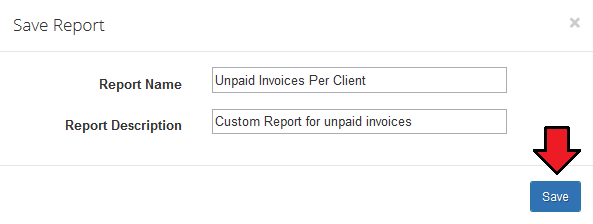
| Finally, name your report and describe it shortly. |
|
| When everything is ready, you can see your report. You can always: 1. Edit your report section |
|
Intermediate Creator
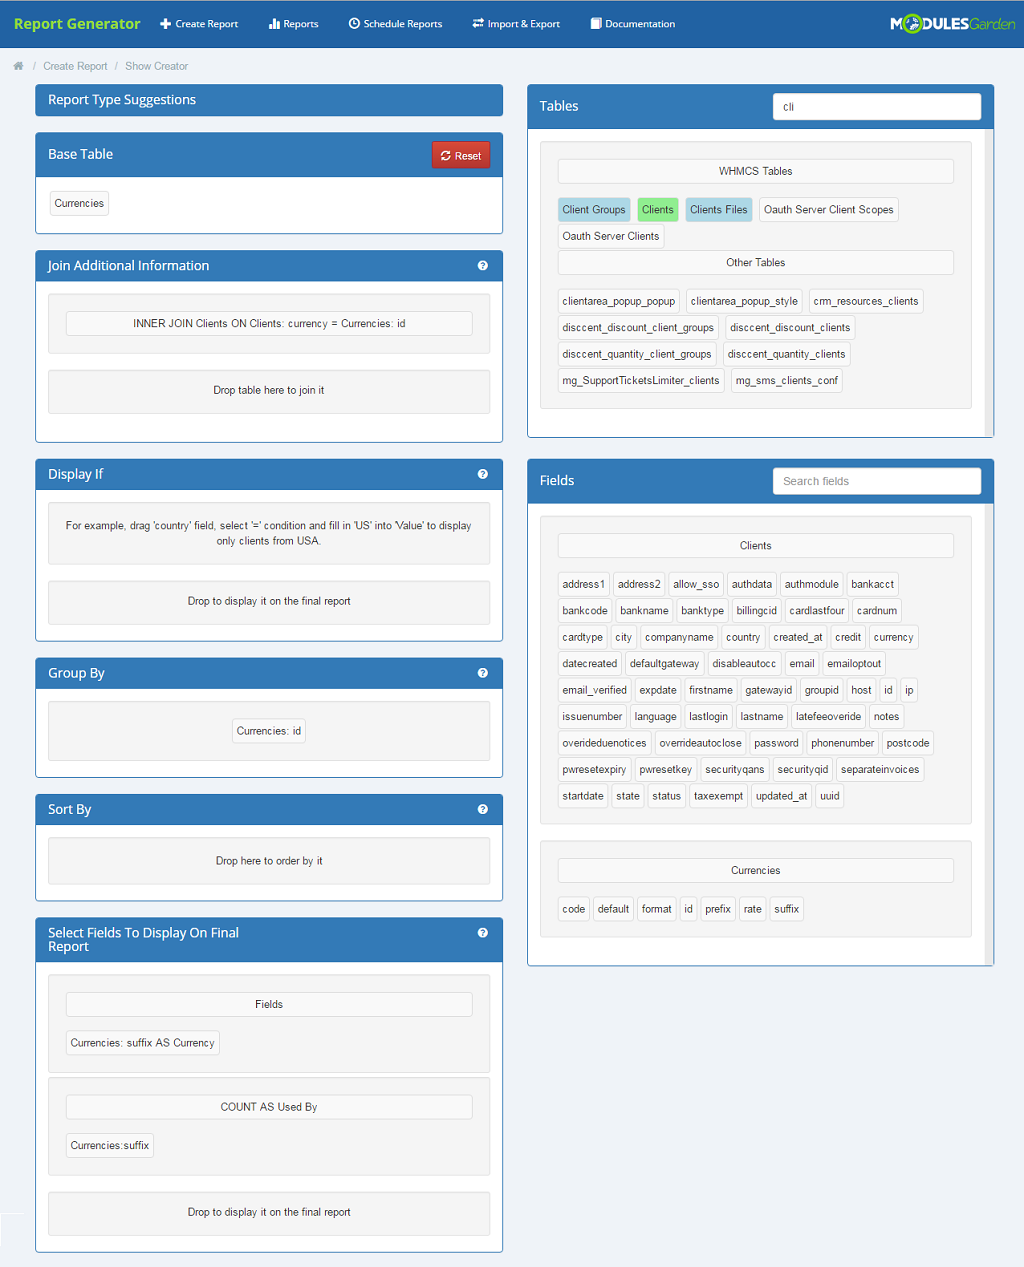
| When you open the creator, the overall view is very similar to the 'Beginner' creator type. Here you also select items depending on your needs and drag them into proper fields. |
|
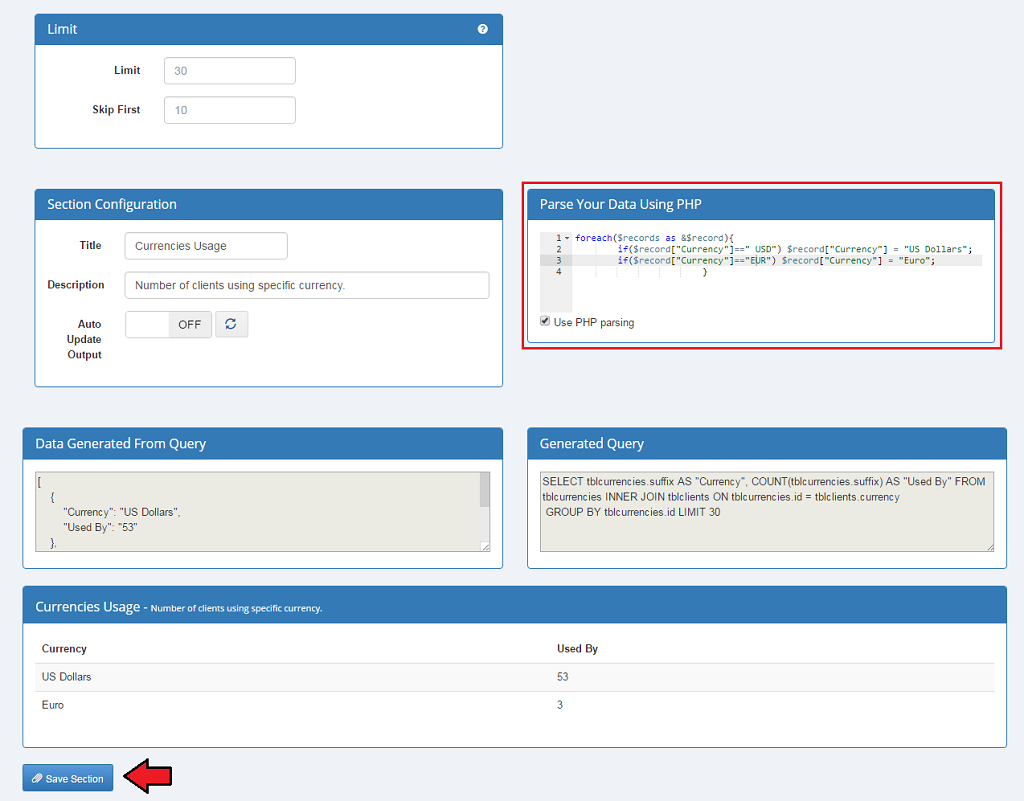
| The difference here is the possibility to make adjustments to your report with the use of PHP language. Whenever you commit any changes remember to save the section. |
|
Advanced Creator
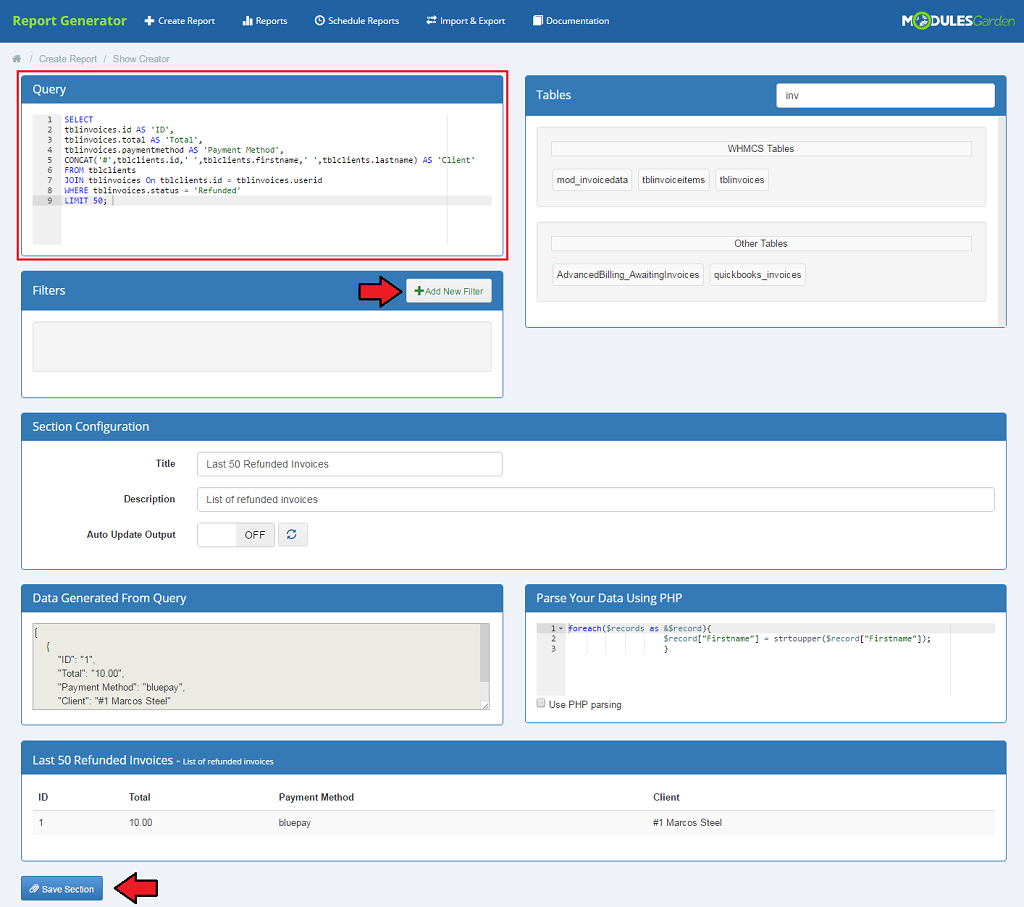
| This creator allows to use advanced option, such as writing an SQL query. Just provide correct variables in the box on the left. |
|
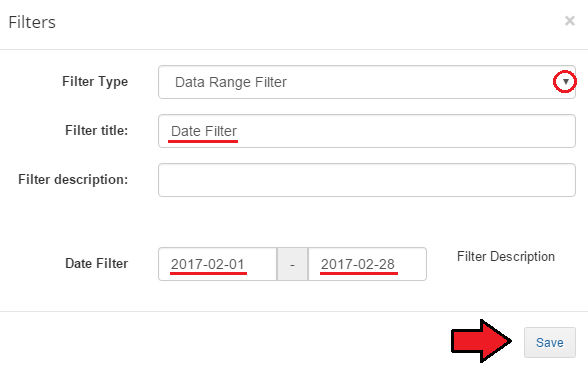
| You can also add a filter that will be used while searching through the report. Give the details corresponding to your needs the most and save changes. |
|
Schedule Report
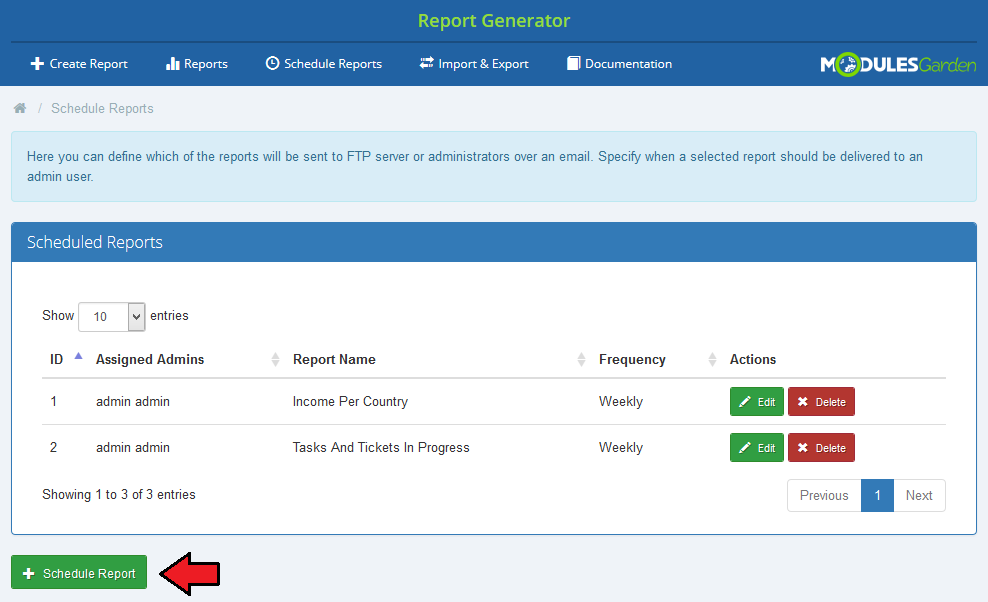
| At 'Schedule Reports' section, you can point which reports will be sent directly to administrators. Press 'Schedule Report' to begin. |
|
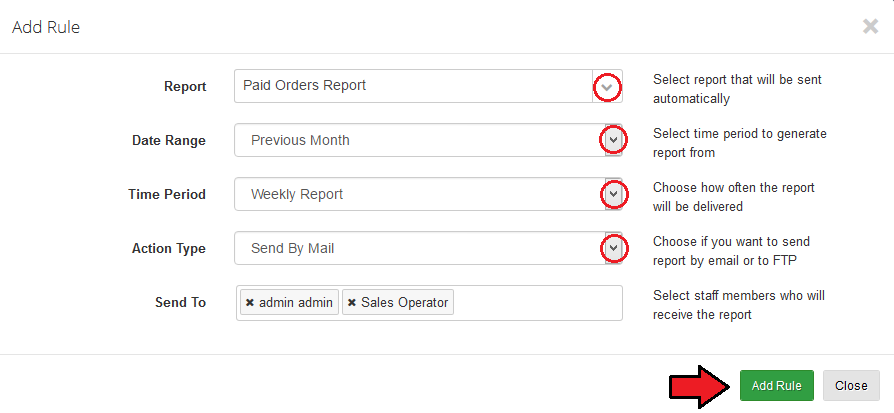
| Box with a form to fill in will appear. Start by selecting the report you want to schedule. On the dropdowm menu you will find all reports available in you module including your custom reports. Please note that the form may slightly differ depending on the selected report type. Afterwards, specify the conditions, how often reports should be sent, time period for which the report shall be generated and way of sending, by email or by FTP etc. |
|
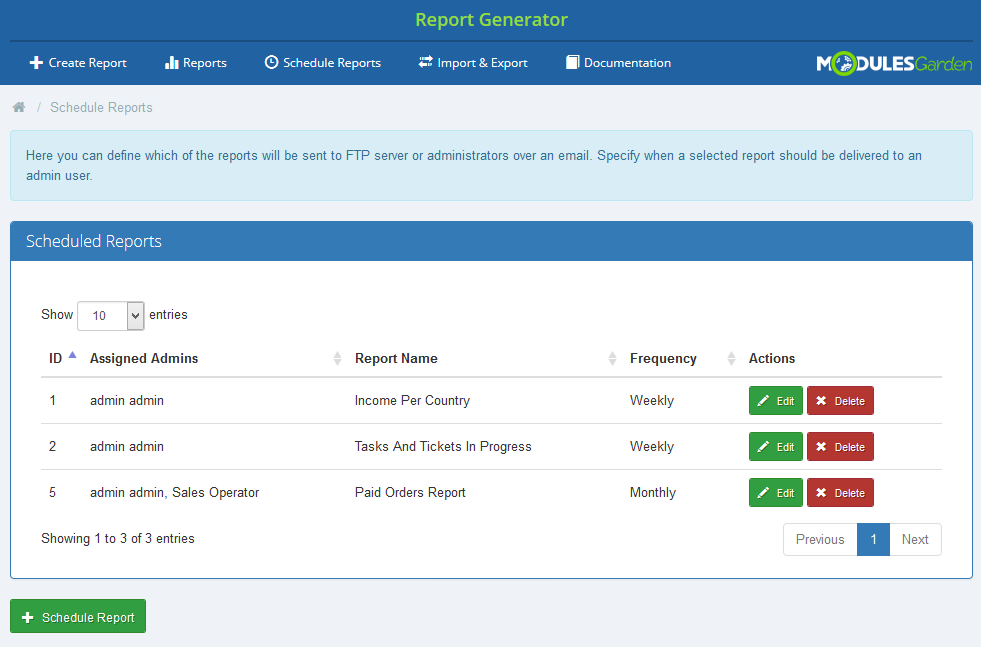
| As you can see on the following screen, all scheduled reports are listed in the table with report name, frequency and assigned admin users. Each of planned relations can be removed or edited at any time, use action buttons to do so. |
|
At the end you have to add a cron job as shown below (each 24 hours suggested).
php -q /your_whmcs/modules/addons/reportgenerator/cron/cron.php Do not forget to replace 'your_whmcs' with your WHMCS root location. |
Import/Export
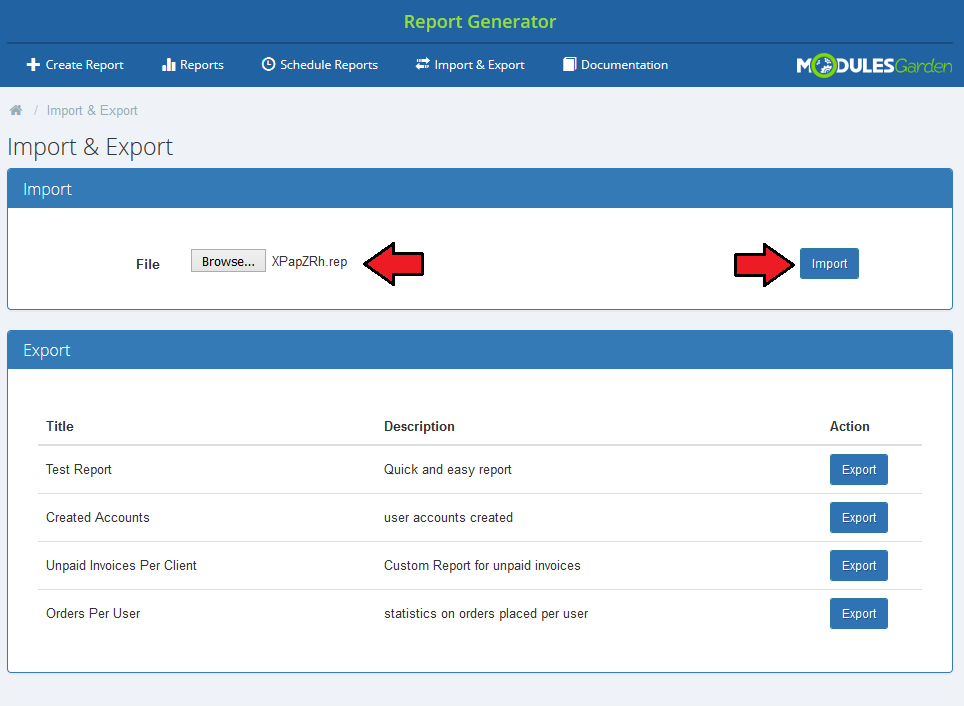
| 'Import/Export' section allows to quickly import your saved previously reports if you have for example stored them on your external disk for later use. Just select file and press 'Import'. Imported report will appear on the list of your custom reports. |
|
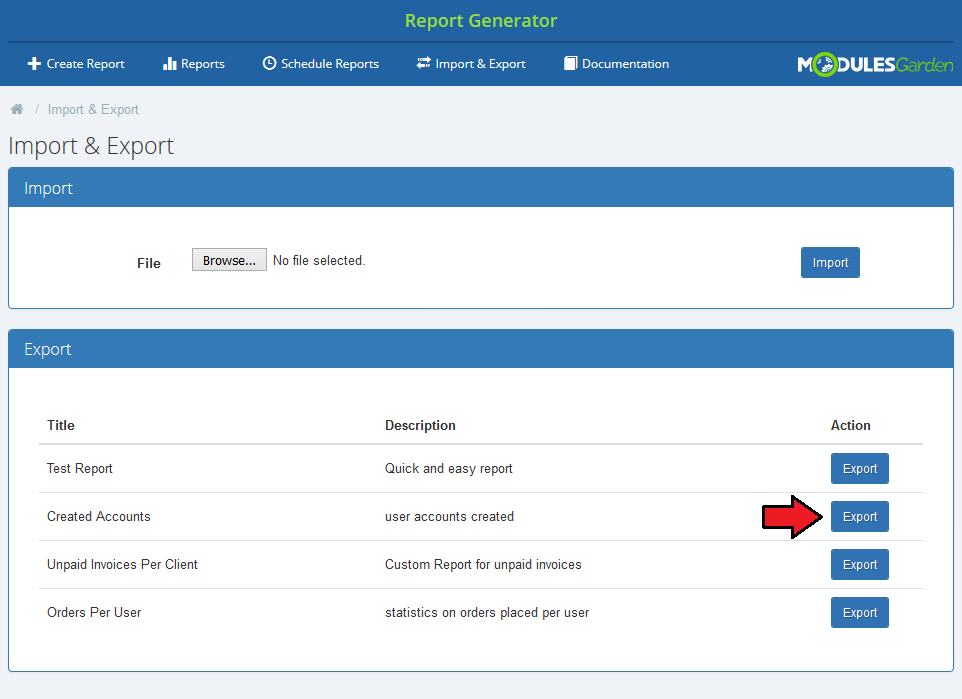
| Underneath, you can see a list of your custom reports. Press 'Export' button to save its files on your disk. |
|
Tips
| 1. If you want to edit your custom report and make it more complicated, you may do it with a more advanced creator. When you are editing a report you may choose from the beginning which creator type you are going to use. |
| 2. Report Generator For WHMCS requires ZipArchive PHP library installed on your server. |
Update Instructions
| Essential guidance through the process of updating the module is offered here. Keep in mind there is a quick and easy option in our client area that will let you upgrade the license of your module to an open source version at any time - and at a lower price! |
Common Problems
| 1. When you have problems with connection, check whether your SELinux or firewall does not block ports. |